The Unsung Hero Of Connectivity: Understanding Network Controller Drivers In Windows 10

The Unsung Hero of Connectivity: Understanding Network Controller Drivers in Windows 10

Introduction

With great pleasure, we will explore the intriguing topic related to The Unsung Hero of Connectivity: Understanding Network Controller Drivers in Windows 10. Let’s weave interesting information and offer fresh perspectives to the readers.

The Unsung Hero of Connectivity: Understanding Network Controller Drivers in Windows 10

Realtek Ethernet Controller Driver Not Installing Windows 10 - dwnloadmanual

In the modern digital landscape, seamless connectivity is paramount. We rely on the internet for work, entertainment, communication, and countless other aspects of our lives. While we often focus on the applications and websites we interact with, the foundation of this connectivity lies in a crucial but often overlooked component: the network controller driver.

This article delves into the world of network controller drivers in Windows 10, exploring their role, function, and importance in ensuring a stable and efficient network experience.

What is a Network Controller Driver?

A network controller driver acts as a translator between your computer’s operating system (Windows 10 in this case) and the hardware responsible for managing your network connection. Think of it as a bridge connecting two different languages: the complex instructions of your operating system and the specific language of your network card.

The Role of Network Controllers:

Network controllers, also known as network interface cards (NICs), are the physical hardware components that enable your computer to connect to a network. They come in various forms, including:

  • Ethernet cards: These are the most common type, connecting to wired networks using RJ-45 cables.
  • Wireless cards: These allow for wireless connectivity via Wi-Fi networks.
  • Bluetooth adapters: These facilitate short-range wireless communication with devices like smartphones, speakers, and printers.

The Driver’s Crucial Function:

The network controller driver’s primary function is to interpret commands from the operating system and translate them into instructions that the network controller can understand. This includes tasks such as:

  • Sending and receiving data packets: The driver handles the intricate process of breaking down data into packets, transmitting them across the network, and reassembling them at the destination.
  • Managing network resources: The driver allocates bandwidth, prioritizes network traffic, and ensures efficient data flow.
  • Configuring network settings: The driver allows you to modify network settings, such as IP addresses, subnet masks, and DNS servers.
  • Detecting and resolving network issues: The driver monitors the network connection, identifies potential problems, and alerts the operating system for troubleshooting.

The Importance of Up-to-date Drivers:

Just like any software, network controller drivers can become outdated. Old or incompatible drivers can lead to a range of problems, including:

  • Slow network speeds: Outdated drivers may not be optimized for the latest network technologies, resulting in slower data transfer rates.
  • Connection instability: Incompatibility can lead to frequent disconnections, network errors, and unreliable internet access.
  • Security vulnerabilities: Older drivers may have known security flaws that could expose your system to malicious attacks.
  • Hardware conflicts: Outdated drivers can clash with other software or hardware components, causing system instability.

Maintaining Optimal Network Performance:

To ensure optimal network performance and avoid potential issues, it’s crucial to keep your network controller drivers up-to-date.

Here’s how you can update drivers in Windows 10:

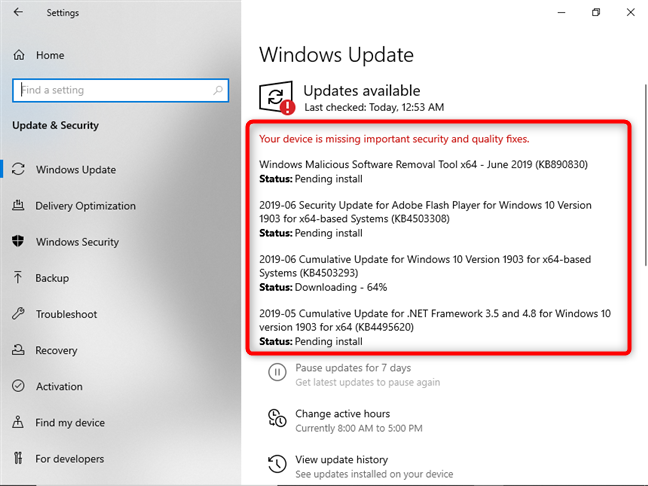
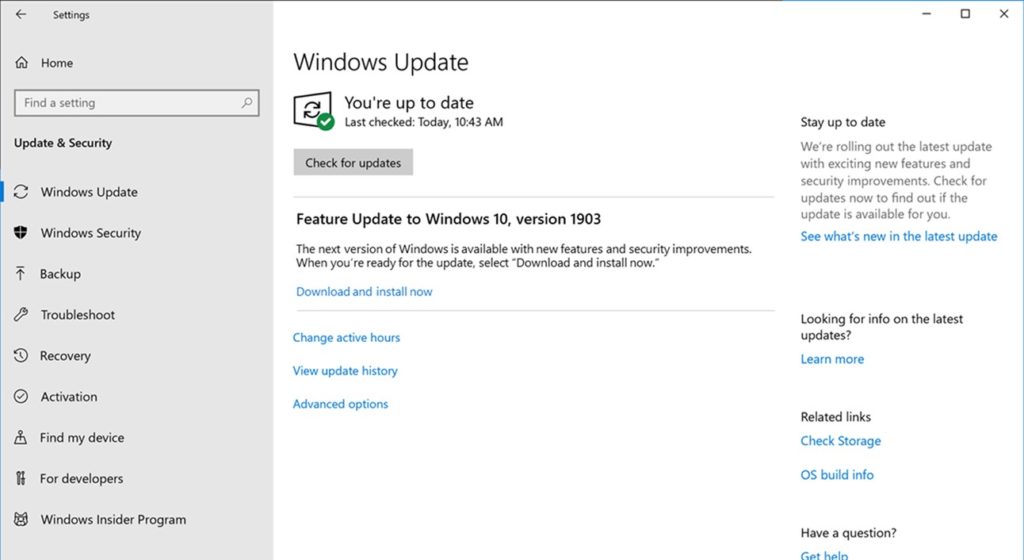
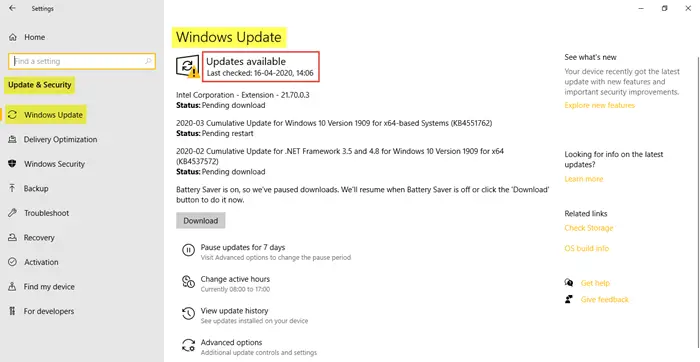
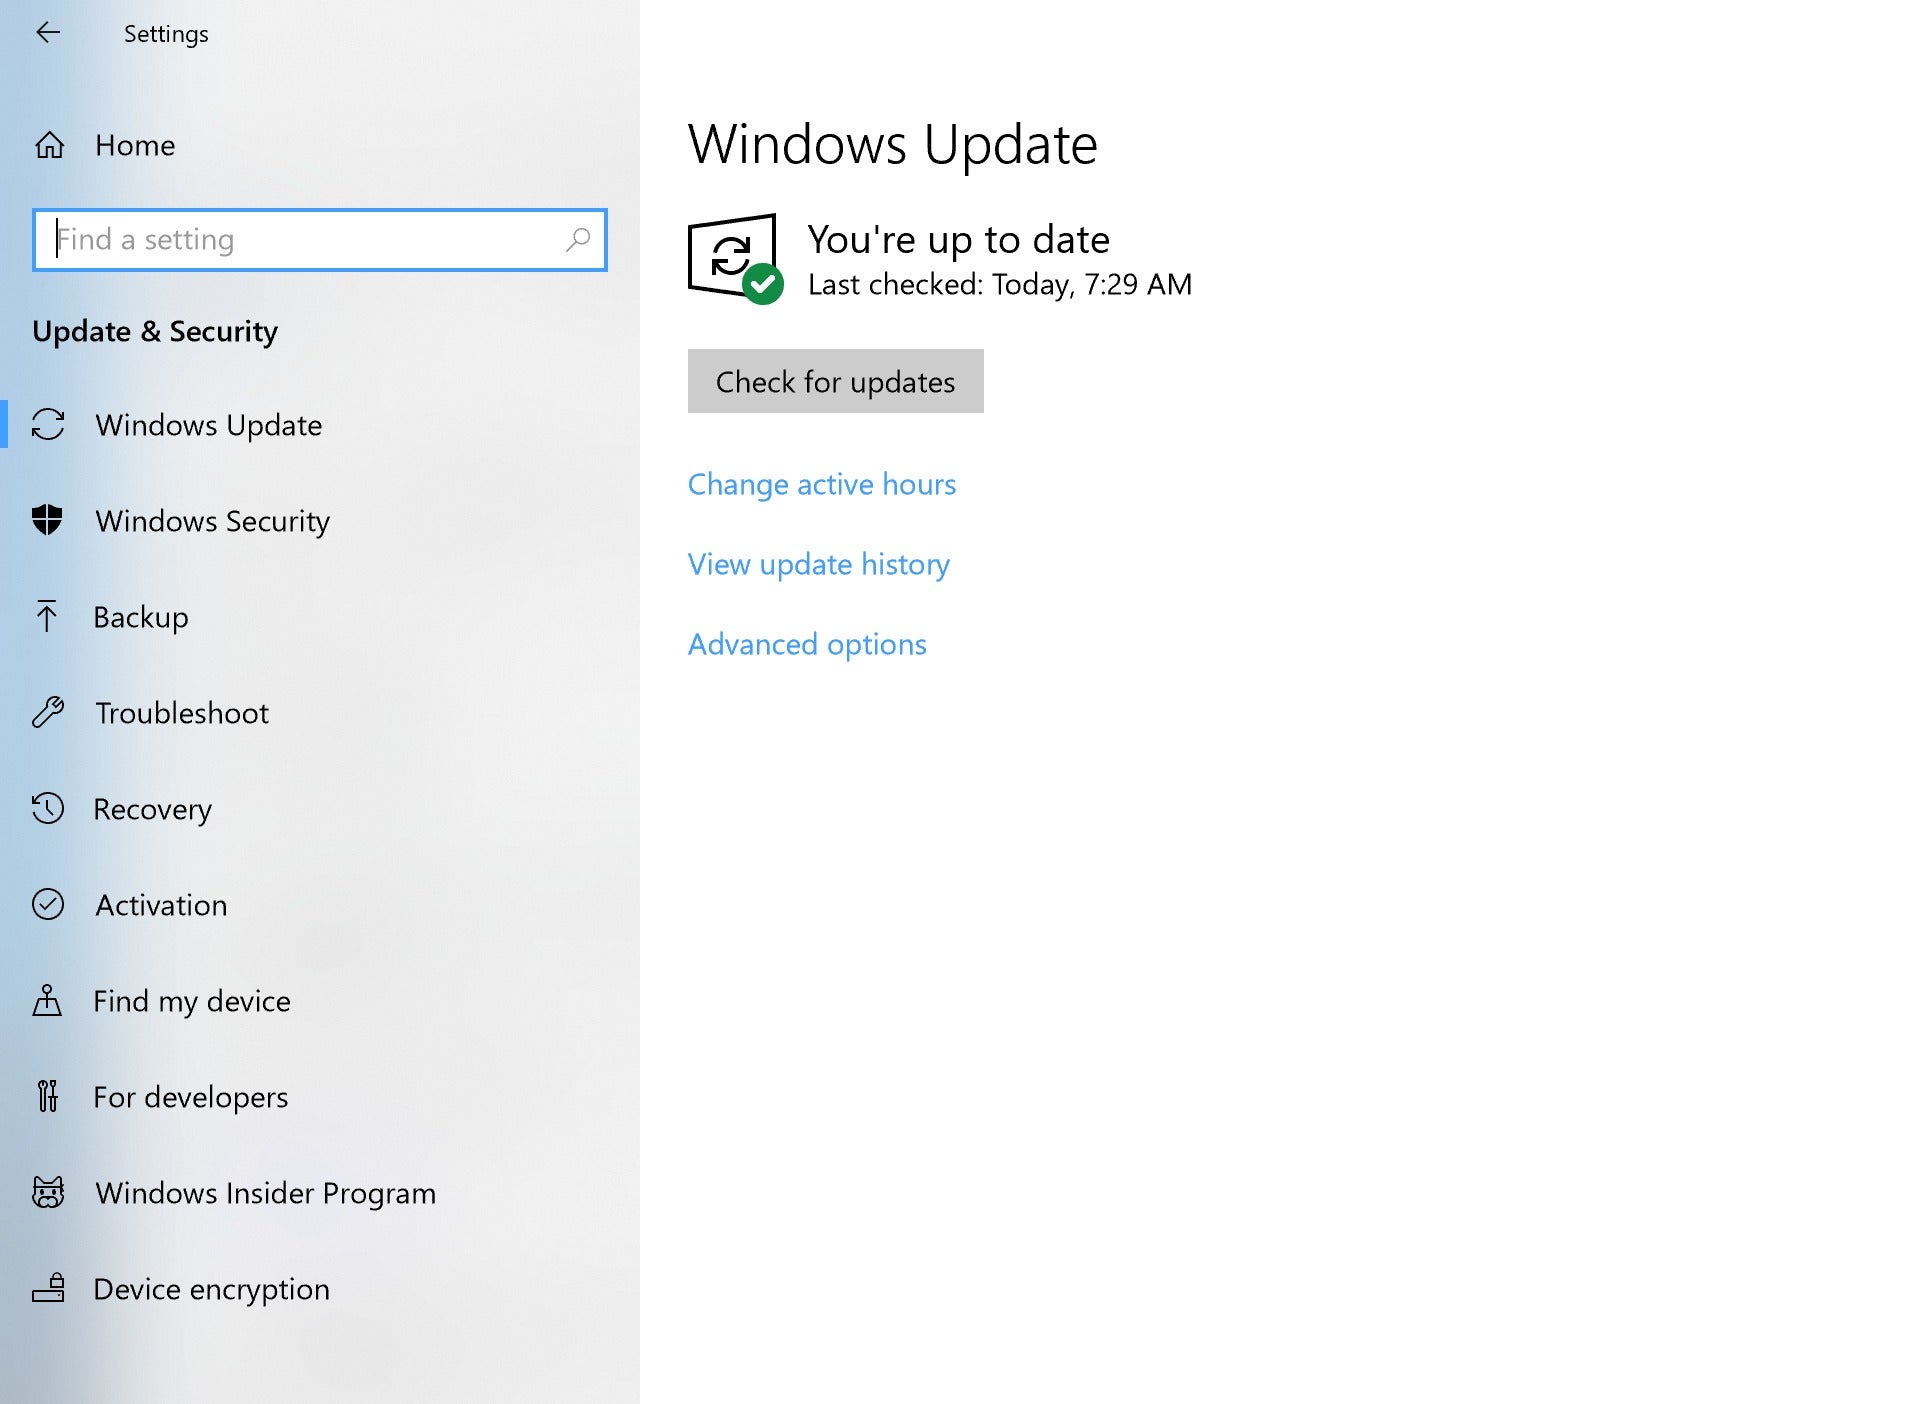
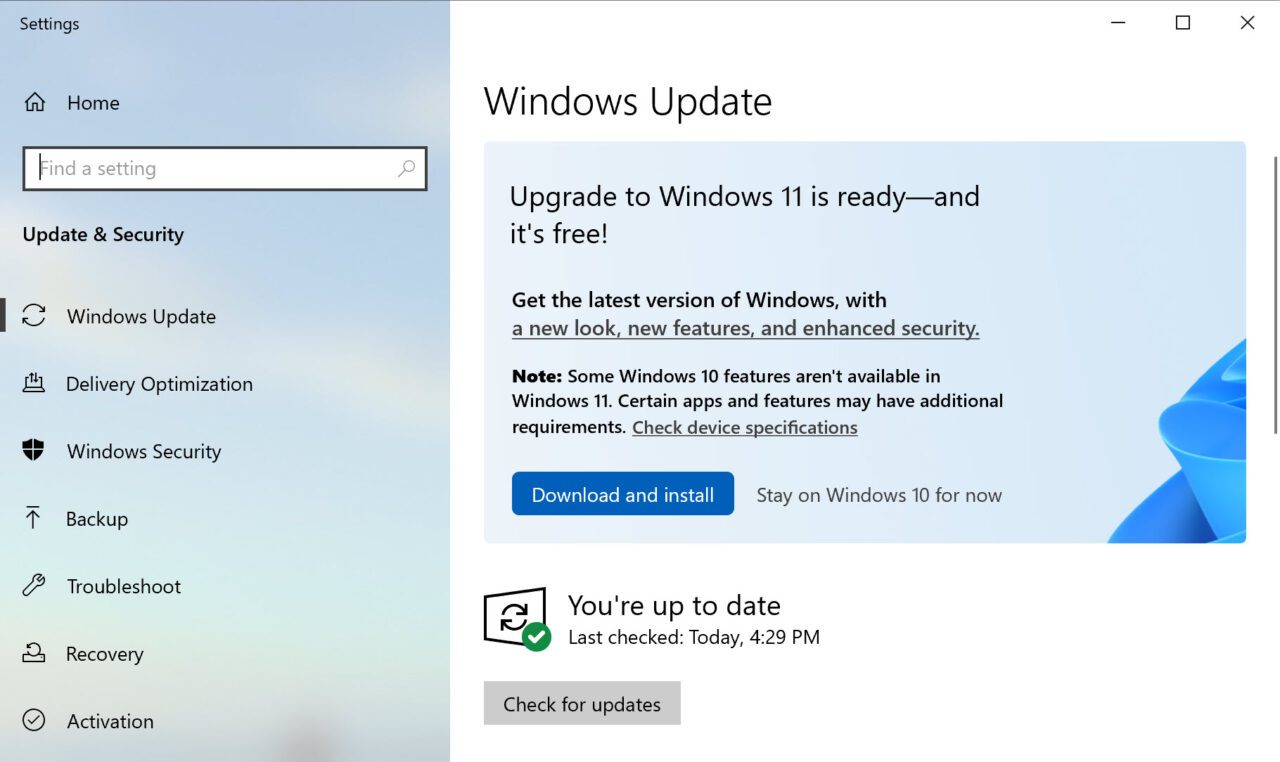
  • Windows Update: Windows Update automatically checks for and installs driver updates for your network controller and other system components.
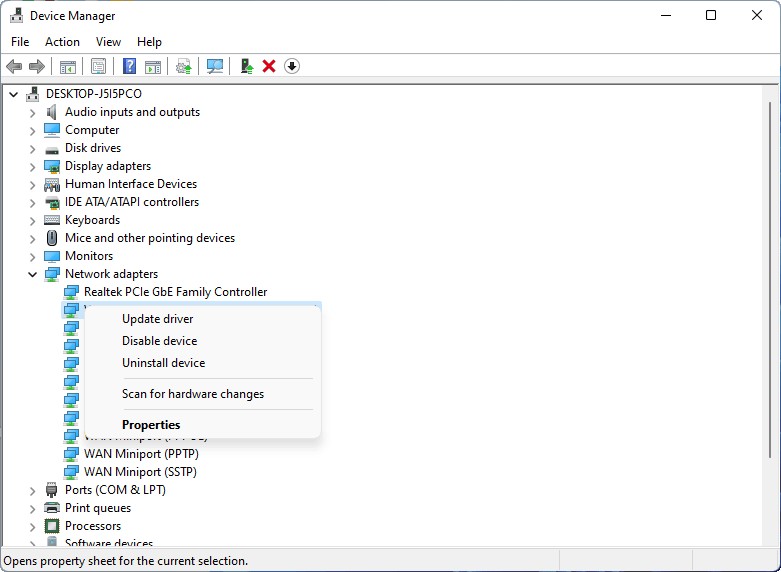
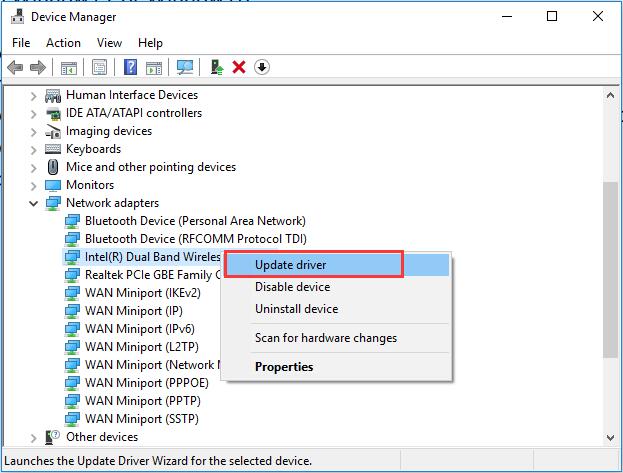
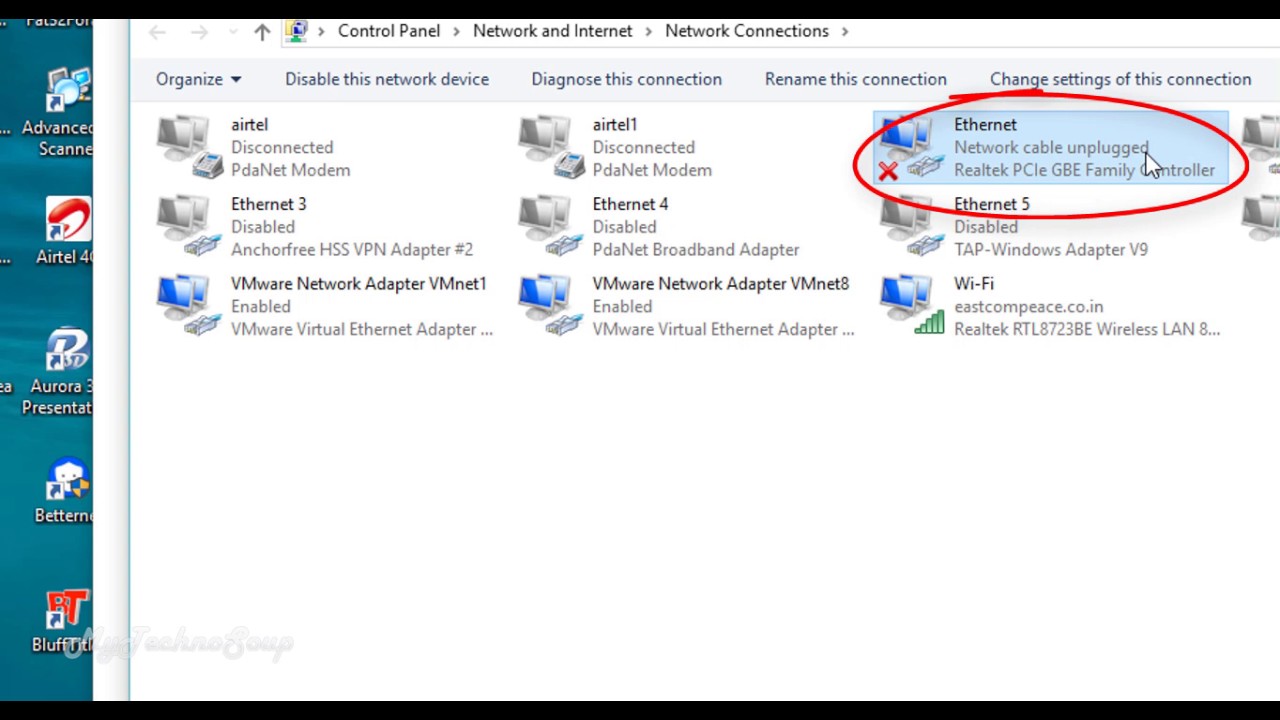
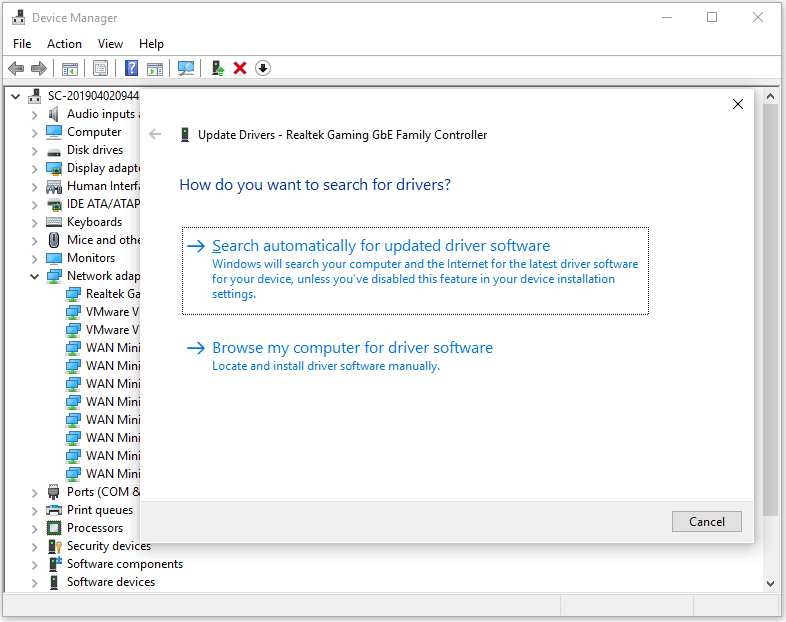
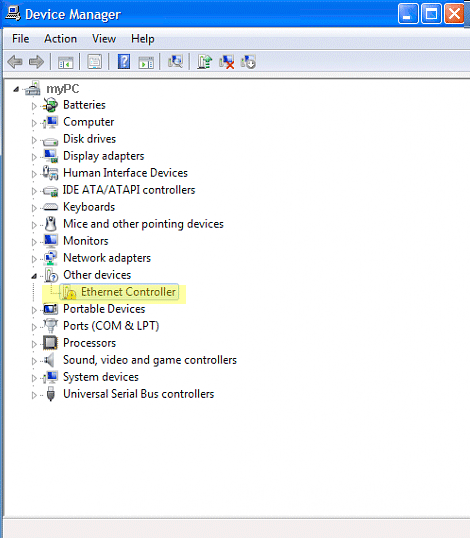
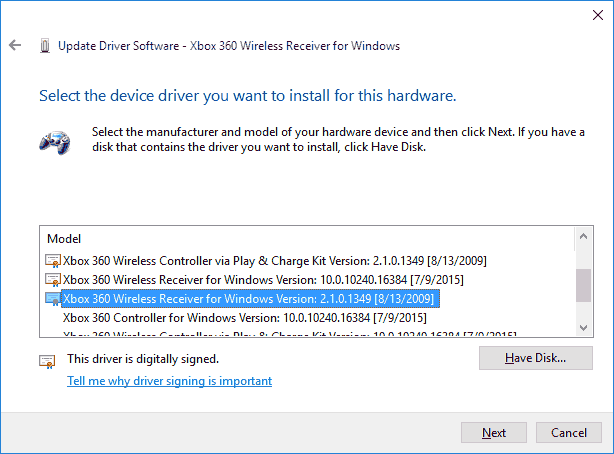
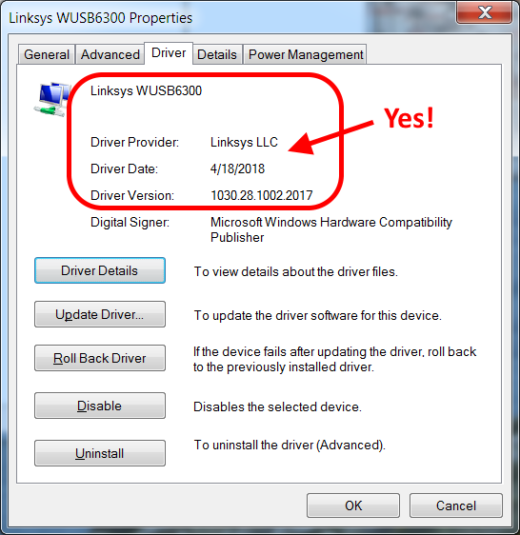
  • Device Manager: You can manually check for driver updates by navigating to Device Manager (accessible through the search bar), expanding the "Network adapters" section, right-clicking on your network controller, and selecting "Update driver."
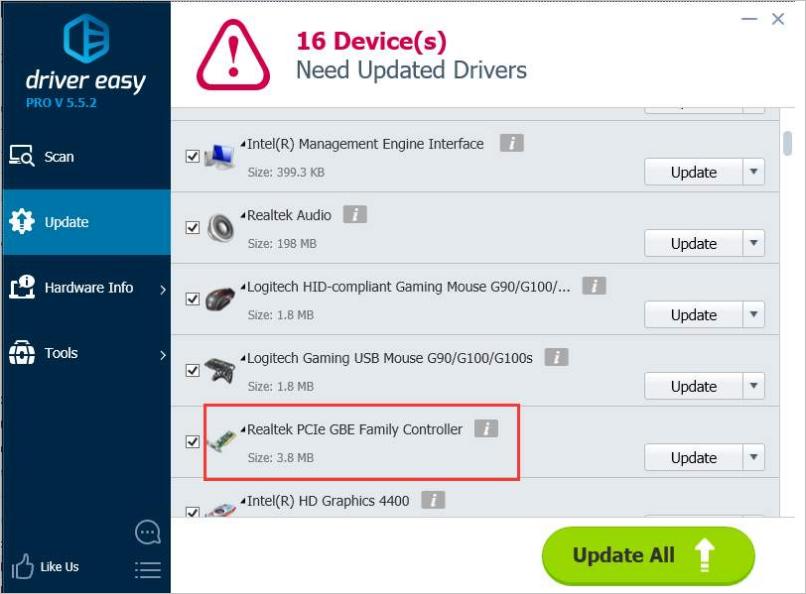
  • Manufacturer’s website: The most reliable way to get the latest drivers is to visit the website of your network controller manufacturer and download the specific drivers for your model.

Troubleshooting Network Problems:

If you experience network problems, it’s often helpful to start by checking your network controller driver. Here are some troubleshooting steps:

  • Reinstall the driver: Sometimes, simply reinstalling the driver can resolve connection issues.
  • Roll back the driver: If a recent driver update caused problems, you can roll back to a previous version.
  • Check for conflicts: Examine Device Manager for any conflicts or error messages related to your network controller.
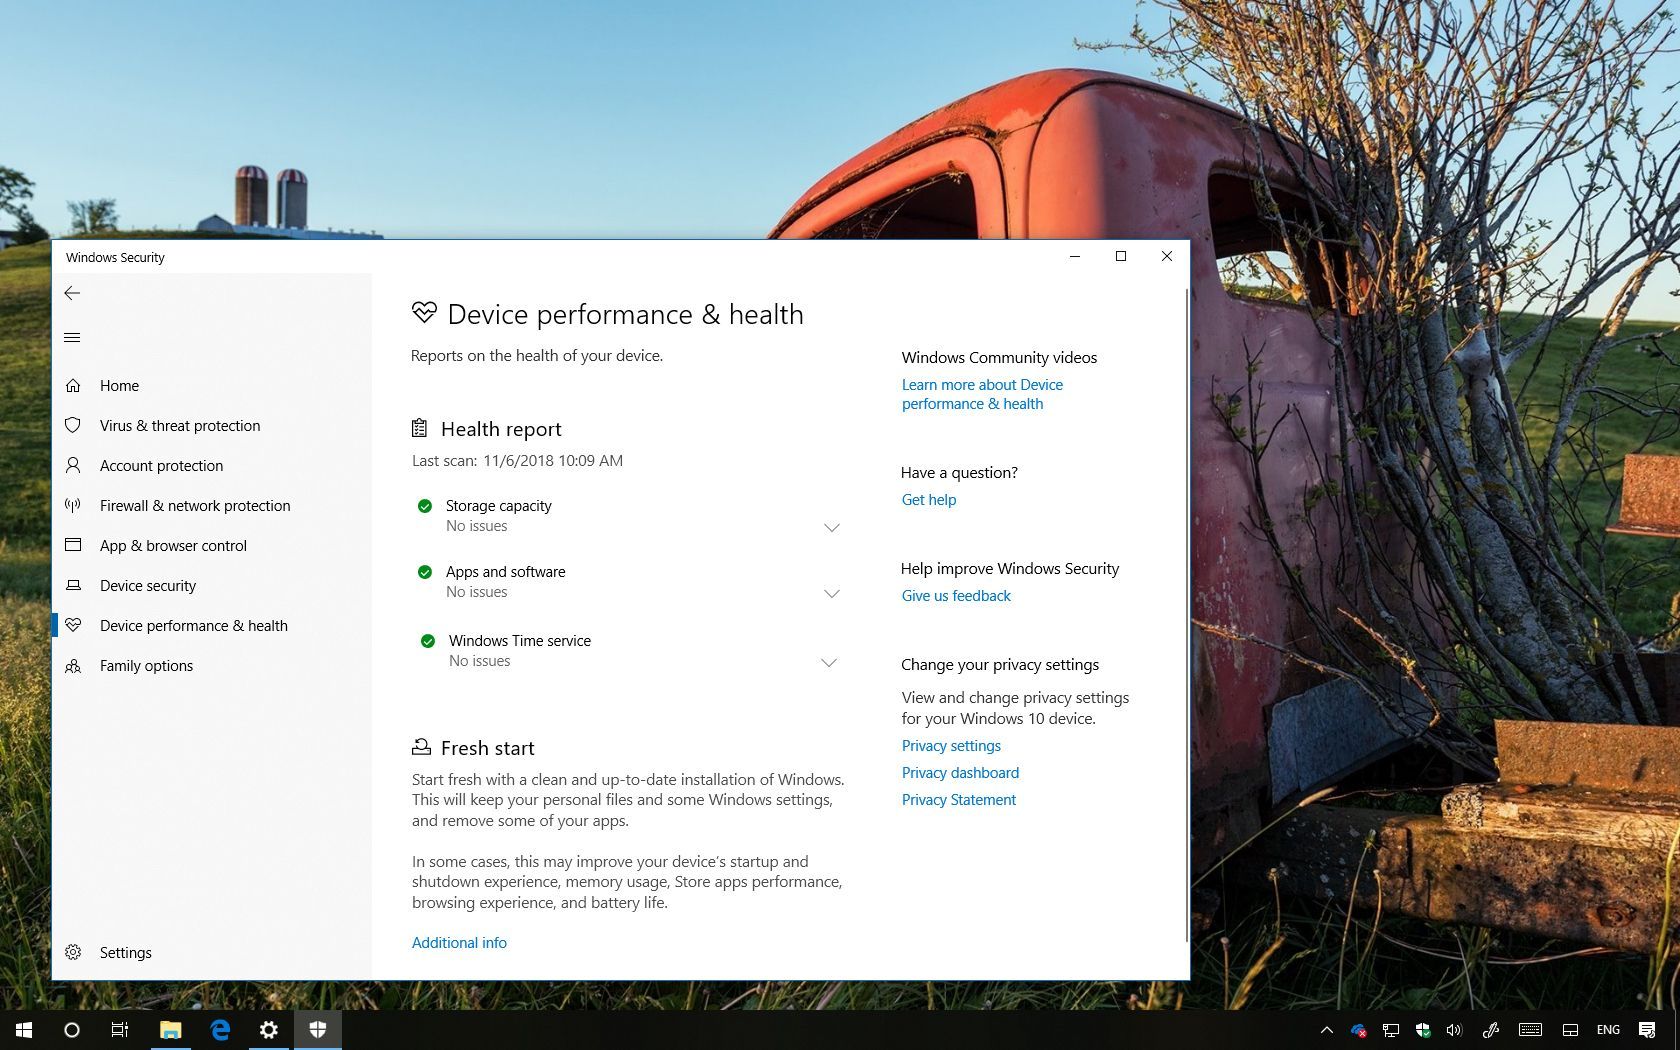
  • Run a network troubleshooter: Windows 10 includes built-in network troubleshooters that can identify and fix common network issues.
  • Contact your network provider: If you suspect a problem with your internet service, contact your network provider for assistance.

FAQs about Network Controller Drivers in Windows 10:

Q: Why do I need to update my network controller driver?

A: Updating your network controller driver ensures compatibility with the latest network technologies, improves performance, and mitigates potential security vulnerabilities.

Q: How often should I update my network controller driver?

A: It’s generally recommended to update your drivers regularly, either through Windows Update or by checking the manufacturer’s website for newer versions. However, if you’re experiencing network problems, updating your driver should be one of the first troubleshooting steps.

Q: What if I can’t find the latest driver for my network controller?

A: If you’re unable to find the latest driver on the manufacturer’s website, you can try searching for generic drivers for your network controller type. However, this may not provide optimal performance or compatibility.

Q: Can I disable my network controller driver?

A: Disabling your network controller driver will prevent your computer from connecting to any network. This is not recommended unless you are specifically troubleshooting a network issue and need to temporarily disable the driver.

Tips for Network Controller Driver Management:

  • Keep your operating system updated: Windows Update not only provides driver updates but also includes security patches and system optimizations that can improve network performance.
  • Monitor network performance: Pay attention to your network connection speed, stability, and any error messages. This can help you identify potential driver-related issues early on.
  • Back up your drivers: Before installing a new driver, it’s a good practice to create a backup of your existing driver in case you need to revert to the previous version.
  • Consider using driver update software: Several third-party software programs can automatically scan for and update your drivers, including network controller drivers. However, exercise caution when using such software, as some may contain malware or potentially conflict with your system.

Conclusion:

Network controller drivers are essential components that enable seamless connectivity in Windows 10. Understanding their role and importance is crucial for maintaining a stable and efficient network experience. By keeping your drivers up-to-date, troubleshooting any issues promptly, and following best practices for driver management, you can ensure optimal network performance and avoid common connectivity problems.

(Realtek) Ethernet Controller Driver Windows 10 Download/Update - MiniTool Windows network adapter driver windows 10 - globalgross Realtek ethernet controller driver windows 10 - tenbpo
Pci Data Acquisition And Signal Processing Controller Driver Windows 10 - arenanew Realtek ethernet controller driver windows 10 - socalker Realtek ethernet controller driver windows 10 good or not - pixelslop
Windows 10 Network Adapter Missing โ€“ How to Install Ethernet Driver on PC Realtek ethernet controller driver windows 10 good or not - pixelslop

Closure

Thus, we hope this article has provided valuable insights into The Unsung Hero of Connectivity: Understanding Network Controller Drivers in Windows 10. We appreciate your attention to our article. See you in our next article!

Overscan: Understanding And Managing Display Settings In Windows 10

Overscan: Understanding and Managing Display Settings in Windows 10

Introduction

With great pleasure, we will explore the intriguing topic related to Overscan: Understanding and Managing Display Settings in Windows 10. Let’s weave interesting information and offer fresh perspectives to the readers.

Overscan: Understanding and Managing Display Settings in Windows 10

Overscaling Or Overscan in Windows 10 and Windows 11 [Fixed]

In the realm of digital displays, the way content is presented on a screen is paramount. Windows 10, the widely used operating system, offers various display settings to ensure optimal viewing experiences. One of these settings, often overlooked but crucial, is overscan. This article delves into the intricacies of overscan, explaining its workings, its impact on display quality, and how to effectively manage it within the Windows 10 environment.

Understanding Overscan: The Invisible Edges

Overscan, in essence, is a feature that extends the displayed image beyond its intended boundaries. This extension occurs on the edges of the screen, resulting in a slightly cropped view of the original content. While this may seem like a minor inconvenience, it can significantly impact the visual experience, especially when dealing with specific types of content or when striving for pixel-perfect accuracy.

The Origins of Overscan:

Overscan originated in the days of analog television broadcasting. Due to limitations in the signal transmission process, a small portion of the image signal was lost at the edges. To compensate for this loss and ensure a complete picture, television manufacturers incorporated overscan into their displays. This practice ensured that the received signal, despite the loss, would still fit within the screen’s visible area.

Overscan in the Digital Age:

While digital displays are free from the signal limitations of their analog predecessors, overscan remains a legacy feature in many devices. This is primarily due to the compatibility issues that might arise with older content sources, such as DVD players or legacy gaming consoles, which still adhere to analog standards.

The Implications of Overscan:

Overscan can introduce several undesirable effects:

  • Content Cropping: The most noticeable consequence of overscan is the cropping of content at the edges of the screen. This can lead to missing information, cut-off text, or even obscured important elements within the image.
  • Distorted Aspect Ratios: In scenarios where content is designed for a specific aspect ratio, overscan can distort the image, stretching it beyond its intended proportions. This can result in a stretched or squashed appearance, compromising the visual integrity of the content.
  • Blurred Edges: Overscan can also lead to blurred or indistinct edges, as the display attempts to extend the content beyond its original boundaries. This can result in a less sharp and defined image overall.

Managing Overscan in Windows 10: A Step-by-Step Guide

Windows 10 offers a straightforward way to manage overscan settings, ensuring optimal display quality for your content:

  1. Accessing Display Settings:

    • Click the Start button and select Settings.
    • Navigate to System and then click Display.
  2. Adjusting Overscan:

    • Within the Display settings, locate the Scale and layout section.
    • If your display is set to overscan, you will see a message indicating that the image might be cropped.
    • Click on Advanced display settings to access further customization options.
  3. Enabling or Disabling Overscan:

    • In the Advanced display settings window, locate the Display adapter properties section.
    • Select the Monitor tab and then click on the Properties button.
    • Navigate to the Timing tab.
    • Look for the Overscan option. This option might be labeled as Horizontal Overscan and Vertical Overscan.
    • Depending on your display and its capabilities, you may have the option to adjust the overscan percentage or completely disable it.
    • Apply the changes and restart your computer for the settings to take effect.

Troubleshooting Overscan Issues: Common Problems and Solutions

While managing overscan settings in Windows 10 is relatively straightforward, you might encounter some issues along the way. Here are some common problems and their respective solutions:

  • Overscan Settings Unavailable: If you cannot find the overscan options within your display settings, it’s possible that your monitor does not support overscan adjustments. In such cases, you might need to rely on the display’s built-in settings or contact the manufacturer for support.
  • Overscan Not Effective: If you have adjusted the overscan settings, but the image still appears cropped or distorted, it could be due to conflicting settings or outdated drivers. Try updating your display drivers to the latest version, or check for any other software that might be interfering with the display settings.
  • Inconsistent Overscan Behavior: If you experience inconsistent overscan behavior, it could be a result of the content source. Certain media players or applications might have their own built-in overscan settings that override the system-level adjustments. In these cases, you might need to adjust the overscan settings within the specific application.

The Importance of Overscan: A Matter of Preference and Precision

While overscan has historically been a necessity, its relevance in the modern digital landscape is debatable. Its importance boils down to individual preferences and the specific use case.

  • For Content Creators: Overscan can be a critical factor for content creators, especially those working with video editing or graphic design. Ensuring pixel-perfect accuracy and maintaining the intended aspect ratio of content requires precise control over the display area.
  • For Gaming Enthusiasts: Gamers often prioritize a full-screen experience, maximizing the display area for immersive gameplay. Overscan can hinder this goal by cropping important elements of the game interface or even the game world itself.
  • For General Users: For everyday users, the impact of overscan might be less pronounced. However, it can still affect the viewing experience, especially when consuming content that is designed for specific aspect ratios or when dealing with media players that do not automatically compensate for overscan.

Frequently Asked Questions (FAQs)

Q: What is the difference between overscan and underscan?

A: Overscan extends the image beyond its intended boundaries, while underscan restricts the image within a smaller area, potentially leaving black borders around the edges.

Q: How can I determine if my monitor has overscan enabled?

A: You can typically identify overscan by observing the edges of the screen. If you see content being cropped or missing, it is likely that overscan is enabled. You can also check the display settings in Windows 10 for any indications of overscan.

Q: Is it better to enable or disable overscan?

A: The best setting for overscan depends on your individual needs and preferences. For content creators and gamers, disabling overscan is generally recommended to ensure pixel-perfect accuracy and a full-screen experience. For general users, the impact of overscan might be less significant.

Q: Can I adjust overscan settings for specific applications?

A: Some applications might have their own built-in overscan settings that override the system-level adjustments. You can check the application’s settings or documentation for any specific overscan options.

Tips for Optimal Overscan Management

  • Experiment with Different Settings: Try enabling and disabling overscan to see which setting works best for your content and viewing preferences.
  • Use a Test Pattern: To visually assess the impact of overscan, you can use a test pattern, such as a crosshair or a grid pattern, to identify any cropping or distortion.
  • Consider Display Calibration: For professional content creators, calibrating your display can help ensure accurate color representation and pixel-perfect alignment, minimizing the impact of overscan.
  • Check Display Manufacturer Settings: Some monitors offer their own overscan settings, which can be accessed through the display’s on-screen menu.

Conclusion

Overscan, a legacy feature from the analog era, can still impact the way content is displayed on modern digital displays. Understanding the implications of overscan and managing its settings effectively can enhance the viewing experience, ensuring that content is presented as intended, whether for professional work, gaming, or casual viewing. By carefully adjusting overscan settings and exploring the various options available in Windows 10, users can optimize their display settings for a more precise and enjoyable visual experience.

Overscaling Or Overscan in Windows 10 and Windows 11 [Fixed] Windows 10 Display Settings superguide: How to adjust every feature  PCWorld How best to change your display settings in Windows 10 - CNET
How To Fix Overscan In Windows 10 To Fit To Screen  deskgeek Multiple Displays - Change Settings and Layout in Windows 10  Tutorials Use Windows 10's individual display scaling to perfect your multi-monitor setup  PCWorld
Advanced display settings Overscaling Or Overscan in Windows 10 and Windows 11 [Fixed]

Closure

Thus, we hope this article has provided valuable insights into Overscan: Understanding and Managing Display Settings in Windows 10. We appreciate your attention to our article. See you in our next article!

Navigating The Windows 10 Desktop: Understanding Tabs And Their Significance

Navigating the Windows 10 Desktop: Understanding Tabs and Their Significance

Introduction

In this auspicious occasion, we are delighted to delve into the intriguing topic related to Navigating the Windows 10 Desktop: Understanding Tabs and Their Significance. Let’s weave interesting information and offer fresh perspectives to the readers.

Windows 10 Basic Desktop and Navigation - Interface Technical Training  Interface Technical

The Windows 10 desktop is the primary interface for interacting with the operating system. Its organization and functionality are crucial for efficient computer use. Within this environment, tabs play a pivotal role in streamlining workflow and enhancing user experience.

Tabs: A Foundation for Efficient Organization

Tabs, often referred to as "onglets" in French, are a fundamental aspect of modern user interface design. They facilitate efficient navigation and organization within a digital environment. In the context of Windows 10, tabs are primarily found within applications, allowing users to manage multiple documents, files, or tasks simultaneously.

Benefits of Utilizing Tabs in Windows 10

  • Enhanced Organization: Tabs provide a structured way to manage multiple open items within a single application window. This eliminates the need to constantly switch between windows, minimizing clutter and maximizing screen space.

  • Improved Efficiency: By keeping related content within a single window, tabs facilitate a seamless workflow. Users can easily switch between different documents, web pages, or sections of a program without losing their place.

  • Increased Productivity: With tabs, users can work on multiple tasks concurrently without the need for excessive window management. This streamlines workflow and allows for more efficient multitasking.

Exploring the Use of Tabs in Different Windows 10 Applications

1. Web Browsers: Tabs are an integral part of modern web browsers. Users can open multiple websites in separate tabs within the same browser window, allowing for easy navigation and comparison between different sources.

2. Microsoft Office Applications: Word, Excel, PowerPoint, and other Microsoft Office applications utilize tabs to manage multiple documents, spreadsheets, or presentations simultaneously. This allows users to work on different projects or components of a single project within a single application window.

3. File Explorer: While not as prominent as in other applications, tabs are also available in Windows 10’s File Explorer. Users can open multiple folders or drives in different tabs, facilitating easy access to various files and directories.

4. Other Applications: Numerous other Windows 10 applications, including image editors, development tools, and video players, utilize tabs to enhance their user interface and functionality.

Understanding Tab Functionality

  • Creating Tabs: Tabs are typically created by clicking on a "New Tab" button or by dragging and dropping a file or URL into the application window.

  • Switching Tabs: Users can switch between open tabs by clicking on the desired tab or using keyboard shortcuts like Ctrl+Tab or Ctrl+Shift+Tab.

  • Closing Tabs: Tabs can be closed by clicking on the "X" button located on the tab itself or by using keyboard shortcuts like Ctrl+W or Alt+F4.

  • Tab Management: Many applications offer features for managing tabs, including the ability to group tabs, pin tabs, and customize tab appearance.

FAQs on Tabs in Windows 10

Q: How do I create a new tab in a web browser?
A: Click on the "New Tab" button located in the browser window or press Ctrl+T on your keyboard.

Q: How can I close a specific tab in Windows 10?
A: Click on the "X" button located on the tab you wish to close or press Ctrl+W on your keyboard.

Q: Can I rearrange the order of tabs in a browser?
A: Yes, you can drag and drop tabs to rearrange them in the order you prefer.

Q: How can I manage multiple tabs efficiently?
A: Utilize features like tab groups, pinned tabs, and tab management extensions to organize and prioritize your tabs.

Tips for Effective Tab Management in Windows 10

  • Use Tab Groups: Organize related tabs into groups to improve clarity and reduce clutter.

  • Pin Important Tabs: Pin essential tabs to keep them readily accessible at the top of the tab bar.

  • Utilize Tab Management Extensions: Consider using browser extensions or add-ons to enhance tab management capabilities.

  • Regularly Close Unnecessary Tabs: Minimize the number of open tabs to improve performance and reduce cognitive overload.

Conclusion

Tabs are an essential element of the modern Windows 10 desktop, contributing to a more efficient and user-friendly experience. Their ability to streamline workflow, enhance organization, and facilitate multitasking makes them a valuable tool for users across all levels of computer proficiency. By understanding the functionality and benefits of tabs, users can optimize their use of Windows 10 and unlock its full potential for productivity and efficiency.

Windows 10 Technical Preview: Win+Tab and Virtual Desktops โ€“ azurecurve Video - Windows 10 โ€“ Basic Desktop and Navigation  Interface Technical Training Navigating Windows 10: How to use Task view and Virtual Desktops  Extremetech
Navigating the Windows 10 desktop  Information Services Division - UCL โ€“ University College London Windows 10 Technical Preview: Win+Tab and Virtual Desktops โ€“ azurecurve Windows 10 Basic Desktop and Navigation - Interface Technical Training  Interface Technical
Navigating Windows 10: How to use Task view and Virtual Desktops  Extremetech How to use multiple desktops in Windows 10 - TechEngage

Closure

Thus, we hope this article has provided valuable insights into Navigating the Windows 10 Desktop: Understanding Tabs and Their Significance. We appreciate your attention to our article. See you in our next article!

A Comprehensive Guide To Installing Windows 11

A Comprehensive Guide to Installing Windows 11

Introduction

With great pleasure, we will explore the intriguing topic related to A Comprehensive Guide to Installing Windows 11. Let’s weave interesting information and offer fresh perspectives to the readers.

A Comprehensive Guide to Installing Windows 11

Windows 11 User Guide A Step By Step Guide To Install And Use The New Images

Windows 11, the latest iteration of Microsoft’s flagship operating system, offers a range of new features and improvements designed to enhance user experience and productivity. Installing Windows 11 can be a significant step, bringing your device up to date with the latest technology and unlocking a host of new capabilities. This guide provides a detailed explanation of the installation process, addressing common questions and offering practical tips for a smooth and successful transition.

Understanding the Prerequisites

Before embarking on the installation journey, it is crucial to ensure your device meets the minimum system requirements for Windows 11. These requirements ensure optimal performance and compatibility, guaranteeing a seamless experience.

  • Processor: 1 gigahertz (GHz) or faster with 2 or more cores
  • RAM: 4 gigabytes (GB)
  • Storage: 64 GB or larger storage device
  • Graphics card: Compatible with DirectX 12 or later, WDDM 2.x driver
  • Display: High Definition (720p) display with a minimum screen resolution of 9 inches diagonally
  • Internet connection: Required for initial setup and some features

Choosing the Right Installation Method

Windows 11 installation can be undertaken through two primary methods: clean installation or upgrade. Each method offers unique advantages and considerations:

  • Clean Installation: This involves formatting the hard drive and installing Windows 11 from scratch. This approach is recommended for users seeking a fresh start, removing any existing software or files. It is also beneficial for addressing performance issues or resolving conflicts caused by previous installations.
  • Upgrade: This method allows users to upgrade their existing Windows 10 system to Windows 11, preserving data and settings. This option is ideal for users who prefer a more convenient transition, minimizing disruption to their workflow and data integrity.

Preparing for Installation

Regardless of the chosen method, meticulous preparation is essential for a smooth installation process. The following steps ensure a seamless transition:

  1. Backup Data: Before proceeding with installation, it is crucial to back up all important data, including documents, photos, videos, and other personal files. This step safeguards against potential data loss during the process.
  2. Check Compatibility: Ensure all hardware components, including drivers, are compatible with Windows 11. This step prevents potential issues and ensures optimal performance.
  3. Disable Antivirus: Temporarily disable antivirus software to avoid potential conflicts during installation.
  4. Disconnect External Devices: Disconnect all unnecessary external devices, such as printers, scanners, and external hard drives, to minimize potential conflicts.

Step-by-Step Installation Guide

1. Obtaining the Installation Media:

  • Download the Windows 11 ISO file: Visit the official Microsoft website and download the Windows 11 ISO file, which contains the installation files.
  • Create a bootable USB drive: Use a tool like Rufus or the Windows USB/DVD Download Tool to create a bootable USB drive from the downloaded ISO file. This USB drive will serve as the installation medium.

2. Boot from the Installation Media:

  • Restart your device: Restart your computer and enter the BIOS menu by pressing the appropriate key (usually F2, F10, or Del) during the boot process.
  • Set boot order: In the BIOS menu, navigate to the boot order settings and prioritize the bootable USB drive as the first boot device.
  • Save and exit: Save the changes and exit the BIOS menu. Your computer will now boot from the USB drive.

3. Initiate the Installation Process:

  • Follow the on-screen instructions: The Windows 11 setup screen will appear. Select your language, keyboard layout, and time zone.
  • Accept the license terms: Carefully read and accept the Windows 11 license terms.
  • Choose the installation type: Select either "Custom: Install Windows only (advanced)" for a clean installation or "Upgrade: Install Windows and keep files, apps, and settings" for an upgrade.
  • Select the drive: Choose the drive where you want to install Windows 11. If performing a clean installation, ensure the selected drive is formatted.

4. Complete the Installation:

  • Wait for installation: The installation process may take some time, depending on the hardware and chosen method.
  • Personalize your settings: Once the installation is complete, you will be prompted to personalize your settings, such as creating a user account and choosing your preferred settings.
  • Activate Windows: After completing the initial setup, activate Windows 11 using your product key or by opting for a free trial.

Troubleshooting Common Installation Issues

Despite meticulous preparation, installation challenges may arise. The following troubleshooting tips can help address common issues:

  • Error messages: Carefully read any error messages that appear during installation and search for solutions online or contact Microsoft support for assistance.
  • Hardware incompatibility: Ensure all hardware components are compatible with Windows 11. If a specific device is causing issues, try updating its driver or seeking a compatible alternative.
  • Boot problems: If the device fails to boot from the installation media, check the BIOS settings and ensure the boot order is correctly configured.
  • Installation hangs: If the installation process hangs, try restarting the device and repeating the installation process.

Frequently Asked Questions (FAQs)

Q: Can I upgrade from Windows 7 or Windows 8 to Windows 11?

A: While Windows 11 is designed to be compatible with Windows 10, direct upgrades from older versions like Windows 7 or Windows 8 are not officially supported. It is recommended to first upgrade to Windows 10 and then proceed with the upgrade to Windows 11.

Q: Will I lose my data during a clean installation?

A: Yes, a clean installation will erase all data on the selected drive. It is crucial to back up all important data before performing a clean installation.

Q: Can I install Windows 11 on a virtual machine?

A: Yes, Windows 11 can be installed on a virtual machine, such as VMware or VirtualBox, allowing you to test the operating system in a controlled environment without affecting your primary operating system.

Q: What are the benefits of installing Windows 11?

A: Windows 11 offers a range of benefits, including:

  • Enhanced security: Improved security features, such as Windows Hello facial recognition and a more robust security architecture, protect against potential threats.
  • Improved performance: Optimized for modern hardware, Windows 11 offers faster boot times, smoother multitasking, and improved overall performance.
  • Enhanced user experience: A refined user interface with new features, such as Snap Layouts for efficient multitasking and a streamlined Start menu, provides a more intuitive and user-friendly experience.
  • Modern design: A visually appealing design with rounded corners, vibrant colors, and a focus on simplicity enhances the overall aesthetic experience.

Tips for a Successful Installation

  • Verify system requirements: Ensure your device meets the minimum system requirements before proceeding with installation.
  • Back up data: Always back up all important data before performing a clean installation.
  • Check compatibility: Verify that all hardware components, including drivers, are compatible with Windows 11.
  • Disable antivirus: Temporarily disable antivirus software to avoid potential conflicts during installation.
  • Disconnect external devices: Disconnect all unnecessary external devices to minimize potential conflicts.
  • Create a bootable USB drive: Use a reliable tool to create a bootable USB drive from the Windows 11 ISO file.
  • Follow the on-screen instructions: Carefully read and follow the on-screen instructions during the installation process.
  • Troubleshoot issues: If you encounter any issues, refer to the troubleshooting tips provided in this guide or seek assistance from Microsoft support.

Conclusion

Installing Windows 11 can be a rewarding experience, bringing your device up to date with the latest technology and unlocking a range of new features and improvements. By understanding the prerequisites, choosing the right installation method, preparing meticulously, and following the step-by-step guide, you can ensure a smooth and successful transition to Windows 11. Remember to back up your data, check compatibility, and troubleshoot any issues that may arise. With careful planning and attention to detail, the installation process can be completed efficiently and effectively, allowing you to enjoy the benefits of Windows 11.

Windows 11 installation process - Step by Step  How to install Windows 11  Windows 11 How to Install Windows 11 on any PC Step by step ๏ธ Ultimate Guide �� Install Microsoft Windows 11 Buy Windows 11: A Complete Tutorial Guide for Beginners with Tips & Tricks to Mastering Windows
The Ultimate Guide to Installing Windows 11  Petri Buy WINDOWS 11 AT YOUR FINGER TIPS: A Simplified Guide To Install And Master All The New How to Install Windows 11  Installing Windows 11 on My Computer/PC �� - YouTube
How to Install Windows 11 Step by Step: Guide with Images How to Install Windows 11 Update or Upgrade  FREE Step by Step - YouTube

Closure

Thus, we hope this article has provided valuable insights into A Comprehensive Guide to Installing Windows 11. We appreciate your attention to our article. See you in our next article!

Near Field Communication: The Invisible Power Of Proximity

Near Field Communication: The Invisible Power of Proximity

Introduction

With great pleasure, we will explore the intriguing topic related to Near Field Communication: The Invisible Power of Proximity. Let’s weave interesting information and offer fresh perspectives to the readers.

Near Field Communication: The Invisible Power of Proximity

Near Field Communication (NFC)

Near Field Communication (NFC) technology, often described as a wireless communication protocol operating at short distances, has become a ubiquitous presence in our everyday lives. While its operation may be invisible to the naked eye, its impact on the way we interact with devices, make payments, and access information is undeniable. This article delves into the intricacies of NFC, exploring its underlying principles, practical applications, and the transformative potential it holds for the future.

Understanding the Fundamentals:

NFC operates on the principle of electromagnetic induction, a phenomenon where a changing magnetic field induces an electric current in a nearby conductor. This interaction occurs within a very short range, typically a few centimeters, making NFC a highly secure and efficient communication method.

At its core, NFC relies on two key components:

  • The Transmitter: This component generates a fluctuating magnetic field, transmitting data to the receiver.
  • The Receiver: This component captures the magnetic field generated by the transmitter, converting it back into an electrical signal and extracting the data.

Both the transmitter and receiver must be in close proximity for communication to occur. This proximity requirement ensures that data exchange is limited to authorized devices, enhancing security and privacy.

Types of NFC Communication:

NFC communication can be categorized into two distinct modes:

  • Passive Mode: In this mode, one device acts as a passive tag, relying solely on the energy provided by the other device, known as the reader, to power its communication. This mode is commonly used for applications like contactless payment, data transfer, and access control.
  • Active Mode: Both devices in this mode operate actively, each possessing its own power source and transmitting data. This mode is typically used for peer-to-peer communication between two NFC-enabled devices, facilitating data exchange, file sharing, and device pairing.

The Evolution of NFC: From Niche Technology to Mainstream Adoption:

The origins of NFC can be traced back to the early 2000s, when it emerged as a promising technology for mobile payments and data transfer. However, its initial adoption was limited by factors such as high implementation costs and a lack of widespread device compatibility.

A turning point occurred in the late 2000s and early 2010s, with the introduction of NFC-enabled smartphones and the increasing popularity of contactless payment systems. This surge in adoption propelled NFC into the mainstream, making it an integral part of our modern technological landscape.

Applications of NFC: Transforming Everyday Experiences:

NFC has permeated various aspects of our lives, revolutionizing how we interact with our environment and devices. Some of its most prominent applications include:

  • Contactless Payment: NFC has transformed the way we pay for goods and services, enabling secure and convenient transactions without the need for physical cards. By simply tapping an NFC-enabled smartphone or wearable device on a payment terminal, users can quickly and securely complete their purchases.

  • Data Transfer: NFC facilitates seamless data exchange between devices, enabling users to share files, contacts, and other information effortlessly. This feature is particularly useful for transferring data between smartphones, tablets, and other NFC-enabled devices.

  • Access Control: NFC is widely used for access control systems, granting authorized individuals access to buildings, rooms, and other restricted areas. By simply presenting an NFC-enabled card or device to a reader, users can gain entry, eliminating the need for physical keys or traditional access cards.

  • Mobile Ticketing: NFC has revolutionized ticketing systems, enabling users to purchase, store, and present tickets directly on their smartphones. This eliminates the need for paper tickets and facilitates a more efficient and convenient ticketing experience.

  • Device Pairing: NFC enables effortless pairing of devices, simplifying the process of connecting smartphones, headphones, and other accessories. By simply tapping two NFC-enabled devices together, users can establish a connection and begin using the devices seamlessly.

  • Interactive Marketing: NFC is increasingly being employed in interactive marketing campaigns, allowing businesses to engage customers through immersive experiences. By tapping an NFC-enabled poster or product, users can access additional information, videos, and promotional offers, enhancing their brand interaction.

Benefits of NFC: Enhancing Convenience, Security, and Efficiency:

NFC technology offers a plethora of benefits, contributing to a more convenient, secure, and efficient user experience:

  • Convenience: NFC eliminates the need for physical cards, keys, and tickets, streamlining everyday tasks and reducing the hassle associated with traditional methods.

  • Security: NFC operates within a very short range, limiting communication to authorized devices and minimizing the risk of unauthorized access. This inherent security feature makes NFC a highly secure communication method.

  • Efficiency: NFC enables quick and easy transactions, data transfers, and device pairing, enhancing efficiency and saving time.

  • Versatility: NFC is a versatile technology, adaptable to a wide range of applications, from mobile payments and data transfer to access control and interactive marketing.

Addressing Concerns and Challenges:

While NFC technology offers numerous advantages, it also faces certain challenges and concerns:

  • Security Concerns: Despite its inherent security features, NFC can be vulnerable to certain security threats, such as cloning or spoofing attacks. Robust security measures and user education are crucial to mitigate these risks.

  • Interoperability: Ensuring interoperability between different NFC devices and platforms remains a challenge. Standardization efforts and industry collaboration are essential to promote seamless communication across diverse ecosystems.

  • Privacy Concerns: As NFC technology collects and transmits data, concerns regarding user privacy arise. Ensuring data privacy and implementing appropriate security protocols are paramount to address these concerns.

Future of NFC: Expanding Horizons and Possibilities:

NFC technology continues to evolve, with exciting developments on the horizon:

  • Integration with IoT: NFC is poised to play a crucial role in the Internet of Things (IoT), enabling seamless communication between devices and the surrounding environment.

  • Enhanced Security Features: Ongoing research and development are focused on enhancing NFC security measures, further protecting user data and preventing unauthorized access.

  • New Applications: NFC is expected to find new and innovative applications in various industries, from healthcare and transportation to education and entertainment.

FAQs:

Q: What is the range of NFC communication?

A: NFC communication typically occurs within a range of a few centimeters, making it a short-range wireless technology.

Q: Is NFC secure?

A: NFC is considered a highly secure technology due to its short-range communication and encryption capabilities. However, it’s essential to implement appropriate security measures and stay informed about potential vulnerabilities.

Q: What devices support NFC?

A: Many modern smartphones, tablets, and wearable devices support NFC. Check the device specifications or manufacturer’s website for NFC compatibility.

Q: How can I use NFC for mobile payments?

A: To use NFC for mobile payments, your device must be NFC-enabled and linked to a compatible payment service. Simply tap your device on a payment terminal to complete the transaction.

Q: Can I transfer files using NFC?

A: Yes, NFC enables data transfer between devices, allowing you to share files, contacts, and other information seamlessly.

Q: Is NFC used in other industries besides mobile payments?

A: Yes, NFC is used in a wide range of industries, including access control, ticketing, transportation, healthcare, and interactive marketing.

Tips:

  • Check Device Compatibility: Ensure your device supports NFC before attempting to use it.

  • Enable NFC on Your Device: Activate NFC settings on your device to enable communication.

  • Keep Devices Close: NFC requires close proximity between devices for communication to occur.

  • Use Reputable Payment Services: Choose trusted and secure payment services for NFC transactions.

  • Be Aware of Security Risks: Stay informed about potential security threats and implement appropriate security measures.

Conclusion:

NFC technology has emerged as a powerful and versatile communication method, transforming the way we interact with devices, make payments, and access information. Its convenience, security, and efficiency have made it an integral part of our modern technological landscape. As NFC continues to evolve and find new applications, its transformative potential promises to shape the future of communication and enhance our everyday experiences.

Near Field Communication What is Near Field Communication (NFC)?  - YouTube Near Field Communication NFC, NFC Technology Explained
What is NFC? - GeeksforGeeks Near-Field Communications (NFC) for Wireless Power Transfer (WPT): An Overview  IntechOpen What Is Near Field Communication Applications - CXJRFIDFactory
The Beginnerโ€™s Guide to NFCs (Near Field Communication) NFC (Near Field Communication)  Download Scientific Diagram

Closure

Thus, we hope this article has provided valuable insights into Near Field Communication: The Invisible Power of Proximity. We hope you find this article informative and beneficial. See you in our next article!

Navigating The World Of Offline Entertainment: A Comprehensive Guide To Downloading Netflix Content On Windows 10

Navigating the World of Offline Entertainment: A Comprehensive Guide to Downloading Netflix Content on Windows 10

Introduction

With enthusiasm, let’s navigate through the intriguing topic related to Navigating the World of Offline Entertainment: A Comprehensive Guide to Downloading Netflix Content on Windows 10. Let’s weave interesting information and offer fresh perspectives to the readers.

How To Download and Install Netflix App on Windows 10

The allure of streaming services like Netflix lies in their vast libraries of entertainment, readily accessible at the click of a button. However, the requirement for a stable internet connection can pose a barrier to enjoying these services on the go. Fortunately, Netflix offers a solution โ€“ the ability to download content directly to your device for offline viewing. This feature empowers users to access their favorite shows and movies even without an internet connection, making it ideal for travel, commutes, or simply enjoying entertainment in areas with limited connectivity.

This guide aims to provide a comprehensive understanding of downloading Netflix content on Windows 10 laptops, outlining the process, addressing common queries, and offering tips for a seamless experience.

Understanding Netflix Downloads on Windows 10

Downloading Netflix content on Windows 10 is a straightforward process, accessible through the official Netflix app. The app provides a user-friendly interface, enabling users to select their desired content for offline viewing. Once downloaded, the content remains available on the device for a specific duration, allowing for repeated viewing within that timeframe.

Downloading Netflix Content: A Step-by-Step Guide

  1. Ensure Compatibility: Not all Netflix content is available for download. Check the availability of the desired show or movie by looking for the download icon (arrow pointing down) beneath the title.

  2. Download the Netflix App: If you haven’t already, download the official Netflix app from the Microsoft Store.

  3. Log in to Your Account: Open the app and log in using your Netflix account credentials.

  4. Browse and Select Content: Navigate through the Netflix library and locate the content you wish to download.

  5. Initiate Download: Click the download icon (arrow pointing down) beneath the title. The download process will commence, and the progress will be displayed.

  6. Manage Downloads: The downloaded content is accessible from the "My Downloads" section within the Netflix app. From here, users can manage their downloaded content, deleting or re-downloading as needed.

Key Considerations for Downloading Netflix Content

  • Download Limits: Each Netflix account has a download limit, typically ranging from 1 to 4 devices. It is crucial to manage download quotas effectively to avoid exceeding the limit.

  • Download Quality: Users can select the download quality for their content, ranging from standard to high definition. The selected quality impacts the download size and the storage space required.

  • Download Expiration: Downloaded content remains available for a specific duration, typically ranging from 48 hours to 7 days. Once the expiration date is reached, the content will be removed from the device.

  • Data Usage: Downloading Netflix content can consume significant data, particularly for high-definition videos. Users with limited data plans should be mindful of their usage.

Addressing Common Queries Regarding Netflix Downloads

Q: Can I download content on multiple devices using the same Netflix account?

A: Yes, Netflix allows users to download content on multiple devices using the same account, subject to the download limit for each account.

Q: What happens to downloaded content when I delete the Netflix app?

A: Deleting the Netflix app will remove the downloaded content from your device. To retain the content, it is advisable to keep the app installed.

Q: Can I download content on my laptop and watch it on another device?

A: No, downloaded content is device-specific and cannot be transferred to other devices.

Q: How do I remove downloaded content from my laptop?

A: Open the Netflix app, navigate to "My Downloads," and select the content you wish to remove. Click the "Delete" icon to remove the content from your device.

Tips for Maximizing Your Netflix Download Experience

  • Prioritize Downloads: Download content in advance when connected to Wi-Fi to avoid consuming mobile data.

  • Utilize Download Quality Settings: Choose the appropriate download quality based on your storage space and internet speed.

  • Manage Download Limits: Keep track of your download quota to avoid exceeding the limit.

  • Clear Downloaded Content Regularly: Regularly remove downloaded content that is no longer required to free up storage space.

  • Update the Netflix App: Ensure you are using the latest version of the Netflix app to benefit from new features and enhancements.

Conclusion: The Power of Offline Entertainment

The ability to download Netflix content on Windows 10 laptops unlocks a world of convenience and flexibility. Whether traveling, commuting, or simply enjoying entertainment in areas with limited connectivity, downloading content empowers users to access their favorite shows and movies without relying on an internet connection. By understanding the process, key considerations, and tips outlined in this guide, users can maximize their offline entertainment experience and enjoy the convenience of Netflix, even when offline.

Complete Guide: How to Download and Install Netflix App for Windows 10 & 11 - Click This Blog How to Download Netflix Shows, Movies for Offline Viewing in Windows 10 ~ Scholars Globe - News How to Download Movies from Netflix in Windows 10 - Make Tech Easier
How To Download and Install Netflix App on Windows 10 How To Download Netflix Content On Windows 10 Download Netflix Films And Tv On Windows 10 To Watch Offline  groovypost
Netflix Releases Offline Viewing and Download Support for Windows 10 Netflix offline arriva anche su Windows 10: come scaricare film e serie TV con l'app ufficiale

Closure

Thus, we hope this article has provided valuable insights into Navigating the World of Offline Entertainment: A Comprehensive Guide to Downloading Netflix Content on Windows 10. We hope you find this article informative and beneficial. See you in our next article!

The Essential Bridge: Realtek WiFi Drivers For Windows 11

The Essential Bridge: Realtek WiFi Drivers for Windows 11

Introduction

With enthusiasm, let’s navigate through the intriguing topic related to The Essential Bridge: Realtek WiFi Drivers for Windows 11. Let’s weave interesting information and offer fresh perspectives to the readers.

The Essential Bridge: Realtek WiFi Drivers for Windows 11

Realtek WiFi Driver Download for Windows 11, 10

In the modern digital landscape, wireless connectivity is paramount. For users of Windows 11, the ability to seamlessly connect to the internet, access online services, and engage with a vast digital ecosystem hinges on a crucial component: the WiFi driver. Among the most prevalent and reliable WiFi driver developers, Realtek stands out, offering a range of solutions tailored for diverse hardware configurations. This article delves into the intricate world of Realtek WiFi drivers in the Windows 11 environment, exploring their significance, functionality, and the benefits they bring to users.

Understanding the Role of WiFi Drivers

At their core, WiFi drivers serve as intermediaries, bridging the gap between the operating system and the physical hardware responsible for wireless communication. These drivers contain a set of instructions that enable Windows 11 to recognize, communicate with, and effectively utilize the WiFi adapter installed in a computer. Without a compatible and up-to-date driver, the WiFi adapter remains inert, incapable of establishing a wireless connection.

Realtek: A Leading Name in WiFi Connectivity

Realtek Semiconductor Corporation, a renowned Taiwanese company, is a leading provider of integrated circuits (ICs) for networking applications. Their expertise extends to the design and development of WiFi controllers, which are the fundamental components within WiFi adapters. Realtek’s extensive portfolio of drivers ensures compatibility with a wide array of WiFi adapters, catering to both desktop and laptop computers.

Benefits of Using Realtek WiFi Drivers

The use of Realtek WiFi drivers for Windows 11 brings a multitude of benefits, enhancing user experience and optimizing wireless connectivity:

  • Seamless Connectivity: Realtek drivers ensure a smooth and consistent connection to WiFi networks, eliminating frustrating dropouts and connectivity issues.
  • Enhanced Performance: Optimized drivers translate to improved data transfer speeds, enabling faster downloads, smoother streaming, and quicker access to online content.
  • Increased Compatibility: Realtek drivers are designed to work seamlessly with a vast range of WiFi adapters, ensuring compatibility across different hardware configurations.
  • Enhanced Security: Realtek drivers incorporate security features that protect against unauthorized access and potential vulnerabilities, safeguarding wireless communication.
  • Regular Updates: Realtek actively releases driver updates to address compatibility issues, improve performance, and introduce new features, ensuring optimal functionality.

Installing and Updating Realtek WiFi Drivers

Installing and updating Realtek WiFi drivers in Windows 11 is a straightforward process:

  • Automatic Updates: Windows 11’s built-in update mechanism often automatically installs or updates Realtek drivers. This ensures compatibility and addresses known issues.
  • Manufacturer Website: Users can directly download the latest drivers from the Realtek website, ensuring compatibility with their specific model of WiFi adapter.
  • Device Manager: Windows 11’s Device Manager provides a convenient interface to update drivers. By right-clicking on the WiFi adapter, users can select "Update Driver" and follow the on-screen prompts.

Troubleshooting Common WiFi Issues

Despite the generally seamless nature of Realtek drivers, users may encounter occasional connectivity problems. Common troubleshooting steps include:

  • Driver Update: Ensuring the driver is up-to-date can resolve compatibility issues and performance problems.
  • Network Reset: Resetting the network settings in Windows 11 can resolve configuration conflicts.
  • Restarting Devices: A simple restart of the computer and the WiFi router can often resolve temporary connectivity issues.
  • WiFi Adapter Settings: Verifying and adjusting settings within the WiFi adapter’s properties can address specific connectivity issues.

Frequently Asked Questions (FAQs)

1. How do I know if I need to update my Realtek WiFi driver?

If you experience connectivity issues, slow speeds, or other problems related to your WiFi connection, updating your driver is a good first step. You can also check for driver updates through Windows Update or the Realtek website.

2. What if I can’t find the correct Realtek driver for my WiFi adapter?

If you are unable to locate the specific driver for your adapter on the Realtek website, it is advisable to contact the manufacturer of your computer or WiFi adapter for assistance.

3. Is it safe to install drivers from third-party websites?

Downloading drivers from untrusted sources poses a potential security risk. It is highly recommended to obtain drivers from reputable sources like the Realtek website or the manufacturer’s website.

4. Can I uninstall my Realtek WiFi driver?

While it is generally not recommended, you can uninstall the Realtek driver. However, doing so will disable your WiFi adapter until a new driver is installed.

5. What is the difference between a Realtek WiFi driver and a Realtek WiFi controller?

A WiFi controller is the physical hardware component within the WiFi adapter. The Realtek WiFi driver is the software that enables Windows 11 to communicate with and control the WiFi controller.

Tips for Optimizing Realtek WiFi Performance

  • Ensure Driver Compatibility: Always install the correct driver for your specific WiFi adapter model.
  • Regular Updates: Keep your Realtek drivers up-to-date to benefit from performance enhancements and security patches.
  • Check Network Settings: Verify and adjust network settings to optimize bandwidth and signal strength.
  • Avoid Interference: Minimize interference from other wireless devices by positioning your router strategically.
  • Firewall Settings: Configure your firewall to allow access to necessary network services.

Conclusion

Realtek WiFi drivers play a vital role in establishing and maintaining reliable wireless connectivity for Windows 11 users. By understanding their significance, functionality, and the benefits they provide, users can ensure seamless internet access, enhanced performance, and optimal functionality. Regular driver updates, along with proper troubleshooting techniques, contribute to a smooth and enjoyable digital experience. Realtek’s commitment to innovation and driver development continues to empower users with the tools they need to navigate the increasingly interconnected world.

Realtek wifi drivers windows 11 - vselost Realtek Wireless LAN Driver Windows 11 Realtek Wifi Driver Windows 11 Update
Realtek Wifi Drivers Windows 11 Realtek Drivers Windows 11 Wifi Realtek Wireless LAN Driver Windows 11
Realtek wifi drivers windows 11 - gaishort Realtek Wifi Driver Windows 11 Dell

Closure

Thus, we hope this article has provided valuable insights into The Essential Bridge: Realtek WiFi Drivers for Windows 11. We hope you find this article informative and beneficial. See you in our next article!

The Windows 10 PC Health Check: A Comprehensive Guide

The Windows 10 PC Health Check: A Comprehensive Guide

Introduction

With enthusiasm, let’s navigate through the intriguing topic related to The Windows 10 PC Health Check: A Comprehensive Guide. Let’s weave interesting information and offer fresh perspectives to the readers.

The Windows 10 PC Health Check: A Comprehensive Guide

Windows 10: Health Check for Your PC - YouTube

The Windows 10 operating system, like any complex software, requires regular maintenance and optimization to function smoothly and efficiently. To assist users in this endeavor, Microsoft introduced the PC Health Check app. This tool provides a user-friendly interface for assessing the health of a Windows 10 device, identifying potential issues, and recommending solutions. This article aims to offer a comprehensive guide to the PC Health Check app, detailing its functionalities, importance, and benefits for Windows 10 users.

Understanding the PC Health Check App

The PC Health Check app is a lightweight utility designed to provide a snapshot of a Windows 10 device’s overall health. It scans various system components, including hardware, software, and security settings, to identify potential issues that may impact performance, stability, or security. The app presents its findings in a clear and concise manner, using simple language and icons to convey information effectively.

Key Features of the PC Health Check App

The PC Health Check app offers a range of features designed to help users maintain a healthy and optimized Windows 10 experience. These features include:

1. System Health Assessment: The app performs a comprehensive system scan to assess the overall health of the device. It checks for hardware compatibility, driver updates, storage space availability, and other critical factors that contribute to a smooth and stable operating environment.

2. Performance Optimization: The app identifies potential performance bottlenecks and suggests ways to improve system responsiveness. This may involve clearing temporary files, disabling unnecessary startup programs, or updating outdated drivers.

3. Security Checks: The app scans for security vulnerabilities and recommends actions to enhance system protection. This includes checking for missing security updates, identifying outdated antivirus software, and suggesting steps to strengthen firewall settings.

4. Storage Management: The app provides insights into storage space usage, identifying large files and applications that consume significant disk space. Users can then choose to remove unnecessary files or relocate them to external storage devices to free up space.

5. Troubleshooting Assistance: The app identifies common issues that may affect system performance or stability. It provides step-by-step troubleshooting guides and links to relevant Microsoft support articles for resolving these issues.

6. Windows Update Status: The app checks for available Windows updates and provides information about the latest security patches and feature updates. Users can then choose to install updates directly from within the app to ensure their system is up-to-date.

7. Driver Updates: The app identifies outdated drivers and suggests updates to improve system stability and compatibility. It provides links to the manufacturer’s websites for downloading and installing the latest drivers.

8. Application Compatibility: The app checks the compatibility of installed applications with the current Windows 10 version. It identifies any apps that may not be fully compatible and suggests alternative solutions or updates.

9. Battery Health: (For devices with batteries) The app monitors battery health and provides insights into its remaining capacity and performance. It also suggests ways to optimize battery life and extend its lifespan.

The Importance of PC Health Check

The PC Health Check app plays a crucial role in ensuring optimal performance and stability of Windows 10 devices. Its regular use offers numerous benefits, including:

1. Enhanced System Performance: By identifying and resolving potential performance bottlenecks, the app helps users achieve a smoother and more responsive computing experience.

2. Improved System Stability: The app helps prevent system crashes and freezes by identifying and addressing potential issues that could lead to instability.

3. Increased Security: The app helps users protect their devices from malware and cyber threats by identifying vulnerabilities and recommending security updates and configurations.

4. Prolonged Device Lifespan: By optimizing system performance and addressing potential issues, the app helps extend the lifespan of Windows 10 devices.

5. Enhanced User Experience: The app provides users with a comprehensive understanding of their device’s health, empowering them to take proactive steps to maintain optimal performance and stability.

Using the PC Health Check App

The PC Health Check app is straightforward to use, even for novice computer users. It provides a user-friendly interface with clear instructions and intuitive navigation. To use the app, follow these steps:

  1. Download and Install: Download the PC Health Check app from the Microsoft Store. The app is free to download and use.
  2. Run the App: Launch the app from the Start menu or the taskbar.
  3. Perform a System Scan: The app will automatically perform a comprehensive system scan to assess the overall health of your device.
  4. Review Results: The app will display the scan results, highlighting any potential issues and providing recommendations for resolving them.
  5. Take Action: Follow the app’s recommendations to address identified issues. This may involve updating drivers, installing software updates, or clearing temporary files.

FAQs about the PC Health Check App

Q: Is the PC Health Check app compatible with all versions of Windows 10?

A: The PC Health Check app is compatible with Windows 10 versions 1903 and later.

Q: Does the PC Health Check app require administrator privileges to run?

A: Yes, the PC Health Check app requires administrator privileges to access and analyze system files and settings.

Q: Can the PC Health Check app diagnose hardware problems?

A: The PC Health Check app can identify potential hardware issues, but it cannot diagnose specific hardware failures. For hardware troubleshooting, it’s recommended to contact the device manufacturer or a qualified technician.

Q: Does the PC Health Check app collect personal data?

A: The PC Health Check app collects minimal data about your device, such as its hardware specifications and software versions. This data is used to provide personalized recommendations and troubleshoot issues.

Q: How often should I run the PC Health Check app?

A: It’s recommended to run the PC Health Check app at least once a month to ensure your device is running optimally. You can also run the app more frequently if you experience performance issues or suspect security vulnerabilities.

Tips for Optimizing Your Windows 10 Device

In addition to using the PC Health Check app, there are several other tips you can follow to optimize your Windows 10 device:

1. Install Windows Updates Regularly: Windows updates provide essential security patches and performance improvements. Ensure that your device is up-to-date by installing updates regularly.

2. Use a Reliable Antivirus Software: Protect your device from malware and cyber threats by installing and maintaining a reputable antivirus software.

3. Clear Temporary Files: Temporary files can accumulate over time and slow down your device. Regularly clear these files to free up disk space and improve performance.

4. Manage Startup Programs: Disable unnecessary startup programs to reduce the time it takes for your device to boot up.

5. Optimize Power Settings: Adjust power settings to conserve battery life and extend the lifespan of your device.

6. Defragment Your Hard Drive: Defragmenting your hard drive can improve performance by organizing files more efficiently.

7. Run a Disk Cleanup: Use the Disk Cleanup tool to remove unnecessary files and free up disk space.

8. Scan for Malware: Regularly scan your device for malware to prevent infections and protect your data.

9. Use a Password Manager: A password manager can help you create and manage strong passwords for all your online accounts.

10. Back Up Your Data: Regularly back up your important data to prevent data loss in case of hardware failure or malware infection.

Conclusion

The PC Health Check app is an invaluable tool for Windows 10 users who want to ensure their devices are running optimally. By providing a comprehensive assessment of system health, identifying potential issues, and recommending solutions, the app empowers users to maintain a smooth, stable, and secure computing experience. Regular use of the PC Health Check app, combined with other best practices for optimizing Windows 10, can significantly enhance the performance, stability, and lifespan of your device.

How to health check windows 10 for best performance How to check your device health on Windows 10 - Pureinfotech How to change time and language formats in Windows 10 - gHacks Tech News
How to Check the Health of Your Windows 10 PC (And Keep It in Shape)  LaptrinhX Windows 10 Users to Get PC Health Check App With New Features - Techsprout News You can get the PC Health Check if you are a Windows Insider
Windows Pc Health Check Setup Microsoft PC Health Check App Windows 10 - YouTube

Closure

Thus, we hope this article has provided valuable insights into The Windows 10 PC Health Check: A Comprehensive Guide. We thank you for taking the time to read this article. See you in our next article!

Reliving The Golden Era: A Comprehensive Guide To PlayStation 1 Emulation On Windows

Reliving the Golden Era: A Comprehensive Guide to PlayStation 1 Emulation on Windows

Introduction

In this auspicious occasion, we are delighted to delve into the intriguing topic related to Reliving the Golden Era: A Comprehensive Guide to PlayStation 1 Emulation on Windows. Let’s weave interesting information and offer fresh perspectives to the readers.

Reliving the Golden Era: A Comprehensive Guide to PlayStation 1 Emulation on Windows

Sony PlayStation (1) - Reliving Golden Age - Pixel Refresh

The PlayStation 1, launched in 1994, revolutionized the gaming industry with its groundbreaking 3D graphics, innovative controller, and a library of unforgettable titles. While the console itself may be gathering dust in attics and storage units, its legacy lives on thanks to the power of emulation. This guide provides a comprehensive exploration of PlayStation 1 emulators for Windows, outlining their functionality, benefits, and the steps to embark on a journey back to the golden age of gaming.

Understanding Emulation

Emulation involves creating a virtual environment that replicates the hardware and software of a specific platform, allowing users to run applications designed for that platform on a different system. In the context of PlayStation 1 emulation, this means running PlayStation 1 games on a modern Windows computer, bypassing the need for the original console and its accessories.

The Benefits of PlayStation 1 Emulation

The advantages of emulating PlayStation 1 games on Windows are numerous:

  • Accessibility: The availability of PlayStation 1 emulators eliminates the need for a physical console, making a vast library of games accessible to anyone with a compatible computer. This is especially valuable for those who may have lost or damaged their original consoles or are unable to find them readily available.
  • Convenience: Emulators often offer features that enhance the gaming experience. These features may include improved graphics, higher resolutions, save state functionality, and even the ability to remap controller inputs for a more comfortable experience.
  • Preservation: Emulation plays a crucial role in preserving gaming history. As original consoles become increasingly obsolete, emulators ensure that these classic games remain playable for future generations.

Popular PlayStation 1 Emulators for Windows

Several high-quality emulators cater to the needs of PlayStation 1 enthusiasts. Some of the most popular and widely-used options include:

  • ePSXe: This emulator has been a mainstay for years, known for its stability, compatibility, and extensive customization options. It supports a wide range of PlayStation 1 games and offers features like high-resolution rendering and plugin support for enhanced audio and graphics.
  • PSX: This emulator stands out for its simplicity and user-friendliness. It provides a straightforward interface and integrates well with Windows, making it a good choice for beginners.
  • Mednafen: A versatile emulator, Mednafen excels in its support for various platforms, including PlayStation 1. It’s known for its accuracy and ability to run games at near-native speeds.
  • PCSX2: While primarily known for its PlayStation 2 emulation capabilities, PCSX2 also offers robust PlayStation 1 emulation, making it a comprehensive solution for retro gaming.

Setting Up a PlayStation 1 Emulator

Setting up a PlayStation 1 emulator on Windows is a straightforward process:

  1. Download the Emulator: Choose an emulator from the list above and download the latest version from a reputable source.
  2. Install the Emulator: Follow the on-screen instructions to install the emulator on your computer.
  3. Obtain BIOS Files: Some emulators require BIOS files, which are essentially the software that allows the emulator to mimic the PlayStation 1’s hardware. You can find these files online, but ensure you obtain them from a trusted source.
  4. Configure the Emulator: Adjust the emulator’s settings to your preferences, including graphics options, controller mapping, and sound settings.
  5. Add Games: Locate your PlayStation 1 game files (typically in .BIN or .ISO format) and add them to the emulator’s game library.
  6. Start Playing: Select a game from your library and enjoy playing classic PlayStation 1 titles on your Windows computer.

Important Considerations

  • Legality: It is crucial to obtain game files legally. Downloading games from unauthorized sources is illegal and can expose your computer to malware. Consider purchasing digital versions of games from reputable online retailers or using physical copies of your owned games.
  • Performance: Emulators require system resources to run efficiently. Ensure your computer meets the minimum requirements for the emulator you choose.
  • Troubleshooting: If you encounter issues, refer to the emulator’s documentation or online forums for troubleshooting tips.

FAQs

Q: Do I need a powerful computer to run PlayStation 1 emulators?

A: PlayStation 1 emulators are generally not demanding on system resources. Even older computers can run them smoothly. However, for optimal performance and enhanced graphics, a more powerful system is recommended.

Q: What are BIOS files and where can I find them?

A: BIOS files contain the essential software that emulators use to mimic the hardware of the original console. They are usually available online, but ensure you download them from a trusted source.

Q: Can I use my PlayStation 4 or Xbox One controller with emulators?

A: Yes, most emulators support various controllers, including modern gamepads. You can configure the emulator to map controller buttons to the desired actions.

Q: What are the best ways to obtain PlayStation 1 game files legally?

A: You can purchase digital versions of games from online retailers like the PlayStation Store, or you can use physical copies of your owned games by converting them to digital formats using a disc drive.

Tips for Enhanced Emulation

  • Optimize Graphics: Experiment with different graphics settings within the emulator to find the balance between visual fidelity and performance.
  • Use Save States: Save states allow you to save your game progress at any point, eliminating the need for frequent manual saves.
  • Explore Plugins: Many emulators support plugins for enhanced features, such as improved audio quality, high-resolution rendering, and custom controller mappings.
  • Join Online Communities: Online forums and communities dedicated to PlayStation 1 emulation provide valuable resources, troubleshooting tips, and a platform for sharing knowledge.

Conclusion

PlayStation 1 emulation on Windows offers a compelling way to relive the golden age of gaming. With a variety of emulators available, users can experience the nostalgia of classic titles while enjoying modern conveniences. By understanding the fundamentals of emulation, choosing the right emulator, and following best practices, players can embark on a journey back to a time when gaming was filled with innovation and unforgettable experiences. As technology continues to evolve, emulation will undoubtedly play an increasingly important role in preserving gaming history and ensuring that these classic titles remain accessible for future generations.

Sony PlayStation (1) - Reliving Golden Age - Pixel Refresh O videogame Sony PlayStation PS1 de 1994 โ€“ MCC - Museu Capixaba do Computador PlayStation Emulation on PC: Duckstation setup guide / tutorial - YouTube
The ultimate PS1/PSX 4k emulation guide using Ducksation, includes bios files for all regions What's the Difference Between Hardware and Software Emulation? - History-Computer The Golden Age of the Playstation - YouTube
8 Great PS1 and PS2 Era Games That Need a Comeback - KeenGamer Reliving the Golden Age of Arcade Gaming - YouTube

Closure

Thus, we hope this article has provided valuable insights into Reliving the Golden Era: A Comprehensive Guide to PlayStation 1 Emulation on Windows. We hope you find this article informative and beneficial. See you in our next article!

A Comprehensive Guide To The Latest Windows 10 Updates: Enhancing Performance, Security, And User Experience

A Comprehensive Guide to the Latest Windows 10 Updates: Enhancing Performance, Security, and User Experience

Introduction

In this auspicious occasion, we are delighted to delve into the intriguing topic related to A Comprehensive Guide to the Latest Windows 10 Updates: Enhancing Performance, Security, and User Experience. Let’s weave interesting information and offer fresh perspectives to the readers.

A Comprehensive Guide to the Latest Windows 10 Updates: Enhancing Performance, Security, and User Experience

The complete guide to Windows 10 updates - Digital Citizen

Windows 10, since its release in 2015, has undergone continuous evolution through a series of updates, each designed to refine its functionality, enhance security, and improve the user experience. These updates, often referred to as "feature updates," introduce significant changes, new features, and performance enhancements, ensuring the operating system remains relevant and competitive. This article provides a comprehensive overview of the latest Windows 10 updates, highlighting their key features, benefits, and impact on users.

Understanding Windows 10 Updates:

Windows 10 updates are categorized into two primary types:

  • Feature Updates: These updates introduce significant changes, new features, and design enhancements to the operating system. They are released twice a year, typically in the spring and fall. Feature updates are designated by a year and a version number, such as Windows 10, version 20H2 or Windows 10, version 21H1.
  • Quality Updates: These updates focus on addressing bugs, improving security, and enhancing system stability. They are released monthly and are typically smaller in size than feature updates. Quality updates are designated by a year, month, and build number, such as Windows 10, version 2004, Build 19041.450.

Recent Feature Updates and their Impact:

Windows 10, version 21H1 (May 2021): This update introduced a streamlined installation process, improved performance for Windows Hello facial recognition, and enhanced security features. It also included minor improvements to the Start menu and taskbar, focusing on optimizing user experience and system efficiency.

Windows 10, version 20H2 (October 2020): This update focused on stability improvements and security enhancements, addressing known issues and vulnerabilities. It included updates to the Windows Subsystem for Linux, improving compatibility and performance. The update also introduced new features for the Edge browser, enhancing its functionality and security.

Windows 10, version 2004 (May 2020): This update introduced several significant features, including a new Start menu design, improved search functionality, and the ability to customize the taskbar. It also included a new cloud recovery feature, allowing users to restore their devices from a cloud backup.

Windows 10, version 1909 (November 2019): This update focused on stability improvements and security enhancements, addressing known issues and vulnerabilities. It also included minor feature updates, such as improved support for Windows Sandbox and a new version of the Windows Terminal.

Benefits of Keeping Windows 10 Up to Date:

  • Enhanced Security: Regular updates address security vulnerabilities, protecting users from malware, viruses, and other threats.
  • Improved Performance: Updates optimize system performance, reducing lag, improving responsiveness, and extending battery life.
  • New Features and Functionality: Updates introduce new features, enhancements, and functionalities, keeping the operating system relevant and competitive.
  • Stability and Reliability: Updates address bugs, fix glitches, and improve system stability, ensuring a seamless user experience.

FAQs About Windows 10 Updates:

Q: How do I know if my Windows 10 is up to date?

A: To check your Windows 10 version, go to Settings > System > About. The "Windows Specifications" section will display your current version. To check for updates, go to Settings > Update & Security > Windows Update and click "Check for updates."

Q: Is it safe to update my Windows 10?

A: Yes, it is generally safe to update Windows 10. Microsoft rigorously tests updates before releasing them to ensure stability and security. However, it is recommended to back up your data before installing any major update.

Q: How do I install Windows 10 updates?

A: Windows 10 updates are automatically downloaded and installed in the background. You can also manually check for updates by going to Settings > Update & Security > Windows Update and clicking "Check for updates."

Q: What if I have problems after installing a Windows 10 update?

A: If you encounter any problems after installing a Windows 10 update, you can try the following:

  • Restart your computer: This can often resolve minor issues.
  • Check for updates: There may be a newer update that addresses the issue.
  • Run the Windows Update troubleshooter: This can help diagnose and fix problems with Windows Update.
  • Uninstall the update: You can uninstall the update by going to Settings > Update & Security > Windows Update > View update history.

Tips for Managing Windows 10 Updates:

  • Schedule updates: You can schedule updates to be installed at a specific time, allowing you to control when your computer restarts.
  • Disable automatic updates: While not recommended, you can disable automatic updates if you need to prevent your computer from restarting.
  • Check for driver updates: Ensure your drivers are up to date to avoid compatibility issues with new updates.
  • Back up your data: Regularly back up your data to ensure that you can restore your files if an update causes problems.

Conclusion:

Windows 10 updates are essential for maintaining a secure, stable, and functional operating system. By regularly installing updates, users can benefit from improved performance, enhanced security, and access to new features. Understanding the different types of updates, their benefits, and how to manage them effectively ensures a smooth and enjoyable Windows 10 experience.

How to Install the Latest Windows 10 Feature Update Using Windows Update : Ask the system questions Latest microsoft updates for windows 10 - loenglish Improving the Windows 10 update experience with control, quality and transparency โ€“ ์ง€๋ฝ๋ฌธํ™”์˜ˆ์ˆ ๊ณต์ž‘๋‹จ
Latest Microsoft Windows security update options explained  CSO Online Windows Update And Security Settings In Windows 10  thewindowsclub How to manage Windows 10 updates to prevent them from ruining your life  PCWorld
Microsoft Windows Security Updates Guide Tips to Improve PC Performance on Windows 10

Closure

Thus, we hope this article has provided valuable insights into A Comprehensive Guide to the Latest Windows 10 Updates: Enhancing Performance, Security, and User Experience. We appreciate your attention to our article. See you in our next article!