Understanding Overscan Adjustment In Windows 11: Optimizing Your Display Experience
Understanding Overscan Adjustment in Windows 11: Optimizing Your Display Experience
Related Articles: Understanding Overscan Adjustment in Windows 11: Optimizing Your Display Experience
Introduction
With great pleasure, we will explore the intriguing topic related to Understanding Overscan Adjustment in Windows 11: Optimizing Your Display Experience. Let’s weave interesting information and offer fresh perspectives to the readers.
Table of Content
Understanding Overscan Adjustment in Windows 11: Optimizing Your Display Experience
In the realm of digital displays, achieving a perfect visual experience hinges on the accurate representation of the intended image. Overscan, a phenomenon where the displayed image extends beyond the physical boundaries of the screen, can disrupt this harmony, leading to cropped content, distorted proportions, and an overall less-than-ideal viewing experience. Windows 11, with its focus on user-centricity and visual refinement, introduces robust tools to address overscan and empower users to tailor their display settings for optimal visual fidelity.
Overscan: A Deeper Dive
Overscan, in its simplest form, refers to the display of an image beyond the physical limits of the screen. This occurs when the display’s electronic circuitry expands the image signal, resulting in the image exceeding the screen’s active area. While historically intended to compensate for limitations in older television technology, overscan can pose significant issues in modern displays, particularly for computer monitors.
The Challenges of Overscan
Overscan can manifest in several ways, each impacting the user experience:
- Cropped Content: Overscan can obscure crucial elements of the image, such as text, icons, or essential details, leading to incomplete information and frustration.
- Distorted Aspect Ratios: The expanded image can distort the intended proportions of the content, resulting in stretched or squashed visuals, compromising the aesthetic appeal and potentially affecting the intended design.
- Reduced Viewing Area: Overscan effectively reduces the usable display area, limiting the amount of content that can be displayed on the screen. This can be particularly problematic for users who rely on extensive screen real estate for productivity tasks or entertainment.
Windows 11: Empowering Display Control
Windows 11 acknowledges the importance of accurate image representation and provides users with granular control over their display settings, including the ability to address overscan. This empowers users to fine-tune their display experience to match their specific needs and preferences.
Understanding Display Settings in Windows 11
Windows 11’s display settings offer a comprehensive suite of options to customize the visual experience. To access these settings:
- Open Settings: Click the Start button and select "Settings."
- Navigate to System: Choose "System" from the left-hand menu.
- Select Display: Click "Display" to access display-related settings.
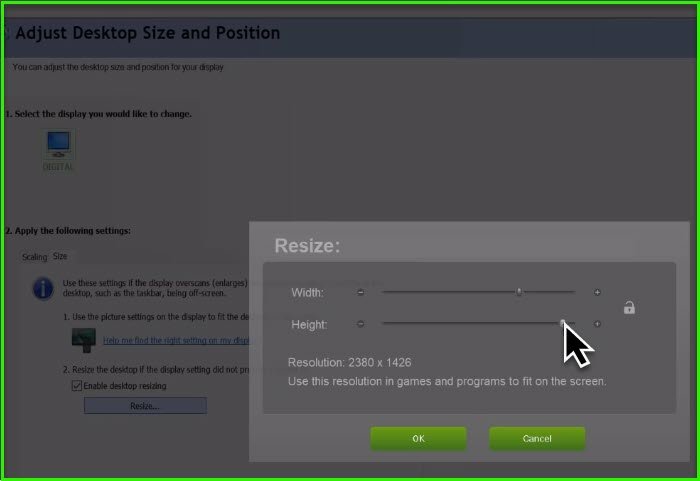
Addressing Overscan in Windows 11
Windows 11 offers two primary methods to address overscan:
1. Scaling and Layout Settings:
- Scaling: Windows 11 allows users to adjust the scaling of their display to accommodate different screen resolutions and sizes. This setting can effectively compensate for overscan by ensuring that the image fits within the physical boundaries of the screen.
- Layout: Windows 11 offers a "Layout" option within the "Scaling and layout" settings. This feature allows users to fine-tune the placement of elements on the screen, ensuring that all content is visible and not obscured by overscan.
2. Advanced Display Settings:
- Display Adapter Properties: Users can access more advanced display settings by right-clicking on their desktop and selecting "Display settings." This opens the "Display settings" window, where users can access "Advanced display settings" for their primary display.
- Monitor Settings: Within "Advanced display settings," users can access the "Monitor" tab, which provides access to specific settings for their connected display. These settings often include an option to adjust the display’s overscan, enabling users to fine-tune the image’s boundaries and ensure accurate representation.
The Benefits of Overscan Adjustment
Adjusting overscan settings in Windows 11 offers numerous benefits for users:
- Enhanced Visual Fidelity: Correcting overscan ensures that the displayed image accurately reflects the intended content, preserving its original proportions and detail.
- Improved User Experience: By eliminating cropped content and distorted visuals, overscan adjustment enhances the user experience, making it easier to consume information and engage with digital content.
- Increased Productivity: By maximizing the usable display area, overscan adjustment allows users to view more content on their screen, boosting productivity for tasks involving extensive information display.
- Optimized Viewing Pleasure: Overscan adjustment ensures that entertainment content, such as movies and games, is displayed as intended, enhancing the viewing experience and maximizing enjoyment.
FAQs: Overscan Adjustment in Windows 11
Q: How do I determine if my display is experiencing overscan?
A: Look for visual cues such as cropped content, distorted proportions, or a noticeable black border around the image. If you notice any of these signs, it’s likely that overscan is occurring.
Q: Can I adjust overscan settings for all connected displays?
A: Windows 11 allows you to adjust overscan settings for each connected display individually. This ensures that you can tailor the settings to match the specific characteristics of each display.
Q: What if I can’t find overscan settings in my display’s driver?
A: If the display driver doesn’t offer specific overscan settings, you can still adjust scaling and layout settings within Windows 11 to compensate for overscan.
Q: Is it necessary to adjust overscan settings for all displays?
A: While overscan adjustment is not universally required, it is recommended to check and adjust settings for each display, especially if you experience any of the issues mentioned above.
Tips for Optimizing Overscan Adjustment
- Experiment with Different Settings: Explore various scaling and layout options to find the best configuration for your specific display and content.
- Use Test Images: Utilize test images with clear borders and patterns to visually assess the effects of overscan adjustment.
- Consult Display Documentation: Refer to the documentation for your display to understand its specific overscan settings and capabilities.
- Seek Assistance: If you encounter difficulties adjusting overscan settings, consult online resources or contact the manufacturer of your display for support.
Conclusion: Achieving Optimal Display Performance
Overscan adjustment is a crucial aspect of optimizing the display experience in Windows 11. By understanding the challenges posed by overscan and leveraging the tools provided by Windows 11, users can ensure that their content is displayed accurately, enhancing visual fidelity, improving user experience, and maximizing productivity and entertainment enjoyment. With the right knowledge and configuration, users can unlock the full potential of their displays and enjoy a truly immersive and satisfying visual experience.
![Overscaling Or Overscan in Windows 10 and Windows 11 [Fixed]](https://www.techcommuters.com/wp-content/uploads/2021/05/1.-Change-Display-Setting-768x539.png)
![Overscaling Or Overscan in Windows 10 and Windows 11 [Fixed]](https://www.techcommuters.com/wp-content/uploads/2021/05/4.-Display-adapter-properties-1024x576.jpg)
![Overscaling Or Overscan in Windows 10 and Windows 11 [Fixed]](https://www.techcommuters.com/wp-content/uploads/2021/05/2.-Scale-and-Layout-1-768x432.jpg)
![Overscaling Or Overscan in Windows 10 and Windows 11 [Fixed]](https://www.techcommuters.com/wp-content/uploads/2021/06/How-to-Fix-Overscan-in-Windows-10-1-1024x576.jpg)


![Overscaling Or Overscan in Windows 10 and Windows 11 [Fixed]](https://www.techcommuters.com/wp-content/uploads/2021/05/6.-Windows-update-768x512.png)
Closure
Thus, we hope this article has provided valuable insights into Understanding Overscan Adjustment in Windows 11: Optimizing Your Display Experience. We hope you find this article informative and beneficial. See you in our next article!
Leave a Reply