Reviving The Shadow Of Your Data: Repairing VSS In Windows 10
Reviving the Shadow of Your Data: Repairing VSS in Windows 10
Related Articles: Reviving the Shadow of Your Data: Repairing VSS in Windows 10
Introduction
With great pleasure, we will explore the intriguing topic related to Reviving the Shadow of Your Data: Repairing VSS in Windows 10. Let’s weave interesting information and offer fresh perspectives to the readers.
Table of Content
- 1 Related Articles: Reviving the Shadow of Your Data: Repairing VSS in Windows 10
- 2 Introduction
- 3 Reviving the Shadow of Your Data: Repairing VSS in Windows 10
- 3.1 Understanding the Vital Role of VSS
- 3.2 Recognizing the Signs of VSS Trouble
- 3.3 Unraveling the Causes of VSS Failure
- 3.4 A Comprehensive Guide to Repairing VSS in Windows 10
- 3.5 Frequently Asked Questions about Repairing VSS in Windows 10
- 3.6 Tips for Maintaining a Healthy VSS in Windows 10
- 3.7 Conclusion
- 4 Closure
Reviving the Shadow of Your Data: Repairing VSS in Windows 10
Windows 10, like any complex operating system, relies on a network of intricate processes to function smoothly. One such vital component is the Volume Shadow Copy Service (VSS), responsible for creating snapshots of your data, enabling crucial operations like backups, system restores, and application installations. When VSS malfunctions, it can lead to a cascade of problems, jeopardizing data integrity and hindering critical system functions. This article delves into the intricacies of VSS repair in Windows 10, offering a comprehensive understanding of its significance, common causes of failure, and effective troubleshooting strategies.
Understanding the Vital Role of VSS
The Volume Shadow Copy Service, commonly known as VSS, acts as a silent guardian of your digital assets. It operates behind the scenes, creating consistent snapshots of your data volumes at specific points in time. These snapshots, often referred to as shadow copies, provide a safe haven for your data, allowing you to:
- Back up your system: VSS enables efficient backups, allowing you to restore your system to a previous state in case of data loss or system failure.
- Restore files and applications: VSS facilitates the recovery of individual files or applications from previous snapshots, even if the original data has been deleted or corrupted.
- Install and uninstall software: VSS plays a crucial role in software installation and uninstallation processes, ensuring data integrity during these operations.
- Run system recovery: VSS is instrumental in system recovery processes, allowing you to restore your system to a previous working state in case of critical errors or malware infections.
Without a functioning VSS, these essential operations become unreliable or impossible. The consequences can be severe, ranging from data loss and system instability to the inability to perform critical tasks.
Recognizing the Signs of VSS Trouble
While VSS operates silently in the background, its malfunctioning can manifest itself in various ways, often signaling a need for repair. These signs include:
- Backup failures: Frequent errors during backup processes, particularly when using built-in Windows backup tools, can indicate VSS issues.
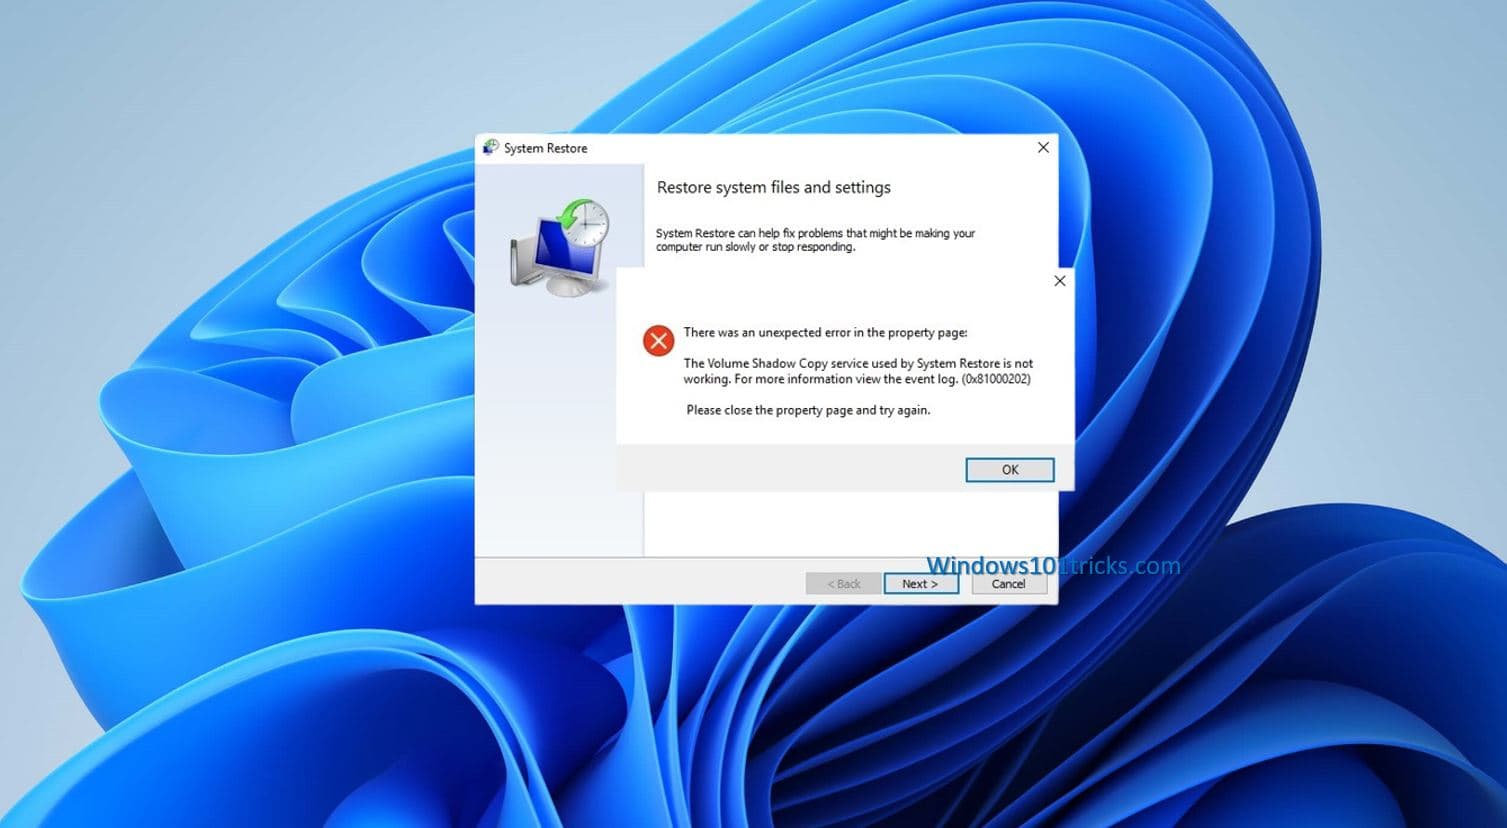
- System restore errors: If you encounter errors while attempting to restore your system to a previous point, VSS might be the culprit.
- Application installation or uninstallation problems: Difficulties during software installation or uninstallation, often accompanied by error messages, could be related to VSS malfunctions.
- Slow system performance: A noticeable decline in system performance, particularly during tasks involving data operations, might point to VSS issues.
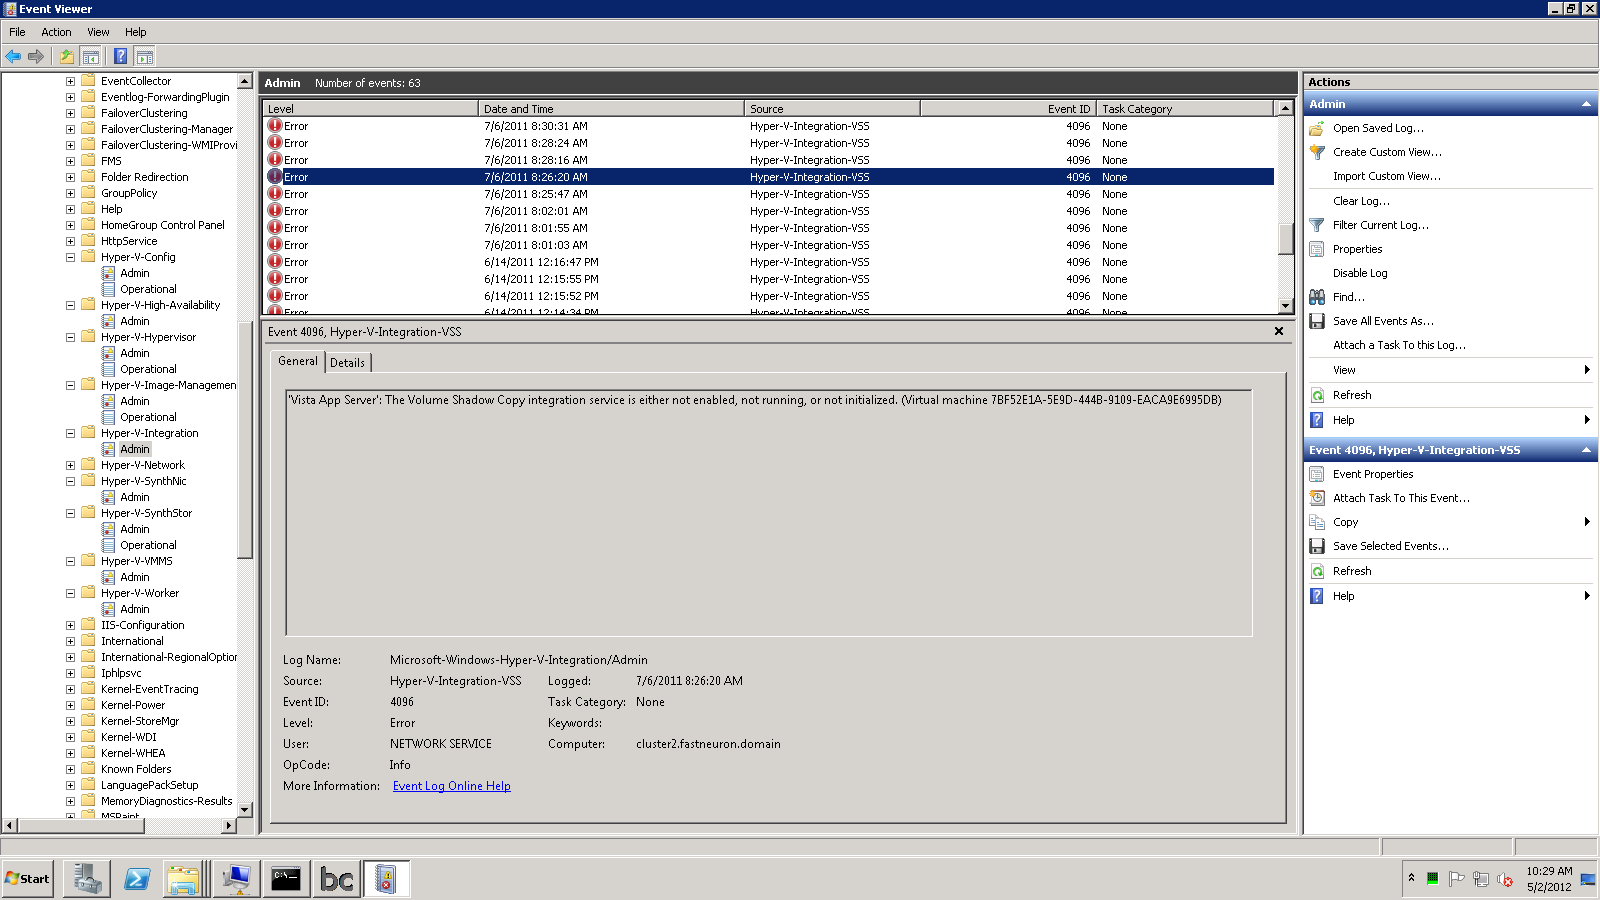
- Error messages related to VSS: Windows Event Viewer may display error messages specifically related to VSS, providing valuable clues about the problem.
These symptoms, individually or collectively, should prompt you to investigate and potentially repair your VSS.
Unraveling the Causes of VSS Failure
VSS problems can arise from a multitude of factors, making diagnosis crucial for effective repair. Common causes include:
- Software conflicts: Incompatible or outdated software, particularly backup utilities or security applications, can interfere with VSS operations.
- Hardware issues: Faulty hard drives, failing storage controllers, or other hardware components can disrupt VSS functionality.
- Corrupted system files: Damaged or corrupted system files, including those responsible for VSS, can lead to malfunctions.
- Insufficient system resources: Lack of available memory or disk space can hinder VSS operations, resulting in errors.
- Malware infections: Malicious software can corrupt system files, interfere with VSS processes, or even disable VSS entirely.
Understanding the potential causes helps pinpoint the source of the problem, facilitating efficient troubleshooting and repair.
A Comprehensive Guide to Repairing VSS in Windows 10
Repairing VSS in Windows 10 involves a systematic approach, starting with troubleshooting steps and progressing to more advanced solutions.
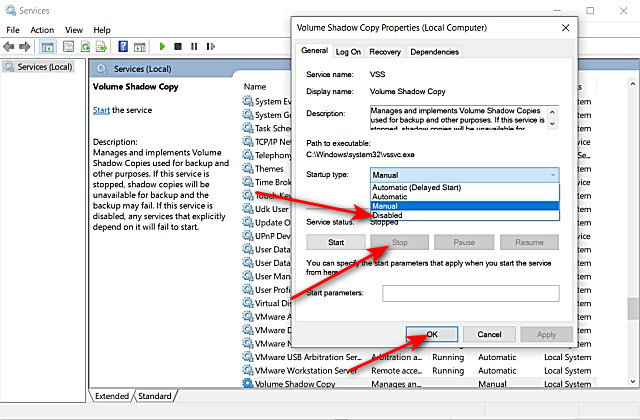
1. Restarting the VSS Service:
Often, a simple restart of the VSS service can resolve minor issues. This can be achieved through the following steps:
- Open the Services window: Press Windows key + R, type services.msc, and press Enter.
- Locate the VSS service: Scroll through the list of services until you find "Volume Shadow Copy".
- Restart the service: Right-click on the service and select Restart.
- Check for improvements: Observe if the VSS-related issues have been resolved after restarting the service.
2. Checking System Resources:
Ensure sufficient system resources are available for VSS operations. This involves:
- Checking available memory: Open Task Manager (Ctrl + Shift + Esc) and navigate to the Performance tab. Monitor the memory usage and ensure sufficient free memory is available.
- Checking disk space: Open File Explorer, right-click on the drive where you want to create shadow copies, and select Properties. Check the available disk space and ensure enough is available for VSS operations.
3. Running System File Checker (SFC):
System File Checker (SFC) is a built-in tool that scans for and repairs corrupted system files. This can be useful for resolving VSS issues related to damaged system files.
- Open Command Prompt as administrator: Search for "Command Prompt" in the Start menu, right-click on the result, and select "Run as administrator".
- Run SFC scan: Type sfc /scannow and press Enter. The scan may take some time to complete.
- Check for errors: After the scan finishes, check for any reported errors. If errors are found, try running SFC again.
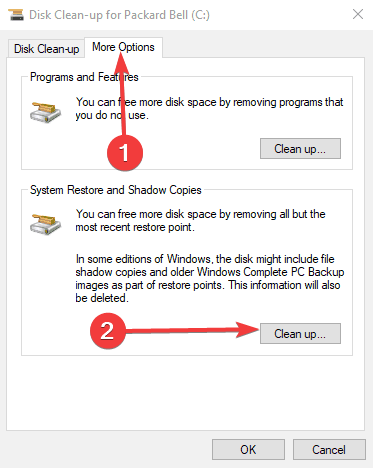
4. Running Disk Cleanup:
Disk Cleanup is a built-in tool that helps free up disk space by removing unnecessary files. This can be beneficial for VSS operations, especially if disk space is limited.
- Open Disk Cleanup: Search for "Disk Cleanup" in the Start menu and open the tool.
- Select the drive: Choose the drive where you want to run Disk Cleanup.
- Select files to delete: Check the boxes next to the file types you want to delete and click OK.
- Confirm deletion: Confirm the deletion by clicking Delete Files.
5. Checking for Software Conflicts:
Incompatible or outdated software can interfere with VSS operations. To address this:
- Identify potential culprits: Consider recent software installations or updates that might be causing conflicts.
- Temporarily disable conflicting software: Disable the suspected software and check if VSS issues persist.
- Update or uninstall conflicting software: If the software is causing conflicts, consider updating it to the latest version or uninstalling it entirely.
6. Updating Device Drivers:
Outdated or corrupted device drivers, particularly for storage controllers, can disrupt VSS functionality.
- Check for driver updates: Use Windows Update or visit the manufacturer’s website to download and install the latest drivers for your storage controller.
- Reinstall drivers: If driver updates don’t resolve the issue, consider reinstalling the drivers.
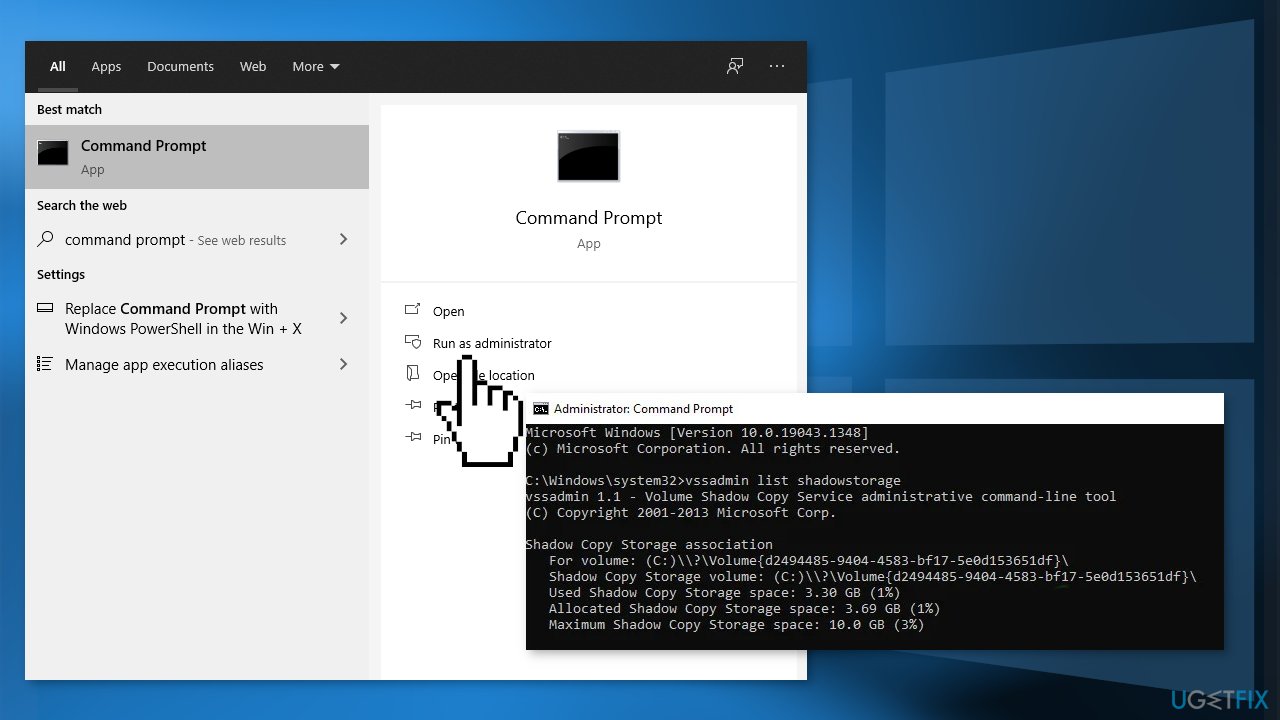
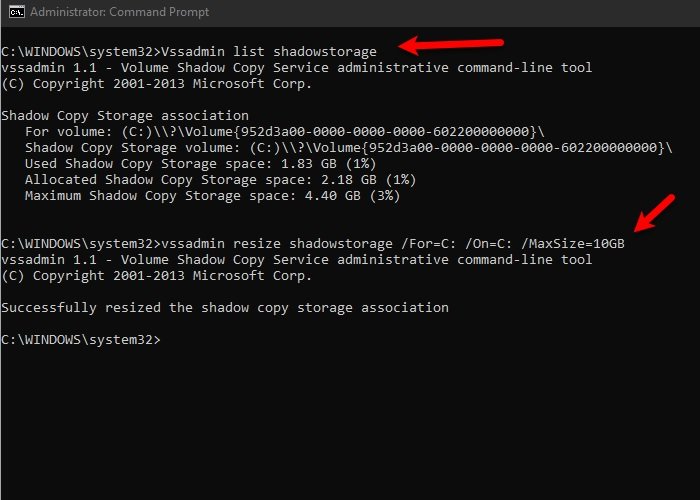
7. Using the VSSAdmin Command:
The VSSAdmin command-line tool provides advanced control over VSS operations. It can be used to diagnose and repair VSS issues.
- Open Command Prompt as administrator: Search for "Command Prompt" in the Start menu, right-click on the result, and select "Run as administrator".
- Run VSSAdmin commands: Use commands like vssadmin list writers to list available VSS writers, vssadmin list shadows to list existing shadow copies, and vssadmin delete shadows /all to delete all shadow copies.
- Consult documentation: Refer to Microsoft documentation for specific VSSAdmin commands and their usage.
8. Performing a System Restore:
If all else fails, a system restore to a previous point in time can potentially resolve VSS issues.
- Open System Restore: Search for "System Restore" in the Start menu and open the tool.
- Choose a restore point: Select a restore point from before the VSS issues began.
- Confirm restoration: Confirm the restoration process and proceed with the system restore.
9. Seeking Professional Assistance:
If you have exhausted all troubleshooting steps and are unable to resolve VSS issues, consider seeking professional assistance from a qualified IT technician.
Frequently Asked Questions about Repairing VSS in Windows 10
Q: How often should I check for VSS errors?
A: It’s advisable to monitor for VSS errors regularly, especially after installing new software or updating your system. You can check the Windows Event Viewer for error messages related to VSS.
Q: Can I manually create shadow copies?
A: While VSS automatically creates shadow copies for various purposes, you can manually create them using the "Create a system restore point" option in the System Properties window.
Q: What are the risks of disabling VSS?
A: Disabling VSS can severely limit your ability to perform backups, system restores, and other critical operations. It is generally not recommended unless absolutely necessary.
Q: Can I repair VSS without losing data?
A: In most cases, repairing VSS can be achieved without data loss. However, if the problem is severe or involves corrupted system files, data loss may be unavoidable.
Q: How can I prevent future VSS issues?
A: To minimize the likelihood of future VSS issues, keep your system updated with the latest security patches and software updates, regularly run system maintenance tasks, and avoid installing unnecessary software.
Tips for Maintaining a Healthy VSS in Windows 10
- Regularly back up your data: Implement a regular backup schedule to safeguard your data, even if VSS is functioning correctly.
- Keep your system updated: Install the latest Windows updates and security patches to address potential vulnerabilities and improve system stability.
- Monitor system resources: Ensure sufficient memory and disk space are available for VSS operations.
- Avoid installing unnecessary software: Limit the number of applications installed on your system to minimize potential conflicts with VSS.
- Run system maintenance tasks: Regularly run Disk Cleanup, defragmentation, and other system maintenance tasks to keep your system healthy.
Conclusion
The Volume Shadow Copy Service is an essential component of Windows 10, ensuring data integrity and enabling critical system operations. While VSS issues can be frustrating, a systematic approach to troubleshooting and repair can effectively address most problems. By understanding the causes of VSS failure, implementing appropriate repair strategies, and adopting preventive measures, you can ensure the smooth operation of this vital service, safeguarding your data and maintaining system stability.

Closure
Thus, we hope this article has provided valuable insights into Reviving the Shadow of Your Data: Repairing VSS in Windows 10. We hope you find this article informative and beneficial. See you in our next article!
Leave a Reply