Mastering Print Settings In Windows 10: A Comprehensive Guide
Mastering Print Settings in Windows 10: A Comprehensive Guide
Related Articles: Mastering Print Settings in Windows 10: A Comprehensive Guide
Introduction
With enthusiasm, let’s navigate through the intriguing topic related to Mastering Print Settings in Windows 10: A Comprehensive Guide. Let’s weave interesting information and offer fresh perspectives to the readers.
Table of Content
- 1 Related Articles: Mastering Print Settings in Windows 10: A Comprehensive Guide
- 2 Introduction
- 3 Mastering Print Settings in Windows 10: A Comprehensive Guide
- 3.1 The Importance of Print Settings
- 3.2 Navigating Print Settings in Windows 10
- 3.3 Understanding Key Print Settings
- 3.4 FAQs about Print Settings in Windows 10
- 3.5 Tips for Optimizing Print Settings in Windows 10
- 3.6 Conclusion
- 4 Closure
Mastering Print Settings in Windows 10: A Comprehensive Guide
Windows 10 provides a robust set of print settings that empower users to tailor their printing experience, ensuring optimal results for various documents and tasks. Understanding and utilizing these settings is essential for achieving precise control over print quality, paper usage, and overall document appearance. This comprehensive guide delves into the intricacies of print settings in Windows 10, explaining their significance and providing practical tips for maximizing their potential.
The Importance of Print Settings
Print settings are not merely aesthetic embellishments; they play a crucial role in ensuring accurate and professional output. By adjusting these settings, users can:
- Control Print Quality: Optimize print resolution, color depth, and ink usage to achieve the desired level of detail and clarity for different document types, such as photographs, presentations, or technical drawings.
- Manage Paper Usage: Choose paper size, orientation (portrait or landscape), and margins to minimize waste and ensure efficient use of paper resources.
- Customize Document Layout: Fine-tune page layout, including scaling, margins, and headers/footers, to create visually appealing and professional-looking documents.
- Enhance Print Efficiency: Configure printing preferences, such as duplex printing (two-sided printing) and multiple copies, to streamline printing tasks and save time.
- Optimize Printing Costs: By adjusting print quality and paper settings, users can reduce ink and paper consumption, leading to cost savings in the long run.
Navigating Print Settings in Windows 10
Accessing print settings in Windows 10 is straightforward:
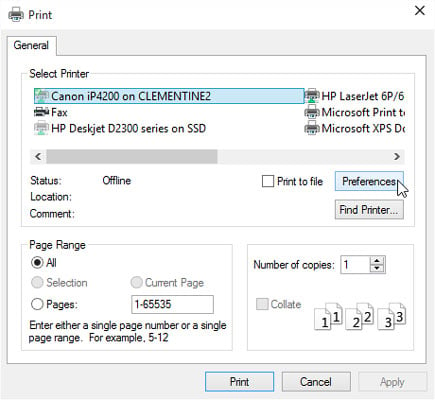
- Open the Print Dialog Box: This can be done through various applications. For example, in Microsoft Word, click "File" > "Print," or in a web browser, select "Print" from the menu.
- Select the Desired Printer: Choose the printer you wish to use from the list of available devices.
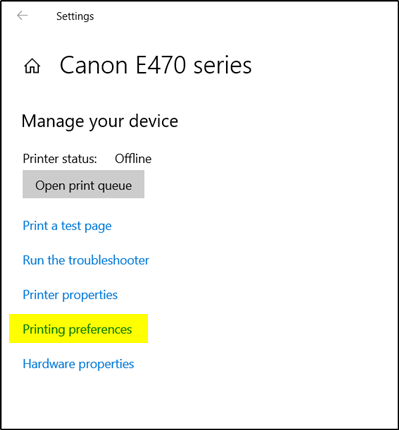
- Access Print Settings: Locate the "Properties" or "Preferences" button, typically found within the print dialog box. This will open a window displaying a range of print settings categorized by function.
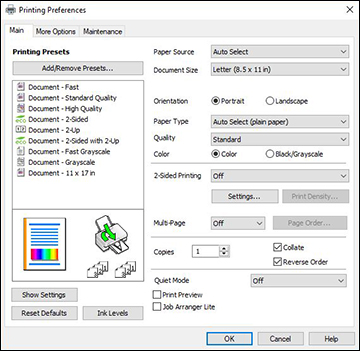
Understanding Key Print Settings
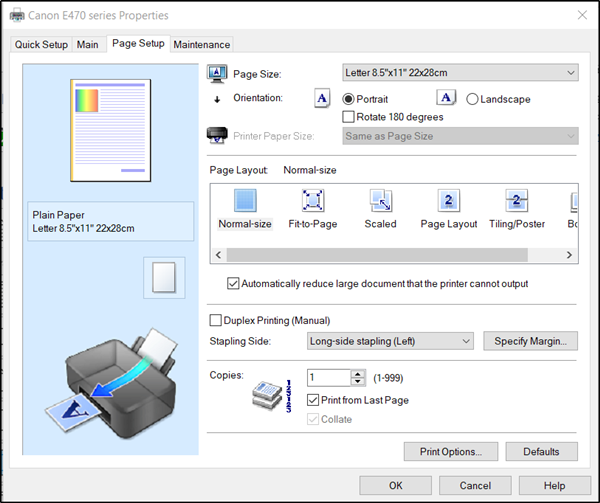
1. Paper Settings:
- Paper Size: Select the appropriate paper size (e.g., Letter, A4, Legal) based on the document’s dimensions and intended use.
- Paper Source: Choose the paper tray or feeder to be used for printing. This is particularly relevant for printers with multiple paper trays.
- Orientation: Opt for either "Portrait" (vertical) or "Landscape" (horizontal) orientation depending on the document’s layout and content.
- Margins: Define the blank space around the printed content, ensuring adequate margins for binding or other purposes.
2. Print Quality Settings:
- Resolution: Adjust the resolution (dots per inch – DPI) to control the level of detail and sharpness in the printed output. Higher DPI results in finer detail but consumes more ink and printing time.
- Color Mode: Select between "Color" or "Black and White" printing depending on the document’s requirements.
- Print Quality: Choose from various quality levels (e.g., Draft, Normal, High) to balance print quality with speed and ink consumption.
3. Layout and Content Settings:
- Scaling: Adjust the document size to fit the selected paper size. Options include scaling to fit the page, scaling to a specific percentage, or custom scaling.
- Headers and Footers: Configure headers and footers to include page numbers, date, or other relevant information.
- Collation: Specify whether multiple copies of a document should be collated (printed in order) or printed as separate stacks.
4. Advanced Print Settings:
- Duplex Printing: Enable duplex printing to print on both sides of the paper, saving paper and reducing printing costs.
- Multiple Copies: Specify the number of copies to be printed.
- Print to File: Create a PDF or other file format instead of printing directly to the printer. This allows for easy sharing and archiving.
- Custom Print Settings: Many printers offer advanced settings specific to their models, including settings for color profiles, paper types, and other specialized features.
FAQs about Print Settings in Windows 10
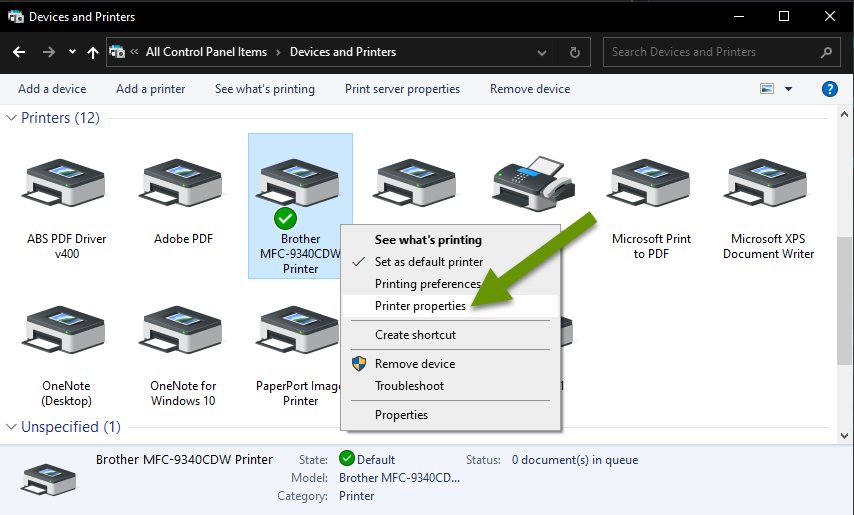
Q: How do I change the default printer in Windows 10?
A: To change the default printer, open the "Settings" app, navigate to "Devices" > "Printers & Scanners," and select the desired printer from the list. Click the "Manage" button next to the printer name and choose "Set as default."
Q: How do I troubleshoot printing problems in Windows 10?
A: Start by ensuring the printer is connected and powered on. Check the printer’s status in the "Printers & Scanners" settings. If the printer is offline, try restarting it. You can also run the Windows troubleshooter for printing by searching for "troubleshoot printing" in the Start menu.
Q: Can I print directly from a web browser in Windows 10?
A: Yes, most web browsers allow you to print directly from the browser window. Select "Print" from the menu or use the keyboard shortcut Ctrl+P. You can then choose the printer and adjust print settings as needed.
Q: How do I print to a PDF file in Windows 10?
A: You can print to a PDF file using the "Microsoft Print to PDF" virtual printer, which is included in Windows 10. Select "Microsoft Print to PDF" as the printer in the print dialog box, choose a location to save the PDF file, and click "Print."
Q: How do I manage print queues in Windows 10?
A: To view the print queue, open the "Printers & Scanners" settings and select the desired printer. Click the "Open queue" button to view the list of print jobs in the queue. You can pause, cancel, or restart print jobs from this window.
Tips for Optimizing Print Settings in Windows 10
- Preview Before Printing: Always preview your document before printing to ensure the layout, margins, and other settings are as expected.
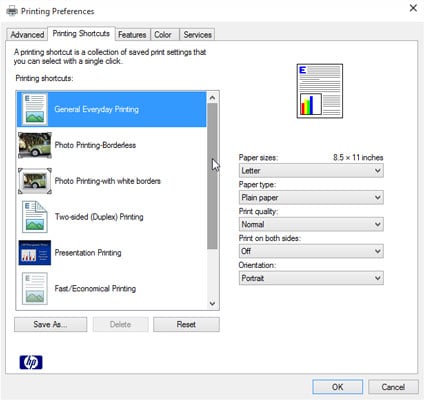
- Test Print Settings: Experiment with different print settings to find the optimal combination for your specific needs and printer model.
- Utilize Printer Properties: Explore the advanced settings within the printer’s properties dialog box to access features specific to your printer model.
- Save Custom Print Settings: Save frequently used print settings as presets to streamline future printing tasks.
- Maintain Your Printer: Regularly clean your printer and replace ink cartridges or toner to ensure optimal print quality and longevity.
Conclusion
Mastering print settings in Windows 10 empowers users to achieve professional and efficient printing results. By understanding the various settings and their impact, users can optimize print quality, manage paper usage, and customize document layouts to meet specific needs. Through careful configuration and utilization of these settings, users can transform their printing experience, achieving accurate, visually appealing, and cost-effective results.


Closure
Thus, we hope this article has provided valuable insights into Mastering Print Settings in Windows 10: A Comprehensive Guide. We hope you find this article informative and beneficial. See you in our next article!
Leave a Reply