Managing User Accounts In Windows 11 Home: A Comprehensive Guide To Account Removal
Managing User Accounts in Windows 11 Home: A Comprehensive Guide to Account Removal
Related Articles: Managing User Accounts in Windows 11 Home: A Comprehensive Guide to Account Removal
Introduction
In this auspicious occasion, we are delighted to delve into the intriguing topic related to Managing User Accounts in Windows 11 Home: A Comprehensive Guide to Account Removal. Let’s weave interesting information and offer fresh perspectives to the readers.
Table of Content
- 1 Related Articles: Managing User Accounts in Windows 11 Home: A Comprehensive Guide to Account Removal
- 2 Introduction
- 3 Managing User Accounts in Windows 11 Home: A Comprehensive Guide to Account Removal
- 3.1 Understanding Account Types in Windows 11 Home
- 3.2 Removing a Local Account in Windows 11 Home
- 3.3 Removing a Microsoft Account in Windows 11 Home
- 3.4 Considerations and Best Practices for Account Removal
- 3.5 Frequently Asked Questions (FAQs)
- 3.6 Tips for Account Removal
- 3.7 Conclusion
- 4 Closure
Managing User Accounts in Windows 11 Home: A Comprehensive Guide to Account Removal
Windows 11 Home, like its predecessors, provides a robust system for managing user accounts. This system allows for the creation of multiple accounts, each with its own unique settings, files, and permissions. While this flexibility is beneficial, it may become necessary to remove a user account from the system. This could be due to a variety of reasons, such as:
- Account Inactivity: An account that is no longer in use can be removed to streamline system resources and improve security.
- Data Security: Removing an account can be a crucial step in protecting sensitive information, especially if the account has been compromised or is no longer required.
- System Optimization: Removing unnecessary accounts can enhance system performance and responsiveness by reducing the load on the operating system.
- Account Sharing: In scenarios where a device is shared among multiple users, removing an account might be necessary to ensure privacy and prevent unauthorized access.
This guide will provide a comprehensive overview of the process involved in removing a user account from Windows 11 Home, outlining the various methods and considerations involved.
Understanding Account Types in Windows 11 Home
Before delving into the account removal process, it is crucial to understand the different account types present in Windows 11 Home:
- Local Accounts: These accounts are created directly on the device and do not rely on an external service like Microsoft Account. They are typically used for standalone systems or when internet connectivity is limited.
- Microsoft Accounts: These accounts are linked to an email address and provide access to various Microsoft services, including OneDrive, Xbox Live, and the Microsoft Store. They offer enhanced synchronization features and cloud storage capabilities.
The type of account being removed will influence the steps involved in the process. Removing a local account is a straightforward procedure, while removing a Microsoft account might require additional considerations.
Removing a Local Account in Windows 11 Home
Removing a local account is a relatively simple process that can be completed through the Settings app:
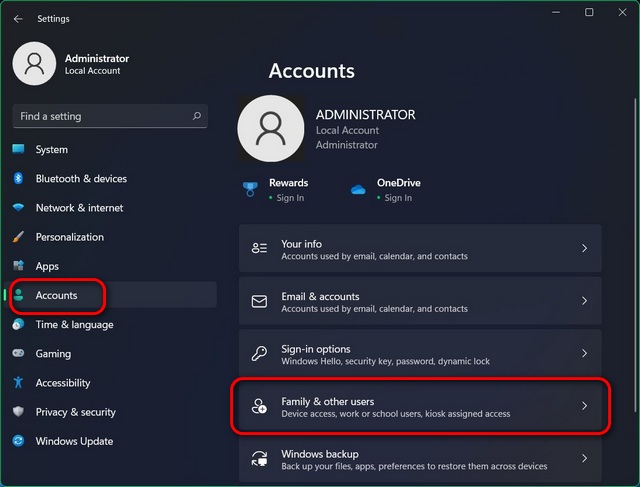
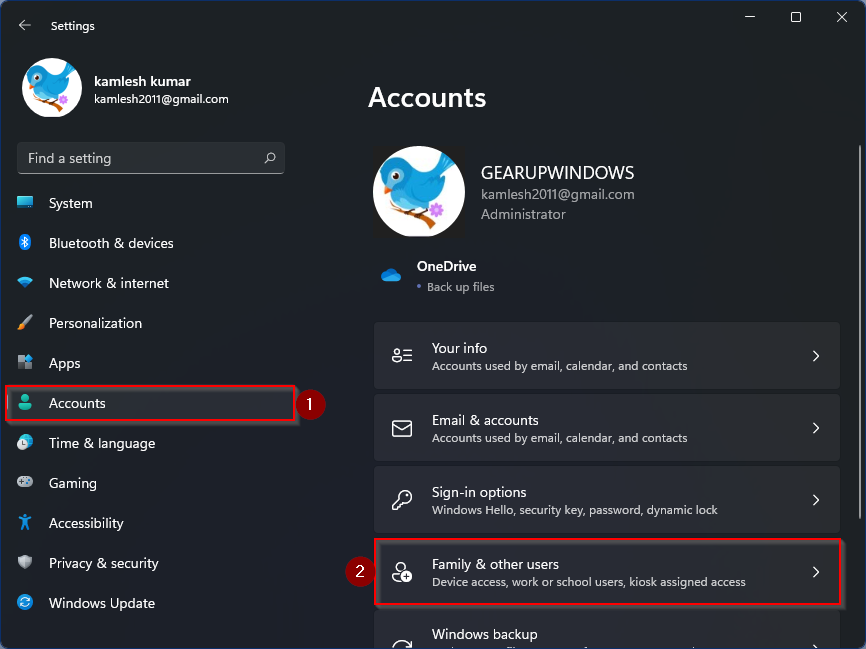
- Access Settings: Open the "Settings" app by pressing the Windows key + I.
- Navigate to Accounts: Click on "Accounts" from the left-hand menu.
- Select "Family & other users": Choose "Family & other users" from the options displayed on the right side of the window.
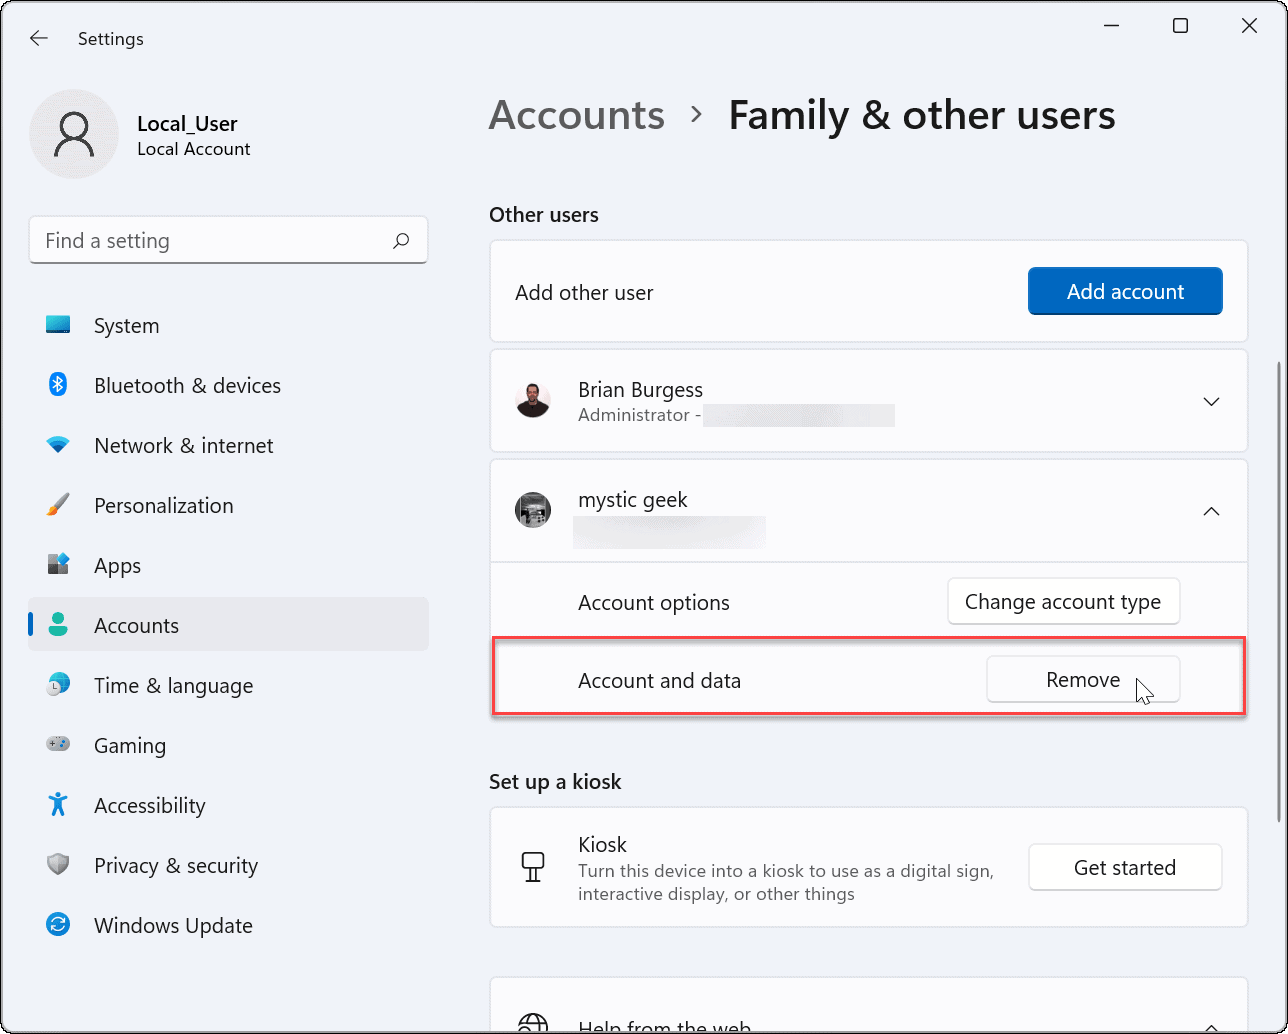
- Locate the Account: Identify the local account you wish to remove from the list of users.
- Select "Remove" and Confirm: Click on the "Remove" button next to the account name and confirm the removal by clicking "Delete account and data."
Important Note: Removing a local account will permanently delete all associated files, folders, and settings. It is crucial to back up any important data before proceeding with the removal process.
Removing a Microsoft Account in Windows 11 Home
Removing a Microsoft account from Windows 11 Home is a more complex process, as it involves considerations beyond simply deleting the account from the device. Here are the key steps involved:
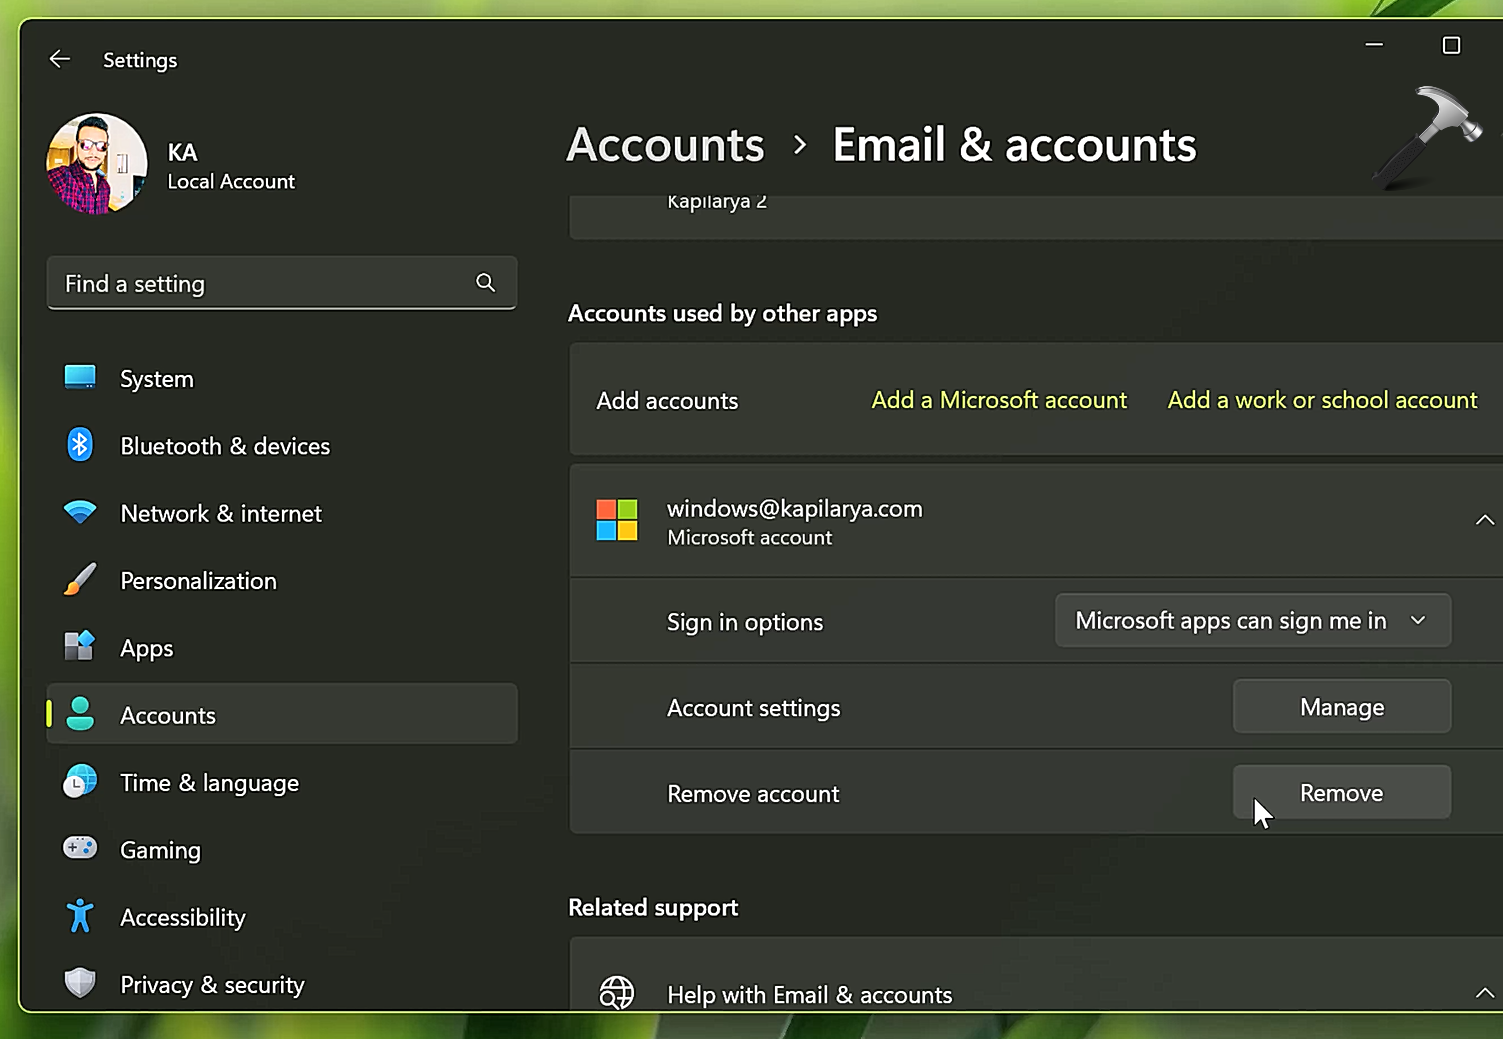
- Sign Out of the Account: First, sign out of the Microsoft account from the current user session. This can be done by clicking on the user profile picture in the taskbar and selecting "Sign out."
- Access Settings: Open the "Settings" app by pressing the Windows key + I.
- Navigate to Accounts: Click on "Accounts" from the left-hand menu.
- Select "Your info": Choose "Your info" from the options displayed on the right side of the window.
- Select "Sign out of your Microsoft account": Click on the option to "Sign out of your Microsoft account" and follow the on-screen instructions.
- Remove Account from Device: After signing out, the account will be removed from the device. However, the account will still be associated with the device until it is explicitly removed from the Microsoft account settings.
- Manage Microsoft Account Settings: To completely remove the account from the device, you need to access the Microsoft account settings online. Navigate to the Microsoft account website (account.microsoft.com) and log in using the credentials of the account you wish to remove.
- Locate Devices: Go to the "Devices" section within the Microsoft account settings.
- Remove Device: Find the Windows 11 Home device from the list of associated devices and select the option to "Remove" the device.
Important Note: Removing a Microsoft account from a device will not delete the account itself. It will only disassociate the account from the device, allowing you to use it on other devices.
Considerations and Best Practices for Account Removal
While removing an account may seem like a straightforward process, several considerations should be taken into account to ensure a smooth and secure experience:
- Data Backup: Before removing any account, it is crucial to back up all essential data associated with the account. This includes files, folders, documents, and any other important information.
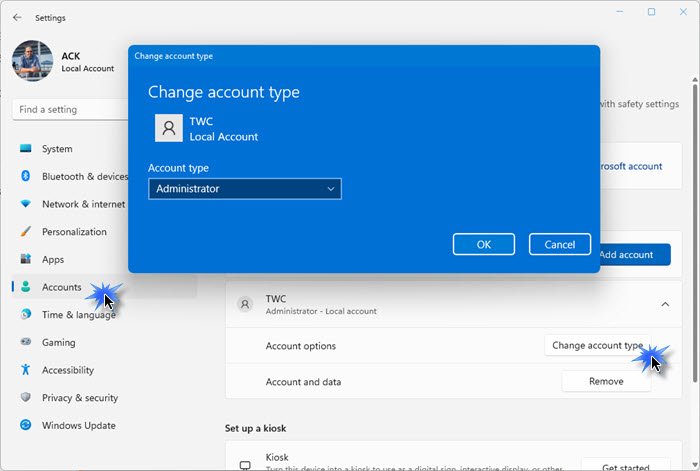
- Account Permissions: If the account being removed has administrator privileges, it is recommended to transfer these privileges to another account before proceeding with the removal. This ensures that the system remains manageable after the account is removed.
- Shared Files and Folders: If the account being removed has access to shared files or folders, ensure that these resources are properly managed before removal. This may involve transferring ownership to another account or granting access to other users.
- Software Licenses: Some software licenses may be tied to specific user accounts. Before removing an account, confirm that any associated licenses are transferred to another account or are still valid.
- System Recovery: It is always a good practice to create a system recovery point before making significant changes to the system, including account removal. This allows you to restore the system to its previous state in case of any unforeseen issues.
Frequently Asked Questions (FAQs)
1. What happens to the data associated with the removed account?
Data associated with a removed local account is permanently deleted from the device. However, data associated with a removed Microsoft account remains on the cloud and can be accessed by logging in to the account from another device.
2. Can I recover a removed account?
Recovering a removed local account is generally not possible. However, if the account was a Microsoft account, you might be able to recover it by contacting Microsoft support.
3. Is it safe to remove an account that has been compromised?
Removing a compromised account is a crucial step in protecting your data and system security. It prevents the compromised account from being used to access your data or system resources.
4. What should I do if I cannot remove an account?
If you encounter difficulties removing an account, you can try restarting your computer or logging in as a different user with administrator privileges. If the issue persists, you may need to seek assistance from Microsoft support.
5. Can I remove the administrator account?
While it is technically possible to remove the administrator account, it is strongly discouraged. Removing the administrator account can make it difficult to manage the system and may lead to security vulnerabilities.
Tips for Account Removal
- Review Account Permissions: Before removing an account, carefully review its permissions and ensure that the removal will not disrupt critical system functions.
- Use a Third-Party Backup Tool: Consider using a third-party backup tool to ensure a complete and reliable backup of your data before removing an account.
- Test the Removal Process: After removing an account, test the system to ensure that everything is working as expected.
- Seek Professional Help: If you are unsure about the process or encounter difficulties, it is always recommended to seek assistance from a qualified IT professional.
Conclusion
Removing a user account from Windows 11 Home can be a necessary step for various reasons, including data security, system optimization, and account management. While the process is generally straightforward, it is essential to understand the different account types, their associated data, and the potential implications of removing an account. By following the steps outlined in this guide and considering the best practices, you can confidently remove user accounts from your Windows 11 Home device, ensuring a smooth and secure experience.


Closure
Thus, we hope this article has provided valuable insights into Managing User Accounts in Windows 11 Home: A Comprehensive Guide to Account Removal. We hope you find this article informative and beneficial. See you in our next article!
Leave a Reply