Enhancing Textual Emphasis: Techniques For Visual Distinction In Windows 11
Enhancing Textual Emphasis: Techniques for Visual Distinction in Windows 11
Related Articles: Enhancing Textual Emphasis: Techniques for Visual Distinction in Windows 11
Introduction
With great pleasure, we will explore the intriguing topic related to Enhancing Textual Emphasis: Techniques for Visual Distinction in Windows 11. Let’s weave interesting information and offer fresh perspectives to the readers.
Table of Content
Enhancing Textual Emphasis: Techniques for Visual Distinction in Windows 11

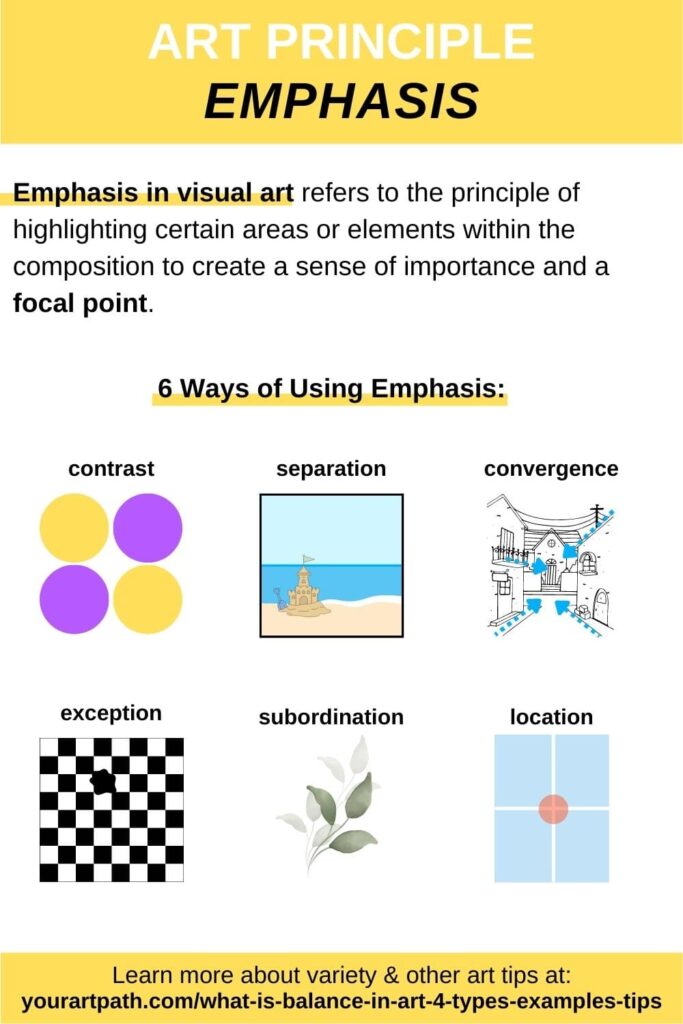
In the realm of digital communication, the visual presentation of text plays a significant role in conveying meaning and capturing attention. While standard font styles and sizes provide basic formatting, more advanced techniques are available to highlight specific words or phrases, drawing the reader’s eye and emphasizing their importance. One such technique, often referred to as "arching," involves visually curving or bending text to create a distinct visual effect.
While Windows 11 does not offer a built-in "arch" function for text, achieving a similar visual effect can be accomplished through various methods utilizing readily available tools. This article explores these methods, providing a comprehensive guide to enhancing textual emphasis within the Windows 11 environment.
Method 1: Utilizing Image Editing Software
For a more controlled and customizable approach, image editing software can be employed to achieve an "arch" effect. Popular options include Adobe Photoshop, GIMP (GNU Image Manipulation Program), and Microsoft Paint.
- Prepare the Text: Create the desired text using a word processor or text editor. Ensure the font, size, and style are suitable for the intended visual effect.
- Export as Image: Save the text as an image file (e.g., PNG, JPG).
- Open in Image Editor: Load the image into the chosen image editing software.
-
Apply Distortion: Utilize tools within the image editor to distort the image, creating a curved or arched shape. Popular techniques include:
- Warp Tool: This tool allows for flexible manipulation of specific areas of the image, creating a controlled arch effect.
- Transform Tool: This tool offers a range of transformations, including perspective and warp, which can be used to create an arched appearance.
- Free Transform Tool: This tool provides greater flexibility in manipulating the image, enabling the creation of complex curves and arches.
- Adjust and Refine: Fine-tune the distortion until the desired arch effect is achieved. This may involve adjusting the degree of curvature, the position of the arch, and the overall shape.
- Export the Image: Save the edited image in a suitable format for further use.
This method offers maximum control over the final appearance of the arched text, allowing for intricate adjustments and unique visual styles. However, it requires some familiarity with image editing software and may be time-consuming for complex designs.
Method 2: Employing Online Text Arching Tools
Several online tools are specifically designed for creating arched text, offering a user-friendly interface and quick results. These tools often provide a range of customization options, allowing users to adjust the degree of curvature, font style, and text color.
- Search for Online Tools: Utilize a search engine to find online text arching tools. Numerous websites offer this functionality, often free of charge.
- Input the Text: Enter the desired text into the tool’s input field.
- Customize the Arch: Adjust the curvature, font style, and other parameters to create the desired visual effect.
- Generate the Image: The tool will generate an image of the arched text, often allowing for download in various formats.
This method offers a convenient and straightforward way to create arched text, requiring minimal technical knowledge. However, it may be limited in terms of customization options compared to image editing software.
Method 3: Utilizing Text-Based Approaches
While not strictly "arching" text, certain text formatting techniques can create a similar visual effect of emphasis and distinction.
- Underline: A simple underline can draw attention to specific words or phrases, visually separating them from the surrounding text.
- Bold and Italic: Combining bold and italic formatting can create a distinct visual emphasis, drawing the reader’s eye to the highlighted text.
- Font Size and Style: Varying font size and style can create a visual hierarchy, highlighting key words or phrases through contrast.
- Color Contrast: Using contrasting colors for specific words or phrases can enhance their visibility and create a visual emphasis.
These techniques, while not creating a literal arch, can provide subtle visual distinctions and emphasize key elements within a document.
Importance and Benefits of Textual Emphasis
Visual emphasis, whether achieved through arching or other techniques, plays a crucial role in enhancing the clarity and effectiveness of written communication. By drawing attention to specific words or phrases, emphasis can:
- Improve Readability: Emphasized text helps guide the reader’s eye, making the text easier to understand and follow.
- Enhance Comprehension: By highlighting key information, emphasis aids in comprehension and retention of the presented content.
- Increase Engagement: Visually appealing text can increase reader engagement and encourage deeper interaction with the presented information.
- Convey Importance: Emphasized text effectively conveys the significance of specific elements, guiding the reader’s understanding of the message.
FAQs
Q: Are there any free tools for arching text in Windows 11?
A: While Windows 11 does not have a built-in "arch" function, numerous free online tools are available for this purpose. These tools often offer a range of customization options and user-friendly interfaces.
Q: Can I arch text within a Word document?
A: While Microsoft Word does not offer a direct "arch" function, you can achieve a similar effect by utilizing image editing software or online tools. The resulting image can then be inserted into the Word document.
Q: What are the best practices for using text emphasis techniques?
A: Use emphasis techniques sparingly to avoid overwhelming the reader. Focus on highlighting key elements and avoid overusing bold, italics, or color contrasts.
Tips
- Consider the context: Use emphasis techniques strategically, considering the overall message and intended audience.
- Experiment with different methods: Explore various techniques and tools to find the best approach for your specific needs.
- Maintain consistency: Ensure that emphasis techniques are applied consistently throughout the document for a cohesive visual presentation.
- Test readability: Review the emphasized text to ensure it remains easily legible and does not hinder the overall reading experience.
Conclusion
While Windows 11 does not offer a built-in "arch" function, various methods can be employed to achieve a similar visual effect. Utilizing image editing software, online text arching tools, or text-based formatting techniques allows for effective textual emphasis, enhancing readability, comprehension, engagement, and the overall impact of written communication. By strategically employing these methods, users can effectively highlight key elements and create visually appealing and informative documents.
.png)


Closure
Thus, we hope this article has provided valuable insights into Enhancing Textual Emphasis: Techniques for Visual Distinction in Windows 11. We hope you find this article informative and beneficial. See you in our next article!
Leave a Reply