Troubleshooting R In Windows 10: A Comprehensive Guide

Troubleshooting R in Windows 10: A Comprehensive Guide

Introduction

In this auspicious occasion, we are delighted to delve into the intriguing topic related to Troubleshooting R in Windows 10: A Comprehensive Guide. Let’s weave interesting information and offer fresh perspectives to the readers.

Troubleshooting R in Windows 10: A Comprehensive Guide

Microsoft Windows 10 Troubleshooting Guide – J.R. Clarke Public Library

R, a powerful open-source programming language and software environment, is widely used for statistical computing, data visualization, and machine learning. While it’s a versatile tool, users sometimes encounter difficulties running R on Windows 10. This guide aims to provide a comprehensive understanding of potential issues and offer practical solutions for resolving them.

Common Causes of R Not Running on Windows 10:

  • Installation Issues: Incorrect installation procedures, incomplete downloads, or corrupted files can lead to R failing to launch.
  • Environment Variables: R relies on specific environment variables to function correctly. Incorrectly configured or missing variables can cause issues.
  • Software Dependencies: R requires certain software components to be installed, such as the Rtools package and a compatible compiler.
  • Path Conflicts: Conflicting paths in the system environment variables can interfere with R’s execution.
  • Software Updates: Updating operating system components, antivirus software, or other applications can sometimes disrupt R’s functionality.
  • Administrative Privileges: R may require administrative privileges to install and run correctly.
  • Compatibility Issues: Certain versions of R may not be compatible with specific Windows 10 builds or other software.
  • Hardware Limitations: Insufficient RAM or outdated hardware can impact R’s performance and cause it to malfunction.

Troubleshooting Steps:

1. Verify Installation:

  • Reinstall R: Ensure a clean installation by completely uninstalling R and then reinstalling it from the official website.
  • Check File Integrity: Download the R installer again and verify the integrity of the downloaded file. Use a checksum tool to compare the downloaded file with the official checksum provided on the website.
  • Run as Administrator: Right-click the R shortcut and select "Run as administrator." This grants R the necessary privileges to function properly.

2. Manage Environment Variables:

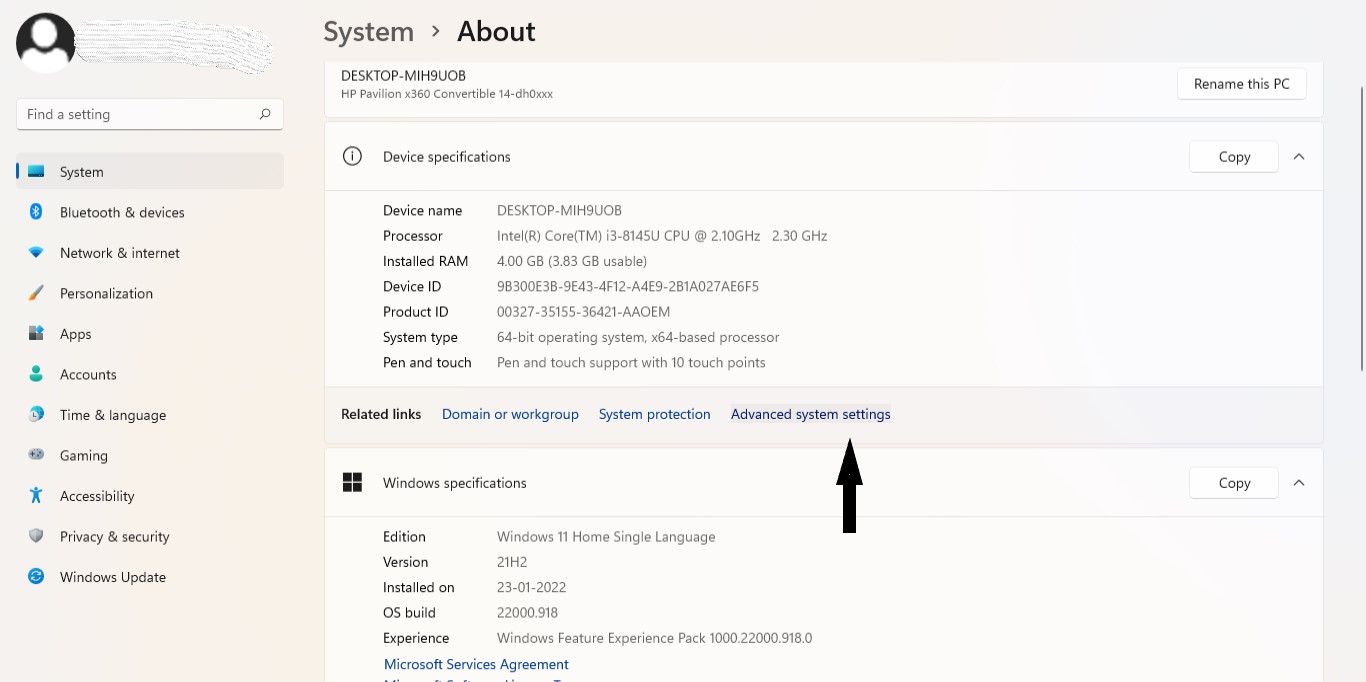
  • Check Existing Variables: Open the System Properties window (by searching for "System" in the Start menu), navigate to "Advanced system settings," and click "Environment Variables." Verify that the following variables are set correctly:
    • R_HOME: This variable should point to the root directory of your R installation.
    • R_LIBS_USER: This variable defines the location of user-specific libraries.
    • PATH: The PATH variable should include the directory containing the R executable (typically "C:Program FilesRR-4.x.xbin").
  • Add or Modify Variables: If necessary, add or modify the environment variables to ensure they are correctly configured.

3. Install Essential Software:

  • Rtools: Rtools provides essential tools for building and compiling R packages. Install the appropriate version of Rtools for your R installation.
  • Compiler: R requires a compatible compiler to build packages. If you haven’t already, install a compiler like MinGW-w64 or Microsoft Visual Studio.

4. Resolve Path Conflicts:

  • Check Path Variables: Review the PATH environment variable and ensure there are no conflicting or redundant entries.
  • Remove Unnecessary Entries: Remove any unnecessary entries from the PATH variable, especially those related to older R installations or other software that may interfere with R’s execution.

5. Update Software:

  • Windows Updates: Ensure that your Windows 10 operating system is up to date. Install all available updates to maintain compatibility and resolve potential conflicts.
  • Antivirus Software: Temporarily disable your antivirus software and try running R again. If the issue is resolved, consider adding R to your antivirus’s exclusion list.

6. Check Hardware:

  • RAM: Ensure that your computer has sufficient RAM to run R smoothly. R can be resource-intensive, especially when working with large datasets.
  • CPU: An outdated CPU might struggle to keep up with R’s demands. Consider upgrading your CPU if necessary.

7. Compatibility Issues:

  • R Version: Ensure that your R version is compatible with your Windows 10 build. Check the R website for compatibility information and download a compatible version if needed.
  • Other Software: Certain software, such as antivirus programs, firewalls, or other applications, might interfere with R’s functionality. Try disabling them temporarily to see if they are causing the issue.

FAQs:

Q: What are the benefits of using R in Windows 10?

A: R offers a multitude of benefits for data analysis and machine learning:

  • Open-source and Free: R is free to use and distribute, making it accessible to everyone.
  • Powerful Statistical Capabilities: R provides a comprehensive set of tools for statistical analysis, including data manipulation, visualization, and modeling.
  • Extensive Libraries: R boasts a vast collection of packages developed by a global community, covering a wide range of applications.
  • Active Community: R has a large and active user community, providing support, resources, and collaboration opportunities.
  • Flexibility and Customization: R offers a high degree of flexibility and customization, allowing users to tailor their analysis workflows.

Q: Why is R not running on my Windows 10 machine?

A: There are several reasons why R might not be running on Windows 10, including installation issues, environment variable problems, software dependencies, path conflicts, or compatibility issues.

Q: How do I install R on Windows 10?

A: Download the latest version of R from the official website (https://cran.r-project.org/). Run the installer and follow the on-screen instructions. Ensure that you have administrative privileges to install R successfully.

Q: How do I troubleshoot R environment variables?

A: Open the System Properties window, navigate to "Advanced system settings," and click "Environment Variables." Check the variables mentioned in the "Manage Environment Variables" section and make sure they are correctly configured.

Tips:

  • Keep R Updated: Regularly update R to benefit from the latest features, bug fixes, and security enhancements.
  • Use a Package Manager: Consider using a package manager like RStudio or Tinn-R to streamline your R workflow and simplify package management.
  • Consult Online Resources: Utilize online resources like Stack Overflow, R documentation, and community forums to find solutions to specific problems.
  • Start with a Simple Script: When troubleshooting, start with a simple R script to isolate the issue. Gradually add complexity to identify the source of the problem.
  • Check Error Messages: Pay close attention to error messages generated by R. They often provide valuable clues about the underlying cause of the issue.

Conclusion:

Successfully running R on Windows 10 requires careful attention to installation procedures, environment variables, software dependencies, and compatibility issues. By following the troubleshooting steps and tips outlined in this guide, users can overcome common obstacles and unlock the full potential of this powerful tool for data analysis and machine learning.

How To Open Troubleshooting In Windows 10 How to access Windows 10 troubleshooting tools step by step  TechTarget How to access Windows 10 troubleshooting tools step by step  TechTarget
Windows 10 Quick Tips - Troubleshooting  Daves Computer Tips 13 Troubleshooting Tools to Fix Windows 10  MakeUseOf How to Enable Recommended Troubleshooting in Windows 10
How to access Windows 10 troubleshooting tools step by step How to use Recommended Troubleshooting on Windows 10 May 2019 Update  Windows Central

Closure

Thus, we hope this article has provided valuable insights into Troubleshooting R in Windows 10: A Comprehensive Guide. We hope you find this article informative and beneficial. See you in our next article!

Understanding The Evolution Of Gmail: A Comprehensive Guide To Interface Changes

Understanding the Evolution of Gmail: A Comprehensive Guide to Interface Changes

Introduction

With great pleasure, we will explore the intriguing topic related to Understanding the Evolution of Gmail: A Comprehensive Guide to Interface Changes. Let’s weave interesting information and offer fresh perspectives to the readers.

Understanding the Evolution of Gmail: A Comprehensive Guide to Interface Changes

The evolution of Gmail - YouTube

Gmail, Google’s ubiquitous email service, has undergone significant transformations since its inception. These changes, ranging from subtle refinements to complete overhauls, reflect the platform’s ongoing commitment to enhancing user experience and adapting to the ever-evolving digital landscape. This article aims to provide a comprehensive understanding of these changes, exploring the reasons behind them and the impact they have on user interaction.

The Early Days: Simplicity and Functionality

Gmail’s initial iteration, launched in 2004, prioritized simplicity and functionality. The interface was clean and uncluttered, focusing on core email features such as composing, sending, and receiving messages. This minimalist approach resonated with users seeking a streamlined and efficient email experience, contributing to Gmail’s rapid adoption.

The Rise of Features and Customization:

Over time, Gmail evolved to incorporate a wider range of features, catering to the growing demands of users. The introduction of labels, filters, and search functionality enhanced email organization and management. Users could now categorize messages, automate actions, and quickly locate specific emails. This shift towards customization allowed users to tailor their Gmail experience to their specific needs and preferences.

The Integration of Google Services:

Gmail’s integration with other Google services, such as Google Drive and Calendar, marked a significant turning point. This interconnectedness enabled users to seamlessly access and manage their files, schedules, and emails within a unified ecosystem. The integration of Google Chat and Meet further expanded Gmail’s capabilities, transforming it into a comprehensive communication platform.

The Emergence of a Modern Interface:

The modern Gmail interface, characterized by a clean, intuitive design and a focus on visual elements, reflects the platform’s evolution towards a user-centric experience. The introduction of themes, personalized backgrounds, and dynamic layouts allows for greater customization and personalization. This emphasis on visual appeal enhances user engagement and promotes a more enjoyable email experience.

The Impact of Mobile Devices:

The rise of mobile devices has profoundly impacted Gmail’s development. The platform has adapted to the constraints of smaller screens, introducing responsive design elements and touch-optimized controls. This ensures a seamless and intuitive experience across devices, regardless of screen size.

The Importance of User Feedback:

Gmail’s evolution is driven by constant feedback from its vast user base. Google actively seeks user input through surveys, forums, and feedback mechanisms. This collaborative approach ensures that the platform remains relevant and responsive to user needs.

Benefits of the Evolving Gmail Interface:

The changes in Gmail’s interface have resulted in numerous benefits for users:

  • Enhanced User Experience: The focus on intuitive design and user-friendly features makes Gmail easier to navigate and use.
  • Improved Efficiency: The introduction of features such as labels, filters, and search functionality streamlines email management and saves time.
  • Increased Productivity: The integration of Google services allows users to manage their emails, files, and schedules from a single platform, increasing productivity.
  • Enhanced Security: Gmail’s continuous security updates and encryption measures protect user data and privacy.
  • Personalized Experience: Customization options allow users to tailor their Gmail experience to their specific needs and preferences.

FAQs about Changes in Gmail Interface:

Q: Why does my Gmail look different?

A: Gmail regularly updates its interface to improve user experience, introduce new features, and adapt to evolving technologies. These updates may result in changes to the layout, design elements, and functionality.

Q: How can I revert to the old Gmail interface?

A: While Google generally prioritizes the latest interface, it may offer options to revert to previous versions. Check the settings menu for any available options to switch between different interface versions.

Q: What are the key changes in the new Gmail interface?

A: The new Gmail interface often includes updates to the layout, design elements, and features. Key changes may include a more streamlined design, improved search functionality, enhanced integration with other Google services, and a focus on mobile optimization.

Q: Will my old emails be affected by the changes?

A: The changes in Gmail’s interface generally do not affect the content or accessibility of your existing emails. Your emails will remain accessible and organized as before.

Tips for Adapting to the New Gmail Interface:

  • Familiarize yourself with the new layout and design elements. Take some time to explore the changes and understand the new interface.
  • Utilize the help resources available. Gmail provides comprehensive help documentation and tutorials to assist with navigating the new interface.
  • Seek support from the community. Online forums and support groups can offer guidance and troubleshooting tips for adapting to the new Gmail interface.

Conclusion:

Gmail’s evolution is a testament to its commitment to providing a user-centric and adaptable email platform. The changes in its interface reflect the platform’s ongoing efforts to enhance user experience, improve efficiency, and adapt to the ever-changing digital landscape. By understanding the reasons behind these changes and the benefits they offer, users can navigate the evolving Gmail interface with greater confidence and efficiency.

Gmail Logo and Its History  LogoMyWay The Evolution of Gmail [Infographic] - iClarified #Infographic #Infografia Gmail Evolution,La Evolución de Gmail  Info
The Evolution of Gmail From 2004 Until Today - GeekShizzle The Evolution of Gmail From 2004 Until Today - GeekShizzle The Evolution of Gmail From 2004 Until Today - GeekShizzle
Google Changed Gmail Logo: Here’s What Changes Made So Far? – OXO Solutions® The Evolution of Gmail, Visualized

Closure

Thus, we hope this article has provided valuable insights into Understanding the Evolution of Gmail: A Comprehensive Guide to Interface Changes. We thank you for taking the time to read this article. See you in our next article!

Navigating The Digital Landscape: A Guide To The Official Microsoft Windows 10 Home Website

Navigating the Digital Landscape: A Guide to the Official Microsoft Windows 10 Home Website

Introduction

With great pleasure, we will explore the intriguing topic related to Navigating the Digital Landscape: A Guide to the Official Microsoft Windows 10 Home Website. Let’s weave interesting information and offer fresh perspectives to the readers.

Navigating The Digital Landscape: A Comprehensive Guide To The Best Map And Directions Websites

The official Microsoft Windows 10 Home website serves as a comprehensive hub for users seeking information, resources, and support related to the popular operating system. This digital platform, meticulously designed to cater to diverse user needs, provides a gateway to understanding the capabilities, features, and functionalities of Windows 10 Home.

Exploring the Landscape: A Deep Dive into the Website’s Structure

The website’s structure is intuitive and user-friendly, facilitating easy navigation and access to relevant information. The homepage, acting as the initial point of contact, presents a concise overview of Windows 10 Home, highlighting its key features and benefits.

Key Components of the Website:

  • "Windows 10 Home" Section: This section provides a detailed exploration of Windows 10 Home, outlining its core functionalities and advantages. It delves into features like the Start menu, Cortana, Microsoft Edge, and the Windows Store, presenting a clear picture of the user experience.
  • "System Requirements" Section: This section is crucial for users seeking to determine if their computer meets the minimum specifications required to run Windows 10 Home smoothly. It outlines the necessary hardware and software requirements, ensuring compatibility and optimal performance.
  • "Pricing and Purchase" Section: This section provides transparent information regarding pricing options for Windows 10 Home, offering various purchase methods and licensing details. It ensures users can make informed decisions based on their individual needs and budgets.
  • "Download and Installation" Section: This section offers comprehensive guidance on downloading and installing Windows 10 Home, outlining the process step-by-step and addressing common installation issues.
  • "Support and Resources" Section: This section acts as a central hub for users seeking support, troubleshooting advice, and access to comprehensive documentation. It provides links to relevant articles, forums, and contact information, ensuring users have the resources they need to address any challenges.
  • "Community Forum" Section: This section fosters a vibrant online community where users can connect, share experiences, and exchange knowledge. It allows users to engage with other Windows 10 Home users, seeking solutions to problems and contributing to a collaborative learning environment.

The Importance of the Official Website:

The official Microsoft Windows 10 Home website plays a pivotal role in empowering users with the necessary knowledge and resources. It serves as a central information source, providing a comprehensive understanding of the operating system and its capabilities.

Benefits of Utilizing the Website:

  • Access to Accurate Information: The official website serves as the primary source of accurate and up-to-date information about Windows 10 Home, ensuring users receive reliable and verified data.
  • Troubleshooting Guidance: The website offers a wealth of troubleshooting resources, assisting users in resolving common issues and ensuring a smooth user experience.
  • Community Support: The forum section facilitates interaction with other users, creating a supportive community where knowledge is shared and problems are collaboratively solved.
  • Download and Installation Support: The website provides detailed instructions and guidance on downloading and installing Windows 10 Home, ensuring a seamless transition for users.
  • Regular Updates and News: The website keeps users informed about the latest updates, news, and features related to Windows 10 Home, ensuring they stay abreast of the evolving operating system.

FAQs by the Official Microsoft Windows 10 Home Website:

1. What are the system requirements for Windows 10 Home?

The minimum system requirements for Windows 10 Home include a 1 GHz processor, 1 GB RAM for 32-bit or 2 GB RAM for 64-bit, 16 GB of free hard disk space, and a DirectX 9 graphics device with WDDM 1.0 driver.

2. How can I upgrade to Windows 10 Home from a previous version?

To upgrade to Windows 10 Home, ensure your current operating system meets the upgrade requirements. You can then use the Windows 10 Upgrade Assistant tool available on the website, which will guide you through the process.

3. What are the key features of Windows 10 Home?

Windows 10 Home offers a range of features including the Start menu, Cortana, Microsoft Edge, the Windows Store, and improved security features.

4. How do I contact Microsoft support for Windows 10 Home?

You can access Microsoft support options through the "Support and Resources" section of the website. This includes links to relevant articles, forums, and contact information.

5. Can I purchase Windows 10 Home directly from the website?

Yes, the "Pricing and Purchase" section on the website provides options to purchase Windows 10 Home, offering various licensing options and payment methods.

Tips by the Official Microsoft Windows 10 Home Website:

  • Regularly check for updates: Ensure your Windows 10 Home installation is up-to-date by regularly checking for and installing available updates.
  • Utilize the Windows Store: Explore the Windows Store for a wide range of applications, games, and software to enhance your Windows 10 Home experience.
  • Customize your settings: Personalize your Windows 10 Home experience by customizing settings such as the Start menu, taskbar, and themes.
  • Explore the "Help and Tips" section: The website’s "Help and Tips" section provides valuable resources and tutorials for navigating and utilizing Windows 10 Home effectively.
  • Join the community forum: Engage with other Windows 10 Home users in the forum section to share experiences, seek solutions, and contribute to a collaborative learning environment.

Conclusion by the Official Microsoft Windows 10 Home Website:

The official Microsoft Windows 10 Home website serves as a comprehensive resource for users, offering a gateway to the operating system’s functionalities, resources, and support. By providing accurate information, troubleshooting guidance, and a vibrant online community, the website empowers users to navigate the digital landscape and make the most of Windows 10 Home. Through its intuitive design and user-friendly interface, the website ensures a seamless and enriching experience for all users.

Concept: Here is a quick and easy way Microsoft could add a landscape start screen to Windows 10 MS Windows 10 Home OEM KEY GLOBAL – Redec de Colombia Microsoft Windows 10 Home (32/64-bit, Download) KW9-00265 B&H
Webinar - How to navigate the new digital landscape  BIMobject Microsoft : Microsoft Windows 10 Home 64bit Microsoft Windows 10 Home Digital OEM Key - Universal Version - Prime Tech Mart
Microsoft Reveals the Official Windows 10 Wallpaper Navigating the Digital Landscape E-Book

Closure

Thus, we hope this article has provided valuable insights into Navigating the Digital Landscape: A Guide to the Official Microsoft Windows 10 Home Website. We appreciate your attention to our article. See you in our next article!

Navigating The Paging File: A Comprehensive Guide For Windows 11 With 8GB RAM

Navigating the Paging File: A Comprehensive Guide for Windows 11 with 8GB RAM

Introduction

With enthusiasm, let’s navigate through the intriguing topic related to Navigating the Paging File: A Comprehensive Guide for Windows 11 with 8GB RAM. Let’s weave interesting information and offer fresh perspectives to the readers.

How To Properly Set The Windows 11 Paging File - YouTube

In the intricate world of computer memory management, the paging file, also known as the virtual memory file, plays a crucial role. This hidden file acts as an extension of your physical RAM, providing a buffer when your system runs out of available memory. While 8GB RAM is generally sufficient for everyday computing, understanding how the paging file operates and optimizing its size can significantly impact your Windows 11 experience.

Understanding the Paging File’s Role

Imagine your physical RAM as a bustling marketplace. Each application and process running on your computer requires a certain amount of space in this marketplace to function. However, the marketplace has a limited capacity. When the marketplace becomes full, the operating system uses the paging file as a temporary storage area.

Think of the paging file as a spacious warehouse outside the marketplace. When a process needs more space than the marketplace can provide, the operating system temporarily moves less frequently used data from the marketplace to the warehouse. This allows the marketplace to accommodate new processes and continue running smoothly.

The Importance of the Paging File

The paging file is essential for several reasons:

  • Handling Memory Overruns: When the physical RAM is exhausted, the paging file prevents system crashes by providing a temporary storage space for inactive data.
  • Enabling Multitasking: By moving less active data to the paging file, the system can accommodate more applications and processes simultaneously, enhancing multitasking capabilities.
  • Supporting Large Applications: Some applications, especially those demanding high memory resources, rely on the paging file to function efficiently.

Factors Influencing Paging File Size

The ideal paging file size depends on various factors:

  • RAM Capacity: With 8GB RAM, the paging file plays a less critical role as the system has more memory available. However, the paging file is still crucial for handling memory spikes and ensuring smooth operation.
  • Application Usage: If you use resource-intensive applications like video editing software, gaming, or virtual machines, a larger paging file might be beneficial.
  • System Performance: A well-sized paging file can improve overall system responsiveness, especially when running memory-intensive tasks.

Optimizing the Paging File for 8GB RAM

For a system with 8GB RAM, a generally recommended paging file size is 1.5 to 2 times the amount of physical RAM. In this case, the recommended size would be between 12GB to 16GB.

Key Considerations for Optimizing Paging File Size:

  • System Performance: Regularly monitor your system’s performance, especially when running demanding applications. If you experience frequent slowdowns or crashes, consider adjusting the paging file size.
  • Hard Drive Speed: The paging file is stored on your hard drive. A faster hard drive will result in faster data transfer between the paging file and RAM, improving system performance.
  • Hard Drive Space: Ensure you have sufficient free space on your hard drive to accommodate the paging file.

Tips for Managing the Paging File

  • Automatic Management: Windows 11 automatically manages the paging file size, adjusting it based on system usage. However, you can manually adjust it if needed.
  • Manually Adjusting the Paging File: To manually adjust the paging file size, navigate to System Properties > Advanced system settings > Performance > Advanced > Virtual memory > Change. You can choose to let Windows manage the size, set a custom size, or disable the paging file altogether.
  • Disabling the Paging File: Disabling the paging file is generally not recommended for systems with 8GB RAM, as it can lead to instability and crashes.

FAQs about Paging File Size for 8GB RAM Windows 11

Q1: Should I disable the paging file on a system with 8GB RAM?

A: Disabling the paging file is generally not recommended for systems with 8GB RAM. It can lead to instability and crashes, especially when running resource-intensive applications.

Q2: How do I know if my paging file is too small or too large?

A: If you experience frequent system slowdowns, crashes, or error messages related to low memory, it might indicate a too small paging file. Conversely, if your system has a large amount of free hard drive space and your paging file is consuming a significant portion of it, you might consider reducing its size.

Q3: What is the difference between a fixed and dynamic paging file?

A: A fixed paging file has a set size that remains constant. A dynamic paging file adjusts its size based on system usage, growing or shrinking as needed. For systems with 8GB RAM, a dynamic paging file is generally recommended.

Q4: Should I move the paging file to a different drive?

A: Moving the paging file to a different drive can improve performance if the drive you choose is faster than your primary drive. However, ensure the chosen drive has sufficient free space to accommodate the paging file.

Conclusion

The paging file is an integral component of Windows 11’s memory management system. While 8GB RAM provides a solid foundation for everyday computing, understanding the paging file’s role and optimizing its size can enhance your system’s performance, stability, and multitasking capabilities. By following the tips and considerations outlined in this guide, you can ensure your system runs smoothly and efficiently, maximizing your Windows 11 experience.

How to manage Virtual Memory Paging File in Windows 11 Manage Virtual Memory Paging File in Windows 11 Tutorial  Windows 11 Forum How to manage Virtual Memory Paging File in Windows 11
How to Increase Virtual Memory in Windows 11 How to manage Virtual Memory Paging File in Windows 11 Windows 11 Paging File
What is Virtual Memory Paging File, When and How to Change Its Size in Windows 11? – WebNots Custom Paging File Size for windows 11 4 GB / 8 GB/ 16 GB RAM - YouTube

Closure

Thus, we hope this article has provided valuable insights into Navigating the Paging File: A Comprehensive Guide for Windows 11 with 8GB RAM. We thank you for taking the time to read this article. See you in our next article!

Photo Story 3.0 For Windows 10

photo story 3.0 for windows 10

Related Articles: photo story 3.0 for windows 10

Introduction

With enthusiasm, let’s navigate through the intriguing topic related to photo story 3.0 for windows 10. Let’s weave interesting information and offer fresh perspectives to the readers.

A Comprehensive Guide to Photo Story 3.0 for Windows 10

Photo story 3 for windows

While Photo Story 3.0 may not be a household name, it remains a valuable tool for Windows 10 users seeking to craft engaging visual narratives. Originally introduced as a standalone application in 2004, Photo Story 3.0 was later integrated into Windows Live Movie Maker for Windows Vista and Windows 7. Although it has since been discontinued by Microsoft, its legacy lives on, providing a simple yet effective method for creating slideshows with added motion and narration.

Understanding the Power of Photo Story 3.0

Photo Story 3.0 operates as a slideshow creator, enabling users to transform a collection of images into a dynamic visual presentation. The software allows for the inclusion of various elements, including:

  • Images: The foundation of any Photo Story, images serve as the visual building blocks. Users can incorporate personal photographs, downloaded images, or even screenshots.
  • Music: Adding a soundtrack enhances the emotional impact and sets the tone for the slideshow. Photo Story 3.0 supports various audio formats, including MP3, WMA, and WAV.
  • Narration: The ability to add voice-over narration provides context, depth, and a personal touch to the slideshow. Users can record their own voice directly into the software or import pre-recorded audio.
  • Text:

Download Microsoft Photo Story 3.0 How to download and install Photo Story on Windows 10 Photo Story 3 for Windows  Other Multimedia Software
Photo Story 3 for Windows - QuanTriMang.com Photo Story 3 For Windows Download �� Bajar Microsoft Photo Story 3.0 en español
�� Descargar Microsoft Photo Story 3.0 Gratis para Windows PPT - Microsoft Photo Story 3 for Windows PowerPoint Presentation, free download - ID:6806569

Closure

Thus, we hope this article has provided valuable insights into photo story 3.0 for windows 10. We hope you find this article informative and beneficial. See you in our next article!

Unlocking Windows: Understanding And Managing App-Linked Accounts

Unlocking Windows: Understanding and Managing App-Linked Accounts

Introduction

With enthusiasm, let’s navigate through the intriguing topic related to Unlocking Windows: Understanding and Managing App-Linked Accounts. Let’s weave interesting information and offer fresh perspectives to the readers.

Unlocking Windows: Understanding and Managing App-Linked Accounts

How to set up linked accounts in Windows 10 Mail  On MSFT

In the modern digital landscape, applications have become increasingly reliant on user accounts for seamless functionality. While this integration offers convenience, it also raises concerns about privacy and security. Applications, especially those designed for online services, often request access to your Windows account, which can lead to unintended consequences. Understanding how to manage these app-linked accounts is crucial for maintaining control over your digital footprint and safeguarding your personal information.

The Need for Control: Why Managing App-Linked Accounts Matters

The proliferation of applications and their reliance on user accounts has created a complex ecosystem. This interdependence, while beneficial in many ways, can pose challenges:

  • Privacy Concerns: Applications often request access to your Windows account for various reasons, including data synchronization, personalized experiences, and online services. This access can potentially expose your personal information, such as browsing history, email addresses, and contacts, to third-party applications.
  • Security Risks: Applications with access to your Windows account may be vulnerable to security breaches, exposing your account to unauthorized access and potential data theft.
  • Unwanted Data Collection: Some applications may collect more data than necessary, potentially leading to excessive data collection and privacy violations.
  • Account Clutter: Multiple applications linked to your Windows account can create confusion and difficulty in managing your online presence.

Navigating the Landscape: Understanding App-Linked Account Types

App-linked accounts can be categorized into two main types:

1. Local Accounts: These are accounts created specifically for a particular application and are stored locally on your device. They are typically used for applications that do not require online access or data synchronization.

2. Online Accounts: These are accounts linked to online services, such as email providers, social media platforms, or cloud storage services. They offer convenience and data synchronization across multiple devices.

Taking Control: Strategies for Managing App-Linked Accounts

Managing app-linked accounts effectively involves understanding the permissions granted to each application and taking appropriate steps to minimize potential risks:

1. Reviewing App Permissions:

  • Windows Settings: Access the "Apps" section in Windows Settings and select "Apps & features." This allows you to view all installed applications and their permissions.
  • Individual App Settings: Many applications have their own settings menus where you can manage permissions related to your Windows account.
  • Third-Party Tools: Some third-party security software and privacy tools offer detailed insights into app permissions and allow you to control them more granularly.

2. Removing Unnecessary App-Linked Accounts:

  • Windows Settings: In the "Apps & features" section, you can uninstall applications that are no longer needed. This will remove any associated app-linked accounts.
  • Individual App Settings: Some applications allow you to disconnect your Windows account from within their settings.
  • Third-Party Tools: Privacy-focused tools can help identify and remove app-linked accounts that are no longer required.

3. Implementing Strong Security Measures:

  • Strong Passwords: Use strong, unique passwords for each online account linked to your Windows profile.
  • Two-Factor Authentication: Enable two-factor authentication for online accounts to enhance security.
  • Regular Security Updates: Keep your operating system and applications updated with the latest security patches to mitigate vulnerabilities.

FAQs: Addressing Common Questions about App-Linked Accounts

Q: Can I use the same account for multiple applications?

A: While possible, it is generally recommended to use separate accounts for different applications, especially those dealing with sensitive data. This helps minimize the impact of a security breach on other applications.

Q: Can I remove my Windows account from an application without deleting the application itself?

A: This depends on the application. Some applications may allow you to disconnect your Windows account from their settings, while others may require you to uninstall the application entirely.

Q: How do I know if an application is accessing my personal information?

A: Review the application’s privacy policy and permissions granted to the application. You can also use third-party security tools to monitor application activity and identify any suspicious behavior.

Tips for Effective Account Management:

  • Regularly review app permissions: Make it a habit to periodically check the permissions granted to applications linked to your Windows account.
  • Be cautious with app installations: Only download applications from trusted sources and read reviews before installing them.
  • Use a password manager: A password manager can help you create and manage strong, unique passwords for all your online accounts.
  • Enable privacy settings: Utilize privacy settings within applications to control the amount of data they collect and share.

Conclusion: The Importance of Informed Account Management

Managing app-linked accounts is an essential aspect of maintaining privacy and security in the digital age. By understanding the different types of accounts, reviewing permissions, and implementing robust security measures, users can take control of their online presence and safeguard their personal information. This proactive approach helps ensure a secure and enjoyable digital experience.

Unlocking Windows 10 Account Quick and Easy Solution How to set up linked accounts in Windows 10 Mail OnMSFT.com OnMSFT.com How to link your Windows 10 license to a Microsoft Account
Manage Your Microsoft Account in Windows 11 – windows.do How to set up linked accounts in Windows 10 Mail OnMSFT.com OnMSFT.com Windows 10: Managing User Accounts and Parental Controls
How to set up linked accounts in Windows 10 Mail OnMSFT.com OnMSFT.com Manage linked accounts

Closure

Thus, we hope this article has provided valuable insights into Unlocking Windows: Understanding and Managing App-Linked Accounts. We hope you find this article informative and beneficial. See you in our next article!

Managing Accounts In Windows 11 Outlook: A Comprehensive Guide

Managing Accounts in Windows 11 Outlook: A Comprehensive Guide

Introduction

With great pleasure, we will explore the intriguing topic related to Managing Accounts in Windows 11 Outlook: A Comprehensive Guide. Let’s weave interesting information and offer fresh perspectives to the readers.

Managing Accounts in Windows 11 Outlook: A Comprehensive Guide

Manage Your Microsoft Account in Windows 11 – windows.do

Microsoft Outlook, an integral part of the Windows ecosystem, plays a crucial role in managing emails, calendars, contacts, and tasks. Users often configure multiple accounts within Outlook, ranging from personal accounts like Gmail or Yahoo to professional accounts associated with their workplace. However, situations may arise where the need to remove an account from Windows 11 Outlook becomes necessary. This could be due to a change in email providers, account inactivity, security concerns, or simply to declutter the Outlook interface. This article will guide you through the process of removing an account from Windows 11 Outlook, providing a clear and comprehensive understanding of the steps involved.

Understanding the Process:

Removing an account from Windows 11 Outlook involves disconnecting the chosen account from the application. This process does not delete the account itself; it merely removes the association between the account and Outlook. The account remains intact on the email provider’s server.

Steps to Remove an Account from Windows 11 Outlook:

  1. Open Outlook: Launch the Outlook application on your Windows 11 computer.

  2. Access Account Settings: Click on the "File" tab located in the top left corner of the Outlook window. From the menu that appears, select "Account Settings" and then choose "Account Settings" again.

  3. Select the Account: In the "Account Settings" window, locate the "Email" tab. The list displays all email accounts configured within Outlook. Identify the account you wish to remove.

  4. Remove the Account: Right-click on the chosen account and select "Remove". Alternatively, click on the "Remove" button located at the bottom of the window.

  5. Confirm Removal: A confirmation prompt will appear asking if you are sure you want to remove the account. Click "Yes" to proceed with the removal.

  6. Complete Removal: Outlook will initiate the removal process, disconnecting the account from the application. Upon completion, the account will no longer be listed in the "Account Settings" window.

Important Considerations:

  • Data Preservation: Removing an account from Outlook does not delete any data associated with it. Emails, contacts, and calendar events remain on the email provider’s server.

  • Data Access: After removing an account, you can still access its data by logging in directly to the email provider’s website.

  • Offline Access: If you have enabled offline access for the account, the data will be cached locally on your computer. Removing the account will not delete this cached data.

  • Account Recovery: If you accidentally remove an account, you can re-add it by following the steps for adding a new account in Outlook.

Benefits of Removing an Account:

  • Improved Organization: Removing inactive or unnecessary accounts simplifies the Outlook interface, enhancing user experience.

  • Enhanced Security: Removing accounts that are no longer in use helps minimize security risks by reducing the number of potential access points.

  • Streamlined Communication: Removing accounts associated with inactive or outdated email addresses ensures that communication remains focused on active channels.

FAQs Regarding Account Removal:

Q: Will removing an account delete my emails, contacts, and calendar events?

A: No, removing an account from Outlook does not delete any associated data. The data remains on the email provider’s server.

Q: Can I recover a removed account?

A: Yes, you can re-add a removed account to Outlook by following the steps for adding a new account.

Q: What happens to my offline data when I remove an account?

A: Offline data remains on your computer even after removing the account. You can access this data by logging in directly to the email provider’s website.

Q: Can I remove an account without removing the data?

A: No, removing an account from Outlook removes the association between the account and the application. You cannot selectively remove the account while retaining the data.

Tips for Managing Accounts in Outlook:

  • Regularly Review Accounts: Periodically review your Outlook accounts to identify inactive or unnecessary accounts.

  • Organize Accounts: Create folders within Outlook to categorize accounts based on their purpose or origin.

  • Utilize Account Groups: Use account groups to manage multiple accounts collectively, simplifying communication and collaboration.

  • Enable Offline Access: If you frequently work offline, enable offline access for important accounts to ensure continued access to data.

  • Implement Strong Passwords: Use strong, unique passwords for each account to enhance security.

Conclusion:

Managing accounts effectively is crucial for maintaining a streamlined and secure email experience. Removing accounts from Windows 11 Outlook can be a valuable step in optimizing account management, enhancing user experience, and strengthening security. By understanding the process, benefits, and considerations associated with removing accounts, users can confidently manage their email accounts within Outlook and ensure a smooth and efficient workflow.

How to Manage Multiple Microsoft Outlook Accounts How to Manage User Account Settings in Windows 11 Microsoft releases new Outlook app for Windows 11 (preview) - Pureinfotech
How to add multiple email accounts to new Outlook app on Windows 11 - Pureinfotech Windows 11  How to Add Multiple Email Accounts in Outlook 365 Apps  Add Multiple Email to How to Add Multiple Accounts on Windows 11
Microsoft's new Windows 11 Outlook app now works with personal Microsoft accounts  Windows Central How to Change User Account Name in Windows 11

Closure

Thus, we hope this article has provided valuable insights into Managing Accounts in Windows 11 Outlook: A Comprehensive Guide. We thank you for taking the time to read this article. See you in our next article!

Windows 10 Version 20H2: A Comprehensive Overview

Windows 10 Version 20H2: A Comprehensive Overview

Introduction

With great pleasure, we will explore the intriguing topic related to Windows 10 Version 20H2: A Comprehensive Overview. Let’s weave interesting information and offer fresh perspectives to the readers.

Windows 10 Version 20H2: A Comprehensive Overview

Windows 10 20H2 new features and changes - Pureinfotech

Windows 10 Version 20H2, released in October 2020, marked a significant milestone in the evolution of Microsoft’s operating system. While not a major feature update like its predecessors, 20H2 focused on refining existing functionalities, enhancing security, and delivering a more streamlined user experience. This update offered a range of improvements, addressing user feedback and incorporating the latest technological advancements.

Key Enhancements in Windows 10 Version 20H2

1. Performance and Stability:

  • Optimized for Efficiency: 20H2 aimed to improve overall system performance, particularly on devices with limited resources. This was achieved through various optimizations, including improved memory management and background process handling.
  • Enhanced Stability: The update addressed several known issues and bugs, contributing to a more stable and reliable operating system. This translated into fewer crashes, improved responsiveness, and smoother application performance.

2. Security Enhancements:

  • Improved Security Features: 20H2 introduced new security measures, including enhanced protection against malware and phishing attacks. These features helped safeguard user data and ensure a secure computing environment.
  • Enhanced Firewall: The Windows Firewall received improvements, bolstering its ability to detect and block malicious network traffic. This contributed to a more secure connection to the internet and protected against unauthorized access.

3. User Experience Improvements:

  • Streamlined Interface: 20H2 brought subtle yet significant refinements to the user interface, resulting in a more intuitive and user-friendly experience. The Start Menu received a refresh, while the taskbar was optimized for better usability.
  • Enhanced Search Functionality: The search function was improved, delivering faster and more accurate results. This facilitated easier navigation and access to information within the operating system.
  • Improved Accessibility Features: 20H2 introduced new accessibility features, making the operating system more inclusive for users with disabilities. These features included improved screen reader functionality and enhanced keyboard navigation.

4. Other Notable Features:

  • Windows Subsystem for Linux (WSL) 2: This update brought a significant upgrade to WSL, enabling users to run Linux applications more efficiently and seamlessly within the Windows environment.
  • Improved Graphics Support: 20H2 incorporated advancements in graphics technology, delivering smoother visuals and enhanced support for modern gaming experiences.
  • Enhanced Bluetooth Connectivity: The update refined Bluetooth connectivity, ensuring a more stable and reliable connection with various devices.

Importance and Benefits of Windows 10 Version 20H2

Windows 10 Version 20H2 was crucial for several reasons:

  • Enhanced Security: By implementing advanced security measures, 20H2 helped protect users from emerging cyber threats and ensured a secure computing environment.
  • Improved User Experience: The update focused on refining user interface elements and enhancing accessibility features, contributing to a more intuitive and enjoyable experience for all users.
  • Enhanced Performance: The optimizations implemented in 20H2 resulted in a more efficient and responsive operating system, particularly on devices with limited resources.
  • Compatibility and Stability: 20H2 addressed compatibility issues and bugs found in previous versions, leading to a more stable and reliable operating system.

FAQs on Windows 10 Version 20H2

1. Is Windows 10 Version 20H2 a major update?

No, 20H2 is considered a "feature update" rather than a major version upgrade. It focused on refining existing functionalities and enhancing the user experience, rather than introducing entirely new features.

2. What are the system requirements for Windows 10 Version 20H2?

The system requirements for 20H2 are generally the same as those for earlier versions of Windows 10. You can find detailed information on Microsoft’s official website.

3. How do I update to Windows 10 Version 20H2?

The update was automatically delivered to eligible devices through Windows Update. However, you can manually check for the update by navigating to Settings > Update & Security > Windows Update.

4. Are there any known issues with Windows 10 Version 20H2?

While 20H2 addressed many known issues, some users may encounter specific problems. Microsoft regularly releases updates and patches to address reported issues.

5. What is the difference between Windows 10 Version 20H2 and Windows 11?

Windows 11 is a major upgrade to Windows 10, introducing a completely redesigned user interface, new features, and enhanced performance. 20H2, on the other hand, was a minor update focused on refining existing functionalities.

Tips for Using Windows 10 Version 20H2

  • Regularly Update Your System: Ensure your system is up-to-date with the latest patches and security updates to maintain optimal performance and security.
  • Optimize Your System: Utilize built-in tools like Disk Cleanup and Storage Sense to free up disk space and optimize system performance.
  • Customize Your Settings: Explore the various settings options to personalize your user experience and tailor the operating system to your preferences.
  • Use Built-in Security Features: Take advantage of Windows Defender and other built-in security features to protect your system from malware and other threats.
  • Explore New Features: Discover and utilize the new features introduced in 20H2, such as the improved search function and enhanced accessibility features.

Conclusion

Windows 10 Version 20H2 was a significant update that focused on refining existing functionalities, enhancing security, and delivering a more streamlined user experience. This update addressed user feedback, incorporated the latest technological advancements, and provided a more stable and efficient operating system. While not a major version upgrade, 20H2 played a crucial role in enhancing the overall experience for Windows 10 users. It served as a foundation for future updates and laid the groundwork for the eventual release of Windows 11. As technology continues to evolve, Microsoft will continue to release updates and improvements to ensure Windows remains a powerful and reliable operating system for users worldwide.

Windows 10 20h2 Oct Update Redesigned Taskbar Start Menu What's Windows 10 version 20H2, October 2020 Update? - Pureinfotech Windows 10 Version 20H2  What's New in Windows 10 20H2 Update? - YouTube
Windows 10 version 20H2 is now a step closer to public launch Windows 10 20h2 Review 2023 – Get Latest Windows 10 Update Microsoft announces Windows 10 version 20H2 update
You can now download Windows 10 version 20H2 ISO images Windows 10 Version 20H2 Update - YouTube

Closure

Thus, we hope this article has provided valuable insights into Windows 10 Version 20H2: A Comprehensive Overview. We hope you find this article informative and beneficial. See you in our next article!

The Recycle Bin: A Vital Component Of Windows 10 File Management

The Recycle Bin: A Vital Component of Windows 10 File Management

Introduction

In this auspicious occasion, we are delighted to delve into the intriguing topic related to The Recycle Bin: A Vital Component of Windows 10 File Management. Let’s weave interesting information and offer fresh perspectives to the readers.

The Recycle Bin: A Vital Component of Windows 10 File Management

Windows 10 Recycle Bin: All the Things You Need to Know

The Recycle Bin, a familiar icon on the desktop of every Windows 10 user, serves as a crucial component in the operating system’s file management system. It acts as a temporary holding area for deleted files and folders, offering a safety net for accidental deletions and providing users with a chance to retrieve lost data. This article delves into the intricacies of the Recycle Bin in Windows 10, highlighting its significance and exploring its features, functionality, and underlying mechanisms.

Understanding the Recycle Bin’s Role:

The Recycle Bin functions as a temporary storage location for deleted files and folders. When a user deletes a file or folder, it is not permanently removed from the system but instead moved to the Recycle Bin. This provides a safety net against accidental deletions, allowing users to retrieve their data if needed.

The Mechanics of File Deletion and Recovery:

When a file is deleted, it is not physically erased from the hard drive. Instead, the file’s entry in the file allocation table (FAT) or Master File Table (MFT) is marked as deleted, making the space occupied by the file available for new data. The actual data remains on the disk until overwritten. The Recycle Bin essentially serves as a placeholder for these marked files, allowing users to restore them to their original location.

Recycle Bin Settings and Customization:

Windows 10 offers users a degree of control over the Recycle Bin’s behavior. Users can adjust the following settings:

  • Recycle Bin Size: This setting determines the maximum storage space allocated to the Recycle Bin. Users can adjust the size to accommodate their needs, but it is crucial to ensure sufficient space for storing deleted files.
  • Empty Recycle Bin: This option allows users to permanently delete all files and folders contained within the Recycle Bin. This action permanently removes the files from the system, making them unrecoverable.
  • Empty Recycle Bin Automatically: This feature automatically empties the Recycle Bin based on a user-defined schedule. This can be helpful for maintaining disk space and preventing the accumulation of unnecessary files.

Emptying the Recycle Bin:

Emptying the Recycle Bin is a crucial step in managing disk space and ensuring security. When the Recycle Bin is emptied, all files and folders within it are permanently deleted. This action removes the files from the system, making them unrecoverable. Users can empty the Recycle Bin by right-clicking on the Recycle Bin icon and selecting "Empty Recycle Bin."

Understanding the Importance of the Recycle Bin:

The Recycle Bin plays a vital role in Windows 10’s file management system. Its primary benefits include:

  • Data Recovery: The Recycle Bin provides a safety net for accidental deletions, allowing users to recover lost data.
  • Disk Space Management: The Recycle Bin helps manage disk space by temporarily storing deleted files, preventing them from occupying space on the hard drive.
  • Security: The Recycle Bin can help protect sensitive data from unauthorized access. By emptying the Recycle Bin regularly, users can prevent deleted files from being recovered by unauthorized individuals.

Factors Affecting Recycle Bin Functionality:

The Recycle Bin’s functionality can be influenced by several factors, including:

  • Disk Space: The available disk space limits the Recycle Bin’s capacity. If the hard drive is nearly full, the Recycle Bin may be unable to accept new files.
  • File Size: Large files may exceed the Recycle Bin’s size limit and be deleted permanently without being moved to the Recycle Bin.
  • System Configuration: The Recycle Bin’s behavior is influenced by system configuration settings, including the Recycle Bin size and automatic emptying options.

Frequently Asked Questions (FAQs):

Q: What happens to files when they are deleted?

A: When a file is deleted, it is not physically erased from the hard drive. Instead, the file’s entry in the file allocation table (FAT) or Master File Table (MFT) is marked as deleted, making the space occupied by the file available for new data. The actual data remains on the disk until overwritten.

Q: How do I recover files from the Recycle Bin?

A: To recover files from the Recycle Bin, double-click the Recycle Bin icon to open it. Locate the desired file or folder, right-click on it, and select "Restore." The file will be restored to its original location.

Q: How do I empty the Recycle Bin?

A: To empty the Recycle Bin, right-click on the Recycle Bin icon and select "Empty Recycle Bin." Alternatively, you can select "Empty Recycle Bin" from the Recycle Bin’s menu bar.

Q: What happens to files that are too large for the Recycle Bin?

A: If a file is too large for the Recycle Bin, it will be deleted permanently without being moved to the Recycle Bin.

Q: Can I change the Recycle Bin’s size?

A: Yes, you can adjust the Recycle Bin’s size by right-clicking on the Recycle Bin icon, selecting "Properties," and adjusting the "Maximum size (MB)" setting.

Q: Can I automatically empty the Recycle Bin?

A: Yes, you can set the Recycle Bin to empty automatically by right-clicking on the Recycle Bin icon, selecting "Properties," and enabling the "Empty Recycle Bin automatically" option.

Tips for Managing the Recycle Bin:

  • Empty the Recycle Bin regularly: This prevents the accumulation of unnecessary files and helps maintain disk space.
  • Review the Recycle Bin before emptying it: Ensure you are not deleting any files you may need before emptying the Recycle Bin.
  • Consider using a file recovery program: If you accidentally delete a file and it is not in the Recycle Bin, you can use a file recovery program to attempt to recover the file.
  • Disable the Recycle Bin for specific drives: If you have a drive that you do not need to use the Recycle Bin for, you can disable it by right-clicking on the drive in File Explorer, selecting "Properties," and unchecking the "Use Recycle Bin for this drive" option.

Conclusion:

The Recycle Bin is an essential component of Windows 10’s file management system, providing a safety net for accidental deletions and offering users a chance to retrieve lost data. By understanding the Recycle Bin’s functionality, users can effectively manage their files, protect sensitive data, and ensure the smooth operation of their system. Regularly emptying the Recycle Bin and utilizing its various features can enhance file management efficiency and contribute to a more secure and organized computing experience.

We answer: What is Recycle Bin in Windows 10 and how to use it? How To Permanently Delete Files From The Windows 10 Recycle Bin Temp File Recovery: Recover Temp Files Windows 10 in 3 Ways
Recycle bin windows 10 - fiaceto How To Get Help In Windows Recycle Bin – Lates Windows 10 Update How To Get Help In Windows Recycle Bin – Lates Windows 10 Update
How to Add the Recycle Bin to File Explorer in Windows 10 Windows Registry, Icon Files, Small Where is the Recycle Bin in Windows 10 and Windows 11?

Closure

Thus, we hope this article has provided valuable insights into The Recycle Bin: A Vital Component of Windows 10 File Management. We hope you find this article informative and beneficial. See you in our next article!

Navigating The Challenges Of Windows 11: A Comprehensive Overview

Navigating the Challenges of Windows 11: A Comprehensive Overview

Introduction

With enthusiasm, let’s navigate through the intriguing topic related to Navigating the Challenges of Windows 11: A Comprehensive Overview. Let’s weave interesting information and offer fresh perspectives to the readers.

Navigating troubles in Windows 11: Top 10 solutions! - SDN

Windows 11, the latest iteration of Microsoft’s ubiquitous operating system, arrived with a host of new features and a visually appealing redesign. However, as with any new software release, it has not been without its share of challenges and drawbacks. This article aims to provide a comprehensive overview of the common issues users have encountered with Windows 11, offering insights into their causes and potential solutions.

Performance and Compatibility Issues

One of the most frequently reported problems with Windows 11 is a decline in performance compared to its predecessor, Windows 10. This can manifest in various ways, including slower boot times, sluggish application loading, and overall system lag. Several factors contribute to this issue:

  • Hardware Requirements: Windows 11 has stricter hardware requirements than Windows 10, including a minimum of 4GB RAM and a compatible processor. If a system fails to meet these requirements, performance degradation is inevitable.
  • Resource-Intensive Features: New features like the redesigned Start menu, the updated taskbar, and the integration of Android apps can place a heavier burden on system resources, leading to performance issues.
  • Driver Compatibility: New hardware and software may not have fully compatible drivers for Windows 11, leading to instability and performance issues.

System Stability and Error Messages

Windows 11 has also been plagued by stability issues, ranging from frequent crashes and freezes to persistent error messages. Some common culprits include:

  • Driver Conflicts: Outdated or incompatible drivers can cause system instability and generate error messages.
  • Software Incompatibility: Certain software applications, especially older ones, may not be fully compatible with Windows 11, resulting in crashes or errors.
  • Corrupted System Files: System file corruption can lead to a wide range of errors and instability.
  • Hardware Malfunctions: Faulty hardware components can also contribute to system instability and error messages.

Security and Privacy Concerns

While Windows 11 boasts enhanced security features, some users have expressed concerns about its privacy implications:

  • Data Collection: Microsoft collects more data about user activity and preferences in Windows 11 compared to previous versions. This has raised concerns about user privacy and data security.
  • Increased Security Measures: Windows 11’s stricter security measures, while intended to protect users, can sometimes lead to unwanted restrictions and interference with everyday tasks.

User Interface and Functionality

The new user interface and design changes in Windows 11 have also been a source of frustration for some users:

  • Start Menu Redesign: The new Start menu, while visually appealing, has been criticized for its lack of customization and its departure from the familiar Windows 10 layout.
  • Taskbar Changes: The redesigned taskbar, with its centralized icons and lack of support for drag-and-drop functionality, has been met with mixed reactions.
  • App Compatibility: Not all Windows 10 apps are fully compatible with Windows 11, leading to compatibility issues and potential functionality limitations.

Frequently Asked Questions (FAQs)

Q: Is Windows 11 right for me?

A: Windows 11 is a significant upgrade with new features and a redesigned user interface. However, it requires a compatible system and may not be suitable for all users. If your current system meets the minimum hardware requirements and you are comfortable with the new interface, Windows 11 can offer a positive experience.

Q: How can I improve performance in Windows 11?

A: Several steps can be taken to improve performance in Windows 11:

  • Ensure Hardware Compatibility: Verify that your system meets the minimum hardware requirements for Windows 11.
  • Update Drivers: Install the latest drivers for all your hardware components.
  • Close Unnecessary Applications: Limit the number of applications running in the background to free up system resources.
  • Optimize Startup Programs: Disable unnecessary programs from launching at startup.
  • Run Disk Cleanup: Remove unnecessary files and programs to free up disk space.

Q: What can I do about software incompatibility issues?

A: Software incompatibility issues can be addressed in several ways:

  • Check for Updates: Ensure that the software application is up to date with the latest version.
  • Contact Developer: Reach out to the software developer for compatibility information and potential solutions.
  • Use Older Version: If possible, consider using an older, compatible version of the software.

Q: How can I address privacy concerns in Windows 11?

A: While Microsoft collects more data in Windows 11, there are measures you can take to mitigate privacy concerns:

  • Adjust Privacy Settings: Carefully review and adjust privacy settings in Windows 11 to control what data Microsoft collects.
  • Use Privacy-Focused Browsers: Consider using privacy-focused browsers like Brave or Firefox with enhanced privacy features.
  • Install Anti-Malware Software: Use a reputable antivirus and anti-malware software to protect your system from threats.

Tips for Navigating Windows 11

  • Research Before Upgrading: Before upgrading to Windows 11, research the minimum hardware requirements and ensure your system meets them.
  • Back Up Your Data: Create a backup of your important files and data before upgrading to Windows 11.
  • Be Patient with New Features: Allow yourself time to adjust to the new interface and features in Windows 11.
  • Seek Community Support: If you encounter problems, join online communities or forums for support and troubleshooting advice.

Conclusion

Windows 11 represents a significant update to Microsoft’s operating system, offering new features, a redesigned interface, and enhanced security. However, it has also introduced challenges and drawbacks, including performance issues, stability problems, and privacy concerns. By understanding these challenges, users can navigate the transition to Windows 11 effectively, addressing compatibility issues, optimizing performance, and mitigating privacy risks. It is important to remember that while Windows 11 offers advancements, it is not a perfect solution for every user. Ultimately, the decision to upgrade to Windows 11 should be made based on individual needs and preferences, weighing the benefits against the potential drawbacks.

Windows 11 Overview - Windows 11 Features, Price, System Requirement Windows 11  overview and new features - YouTube Windows 11 Challenges: Microsoft's Ongoing Efforts  May 23, 2023  Tech Backend
Buy Windows 11 User Guide for Beginners: A Comprehensive Guide to Master Windows 11 Operating Windows 11 overview: Hardware requirements, security updates and upgrade confusion  Computerworld Windows 11 Information and Overview - YouTube
Windows 11 Comprehensive Guide And Cheat Sheet, 54% OFF Windows-11: Overview, System requirements, Steps to Install and setup.  Story Network

Closure

Thus, we hope this article has provided valuable insights into Navigating the Challenges of Windows 11: A Comprehensive Overview. We hope you find this article informative and beneficial. See you in our next article!