Seamless Sharing In The Digital Age: Exploring The Power Of Windows 10’s Nearby Sharing Feature

Seamless Sharing in the Digital Age: Exploring the Power of Windows 10’s Nearby Sharing Feature

Introduction

In this auspicious occasion, we are delighted to delve into the intriguing topic related to Seamless Sharing in the Digital Age: Exploring the Power of Windows 10’s Nearby Sharing Feature. Let’s weave interesting information and offer fresh perspectives to the readers.

Seamless Sharing in the Digital Age: Exploring the Power of Windows 10’s Nearby Sharing Feature

Seamless File Sharing: Google Nearby Share for Windows

In the interconnected world we inhabit, the ability to effortlessly share files, photos, and even entire folders between devices has become a cornerstone of digital productivity. Windows 10, recognizing this need, introduced a powerful and intuitive feature called "Nearby Sharing," enabling users to transfer data seamlessly between compatible devices within close proximity. This article delves into the intricacies of Nearby Sharing, exploring its functionality, benefits, and potential applications, highlighting its significance in enhancing user experience and fostering collaboration in the digital realm.

Understanding the Mechanism of Nearby Sharing

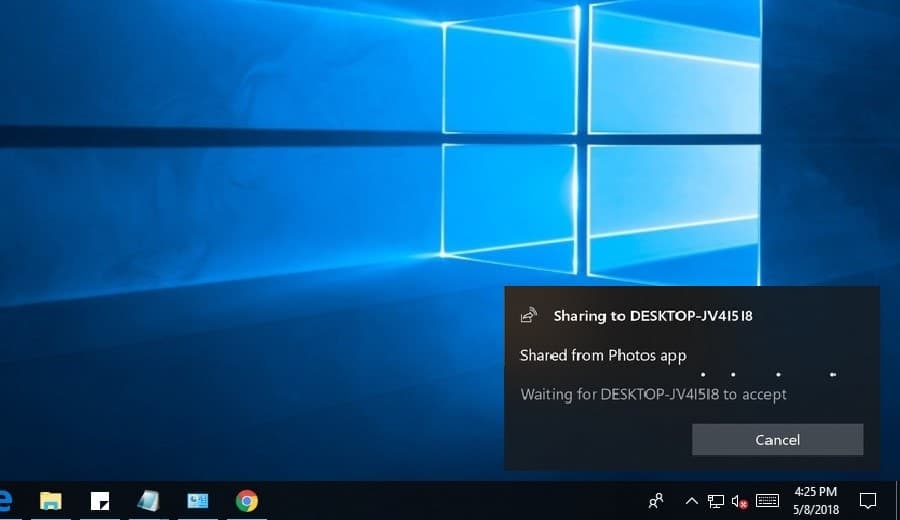
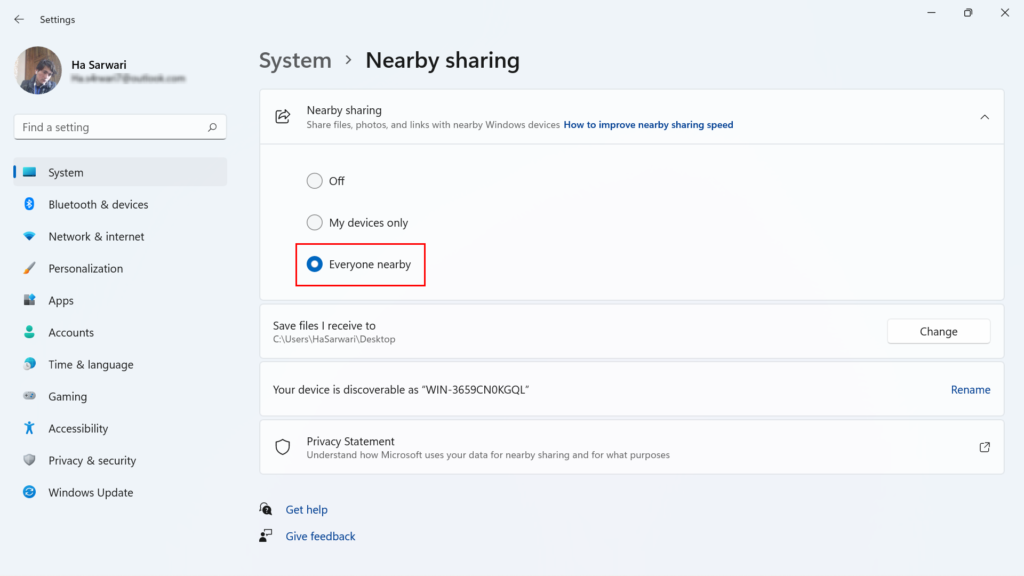
Nearby Sharing, a component of Windows 10’s connectivity suite, operates on the principles of Bluetooth and Wi-Fi Direct technology. This allows for a secure and efficient transfer of data between nearby devices without the need for an internet connection or external cloud services. The process is remarkably straightforward:

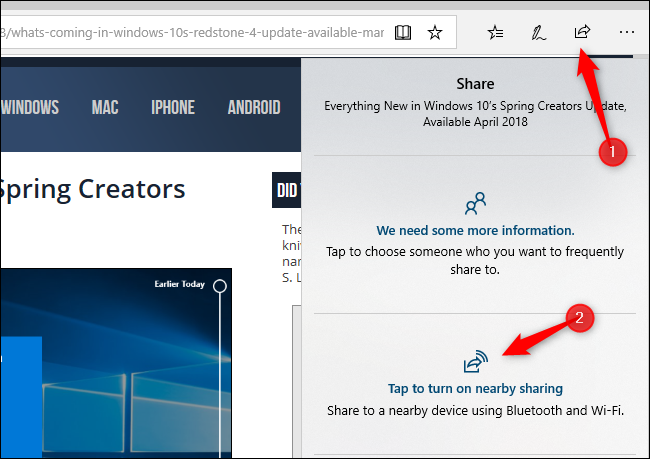
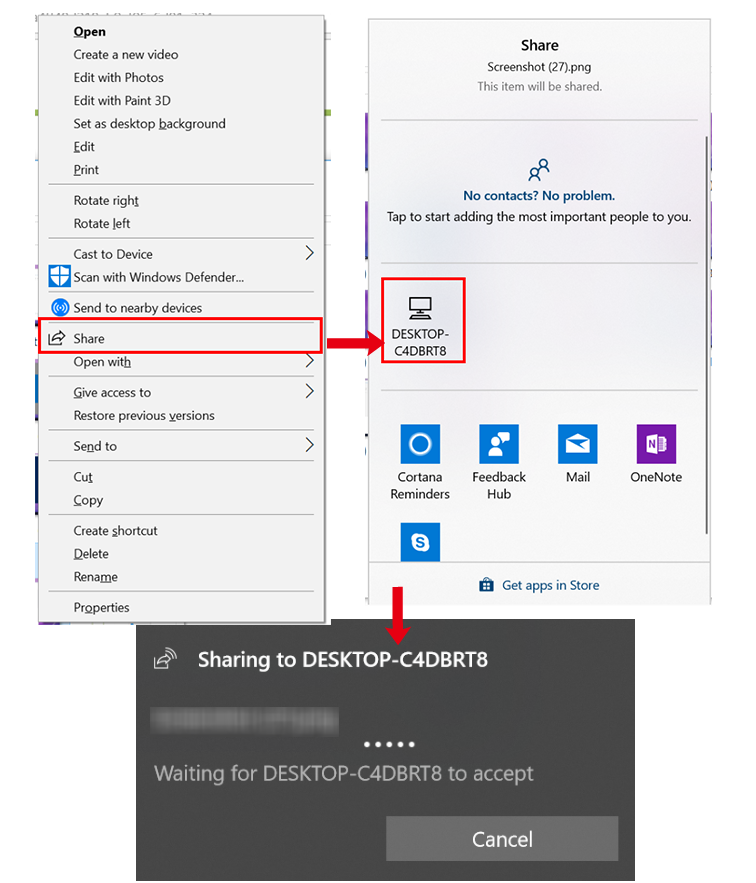
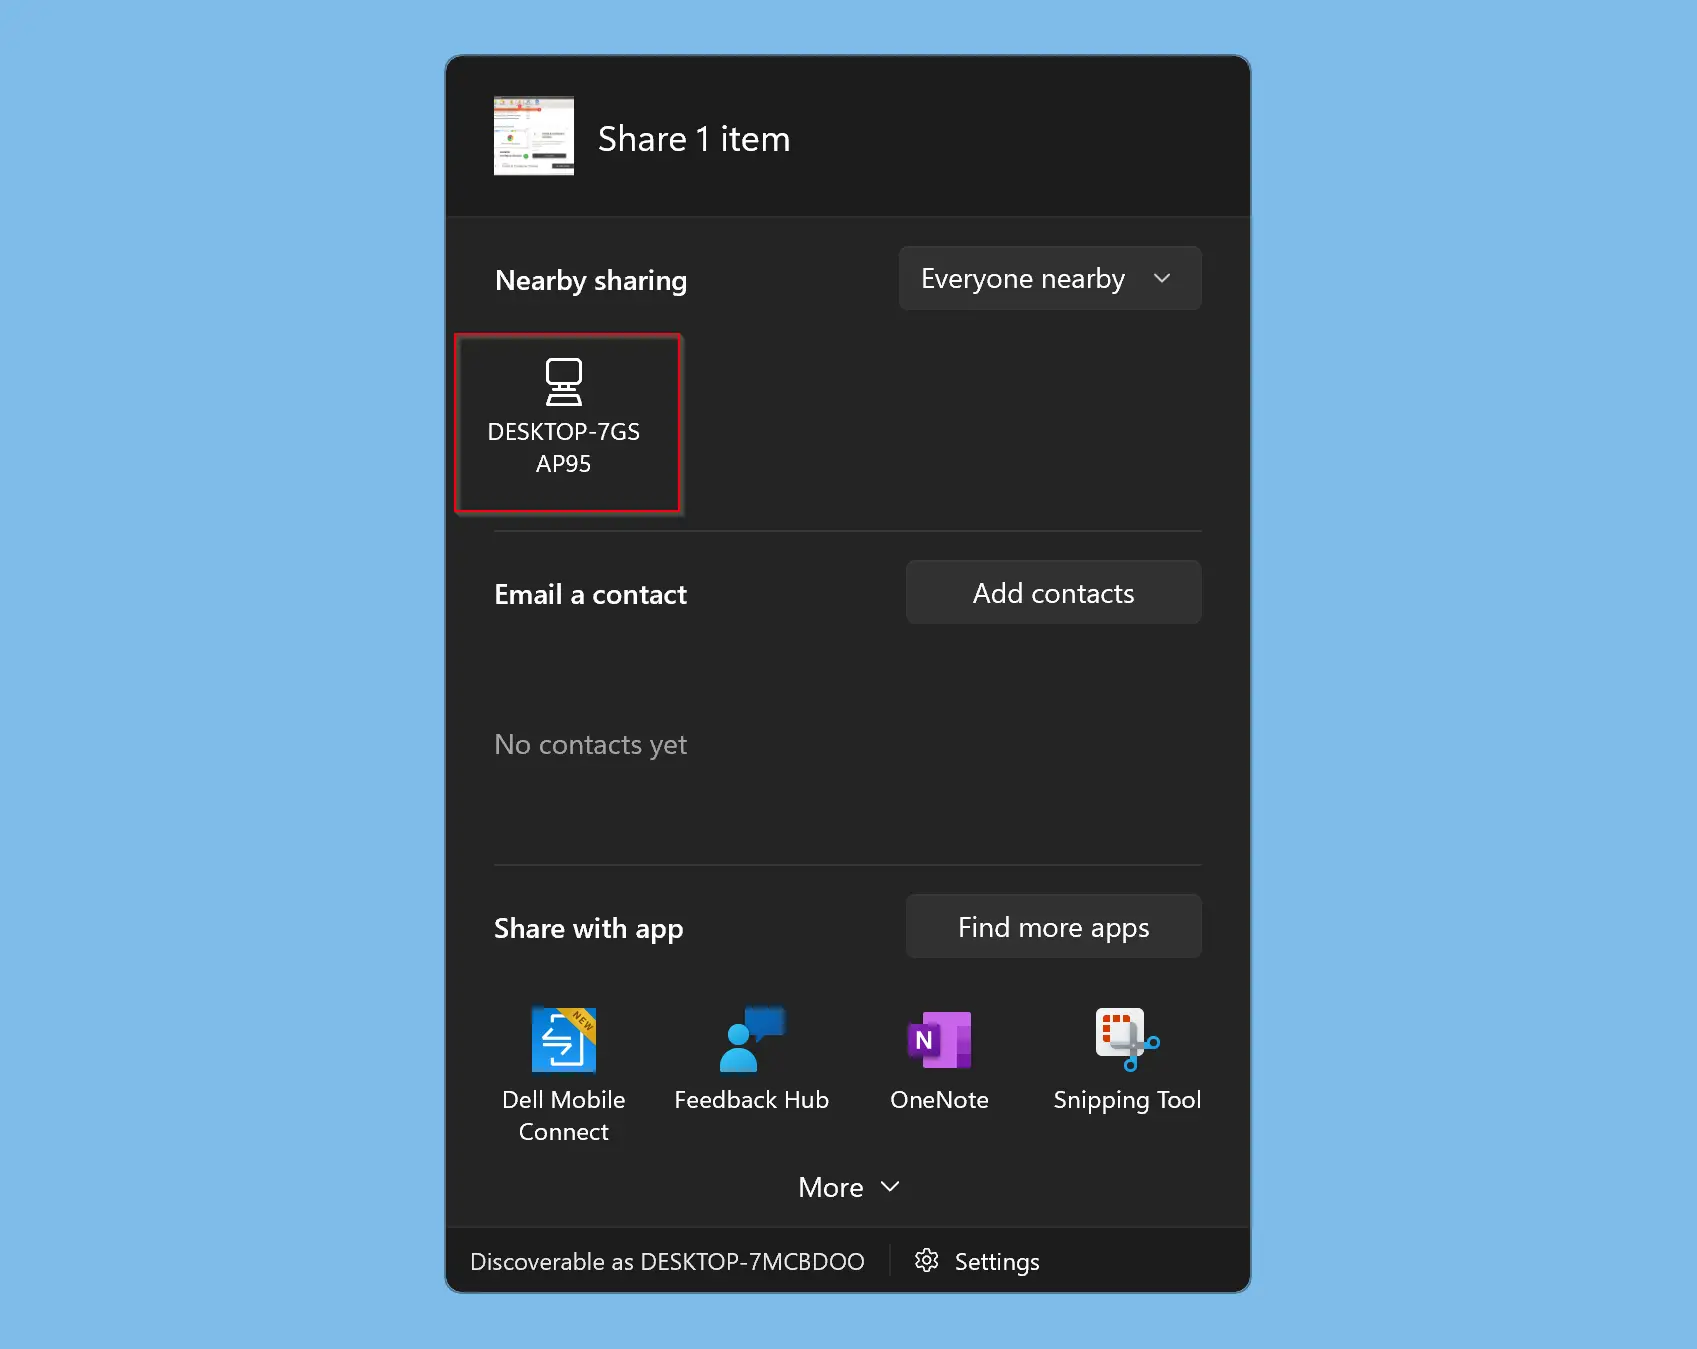
  1. Device Discovery: When enabled, Nearby Sharing broadcasts a signal that allows other nearby devices to detect its presence. This discovery phase relies on the Bluetooth protocol, ensuring a secure and reliable connection.
  2. Pairing and Connection: Upon detecting a compatible device, the user can initiate a connection by selecting the desired recipient. Windows 10 utilizes Wi-Fi Direct for the actual data transfer, leveraging the higher bandwidth and speed of this technology for faster file transfers.
  3. Data Transfer: Once the connection is established, the user can select the files or folders they wish to share. The data is then securely transmitted to the recipient device, ensuring privacy and integrity.

Benefits of Nearby Sharing

The ease of use and versatility of Nearby Sharing translate into a multitude of benefits for Windows 10 users:

  • Simplified File Transfers: Eliminating the need for cumbersome external drives or cloud storage services, Nearby Sharing offers a streamlined and convenient method for transferring files between devices. This is particularly useful for sharing large files, such as high-resolution photos, videos, or documents, where traditional methods can be time-consuming and inefficient.
  • Enhanced Collaboration: Nearby Sharing fosters seamless collaboration by facilitating the quick and easy sharing of files between colleagues or classmates working on projects. This can significantly improve workflow efficiency and accelerate project completion.
  • Increased Productivity: The ability to share files effortlessly across devices empowers users to access and work on their files from any location. This flexibility increases productivity by allowing for seamless transitions between devices without interruptions.
  • Secure Data Transfer: Unlike traditional file-sharing methods that rely on external servers or cloud storage, Nearby Sharing utilizes secure protocols, ensuring the privacy and integrity of shared data. This is particularly relevant in situations where sensitive information needs to be transferred.

Applications of Nearby Sharing

The versatility of Nearby Sharing extends beyond simple file transfers, finding its application in various scenarios:

  • Personal Use: Sharing photos and videos with friends and family, transferring documents between personal devices, or sharing music playlists between devices are just some examples of how Nearby Sharing enhances personal use cases.
  • Professional Settings: In professional environments, Nearby Sharing can facilitate collaborative projects, allowing team members to share large files, presentations, or project documents quickly and securely.
  • Educational Institutions: Students can utilize Nearby Sharing to share assignments, research materials, or group projects with classmates, fostering a collaborative learning environment.
  • Creative Collaboration: Artists, designers, and other creative professionals can leverage Nearby Sharing to share large design files, sketches, or project updates with collaborators, streamlining their creative workflow.

Frequently Asked Questions (FAQs)

Q: What devices are compatible with Nearby Sharing?

A: Nearby Sharing is compatible with Windows 10 devices that have Bluetooth and Wi-Fi Direct capabilities. This includes laptops, desktops, tablets, and even some printers.

Q: How secure is Nearby Sharing?

A: Nearby Sharing utilizes Bluetooth and Wi-Fi Direct protocols, both of which are secure communication technologies. Data transfer is encrypted, ensuring privacy and integrity.

Q: Can I share files with devices outside of my network?

A: Nearby Sharing requires both devices to be within close proximity and on the same network. It does not support sharing files with devices on different networks.

Q: What types of files can I share with Nearby Sharing?

A: Nearby Sharing can handle various file types, including documents, images, videos, music, and even folders.

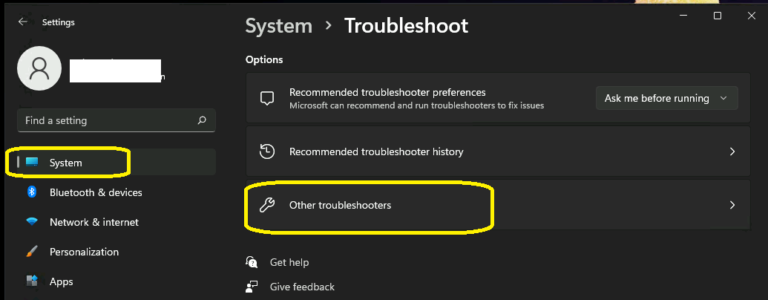
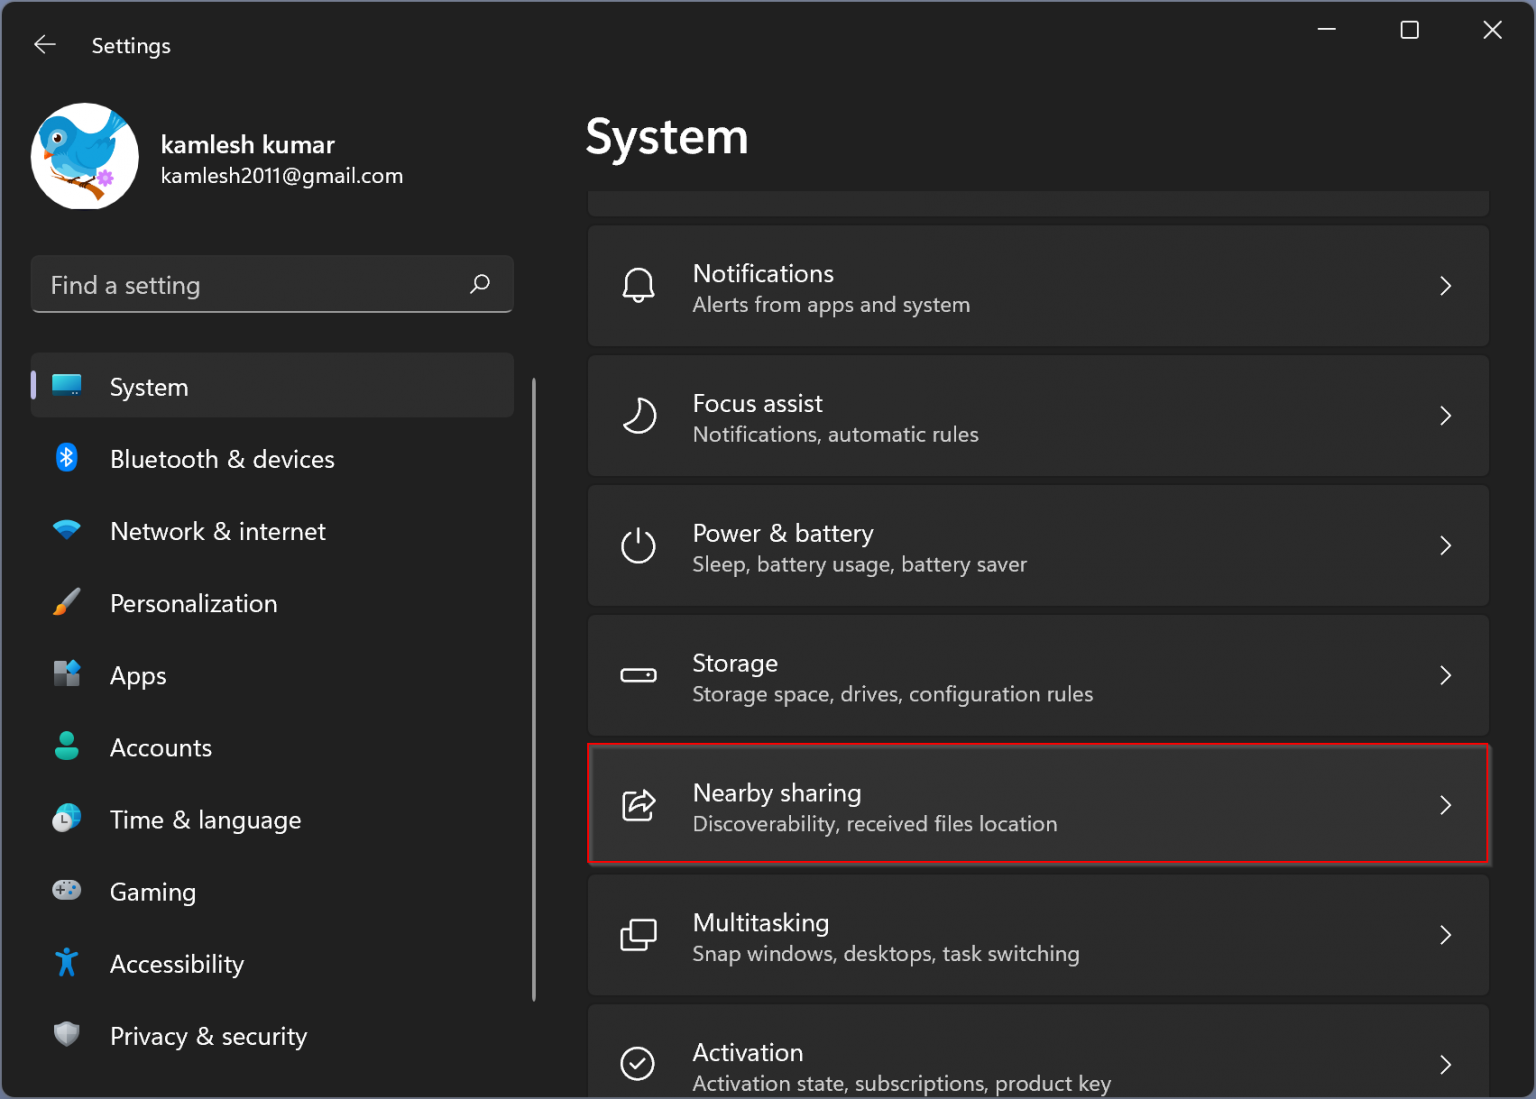
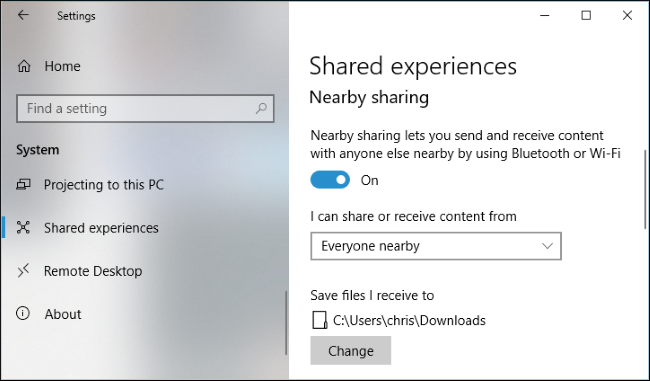
Q: How can I enable or disable Nearby Sharing?

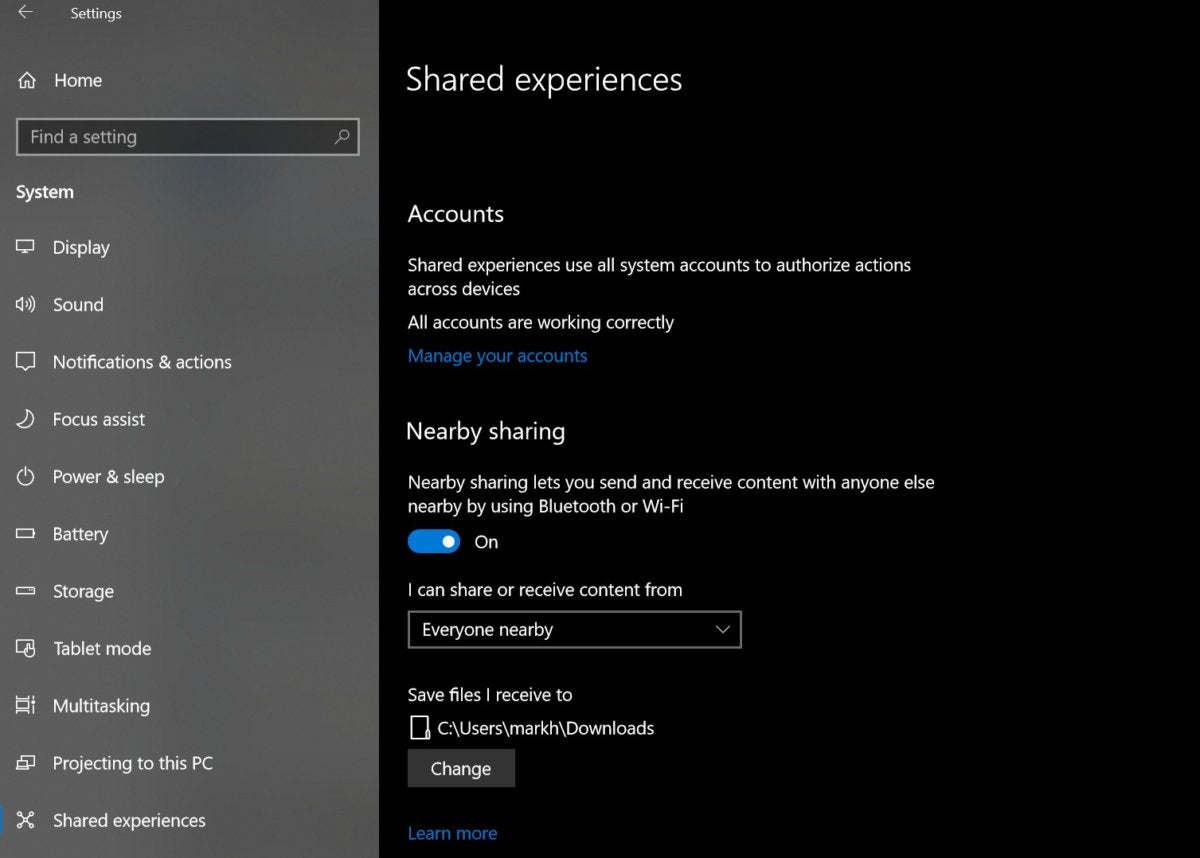
A: You can enable or disable Nearby Sharing by navigating to "Settings > System > Shared experiences" on your Windows 10 device.

Tips for Utilizing Nearby Sharing Effectively

  • Ensure Devices are Discoverable: Enable "Nearby Sharing" on both devices to ensure they can detect each other.
  • Confirm Device Compatibility: Verify that both devices are compatible with Nearby Sharing.
  • Keep Devices in Close Proximity: Nearby Sharing requires both devices to be within close range for successful data transfer.
  • Check for Updates: Ensure both devices are running the latest versions of Windows 10 to benefit from the latest features and improvements.
  • Monitor Data Transfer Progress: Pay attention to the transfer progress indicator to ensure a successful transfer.

Conclusion

Windows 10’s Nearby Sharing feature stands as a testament to the power of modern technology in simplifying everyday tasks. Its intuitive design, secure protocols, and versatile applications make it a valuable tool for individuals and businesses alike. By streamlining file transfers, facilitating collaboration, and enhancing productivity, Nearby Sharing plays a crucial role in shaping the future of digital communication and collaboration. As technology continues to evolve, Nearby Sharing is poised to become an indispensable part of the digital ecosystem, empowering users to connect and share with ease and efficiency.

How to Use Nearby Sharing to Share Files in Windows 10 How to Use Nearby Sharing in Windows 10 How to Use Nearby Sharing on Windows 10
How Windows 10's Near Share feature wirelessly beams files to nearby PCs  PCWorld How to use Nearby sharing on Windows 10 or 11 and Microsoft Edge - YouTube How to Use Nearby Sharing on Windows 10
How to Use Nearby Sharing in Windows 10 Use Nearby sharing in Windows 10  HUAWEI Support Global

Closure

Thus, we hope this article has provided valuable insights into Seamless Sharing in the Digital Age: Exploring the Power of Windows 10’s Nearby Sharing Feature. We appreciate your attention to our article. See you in our next article!

Seamless Sharing: Exploring The Benefits Of Windows 11’s "Nearby Share" Feature

Seamless Sharing: Exploring the Benefits of Windows 11’s "Nearby Share" Feature

Introduction

In this auspicious occasion, we are delighted to delve into the intriguing topic related to Seamless Sharing: Exploring the Benefits of Windows 11’s "Nearby Share" Feature. Let’s weave interesting information and offer fresh perspectives to the readers.

Seamless Sharing: Exploring the Benefits of Windows 11’s "Nearby Share" Feature

Seamless File Sharing: Google Nearby Share for Windows

In the contemporary digital landscape, the ability to effortlessly share files and content between devices is paramount. Windows 11 introduces a powerful tool for achieving this seamless connectivity: "Nearby Share." This feature, inspired by the success of Android’s "Nearby Share" app, empowers users to quickly and securely transfer files, images, links, and even text between compatible devices within close proximity.

Understanding the Mechanics of Nearby Share

At its core, Nearby Share operates on the principles of Bluetooth and Wi-Fi Direct, establishing a direct connection between devices without relying on internet connectivity. This direct connection ensures swift and secure data transfer, minimizing the time and effort involved in sharing content.

The Advantages of Utilizing Nearby Share

  1. Simplicity and Convenience: Nearby Share significantly simplifies the process of file sharing. Users can effortlessly transfer files between their Windows 11 devices and compatible Android phones or tablets with just a few clicks. No complex configurations or cloud storage services are required, streamlining the entire process.

  2. Enhanced Security: Data transferred via Nearby Share is protected through encryption, ensuring that the content remains secure and inaccessible to unauthorized individuals. This robust security measure provides peace of mind for users sharing sensitive information.

  3. Increased Efficiency: Nearby Share eliminates the need for cumbersome file-sharing methods like email attachments or external drives. The direct connection between devices enables rapid transfers, saving valuable time and effort.

  4. Broader Device Compatibility: While primarily designed for seamless integration between Windows 11 and Android devices, Nearby Share also supports file transfers between compatible Windows 11 devices. This expanded compatibility further enhances the feature’s versatility.

Navigating the Nearby Share Setup Process

Setting up Nearby Share on a Windows 11 device is a straightforward process:

  1. Enable Bluetooth and Wi-Fi: Ensure that both Bluetooth and Wi-Fi are activated on the device.

  2. Access the Settings Menu: Navigate to the "Settings" app on the Windows 11 device.

  3. Locate the "Connected devices" Section: Within the "Settings" menu, locate the "Connected devices" section.

  4. Activate "Nearby Share": Select "Nearby Share" and enable the feature.

  5. Choose Sharing Preferences: Configure the sharing preferences, including the types of content to share and the visibility of the device to other Nearby Share users.

Exploring the Capabilities of Nearby Share

Nearby Share offers a wide range of functionalities to enhance the sharing experience:

  1. File Transfers: Transfer various file types, including documents, images, videos, and audio files, between compatible devices.

  2. Link Sharing: Share web links, URLs, and other online resources effortlessly.

  3. Text Sharing: Transfer short text messages or snippets of information between devices.

  4. Device Discovery: Nearby Share allows users to discover and connect with other compatible devices within proximity.

Frequently Asked Questions about Nearby Share

  • Q: What devices are compatible with Nearby Share?

    • A: Nearby Share is compatible with Windows 11 devices and Android devices running Android 6.0 (Marshmallow) or later.
  • Q: Does Nearby Share require internet connectivity?

    • A: No, Nearby Share utilizes Bluetooth and Wi-Fi Direct, enabling direct connections between devices without relying on internet access.
  • Q: Is Nearby Share secure?

    • A: Yes, Nearby Share employs encryption to protect data during transfer, ensuring security and privacy.
  • Q: How can I troubleshoot Nearby Share issues?

    • A: Ensure both devices have Bluetooth and Wi-Fi enabled. Check for software updates on both devices. Restart both devices and try again.
  • Q: Can I use Nearby Share to share files with non-compatible devices?

    • A: Currently, Nearby Share primarily supports transfers between Windows 11 and Android devices. Sharing with other operating systems may require alternative methods.

Tips for Optimizing Nearby Share

  • Maintain Close Proximity: Ensure the devices are within a reasonable distance for optimal connection.

  • Keep Bluetooth and Wi-Fi Enabled: Ensure both Bluetooth and Wi-Fi are activated on both devices for seamless connectivity.

  • Update Software Regularly: Update both Windows 11 and Android devices to the latest software versions for improved compatibility and performance.

  • Clear Background Processes: Close unnecessary background applications and processes to minimize potential interference with Nearby Share.

  • Check for Device Compatibility: Verify that both devices are compatible with Nearby Share before attempting file transfers.

Conclusion

Windows 11’s "Nearby Share" feature represents a significant advancement in seamless file sharing, offering simplicity, security, and efficiency. By leveraging Bluetooth and Wi-Fi Direct, Nearby Share enables rapid and secure data transfer between compatible devices, eliminating the need for cumbersome traditional methods. As technology continues to evolve, features like Nearby Share will play an increasingly vital role in enhancing the user experience and fostering seamless connectivity across diverse devices.

How to Use Nearby Sharing on Windows 11?  Gear Up Windows How to Use Nearby Sharing on Windows 11 Nearby Share is Finally Available on Windows, Allowing for a Seamless File Sharing Experience
How to Use Nearby Sharing on Windows 11?  Gear Up Windows How To Use Nearby Share In Windows 11_best Methods - Rayabaan Nearby share for pc  nearby share windows 11  android to pc file transfer  how to use nearby
What is Nearby Sharing in Windows 11, How Does it Work? -TECHNIG How to Enable Nearby Sharing in Windows 11?  Gear Up Windows

Closure

Thus, we hope this article has provided valuable insights into Seamless Sharing: Exploring the Benefits of Windows 11’s "Nearby Share" Feature. We thank you for taking the time to read this article. See you in our next article!

The Panasonic Toughbook: A Ruggedized Platform Powered By Windows 10

The Panasonic Toughbook: A Ruggedized Platform Powered by Windows 10

Introduction

In this auspicious occasion, we are delighted to delve into the intriguing topic related to The Panasonic Toughbook: A Ruggedized Platform Powered by Windows 10. Let’s weave interesting information and offer fresh perspectives to the readers.

The Panasonic Toughbook: A Ruggedized Platform Powered by Windows 10

Panasonic Toughbook CF-33 Rugged Windows 10 2-in-1 with 12-inch QHD display announced

Panasonic’s Toughbook line of laptops has long been synonymous with durability and reliability, designed for demanding environments where standard laptops would fail. The integration of Windows 10 on these ruggedized devices has further enhanced their capabilities, providing users with a familiar and powerful operating system that complements the inherent toughness of the hardware.

Understanding the Toughbook Advantage

The Toughbook series is renowned for its robust construction, capable of withstanding extreme temperatures, shocks, vibrations, dust, and even water. This resilience stems from the use of high-quality materials and rigorous testing procedures, ensuring that these devices can operate reliably in challenging conditions.

Windows 10: A Powerful and Familiar Operating System

Windows 10 provides a comprehensive and user-friendly interface that is familiar to millions of users worldwide. Its intuitive design, advanced security features, and wide range of applications make it an ideal platform for a diverse range of tasks.

The Synergy of Ruggedness and Software

The combination of Panasonic’s Toughbook hardware and Windows 10 offers a compelling proposition for professionals who require a reliable and powerful computing solution in demanding environments. This synergy provides users with:

  • Unparalleled Durability: The ruggedized construction of the Toughbook ensures that the device can withstand the rigors of field work, industrial settings, and other challenging environments.
  • Versatile Performance: Windows 10 provides a powerful and flexible platform that can handle demanding applications, from data analysis to multimedia creation.
  • Enhanced Security: Windows 10 offers comprehensive security features, including built-in antivirus protection and robust authentication options, safeguarding sensitive data and protecting against cyber threats.
  • Seamless Integration: Windows 10 seamlessly integrates with other devices and applications, allowing users to work efficiently across multiple platforms.

Applications Across Industries

The combination of Toughbook hardware and Windows 10 has found widespread adoption in various industries, including:

  • Field Service: Technicians and engineers rely on Toughbooks for on-site data collection, diagnostics, and repair documentation.
  • Manufacturing: Workers on the factory floor use Toughbooks for quality control, inventory management, and production monitoring.
  • Healthcare: Medical professionals use Toughbooks for patient records, medication administration, and remote consultations.
  • Law Enforcement: Police officers and first responders utilize Toughbooks for evidence collection, crime scene documentation, and communication.
  • Logistics and Transportation: Drivers and dispatchers use Toughbooks for route optimization, delivery tracking, and fleet management.

Key Features and Benefits

1. Long Battery Life: Toughbooks are equipped with high-capacity batteries that can power the device for extended periods, ensuring uninterrupted operation in remote locations or during long shifts.

2. Enhanced Connectivity: Toughbooks offer a range of connectivity options, including Wi-Fi, Bluetooth, cellular data, and even satellite communication, enabling reliable data transfer and access in diverse environments.

3. Customizable Configurations: Users can tailor the Toughbook to their specific needs by choosing from a variety of options, such as different screen sizes, processors, and storage capacities.

4. Comprehensive Security Features: Windows 10 provides robust security features, including BitLocker encryption, secure boot, and Windows Defender, protecting sensitive data and preventing unauthorized access.

5. Remote Management Capabilities: Administrators can remotely manage and configure Toughbooks, enabling efficient deployment and maintenance across a fleet of devices.

6. Software Compatibility: Toughbooks are compatible with a wide range of Windows 10 applications, providing users with access to a vast library of software solutions.

FAQs on Panasonic Toughbook with Windows 10

1. What are the key advantages of using a Panasonic Toughbook with Windows 10 in demanding environments?

The primary advantages lie in the synergy of ruggedized hardware and a powerful operating system. The Toughbook’s durability ensures reliable operation in harsh conditions, while Windows 10 provides a versatile and user-friendly platform for demanding tasks, enhanced security, and seamless integration with other devices.

2. Can I use standard Windows 10 applications on a Toughbook?

Yes, Toughbooks are fully compatible with a wide range of Windows 10 applications, allowing users to leverage the same software solutions they are accustomed to on standard laptops.

3. How does the battery life of a Toughbook compare to a standard laptop?

Toughbooks are designed with long battery life in mind, often exceeding the battery life of standard laptops. This is crucial for users who require uninterrupted operation in remote locations or during extended shifts.

4. What are the security features offered by Windows 10 on a Toughbook?

Windows 10 offers comprehensive security features, including BitLocker encryption, secure boot, and Windows Defender, protecting sensitive data and preventing unauthorized access.

5. Can I customize the configuration of a Toughbook to suit my specific needs?

Yes, Toughbooks offer a range of customizable options, including different screen sizes, processors, and storage capacities, allowing users to tailor the device to their specific requirements.

6. What are the common applications of Toughbooks in various industries?

Toughbooks are widely used in field service, manufacturing, healthcare, law enforcement, logistics, and transportation, providing reliable computing solutions in demanding environments.

Tips for Optimizing Your Panasonic Toughbook with Windows 10

1. Regular Maintenance: Perform regular maintenance tasks, such as updating drivers, running system scans, and clearing temporary files, to ensure optimal performance and stability.

2. Utilize Security Features: Enable Windows 10’s security features, such as BitLocker encryption and Windows Defender, to protect sensitive data and prevent unauthorized access.

3. Optimize Battery Life: Adjust power settings, disable unnecessary background processes, and utilize power-saving modes to extend battery life.

4. Utilize Remote Management Tools: Leverage Windows 10’s remote management capabilities to efficiently deploy, update, and maintain a fleet of Toughbooks.

5. Install Necessary Applications: Install essential applications and drivers tailored to your specific work requirements, maximizing the utility of your Toughbook.

Conclusion

Panasonic Toughbooks with Windows 10 offer a powerful and reliable computing solution for demanding environments. Their robust construction, versatile performance, and comprehensive security features make them ideal for professionals in various industries. By understanding the key features, benefits, and best practices for optimizing these devices, users can maximize their productivity and efficiency in challenging settings. The combination of Toughbook hardware and Windows 10 represents a compelling solution for users who require a durable, powerful, and secure computing experience in demanding environments.

Panasonic Toughbook 12" CF-33 MK2 Fully Rugged Detachable Notebook with Windows 10 Pro, i5 Panasonic announces Toughbook 33 2-in-1 detachable laptop powered by Windows 10  Windows The Panasonic Toughbook 20 is the first Windows 10 2-in-1 rugged laptop  Windows Central
Press To Zoom Toughbook 55  Panasonic Rugged Laptops  BAYCOM Panasonic unveils Toughbook CF-33 Windows 10 Powered Rugged 2-in-1 detachable Laptop
Panasonic launches the rugged Windows 10 2-in-1, Toughbook CF-33, in India - OnMSFT.com Panasonic TOUGHBOOK G2  FZ-G2 Fully Rugged Tablet and 2-in-1 โ€“ MooringTech

Closure

Thus, we hope this article has provided valuable insights into The Panasonic Toughbook: A Ruggedized Platform Powered by Windows 10. We thank you for taking the time to read this article. See you in our next article!

The Windows 11 Gaming Overlay: A Comprehensive Guide For Enhanced Gameplay

The Windows 11 Gaming Overlay: A Comprehensive Guide for Enhanced Gameplay

Introduction

With great pleasure, we will explore the intriguing topic related to The Windows 11 Gaming Overlay: A Comprehensive Guide for Enhanced Gameplay. Let’s weave interesting information and offer fresh perspectives to the readers.

The Windows 11 Gaming Overlay: A Comprehensive Guide for Enhanced Gameplay

Windows 11: You'll Need a New App to Open this MS-Gaming Overlay - YouTube

The Windows 11 Gaming Overlay is a powerful tool designed to elevate the gaming experience. This built-in feature provides a range of functionalities, allowing players to seamlessly access essential information, manage system settings, and interact with their gaming environment without ever leaving their game.

Understanding the Gaming Overlay

The Gaming Overlay is essentially a transparent, customizable interface that appears on top of any game window. It is accessed via a hotkey combination, typically the Windows key + G, and offers a variety of features, including:

  • Performance Monitoring: Players can track key system metrics like CPU usage, GPU load, frame rate (FPS), and memory usage in real-time. This information is crucial for understanding system performance and identifying potential bottlenecks that could affect gameplay.
  • Game Bar: This central hub provides access to various features, including recording gameplay, taking screenshots, adjusting audio settings, and launching other applications.
  • Chat and Communication: The Overlay allows players to communicate with friends and fellow gamers via text and voice chat, without needing to switch between applications.
  • Widgets and Apps: The Overlay supports a range of widgets and apps, such as the Xbox Game Bar, which offers features like achievements tracking, game invites, and cloud saves.
  • Customization: The Overlay can be customized to suit individual preferences, allowing players to choose its location, transparency, and the specific features displayed.

Benefits of the Gaming Overlay

The Windows 11 Gaming Overlay offers a plethora of benefits for both casual and hardcore gamers, enhancing their gaming experience in various ways:

  • Improved Game Performance: By monitoring system performance, players can identify potential issues hindering gameplay and adjust settings accordingly. This could involve closing unnecessary applications, lowering graphics settings, or ensuring adequate cooling.
  • Seamless Multitasking: The Overlay allows players to manage system settings, communicate with friends, and access other applications without interrupting gameplay. This is especially beneficial for players who enjoy streaming or recording their gameplay.
  • Enhanced Gameplay Experience: Features like recording gameplay, taking screenshots, and accessing performance metrics can significantly improve the overall gaming experience, allowing players to capture memorable moments, analyze their performance, and optimize their gameplay.
  • Simplified Communication: The Overlay facilitates communication with friends and fellow gamers through voice and text chat, creating a more immersive and connected gaming experience.
  • Accessibility and Convenience: The Overlay provides easy access to essential features and information, making it a convenient tool for gamers of all levels.

Accessing and Using the Gaming Overlay

The Windows 11 Gaming Overlay is readily accessible and easy to use. Here’s a step-by-step guide:

  1. Enable the Gaming Overlay: Open the Windows Settings app, navigate to "Gaming," and ensure the "Xbox Game Bar" toggle is switched on.
  2. Launch a Game: Start any game compatible with the Gaming Overlay.
  3. Activate the Overlay: Press the Windows key + G to activate the overlay.
  4. Navigate the Overlay: Use the mouse or keyboard to interact with the various features and widgets available.
  5. Customize the Overlay: Access the settings menu to adjust the overlay’s appearance, features, and hotkeys.

Frequently Asked Questions (FAQs)

Q1: What games are compatible with the Gaming Overlay?

A: The Gaming Overlay works with a wide range of games, including most modern titles released on the Windows platform. However, some older or less popular games may not be compatible.

Q2: Can I customize the overlay’s appearance?

A: Yes, the overlay can be customized to match individual preferences. You can adjust its transparency, location, and the features displayed.

Q3: How do I record gameplay using the overlay?

A: To record gameplay, click the "Record" button in the Game Bar. You can then start and stop recording at any time.

Q4: Can I use the overlay to communicate with friends?

A: Yes, the overlay allows you to communicate with friends via voice and text chat. You can join or create party chats directly from the overlay.

Q5: How do I access the overlay’s settings?

A: Click the "Settings" button in the Game Bar to access the overlay’s settings menu.

Tips for Using the Gaming Overlay

  • Experiment with different features: The Gaming Overlay offers a wide range of features. Experiment with them to find those that best suit your gaming needs and preferences.
  • Customize the overlay for optimal performance: Adjust the overlay’s transparency, location, and features to minimize distractions and ensure smooth gameplay.
  • Utilize the performance monitoring tools: Track key system metrics to identify potential bottlenecks and optimize your gaming experience.
  • Explore the available widgets and apps: The overlay supports a range of widgets and apps, offering additional features and functionalities.
  • Keep the overlay up-to-date: Ensure you have the latest version of the Gaming Overlay to benefit from new features and bug fixes.

Conclusion

The Windows 11 Gaming Overlay is a powerful tool that significantly enhances the gaming experience. By providing access to essential information, facilitating communication, and offering a range of customization options, the overlay empowers players to maximize their gameplay and enjoy a more immersive and enjoyable experience. Whether you’re a casual gamer or a seasoned veteran, the Gaming Overlay is a valuable tool worth exploring and utilizing.

Windows 11 Gaming Features: Upgrades That Make Gaming Better - TechPP How to Improve Gaming Performance in Windows 11 [15+ Methods] Windows 11 22H2 New Gaming Features - YouTube
Windows 11 Gaming Features: Upgrades That Make Gaming Better - TechPP 8 Tips to Optimize Your Windows 11 PC for Gaming Performance - Make Tech Easier Windows 11 Gaming
TOP 5 Best Custom Windows 11 OS For Gaming And Performance 2023 Windows 11 gaming - intelligenceras

Closure

Thus, we hope this article has provided valuable insights into The Windows 11 Gaming Overlay: A Comprehensive Guide for Enhanced Gameplay. We appreciate your attention to our article. See you in our next article!

Exploring The Realm Of Windows 11: A Comprehensive Guide

Exploring the Realm of Windows 11: A Comprehensive Guide

Introduction

In this auspicious occasion, we are delighted to delve into the intriguing topic related to Exploring the Realm of Windows 11: A Comprehensive Guide. Let’s weave interesting information and offer fresh perspectives to the readers.

Exploring the Realm of Windows 11: A Comprehensive Guide

Exploring Windows 11: The Illustrated, Practical Guide to Using Microsoft Windows ยป GFxtra

Windows 11, the latest iteration of Microsoft’s ubiquitous operating system, has ushered in a new era of computing, boasting a refined user interface, enhanced security features, and a multitude of performance improvements. This guide aims to provide a comprehensive understanding of Windows 11, delving into its key functionalities, advantages, and potential drawbacks, while also addressing common questions and offering helpful tips for navigating this new operating system.

Understanding the Foundation: Key Features of Windows 11

Windows 11 is built upon a foundation of innovation, incorporating a range of features designed to enhance user experience and productivity. Some of the most prominent features include:

  • Refined User Interface: Windows 11 boasts a visually appealing and streamlined user interface, with rounded corners, centered taskbar icons, and a modernized Start menu. This aesthetic overhaul aims to improve user navigation and create a more cohesive visual experience.

  • Enhanced Security: Windows 11 prioritizes security with features like Microsoft Defender, a built-in antivirus program, and Windows Hello, which enables secure facial recognition or fingerprint login. These measures aim to safeguard users from malware and unauthorized access.

  • Performance Optimization: Windows 11 incorporates performance optimizations to enhance system responsiveness and efficiency. These improvements include faster boot times, improved application loading speeds, and optimized resource utilization.

  • Gaming Enhancements: Windows 11 offers features specifically designed to enhance gaming experiences, such as Auto HDR, which automatically applies high dynamic range to games, and DirectStorage, which allows for faster loading times.

  • Integration with Microsoft Ecosystem: Windows 11 seamlessly integrates with other Microsoft services, including OneDrive, Microsoft Teams, and Xbox Game Pass, offering a unified and convenient experience for users across various platforms.

Benefits of Embracing Windows 11

The adoption of Windows 11 presents users with a range of potential benefits, including:

  • Improved User Experience: The refined user interface and intuitive navigation contribute to a more streamlined and user-friendly experience.

  • Enhanced Security: The robust security features provide users with peace of mind, protecting their data and privacy from potential threats.

  • Increased Productivity: The performance optimizations and integration with Microsoft services can significantly improve productivity and efficiency.

  • Modernized Aesthetics: The visually appealing design and modern elements contribute to a more visually engaging and enjoyable computing experience.

  • Gaming Enhancements: The gaming-centric features offer an immersive and visually stunning gaming experience, particularly for users with high-performance systems.

Potential Drawbacks and Considerations

While Windows 11 offers numerous advantages, it’s important to acknowledge potential drawbacks and considerations:

  • Hardware Requirements: Windows 11 has specific hardware requirements, including a compatible processor, sufficient RAM, and a TPM 2.0 module. Users with older systems may need to upgrade their hardware to run Windows 11 effectively.

  • Compatibility Issues: Some older applications and devices may not be fully compatible with Windows 11, leading to potential functionality issues or compatibility problems.

  • Learning Curve: The new user interface and features may require users to adapt and learn new functionalities, potentially leading to a learning curve for those accustomed to previous Windows versions.

  • Privacy Concerns: As with any operating system, concerns regarding data privacy and user tracking may arise. Users should carefully review privacy settings and ensure they are comfortable with the data collection practices employed by Windows 11.

Addressing Common Questions: FAQs

Q: Is Windows 11 free to upgrade?

A: Windows 11 is offered as a free upgrade for eligible Windows 10 users. However, eligibility depends on specific hardware requirements, and not all Windows 10 devices are guaranteed to receive the upgrade.

Q: What are the minimum system requirements for Windows 11?

A: The minimum system requirements for Windows 11 include a 1 GHz or faster processor with two or more cores, 4 GB of RAM, 64 GB of storage space, a compatible graphics card, and a TPM 2.0 module.

Q: Is Windows 11 compatible with my current hardware?

A: To determine if your current hardware meets the requirements for Windows 11, you can use the "PC Health Check" application available on the Microsoft website. This tool assesses your system and provides information on compatibility.

Q: Can I downgrade from Windows 11 to Windows 10?

A: While downgrading from Windows 11 to Windows 10 is possible, it may not be a straightforward process. Microsoft recommends checking their support documentation for detailed instructions and potential limitations.

Q: How do I customize the Windows 11 user interface?

A: Windows 11 offers a range of customization options, including the ability to change themes, personalize the Start menu, adjust taskbar settings, and customize desktop backgrounds. You can access these settings through the "Settings" application.

Q: What are some tips for optimizing Windows 11 performance?

A: To optimize Windows 11 performance, consider the following tips:

  • Disable unnecessary startup programs: Minimize the number of programs that automatically launch at startup to reduce resource utilization.
  • Clean up disk space: Regularly delete unnecessary files and folders to free up storage space and improve system responsiveness.
  • Update drivers: Ensure that your device drivers are up to date to enhance hardware compatibility and performance.
  • Adjust power settings: Optimize power settings to balance performance and energy efficiency based on your usage patterns.

Conclusion: Navigating the Future of Computing

Windows 11 marks a significant step forward in the evolution of computing, offering a range of innovative features and improvements designed to enhance user experience, productivity, and security. While some users may encounter challenges or require adjustments, the benefits of embracing Windows 11, including its refined interface, enhanced security, and performance optimizations, outweigh potential drawbacks for many. By understanding the key features, benefits, and potential considerations, users can navigate the world of Windows 11 effectively and unlock the full potential of this latest operating system.

Windows 11 Comprehensive Guide And Cheat Sheet, 54% OFF A Comprehensive English Guide on Upgrading to Windows 11 - REALM RUSH Windows 11 Comprehensive Guide And Cheat Sheet, 54% OFF
This Microsoft Certified Partner tried to sell me the non-existent Windows 11 [Updated] Mastering The Taskbar In Windows 11 A Comprehensive G - vrogue.co Exploring the Boundless Realms: A Comprehensive Guide to Virtual Reality Technology  SRI IT
Exploring The Realm Of Gaming Guilds: A Comprehensive Guide For Gamers - GamesPad Series 1 1 - Data Analytics: A Comprehensive Beginnerโ€™s Guide to Learn the Realms of  bol

Closure

Thus, we hope this article has provided valuable insights into Exploring the Realm of Windows 11: A Comprehensive Guide. We thank you for taking the time to read this article. See you in our next article!

Understanding The MSMG Toolkit For Windows 11: A Comprehensive Guide

Understanding the MSMG Toolkit for Windows 11: A Comprehensive Guide

Introduction

With enthusiasm, let’s navigate through the intriguing topic related to Understanding the MSMG Toolkit for Windows 11: A Comprehensive Guide. Let’s weave interesting information and offer fresh perspectives to the readers.

Understanding the MSMG Toolkit for Windows 11: A Comprehensive Guide

Msmg toolkit windows 11 - barterloki

The MSGM Toolkit, often associated with Windows 11, is a collection of tools designed to streamline the process of managing and deploying Windows operating systems within an enterprise environment. It offers a variety of features that simplify tasks such as product activation, license management, and system customization. However, it is crucial to understand that the MSGM Toolkit is not an officially sanctioned Microsoft product. Its use falls into a grey area of legality, and its distribution and application are often associated with unauthorized activation of Windows operating systems.

Key Features and Functionality:

The MSGM Toolkit encompasses a range of tools, each serving a specific purpose. Some of the most prominent features include:

  • Product Activation: The toolkit enables the activation of Windows operating systems without requiring a valid product key. This is achieved through various methods, including KMS (Key Management Service) activation and using pre-activated versions of Windows.
  • License Management: The MSGM Toolkit can assist in managing and tracking licenses for Windows installations. This feature can be helpful for organizations with a large number of computers running Windows.
  • System Customization: The toolkit allows for modifications to the Windows operating system, such as disabling certain features, customizing the boot process, and altering the system’s appearance.
  • Driver Management: The MSGM Toolkit can facilitate the installation and management of drivers for various hardware components. This can be useful for ensuring compatibility and stability across different computer systems.

The Legal and Ethical Considerations:

While the MSGM Toolkit offers a range of attractive features, it is essential to recognize the legal and ethical implications associated with its use.

  • License Violation: Using the MSGM Toolkit to activate Windows without a valid license is a violation of Microsoft’s licensing terms and conditions. This can result in legal repercussions, including fines and penalties.
  • Security Risks: The MSGM Toolkit is often distributed through unofficial channels, increasing the risk of malware or other security threats being bundled with the software.
  • Software Integrity: Modifying the Windows operating system using the MSGM Toolkit can potentially compromise its stability and security. This can lead to system crashes, data loss, or vulnerability to malicious attacks.

Alternatives to the MSGM Toolkit:

For organizations seeking legitimate and ethical methods to manage and deploy Windows operating systems, several alternative solutions are available:

  • Microsoft Volume Licensing: This program offers various licensing options for organizations, including volume discounts and flexible deployment models.
  • Microsoft Endpoint Manager: This cloud-based management platform provides comprehensive tools for managing Windows devices, including deployment, updates, and security.
  • Third-Party Deployment Tools: Numerous reputable third-party software providers offer deployment solutions that comply with Microsoft’s licensing terms and conditions.

Conclusion:

The MSGM Toolkit presents a complex scenario, offering potential benefits but also significant legal and ethical risks. While it may seem attractive for its ability to circumvent license requirements, the potential consequences outweigh any perceived advantages. Organizations should prioritize legitimate and ethical methods for managing and deploying Windows operating systems, ensuring compliance with licensing terms and safeguarding the integrity and security of their systems.

FAQs:

1. Is the MSGM Toolkit legal?

The MSGM Toolkit is not an officially sanctioned Microsoft product, and its use to activate Windows without a valid license is a violation of Microsoft’s licensing terms.

2. What are the risks of using the MSGM Toolkit?

Using the MSGM Toolkit can expose your system to malware, compromise system stability, and violate Microsoft’s licensing terms, leading to legal consequences.

3. What are the alternatives to the MSGM Toolkit?

Legitimate alternatives include Microsoft Volume Licensing, Microsoft Endpoint Manager, and third-party deployment tools that comply with Microsoft’s licensing terms.

4. Can I use the MSGM Toolkit for personal use?

While the MSGM Toolkit might appear tempting for personal use, it is still illegal and carries the same risks as using it in a corporate environment.

5. What are the potential consequences of using the MSGM Toolkit?

Potential consequences include fines, penalties, system instability, data loss, and vulnerability to malware.

Tips:

  • Prioritize legitimate and ethical methods for managing and deploying Windows operating systems.
  • Ensure compliance with Microsoft’s licensing terms and conditions.
  • Utilize official Microsoft tools and resources for managing Windows installations.
  • Avoid using unofficial or potentially illegal software like the MSGM Toolkit.
  • Implement robust security measures to protect your systems from malware and other threats.

Conclusion:

The MSGM Toolkit, while offering seemingly convenient features, presents significant legal and ethical risks. Organizations and individuals should prioritize legitimate and ethical methods for managing and deploying Windows operating systems, safeguarding their systems from potential security vulnerabilities and legal repercussions.

Msmg toolkit windows 11 Msmg toolkit windows 11 - naawell Msmg toolkit windows 11
Msmg toolkit windows 11 - kcHop Msmg toolkit windows 11 Msmg toolkit windows 11
Building a Windows 11 Lighter Edition With MSMG Toolkit version 12.4 - YouTube ์œˆ๋„์šฐ ํฌ๋Ÿผ - ์ž ๋ฃŒ ์‹ค - MSMG Toolkit 11.7 - Win OS ๊ธฐ๋Šฅ ํ™œ์„ฑํ™” ๋˜๋Š” ๋น„ํ™œ์„ฑํ™” ๋„๊ตฌ

Closure

Thus, we hope this article has provided valuable insights into Understanding the MSMG Toolkit for Windows 11: A Comprehensive Guide. We thank you for taking the time to read this article. See you in our next article!

Navigating The Recycle Bin: A Comprehensive Guide To Windows 10’s Essential Feature

Navigating the Recycle Bin: A Comprehensive Guide to Windows 10’s Essential Feature

Introduction

With enthusiasm, let’s navigate through the intriguing topic related to Navigating the Recycle Bin: A Comprehensive Guide to Windows 10’s Essential Feature. Let’s weave interesting information and offer fresh perspectives to the readers.

Windows 10 Recycle Bin: All the Things You Need to Know

The Recycle Bin, a ubiquitous feature in Windows operating systems, acts as a temporary holding area for deleted files. This seemingly simple tool plays a crucial role in data management, offering users a safety net for accidental deletions and a convenient way to reclaim storage space. Understanding its functionalities and nuances is essential for effective file management and data recovery.

Understanding the Basics

The Recycle Bin operates on a straightforward principle: when a file is deleted, it is not permanently erased from the system but instead moved to this temporary storage location. This allows users a chance to retrieve the deleted file if needed. However, it is crucial to remember that the Recycle Bin is not an infinite repository. It has a fixed size limit, determined by system settings, and once it reaches capacity, older files will be permanently deleted to accommodate new ones.

Accessing the Recycle Bin

Several methods allow users to access the Recycle Bin:

  • Desktop Icon: The most common method is through the Recycle Bin icon typically found on the desktop. Double-clicking this icon opens a window displaying the contents of the Recycle Bin.
  • File Explorer: Alternatively, users can access the Recycle Bin through File Explorer. Navigating to "This PC" and then "Recycle Bin" will open the same window as the desktop icon.
  • Search Bar: Typing "Recycle Bin" in the Windows search bar will also bring up the Recycle Bin window.

Managing the Recycle Bin

The Recycle Bin offers several functionalities for managing deleted files:

  • Emptying the Recycle Bin: This action permanently removes all files from the Recycle Bin, freeing up storage space. Users can empty the Recycle Bin by right-clicking the icon and selecting "Empty Recycle Bin" or by using the "Empty" button within the Recycle Bin window.
  • Restoring Files: If a file has been deleted accidentally, it can be restored from the Recycle Bin. Simply locate the desired file in the Recycle Bin window, right-click it, and select "Restore." The file will be moved back to its original location.
  • Deleting Specific Files: If a particular file needs to be permanently deleted, it can be done directly from the Recycle Bin. Right-click the file and select "Delete" to permanently erase it from the system.
  • Changing Recycle Bin Settings: Users can customize the Recycle Bin’s behavior through the Control Panel. Accessing the "System and Security" section, then "System," and finally "Advanced System Settings" allows users to modify the Recycle Bin’s size, determine if files should be deleted immediately without moving to the Recycle Bin, and specify the number of days before files are automatically deleted from the Recycle Bin.

Beyond the Basics: Understanding Hidden Files and Special Cases

While the Recycle Bin offers a convenient way to manage deleted files, it’s important to understand that certain files may not always end up there. For instance, files deleted from network drives or external devices are not typically stored in the Recycle Bin. Additionally, some system files or files deleted using specific commands might bypass the Recycle Bin altogether.

Data Recovery: When the Recycle Bin Fails

Even though the Recycle Bin offers a safety net for accidental deletions, it’s not a foolproof solution for data recovery. If the Recycle Bin has been emptied or if a file was deleted directly without going through the Recycle Bin, specialized data recovery software might be necessary to retrieve the lost data. These programs scan the hard drive for traces of deleted files and attempt to recover them, but success is not guaranteed.

FAQs

1. What happens when I empty the Recycle Bin?

Emptying the Recycle Bin permanently deletes all files contained within it, freeing up storage space on your hard drive. These files are no longer recoverable without specialized data recovery software.

2. Can I change the size of the Recycle Bin?

Yes, you can adjust the Recycle Bin’s size through the Control Panel. This allows you to allocate more or less storage space for deleted files, depending on your needs.

3. What happens if the Recycle Bin is full?

When the Recycle Bin reaches its capacity, older files will be automatically deleted to accommodate new ones. This can lead to permanent data loss if the desired file is overwritten.

4. Can I recover files deleted from external drives?

Files deleted from external drives are not typically stored in the Recycle Bin. They are deleted directly from the device and might be recoverable using data recovery software.

5. Why can’t I find certain deleted files in the Recycle Bin?

Some files, like system files or files deleted using specific commands, may bypass the Recycle Bin and be deleted directly from the hard drive.

Tips for Effective Recycle Bin Usage

  • Regularly empty the Recycle Bin: This prevents it from filling up and potentially overwriting important files.
  • Understand the implications of emptying the Recycle Bin: Be cautious before emptying the Recycle Bin, as it permanently deletes files.
  • Use data recovery software if needed: If you need to recover files that have been deleted from the Recycle Bin, consider using specialized data recovery software.
  • Consider using cloud storage: Cloud storage services offer an additional layer of protection for your data. Deleted files might be recoverable from your cloud storage account.
  • Back up your data regularly: Regularly backing up your data is essential to prevent data loss, regardless of the Recycle Bin’s role.

Conclusion

The Recycle Bin in Windows 10 is a valuable tool for managing deleted files, offering a safety net for accidental deletions and a convenient way to reclaim storage space. Understanding its functionality, including its limitations, is crucial for effective file management and data recovery. While the Recycle Bin provides a safety net, it’s important to remember that it is not a foolproof solution for data loss. Regular backups and proper data management practices are essential to ensure the safety of your valuable information.

We answer: What is Recycle Bin in Windows 10 and how to use it? The Complete Guide of $recycle.bin Folder: What is It and How to Use Recycle Bin in Windows 10  CustomGuide
Recycle Bin In Windows 10 Customguide Images How to Pin the Recycle Bin in Windows 10: 12 Steps (with Pictures) How To Get Help In Windows Recycle Bin โ€“ Lates Windows 10 Update
Recycle Bin in Windows 10  CustomGuide Recycle bin windows 10 - fiaceto

Closure

Thus, we hope this article has provided valuable insights into Navigating the Recycle Bin: A Comprehensive Guide to Windows 10’s Essential Feature. We thank you for taking the time to read this article. See you in our next article!

Rejuvenating Your Windows 11: A Guide To Clean Installation With Data Preservation

Rejuvenating Your Windows 11: A Guide to Clean Installation with Data Preservation

Introduction

With great pleasure, we will explore the intriguing topic related to Rejuvenating Your Windows 11: A Guide to Clean Installation with Data Preservation. Let’s weave interesting information and offer fresh perspectives to the readers.

Rejuvenating Your Windows 11: A Guide to Clean Installation with Data Preservation

How to Clean Install Windows 11: A Step-By-Step Guide - Guiding Tech

Windows 11, like any operating system, can experience performance degradation over time due to accumulated temporary files, outdated drivers, and software conflicts. A clean installation, while seemingly drastic, can often be the most effective way to revitalize your system and address these issues. However, the fear of losing precious data often deters users from undertaking this process. Fortunately, reinstalling Windows 11 can be accomplished without sacrificing your valuable files and applications. This guide will provide a comprehensive understanding of how to perform a clean installation while preserving your data, highlighting the benefits and considerations involved.

Understanding the Need for a Clean Installation

A clean installation involves completely removing the existing operating system from your computer and installing a fresh copy. This process eliminates any corrupted or outdated files, drivers, and software that may be hindering performance. The result is a system that runs smoothly, efficiently, and with minimal bloatware.

The Importance of Data Preservation

While a clean installation offers numerous advantages, losing valuable data is a significant concern. Fortunately, several methods allow you to preserve your data during the process. These methods include:

  • Backup and Restore: The most reliable and comprehensive approach is to create a full system backup before reinstalling Windows 11. This backup can be stored on an external hard drive, USB flash drive, or cloud storage service. Once the installation is complete, you can restore your entire system from the backup, including all your files, applications, and settings.

  • Data Transfer: Instead of restoring an entire backup, you can selectively transfer specific files and folders from your old system to the newly installed one. This approach is less time-consuming than a full system restore, but it requires more manual effort.

  • Cloud Storage: If you use cloud storage services like OneDrive, Google Drive, or Dropbox, your data is already backed up and easily accessible on your new system. This method eliminates the need for manual backup and restoration processes.

Methods for Reinstalling Windows 11 with Data Preservation

1. Using a USB Drive

  • Creating a Bootable USB Drive: The first step is to create a bootable USB drive containing the Windows 11 installation files. Microsoft provides a tool called the Media Creation Tool to facilitate this process.
  • Backing Up Your Data: Before proceeding, ensure your important data is backed up using one of the methods described earlier.
  • Booting from the USB Drive: Restart your computer and enter the BIOS or UEFI settings. Configure the boot order to prioritize the USB drive. Save the changes and exit.
  • Installation Process: The Windows 11 installation process will begin. Follow the on-screen prompts and select the "Custom" installation option to choose the drive where you want to install Windows 11.
  • Data Preservation: During the installation, you will be presented with options to keep your existing files and applications or perform a clean installation. Select the option to keep your personal files and applications. This will preserve your data while reinstalling Windows 11.

2. Using the Windows Recovery Environment

  • Accessing the Recovery Environment: Restart your computer and hold down the Shift key while clicking the "Restart" option. This will launch the Windows Recovery Environment.
  • Choosing the Reset Option: From the Recovery Environment menu, select "Troubleshoot" and then "Reset this PC."
  • Data Preservation: You will be presented with two options: "Keep my files" and "Remove everything." Choose "Keep my files" to preserve your data during the installation.
  • Installation Process: The Windows 11 installation process will begin. The system will automatically download and install the necessary files.

3. Using a Fresh Installation with Data Transfer

  • Clean Installation: Perform a clean installation of Windows 11 by following the steps outlined in the "Using a USB Drive" section, but choose the "Custom" installation option and select the drive where you want to install Windows 11 without selecting the option to keep your files.
  • Transferring Data: After the clean installation, use one of the data transfer methods described earlier to transfer your files and applications from your old system to the newly installed one.

Benefits of Reinstalling Windows 11 with Data Preservation

  • Improved Performance: A clean installation eliminates unnecessary files and software, leading to faster boot times, smoother application performance, and reduced system lag.
  • Enhanced Security: A fresh installation removes potentially vulnerable software and outdated drivers, improving overall system security.
  • Elimination of Bloatware: Preinstalled software, often referred to as bloatware, can consume valuable system resources and slow down performance. A clean installation eliminates this bloatware, providing a cleaner and more efficient system.
  • Troubleshooting Issues: A clean installation is often the most effective solution for resolving persistent errors or system crashes.

FAQs about Reinstalling Windows 11 with Data Preservation

1. What data will be preserved during a clean installation with data preservation?

During a clean installation with data preservation, your personal files, such as documents, photos, music, and videos, will be preserved. However, applications and settings will typically be removed.

2. Will my installed applications be preserved during a clean installation?

No, applications are generally not preserved during a clean installation. You will need to reinstall them after the installation process is complete.

3. Will I lose my Windows license after a clean installation?

No, your Windows license is tied to your computer’s hardware. You can reinstall Windows 11 without affecting your license.

4. How long does it take to reinstall Windows 11 with data preservation?

The time required for the installation process varies depending on your computer’s hardware and the chosen method. It can take anywhere from 30 minutes to several hours.

5. What should I do if I encounter issues during the installation process?

If you encounter any issues during the installation process, consult Microsoft’s official documentation or contact their support team for assistance.

Tips for Reinstalling Windows 11 with Data Preservation

  • Back Up Your Data: Always create a full system backup before proceeding with a clean installation.
  • Choose the Right Method: Carefully consider the different methods available and select the one that best suits your needs and comfort level.
  • Check for Updates: Ensure your Windows 11 installation media is up-to-date before starting the installation process.
  • Test the Installation: After the installation is complete, test your system thoroughly to ensure all your files and applications are working correctly.

Conclusion

Reinstalling Windows 11 with data preservation offers a powerful way to rejuvenate your system, improve performance, and enhance security. By understanding the different methods, benefits, and considerations involved, you can confidently undertake this process and enjoy a fresh, optimized system without sacrificing your valuable data.

Windows 11 Upgrade VS Clean Install [What's the Difference] - EaseUS How To Clean Install Windows 11  appuals Clean Install Of Windows 11
How To Use A Windows 11 ISO File To Perform A Clean Install Steps to make clean install of Windows 11 Clean install windows 11 - angryetp
Steps to make clean install of Windows 11 Windows 11 Pro: New clean install process with offline account  How to clean install Windows 11

Closure

Thus, we hope this article has provided valuable insights into Rejuvenating Your Windows 11: A Guide to Clean Installation with Data Preservation. We thank you for taking the time to read this article. See you in our next article!

Navigating The Labyrinth: Troubleshooting Windows 11’s "Nearby Share" Feature

Navigating the Labyrinth: Troubleshooting Windows 11’s "Nearby Share" Feature

Introduction

In this auspicious occasion, we are delighted to delve into the intriguing topic related to Navigating the Labyrinth: Troubleshooting Windows 11’s "Nearby Share" Feature. Let’s weave interesting information and offer fresh perspectives to the readers.

How to run a troubleshooter in Windows 11  LaptrinhX / News

Windows 11’s "Nearby Share" feature, a modern iteration of Bluetooth file transfer, promises seamless file sharing between compatible devices. However, like any technology, it can encounter hiccups, leaving users frustrated. This article aims to equip users with the knowledge to troubleshoot common "Nearby Share" issues, ensuring a smooth and efficient file transfer experience.

Understanding the Core of the Issue

Before diving into specific troubleshooting steps, it is crucial to understand the underlying causes of "Nearby Share" malfunctions. These can broadly be categorized as:

  • Connectivity Issues: The primary culprit is often a faulty connection between the devices attempting to share files. This can arise from Bluetooth signal interference, limited Bluetooth range, or compatibility issues between the devices.
  • Software Glitches: Windows 11, like any operating system, is susceptible to software bugs that can affect "Nearby Share" functionality. This could involve incorrect configurations, outdated drivers, or even corrupted system files.
  • Device-Specific Limitations: Some devices, even if compatible with "Nearby Share", might have limitations or restrictions imposed by the manufacturer. These could involve specific hardware configurations or software restrictions.

Troubleshooting Strategies: A Step-by-Step Approach

With a grasp of the potential causes, let’s delve into practical troubleshooting steps:

1. Verify Device Compatibility:

  • Check Operating Systems: Ensure both devices are running Windows 11 and have the latest updates installed. "Nearby Share" is not supported on earlier Windows versions.
  • Bluetooth Compatibility: Confirm that both devices have functional Bluetooth adapters. This can be checked in the device’s settings or by attempting to pair with other Bluetooth devices.

2. Ensure Proximity and Visibility:

  • Physical Distance: "Nearby Share" operates within a limited range. Keep the devices within a few feet of each other for optimal connection.
  • Device Visibility: Ensure both devices are set to "discoverable" for "Nearby Share". This setting is typically found within the "Nearby Share" settings in Windows 11.

3. Troubleshoot Bluetooth Connection:

  • Restart Bluetooth: Turn off Bluetooth on both devices, wait for a few seconds, and then turn it back on. This can resolve minor connection issues.
  • Forget and Re-pair: If a persistent Bluetooth connection problem exists, "forget" the paired devices from each other and then re-pair them.
  • Check for Interference: Avoid using "Nearby Share" in areas with heavy wireless interference, such as near microwaves or other Bluetooth devices.

4. Address Software Issues:

  • Restart Devices: A simple restart can resolve temporary software glitches affecting "Nearby Share" functionality.
  • Update Drivers: Outdated Bluetooth drivers can cause compatibility problems. Update drivers through the Device Manager or the manufacturer’s website.
  • Troubleshoot Windows 11: If "Nearby Share" issues persist, use Windows 11’s built-in troubleshooter to diagnose and potentially fix system-wide problems.

5. Explore Advanced Options:

  • Network Reset: If the problem persists, consider performing a network reset in Windows 11. This can reset network settings to their default configuration, potentially resolving connectivity issues.
  • Check Firewall Settings: Ensure that the firewall on both devices is not blocking "Nearby Share" communication. Add "Nearby Share" to the firewall’s exception list if necessary.

6. Contact Support:

If all troubleshooting steps have been exhausted, consider contacting Microsoft support for assistance. Provide detailed information about the issue, including the device models, operating system versions, and any error messages encountered.

FAQs: Addressing Common Queries

Q: Why is "Nearby Share" not working on my Windows 11 device?

A: This could be due to a variety of factors, including compatibility issues, connectivity problems, software glitches, or device-specific limitations. Refer to the troubleshooting steps outlined above for potential solutions.

Q: Can I use "Nearby Share" to transfer files between Windows 11 and other operating systems?

A: Currently, "Nearby Share" is designed to work exclusively between Windows 11 devices. While cross-platform compatibility might be introduced in the future, it is not available at this time.

Q: What are the limitations of "Nearby Share" in terms of file size and type?

A: "Nearby Share" has a maximum file size limit of 5GB. While it can transfer various file types, some file formats might be restricted by security protocols or device-specific limitations.

Q: How can I improve the speed and reliability of "Nearby Share" transfers?

A: Ensuring a strong Bluetooth connection, minimizing interference, and using the latest drivers can significantly enhance transfer speed and reliability.

Tips for Optimizing "Nearby Share" Performance

  • Keep Devices Updated: Ensure both devices have the latest Windows 11 updates installed, as these often include bug fixes and performance improvements for "Nearby Share".
  • Prioritize Bluetooth Connection: If using "Nearby Share" in an area with heavy wireless interference, consider connecting the devices directly via Bluetooth for a more stable connection.
  • Clear Cache and Temporary Files: Regularly clear the cache and temporary files on both devices to optimize system performance and potentially resolve software-related issues.

Conclusion: A Pathway to Seamless File Sharing

"Nearby Share" offers a convenient and efficient way to share files between Windows 11 devices. By understanding the potential causes of issues and following the troubleshooting steps outlined in this article, users can navigate the occasional hiccups and enjoy a seamless file transfer experience. Remember, patience and persistence are key to resolving technical challenges, and with a systematic approach, "Nearby Share" can become a valuable tool for sharing files effortlessly.

How to Run Windows 11/10 Troubleshooters to Fix PC Problems - MiniTool How to use Nearby Sharing feature on Windows 10 Navigating The Labyrinth on Steam
Navigating the Labyrinth: An Executive Guide to Data Management eBook : Sebastian-Coleman, Laura FIX Windows Update Issues For Windows 11 Errors Troubleshooting Tips HTMD Blog How To Get Help In Windows 11 6 Useful Methods  techdatu
Navigating The Labyrinth System Requirements - Can I Run It? - PCGameBenchmark Navigating The Labyrinth Screenshots ยท SteamDB

Closure

Thus, we hope this article has provided valuable insights into Navigating the Labyrinth: Troubleshooting Windows 11’s "Nearby Share" Feature. We appreciate your attention to our article. See you in our next article!

Seamless Connectivity: Exploring The Power Of Windows 11’s Near Share Feature

Seamless Connectivity: Exploring the Power of Windows 11’s Near Share Feature

Introduction

With enthusiasm, let’s navigate through the intriguing topic related to Seamless Connectivity: Exploring the Power of Windows 11’s Near Share Feature. Let’s weave interesting information and offer fresh perspectives to the readers.

Seamless Connectivity: Exploring the Power of Windows 11’s Near Share Feature

How to Use Nearby Sharing on Windows 11

Windows 11 introduced a revolutionary feature designed to simplify file sharing between devices, eliminating the need for traditional methods like email or cloud storage. This innovative tool, known as "Near Share," leverages Bluetooth and Wi-Fi to enable fast and secure file transfers between compatible Windows 11 devices.

Understanding the Mechanics of Near Share

Near Share operates on the principle of proximity, relying on Bluetooth and Wi-Fi to establish a direct connection between devices. When a user initiates a file transfer, the app searches for nearby devices that have Near Share enabled. Once a compatible device is detected, the user can select the intended recipient and initiate the transfer.

Benefits of Near Share

Near Share offers several advantages over traditional file-sharing methods:

  • Speed and Efficiency: Near Share transfers files at significantly faster speeds than traditional methods like email or cloud storage, especially for larger files. This efficiency is crucial for users who frequently share large documents, images, or videos.
  • Security and Privacy: Near Share utilizes encryption to ensure secure file transfers, safeguarding sensitive information from unauthorized access. This secure connection prevents unauthorized parties from intercepting or accessing the shared data.
  • Simplicity and User-Friendliness: The Near Share interface is intuitive and easy to use, making it accessible to users of all technical skill levels. This simplicity eliminates the need for complex configurations or technical knowledge, allowing users to focus on sharing their files without hassle.
  • Versatility and Compatibility: Near Share supports a wide range of file types, including documents, images, videos, and more. It is also compatible with a variety of Windows 11 devices, including laptops, desktops, and tablets, expanding its utility and accessibility.

Exploring the Functionality of Near Share

Near Share offers various features designed to enhance the file-sharing experience:

  • File Transfer Control: Users can choose the specific files they wish to share, granting them granular control over the transfer process. This selective approach ensures that only the intended files are shared, preventing accidental or unwanted transfers.
  • Device Visibility Management: Users can control which devices can discover their device for file sharing. This feature allows users to restrict access to their files, ensuring privacy and security.
  • Transfer Progress Monitoring: Near Share provides real-time updates on the progress of the file transfer, enabling users to track the transfer status and anticipate completion. This feature provides transparency and keeps users informed throughout the process.
  • Transfer History: Near Share maintains a record of recent file transfers, allowing users to easily access past transfers and retrieve shared files. This feature simplifies file management and facilitates efficient retrieval of previously shared content.

Utilizing Near Share: A Step-by-Step Guide

  1. Enabling Near Share: To utilize Near Share, users need to ensure the feature is enabled on their device. This can be done by navigating to the "Settings" app, selecting "System," and then "Near Share."
  2. Discovering Compatible Devices: Once Near Share is enabled, the device will automatically search for nearby compatible devices. The discovered devices will be displayed in the Near Share interface.
  3. Selecting a Recipient: Users can select the specific device they wish to share files with from the list of discovered devices.
  4. Initiating the Transfer: Once a recipient is selected, users can choose the files they wish to share and initiate the transfer.
  5. Transfer Completion: The transfer will proceed automatically, and users will receive notifications when the transfer is complete.

Addressing Common Concerns and FAQs

Q: Is Near Share compatible with all Windows 11 devices?

A: Near Share is compatible with most Windows 11 devices, but some older models may not support the feature. To ensure compatibility, check the device specifications or consult the Windows 11 documentation.

Q: Does Near Share require an internet connection?

A: Near Share does not require an internet connection to function. It relies on Bluetooth and Wi-Fi to establish a direct connection between devices.

Q: Is Near Share secure?

A: Yes, Near Share uses encryption to ensure secure file transfers. The encryption process protects the shared data from unauthorized access, ensuring privacy and security.

Q: Can I control which devices can discover my device for file sharing?

A: Yes, users can control which devices can discover their device for file sharing. This feature allows users to restrict access to their files, ensuring privacy and security.

Q: What happens if I lose my internet connection during a file transfer?

A: If the internet connection is lost during a file transfer, the transfer will be paused until the connection is restored. Once the connection is re-established, the transfer will resume automatically.

Q: Can I share files with devices that do not have Near Share enabled?

A: No, Near Share only works with devices that have Near Share enabled. To share files with devices that do not support Near Share, you can use traditional methods like email or cloud storage.

Tips for Optimizing Near Share

  • Ensure Bluetooth and Wi-Fi are enabled: Near Share relies on Bluetooth and Wi-Fi to establish a connection between devices. Ensure that both Bluetooth and Wi-Fi are enabled on both devices for optimal performance.
  • Keep devices close together: Near Share works best when devices are within close proximity to each other. For optimal performance, keep the devices within a few feet of each other.
  • Check for software updates: Ensure that both devices have the latest software updates installed. This will ensure compatibility and optimal performance.
  • Use a strong password: If your device is password protected, ensure that you use a strong password to protect your data.

Conclusion

Near Share is a powerful and versatile feature that simplifies file sharing between Windows 11 devices. Its speed, security, and user-friendliness make it an ideal solution for users who frequently share files between devices. By embracing Near Share, users can streamline their file-sharing experience, eliminating the need for traditional methods and enhancing efficiency and productivity. As Windows 11 continues to evolve, Near Share is poised to become an indispensable tool for seamless connectivity and data exchange, further solidifying its role in the future of file sharing.

Seamless Connectivity How to Enable and Use Nearby Sharing in Windows 11? 2024�� Enable seamless connectivity: Using SSH on Windows 11 with Putty, Git Bash and WSL2 โ€” Part 1
How to Enable Nearby Sharing in Windows 11?  Gear Up Windows Unlocking Seamless Connectivity: Exploring Device Interoperability - YouTube How to Link Your iPhone to Windows 11 for Seamless Connectivity
PPT - Unleashing Seamless Connectivity: Exploring MS Remote Desktop for Windows 10 PowerPoint The Power of Seamless Connectivity: Exploring Enterprise Integration Services

Closure

Thus, we hope this article has provided valuable insights into Seamless Connectivity: Exploring the Power of Windows 11’s Near Share Feature. We thank you for taking the time to read this article. See you in our next article!