Protecting Your Privacy And Data: Removing Your Windows Account Before Selling Your PC

Protecting Your Privacy and Data: Removing Your Windows Account Before Selling Your PC

Introduction

With enthusiasm, let’s navigate through the intriguing topic related to Protecting Your Privacy and Data: Removing Your Windows Account Before Selling Your PC. Let’s weave interesting information and offer fresh perspectives to the readers.

Protecting Your Privacy and Data: Removing Your Windows Account Before Selling Your PC

How to Protect Your Privacy on Windows? - GeeksforGeeks

Selling a personal computer often involves more than just transferring ownership. It necessitates a thorough cleaning process to ensure that sensitive information remains secure and the new owner starts with a fresh slate. A critical step in this process is removing the existing Windows account, which is paramount for safeguarding your privacy and data.

The Importance of Removing Your Windows Account

Leaving your Windows account intact on a computer you are selling can pose significant risks:

  • Exposure of Personal Data: Your Windows account holds a treasure trove of personal information, including browsing history, passwords, emails, documents, and even financial details. This data could be easily accessed by the new owner, potentially leading to identity theft or unauthorized access to sensitive accounts.

  • Security Breaches: If your account remains active, the new owner could potentially gain access to your online accounts, including banking, social media, and email. This could result in unauthorized transactions, account takeovers, and even malicious activities.

  • Software and File Access: The new owner could access your installed software, applications, and stored files, potentially compromising your intellectual property or confidential data.

  • Malware and Viruses: If your computer is infected with malware or viruses, these could be transferred to the new owner, potentially harming their system and exposing them to security risks.

The Process of Removing Your Windows Account

Removing your Windows account from a PC is a straightforward process that can be completed within a few steps:

  1. Log Out of All Accounts: Ensure you are logged out of all online accounts, including Microsoft accounts, email accounts, and social media platforms.

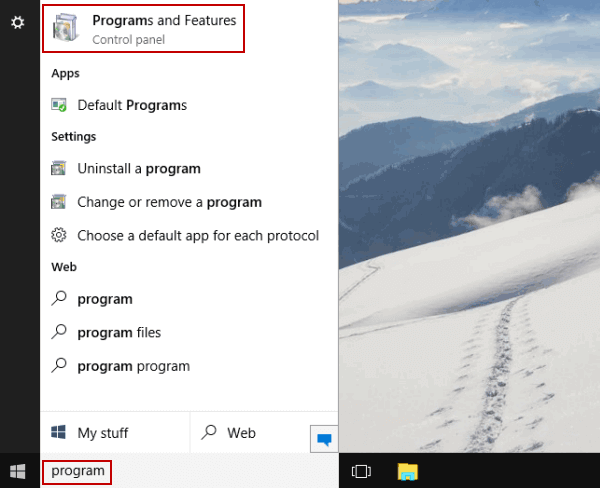
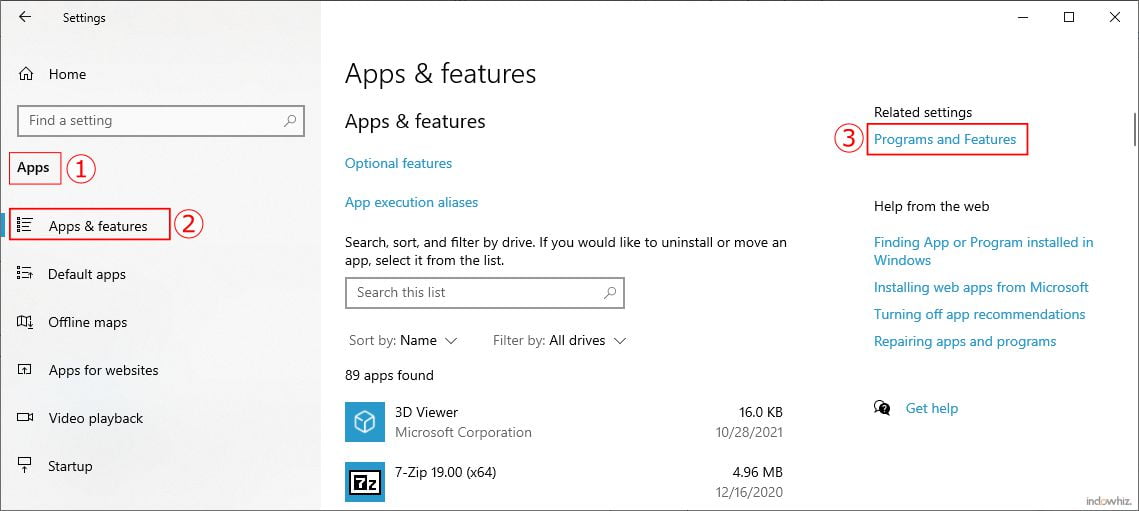
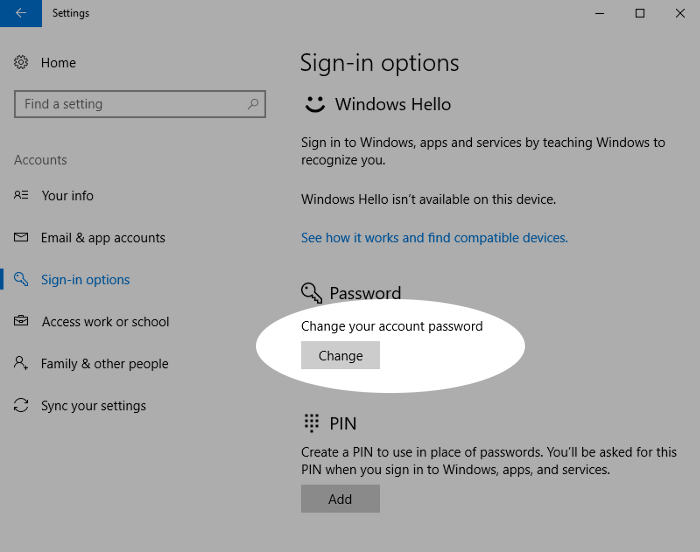
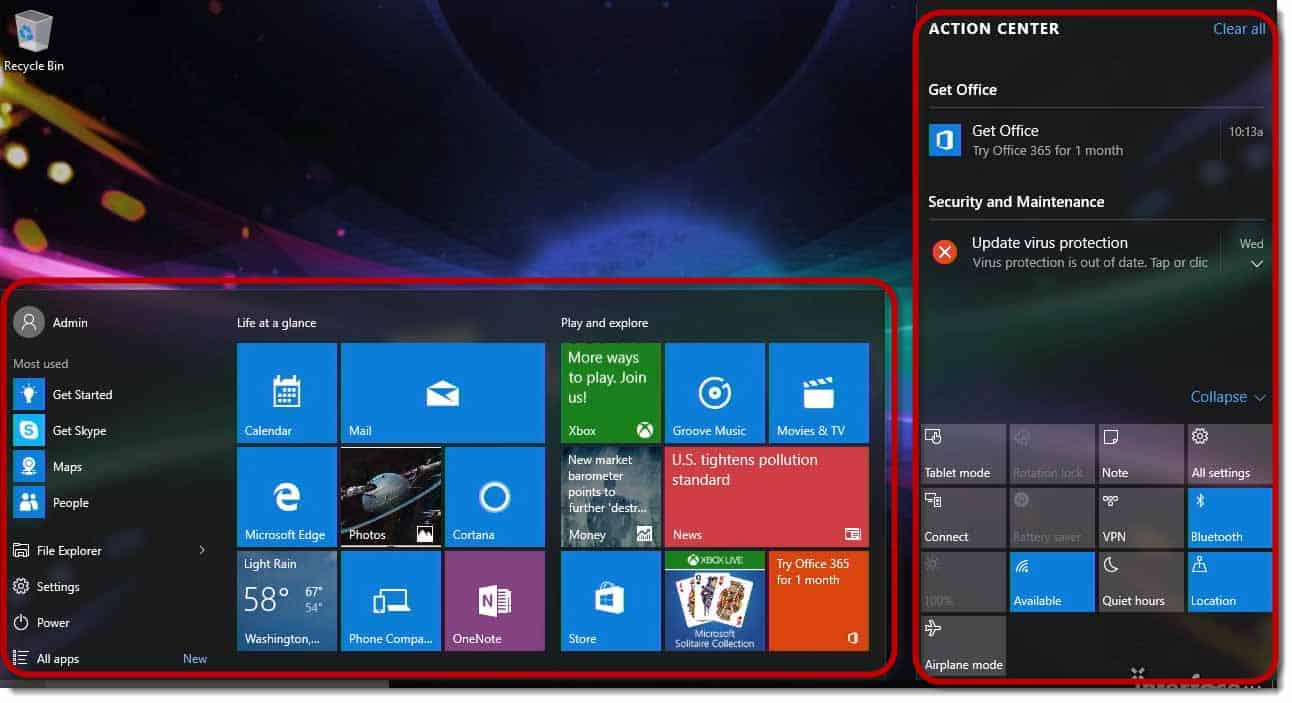
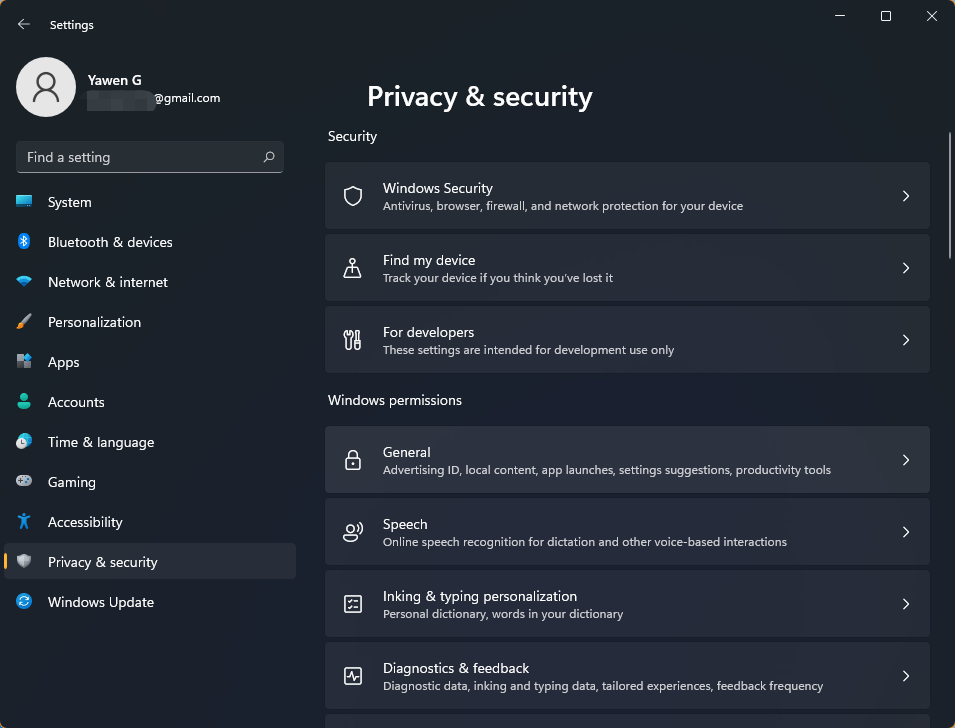
  2. Access the Settings Menu: Navigate to the Windows settings menu by pressing the Windows key + I or clicking the "Start" button and selecting "Settings."

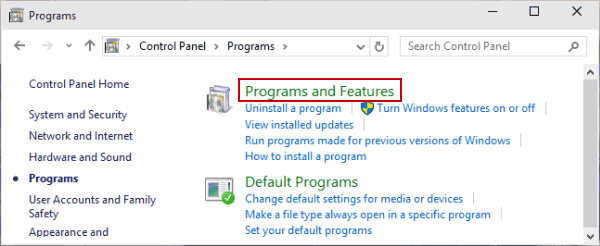
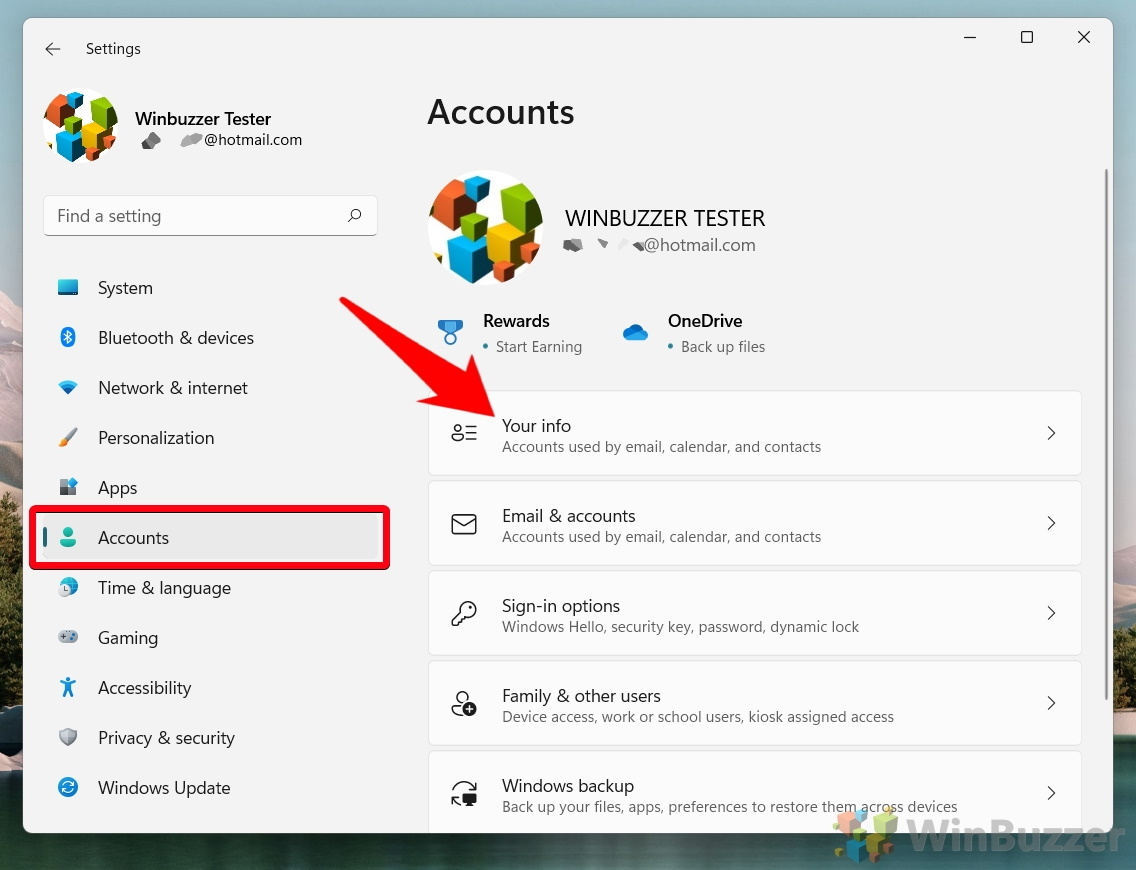
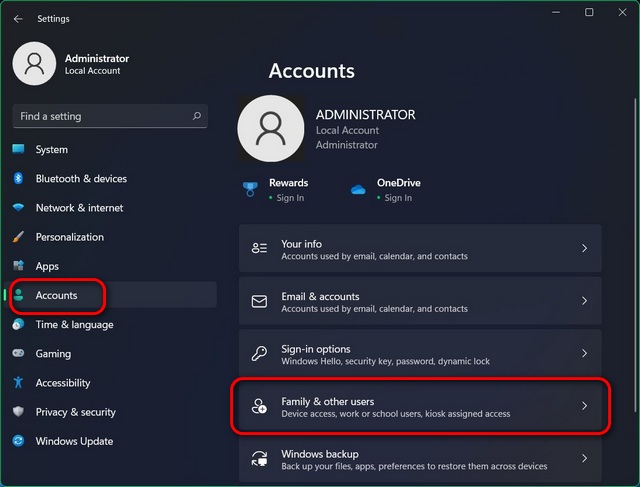
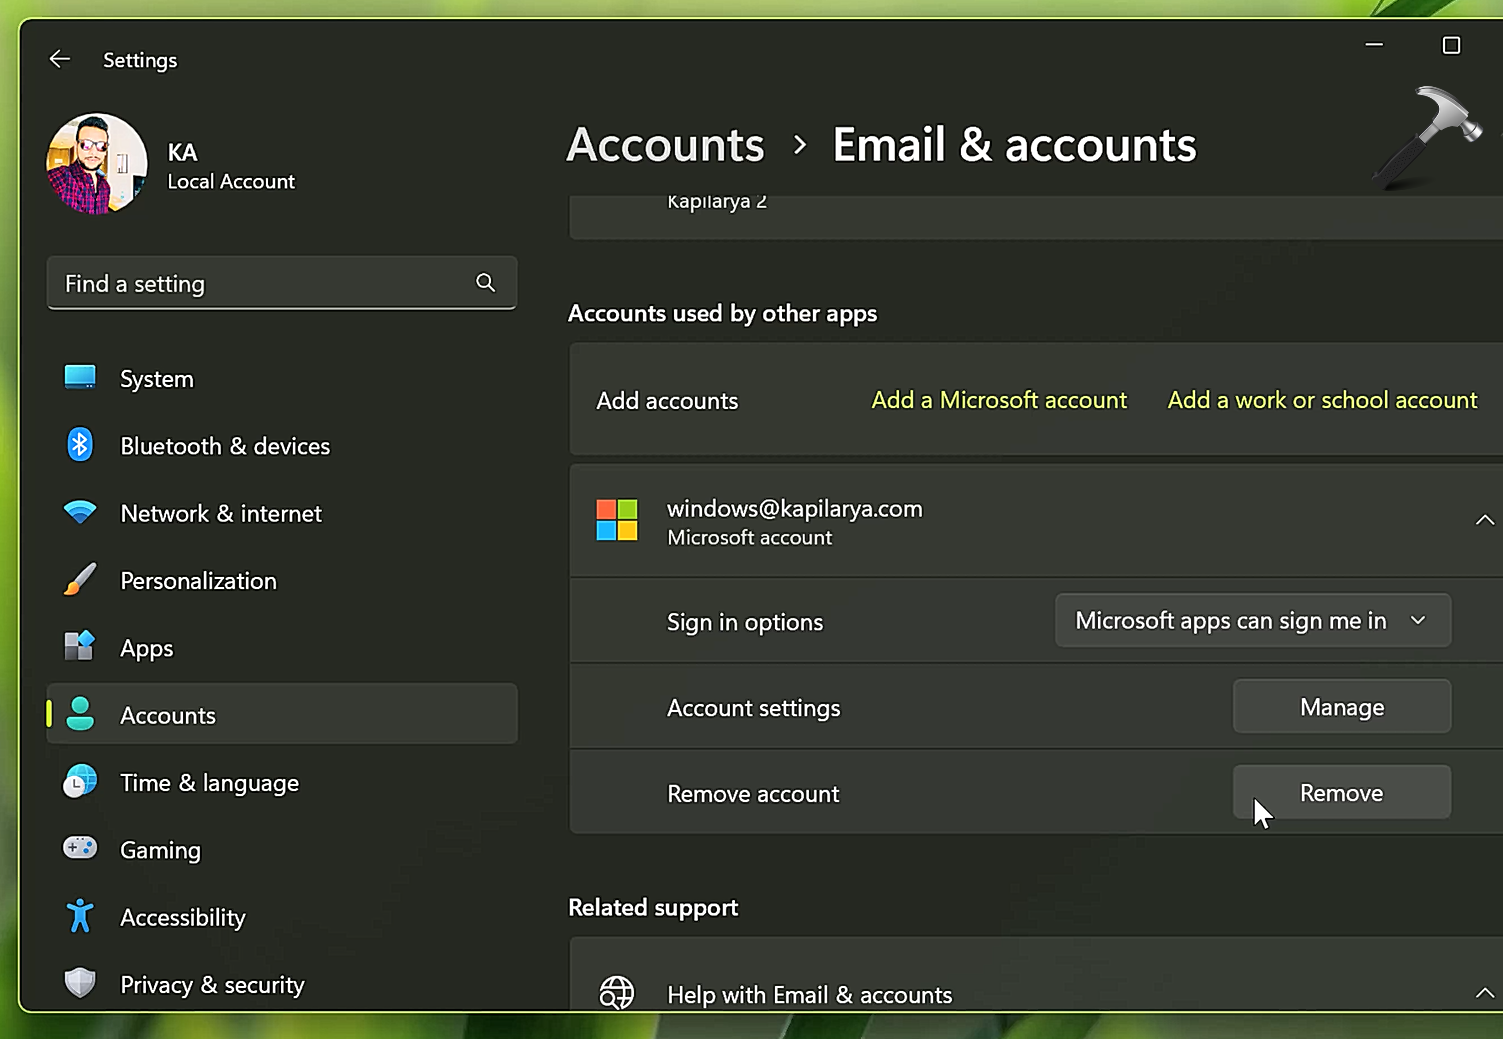
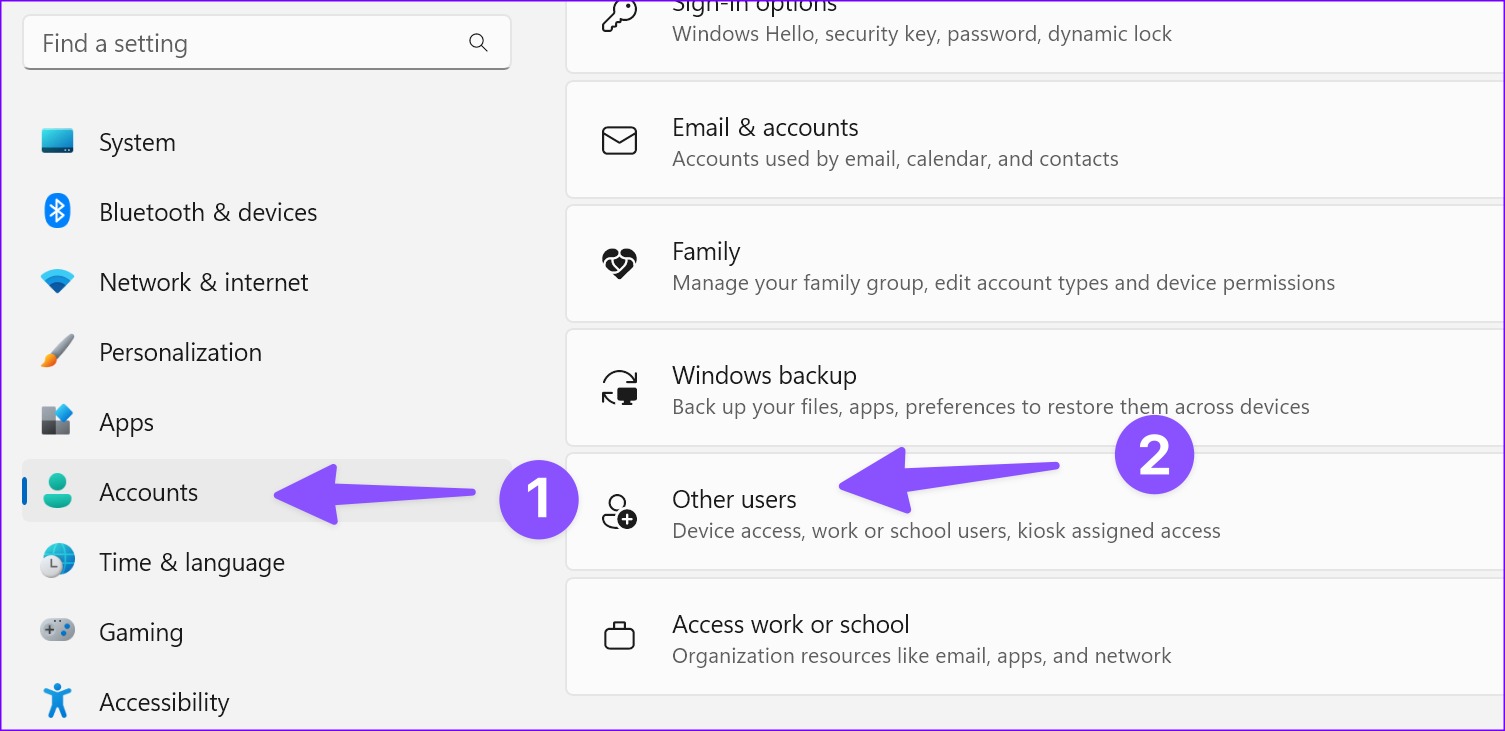
  3. Locate Accounts: In the Settings menu, select "Accounts."

  4. Select "Your Info": Under the "Accounts" section, click on "Your Info."

  5. Choose "Sign out": Select the "Sign out" option to remove your account from the device.

  6. Confirm Removal: Confirm your decision to remove the account by clicking "Sign out" in the confirmation window.

Additional Steps for Enhanced Security:

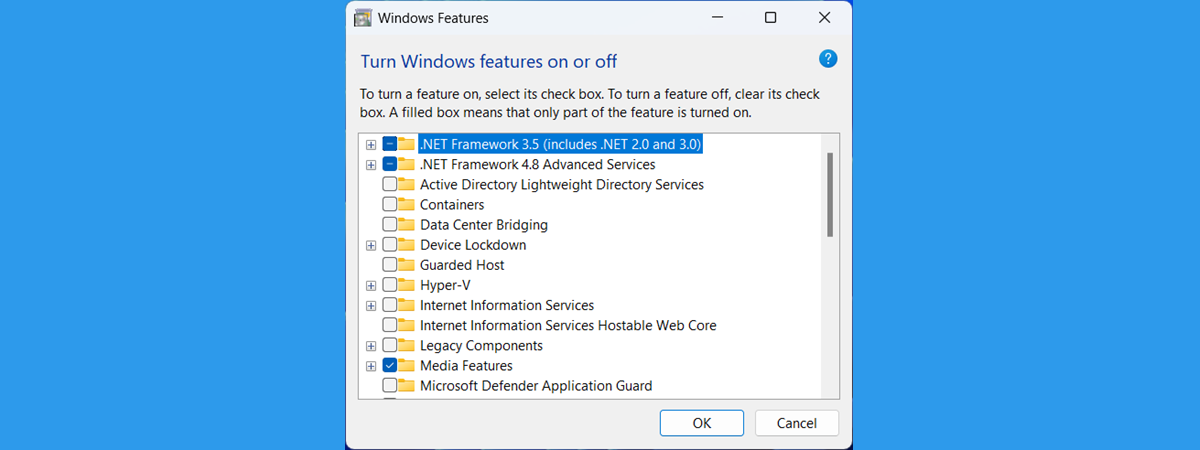
  • Reset Windows: Performing a full reset of Windows will completely wipe the hard drive, removing all data and software, including your account information. This is the most secure option, ensuring a clean slate for the new owner.

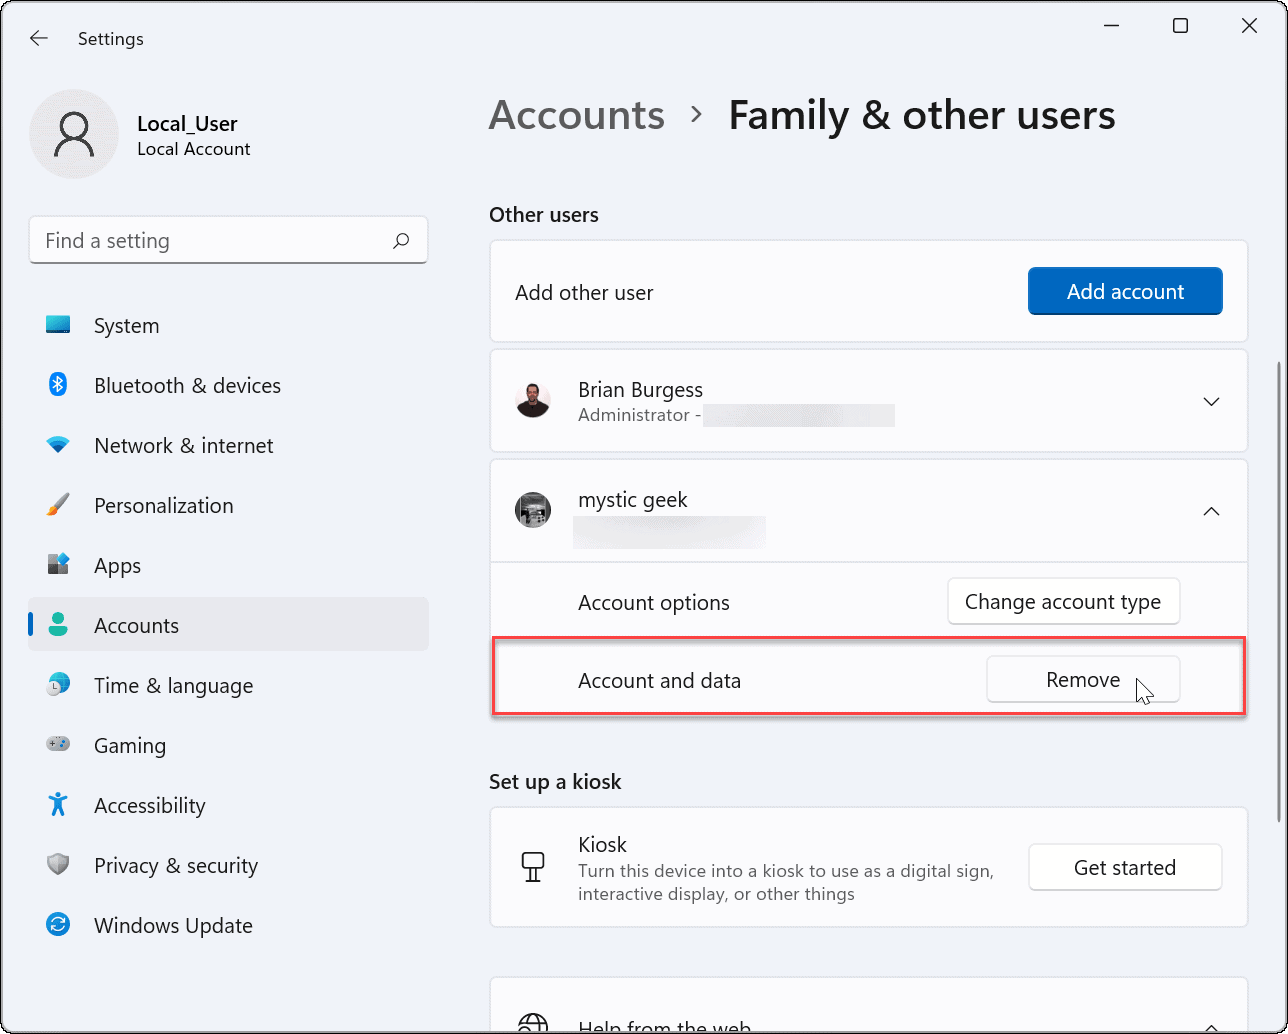
  • Create a New User Account: Before selling, create a temporary user account with limited privileges. This can be used for basic tasks during the transfer process without compromising your personal data.

  • Delete User Data: Manually delete any files, folders, and applications associated with your account. Ensure you remove all remnants of your online activity, including browsing history, cookies, and cache files.

FAQs on Removing Windows Account Before Selling PC

Q: What happens to my files and data after I remove my account?

A: Removing your account does not automatically delete your files and data. They will remain on the hard drive, but the new owner will have access to them. It is crucial to delete or back up your personal data before removing your account.

Q: Can I remove my account without losing my data?

A: You can remove your account without losing your data, but it is not recommended. It is best to back up your data or delete it completely to ensure your privacy.

Q: Do I need to remove my account if I am selling a used computer?

A: It is highly recommended to remove your account before selling a used computer. It is essential to protect your personal information and prevent potential security breaches.

Q: What if I forget my password?

A: If you forget your password, you can reset it using a Microsoft account recovery process. However, it is advisable to remove your account before selling the computer to avoid any complications.

Tips for Removing Your Windows Account Before Selling PC

  • Back Up Your Data: Before removing your account, back up all important files and data to an external hard drive or cloud storage service.

  • Uninstall Unnecessary Software: Uninstall any software you no longer need or that is associated with your account.

  • Clear Browsing History and Cookies: Delete your browsing history, cookies, and cache files to prevent the new owner from accessing your online activity.

  • Disable Automatic Login: Ensure that the "Automatic login" option is disabled to prevent the new owner from accessing your account without your permission.

  • Remove All Peripherals: Disconnect any external devices, such as USB drives, printers, and external hard drives, to prevent the new owner from accessing your data.

Conclusion

Removing your Windows account before selling your PC is a vital step in protecting your privacy and data. By following the outlined steps and taking additional security measures, you can ensure that your personal information remains secure and that the new owner starts with a clean and safe computing environment. Remember, safeguarding your data is essential, especially when parting ways with a personal computer.

How to Protect Your Privacy on Windows 10 22 Best Practices for Protecting Data Privacy in 2022 [Infographic] - TitanFile Microsoft introduces a new privacy set up experience on Windows 10
Protect your Privacy on your New Windows 10 Computer How to Protect Your Privacy in Windows  PCMag How to Protect Your Privacy in Windows  PCMag
Data Privacy Day Posters 2020  Information Security Office How to Protect Your Privacy in Windows 10?

Closure

Thus, we hope this article has provided valuable insights into Protecting Your Privacy and Data: Removing Your Windows Account Before Selling Your PC. We thank you for taking the time to read this article. See you in our next article!

Navigating The World Of PC Purchases With Windows 10: A Comprehensive Guide

Navigating the World of PC Purchases with Windows 10: A Comprehensive Guide

Introduction

With enthusiasm, let’s navigate through the intriguing topic related to Navigating the World of PC Purchases with Windows 10: A Comprehensive Guide. Let’s weave interesting information and offer fresh perspectives to the readers.

VinBoiSoft Blog: 10 Quick Clicks: A PC Guide for Navigating Windows 10

The decision to purchase a new PC is a significant one, requiring careful consideration of individual needs and budget constraints. While the market offers a plethora of options, a common element uniting many choices is the operating system: Windows 10. This guide aims to illuminate the process of purchasing a PC with Windows 10, providing a comprehensive understanding of its features, benefits, and considerations for a successful purchase.

Understanding the Significance of Windows 10

Windows 10, released in 2015, represents a substantial evolution in Microsoft’s operating system. It boasts a user-friendly interface, robust security features, and a vast library of compatible applications. Its widespread adoption across personal and professional environments makes it a crucial factor to consider during a PC purchase.

The Advantages of Choosing Windows 10:

  • User-Friendly Interface: Windows 10 prioritizes intuitive navigation. Its Start menu combines elements of previous versions, offering familiarity while introducing new features like Live Tiles for quick access to frequently used applications.
  • Enhanced Security: Windows 10 incorporates advanced security measures, including Windows Defender, a built-in antivirus, and Windows Hello, which enables secure login using facial recognition or fingerprint scanning.
  • Seamless Integration: The operating system seamlessly integrates with other Microsoft products and services, such as OneDrive for cloud storage and Microsoft Office for productivity.
  • Extensive App Ecosystem: Windows 10 boasts a massive app store, offering a wide range of applications for work, entertainment, and creativity.
  • Regular Updates: Microsoft provides regular updates to ensure security, performance, and feature enhancements, making Windows 10 a continuously evolving platform.

Key Considerations for PC Purchases with Windows 10:

  • Budget: PCs with Windows 10 come in various price ranges, from budget-friendly options to high-end gaming machines. Determine your budget before starting your search.
  • Purpose: Define the primary use for your PC. If it’s for everyday tasks, a basic model might suffice. For gaming or creative work, a more powerful machine is necessary.
  • Hardware Specifications: Consider the processor, RAM, storage capacity, and graphics card based on your needs. Research the minimum and recommended requirements for specific applications or games.
  • Manufacturer: Reputable manufacturers like Dell, HP, Lenovo, and Acer offer a wide selection of Windows 10 PCs, each with its own strengths and customer support policies.
  • Warranty: Check the warranty period and coverage offered by the manufacturer. Extended warranties can provide peace of mind for potential repairs.

Navigating the PC Purchase Process:

  • Online Retailers: Websites like Amazon, Best Buy, and Newegg offer a wide range of PCs with Windows 10, allowing for convenient comparison and price checking.
  • Local Computer Stores: Visiting physical stores provides the opportunity to physically inspect models and interact with sales representatives for personalized advice.
  • Manufacturer Websites: Directly accessing manufacturer websites offers detailed information about their product lines, specifications, and pricing.

Frequently Asked Questions:

  • Is Windows 10 free? While Windows 10 is available as a free upgrade for some users, purchasing a new PC typically includes the operating system pre-installed at no additional cost.
  • What are the system requirements for Windows 10? The minimum system requirements include a 1 GHz processor, 1 GB RAM for 32-bit or 2 GB RAM for 64-bit, and 16 GB of free hard disk space.
  • Can I upgrade to Windows 10 from an older version? Depending on the age and specifications of your current PC, upgrading to Windows 10 might be possible. However, compatibility should be verified before proceeding.
  • How do I update Windows 10? Windows 10 automatically downloads and installs updates in the background. You can manually check for updates by going to Settings > Update & Security > Windows Update.
  • Is Windows 10 compatible with my existing software? Windows 10 is designed to be compatible with most software programs, but it’s always advisable to check for compatibility before purchasing.

Tips for a Smooth PC Purchase:

  • Read Reviews: Consult reviews from reputable sources to gain insights into the performance, reliability, and user experience of specific models.
  • Compare Prices: Utilize price comparison websites to find the best deals from different retailers.
  • Check for Bundles: Some retailers offer bundles that include peripherals like mice, keyboards, or external hard drives at discounted prices.
  • Consider Future Upgrades: If you anticipate upgrading your PC in the future, choose a model with expandable components like RAM slots or storage bays.
  • Seek Professional Advice: If you’re unsure about specific features or configurations, consult with a knowledgeable salesperson or computer technician.

Conclusion:

Purchasing a PC with Windows 10 presents a valuable investment in a reliable and versatile computing platform. By carefully considering your budget, purpose, and desired features, you can make an informed decision that aligns with your individual needs. With its user-friendly interface, robust security, and extensive app ecosystem, Windows 10 empowers users to navigate the digital landscape with ease and efficiency.

How to Navigate in Windows 10 - Windows 10 User Interface Overview - YouTube Windows 10 Basic Desktop and Navigation - Interface Technical Training  Interface Technical PC_purchase_list.jpg
Computer Buying Guide Computer Buying Guide Windows 10 Basic Desktop and Navigation - Interface Technical Training  Interface Technical
Windows 10 - Navigating the Settings Menu - YouTube Noble PC - A Friendly Guide to Navigating the World of Computers: Choosing Between Windows and Mac

Closure

Thus, we hope this article has provided valuable insights into Navigating the World of PC Purchases with Windows 10: A Comprehensive Guide. We hope you find this article informative and beneficial. See you in our next article!

Understanding File Compatibility Issues With QBittorrent On Windows 11

Understanding File Compatibility Issues with qBittorrent on Windows 11

Introduction

In this auspicious occasion, we are delighted to delve into the intriguing topic related to Understanding File Compatibility Issues with qBittorrent on Windows 11. Let’s weave interesting information and offer fresh perspectives to the readers.

Understanding File Compatibility Issues with qBittorrent on Windows 11

Check windows 11 compatibility - peacegre

qBittorrent, a popular and open-source torrent client, is generally compatible with Windows 11. However, certain file types may not be supported, leading to difficulties in downloading or accessing specific content. This article aims to demystify these compatibility issues, providing a comprehensive understanding of the underlying factors and offering practical solutions.

Delving into the Compatibility Challenges

The incompatibility of certain files with qBittorrent on Windows 11 is often rooted in the following:

  • File Format: qBittorrent primarily supports common file formats like .torrent files, which contain metadata for downloading torrents. However, some less common or specialized file formats may not be recognized by the software. This can occur with specific archive formats, encrypted files, or proprietary file types.

  • Operating System Changes: Windows 11 introduces new features and updates that may impact the behavior of older software, including qBittorrent. While the core functionality of qBittorrent remains largely intact, certain components or libraries may require updates to fully integrate with the new operating system.

  • Codec Compatibility: Some files, especially multimedia content, rely on specific codecs for playback. If the necessary codecs are not installed on your system, qBittorrent may encounter difficulties opening or playing these files.

  • Security Measures: Windows 11’s security features, including its built-in antivirus and firewall, may occasionally interfere with the operation of qBittorrent, particularly when downloading files from untrusted sources. These security measures are designed to protect your system from malware, but they may inadvertently block legitimate file transfers.

Identifying and Resolving File Compatibility Issues

  1. Verify File Format: Ensure the file you are attempting to download or open is supported by qBittorrent. Check the file extension and refer to the official qBittorrent documentation for a list of supported formats.

  2. Update qBittorrent: Download and install the latest version of qBittorrent from the official website. This ensures you have access to the most recent bug fixes, compatibility improvements, and security patches.

  3. Install Necessary Codecs: If you are encountering issues with multimedia files, install the required codecs from reputable sources. Popular codec packs like K-Lite Codec Pack offer a comprehensive solution for most multimedia formats.

  4. Adjust Security Settings: Temporarily disable your antivirus or firewall to see if it resolves the issue. If necessary, add qBittorrent to your security software’s exceptions list to allow it to operate without interference.

  5. Check for System Updates: Ensure your Windows 11 operating system is up to date. System updates often include bug fixes and compatibility improvements that may address file-related issues.

  6. Seek Community Support: If you encounter persistent compatibility problems, consult the qBittorrent community forums or documentation for troubleshooting guidance and potential solutions from experienced users.

FAQ: qBittorrent File Compatibility on Windows 11

Q: Why can’t I download certain files using qBittorrent on Windows 11?

A: This could be due to file format incompatibility, missing codecs, security restrictions, or outdated software. Verify the file format, update qBittorrent, install necessary codecs, and adjust security settings as needed.

Q: How do I know if a specific file format is supported by qBittorrent?

A: Refer to the official qBittorrent documentation or search for information on supported file formats online. You can also try downloading a small sample file of the desired format to see if qBittorrent recognizes it.

Q: What can I do if my antivirus is blocking qBittorrent downloads?

A: Temporarily disable your antivirus or add qBittorrent to its exceptions list. However, exercise caution when disabling security measures, as it can increase your vulnerability to malware.

Q: Are there any alternative torrent clients for Windows 11?

A: Yes, other popular torrent clients include uTorrent, Deluge, and Transmission. However, be sure to choose a reputable and trustworthy client to avoid security risks.

Tips for Optimizing File Compatibility

  • Use a Reliable Source: Download files from reputable torrent sites to minimize the risk of encountering corrupted or incompatible files.

  • Scan Downloaded Files: Regularly scan downloaded files with your antivirus software to detect any potential malware.

  • Back Up Important Data: Always back up important data before making any significant changes to your system or software.

Conclusion: Navigating File Compatibility Challenges

While occasional file compatibility issues may arise with qBittorrent on Windows 11, these problems are often solvable through troubleshooting and optimization. By understanding the underlying factors and implementing the recommended solutions, users can ensure a smooth and efficient torrenting experience. Remember to prioritize security and update your software regularly to mitigate potential risks and maintain a stable system environment.

Windows 11 Compatibility Windows 11 Compatibility issue - YouTube Add Or Remove Compatibility Tab From File Properties In Windows 11 10  thewindowsclub
Add or remove Compatibility Tab from File Properties in Windows 11/10 How to fix app compatibility problems on Windows 11 - Pureinfotech How To Check Windows 11 Compatibility Windows 11 How To Download Pc  Images and Photos finder
10 Best Torrent Clients For Windows 11  digitbin Microsoft windows 11 compatibility check - ffopperks

Closure

Thus, we hope this article has provided valuable insights into Understanding File Compatibility Issues with qBittorrent on Windows 11. We thank you for taking the time to read this article. See you in our next article!

Windows 11: A Comprehensive Exploration Of Microsoft’s Latest Operating System

Windows 11: A Comprehensive Exploration of Microsoft’s Latest Operating System

Introduction

In this auspicious occasion, we are delighted to delve into the intriguing topic related to Windows 11: A Comprehensive Exploration of Microsoft’s Latest Operating System. Let’s weave interesting information and offer fresh perspectives to the readers.

Windows 11: A Comprehensive Exploration of Microsoft’s Latest Operating System

Windows 11 is now official: this is Microsoft's new operating system - MeTimeTech

Windows 11, the successor to Windows 10, represents a significant evolution in Microsoft’s flagship operating system. Released in October 2021, it brought a host of new features, design refinements, and performance enhancements, aiming to provide a more user-friendly and visually appealing experience for users. This article delves into the intricacies of Windows 11, exploring its core features, benefits, and potential drawbacks.

The New Face of Windows:

One of the most striking aspects of Windows 11 is its redesigned user interface. The operating system embraces a cleaner, more minimalist aesthetic, with rounded corners, a centered taskbar, and a new Start menu that prioritizes pinned applications and recommended content. This visual overhaul emphasizes a streamlined and intuitive experience, aiming to simplify navigation and enhance productivity.

Core Features and Enhancements:

Windows 11 introduces several notable features designed to improve user experience and productivity. These include:

  • Improved Task Management: Windows 11 boasts a refined task management system, with a redesigned Taskbar and a new Snap Layouts feature. Snap Layouts allows users to quickly and efficiently arrange windows into predefined layouts, maximizing screen space and streamlining multitasking.
  • Enhanced Gaming Performance: Windows 11 incorporates features specifically tailored to gaming, including Auto HDR, which automatically enhances the visual fidelity of games, and DirectStorage, which accelerates game loading times by leveraging the latest storage technologies.
  • Focus Modes and Do Not Disturb: Recognizing the importance of focus and productivity, Windows 11 introduces Focus Modes and Do Not Disturb features. These allow users to minimize distractions and create a dedicated workspace for specific tasks, fostering a more focused and efficient workflow.
  • Android App Support: Windows 11 brings the ability to run Android apps directly on the operating system through the Amazon Appstore. This expands the app ecosystem available to Windows users, offering access to a wider range of mobile applications.
  • Enhanced Security: Windows 11 prioritizes user security with features like Windows Hello for facial recognition and fingerprint login, as well as improved malware protection through Windows Defender.

Benefits of Windows 11:

The introduction of Windows 11 brings a multitude of benefits for users, including:

  • Improved User Interface: The redesigned UI, with its clean aesthetics and streamlined navigation, offers a more intuitive and user-friendly experience.
  • Enhanced Productivity: The new features, such as Snap Layouts and Focus Modes, aim to improve productivity by facilitating efficient multitasking and minimizing distractions.
  • Elevated Gaming Experience: The integration of gaming-specific features like Auto HDR and DirectStorage enhances the visual fidelity and loading speeds of games, providing a more immersive and enjoyable gaming experience.
  • Expanded App Ecosystem: The ability to run Android apps directly on Windows 11 opens up a vast library of mobile applications to users, expanding their choices and functionality.
  • Enhanced Security: With features like Windows Hello and improved malware protection, Windows 11 prioritizes user security and data privacy.

Potential Drawbacks:

While Windows 11 offers a compelling set of features and enhancements, it also presents some potential drawbacks:

  • System Requirements: Windows 11 introduces stricter system requirements compared to its predecessor, potentially excluding older hardware from compatibility.
  • User Interface Changes: The redesigned UI, while aiming for a streamlined experience, may require a learning curve for users accustomed to the previous Windows 10 interface.
  • Android App Integration: While a valuable addition, the integration of Android apps may not always provide a seamless experience, with potential performance and compatibility issues.

Frequently Asked Questions (FAQs):

Q: What are the minimum system requirements for Windows 11?

A: Windows 11 requires a 1 GHz or faster processor with at least two cores, 4 GB of RAM, 64 GB of storage space, and a compatible graphics card. It also requires a UEFI firmware with Secure Boot capability and a TPM 2.0 module.

Q: Can I upgrade my existing Windows 10 device to Windows 11?

A: Yes, you can upgrade your Windows 10 device to Windows 11 if it meets the minimum system requirements. Microsoft offers a free upgrade for eligible devices.

Q: Is Windows 11 compatible with my existing applications?

A: Most applications compatible with Windows 10 should also be compatible with Windows 11. However, some older applications may require updates or may not be fully compatible.

Q: What are the advantages of using Windows 11 over Windows 10?

A: Windows 11 offers a redesigned user interface, improved productivity features, enhanced gaming performance, Android app support, and enhanced security.

Q: What are the disadvantages of using Windows 11 over Windows 10?

A: Windows 11 has stricter system requirements, may require a learning curve for users accustomed to Windows 10, and Android app integration may not always be seamless.

Tips for Using Windows 11:

  • Familiarize yourself with the new UI: Take some time to explore the redesigned interface and understand the new features.
  • Utilize Snap Layouts: Leverage the Snap Layouts feature to efficiently arrange windows and maximize screen space.
  • Explore Focus Modes: Experiment with Focus Modes to create dedicated workspaces and minimize distractions.
  • Enable Windows Hello: Enhance security and convenience by enabling Windows Hello for facial recognition or fingerprint login.
  • Update your drivers: Ensure your device drivers are up-to-date for optimal performance and compatibility.

Conclusion:

Windows 11 represents a significant evolution in the Windows operating system, offering a redesigned interface, improved productivity features, enhanced gaming performance, and expanded app ecosystem. While it introduces stricter system requirements and potential compatibility issues, it presents a compelling option for users seeking a modern, user-friendly, and feature-rich operating system. With its focus on aesthetics, productivity, and security, Windows 11 aims to provide a more streamlined and enjoyable experience for users across various devices and applications.

Windows 11: this is the new Microsoft operating system - Techidence Microsoft has released version 11 of the Windows operating system - pictures What the New Windows 11 Operating System Means for Businesses
Buy Windows 11 User Guide for Beginners: A Comprehensive Guide to Master Windows 11 Operating Windows 11: Everything you need to know about the new operating system โ€ข TechBriefly Windows 11: The Ultimate Guide to the Latest Operating System by Microsoft
Microsoft Introduces New Windows 11 Operating System; An Adequate Interface to Compete with Microsoft Windows 11 Operating Systems

Closure

Thus, we hope this article has provided valuable insights into Windows 11: A Comprehensive Exploration of Microsoft’s Latest Operating System. We thank you for taking the time to read this article. See you in our next article!

Ensuring Privacy And Security: Removing Accounts From Windows 11 Before Selling

Ensuring Privacy and Security: Removing Accounts from Windows 11 Before Selling

Introduction

With great pleasure, we will explore the intriguing topic related to Ensuring Privacy and Security: Removing Accounts from Windows 11 Before Selling. Let’s weave interesting information and offer fresh perspectives to the readers.

Ensuring Privacy and Security: Removing Accounts from Windows 11 Before Selling

How to Remove a Microsoft Account from Windows 11

Selling a used computer, whether a laptop or desktop, necessitates a thorough preparation process to ensure the privacy and security of both the seller and the future user. A crucial step in this process is removing all personal accounts associated with the device. This act not only safeguards sensitive data but also prevents unauthorized access to files, settings, and online services.

Understanding the Importance of Account Removal

Leaving accounts on a device being sold poses significant risks:

  • Data Security Breaches: Personal data stored on the device, including emails, documents, browsing history, and financial information, becomes vulnerable to unauthorized access by the new owner.
  • Unauthorized Access to Online Services: The new owner could gain access to the seller’s online accounts, including email, social media, and banking services, potentially leading to identity theft and financial loss.
  • Compromised Privacy: The new owner could access personal files, photos, and other sensitive information, compromising the seller’s privacy.
  • Technical Issues: Remaining accounts may interfere with the new owner’s ability to set up their own accounts and use the device effectively.

Steps to Remove Accounts from Windows 11

The process of removing accounts from Windows 11 involves two main steps:

  1. Removing Local Accounts: These are accounts created directly on the device, typically used for day-to-day access.

    • Navigate to Settings: Click the Start menu, then select "Settings."
    • Select Accounts: Choose "Accounts" from the left-hand menu.
    • Access Family & Other Users: Click on "Family & other users" in the right-hand panel.
    • Manage Local Accounts: Select the local account you wish to remove.
    • Remove Account: Click "Remove" and follow the on-screen instructions.
  2. Removing Microsoft Accounts: These are accounts linked to your Microsoft services, such as Outlook, OneDrive, and the Microsoft Store.

    • Navigate to Settings: Click the Start menu, then select "Settings."
    • Select Accounts: Choose "Accounts" from the left-hand menu.
    • Access Your Info: Click on "Your info" in the right-hand panel.
    • Sign Out: Click "Sign out" to disconnect your Microsoft account from the device.
    • Remove Account: If you wish to completely remove the account, click "Remove" and follow the on-screen instructions.

Additional Measures for Enhanced Security

Beyond removing accounts, several additional steps enhance security and privacy:

  • Resetting Windows: A clean install of Windows 11, either by upgrading or performing a fresh installation, eliminates all existing data and settings, effectively erasing all traces of previous users.
  • Deleting Personal Data: Manually deleting all files, folders, and browser history ensures no sensitive information remains on the device.
  • Formatting the Hard Drive: Formatting the hard drive completely wipes the device, eliminating any remaining data.
  • Using Data Erasure Software: Specialized data erasure software permanently deletes all data, making recovery impossible.

FAQs: Addressing Common Concerns

Q: What happens to my data after removing an account?

A: Removing an account does not delete your data. It merely disconnects the account from the device. Your data will remain on the device unless you manually delete it or perform a clean install of Windows.

Q: Can I recover data after removing an account?

A: It is possible to recover data after removing an account, but it requires specialized software and technical expertise. However, performing a clean install of Windows or formatting the hard drive makes data recovery extremely difficult, if not impossible.

Q: Do I need to remove all accounts before selling?

A: While removing all accounts is the most secure option, it is not always necessary. Removing accounts linked to sensitive information, like banking or email, is crucial. However, removing accounts primarily used for gaming or entertainment may not be as critical.

Q: What if I forget to remove an account?

A: If you forget to remove an account, the new owner could potentially access your data and online services. It is important to contact the relevant service providers to change passwords and secure your accounts.

Tips for a Secure Sale

  • Back up important data: Before removing accounts, back up all essential data to an external drive or cloud storage.
  • Use a strong password: Use a unique and strong password for your Microsoft account to prevent unauthorized access.
  • Enable two-factor authentication: Enabling two-factor authentication adds an extra layer of security by requiring a code from your phone or email in addition to your password.
  • Review privacy settings: Regularly review your privacy settings and ensure only necessary information is shared.
  • Be cautious of third-party applications: Avoid installing unnecessary applications, as they may collect personal data without your knowledge.

Conclusion: Prioritizing Privacy and Security

Removing accounts from Windows 11 before selling is a crucial step in ensuring the privacy and security of both the seller and the future owner. This process safeguards sensitive data, prevents unauthorized access to online services, and minimizes the risk of identity theft. By taking the necessary steps to remove accounts and implement additional security measures, sellers can confidently part ways with their devices, knowing their personal information remains protected.

How to Remove a Microsoft Account from Windows 11 How To Remove Microsoft Account From Windows 11 Guide  yorketech Windows 11 New Settings: How to Open it?  How to Use It? - MiniTool
How To Remove Microsoft Account From Windows 11 Guide  beebom How to Remove Microsoft Account from Windows 11 [Guide]  Beebom How to remove Microsoft account in Windows 11
How to Remove a Microsoft Account From Windows 11 - Guiding Tech [GUIDE] Removing Microsoft Account From Windows 11

Closure

Thus, we hope this article has provided valuable insights into Ensuring Privacy and Security: Removing Accounts from Windows 11 Before Selling. We appreciate your attention to our article. See you in our next article!

Uninstalling Microsoft Copilot From Windows 11: A Comprehensive Guide

Uninstalling Microsoft Copilot from Windows 11: A Comprehensive Guide

Introduction

With enthusiasm, let’s navigate through the intriguing topic related to Uninstalling Microsoft Copilot from Windows 11: A Comprehensive Guide. Let’s weave interesting information and offer fresh perspectives to the readers.

Uninstalling Microsoft Copilot from Windows 11: A Comprehensive Guide

Remove Windows Copilot button from taskbar on Windows 11 - YouTube

Microsoft Copilot, a powerful AI-powered assistant integrated into Windows 11, offers a range of features designed to enhance productivity and streamline workflows. However, some users might prefer to disable or completely remove Copilot from their system due to privacy concerns, resource limitations, or simply a preference for a more traditional user experience. This article provides a comprehensive guide to uninstalling Copilot from Windows 11, outlining the different methods available and addressing common queries.

Understanding the Options

There are two primary ways to remove Copilot from Windows 11:

  1. Disabling Copilot: This option temporarily deactivates Copilot without completely removing its components. This is suitable for users who wish to temporarily disable Copilot’s features without permanently removing it from their system.
  2. Uninstalling Copilot: This option completely removes Copilot from the system, including all its associated files and components. This is recommended for users who wish to permanently remove Copilot from their system and reclaim disk space.

Disabling Copilot

Disabling Copilot is a relatively simple process and can be accomplished through the Windows 11 settings:

  1. Open Settings: Access the Windows 11 settings by pressing the Windows key + I.
  2. Navigate to Privacy & Security: In the left-hand menu, select Privacy & Security.
  3. Choose "Windows Permissions": Under "Privacy & Security," click on "Windows Permissions."
  4. Disable Copilot: Locate the "Copilot" section and toggle the switch to "Off."

Once disabled, Copilot will no longer be accessible through the Windows 11 interface or through any of its integrated features. However, all Copilot components will remain installed on the system.

Uninstalling Copilot

Uninstalling Copilot involves removing all its associated files and components from the system. This process is more involved than disabling Copilot and requires using the Windows 11 settings or the command prompt.

Using Windows Settings

  1. Open Settings: Access the Windows 11 settings by pressing the Windows key + I.
  2. Navigate to Apps: In the left-hand menu, select "Apps."
  3. Choose "Apps & features": Under "Apps," click on "Apps & features."
  4. Locate Copilot: Scroll through the list of installed apps and find "Microsoft Copilot."
  5. Uninstall Copilot: Click on "Microsoft Copilot" and then click the "Uninstall" button.
  6. Confirm Uninstallation: Confirm the uninstallation by clicking "Uninstall" in the confirmation dialog box.

Using Command Prompt

  1. Open Command Prompt: Search for "Command Prompt" in the Windows search bar and select the "Run as administrator" option.
  2. Execute the Uninstall Command: Type the following command and press Enter: %LocalAppData%MicrosoftWindowsAppsMicrosoft.Copilot_1.0.0.0_x64__8wekyb3d8bbweMicrosoft.Copilot.exe /uninstall

Important Note: The version number in the command might differ based on the installed version of Copilot. Ensure you replace the version number with the correct one from your system.

Benefits of Removing Copilot

Removing Copilot from Windows 11 offers several benefits, including:

  • Privacy: Copilot collects data about user interactions and usage patterns. Removing Copilot helps protect user privacy by preventing the collection of this data.
  • Resource Optimization: Copilot can consume system resources, including CPU and memory. Removing Copilot can improve system performance and free up resources for other applications.
  • Clean User Interface: Some users might prefer a cleaner user interface without the presence of Copilot’s features and icons. Removing Copilot simplifies the user interface and eliminates any potential clutter.
  • Customization: Removing Copilot allows users to customize their Windows 11 experience without the influence of AI-powered features. This provides more control over the user interface and functionality.

FAQs

Q: Can I reinstall Copilot after uninstalling it?

A: Yes, you can reinstall Copilot from the Microsoft Store after uninstalling it.

Q: Will removing Copilot affect other Windows 11 features?

A: Removing Copilot should not affect other Windows 11 features, as it is a separate application. However, some features might rely on Copilot’s capabilities, such as the "Suggest" feature in the Windows search bar.

Q: Will removing Copilot delete my data?

A: Removing Copilot will not delete any personal data stored on your system. However, it will remove all Copilot-related files and configurations.

Q: What are the alternatives to Copilot?

A: There are several alternatives to Copilot, including other AI-powered assistants like Google Assistant, Amazon Alexa, and Siri. Additionally, users can explore third-party productivity tools and applications that offer similar functionality.

Tips

  • Backup Data: Before uninstalling Copilot, it is recommended to back up any important data or configurations associated with Copilot, such as saved prompts or preferences.
  • Check for Updates: Ensure you are running the latest version of Windows 11 before uninstalling Copilot.
  • Restart System: After uninstalling Copilot, restart your system to ensure all changes are applied correctly.
  • Monitor System Performance: After removing Copilot, monitor your system’s performance to assess any improvements in resource utilization or speed.

Conclusion

Removing Copilot from Windows 11 can be a beneficial decision for users who prioritize privacy, resource optimization, or a clean user interface. By following the steps outlined in this guide, users can disable or completely uninstall Copilot from their systems, achieving a customized Windows 11 experience tailored to their preferences. However, it is important to carefully consider the potential impact of removing Copilot on other Windows 11 features and functionalities before making a decision.

How to Remove Copilot From Windows 11 Taskbar with a few steps - Enceodemore How to remove copilot from taskbar windows 11  Disable copilot from taskbar windows 10 - YouTube How to remove Microsoft's new Copilot AI from Windows 11
4 Ways To Remove Copilot From Windows 11 Taskbar How To Remove Windows Copilot On Windows 11 Images An - vrogue.co How to Disable Copilot on Windows 11 23H2 and 22H2  Remove Copilot From PC, Taskbar, Start Menu
Turn off Copilot in Windows 11 using Settings and Registry How to uninstall or remove Copilot from Windows 11

Closure

Thus, we hope this article has provided valuable insights into Uninstalling Microsoft Copilot from Windows 11: A Comprehensive Guide. We thank you for taking the time to read this article. See you in our next article!

Navigating The Landscape Of Windows 12: Understanding Programs And Features Settings

Navigating the Landscape of Windows 12: Understanding Programs and Features Settings

Introduction

With enthusiasm, let’s navigate through the intriguing topic related to Navigating the Landscape of Windows 12: Understanding Programs and Features Settings. Let’s weave interesting information and offer fresh perspectives to the readers.

Move over Windows 11, Windows 12 is the operating system we need

Windows 12, the latest iteration of Microsoft’s operating system, introduces a refined and streamlined interface, including a dedicated section for managing installed programs and features. This section, often referred to as "Programs and Features" or "Apps and Features," empowers users to tailor their Windows experience by installing, uninstalling, and modifying various applications and system components.

Understanding the Scope of Programs and Features Settings

The "Programs and Features" settings serve as a central hub for managing the software landscape of your Windows 12 device. This encompasses a wide range of actions, including:

  • Installation and Uninstallation: Users can easily install new applications from the Microsoft Store or other sources, and subsequently remove unwanted programs to optimize system resources and maintain desired functionality.

  • Feature Management: Windows 12 includes optional features that can be enabled or disabled to fine-tune the operating system’s behavior and capabilities. This can range from enabling specific Windows components to activating language packs and customizing accessibility options.

  • Application Updates: Users can manage application updates, choosing to install updates automatically or manually. This ensures that programs remain secure and receive the latest bug fixes and performance enhancements.

  • Repairing Applications: In cases where an application encounters issues, the "Programs and Features" settings allow users to attempt a repair, potentially resolving problems without the need for complete reinstallation.

Accessing the Programs and Features Settings

Navigating to the "Programs and Features" settings in Windows 12 is straightforward:

  1. Start Menu: Click the Start button and type "Apps and Features" or "Programs and Features" into the search bar.
  2. Settings: Open the Settings app by clicking the gear icon in the Start menu. Navigate to "Apps" and then select "Apps & features".
  3. Control Panel: Open the Control Panel by searching for it in the Start menu. Select "Programs" and then "Programs and Features."

Exploring the Programs and Features Interface

The "Programs and Features" interface presents a list of all installed applications, providing key information such as the application name, size, installation date, and publisher. This information empowers users to quickly identify and manage specific programs.

Key Features and Options within Programs and Features

1. Sorting and Filtering: The interface allows users to sort applications by name, size, installation date, and other criteria. Filtering options further enhance the ability to quickly locate specific applications by name, publisher, or installation date.

2. Application Details: Clicking on an application reveals detailed information, including the installation path, version number, and available actions such as "Uninstall," "Modify," or "Repair."

3. Advanced Options: The "Programs and Features" settings often include additional options, such as managing default programs, configuring advanced startup settings, and accessing troubleshooting tools.

4. Feature Management: Windows 12’s "Programs and Features" settings also house the management of optional features. Users can enable or disable various components, such as Windows Media Player, .NET Framework, and optional language packs, to customize the operating system’s functionality.

Benefits of Managing Programs and Features

Maintaining a well-organized and optimized software landscape offers numerous benefits:

  • Enhanced System Performance: Regularly uninstalling unused applications frees up disk space and reduces the number of programs running in the background, leading to improved system performance.

  • Improved Security: Keeping applications up to date through the "Programs and Features" settings ensures that your system is protected against vulnerabilities and exploits.

  • Customized Functionality: The ability to enable or disable optional features allows users to tailor Windows 12 to their specific needs, whether it’s prioritizing multimedia capabilities or enhancing accessibility options.

  • Simplified Troubleshooting: The "Programs and Features" settings often provide tools for repairing or resetting applications, simplifying the troubleshooting process when encountering software-related issues.

FAQs about Programs and Features Settings

Q: Can I uninstall pre-installed apps from Windows 12?

A: While most pre-installed apps can be uninstalled through the "Programs and Features" settings, some core system components may be essential for the operating system’s functionality and cannot be removed.

Q: How can I restore a program to its default settings?

A: Many programs offer a "Repair" option within the "Programs and Features" settings. This can help restore the application to its default configuration, potentially resolving issues or restoring functionality.

Q: What is the difference between uninstalling and repairing an application?

A: Uninstalling an application completely removes it from your system, while repairing attempts to fix issues within the application without deleting its data.

Q: Can I use the "Programs and Features" settings to manage drivers?

A: While the "Programs and Features" settings primarily focus on applications, you can sometimes find drivers listed there. However, managing drivers is often best handled through the Device Manager, accessible through the Control Panel.

Tips for Effective Program and Feature Management

  • Regularly Review Installed Applications: Periodically review the list of installed programs and uninstall any applications you no longer use.

  • Enable Automatic Updates: Ensure that automatic updates are enabled for both Windows 12 and individual applications to maintain security and receive the latest features.

  • Utilize Search Functionality: The "Programs and Features" settings offer search functionality to quickly locate specific applications.

  • Backup Important Data: Before making any significant changes to your system, including uninstalling applications, back up your important data to prevent accidental loss.

Conclusion

The "Programs and Features" settings in Windows 12 are a powerful tool for managing and customizing the software landscape of your device. By understanding the available options and utilizing best practices, users can optimize system performance, enhance security, and tailor their Windows experience to meet their specific needs. Regular review and maintenance of the software installed on your device is crucial for maintaining a smooth and efficient computing environment.

Enabling Roles and Features in Windows Server 2012 or Later Meet Windows 12 Concept - YouTube Windows 12 concept video shows off drool-worthy design for a dream OS  Windows Central
Windows programs and features command Ways to Open Windows Programs and Features How to add or remove Windows features or components - Digital Citizen
Windows programs and features command Windows: Solving 0x0000011b Error When Connecting to Shared Printer โ€“ Indowhiz

Closure

Thus, we hope this article has provided valuable insights into Navigating the Landscape of Windows 12: Understanding Programs and Features Settings. We appreciate your attention to our article. See you in our next article!

The Calculator In Windows 11: A Versatile Tool For Everyday Computing

The Calculator in Windows 11: A Versatile Tool for Everyday Computing

Introduction

With great pleasure, we will explore the intriguing topic related to The Calculator in Windows 11: A Versatile Tool for Everyday Computing. Let’s weave interesting information and offer fresh perspectives to the readers.

The Calculator in Windows 11: A Versatile Tool for Everyday Computing

Windows 11 Calculator App

The Calculator application in Windows 11 is a powerful and versatile tool that goes far beyond basic arithmetic. It provides a user-friendly interface for a wide range of mathematical operations, from simple addition and subtraction to complex scientific calculations and conversions. This article will explore the features, benefits, and functionalities of the Calculator in Windows 11, highlighting its importance in various computing scenarios.

A Multifaceted Interface for Diverse Needs

The Calculator in Windows 11 offers a variety of modes, each tailored for specific purposes:

Standard Mode: This mode provides the basic arithmetic functions, including addition, subtraction, multiplication, division, percentage, and square root. It is ideal for everyday calculations, such as balancing budgets, calculating discounts, or splitting bills.

Scientific Mode: This mode expands the functionality to include trigonometric functions, logarithmic functions, exponential functions, and more. It is particularly useful for students, engineers, and scientists who require advanced mathematical calculations.

Programmer Mode: This mode is specifically designed for programmers and developers. It allows for binary, octal, decimal, and hexadecimal calculations, along with bitwise operations. This mode is essential for working with computer code and understanding the underlying logic of binary systems.

Date Calculation Mode: This mode enables users to calculate the difference between two dates, determine the number of days between two dates, and convert between different date formats. It is a valuable tool for scheduling, project management, and financial planning.

Converter Mode: This mode allows users to convert between various units of measurement, including length, weight, temperature, volume, and currency. It simplifies the process of converting measurements across different systems and regions.

Beyond Basic Arithmetic: Advanced Features and Functionality

The Calculator in Windows 11 goes beyond simple calculations and offers a range of advanced features:

Memory Functions: Users can store intermediate results in memory for later use, simplifying complex calculations and preventing the need to re-enter values.

History: The Calculator keeps a record of recent calculations, allowing users to easily revisit and review past operations.

Copy and Paste: Calculations can be copied and pasted into other applications, facilitating seamless integration with other software and documents.

Customizable Appearance: Users can adjust the size and appearance of the Calculator, including the font size and color scheme, to suit their preferences.

Accessibility Features: The Calculator is designed to be accessible to all users, with options for screen readers, high contrast modes, and keyboard navigation.

Benefits of Using the Calculator in Windows 11

The Calculator in Windows 11 offers numerous benefits to users:

Convenience and Accessibility: It is readily available within the Windows operating system, making it easily accessible for all users.

Versatility and Functionality: Its diverse modes and features cater to a wide range of computing needs, from basic arithmetic to complex scientific calculations.

Accuracy and Reliability: The Calculator utilizes precise algorithms and ensures accurate results for all calculations.

User-Friendly Interface: Its intuitive interface and clear layout make it easy to navigate and use, regardless of technical expertise.

Time-Saving: It streamlines the calculation process, saving users time and effort compared to manual calculations.

FAQs about the Calculator in Windows 11

Q: How do I access the Calculator in Windows 11?

A: The Calculator can be accessed through the Start menu or by searching for "Calculator" in the Windows search bar.

Q: Can I customize the appearance of the Calculator?

A: Yes, users can adjust the size, font, and color scheme of the Calculator to their preferences.

Q: How do I use the memory functions in the Calculator?

A: The Calculator provides buttons for storing values in memory (M+), recalling values from memory (MR), and clearing the memory (MC).

Q: Can I use the Calculator in offline mode?

A: Yes, the Calculator is a built-in application and does not require an internet connection to function.

Q: What are the accessibility features of the Calculator?

A: The Calculator offers features such as screen reader compatibility, high contrast modes, and keyboard navigation to ensure accessibility for all users.

Tips for Using the Calculator in Windows 11

Tip 1: Explore all the available modes to discover the full range of functionalities offered by the Calculator.

Tip 2: Utilize the memory functions to simplify complex calculations and store intermediate results.

Tip 3: Take advantage of the history feature to review past calculations and revisit previous operations.

Tip 4: Customize the appearance of the Calculator to suit your preferences and enhance your user experience.

Tip 5: Explore the accessibility features to ensure a comfortable and inclusive computing experience.

Conclusion

The Calculator in Windows 11 is an indispensable tool for everyday computing, offering a comprehensive range of functionalities to meet diverse needs. Its versatility, accuracy, and user-friendly interface make it a valuable resource for students, professionals, and casual users alike. From basic arithmetic to advanced scientific calculations, the Calculator in Windows 11 provides a reliable and efficient solution for all your computational needs.

Windows 11โ€™s Calculator App Is Packed With Powerful Features Windows 11: The new Calculator, Snipping Tool, Mail and Calendar apps are here  Laptop Mag How to use the Windows 11 calculator?  Medium
Closer Look: Calculator app in Windows 11 - Neowin Here are some of the best Windows 11 calculator apps Windows Calculator Gets a Facelift in Windows 11
How to Open the Calculator in Windows 11 Closer Look: Calculator app in Windows 11 - Neowin

Closure

Thus, we hope this article has provided valuable insights into The Calculator in Windows 11: A Versatile Tool for Everyday Computing. We hope you find this article informative and beneficial. See you in our next article!

Understanding The Page File In Windows 11: A Comprehensive Guide

Understanding the Page File in Windows 11: A Comprehensive Guide

Introduction

With enthusiasm, let’s navigate through the intriguing topic related to Understanding the Page File in Windows 11: A Comprehensive Guide. Let’s weave interesting information and offer fresh perspectives to the readers.

Understanding the Page File in Windows 11: A Comprehensive Guide

How To Properly Set The Windows 11 Paging File - YouTube

The Windows operating system, in its latest iteration, Windows 11, relies heavily on a crucial component known as the page file. This hidden file, often referred to as the "virtual memory" or "swap file," plays a vital role in managing system resources, ensuring smooth operation and preventing crashes. This article delves into the intricacies of the page file in Windows 11, exploring its purpose, functionality, and significance in optimizing system performance.

The Essence of the Page File:

At its core, the page file serves as an extension of the physical RAM (Random Access Memory). When the system’s RAM becomes overloaded, the page file steps in as a temporary storage space for data that is not actively being used. This data is "paged out" to the page file, freeing up valuable RAM for critical processes. Conversely, when the system requires access to data stored in the page file, it is "paged in" back to RAM.

Understanding the Page File’s Role:

Imagine RAM as a high-speed workspace, ideal for frequently accessed data. However, this workspace has limited capacity. The page file acts as a larger, slower storage area, holding data that is not immediately needed. This dynamic exchange between RAM and the page file ensures efficient resource utilization.

The Importance of the Page File:

  • Preventing System Crashes: Without a page file, a system running out of RAM would inevitably crash. The page file acts as a safety net, preventing data loss and system instability.
  • Optimizing Performance: By offloading less frequently used data to the page file, the system can focus on processing critical tasks, leading to smoother operation and faster response times.
  • Supporting Virtual Memory: The page file is essential for enabling virtual memory, a technique that allows applications to access more memory than physically available. This is particularly important for resource-intensive applications like video editing or gaming.

Factors Affecting Page File Size:

The size of the page file is a crucial parameter that directly impacts system performance. A larger page file offers more storage space for paged-out data, potentially reducing the frequency of page swapping. However, an excessively large page file can also lead to slower disk access times and reduced overall performance.

Determining the Optimal Page File Size:

The ideal page file size varies depending on several factors, including:

  • RAM Size: Systems with larger amounts of RAM generally require smaller page files.
  • Application Usage: Resource-intensive applications necessitate larger page files.
  • System Configuration: The presence of other applications and system processes can influence the page file size.

Managing the Page File:

Windows 11 provides tools for managing the page file, allowing users to customize its size and location. While automatic management is generally sufficient, manual adjustments can be beneficial in specific scenarios.

Adjusting the Page File:

  • Automatic Management: Windows 11 automatically manages the page file size based on system usage patterns. This is the recommended approach for most users.
  • Manual Adjustment: Users with specific requirements can manually configure the page file size. This involves accessing the system properties and modifying the virtual memory settings.

Tips for Managing the Page File:

  • Avoid Setting a Fixed Size: Using a fixed page file size can lead to performance issues if the system needs more space.
  • Monitor System Performance: Track the page file usage and adjust its size based on observed performance trends.
  • Consider SSD Storage: Storing the page file on a solid-state drive (SSD) can significantly improve performance due to faster read and write speeds.

FAQs about the Page File in Windows 11:

Q: Is it necessary to have a page file in Windows 11?

A: While Windows 11 can function without a page file, it is highly recommended to have one. The page file serves as a crucial safety net, preventing system crashes and ensuring optimal performance.

Q: What happens if the page file is too small?

A: A small page file can lead to frequent page swapping, resulting in slowdowns and system instability.

Q: What happens if the page file is too large?

A: A large page file can increase disk access times, potentially impacting overall system performance.

Q: Can I disable the page file completely?

A: Disabling the page file is not recommended, as it can lead to system instability and crashes.

Q: How do I check the page file size in Windows 11?

A: You can check the page file size by accessing the System Properties window and navigating to the Advanced system settings.

Q: Can I move the page file to a different location?

A: Yes, you can move the page file to a different location by modifying the virtual memory settings in the System Properties window.

Q: Should I store the page file on my SSD?

A: Storing the page file on an SSD can significantly improve performance due to faster read and write speeds.

Conclusion:

The page file, though often hidden from view, plays a crucial role in ensuring the smooth operation and stability of Windows 11. By understanding its purpose and managing it effectively, users can optimize system performance and prevent potential crashes. While automatic management is generally sufficient, manual adjustments can be beneficial in specific scenarios. By paying attention to the page file, users can unlock the full potential of their Windows 11 system.

Pagefile.sys Windows 11 How to manage Virtual Memory Paging File in Windows 11 Windows 11 Paging File
Help Windows 11 has no paging file, why? What is Virtual Memory Paging File, When and How to Change Its Size in Windows 11? โ€“ WebNots Windows 11 Paging File
What is Virtual Memory Paging File, When and How to Change Its Size in Windows 11? โ€“ WebNots Select Files in Windows 11 - Instructions and Video Lesson

Closure

Thus, we hope this article has provided valuable insights into Understanding the Page File in Windows 11: A Comprehensive Guide. We thank you for taking the time to read this article. See you in our next article!

Understanding Windows 10 Home: A Comprehensive Guide

Understanding Windows 10 Home: A Comprehensive Guide

Introduction

With great pleasure, we will explore the intriguing topic related to Understanding Windows 10 Home: A Comprehensive Guide. Let’s weave interesting information and offer fresh perspectives to the readers.

Understanding Windows 10 Home: A Comprehensive Guide

PPT - DOWNLOAD Windows 10 A Comprehensive Beginner s Guide to Learn Windows 10 Step by Step

Windows 10 Home, a widely adopted operating system, powers countless personal computers and devices worldwide. This guide aims to provide a comprehensive understanding of Windows 10 Home, its features, and the role of a product key in activating and utilizing its full potential.

What is Windows 10 Home?

Windows 10 Home is a user-friendly operating system designed for personal computing. It offers a familiar interface, robust security features, and a wide range of applications for everyday tasks. It is generally considered suitable for home users, students, and those who primarily use their computers for browsing the web, managing personal files, and enjoying multimedia content.

The Importance of a Product Key

A product key is a unique alphanumeric code that serves as a digital license for Windows 10 Home. This key is essential for activating the operating system, unlocking its full functionality, and ensuring that the user has the legal right to use it.

How Does a Product Key Work?

When a user installs Windows 10 Home, the operating system prompts for a product key. This key is then verified by Microsoft’s activation servers. If the key is valid, the operating system is activated, granting the user full access to its features.

Benefits of Activating Windows 10 Home

Activating Windows 10 Home with a valid product key offers several significant benefits:

  • Full Functionality: An activated Windows 10 Home unlocks all its features, including access to the Windows Store, automatic updates, and various customization options.
  • Legal Compliance: Using a valid product key ensures that users are legally licensed to use Windows 10 Home, avoiding potential legal issues.
  • Security and Stability: Activated Windows 10 Home receives regular security updates and patches, protecting the system from malware and vulnerabilities.
  • Personalized Experience: Users can customize their activated Windows 10 Home environment, setting preferences and installing applications that align with their individual needs.

Obtaining a Product Key

A product key for Windows 10 Home can be obtained through various channels:

  • New PC Purchase: Most new computers come pre-installed with Windows 10 Home, and a product key is included in the purchase.
  • Retail Purchase: Users can purchase a Windows 10 Home product key from authorized retailers, either online or in physical stores.
  • Upgrade from Previous Versions: Users who previously owned a licensed version of Windows can upgrade to Windows 10 Home and receive a new product key.

Frequently Asked Questions (FAQs)

Q: What happens if I don’t activate Windows 10 Home?

A: An unactivated Windows 10 Home will operate in a limited mode, with restrictions on features like personalization and access to certain applications. It will also display a watermark on the desktop, reminding users that the operating system is not activated.

Q: Can I use the same product key on multiple computers?

A: No, a single product key is typically associated with a specific computer. Using it on multiple devices may result in activation issues.

Q: What if I lose my product key?

A: If you lose your product key, you can attempt to retrieve it through Microsoft’s product key recovery service. However, this may require proof of purchase and may not always be successful.

Q: Can I transfer my product key to a new computer?

A: In some cases, Microsoft allows transferring a product key to a new computer, but this process may require specific steps and may be subject to certain limitations.

Tips for Managing Windows 10 Home Product Keys

  • Store Your Product Key Safely: Keep a record of your product key in a secure location, such as a password manager or a physical document.
  • Check for Genuine Windows: Ensure that the product key you obtain is legitimate and not a counterfeit.
  • Regularly Update Your Windows: Keep your Windows 10 Home installation up-to-date with the latest updates and patches to ensure optimal performance and security.

Conclusion

A product key for Windows 10 Home is crucial for activating and unlocking the full potential of this popular operating system. It ensures legal compliance, grants access to all features, and promotes security and stability. By understanding the importance of a product key, users can make informed decisions regarding its acquisition and management, maximizing their Windows 10 Home experience.

How to Remote Desktop on Windows 10 Home: Full Guide Mastering Windows 10: A Beginner's Guide to Navigating the Operating System Microsoft Windows 10 Comprehensive - STANZATEXTBOOKS
PPT - A Comprehensive Guide to Installing Windows 10_ Step-by-Step Tutorial PowerPoint Understanding Windows 10 โ€“ a Guide to Help Get You Started Settings - DocsLib Windows 10 Home - ResolveIT Webstore
Windows 10 Home Licence Understanding Windows 10 - YouTube

Closure

Thus, we hope this article has provided valuable insights into Understanding Windows 10 Home: A Comprehensive Guide. We thank you for taking the time to read this article. See you in our next article!