Navigating Your Digital Footprint: Understanding Recent Access In Windows 10

Navigating Your Digital Footprint: Understanding Recent Access in Windows 10

Introduction

With enthusiasm, let’s navigate through the intriguing topic related to Navigating Your Digital Footprint: Understanding Recent Access in Windows 10. Let’s weave interesting information and offer fresh perspectives to the readers.

How to Clear Quick Access and Recent File and Folders in Windows 10  4iT

Windows 10, like many modern operating systems, employs a feature that tracks recently accessed files. This seemingly simple function, often found in the "File Explorer" or "Quick Access" area, plays a crucial role in enhancing user experience and productivity. It essentially acts as a digital memory, enabling users to effortlessly revisit files they have interacted with recently. This article delves into the mechanics of this feature, exploring its benefits, addressing common questions, and offering tips for optimization.

Understanding the Mechanism: How Recent Access Works

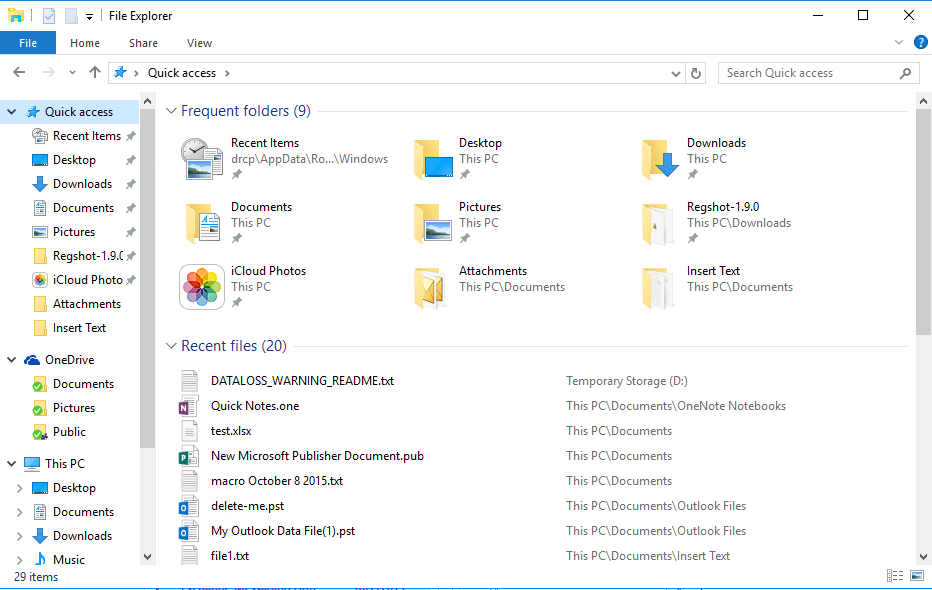
At its core, the recent access feature functions by maintaining a dynamic list of files accessed by the user. This list is not a mere chronological record but rather a dynamic representation of files deemed most relevant based on user activity. The system continuously updates this list, prioritizing files based on the recency and frequency of access.

Several factors contribute to the prioritization of files within the recent access list:

  • Recency: Files accessed most recently are generally placed higher on the list, facilitating swift retrieval.
  • Frequency: Files accessed repeatedly, even if not recently, may also gain prominence, reflecting user preference and ongoing engagement with specific content.
  • File Type: Certain file types, such as documents or images, might be prioritized over others, reflecting common user workflows and needs.

This dynamic prioritization ensures that the list remains relevant and useful, offering users a personalized and efficient pathway to their frequently used files.

Benefits of Recent Access: A Productivity Booster

The recent access feature offers several significant advantages for users, contributing to a more streamlined and productive workflow:

  • Time-Saving Navigation: By providing quick access to recently used files, the feature eliminates the need for extensive searching within folders and drives. This saves valuable time, especially for users who frequently work with numerous files.
  • Enhanced Organization: The feature acts as a virtual hub, consolidating commonly accessed files, thereby contributing to a sense of organized digital workspace.
  • Improved File Management: The recent access list can serve as a reminder of files that require further action, prompting users to revisit and complete tasks.
  • Seamless Workflow: For users engaged in multi-step processes involving several files, the feature allows for easy transitions between files, promoting a smoother and more efficient workflow.

Addressing Common Concerns: FAQs on Recent Access

Q: Can I customize the number of files displayed in the recent access list?

A: While the exact settings may vary depending on the version of Windows 10, the feature typically offers options to adjust the number of files displayed. Users can choose to display a smaller or larger number of files, tailoring the list to their specific needs and preferences.

Q: Is it possible to remove individual files from the recent access list?

A: Yes, most versions of Windows 10 allow for the removal of individual files from the recent access list. This can be achieved through a simple right-click action on the file within the list, followed by selecting the option to remove it.

Q: Can I completely disable the recent access feature?

A: While disabling the feature entirely is not typically an option within the standard settings, users can achieve a similar effect by clearing the recent access list regularly. Additionally, some third-party tools and utilities may offer more advanced options for controlling the feature.

Q: Does the recent access feature compromise user privacy?

A: The recent access feature primarily functions at the user level, tracking only the files accessed by the specific user. However, it’s important to be aware of potential security implications, especially when sharing computers or devices. If privacy concerns arise, users can periodically clear the list or explore additional privacy settings offered by Windows 10.

Q: Is it possible to access the recent access list from multiple devices?

A: The recent access feature is primarily tied to the individual device and user account. However, certain cloud storage services or file syncing applications can offer a similar functionality across multiple devices, allowing users to access recently accessed files from different locations.

Tips for Optimizing Recent Access: Enhancing User Experience

  • Regularly Clear the List: Maintaining a clean recent access list ensures its relevance and prevents unnecessary clutter. Periodically clearing the list removes outdated or irrelevant files, improving the overall user experience.
  • Utilize the Search Function: For files not readily available in the recent access list, leverage the powerful search function within Windows 10 to efficiently locate desired files.
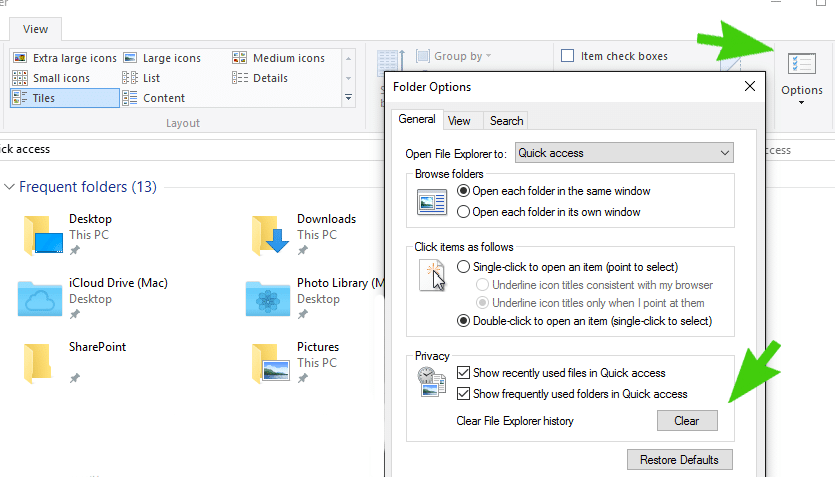
  • Explore Folder Options: The "File Explorer" in Windows 10 offers options for customizing folder behavior. Users can choose to display or hide the recent access list within specific folders, adapting the feature to their individual needs.
  • Utilize Third-Party Tools: Several third-party tools and utilities offer enhanced functionality for managing recent access, providing additional options for customization and control.

Conclusion: A Powerful Tool for Productivity and Organization

The recent access feature in Windows 10 is a valuable tool for enhancing user experience and productivity. By offering quick access to frequently used files, the feature streamlines workflow, saves time, and contributes to a more organized digital workspace. While privacy considerations should be acknowledged, the feature offers numerous benefits when used appropriately. By understanding the mechanics, benefits, and potential concerns, users can effectively leverage this feature to optimize their digital experience and maximize their productivity.

PPT - Understanding your Digital Footprint PowerPoint Presentation, free download - ID:2344648 What is a Digital Footprint and How to Protect it? - SecurityHQ What is your digital footprint • Teacha!
Add the Recent Items Folder to Windows 10 Quick Access  @Poremsky.com Navigating Your Digital Footprint: Essential Steps for Safety and Security Importance Of Digital Footprint: Complete Guide [2024]
What is Digital Footprinting in Cybersecurity? - sunnyvalley.io Digital Footprint

Closure

Thus, we hope this article has provided valuable insights into Navigating Your Digital Footprint: Understanding Recent Access in Windows 10. We appreciate your attention to our article. See you in our next article!

The Enduring Utility Of Notepad: A Guide To Using The Classic Text Editor In Windows 11

The Enduring Utility of Notepad: A Guide to Using the Classic Text Editor in Windows 11

Introduction

With enthusiasm, let’s navigate through the intriguing topic related to The Enduring Utility of Notepad: A Guide to Using the Classic Text Editor in Windows 11. Let’s weave interesting information and offer fresh perspectives to the readers.

The Enduring Utility of Notepad: A Guide to Using the Classic Text Editor in Windows 11

How to Make Notepad++ the Default Text Editor in Windows 11

In the ever-evolving landscape of operating systems and software, the simple elegance of Notepad remains a constant. This unassuming text editor, pre-installed on every Windows system since its inception, continues to hold a prominent position in the digital toolbox of users across all skill levels. While more feature-rich text editors and IDEs (Integrated Development Environments) exist, Notepad’s streamlined functionality and uncluttered interface make it an invaluable tool for a wide range of tasks.

Understanding Notepad’s Core Functionality

Notepad’s primary purpose is straightforward: to create and edit plain text files. It lacks the advanced formatting options found in word processors, focusing solely on the raw text itself. This simplicity makes it ideal for tasks that demand unadorned content, such as:

  • Writing code: Notepad is a popular choice for writing and editing code in various programming languages, particularly those that rely on plain text syntax. Its lack of formatting ensures that the code remains uncorrupted and easily portable across different systems.
  • Creating configuration files: Many applications and operating system components rely on configuration files that are essentially plain text documents. Notepad allows users to create, edit, and manage these files with ease.
  • Taking notes: Whether it’s a quick thought, a shopping list, or a longer-form note, Notepad provides a simple and accessible way to jot down ideas and information.
  • Working with text-based data: Notepad can be used to manipulate and analyze text-based data, such as logs, scripts, and data files.
  • Creating web pages: While not as robust as dedicated web development tools, Notepad can be used to create basic HTML pages for simple websites.

The Benefits of Using Notepad

Despite its minimalist design, Notepad offers several advantages that continue to make it a relevant and valuable tool in the modern digital landscape:

  • Simplicity and Ease of Use: Notepad’s intuitive interface and lack of complex features make it incredibly easy to learn and use. Even novice computer users can quickly grasp its basic functionalities.
  • Lightweight and Fast: Notepad requires minimal system resources, making it a fast and efficient application that runs smoothly on even older computers.
  • Cross-Platform Compatibility: Plain text files created in Notepad are compatible with virtually all operating systems and text editors, ensuring seamless data exchange.
  • Universal Availability: Notepad is pre-installed on every Windows system, making it readily accessible without the need for additional downloads or installations.
  • Customizable: While Notepad’s interface is intentionally minimalistic, users can customize its appearance and functionality through various settings and extensions.

Navigating Notepad in Windows 11

In Windows 11, accessing Notepad is straightforward. It can be found through the following methods:

  • Start Menu Search: Type "Notepad" in the Start menu search bar and select the corresponding result.
  • Run Command: Press the Windows key + R to open the Run dialog box, type "notepad" and press Enter.
  • File Explorer: Navigate to the "C:WindowsSystem32" folder in File Explorer and double-click the "notepad.exe" file.

Once Notepad is open, users can begin creating and editing text files. The basic functionalities include:

  • Creating New Files: Use the "File" menu and select "New" to create a blank document.
  • Opening Existing Files: Use the "File" menu and select "Open" to browse and open an existing text file.
  • Saving Files: Use the "File" menu and select "Save" or "Save As" to save the current document.
  • Editing Text: Use the standard keyboard shortcuts and mouse actions to edit text, including cut, copy, paste, and undo.
  • Formatting Text: While Notepad lacks extensive formatting options, it allows users to change font size, font style, and text color.

Beyond the Basics: Expanding Notepad’s Functionality

While Notepad’s core functionality is focused on plain text editing, various methods can enhance its capabilities:

  • Using Keyboard Shortcuts: Learning keyboard shortcuts can significantly streamline the editing process, increasing efficiency and speed.
  • Integrating with Other Applications: Notepad can be integrated with other applications, such as web browsers and programming environments, to facilitate seamless data transfer and collaboration.
  • Utilizing Plugins and Extensions: While Notepad itself lacks extensibility, third-party plugins and extensions can add features and functionality, expanding its capabilities beyond basic text editing.
  • Leveraging Notepad’s Command Line Interface: Notepad can be accessed and controlled through the command line interface, enabling users to automate tasks and integrate it into scripting processes.

Frequently Asked Questions (FAQs) about Notepad in Windows 11

1. Can I use Notepad to create and edit documents with complex formatting?

While Notepad is primarily designed for plain text editing, it lacks the advanced formatting options found in word processors like Microsoft Word. For documents requiring complex formatting, dedicated word processing software is recommended.

2. Is Notepad suitable for writing code in all programming languages?

Notepad is a viable option for writing code in various programming languages, particularly those that rely on plain text syntax. However, for more complex coding projects, dedicated IDEs (Integrated Development Environments) offer specialized features and tools that can enhance productivity.

3. Can I use Notepad to create and edit images or other non-text files?

Notepad is designed specifically for text files and cannot be used to create or edit images or other non-text file formats.

4. Does Notepad have a built-in spell checker?

Notepad does not have a built-in spell checker. However, users can utilize third-party spell checkers or integrate Notepad with other applications that offer spell-checking functionality.

5. Is Notepad secure for storing sensitive information?

Notepad is a simple text editor and does not offer any built-in security features. For storing sensitive information, it is recommended to use encrypted text editors or dedicated password managers.

Tips for Using Notepad Effectively in Windows 11

  • Utilize Keyboard Shortcuts: Mastering keyboard shortcuts can significantly enhance editing speed and efficiency.
  • Organize Your Files: Create separate folders for different types of documents to maintain organization and ease of access.
  • Utilize Notepad’s Find and Replace Feature: This feature can be invaluable for quickly searching and replacing text within documents.
  • Consider Third-Party Plugins and Extensions: Explore available plugins and extensions to expand Notepad’s functionality and adapt it to specific needs.
  • Explore Notepad’s Command Line Interface: Utilize the command line interface to automate tasks and integrate Notepad into scripting processes.

Conclusion

Despite its simplicity, Notepad remains an indispensable tool for users across all skill levels. Its uncluttered interface, lightweight design, and universal availability make it an ideal choice for a wide range of tasks, from writing code and taking notes to creating configuration files and manipulating text-based data. While more feature-rich text editors and IDEs exist, Notepad’s enduring utility lies in its straightforward functionality and ease of use, ensuring its continued relevance in the modern digital landscape.

How to Make Notepad++ Default Text Editor on Windows 11 - YouTube How to Install Classic Notepad in Windows 11? - Technoresult How to Change Notepad Font and Size in Windows 11?  Gear Up Windows
Notepad Text Editor Download Notepad++ Editor on Windows 11  TestingDocs.com Notepad++ Text Editor for Windows - OlympusNet
Download Notepad++ Editor on Windows 11  TestingDocs.com Top 7 Best Text Editors for Windows 11  Free Text Editors  Guiding Tech - YouTube

Closure

Thus, we hope this article has provided valuable insights into The Enduring Utility of Notepad: A Guide to Using the Classic Text Editor in Windows 11. We appreciate your attention to our article. See you in our next article!

Navigating The BIOS: A Comprehensive Guide To Windows 11 Boot Settings

Navigating the BIOS: A Comprehensive Guide to Windows 11 Boot Settings

Introduction

In this auspicious occasion, we are delighted to delve into the intriguing topic related to Navigating the BIOS: A Comprehensive Guide to Windows 11 Boot Settings. Let’s weave interesting information and offer fresh perspectives to the readers.

How to Boot to BIOS in Windows 11  TechSpot

The BIOS (Basic Input/Output System) is the fundamental software that governs your computer’s hardware operations. It is the first program your computer runs when you turn it on, initializing and testing components before handing control over to the operating system. While most users interact with the BIOS only occasionally, understanding its functions and how to access it can be invaluable for troubleshooting issues, optimizing performance, and customizing your system.

Accessing the BIOS in Windows 11

Accessing the BIOS on a Windows 11 system is typically achieved during the boot process. This involves entering a specific key sequence, often a function key like F2, F10, or Delete, immediately after powering on the computer. The exact key combination varies depending on the motherboard manufacturer and model.

Methods for Entering the BIOS:

  • During Boot: As the computer starts, pay close attention to the initial screen displaying the manufacturer’s logo or system information. This screen often includes a prompt indicating the key to press to enter the BIOS. The message may appear briefly, so be prepared to act quickly.
  • Using the Boot Menu: Some computers provide a boot menu that allows you to select various boot options, including entering the BIOS. This menu is typically accessed by pressing a key like F8, F11, or Esc during the boot process.
  • Through the Windows Settings: In Windows 11, navigate to Settings > System > Recovery. Under "Advanced startup," select Restart now. This will initiate a blue screen with options, including "Troubleshoot" and "Advanced options." Choose "UEFI Firmware Settings" to access the BIOS.

Understanding the BIOS Interface

The BIOS interface is a text-based menu system, often with a blue or black background. It presents various settings categorized into tabs or sections. The specific options and their arrangement may differ between manufacturers. However, common sections include:

  • Main: Displays basic system information like the date, time, and boot sequence.
  • Advanced: Contains settings related to the CPU, memory, and other hardware components.
  • Boot: Manages the boot order, allowing you to prioritize boot devices like hard drives, USB drives, or network drives.
  • Security: Enables or disables security features like Secure Boot, which helps prevent malware from loading during startup.
  • Exit: Allows you to save changes and exit the BIOS or discard changes and exit.

Key BIOS Settings to Understand:

  • Boot Order: This setting determines the order in which the computer searches for a bootable device. Prioritizing a specific drive or USB device can be crucial for installing a new operating system or troubleshooting boot issues.
  • Secure Boot: This feature helps protect your computer from malicious software by verifying the digital signature of boot files. Enabling Secure Boot can enhance system security.
  • UEFI Mode: The Unified Extensible Firmware Interface (UEFI) is a modern replacement for the traditional BIOS. It offers a more user-friendly interface, faster boot times, and enhanced security features.
  • XMP Profiles: For overclocking enthusiasts, XMP (Extreme Memory Profiles) allow you to automatically configure your RAM for higher performance.

Importance of Navigating the BIOS:

Understanding and navigating the BIOS is crucial for several reasons:

  • Troubleshooting Boot Issues: If your computer fails to boot properly, the BIOS can help you identify the cause. You can check the boot order, ensure that the hard drive is detected, or examine other settings that might be interfering with the boot process.
  • Installing New Hardware: When installing new hardware, like a hard drive or a graphics card, you may need to adjust BIOS settings to ensure compatibility and proper functioning.
  • Overclocking and Performance Tuning: The BIOS allows you to fine-tune various hardware settings, such as the CPU clock speed and memory timing, to enhance system performance. However, overclocking requires careful consideration and should only be attempted by experienced users.
  • Security Configuration: The BIOS provides security settings like Secure Boot and password protection, allowing you to enhance your system’s security and prevent unauthorized access.

Navigating the BIOS: A Step-by-Step Guide

  1. Enter the BIOS: Power on your computer and press the appropriate key combination (F2, F10, Delete, or another key) as indicated on the initial boot screen.
  2. Navigate the Menus: Use the arrow keys to move between tabs or sections within the BIOS.
  3. Adjust Settings: Use the arrow keys to select the desired setting and press Enter to modify it. Some settings may require you to use the "+" and "-" keys to adjust values.
  4. Save Changes: Once you have made the desired changes, navigate to the "Exit" section. Select "Save and Exit" to apply the changes and restart your computer. Alternatively, select "Discard Changes and Exit" to exit without saving.

FAQs on Navigating the BIOS:

Q: What if I accidentally change a BIOS setting and my computer doesn’t boot?

A: If you make changes to the BIOS that prevent your computer from booting, you can usually reset the BIOS to its default settings. Look for an option like "Load Default Settings" or "Factory Reset" within the BIOS menu. This will restore the BIOS to its original configuration, allowing you to boot into the operating system.

Q: Can I change the BIOS settings without knowing what they do?

A: It is generally not recommended to change BIOS settings unless you understand their purpose. Modifying settings without proper knowledge can lead to system instability, hardware damage, or other issues. If you are unsure about a setting, it is best to leave it at its default value.

Q: Should I always enable Secure Boot?

A: Enabling Secure Boot is generally recommended as it enhances system security. However, some older or specialized hardware may not be compatible with Secure Boot. If you experience issues after enabling Secure Boot, you may need to disable it.

Q: How often should I access the BIOS?

A: Most users only need to access the BIOS occasionally. However, if you are installing new hardware, experiencing boot issues, or want to adjust performance settings, you may need to access the BIOS more frequently.

Tips for Navigating the BIOS:

  • Read the documentation: Refer to the motherboard manual or manufacturer’s website for detailed information about specific BIOS settings and their functionality.
  • Use caution: Avoid making changes to BIOS settings unless you are confident about their purpose and potential consequences.
  • Backup your BIOS settings: Before making any significant changes, consider backing up your current BIOS settings. This allows you to easily restore them if necessary.
  • Seek help if needed: If you are unsure about a BIOS setting or are experiencing difficulties, consult a qualified technician or online resources for assistance.

Conclusion:

The BIOS plays a critical role in the operation of your computer. Understanding its functions and how to access it can be invaluable for troubleshooting issues, optimizing performance, and customizing your system. By navigating the BIOS carefully and making informed changes, you can ensure your computer runs smoothly and efficiently. Remember to approach BIOS settings with caution and consult resources if you are unsure about a particular setting.

How to Boot Windows 11 to BIOS - AvoidErrors How to Boot to BIOS in Windows 11 [TechSpot] – Up My Tech Windows 11 BIOS Settings [Enable TPM 2.0, Secure Boot, UEFI]
How to Boot to BIOS in Windows 11  TechSpot How to Boot to BIOS in Windows 11  TechSpot How to change BIOS settings on Windows 11
How To Open BIOS Settings On Windows 11?  TCG Boot To Bios Windows 11 Dell

Closure

Thus, we hope this article has provided valuable insights into Navigating the BIOS: A Comprehensive Guide to Windows 11 Boot Settings. We appreciate your attention to our article. See you in our next article!

Seamless Sharing: Unlocking The Power Of Nearby Sharing On Windows 10

Seamless Sharing: Unlocking the Power of Nearby Sharing on Windows 10

Introduction

With great pleasure, we will explore the intriguing topic related to Seamless Sharing: Unlocking the Power of Nearby Sharing on Windows 10. Let’s weave interesting information and offer fresh perspectives to the readers.

Seamless Sharing: Unlocking the Power of Nearby Sharing on Windows 10

Seamless File Sharing: Google Nearby Share for Windows

In the digital age, the ability to share files, documents, and even entire folders seamlessly is crucial. Windows 10, with its ever-evolving features, introduces a powerful tool for effortless sharing: Nearby Sharing. This feature allows users to transfer files and content between Windows 10 devices within close proximity, eliminating the need for cumbersome cables or cloud storage services.

Understanding the Mechanics of Nearby Sharing

At its core, Nearby Sharing leverages Bluetooth technology to establish a secure connection between devices. When enabled, Windows 10 devices emit a signal that other nearby devices can detect. This signal allows for the discovery and selection of compatible devices for file transfer.

The Advantages of Nearby Sharing

The convenience of Nearby Sharing lies in its simplicity and efficiency. It offers several advantages over traditional methods:

  • Speed and Simplicity: Nearby Sharing enables swift transfers, often exceeding the speed of traditional Bluetooth file sharing. The user interface is intuitive, requiring minimal steps for initiating and completing transfers.
  • Security: Nearby Sharing prioritizes security through the use of Bluetooth Low Energy (BLE) technology. This ensures that only authorized devices can access and transfer files.
  • Accessibility: Unlike cloud-based sharing platforms, Nearby Sharing does not require internet access. This makes it ideal for environments where internet connectivity is limited or unavailable.
  • Flexibility: Nearby Sharing supports a wide range of file types, including documents, photos, videos, and even entire folders. This versatility caters to diverse sharing needs.

Enabling and Using Nearby Sharing

Enabling Nearby Sharing is a straightforward process:

  1. Open Settings: Navigate to "Settings" on your Windows 10 device.
  2. Access System: Select "System" from the settings menu.
  3. Choose Shared Experiences: Locate the "Shared Experiences" option within the System settings.
  4. Toggle Nearby Sharing: Enable "Nearby Sharing" by toggling the switch to the "On" position.
  5. Select Sharing Options: Choose the preferred sharing options, including "Everyone nearby" or "My devices only."

Once enabled, sharing files is as simple as these steps:

  1. Locate the File: Open the folder containing the file you wish to share.
  2. Select the File: Right-click on the file and select "Share."
  3. Choose Nearby Sharing: Choose "Nearby Sharing" from the sharing options.
  4. Select Recipient Device: Choose the recipient device from the list of nearby devices displayed.
  5. Confirm Transfer: Confirm the transfer by clicking "Send."

Troubleshooting Common Issues

While Nearby Sharing is generally reliable, certain issues may arise:

  • Device Invisibility: If your device is not visible to other devices, ensure Bluetooth is enabled and Nearby Sharing is turned on.
  • Connectivity Issues: If the transfer fails, ensure both devices are within close proximity and have sufficient battery life.
  • File Size Limitations: Some devices may have file size limitations for Nearby Sharing.
  • Security Concerns: If you are unsure about the security of a nearby device, refrain from sharing sensitive information.

FAQs About Nearby Sharing

Q: What is the maximum distance for Nearby Sharing?

A: The effective range of Nearby Sharing depends on factors like environmental conditions and device specifications. Typically, it operates within a range of 30 feet or less.

Q: Can I share files with devices running other operating systems?

A: Currently, Nearby Sharing is primarily designed for sharing between Windows 10 devices. However, future updates may introduce cross-platform compatibility.

Q: Is Nearby Sharing secure?

A: Yes, Nearby Sharing uses Bluetooth Low Energy (BLE) technology to ensure secure communication between devices.

Q: Can I limit sharing to specific devices?

A: Yes, you can choose to share files only with your own devices by selecting "My devices only" in the sharing settings.

Q: Can I share folders using Nearby Sharing?

A: Yes, you can share entire folders using Nearby Sharing.

Tips for Optimal Nearby Sharing Experience

  • Ensure Bluetooth is Enabled: Verify that Bluetooth is enabled on both devices for successful connection.
  • Keep Devices Close: Maintain a close proximity between devices for optimal transfer speeds.
  • Check Battery Levels: Ensure both devices have sufficient battery life to complete the transfer.
  • Update Drivers: Keep your Bluetooth drivers updated for improved compatibility and performance.

Conclusion

Nearby Sharing on Windows 10 offers a convenient and secure method for sharing files and content between devices. Its simplicity, speed, and flexibility make it an invaluable tool for both personal and professional use. By understanding its features and benefits, users can unlock the potential of Nearby Sharing for seamless file transfers and enhanced collaboration.

Nearby Share is Finally Available on Windows, Allowing for a Seamless File Sharing Experience How to Use Nearby Sharing in Windows 10 How to Use Nearby Sharing to Share Files in Windows 10
How to transfer files using Nearby Sharing in Windows 10? How to Use Nearby Sharing in Windows 10 What Is "Near Share" In Windows 10? How To Share Files Wirelessly
How to Use Nearby Sharing on Windows 10 Use Nearby sharing in Windows 10  HUAWEI Support Sri Lanka

Closure

Thus, we hope this article has provided valuable insights into Seamless Sharing: Unlocking the Power of Nearby Sharing on Windows 10. We appreciate your attention to our article. See you in our next article!

Exploring The Realm Of PlayStation Emulation On Windows 10

Exploring the Realm of PlayStation Emulation on Windows 10

Introduction

With enthusiasm, let’s navigate through the intriguing topic related to Exploring the Realm of PlayStation Emulation on Windows 10. Let’s weave interesting information and offer fresh perspectives to the readers.

Exploring the Realm of PlayStation Emulation on Windows 10

PlayStation One Emulator Setup Windows 10 Test - YouTube

The world of gaming has evolved dramatically over the years, with advancements in technology constantly pushing boundaries. However, nostalgia often pulls us back to the golden age of gaming, a time when consoles like the PlayStation dominated the market. The desire to revisit these classic titles has led to the development of emulators, software programs that allow users to play games designed for one platform on another. This article delves into the fascinating world of PlayStation emulation on Windows 10, examining its intricacies, benefits, and challenges.

Understanding the Concept of Emulation

Emulation essentially involves recreating the hardware and software environment of a specific gaming console on a different platform. In this case, we are focusing on emulating the PlayStation on a Windows 10 computer. This means that the emulator software emulates the PlayStation’s central processing unit (CPU), graphics processing unit (GPU), and other components, allowing the computer to run PlayStation games.

The Benefits of PlayStation Emulation on Windows 10

The rise of PlayStation emulators on Windows 10 is driven by a multitude of compelling advantages:

  • Accessibility: Emulation removes the barrier of owning a physical PlayStation console, making a vast library of classic games readily accessible to Windows 10 users.
  • Cost-Effectiveness: Acquiring a PlayStation console, especially older models, can be costly. Emulation offers a cost-effective solution, allowing users to enjoy these games without significant financial investment.
  • Enhanced Gameplay Experience: Emulators often offer features that enhance the gameplay experience, such as the ability to save game progress at any point, rewind gameplay, and even modify game settings.
  • Preservation of Gaming History: Emulation plays a crucial role in preserving gaming history by allowing players to access and enjoy games that might otherwise become inaccessible due to aging hardware or discontinued production.
  • Flexibility and Convenience: Emulation allows players to enjoy their favorite PlayStation games on their preferred platform, offering greater flexibility and convenience compared to being tied to a specific console.

Choosing the Right PlayStation Emulator for Windows 10

The landscape of PlayStation emulators is diverse, with numerous options available. Each emulator comes with its own set of strengths and weaknesses, making choosing the right one crucial. Factors to consider include:

  • Compatibility: Different emulators have varying levels of compatibility with different PlayStation games. Researching the compatibility list of each emulator is essential.
  • Performance: Performance is crucial for a smooth gaming experience. Some emulators are more optimized than others, offering better frame rates and overall responsiveness.
  • Features: Emulators offer various features, such as save state management, controller mapping, and graphical enhancements. Choosing an emulator with the desired features is crucial.
  • Ease of Use: Some emulators are user-friendly, while others require a steeper learning curve. Opting for an emulator with a straightforward interface and intuitive controls can enhance the overall experience.

Popular PlayStation Emulators for Windows 10

Some of the most popular and widely used PlayStation emulators for Windows 10 include:

  • ePSXe: A long-standing and highly regarded emulator known for its stability and compatibility with a wide range of games.
  • PCSX2: A powerful emulator capable of running PlayStation 2 games on Windows 10, offering high performance and advanced features.
  • Mednafen: A versatile emulator that supports a variety of platforms, including the PlayStation, offering excellent compatibility and customization options.
  • RetroArch: A multi-system emulator that includes support for the PlayStation, offering a unified interface for managing multiple consoles and games.

Setting Up a PlayStation Emulator on Windows 10

Setting up a PlayStation emulator on Windows 10 involves a few key steps:

  1. Download and Install the Emulator: Download the desired emulator from a reputable source and install it on your Windows 10 computer.
  2. Obtain PlayStation BIOS Files: Some emulators require PlayStation BIOS files to function correctly. These files are typically available online, but it is important to ensure their legality and origin.
  3. Configure the Emulator: Configure the emulator settings, such as controller mapping, graphics settings, and sound output.
  4. Locate and Load PlayStation Games: Locate the PlayStation game files (usually in .ISO or .BIN format) and load them into the emulator.

Legal Considerations and Ethical Implications

While emulation offers numerous advantages, it is important to be aware of the legal and ethical implications surrounding it. Using emulators to play games you have not purchased is considered piracy and can have legal consequences. It is crucial to obtain legitimate copies of games to ensure compliance with copyright laws.

FAQs on PlayStation Emulation on Windows 10

Q: Is PlayStation emulation legal?

A: Emulation itself is generally legal. However, using emulators to play games you have not purchased is illegal. It is essential to obtain legitimate copies of games to avoid copyright infringement.

Q: Is it safe to use PlayStation emulators?

A: Downloading emulators from reputable sources generally minimizes the risk of malware or security threats. However, it is always advisable to scan downloaded files with antivirus software before running them.

Q: What are the system requirements for PlayStation emulation?

A: The system requirements for PlayStation emulation vary depending on the emulator and the game being played. However, a modern computer with a decent processor, graphics card, and sufficient RAM should be able to run most PlayStation games smoothly.

Q: Can I use my existing PlayStation controller with an emulator?

A: Yes, you can use your existing PlayStation controller with an emulator. Many emulators support a wide range of controllers, including PlayStation controllers.

Tips for Optimizing PlayStation Emulation on Windows 10

  • Use a Dedicated Graphics Card: A dedicated graphics card significantly improves performance and enhances the visual experience.
  • Configure Emulator Settings: Experiment with different settings, such as resolution, frame rate, and graphics filters, to optimize the gaming experience.
  • Use a High-Quality Controller: A high-quality controller provides better responsiveness and precision, enhancing the gameplay experience.
  • Keep Your System Updated: Ensure your Windows 10 operating system and emulator software are up to date for optimal performance and stability.

Conclusion

PlayStation emulation on Windows 10 offers a compelling way to revisit the golden age of gaming, providing access to a vast library of classic titles. While legal and ethical considerations must be addressed, emulation presents a valuable tool for gaming enthusiasts, enabling them to enjoy these games on their preferred platform with enhanced features and flexibility. As technology continues to advance, the realm of emulation will undoubtedly evolve, offering even more exciting possibilities for gamers to explore and enjoy.

Playstation emulator for pc windows 10 - hoolivids Best psx emulator windows 10 graphics - silkholoser Download ps3 emulator for windows 10 pc - gaigram
Playstation Emulator Windows 10 (EN) 2020 - YouTube Launchbox Frontend: Playstation SwanStation Emulation Setup Guide For Windows/PC - YouTube Playstation Emulation
RPCS3: An Experimental Open-source Sony PlayStation Emulator Our  Psn Emulador  jsandanski Download pSX Emulator

Closure

Thus, we hope this article has provided valuable insights into Exploring the Realm of PlayStation Emulation on Windows 10. We hope you find this article informative and beneficial. See you in our next article!

Seamless Sharing: Exploring The Advantages Of Windows 11’s "Nearby Share" Feature

Seamless Sharing: Exploring the Advantages of Windows 11’s "Nearby Share" Feature

Introduction

With great pleasure, we will explore the intriguing topic related to Seamless Sharing: Exploring the Advantages of Windows 11’s "Nearby Share" Feature. Let’s weave interesting information and offer fresh perspectives to the readers.

Seamless Sharing: Exploring the Advantages of Windows 11’s "Nearby Share" Feature

Seamless File Sharing: Google Nearby Share for Windows

In the realm of modern computing, the ability to share files and content effortlessly across devices has become a cornerstone of productivity and collaboration. Windows 11, Microsoft’s latest operating system, introduces a powerful and user-friendly feature designed to streamline this process – "Nearby Share." This innovative technology, drawing inspiration from similar functionalities found in other platforms, allows users to transfer data between Windows devices in close proximity without the need for cumbersome cables or cloud-based services.

Understanding the Mechanics of Nearby Share:

At its core, Nearby Share leverages Bluetooth technology to establish a secure connection between compatible devices. This connection, facilitated by a combination of Bluetooth Low Energy (BLE) and Wi-Fi Direct, enables the rapid transfer of files, images, documents, and even links. The process is remarkably straightforward:

  1. Device Discovery: When a user attempts to share content, Nearby Share initiates a search for nearby devices. This search operates within a limited radius, ensuring the transfer remains secure and confined to trusted devices.

  2. Connection Establishment: Once a compatible device is identified, Nearby Share establishes a secure connection using a combination of Bluetooth and Wi-Fi Direct. This connection ensures the integrity and confidentiality of the shared data.

  3. Data Transfer: With the connection established, the selected file or content is transferred to the receiving device at speeds that are significantly faster than traditional Bluetooth transfers.

Benefits of Nearby Share:

The implementation of Nearby Share in Windows 11 brings several advantages to the table, enhancing the user experience and fostering seamless collaboration:

  • Simplicity and Convenience: The intuitive interface of Nearby Share simplifies the process of sharing data. Users can easily select the content they wish to share and choose the target device, eliminating the need for complex configuration or third-party applications.

  • Speed and Efficiency: Compared to traditional methods like email attachments or cloud storage, Nearby Share offers significantly faster transfer speeds. This efficiency is particularly beneficial for large files, reducing waiting times and enhancing productivity.

  • Security and Privacy: Nearby Share prioritizes security by only allowing transfers between devices within a specified proximity. This feature helps protect sensitive data from unauthorized access and maintains the confidentiality of information.

  • Cross-Platform Compatibility: While primarily designed for Windows devices, Nearby Share can also be used to share files with Android devices. This cross-platform compatibility further expands the utility of the feature, enabling seamless collaboration across different operating systems.

Applications and Use Cases:

The versatility of Nearby Share makes it suitable for a wide range of scenarios, catering to both personal and professional needs:

  • File Sharing: Sharing documents, presentations, images, and other files between colleagues, friends, or family members becomes effortless with Nearby Share. This eliminates the need for cumbersome email attachments or cloud storage solutions, streamlining collaboration and information exchange.

  • Project Collaboration: Teams working on shared projects can leverage Nearby Share to quickly transfer design files, code snippets, or project updates between their devices. This facilitates efficient communication and collaboration, accelerating project timelines.

  • Content Sharing: Quickly share photos, videos, or music with friends and family members who are nearby. This eliminates the need for complex file sharing services and enables immediate enjoyment of shared content.

  • Troubleshooting and Support: Tech support professionals can use Nearby Share to quickly transfer diagnostic tools or troubleshooting guides to a user’s device, enabling faster and more efficient resolution of technical issues.

  • Educational Settings: Teachers can utilize Nearby Share to distribute learning materials, assignments, or project files to students’ devices, fostering a more interactive and collaborative learning environment.

Addressing Potential Concerns:

While Nearby Share offers numerous advantages, it is important to address potential concerns and limitations:

  • Limited Range: The effective range of Nearby Share is relatively limited due to the use of Bluetooth technology. This means that devices must be in close proximity for the feature to function properly.

  • Device Compatibility: Nearby Share is currently supported on Windows 11 devices and some Android devices. Compatibility with other operating systems, such as macOS or iOS, may be limited.

  • Security Considerations: As with any wireless communication technology, there are inherent security risks associated with Nearby Share. It is essential to ensure that devices are protected with strong passwords and updated with the latest security patches to mitigate potential vulnerabilities.

FAQs about Nearby Share:

Q: What devices are compatible with Nearby Share?

A: Currently, Nearby Share is compatible with Windows 11 devices and some Android devices. Compatibility with other operating systems may be limited.

Q: How secure is Nearby Share?

A: Nearby Share utilizes a combination of Bluetooth and Wi-Fi Direct to establish a secure connection between devices. This connection helps protect data from unauthorized access. However, it is essential to ensure that devices are protected with strong passwords and updated with the latest security patches.

Q: How far can I share files using Nearby Share?

A: The effective range of Nearby Share is limited by the capabilities of Bluetooth technology. Typically, devices must be within a few meters of each other for the feature to function properly.

Q: Can I use Nearby Share to share files with non-Windows devices?

A: While Nearby Share is primarily designed for Windows devices, it can also be used to share files with some Android devices. Compatibility with other operating systems may be limited.

Q: What types of files can I share using Nearby Share?

A: Nearby Share supports the sharing of a wide range of file types, including documents, images, videos, music, and even links.

Tips for Using Nearby Share:

  • Enable Nearby Share: Ensure that Nearby Share is enabled on both the sending and receiving devices. This can typically be done through the settings menu.

  • Check Device Compatibility: Verify that both devices are compatible with Nearby Share. Refer to the device specifications or manufacturer documentation for confirmation.

  • Ensure Proximity: Devices must be within close proximity for Nearby Share to function properly.

  • Maintain Security: Protect devices with strong passwords and ensure they are updated with the latest security patches to mitigate potential vulnerabilities.

Conclusion:

Windows 11’s Nearby Share feature represents a significant advancement in the realm of file sharing and collaboration. Its simplicity, speed, and security make it a valuable tool for both personal and professional use. By embracing this technology, users can streamline their workflow, enhance collaboration, and experience the convenience of seamless content sharing between their devices. As the feature continues to evolve and expand its compatibility, it has the potential to become an indispensable part of the modern computing landscape.

How to Use Nearby Sharing on Windows 11 How to Use Nearby Sharing on Windows 11?  Gear Up Windows Nearby Share is Finally Available on Windows, Allowing for a Seamless File Sharing Experience
How to Use Nearby Sharing on Windows 11?  Gear Up Windows What is Nearby Sharing in Windows 11, How Does it Work? -TECHNIG شرح استخدام ميزة Nearby Share بين Windows 11 و Android - Arabhardware
How To Use Nearby Share In Windows 11_best Methods - Rayabaan Nearby share for pc  nearby share windows 11  android to pc file transfer  how to use nearby

Closure

Thus, we hope this article has provided valuable insights into Seamless Sharing: Exploring the Advantages of Windows 11’s "Nearby Share" Feature. We thank you for taking the time to read this article. See you in our next article!

Navigating The Cost Of Windows 10 Pro: A Comprehensive Guide

Navigating the Cost of Windows 10 Pro: A Comprehensive Guide

Introduction

In this auspicious occasion, we are delighted to delve into the intriguing topic related to Navigating the Cost of Windows 10 Pro: A Comprehensive Guide. Let’s weave interesting information and offer fresh perspectives to the readers.

All You Need to Know About Windows 10 Professional: A Comprehensive Guide - Aartisto Web Media

Windows 10 Pro, Microsoft’s flagship operating system for professional and business users, offers a robust suite of features designed to enhance productivity, security, and manageability. While its powerful capabilities are widely recognized, understanding the associated costs is crucial for informed decision-making. This comprehensive guide will explore the various pricing models for Windows 10 Pro, providing clarity on the factors influencing its cost and highlighting its benefits.

Understanding the Pricing Landscape

Windows 10 Pro is available through a variety of channels, each with its own pricing structure:

1. Retail Purchase:

  • Full Version: The most common approach involves purchasing a full version of Windows 10 Pro from authorized retailers or online stores. This option provides a perpetual license, meaning you retain the right to use the software indefinitely. Prices for full versions vary depending on the retailer, promotions, and the specific edition (e.g., single-language, multilingual).
  • Upgrade License: If you are upgrading from a previous version of Windows (like Windows 7 or 8), you may be eligible for an upgrade license at a discounted price. However, upgrade licenses typically have specific requirements regarding the previous operating system installed and may not be available in all regions.

2. OEM (Original Equipment Manufacturer) Purchase:

  • Pre-installed on New Devices: Many new computers and laptops come pre-installed with Windows 10 Pro. In these cases, the operating system cost is usually included in the overall device price. However, the specific edition of Windows 10 Pro (e.g., single-language, multilingual) may be determined by the OEM.

3. Volume Licensing:

  • Microsoft Volume Licensing Programs: Businesses and organizations with multiple devices can purchase Windows 10 Pro through Microsoft’s volume licensing programs. These programs offer discounts based on the number of licenses purchased and provide flexible deployment options.
  • Open License Program: This program is designed for smaller organizations and provides a flexible way to purchase Windows 10 Pro licenses. It offers a variety of options, including pay-as-you-go and subscription-based models.
  • Select Plus Program: This program is designed for larger organizations and offers a comprehensive suite of benefits, including volume discounts, software assurance, and access to technical support.

Factors Influencing the Price of Windows 10 Pro:

Several factors contribute to the final price of Windows 10 Pro, including:

  • Edition: Different editions of Windows 10 Pro exist, such as single-language, multilingual, and education editions. Each edition may have a slightly different price based on its specific features and target audience.
  • Purchase Channel: The pricing structure varies depending on the purchase channel, with retailers, OEMs, and volume licensing programs offering different prices.
  • Promotions and Discounts: Microsoft and its partners often offer promotions and discounts, particularly during special events or for specific customer segments.
  • Region: Prices for Windows 10 Pro can vary depending on the region, due to factors like currency exchange rates and local market conditions.

Benefits of Windows 10 Pro:

Windows 10 Pro offers a comprehensive set of features designed for professional and business users, including:

  • Enhanced Security: Windows 10 Pro includes advanced security features like BitLocker drive encryption, Windows Defender Firewall, and Windows Hello for biometric authentication.
  • Improved Management: Features like Group Policy and Windows Update for Business allow organizations to manage and control their Windows 10 Pro deployments effectively.
  • Productivity Tools: Windows 10 Pro includes features like Windows Ink, Cortana, and Microsoft Edge, designed to enhance productivity and streamline workflows.
  • Remote Desktop: Windows 10 Pro enables users to remotely access their computers, facilitating remote work and collaboration.
  • Domain Join: This feature allows organizations to connect their Windows 10 Pro devices to a domain, providing centralized management and security.
  • Hyper-V: This virtualization technology allows users to run multiple operating systems on a single computer, enhancing efficiency and flexibility.

Frequently Asked Questions (FAQs)

Q: Can I upgrade from Windows 10 Home to Windows 10 Pro?

A: Yes, you can upgrade from Windows 10 Home to Windows 10 Pro. You will need to purchase a Windows 10 Pro upgrade license and follow the upgrade process provided by Microsoft.

Q: Is Windows 10 Pro compatible with my existing hardware?

A: Windows 10 Pro has specific hardware requirements. To ensure compatibility, check the official Microsoft website for the minimum system requirements.

Q: How often do I need to pay for Windows 10 Pro?

A: Windows 10 Pro is a perpetual license, meaning you pay for it once and have the right to use it indefinitely. However, you may need to pay for future feature updates or security patches.

Q: What are the differences between Windows 10 Pro and Windows 10 Home?

A: Windows 10 Pro offers advanced features designed for professional and business users, including enhanced security, management tools, and productivity features not available in Windows 10 Home.

Q: Can I use Windows 10 Pro on multiple computers?

A: A single Windows 10 Pro license typically allows you to install and use the software on one computer at a time. However, some volume licensing programs may allow for multiple installations.

Tips for Choosing the Right Windows 10 Pro Option:

  • Assess Your Needs: Consider your specific requirements, including security needs, management capabilities, and productivity tools.
  • Evaluate Pricing Options: Compare prices from different retailers, OEMs, and volume licensing programs to find the best value for your needs.
  • Check for Promotions and Discounts: Explore available promotions and discounts, particularly during special events or for specific customer segments.
  • Consult with Experts: If you are unsure about which option is best for your organization, consult with IT professionals or Microsoft partners for guidance.

Conclusion:

Windows 10 Pro offers a powerful and versatile operating system for professional and business users. Understanding the various pricing models and factors influencing the cost is essential for making informed decisions. By carefully evaluating your needs, comparing prices, and leveraging available resources, you can find the most suitable Windows 10 Pro option for your organization, ensuring a smooth and cost-effective transition to this robust operating system.

All You Need to Know About Windows 10 Professional: A Comprehensive Guide - Aartisto Web Media Buy Windows 10 Pro for Workstations  Digital Delivery  LicenceDeals Microsoft Windows 10 Pro  Major Geeks
Windows 10 Home Vs Pro For Gaming - MiniTool Windows 10 Professional - Download from Licenseking at top price  licenceking.co.uk Windows 10 Price  Windows Pro for Business  Perpetual License
Microsoft Windows 10 Pro  Academy Of Skills Khám Phá Windows 10 Pro Product Key: Phương Pháp Tối Ưu Cho Kích Hoạt

Closure

Thus, we hope this article has provided valuable insights into Navigating the Cost of Windows 10 Pro: A Comprehensive Guide. We thank you for taking the time to read this article. See you in our next article!

Unlocking The Potential: A Comprehensive Guide To Opening 7z Files On Windows 10

Unlocking the Potential: A Comprehensive Guide to Opening 7z Files on Windows 10

Introduction

With enthusiasm, let’s navigate through the intriguing topic related to Unlocking the Potential: A Comprehensive Guide to Opening 7z Files on Windows 10. Let’s weave interesting information and offer fresh perspectives to the readers.

Unlocking the Potential: A Comprehensive Guide to Opening 7z Files on Windows 10

How to Open 7z Files on Windows: A Comprehensive Guide

The 7z format, renowned for its high compression ratio and robust encryption capabilities, has become a popular choice for archiving and sharing data. However, navigating the process of opening these files on Windows 10 can sometimes present a challenge. This article aims to demystify the process, providing a comprehensive guide to unlocking the potential of 7z files on your Windows 10 system.

Understanding the 7z Format

The 7z format, developed by Igor Pavlov, is a powerful archiving format that utilizes a sophisticated compression algorithm to significantly reduce file sizes. This makes it particularly advantageous for storing and sharing large amounts of data, including images, videos, and documents.

Beyond its compression capabilities, 7z offers strong encryption features. This ensures the confidentiality and integrity of your data, making it ideal for sensitive information.

Methods for Opening 7z Files on Windows 10

While Windows 10 doesn’t inherently support 7z files, several readily available solutions enable you to open and extract their contents effortlessly. Here’s a breakdown of the most popular methods:

1. Utilizing Dedicated 7z Archiving Software

The most direct and comprehensive approach is to utilize specialized 7z archiving software. These applications are specifically designed to handle 7z files, offering a wide range of features beyond simple extraction. Some popular options include:

  • 7-Zip: Widely regarded as the gold standard for 7z file management, 7-Zip is a free, open-source program offering exceptional compression and extraction capabilities. It supports a wide array of archive formats, including 7z, ZIP, RAR, and more.
  • WinRAR: Another popular choice, WinRAR is a commercial software with a robust feature set, including advanced compression, password protection, and self-extracting archives. It also supports a vast array of archive formats.
  • PeaZip: A free, open-source alternative, PeaZip provides a user-friendly interface and a comprehensive suite of features, including support for 7z, ZIP, RAR, and numerous other archive formats.

2. Leveraging Windows 10’s Built-in Features

While Windows 10 doesn’t natively support 7z files, you can leverage its built-in capabilities with a few tweaks.

  • Using File Explorer: Windows 10’s File Explorer can be configured to open 7z files using associated programs. To achieve this, right-click on a 7z file, select "Open with," and then choose the desired archiving software from the list. This will set the default program for opening future 7z files.
  • Installing a Third-Party App: Some third-party applications, such as WinRAR or 7-Zip, offer integration with Windows 10’s context menu, allowing you to directly access their features through the right-click menu in File Explorer.

3. Online 7z File Extractors

For occasional 7z file extraction needs, online services provide a convenient and readily accessible solution. These services allow you to upload your 7z file and extract its contents directly in your web browser. However, it’s important to exercise caution when using online services, as they may not offer the same level of security and privacy as dedicated software.

Benefits of Opening 7z Files

Opening and extracting 7z files offers numerous benefits, making them a valuable tool for both personal and professional use:

  • Efficient Data Compression: 7z’s advanced compression algorithm significantly reduces file sizes, saving storage space and minimizing download times.
  • Enhanced Data Security: 7z’s encryption capabilities ensure the confidentiality and integrity of your data, safeguarding it from unauthorized access.
  • Streamlined Data Organization: Archiving files into 7z containers allows for efficient organization and management of large datasets, facilitating easy retrieval and sharing.
  • Cross-Platform Compatibility: While primarily associated with Windows, 7z files can be opened and extracted on various operating systems, including macOS, Linux, and Android, ensuring wide compatibility.

FAQs

Q: Can I open a 7z file without installing any software?

A: While Windows 10 doesn’t natively support 7z files, you can use online extraction services, although they may not offer the same level of security and privacy as dedicated software.

Q: How do I extract a password-protected 7z file?

A: To extract a password-protected 7z file, you’ll need the correct password. Enter the password when prompted by the archiving software, and the file will be extracted.

Q: What are the different types of 7z files?

A: There are two main types of 7z files:

  • Standard 7z files: These are the most common type of 7z file and can be compressed and encrypted.
  • Self-extracting 7z files: These files contain a built-in extractor, allowing you to extract the contents without needing dedicated software.

Q: Can I create 7z files on Windows 10?

A: Yes, you can create 7z files using dedicated archiving software like 7-Zip or WinRAR. These programs allow you to select files and folders, choose compression levels, and even set passwords.

Tips for Opening 7z Files

  • Choose a reputable archiving software: Select a trusted and well-established program like 7-Zip or WinRAR to ensure reliable performance and security.
  • Consider the features you need: If you require advanced features like password protection or self-extracting archives, choose a software that offers those capabilities.
  • Familiarize yourself with the software interface: Take some time to understand the software’s layout and features to maximize its functionality.
  • Backup important files: Before extracting any 7z file, it’s always advisable to back up any critical files, just in case of unforeseen issues.
  • Be cautious with online extraction services: Use reputable services and avoid uploading sensitive information to ensure your data’s safety.

Conclusion

Opening 7z files on Windows 10 is a straightforward process with various readily available solutions. Whether you opt for dedicated archiving software, leverage Windows 10’s built-in features, or utilize online services, unlocking the potential of 7z files empowers you to efficiently manage, compress, and protect your data. By understanding the different methods and their associated benefits, you can seamlessly navigate the world of 7z files and harness their power for your own needs.

How to Open 7z Files on Windows 10 - How to Open 7zip Files - YouTube How to Open 7zip Files in Windows 11/10 - YouTube How to Open 7z Files on Windows: A Comprehensive Guide
Can't Open 7z Extension files? How to extract 7z files on Windows 10 - GUIDE - YouTube How to Open 7z Files on Windows: A Comprehensive Guide How to Open 7z Files on Windows: A Comprehensive Guide
How To Open 7z Files? [Windows 10 / Mac] - YouTube How To Open 7Z Files Comprehensive Guide, 48% OFF

Closure

Thus, we hope this article has provided valuable insights into Unlocking the Potential: A Comprehensive Guide to Opening 7z Files on Windows 10. We thank you for taking the time to read this article. See you in our next article!

Navigating The "Not Administrator" Message: A Guide To Understanding And Resolving Access Restrictions On Your Computer

Navigating the "Not Administrator" Message: A Guide to Understanding and Resolving Access Restrictions on Your Computer

Introduction

In this auspicious occasion, we are delighted to delve into the intriguing topic related to Navigating the "Not Administrator" Message: A Guide to Understanding and Resolving Access Restrictions on Your Computer. Let’s weave interesting information and offer fresh perspectives to the readers.

3 Ways to Fix Operation has Been Cancelled in Device Manager in 2022  Newsletter software

Encountering a message indicating a lack of administrative privileges on your computer can be frustrating and confusing. This message, often accompanied by a denial of permission to perform certain actions, signals that your user account does not possess the necessary authority to modify or manage system settings. This article aims to provide a comprehensive understanding of the "Not Administrator" message, exploring its causes, implications, and potential solutions.

Understanding the Concept of Administrative Privileges

Operating systems, such as Windows, implement a tiered system of user accounts to manage access to system resources and perform critical tasks. These tiers define the level of control and authority granted to each user. The highest level, known as the "Administrator" account, possesses complete control over the computer, including the ability to install software, modify system settings, and manage other user accounts.

In contrast, standard user accounts operate with limited privileges, primarily designed for everyday tasks like browsing the internet, running applications, and accessing personal files. These limitations are intended to protect the system from accidental or malicious changes by users who may not possess the necessary knowledge or expertise.

Causes of the "Not Administrator" Message

The "Not Administrator" message can arise from various scenarios, each requiring a specific approach to resolution.

  • Standard User Account: The most common reason for this message is simply that the user is logged in with a standard account. This is often the case for newly created user profiles or when an administrator intentionally restricts access to certain users.
  • Account Corruption: Occasionally, user account profiles can become corrupted, leading to inconsistencies in access permissions. This can occur due to software malfunctions, system errors, or even malware infections.
  • Group Policy Restrictions: System administrators may implement group policies to enforce specific access restrictions on user accounts. These policies can be applied to individual users or entire groups, restricting access to specific folders, programs, or system settings.
  • Password Protection: Certain system settings and programs may require an administrator password for modification or execution. If the user does not know the password, they will encounter the "Not Administrator" message.

The Importance of Administrative Privileges

While administrative privileges offer significant control over the computer, they also carry a high level of responsibility. Unauthorized modifications or actions by users with administrative access can potentially compromise system security, stability, and data integrity. Therefore, it is crucial to understand the implications of using an administrator account and to exercise caution when performing administrative tasks.

Resolving the "Not Administrator" Message

The solution to the "Not Administrator" message depends on its underlying cause.

  • Switching to an Administrator Account: If the user is logged in with a standard account, the simplest solution is to log in with an administrator account. This will grant access to all system resources and settings.
  • Elevating Privileges (Run as Administrator): For specific tasks, users can temporarily elevate their privileges by right-clicking the program or setting and selecting "Run as administrator." This allows them to execute the desired action with administrator permissions without logging in with an administrator account.
  • Account Recovery: If account corruption is suspected, attempting to repair or reset the user account might resolve the issue. This can be done through system tools or by contacting technical support.
  • Contacting the System Administrator: In cases where group policies or password protection are involved, contacting the system administrator is essential. They can modify the relevant settings or provide the necessary password to grant access.

FAQs on the "Not Administrator" Message

Q: Can I permanently elevate my standard user account to administrator status?

A: While possible, it is generally not recommended. Elevating a standard account to administrator status permanently exposes the system to increased security risks. It is advisable to maintain separate administrator and standard accounts for improved security and system management.

Q: What are the risks of using an administrator account for everyday tasks?

A: Using an administrator account for everyday tasks increases the risk of accidental or malicious changes to the system. If a user with administrator privileges downloads malware or makes unintended changes, the consequences can be severe.

Q: Can I create a new administrator account if I forget my current administrator password?

A: Creating a new administrator account without knowing the current administrator password is generally not possible. It may require advanced technical knowledge or system recovery procedures, which could potentially lead to data loss.

Tips for Managing Administrative Privileges

  • Use Separate Accounts: Maintain separate accounts for standard and administrative tasks. This minimizes the risks associated with using an administrator account for everyday use.
  • Minimize Administrator Use: Only use an administrator account when absolutely necessary. For routine tasks, use a standard user account to limit potential damage.
  • Regularly Update System: Keep your operating system and security software updated to protect against vulnerabilities that could be exploited by malicious actors.
  • Be Cautious with Downloads: Download software only from trusted sources and be wary of suspicious links or attachments.
  • Use Strong Passwords: Create strong and unique passwords for all accounts, especially administrator accounts.

Conclusion

The "Not Administrator" message is a common occurrence that often arises from a lack of understanding of user account privileges. By understanding the reasons behind this message and following the appropriate steps to resolve it, users can regain access to the necessary system settings and perform the desired tasks. It is crucial to prioritize system security and to use administrative privileges responsibly to ensure the stability and integrity of the computer.

Fix Access Denied Error on Windows 11: Quick Solutions to Regain Control - Byte Bite Bit Personal Finance software user guide - Access restrictions Access Restrictions - Magento 2 Advanced Reports Extension User Guide
How Does Resolving Domain to IP Work? – WebNots Your IT Administrator Has Limited Access" Error Fix (2023) Windows – Group Policy Editor restricting the administrator account – Unix Server Solutions
This Operation Has Been Cancelled Due to Restrictions? [Resolved] - MiniTool Partition Wizard Data Privacy Day: Taking Security to the Next Level with Access Control - The Security Camera Blog

Closure

Thus, we hope this article has provided valuable insights into Navigating the "Not Administrator" Message: A Guide to Understanding and Resolving Access Restrictions on Your Computer. We thank you for taking the time to read this article. See you in our next article!

Navigating The Landscape Of Windows 14: A Deep Dive Into Programs And Features Settings

Navigating the Landscape of Windows 14: A Deep Dive into Programs and Features Settings

Introduction

With great pleasure, we will explore the intriguing topic related to Navigating the Landscape of Windows 14: A Deep Dive into Programs and Features Settings. Let’s weave interesting information and offer fresh perspectives to the readers.

Introducing Windows 14 (Concept) - YouTube

The Programs and Features section within Windows 14 serves as a central hub for managing the software installed on your system. This powerful tool allows users to meticulously control the applications present on their computer, providing a gateway to optimize performance, address conflicts, and maintain a streamlined user experience.

Understanding the Programs and Features Settings:

The Programs and Features settings are accessible through the Windows Settings app, typically found by searching for "Programs and Features" in the search bar. This interface presents a comprehensive list of all installed programs, offering a range of functionalities, including:

  • Uninstalling Programs: The primary function of this section is the ability to remove unwanted or unused applications. This process efficiently removes the program’s files, registry entries, and associated data, ensuring a clean and organized system.
  • Viewing Program Details: Each program listing provides essential information, including its name, version, publisher, and installation date. This data aids in identifying specific programs and understanding their origins.
  • Modifying Program Settings: Certain applications offer the option to modify their default settings, allowing users to tailor their behavior to their specific needs. This includes adjusting program defaults, language preferences, and other configuration options.
  • Repairing Programs: In cases where an application encounters errors or malfunctions, the Programs and Features settings provide the option to repair the installation. This process attempts to fix corrupted files or configurations, restoring the program to a functional state.
  • Managing Updates: For programs that offer automatic updates, the Programs and Features settings can be used to manage these updates. Users can choose to disable automatic updates, schedule updates for specific times, or manually check for available updates.

The Importance of Programs and Features Settings:

Maintaining a well-organized and efficient system is paramount for any computer user. The Programs and Features settings play a crucial role in achieving this goal by offering a comprehensive solution for:

  • Optimizing System Performance: By removing unnecessary programs, users can free up valuable disk space and system resources, resulting in improved performance and responsiveness.
  • Resolving Software Conflicts: When multiple programs compete for the same resources or have conflicting configurations, uninstalling or repairing problematic applications can alleviate these conflicts, leading to a more stable system.
  • Enhancing Security: Removing outdated or potentially malicious programs can strengthen system security, reducing the risk of vulnerabilities and malware infections.
  • Managing Storage Space: Regularly reviewing installed programs and removing those no longer in use helps manage storage space, preventing the system from becoming overloaded and ensuring ample room for essential files and applications.
  • Customizing User Experience: By modifying program settings and adjusting program behavior, users can personalize their system to meet their specific needs and preferences.

FAQs Regarding Programs and Features Settings:

Q: How do I uninstall a program in Windows 14?

A: To uninstall a program, open the Programs and Features settings, locate the program you wish to remove, and click "Uninstall." Follow the on-screen instructions to complete the uninstallation process.

Q: What happens when I uninstall a program?

A: Uninstalling a program removes its files, registry entries, and associated data from your system. It effectively removes the program from your computer.

Q: Can I reinstall a program after uninstalling it?

A: Yes, you can reinstall a program after uninstalling it. You can typically download the program’s installer from the original source or from a reputable software repository.

Q: How do I repair a program in Windows 14?

A: To repair a program, open the Programs and Features settings, locate the program, and click "Modify." Choose the "Repair" option from the available choices and follow the on-screen instructions to complete the repair process.

Q: What is the difference between uninstalling and repairing a program?

A: Uninstalling a program completely removes it from your system, while repairing attempts to fix corrupted files or configurations within the existing program installation.

Q: How do I manage program updates in Windows 14?

A: Some programs offer automatic updates. To manage these updates, open the Programs and Features settings, locate the program, and click "Modify." You can then choose to disable automatic updates, schedule updates, or manually check for updates.

Tips for Using Programs and Features Settings:

  • Regularly review installed programs: Periodically check the list of installed programs to identify any unnecessary or outdated applications.
  • Use a reliable uninstaller: Consider using a dedicated uninstaller tool for more thorough program removal, ensuring that all associated files and registry entries are removed.
  • Backup important data: Before uninstalling any program, especially if it is critical to your workflow, create a backup of your important data to ensure its safety.
  • Read program descriptions carefully: Pay attention to the program descriptions and system requirements before installing any new software.
  • Keep your system updated: Regularly update Windows and installed programs to benefit from security patches, bug fixes, and performance enhancements.

Conclusion:

The Programs and Features settings in Windows 14 are an essential tool for managing the software installed on your system. By effectively utilizing these settings, users can optimize system performance, resolve conflicts, enhance security, and customize their user experience. Regular maintenance and careful management of installed programs contribute to a smooth and efficient computing environment.

Introducing Windows 14  Concept - YouTube Deep dive: Logging on to Windows - Microsoft Community Hub Deep dive: Logging on to Windows - Microsoft Community Hub
New 2024 Windows 14 ISO (32/64Bit): Concept & Requirements Exploring The Features Of Windows 11: A Deep Dive Windows programs and features command
Exploring The Features Of Windows 11: A Deep Dive Windows 11 deep dive: Checking out the new Settings app

Closure

Thus, we hope this article has provided valuable insights into Navigating the Landscape of Windows 14: A Deep Dive into Programs and Features Settings. We appreciate your attention to our article. See you in our next article!