Navigating The Digital Landscape: A Guide To Password Managers In Windows 11

Navigating the Digital Landscape: A Guide to Password Managers in Windows 11

Introduction

In this auspicious occasion, we are delighted to delve into the intriguing topic related to Navigating the Digital Landscape: A Guide to Password Managers in Windows 11. Let’s weave interesting information and offer fresh perspectives to the readers.

Windows 11 Password Manager: 5 Best We Tested

In the digital age, the need for robust security measures has become paramount. With online accounts proliferating across various platforms, managing and remembering complex passwords for each one can be a daunting task. This is where password managers emerge as invaluable tools, offering a streamlined and secure approach to online identity management.

The Importance of Password Managers

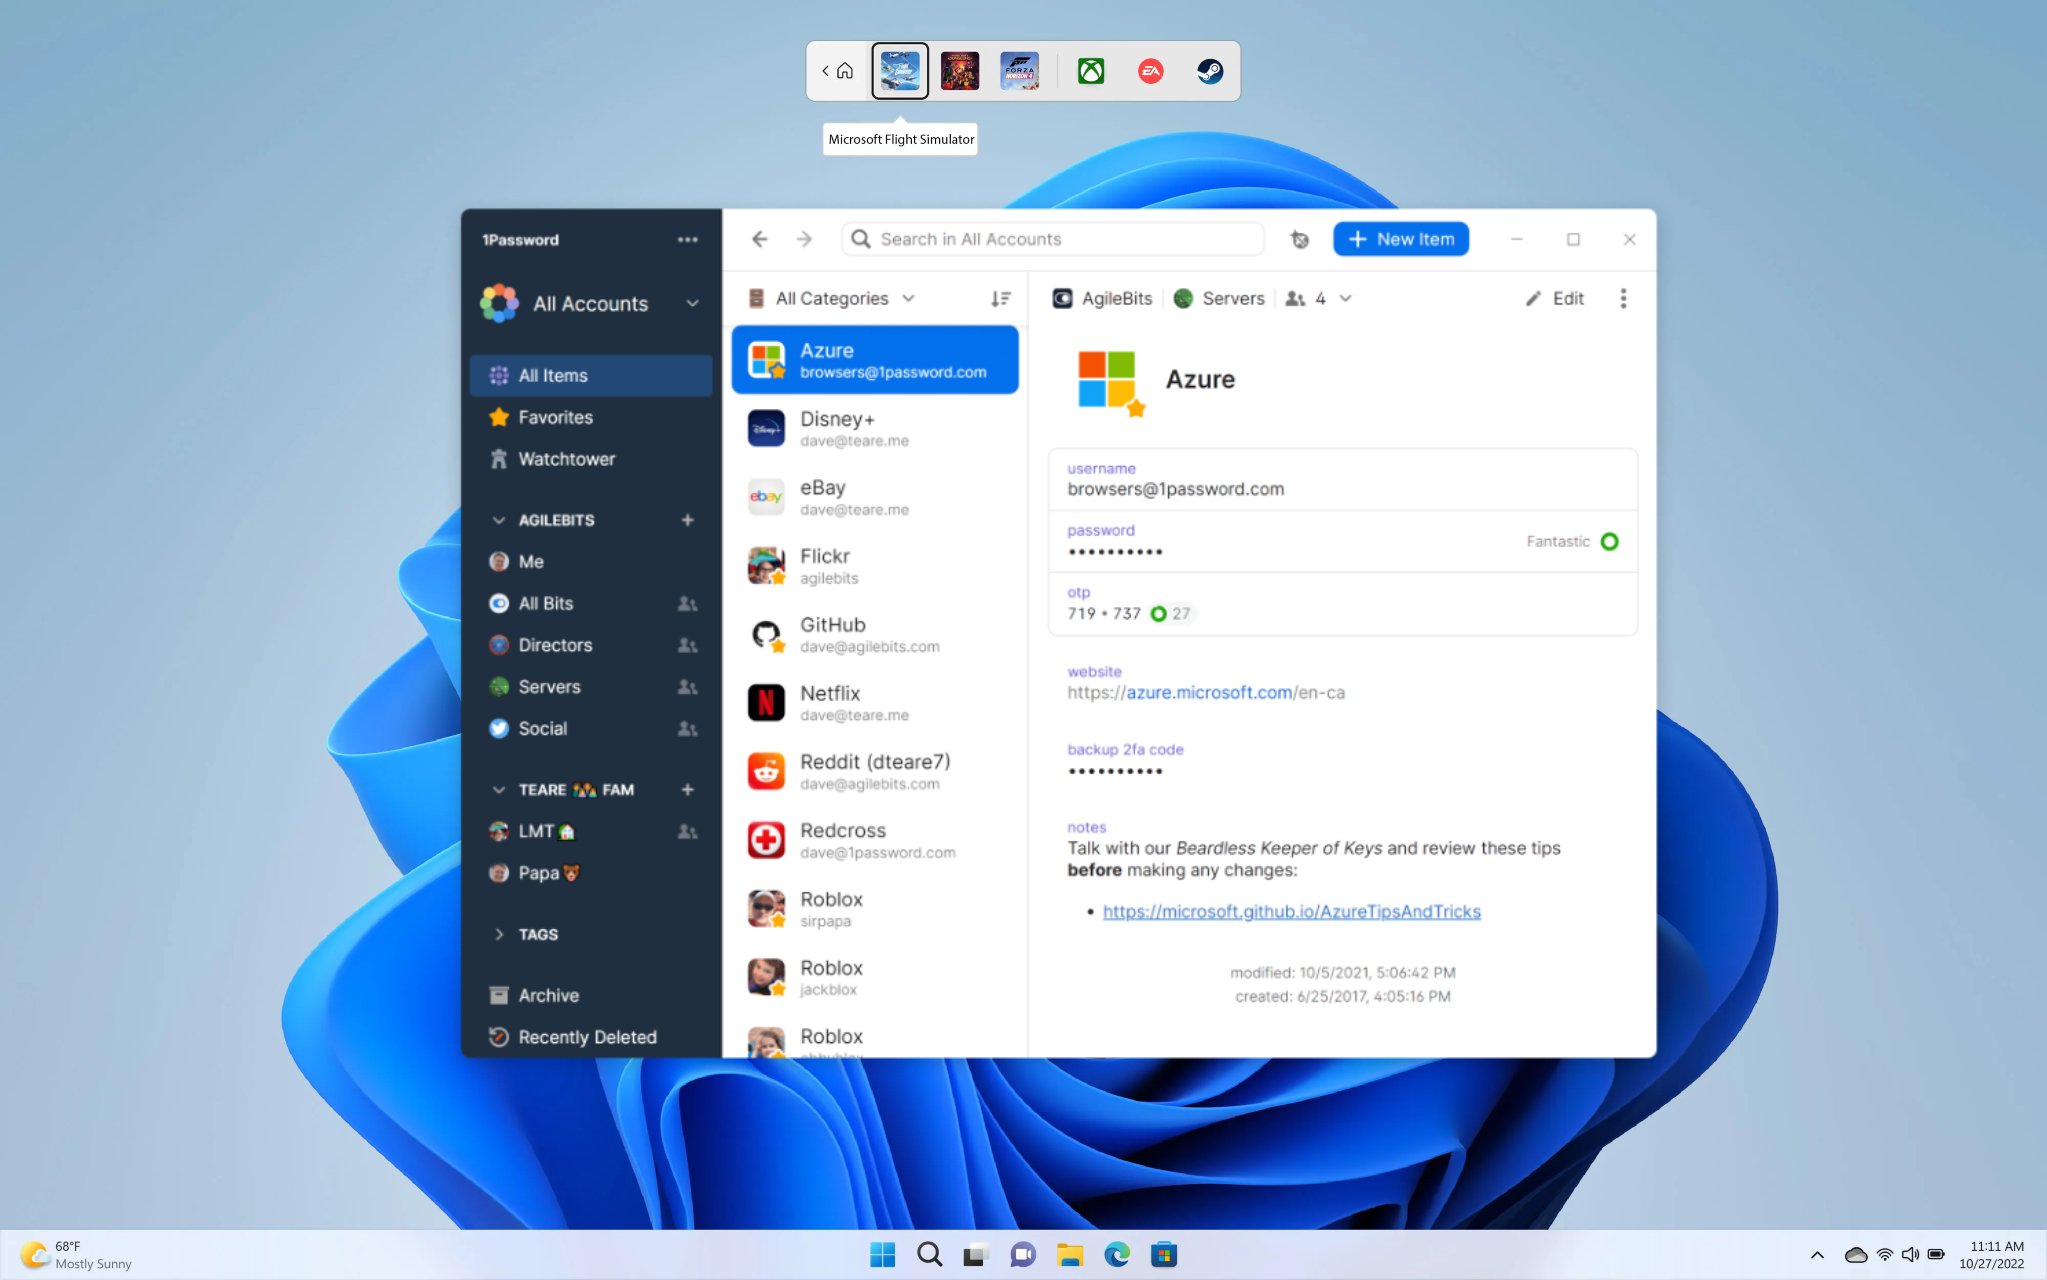
Password managers serve as digital vaults, securely storing and managing all your online credentials. They eliminate the need to remember numerous passwords, reducing the risk of forgetting them or compromising security through weak or reused passwords. By employing strong encryption algorithms, these tools safeguard your login information from unauthorized access, ensuring your online accounts remain protected.

Key Features of Password Managers in Windows 11

Windows 11, the latest iteration of Microsoft’s operating system, integrates seamlessly with password managers, enhancing the user experience. Here are some key features that make password managers essential in the Windows 11 environment:

  • Secure Password Generation: Password managers generate strong, random passwords that are practically impossible to guess, significantly bolstering account security.
  • Automatic Login: With a single click, password managers automatically fill in your login details, streamlining the process of accessing websites and applications.
  • Cross-Platform Compatibility: Most password managers offer cross-platform compatibility, allowing you to access your stored credentials across various devices, including smartphones, tablets, and computers.
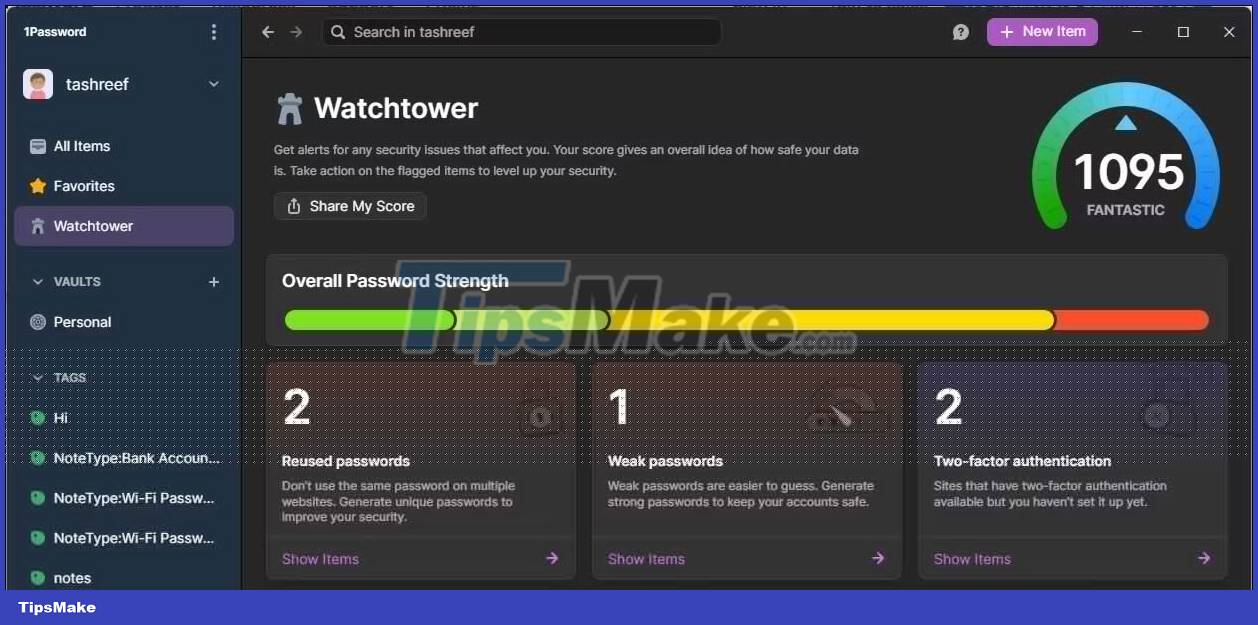
  • Password Auditing and Security Alerts: Advanced features include password auditing, highlighting weak or compromised passwords, and providing security alerts when vulnerabilities are detected.
  • Data Synchronization: Password managers synchronize your data across all your devices, ensuring consistent access to your credentials regardless of your location.
  • Biometric Authentication: Some password managers support biometric authentication, such as fingerprint scanning or facial recognition, adding an extra layer of security.

Choosing the Right Password Manager

The choice of a password manager depends on individual needs and preferences. Factors to consider include:

  • Ease of Use: The interface should be intuitive and user-friendly, facilitating a smooth onboarding experience.
  • Security Features: Look for robust encryption algorithms, multi-factor authentication options, and features like password auditing and breach monitoring.
  • Platform Compatibility: Ensure the password manager is compatible with your preferred operating systems and devices.
  • Pricing: Password managers are available in both free and paid versions. Free versions often offer limited features, while paid plans provide more advanced functionalities.

Benefits of Using a Password Manager

The benefits of utilizing a password manager extend beyond convenience:

  • Enhanced Security: Strong passwords, encryption, and multi-factor authentication significantly reduce the risk of unauthorized access to your online accounts.
  • Improved Privacy: By eliminating the need to store passwords in plain text, password managers protect your sensitive information from unauthorized access.
  • Increased Productivity: Automatic login and password generation streamline online activities, saving time and effort.
  • Centralized Management: Having all your passwords stored in one secure location simplifies account management and password recovery.

FAQs About Password Managers in Windows 11

Q1: Are password managers safe?

Password managers employ robust encryption algorithms to protect your credentials. Reputable providers adhere to industry best practices and security standards, ensuring the safety of your data.

Q2: How do I choose a reliable password manager?

Consider factors like user reviews, security features, platform compatibility, and pricing. Researching the provider’s reputation and security practices is crucial.

Q3: Can I use a password manager on multiple devices?

Yes, most password managers offer cross-platform compatibility, allowing you to access your credentials on various devices.

Q4: What if I forget my master password?

Password managers typically provide recovery options, such as security questions or email-based password resets. However, it is essential to choose a master password you can remember and keep it secure.

Q5: Is it necessary to pay for a password manager?

Free versions of password managers are available, but they often have limitations. Paid plans provide more features, such as advanced security features, unlimited password storage, and customer support.

Tips for Using a Password Manager Effectively

  • Choose a Strong Master Password: Select a complex and unique master password that is easy for you to remember but difficult for others to guess.
  • Enable Two-Factor Authentication: Adding an extra layer of security through two-factor authentication further protects your account from unauthorized access.
  • Regularly Audit Your Passwords: Password managers often provide tools for auditing and identifying weak or compromised passwords.
  • Keep Your Software Updated: Ensure your password manager and other security software are updated regularly to benefit from the latest security patches and bug fixes.

Conclusion

In the modern digital landscape, password managers have become indispensable for safeguarding online identities. By streamlining account management, generating strong passwords, and providing robust security features, these tools empower individuals to navigate the online world with confidence. As technology evolves, password managers continue to adapt and enhance their functionalities, ensuring a secure and seamless online experience for users in Windows 11 and beyond.

Best Password Manager for Windows 11/10/8/7 for 2023 How to Change the Password on Your Windows 11 Computer? - MiniTool 4 best password managers for Windows 11 - TipsMake.com
How to Disable or Remove Login Password on Windows 11 - The Microsoft Windows11 Best Password Managers & Security Tips  Restore Privacy 12 Best Password Managers Software For Windows 10,11 in 2024
Navigating The Digital Landscape With Confidence And Cybersecurity. Digital Landscape Best password managers 2023: Reviews of top products  PCWorld

Closure

Thus, we hope this article has provided valuable insights into Navigating the Digital Landscape: A Guide to Password Managers in Windows 11. We thank you for taking the time to read this article. See you in our next article!

Restoring Digital Memories: A Guide To Repair Apps And Programs For Windows 10 Photos

Restoring Digital Memories: A Guide to Repair Apps and Programs for Windows 10 Photos

Introduction

With great pleasure, we will explore the intriguing topic related to Restoring Digital Memories: A Guide to Repair Apps and Programs for Windows 10 Photos. Let’s weave interesting information and offer fresh perspectives to the readers.

Restoring Digital Memories: A Guide to Repair Apps and Programs for Windows 10 Photos

How To Repair Apps & Programs In Windows 10

Digital photographs, the cherished records of life’s moments, are susceptible to various forms of damage. From accidental deletion to file corruption, the loss of these precious images can be deeply distressing. Fortunately, a range of repair apps and programs specifically designed for Windows 10 photos can help reclaim these lost memories. This comprehensive guide explores the diverse landscape of these tools, offering insights into their functionalities, benefits, and limitations.

Understanding the Importance of Photo Repair Tools

The need for photo repair tools arises from the inherent vulnerabilities of digital images. Common scenarios that necessitate their use include:

  • Accidental Deletion: A misplaced click or a system error can lead to the disappearance of valuable photos.
  • File Corruption: Malware infections, power outages, or storage media malfunctions can corrupt image files, rendering them inaccessible.
  • Damaged Files: Physical damage to storage devices or improper handling can compromise the integrity of photo files.
  • Compression Artifacts: Excessive compression during image resizing or online sharing can introduce visual distortions.

Types of Photo Repair Programs

The landscape of photo repair tools encompasses a diverse range of programs, each catering to specific types of damage and offering varying levels of functionality.

1. Data Recovery Software:

  • Functionality: Primarily focused on recovering deleted files, including photos, from storage devices.
  • Benefits: Can retrieve photos even after emptying the Recycle Bin or formatting a storage drive.
  • Limitations: May not be effective in repairing corrupted or damaged files.

2. Photo Repair Software:

  • Functionality: Designed specifically to address damage within image files, such as corruption or compression artifacts.
  • Benefits: Can restore damaged photos to their original quality, often without significant loss of detail.
  • Limitations: May not be effective for all types of damage, and some programs may have limitations in terms of file format support.

3. Online Photo Repair Tools:

  • Functionality: Web-based services offering quick and often free photo repair solutions.
  • Benefits: Convenient and readily accessible, often requiring minimal technical expertise.
  • Limitations: Limited in functionality compared to dedicated software, and may compromise privacy due to reliance on third-party services.

4. Built-in Windows 10 Photo Editing Features:

  • Functionality: Windows 10’s Photos app offers basic editing tools, including cropping, resizing, and color correction, which can sometimes address minor photo imperfections.
  • Benefits: Convenient and accessible for users already familiar with the Photos app.
  • Limitations: Limited in their ability to repair severely damaged photos or address complex issues.

Choosing the Right Photo Repair Tool

The selection of the appropriate photo repair tool depends on the specific needs of the user. Factors to consider include:

  • Type of Damage: Determine the nature of the damage to the photos (e.g., deletion, corruption, compression artifacts).
  • Severity of Damage: Assess the extent of the damage to determine the required level of repair functionality.
  • File Formats: Ensure the tool supports the file formats of the damaged photos.
  • Budget: Consider the cost of the software or service, as some options are free while others are paid.
  • Ease of Use: Choose a tool that offers a user-friendly interface and intuitive features.

Popular Photo Repair Apps and Programs

The following is a selection of well-regarded photo repair apps and programs available for Windows 10:

  • Stellar Photo Recovery: This comprehensive data recovery software excels in recovering deleted photos, even from formatted drives.
  • Recuva: A free and user-friendly data recovery tool that can recover a wide range of file types, including photos.
  • EaseUS Data Recovery Wizard: Offers a powerful solution for recovering lost photos, including those deleted from the Recycle Bin.
  • PhotoRec: A free and open-source command-line tool that can recover various file types, including photos, from damaged storage devices.
  • MiniTool Power Data Recovery: A paid data recovery tool that boasts advanced features for recovering lost photos.
  • ReImage Photo Repair: A dedicated photo repair tool designed to address various types of image damage, including corruption and compression artifacts.
  • Photo Repair Tool by Ashampoo: A comprehensive photo repair program that offers a range of tools for repairing damaged photos.
  • Photo Doctor: A user-friendly photo repair tool that focuses on restoring faded, blurry, and noisy images.

FAQs: Repair Apps and Programs for Windows 10 Photos

1. Can I repair a photo that has been deleted from the Recycle Bin?

Yes, data recovery software can often recover deleted photos, even after emptying the Recycle Bin. However, the success rate depends on factors such as the time elapsed since deletion and the extent of overwriting on the storage device.

2. What if my photo is corrupted due to a virus infection?

Photo repair software may be able to restore corrupted photos caused by viruses. However, it is crucial to first address the virus infection to prevent further damage.

3. Can I repair a photo that has been physically damaged on a storage device?

Photo recovery tools may be able to recover photos from physically damaged storage devices, but the success rate depends on the severity of the damage. It is advisable to seek professional data recovery services for severe physical damage.

4. Is it possible to repair a photo that has been compressed too much?

Some photo repair tools can address compression artifacts, but the effectiveness depends on the extent of compression. Severe compression can lead to irreversible loss of detail.

5. Are there any free photo repair tools available?

Yes, several free photo repair tools are available, both online and as downloadable software. However, free tools often have limitations in functionality or file format support.

Tips for Using Photo Repair Apps and Programs

  • Backup Your Photos: Regularly back up your photos to prevent permanent loss. Cloud storage services or external hard drives are suitable options.
  • Use Reputable Tools: Choose photo repair tools from trusted developers with a proven track record.
  • Read Reviews: Research user reviews and ratings before purchasing or using any software.
  • Try Free Trials: Many photo repair tools offer free trials to allow you to test their capabilities before committing to a purchase.
  • Be Realistic About Expectations: Photo repair tools can restore damaged photos, but they may not always achieve perfect results.

Conclusion: Restoring Digital Memories

Photo repair apps and programs offer valuable tools for restoring damaged or lost digital photographs. By understanding the different types of tools available, the nature of photo damage, and the importance of backup, users can effectively utilize these programs to protect their precious digital memories. While these tools can be immensely helpful, it is essential to remember that they are not a substitute for regular backups and responsible digital practices. By combining these tools with proactive measures, users can ensure the longevity and accessibility of their cherished digital photographs.

How to use System Restore on Windows 10  Windows Central Windows 10 Repair & Recovery Disk Pro & Home 32 & 64 Bit DVD Recover Reinstall Reboot Fix ALL How to Repair Apps/Programs Common Problems Windows 10 - MiniTool
Restoring Individual Files in Windows 10 Backup: A Step-by-Step Guide - Updated - Technology 6 best apps & software to restore old photos 07 Best Ways to Backup your PC- For Restoring your Memories - Tech Nukti
Download free Digital Picture Restore by Memory card restore v.5.3.1.2 software 547049 Screenshots of digital pictures restore software to perform data recovery

Closure

Thus, we hope this article has provided valuable insights into Restoring Digital Memories: A Guide to Repair Apps and Programs for Windows 10 Photos. We appreciate your attention to our article. See you in our next article!

A Deeper Dive Into Windows 11’s Visual Identity: Exploring The New Wallpapers

A Deeper Dive into Windows 11’s Visual Identity: Exploring the New Wallpapers

Introduction

With great pleasure, we will explore the intriguing topic related to A Deeper Dive into Windows 11’s Visual Identity: Exploring the New Wallpapers. Let’s weave interesting information and offer fresh perspectives to the readers.

A Deeper Dive into Windows 11’s Visual Identity: Exploring the New Wallpapers

Exploring The Features Of Windows 11: A Deep Dive

Microsoft’s Windows 11 operating system, released in October 2021, introduced a significant visual overhaul, including a suite of new wallpapers that embody the design philosophy of the operating system. These wallpapers are not mere aesthetic elements; they serve as visual representations of the key principles behind Windows 11’s design, reflecting the focus on simplicity, clarity, and a sense of serenity.

The Evolution of Windows Wallpapers: From Nostalgia to Modernity

Windows wallpapers have long served as a visual anchor for the operating system, reflecting the evolving design language of each iteration. From the iconic "Bliss" wallpaper in Windows XP, capturing a serene landscape, to the more abstract and vibrant designs in Windows 10, each iteration has offered a distinct visual experience. Windows 11’s wallpapers continue this tradition, embracing a minimalist approach that aligns with the operating system’s overall design philosophy.

A Closer Look at Windows 11’s Wallpaper Collection

The default wallpaper collection in Windows 11 consists of five distinct designs, each offering a unique visual experience:

  1. "Azure": This wallpaper features a gradient of soft blues, evoking a sense of calm and serenity. The subtle transitions between shades create a sense of depth and tranquility, aligning with the minimalist design language of Windows 11.

  2. "Sunrise": This wallpaper showcases a vibrant sunrise, capturing the transition from darkness to light. The warm hues of the sunrise symbolize a fresh start and optimism, reflecting the spirit of innovation associated with Windows 11.

  3. "Green": This wallpaper features a gradient of greens, evoking a sense of nature and growth. The natural tones promote a sense of tranquility and focus, aligning with the idea of a productive and calming work environment.

  4. "Purple": This wallpaper showcases a gradient of purples, creating a sense of sophistication and elegance. The deep hues of purple suggest creativity and inspiration, reflecting the idea of Windows 11 as a platform for expression and innovation.

  5. "Black": This wallpaper features a solid black background, offering a minimalist and clean visual experience. The absence of color allows the user to focus on the content and applications displayed on the screen, promoting a sense of clarity and productivity.

The Significance of Minimalism in Windows 11 Wallpapers

The minimalist aesthetic of Windows 11’s wallpapers is not merely a stylistic choice. It serves a functional purpose, reflecting the operating system’s commitment to simplicity and clarity. By reducing visual clutter, the wallpapers create a more focused and productive work environment, allowing users to concentrate on the tasks at hand.

Beyond Aesthetics: The Functional Role of Windows 11 Wallpapers

Windows 11’s wallpapers are not merely decorative elements. They play a crucial role in enhancing user experience, contributing to the overall functionality and usability of the operating system.

  1. Enhanced Focus: The minimalist and calming nature of the wallpapers helps users focus on their tasks, reducing distractions and promoting a more productive work environment.

  2. Improved Readability: The clean and uncluttered backgrounds improve readability by providing a clear canvas for text and graphics, enhancing the visual clarity of content displayed on the screen.

  3. Personalized Experience: The ability to customize wallpapers allows users to personalize their workspace, reflecting their individual preferences and creating a more engaging and enjoyable user experience.

  4. Visual Harmony: The consistent design language across the wallpapers ensures visual harmony with the overall design of Windows 11, creating a cohesive and aesthetically pleasing user interface.

FAQs about Windows 11 Wallpapers:

1. Can I customize the default Windows 11 wallpapers?

Yes, users can customize the default wallpapers by choosing from a variety of options available in the settings menu. They can also set custom images as their desktop background.

2. Are there any specific technical requirements for using Windows 11 wallpapers?

Windows 11 wallpapers are designed to be compatible with all devices running the operating system. They are optimized for various screen resolutions and display settings, ensuring a seamless visual experience across different devices.

3. Can I download additional wallpapers for Windows 11?

Yes, users can download additional wallpapers from various online sources, including Microsoft’s official website and third-party platforms. These wallpapers can be customized to personalize the user experience further.

4. How do I change the wallpaper in Windows 11?

To change the wallpaper, users can navigate to the settings menu, select "Personalization," and then choose "Background." From there, they can select from the available options or choose a custom image.

5. Is there a specific wallpaper recommended for different types of users?

While there are no specific recommendations for different types of users, the wallpapers offer a range of visual experiences. Users can choose the wallpaper that best aligns with their personal preferences and work environment.

Tips for Using Windows 11 Wallpapers Effectively:

  1. Consider the Purpose: Choose a wallpaper that complements the type of work you do. For example, a calming wallpaper might be suitable for creative tasks, while a minimalist wallpaper might be better for focused work.

  2. Experiment with Different Options: Explore the available wallpaper options and experiment with different designs to find what works best for you.

  3. Use Custom Images: If you have a favorite image, consider setting it as your desktop background for a more personalized experience.

  4. Maintain Consistency: Choose wallpapers that maintain visual harmony with the overall design of Windows 11, creating a cohesive and aesthetically pleasing user interface.

  5. Regularly Update Wallpapers: Consider updating your wallpapers periodically to keep your workspace fresh and engaging.

Conclusion: A Visual Reflection of Modern Design Principles

Windows 11’s new wallpapers are more than just decorative elements. They serve as a visual representation of the operating system’s core design principles, embodying simplicity, clarity, and a sense of serenity. By embracing minimalism and focusing on functionality, the wallpapers contribute to a more focused and productive work environment, enhancing the overall user experience. The ability to customize wallpapers further allows users to personalize their workspace, creating a more engaging and enjoyable user experience. In essence, Windows 11’s wallpapers are a testament to the evolving design language of modern operating systems, reflecting the shift towards simplicity, clarity, and user-centricity.

Windows 11 Wallpapers - Wallpaper Cave Windows 11 Deep Dive Checking Out The New Snipping To - vrogue.co Download wallpaper: New Windows 11 1920x1200
What is Windows 11 in S mode?  Deep Dive 2023 Windows 11 5k Hd Computer 4k Wallpapers Images Backgrounds - IMAGESEE Windows 11 HD Wallpapers 1080P
Windows 11 to get graphics improvements for high-refresh-rate displays Windows 11 Wallpapers 4k Windows 11 S Default Wallpapers Are Images

Closure

Thus, we hope this article has provided valuable insights into A Deeper Dive into Windows 11’s Visual Identity: Exploring the New Wallpapers. We hope you find this article informative and beneficial. See you in our next article!

Navigating The World Of File Sharing: A Comprehensive Guide To QBittorrent On Windows 11 64-bit

Navigating the World of File Sharing: A Comprehensive Guide to qBittorrent on Windows 11 64-bit

Introduction

With enthusiasm, let’s navigate through the intriguing topic related to Navigating the World of File Sharing: A Comprehensive Guide to qBittorrent on Windows 11 64-bit. Let’s weave interesting information and offer fresh perspectives to the readers.

qBittorrent Free Download for Windows 10, 11, 7 (32 / 64-bit)

In today’s digital landscape, the ability to share and download files efficiently is paramount. While numerous options exist, qBittorrent stands out as a reliable and user-friendly solution, particularly for Windows 11 64-bit users. This comprehensive guide explores the nuances of qBittorrent, its features, benefits, and how to seamlessly integrate it into your Windows 11 environment.

Understanding qBittorrent: A Free and Open-Source Torrent Client

qBittorrent is a free and open-source BitTorrent client, designed to provide a secure and efficient way to download and share files. It operates on the principle of peer-to-peer (P2P) file sharing, where users contribute their bandwidth and storage space to distribute files across a network. This decentralized approach eliminates the need for central servers, making qBittorrent a robust and resilient platform.

Key Features and Benefits of qBittorrent:

  • Open-Source and Free: qBittorrent’s open-source nature ensures transparency and community-driven development, while its free availability makes it accessible to all users.
  • User-Friendly Interface: qBittorrent boasts a clean and intuitive interface, making it easy to navigate, manage downloads, and control torrent settings.
  • Lightweight and Resource-Efficient: qBittorrent consumes minimal system resources, ensuring smooth operation without impacting other applications or slowing down your system.
  • Cross-Platform Compatibility: qBittorrent is available for various operating systems, including Windows, macOS, Linux, and FreeBSD, ensuring compatibility across diverse platforms.
  • Integrated Search Functionality: qBittorrent features a built-in search function, enabling users to discover and download torrents directly from within the application.
  • Advanced Download Management: qBittorrent offers comprehensive download management features, including scheduling, prioritization, speed limits, and selective file downloads.
  • IP Filtering and Encryption: qBittorrent prioritizes user security and privacy, incorporating IP filtering and encryption features to protect user data during file transfers.
  • Support for Magnet Links: qBittorrent seamlessly handles magnet links, allowing users to access torrent files without the need for physical torrent files.
  • Extensive Plugin Ecosystem: qBittorrent’s plugin ecosystem provides a wide range of extensions and functionalities, enhancing the user experience and expanding its capabilities.

Installing qBittorrent on Windows 11 64-bit:

  1. Download the Installer: Visit the official qBittorrent website and download the installer for Windows 64-bit.
  2. Run the Installer: Double-click the downloaded installer file to launch the setup process.
  3. Follow the Installation Instructions: Follow the on-screen instructions, selecting your preferred installation directory and language settings.
  4. Launch qBittorrent: Once the installation is complete, you can launch qBittorrent from your Start Menu or desktop shortcut.

Using qBittorrent: A Step-by-Step Guide:

  1. Adding Torrents: You can add torrents to qBittorrent by either dragging and dropping the torrent file into the application window or by clicking the "Add Torrent" button and selecting the torrent file from your computer.
  2. Managing Downloads: Once a torrent is added, qBittorrent automatically starts downloading the files. You can monitor the download progress, pause or resume downloads, and prioritize specific files within the torrent.
  3. Configuring Settings: qBittorrent offers a wide range of settings to customize your download experience. Access the settings menu by clicking the "Options" button in the top-right corner of the application window.
  4. Using the Search Functionality: The built-in search function allows you to find torrents directly from within qBittorrent. Simply enter your search term in the search bar and browse the results.
  5. Utilizing Plugins: qBittorrent’s plugin ecosystem offers a variety of extensions to enhance functionality. Access the plugin manager by clicking the "Tools" button and selecting "Plugins."

Frequently Asked Questions (FAQs) about qBittorrent:

  • Is qBittorrent safe to use?
    qBittorrent is considered safe and secure, as it is free from malware and adware. Its open-source nature allows for community scrutiny and regular security updates.
  • Is qBittorrent legal?
    The legality of using BitTorrent depends on the content being downloaded. Downloading copyrighted material without permission is illegal, while downloading free and open-source content is generally permissible.
  • How does qBittorrent work?
    qBittorrent operates on the BitTorrent protocol, a peer-to-peer file-sharing technology. Users download and share files simultaneously, contributing to a decentralized network.
  • How can I improve my download speed?
    Download speed depends on factors such as the number of seeders, your internet connection speed, and the torrent’s popularity. You can try using a VPN, optimizing your network settings, and limiting the number of simultaneous downloads.
  • Can I use qBittorrent on multiple devices?
    Yes, qBittorrent can be used on multiple devices. However, it is essential to ensure that you have a stable internet connection and sufficient bandwidth to handle multiple downloads simultaneously.

Tips for Using qBittorrent Effectively:

  • Use a VPN: A VPN can encrypt your internet traffic and protect your privacy while using qBittorrent.
  • Prioritize Downloads: Prioritize important downloads by dragging them to the top of the queue or using the "Priority" setting.
  • Limit Download Speed: Limit download speed to avoid overloading your internet connection or impacting other applications.
  • Schedule Downloads: Schedule downloads for specific times to avoid disrupting your work or sleep.
  • Use the Search Function: Leverage the built-in search function to quickly find and download torrents.
  • Explore Plugins: Enhance your qBittorrent experience by installing plugins that offer additional functionalities.

Conclusion:

qBittorrent provides a reliable and user-friendly platform for downloading and sharing files on Windows 11 64-bit. Its open-source nature, robust features, and intuitive interface make it an ideal choice for both casual and advanced users. By understanding its capabilities and implementing best practices, you can harness the power of qBittorrent to efficiently manage your downloads and explore the vast world of file sharing.

qBittorrent Download With Qt Interface & Remote Control File Sharing Free Download qBittorrent 64 bit for Windows 11, 10 PC. Free How to share files on Windows 11 - Pureinfotech
Qbittorrent windows - drrilo Windows用のqBittorrent 64-bit 4.3.4.1をダウンロード - Filehippo.com Download qBittorrent 64 bit for Windows 11, 10 PC. Free
Download qBittorrent 64 bit for Windows 11, 10 PC. Free Qbittorrent for windows - nawperu

Closure

Thus, we hope this article has provided valuable insights into Navigating the World of File Sharing: A Comprehensive Guide to qBittorrent on Windows 11 64-bit. We hope you find this article informative and beneficial. See you in our next article!

Understanding And Managing Windows 11’s Pinned Features: A Comprehensive Guide

Understanding and Managing Windows 11’s Pinned Features: A Comprehensive Guide

Introduction

In this auspicious occasion, we are delighted to delve into the intriguing topic related to Understanding and Managing Windows 11’s Pinned Features: A Comprehensive Guide. Let’s weave interesting information and offer fresh perspectives to the readers.

Understanding and Managing Windows 11’s Pinned Features: A Comprehensive Guide

Buy Windows 11 User Guide for Beginners: A Comprehensive Guide to Master Windows 11 Operating

Windows 11, with its sleek interface and enhanced features, aims to provide a streamlined user experience. However, the default pinning of applications and files to the taskbar and Start menu can sometimes feel intrusive or hinder a user’s preferred workflow. This guide explores the various methods to manage and customize these pinned elements, providing users with greater control over their digital environment.

The Purpose of Pinning in Windows 11

Pinning in Windows 11 serves as a shortcut system, offering quick and convenient access to frequently used applications, files, and folders. This can be particularly beneficial for users who rely on specific programs or documents for their daily tasks. For instance, a graphic designer might pin their preferred design software to the taskbar, while a writer might pin their current manuscript to the Start menu for easy access.

Why Manage Pinned Elements?

While pinning provides a convenience, it can also lead to clutter and hinder the user’s ability to quickly locate specific items. A taskbar overflowing with pinned applications can be visually overwhelming and hinder efficient navigation. Similarly, a Start menu filled with pinned items might obscure the user’s desired program or file.

Furthermore, pinning can introduce security risks if an unauthorized user gains access to the computer. A pinned program might provide access to sensitive data or allow unauthorized actions.

Methods for Managing Pinned Elements

Windows 11 offers a variety of methods to manage pinned elements, providing users with the flexibility to customize their digital experience.

1. Removing Pinned Items from the Taskbar

  • Right-click on the pinned item: This will open a context menu, where you will see the option to "Unpin from taskbar." Clicking this option will remove the item from the taskbar.

  • Drag and drop: Click and hold the pinned item and drag it off the taskbar. The item will be removed from the pinned area.

2. Removing Pinned Items from the Start Menu

  • Right-click on the pinned item: This will open a context menu, where you will see the option to "Unpin from Start." Clicking this option will remove the item from the Start menu.

  • Drag and drop: Click and hold the pinned item and drag it off the Start menu. The item will be removed from the pinned area.

3. Customizing the Start Menu Layout

Windows 11 offers a flexible Start menu layout that allows users to customize the pinned items and their arrangement.

  • Click the "All apps" button: This will open the full list of applications installed on your computer.
  • Drag and drop: Click and hold an application from the "All apps" list and drag it to the pinned area of the Start menu. You can reposition pinned items by dragging them to a new location within the pinned area.

4. Using the "Show more" Feature

The "Show more" feature within the Start menu provides a convenient way to manage the displayed applications. Clicking this option expands the pinned area to include additional applications, allowing users to quickly access a broader range of programs.

5. Utilizing Third-Party Tools

While Windows 11 offers built-in tools to manage pinned elements, third-party software can provide additional features and customization options. These tools might allow users to:

  • Schedule automatic pinning: Pin certain applications or files at specific times.
  • Create custom groups: Organize pinned items into categories for easier navigation.
  • Hide specific pinned items: Temporarily remove pinned items from the taskbar or Start menu without permanently unpinning them.

FAQs

Q: Can I remove all pinned items from the taskbar or Start menu at once?

A: Unfortunately, there is no single-click option to remove all pinned items simultaneously. However, you can quickly unpin items using the methods described above.

Q: What happens to pinned items if I uninstall the corresponding application?

A: Uninstalling the application will automatically remove the pinned item from the taskbar and Start menu.

Q: Can I pin folders to the taskbar or Start menu?

A: Yes, you can pin folders to both the taskbar and Start menu. This allows for easy access to frequently used files and documents.

Tips for Managing Pinned Elements

  • Regularly review pinned items: Periodically check the pinned items on your taskbar and Start menu to ensure they remain relevant and useful.
  • Use the "Show more" feature: This allows you to access a broader range of applications without cluttering the Start menu.
  • Consider using third-party tools: These can provide additional features and customization options for managing pinned elements.
  • Prioritize essential applications: Pin only the most frequently used applications to avoid clutter and maintain a clean interface.

Conclusion

Managing pinned elements in Windows 11 provides users with greater control over their digital environment. By understanding the various methods for customizing pinned items and utilizing the available tools, users can create a streamlined and efficient workflow that caters to their individual needs and preferences. Whether it’s unpinning unwanted items, organizing pinned applications, or exploring third-party solutions, users can effectively manage their digital experience and optimize their productivity.

Windows 11 - How to Customize Pinned Apps on the Start Menu - YouTube How to Pin Almost Anything to the Windows 11 Taskbar How To Pin Apps To The Start Menu In Windows 11
How To Show More Pinned Apps in Windows 11 Start Menu - YouTube How to show more Pinned Tiles on Windows 11 Start Menu Managing Pinned Start Menu Items in Windows 11 - TurboFuture
Windows 11 Pin To Taskbar - 6 Examples - Itechguides.com How to Change Your PIN in Windows 11 - Instructions - TeachUcomp, Inc.

Closure

Thus, we hope this article has provided valuable insights into Understanding and Managing Windows 11’s Pinned Features: A Comprehensive Guide. We hope you find this article informative and beneficial. See you in our next article!

Understanding Processor Performance In Windows 11: A Comprehensive Guide

Understanding Processor Performance in Windows 11: A Comprehensive Guide

Introduction

With enthusiasm, let’s navigate through the intriguing topic related to Understanding Processor Performance in Windows 11: A Comprehensive Guide. Let’s weave interesting information and offer fresh perspectives to the readers.

Understanding Processor Performance in Windows 11: A Comprehensive Guide

How to check cpu performance windows 11? - YouTube

Windows 11, like its predecessors, relies heavily on the capabilities of the computer’s processor, or Central Processing Unit (CPU), to deliver a smooth and responsive user experience. The CPU is the brain of the computer, responsible for executing instructions and processing data. Its performance directly impacts the speed and efficiency of various tasks, from launching applications to playing demanding games.

While Windows 11 offers various optimization features to enhance system performance, users often seek to further fine-tune their system’s capabilities to match their specific needs. This is where the concept of "overriding" processor settings comes into play. However, it’s crucial to understand that "overriding" processor settings in Windows 11 is not a straightforward process. It involves delving into advanced system configuration, requiring a deeper understanding of the underlying hardware and software interactions.

The Importance of Processor Settings in Windows 11

Windows 11 utilizes a complex interplay of software and hardware components to manage system resources effectively. The operating system allocates processing power to different tasks based on factors like priority, resource availability, and user preferences. These settings are designed to strike a balance between performance and energy efficiency.

However, these default settings might not always align with individual user needs. For instance, a user might prioritize maximum performance for demanding applications like video editing or gaming, while another might prioritize battery life for mobile usage. In these scenarios, understanding and adjusting processor settings can significantly impact the overall user experience.

Understanding the Different Processor Settings

Windows 11 offers various options for managing processor performance, each with its own set of implications:

  • Power Management: Windows 11 includes built-in power management features that dynamically adjust processor performance based on system load and battery level. These features aim to optimize energy consumption and extend battery life, potentially sacrificing performance for efficiency.
  • Processor Affinity: This setting allows users to manually assign specific tasks to particular CPU cores. By allocating resource-intensive tasks to specific cores, users can potentially improve performance in certain scenarios. However, this requires a deeper understanding of CPU architecture and workload distribution.
  • Processor Throttling: Modern CPUs employ throttling mechanisms to prevent overheating and maintain stability. These mechanisms can dynamically reduce processor clock speeds when temperatures exceed certain thresholds. Users can sometimes adjust these thresholds, but this should be done cautiously to avoid potential system instability.
  • Advanced Performance Options: Windows 11’s advanced performance options allow users to fine-tune system settings, including processor scheduling and priority levels. These options provide more granular control over resource allocation, but require a thorough understanding of the implications of each setting.

The Risks and Rewards of Modifying Processor Settings

While adjusting processor settings can potentially enhance performance in specific scenarios, it’s crucial to understand the associated risks:

  • System Instability: Incorrectly configuring processor settings can lead to system instability, crashes, and unexpected behavior. This can result in data loss or system corruption, requiring extensive troubleshooting and potential data recovery.
  • Hardware Damage: Overclocking, which involves pushing the processor beyond its designed limits, can increase heat generation and potentially damage the CPU. Overclocking should be attempted only by experienced users with a thorough understanding of the risks involved.
  • Reduced Battery Life: Aggressive performance settings can lead to increased power consumption, reducing battery life on mobile devices.

Alternative Approaches to Enhancing Processor Performance

Before venturing into advanced processor settings, consider alternative approaches to improve system performance:

  • Hardware Upgrades: Upgrading to a more powerful CPU or increasing RAM capacity can significantly enhance system performance without delving into complex settings.
  • Software Optimization: Regularly updating drivers, cleaning up disk space, and disabling unnecessary background applications can optimize system resources and improve performance.
  • Operating System Settings: Windows 11 offers various built-in performance optimization features, such as disabling visual effects and adjusting background processes, which can improve system responsiveness without modifying processor settings.

FAQs on Processor Performance in Windows 11

Q: Is it safe to override processor settings in Windows 11?

A: While it is technically possible to modify processor settings in Windows 11, it is not recommended for inexperienced users. Incorrect configuration can lead to system instability and potential hardware damage.

Q: What are the potential benefits of modifying processor settings?

A: Modifying processor settings can potentially improve performance in specific scenarios, such as gaming or video editing. However, these benefits are often marginal and come with significant risks.

Q: How can I determine the optimal processor settings for my system?

A: The optimal processor settings depend on individual needs and hardware specifications. It’s recommended to research and experiment cautiously, starting with minor adjustments and monitoring system behavior.

Q: Can I overclock my processor in Windows 11?

A: Overclocking is possible in Windows 11, but it requires advanced knowledge and carries significant risks. Overclocking can potentially damage the CPU and void warranties.

Tips for Managing Processor Performance in Windows 11

  • Monitor System Temperature: Regularly monitor CPU temperatures to ensure they remain within acceptable ranges. Excessive heat can indicate potential overheating issues.
  • Use Performance Monitoring Tools: Utilize built-in performance monitoring tools or third-party applications to track CPU utilization, temperature, and other relevant metrics.
  • Consider Professional Help: If you’re unsure about modifying processor settings, consider seeking professional assistance from a qualified technician.

Conclusion

Managing processor performance in Windows 11 can be a complex endeavor, requiring a balance between performance optimization and system stability. While advanced settings offer potential benefits, they come with significant risks. It’s crucial to approach these settings with caution, thorough research, and a clear understanding of the potential consequences. For most users, focusing on hardware upgrades, software optimization, and utilizing built-in Windows 11 performance features often proves more effective and less risky than venturing into complex processor settings.

How to Check CPU Usage on Windows 11 How to Check CPU Usage on Windows 11 Performance Options Windows 11
How to display CPU, GPU and RAM usage natively on Windows 11 - gHacks Tech News How to display CPU, GPU and RAM usage natively on Windows 11 - gHacks Tech News How to Check RAM, GPU, and CPU Usage in Windows 11
Windows 11 How To Check What Processor Cpu Is In Your Pchow To Check What Processor Cpu Is In How to Use Performance Monitor App in Windows 11? – WebNots

Closure

Thus, we hope this article has provided valuable insights into Understanding Processor Performance in Windows 11: A Comprehensive Guide. We thank you for taking the time to read this article. See you in our next article!

Navigating The NVIDIA GeForce 7300 LE Driver Landscape On Windows 10: A Comprehensive Guide

Navigating the NVIDIA GeForce 7300 LE Driver Landscape on Windows 10: A Comprehensive Guide

Introduction

With great pleasure, we will explore the intriguing topic related to Navigating the NVIDIA GeForce 7300 LE Driver Landscape on Windows 10: A Comprehensive Guide. Let’s weave interesting information and offer fresh perspectives to the readers.

Nvidia Geforce 7300 Le Windows 10 Driver - renewch

The NVIDIA GeForce 7300 LE, while a product of a bygone era, continues to hold a place in the hearts of many users, particularly those with older systems. While its performance may not match modern graphics cards, it remains capable of delivering a satisfactory visual experience for various tasks, including casual gaming, multimedia playback, and basic productivity. However, maximizing its potential hinges on utilizing the correct drivers, particularly on the widely adopted Windows 10 operating system.

This guide delves into the intricacies of finding, installing, and troubleshooting NVIDIA GeForce 7300 LE drivers on Windows 10, providing a comprehensive understanding of the process and its associated nuances.

Understanding the Importance of Drivers

Drivers serve as the crucial link between your computer’s hardware and software, allowing them to communicate and function effectively. In the context of a graphics card like the GeForce 7300 LE, drivers facilitate the transfer of visual data from the card to your monitor, enabling you to see what’s on your screen.

The Challenge of Legacy Drivers on Modern Operating Systems

Windows 10, with its continuous evolution and focus on supporting the latest hardware, presents a unique challenge for older graphics cards like the GeForce 7300 LE. While NVIDIA might not actively develop drivers specifically for this card on Windows 10, it’s crucial to understand that the absence of official support doesn’t necessarily render the card unusable.

The Quest for Compatible Drivers: A Strategic Approach

Finding compatible drivers for the GeForce 7300 LE on Windows 10 requires a multi-pronged approach:

  • NVIDIA’s Official Website: While NVIDIA may not offer drivers explicitly designed for Windows 10 and the GeForce 7300 LE, it’s always worth checking their official website. Occasionally, older drivers might still be available in their driver archive.
  • Windows Update: Windows Update often automatically installs generic drivers for basic functionality, but these might not optimize performance or fully leverage the card’s capabilities.
  • Third-Party Driver Databases: Websites like DriverAgent, DriverPack Solution, and others specialize in hosting a vast repository of drivers, including those for older hardware. While utilizing such resources can be beneficial, it’s essential to exercise caution and download drivers from reputable sources to avoid potential malware risks.
  • Manufacturer’s Website: In some cases, the manufacturer of your computer or motherboard may offer drivers specifically tailored for their systems, even if they include older hardware like the GeForce 7300 LE.

Installation and Troubleshooting: A Step-by-Step Guide

Once you’ve obtained a compatible driver package for your GeForce 7300 LE, the installation process is generally straightforward:

  1. Download the driver: Download the driver package from a trusted source.
  2. Run the installer: Double-click the downloaded file to launch the installation wizard.
  3. Follow the on-screen instructions: The wizard will guide you through the installation process, typically involving accepting terms, choosing installation options, and potentially restarting your computer.

Troubleshooting Common Driver-Related Issues:

  • Black screen or display issues: If you encounter a black screen after installing drivers, try rolling back the driver to a previous version or reinstalling the operating system.
  • Driver incompatibility: If you experience crashes or other issues, ensure you’ve downloaded the correct driver for your specific operating system (Windows 10) and graphics card model (GeForce 7300 LE).
  • Driver conflicts: If you have multiple graphics cards installed, ensure the correct driver is associated with the GeForce 7300 LE.

Optimizing Performance: Beyond the Basics

While finding the right drivers is crucial, additional steps can further optimize your GeForce 7300 LE’s performance:

  • Update BIOS: Ensure your motherboard’s BIOS is updated to the latest version, as it can significantly impact hardware compatibility and performance.
  • Adjust graphics settings: Within the NVIDIA control panel, you can fine-tune graphics settings to balance performance and visual quality. Lowering settings like resolution or anti-aliasing can improve frame rates in demanding applications.
  • Monitor system temperature: Overheating can lead to performance degradation and potential damage. Ensure your system has adequate cooling, and consider using monitoring tools to keep track of temperatures.

FAQs: Addressing Common Queries

Q: Are there any specific drivers for the GeForce 7300 LE on Windows 10?

A: While NVIDIA may not have official drivers specifically for this card on Windows 10, you can explore their driver archive or utilize third-party driver databases.

Q: Can I use the drivers from an older Windows version on Windows 10?

A: Using drivers from an older Windows version on Windows 10 is not recommended, as it can lead to instability and compatibility issues.

Q: What if I can’t find any compatible drivers for the GeForce 7300 LE on Windows 10?

A: In such cases, you might need to consider upgrading your graphics card or using a virtual machine to run an older operating system that supports the card.

Tips: Enhancing Your Experience

  • Backup your system: Before installing any new drivers, create a system restore point or backup your data to prevent potential issues.
  • Check for driver updates regularly: While NVIDIA may not actively develop drivers for the GeForce 7300 LE on Windows 10, occasionally checking their website for updates is recommended.
  • Consult online forums: For specific troubleshooting advice, online forums dedicated to NVIDIA graphics cards or Windows 10 can be valuable resources.

Conclusion: Maximizing Legacy Hardware on Modern Platforms

While the NVIDIA GeForce 7300 LE may not be the latest and greatest graphics card, it can still provide a satisfactory visual experience with careful driver management. By following the steps outlined in this guide, users can navigate the driver landscape, find compatible options, and optimize their GeForce 7300 LE’s performance on Windows 10, ensuring that this legacy hardware continues to serve its purpose effectively. Remember, the key to success lies in a combination of research, caution, and a willingness to explore available resources to bridge the gap between older hardware and modern operating systems.

Nvidia geforce 7300 le driver windows 10 - portechnologies Nvidia Geforce 7300 Le Windows 10 Driver - renewmessenger Nvidia Geforce 7300 Le Windows 10 Driver - renewmessenger
Nvidia geforce 7300 le driver windows 10 - mashdas Nvidia geforce 7300 le driver windows 10 - mashdas Nvidia Geforce 7300 Le Driver Windows 10 64 Bit
Nvidia geforce 7300 le driver for windows 10 - porcatholic Nvidia Geforce 7300 Le Windows 10 Driver - cleversam

Closure

Thus, we hope this article has provided valuable insights into Navigating the NVIDIA GeForce 7300 LE Driver Landscape on Windows 10: A Comprehensive Guide. We appreciate your attention to our article. See you in our next article!

Is Windows 11’s Built-in Protection Sufficient? A Comprehensive Analysis Of Microsoft Defender

Is Windows 11’s Built-in Protection Sufficient? A Comprehensive Analysis of Microsoft Defender

Introduction

With great pleasure, we will explore the intriguing topic related to Is Windows 11’s Built-in Protection Sufficient? A Comprehensive Analysis of Microsoft Defender. Let’s weave interesting information and offer fresh perspectives to the readers.

Is Windows 11’s Built-in Protection Sufficient? A Comprehensive Analysis of Microsoft Defender

How to use Windows Security in Windows 11 for best protection

In the digital age, where cyber threats are constantly evolving and becoming more sophisticated, ensuring robust security for personal computers is paramount. Microsoft, recognizing this need, has integrated its own antivirus solution, Microsoft Defender, directly into Windows 11. This built-in security system aims to provide comprehensive protection against a wide range of online threats. However, the question arises: Is Microsoft Defender alone sufficient to safeguard your Windows 11 device? This article delves into the capabilities and limitations of Microsoft Defender, exploring its strengths and weaknesses to provide a well-rounded understanding of its efficacy in today’s digital landscape.

Understanding Microsoft Defender’s Capabilities:

Microsoft Defender, formerly known as Windows Defender, has undergone significant enhancements in Windows 11. It now utilizes a multi-layered approach to security, encompassing:

  • Real-time Protection: Microsoft Defender continuously monitors the system for suspicious activities, blocking malicious files and applications from executing. This proactive approach helps to prevent infections before they can cause harm.
  • Antivirus Scanning: Regularly scheduled scans detect and remove known malware, viruses, and other threats from the system. Users can also initiate manual scans on demand.
  • Firewall: This essential security component acts as a barrier, filtering incoming and outgoing network traffic, preventing unauthorized access to the system.
  • Exploit Protection: Microsoft Defender incorporates various techniques to mitigate vulnerabilities, preventing attackers from exploiting system weaknesses.
  • Cloud-Based Protection: Leveraging the power of cloud computing, Microsoft Defender receives constant updates and threat intelligence, ensuring that it is always equipped to combat the latest cyber threats.

Strengths of Microsoft Defender:

  • Ease of Use: Microsoft Defender is seamlessly integrated into Windows 11, requiring minimal configuration and user intervention. This user-friendly approach makes it accessible for users of all technical skill levels.
  • Constant Updates: Microsoft constantly updates Defender with the latest security patches and threat definitions, ensuring it remains effective against emerging threats.
  • Comprehensive Protection: Defender offers a wide range of security features, covering various attack vectors, including malware, ransomware, phishing attempts, and more.
  • System Integration: As a built-in solution, Defender integrates seamlessly with other Windows 11 features, enhancing overall system security.
  • Free of Charge: Microsoft Defender is a free component of Windows 11, eliminating the need for additional subscription costs.

Limitations of Microsoft Defender:

While Microsoft Defender provides a strong baseline of protection, it does have certain limitations:

  • Limited Customization: Users have limited customization options for Defender, restricting the ability to tailor settings to specific needs or preferences.
  • Potential for False Positives: Like any antivirus solution, Defender may occasionally flag legitimate files or applications as threats, causing inconvenience and disruption.
  • Limited Advanced Features: Compared to some third-party antivirus solutions, Defender lacks advanced features such as vulnerability scanning, password management, and parental controls.
  • Reliance on Cloud Connectivity: Defender’s cloud-based protection relies on a stable internet connection. In offline scenarios, its effectiveness may be compromised.
  • Focus on Known Threats: Defender primarily focuses on known threats, leaving it potentially vulnerable to zero-day attacks, which exploit previously unknown vulnerabilities.

The Need for Additional Security Measures:

While Microsoft Defender offers a solid foundation for security, it is crucial to acknowledge that no single security solution is infallible. To enhance overall system security, consider implementing additional measures:

  • Strong Passwords and Multi-Factor Authentication: Utilizing strong, unique passwords for each online account and enabling multi-factor authentication (MFA) significantly reduces the risk of unauthorized access.
  • Regular Software Updates: Keeping all software, including operating systems, applications, and drivers, updated with the latest security patches is crucial to address vulnerabilities.
  • Phishing Awareness: Be vigilant of suspicious emails, links, and messages. Avoid clicking on unfamiliar links or opening attachments from unknown senders.
  • Secure Browsing Practices: Use reputable browsers with built-in security features and avoid visiting untrusted websites.
  • Data Backup: Regularly backing up important data to an external storage device or cloud service provides a safety net in case of data loss due to a security breach.

FAQs on Windows 11’s Built-in Security:

1. Is Microsoft Defender enough for everyday users?

For the average user who primarily browses the web, checks email, and performs basic tasks, Microsoft Defender can provide sufficient protection. However, it is essential to practice good online hygiene and implement additional security measures, such as strong passwords and regular software updates.

2. Is Microsoft Defender effective against ransomware?

Microsoft Defender incorporates anti-ransomware features, including behavioral analysis and file protection, which can help mitigate the risks associated with ransomware attacks. However, it is crucial to have a comprehensive backup strategy in place as ransomware can still cause significant data loss.

3. Can I disable Microsoft Defender?

While it is technically possible to disable Microsoft Defender, it is strongly discouraged. Disabling the built-in protection significantly increases the vulnerability of your system to malware and other threats.

4. Does Microsoft Defender slow down my computer?

Microsoft Defender is designed to have a minimal impact on system performance. However, if you experience noticeable slowdowns, you can adjust scan settings or optimize your system for better performance.

5. Should I use a third-party antivirus alongside Microsoft Defender?

While Microsoft Defender provides solid protection, some users may prefer to use a third-party antivirus solution for additional features, advanced threat detection, or specialized protection needs. However, it is important to note that running multiple antivirus programs simultaneously can cause conflicts and performance issues.

Tips for Optimizing Microsoft Defender:

  • Enable Real-Time Protection: Ensure that real-time protection is enabled for continuous monitoring and threat detection.
  • Schedule Regular Scans: Configure scheduled scans to ensure that your system is regularly checked for threats.
  • Update Defender Regularly: Keep Defender up-to-date with the latest security patches and threat definitions.
  • Review Scan Settings: Adjust scan settings to optimize performance and customize your security needs.
  • Monitor Defender Logs: Regularly review Defender’s logs for any suspicious activities or detected threats.

Conclusion:

Microsoft Defender, as a built-in security solution in Windows 11, provides a strong foundation for protecting your computer from various threats. Its ease of use, constant updates, and comprehensive protection features make it a valuable tool for everyday users. However, it is crucial to recognize its limitations and supplement it with additional security measures, such as strong passwords, regular software updates, and secure browsing practices. By implementing a multi-layered approach to security, users can significantly reduce the risk of cyber threats and ensure the safety of their digital lives.

Built-in Protection for Microsoft Defender is now Generally Available! Microsoft Defender scores full marks in Windows 11 LSASS credential dump protection test - Neowin Windows 11 Defender to get a massive overhaul with Android, iOS, macOS support
Is Windows Defender sufficient for Windows 11/10? – Want to lose weight?Do How to enable or disable Microsoft Defender in Windows 11 How to Delete Windows Defender Protection History On Windows 11 - YouTube
Enable or Disable Windows Defender Realtime Protection in Windows 11 - YouTube Microsoft Defender: Complete Cybersecurity Review

Closure

Thus, we hope this article has provided valuable insights into Is Windows 11’s Built-in Protection Sufficient? A Comprehensive Analysis of Microsoft Defender. We appreciate your attention to our article. See you in our next article!

The "OEM Key Not Present In Firmware" Error In Windows 11: Understanding The Issue And Finding Solutions

The "OEM Key Not Present in Firmware" Error in Windows 11: Understanding the Issue and Finding Solutions

Introduction

In this auspicious occasion, we are delighted to delve into the intriguing topic related to The "OEM Key Not Present in Firmware" Error in Windows 11: Understanding the Issue and Finding Solutions. Let’s weave interesting information and offer fresh perspectives to the readers.

The "OEM Key Not Present in Firmware" Error in Windows 11: Understanding the Issue and Finding Solutions

Oem Key Not Present In Firmware

The "OEM key not present in firmware" error message in Windows 11 often arises during the installation process, indicating a potential issue with the system’s ability to verify its authenticity. This message signifies that the operating system cannot locate the unique Product Key, typically embedded in the firmware of a device, to validate the installation.

This error can stem from various factors, ranging from a faulty or corrupted firmware to a mismatch between the installed operating system and the original Product Key associated with the device. Understanding the root cause is crucial for effectively addressing the problem and ensuring a legitimate Windows 11 installation.

Delving into the Root Causes

Several potential culprits can contribute to the "OEM key not present in firmware" error:

  • Corrupted or Missing Firmware: The firmware, often referred to as BIOS or UEFI, houses the system’s fundamental configuration settings, including the OEM Product Key. If the firmware is corrupted or damaged, it can lead to the inability to retrieve the key, resulting in the error message.
  • Incorrect or Incompatible Product Key: The Product Key embedded in the firmware may not match the operating system being installed. This could happen if the device was previously running a different version of Windows or if the Product Key was incorrectly entered during the initial setup.
  • Hardware Modifications: Modifications to the system’s hardware, such as replacing the motherboard or hard drive, can disrupt the connection between the firmware and the Product Key, leading to the error.
  • Firmware Updates: While firmware updates are intended to improve system performance and security, they can sometimes introduce errors or inconsistencies. If a recent firmware update coincides with the "OEM key not present in firmware" error, it could be a contributing factor.
  • System Compatibility Issues: Windows 11 has specific system requirements, and older devices might not meet these standards. If the device is not compatible with Windows 11, the operating system may not be able to validate the Product Key, resulting in the error.

Navigating the Solutions

The best approach to resolving the "OEM key not present in firmware" error depends on the underlying cause. Here’s a breakdown of possible solutions:

1. Check System Compatibility:

  • Verify System Requirements: Ensure that your device meets the minimum system requirements for Windows 11. You can find these requirements on the official Microsoft website.
  • Utilize the PC Health Check App: Download and run the PC Health Check app from Microsoft to assess your system’s compatibility with Windows 11. This tool provides valuable insights into potential compatibility issues.

2. Recheck the Product Key:

  • Verify the Product Key: If you have access to the original Product Key, double-check that it matches the one embedded in the firmware.
  • Contact the Manufacturer: If you cannot locate the original Product Key, contact the device manufacturer. They may be able to provide you with the correct key or assist in retrieving it.

3. Update or Repair the Firmware:

  • Update the Firmware: Check for firmware updates from the device manufacturer’s website. Updating the firmware can resolve inconsistencies or errors that might be causing the problem.
  • Repair the Firmware: If the firmware is corrupted, you may need to repair it. This process typically involves using a recovery tool provided by the manufacturer.

4. Troubleshoot Windows Installation:

  • Clean Boot: Perform a clean boot to eliminate potential conflicts with third-party software that might be interfering with the Windows installation process.
  • Run the Windows Installation Media: If the issue persists, try running the Windows 11 installation media from a USB drive or DVD. This can help to bypass any issues with the existing installation.

5. Seek Professional Assistance:

  • Contact Microsoft Support: If you’ve exhausted all other troubleshooting options, contact Microsoft Support for assistance. They can provide more specific guidance based on your situation.
  • Consult a Technician: If you’re not comfortable with the technical aspects of troubleshooting, consider seeking help from a qualified computer technician.

Frequently Asked Questions (FAQs)

1. Can I install Windows 11 without an OEM key?

You can install Windows 11 without an OEM key, but you will be using an unactivated version. This means you will face certain limitations, such as the inability to personalize your desktop or use certain features. To activate Windows 11, you will need to purchase a genuine Product Key.

2. Is it safe to update the firmware?

Updating the firmware is generally safe, but it’s crucial to download the update from the device manufacturer’s website and follow the instructions carefully. Improperly updating the firmware can potentially damage your device.

3. Can I use a retail Product Key instead of an OEM key?

While you can use a retail Product Key to activate Windows 11, it’s important to note that it might not be compatible with your device’s firmware.

4. What are the consequences of using an unactivated copy of Windows 11?

Using an unactivated copy of Windows 11 can result in limited functionality, including the inability to personalize your desktop, use certain features, and receive updates. It also poses security risks as the operating system may be vulnerable to exploits.

5. Can I transfer my Windows 11 license to a new device?

Transferring a Windows 11 license to a new device depends on the type of license. OEM licenses are typically tied to the specific device, while retail licenses offer more flexibility. Check the terms and conditions of your license for details.

Tips for Preventing the "OEM Key Not Present in Firmware" Error:

  • Back Up Your Data: Before making any changes to your system, back up your important data to prevent potential loss.
  • Read the Instructions Carefully: Always read the instructions provided by the manufacturer before updating or repairing your firmware.
  • Choose Reliable Sources: Only download firmware updates from the device manufacturer’s website. Avoid third-party sources that may contain malicious software.
  • Monitor System Updates: Keep your operating system and firmware up-to-date to ensure optimal performance and security.
  • Consider a Clean Installation: If you encounter persistent issues, a clean installation of Windows 11 might be necessary. This involves formatting your hard drive and installing the operating system from scratch.

Conclusion

The "OEM key not present in firmware" error in Windows 11 can be a frustrating issue, but by understanding the potential causes and following the troubleshooting steps outlined above, you can effectively address the problem. Remember to prioritize system compatibility, verify your Product Key, and consider updating or repairing the firmware if necessary. If all else fails, seeking professional assistance from Microsoft Support or a qualified technician can provide a solution. By taking a methodical approach and exercising caution, you can ensure a smooth and legitimate Windows 11 installation experience.

Oem Key Not Present In Firmware Oem Key Not Present In Firmware Oem Key Not Present In Firmware
OEM Key Not Present in Firmware: Nguyên Nhân và Giải Pháp Khắc Phục Hiệu Quả Windows 11 Errors, Bugs, and Issues - A Full List - PC Guide Windows bios oem key какая windows версия была установлена • Smartadm.ru
Fix Firmware update failed in Windows 11/10 (2022) Oem Key Not Present In Firmware

Closure

Thus, we hope this article has provided valuable insights into The "OEM Key Not Present in Firmware" Error in Windows 11: Understanding the Issue and Finding Solutions. We appreciate your attention to our article. See you in our next article!

Rejuvenating Your Windows 11: A Guide To Refreshing Your System Without Losing Data

Rejuvenating Your Windows 11: A Guide to Refreshing Your System Without Losing Data

Introduction

With enthusiasm, let’s navigate through the intriguing topic related to Rejuvenating Your Windows 11: A Guide to Refreshing Your System Without Losing Data. Let’s weave interesting information and offer fresh perspectives to the readers.

Rejuvenating Your Windows 11: A Guide to Refreshing Your System Without Losing Data

How to Reset Windows 11 without Losing Data - YouTube

Windows 11, like any operating system, can experience performance degradation over time. This can manifest as sluggish application launches, frequent crashes, or an overall sense of sluggishness. While a clean installation can resolve these issues, the prospect of losing valuable data often discourages users. Fortunately, there are methods to refresh Windows 11 without sacrificing your precious files, photos, and other important information.

Understanding the Need for a Refresh

Before delving into the methods, it’s essential to understand the reasons behind choosing to refresh Windows 11. While a clean installation is the most drastic solution, it’s not always necessary.

Common scenarios where a refresh might be beneficial include:

  • Performance issues: If your system feels sluggish, applications take longer to load, or you experience frequent crashes, a refresh can often resolve these problems.
  • Malware or virus infection: If your system has been compromised, a refresh can help remove malicious software and restore system stability.
  • Software conflicts: Incompatible or outdated software can lead to system instability. A refresh can help resolve such conflicts and create a clean slate for software installation.
  • System errors: Occasional system errors or blue screens of death can indicate underlying issues. A refresh can address these errors and improve overall stability.
  • Upgrading from an older version: If you have recently upgraded to Windows 11 from an older version, a refresh can help resolve any lingering compatibility issues.

Methods to Refresh Windows 11 Without Data Loss

There are two primary methods to refresh Windows 11 without losing data:

1. Reset This PC (Cloud Download):

This method is the most straightforward and efficient way to refresh your Windows 11 installation. It essentially re-installs Windows 11, preserving your personal files, but removing all installed applications and settings. This is equivalent to a factory reset but with the option to keep your personal files.

Steps to Perform a Reset with Cloud Download:

  1. Access the Reset Settings: Open the Settings app (Windows key + I) and navigate to System > Recovery.
  2. Select Reset this PC: Choose the Reset this PC option.
  3. Choose Keep My Files: Select the Keep my files option. This ensures your personal files are preserved during the refresh.
  4. Confirm and Restart: Confirm your choice and follow the on-screen instructions. Your computer will restart, and the refresh process will begin.

2. Reset This PC (Local Reinstallation):

This method is similar to the cloud download option but utilizes a local installation of Windows 11 on your computer. This method is generally faster than the cloud download option, as it doesn’t require downloading the operating system from the internet. However, it requires a bootable USB drive with the Windows 11 installation files.

Steps to Perform a Reset with Local Reinstallation:

  1. Create a Bootable USB Drive: Download the Windows 11 installation files from Microsoft’s website and create a bootable USB drive using the Media Creation Tool.
  2. Boot from USB Drive: Restart your computer and boot from the USB drive.
  3. Choose Repair Your Computer: In the Windows installation screen, select the Repair your computer option.
  4. Select Troubleshoot: Choose the Troubleshoot option from the available options.
  5. Select Reset This PC: Choose the Reset this PC option.
  6. Choose Keep My Files: Select the Keep my files option to preserve your data.
  7. Confirm and Restart: Confirm your choice and follow the on-screen instructions. The refresh process will begin.

Considerations and Precautions

While refreshing Windows 11 without losing data offers a convenient solution, it’s crucial to understand certain aspects:

  • Backup is Key: Even though these methods claim to preserve your data, it’s highly recommended to create a backup of your essential files before proceeding. This serves as an extra layer of protection against unexpected data loss.
  • Software Reinstallation: All your installed applications will be removed during the refresh process. Make sure to note down your software licenses and download links for reinstallation after the refresh.
  • System Performance: While a refresh can improve system performance, it’s not a guarantee. If performance issues persist, further troubleshooting may be required.
  • Time Commitment: Refreshing Windows 11 can take a significant amount of time, ranging from 30 minutes to several hours depending on the method and your system’s specifications.

FAQs

1. What happens to my personal files during a refresh?

Your personal files, including documents, photos, music, and videos, will be preserved during a refresh.

2. Will my installed applications be removed?

Yes, all installed applications will be removed during a refresh.

3. Do I need a bootable USB drive for both methods?

Only the local reinstallation method requires a bootable USB drive with the Windows 11 installation files.

4. Can I refresh Windows 11 without losing my installed applications?

No, both methods will remove all installed applications.

5. Is it necessary to create a backup before refreshing?

While the methods claim to preserve data, it’s highly recommended to create a backup of your essential files as a precautionary measure.

6. What if my system performance issues persist after a refresh?

If performance issues persist after a refresh, further troubleshooting may be required. This could involve identifying and resolving specific software conflicts or hardware issues.

Tips for a Smooth Refresh

  • Perform a backup: Always create a backup of your essential files before refreshing Windows 11.
  • Update your drivers: Ensure your system has the latest drivers installed before proceeding with the refresh.
  • Disable unnecessary startup programs: Reduce the number of programs that start automatically when your computer boots up.
  • Run a disk cleanup: Free up disk space by deleting temporary files and unnecessary programs.
  • Defragment your hard drive: This can improve system performance and speed up data access.

Conclusion

Refreshing Windows 11 without losing data presents a convenient and effective way to rejuvenate your system and address performance issues or software conflicts. While the methods are designed to preserve your personal files, it’s essential to prioritize data backup as a precautionary measure. By following the outlined steps and considerations, you can refresh your Windows 11 installation and enjoy a smoother, more responsive system without losing valuable data.

How To Refresh Windows 11 Without Losing Programs 3 W - vrogue.co Windows 11 Refresh How To Repair Windows 11 Without Losing Data Or Programs - 5 Easy Ways
How to change your display's refresh rate on Windows 11 How To Reset Windows 11 Without Losing Data - vrogue.co 3 Ways to Refresh Your Windows 11 PC- Refresh Button Missing? - Gadgets To Use
Buy Windows 11 User Guide: A Complete Guide to Master the New Windows 11 OS with Tips and Tricks Reset Windows 11 Without Losing Apps

Closure

Thus, we hope this article has provided valuable insights into Rejuvenating Your Windows 11: A Guide to Refreshing Your System Without Losing Data. We hope you find this article informative and beneficial. See you in our next article!