The Power Of Seamless Sharing: Exploring Windows 10’s "Near Share" Functionality

The Power of Seamless Sharing: Exploring Windows 10’s "Near Share" Functionality

Introduction

In this auspicious occasion, we are delighted to delve into the intriguing topic related to The Power of Seamless Sharing: Exploring Windows 10’s "Near Share" Functionality. Let’s weave interesting information and offer fresh perspectives to the readers.

The Power of Seamless Sharing: Exploring Windows 10’s "Near Share" Functionality

Seamless File Sharing: Google Nearby Share for Windows

In the digital age, sharing files, photos, and other data has become an integral part of our daily lives. Whether collaborating on projects, sharing memories with loved ones, or simply transferring files between devices, the ease and speed of file sharing significantly impact user experience. Recognizing this need, Microsoft introduced "Near Share" in Windows 10, a feature designed to simplify file transfer between compatible devices.

Near Share leverages Bluetooth and Wi-Fi Direct technology to enable wireless data exchange without the need for internet connectivity or complex configurations. This feature allows users to quickly and securely share files with nearby Windows 10 devices, making it a valuable tool for individuals, families, and businesses alike.

Understanding the Mechanics of Near Share

Near Share operates by establishing a direct connection between two devices through Bluetooth or Wi-Fi Direct. When a user initiates a file transfer using Near Share, the sending device broadcasts a signal to nearby devices. If a compatible receiving device is within range, it receives the signal and displays a notification, allowing the user to accept or decline the file transfer.

The transfer process itself is encrypted and secured, ensuring that shared data remains private and protected from unauthorized access. This robust security mechanism adds an extra layer of confidence to the sharing experience, particularly when handling sensitive information.

The Advantages of Near Share:

Near Share presents several advantages over traditional file sharing methods, making it a compelling choice for users seeking a seamless and efficient solution:

  • Simplicity and Ease of Use: Near Share eliminates the need for complex setups or external applications. Its user-friendly interface makes sharing files as simple as dragging and dropping them onto the "Near Share" icon.
  • No Internet Connection Required: Near Share operates independently of internet connectivity, allowing for file transfer even in environments where internet access is limited or unavailable. This feature proves particularly beneficial in situations like offline work environments or locations with unreliable internet connections.
  • Fast and Reliable Transfer Speeds: Near Share utilizes Bluetooth and Wi-Fi Direct, which offer relatively fast data transfer speeds compared to traditional methods like email or cloud storage. This ensures efficient file sharing, particularly for larger files.
  • Enhanced Security: Near Share employs encryption to protect shared data from unauthorized access. This ensures that only the intended recipient can access the shared files, promoting data privacy and security.
  • Wide Device Compatibility: Near Share is compatible with a wide range of Windows 10 devices, making it a versatile tool for sharing files across different types of computers, tablets, and even phones.

Exploring the Practical Applications of Near Share:

Near Share’s simplicity and functionality make it a valuable tool across various scenarios:

  • Collaboration and Project Work: Near Share facilitates seamless file sharing among team members working on collaborative projects, allowing for quick and efficient exchange of documents, presentations, and other project materials.
  • Sharing Personal Files: Near Share simplifies sharing personal files like photos, videos, and documents with friends and family, eliminating the need for cumbersome file-sharing services or physical storage devices.
  • Transferring Files Between Devices: Near Share allows users to easily transfer files between their own devices, such as transferring photos from a phone to a computer or documents between two laptops.
  • Offline File Sharing: Near Share enables file sharing even in environments without internet access, proving invaluable for offline work environments or locations with unreliable internet connections.

Frequently Asked Questions About Near Share:

Q: What are the system requirements for using Near Share?

A: Near Share is available on Windows 10 devices running the Fall Creators Update (version 1709) or later. Bluetooth and Wi-Fi Direct must be enabled on both the sending and receiving devices.

Q: Can I share files with devices other than Windows 10?

A: Currently, Near Share is limited to file sharing between Windows 10 devices. It does not support file sharing with devices running other operating systems like Android or iOS.

Q: What types of files can I share using Near Share?

A: Near Share supports sharing various file types, including documents, photos, videos, music, and other common file formats.

Q: Is Near Share a secure way to share files?

A: Yes, Near Share employs encryption to protect shared data from unauthorized access. This ensures that only the intended recipient can access the shared files, promoting data privacy and security.

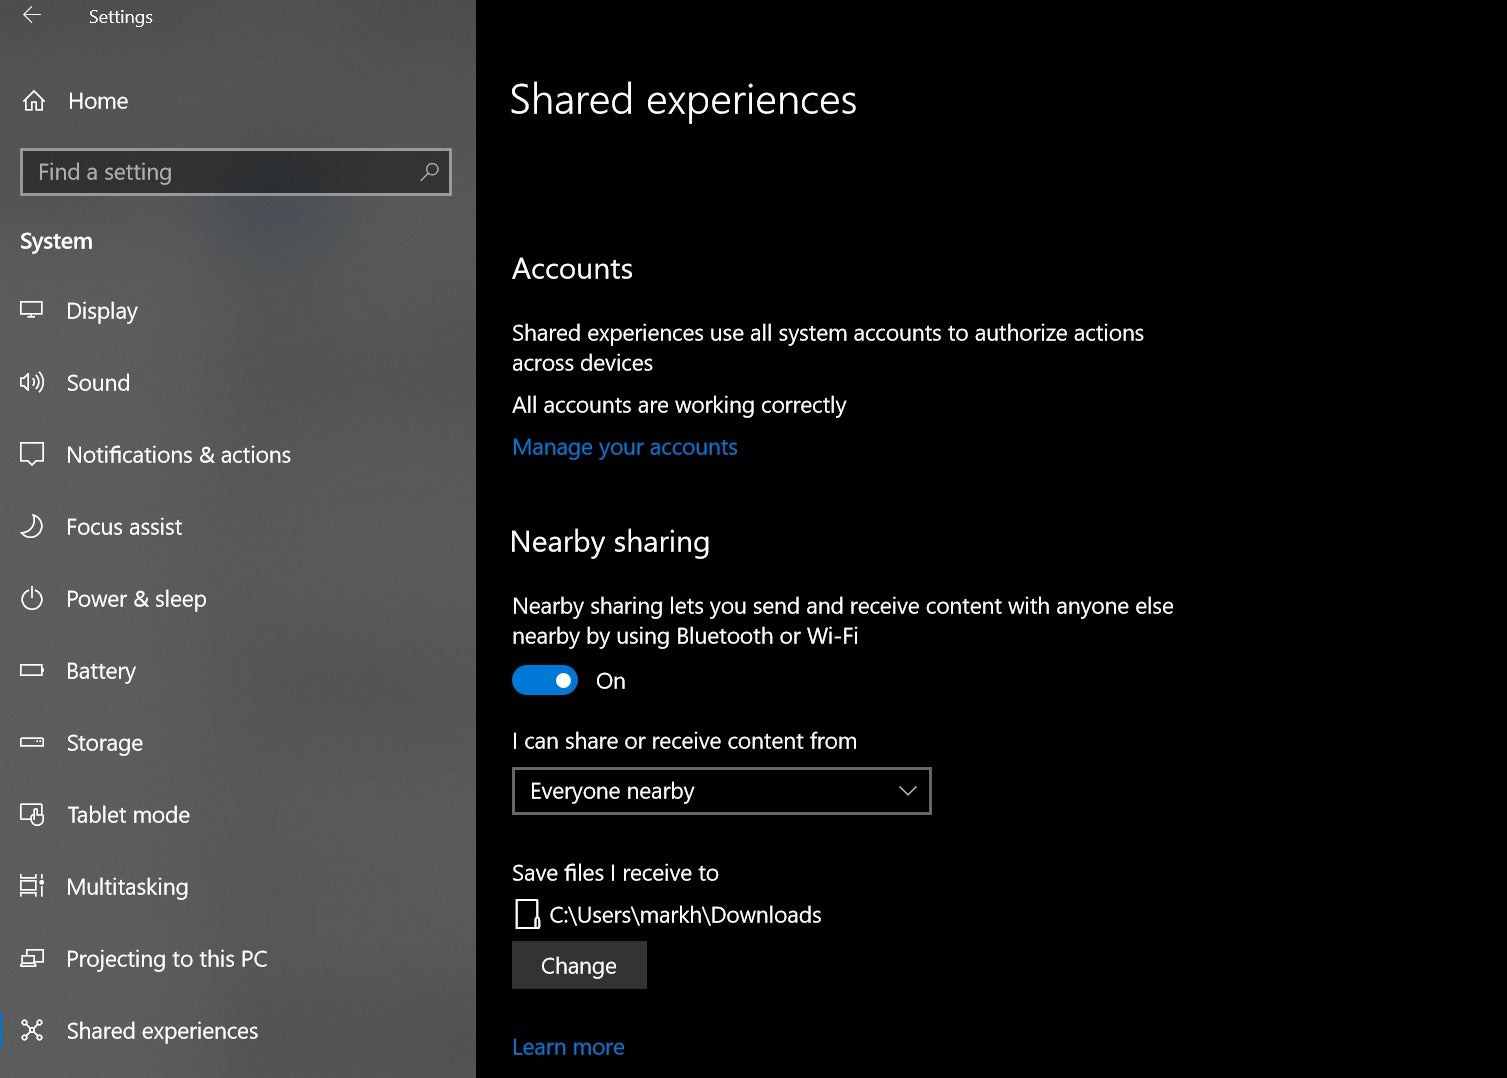
Q: How can I enable Near Share on my Windows 10 device?

A: To enable Near Share, open the "Settings" app on your Windows 10 device, go to "System," and then select "Shared experiences." Ensure that the "Near Share" toggle is switched on.

Q: What happens if a receiving device is not within range?

A: If a receiving device is not within range, the sending device will not be able to initiate a file transfer using Near Share. The transfer will only proceed if the receiving device is within range and has accepted the file transfer request.

Q: Can I restrict who can share files with my device?

A: Yes, you can control who can share files with your device by adjusting the "Near Share" settings. You can choose to receive files from everyone, only your contacts, or only specific people.

Tips for Using Near Share Effectively:

  • Ensure Both Devices Have Near Share Enabled: Confirm that both the sending and receiving devices have Near Share enabled in their respective settings.
  • Check Device Compatibility: Verify that both devices are compatible with Near Share. Near Share is only available on Windows 10 devices running the Fall Creators Update (version 1709) or later.
  • Maintain Close Proximity: For successful file transfer, ensure that the sending and receiving devices are within close proximity to each other, ideally within a few feet.
  • Enable Bluetooth and Wi-Fi Direct: Make sure that Bluetooth and Wi-Fi Direct are enabled on both devices.
  • Review Security Settings: Adjust the Near Share settings to control who can share files with your device, ensuring that only trusted individuals can access your files.
  • Check File Transfer Progress: Monitor the file transfer progress to ensure that the process is complete and the files have been successfully transferred.

Conclusion:

Windows 10’s Near Share feature offers a simple, secure, and efficient way to share files between compatible devices. Its intuitive design, reliance on Bluetooth and Wi-Fi Direct, and robust security measures make it a valuable tool for individuals, families, and businesses seeking a seamless and reliable file sharing solution. As technology continues to evolve, Near Share’s capabilities are likely to expand, offering even more features and benefits to users in the future.

Nearby Share is Finally Available on Windows, Allowing for a Seamless File Sharing Experience How Windows 10's Near Share feature wirelessly beams files to nearby PCs  PCWorld Nearby Share is Finally Available on Windows, Allowing for a Seamless File Sharing Experience
Windows 10 near Share feature - YouTube Windows 10 Near Share makes sending files to nearby devices easier - Liliputing Here's a look at how Near Share works in Windows 10 - YouTube
What Is "Near Share" In Windows 10? How To Share Files Wirelessly How Windows 10's Near Share feature wirelessly beams files to nearby PCs  PCWorld

Closure

Thus, we hope this article has provided valuable insights into The Power of Seamless Sharing: Exploring Windows 10’s "Near Share" Functionality. We thank you for taking the time to read this article. See you in our next article!

The Unveiling Of Windows 11: A Comprehensive Timeline

The Unveiling of Windows 11: A Comprehensive Timeline

Introduction

With enthusiasm, let’s navigate through the intriguing topic related to The Unveiling of Windows 11: A Comprehensive Timeline. Let’s weave interesting information and offer fresh perspectives to the readers.

The Unveiling of Windows 11: A Comprehensive Timeline

Windows 11 & Windows 10 Servicing Timeline Update

Windows 11, the latest iteration of Microsoft’s flagship operating system, marked a significant milestone in the evolution of personal computing. Its release, meticulously planned and strategically executed, brought with it a host of new features, design enhancements, and performance improvements. To understand the significance of Windows 11’s launch, it is crucial to delve into the chronological sequence of events leading up to its arrival.

The Pre-Release Journey:

The anticipation surrounding Windows 11 began to build in the summer of 2021. Microsoft, in a strategic move, unveiled the operating system at its annual "What’s Next for Windows" event on June 24th. This initial reveal, however, was more of a preview, showcasing the key features and design elements that would define the new operating system. The event generated significant buzz, sparking discussions and speculation amongst tech enthusiasts and industry experts alike.

The Insider Program: A Glimpse into the Future:

Following the initial reveal, Microsoft launched the Windows Insider Program for Windows 11, offering early access to the operating system for testers. This program played a crucial role in gathering user feedback and refining the operating system before its official release. The Insider Program allowed Microsoft to identify and address potential issues, ensuring a more stable and polished final product.

The Official Release: October 5th, 2021

After months of anticipation and meticulous testing, Windows 11 was officially released to the public on October 5th, 2021. This date marked a pivotal moment in the history of Windows, ushering in a new era of computing experience. The release was accompanied by a global marketing campaign, highlighting the key features and benefits of Windows 11.

The Significance of Windows 11’s Release:

Windows 11’s release was not merely a technical update; it was a strategic move by Microsoft to redefine the user experience and compete effectively in a rapidly evolving technological landscape. The operating system introduced several key features that aimed to enhance user productivity, improve security, and create a more intuitive and visually appealing interface.

Key Features and Enhancements:

  • Modern Design: Windows 11 boasts a refined and minimalist design, with rounded corners, a centered taskbar, and a new Start menu. This aesthetic overhaul aimed to create a more visually appealing and user-friendly experience.
  • Improved Performance: Windows 11 introduced various performance enhancements, including optimized system resources and a more efficient use of memory. These improvements resulted in a smoother and faster user experience.
  • Enhanced Security: Windows 11 included enhanced security features, such as improved malware protection, enhanced privacy settings, and stronger password requirements. These measures aimed to safeguard user data and protect against cyber threats.
  • Integration with Microsoft Ecosystem: Windows 11 seamlessly integrates with other Microsoft services, such as Microsoft Teams, OneDrive, and Xbox Game Pass. This integration aimed to create a unified and streamlined user experience across various devices and platforms.

The Impact of Windows 11’s Release:

The release of Windows 11 had a significant impact on the technology industry. It sparked a wave of innovation, with hardware manufacturers releasing new devices optimized for the operating system. Software developers also adapted their applications to take advantage of the new features and capabilities offered by Windows 11. The release also fueled discussions around the future of personal computing, with experts debating the implications of the new operating system for various industries and sectors.

Frequently Asked Questions (FAQs):

Q: What are the minimum system requirements for Windows 11?

A: To run Windows 11, your device must meet the following minimum requirements:

  • Processor: 1 gigahertz (GHz) or faster with 2 or more cores on a compatible 64-bit processor or System on a Chip (SoC).
  • Memory: 4 gigabytes (GB) of RAM.
  • Storage: 64 GB or larger storage device.
  • Graphics: Compatible with DirectX 12 or later with WDDM 2.x driver.
  • Display: High Definition (720p) display that is at least 9 inches diagonally.
  • Internet Connection: Required for some features.

Q: Is Windows 11 a free upgrade for existing Windows 10 users?

A: While Microsoft offered a free upgrade to Windows 11 for eligible Windows 10 devices during the initial release period, this offer is no longer available. As of now, you need to purchase a Windows 11 license to upgrade your device.

Q: What are the key differences between Windows 10 and Windows 11?

A: Windows 11 features a redesigned interface with a centered taskbar, a new Start menu, and rounded corners. It also includes performance enhancements, improved security features, and enhanced integration with Microsoft’s ecosystem. However, Windows 11 does require more stringent hardware requirements compared to Windows 10.

Q: What are the benefits of upgrading to Windows 11?

A: Upgrading to Windows 11 offers several benefits, including:

  • Improved user experience: The redesigned interface and performance enhancements contribute to a smoother and more intuitive user experience.
  • Enhanced security: Windows 11 includes improved security features, such as enhanced malware protection and stronger password requirements.
  • Integration with Microsoft ecosystem: Windows 11 seamlessly integrates with other Microsoft services, providing a unified and streamlined user experience.
  • Access to new features: Windows 11 offers new features and capabilities, such as the ability to run Android apps and the improved Windows Store.

Tips for Upgrading to Windows 11:

  • Check system requirements: Ensure that your device meets the minimum system requirements for Windows 11 before attempting to upgrade.
  • Back up your data: Before upgrading, it is crucial to back up your important data to prevent data loss.
  • Download the latest drivers: Ensure that you have the latest drivers for your hardware components, as this can improve compatibility and performance.
  • Consider a clean install: For a fresh start, consider performing a clean install of Windows 11 instead of upgrading from Windows 10.

Conclusion:

The release of Windows 11 marked a significant milestone in the evolution of personal computing. It introduced a host of new features, design enhancements, and performance improvements, aiming to redefine the user experience and compete effectively in a rapidly evolving technological landscape. While the release was met with both excitement and skepticism, Windows 11 has undoubtedly left its mark on the industry, shaping the future of personal computing and influencing the trajectory of technology advancements. As the operating system continues to evolve, it will be interesting to see how it adapts to emerging trends and challenges in the years to come.

Take a look at the history of Windows up until Windows 11 Windows 11 Timeline for Your Business  Inspired IT Windows 11 Timeline for Your Business
Development of Windows 11 Summer'21 (co_release) & Fall'21 (co_refresh) releases explained in a Windows 11 release schedule - contactsbda What is the Servicing timeline for WINDOWS 11 Feature update #Shorts - YouTube
The Evolution of Microsoft's Operating Systems: Windows 10 and Windows 11 Microsoft Announces Windows 11 Release Date Today

Closure

Thus, we hope this article has provided valuable insights into The Unveiling of Windows 11: A Comprehensive Timeline. We appreciate your attention to our article. See you in our next article!

The Enigma Of Unresponsive Previews In Windows 10: A Comprehensive Guide To Troubleshooting

The Enigma of Unresponsive Previews in Windows 10: A Comprehensive Guide to Troubleshooting

Introduction

In this auspicious occasion, we are delighted to delve into the intriguing topic related to The Enigma of Unresponsive Previews in Windows 10: A Comprehensive Guide to Troubleshooting. Let’s weave interesting information and offer fresh perspectives to the readers.

The Enigma of Unresponsive Previews in Windows 10: A Comprehensive Guide to Troubleshooting

There will be no confirmation, so press it once. You can now close File Explorer Folder Options.

Windows 10’s Preview pane, a convenient feature that allows users to quickly view the contents of files without opening them, plays a crucial role in enhancing productivity and file management. However, encountering a non-functional Preview pane can significantly hinder these workflows, leaving users frustrated and searching for solutions. This article delves into the intricacies of this issue, exploring common causes, effective troubleshooting steps, and potential workarounds.

Understanding the Significance of the Preview Pane

The Preview pane, integrated within Windows Explorer (File Explorer), serves as a visual gateway to file contents. It provides a glimpse into the essence of documents, images, videos, and other file types, enabling users to:

  • Rapidly identify and select the desired files: By displaying thumbnails, previews, or metadata, the Preview pane facilitates efficient file sorting and selection, saving valuable time and effort.
  • Gain quick insights into file content: Users can quickly assess the relevance of a document, image, or video without needing to open it fully, streamlining decision-making and workflow.
  • Enhance file management efficiency: The Preview pane simplifies the task of organizing and managing files, allowing users to quickly identify duplicates, assess file sizes, and make informed decisions about file actions.

Unveiling the Roots of Preview Pane Malfunction

The Preview pane’s non-functionality can stem from various factors, ranging from simple configuration errors to more complex system issues. Here’s a breakdown of common culprits:

1. Disabled Preview Pane:

  • User error: The Preview pane may be accidentally disabled by the user.
  • System update: Windows updates can sometimes alter settings, inadvertently disabling the Preview pane.

2. Corrupted System Files:

  • System errors: Errors within Windows files can disrupt the functionality of various system components, including the Preview pane.
  • Malware infection: Malware can corrupt system files, interfering with the Preview pane’s operation.

3. Incompatible or Missing Codecs:

  • File type support: The Preview pane relies on specific codecs (software components) to display previews of various file types. Missing or outdated codecs can prevent the Preview pane from functioning properly.
  • Unsupported file formats: Certain file formats might not have associated codecs installed, leading to the Preview pane’s inability to display them.

4. Hardware Issues:

  • Graphics card problems: The Preview pane’s visual rendering relies on the graphics card. Issues with the graphics card or its drivers can affect the Preview pane’s display.
  • Insufficient memory: The Preview pane requires sufficient RAM to function effectively. Low memory resources can cause rendering problems and slow down the Preview pane’s performance.

5. Software Conflicts:

  • Third-party programs: Some third-party software, especially those related to file management or security, can interfere with the Preview pane’s operation.
  • Antivirus software: Antivirus programs might flag certain system files related to the Preview pane, causing conflicts and hindering its functionality.

Navigating the Troubleshooting Maze: A Step-by-Step Guide

Identifying the root cause of the Preview pane malfunction is crucial for effectively addressing the issue. The following steps provide a comprehensive approach to troubleshooting:

1. Verify Preview Pane Settings:

  • Open File Explorer: Navigate to the "View" tab.
  • Enable Preview Pane: Ensure that the "Preview pane" option is checked.
  • Adjust Preview Pane Size: The Preview pane’s size can be adjusted to suit preferences.

2. Run System File Checker (SFC) Scan:

  • Open Command Prompt: Search for "cmd" in the Start menu and run as administrator.
  • Execute SFC scan: Type "sfc /scannow" and press Enter. This command will scan system files and attempt to repair any corrupted files.

3. Update Graphics Drivers:

  • Identify Graphics Card: Right-click on the desktop and select "Display settings." Under "Display adapter properties," identify the graphics card model.
  • Update Drivers: Visit the manufacturer’s website (e.g., NVIDIA, AMD, Intel) and download the latest drivers for your graphics card model. Install the drivers and restart your computer.

4. Install Missing Codecs:

  • Identify Missing Codecs: If the Preview pane fails to display specific file types, it might indicate missing codecs. Research the necessary codecs for the unsupported file format.
  • Install Codecs: Download and install the appropriate codecs from reputable sources. Restart your computer to apply the changes.

5. Disable Third-Party Software:

  • Temporarily Disable Programs: Disable recently installed software or programs known to interfere with file management or system processes.
  • Observe Changes: After disabling the software, check if the Preview pane functions correctly. If it does, the disabled program is likely the culprit.

6. Reinstall Windows Explorer:

  • Open File Explorer: Navigate to the "View" tab.
  • Reset File Explorer: Click on "Reset Folder Options" and select "Restore defaults." This will reset File Explorer settings to their default values, potentially resolving the issue.

7. Perform a Clean Boot:

  • Access System Configuration: Search for "msconfig" in the Start menu and open it.
  • Select Selective Startup: Choose "Load system services" and "Load startup items."
  • Disable Startup Items: Deselect all startup items and click "Apply" and "OK."
  • Restart Computer: Restart your computer and observe if the Preview pane functions correctly. If it does, re-enable startup items one by one to identify the culprit.

8. Consider Reinstalling Windows:

  • Back Up Data: Before reinstalling Windows, back up all important data to prevent loss.
  • Perform Clean Installation: Reinstall Windows using a bootable USB drive or DVD. This will completely erase the existing operating system and install a fresh copy.

Frequently Asked Questions (FAQs)

Q: Why is the Preview pane not working for specific file types?

A: The Preview pane’s functionality depends on the availability of appropriate codecs. Missing or outdated codecs can prevent the Preview pane from displaying previews for certain file types.

Q: Can I force the Preview pane to display a specific file type?

A: While the Preview pane relies on associated codecs, some file types might not have built-in preview support. In such cases, you can explore third-party software that offers preview capabilities for those specific file formats.

Q: Is there a way to disable the Preview pane without affecting other settings?

A: While disabling the Preview pane itself is not possible, you can adjust the "View" tab settings in File Explorer to hide the Preview pane without affecting other settings.

Q: Can I customize the Preview pane’s appearance?

A: While the Preview pane’s size can be adjusted, customizing its appearance (e.g., font, color) is not directly supported within Windows settings. However, third-party software might offer such customization options.

Tips for Enhancing Preview Pane Functionality

  • Keep Codecs Updated: Regularly update your codecs to ensure compatibility with a wide range of file formats.
  • Monitor System Resources: Ensure sufficient RAM and hard drive space to support the Preview pane’s performance.
  • Minimize Software Conflicts: Avoid installing unnecessary programs or software that might interfere with file management processes.
  • Run Regular System Maintenance: Perform regular system maintenance tasks, including disk cleanup and defragmentation, to optimize system performance and prevent file corruption.

Conclusion

The Preview pane in Windows 10 is a valuable tool for enhancing file management efficiency and productivity. While encountering a non-functional Preview pane can be frustrating, understanding the underlying causes and applying the appropriate troubleshooting steps can often resolve the issue. By systematically addressing potential problems, users can restore the Preview pane’s functionality and regain seamless file management capabilities. Remember, a proactive approach to system maintenance, codec updates, and software management can significantly contribute to preventing such issues from arising in the first place.

How to Fix Thumbnail Previews Not Appearing in Windows 10 & 11 - Delete Thumbnail Cache How To Fix An Unresponsive App On Windows 10/7/8? - Windows Lifestyle How to disable Taskbar Previews in Windows 10
How to replace taskbar previews with list view on Windows 10 - YouTube Windows 10 Very Slow and Unresponsive - Programming Insider How to Fix Thumbnail Previews Not Appearing in Windows 10 & 11 - Folder Options Setting
How to Fix Unresponsive Windows 10 Taskbar and Start Menu - The Genesis Of Tech Taskbar unresponsive windows 10 - rtsprofiles

Closure

Thus, we hope this article has provided valuable insights into The Enigma of Unresponsive Previews in Windows 10: A Comprehensive Guide to Troubleshooting. We appreciate your attention to our article. See you in our next article!

A Comprehensive Guide To QBittorrent For Windows: A User-Friendly And Powerful Torrent Client

A Comprehensive Guide to QBittorrent for Windows: A User-Friendly and Powerful Torrent Client

Introduction

In this auspicious occasion, we are delighted to delve into the intriguing topic related to A Comprehensive Guide to QBittorrent for Windows: A User-Friendly and Powerful Torrent Client. Let’s weave interesting information and offer fresh perspectives to the readers.

A Comprehensive Guide to QBittorrent for Windows: A User-Friendly and Powerful Torrent Client

Qbittorrent windows - acakit

In the realm of file sharing, torrent technology has revolutionized how users access and distribute digital content. Among the plethora of torrent clients available, QBittorrent stands out as a robust, open-source, and user-friendly option for Windows users. This article delves into the intricacies of QBittorrent, exploring its features, benefits, and how it empowers users to navigate the world of torrenting effectively.

Understanding the Essence of Torrenting:

Torrenting, in essence, is a peer-to-peer (P2P) file-sharing protocol that allows users to download and distribute digital content directly from each other. Unlike traditional download methods that rely on a central server, torrenting leverages a decentralized network where every participant contributes to the download process. This distributed nature makes torrenting exceptionally efficient, particularly for large files, as the download speed increases with the number of participants.

QBittorrent: A User-Friendly and Powerful Torrent Client:

QBittorrent emerges as a popular choice among torrent clients for its user-friendly interface, feature-rich capabilities, and commitment to user privacy. Its open-source nature ensures transparency and community-driven development, fostering continuous improvement and security updates. Here’s a breakdown of QBittorrent’s key features:

1. Intuitive Interface and User-Friendliness:

QBittorrent boasts a clean and intuitive interface, making it accessible to both novice and experienced users. The interface is designed with simplicity in mind, featuring a straightforward layout and easily understandable options. Key features are readily accessible, minimizing the learning curve and allowing users to navigate the application effortlessly.

2. Powerful Download Management:

QBittorrent offers comprehensive download management capabilities, enabling users to prioritize downloads, set speed limits, schedule downloads, and manage multiple torrents simultaneously. This granular control empowers users to optimize their download experience and prioritize tasks according to their needs.

3. Comprehensive Search Functionality:

QBittorrent integrates a built-in search function that allows users to locate torrents directly within the application. This eliminates the need for external search engines, streamlining the torrent discovery process and simplifying the entire downloading experience.

4. Built-in Torrent Creation:

QBittorrent provides the ability to create torrents, enabling users to share their own files with others. This feature empowers users to become active participants in the torrent community, fostering collaboration and sharing of valuable content.

5. RSS Feed Support:

QBittorrent supports RSS feeds, allowing users to subscribe to their favorite torrent websites and automatically download new torrents as they become available. This feature streamlines the process of discovering and downloading new content, ensuring users never miss out on the latest releases.

6. Advanced Security Features:

QBittorrent prioritizes user privacy and security, incorporating features such as encryption and IP masking. This ensures that users’ download activities remain private and protected from unwanted scrutiny.

7. Cross-Platform Compatibility:

QBittorrent is available for various operating systems, including Windows, macOS, Linux, and FreeBSD. This cross-platform compatibility allows users to access QBittorrent’s features and benefits across multiple devices, ensuring seamless integration into their digital ecosystems.

The Benefits of Using QBittorrent:

QBittorrent offers a multitude of benefits, making it a compelling choice for users seeking a reliable and efficient torrent client. Here are some key advantages:

1. Open-Source and Free of Charge:

QBittorrent is an open-source application, meaning its code is publicly accessible and can be reviewed and modified by anyone. This transparency fosters community involvement and ensures that the software is free from hidden agendas or proprietary limitations. Furthermore, QBittorrent is completely free to use, eliminating any financial barriers to access its features and benefits.

2. Lightweight and Resource-Efficient:

QBittorrent is designed to be lightweight and resource-efficient, minimizing its impact on system performance. This allows users to run QBittorrent alongside other applications without experiencing slowdowns or resource conflicts.

3. User-Friendly and Intuitive Interface:

QBittorrent’s intuitive interface makes it easy for users of all levels of technical expertise to navigate and utilize its features. The straightforward design minimizes the learning curve, enabling users to start downloading torrents quickly and efficiently.

4. Powerful Download Management Capabilities:

QBittorrent provides extensive download management features, allowing users to customize their download experience according to their preferences. This granular control empowers users to optimize download speeds, prioritize tasks, and manage multiple torrents simultaneously.

5. Built-in Search Functionality and RSS Feed Support:

QBittorrent’s built-in search function and RSS feed support streamline the torrent discovery process, making it easier for users to find and download the content they desire. These features enhance the overall user experience by eliminating the need for external search engines and ensuring users never miss out on new releases.

6. Advanced Security Features:

QBittorrent prioritizes user privacy and security, incorporating features such as encryption and IP masking. These measures protect users’ download activities from unwanted scrutiny and ensure their privacy remains intact.

7. Active Community and Continuous Development:

QBittorrent benefits from an active community of developers and users who contribute to its ongoing development. This collaborative environment ensures that QBittorrent remains up-to-date, secure, and feature-rich, continuously improving the user experience.

FAQs about QBittorrent for Windows:

1. Is QBittorrent Legal to Use?

QBittorrent itself is a legal software application. However, the legality of downloading copyrighted content through torrenting depends on the specific laws of your jurisdiction. It is crucial to familiarize yourself with the legal implications of torrenting in your region before downloading any content.

2. Is QBittorrent Safe to Use?

QBittorrent is generally safe to use, as long as you download content from reputable sources and take appropriate security precautions. However, it is essential to be aware of potential risks, such as malware-infected torrents or phishing scams.

3. How Do I Download QBittorrent for Windows?

You can download QBittorrent for Windows directly from its official website: https://www.qbittorrent.org/. Ensure you download the software from the official source to avoid potential malware or security risks.

4. How Do I Use QBittorrent?

QBittorrent’s user interface is intuitive and easy to navigate. After downloading and installing the software, simply open the application, paste the magnet link or torrent file into the designated area, and click the "Add Torrent" button. The download process will begin automatically.

5. What are the Best Torrent Websites to Use with QBittorrent?

While it is not possible to recommend specific torrent websites due to the legal complexities surrounding copyright and distribution, it is essential to prioritize websites known for their reliability, user base, and reputation for hosting legitimate content.

Tips for Using QBittorrent Effectively:

1. Prioritize Downloads:

QBittorrent allows users to prioritize downloads based on their importance. This feature is particularly helpful when managing multiple downloads simultaneously, ensuring that the most critical tasks are completed first.

2. Set Speed Limits:

To prevent QBittorrent from consuming excessive bandwidth and impacting other online activities, users can set speed limits for downloads and uploads. This ensures a balanced internet experience, allowing users to browse the web, stream content, and download torrents simultaneously without encountering performance issues.

3. Schedule Downloads:

QBittorrent enables users to schedule downloads to occur during specific times, such as overnight when internet traffic is typically lower. This feature allows users to take advantage of off-peak hours to maximize download speeds and minimize impact on their internet connection.

4. Use a VPN for Enhanced Privacy:

While QBittorrent offers built-in security features, using a Virtual Private Network (VPN) can further enhance privacy and security. VPNs encrypt internet traffic and mask users’ IP addresses, providing an extra layer of protection against potential surveillance or monitoring.

5. Stay Updated:

QBittorrent developers release regular updates to address security vulnerabilities and introduce new features. It is crucial to keep QBittorrent updated to ensure optimal performance, security, and access to the latest enhancements.

Conclusion:

QBittorrent emerges as a powerful and user-friendly torrent client for Windows users. Its open-source nature, feature-rich capabilities, and commitment to user privacy make it a compelling choice for anyone seeking a reliable and efficient way to download and share digital content. By understanding its features, benefits, and best practices, users can leverage QBittorrent to navigate the world of torrenting effectively and responsibly. Remember to prioritize legal and ethical considerations, utilize reputable torrent websites, and take appropriate security measures to ensure a safe and enjoyable torrenting experience.

10 Best Torrent Clients for Windows 11 Qbittorrent for windows - mathgre Qbittorrent for windows - cclasbrands
Qbittorrent windows 10 - productionsgai qBittorrent 4.1.1 - Neowin qBitTorrent Review 2024 [Features, Security, Pricing & More]
qBittorrent  Flathub Qbittorrent 3 3 11 โ€“ Lightweight Bittorrent Client - coolefiles

Closure

Thus, we hope this article has provided valuable insights into A Comprehensive Guide to QBittorrent for Windows: A User-Friendly and Powerful Torrent Client. We hope you find this article informative and beneficial. See you in our next article!

Windows 10 Pro: A Comprehensive Guide To Enhanced Features And Functionality

Windows 10 Pro: A Comprehensive Guide to Enhanced Features and Functionality

Introduction

With enthusiasm, let’s navigate through the intriguing topic related to Windows 10 Pro: A Comprehensive Guide to Enhanced Features and Functionality. Let’s weave interesting information and offer fresh perspectives to the readers.

Windows 10 Pro: A Comprehensive Guide to Enhanced Features and Functionality

All You Need to Know About Windows 10 Professional: A Comprehensive Guide - Aartisto Web Media

Windows 10 Pro, a robust operating system designed for businesses and power users, offers an array of advanced features and functionalities that enhance productivity, security, and management capabilities. This comprehensive guide delves into the intricacies of Windows 10 Pro, examining its key features, benefits, and applications in detail.

Understanding the Essence of Windows 10 Pro

At its core, Windows 10 Pro is an evolution of the Windows operating system, incorporating the best of its predecessors while introducing significant advancements. Its primary focus lies in empowering users with advanced tools and functionalities, catering specifically to the needs of professional environments, small and medium businesses, and individuals seeking enhanced control and security.

Key Features of Windows 10 Pro

1. Enhanced Security Features:

  • BitLocker Drive Encryption: This feature encrypts the entire hard drive, safeguarding sensitive data from unauthorized access. BitLocker ensures that even if a device is lost or stolen, the data remains protected.
  • Windows Hello: Windows Hello provides secure and convenient biometric authentication using facial recognition, fingerprint scanning, or a PIN. It eliminates the need for traditional passwords, streamlining login processes and bolstering security.
  • Device Guard: A crucial security measure, Device Guard restricts the execution of untrusted applications and software, preventing malicious code from compromising the system. This feature is particularly valuable in environments where sensitive data is handled.
  • Windows Defender Advanced Threat Protection: This comprehensive security solution actively monitors for and mitigates advanced threats, such as zero-day exploits and ransomware. It provides real-time protection, safeguarding against evolving cyberattacks.

2. Advanced Management Capabilities:

  • Domain Join: Windows 10 Pro allows seamless integration with Active Directory domains, enabling centralized management of user accounts, policies, and resources within a network. This feature streamlines administration tasks and ensures consistent security protocols across the organization.
  • Group Policy Management: Group Policy provides a powerful mechanism for configuring and controlling user settings, software installations, and security policies. Administrators can deploy and enforce policies across multiple devices, maintaining a consistent and secure operating environment.
  • Remote Desktop: Windows 10 Pro supports remote desktop access, enabling users to connect to and control their computers from any location with an internet connection. This functionality is essential for remote work, collaboration, and troubleshooting.

3. Enhanced Productivity Features:

  • Windows Sandbox: This isolated environment allows users to safely run untrusted applications without affecting the main operating system. Windows Sandbox provides a secure testing ground for potentially risky software, protecting the primary system from malware or vulnerabilities.
  • Multiple Desktop Environments: Windows 10 Pro offers the ability to create and manage multiple virtual desktops, allowing users to organize their workspaces and enhance productivity. This feature is particularly beneficial for users who work on multiple projects simultaneously.
  • Enhanced Task Management: Windows 10 Pro introduces features like Task View and Timeline, which streamline task management and allow users to easily switch between open applications and access their recent activities.

4. Additional Features:

  • Windows Update for Business: This feature provides businesses with granular control over software updates, enabling them to schedule updates, test new features, and manage update deployment across the organization.
  • Hyper-V: Windows 10 Pro includes Hyper-V, a powerful virtualization platform that allows users to run multiple operating systems simultaneously on a single physical machine. This feature is invaluable for testing, development, and running specialized applications.

Benefits of Windows 10 Pro

  • Enhanced Security: Windows 10 Pro’s robust security features safeguard sensitive data and protect against evolving cyber threats, ensuring a secure and reliable computing environment.
  • Improved Productivity: Advanced features like multiple desktops, Task View, and Windows Sandbox empower users to work more efficiently, streamline workflows, and maximize productivity.
  • Streamlined Management: Centralized management capabilities, including domain join and group policy management, simplify administration tasks, reduce downtime, and ensure consistent security protocols across the organization.
  • Flexibility and Scalability: Windows 10 Pro adapts to diverse business needs, supporting a wide range of devices and applications, and scaling effortlessly to meet evolving requirements.

Applications of Windows 10 Pro

  • Small and Medium Businesses: Windows 10 Pro provides a comprehensive platform for managing devices, securing data, and streamlining operations, enabling businesses to optimize their IT infrastructure and enhance productivity.
  • Large Enterprises: The robust security features, centralized management capabilities, and scalability of Windows 10 Pro make it an ideal choice for large organizations, ensuring secure and reliable operations across diverse departments and locations.
  • Power Users: Individuals seeking advanced functionality, enhanced security, and greater control over their computing environment will find Windows 10 Pro a powerful and versatile operating system.
  • Educational Institutions: Windows 10 Pro provides a secure and manageable platform for educational institutions, supporting both student and faculty needs with its advanced features and robust security measures.

FAQs about Windows 10 Pro

Q: What are the system requirements for Windows 10 Pro?

A: Windows 10 Pro requires a processor with a clock speed of 1 GHz or faster, 1 GB of RAM (for 32-bit) or 2 GB of RAM (for 64-bit), 16 GB of free hard disk space, and a display resolution of 800 x 600 pixels.

Q: Can I upgrade from Windows 10 Home to Windows 10 Pro?

A: Yes, you can upgrade from Windows 10 Home to Windows 10 Pro. However, you will need to purchase a separate license key for the upgrade.

Q: What are the differences between Windows 10 Home and Windows 10 Pro?

A: Windows 10 Pro includes advanced features like BitLocker encryption, Domain Join, Group Policy management, and Remote Desktop, which are not available in Windows 10 Home.

Q: How do I activate Windows 10 Pro?

A: You can activate Windows 10 Pro using a product key, which is provided during purchase. Activation can be done online or through a phone call.

Q: How do I recover my Windows 10 Pro license key?

A: If you have lost your Windows 10 Pro license key, you can try recovering it through your Microsoft account or by contacting Microsoft support.

Q: Is Windows 10 Pro compatible with my existing hardware?

A: Windows 10 Pro is compatible with a wide range of hardware, but it’s important to check the system requirements to ensure compatibility with your specific device.

Q: How do I troubleshoot common issues with Windows 10 Pro?

A: Common issues with Windows 10 Pro can be addressed through troubleshooting steps like updating drivers, running system scans, or using the built-in troubleshooting tools. If the issue persists, you can consult Microsoft support for further assistance.

Tips for Optimizing Windows 10 Pro

  • Regularly Update Windows: Keep your operating system updated with the latest security patches and bug fixes to ensure optimal performance and security.
  • Use a Secure Password: Choose a strong password for your user account and enable two-factor authentication for added security.
  • Enable BitLocker Encryption: Encrypt your hard drive with BitLocker to safeguard sensitive data from unauthorized access.
  • Optimize System Performance: Use the built-in performance tools to clean up temporary files, manage startup programs, and adjust system settings for optimal performance.
  • Monitor Disk Space: Regularly check your disk space and delete unnecessary files to maintain optimal system performance.
  • Utilize Windows Sandbox: Use Windows Sandbox to safely test untrusted applications without affecting your main operating system.
  • Explore Advanced Features: Experiment with features like multiple desktops, Task View, and Timeline to enhance productivity and streamline workflows.

Conclusion

Windows 10 Pro offers a comprehensive and powerful operating system designed to empower businesses, power users, and individuals seeking enhanced features and functionalities. Its robust security measures, advanced management capabilities, and productivity-enhancing features make it a reliable and versatile platform for a wide range of applications. By understanding its key features, benefits, and applications, users can leverage the full potential of Windows 10 Pro to optimize their computing experience, enhance productivity, and ensure a secure and reliable operating environment.

Windows 10 Pro-User Guide & Easy Learning 2019.pdf  Windows 10  Microsoft Windows MICROSOFT WINDOWS 10 PRO BOX  LINE SHOPPING Microsoft announces Windows 10 Pro for Workstations - CGPress
MICROSOFT Windows 10 Pro Review Windows 10 Pro ISO Installation Guide and Review - GET INTO PC FILE Unveiling Windows 10 Pro: Top Features & Tips
Microsoft Windows 10 Pro  Major Geeks Microsoft Windows 10 Pro - Bright Technologies

Closure

Thus, we hope this article has provided valuable insights into Windows 10 Pro: A Comprehensive Guide to Enhanced Features and Functionality. We thank you for taking the time to read this article. See you in our next article!

Uncluttering The Desktop: Removing Icons In Windows 10

Uncluttering the Desktop: Removing Icons in Windows 10

Introduction

With great pleasure, we will explore the intriguing topic related to Uncluttering the Desktop: Removing Icons in Windows 10. Let’s weave interesting information and offer fresh perspectives to the readers.

Uncluttering the Desktop: Removing Icons in Windows 10

How to Remove Desktop Icons on Windows 10

The Windows 10 desktop, while a familiar and often-used interface, can become cluttered with icons, making it visually distracting and potentially hindering productivity. Removing these icons can streamline the user experience, enhance visual clarity, and improve overall desktop aesthetics. This article explores the various methods for removing desktop icons in Windows 10, providing a comprehensive guide for users seeking a cleaner, more organized desktop environment.

Understanding the Need for Icon Removal

A cluttered desktop can negatively impact user experience in several ways:

  • Visual Distractions: Excessive icons can create a chaotic visual landscape, making it difficult to locate specific files or applications.
  • Reduced Focus: A cluttered desktop can divert attention, hindering focus on tasks at hand.
  • Performance Impact: In some cases, a large number of desktop icons can strain system resources, leading to slower performance.
  • Aesthetic Concerns: A cluttered desktop can detract from the overall visual appeal of the system.

Methods for Removing Desktop Icons

Several methods can be employed to remove desktop icons in Windows 10. These methods range from simple visual adjustments to more advanced configuration options.

1. Directly Removing Icons

The most straightforward method involves manually removing icons from the desktop. This can be done by following these steps:

  • Right-click on the icon you wish to remove.
  • Select Delete from the context menu.

This method is suitable for removing individual icons, but it may not be ideal for removing a large number of icons.

2. Using the "Show Desktop Icons" Setting

Windows 10 provides a built-in setting to toggle the visibility of desktop icons. This setting allows users to quickly hide or reveal all desktop icons simultaneously.

  • Right-click on an empty area of the desktop.
  • Select View.
  • Uncheck the Show Desktop Icons option.

This method is convenient for temporary hiding of icons, but it does not permanently remove them. To restore the icons, simply re-check the "Show Desktop Icons" option.

3. Customizing the "Desktop Icon Settings"

The "Desktop Icon Settings" window provides a more granular level of control over which icons appear on the desktop. This allows users to selectively remove or restore specific icons, such as the Recycle Bin, This PC, Network, or User’s Files.

  • Right-click on an empty area of the desktop.
  • Select Personalize.
  • Select Themes from the left-hand menu.
  • Click Desktop icon settings on the right-hand side.
  • Uncheck the boxes next to the icons you wish to remove.
  • Click Apply and then OK.

This method offers more control over the desktop icon landscape, allowing users to tailor the appearance to their preferences.

4. Using the "Settings" App

The "Settings" app provides another way to manage desktop icons. This method allows users to adjust the size and arrangement of icons, as well as hide or reveal them.

  • Navigate to Settings by clicking the gear icon in the Start menu.
  • Select Personalization.
  • Select Themes.
  • Click Desktop icon settings.
  • Adjust the icon settings as desired.

This method offers a more comprehensive interface for managing desktop icons, including options for customizing their appearance.

5. Utilizing Third-Party Tools

Several third-party tools are available that offer additional features for managing desktop icons. These tools often provide more advanced options for customizing icon appearance, organization, and behavior.

6. Creating a Clean Desktop Environment

Beyond removing icons, creating a clean desktop environment involves adopting practices that minimize clutter and promote organization.

  • File Organization: Organize files into folders and subfolders based on their type, project, or purpose.
  • Using the Start Menu: Utilize the Start menu to access applications and files instead of relying on desktop shortcuts.
  • Employing the Taskbar: Pin frequently used applications to the taskbar for easy access.
  • Using the "Quick Access" Toolbar: Utilize the "Quick Access" toolbar to access frequently used files and folders.
  • Regularly Cleaning the Desktop: Make a habit of deleting unnecessary files and organizing remaining files regularly.

Benefits of a Clean Desktop

Removing desktop icons and adopting organizational practices offers several benefits:

  • Improved Focus and Productivity: A clutter-free desktop promotes focus and reduces distractions, leading to increased productivity.
  • Enhanced User Experience: A clean and organized desktop creates a more visually appealing and user-friendly environment.
  • Simplified Navigation: Finding files and applications becomes easier with a streamlined desktop.
  • Improved System Performance: Reducing clutter can potentially improve system performance by minimizing the number of icons that need to be loaded and rendered.

FAQs

Q: Will removing desktop icons delete the files or applications they represent?

A: No, removing desktop icons only removes the visual representation of the underlying files or applications. The files or applications themselves remain unaffected.

Q: Can I customize the size and arrangement of desktop icons?

A: Yes, Windows 10 allows you to adjust the size and arrangement of desktop icons. You can access these settings through the "Settings" app or by right-clicking on an empty area of the desktop and selecting "View."

Q: Can I restore deleted desktop icons?

A: If you have accidentally deleted a desktop icon, you can often recover it by checking the Recycle Bin. However, if the icon was permanently deleted or if the Recycle Bin has been emptied, it may not be possible to recover the icon.

Q: What are some alternative methods for organizing files and applications?

A: Alternatives to desktop icons include using the Start menu, the taskbar, file explorers, and cloud storage services. These methods offer different ways to access and manage files and applications.

Tips

  • Consider using a desktop background that complements your desired aesthetic.
  • Experiment with different icon sizes and arrangements to find what works best for you.
  • Utilize keyboard shortcuts for quick access to files and applications.
  • Regularly review your desktop and remove unnecessary icons or files.

Conclusion

Removing desktop icons in Windows 10 can significantly enhance the user experience, promoting focus, clarity, and overall visual appeal. The methods outlined in this article offer various options for removing icons, ranging from simple visual adjustments to more advanced configuration options. By adopting these methods and incorporating organizational practices, users can create a clean and efficient desktop environment that supports productivity and improves the overall Windows 10 experience.

How To Remove Icons From Desktop Windows 10 - MiniTool How to Remove Unused Icons from the Windows Desktop How To Remove Icons From Desktop Windows 10 Minitool  Images and Photos finder
How to remove icons from desktop without deleting them Windows 10 - YouTube How to Unhide or Hide Desktop icons in Windows 10 - YouTube How to Remove Icons From Your Windows Desktop
How to Add or Remove Desktop Icons in Windows 10? - YouTube How to Delete Desktop Icons (Windows): 10 Steps (with Pictures)

Closure

Thus, we hope this article has provided valuable insights into Uncluttering the Desktop: Removing Icons in Windows 10. We appreciate your attention to our article. See you in our next article!

Unraveling The Mystery Of Windows 11 Update Stalls: A Comprehensive Guide

Unraveling the Mystery of Windows 11 Update Stalls: A Comprehensive Guide

Introduction

With enthusiasm, let’s navigate through the intriguing topic related to Unraveling the Mystery of Windows 11 Update Stalls: A Comprehensive Guide. Let’s weave interesting information and offer fresh perspectives to the readers.

Unraveling the Mystery of Windows 11 Update Stalls: A Comprehensive Guide

Windows 11 Update Error 0x8007001f: Unraveling the Mystery

The seamless operation of Windows 11 hinges on regular updates. These updates deliver vital security patches, performance enhancements, and new features, ensuring a smooth and secure user experience. However, situations arise where the update process encounters roadblocks, leaving users frustrated and seeking solutions. This comprehensive guide delves into the common reasons behind Windows 11 update failures, providing actionable steps to troubleshoot and resolve these issues.

Understanding the Importance of Windows 11 Updates:

Windows 11 updates are not mere optional downloads; they are crucial for maintaining a secure and functional operating system. These updates address vulnerabilities that could be exploited by malicious actors, safeguarding your data and privacy. Furthermore, they introduce performance optimizations, bug fixes, and new features, enhancing the overall user experience.

Delving into the Reasons Behind Update Stalls:

Numerous factors can impede the smooth execution of Windows 11 updates. These range from simple connectivity issues to more complex system conflicts:

1. Insufficient Disk Space:

Windows 11 updates require a significant amount of free disk space to download and install. If your system lacks sufficient space, the update process will fail.

2. Network Connectivity Problems:

A stable internet connection is paramount for successful updates. Intermittent connectivity, slow speeds, or network firewalls can disrupt the download process.

3. Corrupted System Files:

Damaged or corrupted system files can interfere with the update process. These corrupted files might stem from previous incomplete updates, malware infections, or hardware failures.

4. Incompatible Hardware or Drivers:

Windows 11 has specific hardware and driver requirements. If your system components are outdated or incompatible, updates might fail.

5. Background Processes and Applications:

Running applications or processes in the background during the update process can interfere with the update’s completion.

6. Insufficient System Resources:

Windows 11 updates require sufficient system resources, including RAM and CPU power. If your system is already heavily loaded, the update process might fail.

7. Windows Update Service Errors:

The Windows Update service itself can encounter errors, hindering the update process. These errors might be caused by corrupted files within the service or conflicts with other software.

Troubleshooting and Resolution Strategies:

Addressing these potential issues requires a systematic approach. Here’s a step-by-step guide to troubleshooting Windows 11 update failures:

1. Free Up Disk Space:

Ensure you have at least 8GB of free disk space. Delete unnecessary files, uninstall unused programs, and consider moving data to external storage.

2. Verify Network Connectivity:

Check your internet connection. Ensure you have a stable and reliable connection. Restart your modem and router if necessary.

3. Run the Windows Update Troubleshooter:

Windows provides a built-in troubleshooter specifically designed to diagnose and resolve update issues. Access it by searching for "Troubleshoot settings" in the Windows search bar and selecting "Windows Update."

4. Check for Corrupted System Files:

Use the System File Checker (SFC) tool to scan for and repair corrupted system files. Open Command Prompt as administrator and type "sfc /scannow."

5. Update Drivers:

Ensure all your hardware drivers are up-to-date. You can manually update them through the Device Manager or use the manufacturer’s website.

6. Close Background Processes and Applications:

Close all unnecessary applications and processes running in the background before initiating the update.

7. Restart Windows Update Service:

Open the Run dialog box (Windows key + R), type "services.msc," and press Enter. Locate the "Windows Update" service, right-click it, and select "Restart."

8. Temporarily Disable Antivirus Software:

Antivirus software can sometimes interfere with updates. Temporarily disable your antivirus software before attempting the update. Remember to re-enable it afterwards.

9. Perform a Clean Boot:

A clean boot starts Windows with a minimal set of drivers and programs, isolating the issue. This can help determine if a third-party application is causing the update failure. Search for "System Configuration" in the Windows search bar and select "System Configuration."

10. Reset Windows Update Components:

If the above steps fail, you can try resetting Windows Update components. This involves deleting and reinstalling certain files related to Windows Update. This process requires advanced technical knowledge and should only be attempted if you are comfortable with command-line operations.

11. Seek Professional Assistance:

If all else fails, consider seeking professional assistance from a qualified IT technician or Microsoft support.

Frequently Asked Questions (FAQs):

Q: Why is my Windows 11 update stuck at a certain percentage?

A: The update process might stall due to various factors, including insufficient disk space, network connectivity issues, corrupted system files, or background processes interfering with the update.

Q: My Windows 11 update keeps failing. What should I do?

A: Follow the troubleshooting steps outlined above. Start with basic checks like disk space, network connectivity, and driver updates. If the issue persists, consider running the Windows Update troubleshooter, checking for corrupted system files, and performing a clean boot.

Q: Is it safe to disable my antivirus during a Windows update?

A: While temporarily disabling your antivirus software can sometimes resolve update issues, it is generally not recommended. Consider disabling only the real-time protection feature.

Q: Should I reinstall Windows 11 to fix update issues?

A: Reinstalling Windows 11 should be considered as a last resort. It is a time-consuming process and might not guarantee a solution.

Tips for Preventing Future Update Issues:

1. Schedule Regular Maintenance:

Regularly clean up your system by deleting unnecessary files, uninstalling unused programs, and running disk cleanup.

2. Keep Drivers Updated:

Ensure your hardware drivers are up-to-date. You can use the Device Manager or the manufacturer’s website to update drivers.

3. Monitor System Resources:

Ensure your system has sufficient RAM and CPU power to handle updates. Close unnecessary applications and processes during the update process.

4. Maintain a Stable Internet Connection:

Ensure you have a reliable and stable internet connection for seamless updates.

Conclusion:

Windows 11 updates are essential for maintaining a secure and efficient operating system. While update failures can be frustrating, understanding the potential causes and following the troubleshooting steps outlined above will empower you to address these issues effectively. By proactively maintaining your system and addressing any potential problems, you can ensure a smooth and secure Windows 11 experience. Remember, seeking professional assistance is always an option if you encounter persistent difficulties.

Windows 11 Update Error 0xc1900223: Unraveling the Mystery Unraveling the Mysteries of Windows 11 Update Error 0xc00000f0 How to Manual Update Windows 11 - YouTube
Windows 11 is now rolling out to supported devices Your Ultimate Guide on How to update Windows 11 from Windows 10/7/8.1. Windows 11 2024 Update - Ciel Melina
Microsoft windows 11 updates - trendyptu Windows 11 Update

Closure

Thus, we hope this article has provided valuable insights into Unraveling the Mystery of Windows 11 Update Stalls: A Comprehensive Guide. We hope you find this article informative and beneficial. See you in our next article!

Exploring The World Of PlayStation Emulation On Windows 10: A Comprehensive Guide

Exploring the World of PlayStation Emulation on Windows 10: A Comprehensive Guide

Introduction

With great pleasure, we will explore the intriguing topic related to Exploring the World of PlayStation Emulation on Windows 10: A Comprehensive Guide. Let’s weave interesting information and offer fresh perspectives to the readers.

Exploring the World of PlayStation Emulation on Windows 10: A Comprehensive Guide

How to set up Playstation Emulation with Duckstation on PC (Windows) - YouTube

The realm of gaming has witnessed a remarkable evolution, with advancements in technology continuously pushing the boundaries of what is possible. This evolution has led to a surge in interest in emulating older gaming consoles, allowing enthusiasts to revisit cherished classics and experience them anew. For Windows 10 users, emulating PlayStation consoles presents a compelling avenue to explore a rich library of games.

This article delves into the intricacies of PlayStation emulation on Windows 10, providing a comprehensive guide for those seeking to embark on this journey. It will cover essential aspects, including the fundamentals of emulation, popular emulators, setting up and configuring these emulators, and addressing common challenges. The aim is to equip readers with a thorough understanding of the process, enabling them to confidently enjoy their favorite PlayStation titles on their Windows 10 machines.

Understanding PlayStation Emulation: A Glimpse into the Mechanics

Emulation, at its core, involves replicating the functionality of one system on another. In the context of gaming, it allows users to run software designed for a specific console on a different platform, such as a personal computer. This process requires an emulator, a program that mimics the hardware and software architecture of the target console, enabling the execution of its games.

PlayStation emulators for Windows 10 essentially create a virtual PlayStation environment within the operating system. They decode the game files, interpret the instructions, and interact with the computer’s hardware to deliver a faithful recreation of the console’s gameplay experience.

Several robust PlayStation emulators cater to the needs of Windows 10 users. Each emulator possesses its strengths and weaknesses, catering to different preferences and technical requirements. Here’s a look at some of the most prominent options:

1. PCSX2: Widely regarded as the gold standard for PlayStation 2 emulation, PCSX2 is a mature and highly capable emulator. Its ability to run a vast majority of PS2 titles at high resolutions and frame rates, combined with its extensive customization options, makes it a favorite among enthusiasts.

2. ePSXe: A veteran in the PlayStation emulation scene, ePSXe is a reliable emulator known for its ease of use and compatibility with a wide range of games. While primarily designed for the original PlayStation, it can also handle some PS2 titles with the aid of plugins.

3. RetroArch: A versatile multi-system emulator, RetroArch offers support for various consoles, including PlayStation and PlayStation 2. Its modular design allows users to customize its functionality and add support for additional systems through "cores."

4. Mednafen: A high-performance emulator, Mednafen is renowned for its accuracy and ability to handle demanding games. It supports a wide range of systems, including PlayStation and PlayStation 2, and is favored by users seeking a highly faithful emulation experience.

5. RPCS3: Specifically designed for PlayStation 3 emulation, RPCS3 is a relatively new emulator that has made significant strides in recent years. While still under development, it has achieved impressive compatibility with a growing number of PS3 games.

Setting Up and Configuring Your PlayStation Emulator: A Step-by-Step Guide

Setting up and configuring your chosen PlayStation emulator is a relatively straightforward process, requiring a few key steps:

  1. Download and Install the Emulator: Locate the official website of your preferred emulator and download the latest version. Follow the installation instructions provided by the developer.

  2. Obtain BIOS Files: Most PlayStation emulators require BIOS files to function properly. These files contain essential system information that the emulator uses to emulate the console’s hardware. BIOS files are typically obtained from online sources, and their legality varies depending on the specific console and region.

  3. Configure Graphics Settings: Once installed, the emulator allows you to customize its settings, including graphics options like resolution, frame rate, and anti-aliasing. Experiment with these settings to achieve the desired visual quality and performance.

  4. Load and Play Games: Locate your PlayStation game files (ISOs or BIN/CUE files) and load them into the emulator. The emulator will recognize the game and launch it, allowing you to enjoy the gameplay.

Addressing Common Challenges in PlayStation Emulation: Troubleshooting and Optimization

While emulation offers a fantastic way to revisit classic games, it may present some challenges along the way. Here are some common issues and solutions:

1. Game Compatibility: Not all PlayStation games are compatible with every emulator. Some games may require specific versions of the emulator or additional plugins to run properly. Research the compatibility of your desired game with your chosen emulator before attempting to play it.

2. Performance Issues: Emulation can be resource-intensive, especially for newer consoles like PlayStation 3. Insufficient hardware can lead to stuttering, slowdowns, and other performance problems. Ensure your computer meets the minimum system requirements for the emulator and the game you wish to play.

3. Controller Compatibility: Using a physical controller can enhance the gaming experience, but not all controllers are compatible with emulators out of the box. Some emulators require configuration or third-party software to recognize and map controller inputs.

4. Sound Issues: Occasionally, sound problems can arise during emulation. This could be due to driver conflicts, outdated audio settings, or incompatible plugins. Try updating your audio drivers, adjusting the emulator’s audio settings, or experimenting with different plugins to resolve sound issues.

5. Legal Considerations: Emulating games can raise legal concerns, particularly when it comes to obtaining BIOS files and game ROMs. It’s crucial to understand the legal implications in your region and ensure you are acquiring game files from legitimate sources.

Frequently Asked Questions (FAQs) About PlayStation Emulation on Windows 10

1. What are the system requirements for running PlayStation emulators on Windows 10?

The system requirements for running PlayStation emulators vary depending on the specific emulator and the game you wish to play. Generally, a modern computer with a reasonably powerful processor, sufficient RAM, and a dedicated graphics card will provide a smooth emulation experience.

2. Are PlayStation emulators legal to use?

The legality of using PlayStation emulators is a complex issue that varies depending on your location and the specific emulator and game you are using. Emulating games for personal use is generally considered legal in many countries, but distributing or sharing copyrighted game files is often illegal.

3. How can I improve the performance of my PlayStation emulator?

Several methods can improve the performance of your emulator. These include updating your graphics drivers, adjusting the emulator’s settings, closing unnecessary background programs, and ensuring your computer meets the minimum system requirements for the emulator and the game you are running.

4. What are the best settings for PlayStation emulation?

The optimal settings for PlayStation emulation depend on your individual preferences and hardware capabilities. Experiment with different graphics settings, such as resolution, anti-aliasing, and texture filtering, to find the best balance between visual quality and performance.

5. Where can I find PlayStation game files?

PlayStation game files, typically in ISO or BIN/CUE formats, can be found online through various sources. However, it’s essential to be aware of the legal implications of obtaining and using game files. Ensure you are downloading files from reputable sources and are abiding by copyright laws in your region.

Tips for Enhancing Your PlayStation Emulation Experience on Windows 10

1. Invest in a Dedicated Controller: A physical PlayStation controller, whether original or compatible, can significantly enhance the gaming experience. Ensure the controller is compatible with your chosen emulator and properly configured.

2. Optimize Graphics Settings: Experiment with different graphics settings to find the optimal balance between visual quality and performance. Consider enabling anti-aliasing for smoother edges, adjusting texture filtering for sharper visuals, and experimenting with different resolutions to find the best fit for your monitor and hardware.

3. Explore Plugin Options: Many emulators offer plugin support, allowing you to customize and enhance various aspects of the emulation experience, including graphics, sound, and controller input. Research and experiment with different plugins to find those that best suit your needs.

4. Join Online Communities: Engaging with online communities dedicated to PlayStation emulation can provide valuable insights, tips, and troubleshooting support. You can find forums, Discord servers, and other online platforms where fellow enthusiasts share their experiences and knowledge.

5. Stay Updated: Emulators are constantly being updated with new features, bug fixes, and improved compatibility. Regularly check for updates to ensure you are using the latest version and benefiting from the latest enhancements.

Conclusion: Embracing the World of PlayStation Emulation on Windows 10

PlayStation emulation on Windows 10 offers a gateway to a vast library of classic games, allowing enthusiasts to revisit cherished titles and experience them anew. By understanding the fundamentals of emulation, choosing the right emulator, configuring it correctly, and addressing potential challenges, users can embark on a rewarding journey of gaming nostalgia and discovery. The world of PlayStation emulation is constantly evolving, with new emulators, improved compatibility, and enhanced performance emerging regularly. As technology advances, the experience of playing PlayStation games on Windows 10 will continue to improve, offering an increasingly immersive and faithful recreation of the original console experience.

PlayStation Emulation Guide - YouTube Get started with PlayStation and disc-based game emulation: A beginner's guide - YouTube PlayStation Emulation on PC: Duckstation setup guide / tutorial - The GamePad Gamer
Best psx emulator windows 10 graphics - silkholoser Launchbox Frontend: Playstation SwanStation Emulation Setup Guide For Windows/PC - YouTube Playstation Emulator Windows 10 (EN) 2020 - YouTube
Best Psx Emulator Windows 10 - clevernevada Best PSX Emulator Windows 10, Android, PC, Mac, Fire TV - Tech Stray

Closure

Thus, we hope this article has provided valuable insights into Exploring the World of PlayStation Emulation on Windows 10: A Comprehensive Guide. We thank you for taking the time to read this article. See you in our next article!

Obtaining The Official Windows 11 Installation Files: A Comprehensive Guide

Obtaining the Official Windows 11 Installation Files: A Comprehensive Guide

Introduction

In this auspicious occasion, we are delighted to delve into the intriguing topic related to Obtaining the Official Windows 11 Installation Files: A Comprehensive Guide. Let’s weave interesting information and offer fresh perspectives to the readers.

Obtaining the Official Windows 11 Installation Files: A Comprehensive Guide

Windows 11 installation process - Step by Step  How to install Windows 11  Windows 11

The process of installing Windows 11 can be initiated by acquiring the official installation files, commonly referred to as an ISO image. This comprehensive guide will provide an in-depth understanding of obtaining these files, ensuring a smooth and secure installation experience.

Understanding the Importance of Official Sources

Downloading Windows 11 installation files from unofficial sources poses significant risks. These sources might contain corrupted, outdated, or even malicious files, leading to potential system instability, security vulnerabilities, or even data loss. Therefore, it is crucial to obtain the installation files directly from Microsoft, the official developer of the operating system.

Methods for Obtaining the Windows 11 ISO

There are two primary methods for acquiring the official Windows 11 ISO image:

  1. Microsoft’s Official Website: The most reliable and recommended method is to download the ISO directly from Microsoft’s official website. This ensures the authenticity and integrity of the installation files.

  2. Media Creation Tool: Microsoft provides a dedicated tool called the "Media Creation Tool" which simplifies the process of downloading and creating a bootable USB drive or DVD containing the Windows 11 installation files. This tool streamlines the process, making it user-friendly for individuals unfamiliar with ISO image manipulation.

Navigating the Download Process

1. Microsoft’s Official Website:

  • Visit the Windows 11 download page: Access the official Microsoft website dedicated to downloading Windows 11. The specific URL may vary, but a search for "Windows 11 download" will lead you to the correct page.
  • Select the desired edition and language: Choose the appropriate edition of Windows 11, such as Home or Pro, and select the desired language for the installation.
  • Download the ISO file: After selecting the edition and language, initiate the download of the ISO image. This file will typically be a large file, requiring sufficient storage space on your device.

2. Media Creation Tool:

  • Download the Media Creation Tool: Obtain the Media Creation Tool from Microsoft’s website. This tool is available for both Windows and macOS systems.
  • Run the tool and choose your options: After launching the tool, select "Create installation media for another PC" to proceed with downloading the installation files.
  • Select the edition, language, and media type: Choose the edition, language, and whether you wish to create a bootable USB drive or DVD.
  • Download the files and create the media: The tool will automatically download the necessary files and create the bootable media, simplifying the process.

Pre-Installation Considerations

Before embarking on the installation process, consider these important factors:

  • System Requirements: Ensure your computer meets the minimum system requirements for Windows 11. This information is readily available on Microsoft’s website.
  • Backup Your Data: Create a complete backup of your existing data before proceeding with the installation. This safeguards your valuable information in case of any unforeseen issues during the process.
  • Understand the Installation Process: Familiarize yourself with the Windows 11 installation process, including steps like partitioning your hard drive and formatting the target drive.

FAQs

Q: What is the difference between the Home and Pro editions of Windows 11?

A: The Home edition is designed for general home users, while the Pro edition offers additional features like BitLocker encryption, remote desktop access, and the ability to join a domain.

Q: Can I upgrade from Windows 10 to Windows 11 without downloading the ISO?

A: Yes, Microsoft offers an in-place upgrade option for eligible Windows 10 users. However, this method requires a stable internet connection for downloading the necessary files.

Q: What happens if my download is interrupted?

A: If the download is interrupted, you can resume the download process from where it stopped. However, if the download fails completely, you will need to restart the process from the beginning.

Q: Can I install Windows 11 on a virtual machine?

A: Yes, you can install Windows 11 on a virtual machine, allowing you to experiment with the operating system without affecting your main operating system.

Tips

  • Use a reliable internet connection: Ensure a stable and fast internet connection for downloading the large ISO file.
  • Verify the downloaded file: After downloading the ISO image, verify its integrity using a checksum utility.
  • Create a bootable USB drive: Creating a bootable USB drive with the Windows 11 installation files provides a convenient way to install the operating system on multiple computers.
  • Read the installation guide: Familiarize yourself with the Windows 11 installation guide for detailed instructions and troubleshooting tips.

Conclusion

Obtaining the official Windows 11 ISO image is a crucial step in the installation process. By following the methods outlined in this guide and adhering to the pre-installation considerations, you can ensure a secure and successful installation experience. Remember to prioritize official sources, verify the downloaded files, and back up your data before proceeding with the installation. With these steps in mind, you can confidently embark on the journey of upgrading to Windows 11.

Windows 11 Installation And Upgrade 2024 - Win 11 Home Upgrade 2024 Windows 11 Installation Guideline and First Look - YouTube PPT - A Comprehensive Installation Guide to Windows 11 ARM With ISO PowerPoint Presentation - ID
The Ultimate Guide to Installing Windows 11  Petri How To Install Windows 11 ISO [Developer Preview]: 3 Working Methods! Windows 11 Installation Guide
Windows 11 Complete Installation Step By Step Youtube - Vrogue How to download and install Windows 11? - Auslogics blog

Closure

Thus, we hope this article has provided valuable insights into Obtaining the Official Windows 11 Installation Files: A Comprehensive Guide. We thank you for taking the time to read this article. See you in our next article!

Remove Learn About This Picture From Desktop

remove learn about this picture from desktop

Introduction

With enthusiasm, let’s navigate through the intriguing topic related to remove learn about this picture from desktop. Let’s weave interesting information and offer fresh perspectives to the readers.

It seems like you’re asking for an article about how to remove a picture from your desktop, but the phrase "remove learn about this picture from desktop" is a bit confusing. I’m assuming you’re asking for a guide on how to delete images from your computer’s desktop.

Remove Windows Spotlight "Learn about this picture" icon from Desktop

Let’s break down the process of removing pictures from your desktop and explore the importance of managing your digital files.

Managing Your Digital Files: The Importance of Organization

In the digital age, our computers have become repositories of countless files, including images. While these images often hold sentimental value or serve practical purposes, their accumulation can lead to clutter and hinder productivity. Organizing your digital files, including pictures on your desktop, is crucial for several reasons:

  • Increased Efficiency: A cluttered desktop can be distracting and slow down your workflow. Finding the specific image you need amidst a sea of files can be time-consuming. Removing unnecessary images from your desktop allows you to focus on the task at hand without distractions.
  • Improved Performance: A cluttered desktop can also impact your computer’s performance. Too many files on your desktop can slow down your system’s boot time and overall responsiveness. By removing unnecessary files, you can improve your computer’s performance and efficiency.
  • Enhanced Security: Keeping your desktop organized can contribute to better security. By deleting unnecessary files, you reduce the risk of accidental deletion of important data or the exposure of sensitive information.
  • Peace of Mind: A clean and organized desktop can provide a sense of calm and order. It can be a satisfying experience to have a clear and uncluttered workspace, improving your overall digital well-being.

Removing Pictures from Your Desktop: A Step-by-Step Guide

The process of removing pictures from your desktop is relatively straightforward. Here’s a detailed guide:

1. Identify the Image: Locate the picture you want to remove from your desktop. It will likely be represented by a thumbnail preview.

2. Select the Image: Click on the image to select it. You can select multiple images by holding down the Ctrl key (Windows) or Command key (Mac) while clicking on each image.

3. Delete the Image: There are two main ways to delete an image:

* **Right-Click Delete:** Right-click on the selected image and choose "Delete" from the context menu. 
* **Keyboard Shortcut:** Press the **Delete** key on your keyboard.

4. Confirm Deletion: Depending on your operating system, you may be prompted to confirm the deletion. Click "Yes" or "Delete" to proceed.

5. Empty the Recycle Bin (Windows) or Trash (Mac): The deleted image is now in your computer’s Recycle Bin (Windows) or Trash (Mac). To permanently remove the image from your computer, you need to empty this folder.

6. Verify Removal: After emptying the Recycle Bin or Trash, check your desktop to ensure the image has been removed.

Important Note: Deleting a file permanently removes it from your computer. Ensure you have backed up any important files before deleting them.

Tips for Managing Your Desktop Images

Here are some tips for maintaining a clean and organized desktop:

  • Regular Cleanup: Make a habit of regularly cleaning your desktop, removing any unnecessary images or files. This can be done daily, weekly, or monthly, depending on your usage patterns.
  • Create Folders: Organize your images into folders based on categories like "Personal Photos," "Work Projects," or "Travel." This makes it easier to locate specific images when needed.
  • Use Cloud Storage: Consider using cloud storage services like Google Drive, Dropbox, or OneDrive to store your images. Cloud storage offers several advantages, including:
    • Accessibility: Access your images from any device with an internet connection.
    • Backup: Your images are automatically backed up in the cloud, reducing the risk of data loss.
    • Sharing: Easily share images with others.
  • Use a Desktop Image Organizer: There are numerous desktop image organizer applications available that can help you manage your image collection. These applications typically offer features like tagging, search, and slideshow capabilities.

Frequently Asked Questions

Q: What happens if I accidentally delete an image?

A: If you accidentally delete an image, you can try to recover it from your Recycle Bin (Windows) or Trash (Mac). However, if you have emptied these folders, the image may be permanently lost. Data recovery software can sometimes help recover deleted files, but success is not guaranteed.

Q: What are some common causes of desktop clutter?

A: Desktop clutter can be caused by various factors, including:

* **Downloading files directly to the desktop:** Many people tend to download files directly to their desktop, leading to an accumulation of files over time.
* **Saving files to the desktop as a temporary solution:**  Saving files to the desktop as a temporary solution before organizing them can lead to clutter.
* **Using the desktop as a storage space:**  Some people use their desktop as a storage space for documents, images, and other files. This can result in a cluttered desktop.

Q: What are the best practices for managing desktop images?

A: Here are some best practices for managing desktop images:

* **Download files to a designated folder:**  Avoid downloading files directly to your desktop. Instead, create a dedicated "Downloads" folder and download files there.
* **Organize files into folders:**  Create folders for different categories of images, such as "Photos," "Work," "Travel," or "Projects."
* **Use cloud storage:** Consider using cloud storage services to back up and store your images.
* **Regularly clean up your desktop:**  Make a habit of regularly cleaning up your desktop, deleting unnecessary files and organizing remaining files into folders.

Conclusion

Managing your digital files, including images on your desktop, is essential for maintaining a productive and organized digital workspace. By following the steps outlined above and adopting best practices for managing your desktop images, you can create a more efficient, secure, and enjoyable computing experience. Remember, a clean and organized desktop can contribute to a more efficient workflow, improved system performance, and a sense of peace of mind.

Delete Windows Spotlight "Learn more about this picture" icon from Windows 11 Desktop How to remove Windows Spotlight Learn about this picture Desktop icon in Windows 11 How To Delete Windows 11 Desktop Spotlight Learn Abou - vrogue.co
How to remove Learn more about this picture icon in Windows 11 - YouTube Remove Icon Learn About This Picture in Desktop Windows 11 - YouTube [Tip] Remove โ€œLearn About This Pictureโ€ Icon from Windows 11 Desktop โ€“ AskVG
How to Remove 'Learn About this Picture' on Windows 11 Remove the "Learn About This Picture" Icon from the Windows Spotlight Desktop Background - YouTube

Closure

Thus, we hope this article has provided valuable insights into remove learn about this picture from desktop. We appreciate your attention to our article. See you in our next article!