Disabling Fast Startup: A Comprehensive Guide To Enhancing System Stability And Troubleshooting

Disabling Fast Startup: A Comprehensive Guide to Enhancing System Stability and Troubleshooting

Introduction

With great pleasure, we will explore the intriguing topic related to Disabling Fast Startup: A Comprehensive Guide to Enhancing System Stability and Troubleshooting. Let’s weave interesting information and offer fresh perspectives to the readers.

Disabling Fast Startup: A Comprehensive Guide to Enhancing System Stability and Troubleshooting

How to Disable Fast Startup Windows 11

Fast startup, a feature introduced in Windows 8, aims to accelerate the boot process by utilizing a hybrid shutdown mode. While this feature generally provides a faster startup experience, it can also lead to certain complications and limitations. In situations where system stability is paramount, or when troubleshooting complex issues, disabling fast startup might be necessary. This article delves into the intricacies of this feature, exploring its impact, the methods for disabling it, and the potential benefits it can offer.

Understanding Fast Startup

Fast startup, also known as "Hybrid Shutdown," represents a compromise between a traditional shutdown and a hibernation state. Upon selecting "Shut Down," Windows doesn’t completely power off but rather saves the current system state to a hibernation file. This allows for a quicker boot-up process as the system can resume from the saved state instead of loading everything from scratch.

The Trade-offs of Fast Startup

While fast startup generally provides a noticeable speed boost, it comes with certain trade-offs:

  • Limited Troubleshooting: Fast startup can hinder troubleshooting efforts. Since the system doesn’t fully shut down, certain system processes and drivers might remain active in the background, making it difficult to isolate and resolve issues.
  • Increased System Complexity: The hybrid shutdown mode introduces an additional layer of complexity to the system’s shutdown and startup processes, potentially increasing the likelihood of encountering unexpected behavior or errors.
  • Potential Data Integrity Issues: In rare cases, fast startup can lead to data corruption if the hibernation file becomes corrupted or if the system encounters an unexpected shutdown during the hibernation process.
  • Incompatibility with Certain Software: Some applications and utilities might not function correctly when fast startup is enabled, as they require a clean system shutdown for proper operation.

Disabling Fast Startup: A Practical Solution

Disabling fast startup is a straightforward process that can be accomplished through the Windows Control Panel or by modifying the system registry.

Using the Control Panel:

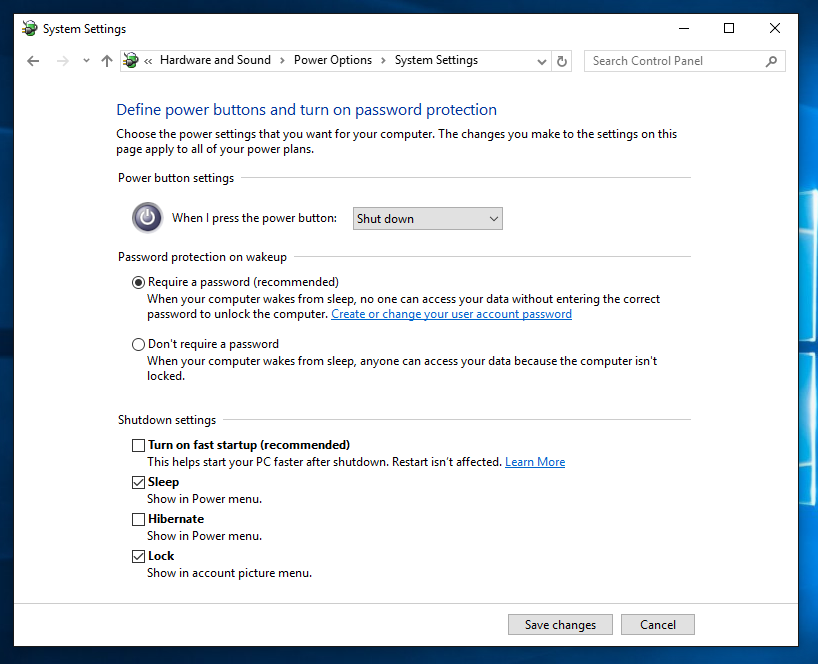
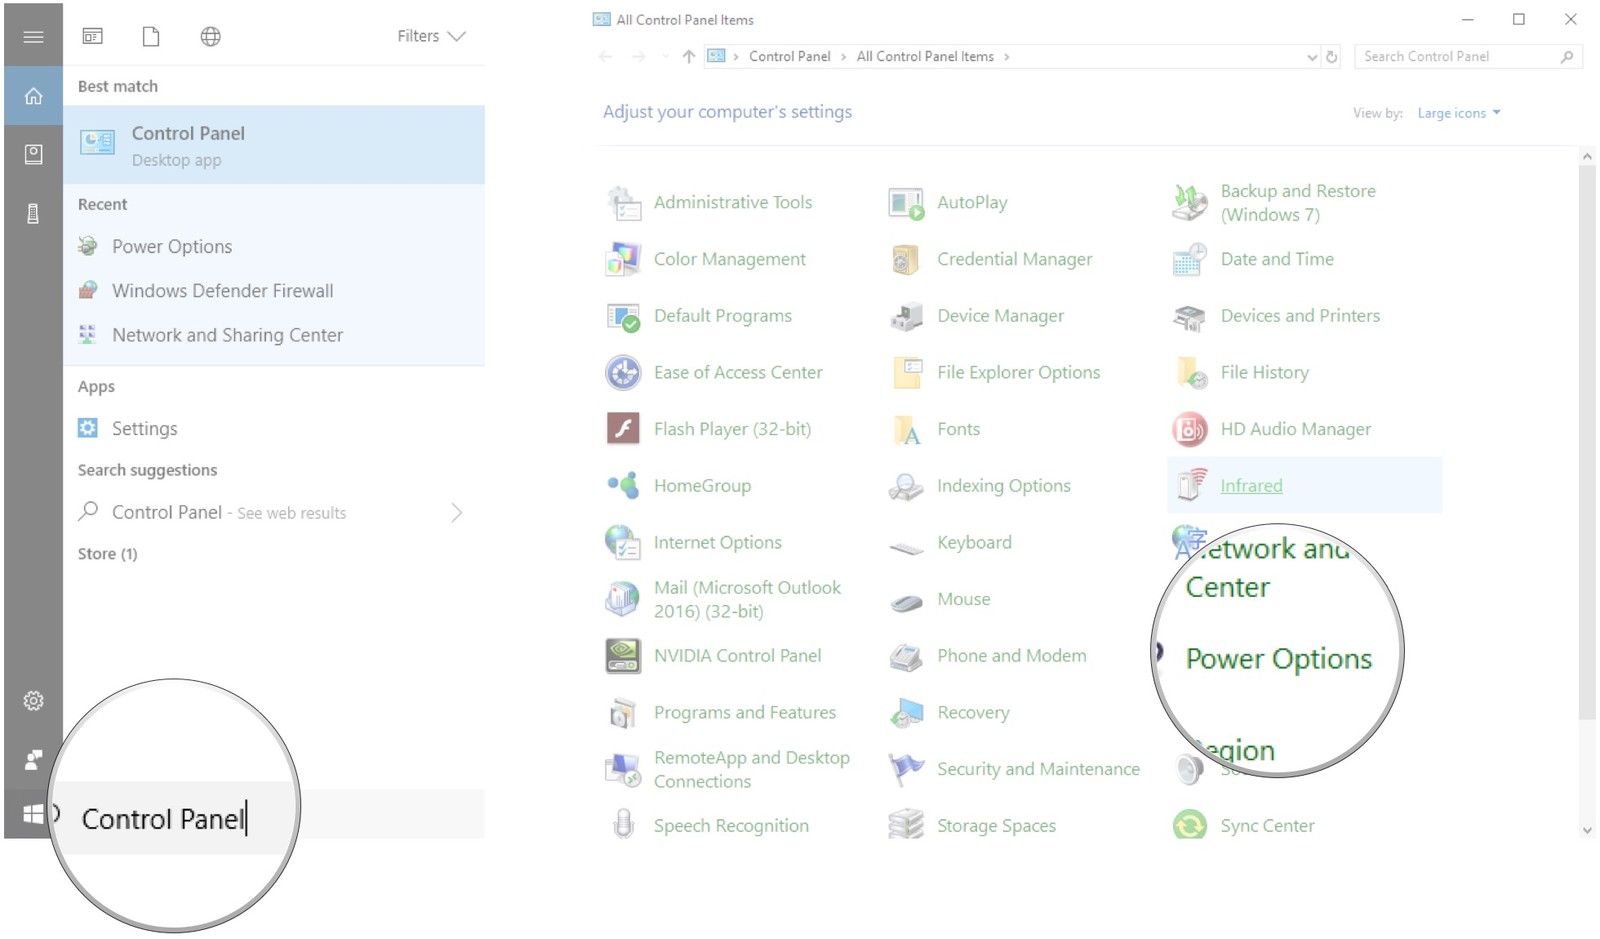
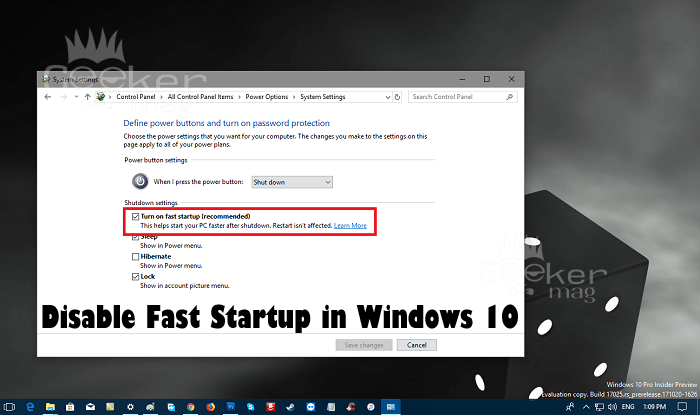
  1. Access Power Options: Open the Control Panel and navigate to "Power Options."
  2. Choose "Choose what the power buttons do": In the left-hand pane, click on "Choose what the power buttons do."
  3. Modify Settings: Click on "Change settings that are currently unavailable."
  4. Disable Fast Startup: Uncheck the box labeled "Turn on fast startup (recommended)."
  5. Save Changes: Click "Save Changes" to apply the modifications.

Using the Registry Editor (Regedit):

  1. Open Registry Editor: Press "Windows Key + R" to open the Run dialog box. Type "regedit" and press Enter.
  2. Navigate to the Registry Key: Navigate to the following registry key:
    HKEY_LOCAL_MACHINESYSTEMCurrentControlSetControlPower
  3. Modify the "HiberbootEnabled" Value: Double-click on the "HiberbootEnabled" DWORD value. Set the value data to "0" and click "OK."
  4. Modify the "FastStartupEnabled" Value: Double-click on the "FastStartupEnabled" DWORD value. Set the value data to "0" and click "OK."
  5. Close Registry Editor: Close the Registry Editor and restart your computer for the changes to take effect.

Benefits of Disabling Fast Startup:

Disabling fast startup can offer several benefits, particularly for users who prioritize system stability and troubleshooting capabilities:

  • Enhanced Troubleshooting: By disabling fast startup, you ensure a complete system shutdown, allowing for a clean slate for troubleshooting. This eliminates the possibility of lingering processes or drivers interfering with the diagnostic process.
  • Improved System Stability: Disabling fast startup can potentially reduce the occurrence of unexpected system behavior or errors related to the hybrid shutdown mode.
  • Increased Compatibility: Certain software applications and utilities that require a complete system shutdown for proper functionality will work without issues when fast startup is disabled.
  • Reduced Risk of Data Corruption: By eliminating the hibernation file, you reduce the risk of data corruption associated with the fast startup process.

FAQs Regarding Disabling Fast Startup

Q: Will disabling fast startup significantly impact my boot time?

A: While disabling fast startup will result in a slightly longer boot time compared to the fast startup mode, the difference is usually negligible for most users.

Q: Can I revert back to using fast startup after disabling it?

A: Yes, you can re-enable fast startup by following the same steps outlined in the Control Panel or Registry Editor instructions, but setting the values to "1" instead of "0."

Q: Is disabling fast startup necessary for all users?

A: Disabling fast startup is not essential for all users. It is primarily recommended for those who frequently encounter system issues, need to perform extensive troubleshooting, or use software that requires a clean system shutdown.

Tips for Disabling Fast Startup

  • Backup Your Registry: Before making any changes to the registry, it is always advisable to create a backup of your registry to prevent any potential data loss or system instability.
  • Check for Updates: Ensure your system is running the latest Windows updates, as updates often include bug fixes and improvements that might address any issues related to fast startup.
  • Monitor System Performance: After disabling fast startup, closely monitor your system’s performance to ensure that the change has not negatively impacted its overall functionality.

Conclusion

Disabling fast startup can be a valuable step for users seeking to enhance system stability, facilitate troubleshooting, and ensure compatibility with specific software applications. While it might slightly increase boot time, the benefits it offers in terms of system reliability and troubleshooting capabilities outweigh the potential performance trade-off for many users. By understanding the intricacies of fast startup and its implications, users can make informed decisions about whether to disable it based on their individual needs and priorities.

How to disable or enable Fast Startup in Windows 10 How to Disable Windows 10 Fast Startup How To Enable Or Disable Fast Startup In Windows 11 - Vrogue
How to Disable Fast Startup in Windows 11 - WindowsChimp Disable Fast Startup Simple Steps To Do That In Windows 10  itechguides How To Disable Fast Startup In Windows 11 Very Quick Guide On 11 Fix - Vrogue
How to Enable / Disable "Fast Startup" in Windows 11/10  Fast Startup not Showing - YouTube How to Disable Fast Start: A Step-by-Step Guide - The Enlightened Mindset

Closure

Thus, we hope this article has provided valuable insights into Disabling Fast Startup: A Comprehensive Guide to Enhancing System Stability and Troubleshooting. We hope you find this article informative and beneficial. See you in our next article!

A Comprehensive Guide To Understanding And Utilizing QReduce Lite

A Comprehensive Guide to Understanding and Utilizing QReduce Lite

Introduction

With enthusiasm, let’s navigate through the intriguing topic related to A Comprehensive Guide to Understanding and Utilizing QReduce Lite. Let’s weave interesting information and offer fresh perspectives to the readers.

A Comprehensive Guide to Understanding and Utilizing QReduce Lite

QReduce Lite॥QReduce Photo Reducer/Compressor Mobile App॥ How To Reduce Photo Size॥ compress

Introduction

In the realm of software development, optimizing code for efficiency and performance is paramount. One tool that has gained significant traction in this domain is QReduce Lite. This lightweight, yet powerful, application facilitates the process of reducing code complexity and improving its overall quality. This article aims to provide a comprehensive understanding of QReduce Lite, exploring its functionalities, benefits, and practical applications.

Understanding QReduce Lite

QReduce Lite is a code reduction tool designed to simplify and streamline complex code structures. It operates by identifying redundant or unnecessary code segments and suggesting ways to refactor them. The process involves analyzing the code, identifying areas for improvement, and then automatically applying transformations to achieve a more concise and efficient representation.

Key Features and Functionality

QReduce Lite offers a range of features that empower developers to enhance their codebase:

  • Code Simplification: QReduce Lite identifies and eliminates redundant code blocks, variable declarations, and unnecessary function calls, resulting in cleaner and more readable code.
  • Variable Optimization: It analyzes variable usage patterns and suggests more efficient variable names and data types, leading to improved code readability and performance.
  • Function Refactoring: QReduce Lite assists in identifying complex functions and suggests ways to break them down into smaller, more manageable units, improving code modularity and maintainability.
  • Error Detection and Correction: The tool can detect potential errors and inconsistencies in the code, providing suggestions for corrections and improvements.
  • Code Style Standardization: QReduce Lite helps enforce coding standards and best practices, ensuring consistency and uniformity across the codebase.

Benefits of Utilizing QReduce Lite

Employing QReduce Lite offers numerous advantages for developers and software projects:

  • Enhanced Code Readability: By removing unnecessary code and simplifying complex structures, QReduce Lite makes code easier to understand and maintain, reducing the risk of errors and improving collaboration among developers.
  • Improved Code Performance: Optimized code often translates to faster execution times and reduced resource consumption, enhancing the overall performance of applications.
  • Reduced Development Time: By automating the process of code reduction, QReduce Lite saves developers valuable time, allowing them to focus on more complex tasks.
  • Increased Code Maintainability: Streamlined code is easier to modify and update, minimizing the risk of introducing new bugs and facilitating future development efforts.
  • Improved Code Quality: QReduce Lite helps ensure adherence to coding standards and best practices, leading to higher-quality code that is more robust and reliable.

Applications of QReduce Lite

QReduce Lite finds application in a wide range of software development scenarios:

  • Web Development: Simplifying front-end and back-end code for websites and web applications, improving performance and user experience.
  • Mobile Development: Optimizing code for mobile apps, ensuring efficient resource utilization and a smooth user experience.
  • Game Development: Enhancing code performance for games, optimizing rendering, physics calculations, and other critical functionalities.
  • Data Science and Machine Learning: Refactoring complex algorithms and models to improve efficiency and accuracy.
  • Embedded Systems: Simplifying code for resource-constrained embedded systems, optimizing for memory usage and performance.

FAQs about QReduce Lite

Q: Is QReduce Lite compatible with all programming languages?

A: QReduce Lite supports a wide range of popular programming languages, including Python, Java, C++, JavaScript, and more. However, compatibility may vary depending on the specific version and features of the tool.

Q: How does QReduce Lite handle code comments?

A: QReduce Lite is designed to preserve comments during the code reduction process, ensuring that important documentation is not lost.

Q: Can QReduce Lite modify the original code?

A: QReduce Lite typically operates on a copy of the original code, preserving the original version for reference. However, some features may allow users to directly modify the original code.

Q: What are the limitations of QReduce Lite?

A: QReduce Lite is a powerful tool, but it is not a magic bullet. It may not be able to optimize all code segments, and some manual refactoring may still be required. Additionally, the tool’s effectiveness can depend on the complexity and structure of the code.

Tips for Utilizing QReduce Lite

  • Understand the codebase: Before using QReduce Lite, ensure a thorough understanding of the code’s functionality and structure.
  • Start with small code segments: Begin by testing QReduce Lite on smaller code segments to familiarize yourself with its capabilities.
  • Review the suggested changes: Carefully review the transformations suggested by QReduce Lite before applying them to the code.
  • Test thoroughly: After applying changes, conduct thorough testing to ensure that the code remains functional and meets performance expectations.
  • Iterative approach: Use QReduce Lite iteratively, applying changes gradually and testing at each step.

Conclusion

QReduce Lite represents a valuable tool for developers seeking to enhance the quality, efficiency, and readability of their code. By simplifying complex code structures, optimizing variable usage, and identifying potential errors, QReduce Lite empowers developers to create more robust, maintainable, and performant software. While it is not a substitute for careful code design and manual refactoring, QReduce Lite provides a powerful and efficient means to streamline the code reduction process, ultimately contributing to the success of software development projects.

Tutorial mengecilkan resolusi gambar dengan qreduce lite #tutorial #mudahguys #tutorial2020 [Updated] QReduce Lite  Compress image size in kb & mb for PC / Mac / Windows 11,10,8,7 QReduce Lite Premium - Apps on Google Play
Cara Agar Status WhatsApp Tidak Pecah Untuk Video & Foto  Titik ID تحميل برنامج ضغط حجم الصور دفعة واحدة للاندرويد Download Qreduce Lite - تصميم ميكس 10 Aplikasi Kompres Foto Terbaik untuk Laptop dan Android
تحميل تطبيق Qreduce Lite برنامج ضغط الصور وتقليل حجمها للحفاظ على المساحة للأندرويد 2021 QReduce Lite - Compress image size by KB or MB - YouTube

Closure

Thus, we hope this article has provided valuable insights into A Comprehensive Guide to Understanding and Utilizing QReduce Lite. We hope you find this article informative and beneficial. See you in our next article!

Navigating The Latest Windows 11 Landscape: A Comprehensive Review Of New Products And Features

Navigating the Latest Windows 11 Landscape: A Comprehensive Review of New Products and Features

Introduction

In this auspicious occasion, we are delighted to delve into the intriguing topic related to Navigating the Latest Windows 11 Landscape: A Comprehensive Review of New Products and Features. Let’s weave interesting information and offer fresh perspectives to the readers.

Microsoft Just Unveiled The Seven Main New Features Of Windows 11 - Vrogue

Microsoft’s Windows 11, launched in October 2021, has ushered in a new era for the operating system. Beyond its sleek aesthetic and redesigned interface, Windows 11 has been steadily evolving, introducing new features and products that enhance user experience and productivity. This article explores some of the most noteworthy additions to the Windows 11 ecosystem, analyzing their capabilities and potential impact on users.

1. Windows 11 2023 Update: A Focus on Refinement and Efficiency

The latest major update for Windows 11, released in September 2023, brings a suite of enhancements focused on user experience and productivity. This update focuses on subtle refinements, making the operating system more intuitive and efficient.

  • Improved Taskbar: The taskbar has undergone a significant revamp, now offering a more modern and streamlined design. It features a redesigned search bar, offering faster access to files and applications. The taskbar also incorporates a new "Overflow" menu, which neatly hides less frequently used icons, reducing visual clutter.
  • Enhanced Widgets: Windows 11’s widgets have been redesigned for better usability. They now offer more personalized content and are easier to customize. The update also introduces new widgets for popular apps, such as Spotify and Microsoft Teams, enhancing the overall user experience.
  • Focus Modes and Do Not Disturb: The update refines the Focus Modes and Do Not Disturb features, allowing users to tailor their work environment more effectively. These features can now be triggered by specific apps or activities, ensuring a more focused and productive workflow.
  • Performance Optimizations: The update includes performance improvements across the system, enhancing overall responsiveness and reducing application load times. This translates to a smoother and more enjoyable user experience, especially for resource-intensive tasks.

2. Windows 365: Bridging the Gap Between Desktop and Cloud

Windows 365, introduced in 2021, represents a significant shift in how users access and interact with their operating system. This cloud-based desktop experience allows users to stream a full Windows 11 environment to any device, regardless of its hardware specifications.

  • Cloud-Based Flexibility: Windows 365 empowers users to access their work environment from any location, on any device, with a stable internet connection. This eliminates the need for powerful hardware, making it ideal for remote workers, students, and anyone seeking flexible work options.
  • Enhanced Security: As a cloud-based service, Windows 365 benefits from robust security features, ensuring data protection and user privacy. Microsoft manages security updates and configurations, eliminating the burden on individual users.
  • Cost-Effective Solution: By leveraging cloud infrastructure, Windows 365 offers a cost-effective alternative to purchasing expensive hardware. Users can access a full Windows 11 desktop environment with minimal investment, making it an attractive option for businesses and individuals alike.

3. Microsoft Store: A Revitalized App Ecosystem

The Microsoft Store has undergone a significant transformation with Windows 11, becoming a more robust and versatile platform for application distribution.

  • Expanded App Compatibility: The store now supports a wider range of applications, including Android apps, through the Amazon Appstore integration. This significantly expands the available app library, providing users with more options to choose from.
  • Improved User Experience: The Microsoft Store features a redesigned interface, offering a more intuitive and user-friendly browsing experience. The store also includes improved search functionality, making it easier to find the desired applications.
  • Enhanced Security: The Microsoft Store prioritizes app security, ensuring that downloaded applications are vetted and safe for users. The store also includes features to prevent malicious software installations, enhancing overall system security.

4. Windows 11 for Business: Tailored for Enterprise Needs

Windows 11 caters to the specific requirements of businesses with features that enhance productivity, security, and manageability.

  • Enhanced Security Features: Windows 11 for Business includes advanced security features, such as Microsoft Endpoint Manager, which allows IT administrators to manage and secure devices across an organization. This ensures data protection and compliance with industry standards.
  • Streamlined Deployment: Windows 11 offers streamlined deployment options for businesses, allowing for efficient and scalable rollout across an organization. This reduces deployment time and associated costs, enabling organizations to quickly adopt the new operating system.
  • Productivity Enhancements: Windows 11 for Business incorporates features that enhance productivity, such as Microsoft Teams integration, which facilitates seamless collaboration and communication within organizations.

5. Windows 11 on ARM: A New Era of Power Efficiency

Windows 11 on ARM, powered by Qualcomm’s Snapdragon processors, offers a unique blend of performance and power efficiency. This platform is ideal for users seeking long battery life and a compact form factor.

  • Improved Power Efficiency: ARM-based devices offer significantly better battery life compared to their Intel-based counterparts, making them ideal for mobile users and those who prioritize battery longevity.
  • Compact Form Factor: ARM-based devices are often smaller and lighter, making them more portable and convenient for travel and everyday use.
  • Enhanced Performance: While traditionally known for their power efficiency, ARM processors have made significant strides in performance, offering a smooth and responsive user experience.

FAQ: Exploring Common Questions About Windows 11 Products

Q: What are the minimum system requirements for Windows 11?

A: To run Windows 11, your computer must meet the following minimum requirements:

  • Processor: 1 gigahertz (GHz) or faster with 2 or more cores on a compatible 64-bit processor or System on a Chip (SoC)
  • RAM: 4 gigabytes (GB)
  • Storage: 64 GB or larger storage device
  • System Firmware: UEFI, Secure Boot capable
  • Graphics Card: Compatible with DirectX 12 or later, with WDDM 2.x driver
  • Display: High Definition (720p) display, at least 9 inches diagonally, with 8 bits per color channel

Q: Is Windows 11 a free upgrade for Windows 10 users?

A: While Windows 11 was initially offered as a free upgrade for eligible Windows 10 users, this offer has since expired. New installations of Windows 11 require a purchase.

Q: What are the key benefits of using Windows 11 for businesses?

A: Windows 11 for Business offers a range of benefits for businesses, including:

  • Enhanced security: Advanced security features protect sensitive data and ensure compliance with industry standards.
  • Streamlined deployment: Efficient deployment options allow for quick and scalable rollout across an organization.
  • Productivity enhancements: Features like Microsoft Teams integration facilitate seamless collaboration and communication.

Q: What is the difference between Windows 11 and Windows 11 Pro?

A: Windows 11 Pro offers additional features and capabilities tailored for businesses, including:

  • BitLocker drive encryption: Protects data on devices from unauthorized access.
  • Remote Desktop: Enables remote access to devices, enhancing flexibility and productivity.
  • Domain join: Allows devices to be joined to an organizational network, facilitating centralized management.

Q: What are the advantages of using Windows 11 on ARM devices?

A: Windows 11 on ARM devices offers advantages such as:

  • Improved power efficiency: Longer battery life compared to traditional Intel-based devices.
  • Compact form factor: Smaller and lighter devices, ideal for portability and travel.
  • Enhanced performance: ARM processors offer a smooth and responsive user experience.

Tips for Optimizing Your Windows 11 Experience

  • Regularly update your system: Keeping your operating system updated ensures you have the latest security patches and performance improvements.
  • Customize your settings: Tailor your Windows 11 experience to your specific needs and preferences by adjusting settings for notifications, themes, and other features.
  • Utilize the Start menu effectively: The redesigned Start menu offers quick access to recently used files, applications, and settings.
  • Explore the new widgets: Windows 11’s widgets provide personalized content and quick access to information.
  • Take advantage of the Microsoft Store: The Microsoft Store offers a wide range of applications, including Android apps through the Amazon Appstore integration.

Conclusion: Windows 11 – A Continuously Evolving Operating System

Windows 11 has emerged as a powerful and versatile operating system, offering a range of new features and products designed to enhance user experience and productivity. From the refined interface and improved Taskbar to the cloud-based flexibility of Windows 365 and the expanded app ecosystem of the Microsoft Store, Windows 11 caters to the needs of diverse users, from individuals to businesses. As Microsoft continues to innovate and refine its operating system, Windows 11 is poised to play a pivotal role in shaping the future of computing.

Microsoft unveils the New Windows 11 packed with New Amazing Features Windows 11 update: All new features, changes & release date  WinCentral Windows 11: A Comprehensive Guide about Features and Updates Perunity - Latest Business Story
Microsoft Windows 11 Review Pcmag - Riset Wallpaper Windows 11, landscape, Microsoft, 4K, OS #24105 Windows 11 Review  New Features in 2023 - gHacks Tech News
Microsoft rolling out new features for Windows 11 Version 22H2 in the Release Preview Channel List of All Windows 11 Editions: Mixed Reality Enters the Stage

Closure

Thus, we hope this article has provided valuable insights into Navigating the Latest Windows 11 Landscape: A Comprehensive Review of New Products and Features. We thank you for taking the time to read this article. See you in our next article!

Mastering Print Settings In Windows 10: A Comprehensive Guide

Mastering Print Settings in Windows 10: A Comprehensive Guide

Introduction

With enthusiasm, let’s navigate through the intriguing topic related to Mastering Print Settings in Windows 10: A Comprehensive Guide. Let’s weave interesting information and offer fresh perspectives to the readers.

Mastering Print Settings in Windows 10: A Comprehensive Guide

How to Adjust Printer Settings in Windows 10 - dummies

Windows 10 provides a robust set of print settings that empower users to tailor their printing experience, ensuring optimal results for various documents and tasks. Understanding and utilizing these settings is essential for achieving precise control over print quality, paper usage, and overall document appearance. This comprehensive guide delves into the intricacies of print settings in Windows 10, explaining their significance and providing practical tips for maximizing their potential.

The Importance of Print Settings

Print settings are not merely aesthetic embellishments; they play a crucial role in ensuring accurate and professional output. By adjusting these settings, users can:

  • Control Print Quality: Optimize print resolution, color depth, and ink usage to achieve the desired level of detail and clarity for different document types, such as photographs, presentations, or technical drawings.
  • Manage Paper Usage: Choose paper size, orientation (portrait or landscape), and margins to minimize waste and ensure efficient use of paper resources.
  • Customize Document Layout: Fine-tune page layout, including scaling, margins, and headers/footers, to create visually appealing and professional-looking documents.
  • Enhance Print Efficiency: Configure printing preferences, such as duplex printing (two-sided printing) and multiple copies, to streamline printing tasks and save time.
  • Optimize Printing Costs: By adjusting print quality and paper settings, users can reduce ink and paper consumption, leading to cost savings in the long run.

Accessing print settings in Windows 10 is straightforward:

  1. Open the Print Dialog Box: This can be done through various applications. For example, in Microsoft Word, click "File" > "Print," or in a web browser, select "Print" from the menu.
  2. Select the Desired Printer: Choose the printer you wish to use from the list of available devices.
  3. Access Print Settings: Locate the "Properties" or "Preferences" button, typically found within the print dialog box. This will open a window displaying a range of print settings categorized by function.

Understanding Key Print Settings

1. Paper Settings:

  • Paper Size: Select the appropriate paper size (e.g., Letter, A4, Legal) based on the document’s dimensions and intended use.
  • Paper Source: Choose the paper tray or feeder to be used for printing. This is particularly relevant for printers with multiple paper trays.
  • Orientation: Opt for either "Portrait" (vertical) or "Landscape" (horizontal) orientation depending on the document’s layout and content.
  • Margins: Define the blank space around the printed content, ensuring adequate margins for binding or other purposes.

2. Print Quality Settings:

  • Resolution: Adjust the resolution (dots per inch – DPI) to control the level of detail and sharpness in the printed output. Higher DPI results in finer detail but consumes more ink and printing time.
  • Color Mode: Select between "Color" or "Black and White" printing depending on the document’s requirements.
  • Print Quality: Choose from various quality levels (e.g., Draft, Normal, High) to balance print quality with speed and ink consumption.

3. Layout and Content Settings:

  • Scaling: Adjust the document size to fit the selected paper size. Options include scaling to fit the page, scaling to a specific percentage, or custom scaling.
  • Headers and Footers: Configure headers and footers to include page numbers, date, or other relevant information.
  • Collation: Specify whether multiple copies of a document should be collated (printed in order) or printed as separate stacks.

4. Advanced Print Settings:

  • Duplex Printing: Enable duplex printing to print on both sides of the paper, saving paper and reducing printing costs.
  • Multiple Copies: Specify the number of copies to be printed.
  • Print to File: Create a PDF or other file format instead of printing directly to the printer. This allows for easy sharing and archiving.
  • Custom Print Settings: Many printers offer advanced settings specific to their models, including settings for color profiles, paper types, and other specialized features.

FAQs about Print Settings in Windows 10

Q: How do I change the default printer in Windows 10?

A: To change the default printer, open the "Settings" app, navigate to "Devices" > "Printers & Scanners," and select the desired printer from the list. Click the "Manage" button next to the printer name and choose "Set as default."

Q: How do I troubleshoot printing problems in Windows 10?

A: Start by ensuring the printer is connected and powered on. Check the printer’s status in the "Printers & Scanners" settings. If the printer is offline, try restarting it. You can also run the Windows troubleshooter for printing by searching for "troubleshoot printing" in the Start menu.

Q: Can I print directly from a web browser in Windows 10?

A: Yes, most web browsers allow you to print directly from the browser window. Select "Print" from the menu or use the keyboard shortcut Ctrl+P. You can then choose the printer and adjust print settings as needed.

Q: How do I print to a PDF file in Windows 10?

A: You can print to a PDF file using the "Microsoft Print to PDF" virtual printer, which is included in Windows 10. Select "Microsoft Print to PDF" as the printer in the print dialog box, choose a location to save the PDF file, and click "Print."

Q: How do I manage print queues in Windows 10?

A: To view the print queue, open the "Printers & Scanners" settings and select the desired printer. Click the "Open queue" button to view the list of print jobs in the queue. You can pause, cancel, or restart print jobs from this window.

Tips for Optimizing Print Settings in Windows 10

  • Preview Before Printing: Always preview your document before printing to ensure the layout, margins, and other settings are as expected.
  • Test Print Settings: Experiment with different print settings to find the optimal combination for your specific needs and printer model.
  • Utilize Printer Properties: Explore the advanced settings within the printer’s properties dialog box to access features specific to your printer model.
  • Save Custom Print Settings: Save frequently used print settings as presets to streamline future printing tasks.
  • Maintain Your Printer: Regularly clean your printer and replace ink cartridges or toner to ensure optimal print quality and longevity.

Conclusion

Mastering print settings in Windows 10 empowers users to achieve professional and efficient printing results. By understanding the various settings and their impact, users can optimize print quality, manage paper usage, and customize document layouts to meet specific needs. Through careful configuration and utilization of these settings, users can transform their printing experience, achieving accurate, visually appealing, and cost-effective results.

Selecting Basic Print Settings - Windows The Better Way to Adjust a Printer's Settings in Windows How to Adjust Printer Settings in Windows 10 - dummies
Как открыть и изменить настройки принтера в Windows 10 - ZanZ print settings in windows 10 How to open and change Printer settings in Windows 10 2023
How to print pictures on Windows 10  Windows Central print settings in windows 10

Closure

Thus, we hope this article has provided valuable insights into Mastering Print Settings in Windows 10: A Comprehensive Guide. We hope you find this article informative and beneficial. See you in our next article!

Unlocking The Network: A Deep Dive Into Realtek Drivers For Windows 10

Unlocking the Network: A Deep Dive into Realtek Drivers for Windows 10

Introduction

With enthusiasm, let’s navigate through the intriguing topic related to Unlocking the Network: A Deep Dive into Realtek Drivers for Windows 10. Let’s weave interesting information and offer fresh perspectives to the readers.

Unlocking the Network: A Deep Dive into Realtek Drivers for Windows 10

Manually Install Latest Realtek Network Driver In Windows 10 - ComputerSluggish

In the digital landscape of today, seamless connectivity is paramount. The ability to access the internet, share files, and communicate effortlessly is essential for individuals and businesses alike. Underlying this smooth experience is a complex interplay of hardware and software, with network drivers playing a crucial role. Among these drivers, Realtek drivers are ubiquitous, powering a vast array of network interfaces in countless Windows 10 devices.

Understanding Realtek Network Drivers

Realtek Semiconductor Corporation is a Taiwanese company renowned for its innovative integrated circuits, particularly in the realm of networking. Their network drivers are the software intermediaries that enable communication between your computer’s operating system (Windows 10 in this case) and the physical network hardware, such as Ethernet controllers, Wi-Fi adapters, and Bluetooth modules.

The Importance of Realtek Drivers

These drivers are essential for several reasons:

  • Hardware Recognition: Drivers act as the translator, allowing Windows 10 to recognize and interact with the specific Realtek network hardware installed in your device. Without them, your computer wouldn’t know how to use the network interface.
  • Performance Optimization: Drivers fine-tune the communication between the hardware and software, ensuring optimal data transfer speeds and reliable connectivity.
  • Feature Enablement: Drivers unlock the full potential of your network hardware, enabling features like advanced Wi-Fi protocols, Bluetooth connectivity, and network management tools.
  • Security Enhancements: Drivers often include security patches and updates that protect your network from vulnerabilities and ensure secure data transmission.

Identifying Realtek Drivers in Windows 10

If you suspect your network is experiencing issues, it’s essential to confirm whether the problem lies with the Realtek drivers. Windows 10 provides several methods to identify and manage these drivers:

  1. Device Manager: Navigate to the Device Manager (accessible through the search bar or by right-clicking the Start menu). Look for the "Network adapters" category, where you’ll find entries related to Realtek network hardware.
  2. System Information: Open the "System Information" window (accessible through the search bar). Navigate to "Components" > "Network" to view details about your network adapters, including the manufacturer (Realtek).
  3. Network Connections: Open the "Network Connections" window (accessible through the search bar). Right-click on your active network connection and select "Properties." Look for the "Driver" tab to view details about the installed driver.

Common Issues and Troubleshooting

While Realtek drivers generally provide a smooth experience, certain issues can arise:

  • Connection Problems: Slow internet speeds, intermittent connectivity, or inability to connect to the network.
  • Driver Conflicts: Conflicts with other drivers or software can lead to network instability.
  • Outdated Drivers: Using outdated drivers can result in compatibility issues, security vulnerabilities, or performance degradation.
  • Driver Corruption: Damaged or corrupted drivers can cause various network errors.

Troubleshooting Strategies

Addressing these issues often requires updating, reinstalling, or troubleshooting the Realtek drivers:

  1. Updating Drivers: Regularly updating drivers is crucial to ensure optimal performance and security. Windows 10 automatically checks for updates, but manually updating drivers through the Device Manager or the Realtek website is recommended.
  2. Reinstalling Drivers: If updating doesn’t resolve the issue, reinstalling the drivers can often rectify the problem. This can be done through the Device Manager or by downloading the latest drivers from the Realtek website.
  3. Troubleshooting Tools: Windows 10 offers built-in troubleshooting tools for network issues. Access these tools by searching for "Network Troubleshooter" in the search bar.
  4. Network Reset: If other troubleshooting steps fail, resetting the network settings can sometimes resolve persistent problems. This option is available in the "Network Connections" window.

FAQs on Realtek Network Drivers in Windows 10

Q: How do I know if I need to update my Realtek drivers?

A: Regularly check for driver updates through Windows Update or the Realtek website. If you experience network issues, outdated drivers could be the culprit.

Q: Where can I find the latest Realtek drivers for my device?

A: The Realtek website provides a comprehensive library of drivers for various devices. You can locate the specific drivers for your model by selecting the "Download" section and searching for your device or chipset.

Q: What should I do if I encounter an error during driver installation?

A: If you encounter an error, try restarting your computer and reinstalling the drivers. If the problem persists, consult the Realtek website for troubleshooting guides or contact their support team.

Q: Can I use generic network drivers instead of Realtek drivers?

A: While generic drivers might work, they might not provide the same level of optimization and feature support as the specific Realtek drivers designed for your hardware.

Q: Are Realtek drivers safe to download from third-party websites?

A: Downloading drivers from unofficial sources can pose security risks. Always download drivers from the official Realtek website or a reputable source to ensure they are legitimate and safe.

Tips for Managing Realtek Drivers in Windows 10

  • Regularly update drivers: Stay ahead of potential issues by regularly checking for driver updates.
  • Backup drivers: Create a backup of your current drivers before installing new ones to facilitate easy rollback if necessary.
  • Monitor driver activity: Keep an eye on the Device Manager for any driver-related errors or warnings.
  • Consult documentation: Refer to the Realtek website or user manuals for detailed instructions and troubleshooting tips.
  • Contact support: If you encounter persistent problems, reach out to Realtek support for assistance.

Conclusion

Realtek network drivers are integral to achieving seamless network connectivity in Windows 10 devices. They bridge the gap between hardware and software, enabling efficient data transfer, unlocking advanced features, and ensuring secure communication. By understanding the importance of these drivers, identifying potential issues, and implementing appropriate troubleshooting strategies, users can optimize their network performance and enjoy a reliable, high-quality digital experience.

Realtek windows 10 drivers - tcver Manually Install Latest Realtek Network Driver In Windows 10 - ComputerSluggish Realtek network adapter driver windows 10 - sugarstashok
Realtek network driver - decoopec Gigabyte realtek network driver windows 10 - prosdopca Realtek ethernet controller driver windows 10 - tenbpo
Realtek Ethernet Controller Driver Download Install For Windows 10 8 7  techpout Realtek network driver windows 10 update - sysdamer

Closure

Thus, we hope this article has provided valuable insights into Unlocking the Network: A Deep Dive into Realtek Drivers for Windows 10. We thank you for taking the time to read this article. See you in our next article!

Reliving The PlayStation Era: A Guide To PS1 Emulation On Windows 10

Reliving the PlayStation Era: A Guide to PS1 Emulation on Windows 10

Introduction

With great pleasure, we will explore the intriguing topic related to Reliving the PlayStation Era: A Guide to PS1 Emulation on Windows 10. Let’s weave interesting information and offer fresh perspectives to the readers.

Reliving the PlayStation Era: A Guide to PS1 Emulation on Windows 10

PlayStation One Emulator Setup Windows 10 Test - YouTube

The PlayStation, released in 1994, ushered in a golden age of gaming. Its iconic library, from Final Fantasy VII to Metal Gear Solid, captivated audiences worldwide. Years later, nostalgia for this era remains strong, leading many to seek ways to revisit these classics on modern platforms. For Windows 10 users, the solution lies in PlayStation 1 emulation.

Emulation allows users to run software designed for one platform on another. In this case, a PS1 emulator replicates the PlayStation’s hardware and software environment on a Windows 10 computer, enabling the execution of PS1 games. This opens up a world of possibilities for gamers seeking to:

  • Replay beloved classics: Relive the joy of iconic titles like Crash Bandicoot, Resident Evil, and Tekken.
  • Experience new games: Explore the vast PS1 library, including hidden gems and titles that may have missed your attention the first time around.
  • Enjoy enhanced features: Emulators often offer features not present on the original console, such as save state functionality, resolution scaling, and frame rate adjustments, enhancing the gameplay experience.
  • Preserve gaming history: Emulation ensures the continued accessibility of these classic games, preventing them from being lost to time.

Understanding the Emulation Process

At its core, PS1 emulation involves several key components:

  • The Emulator: The software responsible for mimicking the PlayStation’s hardware and software environment. This includes replicating the CPU, GPU, memory, and other components.
  • The BIOS: A firmware file that contains the basic instructions for the PlayStation to boot up.
  • The Game Files: The actual game data, typically in the form of .bin, .cue, or .iso files.

When a game is launched, the emulator loads the BIOS, initiates the game files, and then emulates the PlayStation’s hardware to execute the game. This process allows the game to run on the Windows 10 computer, despite being originally designed for a completely different system.

Popular PS1 Emulators for Windows 10

Several PS1 emulators are available for Windows 10, each with its own strengths and weaknesses. Some of the most popular options include:

  • ePSXe: A long-standing and highly regarded emulator known for its stability, compatibility, and advanced features.
  • PCSX-ReARMed: A newer emulator that prioritizes speed and accuracy, offering high-performance emulation on modern hardware.
  • Mednafen: A versatile emulator that supports a wide range of platforms, including PS1.

Choosing the Right Emulator

The best emulator for you will depend on your individual needs and preferences. Consider these factors:

  • Compatibility: Check if the emulator supports the specific games you want to play.
  • Performance: Look for an emulator that runs smoothly on your hardware, ensuring a lag-free gaming experience.
  • Features: Determine if the emulator offers the features you desire, such as save states, resolution scaling, and controller mapping.
  • Ease of Use: Choose an emulator that is user-friendly and straightforward to set up and configure.

Setting Up a PS1 Emulator

Once you have chosen an emulator, setting it up involves several steps:

  1. Download and Install: Download the emulator from a reputable source and install it on your Windows 10 computer.
  2. Obtain BIOS Files: Find and download the PS1 BIOS files. These are essential for the emulator to function properly. Be aware that acquiring BIOS files may involve legal complexities, so ensure you understand the legal implications.
  3. Configure the Emulator: Configure the emulator’s settings, including graphics settings, controller mapping, and save state options.
  4. Load Game Files: Locate and load the game files you want to play. These files are typically .bin, .cue, or .iso files.

Tips for Optimizing PS1 Emulation

To ensure a smooth and enjoyable gaming experience, consider these tips:

  • Upgrade Your Hardware: If you experience performance issues, upgrading your computer’s hardware, particularly the CPU and GPU, can significantly improve emulation performance.
  • Optimize Settings: Experiment with the emulator’s settings to find the best balance between performance and visual quality.
  • Use a Controller: Using a PlayStation controller or a compatible gamepad will enhance the authentic gameplay experience.
  • Keep Your Emulator Updated: Regularly update your emulator to benefit from bug fixes, performance improvements, and new features.

FAQs about PS1 Emulation on Windows 10

Q: Is PS1 emulation legal?

A: Emulating PS1 games for personal use is generally considered legal in most countries. However, distributing or sharing copyrighted game files without permission is illegal.

Q: Do I need a physical PS1 to use a PS1 emulator?

A: No, you do not need a physical PS1 to use a PS1 emulator. The emulator replicates the PlayStation’s hardware and software environment on your computer, eliminating the need for a physical console.

Q: Can I play PS1 games online with other players?

A: While some PS1 games support online multiplayer, emulating these features can be challenging and requires additional software and configuration.

Q: What are the best PS1 games to play on an emulator?

A: The best PS1 games to play are subjective and depend on individual preferences. However, some universally acclaimed titles include:

  • Final Fantasy VII
  • Metal Gear Solid
  • Resident Evil
  • Crash Bandicoot
  • Tekken 3
  • Gran Turismo
  • Spyro the Dragon

Conclusion

PS1 emulation on Windows 10 offers a fantastic opportunity to revisit a cherished era of gaming. By leveraging powerful emulators, gamers can enjoy classic titles with enhanced features and a renewed sense of nostalgia. Whether you’re a seasoned gamer seeking to relive your childhood or a newcomer exploring the rich history of PlayStation, PS1 emulation provides a gateway to a world of iconic games and timeless entertainment.

Downloading ps1 emulator for windows 10 - vastspa 10 best ps1 emulator windows 10 - questtablet Ps1 Emulator Fast setup & Windows 10 Fix How TO - YouTube
Top 5 Best ps1 Emulators for PC in 2024 Ps1 emulator for windows 10 64 bit - pilotmember Most accurate ps1 emulator windows 10 - perkssere
Most accurate ps1 emulator windows 10 - perkssere RetroBat 12TB PlayStation 1 and 2 Complete Emulation Hard Drive for Windows - RetroMini Store

Closure

Thus, we hope this article has provided valuable insights into Reliving the PlayStation Era: A Guide to PS1 Emulation on Windows 10. We thank you for taking the time to read this article. See you in our next article!

Unlocking The Power Of The Page File In Windows 11: A Comprehensive Guide

Unlocking the Power of the Page File in Windows 11: A Comprehensive Guide

Introduction

With great pleasure, we will explore the intriguing topic related to Unlocking the Power of the Page File in Windows 11: A Comprehensive Guide. Let’s weave interesting information and offer fresh perspectives to the readers.

Unlocking the Power of the Page File in Windows 11: A Comprehensive Guide

Pagefile.sys Windows 11

The page file, also known as the virtual memory file, plays a crucial role in Windows 11’s performance and stability. It acts as an extension of your computer’s physical RAM, providing temporary storage space for data that cannot fit in the main memory. This article delves into the intricacies of page file settings in Windows 11, exploring its significance, optimal configurations, and potential impact on system performance.

Understanding the Essence of the Page File

Imagine your computer’s RAM as a bustling marketplace filled with vendors selling various goods. When a program requests data, it’s like a customer searching for a specific item. If the item is readily available in the marketplace (RAM), the transaction is swift and efficient. However, if the item is not present, the customer must rely on a warehouse (page file) to retrieve it. This process, known as "paging," involves transferring data between RAM and the page file, leading to a noticeable delay in the program’s execution.

The page file is essential because it allows Windows 11 to run applications that require more memory than physically available. Without it, the operating system would encounter errors and potentially crash. By providing a temporary storage space, the page file enables smooth multitasking and prevents system instability.

Navigating Page File Settings in Windows 11

Accessing and adjusting page file settings in Windows 11 is straightforward:

  1. Open System Properties: Right-click on "This PC" or "My Computer" and select "Properties."
  2. Navigate to Advanced System Settings: In the left pane, click on "Advanced system settings."
  3. Access Performance Options: In the System Properties window, select the "Advanced" tab and click on "Settings" under the "Performance" section.
  4. Manage Virtual Memory: In the Performance Options window, navigate to the "Advanced" tab and click on "Change…" under the "Virtual memory" section.
  5. Configure Page File: The Virtual Memory window displays the current page file settings. You can choose to "Let Windows manage paging file size for all drives" or "Custom size."

Customizing Page File Settings: A Balancing Act

While Windows 11 generally manages the page file size effectively, customizing it can yield performance improvements, particularly for users with specific needs.

Understanding the Impact of Page File Size:

  • Smaller Page File: A smaller page file may lead to faster access times as data is stored closer to the RAM. However, it can also result in frequent paging and slowdowns if the system needs more memory.
  • Larger Page File: A larger page file provides ample storage space for data, reducing the frequency of paging. However, it can consume disk space and potentially slow down disk operations.

Optimal Page File Configuration:

  • General Recommendations: For most users, allowing Windows to manage the page file size is recommended. It dynamically adjusts the page file based on system usage, striking a balance between performance and efficiency.
  • Memory-Intensive Applications: If you frequently run memory-intensive applications, consider increasing the page file size to accommodate their demands. However, ensure that the allocated space doesn’t exceed 1.5 times your RAM size.
  • SSD Users: SSD users may benefit from a smaller page file size as SSDs generally have faster read/write speeds compared to traditional hard drives.
  • HDD Users: HDD users might consider a larger page file size to minimize the frequency of paging, especially if they experience frequent disk activity.

Tips for Effective Page File Management

  • Monitor System Performance: Use the Task Manager or resource monitor to observe the page file usage and identify potential bottlenecks.
  • Experiment with Settings: Carefully adjust the page file size based on your system’s performance and usage patterns.
  • Regularly Defragment: Defragmenting the hard drive can improve the performance of the page file, especially if it’s located on a traditional hard drive.
  • Consider Alternative Options: Explore alternatives to the page file, such as using a RAM disk or increasing physical RAM, if you encounter persistent performance issues.

FAQs: Addressing Common Concerns

Q: Is it necessary to disable the page file?

A: Disabling the page file is generally not recommended, as it can lead to system instability and crashes. While it may seem like a way to free up disk space, it’s crucial to understand the page file’s critical role in supporting system operations.

Q: How does the page file affect system performance?

A: The page file’s impact on performance is directly linked to its size and the frequency of paging. A larger page file reduces paging but can slow down disk operations. Conversely, a smaller page file may lead to faster access times but could result in frequent paging and slowdowns.

Q: Should I move the page file to another drive?

A: Moving the page file to a different drive can be beneficial if the current drive is experiencing performance issues or is nearing its capacity. However, ensure that the target drive has sufficient free space and adequate performance.

Q: How do I know if the page file is causing performance issues?

A: High page file usage, especially when the system is experiencing slowdowns or crashes, may indicate a potential problem. Monitor system performance and observe resource utilization to identify any correlations.

Conclusion: Optimizing for Performance and Stability

The page file is an integral component of Windows 11, providing a crucial safety net for system stability and enabling the execution of memory-intensive applications. While Windows effectively manages the page file size, customizing it can fine-tune performance for specific needs.

By understanding the nuances of page file settings, users can optimize their systems for optimal performance and stability. Remember to monitor system performance, experiment with settings, and consider alternative solutions if necessary.

Windows 11 Paging File Windows 11 Paging File Windows 11 Paging File
Unlock Windows 11 Files Using Lock Hunter Application HTMD Blog Help Windows 11 has no paging file, why? How to Unblock Downloads in Windows 11
How to improve Windows 11 gaming performance - Tech Advisor How to Tweak Paging File for better Windows 11 or 10 Performance

Closure

Thus, we hope this article has provided valuable insights into Unlocking the Power of the Page File in Windows 11: A Comprehensive Guide. We hope you find this article informative and beneficial. See you in our next article!

Windows 11: A New Era Of Computing

Windows 11: A New Era of Computing

Introduction

With great pleasure, we will explore the intriguing topic related to Windows 11: A New Era of Computing. Let’s weave interesting information and offer fresh perspectives to the readers.

Windows 11: A New Era of Computing

Windows 11: A new era for the PC begins today  Windows Experience Blog

Windows 11, the latest iteration of Microsoft’s flagship operating system, arrived in 2021, ushering in a wave of fresh features and design refinements aimed at enhancing the user experience. This new OS boasts a modern, intuitive interface, enhanced security measures, and an array of productivity-boosting tools, making it a compelling upgrade for both home and professional users.

A Refreshed Visual Experience

The most prominent change in Windows 11 is its redesigned user interface. The Start menu, a cornerstone of the Windows experience, has been completely overhauled, adopting a centered layout and a streamlined design. This shift emphasizes a more minimalist approach, placing a greater emphasis on visual clarity and ease of navigation. The taskbar has also received a makeover, now featuring a modern, rounded aesthetic that complements the updated Start menu. These changes contribute to a visually appealing and intuitive experience, making Windows 11 feel fresh and contemporary.

Enhanced Multitasking and Focus

Windows 11 introduces a suite of features designed to optimize multitasking and improve focus. Snap Layouts, a new feature, enables users to arrange windows in pre-defined configurations, maximizing screen space and streamlining workflow. Snap Groups, another innovative addition, allows users to save specific window arrangements for later recall, significantly reducing the time spent manually arranging windows. These features are particularly beneficial for users who frequently work with multiple applications, facilitating a more efficient and organized workflow.

A New Focus on Productivity

Windows 11 integrates a set of tools designed to boost productivity and streamline workflows. The revamped Taskbar features a dedicated space for widgets, providing quick access to essential information such as weather updates, news headlines, and calendar events. This feature allows users to stay informed without interrupting their ongoing tasks. The integration of Microsoft Teams within the operating system further enhances collaboration, enabling users to initiate video calls, chat with colleagues, and share files directly from the Taskbar. These enhancements contribute to a more seamless and efficient work environment.

Security at the Forefront

Windows 11 prioritizes security, incorporating a range of features designed to protect user data and devices. Windows Hello, a biometric authentication system, utilizes facial recognition or fingerprint scanning to provide secure and convenient login access. Microsoft Defender, the integrated antivirus solution, offers real-time protection against malware and other threats, ensuring a secure computing environment. The integration of TPM (Trusted Platform Module) chips, which are hardware-based security modules, provides an additional layer of protection, safeguarding sensitive data from unauthorized access.

Gaming Enhancements

Windows 11 introduces a range of features specifically designed to enhance the gaming experience. Auto HDR, a technology that automatically enhances the visual fidelity of games, delivers richer and more immersive visuals. DirectStorage, a feature that allows games to directly access data from storage devices, reduces loading times and improves overall performance. These enhancements contribute to a more immersive and enjoyable gaming experience, making Windows 11 an attractive platform for gamers.

FAQs

1. What are the minimum system requirements for Windows 11?

To run Windows 11, a device must meet the following minimum requirements:

  • Processor: 1 gigahertz (GHz) or faster with 2 or more cores on a compatible 64-bit processor or System on a Chip (SoC)
  • RAM: 4 gigabytes (GB)
  • Storage: 64 GB or larger storage device
  • Graphics: Compatible with DirectX 12 or later with WDDM 2.x driver
  • Display: High Definition (720p) display that is at least 9 inches diagonally, with 8 bits per color channel

2. How can I upgrade to Windows 11?

To upgrade to Windows 11, ensure your device meets the minimum system requirements and then follow these steps:

  1. Go to Settings > System > System info.
  2. Check if your device is eligible for an upgrade to Windows 11.
  3. If eligible, you can upgrade directly through Settings > Windows Update.

3. Is Windows 11 compatible with my existing applications?

Most applications that are compatible with Windows 10 will also run on Windows 11. However, some older applications may require updates or compatibility patches to function correctly.

4. What are the benefits of using Windows 11?

Windows 11 offers a range of benefits, including:

  • A modern and intuitive user interface
  • Enhanced multitasking and focus features
  • Improved productivity tools
  • Enhanced security measures
  • Gaming enhancements

5. How can I customize the Start menu in Windows 11?

To customize the Start menu in Windows 11, right-click on the Start button and select "Settings." You can then customize various aspects, including the layout, pinned apps, and the display of recent files.

Tips

1. Utilize Snap Layouts and Snap Groups for efficient multitasking.

By leveraging these features, users can quickly arrange windows in desired configurations and save specific arrangements for later recall, streamlining workflow and maximizing productivity.

2. Explore the Widgets panel for quick access to essential information.

The Widgets panel provides a convenient platform to stay informed without interrupting ongoing tasks. Users can personalize the displayed widgets to suit their individual needs.

3. Enable Windows Hello for secure and convenient login.

Windows Hello utilizes facial recognition or fingerprint scanning to provide a secure and hassle-free login experience, enhancing device security.

4. Optimize gaming performance with Auto HDR and DirectStorage.

These features enhance the visual fidelity and reduce loading times, contributing to a more immersive and enjoyable gaming experience.

Conclusion

Windows 11 represents a significant evolution of the Windows operating system, offering a range of features designed to enhance the user experience across various aspects. From its redesigned user interface to its focus on productivity, security, and gaming, Windows 11 provides a comprehensive and engaging computing platform for both home and professional users. As Microsoft continues to refine and enhance Windows 11, it is poised to become a cornerstone of the modern computing landscape, empowering users with an array of innovative tools and features.

Windows 11's Latest Update: AI-Enhanced Features for a New Era of Computing PPT - Windows 10 vs. Windows 11: A New Era of Computing PowerPoint Presentation - ID:12531032 Windows 11 Review: The New Era Evolves Digital Trends, 51% OFF
Microsoft Windows 11 Review: A Deep Dive 2024 Windows 11 review: The new era evolves - Techno Blender Windows 11 Review: The New Era Evolves Digital Trends
Introducing new Surface devices that take the Windows PC in the next era of computing Windows 11 Review: The New Era Evolves Digital Trends, 51% OFF

Closure

Thus, we hope this article has provided valuable insights into Windows 11: A New Era of Computing. We hope you find this article informative and beneficial. See you in our next article!

Enabling The Power Of Linux Within Windows 10: A Comprehensive Guide To The Windows Subsystem For Linux

Enabling the Power of Linux Within Windows 10: A Comprehensive Guide to the Windows Subsystem for Linux

Introduction

With great pleasure, we will explore the intriguing topic related to Enabling the Power of Linux Within Windows 10: A Comprehensive Guide to the Windows Subsystem for Linux. Let’s weave interesting information and offer fresh perspectives to the readers.

Enabling the Power of Linux Within Windows 10: A Comprehensive Guide to the Windows Subsystem for Linux

How to Enable Windows Subsystem for Linux in Windows 10 - Itechguides

Windows 10, a widely adopted operating system, has undergone significant evolution to become more adaptable and versatile. One of its most notable features is the Windows Subsystem for Linux (WSL), allowing users to seamlessly run Linux environments directly within the Windows environment. This capability opens up a world of possibilities, empowering users to access and utilize the vast ecosystem of Linux tools, applications, and development environments without needing to dual-boot or use virtual machines.

Understanding the Windows Subsystem for Linux

The Windows Subsystem for Linux is a powerful technology that enables users to run Linux binaries directly on Windows. It operates by providing a compatibility layer that translates system calls and other Linux-specific functionality into their Windows equivalents. This enables a seamless integration of Linux environments within the Windows operating system, allowing users to leverage the strengths of both platforms.

Benefits of Utilizing the Windows Subsystem for Linux

The integration of Linux within Windows offers numerous benefits, including:

  • Cross-Platform Development: Developers can utilize the same tools and workflows for both Windows and Linux environments, enabling them to build and test applications across platforms seamlessly.
  • Access to Linux Tools and Applications: Users can access a wide range of Linux tools and applications, including command-line utilities, scripting languages, and development environments, expanding their toolset and capabilities.
  • Enhanced Security: Linux environments are known for their robust security features, and WSL allows users to leverage these features within their Windows environment.
  • Improved System Administration: System administrators can use Linux tools and utilities for tasks like managing servers, network devices, and other systems.
  • Compatibility with Cloud Services: Many cloud services and platforms are based on Linux, and WSL provides a familiar environment for users to interact with these services.

Enabling the Windows Subsystem for Linux

The process of enabling the Windows Subsystem for Linux is straightforward:

  1. Enable the Windows Subsystem for Linux Feature: Navigate to "Control Panel > Programs > Programs and Features > Turn Windows Features on or Off." Enable the "Windows Subsystem for Linux" option.
  2. Install a Linux Distribution: Open the Microsoft Store and search for a desired Linux distribution, such as Ubuntu, Debian, or Kali. Click "Get" to install the distribution.
  3. Launch the Linux Environment: Once installed, search for the distribution name in the Windows Start menu and click to launch the Linux environment. You will be prompted to create a user account for the Linux environment.

Using the Windows Subsystem for Linux

Once the Linux environment is launched, users can utilize it just like any other Linux system. They can use the command line to run commands, install packages, and access various Linux tools and applications.

Key Features and Functionality

  • Command Line Interface: The Linux environment provides a traditional command-line interface (CLI) for interacting with the system.
  • Package Management: Users can install and manage packages using the distribution’s package manager, such as apt or yum.
  • File System Integration: The Linux file system is integrated with the Windows file system, allowing users to access files and folders from both environments.
  • Graphical Applications: While primarily designed for command-line use, WSL can also run some graphical applications using X Server applications like VcXsrv.

Frequently Asked Questions

Q: What Linux distributions are supported by WSL?

A: WSL supports a wide range of popular Linux distributions, including Ubuntu, Debian, Kali, Fedora, openSUSE, and many others.

Q: Can I run GUI applications within WSL?

A: While WSL is primarily designed for command-line applications, it can run some GUI applications using X Server applications.

Q: How do I access files from my Windows environment within WSL?

A: WSL provides access to the Windows file system through the /mnt directory. For example, to access the Documents folder, you would use /mnt/c/Users/<username>/Documents.

Q: Is WSL compatible with my current Windows applications?

A: WSL does not affect the functionality of your existing Windows applications. It operates as a separate environment within Windows.

Tips for Utilizing the Windows Subsystem for Linux

  • Use a package manager: Utilize the distribution’s package manager to install and manage software within the Linux environment.
  • Explore the command line: Familiarize yourself with basic Linux commands and utilities to navigate the environment effectively.
  • Utilize the file system integration: Access files and folders from both Windows and Linux environments seamlessly.
  • Consider using a graphical desktop environment: While not essential, using a graphical desktop environment like GNOME or KDE can enhance the user experience.
  • Stay updated: Regularly update your Linux distribution and packages to ensure security and performance.

Conclusion

The Windows Subsystem for Linux is a transformative feature that empowers Windows users with the flexibility and power of Linux environments. By seamlessly integrating Linux binaries and functionalities within Windows, WSL provides access to a vast ecosystem of tools, applications, and development environments, enhancing the capabilities and versatility of the Windows operating system. Whether for development, system administration, or simply exploring the world of Linux, WSL offers a powerful and convenient way to leverage the benefits of both platforms.

Install Windows Subsystem For Linux Wsl On Windows 10 Windows Subsystem for Linux: How to Enable Linux Shell in Windows 10 Windows Subsystem for Linux: How to Enable Linux Shell in Windows 10
Windows Subsystem for Linux: How to Enable Linux Shell in Windows 10 Everything You Wanted to Know about Windows Subsystem for Linux How to Enable Windows Subsystem for Linux in Windows 10 - Itechguides
Setting Up Windows Subsystem For Linux Wsl 2 For Windows 10 Docker - Vrogue How to Install, Configure and Use a Linux Subsystem in Windows 10 - The Updated Windows Terminal

Closure

Thus, we hope this article has provided valuable insights into Enabling the Power of Linux Within Windows 10: A Comprehensive Guide to the Windows Subsystem for Linux. We thank you for taking the time to read this article. See you in our next article!

The Evolving Landscape Of Productivity: Understanding Office Software And Activation

The Evolving Landscape of Productivity: Understanding Office Software and Activation

Introduction

With enthusiasm, let’s navigate through the intriguing topic related to The Evolving Landscape of Productivity: Understanding Office Software and Activation. Let’s weave interesting information and offer fresh perspectives to the readers.

The Evolving Landscape of Productivity: Understanding Office Software and Activation

What is Office Productivity Software - Infoclutch

The world of productivity software is constantly evolving, with new features and functionalities emerging regularly. Microsoft Office, a mainstay in the professional and personal computing landscape, is no exception. While Microsoft Office 2025 is not an official product release, the concept of activation for future versions of Microsoft Office on Windows 11 remains a relevant topic.

This article delves into the significance of software activation, explores the nuances of Microsoft Office activation on Windows 11, and examines the potential implications of a hypothetical future release like Microsoft Office 2025. It aims to provide a comprehensive understanding of the activation process while addressing common questions and concerns surrounding software licensing and usage.

Understanding Software Activation and its Importance

Software activation is a crucial process that ensures legitimate use of software products. It involves verifying the authenticity of a software license and linking it to a specific device. This process helps software developers combat piracy and ensure that users are accessing legitimate copies of their products.

For users, software activation offers several benefits:

  • Access to the latest features and updates: Activated software grants users access to the most recent versions, including bug fixes, security patches, and new functionalities.
  • Enhanced security: Legitimate software is typically free from malware and security vulnerabilities, providing a safer computing environment.
  • Compliance with licensing agreements: Activation ensures users comply with the terms and conditions of the software license, avoiding legal issues.
  • Support and troubleshooting: Users with activated software are eligible for technical support and assistance from the software developer.

The Nuances of Microsoft Office Activation on Windows 11

Microsoft Office activation on Windows 11 follows a similar process to previous versions. Users can activate their software through various methods, including:

  • Product keys: Entering a unique product key during installation.
  • Microsoft Account: Linking the software to a Microsoft account.
  • Volume Licensing: Utilizing a volume licensing agreement for organizations.

While the activation process itself remains relatively straightforward, users should be aware of the following:

  • Licensing models: Microsoft Office offers various licensing models, including one-time purchase, subscription-based plans, and volume licenses. Understanding the different models is crucial for choosing the appropriate option.
  • Activation limitations: Some licensing models may impose limitations on the number of devices or users who can access the software.
  • Activation issues: Occasional activation issues can arise due to network connectivity problems, corrupted installation files, or incompatible hardware.

Exploring the Potential Implications of a Hypothetical Microsoft Office 2025

While Microsoft Office 2025 is not an official product release, it is reasonable to anticipate that future versions of Microsoft Office will continue to evolve and adapt to the changing technological landscape.

Potential features and functionalities of a hypothetical Microsoft Office 2025 could include:

  • Enhanced collaboration tools: Increased emphasis on real-time collaboration, seamless integration with cloud services, and advanced communication features.
  • AI-powered features: Integration of artificial intelligence (AI) for tasks like document summarization, translation, and automated data analysis.
  • Cross-platform compatibility: Improved compatibility across different operating systems, devices, and platforms.
  • Advanced security features: Enhanced security measures to protect user data and prevent unauthorized access.

FAQs Regarding Microsoft Office Activation on Windows 11

1. What are the different ways to activate Microsoft Office on Windows 11?

Users can activate Microsoft Office on Windows 11 through various methods, including:

  • Product Keys: Entering a unique product key during installation.
  • Microsoft Account: Linking the software to a Microsoft account.
  • Volume Licensing: Utilizing a volume licensing agreement for organizations.

2. How do I know if my Microsoft Office is activated?

Activated Microsoft Office software will display a notification confirming activation, and users will have access to all features and updates.

3. What happens if my Microsoft Office is not activated?

Unactivated Microsoft Office software may have limited functionality, lack access to updates, and may display reminders to activate.

4. Can I activate Microsoft Office on multiple devices?

The number of devices on which you can activate Microsoft Office depends on the specific licensing model. Some models allow activation on multiple devices, while others limit activation to a single device.

5. How do I troubleshoot activation issues?

If you encounter activation issues, you can try the following:

  • Check your internet connection.
  • Verify the product key.
  • Restart your computer.
  • Contact Microsoft support.

6. What is the difference between a one-time purchase and a subscription-based license?

A one-time purchase grants perpetual access to the software version at the time of purchase, while a subscription-based license requires ongoing payments to access the latest features and updates.

7. What are the benefits of using a volume licensing agreement?

Volume licensing agreements offer organizations discounts on software licenses, centralized management, and dedicated support.

8. Can I use a product key from an older version of Microsoft Office to activate a newer version?

No, product keys from older versions of Microsoft Office are not compatible with newer versions.

9. What is the best way to ensure that my Microsoft Office is activated and legitimate?

Always purchase Microsoft Office from authorized retailers or directly from Microsoft. Avoid using unofficial or pirated software, as it can be harmful and may not provide access to genuine features and support.

Tips for Managing Microsoft Office Activation on Windows 11

  • Keep your product key safe and secure.
  • Regularly check your activation status.
  • Ensure that your internet connection is stable during activation.
  • Back up your data before performing any activation-related actions.
  • If you encounter activation issues, contact Microsoft support for assistance.

Conclusion

Software activation is an integral part of the modern software landscape, ensuring legitimate use and access to the latest features and updates. While Microsoft Office 2025 is not yet an official product, the activation process for future versions of Microsoft Office on Windows 11 will likely follow similar principles.

Understanding the nuances of software activation, exploring different licensing models, and staying informed about potential future developments in Microsoft Office are crucial for users seeking to maximize their productivity and ensure a smooth and secure computing experience.

PPT - Office Productivity Software Standards PowerPoint Presentation, free download - ID:4534576 Office Productivity Software: Uses, Options, And Evolving Solutions For Public Education. - ppt Office Productivity Software: Uses, Options, And Evolving Solutions For Public Education. - ppt
45 Business Productivity Software Tools to Grow Your Business  Smith.ai 7 Must-Have Productivity Suite Software Features - Rambox Office Productivity  Smartspeed Consulting
Maximize Productivity with Software: The Ultimate Guide A Complete Guide About Productivity App Development  Code&Care  Code&Care

Closure

Thus, we hope this article has provided valuable insights into The Evolving Landscape of Productivity: Understanding Office Software and Activation. We thank you for taking the time to read this article. See you in our next article!