The Silent Enigma: Understanding And Resolving Audio Output Device Issues In Windows 10

The Silent Enigma: Understanding and Resolving Audio Output Device Issues in Windows 10

Introduction

With great pleasure, we will explore the intriguing topic related to The Silent Enigma: Understanding and Resolving Audio Output Device Issues in Windows 10. Let’s weave interesting information and offer fresh perspectives to the readers.

The Silent Enigma: Understanding and Resolving Audio Output Device Issues in Windows 10

How To Change The Audio Output Device In Windows 10

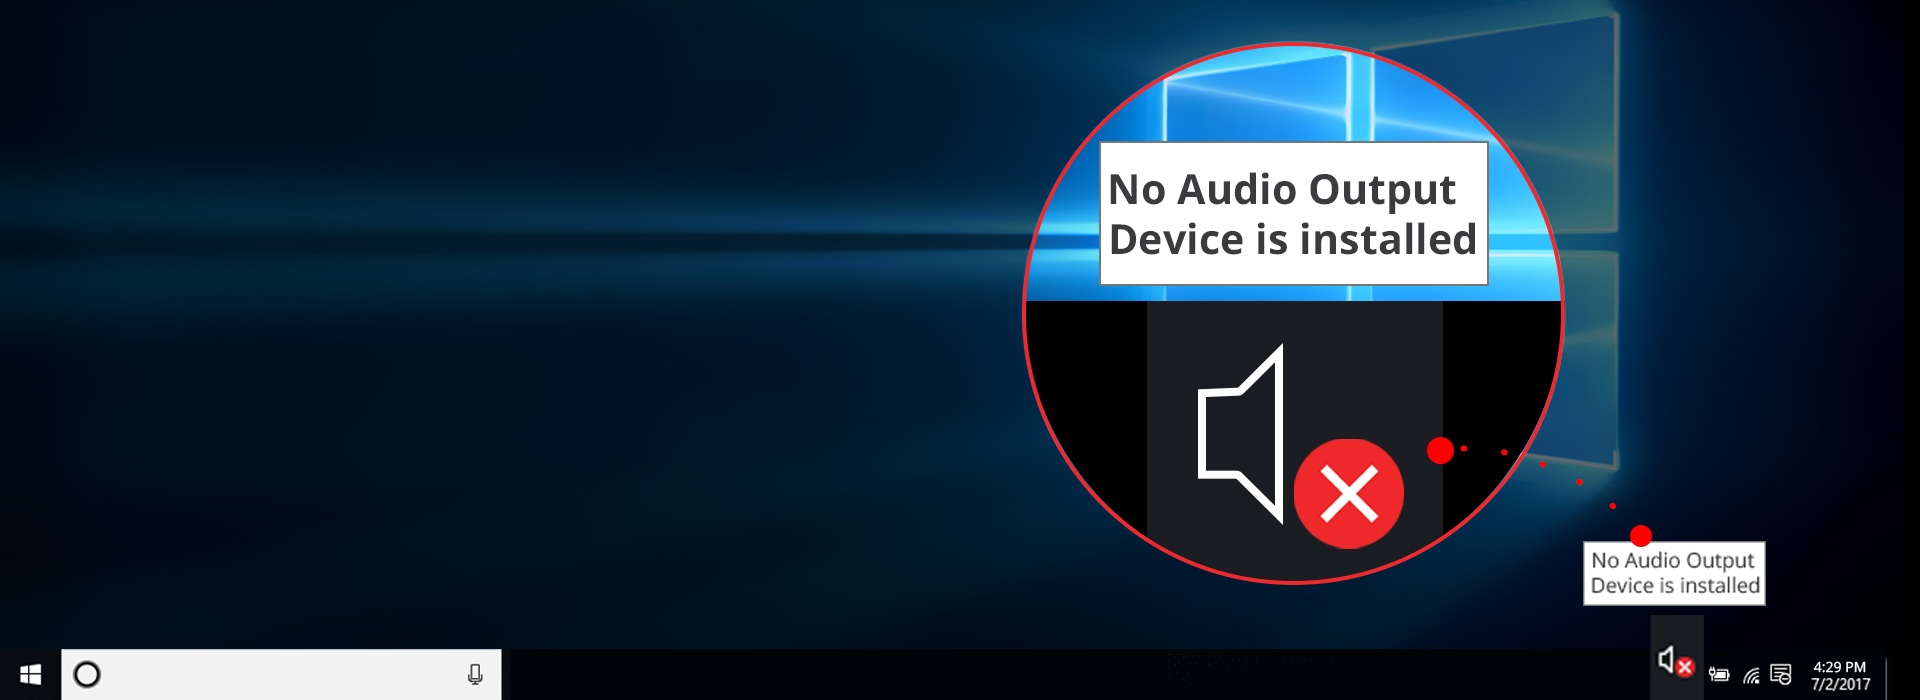
The absence of sound on a Windows 10 computer can be a frustrating experience, particularly when multimedia enjoyment, communication, or work productivity hinges on proper audio functionality. This article delves into the complexities of the "No Audio Output Device Installed" error message, exploring its potential causes and providing a comprehensive guide to troubleshooting and resolving this common issue.

Understanding the "No Audio Output Device Installed" Error

The error message "No Audio Output Device Installed" signifies that Windows 10 cannot locate or identify a functional audio output device, such as speakers, headphones, or external sound systems. This lack of recognition prevents the operating system from routing audio signals to the desired output, rendering the computer effectively mute.

Common Causes of Audio Output Device Issues

The "No Audio Output Device Installed" error can stem from a variety of factors, ranging from simple hardware misconfigurations to more complex software conflicts. Understanding these potential causes is crucial for effective troubleshooting:

1. Hardware Problems:

  • Loose or Damaged Connections: Faulty connections between the audio output device and the computer, or within the device itself, can interrupt the signal flow. This can occur with headphone jacks, USB ports, or internal audio components.
  • Faulty Audio Output Device: The audio output device might be malfunctioning, either due to internal damage or driver incompatibility. This includes speakers, headphones, and external sound cards.
  • Driver Issues: The absence of appropriate or updated drivers for the audio output device can prevent Windows from recognizing and utilizing the hardware.
  • Incorrectly Configured Audio Output: The audio output settings might be incorrectly configured, directing the sound to a non-existent or disabled device.
  • Hardware Conflicts: Other connected hardware devices might be interfering with the audio output device, causing signal conflicts or resource allocation issues.

2. Software Problems:

  • Outdated or Corrupted Drivers: Outdated or corrupted audio drivers can lead to malfunctioning hardware or incompatibility issues.
  • System Errors: Software bugs or system errors within Windows 10 might interfere with audio output functionality.
  • Conflicting Applications: Certain applications might interfere with the audio output device, causing unexpected behavior or muting the system.
  • Malware Infection: Malware can compromise system files, including those responsible for audio output, leading to malfunctions.

Troubleshooting the "No Audio Output Device Installed" Error

Resolving the "No Audio Output Device Installed" error requires a systematic approach, starting with simple checks and progressing to more advanced troubleshooting steps:

1. Basic Checks:

  • Verify Connections: Ensure all connections between the audio output device and the computer are secure and properly plugged in.
  • Check Device Power: Make sure the audio output device is turned on and receives sufficient power.
  • Test Different Devices: Try connecting different audio output devices to the computer to rule out a faulty device.
  • Check Mute Settings: Ensure the volume is not muted on the audio output device, in Windows settings, or within any running applications.
  • Restart the Computer: A simple restart can often resolve temporary software glitches that may be affecting audio output.

2. Software Troubleshooting:

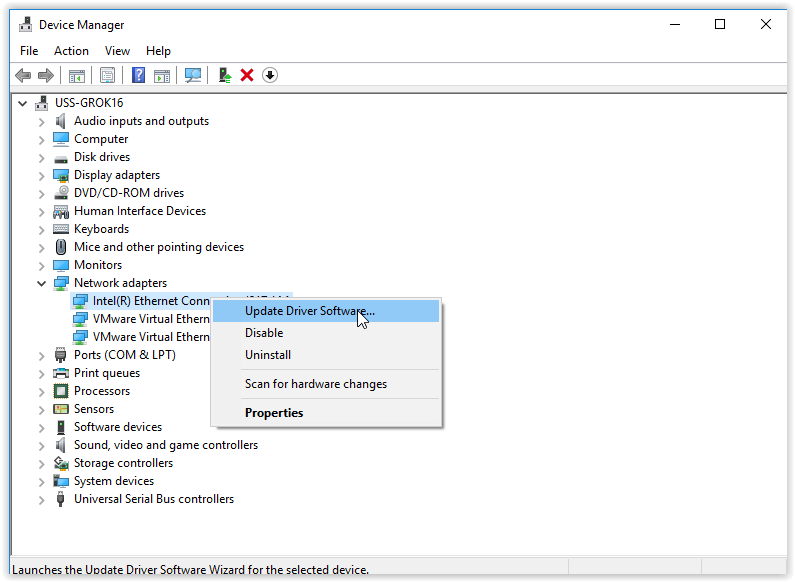
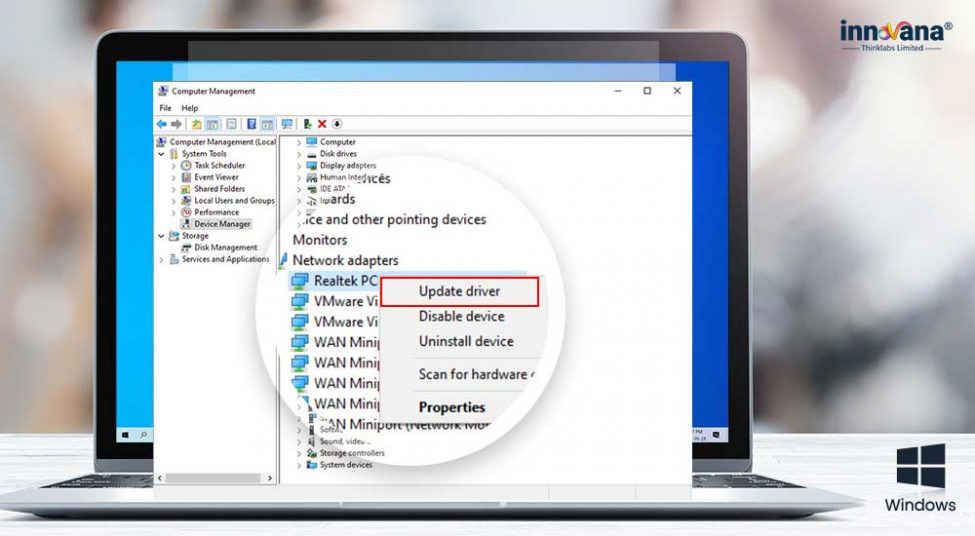
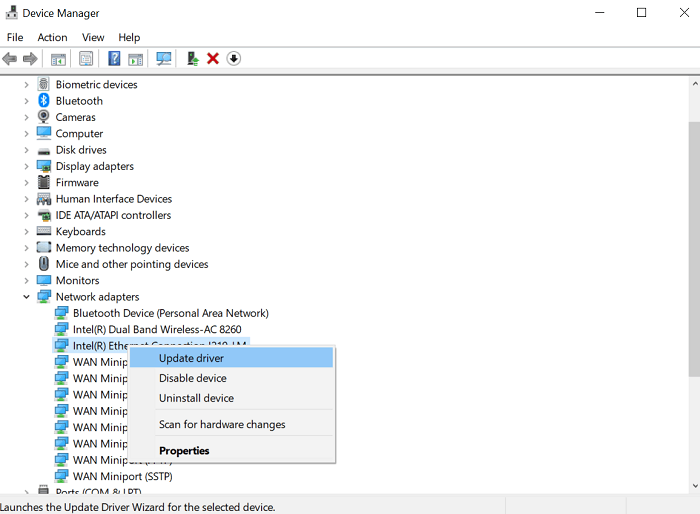
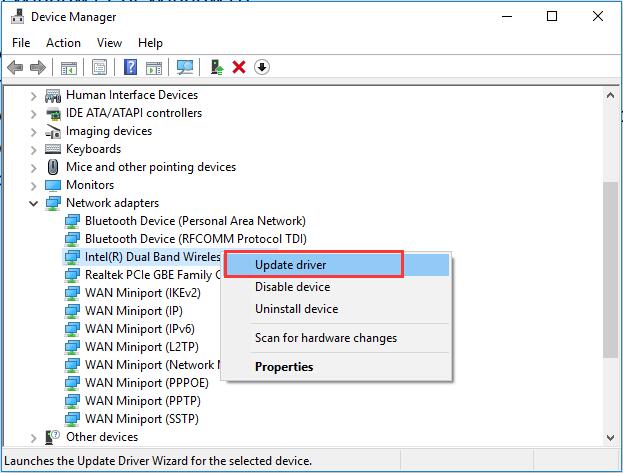
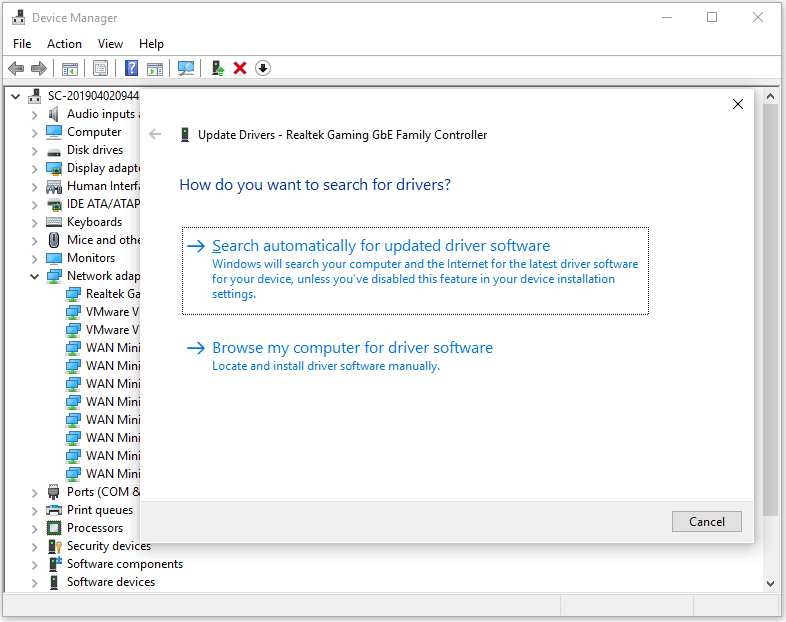
  • Update Audio Drivers: Download and install the latest drivers for your audio output device from the manufacturer’s website.
  • Roll Back Audio Drivers: If updating drivers causes issues, roll back to the previous driver version to see if it resolves the problem.
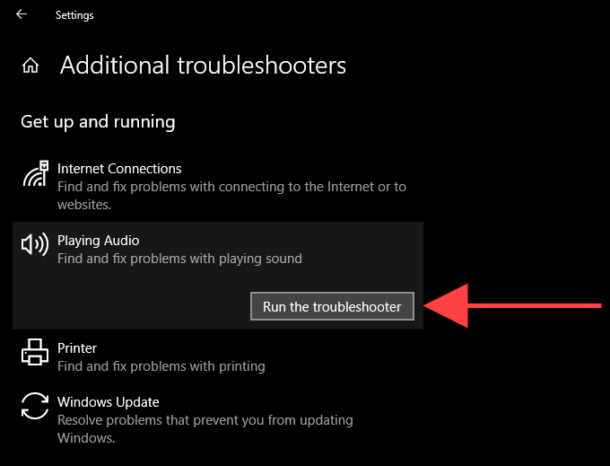
  • Troubleshoot Audio Problems: Utilize the built-in Windows 10 audio troubleshooter by searching "Troubleshoot sound problems" in the Start menu.
  • Disable Conflicting Applications: Temporarily disable any applications that might be interfering with audio output, such as audio editing software or streaming services.
  • Run a System Scan: Use Windows Defender or a reputable antivirus program to scan your computer for malware that might be affecting audio functionality.

3. Advanced Troubleshooting:

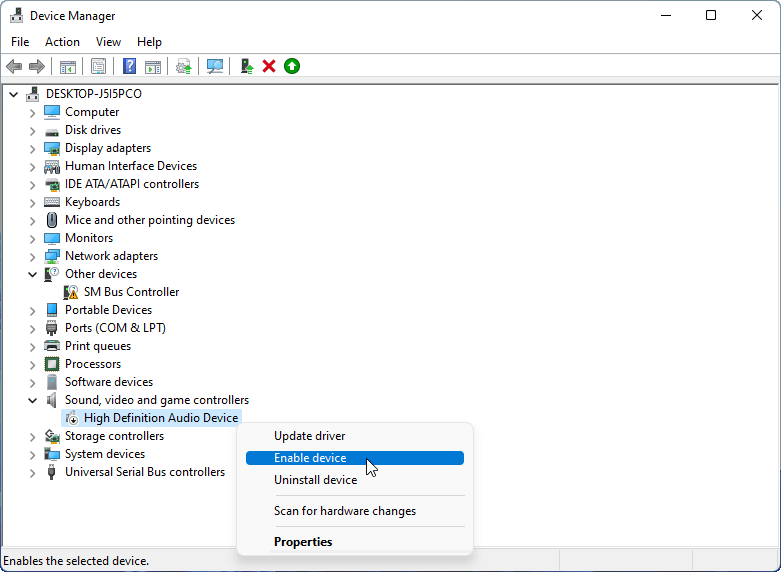
  • Check Audio Services: Ensure the Windows Audio service is running properly by opening the Services window (services.msc) and searching for "Windows Audio."
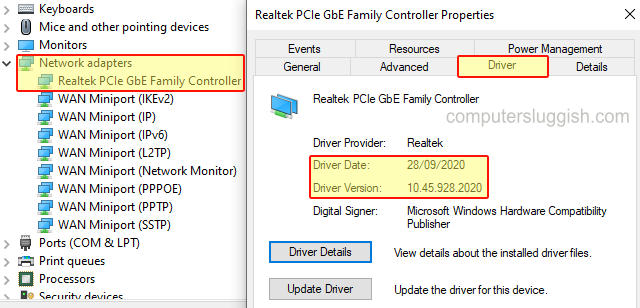
  • Check Device Manager: Look for any error codes or exclamation marks next to the audio output device in Device Manager, which can indicate driver or hardware problems.
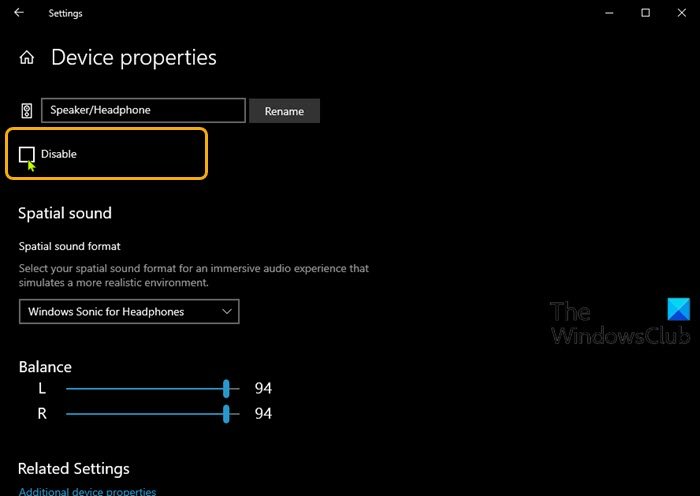
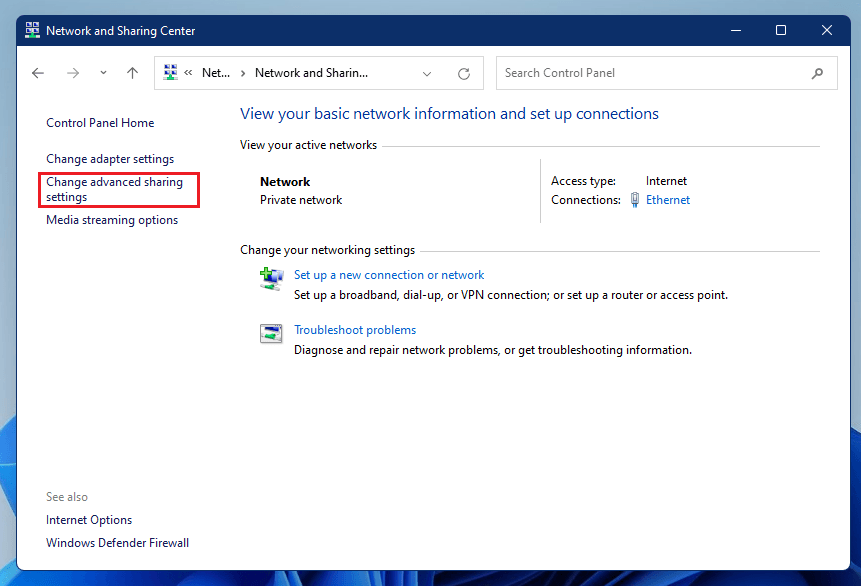
  • Reset Audio Settings: Reset the audio settings to default values by navigating to Settings > System > Sound and selecting "Reset" at the bottom.
  • Reinstall Audio Drivers: Completely uninstall the audio drivers and then reinstall them from the manufacturer’s website.
  • Perform a System Restore: If the issue persists, consider restoring your system to an earlier point in time when audio functionality was working correctly.

FAQs: "No Audio Output Device Installed" Error

1. Why does Windows not recognize my speakers?

Windows may not recognize speakers due to faulty connections, driver issues, incorrect audio output settings, or hardware conflicts.

2. How can I fix the "No Audio Output Device Installed" error without reinstalling Windows?

Troubleshooting steps include updating drivers, running the audio troubleshooter, checking device connections, and resetting audio settings.

3. Can a virus cause audio output problems?

Yes, malware can affect system files, including those responsible for audio output, leading to malfunctions.

4. How do I know if my audio output device is faulty?

Testing the device with different computers or connecting other devices to the same computer can help identify a faulty audio output device.

5. What if the audio troubleshooter doesn’t resolve the issue?

Advanced troubleshooting steps include checking audio services, device manager, and reinstalling audio drivers.

Tips for Preventing Audio Output Device Issues:

  • Regularly Update Drivers: Keep your audio drivers up to date to ensure compatibility and stability.
  • Use Reputable Software: Install applications from trusted sources to minimize the risk of malware infections.
  • Maintain Clean Connections: Regularly check and clean connections to prevent dust buildup and ensure proper signal flow.
  • Monitor System Health: Regularly scan your computer for malware and use system maintenance tools to keep Windows running smoothly.
  • Backup Your System: Create regular system backups to restore your computer to a working state if issues arise.

Conclusion:

The "No Audio Output Device Installed" error can be a frustrating problem, but it is often resolvable with a methodical approach. By understanding the common causes, systematically applying troubleshooting steps, and implementing preventative measures, users can restore audio functionality and enjoy the full multimedia experience of their Windows 10 computer. Remember, persistence and patience are key to overcoming this silent enigma.

FIXED] No Audio Output Device is Installed in Windows 10 How to Fix Windows 10 Audio Sound Problems [3 Solutions] - YouTube How to Fix "No Audio Output Device is Installed" Error in Windows 10/11 - Driver Easy
How to set Audio device as default in Windows 10 5+ Methods: Fix No Output or Input Devices Found Windows 10/11 - MiniTool How to Fix No Audio Output Device Is Installed In Windows 10 PC
No Audio Output Device Is Installed On Windows 10 PC (Best 10 Fixes) How to Fix “No Audio Output Device Is Installed” in Windows 10

Closure

Thus, we hope this article has provided valuable insights into The Silent Enigma: Understanding and Resolving Audio Output Device Issues in Windows 10. We appreciate your attention to our article. See you in our next article!

Unveiling The Mysteries Of Windows 11: A Comprehensive Guide

Unveiling the Mysteries of Windows 11: A Comprehensive Guide

Introduction

With enthusiasm, let’s navigate through the intriguing topic related to Unveiling the Mysteries of Windows 11: A Comprehensive Guide. Let’s weave interesting information and offer fresh perspectives to the readers.

Unveiling the Mysteries of Windows 11: A Comprehensive Guide

Windows 11 Mysteries Continue - YouTube

Windows 11, the latest iteration of Microsoft’s flagship operating system, has been met with both excitement and apprehension. While its sleek new design and enhanced features are enticing, many users grapple with questions about its compatibility, performance, and overall value. This article aims to provide a comprehensive exploration of these inquiries, demystifying Windows 11 and empowering users to make informed decisions.

FAQs: Addressing Common Concerns

1. Is My Computer Compatible with Windows 11?

Compatibility is a key concern for many users. To run Windows 11, your system must meet specific hardware requirements, including:

  • Processor: 1 gigahertz (GHz) or faster with 2 or more cores.
  • RAM: 4 gigabytes (GB) of RAM.
  • Storage: 64 GB or larger storage device.
  • System firmware: UEFI, Secure Boot capable.
  • TPM: Trusted Platform Module (TPM) version 2.0.
  • Graphics Card: Compatible with DirectX 12 or later.

Microsoft provides a dedicated PC Health Check app to assess your device’s compatibility. It’s crucial to understand that meeting these minimum requirements doesn’t guarantee a smooth experience. Older hardware may struggle with the demands of Windows 11, leading to performance issues.

2. How Do I Upgrade to Windows 11?

If your device meets the compatibility requirements, upgrading to Windows 11 is a straightforward process. You can upgrade directly from Windows 10 through the Windows Update settings. However, ensure you back up your data before proceeding, as the upgrade process can be unpredictable.

3. What are the Key Features of Windows 11?

Windows 11 boasts several new features, including:

  • Redesigned User Interface: A modern, clean aesthetic with rounded corners and a centralized taskbar.
  • Snap Layouts: Enhanced multitasking capabilities with customizable window arrangements.
  • Android App Integration: Run Android apps directly within Windows 11 using the Amazon Appstore.
  • Widgets: Customizable panels offering quick access to news, weather, and other information.
  • Focus Modes: Enhance productivity by minimizing distractions and prioritizing specific tasks.
  • Improved Gaming: Enhanced gaming performance with DirectX 12 Ultimate and Auto HDR support.
  • Enhanced Security: Improved protection against malware and other threats.

4. Is Windows 11 Secure?

Microsoft has implemented robust security measures in Windows 11, including the TPM 2.0 chip and enhanced threat detection capabilities. However, security is a constant battle, and users should remain vigilant by updating their software regularly, using strong passwords, and avoiding suspicious links and downloads.

5. What are the Performance Considerations?

While Windows 11 boasts performance improvements, older hardware may experience slower speeds and reduced battery life. This is due to the increased resource demands of the new operating system. It’s essential to consider your hardware’s capabilities before upgrading.

6. How Does Windows 11 Differ from Windows 10?

Windows 11 introduces significant changes compared to Windows 10, including:

  • Visual Design: A complete overhaul of the user interface with a more modern look and feel.
  • Taskbar: A centralized taskbar with redesigned icons and improved functionality.
  • Start Menu: A simplified Start menu with a focus on pinned applications and recommendations.
  • Android App Integration: The ability to run Android apps directly within Windows.
  • Focus Modes: Enhanced productivity features with distraction-free environments.

7. What are the Common Issues Experienced with Windows 11?

Like any new software release, Windows 11 has encountered some initial issues, including:

  • Compatibility Problems: Older hardware may struggle to meet the system requirements.
  • Driver Issues: Some drivers may not be compatible with Windows 11, leading to functionality problems.
  • Performance Issues: Reduced performance and battery life on older devices.
  • Software Incompatibility: Some older software applications may not be compatible with Windows 11.
  • Bugs and Glitches: As with any new software, there may be unexpected bugs and glitches.

Tips for Optimizing Windows 11

1. Ensure Hardware Compatibility: Before upgrading, use the PC Health Check app to verify compatibility.

2. Back Up Your Data: Always back up your data before installing a new operating system.

3. Update Drivers: Ensure your drivers are compatible with Windows 11.

4. Optimize Performance: Adjust settings like visual effects and background processes to improve performance.

5. Use Focus Modes: Utilize Focus Modes to minimize distractions and enhance productivity.

6. Explore Android App Integration: Take advantage of the ability to run Android apps within Windows.

7. Stay Updated: Regularly update your operating system and software to address vulnerabilities and improve security.

Conclusion: A New Era of Windows

Windows 11 represents a significant evolution of Microsoft’s operating system, offering a modern and streamlined user experience with enhanced features and improved security. However, it’s essential to carefully consider hardware compatibility and potential performance issues.

By understanding the key features, addressing common concerns, and implementing optimization tips, users can unlock the full potential of Windows 11 and enjoy a seamless and productive computing experience. While the transition to Windows 11 may present challenges, its potential for innovation and user-centric design makes it a compelling choice for the future of computing.

Windows 11 Comprehensive Guide And Cheat Sheet, 54% OFF Windows 11 Comprehensive Guide And Cheat Sheet, 54% OFF Windows 11 Comprehensive Guide And Cheat Sheet, 54% OFF
Windows 11 Comprehensive Guide And Cheat Sheet, 54% OFF Learn Microsoft Windows 11: Comprehensive Windows 11 Course / AvaxHome

Closure

Thus, we hope this article has provided valuable insights into Unveiling the Mysteries of Windows 11: A Comprehensive Guide. We hope you find this article informative and beneficial. See you in our next article!

Navigating The Digital Landscape: A Comprehensive Guide To PC World Desktop Computer Reviews

Navigating the Digital Landscape: A Comprehensive Guide to PC World Desktop Computer Reviews

Introduction

In this auspicious occasion, we are delighted to delve into the intriguing topic related to Navigating the Digital Landscape: A Comprehensive Guide to PC World Desktop Computer Reviews. Let’s weave interesting information and offer fresh perspectives to the readers.

Navigating The Digital Landscape: A Comprehensive Guide To The Best Map And Directions Websites

The world of desktop computers is vast and ever-evolving, offering a dizzying array of options to suit diverse needs and budgets. Amidst this digital jungle, PC World desktop computer reviews emerge as a crucial compass, guiding consumers through the complexities of hardware, software, and performance. These reviews are not mere product summaries; they are meticulously crafted assessments that provide invaluable insights for making informed purchase decisions.

The Importance of PC World Desktop Computer Reviews

PC World, a respected name in the technology journalism landscape, has established itself as a trusted source for unbiased and comprehensive reviews. These reviews serve several crucial functions:

  • Objectivity and Expertise: PC World’s team of experienced reviewers meticulously test and analyze each desktop computer, evaluating its performance, features, and overall value. This rigorous process ensures that reviews are objective and based on real-world usage, providing readers with reliable information.

  • Comparative Analysis: PC World reviews often compare multiple desktop computers within the same price range or category. This comparative approach allows consumers to see how different models stack up against each other, facilitating informed choices based on individual needs and preferences.

  • Technical Depth: PC World reviews go beyond superficial descriptions, delving into the technical specifications and performance metrics of each desktop computer. This detailed analysis helps readers understand the underlying capabilities of the machine and its suitability for specific tasks, whether it’s gaming, content creation, or everyday productivity.

  • User-Friendly Format: PC World’s reviews are designed to be easily digestible, with clear headings, concise summaries, and informative graphics. This user-friendly format makes it easy for readers to quickly grasp the key takeaways of each review and make informed decisions.

Key Elements of PC World Desktop Computer Reviews

PC World reviews typically cover the following key aspects of a desktop computer:

  • Design and Build Quality: Reviews assess the aesthetics, ergonomics, and overall build quality of the desktop computer. This includes evaluating the chassis design, material quality, and overall durability.

  • Processor (CPU): Reviews delve into the processor’s performance, clock speed, core count, and cache size. This information helps readers understand the computing power of the machine and its ability to handle demanding tasks.

  • Memory (RAM): Reviews examine the amount of RAM installed, its type (DDR4 or DDR5), and its speed. This information is crucial for multitasking and running resource-intensive applications smoothly.

  • Storage: Reviews analyze the type and capacity of the storage drive, whether it’s a traditional hard disk drive (HDD) or a faster solid-state drive (SSD). This information helps readers understand the speed and capacity of the storage system.

  • Graphics Card (GPU): Reviews evaluate the graphics card’s performance, memory, and compatibility with various games and applications. This is particularly important for gamers and content creators who require powerful graphics processing.

  • Connectivity and Ports: Reviews assess the availability of ports, including USB, HDMI, DisplayPort, and Ethernet. This information helps readers determine the connectivity options available and their suitability for specific peripherals.

  • Operating System: Reviews indicate the operating system installed, whether it’s Windows, macOS, or Linux. This information helps readers understand the software environment and its compatibility with their preferred applications.

  • Software and Features: Reviews may also mention pre-installed software, bundled features, and software compatibility. This information helps readers understand the overall software experience and its value.

  • Price and Value: Reviews assess the price of the desktop computer and its overall value for money. This evaluation helps readers determine whether the price is justified by the features and performance offered.

Understanding the Review Score and Verdict

PC World typically assigns a numerical rating or score to each desktop computer review, reflecting its overall performance and value. This score is based on a combination of factors, including:

  • Performance Benchmarks: PC World uses standardized benchmarks to measure the performance of the desktop computer in various tasks, such as gaming, video editing, and general productivity.
  • Feature Set: The review score considers the features offered by the desktop computer, such as connectivity options, software bundles, and warranty coverage.
  • Value for Money: The review score takes into account the price of the desktop computer and its overall value compared to competitors.
  • User Experience: The review score also considers the user experience, including the ease of use, design, and overall satisfaction.

The verdict section of a PC World review provides a concise summary of the reviewer’s overall impression of the desktop computer. This verdict helps readers quickly understand whether the desktop computer is recommended or not, and it highlights the strengths and weaknesses of the machine.

FAQs by PC World Desktop Computer Reviews

Q: What are the best desktop computers for gaming?

A: PC World reviews often highlight desktop computers specifically designed for gaming, emphasizing their powerful processors, high-end graphics cards, and robust cooling systems. They may also consider the compatibility with popular gaming titles and the overall gaming experience.

Q: What are the best desktop computers for video editing and content creation?

A: PC World reviews identify desktop computers tailored for video editing and content creation, emphasizing their powerful processors, abundant RAM, and high-capacity storage drives. They may also consider the compatibility with professional software applications and the overall performance in demanding workflows.

Q: What are the best desktop computers for everyday productivity?

A: PC World reviews recommend desktop computers suitable for everyday tasks, emphasizing their balanced performance, reliable components, and user-friendly features. They may also consider the price point and overall value for money.

Q: What are the best desktop computers for budget-conscious users?

A: PC World reviews feature desktop computers that offer a good balance of performance and affordability, highlighting their value for money and suitability for basic tasks. They may also consider the availability of essential features and the overall user experience.

Tips by PC World Desktop Computer Reviews

  • Consider Your Needs: Before purchasing a desktop computer, carefully consider your intended use. Are you a gamer, a content creator, or simply looking for a machine for everyday tasks? This will help you narrow down your choices and select a machine that meets your specific requirements.

  • Set a Budget: Determine a realistic budget for your desktop computer. PC World reviews can help you identify models within your price range that offer the best value for money.

  • Research Components: Familiarize yourself with the key components of a desktop computer, such as the processor, RAM, storage, and graphics card. PC World reviews provide detailed information on these components and their impact on performance.

  • Read Multiple Reviews: Don’t rely on just one review. Read multiple reviews from different sources to get a comprehensive picture of the desktop computer’s strengths and weaknesses.

  • Check for Warranty and Support: Consider the warranty offered by the manufacturer and the availability of support services. A good warranty can provide peace of mind and ensure that you have access to assistance in case of any issues.

Conclusion by PC World Desktop Computer Reviews

PC World desktop computer reviews serve as an invaluable resource for navigating the complex world of desktop computers. These reviews provide objective and insightful assessments, helping consumers make informed purchase decisions based on their individual needs and preferences. By understanding the key elements of a review, the importance of the review score and verdict, and by following the tips provided, readers can leverage PC World reviews to find the perfect desktop computer to meet their specific requirements.

Navigating the Digital Landscape E-Book PPT - Navigating the Digital Landscape: A Comprehensive Guide to GDPR Compliance PowerPoint Navigating The Digital Landscape: A Comprehensive Exploration Of Internet Mapping - Map of West
Navigating The Digital Landscape: A Comprehensive Guide To The Best Map And Directions Apps Navigating the Digital Experience Landscape PPT - Navigating the Digital Landscape PowerPoint Presentation, free download - ID:12497562
Navigating Digital Landscape: Chatbots & AI/ML Essentials 2023 - Ciente Navigating The Digital Landscape: A Guide To Effective Social Media Use

Closure

Thus, we hope this article has provided valuable insights into Navigating the Digital Landscape: A Comprehensive Guide to PC World Desktop Computer Reviews. We thank you for taking the time to read this article. See you in our next article!

Navigating The Network And File Sharing Landscape In Windows 11

Navigating the Network and File Sharing Landscape in Windows 11

Introduction

In this auspicious occasion, we are delighted to delve into the intriguing topic related to Navigating the Network and File Sharing Landscape in Windows 11. Let’s weave interesting information and offer fresh perspectives to the readers.

Windows 11: Turn On Network Discovery and File Sharing

Windows 11, with its modern interface and enhanced security features, presents a streamlined approach to managing network connections and sharing files. This article delves into the intricacies of network and file sharing within this operating system, exploring its functionality, security aspects, and practical applications.

Understanding the Network and File Sharing Center

The Network and File Sharing Center in Windows 11 serves as a central hub for managing network connections and configuring file sharing settings. This control panel provides a user-friendly interface to:

  • View Active Network Connections: The Network and File Sharing Center displays a list of currently active network connections, including wired Ethernet, wireless Wi-Fi, and virtual private networks (VPNs). This provides a visual representation of the computer’s network status.
  • Access Network and Sharing Settings: This area allows users to customize network discovery, file and printer sharing, and other related settings. This includes enabling or disabling sharing for specific network profiles, such as home, work, or public networks.
  • Manage Network Connections: The center enables users to create, modify, and delete network connections. This includes configuring network profiles, setting password protection, and managing connection properties.
  • Troubleshoot Network Problems: The Network and File Sharing Center incorporates tools for diagnosing and resolving network connectivity issues. This includes network diagnostics, troubleshooting guides, and access to advanced network configuration options.

Network Discovery and File Sharing: A Detailed Look

Network discovery, a key aspect of the Network and File Sharing Center, allows devices on a local network to detect and communicate with each other. When enabled, devices can share files, printers, and other resources.

File Sharing: The Fundamentals

File sharing in Windows 11 involves granting access to specific files or folders to other users on the network. This can be done through various methods, including:

  • Shared Folders: Users can create shared folders, making specific files or directories accessible to others on the network. This requires defining permissions, specifying who can access the shared content, and what level of access they have (read-only, read-write, etc.).
  • Public Folders: Windows 11 includes a dedicated public folder where users can place files intended for general access. This provides a convenient way to share files with anyone on the network, offering a simplified approach for sharing common documents or media.
  • Network Drives: Users can map network drives, essentially creating virtual connections to shared folders on other computers. This allows users to access shared content as if it were locally stored on their device, providing a seamless and convenient experience.

Security Considerations: Protecting Your Network and Data

While network and file sharing offers numerous benefits, it’s crucial to address security considerations to safeguard sensitive information.

  • Password Protection: Strong passwords are essential for protecting shared resources. Ensure that access to shared folders is restricted to authorized users through robust password policies.
  • File Sharing Permissions: Carefully define file sharing permissions to control who can access specific files and folders. This granular control helps prevent unauthorized access and data breaches.
  • Firewall Configuration: Windows 11 includes a built-in firewall that helps block unauthorized access to the network and computer. Configure the firewall to restrict incoming connections and outgoing traffic based on specific rules, ensuring that only necessary connections are allowed.
  • Antivirus Software: Deploy reliable antivirus software to protect against malware and other threats that could exploit vulnerabilities in the network or file sharing protocols. Regularly update the antivirus software to ensure it can detect and neutralize the latest threats.
  • Network Security Settings: Windows 11 offers various network security settings, including encryption options and access control lists (ACLs). Leverage these settings to further enhance network security and protect sensitive information from unauthorized access.

Practical Applications of Network and File Sharing

Network and file sharing in Windows 11 offers numerous practical applications, facilitating collaboration, resource sharing, and streamlined workflows:

  • Collaborative Work Environments: Teams can share documents, spreadsheets, and presentations, enabling simultaneous editing and collaboration on projects. This facilitates efficient teamwork and streamlines project management.
  • Home Network Sharing: Family members can share photos, videos, music, and other files, creating a centralized storage and access point for shared content.
  • Printer Sharing: Users can share printers connected to one computer with other devices on the network, eliminating the need for individual printers on each machine.
  • Remote Access and Control: Network and file sharing capabilities can be used to access and control computers remotely, enabling troubleshooting, file management, and other tasks from different locations.

FAQs Regarding Network and File Sharing in Windows 11

Q1: How do I enable network discovery and file sharing in Windows 11?

A1: To enable network discovery and file sharing, follow these steps:

  1. Open the Network and File Sharing Center.
  2. Click on Change advanced sharing settings.
  3. Under Private, select Turn on network discovery and Turn on file and printer sharing.
  4. Under All Networks, ensure Turn on network discovery and Turn on file and printer sharing are enabled.

Q2: How do I create a shared folder in Windows 11?

A2: To create a shared folder:

  1. Right-click on the folder you want to share.
  2. Select Properties.
  3. Navigate to the Sharing tab.
  4. Click Advanced Sharing.
  5. Check the box Share this folder.
  6. Click Permissions and configure user permissions.

Q3: How do I map a network drive in Windows 11?

A3: To map a network drive:

  1. Open File Explorer.
  2. Click This PC.
  3. Click Map network drive.
  4. Enter the path to the shared folder.
  5. Select a drive letter.
  6. Check Reconnect at sign-in if desired.
  7. Click Finish.

Q4: How do I troubleshoot network connectivity issues in Windows 11?

A4: To troubleshoot network connectivity issues:

  1. Open the Network and File Sharing Center.
  2. Click Troubleshoot problems.
  3. Follow the on-screen instructions.

Q5: How secure is file sharing in Windows 11?

A5: File sharing in Windows 11 is relatively secure when implemented with proper security measures. Employing strong passwords, configuring permissions carefully, and utilizing firewall and antivirus software significantly enhances security. However, it’s essential to remain vigilant and update security settings regularly to mitigate potential risks.

Tips for Effective Network and File Sharing in Windows 11

  • Regularly Update Windows and Security Software: Keep Windows 11 and antivirus software up to date with the latest security patches and updates to address potential vulnerabilities.
  • Use Strong Passwords: Employ strong passwords for network accounts and shared resources, incorporating a mix of uppercase and lowercase letters, numbers, and symbols.
  • Configure Permissions Carefully: Define file sharing permissions granularly, granting access only to authorized users and limiting permissions to the necessary level.
  • Enable Network Encryption: Consider enabling network encryption protocols, such as WPA2/3 for Wi-Fi networks, to protect data transmitted over the network.
  • Regularly Monitor Network Activity: Monitor network activity for unusual patterns or suspicious connections to identify potential security breaches.

Conclusion

Windows 11’s Network and File Sharing Center provides a comprehensive platform for managing network connections, configuring file sharing settings, and ensuring secure data exchange. By understanding the functionalities, security aspects, and practical applications of this feature, users can leverage the benefits of network sharing while mitigating potential risks. Maintaining a proactive approach to security, including regular updates, strong passwords, and careful permission management, is crucial for safeguarding sensitive data and ensuring a secure and efficient network environment.

Full Guide: Windows 11 File Sharing on Network How to share files on Windows 11 - Pureinfotech Full Guide: Windows 11 File Sharing on Network
Full Guide: Windows 11 File Sharing on Network Windows 11: Turn On Network Discovery and File Sharing Windows 11: Turn On Network Discovery and File Sharing
How to share Files and Folders over a Network in Windows 11/10 Full Guide: Windows 11 File Sharing on Network

Closure

Thus, we hope this article has provided valuable insights into Navigating the Network and File Sharing Landscape in Windows 11. We hope you find this article informative and beneficial. See you in our next article!

Unlocking Connectivity: An Exploration Of Network Drivers In Windows 10

Unlocking Connectivity: An Exploration of Network Drivers in Windows 10

Introduction

With great pleasure, we will explore the intriguing topic related to Unlocking Connectivity: An Exploration of Network Drivers in Windows 10. Let’s weave interesting information and offer fresh perspectives to the readers.

Unlocking Connectivity: An Exploration of Network Drivers in Windows 10

Windows 10: Update Network Adapter Drivers - GROK Knowledge Base

In the digital age, seamless connectivity is paramount. We rely on our computers to connect to the internet, share files, and communicate with others, all facilitated by a complex network of hardware and software working in harmony. At the heart of this intricate system lie network drivers, crucial pieces of software that enable communication between your computer and the network. This article delves into the world of network drivers in Windows 10, exploring their significance, functionality, and essential aspects for a smooth and reliable online experience.

The Role of Network Drivers in Windows 10

Network drivers serve as the bridge between your computer’s operating system and its network hardware, such as Wi-Fi adapters, Ethernet cards, and modems. They act as translators, interpreting the language of the hardware and relaying it to the Windows 10 operating system. Without these drivers, your computer would be unable to recognize and utilize your network hardware, leaving you disconnected from the digital world.

Imagine a network driver as a guide leading your computer through the intricate pathways of the network. It provides the necessary instructions for your operating system to understand and interact with your network hardware, allowing you to connect to the internet, share files with other devices, and access online services.

Understanding the Importance of Network Drivers

The significance of network drivers in Windows 10 cannot be overstated. They are the foundation upon which your online experience is built, ensuring reliable communication between your computer and the network. Here’s a breakdown of their crucial roles:

  • Enabling Network Hardware Functionality: Network drivers are responsible for activating and configuring your network hardware, allowing it to perform its intended functions. This includes tasks like connecting to Wi-Fi networks, transmitting and receiving data over Ethernet cables, and establishing communication with modems.
  • Optimizing Network Performance: Drivers play a vital role in optimizing network performance. They fine-tune settings, manage bandwidth allocation, and ensure smooth data transfer, contributing to faster internet speeds, reduced latency, and improved overall network responsiveness.
  • Ensuring Compatibility and Stability: Network drivers are specifically designed to work with particular hardware models. They ensure compatibility between your hardware and the Windows 10 operating system, preventing conflicts and ensuring stable network operation.
  • Supporting Security Features: Modern network drivers often include built-in security features, such as encryption protocols and firewall capabilities, enhancing your online security and protecting your data from unauthorized access.

Types of Network Drivers in Windows 10

Network drivers are categorized based on the type of network hardware they support:

  • Wi-Fi Drivers: These drivers enable your computer to connect to wireless networks, facilitating internet access and data transfer over Wi-Fi.
  • Ethernet Drivers: These drivers allow your computer to connect to the internet or a local network via an Ethernet cable, offering a more stable and often faster connection compared to Wi-Fi.
  • Modem Drivers: These drivers enable your computer to connect to the internet through a modem, typically used for dial-up or DSL connections.
  • Bluetooth Drivers: These drivers facilitate communication between your computer and Bluetooth devices, enabling wireless file transfer, headset connectivity, and more.

How Network Drivers Work in Windows 10

When you install a new network device, Windows 10 automatically searches for and installs the necessary drivers, typically downloading them from Microsoft’s servers. This process ensures compatibility and simplifies the setup process for most users. However, in some cases, you may need to manually install drivers, particularly if you are using specialized hardware or if the automatic installation fails.

Once installed, network drivers reside in the background, quietly managing the communication between your hardware and the operating system. They constantly monitor network activity, adjusting settings and allocating resources as needed to ensure smooth and efficient network operation.

Common Issues and Troubleshooting Network Drivers

While network drivers are essential for seamless connectivity, they can also be a source of issues, leading to connectivity problems, slow internet speeds, or even complete network failure. Common issues include:

  • Outdated or Corrupted Drivers: Over time, network drivers can become outdated or corrupted, leading to compatibility problems or performance issues.
  • Driver Conflicts: If multiple network drivers are installed on your computer, they might conflict with each other, causing network instability.
  • Incorrect Driver Installation: Installing the wrong driver for your hardware can lead to various network problems.

To troubleshoot network driver issues, you can try the following:

  • Updating Drivers: Regularly update your network drivers to ensure compatibility and fix potential bugs.
  • Reinstalling Drivers: If updating drivers doesn’t resolve the issue, try reinstalling them.
  • Rolling Back Drivers: If a recent driver update caused problems, you can roll back to a previous version.
  • Checking Device Manager: The Device Manager in Windows 10 provides information about your installed hardware and drivers, allowing you to identify and troubleshoot issues.
  • Running Network Troubleshooter: Windows 10 includes a built-in Network Troubleshooter that can automatically diagnose and fix common network problems.

FAQs about Network Drivers in Windows 10

Q: How do I know if I need to update my network drivers?

A: You can check for driver updates through the Device Manager in Windows 10 or by visiting the manufacturer’s website for your specific network hardware. If updates are available, it’s recommended to install them.

Q: How do I manually install network drivers in Windows 10?

A: You can download the latest drivers from the manufacturer’s website and install them by double-clicking the downloaded file.

Q: Can I disable network drivers in Windows 10?

A: While you can disable network drivers in the Device Manager, this is not recommended as it will prevent your computer from accessing the network.

Q: How can I troubleshoot slow internet speeds caused by network drivers?

A: Updating your drivers, checking for driver conflicts, and running the Network Troubleshooter can help resolve slow internet speed issues related to drivers.

Q: What are the best practices for managing network drivers in Windows 10?

A: Regularly update your drivers, avoid installing drivers from unreliable sources, and keep a backup of your current drivers in case you need to roll back to a previous version.

Tips for Managing Network Drivers in Windows 10

  • Keep Drivers Updated: Regularly check for and install driver updates to ensure compatibility and optimal performance.
  • Use Trusted Sources: Download drivers only from reputable sources like the manufacturer’s website or Microsoft’s official website.
  • Back Up Drivers: Create a backup of your current drivers before installing new ones, allowing you to easily roll back if necessary.
  • Monitor Network Performance: Pay attention to your network performance and look for any signs of slowdowns or connectivity issues, which might indicate driver problems.
  • Consult Manufacturer’s Documentation: Refer to the manufacturer’s documentation for your network hardware for specific instructions on driver installation and troubleshooting.

Conclusion

Network drivers are the unsung heroes of our digital lives, silently facilitating our connection to the internet and the vast digital world. Understanding their role and importance allows us to optimize network performance, troubleshoot connectivity issues, and enjoy a seamless online experience. By staying informed about network drivers, updating them regularly, and following best practices for management, we can ensure that our computers remain connected and perform at their best.

Windows 10: Update Network Adapter Drivers - GROK Knowledge Base How to Download, Install, and Update Network Drivers on Windows 10, 8, 7 Fix: Ethernet Doesn’t Have A Valid IP Configuration In Windows 10
Network driver windows 10 - chartsmolqy Windows 10 Network Adapter Missing – How to Install Ethernet Driver on PC - EU-Vietnam Business 3 Ways to Download and Update WIFI Drivers for Windows 10 - Windows 10 Skills
HOW TO INSTALL/REINSTALL/UPDATE YOUR NETWORK DRIVER  WINDOWS 10  - YouTube Top 7 How To Reinstall Realtek Ethernet Driver Windows 10

Closure

Thus, we hope this article has provided valuable insights into Unlocking Connectivity: An Exploration of Network Drivers in Windows 10. We appreciate your attention to our article. See you in our next article!

Understanding Overscan: The Hidden Boundaries Of Your TV Display

Understanding Overscan: The Hidden Boundaries of Your TV Display

Introduction

With enthusiasm, let’s navigate through the intriguing topic related to Understanding Overscan: The Hidden Boundaries of Your TV Display. Let’s weave interesting information and offer fresh perspectives to the readers.

Understanding Overscan: The Hidden Boundaries of Your TV Display

How can I adjust overscan on my TV? : crtgaming

In the realm of digital displays, the seamless flow of images often masks a subtle yet crucial aspect – the phenomenon known as overscan. Overscan, a feature inherent to traditional analog television systems, involves extending the displayed image beyond its intended boundaries, effectively cropping the edges of the original content. While this might seem inconsequential at first glance, overscan can have a significant impact on the viewing experience, particularly when connecting a personal computer (PC) to a television.

The Origins of Overscan: A Legacy of Analog Television

The concept of overscan originated in the analog television era, serving a practical purpose. Analog signals, inherently susceptible to noise and interference, required a buffer zone around the image to ensure accurate reception. This buffer zone, known as the "overscan area," effectively masked any potential distortions or artifacts that might occur at the edges of the broadcast signal. Overscan also addressed the limitations of analog television receivers, which lacked the precision to display the entire signal accurately.

Overscan and Digital Displays: A Clash of Standards

The advent of digital television and high-definition displays brought about a significant shift in signal processing. Digital signals, being inherently less susceptible to noise, eliminated the need for the overscan buffer. However, the legacy of overscan persisted, and many television manufacturers continued to implement it, even in their digital models. This created a dissonance between the digital signals generated by PCs and the overscan behavior of televisions, leading to a range of issues for users.

The Consequences of Overscan on PC Displays:

When a PC is connected to a television with overscan enabled, the displayed image is cropped, resulting in several undesirable consequences:

  • Loss of Information: The overscan area effectively hides a portion of the image, potentially obscuring important elements like menus, toolbars, or even vital information within the content itself.
  • Aesthetic Distortion: The cropped image can lead to an uneven aspect ratio, distorting the intended proportions of the displayed content.
  • Reduced Viewing Area: The overscan area limits the usable display space, effectively reducing the overall viewing area.
  • Interface Issues: Overscan can interfere with user interfaces, making it difficult to navigate menus, select options, or interact with elements located near the edges of the screen.

The Importance of Overscan Control:

Recognizing the limitations imposed by overscan, modern televisions and display devices offer settings to adjust or disable overscan. These settings provide users with greater control over the displayed image, allowing them to ensure that the entire content is visible and displayed accurately.

Understanding Overscan Settings:

Most televisions provide a range of settings related to overscan:

  • Overscan: On/Off: This setting allows users to completely disable or enable overscan. Disabling overscan is generally recommended when connecting a PC to a television.
  • Underscan: This setting allows users to adjust the image size to fit within the boundaries of the display, effectively reducing the overscan area.
  • Aspect Ratio: This setting allows users to select the desired aspect ratio for the displayed content. Choosing the correct aspect ratio ensures that the image is displayed in its intended proportions.
  • Pixel Mapping: Some televisions offer advanced settings that allow users to manually adjust the pixel mapping, providing fine-grained control over the displayed image.

Tips for Managing Overscan:

  • Check the User Manual: Consult the user manual for your television to identify the specific settings related to overscan.
  • Experiment with Settings: Experiment with different overscan settings to find the optimal configuration for your setup.
  • Use a Test Pattern: Utilize a test pattern or a dedicated overscan detection tool to visually assess the overscan area and ensure that the entire image is being displayed.
  • Consider an External Display: If your television does not offer sufficient overscan control, consider using an external display, such as a monitor, which typically does not exhibit overscan behavior.

FAQs on Overscan:

Q: Is overscan always a problem?

A: While overscan can be problematic in certain scenarios, it can also be beneficial in some cases, such as when viewing analog television broadcasts. However, for most modern digital content, particularly when connecting a PC to a television, disabling overscan is generally recommended.

Q: How do I know if my television has overscan?

A: You can visually assess overscan by observing the displayed image for any cropping or missing content, especially near the edges. You can also use a test pattern or a dedicated overscan detection tool to confirm the presence of overscan.

Q: Can I disable overscan on all televisions?

A: Not all televisions offer the option to disable overscan. Older models may lack this feature. However, most modern televisions, especially those with HDMI inputs, provide settings for adjusting or disabling overscan.

Q: What is the difference between overscan and underscan?

A: Overscan extends the displayed image beyond its intended boundaries, effectively cropping the edges. Underscan reduces the image size to fit within the boundaries of the display, minimizing the overscan area.

Q: How can I fix overscan issues with my PC display?

A: You can attempt to fix overscan issues by adjusting the overscan settings on your television, using a test pattern to identify and correct the problem, or by using a dedicated overscan detection tool. If your television does not offer sufficient overscan control, consider using an external display.

Conclusion:

Overscan, a relic of the analog television era, can pose challenges for users connecting PCs to televisions. Understanding the implications of overscan and utilizing the available settings to manage it are crucial for achieving an optimal viewing experience. By disabling or adjusting overscan, users can ensure that the entire content is visible, the aspect ratio is preserved, and the user interface remains functional. In the digital age, where high-resolution displays and precise image reproduction are paramount, mastering overscan settings becomes essential for a seamless and immersive viewing experience.

About overscan and underscan on your Mac, Apple TV, or other display - Apple Support About overscan and underscan on your Mac, Apple TV, or other display - Apple Support Zinwell ZIN2100T PC to TV Transmission Kit User Manual
Laserdisc Players and Comb Filters - Not on Blu-ray Fixing Overscan on a 24" ViewSonic VX LED Monitor · Tim G. Thomas Understanding the Arc Flash Boundary  Fluke
Simple visual difference between super 8 and regular 8. Super 8 advanced to smaller sprockets Séura TV Mirrors are changing the way people watch television, breaking down the boundaries of

Closure

Thus, we hope this article has provided valuable insights into Understanding Overscan: The Hidden Boundaries of Your TV Display. We hope you find this article informative and beneficial. See you in our next article!

Creating A Bootable USB Drive For Windows 10: A Comprehensive Guide

Creating a Bootable USB Drive for Windows 10: A Comprehensive Guide

Introduction

In this auspicious occasion, we are delighted to delve into the intriguing topic related to Creating a Bootable USB Drive for Windows 10: A Comprehensive Guide. Let’s weave interesting information and offer fresh perspectives to the readers.

Creating a Bootable USB Drive for Windows 10: A Comprehensive Guide

How to Create a Windows 10 Bootable USB - Using a Media Creation Tool

A bootable USB drive, containing the Windows 10 installation files, serves as a crucial tool for various scenarios. It enables users to install a fresh copy of Windows 10 on a new computer, upgrade an existing operating system, or troubleshoot system issues. This guide provides a detailed explanation of the process, covering essential steps and addressing common queries.

Understanding the Importance of a Bootable USB Drive

The ability to boot a computer from a USB drive is essential for several reasons:

  • Clean Installation: A bootable USB drive allows for a clean installation of Windows 10, removing any existing files and applications, which can be beneficial for resolving software conflicts or starting with a fresh system.
  • Upgrading Existing Systems: A bootable drive facilitates upgrading to the latest version of Windows 10, ensuring compatibility with the latest features and security updates.
  • Troubleshooting System Errors: In cases of system malfunctions, a bootable USB drive can be used to access recovery options, repair corrupted files, or perform a system restore.
  • Dual Boot Environments: A bootable USB drive allows users to create a dual boot environment, enabling them to choose between multiple operating systems at startup.

Essential Tools and Requirements

Before embarking on the process, ensure the following prerequisites are met:

  • Windows 10 Installation Media: Download the Windows 10 ISO file from the official Microsoft website. This file contains all the necessary installation files.
  • USB Drive: A USB flash drive with at least 8GB of storage space. Ensure that the drive is empty or contains data that can be deleted.
  • Rufus: A free and open-source utility designed to create bootable USB drives. It is a reliable and user-friendly tool available for download from the official Rufus website.
  • Computer with Internet Access: A computer with an internet connection is needed to download the Windows 10 ISO file and Rufus.

Step-by-Step Guide to Creating a Bootable USB Drive

  1. Download the Windows 10 ISO File: Navigate to the official Microsoft website and download the Windows 10 ISO file corresponding to your preferred version (Home, Pro, etc.).
  2. Download and Run Rufus: Download Rufus from the official website and run the application.
  3. Select the USB Drive: Connect the USB flash drive to your computer. Rufus will automatically detect the connected drive. Select the drive from the "Device" dropdown menu.
  4. Choose the Boot Selection Method: Select "Create a bootable disk using" and choose "ISO Image" from the dropdown menu.
  5. Select the Windows 10 ISO File: Click on the "SELECT" button and browse to the location where you saved the Windows 10 ISO file. Select the file.
  6. Configure Additional Settings (Optional): Rufus offers various settings for customizing the bootable USB drive. For standard use, the default settings are usually sufficient. However, advanced users can adjust settings like file system, partition scheme, and cluster size based on their specific needs.
  7. Start the Creation Process: Click the "START" button to begin creating the bootable USB drive. The process might take a few minutes depending on the size of the ISO file and the speed of your computer.
  8. Confirmation and Final Steps: Once the process is complete, Rufus will display a confirmation message. Ensure that the "Close window after" option is selected to automatically close the window. The bootable USB drive is now ready for use.

Frequently Asked Questions (FAQs)

Q: Can I use a different tool to create a bootable USB drive?

A: While Rufus is a widely recommended and user-friendly tool, other options are available, such as the Windows 10 Media Creation Tool or the Universal USB Installer. These tools offer similar functionalities and can be used to create bootable USB drives.

Q: What if the USB drive is not detected by Rufus?

A: Ensure that the USB drive is properly connected to the computer and that the drive is formatted with a compatible file system (usually FAT32 or NTFS). If the issue persists, try a different USB port or USB drive.

Q: What happens to the data on the USB drive during the process?

A: All data on the USB drive will be erased during the process. Ensure that any important files are backed up before proceeding.

Q: Can I create a bootable USB drive for multiple versions of Windows 10?

A: You can only create a bootable USB drive for a single version of Windows 10 at a time. You will need to create separate USB drives for different versions.

Q: How do I use the bootable USB drive to install Windows 10?

A: Once the bootable USB drive is created, you can use it to install Windows 10 on a new computer or upgrade an existing one. To do this, you need to change the boot order in the BIOS settings to prioritize the USB drive. This allows the computer to boot from the USB drive and start the installation process.

Tips for Creating a Bootable USB Drive

  • Use a high-quality USB drive: A reliable and durable USB drive is essential for a successful bootable drive creation process.
  • Check the USB drive’s space: Ensure that the USB drive has sufficient space to accommodate the Windows 10 installation files.
  • Back up important data: Before creating a bootable USB drive, back up any essential data from the USB drive as the process will erase all data.
  • Verify the integrity of the ISO file: Before creating the bootable drive, verify the integrity of the downloaded Windows 10 ISO file using a checksum tool. This ensures that the file is not corrupted.
  • Use the latest version of Rufus: Always download and use the latest version of Rufus to ensure compatibility and access to the latest features.

Conclusion

Creating a bootable USB drive for Windows 10 is a straightforward process that can be accomplished using readily available tools like Rufus. It offers users a versatile solution for installing, upgrading, and troubleshooting Windows 10 systems. By following the steps outlined in this guide, users can successfully create a bootable USB drive and leverage its functionality to manage their Windows 10 environment effectively.

Creating A Windows 10 Usb Boot Windows 10 how to make a usb drive bootable - managesexi How to Create Windows 10 Bootable USB Flash Drive  RUFUS
How to Create a Windows 10 Bootable USB Drive using DiskPart  Computer Systems Servicing Guide How To Create Bootable USB Drive from Windows 10 ISO With CMD - YouTube Bootable Windows 10 USB Flash Disk. How to Create Windows 10 Bootable USB Disk? - YouTube
How To Create Bootable Windows 10 Usb Flash Drive Using The Media - Vrogue How To Create A Bootable Usb With Easybcd On Windows 10

Closure

Thus, we hope this article has provided valuable insights into Creating a Bootable USB Drive for Windows 10: A Comprehensive Guide. We appreciate your attention to our article. See you in our next article!

Navigating The Digital Landscape: A Comprehensive Guide To Outlook On Windows 11

Navigating the Digital Landscape: A Comprehensive Guide to Outlook on Windows 11

Introduction

In this auspicious occasion, we are delighted to delve into the intriguing topic related to Navigating the Digital Landscape: A Comprehensive Guide to Outlook on Windows 11. Let’s weave interesting information and offer fresh perspectives to the readers.

Navigating The Digital Landscape: A Comprehensive Guide To The Best Map And Directions Websites

In today’s interconnected world, effective communication is paramount. Whether managing personal correspondence, collaborating on professional projects, or staying informed about global events, the need for a robust and reliable email platform is undeniable. Microsoft Outlook, a cornerstone of the Microsoft 365 suite, emerges as a powerful solution for individuals and businesses alike, offering a comprehensive suite of features designed to streamline communication and enhance productivity.

This article provides a comprehensive guide to downloading and utilizing Outlook on Windows 11, exploring its key features, benefits, and potential challenges.

Understanding Outlook’s Significance

Outlook transcends the limitations of a basic email client. It serves as a central hub for managing emails, calendars, contacts, tasks, and notes, effectively consolidating various aspects of digital communication and organization. This integration streamlines workflows, reduces the need for multiple applications, and fosters a more efficient and organized approach to digital interaction.

Methods for Downloading Outlook on Windows 11

There are two primary ways to obtain Outlook on Windows 11:

  1. Microsoft 365 Subscription: This approach provides access to the full Microsoft 365 suite, including Outlook, Word, Excel, PowerPoint, and more. This option is ideal for individuals and businesses requiring a comprehensive suite of productivity tools and the benefits of cloud storage and collaboration features.

  2. Standalone Outlook Download: For users solely interested in Outlook, a standalone download is available. This option grants access to the core features of Outlook, such as email management, calendar, and contacts, without the inclusion of other Microsoft 365 applications.

Navigating the Download Process

  1. Microsoft 365 Subscription:

    • Visit the official Microsoft 365 website.
    • Choose a suitable subscription plan based on individual or business needs.
    • Complete the registration process and payment details.
    • Download and install the Microsoft 365 suite, which includes Outlook.
  2. Standalone Outlook Download:

    • Access the Microsoft website and navigate to the Outlook download page.
    • Select the appropriate version for your Windows 11 system.
    • Initiate the download and install the software.

Setting Up and Configuring Outlook

Upon successful installation, users are guided through a straightforward setup process.

  • Account Configuration: Enter your email address and password to connect your existing email account. Outlook supports various email providers, including Gmail, Yahoo, and Outlook.com.
  • Customization: Tailor the interface to personal preferences. This includes adjusting themes, fonts, and layout options to enhance the user experience.

Exploring Outlook’s Core Features

Outlook offers a wide array of features designed to enhance communication and organization:

  • Email Management:

    • Organize emails into folders for efficient sorting and retrieval.
    • Filter emails based on sender, subject, or keywords for quick access.
    • Utilize the search function to locate specific emails within seconds.
    • Schedule emails to be sent at a later time.
    • Utilize the "Do Not Disturb" feature to minimize distractions.
  • Calendar:

    • Schedule appointments, meetings, and events with ease.
    • Set reminders to ensure timely attendance.
    • Create recurring events for regular appointments.
    • Share calendars with colleagues or family members for improved coordination.
    • Utilize the calendar view to visualize schedules and plan effectively.
  • Contacts:

    • Store contact information, including names, phone numbers, email addresses, and physical addresses.
    • Organize contacts into groups for streamlined communication.
    • Utilize the "People" tab to access and manage contacts effortlessly.
    • Integrate contacts with other Microsoft 365 applications for seamless communication.
  • Tasks:

    • Create and manage to-do lists for improved productivity.
    • Assign deadlines and priorities to tasks for effective time management.
    • Utilize the task view to monitor progress and ensure timely completion.
    • Share tasks with colleagues for collaborative project management.
  • Notes:

    • Capture ideas, notes, and reminders for easy reference.
    • Organize notes into notebooks for better categorization.
    • Share notes with others for collaborative brainstorming and project development.

Leveraging Advanced Features

Beyond the core features, Outlook offers advanced functionalities to enhance communication and productivity:

  • Rules: Automate email management by setting rules that automatically sort, filter, or move incoming emails based on specific criteria.
  • Quick Steps: Create customized actions for frequently performed tasks, such as forwarding emails or marking them as read.
  • Calendar Sharing: Share calendars with colleagues or family members for improved coordination and collaboration.
  • Task Management: Assign tasks to others, set deadlines, and monitor progress for efficient project management.
  • Integration with Other Microsoft 365 Applications: Seamlessly connect Outlook with other applications, such as Word, Excel, and PowerPoint, for enhanced collaboration and workflow optimization.

Addressing Potential Challenges

While Outlook offers a comprehensive suite of features, users may encounter certain challenges:

  • Learning Curve: The initial setup and familiarization with the various features may require a learning curve for new users.
  • Troubleshooting: Occasional technical issues or compatibility problems may arise, requiring troubleshooting and potential technical support.
  • Security Concerns: Maintaining data security and preventing unauthorized access is crucial for email communication.

FAQs Regarding Outlook on Windows 11

Q: Can I use Outlook without a Microsoft 365 subscription?

A: Yes, a standalone version of Outlook is available for download. However, certain advanced features may be limited compared to the full Microsoft 365 suite.

Q: Is Outlook compatible with other email providers?

A: Yes, Outlook supports various email providers, including Gmail, Yahoo, and Outlook.com.

Q: How do I configure Outlook for multiple accounts?

A: You can add multiple email accounts to Outlook by following the account configuration steps during setup.

Q: Can I access Outlook on multiple devices?

A: Yes, Outlook is accessible on various devices, including computers, smartphones, and tablets.

Q: How do I ensure the security of my email data?

A: Utilize strong passwords, enable two-factor authentication, and keep your software updated to enhance security.

Tips for Optimizing Outlook Usage

  • Utilize Folders: Create and organize emails into folders for efficient retrieval.
  • Set Rules: Automate email management by setting rules for sorting and filtering.
  • Customize Quick Steps: Create shortcuts for frequently performed tasks.
  • Utilize Calendar Sharing: Share calendars with colleagues or family members for improved coordination.
  • Explore Advanced Features: Experiment with features like task management and integration with other Microsoft 365 applications.

Conclusion

Microsoft Outlook on Windows 11 emerges as a powerful and versatile tool for individuals and businesses seeking to streamline communication, enhance productivity, and manage digital interactions effectively. Its comprehensive suite of features, seamless integration with other Microsoft 365 applications, and user-friendly interface make it a valuable asset for navigating the complexities of the digital landscape. By embracing the features and functionalities of Outlook, users can unlock a world of possibilities for efficient communication, collaborative projects, and enhanced organization.

Navigating the Digital Landscape E-Book Visual refresh of Office apps for Windows Webinar - How to navigate the new digital landscape  BIMobject
How to Use Microsoft Outlook (Essential Tutorial Guide) Business Tutorials  Envato Tuts+ Navigate Outlook  CustomGuide Wondered how the digital landscape worked? Take a look here… – howtododigital
PPT - Navigating the Digital Landscape: A Comprehensive Guide to GDPR Compliance PowerPoint Navigating The Digital Landscape: A Comprehensive Guide To The EWashington Map - Map of West Las

Closure

Thus, we hope this article has provided valuable insights into Navigating the Digital Landscape: A Comprehensive Guide to Outlook on Windows 11. We hope you find this article informative and beneficial. See you in our next article!

QBittorrent For Windows 10: A Comprehensive Guide To Secure And Efficient File Sharing

qBittorrent for Windows 10: A Comprehensive Guide to Secure and Efficient File Sharing

Introduction

With great pleasure, we will explore the intriguing topic related to qBittorrent for Windows 10: A Comprehensive Guide to Secure and Efficient File Sharing. Let’s weave interesting information and offer fresh perspectives to the readers.

qBittorrent for Windows 10: A Comprehensive Guide to Secure and Efficient File Sharing

Qbittorrent for windows 10 - ersap

In the digital age, downloading files from the internet has become an integral part of our lives. From software updates and movies to music and games, torrents have emerged as a popular method for obtaining large files quickly and efficiently. Among the plethora of torrent clients available, qBittorrent stands out as a robust and reliable option, particularly for Windows 10 users. This comprehensive guide will delve into the intricacies of qBittorrent, exploring its features, benefits, and how to effectively utilize it for a seamless downloading experience.

Understanding qBittorrent: A Free and Open-Source Alternative

qBittorrent is a free and open-source BitTorrent client that offers a user-friendly interface and a wide array of features. Unlike many other torrent clients that rely on advertising or bundled software, qBittorrent remains entirely free, ensuring a clean and secure download environment. Its open-source nature allows for constant development and community contributions, fostering a reliable and transparent platform.

Key Features of qBittorrent for Windows 10:

1. User-Friendly Interface: qBittorrent boasts an intuitive interface that is easy to navigate, even for novice users. Its clean layout and clear labeling make it simple to find and manage torrents.

2. Comprehensive Torrent Management: The client provides advanced features for managing torrents, including scheduling downloads, prioritizing files, and setting download speed limits. This allows users to fine-tune their download process for optimal efficiency.

3. Integrated Search Engine: qBittorrent integrates with popular torrent search engines, enabling users to find desired files directly within the application. This eliminates the need for external websites, streamlining the search and download process.

4. Advanced Filtering Options: Users can filter torrents based on various criteria, such as file size, upload speed, and file type. This allows for targeted searches and helps to identify torrents that meet specific needs.

5. Built-in Torrent Creation: qBittorrent allows users to create their own torrents, enabling them to share files with others. This feature is particularly useful for individuals who want to distribute large files or collaborate on projects.

6. RSS Feed Support: qBittorrent supports RSS feeds, allowing users to automatically download torrents based on specific criteria. This feature is ideal for staying updated on the latest releases or keeping track of files from specific sources.

7. Secure and Privacy-Focused: qBittorrent is known for its commitment to user privacy and security. It does not track user activity or share personal information, ensuring a safe and anonymous download experience.

Benefits of Using qBittorrent:

1. Enhanced Download Speed: qBittorrent utilizes the BitTorrent protocol, which allows for faster downloads by distributing files across multiple peers. This significantly reduces download times, particularly for large files.

2. Improved Efficiency: With its advanced management features, qBittorrent optimizes download processes, allowing users to schedule downloads, prioritize files, and manage bandwidth effectively.

3. Reduced Resource Consumption: Compared to other torrent clients, qBittorrent is known for its low system resource consumption, ensuring a smooth and efficient download experience without impacting other applications.

4. Enhanced Security: qBittorrent prioritizes user privacy and security, offering a clean and ad-free experience. Its open-source nature allows for community scrutiny, further enhancing its security and reliability.

5. Free and Open-Source: qBittorrent is completely free to use, offering a cost-effective alternative to paid torrent clients. Its open-source nature fosters transparency and allows for continuous improvement.

Downloading qBittorrent for Windows 10:

Downloading qBittorrent for Windows 10 is a straightforward process:

  1. Visit the Official Website: Navigate to the official qBittorrent website: https://www.qbittorrent.org/.
  2. Select the Windows Version: Locate the download section and select the appropriate version for Windows 10.
  3. Download the Installer: Download the installer file to your computer.
  4. Run the Installer: Double-click the installer file to initiate the installation process.
  5. Follow the On-Screen Instructions: Follow the prompts to complete the installation.

Setting Up qBittorrent for Optimal Performance:

Once installed, configure qBittorrent for optimal performance:

  1. Set Download and Upload Limits: Adjust the download and upload speed limits based on your internet connection and preferences.
  2. Enable Bandwidth Prioritization: Prioritize specific torrents or files for faster download speeds.
  3. Configure Download Location: Specify the folder where downloaded files should be saved.
  4. Enable Advanced Features: Explore additional features such as scheduling downloads, RSS feed support, and torrent creation.

Frequently Asked Questions (FAQs):

1. Is qBittorrent Safe to Use?

qBittorrent is a secure and reliable torrent client. Its open-source nature allows for community scrutiny, ensuring transparency and minimizing the risk of malicious code. However, it’s crucial to download torrents from reputable sources and avoid suspicious files.

2. Is qBittorrent Legal to Use?

The legality of torrenting depends on the content being downloaded. Downloading copyrighted material without permission is illegal in most countries. However, qBittorrent itself is a legal tool and can be used for legitimate purposes, such as downloading open-source software or sharing personal files.

3. How Does qBittorrent Work?

qBittorrent uses the BitTorrent protocol, which allows for peer-to-peer file sharing. When downloading a torrent file, users connect to a network of peers who also have parts of the file. By sharing and receiving pieces of the file, the download process is accelerated.

4. What are the System Requirements for qBittorrent?

qBittorrent has minimal system requirements. It runs smoothly on most Windows 10 computers with a modern processor and sufficient RAM.

5. Can I Use qBittorrent on Multiple Devices?

Yes, qBittorrent can be installed and used on multiple devices, including computers, laptops, and mobile devices.

Tips for Using qBittorrent Effectively:

1. Choose Reputable Torrent Sources: Download torrents from trusted websites and sources to minimize the risk of malware or viruses.

2. Verify File Integrity: After downloading a torrent, use a checksum tool to verify the integrity of the downloaded files.

3. Use a VPN for Enhanced Privacy: Consider using a VPN to encrypt your internet traffic and protect your privacy while torrenting.

4. Keep qBittorrent Updated: Regularly update qBittorrent to benefit from the latest security patches and bug fixes.

5. Manage Download Limits: Set download and upload speed limits to prevent excessive bandwidth usage.

Conclusion:

qBittorrent offers a robust and reliable solution for downloading files from the internet. Its user-friendly interface, advanced features, and commitment to security make it an ideal choice for Windows 10 users. By following the tips and guidelines outlined in this guide, users can optimize their torrenting experience and enjoy a seamless and secure download process. Remember, always download files responsibly and ethically, respecting copyright laws and intellectual property rights.

How To Install qBittorrent in Windows 10 - YouTube qBittorrent Download With Qt Interface & Remote Control File Sharing Free 다운로드 qBittorrent Windows 10 (32/64 bit) 한국어
qBittorrent Free Download for Windows 10, 11, 7 (32 / 64-bit) Qbittorrent for windows - cclasbrands Qbittorrent windows 10 - productionsgai
Qbittorrent windows 10 - productionsgai Qbittorrent for windows 10 - ersap

Closure

Thus, we hope this article has provided valuable insights into qBittorrent for Windows 10: A Comprehensive Guide to Secure and Efficient File Sharing. We appreciate your attention to our article. See you in our next article!

Understanding Windows 10 ISO Files: A Comprehensive Guide

Understanding Windows 10 ISO Files: A Comprehensive Guide

Introduction

With enthusiasm, let’s navigate through the intriguing topic related to Understanding Windows 10 ISO Files: A Comprehensive Guide. Let’s weave interesting information and offer fresh perspectives to the readers.

Understanding Windows 10 ISO Files: A Comprehensive Guide

[GUIDE] How To Upgrade To Windows 10 Using ISO File

Windows 10 ISO files are digital representations of the Windows 10 operating system, providing a complete and self-contained installation package. These files are crucial for various scenarios, including clean installations, upgrades, and creating bootable USB drives. This guide delves into the world of Windows 10 ISO files, exploring their purpose, types, methods of obtaining them, and essential usage tips.

What are Windows 10 ISO Files?

An ISO file, short for International Organization for Standardization, is a disc image file that encapsulates the entire content of a physical disc, such as a CD or DVD. In the context of Windows 10, an ISO file contains all the necessary files and folders required to install the operating system on a computer. This single file acts as a comprehensive package, making it convenient for distribution and installation.

Types of Windows 10 ISO Files

Windows 10 ISO files come in various flavors, catering to different needs and scenarios. The most common types include:

  • Windows 10 Home: This edition is targeted towards home users and offers essential features for everyday computing, including basic productivity tools, multimedia playback, and web browsing.
  • Windows 10 Pro: Designed for professionals and small businesses, this edition adds advanced features like BitLocker encryption, remote desktop access, and domain join capabilities.
  • Windows 10 Enterprise: This edition is specifically tailored for large organizations and offers enhanced security features, management tools, and deployment options.
  • Windows 10 Education: This edition is primarily intended for educational institutions, offering features tailored for students and teachers, including educational software and access management.

Why Use Windows 10 ISO Files?

Using Windows 10 ISO files offers several advantages:

  • Clean Installation: ISO files allow for a fresh and clean installation of Windows 10, removing any existing software, files, or settings that might be causing issues.
  • Upgrading from Older Versions: ISO files can be used to upgrade older versions of Windows to the latest version of Windows 10, ensuring compatibility with the latest features and security updates.
  • Creating Bootable USB Drives: ISO files are essential for creating bootable USB drives that can be used to install Windows 10 on a computer without an existing operating system.
  • Troubleshooting and Recovery: ISO files can be used to troubleshoot system issues or to recover from data loss by reinstalling Windows 10.
  • Customization: ISO files can be customized with specific drivers, applications, or settings before installation, tailoring the operating system to individual needs.

Obtaining Windows 10 ISO Files

Several legitimate methods exist for obtaining Windows 10 ISO files:

  • Microsoft’s Official Website: Microsoft provides direct downloads of Windows 10 ISO files through their official website. This method ensures you receive a genuine and verified copy of the operating system.
  • Media Creation Tool: Microsoft offers a dedicated Media Creation Tool that allows users to download and create a bootable USB drive with the latest version of Windows 10.
  • Windows 10 Installation Media: If you have a physical copy of Windows 10 installation media, such as a DVD or USB drive, you can use it to extract the ISO file.
  • Third-Party Websites: While caution is advised, some reputable third-party websites offer Windows 10 ISO files for download. However, it’s crucial to verify the source and ensure the file is legitimate before downloading.

Using Windows 10 ISO Files

Once you have obtained a Windows 10 ISO file, you can use it for various purposes:

  • Installing Windows 10: The ISO file can be used to perform a clean installation of Windows 10 on a computer. This typically involves creating a bootable USB drive, booting from the drive, and following the on-screen instructions.
  • Upgrading Windows 10: The ISO file can be used to upgrade an existing installation of Windows 10 to a newer version. This process involves running the setup file from the ISO file and following the on-screen instructions.
  • Creating a Bootable USB Drive: The ISO file can be used to create a bootable USB drive that can be used to install Windows 10 on a computer without an existing operating system. Several tools are available to create bootable USB drives from ISO files, such as Rufus and Universal USB Installer.
  • Creating a Virtual Machine: The ISO file can be used to create a virtual machine running Windows 10 on another operating system, such as macOS or Linux. This allows you to experiment with Windows 10 without affecting your existing system.

FAQs about Windows 10 ISO Files

Q: What is the difference between a Windows 10 ISO file and a Windows 10 installation media?

A: A Windows 10 ISO file is a digital representation of the installation media, while the installation media itself can be a physical disc (DVD) or a bootable USB drive. The ISO file contains all the data needed to create the installation media.

Q: Can I use a Windows 10 ISO file to install a different edition of Windows 10?

A: No, you cannot use an ISO file for one edition of Windows 10 to install a different edition. Each edition has a unique ISO file.

Q: Is it safe to download Windows 10 ISO files from third-party websites?

A: While some reputable third-party websites offer Windows 10 ISO files, it’s always advisable to download from Microsoft’s official website or use their Media Creation Tool to ensure you get a genuine and secure copy.

Q: How do I verify the authenticity of a Windows 10 ISO file?

A: You can verify the authenticity of an ISO file by checking its digital signature and comparing it to the known signature for the specific edition and version of Windows 10.

Q: Can I modify a Windows 10 ISO file before installing it?

A: Yes, you can modify a Windows 10 ISO file before installing it. This can involve adding drivers, applications, or specific settings to customize the installation. However, proceed with caution as modifying the ISO file can potentially lead to instability or compatibility issues.

Tips for Using Windows 10 ISO Files

  • Back Up Your Data: Before installing or upgrading Windows 10 using an ISO file, always back up your important data to prevent data loss.
  • Use a Reliable Source: Download Windows 10 ISO files only from trusted sources, such as Microsoft’s official website or reputable third-party websites.
  • Verify the File Integrity: Verify the downloaded ISO file’s integrity using a checksum tool to ensure it hasn’t been tampered with during download.
  • Check System Requirements: Ensure your computer meets the minimum system requirements for the edition of Windows 10 you are installing.
  • Understand the Installation Process: Familiarize yourself with the installation process before proceeding, as it involves various steps and decisions.
  • Use a Bootable USB Drive: Creating a bootable USB drive is often the most convenient and reliable method for installing Windows 10 from an ISO file.
  • Be Patient: The installation process can take a considerable amount of time, depending on the hardware and the chosen installation options.

Conclusion

Windows 10 ISO files provide a versatile and convenient method for installing, upgrading, and customizing the Windows 10 operating system. By understanding their purpose, types, and methods of obtaining them, users can leverage these files to enhance their computing experience. Whether performing a clean installation, troubleshooting system issues, or creating a bootable USB drive, Windows 10 ISO files empower users to manage their operating system effectively and efficiently.

See Full Details about a Windows 10 ISO file  Windows 10 Tutorials [GUIDE] How To Upgrade To Windows 10 Using ISO File How to create a Windows 10 ISO file using an Install.ESD image  Windows Central
Windows 10 iso file - qlerotd [GUIDE] How To Upgrade To Windows 10 Using ISO File [GUIDE] How To Upgrade To Windows 10 Using ISO File
How to upgrade to Windows 10 using Windows 10 ISO file - Microsoft Community Windows 10 ISO files: What you need to know  Bingalo

Closure

Thus, we hope this article has provided valuable insights into Understanding Windows 10 ISO Files: A Comprehensive Guide. We appreciate your attention to our article. See you in our next article!