The Power Of Proximity: Understanding Near Field Communication

The Power of Proximity: Understanding Near Field Communication

Introduction

With great pleasure, we will explore the intriguing topic related to The Power of Proximity: Understanding Near Field Communication. Let’s weave interesting information and offer fresh perspectives to the readers.

The Power of Proximity: Understanding Near Field Communication

Near Field Communication (NFC)

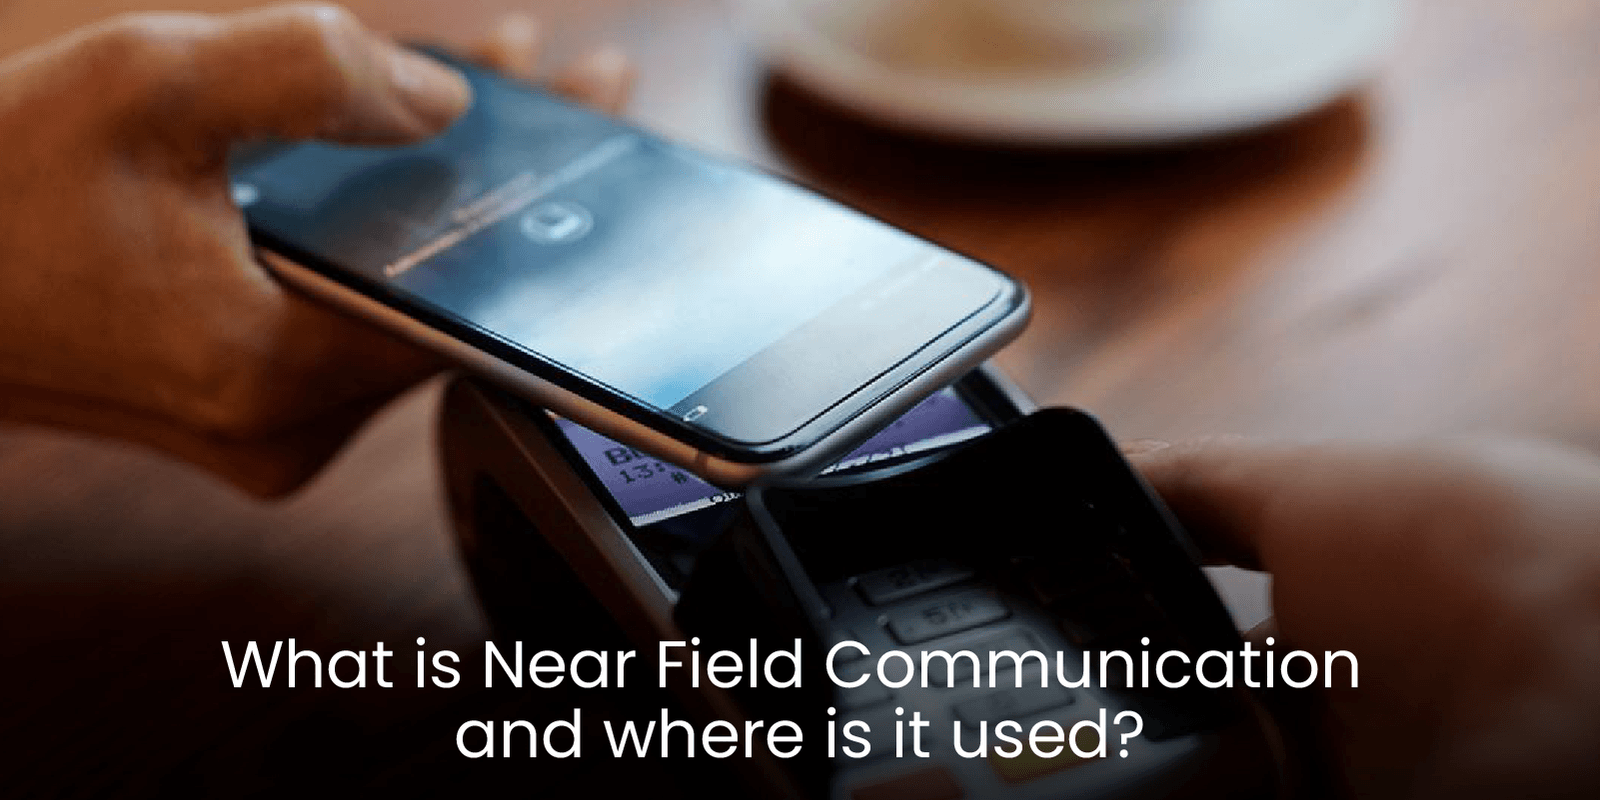
Near field communication (NFC) has become an integral part of our daily lives, quietly facilitating a range of interactions from contactless payments to data sharing. This technology, built upon the principles of electromagnetic induction, allows two devices to communicate wirelessly when placed in close proximity, typically within a few centimeters. While seemingly simple, NFC technology encompasses a complex interplay of electromagnetic fields and data transfer protocols, offering a unique set of advantages that have revolutionized various sectors.

Understanding the Fundamentals

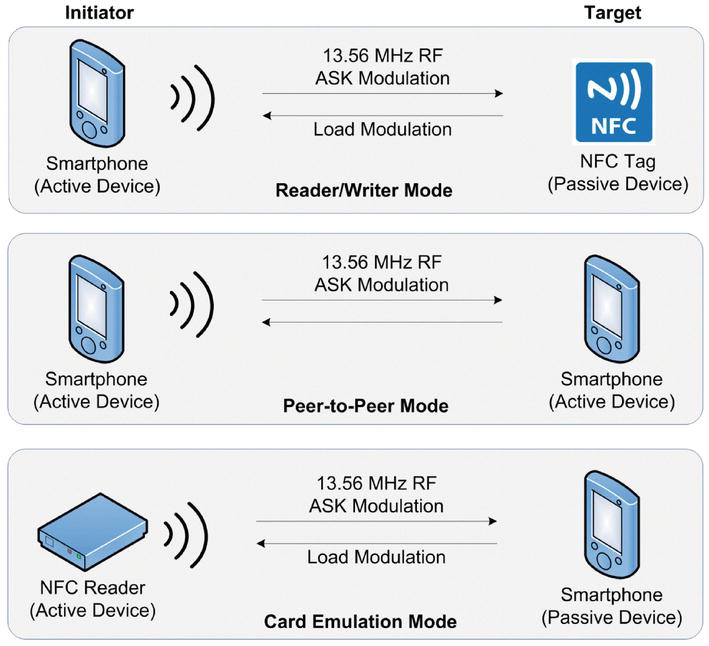
NFC operates on the principle of electromagnetic induction, a phenomenon where a changing magnetic field induces an electric current in a nearby conductor. This principle is harnessed to enable communication between two devices, one acting as the transmitter and the other as the receiver. The transmitter generates a time-varying magnetic field that induces a current in the receiver, enabling the transfer of data.

The communication process is initiated when two NFC-enabled devices are brought within close proximity. This proximity triggers an exchange of data packets through a standardized protocol, ensuring compatibility between different devices. NFC utilizes a variety of frequencies, typically operating at 13.56 MHz, which allows for efficient data transfer over short distances.

Exploring the Applications

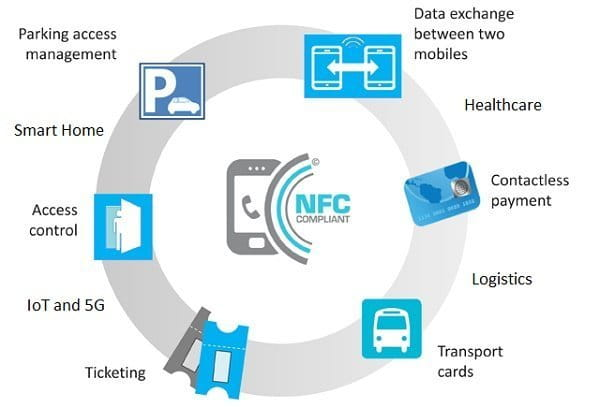
NFC technology finds diverse applications across various sectors, offering a convenient and secure method for data exchange and device interaction. Some of the most prominent applications include:

  • Contactless Payment: NFC has revolutionized the payment industry by enabling quick and secure transactions through contactless cards and mobile devices. Users can simply tap their NFC-enabled device at a point-of-sale terminal to complete a transaction, eliminating the need for physical cards or cash.

  • Data Sharing: NFC facilitates seamless data sharing between devices, allowing users to transfer files, share contact information, or connect to Wi-Fi networks with a simple tap. This feature simplifies data exchange and eliminates the need for manual pairing or complex configuration processes.

  • Device Pairing: NFC enables effortless pairing between devices, simplifying the process of connecting headphones, speakers, or other peripherals. This eliminates the need for manual pairing procedures and streamlines the user experience.

  • Access Control: NFC technology is widely used in access control systems, allowing users to unlock doors, gates, or other restricted areas using NFC-enabled key cards or mobile devices. This technology provides a secure and convenient alternative to traditional key-based access methods.

  • Mobile Ticketing: NFC is increasingly used for mobile ticketing, allowing users to store and access tickets for events, transportation, or other services on their smartphones. This eliminates the need for physical tickets and simplifies the ticketing process.

  • Near Field Communication (NFC) in the Automotive Industry: NFC technology is gaining traction in the automotive industry, enabling keyless entry, remote vehicle control, and secure communication between vehicles and roadside infrastructure.

Benefits of Near Field Communication

The widespread adoption of NFC technology can be attributed to its numerous benefits, including:

  • Security: NFC operates within a short range, making it difficult for unauthorized individuals to intercept or eavesdrop on data transmissions. This inherent security feature makes NFC a suitable technology for sensitive applications like contactless payments and access control.

  • Convenience: NFC simplifies everyday interactions by eliminating the need for physical cards, cables, or complex pairing procedures. This ease of use has contributed to the widespread adoption of NFC in various sectors.

  • Versatility: NFC technology can be integrated into a wide range of devices, from smartphones and tablets to credit cards and key fobs. This versatility allows for a broad range of applications and enhances the user experience across different platforms.

  • Cost-Effectiveness: NFC technology is relatively inexpensive to implement, making it a cost-effective solution for businesses and consumers alike. This affordability has contributed to its widespread adoption across various industries.

  • Energy Efficiency: NFC operates at low power levels, minimizing energy consumption and extending battery life. This energy efficiency makes NFC a sustainable and environmentally friendly technology.

Addressing Common Concerns

Despite its numerous benefits, NFC technology has also raised some concerns, particularly regarding security and privacy.

  • Security Concerns: While NFC offers inherent security features, potential vulnerabilities exist, particularly in cases of compromised devices or malicious software. Implementing robust security protocols and user authentication mechanisms is crucial to mitigating these risks.

  • Privacy Concerns: NFC technology can be used to track user movements and collect personal data. Ensuring data privacy and user consent is paramount when implementing NFC solutions, particularly in sensitive applications like contactless payments and access control.

FAQs on Near Field Communication

Q: What is the range of NFC communication?

A: NFC communication typically operates within a range of 4 centimeters or less.

Q: Is NFC secure?

A: NFC technology inherently offers security features, but it is essential to implement robust security protocols and authentication mechanisms to mitigate potential vulnerabilities.

Q: What are the common applications of NFC?

A: NFC finds widespread applications in contactless payments, data sharing, device pairing, access control, mobile ticketing, and automotive systems.

Q: What are the benefits of using NFC?

A: NFC offers numerous benefits, including security, convenience, versatility, cost-effectiveness, and energy efficiency.

Q: What are the potential risks associated with NFC?

A: Potential risks associated with NFC include security vulnerabilities and privacy concerns, which can be mitigated through robust security protocols and user consent mechanisms.

Tips for Using NFC

  • Ensure your device is NFC-enabled and properly configured.
  • Keep your NFC-enabled device close to the reader or another NFC-enabled device for successful communication.
  • Be aware of potential security risks and implement appropriate measures to protect your data.
  • Stay informed about NFC technology and its latest developments to maximize its benefits.

Conclusion

Near field communication technology has emerged as a powerful tool for simplifying everyday interactions and enabling seamless data exchange between devices. Its inherent security features, convenience, versatility, and cost-effectiveness have made it an indispensable technology across various sectors. As NFC technology continues to evolve, it is poised to play an even more significant role in shaping our future interactions with technology. By understanding the fundamentals of NFC and its applications, we can leverage its potential to enhance our daily lives and unlock new possibilities for innovation.

Near Field Communication The Beginner’s Guide to NFCs (Near Field Communication) What is Near Field Communication, and Where is it used?  Covve
What is Near Field Communication (NFC)?  - YouTube Near-Field Communications (NFC) for Wireless Power Transfer (WPT): An Overview  IntechOpen Near Field Communication (NFC) in a nutshell - YouTube
What Is Near Field Communication Applications - CXJRFIDFactory Near Field Communication (NFC) Technology: UPSC Current Affairs

Closure

Thus, we hope this article has provided valuable insights into The Power of Proximity: Understanding Near Field Communication. We appreciate your attention to our article. See you in our next article!

PhotoImpression 4: A Comprehensive Guide To The Powerful Photo Editing Software

PhotoImpression 4: A Comprehensive Guide to the Powerful Photo Editing Software

Introduction

With great pleasure, we will explore the intriguing topic related to PhotoImpression 4: A Comprehensive Guide to the Powerful Photo Editing Software. Let’s weave interesting information and offer fresh perspectives to the readers.

PhotoImpression 4: A Comprehensive Guide to the Powerful Photo Editing Software

Arcsoft Photoimpression 4 Software - fasrtalent

PhotoImpression 4, a versatile and user-friendly photo editing software, has earned its place as a trusted tool for both amateur and professional photographers alike. Its intuitive interface and comprehensive feature set empower users to enhance, manipulate, and creatively transform their images, achieving professional-quality results with ease. This article will delve into the key features, benefits, and functionalities of PhotoImpression 4, providing a comprehensive understanding of its capabilities.

A Glimpse into PhotoImpression 4’s Features

PhotoImpression 4 boasts a wide array of tools designed to cater to diverse photo editing needs. These features can be broadly categorized as follows:

1. Image Enhancement and Correction:

  • Brightness, Contrast, and Color Balance: Fine-tune the overall luminosity, contrast, and color balance of your images to achieve a visually appealing aesthetic.
  • Sharpening and Noise Reduction: Enhance image clarity by reducing noise and sharpening edges for a more defined and detailed appearance.
  • Red-Eye Removal: Eliminate the distracting red-eye effect often encountered in flash photography with a single click.
  • Color Correction: Adjust specific color hues and saturation levels to achieve a desired color palette or compensate for lighting imperfections.

2. Image Manipulation and Effects:

  • Cropping and Resizing: Precisely crop and resize images to create desired compositions and fit specific dimensions.
  • Rotation and Flipping: Easily rotate and flip images to adjust their orientation or create unique perspectives.
  • Layers and Masks: Utilize layers and masks to isolate specific areas of an image and apply effects selectively, achieving complex manipulations.
  • Special Effects: Explore a wide range of artistic and creative effects, including blur, vignette, embossing, and more, to add a unique touch to your images.

3. Text and Graphics:

  • Text Editing: Add and customize text elements with various fonts, sizes, colors, and styles to create captions, titles, and more.
  • Shapes and Objects: Incorporate geometric shapes, lines, and other objects to enhance image composition or create visual elements.
  • Drawing Tools: Utilize brushes and other drawing tools to create freehand illustrations or edit images directly.

4. Batch Processing:

  • Automated Editing: Apply a set of editing commands to multiple images simultaneously, saving time and effort when working with large collections.

5. File Management and Organization:

  • Image Browser: Easily navigate and manage your image library within the software, making it convenient to locate and access specific files.

Benefits of Using PhotoImpression 4

PhotoImpression 4 offers numerous advantages to users, making it a valuable tool for various purposes:

  • User-Friendly Interface: The software’s intuitive design and straightforward layout make it easy to learn and use, even for beginners.
  • Comprehensive Feature Set: The extensive array of tools caters to a wide range of editing needs, from basic enhancements to complex manipulations.
  • Professional-Quality Results: PhotoImpression 4 empowers users to achieve high-quality results that rival professional-grade editing software.
  • Time-Saving Features: Batch processing and other automated tools streamline workflow and reduce editing time.
  • Cost-Effective Solution: Compared to other professional photo editing software, PhotoImpression 4 offers a cost-effective alternative without compromising on functionality.

FAQs about PhotoImpression 4

1. Is PhotoImpression 4 compatible with my operating system?

PhotoImpression 4 is designed to be compatible with a wide range of operating systems, including Windows and macOS. It is recommended to check the software’s system requirements before downloading and installing it.

2. What file formats does PhotoImpression 4 support?

PhotoImpression 4 supports a variety of image file formats, including JPEG, PNG, GIF, TIFF, and more. This ensures compatibility with various cameras, devices, and applications.

3. Can I use PhotoImpression 4 to create professional-quality prints?

Yes, PhotoImpression 4 allows you to optimize images for printing by adjusting resolution and color settings to achieve high-quality prints.

4. Does PhotoImpression 4 offer tutorials or support resources?

Yes, PhotoImpression 4 provides comprehensive online tutorials and documentation to guide users through its features and functionalities. Additionally, customer support is available for assistance.

5. Is PhotoImpression 4 a free software?

PhotoImpression 4 is typically available as a paid software. However, trial versions may be available for evaluation purposes.

Tips for Using PhotoImpression 4 Effectively

  • Start with basic enhancements: Before diving into advanced features, focus on fundamental adjustments like brightness, contrast, and color balance to establish a solid foundation.
  • Utilize layers: Layers provide a non-destructive editing environment, allowing you to experiment with effects and adjustments without permanently altering the original image.
  • Explore special effects: PhotoImpression 4 offers a range of creative effects that can add visual interest and artistic flair to your images.
  • Utilize batch processing: Streamline your workflow by applying a set of editing commands to multiple images simultaneously, especially when working with large collections.
  • Practice and experiment: The best way to master PhotoImpression 4 is to experiment with its features and explore different techniques to find your own unique editing style.

Conclusion

PhotoImpression 4 stands as a powerful and user-friendly photo editing software, offering a comprehensive suite of tools to enhance, manipulate, and creatively transform images. Its intuitive interface, extensive features, and professional-quality results make it an invaluable asset for photographers, graphic designers, and anyone seeking to elevate their image editing capabilities. By understanding the software’s functionalities and utilizing its features effectively, users can unlock the full potential of PhotoImpression 4 and create stunning visuals that capture the essence of their creative vision.

Photoimpression 4.1 Quick Start Guide Arcsoft photoimpression 4 free download full version - passlwholesale ArcSoft PhotoImpression 4.0 Download (Free trial)
PhotoImpression 4.1 Quick Start Guide  Manualzz Photoimpression 4 Full Version - herofclass ArcSoft PhotoImpression 4.0 Download (Free trial)
Photoimpression 4 Download Full Versionl [PATCHED] Arcsoft photoimpression 4 software - jzascan

Closure

Thus, we hope this article has provided valuable insights into PhotoImpression 4: A Comprehensive Guide to the Powerful Photo Editing Software. We hope you find this article informative and beneficial. See you in our next article!

Navigating The Realtek Installation Error On Windows 11: A Comprehensive Guide

Navigating the Realtek Installation Error on Windows 11: A Comprehensive Guide

Introduction

In this auspicious occasion, we are delighted to delve into the intriguing topic related to Navigating the Realtek Installation Error on Windows 11: A Comprehensive Guide. Let’s weave interesting information and offer fresh perspectives to the readers.

Fix Realtek Semiconductor Driver Install Error 0x80070103 On Windows 11

The "Realtek installation error" on Windows 11, often accompanied by the cryptic code 0x80070103, can be a frustrating hurdle for users seeking to install or update their Realtek audio drivers. This error, typically associated with Realtek’s audio drivers, hinders the smooth operation of audio devices, potentially impacting sound output, microphone functionality, and even system stability.

This comprehensive guide aims to demystify this error, providing a clear understanding of its causes, potential solutions, and preventative measures.

Understanding the Error: A Deep Dive

The error code 0x80070103, in the context of Realtek driver installation, generally indicates a conflict or issue with the installation process. This could stem from various factors, including:

  • Corrupted or Incompatible Drivers: The downloaded Realtek driver package might be corrupted during download or incompatible with the user’s specific hardware configuration.
  • Conflicting Software: Other software installed on the system, particularly audio-related programs, might clash with the Realtek driver installation.
  • System File Corruption: Damaged or missing system files can hinder the driver installation process, leading to the error.
  • Insufficient Permissions: The user might lack sufficient permissions to install or modify system files, preventing the driver installation.
  • Network Connectivity Issues: During driver download or installation, network connectivity problems can disrupt the process, resulting in the error.

Troubleshooting the Realtek Installation Error: A Step-by-Step Approach

Addressing the error requires a systematic approach, starting with the most common solutions and progressing to more advanced troubleshooting steps:

1. Downloading the Correct Driver:

  • Verify Compatibility: Ensure that the downloaded Realtek driver package is compatible with the user’s specific system configuration, including the operating system, processor, and motherboard model.
  • Official Sources: Download the driver from the Realtek website or the manufacturer’s website for the user’s specific motherboard or laptop model. Avoid downloading drivers from unofficial sources, as they might be corrupted or contain malware.

2. Running the Installation as Administrator:

  • Elevated Privileges: Right-click the installation file and select "Run as administrator." This grants the installation process the necessary permissions to modify system files and complete the installation.

3. Temporarily Disabling Antivirus Software:

  • Potential Interference: Antivirus software might mistakenly identify the Realtek driver installation as a threat and block it. Temporarily disabling the antivirus software during the installation process can help resolve the error.

4. Updating Windows:

  • System Updates: Windows updates often include critical bug fixes and driver updates that can resolve compatibility issues. Ensure that the system is running the latest version of Windows.

5. Cleaning the Registry:

  • Registry Errors: Errors in the Windows registry can hinder driver installation. Using a registry cleaner tool can help identify and fix any registry errors that might be causing the problem.

6. Reinstalling the Audio Driver:

  • Complete Removal: Uninstall the existing Realtek audio driver through the Device Manager. Once uninstalled, reboot the system and attempt to install the latest compatible driver.

7. Checking for Hardware Issues:

  • Device Functionality: If the error persists, consider checking for hardware issues with the audio device. Ensure that the device is properly connected and functioning correctly.

8. Utilizing System Restore:

  • Restoring to a Previous State: If the error occurred after a recent system change, using system restore to revert to a previous working state might resolve the issue.

9. Contacting Support:

  • Expert Assistance: If all other troubleshooting steps fail, contact Realtek support or the manufacturer of the user’s motherboard or laptop for further assistance.

FAQs: Addressing Common Queries

Q1: Why is the Realtek driver installation failing with error code 0x80070103?

A: This error code typically signifies a conflict or issue with the installation process. It could be caused by corrupted or incompatible drivers, conflicting software, system file corruption, insufficient permissions, or network connectivity problems.

Q2: What are the potential risks associated with the Realtek installation error?

A: The error can prevent the proper functioning of audio devices, leading to issues with sound output, microphone functionality, and potentially affecting system stability.

Q3: Can I use my computer without installing the Realtek audio driver?

A: While the computer might function without the Realtek driver, it will likely lack audio functionality. Depending on the system configuration, a generic audio driver might be installed, but it may not offer all the features and functionality of the Realtek driver.

Q4: Is there a specific Realtek driver version that is known to cause this error?

A: While specific driver versions might have known issues, the error is not limited to a single version. The issue is generally tied to the installation process and can occur with various driver versions.

Q5: Can I safely ignore the error and continue using my computer?

A: It is not recommended to ignore the error. While the computer might function without the Realtek driver, the error might indicate underlying system issues that could affect other software or hardware.

Tips for Preventing the Error:

  • Regular System Maintenance: Maintain a clean and updated system by regularly running system scans, cleaning the registry, and installing the latest Windows updates.
  • Avoid Unofficial Sources: Download drivers only from the official Realtek website or the manufacturer’s website for the user’s specific motherboard or laptop model.
  • Backup Important Data: Regularly back up important data to prevent data loss in case of system errors.
  • Monitor for Updates: Keep an eye on Realtek’s website for updates to their drivers. Regularly updating drivers can help resolve compatibility issues and improve system performance.

Conclusion: Ensuring Smooth Audio Functionality

The Realtek installation error, often accompanied by the code 0x80070103, can be a frustrating obstacle for Windows 11 users. By understanding the underlying causes and implementing the troubleshooting steps outlined in this guide, users can effectively address this error and restore their audio functionality. Remember to prioritize downloading drivers from official sources, running installations as administrator, and maintaining a clean and updated system to prevent future occurrences of this error.

Realtek Semiconductor Driver Install ERROR 0x80070103 on windows 11 ( easy fix ) - *new update* Realtek Semiconductor Corp Extension Install error in Windows 11 [SOLVED] - YouTube Fix Realtek Semiconductor Driver Install Error 0x80070103 On Windows 11
Fix Realtek Audio Console Not Working in Windows 11 – TechCult How To Download Install And Update Realtek Audio Driver In Windows 11  helpdeskgeek FIXED: Realtek HD Audio Manager Missing Windows 11 & 10  Working Tutorial  PC Error Fix - YouTube
How to Fix Windows 11 Update Error 0x800705aa? Here Are Some Ways Windows 11 Driver

Closure

Thus, we hope this article has provided valuable insights into Navigating the Realtek Installation Error on Windows 11: A Comprehensive Guide. We hope you find this article informative and beneficial. See you in our next article!

Understanding The "Documents" Folder On Windows 10: A Comprehensive Guide

Understanding the "Documents" Folder on Windows 10: A Comprehensive Guide

Introduction

In this auspicious occasion, we are delighted to delve into the intriguing topic related to Understanding the "Documents" Folder on Windows 10: A Comprehensive Guide. Let’s weave interesting information and offer fresh perspectives to the readers.

Understanding the "Documents" Folder on Windows 10: A Comprehensive Guide

Documents And Settings Win 10

The "Documents" folder, a prominent fixture on the Windows 10 desktop, serves as a central hub for user-generated content. This dedicated location simplifies file organization, providing a readily accessible repository for various document types, including text files, spreadsheets, presentations, images, and more.

The Significance of the "Documents" Folder

The "Documents" folder holds significant importance in the Windows 10 ecosystem for several reasons:

  • Centralized Storage: It acts as a designated space to store and manage user-created files, fostering a streamlined workflow.
  • Easy Access: Its prominent placement on the desktop ensures quick and effortless access to essential files.
  • Organization and Categorization: The folder structure encourages the creation of subfolders, enabling users to categorize and organize their documents efficiently.
  • Default Location for Applications: Many applications, particularly those designed for document creation and editing, automatically save files within the "Documents" folder, simplifying file management.
  • Synchronization: The "Documents" folder can be synchronized with cloud storage services like OneDrive, ensuring file accessibility across multiple devices.

Exploring the "Documents" Folder’s Structure and Functionality

The "Documents" folder, upon opening, presents a familiar file explorer interface. This interface allows users to:

  • Navigate: Utilize the navigation pane to browse through folders and subfolders within the "Documents" folder.
  • Create and Modify: Create new folders, rename existing ones, and delete folders as needed.
  • Organize Files: Drag and drop files into the "Documents" folder or its subfolders for convenient organization.
  • Search: Utilize the search bar to quickly locate specific files within the "Documents" folder.
  • Sort: Sort files by name, date modified, type, or size for enhanced organization.
  • View Options: Adjust file view options, including list, details, and thumbnail views, to optimize file display.

Understanding the Benefits of Using the "Documents" Folder

The "Documents" folder offers numerous benefits for Windows 10 users:

  • Enhanced Productivity: Centralized storage and easy access to files streamline workflow and improve productivity.
  • Improved Organization: The folder structure facilitates effective file organization, reducing clutter and enhancing efficiency.
  • Streamlined File Sharing: Sharing files stored within the "Documents" folder becomes effortless through email, cloud storage services, or external drives.
  • Simplified Backup: Backing up the "Documents" folder ensures the preservation of valuable user data.
  • Enhanced Security: The "Documents" folder can be secured with passwords or access restrictions, protecting sensitive information.

Frequently Asked Questions

Q: Can I rename or move the "Documents" folder?

A: While you can technically rename or move the "Documents" folder, it is strongly discouraged. This action can disrupt application functionality and lead to compatibility issues. It is best to use the folder as intended, maintaining its default location.

Q: Can I store files other than documents in the "Documents" folder?

A: Yes, the "Documents" folder can accommodate various file types, including images, videos, audio files, and other data. However, organizing files into dedicated subfolders based on their type is recommended for improved clarity and accessibility.

Q: How can I ensure the security of files stored within the "Documents" folder?

A: Windows 10 offers various security features to protect files stored in the "Documents" folder. These include:

  • Password Protection: Set passwords for individual files or folders to restrict access.
  • File Encryption: Encrypt sensitive files to prevent unauthorized access.
  • File Sharing Permissions: Configure file sharing permissions to control who can access and modify files within the "Documents" folder.

Tips for Optimizing the "Documents" Folder

  • Create Subfolders: Divide the "Documents" folder into subfolders based on file type, project, or any other logical categorization.
  • Use Descriptive Names: Name folders and files clearly and descriptively to facilitate easy identification.
  • Regularly Clean Up: Delete unnecessary files and folders to maintain a clean and organized "Documents" folder.
  • Utilize Cloud Storage: Sync the "Documents" folder with cloud storage services for accessibility across multiple devices.
  • Backup Regularly: Create regular backups of the "Documents" folder to safeguard important data.

Conclusion

The "Documents" folder on Windows 10 plays a crucial role in managing user-generated content. Its centralized storage, easy accessibility, and organizational features contribute significantly to a productive and efficient workflow. By understanding its functionality and incorporating best practices, users can leverage the "Documents" folder to organize their files effectively, enhance productivity, and protect valuable data.

Documents And Settings Win 10 Documents And Settings Win 10 Documents And Settings Folder
How to Move Documents Folder in Windows 10  LaptrinhX / News Documents And Settings Win 10 Windows 10 Tip: Manage Files and Folders with File Explorer
Windows 10 Tip: Manage Files and Folders with File Explorer Organize Folders and Files in Windows 10  CustomGuide

Closure

Thus, we hope this article has provided valuable insights into Understanding the "Documents" Folder on Windows 10: A Comprehensive Guide. We hope you find this article informative and beneficial. See you in our next article!

Reinstalling Windows 10: A Clean Slate For Your PC

Reinstalling Windows 10: A Clean Slate for Your PC

Introduction

With great pleasure, we will explore the intriguing topic related to Reinstalling Windows 10: A Clean Slate for Your PC. Let’s weave interesting information and offer fresh perspectives to the readers.

Reinstalling Windows 10: A Clean Slate for Your PC

Clean Install/ Reinstall Windows 10 - All Steps Included - Using a USB or DVD Installation Media

The allure of a fresh start is undeniable, particularly when it comes to a computer. Reinstalling Windows 10 can revitalize your PC’s performance, resolve persistent issues, and create a more streamlined user experience. However, the process often involves navigating a landscape of pre-installed applications, commonly known as bloatware, which can consume valuable resources and hinder overall efficiency. This article aims to provide a comprehensive guide to reinstalling Windows 10 while eliminating bloatware, allowing you to reclaim control over your digital environment.

The Importance of a Clean Installation

A clean installation of Windows 10 offers several advantages:

  • Enhanced Performance: By removing unnecessary software, a clean install frees up disk space, RAM, and processing power, resulting in faster boot times, smoother application launches, and improved overall performance.
  • Reduced Security Risks: Bloatware often includes vulnerabilities that can be exploited by malicious actors. A clean installation eliminates these risks, creating a more secure computing environment.
  • Personalized User Experience: A fresh install provides the opportunity to customize the operating system, selecting only the desired applications and settings. This tailored approach fosters a more efficient and enjoyable user experience.
  • Troubleshooting and Repair: Reinstalling Windows 10 can resolve various software conflicts, driver issues, and system errors that may have accumulated over time.

Methods for Reinstalling Windows 10

There are two primary methods for reinstalling Windows 10:

  1. In-place Upgrade: This method retains your personal files and settings while reinstalling the operating system. However, it does not eliminate bloatware.
  2. Clean Installation: This method completely wipes the hard drive, removing all data and software, including bloatware. It requires a backup of important files before proceeding.

The Clean Installation Approach: A Step-by-Step Guide

For a truly clean and efficient installation, the clean installation method is recommended. Here’s a detailed guide:

Step 1: Backup Your Data

Before embarking on a clean installation, it is crucial to back up all essential data. This includes documents, photos, videos, music, and any other important files. You can use external hard drives, cloud storage services, or USB drives for this purpose.

Step 2: Create a Bootable USB Drive

To install Windows 10 from scratch, you need a bootable USB drive containing the installation files. Microsoft provides a tool called the Media Creation Tool for this purpose. Download the tool from the official Microsoft website and follow the on-screen instructions to create a bootable USB drive.

Step 3: Access the BIOS and Boot from USB

Restart your computer and access the BIOS setup menu. This is typically done by pressing a specific key during the boot process, often F2, F12, or Delete. Consult your motherboard’s documentation for the correct key. Within the BIOS menu, navigate to the boot settings and prioritize the USB drive as the boot device. Save the changes and exit the BIOS.

Step 4: Install Windows 10

The computer will now boot from the USB drive and initiate the Windows 10 installation process. Follow the on-screen instructions, including selecting the language, keyboard layout, and time zone. You will then be prompted to choose the installation type. Select "Custom: Install Windows only (advanced)".

Step 5: Partition the Hard Drive

The next step involves partitioning the hard drive. This allows you to allocate specific space for the operating system and other files. If you are performing a clean installation, you can delete all existing partitions and create a new one for Windows 10.

Step 6: Complete the Installation

Once the partitions are set up, the installation process will continue. This may take some time, depending on the speed of your computer and the size of the hard drive. Once the installation is complete, you will be prompted to create a user account and configure basic settings.

Step 7: Install Essential Drivers

After completing the initial setup, it is essential to install the necessary device drivers. These drivers ensure that your hardware, such as the graphics card, sound card, and network adapter, functions correctly. You can download the drivers from the manufacturer’s website or use a driver update utility.

Eliminating Bloatware: The Final Step

With Windows 10 installed, you can now focus on removing any unwanted bloatware. Here are some effective methods:

  • Uninstall Through Settings: Access the "Settings" app, navigate to "Apps," and select "Apps & features." From here, you can identify and uninstall unwanted applications.
  • Use a Third-Party Uninstaller: Specialized uninstaller tools, such as Revo Uninstaller or IObit Uninstaller, offer advanced features like deep scanning and removal of leftover files.
  • Disable Bloatware: For applications you don’t want to uninstall but prefer to disable, you can use the "Disable" option in the "Apps & features" settings or use a third-party tool like Autoruns for a more comprehensive approach.

Tips for a Smooth Reinstallation

  • Create a Bootable USB Drive with the Latest Version of Windows 10: Ensure you are using the most up-to-date version of Windows 10 for optimal compatibility and security.
  • Back Up Your Drivers: Before reinstalling Windows 10, back up your existing device drivers to avoid reinstalling them manually later.
  • Download Essential Applications: Prepare a list of essential applications that you will need after reinstalling Windows 10. Download them beforehand for easy installation.
  • Consider a Minimalist Approach: Opt for a clean installation with minimal applications and settings. This creates a leaner and more responsive operating system.

FAQs: Addressing Common Concerns

Q: Will reinstalling Windows 10 erase my data?

A: Yes, a clean installation of Windows 10 will erase all data on the hard drive. It is crucial to back up your data before proceeding.

Q: Can I reinstall Windows 10 without a USB drive?

A: While it is possible to reinstall Windows 10 using a DVD, a USB drive is the preferred method due to its portability and speed.

Q: What if I encounter errors during the installation process?

A: If you encounter errors, consult Microsoft’s support website or seek assistance from a qualified technician.

Q: How often should I reinstall Windows 10?

A: Reinstalling Windows 10 is generally recommended every 1-2 years or when experiencing significant performance issues.

Conclusion: Reclaiming Your Digital Freedom

Reinstalling Windows 10 without bloatware empowers you to regain control over your computing environment. By eliminating unnecessary software, you can enhance performance, improve security, and create a personalized user experience. This comprehensive guide provides a step-by-step approach to a clean installation, ensuring a smooth and efficient process. Remember to back up your data, create a bootable USB drive, and follow the instructions carefully. With a clean installation, you can enjoy a revitalized PC, free from bloatware and ready for a fresh start.

How To Reinstall Windows 10 Step By Step with Pictures 3 Ways to Reinstall Windows 10 without Losing Data - Chrunos Reinstall Windows 10. Step-by-step tutorial. — How To Fix Guide
How to use Reset this PC to easily reinstall Windows 10 How To Reinstall Windows 10 Step By Step with Pictures How to: Perform a Clean Install or Reinstall of Windows 10 - Microsoft Community
How To Reinstall Windows 10 Clean - triplegoodsite How to: Perform a Clean Install or Reinstall of Windows 10 - Microsoft Community

Closure

Thus, we hope this article has provided valuable insights into Reinstalling Windows 10: A Clean Slate for Your PC. We hope you find this article informative and beneficial. See you in our next article!

Troubleshooting Printer Connectivity In Windows 10: A Comprehensive Guide

Troubleshooting Printer Connectivity in Windows 10: A Comprehensive Guide

Introduction

In this auspicious occasion, we are delighted to delve into the intriguing topic related to Troubleshooting Printer Connectivity in Windows 10: A Comprehensive Guide. Let’s weave interesting information and offer fresh perspectives to the readers.

Troubleshooting Printer Connectivity in Windows 10: A Comprehensive Guide

Top 3 Methods to Fix Windows 10 Printer Problems

In the modern digital landscape, printers have become indispensable tools for both personal and professional tasks. However, encountering connectivity issues with your printer can be frustrating, disrupting workflow and productivity. This comprehensive guide aims to equip users with the knowledge and steps necessary to effectively troubleshoot and resolve common printer connectivity problems in Windows 10.

Understanding Printer Connectivity

Before diving into troubleshooting steps, it’s crucial to understand the underlying principles of printer connectivity in Windows 10. Printers connect to computers via various methods, each with its own set of potential issues:

  • USB Connection: This is the most common method, offering a direct physical link between the printer and computer.
  • Wireless Network: Printers equipped with Wi-Fi capabilities can connect to a local network, allowing multiple devices to share access.
  • Ethernet Connection: This method provides a wired connection, often preferred for its stability and speed, particularly in high-traffic environments.
  • Cloud Printing: This modern approach utilizes cloud services to facilitate printing from various devices, regardless of location.

Common Printer Connectivity Issues in Windows 10

While various factors can contribute to printer connectivity problems, some recurring issues are more prevalent:

  • Driver Issues: Outdated or incompatible printer drivers can prevent proper communication between the printer and computer.
  • Network Connectivity: Problems with the Wi-Fi network, router, or network settings can disrupt communication with a wireless printer.
  • Power Issues: A printer that is not receiving sufficient power may fail to respond to commands or connect to the network.
  • Hardware Malfunctions: Faulty cables, damaged ports, or internal printer components can lead to connectivity problems.
  • Software Conflicts: Occasionally, other software programs or conflicting settings can interfere with printer functionality.

Troubleshooting Steps for Printer Connectivity

Addressing printer connectivity issues in Windows 10 requires a systematic approach. The following steps outline a comprehensive troubleshooting process:

1. Verify Basic Connections:

  • USB: Ensure the USB cable is securely connected to both the printer and the computer. Try a different USB port if available.
  • Wireless: Confirm that the printer is connected to the same Wi-Fi network as the computer.
  • Ethernet: Verify that the Ethernet cable is correctly plugged into both the printer and the network router.

2. Check Printer Power:

  • Ensure the printer is turned on and receiving power.
  • Check the power cord for any damage or loose connections.
  • If using a power strip, verify it’s functioning correctly.

3. Update or Reinstall Printer Drivers:

  • Windows Update: Windows automatically updates drivers, but it’s recommended to manually check for the latest version.
  • Manufacturer Website: Download the most recent driver for your printer model from the manufacturer’s website.
  • Device Manager: Access the Device Manager (right-click "This PC" > "Manage" > "Device Manager") and check for any error messages or yellow exclamation marks next to the printer. Update or reinstall the driver if necessary.

4. Troubleshoot Network Connectivity:

  • Network Troubleshooter: Run the Windows Network Troubleshooter (Settings > Network & Internet > Status > Troubleshoot).
  • Router Restart: Restart your router and modem to refresh the network connection.
  • Wi-Fi Signal Strength: Ensure a strong Wi-Fi signal reaches the printer. Consider repositioning the router or using a Wi-Fi extender if needed.
  • Network Settings: Verify the printer’s network settings, such as IP address and SSID, match those of the computer and router.

5. Restart Services:

  • Print Spooler: Restart the Print Spooler service (Search "services.msc" > locate "Print Spooler" > right-click > "Restart").
  • Other Relevant Services: Check for other services related to printing and networking, such as "Windows Update," "Network Location Awareness," and "DHCP Client." Restart any services that appear to be malfunctioning.

6. Clear Print Queue:

  • Open Print Queue: Open the "Printers & Scanners" settings (Settings > Devices > Printers & Scanners) and locate the printer.
  • Clear Queue: Right-click the printer icon > "See what’s printing" > "Cancel all documents."

7. Run System File Checker:

  • Command Prompt: Open the Command Prompt as administrator (Search "cmd" > right-click > "Run as administrator").
  • Run Command: Type "sfc /scannow" and press Enter. This will scan for and repair corrupt system files.

8. Check for Software Conflicts:

  • Uninstall Recent Software: If the problem arose after installing new software, consider uninstalling it to see if the issue resolves.
  • Disable Antivirus: Temporarily disable your antivirus software to rule out any potential conflicts.

9. Reset Printer to Factory Defaults:

  • Printer Settings: Refer to your printer’s user manual for instructions on resetting the printer to factory defaults. This can resolve network connectivity issues caused by incorrect settings.

10. Contact Manufacturer Support:

  • If all troubleshooting steps have been exhausted, it’s advisable to contact the printer manufacturer’s support team for further assistance. They may be able to provide more specific solutions or diagnose hardware problems.

Frequently Asked Questions (FAQs)

1. How do I know if my printer is online?

The printer status in the "Printers & Scanners" settings will indicate whether it’s online. A green checkmark indicates a connected printer.

2. My printer is connected to the network but not printing. What should I do?

This could indicate a driver issue, a problem with the print queue, or a network connectivity issue. Follow the troubleshooting steps outlined above, focusing on driver updates, clearing the print queue, and verifying network settings.

3. Why does my printer keep going offline?

Frequent disconnections could be due to weak Wi-Fi signal, power issues, or network congestion. Check the Wi-Fi signal strength, ensure the printer is receiving adequate power, and consider restarting your router.

4. How do I troubleshoot a printer that is not recognized by Windows 10?

Firstly, ensure the printer is connected correctly. If it’s a USB connection, try a different port. If it’s a wireless printer, verify network connectivity. If the problem persists, check for driver issues or run the Windows Network Troubleshooter.

5. Can I use a printer on a different network without connecting it?

Yes, cloud printing services allow you to print to a printer on a different network without physically connecting it to your computer. This requires setting up a cloud printing account and configuring the printer for cloud printing.

Tips for Maintaining Printer Connectivity

  • Regular Driver Updates: Keep your printer drivers up to date to ensure optimal performance and compatibility.
  • Strong Wi-Fi Signal: Ensure a strong Wi-Fi signal reaches the printer to prevent disconnections.
  • Power Management: Avoid setting power-saving options for the printer that may cause it to turn off unexpectedly.
  • Network Security: Use strong passwords and keep your router’s firmware up to date to protect your network and printers from unauthorized access.

Conclusion

Effective troubleshooting of printer connectivity issues in Windows 10 requires a systematic approach. By following the steps outlined in this guide, users can identify and resolve most common connectivity problems. Regular maintenance, including driver updates and network security practices, can help prevent future issues and ensure seamless printing functionality.

How to Fix Printer Problems in Windows 10? – WebNots Mastering Printer Connectivity: Windows Troubleshooting Guide - YouTube How to Troubleshoot a Printer Connection in Windows
How to Troubleshoot Common Printer Problems in Windows 10 How To Troubleshoot Common Printer Problems In Windows 10  technotips Fix "Windows Cannot Connect to the Printer" Error
Printer Troubleshooter For Windows 10 Pc Windows - Vrogue How to Troubleshoot Common Printer Problems in Windows 10

Closure

Thus, we hope this article has provided valuable insights into Troubleshooting Printer Connectivity in Windows 10: A Comprehensive Guide. We hope you find this article informative and beneficial. See you in our next article!

Qwindows10

qwindows10

Introduction

With enthusiasm, let’s navigate through the intriguing topic related to qwindows10. Let’s weave interesting information and offer fresh perspectives to the readers.

It appears you are asking about a hypothetical operating system called "qwindows10". There is no known operating system with that name. It’s possible you are referring to a variation of Windows 10, a common operating system for personal computers.

Windows 10 Wallpapers, Pictures, Images

However, since "qwindows10" is not a recognized operating system, I cannot provide an article about it.

If you could clarify your query by providing more context or information about what you are looking for, I might be able to assist you further. For example, you could specify:

  • What features or functionalities are you interested in?
  • What aspects of Windows 10 are you curious about?
  • Are you looking for information about a specific version of Windows 10?

By providing more details, I can help you find the information you need.

Windows 10 22H2: Everything you need to know - Pureinfotech Windows 10 Pro 22h2 Download 2023 – Get Latest Windows 10 Update Download windows 10 iso 64 bit fshare - bapebook
Microsoft unveils a lot of big changes for Windows 10 - The Verge Descargar Windows 10 gratis - Instalación Window 10 logo png, Window 10 icon transparent png 20975526 PNG
Windows 10jpeg Png Windows Windows 10 Ipentec Images Windows 10 Professional For Business - Buy Windows 10 Pro Key

Closure

Thus, we hope this article has provided valuable insights into qwindows10. We appreciate your attention to our article. See you in our next article!

Windows 11’s File Explorer: A New Era Of Organization And Efficiency

Windows 11’s File Explorer: A New Era of Organization and Efficiency

Introduction

In this auspicious occasion, we are delighted to delve into the intriguing topic related to Windows 11’s File Explorer: A New Era of Organization and Efficiency. Let’s weave interesting information and offer fresh perspectives to the readers.

Windows 11’s File Explorer: A New Era of Organization and Efficiency

Here’s What Windows 11’s New File Explorer Looks Like - How-To Geek  Explor Exs

Windows 11 introduces a revolutionary feature that transforms how users navigate and manage files: tabbed File Explorer. This innovation, inspired by modern web browsers, significantly enhances user experience by enabling seamless multi-tasking and a more intuitive approach to file management.

The Advantages of Tabbed File Explorer

Tabbed File Explorer offers a plethora of benefits, fundamentally changing how users interact with their files:

1. Enhanced Multi-tasking: The ability to open multiple file locations in separate tabs within the same File Explorer window eliminates the need to constantly switch between windows. Users can effortlessly navigate between different folders, drives, or network locations without losing track of their work. This streamlined approach significantly improves productivity, especially when working with multiple projects or managing large amounts of data.

2. Improved Organization: Tabbed File Explorer provides a more structured and organized view of files. Each tab acts as a dedicated workspace, allowing users to group related files or folders together. This eliminates the need to open numerous windows, creating a cleaner and more efficient workflow.

3. Simplified Navigation: Navigating between folders and drives is now significantly easier. Users can quickly switch between tabs to access different locations within the same window, eliminating the need to repeatedly click through menus or use the address bar. This intuitive navigation system significantly reduces time spent searching for files and improves overall efficiency.

4. Enhanced Memory Management: Tabbed File Explorer optimizes memory usage by consolidating multiple file locations into a single window. This reduces system strain and improves overall performance, particularly on systems with limited resources.

5. Consistent User Experience: The integration of tabs into File Explorer aligns with the user experience of modern web browsers, making it familiar and intuitive for users accustomed to tabbed interfaces. This consistency reduces the learning curve and allows users to seamlessly transition between applications.

Understanding Tabbed File Explorer in Action

To fully appreciate the impact of tabbed File Explorer, consider the following scenarios:

  • Working on a project: Instead of opening separate windows for project folders, documents, and images, users can now access them all within a single File Explorer window, organized into different tabs. This eliminates the clutter of multiple windows and streamlines the workflow.
  • Managing multiple files from different locations: Tabbed File Explorer allows users to open folders from different drives, network shares, or cloud storage services in separate tabs. This provides a central location for accessing and managing files from various sources, without the need to constantly switch between windows.
  • Comparing files: Users can easily open two folders in separate tabs and compare their contents side-by-side, allowing for faster and more efficient file management.

Beyond the Basics: Exploring the Potential of Tabbed File Explorer

The benefits of tabbed File Explorer extend beyond its core functionality. Here are some advanced features and potential use cases:

  • Customizable Tab Behavior: Users can customize tab behavior to suit their workflow. This includes options for pinning frequently used folders, closing tabs automatically after a certain period of inactivity, and customizing the display of tab titles.
  • Integration with Other Applications: Tabbed File Explorer can be integrated with other applications, enabling users to seamlessly open files from different programs within the same window. This eliminates the need to switch between applications and creates a more cohesive workflow.
  • Enhanced Search Functionality: Tabbed File Explorer can be combined with advanced search features, allowing users to quickly find specific files across multiple folders and drives. This streamlined search process significantly reduces the time spent searching for files.

FAQs on Tabbed File Explorer

Q: How do I enable tabbed File Explorer in Windows 11?

A: Tabbed File Explorer is a built-in feature of Windows 11 and should be automatically enabled. If you are not seeing tabs in your File Explorer, ensure you are running the latest version of Windows 11.

Q: Can I customize the appearance of tabs in File Explorer?

A: While you cannot customize the visual appearance of tabs, you can customize their behavior, such as pinning tabs or automatically closing them after a certain period of inactivity.

Q: Can I open tabs in File Explorer from other applications?

A: While you cannot directly open tabs from other applications, you can drag and drop files or folders from other programs into File Explorer to open them in a new tab.

Q: Are there any limitations to tabbed File Explorer?

A: Tabbed File Explorer is a relatively new feature, and there are some limitations. For example, you cannot currently drag and drop files between tabs or use the tabbed interface to manage files in cloud storage services. However, these limitations are expected to be addressed in future updates.

Tips for Utilizing Tabbed File Explorer

  • Organize your tabs: Use tabs to group related files or folders together, creating a more structured and efficient workflow.
  • Pin frequently used folders: Pin folders you access regularly to your tabs for quick access.
  • Customize tab behavior: Experiment with different tab settings to find what works best for you.
  • Use tabbed File Explorer with other applications: Integrate tabbed File Explorer with other programs to create a seamless workflow.

Conclusion: Embracing the Future of File Management

Tabbed File Explorer is a game-changer for Windows 11 users, offering a more intuitive, efficient, and organized approach to file management. By embracing this innovative feature, users can streamline their workflows, increase productivity, and unlock the full potential of their digital workspace. As the feature evolves, it promises to become an indispensable tool for anyone who relies on their computer for work, creativity, or personal organization.

This is Windows 11's new File Explorer, biggest update since Windows 8 Microsoft reveals brief look at Windows 11's new modern File Explorer UI  Windows Central Here's a better look at new Windows 11 File Explorer, Settings app
Windows 11 File Explorer The first preview of Windows 11 is now available How To Use The New File Explorer In Windows 11 And Cr - vrogue.co
How to enable the new File Explorer UI in Windows 11 if you're an Insider Microsoft released redesigned File Explorer for Windows 11, here is how to enable it - Neowin

Closure

Thus, we hope this article has provided valuable insights into Windows 11’s File Explorer: A New Era of Organization and Efficiency. We appreciate your attention to our article. See you in our next article!

The Allure Of PhotoImpression: A Comprehensive Exploration

The Allure of PhotoImpression: A Comprehensive Exploration

Introduction

In this auspicious occasion, we are delighted to delve into the intriguing topic related to The Allure of PhotoImpression: A Comprehensive Exploration. Let’s weave interesting information and offer fresh perspectives to the readers.

The Allure of PhotoImpression: A Comprehensive Exploration

(a) Schematic for the photoimpression patterning of photoadaptable  Download Scientific Diagram

PhotoImpression, a powerful image editing software, has long been a popular choice for both amateur and professional photographers seeking to enhance their images. While the software is no longer actively developed or supported, its legacy continues to resonate within the digital imaging community. This article delves into the features, benefits, and historical significance of PhotoImpression, providing a comprehensive understanding of its capabilities and impact.

A Glimpse into PhotoImpression’s Capabilities:

PhotoImpression, developed by MGI Software, was renowned for its user-friendly interface and an impressive range of editing tools, catering to a wide spectrum of needs. The software provided a comprehensive suite of features, allowing users to:

  • Basic Image Adjustments: PhotoImpression facilitated fundamental image modifications like brightness, contrast, saturation, and color balance adjustments, enabling users to refine the overall tone and appearance of their images.
  • Special Effects: Users could imbue their images with creative flair using a plethora of special effects, including blur, sharpen, emboss, and vignette effects, adding artistic depth and visual interest.
  • Image Manipulation: PhotoImpression offered tools for image cropping, resizing, and rotating, allowing users to tailor their images to specific requirements.
  • Text and Shapes: The software enabled users to incorporate text and various shapes into their images, facilitating the creation of personalized captions, watermarks, or decorative elements.
  • Layers and Masks: PhotoImpression’s layered editing capabilities allowed users to work with multiple image elements independently, providing flexibility and control over image composition.
  • Filters and Presets: A selection of filters and presets were available, providing quick and easy ways to apply stylistic enhancements to images, streamlining the editing process.

The Advantages of PhotoImpression:

PhotoImpression’s appeal stemmed from its user-friendliness and accessibility, making it a popular choice for individuals seeking to enhance their images without the complexities of professional-grade software.

  • Ease of Use: PhotoImpression’s intuitive interface and straightforward design made it easy for users of all skill levels to navigate and utilize its features.
  • Wide Range of Tools: The comprehensive set of tools provided a versatile platform for image manipulation, catering to diverse editing needs.
  • Affordable Pricing: PhotoImpression’s competitive pricing made it an attractive option for budget-conscious individuals seeking high-quality image editing capabilities.
  • Offline Functionality: Unlike many contemporary image editing programs, PhotoImpression operated offline, eliminating the need for an internet connection, providing greater flexibility and accessibility.

The Significance of PhotoImpression in the Digital Landscape:

While PhotoImpression is no longer actively developed, its impact on the digital landscape remains significant. It played a crucial role in democratizing image editing, making it accessible to a broader audience. Its user-friendly approach paved the way for the proliferation of image editing software, fostering creativity and visual expression among individuals.

FAQs Regarding PhotoImpression:

Q: Is PhotoImpression still available for download?

A: PhotoImpression is no longer available for download as it is no longer actively developed or supported by MGI Software.

Q: Can I still use PhotoImpression on my computer?

A: While PhotoImpression is no longer supported, you may still be able to use it on your computer if you have a previously downloaded version. However, it is important to note that the software may not be compatible with newer operating systems and may lack security updates.

Q: Are there any alternatives to PhotoImpression?

A: Numerous image editing software options are available, ranging from free open-source alternatives to professional-grade packages. Some popular alternatives include GIMP, Adobe Photoshop, Paint.NET, and Affinity Photo.

Q: What happened to PhotoImpression?

A: MGI Software ceased development and support for PhotoImpression, likely due to a combination of factors, including the emergence of newer, more advanced image editing software and the evolving demands of the digital landscape.

Tips for Using PhotoImpression:

  • Start with the basics: Begin by familiarizing yourself with the fundamental editing tools, such as brightness, contrast, and saturation adjustments, before exploring more advanced features.
  • Experiment with effects: Use the special effects and filters to explore different artistic styles and enhance your images creatively.
  • Utilize layers: Leverage the layered editing capabilities to work with multiple image elements independently, providing greater control and flexibility.
  • Save your work regularly: Regularly save your progress to prevent losing your edits in case of unexpected software crashes or interruptions.
  • Explore tutorials and online resources: Numerous online resources, tutorials, and forums are available to assist you in mastering PhotoImpression’s features and techniques.

Conclusion:

While PhotoImpression may have reached the end of its active development cycle, its legacy continues to inspire and influence the digital imaging landscape. Its user-friendly approach and powerful features made image editing accessible to a wider audience, fostering creativity and visual expression. While newer, more advanced software options have emerged, PhotoImpression remains a testament to the evolution of digital imaging tools and the enduring power of accessibility in creative expression.

The Timeless Allure of Black and White Photography: A Comprehensive Exploration – Exploring the PhotoImpressionとは何ですか?(ArcSoftより) ArcSoft PhotoImpression Software Informer: Screenshots
PhotoImpression 3.0 - Macintosh Repository wandering in the light: The Gaia Birds Revisited :: My PhotoImpressions Method wandering in the light: Creating a PhotoImpression for the final patch
The Allure of Art: A Comprehensive Exploration ArcSoft PhotoImpression 6 User Manual  Manualzz

Closure

Thus, we hope this article has provided valuable insights into The Allure of PhotoImpression: A Comprehensive Exploration. We thank you for taking the time to read this article. See you in our next article!

Navigating The Path To Windows 11: A Comprehensive Guide To Installation Methods

Navigating the Path to Windows 11: A Comprehensive Guide to Installation Methods

Introduction

With great pleasure, we will explore the intriguing topic related to Navigating the Path to Windows 11: A Comprehensive Guide to Installation Methods. Let’s weave interesting information and offer fresh perspectives to the readers.

Windows 11 User Guide A Step By Step Guide To Install And Use The New Images

The release of Windows 11 has ushered in a new era of user experience, boasting an array of enhancements and features. However, the transition from previous operating systems necessitates a meticulous approach to installation. This article delves into the various methods available for installing Windows 11, providing a comprehensive understanding of each option and its associated considerations.

1. Upgrading from a Compatible Windows 10 Version:

This method is the most straightforward option for users already running a compatible version of Windows 10. The process involves leveraging the built-in Windows Update functionality to download and install the necessary files.

Benefits:

  • Convenience: The process is automated, requiring minimal user interaction.
  • Preservation of Data: Existing user data and applications are generally retained.

Considerations:

  • System Requirements: The system must meet the minimum hardware requirements for Windows 11.
  • Compatibility: Not all Windows 10 versions are eligible for the upgrade.

2. Clean Installation via USB Drive:

This method involves creating a bootable USB drive containing the Windows 11 installation files and then booting from it to perform a fresh installation. This approach is ideal for users seeking a clean slate or experiencing system issues.

Benefits:

  • Fresh Start: Removes any existing software or data, providing a clean environment.
  • Troubleshooting: Useful for resolving system errors or conflicts.

Considerations:

  • Data Loss: All existing data will be erased during the installation process.
  • Preparation: Requires creating a bootable USB drive and backing up important data.

3. Installing from an ISO File:

This method involves downloading the Windows 11 ISO file and then using a tool like Rufus or Universal USB Installer to create a bootable USB drive. The installation process is similar to the clean installation from a USB drive.

Benefits:

  • Flexibility: Allows users to choose the specific edition of Windows 11 to install.
  • Customization: Offers the option to customize the installation process.

Considerations:

  • Technical Expertise: Requires a basic understanding of ISO files and bootable USB drives.
  • Compatibility: Ensure the ISO file is compatible with the system architecture.

4. Using a Virtual Machine:

This method involves creating a virtual environment within an existing operating system to run Windows 11. This approach is ideal for testing purposes or users who want to experiment with the new operating system without affecting their primary system.

Benefits:

  • Isolation: Creates a separate environment for Windows 11, preventing conflicts with the host system.
  • Testing: Allows users to try Windows 11 without committing to a full installation.

Considerations:

  • Performance: Virtual machines may experience performance limitations compared to a native installation.
  • Resource Requirements: Requires sufficient system resources to run both the host operating system and the virtual machine.

5. Utilizing a Third-Party Tool:

Several third-party tools, such as the Media Creation Tool, are available to assist with the Windows 11 installation process. These tools simplify the process and provide additional features, such as the ability to create bootable USB drives.

Benefits:

  • Ease of Use: Simplifies the installation process with a user-friendly interface.
  • Additional Features: May offer features like system diagnostics and partitioning tools.

Considerations:

  • Reliability: Ensure the tool is from a trusted source and has a good reputation.
  • Compatibility: Verify compatibility with the specific Windows 11 edition and system architecture.

FAQs on Windows 11 Installation:

1. What are the minimum system requirements for Windows 11?

Windows 11 requires a processor with at least two cores running at 1 GHz or faster, 4 GB of RAM, 64 GB of storage space, and a compatible graphics card. Additionally, the system must have a UEFI firmware with Secure Boot enabled.

2. Is it possible to upgrade from Windows 7 or 8.1 to Windows 11?

Directly upgrading from Windows 7 or 8.1 to Windows 11 is not possible. Users need to first upgrade to Windows 10 and then perform the upgrade to Windows 11.

3. What happens to my data during a clean installation?

A clean installation will erase all data from the target drive. It is crucial to back up important data before proceeding with a clean installation.

4. Can I perform a clean installation without a bootable USB drive?

While it is possible to install Windows 11 without a bootable USB drive, it is highly recommended to use one for a clean installation. This approach ensures a stable and reliable installation process.

5. What are the benefits of performing a clean installation?

A clean installation removes any existing software or data, providing a fresh environment and potentially resolving system issues. It also allows for a more efficient and streamlined installation process.

Tips for Successful Windows 11 Installation:

  • Check System Requirements: Ensure the system meets the minimum requirements for Windows 11 before proceeding with the installation.
  • Back Up Data: Create a complete backup of all important data before attempting any installation method.
  • Use a Reliable Tool: Opt for trusted tools and sources when creating bootable USB drives or downloading ISO files.
  • Follow the Instructions Carefully: Adhere to the instructions provided during the installation process to avoid any errors or issues.
  • Test the Installation: After the installation is complete, test the system functionality to ensure everything is working correctly.

Conclusion:

Installing Windows 11 requires careful planning and consideration of the available options. Whether upgrading from Windows 10, performing a clean installation, or utilizing a virtual machine, each method offers distinct advantages and disadvantages. Understanding the nuances of each approach and following the provided guidelines will contribute to a smooth and successful installation process. Remember to prioritize data backup and system compatibility to ensure a seamless transition to the latest version of Windows.

Windows 11 Windows 11 Installation How To Install Windows 11 Images Windows 11 Complete Installation Step By Step Youtube - Vrogue PPT - A Comprehensive Installation Guide to Windows 11 ARM With ISO PowerPoint Presentation - ID
How to Download and Install Windows 11 Official [Complete Guide] 2022 - YouTube How to install Windows 11: Step by Step Complete Guide  Electronics Monk GET (?PDF?) DOWNLOAD Windows 11: 2022 Complete User Guide. Everything You Need to Know Before
Buy Windows 11: A Complete Tutorial Guide for Beginners with Tips & Tricks to Mastering Windows How to install Windows 11: Step by Step Complete Guide - Electronics Monk

Closure

Thus, we hope this article has provided valuable insights into Navigating the Path to Windows 11: A Comprehensive Guide to Installation Methods. We appreciate your attention to our article. See you in our next article!