Archives 2024

Powering Down: A Comprehensive Guide To Shutting Down Windows 11

Powering Down: A Comprehensive Guide to Shutting Down Windows 11

Introduction

In this auspicious occasion, we are delighted to delve into the intriguing topic related to Powering Down: A Comprehensive Guide to Shutting Down Windows 11. Let’s weave interesting information and offer fresh perspectives to the readers.

Powering Down: A Comprehensive Guide to Shutting Down Windows 11

Different Ways to Shut Down Windows 11 Systems - Tutorial

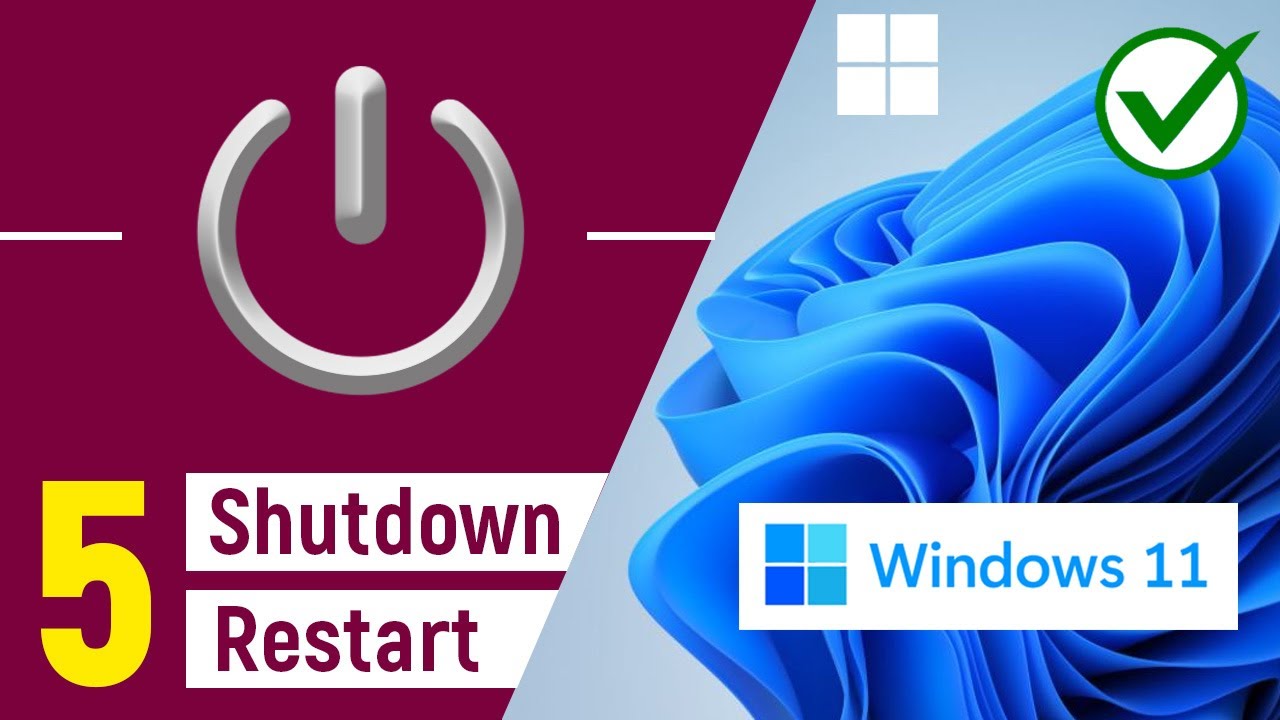
In the digital realm, the act of powering down a computer, while seemingly simple, is a crucial step in maintaining system stability and ensuring data integrity. Windows 11, Microsoft’s latest operating system, offers various methods for gracefully shutting down the computer, each catering to specific user needs and scenarios. This article delves into the intricacies of these methods, outlining their functionalities and highlighting their importance in the context of a robust computing experience.

The Importance of Proper Shutdown

The act of shutting down a computer is not merely about turning off the power. It involves a series of processes that ensure all running applications are closed, data is saved, and the system is prepared for a safe restart. This meticulous sequence prevents data corruption, minimizes the risk of system instability, and ensures a smooth transition to the next use.

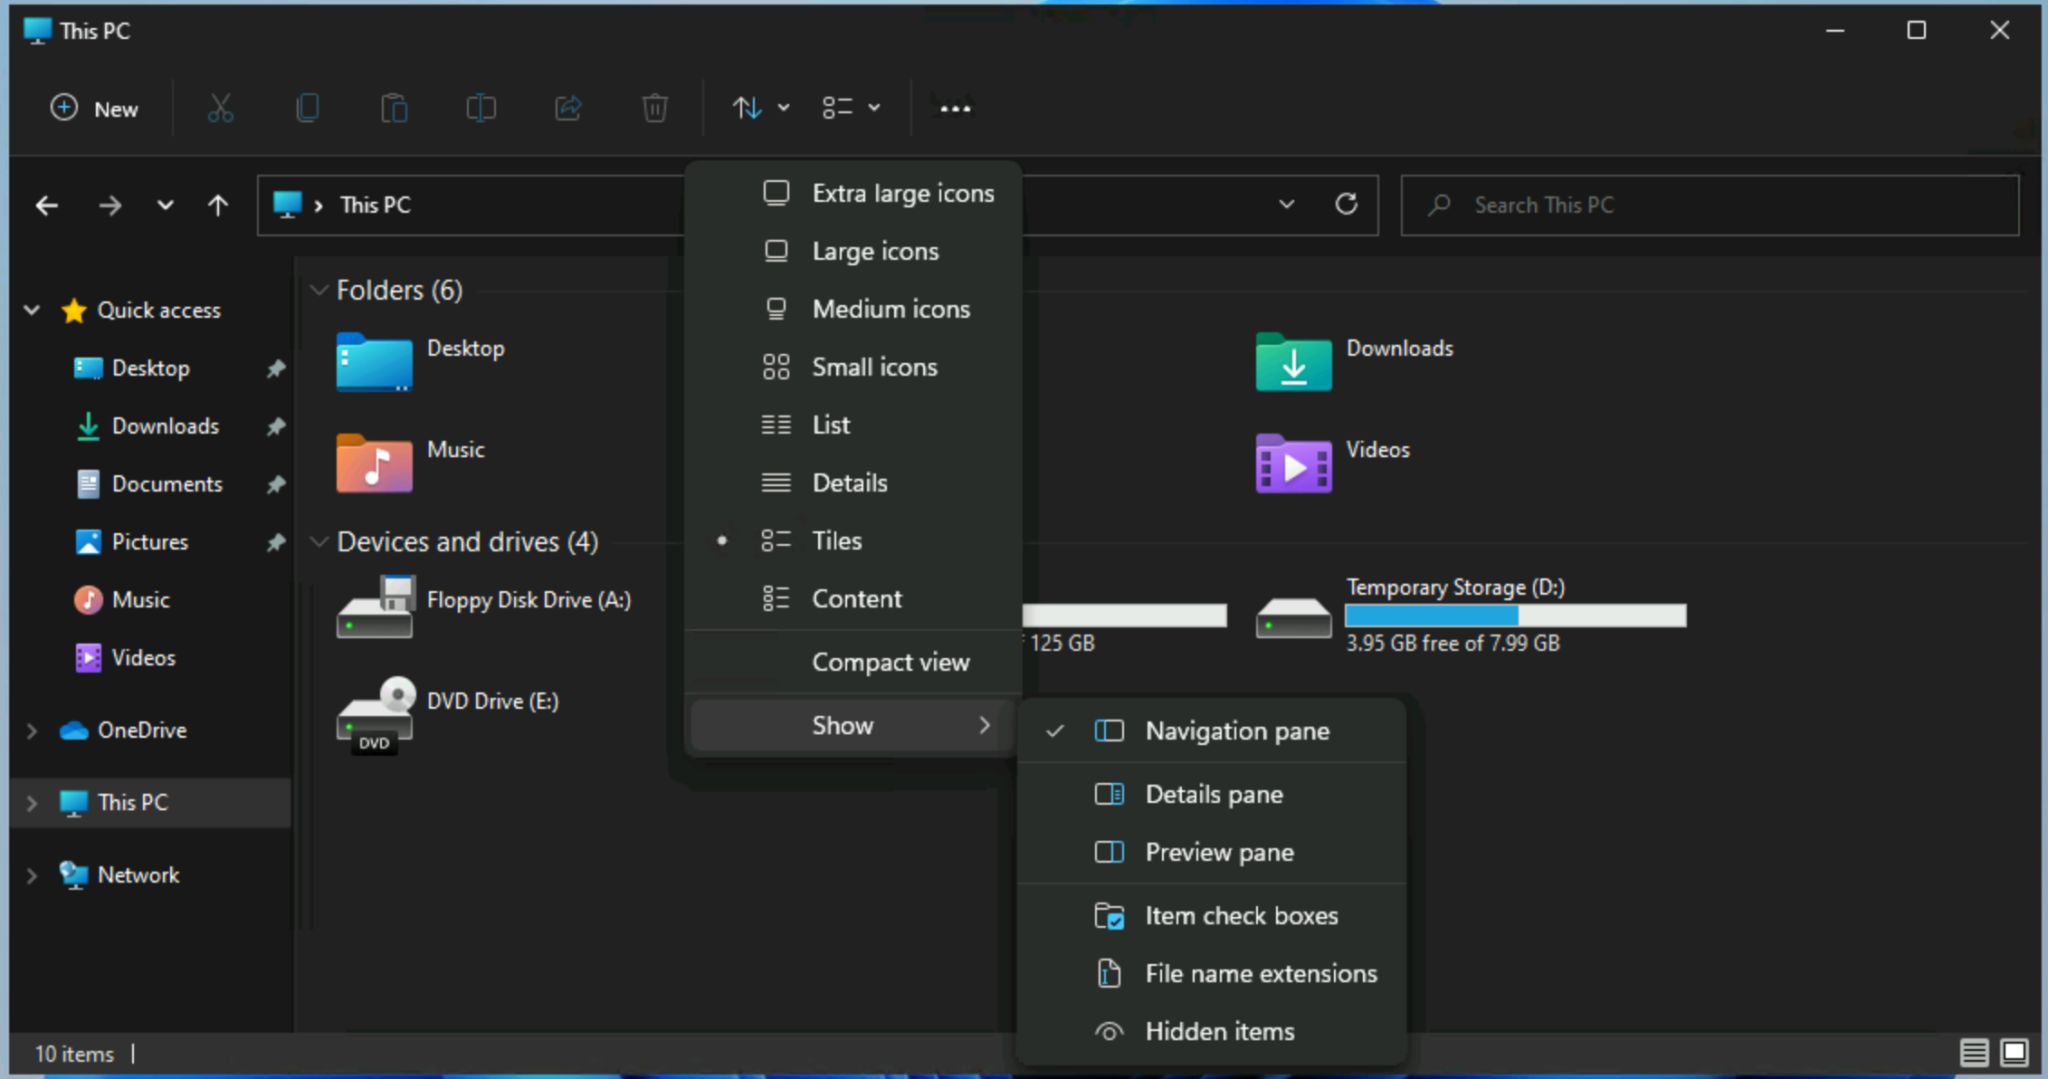
Methods for Powering Down Your Windows 11 Computer

1. The Start Menu Approach

The Start Menu remains the quintessential method for initiating a shutdown in Windows 11. This method is straightforward and readily accessible, making it the go-to option for most users.

  • Locate the Start Menu: The Start Menu icon is typically found at the bottom left corner of the taskbar.
  • Access the Power Options: Click on the Start Menu icon, then navigate to the "Power" button.
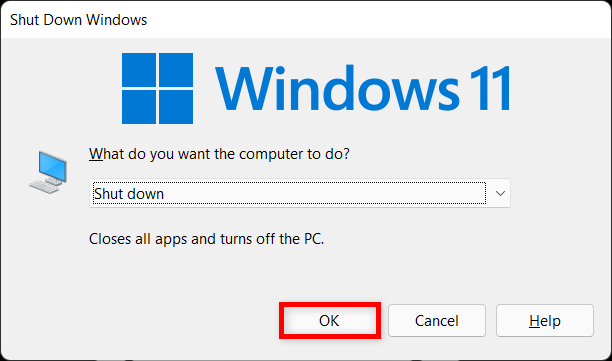
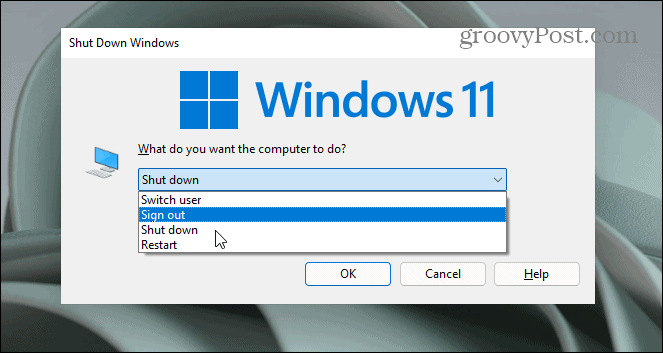
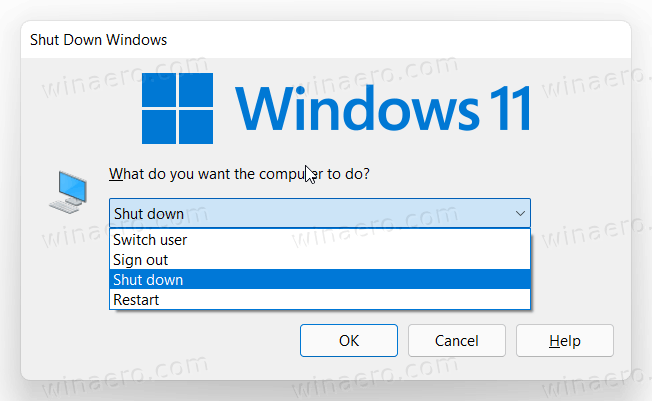
  • Initiate Shutdown: Select "Shut down" from the list of options.

2. The Keyboard Shortcut Method

For users who prefer a faster and more efficient approach, Windows 11 offers a keyboard shortcut for initiating a shutdown.

  • Press the Alt key and the F4 key simultaneously. This combination brings up the "Shut Down Windows" dialog box.
  • Select "Shut down" from the options.

3. The "Sign Out" Option

The "Sign Out" option, found within the Start Menu’s "Power" button, offers a more nuanced shutdown experience. This option logs the current user out of the system, leaving the computer running for other users or for background tasks.

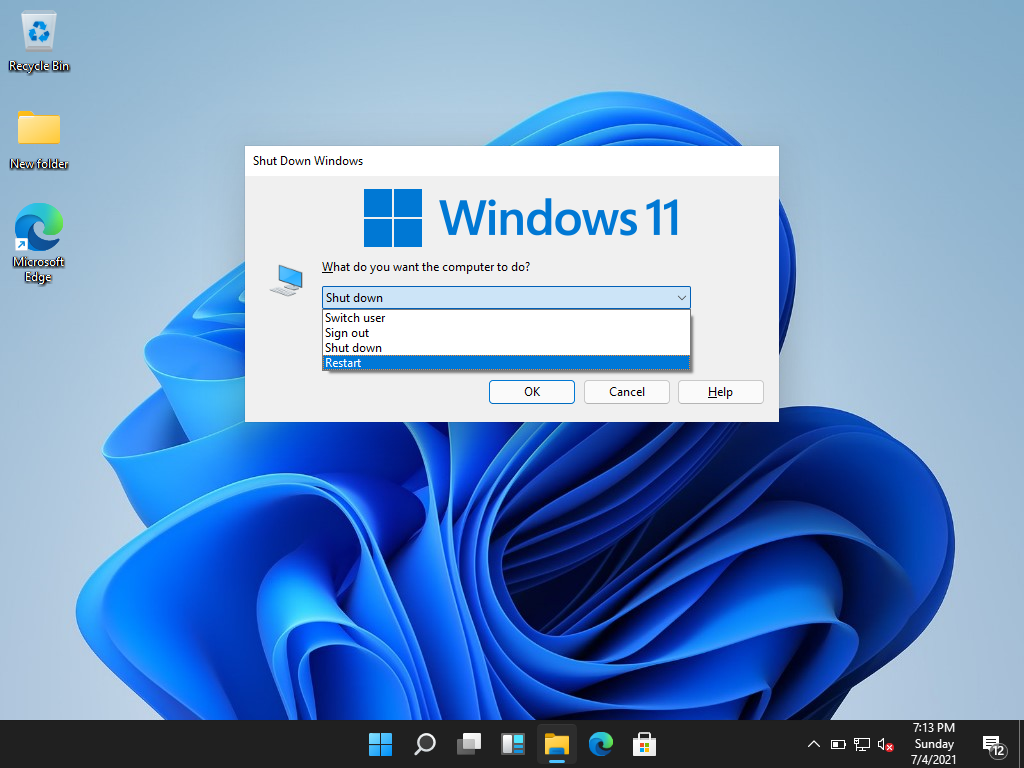
4. The "Restart" Option

The "Restart" option, also available within the Start Menu’s "Power" button, is crucial for applying system updates, resolving software conflicts, or troubleshooting hardware issues. It shuts down the computer, restarts it, and applies the necessary changes.

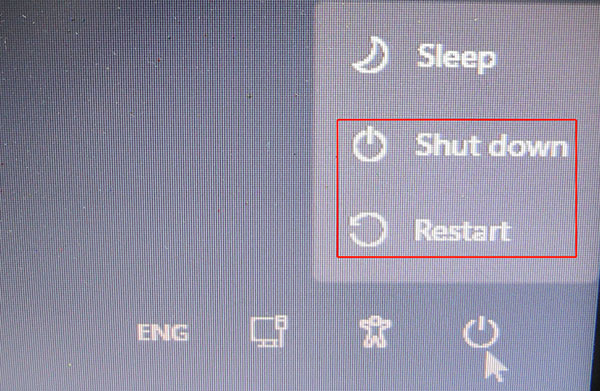
5. The "Sleep" Option

The "Sleep" option, found within the Start Menu’s "Power" button, is designed for energy conservation. It puts the computer into a low-power state, preserving the current state of applications and data. This option is ideal for short breaks or when you intend to resume working quickly.

6. The "Hibernate" Option

The "Hibernate" option, found within the Start Menu’s "Power" button, is a more advanced energy-saving mode. It saves the computer’s state to the hard drive, allowing for a faster restart than a full shutdown. This option is useful when you need to leave the computer unattended for an extended period.

7. The "Power Button" Option

The "Power Button" option, available in the Start Menu’s "Power" button, allows you to configure the behavior of the physical power button on your computer. You can choose to have it initiate a shutdown, a restart, or a sleep mode.

8. The Command Prompt Method

For advanced users, the Command Prompt provides a powerful method for initiating a shutdown.

  • Open the Command Prompt: Type "cmd" in the Windows search bar and press Enter.
  • Enter the shutdown command: Type "shutdown /s /t 0" and press Enter. This command initiates an immediate shutdown.

9. The Task Manager Method

The Task Manager provides a comprehensive view of running processes and allows you to initiate a shutdown.

  • Open the Task Manager: Press Ctrl + Shift + Esc keys simultaneously.
  • Navigate to the "File" menu.
  • Select "Shut down" from the options.

Understanding the Importance of Each Method

The choice of shutdown method depends on the user’s specific needs and the intended outcome.

  • The Start Menu and Keyboard Shortcut methods are the most straightforward and widely used, suitable for everyday use.
  • The "Sign Out" option is ideal for transitioning between users or allowing background processes to continue.
  • The "Restart" option is crucial for applying system updates or troubleshooting issues.
  • The "Sleep" and "Hibernate" options are designed for energy conservation, each catering to different timeframes of inactivity.
  • The "Power Button" option provides flexibility in configuring the behavior of the physical power button.
  • The Command Prompt and Task Manager methods offer more advanced control over the shutdown process, suitable for experienced users.

Frequently Asked Questions (FAQs)

Q: What happens when I shut down my computer?

A: When you shut down your computer, the operating system performs a series of actions, including closing all running programs, saving data, and powering down the hardware components. This process ensures that data is not lost and the system is prepared for a safe restart.

Q: What is the difference between "Shut down" and "Restart"?

A: "Shut down" completely turns off the computer, while "Restart" turns off the computer and then turns it back on, allowing for system updates or troubleshooting.

Q: What is the difference between "Sleep" and "Hibernate"?

A: "Sleep" puts the computer into a low-power state, preserving the current state of applications and data, while "Hibernate" saves the computer’s state to the hard drive, allowing for a faster restart.

Q: What happens to my open files and programs when I shut down my computer?

A: When you shut down your computer, all open files and programs are closed, and any unsaved changes will be lost. It is essential to save your work before initiating a shutdown.

Q: Can I force shut down my computer?

A: While it is possible to force shut down a computer by holding down the power button, this method is not recommended. It can lead to data corruption and system instability.

Q: How do I know if my computer is properly shut down?

A: A properly shut down computer will have all lights and fans turned off, and the screen will be completely black.

Tips for a Smooth Shutdown Experience

  • Save your work before initiating a shutdown. This ensures that no data is lost and prevents potential data corruption.
  • Close all unnecessary programs before shutting down. This reduces the time it takes for the computer to shut down and can improve system stability.
  • Avoid using the physical power button to shut down the computer. This can lead to data corruption and system instability.
  • Use the "Restart" option for applying system updates or troubleshooting issues. This ensures that the necessary changes are applied properly.
  • Consider using the "Sleep" or "Hibernate" options for energy conservation. These options can help reduce energy consumption and extend the life of your computer.

Conclusion

The ability to gracefully shut down a computer is a fundamental aspect of a stable and efficient computing experience. Windows 11 offers a range of methods for powering down your computer, each catering to specific user needs and scenarios. By understanding the nuances of these methods and applying best practices for shutdown, users can ensure data integrity, minimize system instability, and enjoy a seamless transition between computing sessions.

How to Shut Down Windows 11 - Instructions - TeachUcomp, Inc. How to shut down Windows 11 (9 ways) - Digital Citizen How to Shut down or Restart Windows 11 PC? - The Microsoft Windows11
5 Simple Steps To Shut Down Windows 11 - LAPTOP MURAH KOMPUTER MALAYSIA How to Shut down or Restart Your Windows 11 Computer? - MiniTool How To Shut Down Or Restart Windows 11  groovypost
How To Shut Down Or Restart Your Windows 11 Computer - vrogue.co Shutdown Windows 11

Closure

Thus, we hope this article has provided valuable insights into Powering Down: A Comprehensive Guide to Shutting Down Windows 11. We thank you for taking the time to read this article. See you in our next article!

Understanding The R Programming Language And Its Free Download On Windows 10

Understanding the R Programming Language and its Free Download on Windows 10

Introduction

In this auspicious occasion, we are delighted to delve into the intriguing topic related to Understanding the R Programming Language and its Free Download on Windows 10. Let’s weave interesting information and offer fresh perspectives to the readers.

Understanding the R Programming Language and its Free Download on Windows 10

R Programming Language Download windows 10  Tutorial Jinni

The R programming language has emerged as a powerful tool for data analysis, statistical computing, and visualization. Its open-source nature, coupled with a vast and active community, has made it a cornerstone for researchers, data scientists, and statisticians worldwide. This article delves into the intricacies of R, its significance, and how to obtain it for free on a Windows 10 operating system.

What is R?

R is a high-level programming language and free software environment for statistical computing and graphics. It was created by Ross Ihaka and Robert Gentleman at the University of Auckland, New Zealand, and is now maintained by the R Core Team.

R’s foundation lies in the S programming language, developed at Bell Laboratories. It inherits S’s strengths in statistical analysis, data manipulation, and graphical capabilities. However, R expands upon this foundation with its own unique features, including:

  • Comprehensive Statistical Functionality: R offers a wide array of statistical functions for data analysis, including linear and non-linear modeling, time series analysis, clustering, and more.
  • Powerful Graphics Capabilities: R excels in data visualization, providing users with a wide range of tools to create informative and visually appealing plots, charts, and graphs.
  • Extensible Packages: R’s vibrant community has developed thousands of packages, extending its functionality to encompass various domains, including bioinformatics, econometrics, machine learning, and more.
  • Open-Source and Free: R is freely available for use and distribution, making it accessible to anyone, regardless of their budget or background.

The Importance of R in Today’s Data-Driven World

In the age of Big Data, R has become an indispensable tool for extracting meaningful insights from complex datasets. Its applications span diverse industries, including:

  • Academic Research: R is widely used in academic research, facilitating statistical analysis, data visualization, and model development.
  • Data Science and Machine Learning: R’s powerful data manipulation and statistical modeling capabilities make it a valuable tool for data scientists and machine learning practitioners.
  • Business Analytics: Companies leverage R to analyze customer data, optimize marketing campaigns, and make data-driven business decisions.
  • Finance and Economics: R is used extensively in finance and economics for risk analysis, portfolio management, and economic modeling.
  • Healthcare and Biotechnology: R plays a crucial role in analyzing genomic data, developing clinical trials, and improving patient care.

How to Download and Install R on Windows 10

Installing R on Windows 10 is a straightforward process. Here’s a step-by-step guide:

  1. Visit the CRAN Website: Navigate to the Comprehensive R Archive Network (CRAN) website: https://cran.r-project.org/
  2. Choose Your Mirror: Select a CRAN mirror closest to your geographical location for faster download speeds.
  3. Download the Installer: Click on the "Download R for Windows" link and choose the appropriate installer file for your system architecture (32-bit or 64-bit).
  4. Run the Installer: Once the download is complete, double-click the installer file to begin the installation process.
  5. Follow the On-Screen Instructions: The installer will guide you through the installation process. You can accept the default settings or customize them as needed.
  6. Complete the Installation: Click "Finish" to complete the installation.

Setting Up Your R Environment

After installing R, you can enhance your experience by setting up an integrated development environment (IDE) or text editor. Popular options include:

  • RStudio: RStudio is a widely used IDE for R. It provides a user-friendly interface, code completion, debugging tools, and more.
  • VS Code: Visual Studio Code (VS Code) is a versatile code editor that can be extended with plugins to support R development.
  • Notepad++: Notepad++ is a lightweight text editor that can be used to write and execute R code.

Essential R Packages

To further expand your R capabilities, you can install packages from CRAN or other repositories. Some essential packages for beginners include:

  • dplyr: A powerful package for data manipulation and transformation.
  • ggplot2: A comprehensive package for creating informative and visually appealing graphs.
  • tidyr: A package for tidying and reshaping data.
  • stringr: A package for working with strings.
  • lubridate: A package for handling dates and times.

Tips for Learning R

  • Start with the Basics: Begin by learning the fundamental concepts of R, such as data types, variables, operators, and control structures.
  • Explore Online Resources: Utilize online resources like tutorials, courses, and documentation to deepen your understanding.
  • Practice Regularly: The key to mastering R is through consistent practice. Work on projects, solve problems, and apply your knowledge to real-world scenarios.
  • Join Online Communities: Engage with the R community through forums, chat groups, and social media platforms to share knowledge, ask questions, and learn from others.

FAQs

Q: Is R a free software?

A: Yes, R is a free software environment for statistical computing and graphics. It can be downloaded and used without any cost.

Q: What is the difference between R and RStudio?

A: R is the programming language, while RStudio is an integrated development environment (IDE) that provides a user-friendly interface for writing and running R code.

Q: How can I install packages in R?

A: You can install packages in R using the install.packages() function. For example, to install the dplyr package, you would type install.packages("dplyr").

Q: Where can I find help with R?

A: You can find help with R through various resources, including the R documentation, online forums, and the R community.

Q: What are some good books for learning R?

A: Some popular books for learning R include "R for Data Science" by Garrett Grolemund and Hadley Wickham, "The R Book" by Michael J. Crawley, and "Modern Applied Statistics with S" by Venables and Ripley.

Conclusion

R’s free availability, powerful features, and vibrant community have made it an invaluable tool for data analysis and statistical computing. By understanding the fundamentals of R and exploring its vast capabilities, you can unlock a world of possibilities for data exploration, visualization, and model development. As the world becomes increasingly data-driven, mastering R can provide a competitive advantage and empower you to make informed decisions based on data-driven insights.

How to Install R programming Language on Windows 10 - YouTube R Programming Language for PC - How to Install on Windows PC, Mac Introduction to R programming language
Basic programming language for windows 10 - pofesick R Programming language  12 steps to install R Programming Language R Programming language  12 Steps to install R Programming Language
R Programming Language for PC - Free Download: Windows 7,10,11 Edition What Is R Programming Language? - DocsLib

Closure

Thus, we hope this article has provided valuable insights into Understanding the R Programming Language and its Free Download on Windows 10. We thank you for taking the time to read this article. See you in our next article!

Refreshing Your Windows 10 System: A Guide To Reinstallation Without Data Loss

Refreshing Your Windows 10 System: A Guide to Reinstallation Without Data Loss

Introduction

In this auspicious occasion, we are delighted to delve into the intriguing topic related to Refreshing Your Windows 10 System: A Guide to Reinstallation Without Data Loss. Let’s weave interesting information and offer fresh perspectives to the readers.

Refreshing Your Windows 10 System: A Guide to Reinstallation Without Data Loss

Windows 10 Reinstall Without Losing Apps

Windows 10, like any operating system, can experience performance issues over time. This can be due to accumulated temporary files, outdated drivers, or even malware infections. A clean installation of Windows 10 can often revitalize your system, restoring it to a pristine state and resolving many performance bottlenecks. However, the prospect of reinstalling Windows can be daunting, especially when considering the potential loss of personal files, applications, and settings. Fortunately, there are effective methods to refresh your Windows 10 system without sacrificing your valuable data.

Understanding the Importance of a Clean Installation

A clean installation of Windows 10 involves formatting the system drive and installing a fresh copy of the operating system. This process eliminates any existing files, programs, and settings, effectively creating a blank slate. This approach is particularly beneficial in situations where:

  • System Performance Degradation: A sluggish system, frequent crashes, or slow boot times can often be attributed to accumulated clutter, outdated drivers, or malware. A clean installation provides a clean slate, removing these performance hindrances.
  • Software Conflicts: Incompatible or outdated software can cause conflicts and system instability. A fresh installation allows for a clean slate, ensuring that only compatible and updated software is installed.
  • Malware Removal: Malicious software can be difficult to remove entirely through conventional methods. A clean installation effectively wipes the system clean, eliminating any lingering malware remnants.
  • Troubleshooting Complex Issues: When troubleshooting persistent system issues, a clean installation can be a last resort, ruling out any potential software or configuration conflicts.

Methods for Reinstalling Windows 10 Without Losing Data

There are two primary methods for reinstalling Windows 10 without losing data:

1. Resetting Your PC:

This built-in Windows 10 feature allows you to restore your computer to its factory settings while preserving your personal files. Here’s how it works:

  • Access the Reset Option: Navigate to Settings > Update & Security > Recovery.
  • Choose "Reset this PC": Select the "Reset this PC" option and choose "Keep my files".
  • Confirmation and Restart: Confirm your selection and allow Windows to restart and initiate the reset process.

This method essentially performs a clean installation of Windows 10 while retaining your personal files. It removes most applications, settings, and drivers, effectively resolving many performance issues and software conflicts.

2. Using a Backup and Clean Installation:

This method involves creating a backup of your essential data before performing a clean installation of Windows 10. Here’s a step-by-step guide:

  • Backup Your Data: Use a reliable backup solution to create a complete backup of your important files, including documents, photos, videos, and other crucial data.
  • Create a Bootable USB Drive: Download the Windows 10 installation media from Microsoft’s website and create a bootable USB drive using a tool like the Media Creation Tool.
  • Boot from the USB Drive: Restart your computer and configure the BIOS to boot from the USB drive.
  • Perform a Clean Installation: Follow the on-screen prompts to install Windows 10 on your system drive. Choose the "Custom" installation option to format the drive and install Windows from scratch.
  • Restore Your Data: After the installation is complete, restore your backed-up data to your desired location.

This method offers complete control over the installation process and allows for a completely clean slate. However, it requires a thorough backup strategy and the ability to create a bootable USB drive.

Key Considerations and Best Practices:

  • Backup Your Data: Regardless of the chosen method, always prioritize backing up your data before proceeding with any system refresh. This ensures that your valuable information is safe even in case of unforeseen issues.
  • Choose the Right Method: Consider the complexity of your system issues and your level of comfort with the installation process. Resetting your PC is a simpler and less demanding approach, while a clean installation with a backup offers greater control and flexibility.
  • Update Drivers: After reinstalling Windows 10, ensure you install the latest drivers for your hardware components. This ensures optimal performance and compatibility.
  • Install Essential Software: Reinstall your essential applications and configure your settings according to your preferences.
  • Regular Maintenance: Implement a regular maintenance routine to prevent future performance issues. This includes running system scans, updating drivers, and removing unnecessary files.

Frequently Asked Questions

Q: Will I lose all my applications during the process?

A: Yes, both methods will remove most applications. However, some applications might survive the reset process. It’s recommended to create a list of essential applications and reinstall them after the installation is complete.

Q: What happens to my personal files during a clean installation?

A: When using the "Reset this PC" option with "Keep my files", your personal files will be preserved. However, if you choose the "Custom" installation option during a clean installation, you will need to restore your data from a backup.

Q: Can I reinstall Windows 10 without a product key?

A: If you have previously activated Windows 10 on your device, you can reinstall it without a product key. The system will automatically activate after the installation.

Q: How long does the reinstallation process take?

A: The time required for reinstallation varies depending on the method used, the speed of your hardware, and the size of your data. Generally, it can take anywhere from 30 minutes to a few hours.

Q: What if something goes wrong during the process?

A: If you encounter any issues during the reinstallation process, it’s recommended to consult Microsoft’s support resources or seek assistance from a qualified technician.

Tips for a Smooth Reinstallation

  • Use a Wired Connection: Ensure a stable internet connection using a wired Ethernet cable for optimal download speeds and stability.
  • Disable Antivirus Software: Temporarily disable your antivirus software during the installation process to prevent potential conflicts.
  • Close All Programs: Close all unnecessary programs and applications before starting the reinstallation process.
  • Check for Updates: Before starting the reinstallation, ensure that you have the latest updates for Windows 10.
  • Create a Recovery Drive: Create a recovery drive using the "Create a recovery drive" option in the "Recovery" settings. This can be helpful if you encounter issues during the reinstallation process.

Conclusion

Reinstalling Windows 10 can be a powerful way to rejuvenate your system, resolving performance issues and creating a fresh start. By carefully choosing the right method and following the outlined steps, you can effectively refresh your system without losing your valuable data. Remember to prioritize data backup, follow best practices, and consult resources if you encounter any difficulties. With a little planning and preparation, you can enjoy a smoother and more efficient Windows 10 experience.

Reset or Refresh Windows 10 without Losing Programs and Data 3 Ways to Reinstall Windows 10 without Losing Data - Chrunos How to Fresh Reinstall Windows 10/11 without Losing Data FREE
Reset/Refresh Windows 10 without Losing Programs  3 Ways! [Simple Guide] How to Reinstall Windows 10 without Losing Data or Programs/Apps - Sysprobs How to Refresh Windows 10 Without Losing Apps or Data - YouTube
Windows 10 System Restore, Refresh, Reset, Fresh Start & Reinstall guide How to Reinstall Windows 10 Without Losing Programs

Closure

Thus, we hope this article has provided valuable insights into Refreshing Your Windows 10 System: A Guide to Reinstallation Without Data Loss. We appreciate your attention to our article. See you in our next article!

The Enigma Of R In Windows 10: Troubleshooting A Statistical Powerhouse

The Enigma of R in Windows 10: Troubleshooting a Statistical Powerhouse

Introduction

With great pleasure, we will explore the intriguing topic related to The Enigma of R in Windows 10: Troubleshooting a Statistical Powerhouse. Let’s weave interesting information and offer fresh perspectives to the readers.

The Enigma of R in Windows 10: Troubleshooting a Statistical Powerhouse

Solve the enigma : r/puzzles

R, a powerful open-source programming language and free software environment, has revolutionized statistical computing and data visualization. Its versatility, vast libraries, and active community have made it the go-to tool for data scientists, researchers, and analysts across various disciplines. However, the smooth operation of R in Windows 10 can be disrupted by various factors, leading to frustrating scenarios where the software refuses to launch. This article aims to shed light on the common culprits behind these issues and provide a comprehensive guide to troubleshooting and resolving them.

Understanding the Importance of R in Windows 10

R’s significance in Windows 10 stems from its ability to empower users with a wide range of statistical and graphical capabilities. It provides a platform for:

  • Data Analysis and Manipulation: R excels in cleaning, transforming, and analyzing data, allowing users to uncover hidden patterns and insights.
  • Statistical Modeling: Its robust statistical libraries facilitate building complex models, predicting future trends, and testing hypotheses.
  • Data Visualization: R offers powerful tools for creating visually appealing and informative charts, graphs, and plots, aiding in data communication and exploration.
  • Machine Learning and Artificial Intelligence: R’s libraries provide essential tools for building and deploying machine learning algorithms, enabling predictive analytics and intelligent decision-making.

Common Causes of R Not Starting in Windows 10

The inability to launch R in Windows 10 can be attributed to several factors, each requiring a specific approach to resolution. These include:

1. Installation Issues:

  • Incomplete or Corrupted Installation: An incomplete or corrupted installation of R can prevent it from starting correctly. This could arise from interruptions during the installation process or corrupted download files.
  • Missing Dependencies: R relies on various packages and libraries for its functionality. Missing or outdated dependencies can cause startup failures.
  • Incorrect Path Variables: The Windows environment variables play a crucial role in locating and executing programs. Incorrectly configured path variables can prevent R from being found by the system.

2. System Configuration Problems:

  • Conflicting Software: Certain software applications, particularly those interacting with system resources, might clash with R, leading to startup failures.
  • Insufficient System Resources: R, especially when working with large datasets, requires sufficient RAM and processing power. Insufficient system resources can lead to performance issues and even prevent the software from launching.
  • Firewall or Antivirus Interference: Firewall or antivirus software might mistakenly identify R as a threat and block its execution.

3. R Environment Issues:

  • Outdated R Version: Using an outdated version of R can lead to compatibility issues and prevent it from starting correctly.
  • Corrupted R Installation Files: Corrupted R installation files, often caused by malware or hard drive errors, can disrupt the software’s functionality.
  • Incorrect Workspace Configuration: R relies on a workspace to store user-defined variables and functions. Issues with the workspace configuration can hinder the software’s startup.

Troubleshooting and Resolution Strategies

Addressing the root cause of R not starting in Windows 10 requires a systematic approach to troubleshooting. The following steps provide a comprehensive guide to resolving the issue:

1. Verify Installation:

  • Reinstall R: Start by reinstalling R completely. Ensure a stable internet connection and avoid interruptions during the installation process.
  • Check for Corrupted Files: Use the "sfc /scannow" command in the Command Prompt to scan for and repair corrupted system files.
  • Verify Dependencies: Use the "install.packages()" function in R to install any missing or outdated dependencies.

2. Configure Environment Variables:

  • Add R to Path: Ensure the R installation directory is added to the system’s PATH environment variable. This allows Windows to locate and execute R commands.
  • Check for Conflicting Variables: Review other environment variables for potential conflicts with R’s settings.

3. Resolve Software Conflicts:

  • Identify Conflicting Software: Run R in safe mode to identify if any other software is interfering with its execution.
  • Disable Conflicting Applications: Temporarily disable any suspected conflicting applications and try launching R again.

4. Optimize System Resources:

  • Increase RAM: Consider upgrading your system’s RAM if it is insufficient for running R smoothly.
  • Close Unnecessary Applications: Close any unnecessary applications running in the background to free up system resources.

5. Address Firewall and Antivirus Issues:

  • Add R to Exclusions: Add R to the firewall’s and antivirus software’s exclusion list to prevent them from blocking its execution.
  • Temporarily Disable Security Software: Temporarily disable your firewall and antivirus software to see if they are causing the issue.

6. Update R and Packages:

  • Install the Latest Version: Update to the latest version of R to benefit from bug fixes and compatibility improvements.
  • Update R Packages: Use the "update.packages()" function in R to update all installed packages.

7. Check Workspace Configuration:

  • Reset Workspace: Reset the R workspace to its default settings.
  • Check for Errors in .Rprofile: Examine the ".Rprofile" file in the user’s home directory for any errors that might be preventing R from starting.

FAQs: Addressing Common Concerns

Q: Can I run R without installing it?

A: R requires installation on your system to function. While there are online platforms like RStudio Cloud that provide a web-based environment for running R code, they still rely on a server-side installation of R.

Q: Is there a specific version of R that works best with Windows 10?

A: R is generally compatible with various Windows versions. However, it’s recommended to use the latest stable version of R for optimal performance and compatibility.

Q: How do I know if my system has enough resources to run R effectively?

A: R’s resource requirements vary depending on the complexity of the analysis and the size of the datasets. However, a minimum of 4GB RAM and a dual-core processor is recommended for smooth operation.

Q: Can I use R with other programming languages like Python?

A: Yes, R can be integrated with other programming languages like Python using tools like the "reticulate" package in R or the "rpy2" package in Python. This allows for seamless data exchange and combined functionality.

Tips for Smooth R Operation in Windows 10:

  • Regularly Update R and Packages: Keep R and its packages updated to ensure compatibility and benefit from bug fixes and new features.
  • Manage System Resources: Close unnecessary applications and ensure sufficient RAM and processing power for optimal performance.
  • Use a Dedicated R Environment: Consider using a dedicated R environment like RStudio to enhance productivity and provide a more streamlined workflow.
  • Explore R’s Documentation and Community: Utilize R’s extensive documentation and the vibrant online community for support and guidance.

Conclusion: Empowering Data Analysis in Windows 10

Successfully resolving the issue of R not starting in Windows 10 requires a methodical approach to troubleshooting. By understanding the common causes, applying the recommended strategies, and leveraging the available resources, users can overcome these obstacles and unleash the full potential of R in their data analysis endeavors. With its power and flexibility, R remains an invaluable tool for data scientists, researchers, and analysts working on Windows 10, enabling them to unlock insights, build robust models, and visualize data effectively.

What is R? - The Statistical Computing Powerhouse  DataCamp RStudio Help: Ways To Troubleshoot R Problems How to Download R for Windows  Statistical Computing (Biostatistics 140.776)
Introduction to R statistical software, Windows version - YouTube Introduction to Statistical Computing in R ๆŸๅบฆ็ฟป่ฏ‘  OddFar's Notes
The Enigma Protector latest version - Get best Windows software Troubleshooting Windows 10

Closure

Thus, we hope this article has provided valuable insights into The Enigma of R in Windows 10: Troubleshooting a Statistical Powerhouse. We hope you find this article informative and beneficial. See you in our next article!

Optimizing Windows 11: Essential Tools And Techniques For Enhanced Performance

Optimizing Windows 11: Essential Tools and Techniques for Enhanced Performance

Introduction

With great pleasure, we will explore the intriguing topic related to Optimizing Windows 11: Essential Tools and Techniques for Enhanced Performance. Let’s weave interesting information and offer fresh perspectives to the readers.

Optimizing Windows 11: Essential Tools and Techniques for Enhanced Performance

How to Optimize Windows 11 For Better Performance

Windows 11, the latest iteration of Microsoft’s operating system, brings a refined user interface and enhanced features. While it offers a smoother experience, users may encounter performance issues or wish to customize their system for optimal functionality. This article delves into essential tools and techniques for optimizing Windows 11, empowering users to maximize their system’s potential and enhance their computing experience.

Understanding Windows 11 Optimization

Optimizing Windows 11 involves a multifaceted approach encompassing various aspects of system configuration, resource management, and software optimization. The goal is to ensure efficient resource utilization, minimize system lag, and enhance overall performance. This can be achieved through a combination of built-in tools, third-party utilities, and best practices.

Built-in Windows 11 Tools for Optimization

Windows 11 offers a range of built-in tools designed to streamline system performance and enhance user experience. These tools provide a user-friendly interface for managing system resources, optimizing disk space, and troubleshooting performance issues.

1. Task Manager: A comprehensive tool for monitoring system processes, resource utilization, and network activity. Users can identify resource-intensive processes, terminate unnecessary programs, and analyze system performance metrics.

2. Storage Sense: This tool automatically manages disk space by identifying and deleting temporary files, unused applications, and system files that are no longer required. Users can configure Storage Sense settings to suit their individual needs, ensuring optimal disk space utilization.

3. Disk Cleanup: A utility that removes temporary files, system files, and other unnecessary data from the hard drive, freeing up valuable disk space. This tool can be accessed through the "System" settings or by searching for "Disk Cleanup" in the Start menu.

4. Windows Update: Regular updates ensure that the system receives the latest security patches, bug fixes, and performance enhancements. Users can schedule automatic updates or manually check for updates through the "Windows Update" settings.

5. Performance Options: Accessible through the "System" settings, Performance Options allow users to adjust system performance settings based on their priorities. Users can prioritize system responsiveness, visual effects, or background processes, tailoring the system to their specific needs.

Third-Party Tools for Windows 11 Optimization

While Windows 11 provides a suite of built-in tools, third-party utilities offer more advanced features and customization options for optimizing system performance. These tools can enhance resource management, streamline system processes, and provide insights into system health.

1. System Optimization Tools: These tools offer a comprehensive suite of features for optimizing system performance, including disk cleanup, registry optimization, and startup management. Examples include CCleaner, Advanced SystemCare, and IObit Smart Defrag.

2. Antivirus and Malware Protection: Protecting the system from malware and viruses is crucial for optimal performance. Antivirus software like Norton, McAfee, and Bitdefender scan the system for threats, remove malware, and provide real-time protection.

3. Driver Updaters: Keeping drivers up-to-date ensures optimal device performance and compatibility. Driver updaters like Driver Easy and Driver Booster scan the system for outdated drivers and automatically download and install the latest versions.

4. Disk Defragmentation Tools: Defragmenting the hard drive can improve file access speed and system performance. Defragmentation tools like Defraggler and Auslogics Disk Defrag reorganize fragmented files, optimizing disk space and reducing access time.

5. System Monitoring Tools: System monitoring tools provide detailed insights into system performance, resource utilization, and hardware health. Tools like HWMonitor, Speccy, and Open Hardware Monitor display real-time system metrics, helping users identify performance bottlenecks and troubleshoot issues.

Best Practices for Windows 11 Optimization

Beyond utilizing tools, adopting best practices can significantly enhance Windows 11 performance. These practices focus on efficient resource management, minimizing unnecessary processes, and maintaining system hygiene.

1. Regular System Maintenance: Performing regular system maintenance tasks like disk cleanup, defragmentation, and malware scans helps prevent performance degradation and ensures optimal system health.

2. Limiting Startup Programs: Unnecessary programs starting at system boot can slow down the system. Users can manage startup programs through the "Task Manager" or the "System Configuration" tool, disabling unnecessary programs to speed up boot time.

3. Optimizing Power Settings: Adjusting power settings can improve battery life and system performance. Users can choose between power-saving modes or high-performance settings based on their needs.

4. Managing Background Processes: Background processes can consume system resources and impact performance. Users can manage background processes through the "Task Manager," prioritizing essential tasks and minimizing unnecessary activity.

5. Keeping Software Up-to-Date: Updating software regularly ensures that the system receives the latest bug fixes, security patches, and performance enhancements. Users can configure automatic updates or manually check for updates through the respective software applications.

FAQs about Windows 11 Optimization

1. Does Windows 11 Need Optimization?

Windows 11 is designed for optimal performance, but like any operating system, it can benefit from optimization. Users can enhance system performance by addressing specific needs, such as freeing up disk space, managing startup programs, or optimizing power settings.

2. Is It Safe to Use Third-Party Optimization Tools?

Reputable third-party optimization tools can be beneficial, but users should exercise caution. Choose tools from trusted developers and avoid those with intrusive features or dubious claims. Always back up important data before using any optimization tool.

3. How Often Should I Optimize My Windows 11 System?

Regular system maintenance is recommended, ideally on a weekly or monthly basis. This includes tasks like disk cleanup, defragmentation, and malware scans. However, the frequency may vary based on individual usage patterns and system needs.

4. Can I Optimize My Windows 11 System for Gaming?

Yes, specific optimizations can enhance gaming performance. This includes disabling unnecessary background processes, prioritizing gaming software, and adjusting graphics settings. Users can also invest in gaming-specific hardware for optimal performance.

5. What are the Risks Associated with Windows 11 Optimization?

Improper optimization can lead to system instability, data loss, or security vulnerabilities. Avoid using untrusted tools, back up important data before making changes, and exercise caution when modifying system settings.

Tips for Windows 11 Optimization

1. Monitor System Performance: Regularly monitor system performance using the Task Manager or system monitoring tools to identify potential bottlenecks or issues.

2. Prioritize System Responsiveness: Configure Performance Options to prioritize system responsiveness, reducing lag and improving overall user experience.

3. Manage Disk Space: Regularly clean up temporary files, unused applications, and unnecessary data to optimize disk space and prevent performance degradation.

4. Update Drivers Regularly: Ensure that device drivers are up-to-date to prevent compatibility issues and optimize device performance.

5. Seek Expert Help: If encountering persistent performance issues, consult with a computer technician or seek support from Microsoft for assistance.

Conclusion

Optimizing Windows 11 involves a comprehensive approach encompassing built-in tools, third-party utilities, and best practices. By adopting these techniques, users can enhance system performance, minimize lag, and maximize their computing experience. Regular system maintenance, efficient resource management, and prudent use of optimization tools are crucial for maintaining a smooth and efficient Windows 11 environment. Remember to exercise caution when using third-party tools and always back up important data before making significant changes to the system.

How to Speed Up Windows 11 and Improve Performance Optimizing windows 11 for better Performance  Increase Windows11 performance with 5 simple The BEST Windows Optimizer For Windows 11 - YouTube
How to optimize Windows 11 for gaming to increase FPS & performance? - DigiStatement How to Optimize Windows 11 for best performance  Lifehack How to Optimize Windows 11 for Gaming and Get Better Performance
Windows 11 optimization guide: get the most out of Microsoftโ€™s new OS 8 Tips to Optimize Your Windows 11 PC for Gaming Performance - Make Tech Easier

Closure

Thus, we hope this article has provided valuable insights into Optimizing Windows 11: Essential Tools and Techniques for Enhanced Performance. We hope you find this article informative and beneficial. See you in our next article!

Unraveling The "No Such Interface Supported" Error In Windows 11 Photos

Unraveling the "No Such Interface Supported" Error in Windows 11 Photos

Introduction

With great pleasure, we will explore the intriguing topic related to Unraveling the "No Such Interface Supported" Error in Windows 11 Photos. Let’s weave interesting information and offer fresh perspectives to the readers.

Unraveling the "No Such Interface Supported" Error in Windows 11 Photos

Fix "No such interface supported" When Opening png & jpg in windows 11 / 10  FIX CANT OPEN

The "No Such Interface Supported" error message in Windows 11 Photos can be a frustrating experience, leaving users unable to access or manipulate their images. This error typically arises when the Photos app encounters a problem with the underlying system components responsible for image handling. While the exact cause can vary, understanding the common culprits and troubleshooting techniques can help resolve the issue.

Understanding the Error’s Context:

The "No Such Interface Supported" message signals a fundamental incompatibility between the Photos app and the system’s image handling capabilities. This incompatibility can stem from several factors, including:

  • Corrupted System Files: Essential system files, crucial for the Photos app’s functionality, might be damaged or missing. This could result in the app failing to communicate with the necessary components.
  • Outdated Drivers: The drivers responsible for managing the system’s hardware, including graphics cards and display adapters, might be outdated or incompatible with the Photos app.
  • Software Conflicts: Other installed applications or software updates might interfere with the Photos app’s operation, creating a conflict that prevents proper image handling.
  • File System Errors: Issues within the file system, where images are stored, can lead to the Photos app being unable to access or process them.
  • Permissions Issues: The Photos app might lack the necessary permissions to access specific folders or files, leading to the error message.
  • Hardware Malfunctions: Although less common, hardware issues, such as a faulty hard drive or graphics card, could contribute to the error.

Troubleshooting the "No Such Interface Supported" Error:

To effectively troubleshoot the "No Such Interface Supported" error, a systematic approach is recommended:

1. Basic Troubleshooting Steps:

  • Restart the Computer: A simple restart can often resolve temporary glitches that might be causing the error.
  • Run the Photos App as Administrator: Right-click the Photos app icon, select "Run as administrator," and try accessing the image again. This grants the app elevated privileges, potentially resolving permission-related issues.
  • Reinstall the Photos App: Uninstall the Photos app from the "Apps & features" section in Settings and reinstall it from the Microsoft Store. This ensures a fresh installation, eliminating potential issues with corrupted files.

2. Advanced Troubleshooting Techniques:

  • Check for System File Corruption: Utilize the System File Checker (SFC) tool by typing "cmd" in the search bar, running it as administrator, and entering "sfc /scannow." This tool scans for and repairs corrupted system files, potentially resolving the error.
  • Update Graphics Drivers: Navigate to the manufacturer’s website for your graphics card (e.g., NVIDIA, AMD) and download the latest compatible drivers. Install them to ensure your graphics card is fully functional with the Photos app.
  • Run a Disk Check: Use the "chkdsk" command in the Command Prompt to check for and repair file system errors. Type "chkdsk /f /r" and press Enter. This might resolve issues preventing the Photos app from accessing images.
  • Temporarily Disable Antivirus Software: Antivirus software can sometimes interfere with applications, including the Photos app. Temporarily disable your antivirus and try accessing the image again. If the error disappears, consider adding the Photos app as an exception in your antivirus settings.
  • Check for Software Conflicts: Uninstall recently installed software or updates that might be interfering with the Photos app. Reinstall them after resolving the error to determine if they were the root cause.
  • Perform a Clean Boot: A clean boot starts Windows with only essential services and drivers, minimizing the possibility of software conflicts. This can help isolate the cause of the error. Follow these steps:
    • Search for "msconfig" in the search bar and open the System Configuration window.
    • Go to the "Services" tab and check the box for "Hide all Microsoft services."
    • Click "Disable all" and then go to the "Startup" tab.
    • Click "Open Task Manager" and disable any startup programs that are not essential.
    • Restart your computer and try accessing the image. If the error is resolved, enable services and startup programs one by one to identify the culprit.

3. Advanced Solutions (If Troubleshooting Fails):

  • Reset Windows 11: If the above solutions fail, consider resetting Windows 11 to its factory settings. This will erase all data, so make sure to back up important files beforehand.
  • Contact Microsoft Support: If the error persists despite all troubleshooting efforts, contacting Microsoft Support for assistance is recommended. They can provide tailored guidance and potentially identify more advanced solutions.

FAQs: "No Such Interface Supported" Error in Windows 11 Photos

Q: Can I fix this error without reinstalling Windows 11?

A: Yes, in most cases, the error can be resolved through troubleshooting techniques outlined above. Reinstalling Windows 11 should be considered as a last resort.

Q: What if I’m unable to open any images in the Photos app?

A: This suggests a more widespread issue, possibly related to system files or drivers. Try the advanced troubleshooting techniques, particularly the System File Checker and driver updates.

Q: My antivirus software is not causing the issue. What else could be interfering?

A: Other installed applications or recent updates might be creating conflicts. Temporarily disabling them or uninstalling recent updates can help identify the culprit.

Q: Is there a way to prevent this error in the future?

A: Keeping your system updated, including Windows updates and driver updates, can minimize the risk of encountering this error. Additionally, regularly performing disk checks and using the System File Checker can help maintain system health.

Tips for Preventing the "No Such Interface Supported" Error:

  • Regularly Update Windows: Windows updates often include bug fixes and security patches that can improve system stability and prevent compatibility issues.
  • Keep Drivers Up-to-Date: Regularly check for and install the latest drivers for your graphics card and other hardware components.
  • Use a Reliable Antivirus: A robust antivirus can help prevent malware infections that could corrupt system files or cause software conflicts.
  • Perform Regular Disk Checks: Regularly check your hard drive for errors using the "chkdsk" command. This can prevent file system issues that might affect the Photos app.
  • Avoid Installing Unnecessary Software: Only install software that you need and trust. Unnecessary applications can increase the risk of conflicts and system instability.

Conclusion:

The "No Such Interface Supported" error in Windows 11 Photos can be a challenging issue, but with a systematic approach and the right troubleshooting techniques, it can be resolved. Understanding the underlying causes and employing the appropriate methods can effectively restore image handling functionality. By adhering to best practices, such as regular system updates and responsible software installation, users can minimize the risk of encountering this error in the future and enjoy a seamless image viewing and editing experience.

5 Fix "No Such Interface Supported" in Windows 11 - YouTube Fix Windows 11 Can't Open JPG Photos  No Such Interface Supported [Solved] - YouTube No Such Interface Supported Windows 11
Top 5 Ways to Fix No Such Interface Supported Error in Windows 11 - Guiding Tech No Such Interface Supported Windows 11 No Such Interface Supported Windows 11
FIXED: Windows 11 Error "No Such Interface Supported" How To Fix "No Such Interface Supported" on Windows 11 - YouTube

Closure

Thus, we hope this article has provided valuable insights into Unraveling the "No Such Interface Supported" Error in Windows 11 Photos. We appreciate your attention to our article. See you in our next article!

The Windows 11 Experience: A Comprehensive Exploration

The Windows 11 Experience: A Comprehensive Exploration

Introduction

With enthusiasm, let’s navigate through the intriguing topic related to The Windows 11 Experience: A Comprehensive Exploration. Let’s weave interesting information and offer fresh perspectives to the readers.

The Windows 11 Experience: A Comprehensive Exploration

Windows 11: The Experience So Far - Tech Emblem

Windows 11, the latest iteration of Microsoft’s flagship operating system, represents a significant evolution in the way users interact with their computers. This comprehensive exploration delves into the key features, benefits, and considerations associated with Windows 11, providing a detailed understanding of its impact on the modern computing landscape.

A New Visual Identity:

Windows 11 introduces a refined aesthetic that emphasizes clean lines, rounded corners, and a visually appealing interface. The Start menu, a cornerstone of Windows functionality, has undergone a significant transformation, adopting a centered layout and offering quick access to frequently used applications and pinned files. The taskbar, too, has been redesigned, showcasing a streamlined approach with a more prominent focus on open windows and applications. This contemporary visual language enhances user experience by promoting intuitive navigation and visual clarity.

Enhanced Performance and Security:

Windows 11 prioritizes performance and security, incorporating features designed to optimize system resources and protect user data. The operating system leverages the latest advancements in hardware technology, such as support for 12th Generation Intel Core processors and AMD Ryzen processors, to deliver a smoother and more responsive user experience. Additionally, Windows 11 integrates robust security measures, including Windows Defender Antivirus, Microsoft Defender SmartScreen, and Windows Hello, to safeguard against evolving cyber threats. These advancements ensure a secure and efficient computing environment.

A Focus on Productivity and Creativity:

Windows 11 empowers users to enhance their productivity and unleash their creativity through a range of innovative features. The operating system introduces Snap Layouts, a feature that allows users to arrange multiple windows in a visually appealing and efficient manner, maximizing screen real estate for multitasking. Windows 11 also offers improved support for touchscreens, pens, and voice input, enabling users to interact with their devices in a more natural and intuitive way. These features cater to the needs of diverse users, from professionals working on complex projects to individuals seeking a more engaging and productive computing experience.

The Power of Integration:

Windows 11 seamlessly integrates with Microsoft’s ecosystem of products and services, creating a cohesive and connected computing experience. The operating system leverages the power of cloud services, such as OneDrive and Microsoft 365, to enable users to access their files, applications, and data from any device. Windows 11 also supports features like Microsoft Teams and Xbox Cloud Gaming, allowing users to collaborate with colleagues and enjoy a wide range of games across their devices. This interconnectedness fosters a unified and efficient digital environment.

A Platform for Innovation:

Windows 11 serves as a platform for innovation, providing developers with the tools and resources to create cutting-edge applications and experiences. The operating system incorporates the latest technologies, such as support for DirectX 12 Ultimate and the Windows Subsystem for Android, enabling developers to create visually stunning graphics and leverage the power of Android apps. This commitment to innovation ensures that Windows 11 remains a dynamic and evolving platform, driving the advancement of computing technology.

Considerations for Upgrading:

While Windows 11 offers a compelling set of features and benefits, it is crucial to consider certain aspects before upgrading. The minimum system requirements for Windows 11 are more stringent than those for previous versions, requiring users to have a compatible processor, sufficient RAM, and a secure boot-enabled system. Additionally, users should ensure that their applications and drivers are compatible with Windows 11 to avoid potential issues. It is essential to conduct thorough research and assess system compatibility before embarking on an upgrade.

FAQs about Windows 11:

Q: What are the minimum system requirements for Windows 11?

A: Windows 11 requires a 1 GHz or faster processor with at least 2 cores, 4 GB of RAM, 64 GB of storage space, a compatible graphics card, and a UEFI firmware with Secure Boot enabled.

Q: Is Windows 11 compatible with my existing hardware?

A: To determine compatibility, visit the Windows 11 Compatibility Checker on the Microsoft website. This tool will analyze your system and provide information about whether your device meets the minimum requirements.

Q: Can I upgrade from Windows 10 to Windows 11 for free?

A: While Windows 11 was initially offered as a free upgrade for eligible Windows 10 users, this offer has expired. Users who have not yet upgraded to Windows 11 will need to purchase a license.

Q: What are the key differences between Windows 10 and Windows 11?

A: Windows 11 introduces a redesigned user interface, enhanced performance, improved security features, and a range of new productivity and creativity tools. It also features a more streamlined Start menu, a redesigned taskbar, and improved support for touchscreens, pens, and voice input.

Q: How can I troubleshoot common Windows 11 issues?

A: Microsoft provides comprehensive troubleshooting resources on its website, including articles, forums, and support channels. You can also consult online communities and forums for assistance from other users.

Tips for Using Windows 11:

1. Optimize System Performance: Regularly clean up your system by deleting temporary files, removing unnecessary programs, and defragmenting your hard drive.

2. Enhance Security: Enable Windows Defender Antivirus, Microsoft Defender SmartScreen, and Windows Hello to protect your device against malware and unauthorized access.

3. Customize Your Experience: Personalize your desktop with themes, wallpapers, and color schemes to create a visually appealing and comfortable environment.

4. Leverage Cloud Storage: Utilize OneDrive to store and access your files from any device, ensuring data backup and synchronization across your devices.

5. Explore New Features: Experiment with Snap Layouts, Widgets, and other innovative features to enhance your productivity and creativity.

Conclusion:

Windows 11 represents a significant advancement in the world of operating systems, offering a compelling blend of visual appeal, enhanced performance, robust security, and innovative features. By embracing the power of integration, Windows 11 fosters a cohesive and connected computing experience, empowering users to work, create, and play with greater efficiency and ease. As technology continues to evolve, Windows 11 remains at the forefront, driving innovation and shaping the future of computing.

Microsoft unveils Windows 11, a new user experience that brings you closer to what you love Windows 11: A Comprehensive Guide about Features and Updates Perunity - Latest Business Story Microsoft announces refreshed File Explorer experience coming to Windows 11  BigTechWire
How to check Windows 11 Experience Index  HiTech Service The first preview of Windows 11 is now available  TechCrunch Windows 11 New File Explorer Experience New Features Design Details HTMD Blog
Windows 11! (Exploration) - YouTube Making the everyday easier with new experiences available in Windows 11  Windows Experience Blog

Closure

Thus, we hope this article has provided valuable insights into The Windows 11 Experience: A Comprehensive Exploration. We hope you find this article informative and beneficial. See you in our next article!

Understanding PC Health At A Glance In Windows: A Comprehensive Guide

Understanding PC Health at a Glance in Windows: A Comprehensive Guide

Introduction

In this auspicious occasion, we are delighted to delve into the intriguing topic related to Understanding PC Health at a Glance in Windows: A Comprehensive Guide. Let’s weave interesting information and offer fresh perspectives to the readers.

Understanding PC Health at a Glance in Windows: A Comprehensive Guide

Pc Health At A Glance

The modern computer user, accustomed to the seamless operation of their devices, often takes for granted the intricate workings that ensure a smooth experience. However, the reality is that a PC, like any complex machine, requires regular maintenance and attention to remain in peak condition. This is where PC health monitoring tools come into play, providing users with a crucial window into the well-being of their system.

The Importance of PC Health Monitoring

Monitoring the health of a PC is not merely an optional task but a vital practice that offers numerous benefits:

  • Early Detection of Issues: Proactive monitoring allows users to identify potential problems before they escalate into major malfunctions. This can range from detecting failing hardware components to identifying software conflicts that could lead to system instability.
  • Optimized Performance: A healthy PC performs at its best, delivering smooth and efficient operation. Regular monitoring helps identify resource bottlenecks, software conflicts, and other factors that may hinder performance, allowing for timely intervention and optimization.
  • Enhanced Security: A well-maintained PC is less susceptible to security threats. Monitoring can reveal suspicious activity, identify vulnerabilities, and ensure necessary security updates are installed, bolstering the system’s defenses.
  • Extended Lifespan: By addressing issues early and maintaining a clean and efficient operating environment, users can significantly extend the lifespan of their PC, maximizing its value and reducing the need for premature replacements.
  • Reduced Downtime: Promptly identifying and resolving issues minimizes downtime, ensuring users can continue their work or enjoy their entertainment without interruption.

PC Health at a Glance: A Windows Feature

Windows, being the dominant operating system for personal computers, offers a suite of built-in tools designed to help users assess and manage their PC’s health. These tools, collectively known as "PC Health Check," provide a centralized hub for monitoring various aspects of the system’s well-being.

Key Components of PC Health Check:

  • System Information: This section provides a detailed overview of the PC’s hardware specifications, including processor, memory, storage, and graphics capabilities. It also displays the current operating system version and build number.
  • Storage Space: The storage section presents a visual representation of disk usage, highlighting the space occupied by different files and applications. It also provides tools for managing storage, allowing users to identify and remove unnecessary files or relocate data to optimize disk space.
  • Battery Health (For Laptops): Laptops equipped with batteries can monitor their health and charging status. This section provides an estimated battery life, charging cycles, and overall battery health, allowing users to assess the need for replacement.
  • Security Status: This section displays the current security status of the PC, including the presence of active antivirus protection, firewall settings, and recent security updates. Users can access tools to configure security settings and ensure the system is adequately protected.
  • Updates: Windows Update is integrated into the PC Health Check, allowing users to easily check for and install available updates for the operating system and installed applications. Regular updates are crucial for security, performance, and stability.
  • Performance: This section provides a performance overview of the PC, highlighting CPU usage, memory utilization, and disk activity. It allows users to identify potential bottlenecks and resource-intensive applications that may impact performance.
  • Troubleshooting: The PC Health Check includes tools for troubleshooting common issues, such as slow performance, network connectivity problems, or device malfunctions. These tools provide guided solutions and steps to resolve specific issues.

Beyond the Basics: Advanced Monitoring Tools

While Windows offers a comprehensive suite of built-in tools, users seeking deeper insights and more advanced monitoring capabilities can explore third-party applications. These applications often provide a more granular level of detail, offering features such as:

  • Hardware Monitoring: Advanced tools can monitor hardware components such as CPU temperature, fan speed, and hard drive health, providing real-time data and alerts for potential issues.
  • System Stability: These tools can track system stability, identifying crashes, freezes, and other instability issues, helping users pinpoint the root cause of problems.
  • Performance Benchmarking: Advanced tools can perform benchmark tests to measure the overall performance of the PC, comparing it to industry standards and identifying potential bottlenecks.
  • Detailed Event Logs: These tools provide access to detailed system event logs, allowing users to analyze system activity and diagnose issues based on recorded events.

FAQs About PC Health at a Glance

Q: Is PC Health Check a replacement for professional IT support?

A: While PC Health Check provides valuable insights into system health, it should not be considered a substitute for professional IT support. Complex issues or hardware failures may require the expertise of a qualified technician.

Q: How often should I check my PC’s health?

A: Ideally, users should check their PC’s health at least once a month to ensure it is running smoothly. However, the frequency may vary based on individual usage patterns and system stability.

Q: Can I use PC Health Check on older versions of Windows?

A: PC Health Check is primarily available on Windows 10 and later versions. However, older versions of Windows may offer similar features through their built-in system tools.

Q: What should I do if I discover an issue through PC Health Check?

A: If you identify an issue through PC Health Check, it is important to consult the provided troubleshooting information or seek assistance from a qualified IT professional.

Tips for Maintaining PC Health

  • Regular Updates: Ensure that your operating system, applications, and drivers are regularly updated to receive security patches and performance enhancements.
  • Disk Cleanup: Regularly clean your hard drive by removing unnecessary files, temporary files, and downloaded files to free up space and improve performance.
  • Defragmentation: Defragment your hard drive periodically to optimize file organization and improve read/write speeds.
  • Virus Protection: Install and maintain a reliable antivirus program to protect your system from malware and viruses.
  • Firewall: Enable and configure your firewall to prevent unauthorized access to your system.
  • Software Management: Uninstall unused applications and remove unnecessary programs to reduce clutter and improve performance.
  • Hardware Maintenance: Clean dust and debris from your PC’s internal components to improve airflow and prevent overheating.
  • Backup: Regularly back up your important data to protect it from loss in case of hardware failure or system corruption.

Conclusion

PC health monitoring is an essential practice for every computer user. By utilizing the tools provided by Windows and exploring advanced monitoring options, users can gain a comprehensive understanding of their system’s well-being. Proactive maintenance, coupled with timely issue resolution, ensures a smooth and efficient computing experience, extending the lifespan of your PC and minimizing downtime. Remember, a healthy PC is a happy PC, and a happy PC empowers you to achieve your digital goals without interruption.

How to use the PC Health Check app - Microsoft Support  Check in app, Health check, App PC Health Check PC Health At A Glance Introducing Windows 11 Let's check if this PC meets the Pc Health At A Glance
Microsoft releases new and updated Windows 11 PC Health Check app again - YouTube PC Health Check App Windows 11 Download [Official Microsoft] Pc Health At A Glance
Pc Health At A Glance The Windows PC Health Check App Explained

Closure

Thus, we hope this article has provided valuable insights into Understanding PC Health at a Glance in Windows: A Comprehensive Guide. We hope you find this article informative and beneficial. See you in our next article!

A Comprehensive Guide To Nero 7: Compatibility, Features, And Alternatives In The Modern Era

A Comprehensive Guide to Nero 7: Compatibility, Features, and Alternatives in the Modern Era

Introduction

With great pleasure, we will explore the intriguing topic related to A Comprehensive Guide to Nero 7: Compatibility, Features, and Alternatives in the Modern Era. Let’s weave interesting information and offer fresh perspectives to the readers.

A Comprehensive Guide to Nero 7: Compatibility, Features, and Alternatives in the Modern Era

Nero 7 essentials downloads - roomjuja

Nero 7, a popular burning and multimedia software suite released in 2006, has left a lasting mark on the world of computing. While its original release predates the widespread adoption of Windows 10 and 64-bit computing, the software’s legacy continues to attract users seeking reliable tools for disc burning, media management, and data backup. This article delves into the intricacies of using Nero 7 on a modern Windows 10 64-bit system, addressing its compatibility, functionality, and potential limitations.

Understanding Nero 7’s Compatibility with Windows 10 64-bit

The compatibility of Nero 7 with Windows 10 64-bit is a complex issue. While the software was designed for older operating systems, it can be installed on newer platforms through a process known as "compatibility mode." This feature allows Windows 10 to emulate the environment of older operating systems, potentially enabling legacy software to function.

However, compatibility mode is not a guaranteed solution. Several factors can influence the success of running Nero 7 on Windows 10, including:

  • Hardware limitations: Nero 7 might encounter difficulties running on newer hardware configurations. Its design predates modern processors, graphics cards, and memory capacities.
  • Driver compatibility: The software might rely on drivers designed for older operating systems, which may not be fully compatible with Windows 10.
  • Software dependencies: Nero 7 could depend on other legacy software or system components that may not function correctly on Windows 10.

Installing and Running Nero 7 on Windows 10

Assuming you possess a valid license for Nero 7, the installation process on Windows 10 typically involves the following steps:

  1. Obtain the installation files: Locate the original installation media or download the software from a trusted source.
  2. Run the setup program: Execute the installation file and follow the on-screen prompts.
  3. Enable compatibility mode: Right-click on the Nero 7 executable file, select "Properties," and navigate to the "Compatibility" tab. Check the box labeled "Run this program in compatibility mode for:" and select an earlier operating system from the dropdown menu, such as Windows XP or Windows Vista.
  4. Install necessary drivers: If the software requires specific drivers, ensure you have them installed. You may need to locate and download compatible drivers from the manufacturer’s website.

Exploring Nero 7’s Features and Limitations

While Nero 7 might not boast the latest features found in modern burning software, it offers a robust set of functionalities for users seeking reliable and straightforward solutions. Some key features include:

  • CD/DVD/Blu-ray burning: Nero 7 provides comprehensive tools for burning data, music, and video to various disc formats, including CD-R/RW, DVD-R/RW, and Blu-ray.
  • Disc copying and ripping: The software enables users to create copies of existing discs or extract audio tracks from CDs.
  • Image creation and burning: Nero 7 allows users to create disc images (ISO files) and burn them to discs.
  • Media management: The software provides tools for organizing and managing media files, including audio, video, and images.
  • Data backup and recovery: Nero 7 offers basic backup and recovery features to protect important data.

However, it’s important to acknowledge the limitations of using Nero 7 on Windows 10:

  • Lack of modern features: The software lacks features commonly found in newer burning software, such as support for high-resolution video formats, advanced disc encryption, and cloud integration.
  • Compatibility issues: As mentioned earlier, compatibility issues with Windows 10 and modern hardware can hinder the software’s performance and stability.
  • Security concerns: Using outdated software can expose users to security vulnerabilities, as developers often stop providing security updates for older versions.

Exploring Modern Alternatives to Nero 7

Given the challenges of using Nero 7 on Windows 10, exploring modern alternatives can be a wise decision. Numerous contemporary burning and multimedia software options offer advanced features, improved compatibility, and enhanced security:

  • BurnAware: A free and user-friendly burning software offering a comprehensive set of features, including data, music, and video burning, disc copying, and image creation.
  • Ashampoo Burning Studio: A paid software with a user-friendly interface and a wide range of features, including disc burning, image creation, and data backup.
  • CDBurnerXP: A free and open-source burning software with a simple interface and support for various disc formats.
  • ImgBurn: A free and powerful burning software that supports a wide range of disc formats, including Blu-ray and HD DVD.

FAQs on Using Nero 7 on Windows 10

Q: Is it safe to use Nero 7 on Windows 10?

A: While Nero 7 may function on Windows 10, using outdated software can expose you to security vulnerabilities. Consider upgrading to a newer version or exploring modern alternatives for enhanced security and stability.

Q: Can I use Nero 7 to burn Blu-ray discs on Windows 10?

A: Nero 7 supports Blu-ray burning, but its compatibility with Windows 10 and modern hardware might pose challenges. It’s advisable to test the software’s functionality thoroughly before relying on it for critical tasks.

Q: What are the minimum system requirements for running Nero 7 on Windows 10?

A: Nero 7’s official system requirements are designed for older operating systems. While compatibility mode can help, it’s difficult to provide accurate system requirements for Windows 10. It’s recommended to refer to the software’s documentation or seek support from the manufacturer.

Q: Is it possible to update Nero 7 to a newer version?

A: Nero 7 is an older version of the software. While updates were available during its active development phase, it’s unlikely that newer updates are available for this specific version.

Tips for Using Nero 7 on Windows 10

  • Test thoroughly: Before using Nero 7 for critical tasks, test its functionality and compatibility with your system configuration.
  • Keep your system updated: Ensure your Windows 10 operating system and other system components are up-to-date to minimize potential compatibility issues.
  • Consider alternatives: If you encounter significant compatibility problems or security concerns, explore modern burning software alternatives.

Conclusion

While Nero 7 might hold a nostalgic place in the hearts of some users, its compatibility with Windows 10 and modern hardware can be a significant challenge. The software’s outdated design and lack of modern features might not meet the needs of contemporary users. While it might function through compatibility mode, potential issues with drivers, hardware, and security vulnerabilities make it a risky choice for critical tasks. Exploring modern alternatives that offer advanced features, improved compatibility, and enhanced security is a more sensible approach for users seeking reliable burning and multimedia software solutions in the modern era.

Nero 7 essentials - iheartlena NERO 7  D-D The Aquarium Solution Nero 7 review  TechRadar
Nero 7 Essentials Lightscribe - dashboardmultifiles Nero 7 premium - energybilla Nero 7 Ultra Edition Instructions
ELECTRO::: V 2.0: NERO 7 PREMIUM RELOADED (COMPATIBLE-VISTA) Nero 7 Essentials - Startupware: Managing Startups

Closure

Thus, we hope this article has provided valuable insights into A Comprehensive Guide to Nero 7: Compatibility, Features, and Alternatives in the Modern Era. We appreciate your attention to our article. See you in our next article!

Safeguarding Your Windows 10: A Comprehensive Guide To Ransomware Protection

Safeguarding Your Windows 10: A Comprehensive Guide to Ransomware Protection

Introduction

With enthusiasm, let’s navigate through the intriguing topic related to Safeguarding Your Windows 10: A Comprehensive Guide to Ransomware Protection. Let’s weave interesting information and offer fresh perspectives to the readers.

Safeguarding Your Windows 10: A Comprehensive Guide to Ransomware Protection

Complete Guide to Ransomware Protection on Windows 10

In the digital age, where information is paramount and data reigns supreme, the threat of ransomware looms large. This malicious software, designed to encrypt and hold your valuable data hostage until a ransom is paid, poses a significant risk to individuals and organizations alike. Windows 10, despite its robust security features, is not immune to these attacks. Therefore, understanding and implementing effective ransomware protection strategies is crucial for ensuring the safety and integrity of your digital assets.

This comprehensive guide explores the multifaceted world of ransomware protection on Windows 10, providing a detailed understanding of the threats, the vulnerabilities, and the comprehensive strategies for mitigating risks. We delve into the intricacies of preventative measures, proactive security practices, and recovery strategies, empowering you with the knowledge and tools to safeguard your digital environment.

Understanding the Ransomware Threat

Ransomware operates on a simple yet devastating principle: it infiltrates your system, encrypts your files, and demands payment for their decryption. This encryption is often sophisticated, rendering your data inaccessible without the decryption key held by the attackers. The consequences can be dire, ranging from personal inconvenience to crippling business disruptions.

Types of Ransomware Attacks

Ransomware attacks can be broadly categorized into two main types:

  • Crypto-Ransomware: This is the most common type, utilizing strong encryption algorithms to render your files unusable. The attackers demand payment, usually in cryptocurrency, to provide the decryption key.
  • Locker Ransomware: This type blocks access to your entire system, often by locking the screen or taking control of your mouse and keyboard. The attackers demand payment to unlock your system and restore access.

Common Entry Points for Ransomware

Ransomware can infiltrate your Windows 10 system through various methods:

  • Phishing Emails: These emails often contain malicious attachments or links that, when clicked, download the ransomware onto your computer.
  • Malicious Websites: Visiting compromised or untrusted websites can expose your system to ransomware infections.
  • Exploited Vulnerabilities: Outdated software or operating systems can harbor security vulnerabilities that ransomware can exploit.
  • USB Drives and External Devices: Connecting infected external devices to your computer can introduce ransomware.
  • Software Downloads: Downloading software from untrusted sources can expose your system to ransomware.

The Importance of Proactive Protection

Proactive measures are the cornerstone of effective ransomware protection. These measures aim to prevent ransomware from ever gaining access to your system, minimizing the risk of infection and data loss.

Key Proactive Measures:

  • Regular Software Updates: Keeping your operating system, antivirus software, and other applications updated is essential. Updates often include security patches that address known vulnerabilities exploited by ransomware.
  • Strong Passwords: Use complex and unique passwords for all your accounts, including your Windows 10 login. Consider using a password manager to securely store and manage your passwords.
  • Enable Two-Factor Authentication: This adds an extra layer of security by requiring a second verification step, such as a code sent to your phone, when logging into accounts.
  • Be Wary of Phishing Attempts: Never click on suspicious links or open attachments from unknown senders. Verify the sender’s identity and the legitimacy of the email before taking any action.
  • Use a Reputable Antivirus Software: Install and maintain a reliable antivirus program that can detect and remove ransomware threats.
  • Enable Windows Defender: Windows 10 comes equipped with built-in antivirus protection called Windows Defender. Ensure it is enabled and regularly updated.
  • Back Up Your Data Regularly: Creating regular backups of your important data is essential. Store backups in a separate location, such as an external hard drive or cloud storage, to ensure they are not affected by ransomware attacks.
  • Limit User Account Privileges: Restrict user accounts to standard privileges whenever possible. This limits the ability of ransomware to make changes to your system.
  • Implement Network Security Measures: Secure your network with a firewall and use strong passwords for all network devices.
  • Train Employees: If you are in a business environment, educate employees about ransomware threats and best practices for safe online behavior.

Reacting to a Ransomware Attack

Even with the best preventative measures in place, there is always a chance of a ransomware attack. It is essential to have a plan in place to respond effectively to such an event.

Steps to Take in Case of a Ransomware Attack:

  • Disconnect from the Network: Immediately disconnect your infected device from the network to prevent the ransomware from spreading to other devices.
  • Isolate the Affected Device: If possible, isolate the infected device from other devices on the network to prevent further contamination.
  • Run a Full System Scan: Use your antivirus software to run a full system scan to identify and remove any malicious files.
  • Restore from Backup: If you have a recent backup of your data, restore your system from the backup. This will restore your files to their pre-infection state, effectively eliminating the ransomware.
  • Contact Your IT Department or Security Professionals: If you are unable to remove the ransomware or restore your system, contact your IT department or cybersecurity professionals for assistance.
  • Do Not Pay the Ransom: Paying the ransom does not guarantee that you will get your files back. It may also encourage further attacks and contribute to the ransomware economy.
  • Report the Incident: Report the ransomware attack to the authorities, such as your local police department or the FBI.

FAQs About Ransomware Protection

Q: What are the most common signs of a ransomware infection?

A: Common signs include:

  • Unusually slow performance: Your computer may become sluggish or unresponsive.
  • Missing files: You may notice that some of your files have disappeared or been replaced with empty files.
  • Encrypted files: Your files may have unusual file extensions, such as ".locked" or ".encrypted."
  • Ransomware demands: You may receive a message demanding payment to unlock your files.

Q: What are the best free antivirus software options for Windows 10?

A: Some highly-rated free antivirus options include:

  • Windows Defender: Built-in to Windows 10, it offers basic protection against ransomware and other malware threats.
  • Avast Free Antivirus: Provides comprehensive protection, including real-time threat detection and a firewall.
  • AVG AntiVirus Free: Offers a good balance of features and performance.
  • Bitdefender Antivirus Plus: Provides advanced ransomware protection and a user-friendly interface.

Q: How can I prevent ransomware from spreading to other devices on my network?

A: Implement network security measures such as a firewall and strong passwords for all network devices. Use network segmentation to isolate critical systems and data. Keep your network devices updated with the latest security patches.

Q: How can I recover my files if I have not backed them up?

A: If you have not backed up your files, recovering them after a ransomware attack can be challenging. However, there are specialized data recovery tools and services that may be able to help. Consult with cybersecurity professionals for expert assistance.

Tips for Enhanced Ransomware Protection

  • Use a Strong Password Manager: A password manager can securely store and manage your passwords, reducing the risk of using weak or reused passwords.
  • Enable File History: Windows 10’s File History feature automatically creates regular backups of your files, allowing you to restore them to a previous state.
  • Implement a Zero Trust Security Model: Treat all users and devices as potentially untrusted and enforce strict access controls.
  • Educate Yourself and Others: Stay informed about the latest ransomware threats and best practices for preventing attacks. Educate your family, friends, and colleagues about ransomware dangers and how to protect themselves.

Conclusion

Ransomware poses a significant threat to individuals and organizations, demanding a proactive and comprehensive approach to protection. By understanding the vulnerabilities, implementing preventative measures, and developing a robust response plan, you can significantly reduce the risk of falling victim to these attacks. Remember, vigilance, awareness, and proactive security practices are the key to safeguarding your digital assets and ensuring the safety and integrity of your data in the face of evolving cyber threats.

Complete Guide To Ransomware Protection On Windows 10 - vrogue.co Ransomware: How to Protection from Ransomware In Windows 10  Windows 10  [January 2020] - YouTube How to Enable Ransomware Protection in Windows 10 - Tech Advisor
Windows 10 Your Guide To Ransomware - vrogue.co Windows Ransomware Protection?  Sensitive Protection How to Turn on Ransomware Protection in Windows 10 & 11
How to Enable Ransomware Protection on Windows 10 How to Turn Off Ransomware Protection in Windows 10?

Closure

Thus, we hope this article has provided valuable insights into Safeguarding Your Windows 10: A Comprehensive Guide to Ransomware Protection. We hope you find this article informative and beneficial. See you in our next article!