Archives 2024

Navigating The Landscape Of Windows 10 Repair Tools: A Comprehensive Guide

Navigating the Landscape of Windows 10 Repair Tools: A Comprehensive Guide

Introduction

In this auspicious occasion, we are delighted to delve into the intriguing topic related to Navigating the Landscape of Windows 10 Repair Tools: A Comprehensive Guide. Let’s weave interesting information and offer fresh perspectives to the readers.

How To Repair Windows 10 And 11 In 4 Steps Computerwo - vrogue.co

Windows 10, despite its robust design, is not immune to malfunctions. From system crashes to stubborn errors, users often find themselves seeking solutions. Thankfully, a diverse array of repair tools and programs exist, empowering individuals to troubleshoot and restore their Windows 10 experience. This guide delves into the functionalities, benefits, and considerations of these invaluable utilities, providing a comprehensive understanding of their role in maintaining a smooth and efficient Windows 10 environment.

Understanding the Importance of Repair Tools

Repair tools are indispensable for addressing a wide range of Windows 10 issues. These tools can:

  • Identify and Resolve Errors: They act as diagnostic tools, pinpointing the root cause of problems and suggesting appropriate fixes.
  • Restore System Functionality: Repair tools can often restore corrupted system files, corrupted registry entries, or other critical components, restoring normal system operations.
  • Prevent Data Loss: In cases of system crashes or malware infection, repair tools can help recover lost data or prevent further data corruption.
  • Enhance System Performance: By cleaning up temporary files, removing unnecessary programs, and optimizing system settings, repair tools can improve system speed and responsiveness.
  • Provide a User-Friendly Interface: Many repair tools offer intuitive interfaces, simplifying the repair process, even for users with limited technical expertise.

Categorizing Windows 10 Repair Tools

Windows 10 repair tools can be broadly categorized into two main groups:

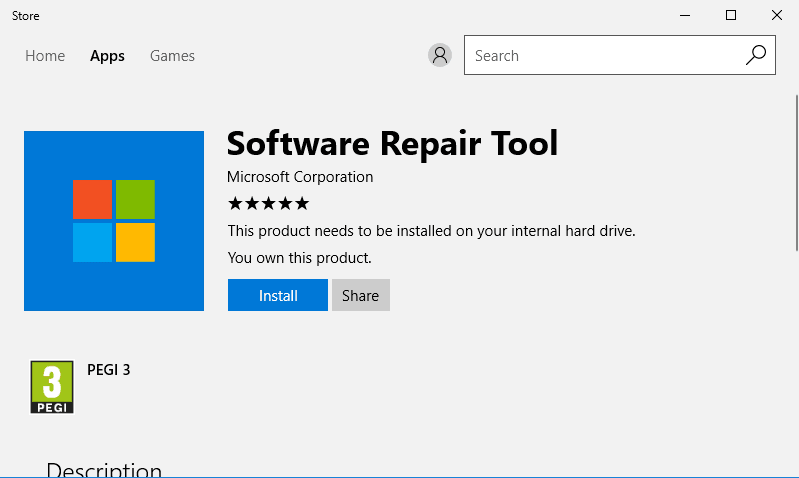
1. Built-in Windows 10 Tools: These are pre-installed utilities within Windows 10, offering a basic level of repair functionality.

a) System File Checker (SFC): This tool scans for and repairs corrupted system files. It is a fundamental tool for addressing many common Windows 10 issues.

b) Deployment Image Servicing and Management (DISM): DISM is a more advanced tool used for repairing the Windows image itself. It can be used to restore corrupted system files, fix errors in the Windows image, and prepare the system for a clean installation.

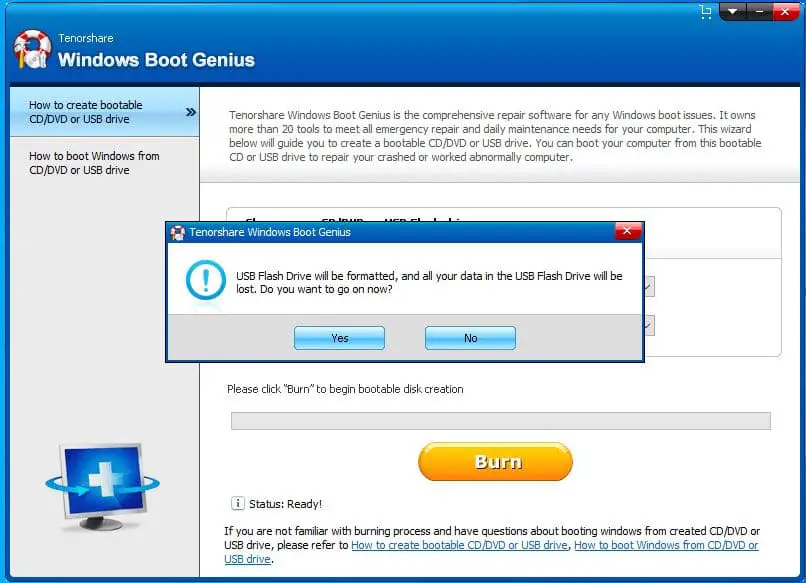
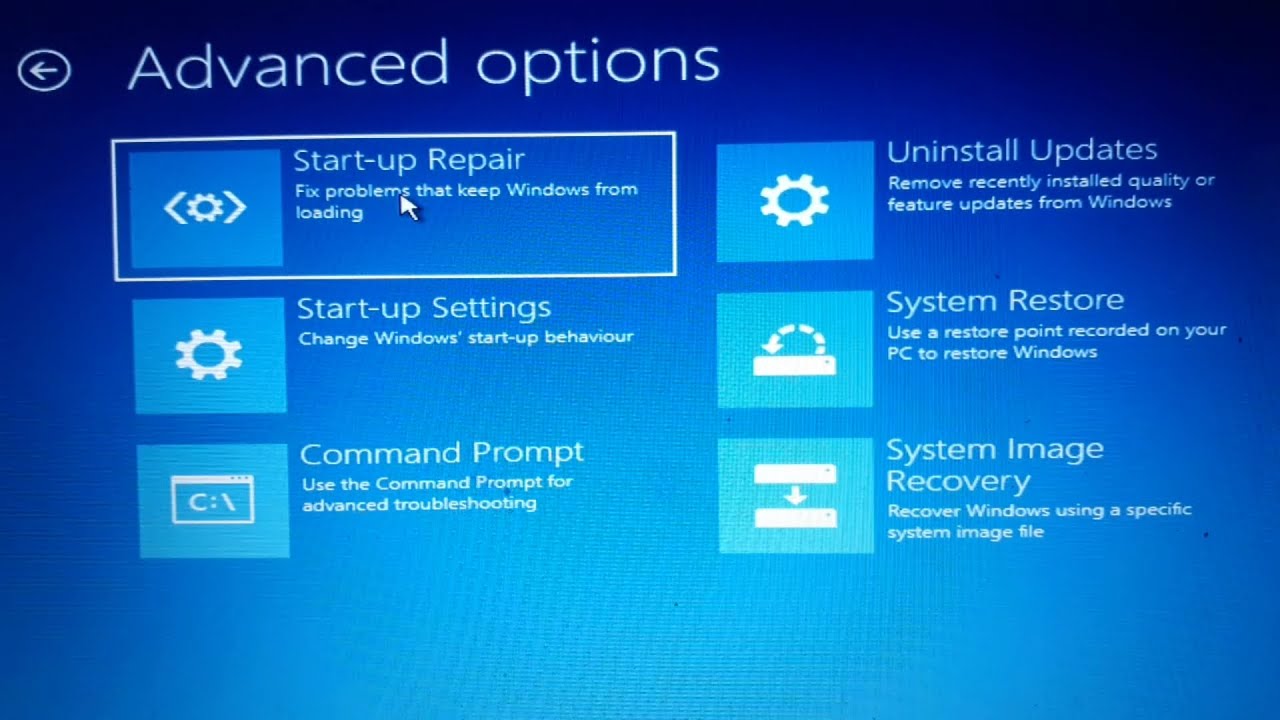
c) Startup Repair: This tool attempts to automatically diagnose and repair issues that prevent Windows 10 from booting properly.

d) System Restore: System Restore allows users to revert the system to a previous state, undoing changes that may have caused problems.

e) Windows Update Troubleshooter: This tool helps resolve issues with Windows updates, ensuring the system receives the latest security patches and improvements.

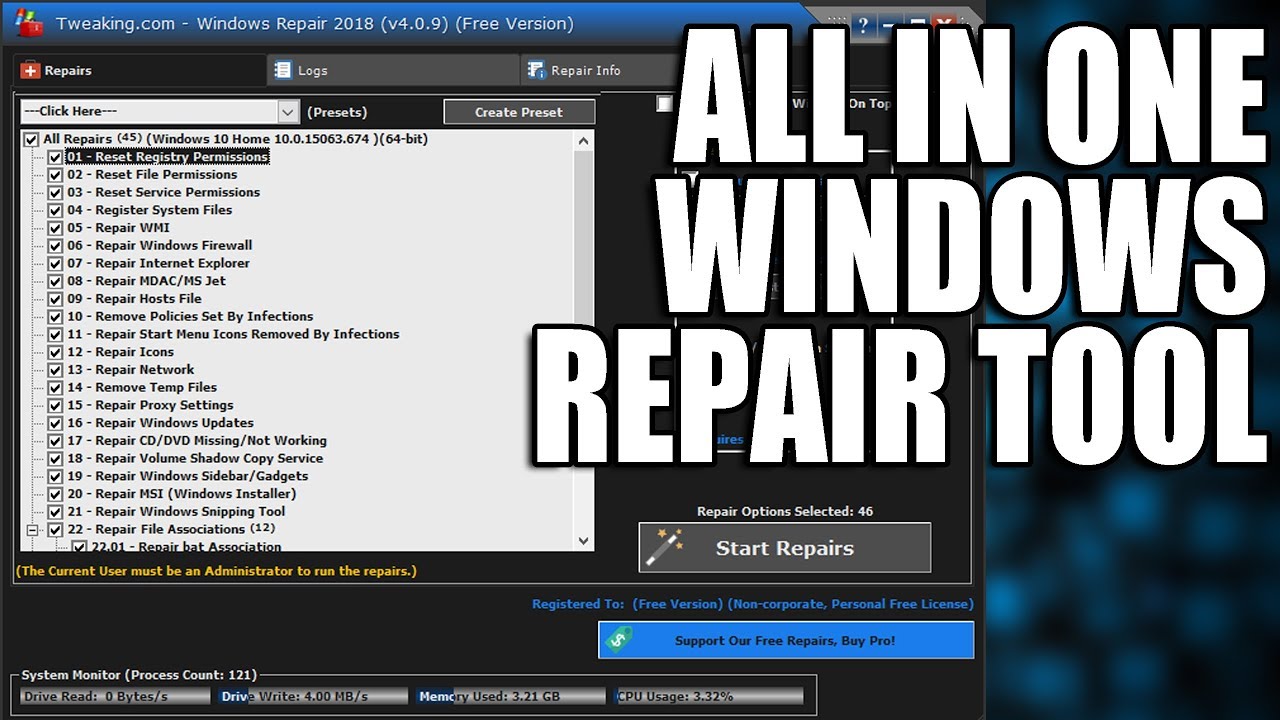
2. Third-Party Repair Tools: These are external programs developed by independent software companies, offering more advanced features and capabilities.

a) System Optimization and Cleaning Tools: These tools can clean up temporary files, remove unnecessary programs, defragment hard drives, and optimize system settings for better performance. Examples include CCleaner, Advanced SystemCare, and IObit Smart Defrag.

b) Registry Cleaners: Registry cleaners scan and repair the Windows registry, which stores system settings and configurations. By removing invalid entries, they can improve system performance and stability. Examples include Wise Registry Cleaner and Reg Organizer.

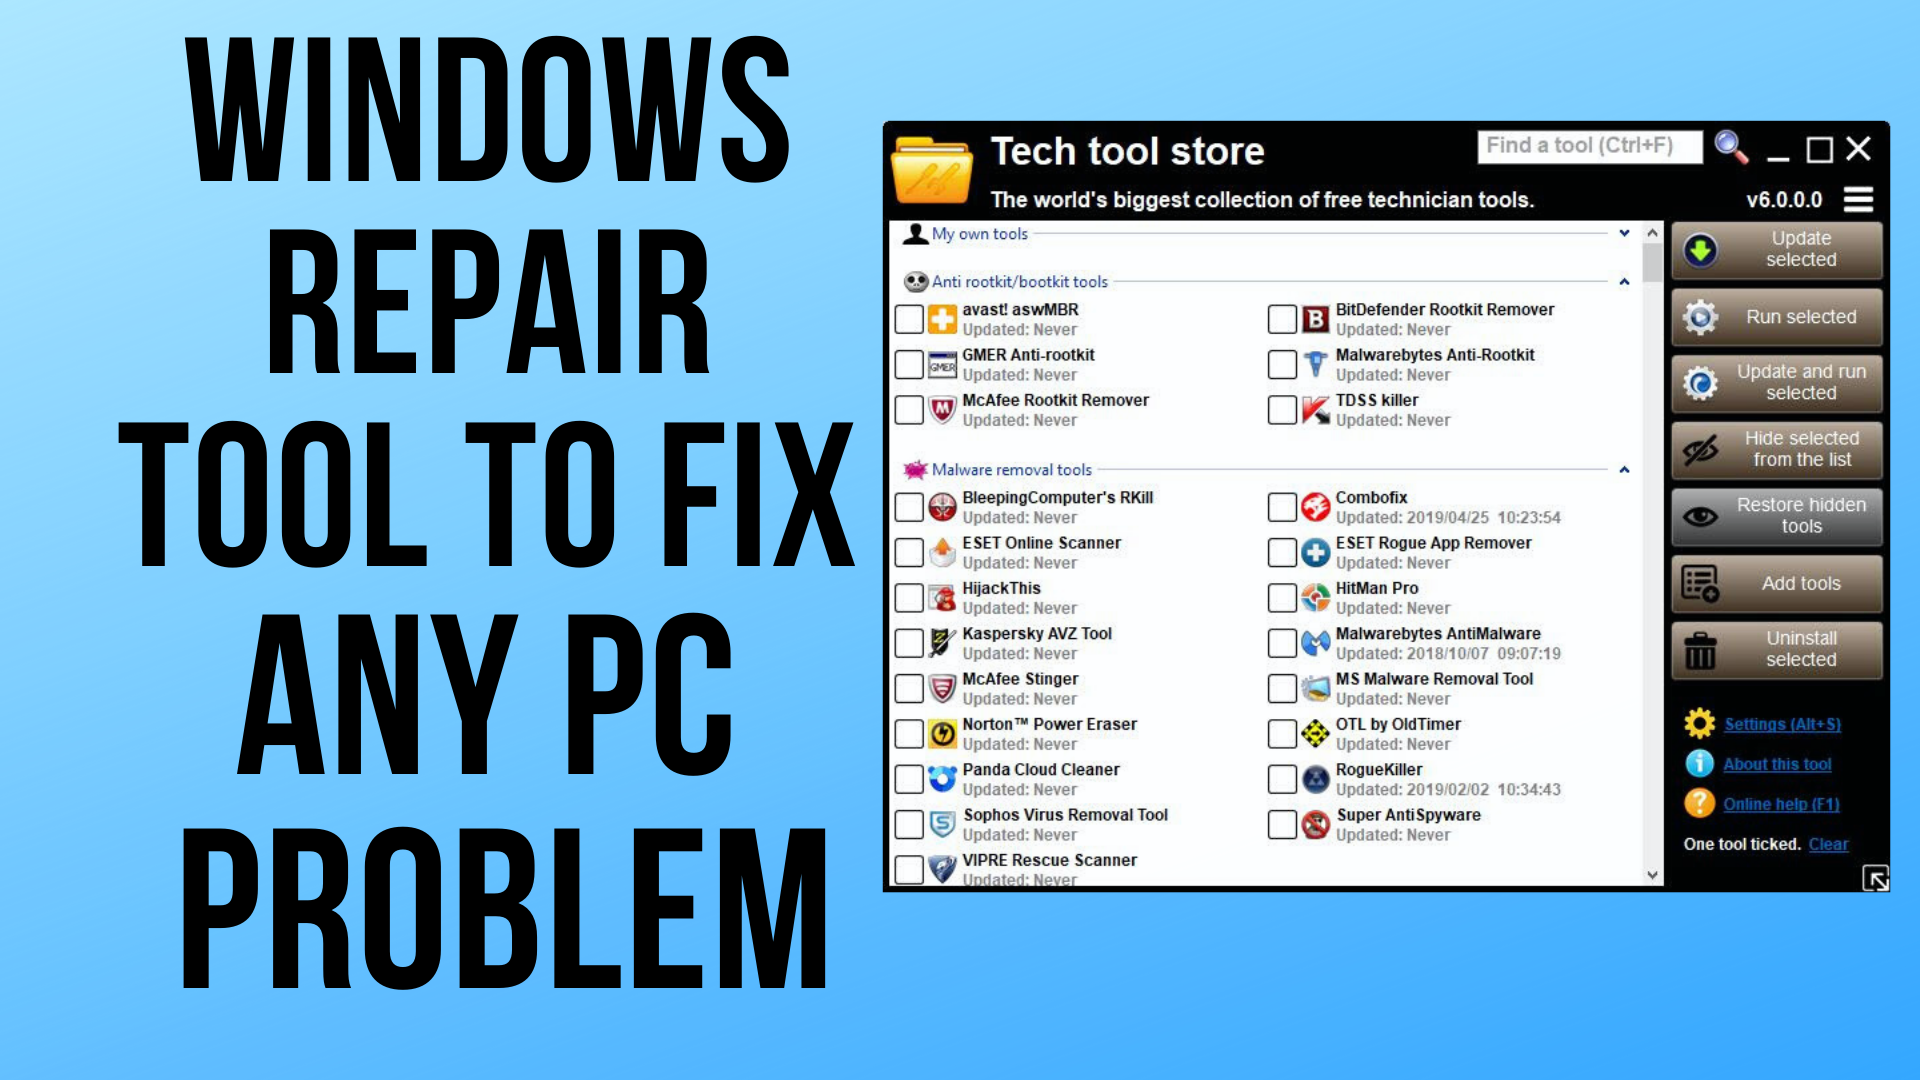
c) Malware Removal Tools: These tools are designed to detect and remove malware, including viruses, spyware, and ransomware, which can significantly impact system stability and security. Examples include Malwarebytes, Avast Antivirus, and Norton AntiVirus.

d) Data Recovery Tools: Data recovery tools can help retrieve lost or deleted files from hard drives, USB drives, and other storage devices, minimizing data loss in case of system crashes or accidental deletions. Examples include Recuva, EaseUS Data Recovery Wizard, and Stellar Data Recovery.

e) Driver Updaters: Driver updaters automatically scan for and update outdated device drivers, ensuring optimal hardware performance and stability. Examples include Driver Booster, DriverEasy, and Snappy Driver Installer.

f) System Backup and Recovery Tools: These tools create backup images of the entire system, allowing users to restore the system to a previous state in case of data loss or system failure. Examples include Acronis True Image, EaseUS Todo Backup, and Macrium Reflect.

Frequently Asked Questions (FAQs)

1. Which repair tools are most effective for specific issues?

The effectiveness of a repair tool depends on the specific issue. For corrupted system files, SFC and DISM are essential. For performance optimization, system optimization and cleaning tools are beneficial. For malware removal, specialized malware removal tools are crucial.

2. Can using repair tools damage my system?

While most repair tools are designed to be safe, using certain tools incorrectly or installing untrusted software can potentially harm your system. It is crucial to download repair tools from reputable sources and use them with caution.

3. How often should I use repair tools?

Regularly running system scans and cleaning tools can help maintain system health. However, avoid using tools excessively, as this can potentially slow down your computer.

4. Are all repair tools free?

Some repair tools are free, while others offer paid versions with additional features. Choose the tool that best suits your needs and budget.

5. How can I choose the right repair tool?

Consider the specific issues you are experiencing, the level of technical expertise you possess, and your budget. Research different tools and read user reviews before making a decision.

Tips for Using Repair Tools Effectively

  • Backup Your System: Before running any repair tool, create a system backup to ensure data recovery in case of unforeseen issues.
  • Use Reputable Tools: Download repair tools from trusted sources to minimize the risk of installing malicious software.
  • Read Instructions Carefully: Follow the instructions provided by the repair tool developer to ensure correct usage.
  • Don’t Overuse Tools: Avoid running repair tools excessively, as this can potentially slow down your computer.
  • Monitor System Performance: After using a repair tool, monitor system performance to assess its effectiveness.

Conclusion

Repair tools are indispensable companions for Windows 10 users, providing essential solutions for a range of system issues. By understanding the functionalities and benefits of different tools, users can effectively troubleshoot and restore their Windows 10 experience. Whether utilizing built-in Windows tools or exploring third-party options, it is crucial to approach repair tools with caution and prioritize system safety and data integrity. With the right tools and a proactive approach, users can maintain a stable and efficient Windows 10 environment, ensuring a seamless computing experience.

7 Repair Tools to Solve Windows 10 Problems Automatically  Geekflare Windows 10 repair tools - beemeva Top 6 Ways to Repair Windows 10 Without Losing Data (Free) - EaseUS
How To Repair Windows 10 - YouTube Windows 10 Repair Tool 11 Of The Best Windows 10 Repair Tools in 2020 - Reviewed��
Windows 10 Repair Tool Windows 10 Repair Tool

Closure

Thus, we hope this article has provided valuable insights into Navigating the Landscape of Windows 10 Repair Tools: A Comprehensive Guide. We thank you for taking the time to read this article. See you in our next article!

Navigating The Network And Sharing Landscape: A Guide To Windows 11’s Network And Sharing Center

Navigating the Network and Sharing Landscape: A Guide to Windows 11’s Network and Sharing Center

Introduction

In this auspicious occasion, we are delighted to delve into the intriguing topic related to Navigating the Network and Sharing Landscape: A Guide to Windows 11’s Network and Sharing Center. Let’s weave interesting information and offer fresh perspectives to the readers.

Full Guide: Windows 11 File Sharing on Network

In the modern digital landscape, seamless connectivity and secure data sharing are paramount. Windows 11, Microsoft’s latest operating system, offers a centralized hub for managing these critical aspects: the Network and Sharing Center. This article delves into the intricacies of this essential tool, providing a comprehensive overview of its functionalities, benefits, and importance in effectively managing network connections and sharing data within a Windows 11 environment.

Understanding the Network and Sharing Center: A Foundation for Connectivity

The Network and Sharing Center serves as the central control panel for all network-related activities within Windows 11. It provides a user-friendly interface to monitor and configure network connections, manage sharing settings, and troubleshoot potential connectivity issues. This central location streamlines the process of managing network resources, ensuring a smooth and secure digital experience.

Key Features and Functionalities: Demystifying the Network and Sharing Center

The Network and Sharing Center encompasses a diverse range of features, each playing a vital role in managing network connections and data sharing. These functionalities can be broadly categorized into the following areas:

1. Network Connection Management:

  • Viewing Network Status: The Network and Sharing Center displays a clear overview of active network connections, including wired Ethernet connections, wireless Wi-Fi networks, and virtual private networks (VPNs). This provides a quick snapshot of the current connectivity status, enabling users to identify any potential issues or disconnected networks.
  • Connecting to Networks: The Network and Sharing Center simplifies the process of connecting to new networks. Users can easily scan for available Wi-Fi networks, input network passwords, and configure connection settings.
  • Managing Connection Properties: For each network connection, users can access detailed properties, including network name, signal strength, IP address, and security settings. This granular control allows for customization of connection parameters to optimize performance and security.

2. Sharing Settings and Data Transfer:

  • Sharing Options: The Network and Sharing Center provides a centralized platform for configuring sharing settings for various network resources, such as files, printers, and folders. Users can choose to enable or disable sharing for specific devices or networks, ensuring data security and controlled access.
  • Network Discovery and File Sharing: This feature enables users to discover other devices on the network and share files seamlessly. Users can choose to share specific folders or drives with other users, allowing for collaborative work and data exchange.
  • Public and Private Network Profiles: The Network and Sharing Center allows users to define different network profiles based on the level of security and sharing desired. Public networks, such as those found in coffee shops or airports, typically offer limited sharing options, while private networks, such as home networks, provide greater control and flexibility.

3. Troubleshooting Network Issues:

  • Connectivity Diagnostics: The Network and Sharing Center offers integrated tools to diagnose and troubleshoot common network issues. These tools can identify problems with network connections, network adapters, or internet service providers (ISPs), providing step-by-step guidance for resolution.
  • Network Adapter Management: Users can access and manage network adapters, including enabling or disabling adapters, configuring adapter settings, and updating drivers. This functionality is essential for maintaining optimal network performance and resolving connectivity issues.

Benefits and Importance: A Seamless and Secure Digital Experience

The Network and Sharing Center plays a pivotal role in facilitating a smooth and secure digital experience for Windows 11 users. Its comprehensive features and functionalities offer several key benefits:

  • Centralized Network Management: The Network and Sharing Center eliminates the need to navigate through multiple menus or settings to manage network connections and sharing options. This centralized location streamlines network management, saving time and effort.
  • Enhanced Security and Privacy: By allowing users to configure sharing settings and define network profiles, the Network and Sharing Center empowers users to control access to their data and devices, mitigating potential security risks.
  • Simplified Troubleshooting: The built-in diagnostic tools and network adapter management capabilities within the Network and Sharing Center enable users to quickly identify and resolve common network issues, minimizing downtime and frustration.
  • Improved Network Performance: By providing granular control over network connections, sharing settings, and adapter properties, the Network and Sharing Center empowers users to optimize network performance, ensuring faster data transfer speeds and smoother online experiences.

FAQs: Addressing Common Queries about the Network and Sharing Center

1. How do I access the Network and Sharing Center?

The Network and Sharing Center can be accessed through various methods:

  • Control Panel: Open the Control Panel and navigate to "Network and Sharing Center."
  • Search Bar: Type "Network and Sharing Center" in the Windows search bar and select the relevant result.
  • Taskbar: Right-click on the network icon in the taskbar and select "Open Network and Sharing Center."

2. How do I change my network sharing settings?

To change network sharing settings:

  • Open the Network and Sharing Center.
  • Click on "Change advanced sharing settings."
  • Select the desired network profile (Public, Private, or Guest).
  • Modify the sharing settings according to your preferences.

3. How do I troubleshoot a network connection issue?

To troubleshoot a network connection issue:

  • Open the Network and Sharing Center.
  • Click on "Troubleshoot problems" to run the built-in network diagnostics.
  • Follow the on-screen instructions to resolve the identified issues.

4. How do I share files with other devices on my network?

To share files with other devices:

  • Open the Network and Sharing Center.
  • Click on "Change advanced sharing settings."
  • Ensure that "File and printer sharing" is enabled for the desired network profile.
  • Right-click on the folder you want to share and select "Properties."
  • Navigate to the "Sharing" tab and click on "Advanced sharing."
  • Check the box to "Share this folder" and click on "Permissions."
  • Add users or groups and set the desired access levels.

5. How do I connect to a VPN?

To connect to a VPN:

  • Open the Network and Sharing Center.
  • Click on "Set up a new connection or network."
  • Select "Connect to a workplace network."
  • Choose "VPN" and enter the necessary VPN details, including server address and credentials.

Tips for Effective Network Management:

  • Regularly update network drivers: Ensure that your network adapters have the latest drivers installed for optimal performance and compatibility.
  • Enable network discovery: This allows you to easily find and connect to other devices on your network.
  • Use strong passwords: Secure your network connections with robust passwords to protect your data from unauthorized access.
  • Enable firewall protection: A firewall acts as a barrier against potential threats, safeguarding your network and devices.
  • Keep your operating system and software up to date: Updates often include security patches and bug fixes, ensuring a secure and stable network environment.

Conclusion: Mastering Network Management with the Network and Sharing Center

The Network and Sharing Center in Windows 11 empowers users to manage network connections, configure sharing settings, and troubleshoot issues effectively. Its comprehensive features and functionalities provide a centralized hub for all network-related activities, ensuring a seamless and secure digital experience. By leveraging the tools and insights provided by the Network and Sharing Center, users can optimize network performance, safeguard data, and navigate the digital landscape with confidence.

Windows 11 Network And Sharing Center Windows 11 Network And Sharing Center Network Sharing Settings In Windows 11
Windows 11 Network Sharing Center Full Guide: Windows 11 File Sharing on Network Network and Sharing Center - Windows 11 - AdamFowlerIT.com
Full Guide: Windows 11 File Sharing on Network Windows 11 Network Sharing Center

Closure

Thus, we hope this article has provided valuable insights into Navigating the Network and Sharing Landscape: A Guide to Windows 11’s Network and Sharing Center. We appreciate your attention to our article. See you in our next article!

The Future Of Windows 10: Understanding Microsoft’s Support Lifecycle

The Future of Windows 10: Understanding Microsoft’s Support Lifecycle

Introduction

With great pleasure, we will explore the intriguing topic related to The Future of Windows 10: Understanding Microsoft’s Support Lifecycle. Let’s weave interesting information and offer fresh perspectives to the readers.

The Future of Windows 10: Understanding Microsoft’s Support Lifecycle

Windows 10 Build Support Lifecycle - Image to u

Windows 10, a ubiquitous operating system powering millions of computers worldwide, has been a mainstay for many users. However, like all software, its lifespan is finite. While there is no definitive "shutdown" date for Windows 10, Microsoft has outlined a clear support lifecycle, providing valuable insights into its future.

Understanding the Support Lifecycle:

Microsoft’s support lifecycle for Windows 10 involves distinct phases:

  • Mainstream Support: This phase encompasses the initial years of the operating system’s release, during which Microsoft provides regular security updates, bug fixes, and new feature releases. Windows 10’s mainstream support phase ended on October 14, 2025.
  • Extended Support: Following mainstream support, Windows 10 entered its extended support phase. During this period, Microsoft continues to provide critical security updates, addressing major vulnerabilities that could compromise system security. However, new features and non-security related updates are discontinued. This phase is expected to last until October 14, 2025.

The Significance of Support End Dates:

The end of support for Windows 10 signifies a critical juncture for users. Once extended support ends, Microsoft will no longer issue security updates or patches, leaving systems vulnerable to potential threats. This vulnerability increases the risk of data breaches, malware infections, and system instability.

Implications for Users:

The end of support for Windows 10 presents users with several options:

  • Upgrade to a newer operating system: Microsoft’s latest operating system, Windows 11, offers enhanced security features, improved performance, and modern user interface elements. Upgrading to Windows 11 would ensure continued access to security updates and new features.
  • Continue using Windows 10 with heightened security measures: Users can choose to stay on Windows 10 but must implement robust security practices to mitigate risks. This includes using reputable antivirus software, keeping software updated, and avoiding suspicious websites and downloads.
  • Migrate to a different operating system: Users may consider switching to alternative operating systems like Linux or macOS, which offer different functionalities and security landscapes.

The Importance of Planning:

It is crucial for users to plan their transition strategy well in advance of the end of support. This includes:

  • Assessing system compatibility: Ensure that your hardware meets the minimum requirements for the target operating system.
  • Back up critical data: Perform a comprehensive backup of all important files and settings to prevent data loss during the transition.
  • Familiarize yourself with the new operating system: Explore the features and functionalities of the chosen operating system to ensure a smooth transition.

FAQs about Windows 10 Support:

Q: What happens when Windows 10 support ends?

A: When extended support ends, Microsoft will no longer provide security updates or patches for Windows 10. This leaves systems vulnerable to security threats and increases the risk of malware infections.

Q: Will my computer stop working after support ends?

A: No, your computer will not automatically stop working. However, it will become increasingly vulnerable to security risks.

Q: Can I still use Windows 10 after support ends?

A: You can continue to use Windows 10, but it is not recommended. Without security updates, your system becomes a potential target for cyberattacks.

Q: Is it mandatory to upgrade to Windows 11?

A: No, upgrading to Windows 11 is not mandatory. You can choose to stay on Windows 10, but it is important to understand the associated security risks.

Tips for Preparing for the End of Windows 10 Support:

  • Assess your system’s compatibility: Check if your hardware meets the minimum requirements for Windows 11.
  • Back up your data: Create a comprehensive backup of all important files and settings.
  • Explore your options: Research alternative operating systems and upgrade paths.
  • Stay informed: Monitor Microsoft’s official announcements regarding Windows 10 support.
  • Implement robust security measures: Use antivirus software, keep software updated, and avoid suspicious websites and downloads.

Conclusion:

The end of support for Windows 10 marks a significant milestone, requiring users to proactively plan for the future. While Windows 10 has served users well, its support lifecycle is nearing its end. By understanding the implications of this change and implementing appropriate strategies, users can ensure a smooth transition to a secure and functional computing environment.

Microsoft to support Windows 10 until at least 2025 - gHacks Tech News Windows 10 Build Support Lifecycle - Image to u Windows 10 Build Support Lifecycle - Image to u
Windows 10 vs. Windows 11 Lifecycle Support - Access IT Automation Find Out Your Microsoft's Product Support Lifecycle - gHacks Tech News Windows 10 Support Dates Lifecycle - Image to u
How Much Do You Know About Windows Lifecycle Support Windows 10 Lifecycle  ZAG Technical Services  Microsoft

Closure

Thus, we hope this article has provided valuable insights into The Future of Windows 10: Understanding Microsoft’s Support Lifecycle. We appreciate your attention to our article. See you in our next article!

The Silent Struggle: Troubleshooting "No Audio Devices Installed" On Windows 10 HP Devices

The Silent Struggle: Troubleshooting "No Audio Devices Installed" on Windows 10 HP Devices

Introduction

With enthusiasm, let’s navigate through the intriguing topic related to The Silent Struggle: Troubleshooting "No Audio Devices Installed" on Windows 10 HP Devices. Let’s weave interesting information and offer fresh perspectives to the readers.

The Silent Struggle: Troubleshooting "No Audio Devices Installed" on Windows 10 HP Devices

Solved: No Audio Device installed issue in Windows 10-HP Laptop - YouTube

The absence of sound on a computer can be a frustrating experience, especially when it occurs on a newly purchased or recently updated device. The error message "No audio devices installed" on a Windows 10 HP computer signifies a deeper issue, often preventing users from enjoying multimedia content, communicating through voice calls, or even receiving system notifications. This article delves into the potential causes of this error, exploring troubleshooting steps, and offering preventative measures to ensure a seamless audio experience.

Understanding the Root of the Silence

The "No audio devices installed" message can stem from a variety of factors, ranging from simple driver issues to more complex hardware malfunctions. Here’s a breakdown of the common culprits:

1. Driver Conflicts and Incompatibilities:

  • Outdated or Missing Drivers: Audio drivers are the software that allows your computer to communicate with your sound card and speakers. If these drivers are outdated, incompatible with your operating system, or missing altogether, your computer won’t be able to recognize your audio hardware.

  • Conflicting Drivers: Sometimes, other software or driver installations can interfere with the proper functioning of your audio drivers. This can happen if a new driver update conflicts with an older one or if another program utilizes a similar audio output.

2. Hardware Malfunctions:

  • Faulty Sound Card: The sound card is the hardware component responsible for processing audio signals. A malfunctioning sound card can render your computer unable to output any sound.

  • Speaker or Headphone Issues: The speakers or headphones themselves might be damaged, disconnected, or have a faulty connection.

  • Loose or Corrupted Connections: A loose connection between the sound card and the speakers, or within the speaker system itself, can disrupt the audio signal flow. Similarly, a corrupted connection within the operating system can hinder audio communication.

3. Operating System Settings:

  • Disabled Audio Services: Windows 10 has various services that manage audio output. If these services are disabled or malfunctioning, your computer might not be able to produce sound.

  • Incorrect Audio Output Device: If the wrong output device is selected in the Windows sound settings, you might not hear any sound despite the device being connected and functioning properly.

4. Software Conflicts:

  • Audio Enhancer Software: Third-party audio enhancement software can sometimes interfere with the default audio settings, causing sound issues.

  • Antivirus or Firewall Interference: Antivirus software or firewalls can sometimes block access to audio devices, preventing sound output.

5. Windows Updates:

  • Incomplete or Corrupted Updates: Windows updates can sometimes cause audio issues, particularly if the update is incomplete or corrupted.

Troubleshooting: A Step-by-Step Guide

Navigating through these potential causes requires a systematic approach. Here’s a comprehensive troubleshooting guide to resolve the "No audio devices installed" error:

1. Restart Your Computer:

  • A simple restart can often resolve temporary glitches or software conflicts that might be affecting your audio output.

2. Check Speaker and Headphone Connections:

  • Ensure that your speakers or headphones are securely plugged into the correct audio output jack on your computer.
  • Try using a different set of speakers or headphones to rule out a hardware issue with your current devices.

3. Update Audio Drivers:

  • Device Manager: Open the Device Manager (right-click on the Start menu and select "Device Manager"). Locate "Sound, video and game controllers," expand the section, and right-click on your audio device. Select "Update driver," and follow the on-screen instructions.
  • Manufacturer Website: Visit the HP support website or the manufacturer’s website for your sound card. Download the latest drivers for your specific model and install them.

4. Troubleshoot Windows Audio Services:

  • Windows Audio Service: Open the "Run" dialog box (Windows key + R), type "services.msc," and press Enter. Locate "Windows Audio," right-click on it, and select "Properties." Ensure that the service is set to "Automatic" and is running. If not, start the service and set the startup type to "Automatic."
  • Multimedia Class Scheduler Service: Similarly, ensure that the "Multimedia Class Scheduler" service is running and set to "Automatic."

5. Check Audio Output Device Settings:

  • Windows Sound Settings: Open the Windows sound settings (right-click on the speaker icon in the taskbar and select "Open Sound settings"). Under "Output," select the correct audio output device for your speakers or headphones.
  • System Sounds: Ensure that the "System Sounds" option is enabled.

6. Disable Audio Enhancement Software:

  • Temporarily disable any audio enhancement software installed on your computer, as it might be interfering with the default audio settings.

7. Check Antivirus and Firewall Settings:

  • Ensure that your antivirus or firewall software is not blocking access to your audio devices. Temporarily disable the software to see if it resolves the issue.

8. Run Windows Audio Troubleshooter:

  • Access the Windows audio troubleshooter (type "troubleshoot" in the search bar and select "Troubleshooting"). Run the "Playing Audio" troubleshooter to automatically detect and fix any audio issues.

9. Perform a System Restore:

  • If the issue persists, consider restoring your system to a previous point in time before the audio problem began. This can help revert any changes that might have caused the issue.

10. Reinstall Audio Drivers:

  • In the Device Manager, right-click on your audio device and select "Uninstall device." Restart your computer, and Windows will automatically attempt to reinstall the drivers.

11. Contact HP Support:

  • If none of the above steps resolve the issue, contact HP support for further assistance. They may be able to provide more specific troubleshooting steps or suggest a hardware repair.

12. Consider Hardware Replacement:

  • If you’ve ruled out software issues and believe the problem lies with your sound card or speakers, consider replacing the faulty hardware.

Preventative Measures: Ensuring Audio Harmony

Preventing the "No audio devices installed" error from recurring requires proactive measures:

  • Regular Driver Updates: Keep your audio drivers up-to-date by regularly checking for updates on the HP support website or the manufacturer’s website for your sound card.

  • Careful Software Installation: Be cautious when installing new software, especially programs that modify audio settings or drivers. Always read the installation instructions carefully and consider using reputable sources for software downloads.

  • Regular System Maintenance: Perform regular system maintenance, including running disk cleanup, defragmenting your hard drive, and scanning for malware. This can help prevent software conflicts and ensure the smooth operation of your audio devices.

  • Avoid Unnecessary Software Changes: Refrain from making unnecessary changes to your system settings, especially those related to audio. Stick to the default settings unless you have a specific reason to modify them.

FAQs: Addressing Common Concerns

Q: Why is my audio device not showing up in the Device Manager?

A: If your audio device is not visible in the Device Manager, it might be due to a driver issue, hardware malfunction, or a disabled device. Try updating the audio drivers, checking for hardware issues, and ensuring the device is not disabled in the Device Manager.

Q: I’ve updated my audio drivers, but the issue persists. What should I do?

A: If updating drivers doesn’t resolve the issue, try reinstalling the drivers, checking for software conflicts, or running the Windows audio troubleshooter. If the problem persists, consider contacting HP support for further assistance.

Q: Can I use external speakers or headphones if the internal sound card is faulty?

A: Yes, you can use external speakers or headphones connected to the audio output jack on your computer, even if the internal sound card is malfunctioning. However, you might need to adjust the audio output device settings in Windows to select the external speakers or headphones as the default output device.

Q: What are some signs of a faulty sound card?

A: Signs of a faulty sound card include no audio output, distorted sound, crackling or popping noises, and intermittent sound interruptions. If you experience these symptoms, consider replacing the sound card.

Conclusion: Finding Harmony in Sound

The "No audio devices installed" error can be a frustrating obstacle, but with the right troubleshooting steps and preventative measures, it can be overcome. By understanding the potential causes, following the step-by-step guide, and implementing preventative practices, users can restore audio functionality and enjoy a seamless multimedia experience on their Windows 10 HP devices. Remember, if the problem persists, seeking professional assistance from HP support or a qualified technician can provide the necessary expertise to resolve the issue effectively.

No Audio Output Device Is Installed On Windows 10 PC (Best 10 Fixes) No Audio Output Device Is Installed In Windows 10- FIX (Working -2020) No Audio Output Device Is Installed In Windows 10- FIX (Working -2020)
No Audio Output Device Is Installed In Windows 10- FIX (Working -2020) No Audio Output Device Is Installed In Windows 10- FIX (Working -2020) FIXED] No Audio Output Device is Installed in Windows 10
How to Fix "No Audio Output Device is Installed" Error in Windows 10/11 - Driver Easy Sound Problem Windows 10 - How to fix No Audio Output Device installed - YouTube

Closure

Thus, we hope this article has provided valuable insights into The Silent Struggle: Troubleshooting "No Audio Devices Installed" on Windows 10 HP Devices. We hope you find this article informative and beneficial. See you in our next article!

Navigating The Digital Workplace: A Guide To Office 365 Login On Windows 10

Navigating the Digital Workplace: A Guide to Office 365 Login on Windows 10

Introduction

With great pleasure, we will explore the intriguing topic related to Navigating the Digital Workplace: A Guide to Office 365 Login on Windows 10. Let’s weave interesting information and offer fresh perspectives to the readers.

Microsoft Office 365 Login Tutorial Video  Office 365 Sign In - YouTube

In today’s interconnected world, seamless access to digital resources is paramount. For organizations and individuals alike, Microsoft’s Office 365 suite has become a cornerstone of productivity, providing a comprehensive set of applications and services. This article explores the process of logging into Office 365 on a Windows 10 operating system, elucidating the steps, benefits, and potential challenges involved.

Understanding the Integration

The integration of Office 365 and Windows 10 creates a cohesive and efficient digital ecosystem. This synergy streamlines access to a vast array of tools, including:

  • Microsoft Office Applications: Word, Excel, PowerPoint, Outlook, OneNote, and more, offering familiar and powerful tools for document creation, data analysis, presentation development, email management, and note-taking.
  • Cloud Storage and Collaboration: OneDrive provides secure cloud storage, enabling file sharing and real-time collaboration on documents, spreadsheets, and presentations.
  • Communication and Collaboration Tools: Teams facilitates online meetings, chat, and file sharing, fostering seamless communication and project management within teams.
  • Security and Management Features: Office 365’s robust security measures and centralized management tools ensure data protection and simplified administration.

The Login Process: A Step-by-Step Guide

  1. Opening the Office Application: Begin by launching any Office 365 application, such as Word, Excel, or Outlook.
  2. Login Prompt: The application will prompt you to sign in.
  3. Enter Credentials: In the provided fields, enter your Office 365 email address and password. This email address is typically your work or school account.
  4. Authentication: The system verifies your credentials and grants access to the application and associated services.

Alternative Login Methods

While the standard login process is straightforward, alternative methods exist to enhance convenience and security:

  • Single Sign-On (SSO): Organizations often implement SSO, allowing users to log in once and gain access to multiple applications and services with a single set of credentials.
  • Multi-Factor Authentication (MFA): This enhanced security measure requires users to provide additional authentication factors, such as a one-time code sent to their mobile device, beyond their password.
  • Azure Active Directory (Azure AD): This cloud-based identity and access management service enables organizations to manage user identities, access permissions, and security policies.

Potential Challenges and Solutions

While the login process is generally smooth, users may encounter challenges:

  • Forgotten Password: If you forget your password, follow the password recovery process provided by Office 365. This typically involves answering security questions or receiving a reset link via email.
  • Account Lockout: Multiple incorrect login attempts may result in account lockout. Contact your IT administrator or follow the account recovery procedures outlined by Office 365.
  • Network Connectivity Issues: Ensure a stable internet connection for seamless login and access to Office 365 services.
  • Synchronization Errors: Occasional synchronization issues may occur, particularly during updates or network disruptions. Patience and restarting the application or device can often resolve these issues.

Optimizing the Login Experience

  • Password Manager: Employ a password manager to securely store and manage your Office 365 credentials, reducing the risk of forgetting your password.
  • Browser Extensions: Utilize browser extensions designed for Office 365 login, providing faster and more convenient access.
  • Enable Auto-Login: If using a personal device, consider enabling auto-login for your Office 365 account, simplifying access.

FAQs: Addressing Common Queries

Q: What if I cannot remember my Office 365 password?

A: Follow the password recovery process provided by Office 365. This typically involves answering security questions or receiving a reset link via email.

Q: Why is my Office 365 account locked out?

A: Multiple incorrect login attempts may result in account lockout. Contact your IT administrator or follow the account recovery procedures outlined by Office 365.

Q: How do I ensure my Office 365 account is secure?

A: Enable multi-factor authentication (MFA) for enhanced security. Regularly update your password and avoid using the same password for multiple accounts.

Q: Can I access Office 365 on multiple devices?

A: Yes, Office 365 allows you to access your account on multiple devices, such as computers, tablets, and smartphones.

Q: What happens if I lose my device?

A: If you lose your device, immediately contact your IT administrator or follow the procedures outlined by Office 365 to secure your account and prevent unauthorized access.

Tips for a Seamless Login Experience

  • Utilize a strong and unique password.
  • Enable multi-factor authentication for enhanced security.
  • Keep your Office 365 applications and operating system updated.
  • Ensure a stable internet connection for seamless access.
  • Contact your IT administrator or Office 365 support for assistance with any issues.

Conclusion

Logging into Office 365 on Windows 10 is a fundamental step in accessing a powerful suite of productivity tools and services. The process is generally straightforward, but understanding the potential challenges and solutions, as well as implementing best practices for security and optimization, ensures a seamless and efficient experience. By mastering the intricacies of Office 365 login, users can unlock the full potential of this comprehensive digital workspace and elevate their productivity.

Office 365 Login, Overview, and Sharing - YouTube How to Login Office 365 Account? Microsoft Office 365 Login Sign In  office.com Sign In - YouTube How to login to Office 365 - YouTube
Office 365 Login๏ปฟ Account  office 356 Sign In How Microsoft Office 365 Suite transforms the Digital Workplace Microsoft Office 365 Admin Login โ€“ User Guide - Broughted
Microsoft 365 Login Latest Guide And Tips WPS Office, 40% OFF Tips - Logging in to Office 365

Closure

Thus, we hope this article has provided valuable insights into Navigating the Digital Workplace: A Guide to Office 365 Login on Windows 10. We appreciate your attention to our article. See you in our next article!

Navigating The Browser Landscape: Exploring Options Beyond Microsoft Edge On Windows 10

Navigating the Browser Landscape: Exploring Options Beyond Microsoft Edge on Windows 10

Introduction

With great pleasure, we will explore the intriguing topic related to Navigating the Browser Landscape: Exploring Options Beyond Microsoft Edge on Windows 10. Let’s weave interesting information and offer fresh perspectives to the readers.

Configure Browser tab experiences in Windows for Microsoft Edge

In the ever-evolving digital landscape, web browsers have become indispensable tools for accessing information, engaging in online activities, and navigating the vast expanse of the internet. While Microsoft Edge has emerged as the default browser on Windows 10, users may find themselves seeking alternative browsing experiences that better align with their needs and preferences. This exploration delves into the reasons why users might choose to explore options beyond Microsoft Edge, providing a comprehensive guide to understanding the available alternatives and the process of transitioning to a different browser.

Understanding the Need for Browser Diversity

The decision to move away from Microsoft Edge is often driven by a desire for enhanced functionality, improved performance, or a more tailored browsing experience. Here are some key reasons why users might consider exploring alternative browsers:

  • Customization and Flexibility: Different browsers offer varying levels of customization, allowing users to personalize their browsing experience with themes, extensions, and settings tailored to their preferences.
  • Security and Privacy: Browser security and privacy are paramount concerns in today’s digital world. Users may prioritize browsers that prioritize robust security features, enhanced privacy settings, and strong anti-tracking measures.
  • Performance and Resource Consumption: Browser performance can significantly impact user experience. Some browsers prioritize speed and resource efficiency, minimizing system impact and ensuring a smooth browsing experience, especially on devices with limited resources.
  • Compatibility and Feature Set: Specific websites or web applications may function optimally with certain browsers. Users might choose a browser known for its compatibility with specific technologies or its robust feature set that aligns with their particular needs.

Exploring the Browser Alternatives

The web browser market offers a diverse range of options, each catering to a specific set of user preferences and requirements. Here are some of the most popular and widely-used browsers:

  • Google Chrome: Known for its speed, vast extension library, and seamless integration with Google services, Chrome enjoys widespread popularity.
  • Mozilla Firefox: Emphasizing privacy and security, Firefox offers a robust feature set, including powerful customization options and a strong focus on user control.
  • Opera: Opera stands out with its built-in VPN, data-saving features, and a unique sidebar for easy access to social media and other online services.
  • Brave: Brave prioritizes privacy and security, blocking ads and trackers by default. It also offers a unique reward system for users who choose to view ads.
  • Safari: Apple’s native browser, Safari, is optimized for Apple devices and offers seamless integration with the Apple ecosystem.

Transitioning to a New Browser: A Step-by-Step Guide

Switching to a new browser involves a straightforward process that ensures a smooth transition while preserving your essential browsing data:

  1. Download and Install the New Browser: Visit the website of your chosen browser and download the installer for your operating system. Run the installer and follow the on-screen instructions to complete the installation.
  2. Import Bookmarks and Settings: Most browsers offer an import feature that allows you to transfer your bookmarks, passwords, and other settings from your previous browser. This ensures a seamless transition and preserves your browsing history.
  3. Configure Your New Browser: Customize your new browser to suit your preferences. Adjust settings related to privacy, security, appearance, and extensions.
  4. Set Your New Browser as Default: Navigate to your operating system’s settings and change the default browser to your newly installed choice. This ensures that all web links automatically open in your preferred browser.
  5. Test and Evaluate: Browse the internet using your new browser and familiarize yourself with its features and functionality. Evaluate its performance, security, and overall user experience.

FAQs: Addressing Common Concerns

1. Will I Lose My Browsing Data?

No, you can easily import your bookmarks, passwords, and other browsing data from your previous browser. Most browsers offer import features that allow you to seamlessly transfer your information.

2. Is It Safe to Switch Browsers?

Yes, switching browsers is safe and generally a straightforward process. Ensure you download the browser from the official website and follow the installation instructions carefully.

3. Can I Use Multiple Browsers Simultaneously?

Yes, you can use multiple browsers on your system without any conflicts. You can choose the browser that best suits your needs for specific tasks or websites.

4. What Happens to My Microsoft Edge Data?

Your Microsoft Edge data, including bookmarks, passwords, and history, remains accessible even after switching browsers. You can import this data into your new browser or choose to keep it separate.

5. Will My Website Preferences Change?

Your website preferences, such as language settings and cookies, are generally linked to your browser profile and will be transferred to your new browser during the import process.

Tips for a Smooth Transition

  • Backup Your Data: Before making the switch, back up your bookmarks, passwords, and other important browsing data to ensure data security.
  • Explore Browser Features: Take time to familiarize yourself with the features and functionalities of your new browser. Explore its customization options, extensions, and security settings.
  • Test Compatibility: Ensure that your new browser is compatible with the websites and web applications you regularly use.
  • Consider Extensions: Explore the extension libraries of different browsers and install extensions that enhance your browsing experience.

Conclusion

Choosing the right web browser is a personal decision influenced by individual needs and preferences. While Microsoft Edge remains a viable option, exploring alternatives allows users to discover browsers that offer enhanced functionality, improved performance, and a more tailored browsing experience. By understanding the reasons for exploring options beyond Microsoft Edge, the available alternatives, and the process of transitioning to a new browser, users can make informed decisions that align with their specific requirements and navigate the digital landscape with greater control and efficiency.

How the transition from microsoft edge legacy to new edge happens on windows 10 530161 2 scaled Microsoft Edge Browser In Windows 10 Settings How to Change Search Engine on Microsoft Edge โ€“ Apps For Windows 10
Navigating the Digital Landscape:Exploring 20 Examples of Web Browsers  by Reynoldsfred  Medium Microsoft Shakes Up The Browser Landscape With The All-New Edge Microsoft Edge to Get New Settings UI Ahead of Windows 10 Redstone 5 Launch
11 Best Microsoft Edge Themes for Windows 10, 11 in 2023 (2023) How to Enable And Use Compatibility View Settings in Edge?

Closure

Thus, we hope this article has provided valuable insights into Navigating the Browser Landscape: Exploring Options Beyond Microsoft Edge on Windows 10. We appreciate your attention to our article. See you in our next article!

A Deep Dive Into Windows 11: Exploring The Latest Operating System For Personal Computers

A Deep Dive into Windows 11: Exploring the Latest Operating System for Personal Computers

Introduction

With enthusiasm, let’s navigate through the intriguing topic related to A Deep Dive into Windows 11: Exploring the Latest Operating System for Personal Computers. Let’s weave interesting information and offer fresh perspectives to the readers.

A Deep Dive into Windows 11: Exploring the Latest Operating System for Personal Computers

Exploring The Features Of Windows 11: A Deep Dive

Windows 11, the latest iteration of Microsoft’s ubiquitous operating system, represents a significant leap forward in both design and functionality. Released in 2021, it has garnered considerable attention from both users and industry experts, promising a more refined and intuitive experience for personal computer users. This article delves into the key features, benefits, and considerations surrounding Windows 11, providing a comprehensive understanding of its capabilities and potential impact.

A Refined User Interface: Reimagining the Desktop Experience

Windows 11 introduces a visually striking and user-friendly interface that emphasizes simplicity and clarity. The most prominent change is the redesigned Start menu, which now features a central location for pinned apps and recently used files, offering a streamlined and accessible way to navigate frequently used applications. The taskbar, too, has undergone a transformation, adopting a centralized layout that aligns with the contemporary design language of modern operating systems.

The new interface incorporates rounded corners for windows and icons, contributing to a more visually cohesive and modern aesthetic. The overall effect is a clean and uncluttered desktop environment that prioritizes user experience, reducing visual noise and promoting a more intuitive workflow.

Enhanced Performance and Security: Building a Solid Foundation

Windows 11 is not just about aesthetics; it also boasts significant improvements in performance and security. Leveraging the power of modern hardware, the operating system delivers faster boot times, smoother application launches, and improved responsiveness overall. This enhancement is attributed to a combination of factors, including optimized system resources, improved power management, and a streamlined codebase.

Security is paramount in the digital age, and Windows 11 addresses this concern with a robust suite of security features. It incorporates hardware-level security measures like Windows Hello for biometric authentication, ensuring secure access to the system. Additionally, the operating system features enhanced anti-malware protection and improved sandboxing capabilities, further safeguarding user data and privacy.

Modernization of Features: Embracing New Technologies

Windows 11 embraces the latest technological advancements, incorporating features that enhance productivity and user engagement. The integration of Microsoft Teams directly into the operating system allows for seamless communication and collaboration, making it easier to connect with colleagues and friends. The introduction of "Snap Layouts" provides a more efficient way to manage multiple windows, enabling users to arrange them in pre-defined configurations for optimal multitasking.

Virtualization, a technology that allows users to run multiple operating systems simultaneously, is also integrated into Windows 11. This feature empowers users to run specialized applications or experiment with different operating systems within a secure environment.

Accessibility and Inclusivity: A Focus on User Experience

Windows 11 emphasizes accessibility and inclusivity, ensuring that the operating system caters to diverse user needs. The operating system incorporates features like improved text-to-speech functionality, enhanced screen reader capabilities, and customizable keyboard shortcuts, making it more accessible for users with disabilities.

Microsoft has also focused on providing language support for a wider range of users, expanding the number of languages supported by the operating system. This commitment to inclusivity ensures that Windows 11 can be used by individuals from various cultural backgrounds and linguistic communities.

Compatibility and Upgrade Considerations: Navigating the Transition

While Windows 11 offers a wealth of improvements, compatibility with older hardware remains a concern. The minimum system requirements for running Windows 11 are more stringent than those for its predecessor, requiring a more modern processor, sufficient RAM, and a compatible TPM chip. This requirement might necessitate hardware upgrades for some users, especially those with older machines.

Upgrading to Windows 11 from an earlier version of Windows involves a straightforward process, typically guided by the operating system itself. However, it is crucial to ensure that the system meets the minimum requirements and to back up important data before proceeding with the upgrade.

FAQs: Addressing Common Queries About Windows 11

Q: Is Windows 11 free to upgrade?

A: Windows 11 is a free upgrade for users with compatible Windows 10 devices. However, it is essential to ensure that the system meets the minimum requirements for a smooth upgrade experience.

Q: What are the minimum system requirements for Windows 11?

A: Windows 11 requires a 1 GHz or faster processor with at least two cores, 4 GB of RAM, 64 GB of storage space, a compatible TPM 2.0 chip, and a display with a resolution of at least 1280 x 720 pixels.

Q: How can I check if my computer is compatible with Windows 11?

A: Microsoft provides a dedicated tool called the "PC Health Check app" that can assess whether your computer meets the minimum system requirements for Windows 11.

Q: What are the benefits of upgrading to Windows 11?

A: Upgrading to Windows 11 offers a range of benefits, including a visually appealing and user-friendly interface, enhanced performance and security, integration of modern technologies, and improved accessibility features.

Q: What are the potential drawbacks of upgrading to Windows 11?

A: Upgrading to Windows 11 might require hardware upgrades for older systems, and some older applications might not be fully compatible with the new operating system.

Tips: Optimizing Your Windows 11 Experience

  • Run Windows Update: Ensure that your system is running the latest version of Windows 11 by regularly checking for updates.
  • Customize the Start Menu: Pin frequently used applications and files to the Start menu for quick and easy access.
  • Utilize Snap Layouts: Optimize multitasking by arranging multiple windows in pre-defined configurations using Snap Layouts.
  • Explore Widgets: Enhance your desktop experience with interactive widgets that provide quick access to information and updates.
  • Enable Windows Hello: Enhance security by setting up Windows Hello for biometric authentication, allowing you to log in using facial recognition or fingerprint scanning.

Conclusion: A New Era of Personal Computing with Windows 11

Windows 11 represents a significant evolution in the world of personal computing. Its refined user interface, enhanced performance, and integration of modern technologies create a more intuitive and efficient desktop experience. While compatibility with older hardware might pose challenges for some users, the benefits offered by Windows 11, including its focus on security, accessibility, and productivity, make it a compelling choice for those seeking a modern and versatile operating system. As Microsoft continues to refine and expand the capabilities of Windows 11, it is poised to become a cornerstone of the future of personal computing, shaping the way users interact with their devices and engage with the digital world.

Feature Deep Dive โ€“ Windows 11 Readiness Windows 11 deep dive: How to use virtual desktops What is Windows 11 in S mode?  Deep Dive - YouTube
Windows 11 deep dive: Learn about Windows features with the Tips app Windows 11 Deep Dive Checking Out The New Snipping To - vrogue.co Link to Windows and Phone Link on Windows 11  Deep Dive - YouTube
Windows 11: Everything We Want From Microsoft's New Operating System - New Jersey Times Windows 11 deep dive: Checking out the new Settings app

Closure

Thus, we hope this article has provided valuable insights into A Deep Dive into Windows 11: Exploring the Latest Operating System for Personal Computers. We appreciate your attention to our article. See you in our next article!

A Comprehensive Guide To Obtaining Windows 10: Installation, Features, And Considerations

A Comprehensive Guide to Obtaining Windows 10: Installation, Features, and Considerations

Introduction

With enthusiasm, let’s navigate through the intriguing topic related to A Comprehensive Guide to Obtaining Windows 10: Installation, Features, and Considerations. Let’s weave interesting information and offer fresh perspectives to the readers.

A Comprehensive Guide to Obtaining Windows 10: Installation, Features, and Considerations

PPT - A Comprehensive Guide to Installing Windows 10_ Step-by-Step Tutorial PowerPoint

Windows 10, Microsoft’s flagship operating system, has become a staple in the digital world, powering a vast array of devices from personal computers to tablets and even some specialized embedded systems. Its widespread adoption is a testament to its robust features, user-friendly interface, and constant updates. This guide aims to provide a comprehensive understanding of obtaining and installing Windows 10, exploring its key features, and addressing common concerns.

Understanding Windows 10 Versions and Licensing

Before embarking on the installation process, it is crucial to understand the different versions of Windows 10 and the licensing implications. Microsoft offers several editions, each tailored to specific needs and budgets:

  • Windows 10 Home: The most basic version, designed for home users and offering essential features like Cortana, Microsoft Edge, and built-in security tools.
  • Windows 10 Pro: Aimed at small businesses and professionals, it includes additional features like BitLocker encryption, Remote Desktop, and the ability to join a domain.
  • Windows 10 Enterprise: Designed for large organizations, it offers advanced security features, management tools, and support for virtual desktops.
  • Windows 10 Education: Specifically tailored for educational institutions, it provides features similar to Enterprise but with additional tools for classroom management and collaboration.

Each version requires a valid license to activate and use. Licensing options include:

  • Retail Licenses: Purchased from retailers, these are tied to a specific device and can be transferred only a limited number of times.
  • OEM Licenses: Pre-installed on new devices, these are typically bundled with the hardware and cannot be transferred.
  • Volume Licensing: Designed for businesses and organizations, these offer various options for managing licenses across multiple devices.

Methods for Obtaining Windows 10

There are several ways to acquire Windows 10, each with its own advantages and considerations:

  • Purchasing a New Device: Most new computers and tablets come pre-installed with Windows 10. This is often the most convenient option, as the license is typically bundled with the hardware.
  • Purchasing a Retail License: Retail licenses can be purchased from online retailers or physical stores. This allows users to install Windows 10 on a new or existing device.
  • Upgrading from a Previous Version: If you have a valid license for a previous version of Windows, such as Windows 7 or 8.1, you may be eligible for a free upgrade to Windows 10. However, this option is no longer available for new installations.
  • Using a Windows 10 Installation Media: This method involves creating a bootable USB drive or DVD containing the Windows 10 installation files. It is a versatile option, allowing users to perform a clean installation, upgrade from an older version, or repair existing installations.

Creating a Bootable USB Drive for Windows 10 Installation

For users who prefer a clean installation or require a bootable media for troubleshooting, creating a bootable USB drive is a common method. The process involves the following steps:

  1. Download the Windows 10 ISO file: Visit the official Microsoft website and download the ISO file for the desired Windows 10 version.
  2. Prepare a USB drive: Ensure the USB drive is at least 8GB in size and format it to FAT32.
  3. Use a tool like Rufus or the Windows 10 USB/DVD Download Tool: These tools allow you to create a bootable USB drive from the downloaded ISO file.

Installing Windows 10

Once you have obtained the necessary files and licensing, you can proceed with the installation. The process typically involves the following steps:

  1. Boot from the installation media: Insert the bootable USB drive or DVD and configure your computer’s BIOS to boot from the external device.
  2. Choose your language, time, and keyboard layout: Select the appropriate settings for your region.
  3. Accept the license terms: Carefully review and agree to the terms of use.
  4. Choose the installation type: You can either perform a clean installation or upgrade from an existing version.
  5. Select the partition to install Windows 10: Choose the appropriate drive where you want to install the operating system.
  6. Wait for the installation to complete: The process may take some time depending on your hardware and chosen installation type.
  7. Configure your system: After installation, you will need to set up your account, personalize your settings, and install any necessary drivers.

Key Features of Windows 10

Windows 10 boasts a wide array of features designed to enhance user experience, productivity, and security. Some of the notable features include:

  • Start Menu: A modernized version of the classic Start menu, providing quick access to applications, settings, and files.
  • Cortana: Microsoft’s digital assistant, offering voice-activated search, reminders, and integration with other apps.
  • Microsoft Edge: A modern web browser with enhanced security features, improved performance, and seamless integration with other Microsoft services.
  • Windows Store: A central hub for downloading and installing apps, games, and software.
  • Continuum: A feature that seamlessly adapts the user interface for different device types, allowing for a smooth transition between desktop and tablet modes.
  • Windows Hello: A biometric authentication system that uses facial recognition or fingerprint scanning for secure login.
  • Windows Defender: A built-in antivirus and antimalware solution that provides real-time protection against threats.
  • Microsoft OneDrive: A cloud storage service that allows users to store files online and access them from any device.

Frequently Asked Questions

Q: Can I install Windows 10 on a device that previously had a different operating system?

A: Yes, you can install Windows 10 on a device that previously had a different operating system, such as Windows 7, 8, or Linux. However, you will need a valid license for Windows 10 and may need to format the hard drive before installation.

Q: What are the minimum system requirements for running Windows 10?

A: To run Windows 10 smoothly, your device should meet the following minimum requirements:

  • Processor: 1 gigahertz (GHz) or faster processor
  • RAM: 1 gigabyte (GB) for 32-bit or 2 GB for 64-bit
  • Hard disk space: 16 GB for 32-bit or 20 GB for 64-bit
  • Graphics card: DirectX 9 or later with WDDM 1.0 driver
  • Display: 800 x 600 resolution

Q: How can I upgrade to a higher version of Windows 10, such as from Home to Pro?

A: To upgrade to a higher version of Windows 10, you will need to purchase a license for the desired version. You can then use the Settings app to upgrade your existing installation.

Q: What is the difference between a clean installation and an upgrade installation?

A: A clean installation erases all data and settings on your drive and installs a fresh copy of Windows 10. An upgrade installation retains your data and settings but updates the operating system to the latest version.

Q: How can I activate Windows 10 after installation?

A: After installation, you will be prompted to activate Windows 10 using a product key. You can enter the product key provided with your license or use the digital license linked to your Microsoft account.

Q: What are the benefits of using a bootable USB drive for Windows 10 installation?

A: A bootable USB drive offers several benefits, including:

  • Clean installation: Allows for a fresh install without carrying over data or settings from the previous operating system.
  • Troubleshooting: Can be used to repair corrupted installations or troubleshoot system issues.
  • Portability: Provides a convenient and portable way to install Windows 10 on multiple devices.

Tips for Installing and Using Windows 10

  • Back up your data: Before installing Windows 10, it is essential to back up your important data to an external drive or cloud storage service.
  • Check for driver compatibility: Ensure your device’s drivers are compatible with Windows 10. You can download the latest drivers from the manufacturer’s website.
  • Customize your settings: Windows 10 offers a wide range of customization options. Take the time to personalize your settings and preferences to enhance your user experience.
  • Keep your system updated: Regularly update Windows 10 to receive the latest security patches, bug fixes, and feature enhancements.
  • Use a strong password: Protect your system by setting a strong and unique password for your user account.
  • Enable Windows Defender: Activate Windows Defender for real-time protection against malware and viruses.
  • Explore the Windows Store: Discover new apps, games, and software in the Windows Store.
  • Learn about the new features: Familiarize yourself with the new features and functionalities of Windows 10 to take full advantage of its capabilities.

Conclusion

Obtaining and installing Windows 10 is a straightforward process with multiple options available to suit individual needs and preferences. By understanding the different versions, licensing options, and installation methods, users can make informed decisions and ensure a smooth transition to the latest Microsoft operating system. Windows 10 offers a wealth of features designed to enhance productivity, security, and user experience, making it a reliable and versatile choice for both personal and professional use. Regular updates and ongoing development ensure that Windows 10 remains a leading platform for the modern digital world.

How to Install Windows 10: Step-by-Step Guide with Pictures How to Install Windows 10: Step-by-Step Guide with Pictures Install Windows 10 The Complete Guide - Riset
How to Install Windows 10 full step by step guide Here's a step-by-step guide to installing Windows 10 - HardwareZone.com.my The ultimate guide to obtaining and installing Windows 10 - Electronic Products
The Process Of Installing Windows 10 Microsoft Community - Riset Tutorial: Comprehensive Windows 10 Installation Guide - YouTube

Closure

Thus, we hope this article has provided valuable insights into A Comprehensive Guide to Obtaining Windows 10: Installation, Features, and Considerations. We appreciate your attention to our article. See you in our next article!

Creating Bootable Windows 11 USB Drives: A Comprehensive Guide

Creating Bootable Windows 11 USB Drives: A Comprehensive Guide

Introduction

With enthusiasm, let’s navigate through the intriguing topic related to Creating Bootable Windows 11 USB Drives: A Comprehensive Guide. Let’s weave interesting information and offer fresh perspectives to the readers.

Creating Bootable Windows 11 USB Drives: A Comprehensive Guide

How to Create Windows 11 Bootable USB - YouTube

The ability to create a bootable USB drive containing the Windows 11 operating system is an essential skill for anyone looking to install or reinstall Windows on their computer, upgrade their existing system, or troubleshoot issues. This process, often referred to as "creating a Windows 11 USB installation media," empowers users to perform a clean install, repair existing installations, or even transfer their operating system to a new computer.

This guide will provide a detailed explanation of how to create a bootable Windows 11 USB drive, covering the necessary steps, tools, and considerations.

Understanding the Process

Creating a bootable USB drive involves transferring the Windows 11 installation files onto a USB flash drive and configuring it to act as a bootable device. This allows your computer to boot from the USB drive, initiating the Windows 11 installation process.

Prerequisites

Before embarking on the creation process, ensure you have the following:

  • A USB flash drive: Choose a USB drive with at least 8GB of storage capacity. The recommended size is 16GB or larger, as the Windows 11 installation files can be quite large.
  • A working computer: This computer will be used to create the bootable USB drive. It can be running any version of Windows.
  • Windows 11 ISO file: This file contains the installation files for Windows 11. You can download it from the official Microsoft website.
  • A USB drive formatting tool: Windows includes a built-in tool for formatting USB drives. Alternatively, you can use third-party tools like Rufus or BalenaEtcher.

Steps to Create a Bootable Windows 11 USB Drive

  1. Download the Windows 11 ISO file: Visit the official Microsoft website and download the Windows 11 ISO file for your desired language and edition.
  2. Format the USB drive: Connect the USB drive to your computer. Open the File Explorer and locate the drive. Right-click on the drive and select Format. In the formatting window, choose NTFS as the file system and ensure the Quick Format option is unchecked. Click Start to format the drive.
  3. Use the Media Creation Tool: Download the Media Creation Tool from the Microsoft website. Run the tool and follow the onscreen instructions. Select "Create installation media for another PC" and choose the language and edition of Windows 11 you want to install.
  4. Select the USB drive: The Media Creation Tool will prompt you to select the USB drive you wish to use. Ensure the correct drive is selected and click Next.
  5. Download and create the installation media: The tool will download the necessary files and create the bootable USB drive. This process might take some time depending on your internet connection speed.
  6. Verify the bootable USB drive: Once the process is complete, you can verify the bootable USB drive by booting your computer from it. To do this, enter the BIOS settings of your computer by pressing the appropriate key during startup (usually F2, F10, or Delete). In the BIOS settings, change the boot order to prioritize the USB drive. Save the changes and exit the BIOS. Your computer should now boot from the USB drive and start the Windows 11 installation process.

Alternative Methods for Creating a Bootable USB Drive

Besides the Media Creation Tool, you can also use other methods to create a bootable Windows 11 USB drive. These methods often require using command-line tools or third-party software:

  • Using the command prompt: This method involves using the Diskpart command-line tool to format the USB drive and then copying the Windows 11 ISO files to it.
  • Using third-party tools: Several third-party tools, such as Rufus, BalenaEtcher, and WinUSB, offer a user-friendly interface for creating bootable USB drives. These tools often provide additional features like selecting specific partitions, creating bootable drives for other operating systems, and customizing the boot process.

Tips for Creating a Bootable Windows 11 USB Drive

  • Use a reliable USB drive: Ensure the USB drive you choose is reliable and has sufficient storage capacity.
  • Back up your data: Before formatting the USB drive, ensure you have backed up all your important data.
  • Download the latest version of the Media Creation Tool: Always download the latest version of the Media Creation Tool to ensure compatibility with the latest Windows 11 updates.
  • Check the system requirements: Before installing Windows 11, ensure your computer meets the minimum system requirements.
  • Use a high-speed internet connection: Downloading the Windows 11 ISO file can take a considerable amount of time, especially if you have a slow internet connection.

Troubleshooting Common Issues

  • The USB drive is not recognized: Ensure the USB drive is properly connected to the computer. Try connecting it to a different USB port.
  • The USB drive is not bootable: Make sure you have followed the correct steps for formatting the drive and copying the installation files.
  • The Media Creation Tool is not working: Try restarting your computer and running the tool again. You can also try downloading the latest version of the tool from the Microsoft website.
  • The Windows 11 installation fails: Ensure your computer meets the system requirements and try reinstalling the operating system.

FAQs

Q: Can I use a USB drive that has been used for other purposes?

A: Yes, you can use a USB drive that has been used for other purposes. However, ensure you format the drive before creating the bootable media. Formatting the drive will erase all existing data on the drive.

Q: What if I have a slow internet connection?

A: Downloading the Windows 11 ISO file can take a considerable amount of time if you have a slow internet connection. You can try downloading the file in smaller chunks or using a different internet connection.

Q: Can I create a bootable USB drive from a different operating system?

A: Yes, you can create a bootable USB drive from a different operating system, such as macOS or Linux. You can use third-party tools like Rufus or BalenaEtcher to create the bootable drive.

Q: Can I create multiple bootable USB drives with the same ISO file?

A: Yes, you can create multiple bootable USB drives with the same ISO file. This can be useful if you need to install Windows 11 on multiple computers.

Q: How long does it take to create a bootable USB drive?

A: The time it takes to create a bootable USB drive depends on the size of the ISO file and the speed of your internet connection. It can take anywhere from 10 minutes to several hours.

Q: What happens to the data on the USB drive after I create the bootable media?

A: The data on the USB drive will be erased when you format it before creating the bootable media.

Conclusion

Creating a bootable Windows 11 USB drive is a straightforward process that empowers users to install, reinstall, or repair their operating system. This guide has provided a comprehensive overview of the necessary steps, tools, and considerations involved in creating a bootable USB drive. By following these instructions and troubleshooting tips, users can effectively create a bootable USB drive and perform various tasks related to their Windows 11 operating system.

How To Make Bootable USB Drive of Windows 11  Windows 11 USB bootable flash drive - YouTube How to Make Windows 11 Bootable USB Drive [Step-by-Step Guide] - MiniTool Partition Wizard How To Create Windows 11 Bootable Usb Drive Full Guide  techvirals
How To Create Windows 11 Bootable USB.Drive. Create bootable USB Drive for Windows 11. Social How To Create Bootable USB Drive of Windows 11. - YouTube How to Create a Bootable Windows 11 USB Flash Drive to Install Windows & Bypass the TPM
How to Create Windows 11 Bootable USB Drive (Full Guide) How to Make a Bootable USB of Windows 11  Rufus Bootable USB of Windows 11  Rufus 3.14  2023

Closure

Thus, we hope this article has provided valuable insights into Creating Bootable Windows 11 USB Drives: A Comprehensive Guide. We thank you for taking the time to read this article. See you in our next article!

Unlocking The Android Experience On Windows 10: A Comprehensive Guide To Online Emulators

Unlocking the Android Experience on Windows 10: A Comprehensive Guide to Online Emulators

Introduction

In this auspicious occasion, we are delighted to delve into the intriguing topic related to Unlocking the Android Experience on Windows 10: A Comprehensive Guide to Online Emulators. Let’s weave interesting information and offer fresh perspectives to the readers.

Unlocking the Android Experience on Windows 10: A Comprehensive Guide to Online Emulators

7 Best Android Emulators for Windows 10 that you Must Consider

The realm of mobile technology has become increasingly intertwined with our daily lives. Android, the ubiquitous operating system powering billions of smartphones and tablets, has become a central hub for communication, entertainment, and productivity. However, accessing the vast library of Android apps and games on a Windows 10 PC was, for a long time, a challenge. Enter online Android emulators: software solutions that bridge the gap between these two platforms, allowing users to experience the Android ecosystem seamlessly on their Windows 10 devices.

This guide aims to provide a comprehensive understanding of online Android emulators for Windows 10, exploring their functionalities, advantages, and considerations.

Understanding Online Android Emulators

An Android emulator, in essence, is a virtual machine that replicates the Android environment within a Windows 10 system. It allows users to install, run, and interact with Android apps and games as if they were using a physical Android device. The "online" aspect refers to the emulator’s availability through a web browser, eliminating the need for complex installations or downloads.

Benefits of Online Android Emulators

The advent of online Android emulators has revolutionized how users engage with the Android ecosystem on Windows 10. Here are some of the key benefits they offer:

  • Accessibility: Online emulators eliminate the need for extensive software downloads and installations. Users can access the Android experience directly through their web browser, simplifying the process and making it readily available to a wider audience.
  • Cross-Platform Compatibility: Online emulators are designed to work seamlessly with Windows 10, ensuring compatibility across various device configurations and specifications.
  • Performance Enhancement: Modern online emulators utilize advanced technologies to optimize performance, delivering a smooth and responsive Android experience on Windows 10.
  • Cost-Effective: Online emulators often offer free or subscription-based access, making them a cost-effective alternative to purchasing physical Android devices.
  • Testing and Development: Online emulators are invaluable tools for developers and testers. They provide a controlled environment for testing Android apps and games across different device configurations and Android versions.
  • Productivity and Entertainment: Online emulators open up a world of Android productivity apps and entertainment options to Windows 10 users. This includes popular messaging apps, productivity tools, and a vast library of games.

Key Features of Online Android Emulators

Online Android emulators offer a diverse range of features to enhance the user experience. Some of the common features include:

  • Multi-Touch Support: Emulators provide support for multi-touch gestures, allowing users to interact with Android apps in a natural and intuitive manner.
  • Keyboard and Mouse Integration: Emulators allow users to control Android apps using their keyboard and mouse, providing a familiar and comfortable input method.
  • App Store Access: Online emulators provide access to the Google Play Store, allowing users to browse and download a vast library of Android apps and games.
  • Customization Options: Many emulators offer customization options, allowing users to adjust settings such as screen resolution, memory allocation, and performance preferences.
  • Performance Optimization: Emulators employ techniques like hardware acceleration and virtualization to optimize performance, delivering a smooth and responsive Android experience.

Choosing the Right Online Android Emulator

With a plethora of online Android emulators available, selecting the right one for your needs can be overwhelming. Here are some key factors to consider:

  • Performance: Look for an emulator with a strong track record of performance and optimization, ensuring a smooth and responsive Android experience.
  • Compatibility: Ensure the emulator supports your desired Android apps and games and is compatible with your Windows 10 system.
  • Features: Consider the features offered by different emulators, including multi-touch support, keyboard and mouse integration, and customization options.
  • Security: Choose an emulator from a reputable developer with a strong commitment to security and privacy.
  • User Interface: Look for an emulator with a user-friendly interface that is easy to navigate and understand.

Popular Online Android Emulators for Windows 10

Several online Android emulators have gained popularity among Windows 10 users. Some of the notable options include:

  • Bluestacks: A widely recognized and highly regarded emulator, Bluestacks offers excellent performance, extensive compatibility, and a user-friendly interface. It supports various customization options and features hardware acceleration for enhanced performance.
  • NoxPlayer: NoxPlayer is another popular choice, known for its gaming-centric features. It offers a customizable keyboard mapping system, macro recording capabilities, and optimized performance for resource-intensive Android games.
  • MEmu Play: MEmu Play is a lightweight emulator designed for smooth performance on a wide range of Windows 10 devices. It features a simple interface, multi-instance support, and a focus on gaming optimization.
  • LDPlayer: LDPlayer is another gaming-focused emulator, offering features like multi-instance support, macro recording, and a built-in gamepad mapper. It prioritizes performance and stability, making it a popular choice for demanding Android games.

FAQs about Online Android Emulators for Windows 10

Q: Are online Android emulators legal?

A: Yes, online Android emulators are legal. They are software programs designed to replicate the Android environment on a different platform. However, it’s crucial to ensure that the emulator you choose is from a reputable developer and adheres to copyright and licensing regulations.

Q: Are online Android emulators safe?

A: The safety of online Android emulators depends on the specific emulator and its developer. It’s essential to choose an emulator from a reputable source and follow best practices for online security. Be cautious about downloading emulators from untrusted websites or sources.

Q: Can I use online Android emulators for gaming?

A: Yes, online Android emulators are excellent for gaming. Many emulators offer features specifically designed for gaming, such as keyboard mapping, macro recording, and performance optimization.

Q: Do online Android emulators require a lot of resources?

A: Online Android emulators can vary in their resource requirements. Some emulators are lightweight and run efficiently on modest hardware configurations, while others demand more powerful hardware for optimal performance.

Q: Can I use online Android emulators for work?

A: Yes, online Android emulators can be used for work purposes. Many productivity apps are available on Android, and emulators can provide a convenient way to access these apps on your Windows 10 PC.

Tips for Using Online Android Emulators

  • Choose the right emulator: Select an emulator that aligns with your needs and preferences, considering factors like performance, compatibility, and features.
  • Optimize performance: Adjust emulator settings, such as memory allocation and hardware acceleration, to enhance performance and reduce lag.
  • Install apps from trusted sources: Download apps from the Google Play Store or other reputable sources to ensure their safety and security.
  • Back up your data: Regularly back up your emulator data to prevent loss in case of issues or system updates.
  • Keep your emulator updated: Regularly update your emulator to benefit from the latest performance improvements, bug fixes, and security updates.

Conclusion

Online Android emulators have become an indispensable tool for Windows 10 users seeking to access the vast world of Android apps and games. They offer a seamless and convenient way to experience the Android ecosystem on their PCs, opening up a world of possibilities for productivity, entertainment, and development. By understanding the benefits, features, and considerations involved in choosing and using online Android emulators, users can unlock the full potential of this technology and enjoy the Android experience on their Windows 10 devices.

9 Best Android Emulators For Windows 10 โ€“ TechCult Top 5 Android emulators for Windows 10 [Gamers and Developers] - Waftr.com Best android emulator for windows 10 2021 - tennisdamer
10 Best Android Emulators To Experience Android On Pc  Images and Photos finder Exploring Android Emulators for Windows VPS: A Comprehensive Guide - VPS Navigator Online Android Emulator to Run Android Apps on Browser - PC/Mac - YouTube
The 9 Best Android Emulators for Windows 10 and Windows 11 (2023) Top 10 Best Android Emulators To Experience Android On PC ยป TechieGenie

Closure

Thus, we hope this article has provided valuable insights into Unlocking the Android Experience on Windows 10: A Comprehensive Guide to Online Emulators. We hope you find this article informative and beneficial. See you in our next article!