Archives 2024

Deciphering The "Page Fault In Nonpaged Area" Error In Windows 11: A Comprehensive Guide

Deciphering the "Page Fault in Nonpaged Area" Error in Windows 11: A Comprehensive Guide

Introduction

With enthusiasm, let’s navigate through the intriguing topic related to Deciphering the "Page Fault in Nonpaged Area" Error in Windows 11: A Comprehensive Guide. Let’s weave interesting information and offer fresh perspectives to the readers.

Deciphering the "Page Fault in Nonpaged Area" Error in Windows 11: A Comprehensive Guide

Page Fault in Nonpaged Area on Windows 11: 6 Tested Fixes

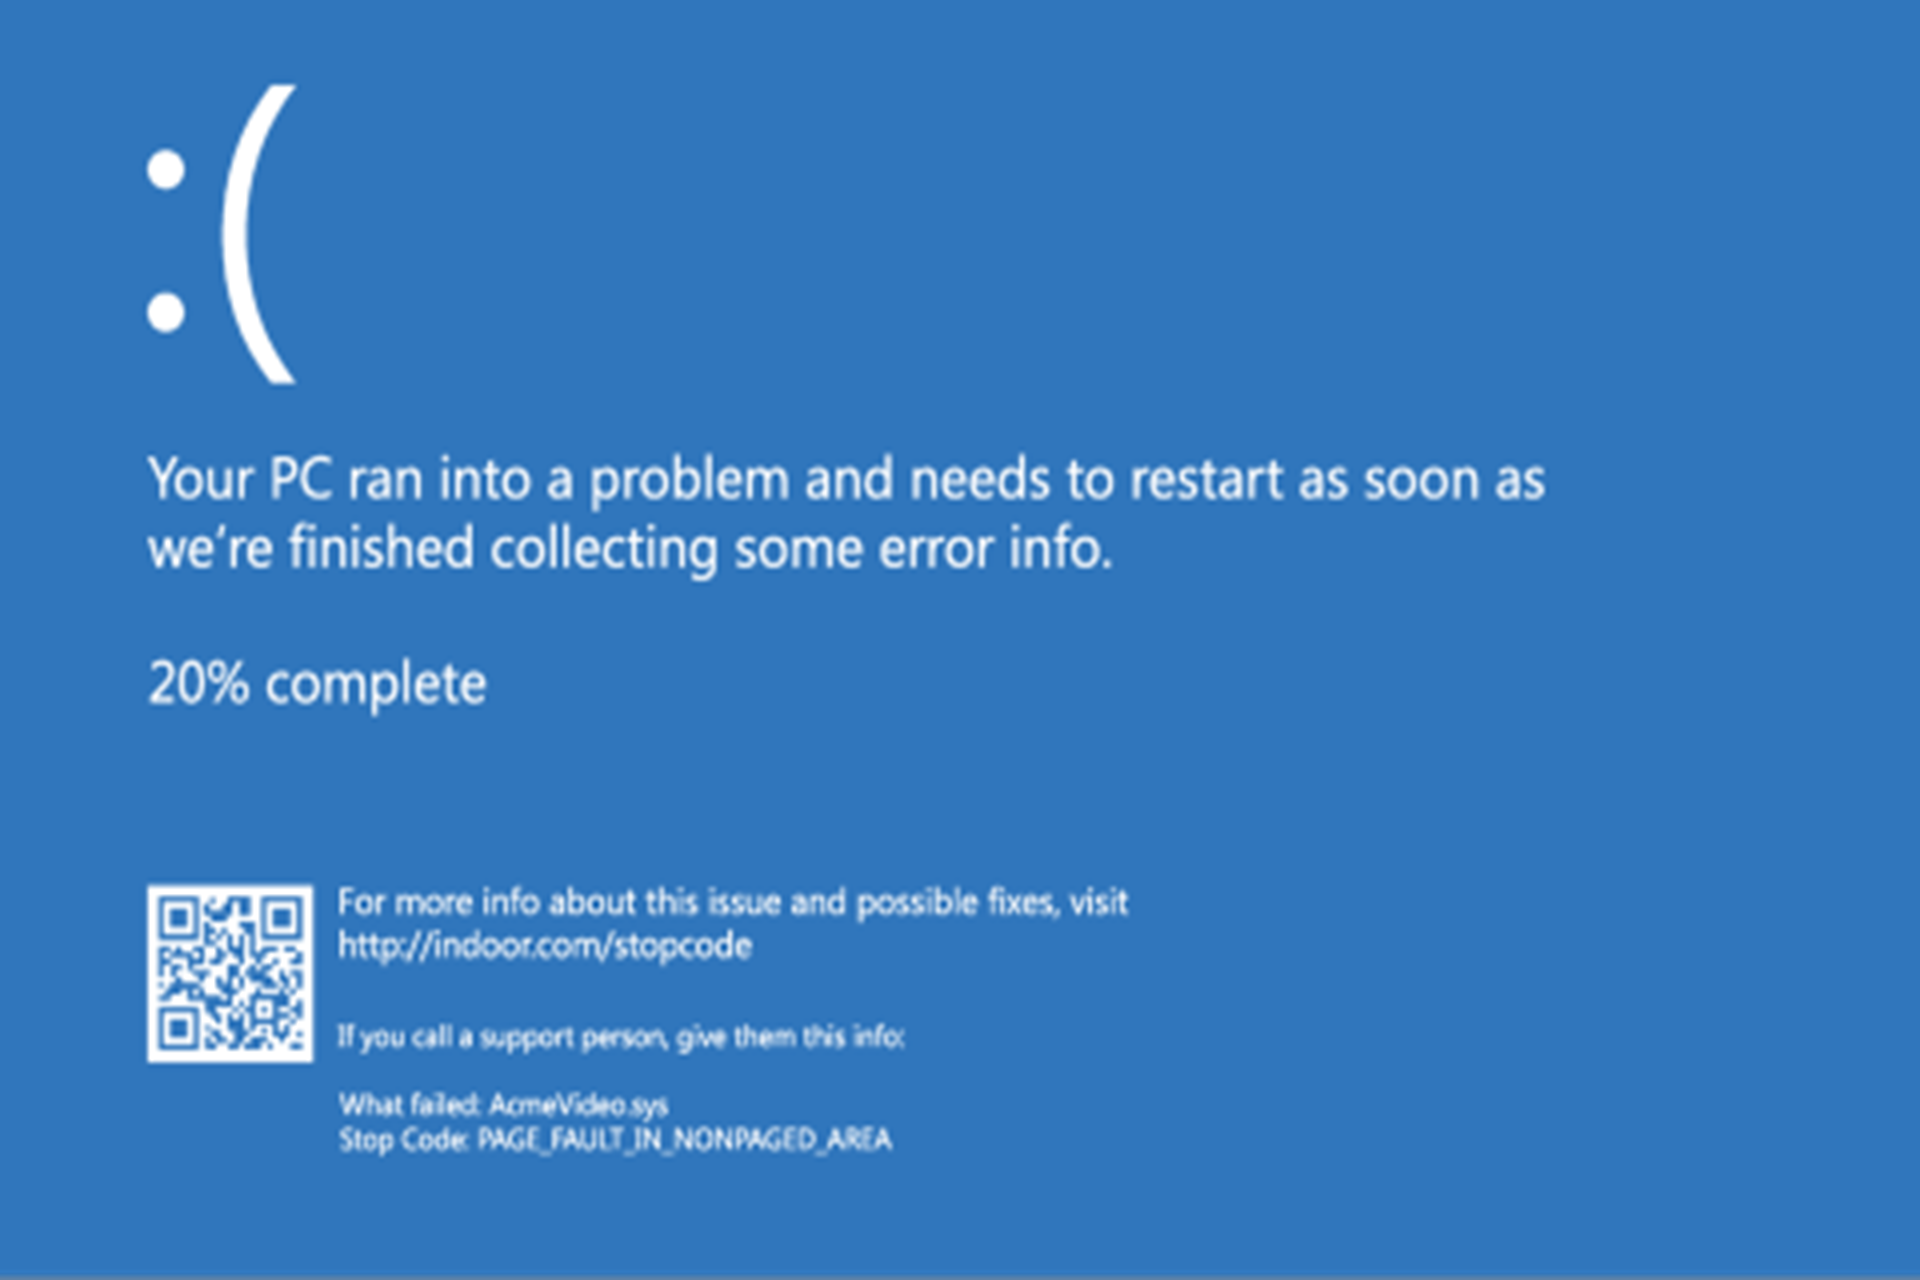
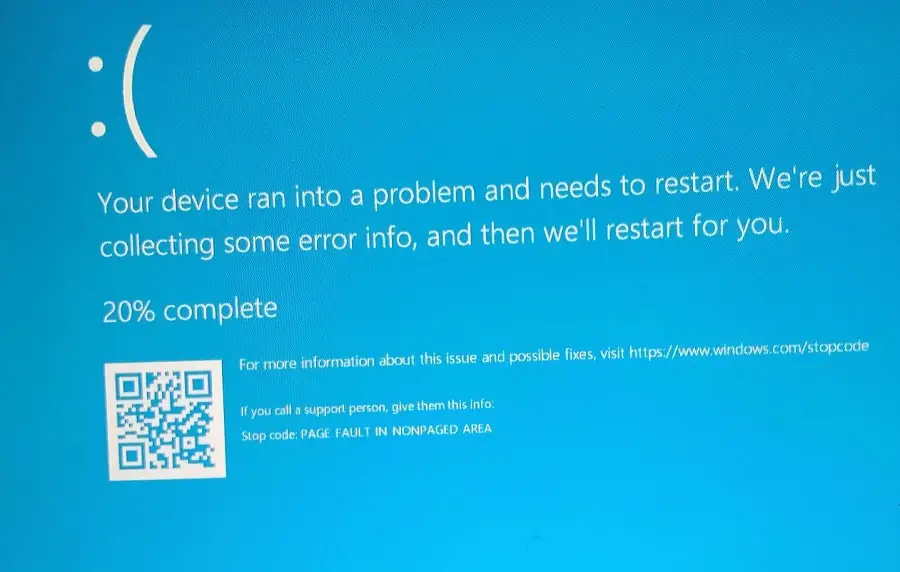
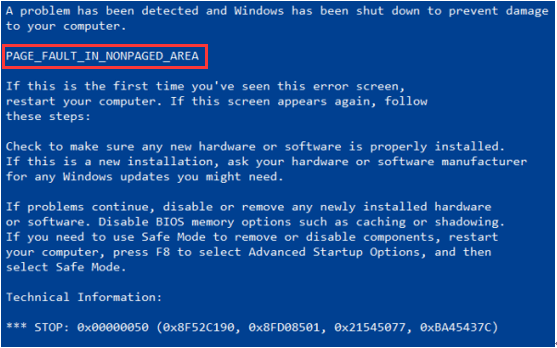
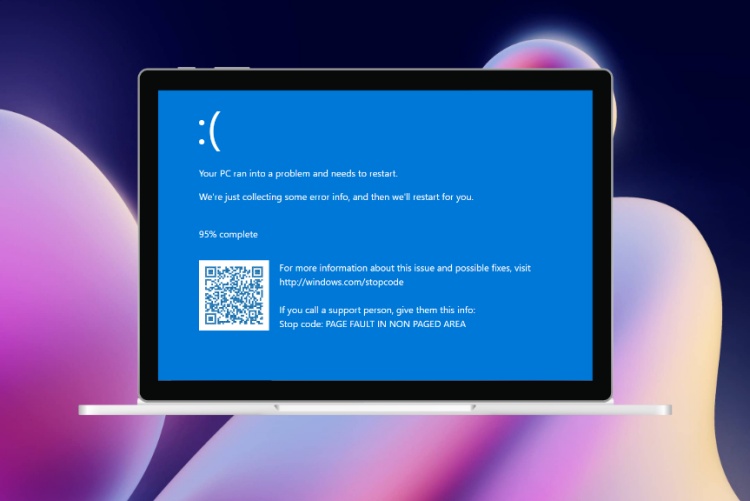
The "Page Fault in Nonpaged Area" error in Windows 11 is a cryptic message that often throws users into a state of confusion and uncertainty. This error, while seemingly intimidating, is a symptom of underlying issues within the operating system’s memory management mechanisms. Understanding the root causes of this error is crucial for effective troubleshooting and ensuring the smooth operation of your Windows 11 system.

Understanding Memory Management in Windows

To comprehend the "Page Fault in Nonpaged Area" error, we must first delve into the fundamental workings of memory management in Windows. The operating system utilizes a sophisticated system known as virtual memory. This system allows applications to access more memory than physically available by utilizing a combination of RAM and hard disk space.

Virtual memory is divided into two distinct areas:

  • Paged Area: This area encompasses memory pages that are actively being used by applications. These pages can be swapped in and out of RAM as needed, utilizing hard disk space for temporary storage.
  • Nonpaged Area: This area houses crucial system files and data that are considered essential for the operating system’s core functionalities. These pages remain permanently resident in RAM, ensuring continuous access for critical operations.

The "Page Fault in Nonpaged Area" Error: A Closer Look

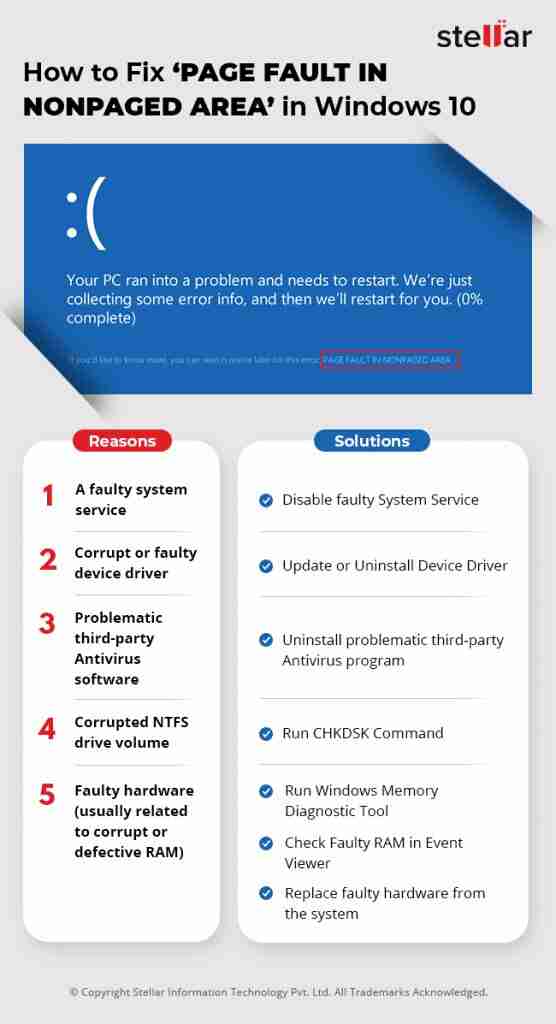
The "Page Fault in Nonpaged Area" error signals a failure to access a critical system component within the nonpaged area of memory. This failure can be triggered by a variety of factors, including:

  • Damaged or Corrupted System Files: Critical system files residing in the nonpaged area can become corrupted due to malware infections, hardware failures, or software conflicts. These corrupted files can lead to access errors, resulting in the "Page Fault in Nonpaged Area" message.
  • Hardware Malfunctions: Faulty RAM modules, defective hard drives, or malfunctioning motherboard components can disrupt the smooth functioning of memory access. These hardware issues can lead to errors in accessing the nonpaged area, triggering the error message.
  • Driver Conflicts or Errors: Incompatible or faulty device drivers can interfere with memory access, causing conflicts that result in the "Page Fault in Nonpaged Area" error.
  • System Overloads: Excessive resource consumption by applications or background processes can lead to memory shortages. This can force the system to attempt accessing the nonpaged area, potentially causing errors.
  • Improperly Configured System Settings: Incorrect memory management settings or conflicting system configurations can lead to memory access errors, triggering the "Page Fault in Nonpaged Area" message.

Troubleshooting Strategies for the "Page Fault in Nonpaged Area" Error

Troubleshooting this error requires a systematic approach, focusing on identifying and resolving the underlying cause. Here’s a comprehensive guide to help you address this issue:

  1. Check for Hardware Issues: Start by assessing the physical hardware components involved in memory access. Perform the following steps:

    • Run Memory Diagnostics: Utilize the Windows Memory Diagnostic tool to scan your RAM for errors. This tool can identify faulty memory modules that could be contributing to the error.
    • Check Hard Drive Health: Use tools like CrystalDiskInfo or SMART utilities to evaluate the health of your hard drive. A failing hard drive can cause memory access errors.
    • Verify System Components: Inspect your system’s components for any signs of damage or loose connections. Ensure that all components are securely installed and functioning properly.
  2. Identify and Resolve Driver Issues: Faulty or incompatible device drivers can be a significant source of memory access errors. Follow these steps:

    • Update Drivers: Ensure that all your device drivers are up-to-date. Visit the manufacturer’s website for the latest driver versions.
    • Rollback Drivers: If recent driver updates have coincided with the error, consider rolling back to a previous driver version.
    • Disable Problematic Drivers: If you suspect a specific driver is causing the issue, temporarily disable it to see if the error persists.
  3. Scan for Malware and Viruses: Malware infections can corrupt system files, including those residing in the nonpaged area. Run a thorough scan using reputable antivirus software to eliminate any potential threats.

  4. Repair Corrupted System Files: Use the System File Checker (SFC) tool to scan and repair corrupted system files. This can help address issues caused by damaged files in the nonpaged area.

  5. Perform a Clean Boot: A clean boot starts Windows with a minimal set of drivers and services. This helps isolate the source of the error by eliminating unnecessary software conflicts.

  6. Check System Settings: Review your system’s memory management settings and ensure they are configured appropriately. Consider adjusting virtual memory settings or checking for conflicting configurations.

  7. Run a System Restore: If the error persists, consider performing a system restore to a previous point in time when the system was operating correctly. This can revert your system to a stable state before the error occurred.

  8. Reinstall Windows: As a last resort, reinstalling Windows can resolve issues caused by deep-seated system corruption or persistent hardware conflicts.

FAQs Related to "Page Fault in Nonpaged Area" Error

Q: What are the potential consequences of ignoring this error?

A: Ignoring this error can lead to system instability, crashes, data loss, and ultimately, complete system failure. It is crucial to address the underlying cause to maintain system stability and prevent further complications.

Q: Can this error be caused by insufficient RAM?

A: While insufficient RAM can contribute to general system slowdowns and performance issues, it is not the primary cause of the "Page Fault in Nonpaged Area" error. This error specifically indicates a problem accessing critical system components within the nonpaged area, which is always resident in RAM.

Q: Is this error specific to Windows 11?

A: No, this error can occur in previous versions of Windows as well. It is a general system error that can arise due to a variety of factors, regardless of the specific operating system version.

Q: Can I fix this error without reinstalling Windows?

A: In many cases, the error can be resolved without resorting to a complete Windows reinstall. The troubleshooting steps outlined above provide a comprehensive approach to identify and address the underlying cause, often eliminating the need for a clean installation.

Tips for Preventing the "Page Fault in Nonpaged Area" Error

  • Regularly Update Drivers: Keep your device drivers updated to ensure compatibility and stability.
  • Run Regular System Scans: Perform regular malware and virus scans to prevent system corruption.
  • Monitor System Health: Use system monitoring tools to track resource usage and identify potential bottlenecks or memory issues.
  • Perform Regular System Maintenance: Run disk cleanup and defragmentation tools to optimize system performance and prevent file corruption.
  • Back Up Your Data: Create regular backups of your important data to protect against potential data loss.

Conclusion

The "Page Fault in Nonpaged Area" error in Windows 11 is a critical indicator of underlying system issues. By understanding the root causes and employing the appropriate troubleshooting strategies, you can effectively address this error and restore your system’s stability. Regular system maintenance, driver updates, and vigilant security practices are essential for preventing this error and ensuring the smooth operation of your Windows 11 system.

FIX: Page Fault in Nonpaged area error in Windows 11 - YouTube PAGE_FAULT_IN_NONPAGED_AREA in Windows 11 (9 solutions) How to Fix Stop code Page Fault in Nonpaged Area Windows 10, 11 - YouTube
Page_fault_in_nonpaged_area Windows 11 PAGE_FAULT_IN_NONPAGED_AREA Windows 11 SOLUCION ️ - YouTube Page_fault_in_nonpaged_area Windows 11
Page_fault_in_nonpaged_area Windows 11 How to Fix 'Page Fault in Nonpaged Area' BSOD Error in Windows 10/11  Beebom

Closure

Thus, we hope this article has provided valuable insights into Deciphering the "Page Fault in Nonpaged Area" Error in Windows 11: A Comprehensive Guide. We hope you find this article informative and beneficial. See you in our next article!

Windows 10: A Comprehensive Overview Of Microsoft’s Flagship Operating System

Windows 10: A Comprehensive Overview of Microsoft’s Flagship Operating System

Introduction

With great pleasure, we will explore the intriguing topic related to Windows 10: A Comprehensive Overview of Microsoft’s Flagship Operating System. Let’s weave interesting information and offer fresh perspectives to the readers.

Windows 10: A Comprehensive Overview of Microsoft’s Flagship Operating System

Microsoft Windows 10 Operating System

Windows 10, released in 2015, represents the latest iteration of Microsoft’s flagship operating system. It is designed to power a wide range of devices, from personal computers and laptops to tablets and smartphones. This operating system has been a significant departure from its predecessors, introducing a user-friendly interface, enhanced security features, and a focus on cloud integration.

Key Features and Benefits:

1. User Interface and Experience:

Windows 10 boasts a modern and intuitive user interface, with a focus on ease of navigation and accessibility. The Start Menu, a familiar feature from previous Windows versions, has been redesigned with a live tile interface, allowing users to quickly access frequently used applications and information. The Taskbar, a central hub for open applications and system tools, remains a key element of the user experience.

2. Enhanced Security:

Windows 10 emphasizes security through features like Windows Defender, a built-in antivirus solution, and Windows Hello, a biometric authentication system that uses facial recognition or fingerprint scanning for secure login. The operating system also incorporates security updates and patches, delivered automatically to keep devices protected against emerging threats.

3. Cloud Integration:

Windows 10 leverages cloud integration for seamless user experiences. OneDrive, Microsoft’s cloud storage service, allows users to store and access their files from any device. The operating system also integrates with other Microsoft services, such as Office 365, ensuring a cohesive and productive work environment.

4. Cortana, the Digital Assistant:

Cortana, Microsoft’s voice-activated digital assistant, is a prominent feature of Windows 10. Users can interact with Cortana to perform tasks like setting reminders, searching the web, and controlling smart home devices. Cortana’s integration with the operating system provides a convenient and hands-free way to manage tasks.

5. Universal Apps:

Windows 10 supports universal apps, designed to function seamlessly across different devices. This allows developers to create apps that can run on PCs, tablets, and smartphones, offering users a unified experience across platforms.

6. Gaming and Entertainment:

Windows 10 is a popular platform for gaming and entertainment. The operating system features DirectX 12, a graphics API that delivers enhanced performance and visual fidelity in games. The Windows Store offers a wide selection of games, movies, and TV shows, catering to diverse entertainment preferences.

7. Updates and Upgrades:

Microsoft regularly releases updates for Windows 10, ensuring that users have access to the latest features, security enhancements, and bug fixes. The operating system also offers free upgrades to newer versions, ensuring that users have access to the latest capabilities.

Frequently Asked Questions (FAQs):

Q: What are the system requirements for Windows 10?

A: The system requirements for Windows 10 vary depending on the edition and desired features. Generally, a 1 GHz processor, 1 GB RAM for 32-bit or 2 GB RAM for 64-bit, and 16 GB of free hard disk space are recommended.

Q: Is Windows 10 free?

A: While Windows 10 was initially offered as a free upgrade for users of Windows 7 and 8.1, it is now available for purchase. However, Microsoft offers a free version of Windows 10 called Windows 10 Home in S mode, which is restricted to apps from the Microsoft Store.

Q: How do I upgrade to Windows 10?

A: You can upgrade to Windows 10 by downloading the installation files from Microsoft’s website and following the on-screen instructions. Alternatively, you can purchase a Windows 10 license and install it on your device.

Q: What are the different editions of Windows 10?

A: Windows 10 is available in several editions, including Home, Pro, Enterprise, and Education. Each edition offers different features and functionalities to cater to specific user needs.

Tips for Using Windows 10:

1. Customize Your Start Menu:

Personalize your Start Menu by pinning frequently used applications, organizing tiles, and adjusting the layout to suit your preferences.

2. Explore the Settings App:

The Settings app provides a centralized location to configure various aspects of your Windows 10 experience, including privacy settings, network connections, and display options.

3. Utilize Cortana:

Take advantage of Cortana’s capabilities to manage tasks, set reminders, and search the web using voice commands.

4. Use Universal Apps:

Explore the Windows Store and download universal apps that offer a seamless experience across different devices.

5. Stay Updated:

Ensure that your Windows 10 system is up-to-date by installing the latest security updates and feature upgrades.

Conclusion:

Windows 10 has emerged as a powerful and user-friendly operating system, offering a wide range of features and benefits. Its intuitive interface, enhanced security measures, cloud integration, and support for universal apps make it a compelling choice for both personal and professional use. Microsoft’s ongoing commitment to delivering updates and upgrades ensures that Windows 10 remains a relevant and robust platform for the foreseeable future.

Windows OS: The Evolution, Features, and Popularity of Microsoft’s Flagship Operating System Microsoft Unveils Windows 10 — The Next Version Of Windows Operating system Windows 10#Operating System - YouTube
Microsoft Windows 10 Comprehensive - STANZATEXTBOOKS The Evolution of Microsoft's Operating Systems: Windows 10 and Windows 11 Windows 10 S: Microsoft launches new operating system  The Independent  The Independent
History And Evolution Of Windows Operating System - The Best Picture History Celebrating the release of Windows 10 - the evolution of the Windows logo  GWS Media

Closure

Thus, we hope this article has provided valuable insights into Windows 10: A Comprehensive Overview of Microsoft’s Flagship Operating System. We appreciate your attention to our article. See you in our next article!

Removing The Windows Copilot Icon From The Taskbar: A Comprehensive Guide

Removing the Windows Copilot Icon from the Taskbar: A Comprehensive Guide

Introduction

With enthusiasm, let’s navigate through the intriguing topic related to Removing the Windows Copilot Icon from the Taskbar: A Comprehensive Guide. Let’s weave interesting information and offer fresh perspectives to the readers.

Removing the Windows Copilot Icon from the Taskbar: A Comprehensive Guide

How to Remove Copilot icon from Taskbar in Windows 11 - YouTube

Microsoft’s Windows Copilot, a powerful AI assistant integrated into Windows 11, aims to enhance productivity and user experience. However, for some users, the persistent presence of the Copilot icon on the taskbar might be perceived as intrusive or unnecessary. This guide provides a comprehensive understanding of how to remove this icon, addressing its potential benefits and exploring related considerations.

Understanding the Copilot Icon and its Purpose

The Copilot icon, typically displayed as a blue "C" symbol, serves as a gateway to the AI-powered features of Windows Copilot. It allows users to initiate interactions with the assistant directly from the taskbar, enabling quick access to features like:

  • Text generation: Creating documents, emails, or code snippets using natural language prompts.
  • Information retrieval: Searching the web, accessing local files, or retrieving data from various applications.
  • Task management: Setting reminders, creating to-do lists, and managing calendar entries.
  • Contextual assistance: Providing relevant information and suggestions based on the user’s current activity.

Benefits of Removing the Copilot Icon

While Copilot offers valuable features, its constant presence on the taskbar might not be desirable for all users. Removing the icon can provide several benefits:

  • Minimized visual clutter: A cleaner taskbar with fewer icons can enhance visual clarity and reduce distractions, particularly for users who prefer a minimalist interface.
  • Enhanced focus: By removing the icon, users can avoid unintentional interactions with Copilot, enabling them to concentrate on their primary tasks without interruptions.
  • Personalized control: Removing the icon allows users to customize their taskbar experience according to their individual preferences and workflow requirements.
  • Reduced resource consumption: While minimal, removing the icon may slightly reduce the system resources dedicated to maintaining the Copilot presence on the taskbar, potentially improving overall system performance.

Methods for Removing the Copilot Icon

There are two primary methods for removing the Copilot icon from the Windows 11 taskbar:

1. Using the Taskbar Settings:

  • Navigate to Settings: Open the Windows Settings app by pressing the Windows key + I.
  • Access Taskbar Settings: Click on "Personalization" and then select "Taskbar" from the left-hand menu.
  • Manage Taskbar Icons: Scroll down to "Taskbar icons" and click on "System icons."
  • Toggle Copilot: Locate the Copilot icon and toggle the switch to the "Off" position.

2. Using the Windows Registry:

  • Open Registry Editor: Press the Windows key + R, type "regedit," and press Enter.
  • Navigate to the relevant key: Go to the following path: HKEY_CURRENT_USERSOFTWAREMicrosoftWindowsCurrentVersionExplorerTaskband.
  • Create a new DWORD value: Right-click in the right pane, select "New," and choose "DWORD (32-bit) Value."
  • Name the value: Name the newly created value "UseTaskbandCopilot."
  • Modify the value: Double-click the "UseTaskbandCopilot" value, set its "Value data" to "0," and click "OK."

Important Considerations

  • Functionality remains: Removing the icon from the taskbar does not disable Copilot. Users can still access its features through the Start menu, the search bar, or by using the keyboard shortcut "Win + C."
  • Potential for future updates: Microsoft may introduce changes to Copilot’s functionality and integration with the taskbar in future updates. The methods described above may require adjustments depending on these updates.

Frequently Asked Questions (FAQs)

Q: Will removing the Copilot icon affect my ability to use Copilot?

A: No, removing the icon does not disable Copilot. You can still access its features through the Start menu, the search bar, or by using the keyboard shortcut "Win + C."

Q: Is there a way to permanently disable Copilot?

A: Currently, there is no official method to permanently disable Copilot. However, by removing the icon, you can prevent it from appearing on the taskbar and avoid unintentional interactions.

Q: Can I customize the Copilot icon?

A: As of now, there is no option to customize the Copilot icon. You can only choose to hide or display it.

Q: Will removing the icon impact my system performance?

A: The impact on system performance is likely minimal, as the icon’s presence is not a significant resource drain. However, removing it may slightly improve overall performance by reducing the resources dedicated to maintaining its presence on the taskbar.

Tips for Optimizing the Copilot Experience

  • Explore the Copilot features: Familiarize yourself with the various features of Copilot to maximize its potential benefits.
  • Use natural language prompts: Copilot is designed to understand natural language, so use clear and concise prompts for optimal results.
  • Provide context: For better responses, provide Copilot with relevant context, such as the specific document or task you are working on.
  • Utilize the keyboard shortcut: Use the "Win + C" keyboard shortcut for quick access to Copilot without relying on the taskbar icon.

Conclusion

Removing the Windows Copilot icon from the taskbar is a matter of personal preference and workflow efficiency. It offers a cleaner visual experience and reduces potential distractions, but it does not disable Copilot’s functionality. By understanding the benefits and considerations involved, users can make an informed decision regarding the presence of the Copilot icon on their taskbar, optimizing their Windows 11 experience for maximum productivity and personalization.

How to remove copilot from taskbar windows 11  Disable copilot from taskbar windows 10 - YouTube How to Hide the Microsoft Copilot Button on Taskbar  Remove Copilot button from taskbar Windows Remove Windows Copilot button from taskbar on Windows 11 - YouTube
How to remove Copilot from Taskbar in Windows 11 How to remove Copilot icon from Taskbar in Windows 11  Umesh Krishnia  - YouTube How to Remove Copilot From Windows 11 Taskbar with a few steps
Add or remove Windows Copilot button on Windows 11 taskbar taskbar - Remove the new Copilot search icon from the Windows 11 task bar - Super User

Closure

Thus, we hope this article has provided valuable insights into Removing the Windows Copilot Icon from the Taskbar: A Comprehensive Guide. We thank you for taking the time to read this article. See you in our next article!

Photoimpression 4.0 Free Download

photoimpression 4.0 free download

Introduction

In this auspicious occasion, we are delighted to delve into the intriguing topic related to photoimpression 4.0 free download. Let’s weave interesting information and offer fresh perspectives to the readers.

PhotoImpression 4.0: A Comprehensive Overview of a Powerful Image Editing Tool

Arcsoft Photoimpression 4.0 Free Download - everhit

PhotoImpression 4.0, while not currently available for free download, represents a significant milestone in the history of image editing software. Its legacy continues to influence the modern landscape of digital image manipulation, offering a powerful suite of tools for users of all skill levels. While the software itself is no longer actively developed, understanding its features and impact on the industry provides valuable insights into the evolution of digital image editing.

Understanding PhotoImpression 4.0

PhotoImpression 4.0 was a popular image editing software released in the late 1990s. It was renowned for its user-friendly interface and comprehensive set of features, making it accessible to both beginners and experienced users.

Key Features of PhotoImpression 4.0

PhotoImpression 4.0 offered a wide range of tools for image manipulation, including:

  • Basic Image Editing: PhotoImpression 4.0 provided essential editing tools like cropping, resizing, rotating, and flipping images. Users could also adjust brightness, contrast, color balance, and sharpness to enhance the overall appearance of their images.
  • Advanced Image Editing: The software offered advanced features like color correction, noise reduction, and sharpening. Users could also apply various effects like blur, emboss, and vignette to their images, adding artistic flair.
  • Layers and Masks: PhotoImpression 4.0 introduced the concept of layers and masks, allowing users to work on different elements of an image independently. This facilitated non-destructive editing, enabling users to experiment with different effects without permanently altering the original image.
  • Text and Graphics: Users could add text and graphics to their images, customizing fonts, colors, and sizes. This feature allowed for creating personalized images for various purposes, such as greeting cards, invitations, or social media posts.
  • Filters and Effects: PhotoImpression 4.0 offered a variety of built-in filters and effects, allowing users to enhance their images with artistic touches. These filters could create a vintage look, add a soft focus, or create a more dramatic effect.
  • File Support: The software supported various image file formats, ensuring compatibility with different devices and applications.

Impact of PhotoImpression 4.0

PhotoImpression 4.0 played a crucial role in popularizing image editing among individuals and businesses alike. Its user-friendly interface and comprehensive features made it accessible to a wide audience, democratizing the process of image manipulation. The software’s influence can be seen in the development of modern image editing software, which often incorporates similar features and functionalities.

FAQs Regarding PhotoImpression 4.0

1. Is PhotoImpression 4.0 still available for download?

PhotoImpression 4.0 is no longer actively developed or supported. While older versions might be available on certain websites, it is important to exercise caution when downloading software from unknown sources.

2. What are the system requirements for PhotoImpression 4.0?

The system requirements for PhotoImpression 4.0 varied depending on the specific version. Generally, the software required a Windows operating system and a minimum of 16 MB of RAM.

3. Are there any alternatives to PhotoImpression 4.0?

Several modern image editing software packages offer similar features and functionalities to PhotoImpression 4.0. Some popular alternatives include Adobe Photoshop, GIMP, and Paint.NET.

4. Is PhotoImpression 4.0 compatible with modern operating systems?

PhotoImpression 4.0 was designed for older operating systems and might not be compatible with modern versions of Windows or macOS.

5. What are the limitations of PhotoImpression 4.0?

PhotoImpression 4.0 lacked advanced features found in modern image editing software, such as support for RAW images, advanced color management, and sophisticated layer manipulation.

Tips for Using PhotoImpression 4.0

While PhotoImpression 4.0 is no longer actively developed, users who still have access to the software can benefit from these tips:

  • Familiarize yourself with the interface: Spend time exploring the software’s various menus, toolbars, and options to understand its layout and functionality.
  • Experiment with different features: Try out various editing tools, filters, and effects to discover their capabilities and find those that best suit your needs.
  • Use layers effectively: Utilize layers to separate different elements of your images, allowing for non-destructive editing and experimentation.
  • Learn from tutorials and online resources: Several online tutorials and resources provide guidance on using PhotoImpression 4.0 effectively.

Conclusion

PhotoImpression 4.0, despite its age, remains a significant chapter in the history of image editing. Its influence on the industry is undeniable, paving the way for the sophisticated image editing software we use today. While the software itself is no longer actively developed, understanding its features and impact offers valuable insights into the evolution of digital image manipulation.

Arcsoft photoimpression 4.0 free download : poecaweal Arcsoft Photoimpression 4.0 Free Download ArcSoft PhotoImpression 4.0 Download (Free trial)
TÉLÉCHARGER ARCSOFT PHOTOIMPRESSION 4 ArcSoft PhotoImpression 4.0 Download (Free trial) Photoimpression 4 Free Full Version - cleverexcel
Free Arcsoft Photoimpression 4 Download - labfasr Скачать редактор фотографий. PhotoImpression 4

Closure

Thus, we hope this article has provided valuable insights into photoimpression 4.0 free download. We hope you find this article informative and beneficial. See you in our next article!

Navigating The Labyrinth: Troubleshooting Outlook Search Issues In Windows 11

Navigating the Labyrinth: Troubleshooting Outlook Search Issues in Windows 11

Introduction

In this auspicious occasion, we are delighted to delve into the intriguing topic related to Navigating the Labyrinth: Troubleshooting Outlook Search Issues in Windows 11. Let’s weave interesting information and offer fresh perspectives to the readers.

How to Fix Outlook Instant Search Problems in Windows 11 - PUPUWEB

Outlook, Microsoft’s ubiquitous email client, is a cornerstone of productivity for individuals and businesses alike. Its robust functionality, including its powerful search capabilities, allows users to efficiently navigate vast amounts of email data. However, encountering search issues in Outlook can significantly impede workflow, turning a simple task into a frustrating ordeal.

This article delves into the common culprits behind Outlook search malfunctions in Windows 11, providing a comprehensive guide to diagnosing and resolving these issues. We will explore a range of troubleshooting steps, from basic checks to more advanced solutions, empowering users to regain control over their email search experience.

The Importance of a Functional Outlook Search

The search function in Outlook serves as a vital tool for accessing and managing email data. It enables users to:

  • Locate specific emails: Quickly find emails based on sender, recipient, subject, keywords, or dates.
  • Filter and organize emails: Refine search results by specific criteria, allowing for efficient email management.
  • Retrieve attachments: Locate attachments within emails based on file type or keywords.
  • Conduct research: Find relevant information within emails for various projects or tasks.

When Outlook search malfunctions, these capabilities are compromised, leading to:

  • Increased time spent searching: Manually sifting through emails becomes necessary, wasting valuable time.
  • Reduced productivity: The inability to quickly access information hinders efficient task completion.
  • Missed deadlines: Crucial information may be overlooked due to the inability to find it promptly.
  • Frustration and dissatisfaction: The inability to efficiently manage emails can lead to frustration and a negative user experience.

Common Causes of Outlook Search Problems in Windows 11

Several factors can contribute to Outlook search issues in Windows 11. Understanding these causes is crucial for pinpointing the root of the problem and implementing the appropriate solution.

1. Indexing Issues:

Outlook relies on a search index to efficiently locate emails. If the index is corrupt, incomplete, or outdated, search results may be inaccurate or nonexistent. This can occur due to:

  • Incomplete Indexing: The initial indexing process may not have been completed successfully.
  • Corrupted Index: The index file can become corrupted due to software glitches, system errors, or hardware failures.
  • Outdated Index: Changes to the email data, such as new emails, deleted emails, or modified attachments, may not be reflected in the index.

2. Search Service Errors:

The Windows Search service plays a crucial role in enabling Outlook search functionality. If this service is not running or encounters errors, search operations will be affected.

3. Outlook Add-ins:

Certain Outlook add-ins can interfere with search functionality. These add-ins may modify email data or interfere with the indexing process, leading to search problems.

4. File System Errors:

Issues with the file system, such as corrupted files or disk errors, can also affect Outlook search functionality.

5. Antivirus Software Conflicts:

Antivirus software can sometimes interfere with Outlook’s search capabilities, especially when scanning email data or attachments.

6. Network Connectivity Issues:

If Outlook is unable to connect to the server or access email data due to network connectivity problems, search operations may fail.

7. Insufficient System Resources:

Insufficient system resources, such as RAM or disk space, can also hinder Outlook search performance.

Troubleshooting Outlook Search Issues in Windows 11

Addressing Outlook search problems requires a systematic approach, starting with basic checks and progressively moving towards more advanced solutions.

1. Basic Troubleshooting Steps:

  • Restart Outlook and Windows: Sometimes, a simple restart can resolve temporary glitches affecting search functionality.
  • Check Network Connectivity: Ensure a stable internet connection and verify that Outlook can access the email server.
  • Disable Add-ins: Temporarily disable all Outlook add-ins to see if they are interfering with search operations.
  • Rebuild Search Index: Rebuild the Outlook search index to ensure it is up-to-date and accurate. This can be done by going to File > Options > Search and clicking Rebuild Search Index.
  • Repair Outlook Installation: Repair the Outlook installation to fix any corrupt or missing files that may be causing search issues. This can be done by going to Control Panel > Programs and Features and selecting Repair for Microsoft Office.

2. Advanced Troubleshooting Steps:

  • Check Windows Search Service: Ensure the Windows Search service is running and configured correctly. This can be done by going to Windows Search in the Services window.
  • Run System File Checker (SFC) Scan: Run the SFC scan to check for and repair any corrupted system files that may be affecting Outlook search functionality.
  • Disable Antivirus Software: Temporarily disable antivirus software to see if it is interfering with Outlook search.
  • Check Disk Space: Ensure sufficient disk space is available for Outlook to function properly.
  • Run Outlook in Safe Mode: Start Outlook in Safe Mode to disable add-ins and other extensions that may be interfering with search.

3. Additional Tips:

  • Use Precise Search Terms: Use specific keywords and phrases when searching for emails to improve search accuracy.
  • Check Email Folder Structure: Ensure emails are organized in a logical folder structure to facilitate efficient searching.
  • Use Advanced Search Options: Utilize advanced search options, such as filters, date ranges, and sender/recipient filters, to refine search results.
  • Consider Alternative Search Tools: If troubleshooting efforts prove unsuccessful, consider using alternative search tools, such as the Windows Search bar or third-party email search applications.

FAQs on Outlook Search Issues in Windows 11

1. Why is my Outlook search not working after a Windows update?

Windows updates can sometimes introduce changes that affect Outlook search functionality. It’s crucial to rebuild the search index after a major update to ensure it reflects the latest changes.

2. Why are my search results not showing up?

Several factors can cause search results to disappear, including a corrupted index, indexing errors, or issues with the Windows Search service.

3. Why is my Outlook search slow?

Slow search performance can be attributed to factors such as a large mailbox size, insufficient system resources, or a fragmented search index.

4. Why am I unable to search for emails older than a specific date?

Outlook’s search function may have limitations in accessing emails older than a certain date. This can be due to indexing settings or limitations in the email server.

5. Why is my Outlook search not finding specific emails?

Search results may not be accurate due to indexing issues, incorrect search terms, or limitations in Outlook’s search functionality.

Conclusion

Outlook search issues in Windows 11 can be frustrating and disruptive to workflow. However, by understanding the common causes and implementing the troubleshooting steps outlined in this article, users can effectively diagnose and resolve these problems. From basic checks to advanced solutions, the guide provides a comprehensive approach to regaining control over Outlook search functionality and maximizing productivity. By following these steps, users can ensure that Outlook search continues to be a reliable and efficient tool for managing email data in Windows 11.

How to Fix: Outlook Search Not Working On Windows  WM Troubleshooting Outlook search issues - Microsoft Support How to Rebuild Your Search Index on Microsoft Outlook How to Fix Outlook Search Problems - YouTube
Outlook Search Not Working: Here’s What to Do - Troubleshooting Central How to resolve search problems in Microsoft Outlook  TechRepublic How to Fix Outlook Search Problems  Comprehensive Guide
How to Fix Outlook Search Problem How to fix: Outlook search problems (Search doesn't work or doesn't return all search results

Closure

Thus, we hope this article has provided valuable insights into Navigating the Labyrinth: Troubleshooting Outlook Search Issues in Windows 11. We appreciate your attention to our article. See you in our next article!

Troubleshooting QNAP Shared Folder Access Issues On Windows 10

Troubleshooting QNAP Shared Folder Access Issues on Windows 10

Introduction

With great pleasure, we will explore the intriguing topic related to Troubleshooting QNAP Shared Folder Access Issues on Windows 10. Let’s weave interesting information and offer fresh perspectives to the readers.

Troubleshooting QNAP Shared Folder Access Issues on Windows 10

Qnap Share Folder Lost Problem  Qnap Advanced Support

The inability to access shared folders on a QNAP NAS from a Windows 10 computer is a common issue that can be frustrating for users. This article aims to provide a comprehensive guide to diagnose and resolve such problems, covering potential causes and offering practical solutions.

Understanding the Issue

Accessing shared folders on a QNAP NAS from Windows 10 involves establishing a connection between the two devices. This connection relies on network protocols, user permissions, and proper configuration on both the QNAP NAS and the Windows 10 computer. When this connection fails, it can manifest in various ways:

  • Network Drive Mapping Failure: The attempt to map a network drive to the shared folder fails, resulting in an error message.
  • Access Denied: Even if the network drive mapping succeeds, accessing the shared folder might be blocked with an "Access Denied" error.
  • Slow Performance: Accessing the shared folder might be extremely slow, indicating network connectivity issues.
  • Folder Not Visible: The shared folder might not be visible in the network explorer, indicating a problem with network discovery or folder sharing settings.

Potential Causes

The root cause of the inability to access shared folders can be attributed to various factors:

1. Network Connectivity Issues:

  • Incorrect Network Settings: Incorrect IP addresses, subnet masks, or gateway settings on either the QNAP NAS or the Windows 10 computer can disrupt network communication.
  • Network Firewall: Firewall rules on either the QNAP NAS or the Windows 10 computer might be blocking access to the shared folder.
  • Network Security Software: Antivirus software or other network security applications might interfere with network connections.
  • Network Cable Issues: Damaged or faulty network cables can disrupt network connectivity.

2. QNAP NAS Configuration Problems:

  • Incorrect SMB Settings: The SMB (Server Message Block) protocol is used to share folders on the QNAP NAS. Incorrect SMB settings, such as disabling SMB1 or using incompatible SMB versions, can cause access issues.
  • User Permissions: The user account on the QNAP NAS might not have the necessary permissions to access the shared folder.
  • Shared Folder Settings: The shared folder settings might be incorrectly configured, preventing access from Windows 10.

3. Windows 10 Configuration Problems:

  • Incorrect User Account Settings: The user account on the Windows 10 computer might not have the necessary permissions to access the shared folder.
  • Windows Firewall: The Windows Firewall might be blocking access to the QNAP NAS.
  • Network Discovery Settings: Windows 10’s network discovery settings might be disabled, preventing the computer from finding the QNAP NAS.
  • Outdated Drivers: Outdated network drivers on the Windows 10 computer can lead to connectivity issues.

Troubleshooting Steps

To diagnose and resolve the issue, follow these troubleshooting steps:

1. Verify Network Connectivity:

  • Check Network Settings: Ensure both the QNAP NAS and the Windows 10 computer are connected to the same network and have correct IP addresses, subnet masks, and gateway settings.
  • Test Network Connection: Use the "ping" command in a command prompt to test the connection between the Windows 10 computer and the QNAP NAS.
  • Disable Firewall Temporarily: Temporarily disable the firewall on both the QNAP NAS and the Windows 10 computer to see if it resolves the issue.
  • Check Network Cables: Inspect the network cables for any damage or loose connections.

2. Verify QNAP NAS Configuration:

  • Enable SMB1: If necessary, enable SMB1 on the QNAP NAS. However, this is not recommended due to security vulnerabilities.
  • Check SMB Settings: Ensure that the SMB protocol is enabled and configured correctly on the QNAP NAS.
  • Review User Permissions: Verify that the user account on the QNAP NAS has the necessary permissions to access the shared folder.
  • Check Shared Folder Settings: Ensure the shared folder settings are configured correctly and allow access from Windows 10.

3. Verify Windows 10 Configuration:

  • Check User Account Permissions: Ensure that the user account on the Windows 10 computer has the necessary permissions to access the shared folder.
  • Disable Windows Firewall: Temporarily disable the Windows Firewall to see if it resolves the issue.
  • Enable Network Discovery: Ensure that network discovery is enabled in the Windows 10 network settings.
  • Update Network Drivers: Update the network drivers on the Windows 10 computer to the latest version.

4. Use Network Troubleshooting Tools:

  • Network Diagnostics: Utilize built-in network diagnostics tools in Windows 10 to identify and troubleshoot network connectivity issues.
  • Command Prompt: Use the "netstat" and "tracert" commands in a command prompt to gather information about network connections and identify potential bottlenecks.
  • Third-Party Network Scanners: Utilize third-party network scanning tools to analyze network traffic and identify potential issues.

FAQs

1. How do I enable SMB1 on my QNAP NAS?

Enabling SMB1 is not recommended due to security vulnerabilities. However, if you must enable it, you can do so by accessing the QNAP NAS control panel and navigating to the "Network Services" section. Locate the "SMB Service" setting and enable SMB1.

2. What are the recommended SMB versions to use?

The recommended SMB versions are SMB2 and SMB3, which offer better security and performance than SMB1.

3. How do I check user permissions on my QNAP NAS?

To check user permissions on the QNAP NAS, access the control panel and navigate to the "Privilege Management" section. Select the user account and view the assigned permissions.

4. How do I enable network discovery in Windows 10?

To enable network discovery in Windows 10, open the "Control Panel" and navigate to the "Network and Sharing Center". Click on "Change advanced sharing settings" and enable "Network Discovery" for the desired network profile.

5. How do I update network drivers in Windows 10?

To update network drivers in Windows 10, open the "Device Manager" and locate the network adapter. Right-click on the adapter and select "Update driver".

Tips

  • Restart Devices: Restarting both the QNAP NAS and the Windows 10 computer can resolve temporary issues.
  • Check Network Logs: Review network logs on both the QNAP NAS and the Windows 10 computer for error messages that might provide clues about the issue.
  • Contact QNAP Support: If the problem persists, contact QNAP support for assistance.
  • Seek Professional Help: If you are unable to resolve the issue, seek assistance from a qualified IT professional.

Conclusion

Inability to access shared folders on a QNAP NAS from a Windows 10 computer can be attributed to various factors, ranging from network connectivity issues to configuration problems on both the QNAP NAS and the Windows 10 computer. By following the troubleshooting steps outlined in this article, users can diagnose and resolve the issue effectively. Remember to prioritize network connectivity, verify QNAP NAS configuration, review Windows 10 settings, and utilize network troubleshooting tools for a comprehensive approach. If the problem persists, seeking assistance from QNAP support or a qualified IT professional is recommended.

Qnap Share Folder Lost Problem  Qnap Advanced Support Connecting to WebDAV shared folders on a QNAP NAS in Windows 10  QNAP Intermittent loss of access to QNAP shared folders from Windows 10 laptop - QNAP NAS Community Forum
How to configure NAS shared folder/subfolders permissions in Windows Client?  QNAP How to configure NAS shared folder/subfolders permissions in Windows Client?  QNAP Qnap-shared-folder
Connecting to WebDAV shared folders on a QNAP NAS in Windows 10  QNAP Fix: Cannot Access Shared Folder on Windows 10 [5 Ways]

Closure

Thus, we hope this article has provided valuable insights into Troubleshooting QNAP Shared Folder Access Issues on Windows 10. We hope you find this article informative and beneficial. See you in our next article!

Understanding The Windows 10 ISO: A Comprehensive Guide

Understanding the Windows 10 ISO: A Comprehensive Guide

Introduction

With enthusiasm, let’s navigate through the intriguing topic related to Understanding the Windows 10 ISO: A Comprehensive Guide. Let’s weave interesting information and offer fresh perspectives to the readers.

Understanding the Windows 10 ISO: A Comprehensive Guide

What is iso image of windows 10 - topoccupy

The Windows 10 operating system, a cornerstone of modern computing, is widely used across desktops, laptops, and even some mobile devices. At the heart of installing and maintaining this operating system lies the Windows 10 ISO file, a crucial component often overlooked but essential for various tasks. This article aims to provide a comprehensive understanding of the Windows 10 ISO, its uses, benefits, and how to utilize it effectively.

What is a Windows 10 ISO File?

An ISO file, short for International Organization for Standardization, is a digital image file containing an exact copy of a disc, typically a CD or DVD. In the context of Windows 10, the ISO file is a digital representation of the entire operating system installation disc. This file encompasses all the necessary files, drivers, and software required to install and run Windows 10 on a compatible computer.

Why is the Windows 10 ISO Important?

The Windows 10 ISO file holds significance for several reasons:

  • Clean Installation: The most prominent use of the ISO file is to perform a clean installation of Windows 10. This process involves formatting the hard drive, effectively wiping it clean, and then installing a fresh copy of the operating system from the ISO file. This is particularly beneficial for resolving system issues, removing bloatware, or starting with a clean slate.
  • Upgrading Older Systems: If a computer is running an older version of Windows, the Windows 10 ISO can be used to upgrade the operating system to the latest version. This process involves using the ISO file to install Windows 10 over the existing operating system, preserving user data and settings.
  • Creating Bootable Media: The ISO file can be used to create bootable media, such as a USB flash drive or DVD, which can then be used to install Windows 10 on a computer. This is particularly useful for installing Windows 10 on a new computer or if the existing operating system is corrupted.
  • Troubleshooting and Recovery: The Windows 10 ISO file can be used to troubleshoot various system issues, including boot errors, corrupted files, or malware infections. It can also be used to recover a system from a failed hard drive or other hardware failures.
  • Customizing Installations: The Windows 10 ISO file can be modified to create a customized installation experience. This can involve removing unnecessary features, adding specific drivers, or pre-configuring the operating system according to specific needs.

How to Obtain a Windows 10 ISO File:

Legally obtaining a Windows 10 ISO file is crucial. Microsoft provides a straightforward method for downloading the ISO file directly from their website. The process involves:

  1. Visiting the Microsoft Website: Go to the official Microsoft website and navigate to the "Download Windows 10" page.
  2. Selecting the Edition: Choose the desired edition of Windows 10, such as Home, Pro, or Enterprise.
  3. Choosing the Language: Select the preferred language for the operating system.
  4. Confirming the Operating System: Verify the correct operating system version (32-bit or 64-bit) for your computer.
  5. Downloading the ISO File: Click the download button and save the ISO file to your computer.

Using the Windows 10 ISO File:

Once the Windows 10 ISO file is downloaded, it can be used for various purposes:

  • Direct Installation: The ISO file can be directly mounted and used to install Windows 10 on a computer. This method requires specific technical knowledge and is typically used for advanced users.
  • Creating Bootable Media: The ISO file can be used to create bootable media, such as a USB flash drive or DVD, using tools like Rufus or the Windows USB/DVD Download Tool. This process involves formatting the media, copying the ISO file to it, and making it bootable.
  • Virtual Machine Installation: The ISO file can be used to install Windows 10 within a virtual machine environment, such as VirtualBox or VMware. This allows users to run Windows 10 on a different operating system, such as macOS or Linux, without affecting the host system.

FAQs Regarding Windows 10 ISO Files:

Q: Is it legal to download a Windows 10 ISO file?

A: Yes, it is legal to download a Windows 10 ISO file from the official Microsoft website. However, it is essential to ensure that you are using a legitimate product key and have a valid license to install the operating system.

Q: What is the difference between a Windows 10 ISO file and a Windows 10 installation disc?

A: The ISO file is a digital representation of the installation disc. Both contain the same data and can be used to install Windows 10. However, the ISO file is a digital file that can be downloaded and used on a computer, while the installation disc is a physical media that needs to be inserted into a disc drive.

Q: Can I use a Windows 10 ISO file to upgrade my existing operating system?

A: Yes, you can use a Windows 10 ISO file to upgrade your existing operating system, but it is recommended to use the official upgrade tool provided by Microsoft for a smoother and more reliable experience.

Q: What are the system requirements for installing Windows 10?

A: The system requirements for installing Windows 10 vary depending on the edition and version of the operating system. However, generally, you will need a processor with a clock speed of 1 GHz or faster, at least 1 GB of RAM for 32-bit or 2 GB of RAM for 64-bit, and 16 GB of free hard disk space.

Tips for Using the Windows 10 ISO File:

  • Back Up Your Data: Before installing Windows 10 from an ISO file, it is essential to back up all your important data to avoid data loss.
  • Verify the Source: Ensure that the ISO file is downloaded from a trusted source, such as the official Microsoft website, to avoid malware or other security risks.
  • Use Reliable Tools: When creating bootable media from an ISO file, use reliable tools like Rufus or the Windows USB/DVD Download Tool to ensure that the process is successful.
  • Check System Requirements: Before installing Windows 10, verify that your computer meets the minimum system requirements to avoid compatibility issues.
  • Activate Your Windows License: After installing Windows 10, ensure that you activate your license using a valid product key.

Conclusion:

The Windows 10 ISO file is an essential tool for anyone who needs to install, upgrade, or troubleshoot the Windows 10 operating system. By understanding the purpose and benefits of the ISO file, users can effectively utilize it for various tasks, ensuring a smooth and efficient experience with Windows 10. Whether it is for a clean installation, upgrading an older system, or creating bootable media, the Windows 10 ISO file remains a vital component in the world of modern computing.

Windows 10 ISO: how to download it legally and install it  Blog Mr Key Shop Download the Windows 10 ISO: Here's how * Techsmartest.com PPT - DOWNLOAD Windows 10 A Comprehensive Beginner s Guide to Learn Windows 10 Step by Step
Mounting Windows 10 ISO: A Step-by-Step Guide - Infetech.com  Tech News, Reviews, and Analysis Windows 10 ISO - Microsoft Community Official ISO images for Windows 10 build 10162 released
How to upgrade Windows 10 using ISO file (Guide) Download Windows 10 ISO Images [Latest Major Update]

Closure

Thus, we hope this article has provided valuable insights into Understanding the Windows 10 ISO: A Comprehensive Guide. We appreciate your attention to our article. See you in our next article!

Navigating The Hub Of Windows 11: Understanding The Start Menu’s Role And Location

Navigating the Hub of Windows 11: Understanding the Start Menu’s Role and Location

Introduction

With enthusiasm, let’s navigate through the intriguing topic related to Navigating the Hub of Windows 11: Understanding the Start Menu’s Role and Location. Let’s weave interesting information and offer fresh perspectives to the readers.

Start Menu in Windows 11 - dSurf

The Windows Start menu, a familiar fixture across generations of Windows users, has undergone a significant evolution in Windows 11. While its core function remains the same – providing a central access point to applications, settings, and system information – its appearance and functionality have been refined, offering a streamlined and intuitive experience.

The Evolution of the Start Menu: A Historical Perspective

To understand the significance of the Start menu’s placement in Windows 11, it’s helpful to trace its evolution. The Start menu originated in Windows 95, serving as the primary interface for launching programs, accessing system settings, and navigating the operating system. Its iconic "Start" button, often adorned with the Windows logo, became synonymous with the Windows experience.

Over the years, the Start menu has undergone numerous iterations. Windows XP introduced the "Start" button’s prominent placement in the lower-left corner of the screen, a design that remained largely unchanged until Windows 8. The shift to a tile-based interface in Windows 8, while introducing a new aesthetic, faced criticism for its departure from the familiar Start menu layout.

Windows 10 brought back the traditional Start menu, albeit with a modernized design that incorporated elements of the Windows 8 tile interface. This hybrid approach aimed to strike a balance between familiarity and innovation, offering users a blend of traditional menu options and dynamic live tiles.

The Start Menu’s Reimagined Form in Windows 11

Windows 11 further refines the Start menu, streamlining its design and enhancing its functionality. The most prominent change is the relocation of the Start button to the center of the taskbar. This shift, while initially met with mixed reactions, aims to create a more symmetrical and visually balanced interface, aligning with the overall design philosophy of Windows 11.

The Start menu itself adopts a minimalist aesthetic, focusing on essential functionalities. It features a compact list of frequently used applications, pinned programs, and recommended files, offering quick access to essential tools. The "All apps" section provides a comprehensive alphabetical list of installed programs, while the "Recommended" section leverages machine learning to suggest relevant applications and files based on user activity.

Navigating the Start Menu: A User-Friendly Experience

Finding the Start menu in Windows 11 is straightforward:

  1. Locate the Taskbar: The taskbar, typically located at the bottom of the screen, serves as the primary hub for accessing system tools and applications.
  2. Identify the Start Button: The Start button, now centrally positioned on the taskbar, features the Windows logo.
  3. Click the Start Button: Clicking the Start button will reveal the Start menu, offering a comprehensive list of applications, settings, and system information.

The Importance of the Start Menu: A Central Hub for User Interaction

The Start menu’s importance lies in its role as a central hub for user interaction with the Windows operating system. It serves as the primary gateway to:

  • Launching Applications: Accessing and launching installed programs, ranging from productivity tools to entertainment applications.
  • Accessing System Settings: Configuring system preferences, managing user accounts, and customizing the operating system.
  • Searching for Files and Applications: Efficiently locating specific files, folders, and applications using the integrated search functionality.
  • Managing Power Options: Shutting down, restarting, or putting the computer to sleep.
  • Accessing Recent Documents and Files: Quickly navigating to recently accessed files and documents for continued work.
  • Exploring System Information: Viewing system specifications, network connections, and other system-related information.

FAQs: Addressing Common Queries about the Start Menu

Q: Can I customize the Start menu’s appearance?

A: Yes, Windows 11 allows for some degree of customization. Users can pin frequently used applications to the Start menu for quick access, rearrange the order of pinned items, and choose from various themes and color palettes to personalize the Start menu’s appearance.

Q: How can I find a specific application quickly?

A: The Start menu features an integrated search bar. Simply type the name of the application or file you’re looking for, and the search functionality will display matching results.

Q: Can I disable the Start menu’s "Recommended" section?

A: While Windows 11 doesn’t offer a direct option to disable the "Recommended" section, users can minimize its prominence by unpinning recommended files and applications from the Start menu.

Q: Can I move the Start button back to the left corner of the taskbar?

A: Windows 11 currently doesn’t provide a native option to move the Start button back to the left corner. However, third-party applications and customization tools might offer workarounds to achieve this.

Tips: Enhancing Your Start Menu Experience

  • Pin Frequently Used Applications: Pinning essential applications to the Start menu provides quick and easy access.
  • Use the Search Functionality: Leverage the integrated search bar to efficiently locate files, folders, and applications.
  • Customize Themes and Colors: Personalize the Start menu’s appearance by choosing from various themes and color palettes.
  • Explore Settings and Options: Delve into the Start menu’s settings to customize its behavior and functionality.
  • Stay Updated: Regularly update Windows 11 to benefit from new features, improvements, and bug fixes.

Conclusion: A Gateway to the Windows 11 Experience

The Start menu, a cornerstone of the Windows operating system, remains an integral part of the user experience in Windows 11. Its streamlined design, enhanced functionality, and central location make it a gateway to the wealth of features and functionalities offered by Windows 11. Understanding the Start menu’s role and navigating its interface effectively empowers users to fully leverage the capabilities of the Windows 11 operating system.

Windows 11 Start menu: Here’s everything that’s new  Tom's Guide Windows 11 Taskbar and Start Menu get a modern remake — Here's how they work  Laptop Mag The New Windows 11 Leak Shows The New Start Menu And Design Similar To - Vrogue
Hands on with Windows 11: A look at the new Start Menu, taskbar and more This is our first look at Windows 11 with brand new Start Menu How to Get the Classic Start Menu Back in Windows 11
How to Customize the Start Menu in Windows 11 - Instructions Windows Start Menu Windows 11

Closure

Thus, we hope this article has provided valuable insights into Navigating the Hub of Windows 11: Understanding the Start Menu’s Role and Location. We appreciate your attention to our article. See you in our next article!

Managing User Accounts In Windows 11: A Focus On Security And Control

Managing User Accounts in Windows 11: A Focus on Security and Control

Introduction

With enthusiasm, let’s navigate through the intriguing topic related to Managing User Accounts in Windows 11: A Focus on Security and Control. Let’s weave interesting information and offer fresh perspectives to the readers.

Managing User Accounts in Windows 11: A Focus on Security and Control

How to manage user account settings on Windows 11  Windows Central

Windows 11, like its predecessors, relies on a robust system of user accounts for managing access and permissions. These accounts are fundamental to ensuring secure and controlled access to system resources and data. While the traditional approach involves creating local user accounts, a more secure and streamlined method focuses on managing user access through Active Directory (AD) or Azure Active Directory (Azure AD). This approach, often referred to as "no local users and groups," offers significant advantages in terms of security, manageability, and scalability.

Understanding the Traditional Approach: Local Users and Groups

In the traditional model, users and groups are created directly on the local computer. These local accounts are independent of any central directory service and are managed individually. While this approach is simple for small deployments, it presents challenges when dealing with larger environments:

  • Security Risks: Local accounts are vulnerable to unauthorized access and potential compromise. If an attacker gains control of a local account, they can potentially access sensitive data stored on the machine.
  • Management Complexity: Managing numerous local accounts across multiple machines can be cumbersome and time-consuming. Changes to user permissions or group memberships require manual intervention on each individual device.
  • Scalability Issues: As the number of users and computers grows, managing local accounts becomes increasingly difficult. The lack of centralized control makes it challenging to enforce consistent security policies and manage user access effectively.

The Advantages of Managing Users and Groups through Active Directory or Azure Active Directory

Leveraging Active Directory or Azure AD for user management offers a more secure, efficient, and scalable solution:

  • Centralized Management: AD or Azure AD provides a centralized repository for managing users, groups, and their associated permissions. This central control simplifies administration and ensures consistency across the entire organization.
  • Enhanced Security: User accounts are managed through a secure, centralized system, reducing the risk of unauthorized access and data breaches. AD and Azure AD enforce strong password policies, multi-factor authentication, and other security measures.
  • Simplified Access Control: AD and Azure AD enable fine-grained access control, allowing administrators to define specific permissions for different users and groups based on their roles and responsibilities.
  • Scalability and Flexibility: AD and Azure AD are designed to scale with the needs of the organization, supporting large numbers of users and devices. They offer flexible deployment options, including on-premises, cloud-based, or hybrid environments.
  • Group Policy Management: AD and Azure AD provide powerful group policy tools for managing system settings, software installations, and user configurations across multiple devices. This centralized approach ensures consistency and simplifies the management of large deployments.

Implementing "No Local Users and Groups" in Windows 11

Migrating to a "no local users and groups" model involves several key steps:

  1. Domain Join: Ensure all Windows 11 computers are joined to the AD or Azure AD domain. This step establishes a connection between the devices and the central directory service, enabling centralized user management.
  2. Create User Accounts: Create user accounts within AD or Azure AD. These accounts will be used to access the Windows 11 machines.
  3. Assign User Permissions: Define the necessary permissions for each user account based on their role and responsibilities. This can be done through group membership or individual user permissions.
  4. Disable Local Account Creation: Configure the Windows 11 devices to prevent the creation of local user accounts. This ensures that all user access is managed through AD or Azure AD.
  5. Configure Group Policies: Utilize group policies to enforce security settings, software installations, and other configurations across all devices.

Frequently Asked Questions (FAQs)

Q: What are the potential challenges of implementing "no local users and groups"?

A: While the benefits of "no local users and groups" are significant, there are some potential challenges:

  • Initial Setup: Setting up AD or Azure AD and migrating existing user accounts can be complex and time-consuming.
  • Network Connectivity: Devices must be connected to the domain network to access user accounts and resources managed through AD or Azure AD.
  • Cost: Implementing AD or Azure AD might involve additional costs for infrastructure, software licenses, and specialized expertise.

Q: Can I still use local accounts for specific scenarios?

A: While the "no local users and groups" approach is generally recommended for security and manageability, there might be specific scenarios where local accounts are still necessary. For example, a local administrator account might be needed for initial configuration or troubleshooting. However, it is essential to minimize the use of local accounts and implement strict security measures for them.

Q: What are the best practices for managing user accounts in Windows 11?

A:

  • Use Strong Passwords: Encourage users to create strong and unique passwords for their accounts.
  • Enable Multi-Factor Authentication (MFA): Implement MFA for all user accounts to enhance security.
  • Regularly Review User Permissions: Regularly review user permissions and ensure they are aligned with current roles and responsibilities.
  • Implement Access Control Lists (ACLs): Use ACLs to define granular permissions for files, folders, and other resources.
  • Utilize Group Policy Management: Leverage group policies to enforce security settings, software installations, and other configurations.

Tips for Implementing "No Local Users and Groups"

  • Plan Carefully: Before implementing "no local users and groups," carefully assess your organization’s needs and existing infrastructure.
  • Phased Rollout: Consider a phased rollout approach to minimize disruption and ensure a smooth transition.
  • Provide User Training: Train users on the new account management system and how to access resources securely.
  • Monitor and Evaluate: Regularly monitor the system’s performance and evaluate the effectiveness of the security measures implemented.

Conclusion

Adopting a "no local users and groups" approach in Windows 11 offers significant advantages in terms of security, manageability, and scalability. By managing user accounts through Active Directory or Azure Active Directory, organizations can centralize control, enforce consistent security policies, and simplify access management across the entire environment. While there might be initial challenges, the benefits of this approach far outweigh the potential drawbacks. By implementing best practices and carefully planning the transition, organizations can significantly enhance their security posture and streamline user account management in Windows 11.

Help With User Account Control In Windows 11 Manage user accounts Windows 11  How to Manage Windows 11 password  Windows 11 Credentials How to Manage User Account Settings in Windows 11
User Accounts Settings in Windows 11 Manage Your Microsoft Account in Windows 11 – windows.do Here’s What Windows 11’s Settings App Looks Like - TECHTELEGRAPH
user-accounts-control-panel-manage-another-account.jpg How to Change Username in Windows 11  XpertsTec

Closure

Thus, we hope this article has provided valuable insights into Managing User Accounts in Windows 11: A Focus on Security and Control. We hope you find this article informative and beneficial. See you in our next article!

Managing User Accounts In Windows 11: A Comprehensive Guide

Managing User Accounts in Windows 11: A Comprehensive Guide

Introduction

In this auspicious occasion, we are delighted to delve into the intriguing topic related to Managing User Accounts in Windows 11: A Comprehensive Guide. Let’s weave interesting information and offer fresh perspectives to the readers.

Managing User Accounts in Windows 11: A Comprehensive Guide

How to manage user account settings on Windows 11  Windows Central

Windows 11, like its predecessors, emphasizes user account management as a cornerstone of system security and privacy. Understanding how to create, manage, and remove user accounts is crucial for maintaining a secure and efficient computing environment. This guide delves into the intricacies of managing user accounts in Windows 11, offering a comprehensive overview of the available options and their implications.

The Significance of User Accounts

User accounts serve as digital identities within the Windows operating system. Each account grants access to specific files, programs, and system settings, ensuring a personalized and secure computing experience. Here’s why managing user accounts is vital:

  • Security: Distinct accounts prevent unauthorized access to sensitive data and system configurations.
  • Privacy: User accounts allow for individual settings and preferences, preserving privacy across different users.
  • Control: System administrators can establish specific privileges for each account, granting or restricting access to particular resources.
  • Organization: Multiple accounts facilitate a structured approach to data storage and application usage, particularly in shared environments.

Understanding Account Types in Windows 11

Windows 11 offers two primary account types:

  • Microsoft Account: Linked to a Microsoft email address, it provides access to cloud services like OneDrive, Microsoft Store, and Xbox Live. These accounts offer seamless synchronization across multiple devices.
  • Local Account: Not tied to a Microsoft account, local accounts are entirely managed on the specific device. They are typically used for offline access and when privacy concerns outweigh the benefits of cloud integration.

Methods for Removing User Accounts in Windows 11

Removing a user account in Windows 11 involves a straightforward process. Here are the primary methods:

  1. Using Settings:

    • Access the "Settings" app by clicking the "Start" menu and selecting "Settings."
    • Navigate to "Accounts" and then "Family & other users."
    • Locate the account you wish to remove and click "Remove."
    • Confirm your action by clicking "Remove account."
  2. Through Control Panel:

    • Open the "Control Panel" by searching for it in the "Start" menu.
    • Navigate to "User Accounts" and then "User Accounts."
    • Select "Manage another account" and choose the account you wish to remove.
    • Click "Delete the account" and follow the on-screen prompts.

Important Considerations Before Removing an Account

  • Data Backup: Before removing any account, ensure that all important data associated with it is backed up to a safe location. This includes files, documents, and any other crucial information.
  • Account Type: Removing a Microsoft account will delete its associated data from the cloud, including OneDrive files and settings. Local accounts only affect the data stored on the specific device.
  • Admin Privileges: Removing an account may require administrator privileges. If you’re not an administrator, you might need to request assistance from someone with the necessary permissions.

Frequently Asked Questions

Q: What happens to the data associated with a removed account?

A: Data stored on the local drive associated with the removed account remains on the device unless manually deleted. Data associated with a Microsoft account, including OneDrive files, will be removed from the cloud.

Q: Can I remove my own account?

A: Yes, you can remove your own account. However, it’s recommended to create a new administrator account before removing your current one to avoid locking yourself out of the system.

Q: What if I accidentally delete an account?

A: It’s possible to recover a deleted account using system restore points or data recovery software. However, this process can be complex and may not always be successful.

Tips for Managing User Accounts Effectively

  • Regularly Review Accounts: Periodically audit user accounts, removing inactive or unnecessary accounts to enhance security and system performance.
  • Use Strong Passwords: Encourage the use of strong and unique passwords for each account.
  • Enable Two-Factor Authentication: Add an extra layer of security by enabling two-factor authentication for sensitive accounts.
  • Limit Account Privileges: Grant only the necessary privileges to each account to minimize the potential for unauthorized actions.
  • Keep Software Updated: Regularly update your operating system and software to ensure the latest security patches are applied.

Conclusion

Managing user accounts in Windows 11 is essential for maintaining a secure, organized, and efficient computing environment. By understanding the different account types, removal methods, and important considerations, users can effectively manage their accounts, ensuring data protection and a personalized experience. Regularly reviewing and updating account settings, along with implementing strong security practices, will contribute to a robust and secure computing experience.

How to Manage User Account Settings in Windows 11 Manage user accounts Windows 11  How to Manage Windows 11 password  Windows 11 Credentials Manage Your Microsoft Account in Windows 11 – windows.do
How to Manage User Account Settings in Windows 11 How to Manage User Accounts with Command Prompt in Windows How to Add a Local User Account on Windows 11
How to Apply default User Account Picture to All Users in Windows 11/10? - Technoresult How to Change Username in Windows 11  XpertsTec

Closure

Thus, we hope this article has provided valuable insights into Managing User Accounts in Windows 11: A Comprehensive Guide. We hope you find this article informative and beneficial. See you in our next article!