Archives 2024

Navigating The Realm Of Windows 10 Drivers: A Comprehensive Guide To Free Online Installation

Navigating the Realm of Windows 10 Drivers: A Comprehensive Guide to Free Online Installation

Introduction

With great pleasure, we will explore the intriguing topic related to Navigating the Realm of Windows 10 Drivers: A Comprehensive Guide to Free Online Installation. Let’s weave interesting information and offer fresh perspectives to the readers.

Windows 10 Drivers

The seamless operation of any computer hinges on the intricate interplay between hardware and software. This harmony is orchestrated by drivers, specialized programs that facilitate communication between the operating system and connected peripherals. In the context of Windows 10, obtaining and installing these drivers is paramount to unlocking the full potential of your system. While traditional methods involving physical media or manufacturer websites are prevalent, the advent of online resources has revolutionized driver acquisition, offering a convenient and often free avenue for users.

This comprehensive guide delves into the intricacies of acquiring and installing Windows 10 drivers online, shedding light on the benefits, potential challenges, and best practices associated with this approach.

Understanding the Essence of Windows 10 Drivers

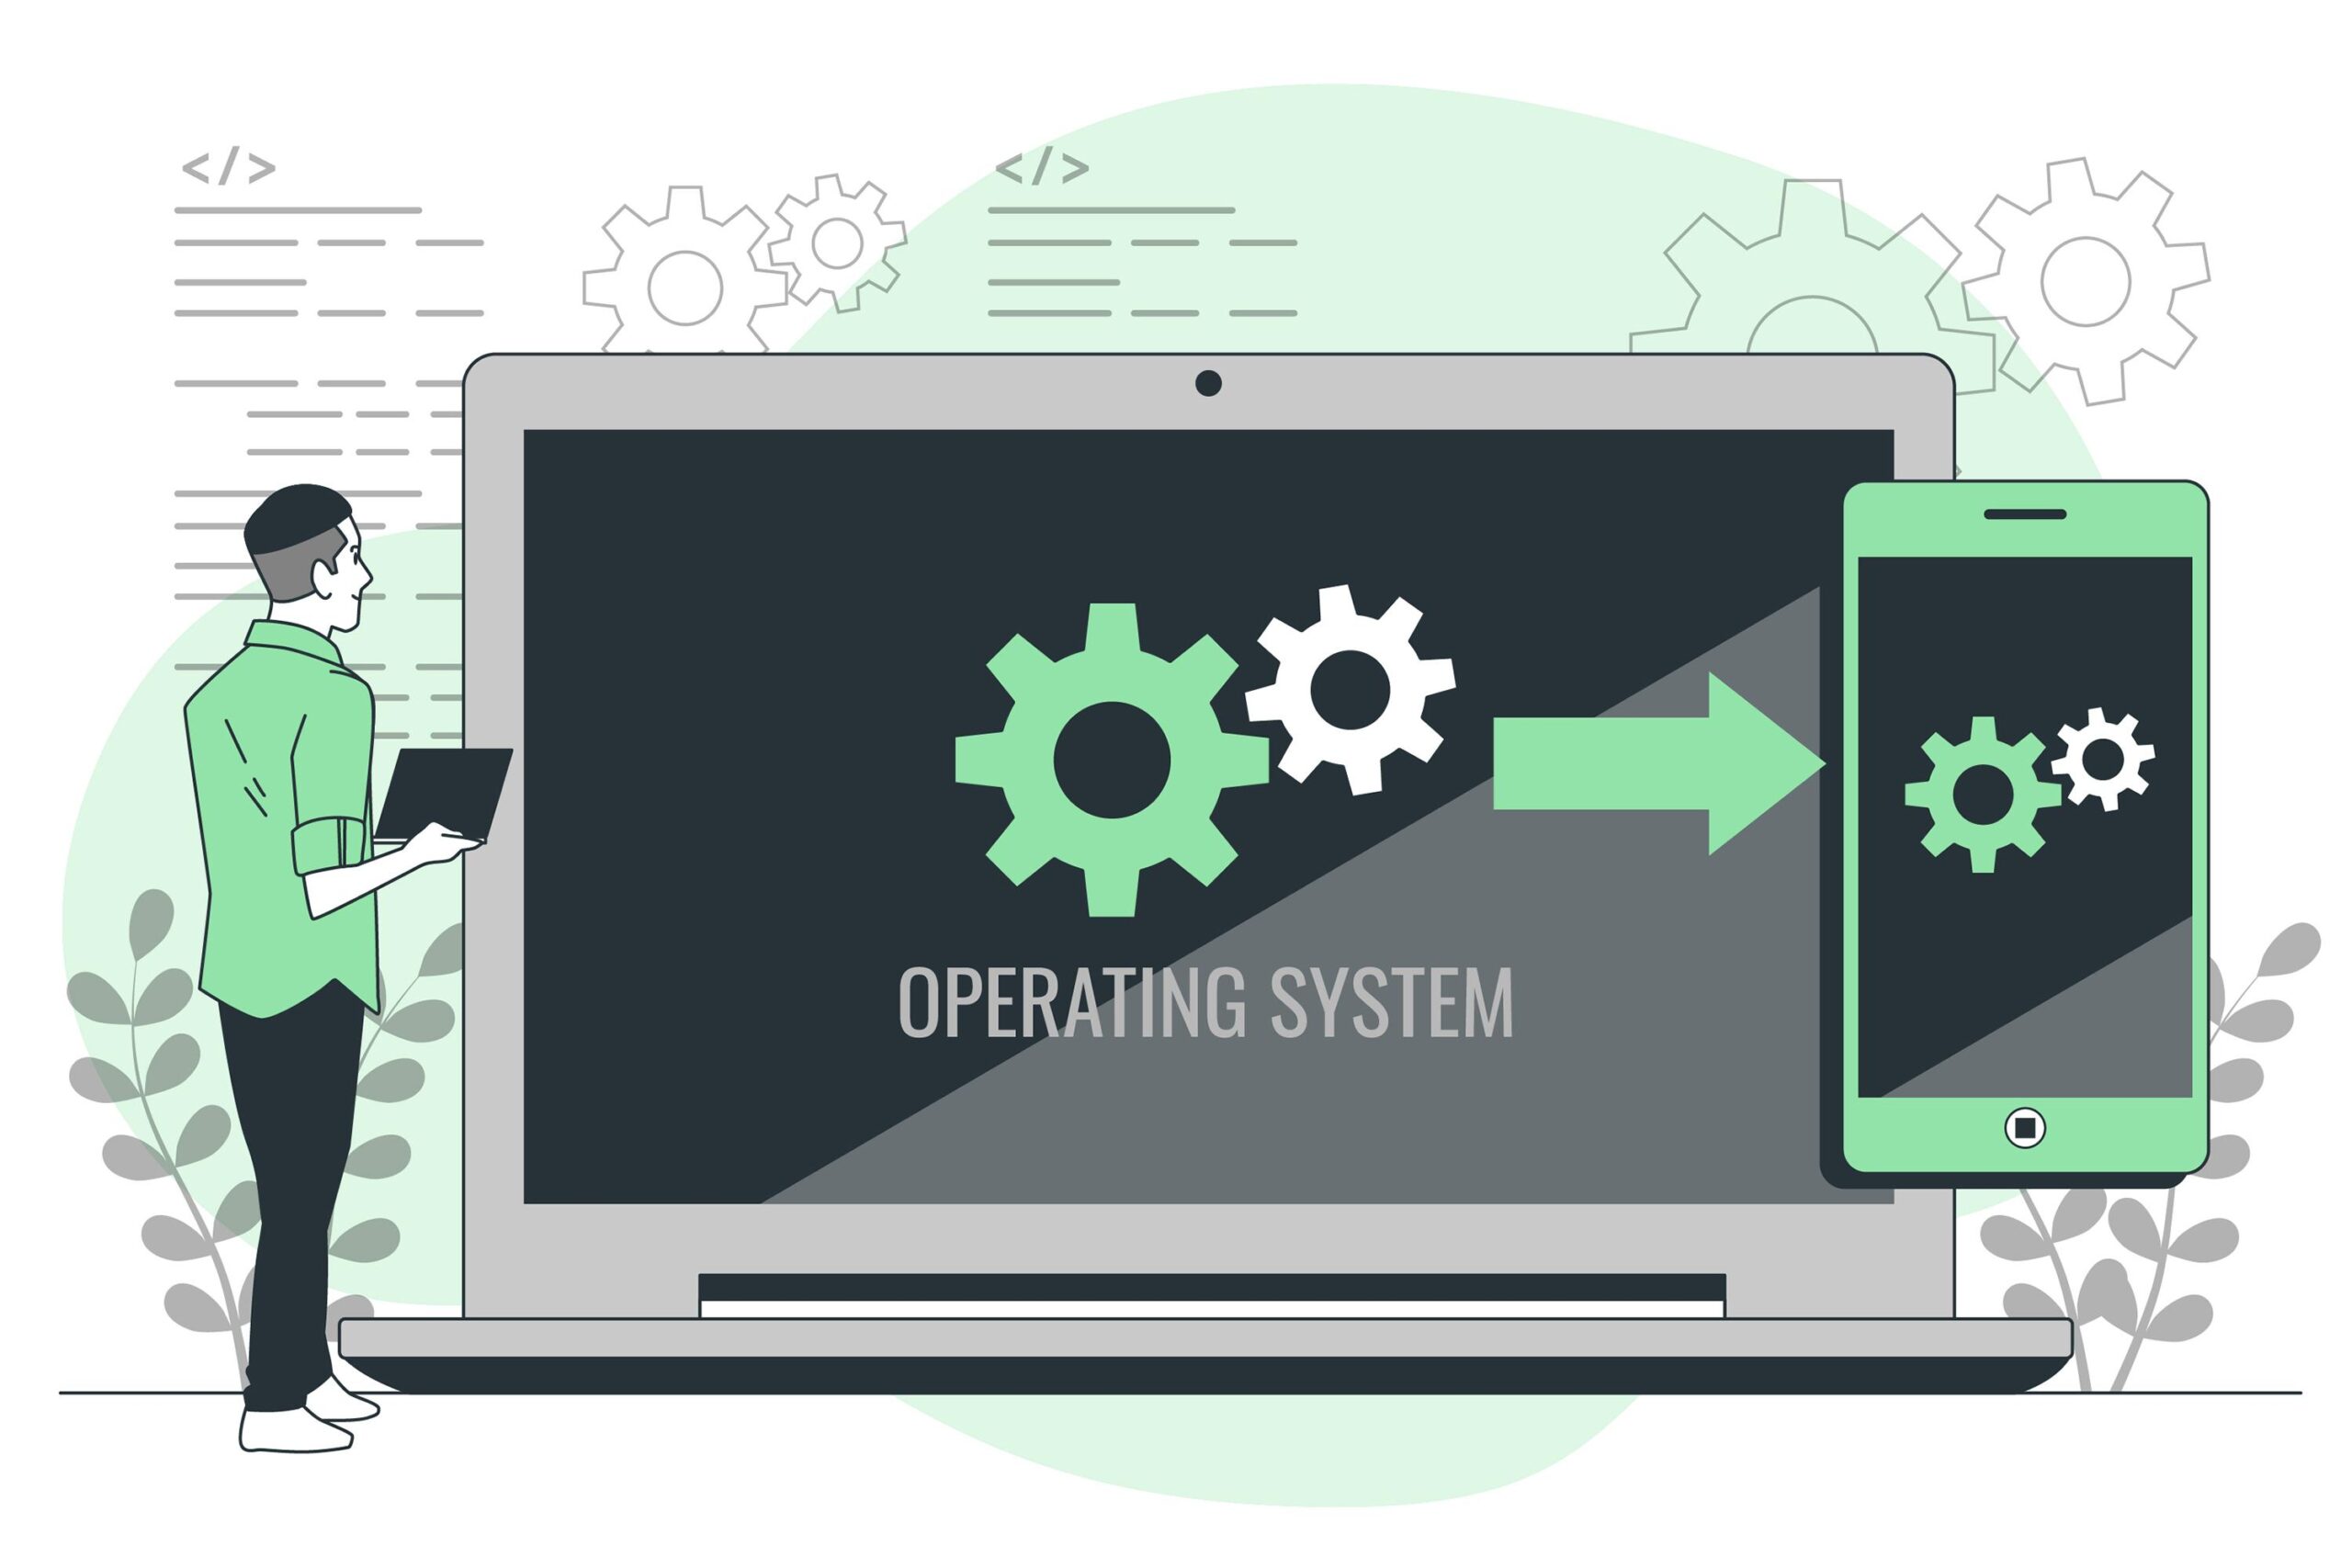
Drivers serve as the bridge between the operating system and various hardware components, such as graphics cards, sound cards, network adapters, and printers. They translate the complex instructions from the operating system into a language understandable by the specific hardware device, enabling smooth data exchange and functionality.

The Significance of Online Driver Acquisition

The online realm offers a plethora of resources for obtaining Windows 10 drivers, providing several advantages over traditional methods:

  • Convenience: Online driver repositories and dedicated websites eliminate the need for physical media or navigating complex manufacturer websites.
  • Accessibility: Users can access a vast library of drivers from anywhere with an internet connection, regardless of location or time constraints.
  • Cost-effectiveness: Many online resources offer free driver downloads, significantly reducing the cost associated with obtaining drivers through other channels.
  • Updates and Compatibility: Online repositories often provide the latest driver versions, ensuring compatibility with the latest Windows 10 updates and enhancing system performance.

Navigating the Online Driver Landscape: A Step-by-Step Guide

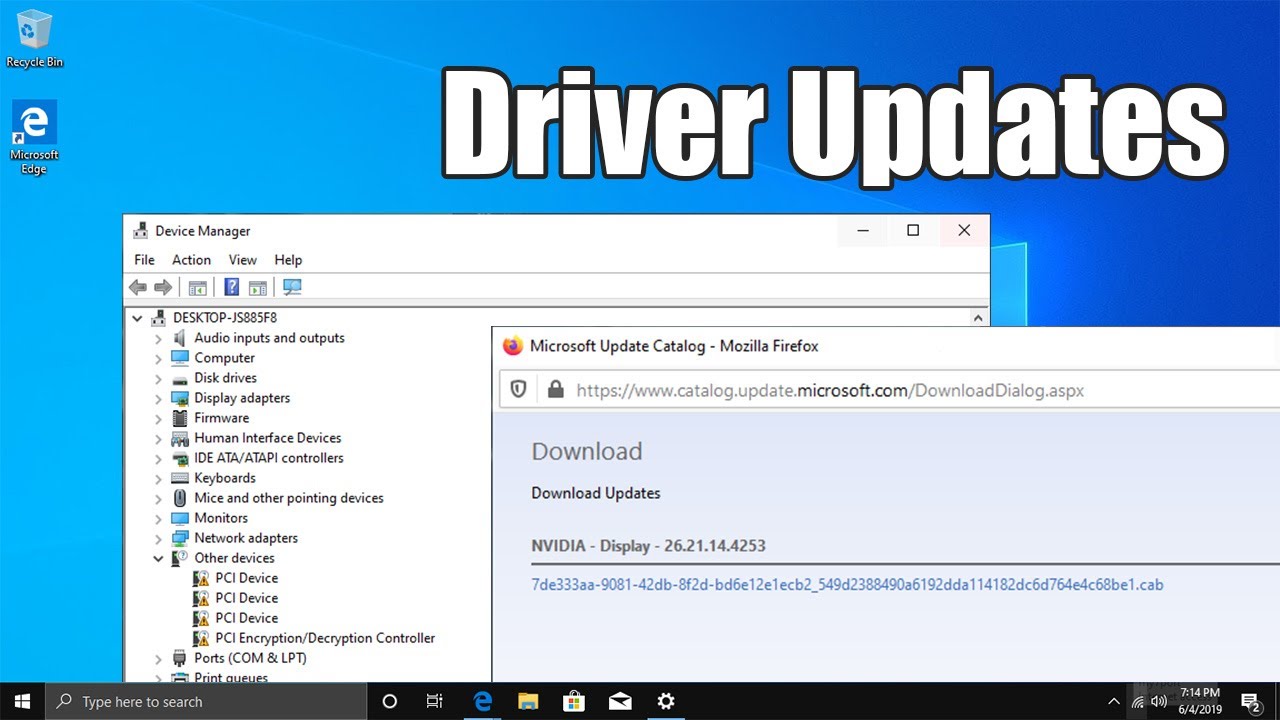
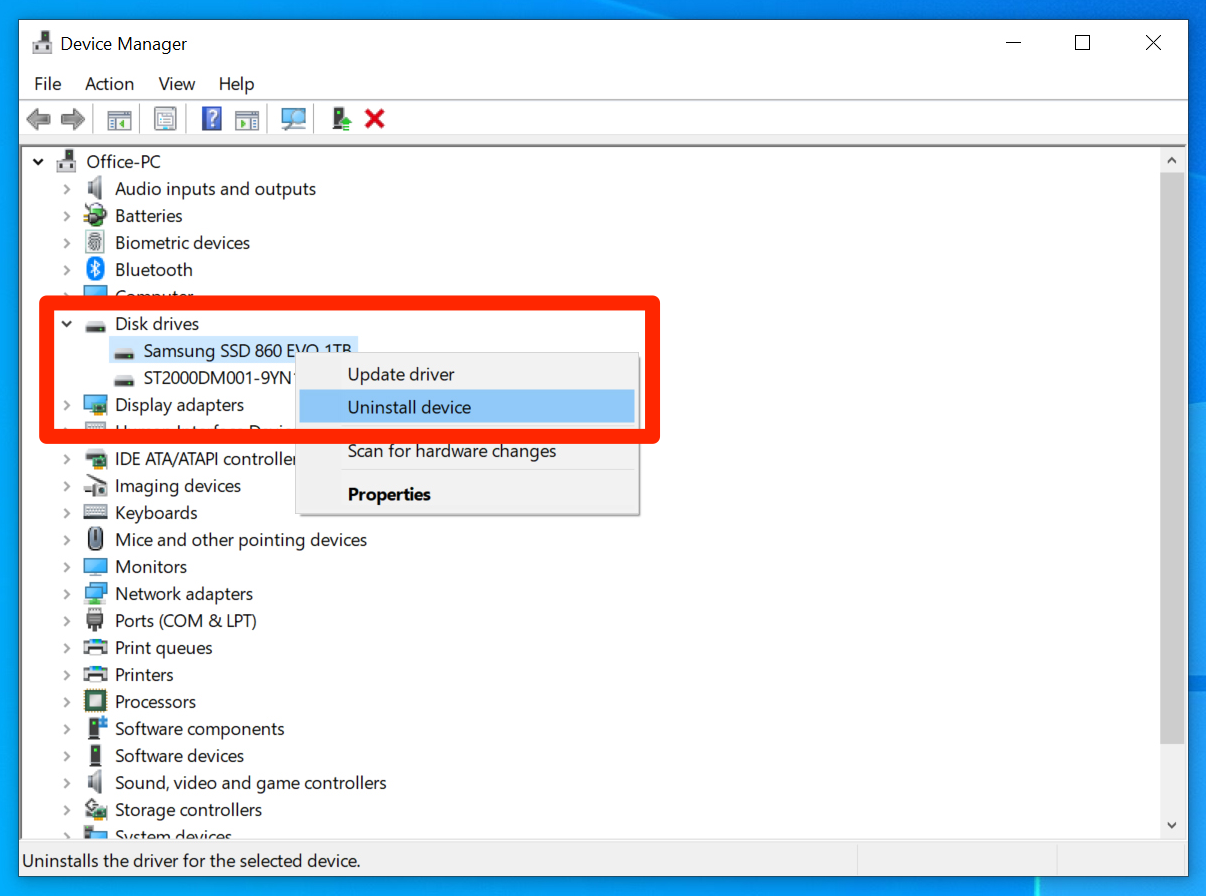
  1. Identify the Hardware Device: The first step involves pinpointing the specific hardware component for which you require a driver. This information can usually be found on the device itself, in the device manager, or through online searches.

  2. Utilize Dedicated Driver Download Websites: Numerous websites specialize in providing free drivers for various hardware components. Some popular options include:

    • DriverAgent: This website offers a comprehensive database of drivers, allowing users to search by hardware model or manufacturer.
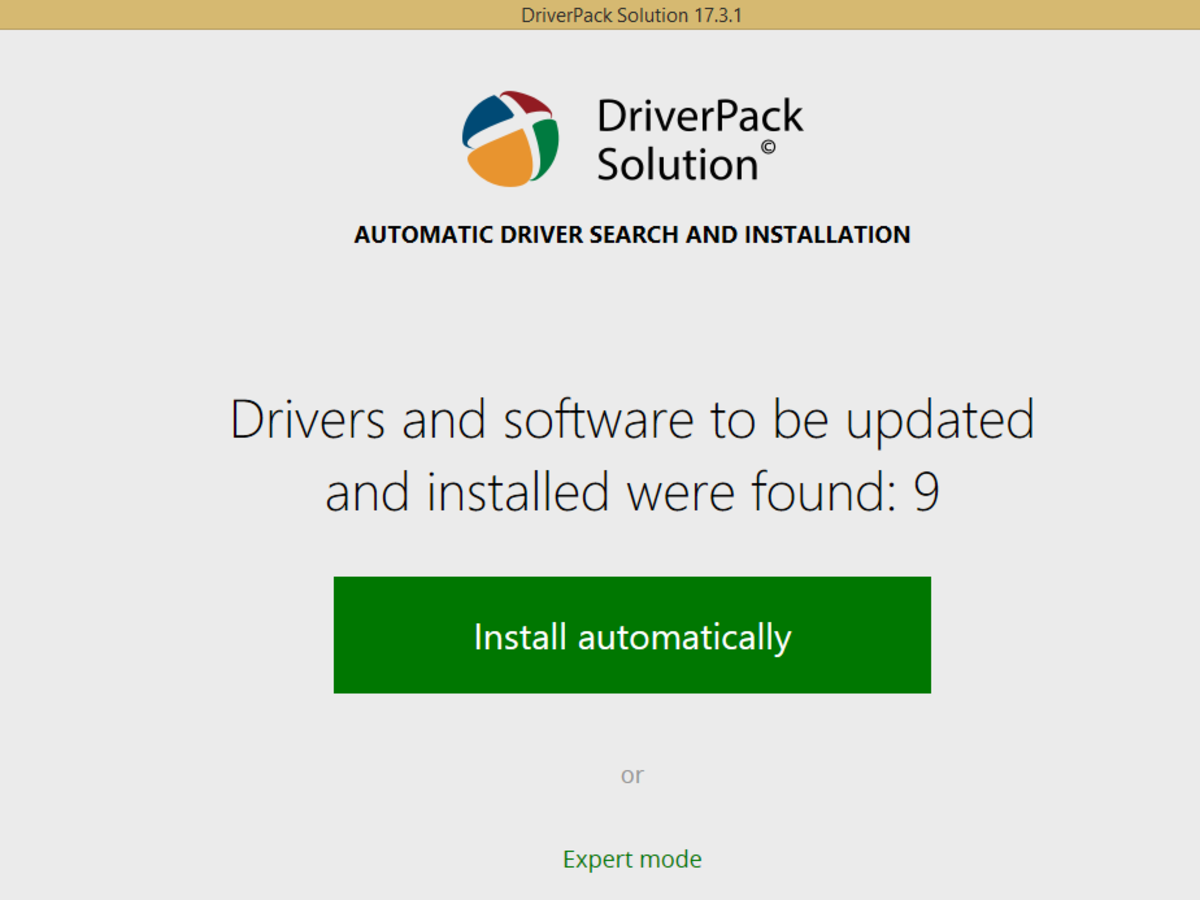
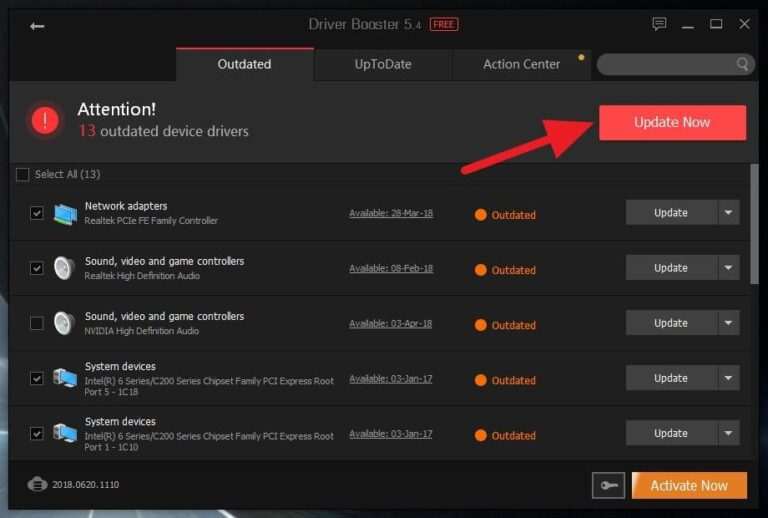
    • DriverPack Solution: This platform offers a driver package that can automatically identify and install missing or outdated drivers.
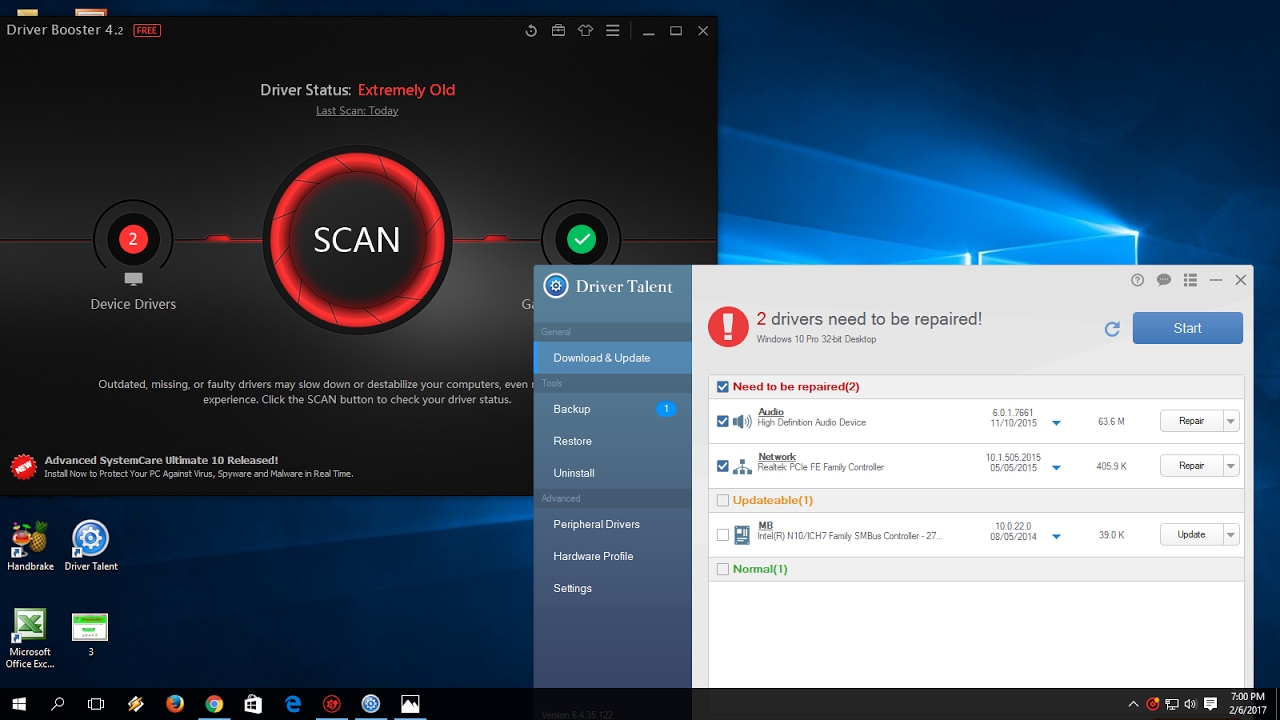
    • Device Doctor: This website provides a user-friendly interface for scanning your system and identifying missing or outdated drivers.
  3. Leverage Manufacturer Websites: While not always free, manufacturers often provide the most up-to-date and reliable drivers for their products. Visiting the manufacturer’s website and searching for the specific device model can yield the desired driver.

  4. Explore Windows Update: While not always comprehensive, Windows Update can automatically identify and install drivers for certain hardware components. This option is often the most convenient and reliable for basic hardware components.

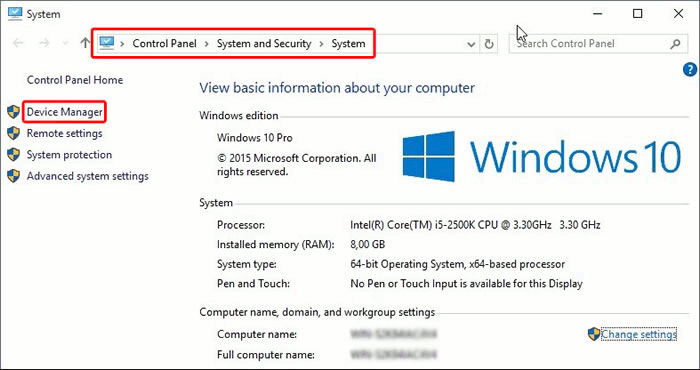
  5. Utilize System Information Tools: Tools like "System Information" (accessible by typing "msinfo32" in the Windows search bar) provide detailed hardware information, including driver versions, which can aid in identifying specific driver requirements.

Potential Challenges and Considerations

While online driver acquisition offers numerous benefits, it’s essential to be aware of potential challenges:

  • Compatibility Issues: Downloading drivers from untrusted sources can lead to compatibility issues, potentially causing system instability or malfunction.
  • Malware Risks: Downloading drivers from illegitimate websites can expose your system to malware, compromising security and data integrity.
  • Driver Version Mismatches: Installing incorrect driver versions can lead to conflicts with other software or hardware, hindering system functionality.

Best Practices for Safe and Effective Online Driver Acquisition

To mitigate these risks and ensure a smooth experience, adhere to the following best practices:

  • Verify Website Legitimacy: Only download drivers from reputable websites, such as those affiliated with the hardware manufacturer or established driver download platforms.
  • Check Driver Compatibility: Before downloading a driver, confirm its compatibility with your operating system and hardware model.
  • Use Antivirus Software: Ensure your system is protected by a robust antivirus program to safeguard against malware threats.
  • Back Up Your System: Before installing any new drivers, create a system restore point to revert to a previous state if necessary.
  • Read User Reviews: Consult user reviews and forums for insights into the reliability and performance of specific drivers.

FAQs Regarding Online Windows 10 Driver Acquisition

Q: Are all online driver downloads free?

A: While many websites offer free driver downloads, some may require a fee for premium services or access to a broader driver database.

Q: How can I identify the correct driver for my hardware?

A: Identify the hardware model and manufacturer, and use this information to search for the driver on dedicated websites or manufacturer websites.

Q: Is it safe to download drivers from unknown websites?

A: Downloading drivers from unknown websites poses significant malware risks. Stick to reputable sources and exercise caution.

Q: What should I do if a downloaded driver causes problems?

A: If a driver causes issues, revert to a previous system restore point or uninstall the driver through the Device Manager.

Q: Can I update drivers automatically?

A: Several driver update tools can automatically identify and install updates for your system. However, exercise caution and ensure the tool is reputable.

Tips for a Seamless Online Driver Installation Experience

  • Disconnect from the internet during the installation process: This minimizes the risk of interruptions and ensures a stable installation.
  • Restart your computer after installing drivers: This allows the system to fully integrate the new drivers and avoid conflicts.
  • Monitor system performance: After installing new drivers, observe system performance for any signs of instability or errors.
  • Keep drivers updated: Regularly check for driver updates to ensure optimal system performance and address security vulnerabilities.

Conclusion

Navigating the online realm for Windows 10 drivers presents a convenient and often free avenue for users to enhance their system’s functionality. By understanding the significance of drivers, adhering to best practices, and utilizing reputable resources, users can confidently acquire and install drivers online, maximizing the potential of their Windows 10 experience. Remember, while online driver acquisition offers significant advantages, it requires a cautious approach to ensure compatibility, security, and system stability.

How to Install/Update Drivers in Windows 10 - YouTube How to Install Windows Drivers Using DriverPack Solution, AIDA and Online Updates - HubPages Free Download and Install Drivers after Windows 10 Update  Driver Talent
How to: Install and Update Hardware Drivers in Windows 10 - Microsoft Community How to download windows 10 for free - sipsapje How to Instantly Update All Windows 10 Drivers at Once
3 Best Free Driver Updater Tool for Windows 10 PC (Update Windows 10 Driver) - YouTube How to update or reinstall your drivers in Windows 10 to keep your computer running smoothly

Closure

Thus, we hope this article has provided valuable insights into Navigating the Realm of Windows 10 Drivers: A Comprehensive Guide to Free Online Installation. We thank you for taking the time to read this article. See you in our next article!

Windows 11 Pro: A Comprehensive Evaluation

Windows 11 Pro: A Comprehensive Evaluation

Introduction

In this auspicious occasion, we are delighted to delve into the intriguing topic related to Windows 11 Pro: A Comprehensive Evaluation. Let’s weave interesting information and offer fresh perspectives to the readers.

Windows 11 Pro: A Comprehensive Evaluation

Buy WINDOWS 11 PRO USER GUIDE: A Comprehensive User Guide for Beginners and Seniors to Master

Windows 11 Pro, the latest iteration of Microsoft’s flagship operating system, presents a compelling proposition for both individual users and businesses. Its design, features, and security enhancements offer a suite of benefits, but it also comes with certain drawbacks that users should consider before making a decision. This article provides a comprehensive evaluation of Windows 11 Pro, examining its advantages and disadvantages in detail.

Pros of Windows 11 Pro

1. Enhanced Security: Windows 11 Pro incorporates several security features designed to protect users from cyber threats. These include:

  • Hardware-Based Security: Windows 11 Pro leverages hardware-based security features like Secure Boot and TPM 2.0, which are essential for mitigating boot-time attacks and enhancing system integrity.
  • Improved Threat Detection: The operating system employs advanced threat detection technologies like Windows Defender Antivirus and Microsoft Defender for Endpoint, offering real-time protection against malware and other cyber threats.
  • Enhanced Privacy Controls: Windows 11 Pro provides granular privacy controls, allowing users to manage access to their personal information and online activity. Users can choose which apps have access to their location, microphone, camera, and other sensitive data.
  • Secure Boot and Trusted Platform Module (TPM): These features work together to ensure that only trusted software can run on the system, preventing unauthorized modifications and malware infections.

2. Modern and Intuitive User Interface: Windows 11 Pro features a redesigned user interface that emphasizes simplicity and ease of use.

  • Clean and Minimalist Design: The new Start Menu, Taskbar, and Action Center are designed to be intuitive and visually appealing, providing a more streamlined and user-friendly experience.
  • Improved Search Functionality: The search bar has been enhanced for faster and more accurate results, making it easier to find files, apps, and settings.
  • Enhanced Multitasking: Features like Snap Layouts and Virtual Desktops allow users to manage multiple windows and applications seamlessly, improving productivity.

3. Enhanced Performance and Efficiency: Windows 11 Pro boasts several performance enhancements that aim to improve system responsiveness and efficiency.

  • Optimized for Modern Hardware: The operating system is optimized for modern hardware, including CPUs, GPUs, and SSDs, leading to faster boot times and application performance.
  • Improved Power Management: Windows 11 Pro features advanced power management capabilities that conserve battery life and reduce energy consumption.
  • DirectStorage: This feature allows games to load data directly from storage devices, eliminating bottlenecks and reducing loading times.

4. Integration with Microsoft Ecosystem: Windows 11 Pro seamlessly integrates with other Microsoft products and services, offering a cohesive and unified user experience.

  • Microsoft 365 Integration: The operating system integrates seamlessly with Microsoft 365, allowing users to access their emails, files, and other services with ease.
  • Windows Hello: This biometric authentication feature allows users to log in to their devices using facial recognition or fingerprint scanning, enhancing security and convenience.
  • Xbox Game Pass Integration: Windows 11 Pro integrates with Xbox Game Pass, providing access to a vast library of games that can be streamed directly to the device.

5. Advanced Networking Capabilities: Windows 11 Pro offers advanced networking features that enhance connectivity and security.

  • Wi-Fi 6 Support: The operating system supports the latest Wi-Fi 6 standard, providing faster and more reliable wireless connectivity.
  • Improved VPN Support: Windows 11 Pro includes improved VPN support, allowing users to connect securely to private networks and access restricted content.
  • Enhanced Network Security: The operating system offers advanced network security features, including firewall protection, intrusion detection, and network isolation.

Cons of Windows 11 Pro

1. System Requirements: Windows 11 Pro has stringent system requirements that some older devices may not meet.

  • TPM 2.0 Requirement: The requirement for a Trusted Platform Module (TPM) 2.0 chip can be a major hurdle for users with older systems.
  • Processor Requirements: Windows 11 Pro requires a processor that meets specific performance criteria, which may exclude some older systems.
  • RAM Requirements: The minimum RAM requirement of 4GB can be a challenge for users with low-memory systems.

2. Compatibility Issues: Some older software and hardware may not be fully compatible with Windows 11 Pro.

  • Driver Compatibility: Drivers for older hardware may not be available for Windows 11 Pro, leading to compatibility issues.
  • Software Compatibility: Some older applications may not run properly or at all on Windows 11 Pro.

3. User Interface Changes: The redesigned user interface, while modern and intuitive, can be a source of frustration for users accustomed to the familiar Windows 10 layout.

  • New Start Menu: The new Start Menu, while visually appealing, can be less efficient for users who relied heavily on the traditional menu structure.
  • Taskbar Changes: The redesigned Taskbar, with its centralized icons, may take some time to get used to.

4. Privacy Concerns: While Windows 11 Pro offers enhanced privacy controls, some users may still have concerns about data collection and privacy practices.

  • Data Collection: Windows 11 Pro collects data about user activity and preferences, which may raise privacy concerns for some users.
  • Advertising Personalization: The operating system uses data collected from user activity to personalize advertising, which some users may find intrusive.

5. Cost: Windows 11 Pro is a paid operating system, and the cost may be a barrier for some users.

FAQs about Windows 11 Pro

Q: What are the minimum system requirements for Windows 11 Pro?

A: The minimum system requirements for Windows 11 Pro are:

  • Processor: 1 gigahertz (GHz) or faster with 2 or more cores on a compatible 64-bit processor or System on a Chip (SoC)
  • RAM: 4 gigabytes (GB)
  • Storage: 64 GB or larger storage device
  • Graphics Card: Compatible with DirectX 12 or later with WDDM 2.x driver
  • Display: High Definition (720p) display that is 9 inches or greater diagonally
  • Internet Connection: For initial setup and some features
  • TPM: Trusted Platform Module (TPM) 2.0
  • Secure Boot: Enabled in the UEFI firmware

Q: What are the differences between Windows 11 Pro and Windows 11 Home?

A: Windows 11 Pro offers additional features and capabilities designed for businesses and power users, including:

  • Domain Join: Allows the device to be joined to a domain network, providing centralized management and security.
  • BitLocker Drive Encryption: Encrypts the entire hard drive, protecting sensitive data from unauthorized access.
  • Remote Desktop: Allows users to connect to and control the device remotely.
  • Hyper-V: Enables running virtual machines on the device, allowing users to test and run multiple operating systems simultaneously.
  • Windows Sandbox: Provides a secure environment for running untrusted applications without affecting the main operating system.

Q: Is Windows 11 Pro compatible with my existing hardware?

A: To determine if your hardware is compatible with Windows 11 Pro, you can use the PC Health Check app, available for download from Microsoft’s website. This app will scan your system and provide information on whether it meets the minimum requirements.

Q: How can I upgrade to Windows 11 Pro?

A: You can upgrade to Windows 11 Pro from a previous version of Windows, such as Windows 10, by purchasing a license key and following the on-screen instructions.

Q: What are the benefits of using Windows 11 Pro for businesses?

A: Windows 11 Pro offers several benefits for businesses, including:

  • Enhanced Security: Provides advanced security features to protect sensitive business data from cyber threats.
  • Centralized Management: Allows businesses to manage and control devices across their network.
  • Improved Productivity: Offers features and tools that enhance productivity for business users.
  • Compatibility with Enterprise Software: Provides compatibility with a wide range of enterprise software applications.

Tips for Using Windows 11 Pro

  • Keep your system updated: Regularly update your system with the latest security patches and software updates to ensure optimal performance and protection against vulnerabilities.
  • Use strong passwords and multi-factor authentication: Enable strong passwords and multi-factor authentication to enhance security and protect your accounts from unauthorized access.
  • Back up your data regularly: Regularly back up your important data to ensure you can recover it in case of a system failure or data loss.
  • Utilize the built-in security features: Take advantage of the security features built into Windows 11 Pro, such as Windows Defender Antivirus, Secure Boot, and TPM 2.0.
  • Explore the new features: Take the time to explore the new features and tools available in Windows 11 Pro, such as Snap Layouts, Virtual Desktops, and Windows Hello.

Conclusion

Windows 11 Pro offers a compelling combination of modern features, enhanced security, and improved performance, making it a compelling choice for both individual users and businesses. However, it’s important to consider the system requirements, compatibility issues, and privacy concerns before making a decision. By carefully evaluating the pros and cons, users can determine whether Windows 11 Pro is the right choice for their needs.

"Get More Done with Windows 11 Pro: A Comprehensive Guide to Features, Benefits, and Why it Windows 11 Professional โ€“ OGsoftwar MICROSOFT Windows 11 Professional Program - niskie ceny i opinie w Media Expert
Windows 11 Professional  Text Book Centre Windows 11 professional iso - pureplm WINDOWS 11 โ€“ Pro  TheFireIsReal
Microsoft Windows 11 Pro Windows 11 Pro

Closure

Thus, we hope this article has provided valuable insights into Windows 11 Pro: A Comprehensive Evaluation. We hope you find this article informative and beneficial. See you in our next article!

Accessing Linux Filesystems On Windows 11: A Guide To Reading EXT4 Partitions

Accessing Linux Filesystems on Windows 11: A Guide to Reading EXT4 Partitions

Introduction

With enthusiasm, let’s navigate through the intriguing topic related to Accessing Linux Filesystems on Windows 11: A Guide to Reading EXT4 Partitions. Let’s weave interesting information and offer fresh perspectives to the readers.

Accessing Linux Filesystems on Windows 11: A Guide to Reading EXT4 Partitions

filesystems - How to read ext4 partitions on Windows? - Super User

Windows 11, Microsoft’s latest operating system, boasts a user-friendly interface and robust functionality. However, its default file system support is limited to NTFS and FAT32, presenting a challenge for users who need to access data stored on Linux-formatted partitions. This is where the need to read EXT4 file systems on Windows 11 arises.

The EXT4 file system, widely used in Linux distributions, provides advanced features like journaling, efficient storage management, and scalability, making it a popular choice for both desktop and server environments. While Windows 11 lacks native support for EXT4, various solutions enable users to access and read data stored on these partitions without requiring a dual-boot setup.

Understanding the Need for EXT4 Access on Windows 11

The ability to read EXT4 file systems on Windows 11 is crucial for various scenarios:

  • Data Recovery: Users might need to recover data from a damaged or malfunctioning Linux system. Accessing the EXT4 partition on a Windows machine allows for data retrieval and preservation.
  • Cross-Platform Collaboration: Sharing files and folders between Windows and Linux systems becomes seamless with the ability to read EXT4 partitions on Windows 11. This eliminates the need for cumbersome file transfer methods.
  • Linux Virtual Machines: When running Linux virtual machines on Windows 11, accessing the virtual machine’s data stored on an EXT4 partition is essential for managing files and applications.
  • Dual Boot Environments: Users with dual-boot systems might need to access files stored on the Linux partition from the Windows environment for various tasks.

Methods for Reading EXT4 Partitions on Windows 11

Several methods allow users to read EXT4 file systems on Windows 11. These solutions offer varying levels of functionality and ease of use:

1. Third-Party Software:

  • Ext2Fsd: A widely-used and reliable open-source driver that allows Windows to read and write to EXT2, EXT3, and EXT4 file systems. Ext2Fsd offers a simple installation process and integrates seamlessly with Windows Explorer, enabling users to browse and access EXT4 partitions as if they were native drives.
  • EXT4 for Windows: A commercial software solution that provides read and write access to EXT4 partitions. It offers advanced features like data recovery, file system integrity checks, and support for encrypted partitions.
  • Paragon ExtFS: Another commercial software solution that allows users to read and write to EXT4 partitions. It offers a user-friendly interface and supports various features like file system repair and partition resizing.

2. Linux Virtual Machines:

  • VirtualBox: A popular virtualization software that allows users to create and run virtual machines on Windows 11. By installing a Linux distribution within a VirtualBox VM, users can access the virtual machine’s EXT4 partitions directly from the host Windows system.
  • VMware Workstation: A powerful virtualization solution that provides similar functionality to VirtualBox. Users can create and run Linux VMs and access their EXT4 partitions from within the Windows 11 environment.

3. Command-Line Tools:

  • Ext2read: A command-line tool that allows users to read and extract data from EXT2, EXT3, and EXT4 file systems. It provides a more technical approach but offers flexibility for advanced users.
  • MountExt2: Another command-line tool that enables users to mount EXT2, EXT3, and EXT4 partitions as a virtual drive in Windows.

Choosing the Right Method

The choice of method for reading EXT4 partitions on Windows 11 depends on the user’s requirements and technical expertise:

  • Ease of Use: Third-party software solutions like Ext2Fsd offer the simplest and most user-friendly approach, integrating seamlessly with Windows Explorer.
  • Functionality: Commercial software solutions like EXT4 for Windows and Paragon ExtFS provide advanced features like data recovery and partition resizing.
  • Technical Expertise: Command-line tools require a deeper understanding of Linux file systems and command-line operations.
  • Flexibility: Virtual machines offer the most flexibility, allowing users to run a full Linux environment within Windows 11.

Important Considerations

  • Driver Compatibility: Ensure that the chosen software or tool is compatible with the specific version of Windows 11 and the EXT4 partition’s format.
  • Data Integrity: Always back up important data before using any third-party tools or performing any operations on the EXT4 partition to prevent data loss.
  • Security: Be cautious when using third-party software and ensure that it is from a reputable source to avoid potential security risks.
  • Performance: The performance of accessing EXT4 partitions on Windows 11 may vary depending on the chosen method and the hardware specifications of the system.

FAQs:

1. Can I write to EXT4 partitions using these methods?

While some methods allow for read-only access, others, like Ext2Fsd, EXT4 for Windows, and Paragon ExtFS, enable read and write operations. However, writing to an EXT4 partition using Windows tools can potentially lead to data corruption or file system errors. It’s recommended to use these features with caution and ensure that the data is backed up before performing any write operations.

2. Is it safe to use third-party software to access EXT4 partitions?

Using reputable third-party software from trusted sources is generally safe. However, it’s crucial to research the software thoroughly, read user reviews, and ensure that it is compatible with your system and the specific version of Windows 11.

3. Can I use these methods to access encrypted EXT4 partitions?

Some commercial software solutions, like EXT4 for Windows and Paragon ExtFS, support encrypted EXT4 partitions. However, users need to provide the correct encryption key or password to access the data.

4. What are the limitations of accessing EXT4 partitions on Windows 11?

While these methods enable users to read and write to EXT4 partitions, they may not always be as efficient or reliable as accessing native NTFS partitions. Some features, like file system permissions and extended attributes, might not be fully supported.

5. How do I choose the best method for my needs?

The best method depends on your specific requirements. Consider the level of functionality, ease of use, technical expertise, and performance expectations. If you need a simple solution for read-only access, Ext2Fsd is a good choice. For advanced features and write access, consider commercial software like EXT4 for Windows or Paragon ExtFS. If you need the flexibility of a full Linux environment, using a virtual machine might be the best option.

Tips:

  • Back up your data: Always back up important data before performing any operations on the EXT4 partition.
  • Use reputable software: Choose software from trusted sources and read reviews before downloading and installing it.
  • Test the software: Before using the software on a critical partition, test it on a non-critical partition to ensure compatibility and functionality.
  • Understand the limitations: Be aware of the limitations of accessing EXT4 partitions on Windows 11. Some features might not be fully supported, and performance may be affected.
  • Seek professional help: If you encounter any issues or are unsure about the process, consult a professional for assistance.

Conclusion:

Accessing EXT4 partitions on Windows 11 is essential for various tasks, including data recovery, cross-platform collaboration, and managing Linux virtual machines. While Windows 11 lacks native support for EXT4, various solutions, including third-party software, virtual machines, and command-line tools, allow users to read and write to these partitions. The choice of method depends on individual requirements, technical expertise, and performance expectations. By understanding the different options and their limitations, users can choose the best solution for their specific needs and access the data stored on EXT4 partitions seamlessly within the Windows 11 environment.

Access ext4 Linux Partitions and Drives on Windows 10/11 - YouTube How to Access and Read EXT4 Partition and Data on Windows 11/10 [2024 Updated] Access Linux filesystems in Windows and WSL 2 - Windows Command Line
How to read ext4 partitions on Windows? - Trenovision How to Access Linux Ext4 Partition from Windows - Make Tech Easier How to Access Linux Ext4 Partition from Windows - Make Tech Easier
How to Access Linux EXT4 Partition and Data on Windows 11/10/8/7 [2023 Updated] - EaseUS Mount an ext4 partition on Windows 11 โ€“ Casiva Agustin

Closure

Thus, we hope this article has provided valuable insights into Accessing Linux Filesystems on Windows 11: A Guide to Reading EXT4 Partitions. We hope you find this article informative and beneficial. See you in our next article!

Understanding The Quarantine Zone In Windows 10: A Comprehensive Guide

Understanding the Quarantine Zone in Windows 10: A Comprehensive Guide

Introduction

With enthusiasm, let’s navigate through the intriguing topic related to Understanding the Quarantine Zone in Windows 10: A Comprehensive Guide. Let’s weave interesting information and offer fresh perspectives to the readers.

Understanding the Quarantine Zone in Windows 10: A Comprehensive Guide

Quarantine Windows 10

Windows 10, like any operating system, faces the constant threat of malware. To combat this, it employs a robust security system, a key component of which is the quarantine zone. This digital holding cell acts as a safe haven for suspicious files, preventing them from wreaking havoc on your system while providing you with the opportunity to investigate and make informed decisions.

The Role of the Quarantine Zone:

The quarantine zone is not a singular, physical location on your hard drive. Instead, it’s a conceptual space managed by your antivirus software. When a file is deemed potentially harmful, it is moved to this zone, effectively isolating it from the rest of your system. This prevents the file from executing, spreading, or accessing sensitive data.

Understanding the Quarantine Process:

When your antivirus software encounters a suspicious file, it undergoes a multi-step process:

  1. Detection: The antivirus software scans the file for known malicious patterns or behaviors. This can involve comparing the file against a database of known malware signatures or analyzing its code for suspicious actions.
  2. Quarantine: If the file is deemed potentially dangerous, it is moved to the quarantine zone. This action effectively disarms the file, preventing it from causing harm.
  3. Notification: The user is typically notified of the quarantined file, often through an alert or notification. This notification provides information about the file, including its name, location, and the reason for its quarantine.
  4. User Decision: The user then has the option to either restore the file (if it is deemed safe) or permanently delete it.

Benefits of the Quarantine Zone:

The quarantine zone plays a crucial role in protecting your system:

  • Prevents Malware Execution: By isolating suspicious files, the quarantine zone stops them from running and causing damage to your system.
  • Provides Time for Analysis: The quarantine zone gives you the opportunity to investigate the file further and make an informed decision about its fate.
  • Protects Sensitive Data: By preventing access to your system’s resources, the quarantine zone helps safeguard your personal information and files.
  • Minimizes System Impact: Quarantining a file instead of immediately deleting it ensures that you don’t accidentally remove a legitimate file.

Locating Quarantined Files:

The location of the quarantine zone varies depending on the antivirus software you use. While some antivirus programs may have a dedicated folder for quarantined files, others might store them in a hidden directory within the program’s installation folder.

To locate quarantined files, follow these steps:

  1. Open your antivirus software: Access the main interface of your antivirus program.
  2. Find the quarantine section: Look for a section labeled "Quarantine," "Vault," or "Isolated Files."
  3. View quarantined files: The quarantine section will typically display a list of quarantined files, along with details such as the file name, date of quarantine, and the reason for quarantine.

Frequently Asked Questions:

Q: Can I access quarantined files?

A: While you can view the quarantined files, you cannot directly access them. This restriction is in place to prevent accidental execution of potentially malicious files.

Q: How do I restore a quarantined file?

A: Most antivirus programs allow you to restore quarantined files. This is typically done by selecting the file in the quarantine section and choosing an option like "Restore" or "Release." However, exercise caution before restoring any file, as it could potentially be malicious.

Q: Can I delete quarantined files?

A: Yes, you can permanently delete quarantined files. This option is usually available in the quarantine section of your antivirus program. Deleting a quarantined file ensures that it is permanently removed from your system.

Q: What if my antivirus software is not working?

A: If you suspect that your antivirus software is not working properly, consider using a second-opinion scanner or performing a manual scan with a different antivirus program. This can help identify and quarantine any potential threats that your current antivirus software may have missed.

Tips for Managing the Quarantine Zone:

  • Regularly review your quarantine zone: Make it a habit to check your quarantine zone periodically to ensure that no legitimate files have been mistakenly quarantined.
  • Be cautious when restoring files: Before restoring a quarantined file, consider the potential risks and ensure that you have a backup of your important data.
  • Keep your antivirus software updated: Regularly updating your antivirus software ensures that it has the latest definitions and can effectively detect and quarantine new threats.

Conclusion:

The quarantine zone is an essential security feature in Windows 10, playing a vital role in protecting your system from malware. By isolating suspicious files, it prevents them from causing harm while giving you the opportunity to investigate and make informed decisions. Understanding how the quarantine zone works and how to manage it effectively can significantly enhance your system’s security and peace of mind. Remember to keep your antivirus software updated and regularly review your quarantine zone to ensure the safety of your system.

PPT - Quarantine PowerPoint Presentation, free download - ID:2495970 Quarantine Windows 10 Quarantine Windows 10
where is the quarantined defender files put? - Windows 10 Forums Windows 10 Quick Tips - Recover Windows Defender Quarantines  Daves Computer Tips File Quarantined Windows 10
Quarantine Zone Explained! - YouTube File Quarantena Windows 10

Closure

Thus, we hope this article has provided valuable insights into Understanding the Quarantine Zone in Windows 10: A Comprehensive Guide. We thank you for taking the time to read this article. See you in our next article!

Navigating The Labyrinth: Repair Apps And Programs For A Smooth Windows 10 Experience

Navigating the Labyrinth: Repair Apps and Programs for a Smooth Windows 10 Experience

Introduction

With enthusiasm, let’s navigate through the intriguing topic related to Navigating the Labyrinth: Repair Apps and Programs for a Smooth Windows 10 Experience. Let’s weave interesting information and offer fresh perspectives to the readers.

How to Repair Apps/Programs Common Problems Windows 10 - MiniTool

Windows 10, despite its robust design, is not immune to the occasional hiccup. From slow performance to system crashes, encountering issues can be frustrating. Fortunately, a plethora of repair apps and programs are available to help users navigate these challenges and restore their system to optimal functionality. This article delves into the world of these valuable tools, providing a comprehensive understanding of their capabilities, benefits, and limitations.

Understanding the Need for Repair Tools:

Windows 10, like any complex operating system, relies on a delicate balance of interconnected components. These components, ranging from system files to drivers, can become corrupted, outdated, or misconfigured, leading to a variety of problems. Repair apps and programs act as troubleshooting and repair specialists, addressing these issues by:

  • Identifying and resolving system errors: These tools scan the system for errors, including corrupted files, registry issues, and driver conflicts, and attempt to fix them automatically.
  • Optimizing system performance: They can clean up unnecessary files, defragment hard drives, and manage startup programs, improving system responsiveness and overall speed.
  • Restoring system settings: In case of major issues, repair tools can revert the system to a previous working state, effectively rolling back changes that might have caused problems.
  • Updating drivers: Outdated drivers can lead to compatibility issues and performance degradation. Repair tools can update drivers to ensure optimal system operation.

A Glimpse into the Diverse Landscape of Repair Tools:

The world of repair apps and programs is vast, encompassing various approaches and functionalities. Here’s a breakdown of some key categories:

1. System Optimization and Maintenance Tools:

  • CCleaner: A popular choice for cleaning up temporary files, registry entries, and unused programs, improving system performance.
  • Advanced SystemCare: Offers comprehensive system optimization, including disk cleanup, registry optimization, and real-time protection against malware.
  • Wise Care 365: Combines system optimization with privacy protection, offering features like disk cleanup, registry cleaner, and browser privacy protection.
  • IObit Smart Defrag: Focuses on defragmenting hard drives, improving file access speeds and overall system performance.

2. System Error Repair and Recovery Tools:

  • Windows 10’s built-in troubleshooters: Windows 10 provides a suite of built-in troubleshooters for specific issues like network problems, printer errors, and audio issues.
  • SFC (System File Checker): A command-line tool that scans and repairs corrupted system files.
  • DISM (Deployment Image Servicing and Management): Another command-line tool that repairs corrupted system images and restores Windows 10 to a healthy state.
  • Windows 10’s Refresh and Reset features: These features allow users to reset their system to factory settings or refresh it while preserving personal files.

3. Registry Cleaners:

  • Registry Mechanic: Scans and cleans the Windows registry, removing invalid entries and optimizing system performance.
  • RegClean Pro: Offers comprehensive registry cleaning, including fixing errors, deleting invalid entries, and optimizing system performance.
  • WinUtilities: Combines registry cleaning with other system optimization features, including disk cleanup, defragmentation, and file recovery.

4. Driver Updaters:

  • Driver Booster: Automatically scans for outdated drivers and provides updates for optimal system performance.
  • Driver Easy: Offers a user-friendly interface for updating drivers, ensuring compatibility and resolving driver-related issues.
  • Snappy Driver Installer: Provides a comprehensive driver database and offers both automatic and manual driver updates.

Navigating the Selection Process:

Choosing the right repair app or program depends on individual needs and preferences. Consider the following factors:

  • Specific issues: Identify the specific problem you’re facing. Some tools are better suited for certain issues than others.
  • Features and functionality: Compare features like system optimization, error repair, and driver updates to find the tool that aligns with your requirements.
  • User interface: Choose a tool with a user-friendly interface that is easy to navigate and understand.
  • Reputation and reviews: Read reviews and research the tool’s reputation to ensure its effectiveness and reliability.

FAQs about Repair Apps and Programs in Windows 10:

1. Are repair apps and programs safe?

While most reputable tools are safe, it’s crucial to download them from trusted sources and be wary of suspicious downloads. Always read reviews and check the tool’s reputation before installing it.

2. Can repair apps and programs damage my system?

Some less reputable tools might contain malware or cause system instability. Always choose tools from trusted developers and back up your system before using any repair tool.

3. How often should I use repair apps and programs?

Regular use can help maintain system health. However, it’s not necessary to run them daily. A monthly or quarterly scan should suffice.

4. Can repair apps and programs replace professional IT support?

While repair tools can address common issues, they cannot replace professional IT support for complex problems or hardware failures.

5. Are repair apps and programs necessary for Windows 10?

While not mandatory, they can significantly improve system performance and stability, especially for users who encounter frequent issues.

Tips for Using Repair Apps and Programs:

  • Back up your system: Before using any repair tool, back up your system to ensure data safety.
  • Read the instructions carefully: Familiarize yourself with the tool’s features and limitations before using it.
  • Be cautious with automatic cleaning: Some tools might aggressively clean the system, potentially deleting important files. Use caution and review the cleaning process before proceeding.
  • Monitor system performance: Observe your system’s performance after using a repair tool and address any lingering issues.
  • Consider professional help: If you encounter persistent problems or are unsure about using repair tools, seek professional IT support.

Conclusion:

Repair apps and programs offer a valuable toolkit for maintaining a smooth and efficient Windows 10 experience. They can address a wide range of issues, from system errors to performance optimization. By understanding their capabilities and selecting the right tools for your needs, users can effectively troubleshoot and restore their system to peak performance. However, it’s essential to use these tools with caution, prioritizing safety and data protection, and seeking professional help when necessary. With a proactive approach and the right tools, users can confidently navigate the labyrinth of Windows 10 issues and enjoy a seamless computing experience.

Labyrinth 2 for Windows 10 PC Free Download - Best Windows 10 Apps Navigating The Labyrinth System Requirements - Can I Run It? - PCGameBenchmark Maze (The Amazing Labyrinth) for Windows 10 PC Free Download - Best Windows 10 Apps
Labyrinth 3D Madness - Windows Game by The App Guruz  Labyrinth 3d, Labyrinth, Game app Labyrinth - Download How to Repair and Uninstall Windows 11/10 Program  Get Your Answer Here - EaseUS
Navigating The Labyrinth on Steam Navigating the Labyrinth: An Executive Guide to Data Management (English Edition) eBook

Closure

Thus, we hope this article has provided valuable insights into Navigating the Labyrinth: Repair Apps and Programs for a Smooth Windows 10 Experience. We hope you find this article informative and beneficial. See you in our next article!

Net Framework 2 0 Download Free Windows 11

net framework 2 0 download free windows 11

Introduction

With great pleasure, we will explore the intriguing topic related to net framework 2 0 download free windows 11. Let’s weave interesting information and offer fresh perspectives to the readers.

Enable Net Framework 2 0 And Net Framework 3 5 In Windows 11  thewindowsclub

In the dynamic world of software development, the .NET Framework stands as a cornerstone, providing a comprehensive platform for building and running applications. While newer versions like .NET 6 and .NET 7 have emerged, the .NET Framework 2.0 remains relevant for certain legacy applications, particularly those designed for Windows XP and Vista. Installing .NET Framework 2.0 on Windows 11 can be a necessity for maintaining compatibility with older software, presenting a unique challenge due to the operating system’s evolution.

The Importance of .NET Framework 2.0

.NET Framework 2.0, released in 2005, marked a significant leap forward in software development. It introduced features like:

  • Generics: Enhanced code reusability and type safety.
  • Windows Communication Foundation (WCF): Facilitated communication between applications.
  • Windows Presentation Foundation (WPF): Provided a rich user interface framework.
  • Language Integration Query (LINQ): Simplified data querying across various sources.

These advancements made .NET Framework 2.0 a popular choice for building a wide range of applications, from desktop software to web services. Many applications, especially those developed during this era, rely on .NET Framework 2.0’s features and functionalities.

Challenges of Installing .NET Framework 2.0 on Windows 11

Windows 11, designed for modern applications and security, is not inherently equipped to support .NET Framework 2.0. The operating system’s architecture and security measures can pose challenges:

  • Compatibility Issues: .NET Framework 2.0 was designed for older Windows versions, making direct installation on Windows 11 problematic.
  • Security Concerns: Windows 11 prioritizes security, potentially blocking the installation of older software due to potential vulnerabilities.
  • Dependency Conflicts: Newer Windows versions often have updated libraries and components that might conflict with .NET Framework 2.0.

Steps for Installing .NET Framework 2.0 on Windows 11

Installing .NET Framework 2.0 on Windows 11 requires careful consideration and adherence to specific steps:

  1. Compatibility Check: Ensure the application requiring .NET Framework 2.0 is compatible with Windows 11. Check for updates or alternative versions that support newer operating systems.
  2. Download the Offline Installer: Download the offline installer for .NET Framework 2.0 from a trusted source like Microsoft’s official website.
  3. Disable Windows Updates: Temporarily disable Windows updates to avoid potential interference during the installation process.
  4. Run the Installer as Administrator: Right-click the installer file and select "Run as administrator" to grant necessary permissions.
  5. Follow Installation Instructions: Follow the on-screen instructions provided by the installer, accepting any prompts or agreements.
  6. Reboot Your Computer: Once the installation completes, reboot your computer to ensure the changes take effect.
  7. Enable Windows Updates: Re-enable Windows updates after successful installation.

Tips for a Smooth Installation:

  • Use a Clean Boot: Consider performing a clean boot to minimize potential conflicts from other applications or services.
  • Check System Requirements: Ensure your system meets the minimum requirements for .NET Framework 2.0 installation.
  • Backup Important Data: Create a backup of your important data before any significant system changes.
  • Consider Virtualization: If direct installation is not feasible, consider running a virtual machine with an older Windows version to run the application requiring .NET Framework 2.0.

FAQs about .NET Framework 2.0 Installation on Windows 11:

Q: Is it safe to install .NET Framework 2.0 on Windows 11?

A: Installing .NET Framework 2.0 on Windows 11 can pose security risks due to the age of the framework. It is essential to download the installer from a trusted source and ensure your system is up-to-date with the latest security patches.

Q: Can I install .NET Framework 2.0 directly from the Windows Update catalog?

A: Windows 11’s update catalog does not include .NET Framework 2.0. You need to download the offline installer from Microsoft’s website.

Q: What if the installation fails?

A: If the installation fails, try troubleshooting by:

  • Re-running the installer: Restart the installation process after ensuring all prerequisites are met.
  • Checking for errors: Review the installation logs for error messages and address the underlying issues.
  • Seeking online support: Consult Microsoft’s support forums or community websites for assistance.

Conclusion:

Installing .NET Framework 2.0 on Windows 11 presents a unique challenge, requiring careful consideration and adherence to specific steps. While newer versions of the .NET Framework offer enhanced features and security, .NET Framework 2.0 remains crucial for running legacy applications. By understanding the compatibility issues and following the outlined steps, users can successfully install .NET Framework 2.0 on Windows 11, ensuring the continued functionality of older software. However, it is important to remember that installing older software carries inherent security risks, and users should exercise caution and prioritize system security.

Microsoft .NET Framework 2.0 - Free Download Download Microsoft .NET Framework 2.0 all packages Offline installer free  GIS English How To Enable Net Framework 2 0 And 3 5 In Windows 11  Images and Photos finder
ะกะบะฐั‡ะฐั‚ัŒ Microsoft .NET Framework 2.0 SP1 How To Enable Net Framework 2 0 And 3 5 In Windows 11  grovetech .NET Framework 2.0 Free Download - Get Into Pc
.NET Framework 2.0 Free Download - Getintopc How To Enable Net Framework 2 0 And 3 5 In Windows 11  grovetech

Closure

Thus, we hope this article has provided valuable insights into net framework 2 0 download free windows 11. We appreciate your attention to our article. See you in our next article!

Windows 11: A Comprehensive Evaluation Of Its Strengths And Weaknesses

Windows 11: A Comprehensive Evaluation of Its Strengths and Weaknesses

Introduction

With enthusiasm, let’s navigate through the intriguing topic related to Windows 11: A Comprehensive Evaluation of Its Strengths and Weaknesses. Let’s weave interesting information and offer fresh perspectives to the readers.

Windows 11: A Comprehensive Evaluation of Its Strengths and Weaknesses

Self Evaluation Examples Of Strengths And Weaknesses

Microsoft’s Windows 11, released in October 2021, marked a significant departure from its predecessor, Windows 10. This new operating system (OS) ushered in a redesigned user interface, enhanced security features, and a suite of new functionalities. While its arrival was met with excitement, it also sparked debate regarding its merits and shortcomings. This article delves into the pros and cons of Windows 11, providing a comprehensive assessment of its impact and implications.

The Pros of Windows 11

1. Modernized User Interface: Windows 11 boasts a refined, modern look and feel that prioritizes visual clarity and user-friendliness. The redesigned Start Menu, Taskbar, and overall interface offer a more intuitive and aesthetically pleasing experience. The rounded corners, translucent elements, and focus on minimalism contribute to a cleaner, more streamlined appearance.

2. Enhanced Security Features: Windows 11 incorporates advanced security measures, including hardware-based security features and improved threat detection capabilities. The inclusion of Windows Hello, a biometric authentication system, strengthens user account security by relying on facial recognition or fingerprint scanning for login. Additionally, the OS employs Microsoft Defender Antivirus, which provides real-time protection against malware and other threats.

3. Improved Gaming Performance: Windows 11 optimizes gaming performance with features like DirectX 12 Ultimate and Auto HDR, enhancing visual fidelity and delivering smoother gameplay. The OS also prioritizes gaming tasks by allocating resources efficiently, resulting in a more responsive and immersive gaming experience.

4. Enhanced Multitasking Capabilities: Windows 11 introduces features like Snap Layouts and Snap Groups, facilitating more efficient multitasking. Snap Layouts enable users to arrange windows in pre-defined layouts, maximizing screen space. Snap Groups allow users to group multiple windows together, enabling seamless switching between related applications.

5. Integration with Microsoft Ecosystem: Windows 11 seamlessly integrates with other Microsoft services and applications, such as Microsoft 365, Teams, and OneDrive. This integration streamlines workflows and enhances productivity, enabling users to access and manage their data across various devices.

6. Focus on Accessibility: Windows 11 emphasizes accessibility, offering features like Narrator and Magnifier to enhance usability for users with disabilities. The OS also incorporates text-to-speech functionality, allowing users to interact with the system through voice commands.

The Cons of Windows 11

1. System Requirements: Windows 11 imposes stricter system requirements than its predecessor, excluding older devices from compatibility. This has drawn criticism, as many users with perfectly functional computers are unable to upgrade to the new OS. The requirement for a TPM 2.0 module and a Secure Boot enabled system has been particularly contentious.

2. Limited App Compatibility: While Windows 11 is designed to support legacy applications, some users have reported compatibility issues with older programs. This can be a significant drawback for users heavily reliant on specific applications that may not have been updated for Windows 11 compatibility.

3. Controversial Design Choices: The redesigned Start Menu and Taskbar have been met with mixed reactions. Some users find the changes to be an improvement, while others prefer the traditional layout of Windows 10. The removal of the "All Apps" list from the Start Menu has also been a source of frustration for some users.

4. Performance Issues: Despite performance optimizations, some users have reported encountering performance issues with Windows 11. These issues can manifest as slow boot times, sluggish application launches, or overall system instability. While these issues are often related to specific hardware configurations or software conflicts, they can be a cause for concern for some users.

5. Privacy Concerns: Windows 11 collects more user data than its predecessor, raising privacy concerns among some users. While Microsoft has stated that this data is used to improve the user experience and personalize features, some individuals remain wary of the potential for data misuse.

FAQs

1. Can I upgrade to Windows 11 from Windows 10?

Yes, you can upgrade to Windows 11 from Windows 10 if your system meets the minimum requirements. You can use the Windows Update tool to check for the upgrade and proceed with the installation.

2. What are the minimum system requirements for Windows 11?

Windows 11 requires a 64-bit processor, 4GB of RAM, 64GB of storage, a TPM 2.0 module, and a Secure Boot enabled system. Additionally, your device must have a compatible graphics card.

3. Is Windows 11 free?

Yes, Windows 11 is free for users who are upgrading from a compatible version of Windows 10. However, new devices that come pre-installed with Windows 11 may require a purchase.

4. What are the key differences between Windows 10 and Windows 11?

Windows 11 features a redesigned user interface, enhanced security features, improved gaming performance, and new multitasking capabilities. It also incorporates a tighter integration with the Microsoft ecosystem and emphasizes accessibility features.

5. Is Windows 11 better than Windows 10?

Whether Windows 11 is "better" than Windows 10 depends on individual user preferences and needs. Windows 11 offers a more modern and intuitive user interface, improved security, and enhanced gaming capabilities, but it also comes with stricter system requirements, potential compatibility issues, and privacy concerns.

Tips

1. Check System Compatibility: Before attempting to upgrade to Windows 11, ensure that your device meets the minimum system requirements. You can use the PC Health Check app from Microsoft to determine compatibility.

2. Backup Your Data: Before proceeding with any OS upgrade, it is essential to back up your important data. This will help to prevent data loss in case of unexpected issues during the installation process.

3. Review Privacy Settings: Once you have upgraded to Windows 11, take the time to review your privacy settings and adjust them according to your preferences. This will help to control the amount of data collected by the OS.

4. Address Compatibility Issues: If you encounter compatibility issues with specific applications after upgrading to Windows 11, consider contacting the software developer for support or seeking alternative solutions.

5. Monitor Performance: Keep an eye on system performance after upgrading to Windows 11. If you encounter performance issues, try updating your drivers, running a system scan, or adjusting your power settings.

Conclusion

Windows 11 is a significant evolution of the Windows operating system, offering a modern user interface, enhanced security features, and improved gaming performance. However, its stricter system requirements, potential compatibility issues, and privacy concerns have generated debate. Ultimately, the decision of whether to upgrade to Windows 11 depends on individual user needs and priorities. By carefully evaluating the pros and cons, users can make an informed decision that aligns with their specific requirements and preferences.

Strengths And Weaknesses Analysis Evaluating List Of Organisational Attributes  PowerPoint Systematic Evaluation of Strengths and Weaknesses Self Evaluation Examples Of Strengths And Weaknesses
How To Write Strengths And Weakness Examples strengths and weakness of various assessment tools Strengths Weaknesses  Download Table Strengths and Weaknesses Assessment - Excelas
Sample Of Strength And Weaknesses Teaching Strengths And Weaknesses Lists

Closure

Thus, we hope this article has provided valuable insights into Windows 11: A Comprehensive Evaluation of Its Strengths and Weaknesses. We hope you find this article informative and beneficial. See you in our next article!

QR Code Reduction: A Comprehensive Guide To QR Code Optimization

QR Code Reduction: A Comprehensive Guide to QR Code Optimization

Introduction

With great pleasure, we will explore the intriguing topic related to QR Code Reduction: A Comprehensive Guide to QR Code Optimization. Let’s weave interesting information and offer fresh perspectives to the readers.

QR Code Reduction: A Comprehensive Guide to QR Code Optimization

QR code optimization

QR codes, ubiquitous in the digital landscape, offer a convenient bridge between the physical and digital worlds. However, the standard QR code, with its intricate pattern of black and white squares, can sometimes be bulky and cumbersome, especially when it comes to printing or embedding within limited spaces. This is where QR code reduction techniques come into play, optimizing QR codes for efficient storage and transmission without compromising their functionality.

Understanding the Need for QR Code Reduction

The size of a QR code, measured in pixels, directly impacts its readability. Larger codes require more space, potentially leading to limitations in printing, website embedding, or even text message transmission. Moreover, larger codes necessitate more data transmission, leading to slower loading times and increased bandwidth consumption.

QR Code Reduction Techniques: A Deep Dive

Several techniques exist to reduce the size of QR codes while maintaining their functionality. These techniques can be broadly categorized as follows:

1. Data Compression:

  • Encoding Techniques: QR codes employ error correction codes to ensure reliable data recovery even in the presence of noise or damage. Different error correction levels offer varying degrees of redundancy. Choosing a lower error correction level can reduce the code size, but it comes at the cost of reduced error tolerance.
  • Data Encoding: QR codes can encode data using various modes, such as numeric, alphanumeric, byte, and kanji. Selecting the most efficient encoding mode for the specific data type can significantly reduce the code size. For instance, encoding a purely numerical string in numeric mode is more efficient than using the byte mode.
  • Data Optimization: Data compression algorithms like Huffman coding and Run-Length encoding can be applied to reduce the size of the data payload within the QR code. These algorithms identify patterns and redundancies in the data and represent them more efficiently.

2. Code Optimization:

  • Mask Patterns: QR codes utilize mask patterns to improve readability by balancing the distribution of black and white modules. Different mask patterns offer varying degrees of optimization, and selecting the optimal pattern can contribute to code size reduction.
  • Version Selection: QR codes come in different versions, each supporting a specific maximum data capacity. Choosing the smallest version that accommodates the required data can significantly reduce the code size.
  • Code Placement: The placement of the QR code within a design or print layout can influence its readability. Positioning the code in a well-lit area with sufficient contrast can enhance its scannability, potentially allowing for a smaller code size.

QR Code Reduction Tools: Empowering Users

Numerous online tools and software applications offer QR code reduction capabilities. These tools often combine data compression, code optimization, and other techniques to generate compact QR codes without compromising functionality.

Benefits of QR Code Reduction

  • Reduced Print Costs: Smaller QR codes require less ink and paper, leading to cost savings in printing applications.
  • Improved Website Performance: Smaller QR codes load faster on websites, enhancing user experience and reducing bounce rates.
  • Enhanced Scannability: Compact QR codes are easier to scan, especially in low-light conditions or when printed on smaller surfaces.
  • Increased Data Capacity: By reducing the size of the code, more data can be encoded within the same physical space, allowing for more complex information or longer URLs.
  • Improved Compatibility: Smaller QR codes are more compatible with various devices and scanners, including those with limited processing power or memory.

FAQs

Q: Can QR code reduction compromise the functionality of the code?

A: QR code reduction techniques are designed to optimize the code without affecting its functionality. However, excessive reduction can lead to a decrease in error tolerance, potentially making the code more susceptible to scanning errors. It is crucial to strike a balance between code size and reliability.

Q: What are the limitations of QR code reduction?

A: QR code reduction techniques are not universally applicable. Some data types, such as images or complex text formats, may not be easily compressed. Additionally, the reduction techniques may not always be effective in achieving significant size reduction.

Q: How do I choose the right QR code reduction tool?

A: Consider the following factors when selecting a QR code reduction tool:

  • Functionality: Ensure the tool supports the necessary data compression and code optimization techniques.
  • Ease of Use: Select a tool with a user-friendly interface and clear instructions.
  • Compatibility: Choose a tool that generates codes compatible with various scanners and devices.
  • Security: Prioritize tools that prioritize data security and privacy.

Tips for Effective QR Code Reduction

  • Optimize Data: Before generating the QR code, ensure the data is clean, concise, and optimized for compression.
  • Choose the Right Encoding Mode: Select the most efficient encoding mode for the specific data type.
  • Experiment with Error Correction Levels: Test different error correction levels to find the optimal balance between code size and reliability.
  • Use a Reputable QR Code Reduction Tool: Choose a tool with a proven track record and positive user reviews.
  • Test the Reduced QR Code: Thoroughly test the reduced QR code to ensure it scans correctly and delivers the intended information.

Conclusion

QR code reduction plays a crucial role in optimizing QR code performance, enabling efficient storage, transmission, and readability. By employing data compression, code optimization, and choosing the appropriate tools, users can significantly reduce the size of QR codes without compromising their functionality. This optimization contributes to a more efficient and user-friendly experience, promoting the widespread adoption of QR codes in various applications.

How to track QR codes: QR statistics and optimization โ€ข QR Code Kit QR Code Optimization: Hereโ€™s How to Make Sure You Get Scans - QR TIGER Unveiling the Power of QR Code Scanner Features: A Comprehensive Guide โ€“ QR Code Scanners
How can QR Codes optimize Maintenance Management? Conversion Rate Optimization with QR Codes: A Detailed Guide QR Code tracking- Measure performance and optimize campaigns
Dynamic VS Static QR Code - Whatโ€™s The Difference? Unveiling the Power of QR Code Scanner Features: A Comprehensive Guide โ€“ QR Code Scanners

Closure

Thus, we hope this article has provided valuable insights into QR Code Reduction: A Comprehensive Guide to QR Code Optimization. We hope you find this article informative and beneficial. See you in our next article!

Navigating The Labyrinth: Troubleshooting Windows 10 Boot Issues

Navigating the Labyrinth: Troubleshooting Windows 10 Boot Issues

Introduction

With great pleasure, we will explore the intriguing topic related to Navigating the Labyrinth: Troubleshooting Windows 10 Boot Issues. Let’s weave interesting information and offer fresh perspectives to the readers.

How to use Startup Repair to fix boot problems with Windows 10  Windows Central

The familiar Windows 10 logo, usually a welcome sight, can become a source of frustration when it fails to appear, leaving you staring at a blank screen. This inability to boot into Windows 10 can stem from various causes, ranging from minor software glitches to severe hardware malfunctions. However, understanding the underlying issues and employing the appropriate troubleshooting techniques can often restore your system to its operational state.

Delving into the Causes: Understanding the Roots of the Problem

Before diving into solutions, it’s essential to grasp the common culprits behind a Windows 10 boot failure. These can be broadly categorized as follows:

1. Software-Related Issues:

  • Corrupted System Files: Essential files within the operating system can become damaged due to software conflicts, malware infections, or improper updates.
  • Driver Conflicts: Incompatible or outdated device drivers can disrupt the boot process.
  • Boot Configuration Errors: The system’s boot settings, which dictate the order and manner in which the system starts, can become corrupted.
  • Malware Infection: Malicious software can interfere with the boot process, preventing Windows from loading.

2. Hardware-Related Issues:

  • Failing Hard Drive: A failing hard drive can lead to data corruption and prevent the operating system from loading.
  • Loose or Damaged Connections: Loose or damaged cables connecting components like RAM, hard drives, or the motherboard can disrupt the boot process.
  • Faulty Hardware Components: Malfunctioning RAM modules, the motherboard, or other critical hardware components can also impede booting.

3. Power-Related Issues:

  • Power Supply Problems: An inadequate or malfunctioning power supply unit can cause instability and prevent the system from booting.
  • Intermittent Power Fluctuations: Power surges or dips can disrupt the boot process and potentially damage hardware.

Troubleshooting Strategies: A Step-by-Step Guide

Once you’ve identified the potential causes, you can embark on a systematic troubleshooting journey. Here’s a comprehensive approach:

1. Basic Troubleshooting:

  • Restart the Computer: A simple restart can often resolve minor glitches and allow the system to boot properly.
  • Check Connections: Ensure that all cables connecting hardware components are firmly secured.
  • Boot into Safe Mode: Safe Mode loads Windows with minimal drivers and programs, helping to isolate the problem. To access Safe Mode, press F8 repeatedly during startup or use the advanced startup options in the Windows Recovery Environment.
  • Run a System Scan: Use the built-in Windows tools like System File Checker (SFC) or the Deployment Image Servicing and Management (DISM) tool to scan and repair corrupted system files.

2. Advanced Troubleshooting:

  • Perform a System Restore: System Restore allows you to revert your system to a previous working state, potentially undoing recent changes that caused the boot issue.
  • Boot from a Recovery Drive: Create a bootable USB drive or DVD with the Windows 10 installation media. This allows you to access the Recovery Environment, which offers tools like Startup Repair and System Restore.
  • Use a Live Linux Distribution: Boot your computer from a live Linux distribution, like Ubuntu, to access your files and potentially diagnose the problem.
  • Reinstall Windows 10: If all else fails, reinstalling Windows 10 can resolve software-related issues and restore your system to a fresh state. However, this will erase all data on your hard drive, so ensure you have a backup.

3. Hardware Troubleshooting:

  • Test RAM: Run memory diagnostic tools to check for faulty RAM modules.
  • Check Hard Drive Health: Use diagnostic software to assess the health of your hard drive.
  • Replace Components: If you suspect faulty hardware, consider replacing the suspected component.
  • Seek Professional Help: If you’re unable to resolve the issue yourself, consult a qualified computer technician.

FAQs: Addressing Common Queries

Q: What is the Windows Recovery Environment (RE)?

A: The Windows Recovery Environment (RE) is a built-in recovery tool accessible through the Windows installation media or a recovery drive. It provides a range of options for troubleshooting boot issues, including Startup Repair, System Restore, and Command Prompt.

Q: How do I create a bootable USB drive with the Windows 10 installation media?

A: You can download the Windows 10 installation media from Microsoft’s website. Then, use the Media Creation Tool to create a bootable USB drive. Follow the on-screen instructions carefully.

Q: What is the difference between Startup Repair and System Restore?

A: Startup Repair automatically attempts to fix boot problems, while System Restore allows you to manually choose a previous restore point to revert your system to a working state.

Q: What if I lose all my data after reinstalling Windows 10?

A: Always back up your important data before performing a clean install. You can use external hard drives, cloud storage services, or other backup solutions to ensure your data is safe.

Tips for Preventing Boot Issues:

  • Keep Your System Updated: Regularly update your operating system and drivers to patch vulnerabilities and ensure compatibility.
  • Run Antivirus Software: Use reliable antivirus software to protect your system from malware.
  • Perform Regular Backups: Create regular backups of your important data to prevent data loss.
  • Monitor System Health: Use system monitoring tools to check for hardware issues and potential problems.

Conclusion: A Path to Restoration

Encountering a Windows 10 boot failure can be a frustrating experience. However, understanding the potential causes and employing the appropriate troubleshooting techniques can often lead to a successful resolution. Remember to be patient, systematic, and consult professional help when necessary. By following these steps and implementing preventative measures, you can minimize the likelihood of encountering such issues in the future and ensure a smooth and reliable computing experience.

How to access Windows 10 troubleshooting tools step by step  TechTarget How To Fix Windows 10 Startup and Boot Problems - YouTube Windows Boot Manager: How to Edit and Fix Boot Manager in Windows 10
How to troubleshoot Windows 10 boot problems? โ€“ Depot Catalog How To Open Troubleshooting Options in Windows 10 How to use Startup Repair to fix boot problems with Windows 10  Windows Central
Troubleshooting Windows 10 Insert the recovery disc or Win10 USB media into your computer.

Closure

Thus, we hope this article has provided valuable insights into Navigating the Labyrinth: Troubleshooting Windows 10 Boot Issues. We appreciate your attention to our article. See you in our next article!

Capturing Your Digital Story: A Guide To Screen Recording On Windows 10

Capturing Your Digital Story: A Guide to Screen Recording on Windows 10

Introduction

In this auspicious occasion, we are delighted to delve into the intriguing topic related to Capturing Your Digital Story: A Guide to Screen Recording on Windows 10. Let’s weave interesting information and offer fresh perspectives to the readers.

Capturing Your Digital Story: A Guide to Screen Recording on Windows 10

The Easiest Way to Record Your Screen in Windows 10: A Step-by-Step Guide (2023)

In the digital age, where information flows seamlessly and interaction is increasingly visual, the ability to record your screen has become an indispensable tool. Whether you’re creating tutorials, capturing gameplay, documenting presentations, or simply sharing a process with others, screen recording on Windows 10 offers a versatile and efficient solution. This article provides a comprehensive guide to the various methods available, their functionalities, and their advantages, empowering you to harness the power of screen recording for your specific needs.

The Power of Screen Recording: Unveiling Its Versatility

Screen recording on Windows 10 transcends the realm of mere technical functionality; it unlocks a plethora of possibilities across diverse applications. Its utility extends far beyond mere entertainment, empowering individuals and businesses alike to communicate, learn, and collaborate more effectively.

1. Educational Content Creation:

  • Tutorials: Whether you’re a tech enthusiast sharing tips, a teacher explaining complex concepts, or a musician demonstrating techniques, screen recording facilitates the creation of engaging and informative tutorials.
  • Educational Videos: Teachers can record lectures, presentations, and interactive exercises, offering students flexible learning opportunities and enhancing their understanding.
  • Online Courses: Screen recording becomes a vital tool for instructors building online courses, capturing screen activity, voiceover narration, and interactive elements for a comprehensive learning experience.

2. Business and Productivity:

  • Product Demonstrations: Businesses can showcase their software or services through detailed screen recordings, highlighting features and benefits for potential clients.
  • Remote Collaboration: Teams can record meetings, brainstorming sessions, and project updates, fostering seamless collaboration even when geographically dispersed.
  • Training Materials: Screen recordings are invaluable for creating training materials, capturing step-by-step instructions and providing a visual reference for employees.

3. Gaming and Entertainment:

  • Gameplay Capture: Gamers can record their gameplay sessions, sharing victories, showcasing skills, or creating entertaining content for online platforms.
  • Livestreaming: Screen recording enables live streaming of gameplay, allowing viewers to participate in real-time and interact with the streamer.
  • Game Reviews and Walkthroughs: Gamers can record walkthroughs, offering guidance and insights to other players, or create reviews highlighting game features and experiences.

4. Documentation and Communication:

  • Technical Support: Screen recordings are essential for documenting technical issues, allowing users to share their experiences with support teams for faster resolution.
  • Software Bug Reporting: Developers can use screen recordings to capture and report software bugs, providing valuable context for debugging and fixing issues.
  • Personal Projects: Individuals can record their creative processes, showcasing their work and offering insights into their methods.

Exploring the Options: A Comprehensive Overview of Screen Recording Tools

Windows 10 offers a variety of built-in and third-party tools for screen recording, each tailored to specific needs and offering unique features. Understanding these options empowers you to choose the tool that best suits your requirements.

1. Built-in Tools:

  • Xbox Game Bar: This feature, accessible via the Windows key + G shortcut, provides a user-friendly interface for recording gameplay. It allows for capturing audio, selecting recording area, and adjusting quality settings. However, its primary focus is on gaming, limiting its functionality for other applications.
  • Windows 10’s Built-in Recorder: Accessible through the "Windows + Alt + R" shortcut, this tool captures the entire screen with audio. While simple to use, it lacks advanced features like editing or annotation.

2. Third-Party Applications:

  • OBS Studio: A powerful open-source application, OBS Studio offers extensive customization options for screen recording and live streaming. It allows for multiple scene setups, source selection, audio mixing, and advanced settings for high-quality video output.
  • Camtasia: A comprehensive screen recording and video editing tool, Camtasia provides a user-friendly interface for recording, editing, and producing professional-looking videos. It includes features like annotations, transitions, and audio editing, making it ideal for creating engaging tutorials and presentations.
  • Bandicam: Known for its high-quality video output and lightweight design, Bandicam allows for capturing specific areas of the screen, recording games, and capturing webcam footage. It offers a range of customization options for video settings and performance optimization.
  • Snagit: Primarily designed for capturing images and videos, Snagit offers a comprehensive suite of tools for creating engaging visuals. It includes features for screen recording, annotation, editing, and sharing, making it ideal for capturing specific moments and creating visually appealing content.

Choosing the Right Tool: Navigating the Options for Your Needs

Selecting the appropriate screen recording tool depends on your specific requirements and the type of content you aim to create. Consider the following factors:

  • Purpose: Determine the primary use for the recording. For gaming, Xbox Game Bar or Bandicam are ideal, while Camtasia or Snagit are better suited for tutorials or presentations.
  • Features: Identify the features you need, such as audio recording, video editing, annotation tools, or specific output formats.
  • Ease of Use: Choose a tool with a user-friendly interface that aligns with your technical expertise.
  • Performance: Consider the system resources required and the impact on your computer’s performance.

FAQs: Addressing Common Questions about Screen Recording

1. Can I record audio with screen recordings?

  • Yes, most screen recording tools allow for audio capture. You can record system audio, microphone audio, or a combination of both.

2. How do I choose the right recording area?

  • Some tools allow you to select a specific area of the screen, while others capture the entire desktop. Choose the option that best suits your content.

3. What video formats are supported?

  • Common video formats include MP4, AVI, and MOV. Choose a format compatible with your intended use and platform.

4. Can I edit screen recordings after capturing them?

  • Many tools offer built-in editing features, allowing you to trim, cut, add transitions, and annotate your recordings.

5. Is there a limit on recording duration?

  • Some tools have recording time limitations, while others offer unlimited recording time. Check the tool’s specifications for details.

Tips: Optimizing Your Screen Recording Experience

  • Prepare your environment: Close unnecessary applications and minimize distractions to ensure smooth recording.
  • Optimize video settings: Choose a recording resolution and frame rate that balances quality and file size.
  • Use a microphone: Record clear audio for better engagement and understanding.
  • Practice recording: Familiarize yourself with the tool’s interface and features before recording important content.
  • Edit your recordings: Enhance your videos by trimming, adding transitions, and annotating key points.

Conclusion: Embracing the Power of Screen Recording

Screen recording on Windows 10 has evolved from a niche functionality to an indispensable tool for individuals and businesses alike. Its versatility, accessibility, and power to capture digital experiences make it a valuable resource for education, business, gaming, and personal projects. By understanding the different options available, choosing the right tool, and mastering its features, you can leverage the power of screen recording to create engaging, informative, and impactful content.

How to screen recorder windows 10 - polypag How To Record Your Screen On Windows 10 Screen record in Windows 10 - How to capture videos of applications and games - IONOS UK
How to screen record on windows 10 How to record video on screen windows 10 - jopuhaus A Guide to Screen recording on Windows 10
The Easiest Way to Record Your Screen in Windows 10: A Step-by-Step Guide How to screen recorder windows 10 - directvse

Closure

Thus, we hope this article has provided valuable insights into Capturing Your Digital Story: A Guide to Screen Recording on Windows 10. We appreciate your attention to our article. See you in our next article!