Archives 2024

Navigating The Windows 10 Service Landscape: A Guide To Selective Removal

Navigating the Windows 10 Service Landscape: A Guide to Selective Removal

Introduction

In this auspicious occasion, we are delighted to delve into the intriguing topic related to Navigating the Windows 10 Service Landscape: A Guide to Selective Removal. Let’s weave interesting information and offer fresh perspectives to the readers.

Navigating The Windows 10 Servicing Options Microsoft - vrogue.co

Windows 10, like any complex operating system, relies on a vast array of services running in the background to ensure smooth operation. These services, ranging from essential system functions to optional applications, consume system resources and can potentially impact performance. Understanding and managing these services, including the selective removal of non-essential ones, can contribute to a more efficient and responsive Windows 10 experience.

This comprehensive guide provides a detailed exploration of Windows 10 services, outlining the importance of service management, the potential benefits of removal, and the practical steps involved in this process. It aims to empower users to confidently navigate the intricacies of Windows 10 services, optimizing their system for peak performance.

Understanding Windows 10 Services

At its core, a Windows 10 service is a program that runs in the background, performing tasks without requiring direct user interaction. These tasks can range from managing network connections and hardware drivers to facilitating application functionality and background updates.

Services are classified into different categories based on their importance and impact on system stability:

  • Essential Services: These services are critical for the core functionality of Windows 10. Disabling them can lead to severe system instability or complete failure. Examples include the "Windows Update Service" and the "Remote Procedure Call (RPC) service."
  • Important Services: These services are crucial for specific functionalities and applications. Disabling them may impact specific features or applications but will not cause system failure. Examples include the "Print Spooler Service" and the "Windows Defender Antivirus Service."
  • Optional Services: These services are associated with specific applications or features that are not essential for the basic operation of Windows 10. Disabling them will not affect system stability but may disable specific features or applications. Examples include the "Windows Search Service" and the "Windows Media Player Network Sharing Service."

The Importance of Service Management

Understanding and managing Windows 10 services is crucial for several reasons:

  • Performance Optimization: Services running in the background consume system resources, including CPU power, memory, and disk space. Disabling unnecessary services can free up these resources, leading to improved system responsiveness and overall performance.
  • Security Enhancement: Some services, especially those associated with specific applications, might contain vulnerabilities that could be exploited by malicious actors. Disabling these services can help mitigate security risks.
  • Resource Allocation: By selectively disabling services, users can prioritize resource allocation towards applications and tasks that are more relevant to their current needs.
  • Troubleshooting: Identifying and disabling problematic services can help diagnose and resolve system issues, especially when encountering performance bottlenecks or unexpected behavior.

Benefits of Removing Services

Removing services from Windows 10 can offer several tangible benefits:

  • Enhanced System Performance: By reducing the number of background processes, removing services can free up valuable system resources, resulting in faster boot times, smoother application performance, and a more responsive user experience.
  • Reduced Resource Consumption: Removing unnecessary services can minimize resource usage, leading to lower power consumption, reduced heat generation, and potentially extended battery life for mobile devices.
  • Increased Security: Removing services associated with specific applications or features that are not actively used can reduce the attack surface and potentially mitigate security risks.
  • Improved Stability: By disabling services that are known to cause instability or conflicts, users can enhance the overall reliability and stability of their Windows 10 system.

Considerations Before Removal

While removing services can be beneficial, it is crucial to proceed with caution. It is essential to understand the implications of disabling a particular service before proceeding.

  • Identify Essential Services: Carefully research the purpose and dependencies of each service before considering removal. Never disable services that are critical for the core functionality of Windows 10.
  • Potential Conflicts: Removing a service might disrupt the functionality of other applications or features that depend on it.
  • Reversibility: Ensure that the removal process is reversible. Always back up your system before making significant changes, and keep track of the services you disable for easy re-enabling if needed.

Practical Steps for Removing Services

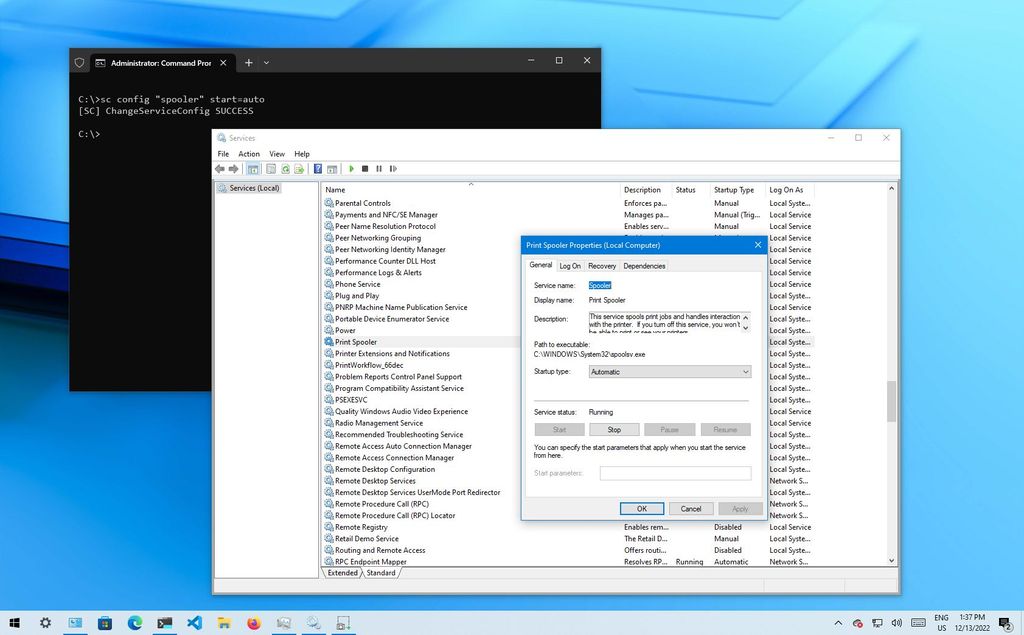
Removing services from Windows 10 can be done through the "Services" console, accessible through the "Run" dialog box (Win + R) by typing "services.msc."

1. Accessing the Services Console:

  • Open the "Run" dialog box (Win + R).
  • Type "services.msc" and press Enter.
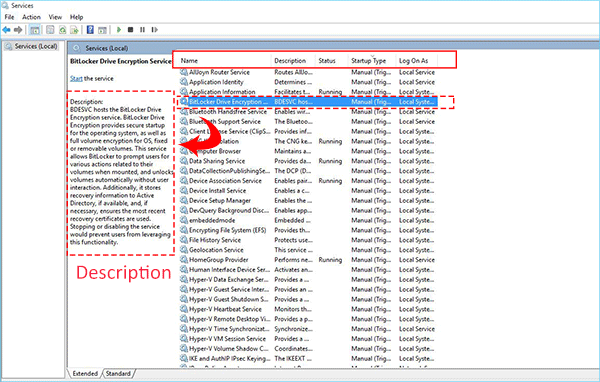
  • The "Services" console will open, displaying a list of services running on your system.

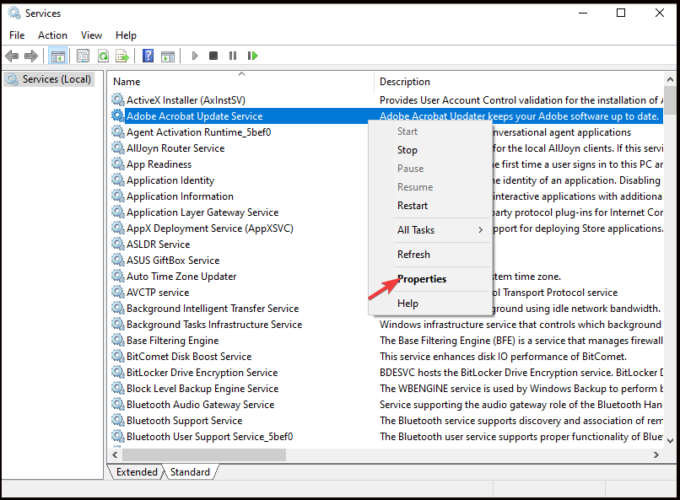
2. Identifying Services for Removal:

  • In the "Services" console, locate the service you wish to disable.
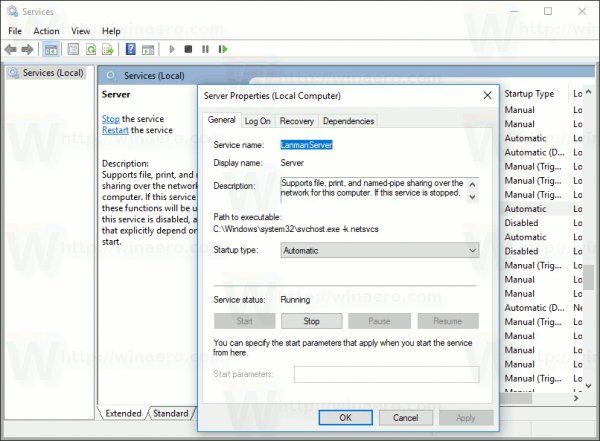
  • Right-click on the service and select "Properties."
  • Review the service description, dependencies, and startup type to ensure it is not essential for system functionality.

3. Disabling Services:

  • In the service’s properties window, locate the "Startup type" dropdown menu.
  • Select "Disabled" to prevent the service from starting automatically.
  • Click "Apply" and "OK" to save the changes.

4. Restarting the System:

  • After disabling the service, restart your computer to ensure the changes take effect.

5. Monitoring System Performance:

  • After restarting, monitor your system’s performance to ensure the disabled service did not cause any issues or disruptions.

6. Re-enabling Services:

  • If you encounter any problems or need to re-enable the service, repeat the steps above, but select "Automatic" or "Manual" in the "Startup type" dropdown menu.

FAQs on Removing Services

Q: Is it safe to remove services from Windows 10?

A: Removing services can be safe if done with caution and proper research. However, it is crucial to avoid disabling essential services that are critical for system functionality.

Q: How do I know which services are safe to remove?

A: Consult reliable sources like Microsoft documentation, reputable tech forums, and online guides to identify services that are safe to disable. Always prioritize safety and stability over performance gains.

Q: What are the potential risks of removing services?

A: Removing services can lead to system instability, application malfunctions, or even data loss if essential services are disabled. It is essential to proceed with caution and research the implications of disabling any service before proceeding.

Q: Can I remove services that are related to specific applications?

A: Removing services associated with specific applications can disable those applications. If you are unsure, consult the application’s documentation or contact the developer for guidance.

Q: What if I accidentally remove an essential service?

A: If you have disabled an essential service, you can usually re-enable it through the "Services" console. However, if the system becomes unstable, you may need to restore your system to a previous point or reinstall Windows 10.

Tips for Removing Services

  • Research thoroughly: Before disabling any service, research its purpose and dependencies to ensure it is safe to remove.
  • Back up your system: Always create a system backup before making significant changes to your system.
  • Start with optional services: Begin by disabling services associated with optional features or applications that you do not actively use.
  • Monitor system performance: After disabling services, monitor your system for any unexpected behavior or performance issues.
  • Document changes: Keep a record of the services you disable and their startup types for easy re-enabling if needed.

Conclusion

Managing Windows 10 services is an essential aspect of optimizing system performance and security. By understanding the purpose and dependencies of different services, users can confidently disable non-essential ones to free up resources, enhance stability, and mitigate potential security risks. However, it is crucial to proceed with caution, research thoroughly, and prioritize system stability over performance gains. Through careful consideration and a methodical approach, users can effectively manage their Windows 10 service landscape and create a more efficient and secure computing environment.

How to start and stop services manually on Windows 10  Windows Central Navigating The Windows 10 Servicing Options Microsoft - vrogue.co Navigating The Windows 10 Servicing Options Microsoft - vrogue.co
8 Ways to Open Windows Services Manager in Windows 10 – TechCult How to Disable A Service in Windows 10 Windows 10 Services You Can Safely Disable & How to Guide
Manage, start, stop, or restart Windows 10 services from the Task Manager  Digital Citizen How to Disable Windows 10 Unnecessary Services to Improve Performance

Closure

Thus, we hope this article has provided valuable insights into Navigating the Windows 10 Service Landscape: A Guide to Selective Removal. We hope you find this article informative and beneficial. See you in our next article!

Navigating The Desktop: A Guide To Removing Unwanted Icons In Windows 10

Navigating the Desktop: A Guide to Removing Unwanted Icons in Windows 10

Introduction

With great pleasure, we will explore the intriguing topic related to Navigating the Desktop: A Guide to Removing Unwanted Icons in Windows 10. Let’s weave interesting information and offer fresh perspectives to the readers.

How to Remove Desktop Icons on Windows 10

The desktop, the first visual interface users encounter upon booting their Windows 10 computers, serves as a gateway to various functionalities and applications. While its purpose is to provide easy access to frequently used programs, files, and folders, it can quickly become cluttered with unnecessary icons, obscuring the crucial elements and hindering efficient navigation. This article delves into the process of removing unwanted icons from the Windows 10 desktop, highlighting the benefits of decluttering and offering a comprehensive guide to achieve a streamlined and organized workspace.

Understanding the Importance of a Clean Desktop

A cluttered desktop can negatively impact productivity and user experience in several ways:

  • Visual Distractions: Excessive icons create visual noise, diverting attention from the task at hand and hindering focus.
  • Navigation Challenges: A crowded desktop makes it difficult to locate specific icons, leading to frustration and wasted time.
  • System Performance: A large number of icons can strain system resources, potentially slowing down performance.
  • Aesthetic Considerations: A clean and organized desktop contributes to a more visually appealing and professional workspace.

Methods for Removing Icons from the Windows 10 Desktop

There are several methods to remove unwanted icons from the Windows 10 desktop, each catering to different scenarios and user preferences.

1. Right-Clicking and Deleting:

This is the most straightforward method, suitable for individual icons.

  • Locate the Icon: Identify the icon you wish to remove.
  • Right-Click: Right-click on the icon.
  • Select "Delete": From the context menu, choose "Delete."
  • Confirm Deletion: A confirmation dialog box will appear. Click "Yes" to confirm the removal.

2. Using the "Organize" Option:

This method allows for bulk deletion of icons, offering more control over the desktop layout.

  • Right-Click on an Empty Space: Right-click on an empty area of the desktop.
  • Select "View": From the context menu, choose "View."
  • Choose "Show Desktop Icons": Ensure this option is checked.
  • Select "Organize Icons by": From the same menu, select "Organize Icons by."
  • Choose "Auto Arrange": This option will automatically arrange the remaining icons on the desktop.
  • Right-Click on an Empty Space: Right-click on an empty area of the desktop again.
  • Select "View": Choose "View" from the context menu.
  • Select "Show Desktop Icons": Ensure this option remains checked.
  • Select "Arrange Icons by": Choose "Arrange Icons by" from the same menu.
  • Choose "Name": This will arrange the remaining icons alphabetically by name.

3. Utilizing the "Settings" Menu:

This method allows users to customize the desktop by selecting which icons are displayed.

  • Open "Settings": Navigate to the "Settings" app by pressing the Windows key + I.
  • Select "Personalization": Click on the "Personalization" option.
  • Choose "Themes": Select "Themes" from the left-hand menu.
  • Click "Desktop Icon Settings": Click on the "Desktop Icon Settings" link at the bottom of the screen.
  • Select Icons: Check the boxes next to the icons you want to display on the desktop. Uncheck the boxes next to the icons you wish to remove.
  • Apply Changes: Click "Apply" and then "OK" to save the changes.

4. Utilizing the "File Explorer":

This method allows users to remove icons that represent files or folders directly from their source location.

  • Open "File Explorer": Open the "File Explorer" by pressing the Windows key + E.
  • Navigate to the File or Folder: Navigate to the location of the file or folder represented by the icon.
  • Select the File or Folder: Right-click on the file or folder you wish to remove.
  • Choose "Delete": Select "Delete" from the context menu.
  • Confirm Deletion: A confirmation dialog box will appear. Click "Yes" to confirm the removal.

5. Using Third-Party Software:

For more advanced customization and management of desktop icons, third-party software applications can provide additional features. These applications often offer:

  • Icon Customization: Change the appearance of icons.
  • Icon Grouping: Group icons into folders for easier organization.
  • Desktop Layout Optimization: Automatically arrange icons based on predefined criteria.

Frequently Asked Questions (FAQs) about Deleting Icons in Windows 10

1. What Happens When I Delete an Icon?

Deleting an icon from the desktop does not delete the underlying file or folder it represents. It simply removes the shortcut from the desktop, meaning you can still access the file or folder through other means.

2. Can I Delete System Icons?

Some icons on the desktop represent system files or folders, which are essential for the proper functioning of Windows 10. Deleting these icons can cause system instability. It is advisable to avoid deleting system icons unless you are certain of their purpose and consequences.

3. How Can I Prevent Icons from Appearing on the Desktop?

To prevent icons from appearing on the desktop, you can:

  • Disable Automatic Icon Placement: In the "Settings" app, navigate to "Personalization" -> "Themes" -> "Desktop Icon Settings." Uncheck the boxes next to the icons you want to prevent from appearing.
  • Change File Association Settings: For specific file types, you can change the default action associated with them, preventing them from appearing as icons on the desktop.

4. How Can I Restore Deleted Icons?

If you accidentally deleted an icon and wish to restore it, you can:

  • Check the Recycle Bin: The deleted icon might be located in the Recycle Bin. Right-click on the Recycle Bin icon, select "Open," and locate the deleted icon.
  • Use "File Explorer": Navigate to the location of the file or folder represented by the deleted icon and create a new shortcut on the desktop.

Tips for Organizing Your Windows 10 Desktop

  • Create Folders: Group related icons into folders for better organization.
  • Utilize the Taskbar: Pin frequently used applications to the taskbar for quick access.
  • Customize the Start Menu: Add frequently used applications and folders to the Start Menu for easy access.
  • Use Desktop Backgrounds: Choose a visually appealing desktop background to enhance the overall aesthetic.
  • Regularly Declutter: Make a habit of periodically reviewing your desktop and removing unnecessary icons.

Conclusion

Maintaining a clean and organized desktop in Windows 10 is essential for an efficient and enjoyable user experience. By following the methods outlined in this article, users can effectively remove unwanted icons, declutter their workspace, and optimize system performance. Regular decluttering and the use of appropriate organization strategies will contribute to a streamlined and productive computing environment.

How to remove unwanted icons from Desktop Toolbars? Solved - Windows 10 Forums How To Remove Icons From The Windows Desktop - Vrogue How to remove unwanted icons from Desktop Toolbars?
How to get rid of unwanted taskbar items? How To Remove Icons From The Windows Desktop - Vrogue [Windows 10 Tip] Remove Icons from Navigation Pane of This PC – AskVG
how to hide desktop icons  HOW TO HIDE UNWANTED FOLDERS ON DESKTOP  icons  windows 10  - YouTube How To Remove Icons From The Windows 10 Desktop Images

Closure

Thus, we hope this article has provided valuable insights into Navigating the Desktop: A Guide to Removing Unwanted Icons in Windows 10. We appreciate your attention to our article. See you in our next article!

Outil Windows 10 Installation

outil windows 10 installation

Introduction

With great pleasure, we will explore the intriguing topic related to outil windows 10 installation. Let’s weave interesting information and offer fresh perspectives to the readers.

It seems you are asking for an article about "outil windows 10 installation," which appears to be a misspelling of "outil Windows 10 installation." However, "outil" is not a standard term in the context of Windows 10 installation. It’s likely you are referring to a specific tool, utility, or software used for installing Windows 10.

Un guide complet de l'outil de création de support Windows 10 : Comment l'utiliser - MiniTool

To provide a helpful and accurate article, I need more information about the specific tool or software you are referring to. Please clarify what "outil" refers to in this context.

For instance, are you asking about:

  • A specific third-party tool: Do you have a particular software name or program in mind?
  • The built-in Windows 10 installation tools: Are you referring to the standard Windows 10 installation process using the media creation tool or a bootable USB drive?
  • A specific method of Windows 10 installation: Are you interested in a particular installation method, such as a clean install, upgrade, or in-place upgrade?

Once you provide more details, I can write a comprehensive article about the "outil Windows 10 installation" you are interested in, explaining the process, benefits, and any relevant information in a clear, informative, and engaging manner.

Comment effectuer une nouvelle installation de Windows 10 - Connectez-vous aux dernières Tutorial : Comment installer Windows 10 par clé USB Bootable ? - Trade Discount Installer Windows 10 Depuis Une Clé USB - Dinner With Oscar
Comment installer Windows 10 depuis USB Installation Windows 10 : Facilitoo Télécharger les outils de récupération gratuits Windows 10  Guide 2022
Hyper V Windows 10 Comment installer Windows 10 : le tutoriel COMPLET - malekal.com

Closure

Thus, we hope this article has provided valuable insights into outil windows 10 installation. We appreciate your attention to our article. See you in our next article!

The Future Of Productivity: Exploring The Possibilities Of Office Software In 2025

The Future of Productivity: Exploring the Possibilities of Office Software in 2025

Introduction

In this auspicious occasion, we are delighted to delve into the intriguing topic related to The Future of Productivity: Exploring the Possibilities of Office Software in 2025. Let’s weave interesting information and offer fresh perspectives to the readers.

The Future of Productivity: Exploring the Possibilities of Office Software in 2025

What is Office Productivity Software - Infoclutch

The landscape of productivity software is constantly evolving, driven by advancements in technology and changing user needs. While "Office 2025" is not an official product name from Microsoft, it serves as a useful placeholder to explore the potential features and functionalities that might define office suites in the near future. This exploration delves into the potential evolution of productivity tools for Windows 11 users in 2025, considering emerging trends in artificial intelligence (AI), cloud computing, and user experience.

The Evolving Landscape of Office Software

The traditional office suite, characterized by applications like Word, Excel, PowerPoint, and Outlook, has become a cornerstone of modern work. However, the future holds exciting possibilities for these tools. The focus will likely shift towards:

  • AI-Powered Assistance: Imagine a future where AI seamlessly integrates with your workflow, offering intelligent suggestions, automating tasks, and improving your productivity. AI could analyze your documents, suggest relevant content, and even draft emails based on your preferences.
  • Enhanced Collaboration: The future of office software will be heavily focused on seamless collaboration. Expect real-time co-editing capabilities, advanced communication features, and tools for project management that seamlessly integrate with existing workflows.
  • Cloud-First Approach: Cloud computing is rapidly transforming how we access and use software. The future of office suites will likely be fully cloud-based, offering users the flexibility to work from anywhere with a reliable internet connection.
  • Personalized User Experience: Office software will become more personalized, adapting to individual user preferences and work styles. This might include customizable interfaces, AI-driven recommendations, and personalized learning resources.

Potential Features of "Office 2025"

While speculating about specific features is challenging, we can draw inspiration from current trends and emerging technologies to envision what "Office 2025" might offer:

  • AI-Powered Content Creation: Imagine a tool that can automatically generate summaries, translate documents, and even draft creative content based on your input.
  • Smart Data Analysis: Expect advanced data visualization tools that leverage AI to identify trends, generate insights, and make data-driven decisions easier.
  • Virtual Meeting Enhancements: Virtual meetings will become more immersive and engaging with features like real-time transcription, AI-powered translation, and even virtual avatars.
  • Enhanced Security and Privacy: With the increasing importance of data security, "Office 2025" will likely prioritize features that ensure data privacy and protection against cyber threats.

Importance and Benefits of Future Office Suites

The evolution of office software holds significant benefits for users and organizations:

  • Increased Productivity: AI-powered features and automation tools will free up time for more creative and strategic tasks, leading to increased productivity.
  • Improved Collaboration: Seamless collaboration tools will facilitate better communication and teamwork, leading to more effective project outcomes.
  • Enhanced Accessibility: Cloud-based platforms will make office software accessible from any device with an internet connection, promoting greater flexibility and remote work opportunities.
  • Greater Innovation: New features and functionalities will empower users to explore new possibilities and drive innovation in their respective fields.

FAQs about "Office 2025"

Q: Will "Office 2025" be a paid product?

A: It is too early to speculate on the pricing model for future office suites. However, considering the current trends, a subscription-based model with flexible pricing options is likely.

Q: Will "Office 2025" be compatible with older operating systems?

A: It is highly probable that "Office 2025" will prioritize compatibility with the latest operating systems, such as Windows 11, due to the rapidly evolving technological landscape.

Q: Will "Office 2025" be available on mobile devices?

A: Given the increasing reliance on mobile devices, "Office 2025" will likely offer seamless integration with smartphones and tablets, providing users with a consistent experience across various platforms.

Tips for Preparing for the Future of Office Software

  • Embrace Cloud Computing: Start transitioning to cloud-based platforms and services to prepare for a future where cloud computing is the dominant model.
  • Develop AI Literacy: Familiarize yourself with the basics of AI and its potential applications in your field to better leverage future AI-powered tools.
  • Stay Updated on Technology Trends: Continuously learn about emerging technologies and their potential impact on productivity software.
  • Focus on Collaboration Skills: Develop your communication and teamwork skills to effectively collaborate in a future where real-time collaboration will be essential.

Conclusion

While the exact features and functionalities of "Office 2025" remain uncertain, it is clear that the future of productivity software will be heavily influenced by AI, cloud computing, and user experience. The evolution of office suites holds the potential to significantly enhance productivity, collaboration, and innovation, shaping the future of work in exciting and transformative ways. By embracing the possibilities of emerging technologies and adapting to the changing landscape, users and organizations can leverage these advancements to unlock new levels of efficiency and success.

The Future of Office Productivity, ChatGPT Advanced Robot Typing on a Computer, Generative AI The Future of Productivity Software  Modular Apps - YouTube The Future According To Microsoft - Productivity Future Vision (2020) - YouTube
Global Productivity Software Market, by Region, 2025 5 Office 365 Business Tools to Skyrocket Your Productivity Best Apps For Focus And Productivity • Gadget Rumours
Exploring the Future of Business Productivity with AI-Powered Tools Maximize Productivity with Software: The Ultimate Guide

Closure

Thus, we hope this article has provided valuable insights into The Future of Productivity: Exploring the Possibilities of Office Software in 2025. We thank you for taking the time to read this article. See you in our next article!

Navigating The Landscape Of Windows 10 64-bit: A Comprehensive Guide

Navigating the Landscape of Windows 10 64-bit: A Comprehensive Guide

Introduction

In this auspicious occasion, we are delighted to delve into the intriguing topic related to Navigating the Landscape of Windows 10 64-bit: A Comprehensive Guide. Let’s weave interesting information and offer fresh perspectives to the readers.

Navigating the OS Landscape: A Practical Approach to Transitioning from Windows 10

Windows 10, released in 2015, revolutionized the personal computing experience. Its 64-bit architecture, in particular, has been a significant driver of this transformation, opening doors to enhanced performance, expanded memory capabilities, and a wider range of software compatibility. This article provides a comprehensive overview of Windows 10 64-bit, delving into its key features, advantages, and considerations for users.

Understanding the 64-bit Architecture: A Foundation for Power

The term "64-bit" refers to the computer architecture that processes data in units of 64 bits. This architecture allows for significantly larger memory addressing, exceeding the limitations of its 32-bit predecessor. In practical terms, this translates to:

  • Vastly increased memory capacity: 64-bit systems can handle significantly larger amounts of RAM, enabling smoother multitasking, faster program loading, and more demanding applications.
  • Enhanced performance: The ability to process data in larger chunks leads to faster execution speeds and improved overall system responsiveness.
  • Wider software compatibility: Many modern programs are designed specifically for 64-bit systems, taking advantage of the expanded memory and processing power.

Key Features of Windows 10 64-bit: A User-Centric Design

Windows 10 64-bit is not just about technical specifications; it’s about delivering a seamless and intuitive user experience. Some of its key features include:

  • Universal Windows Platform (UWP): This platform allows for a unified development environment, ensuring apps function seamlessly across various devices, from desktops to tablets and even mobile phones.
  • Cortana, the Digital Assistant: A voice-activated personal assistant that can help with tasks like scheduling appointments, setting reminders, and finding information.
  • Enhanced Security Features: Windows 10 64-bit incorporates advanced security features, including Windows Defender, which provides real-time protection against malware and other threats.
  • Windows Update: Automatic updates ensure your system is always running the latest software, providing the latest security patches and performance improvements.

The Advantages of Choosing Windows 10 64-bit: A Clear Choice for Modern Computing

Choosing Windows 10 64-bit offers numerous benefits for users:

  • Seamless Multitasking: The increased memory capacity enables users to run multiple applications simultaneously without experiencing lag or performance issues.
  • Powerful Gaming Experience: 64-bit systems are essential for high-end gaming, allowing for the demanding graphics and processing requirements of modern titles.
  • Creative Applications: Software used for video editing, 3D modeling, and other resource-intensive tasks thrives on the power of 64-bit systems.
  • Future-Proofing: As technology advances, the 64-bit architecture ensures your system remains compatible with future software and hardware developments.

Frequently Asked Questions: Addressing Common Concerns

Q: Can I run 32-bit programs on a 64-bit system?

A: Yes, Windows 10 64-bit includes backward compatibility for 32-bit applications. However, 64-bit versions of these programs will often offer better performance.

Q: Is Windows 10 64-bit compatible with my current hardware?

A: Most modern computers released in the past few years are equipped with 64-bit processors and support Windows 10 64-bit. However, it’s crucial to check your system specifications before upgrading.

Q: What are the system requirements for Windows 10 64-bit?

A: The minimum system requirements include:

  • Processor: 1 gigahertz (GHz) or faster processor with 2 cores
  • RAM: 2 gigabytes (GB)
  • Storage: 16 GB available hard disk space
  • Graphics card: Microsoft DirectX 9 graphics device with WDDM 1.0 driver

Q: How do I upgrade to Windows 10 64-bit?

A: If your current system meets the requirements, you can upgrade directly from Windows 7 or Windows 8.1. Alternatively, you can purchase a new computer pre-installed with Windows 10 64-bit.

Tips for Optimizing Windows 10 64-bit Performance: Maximizing Efficiency

  • Regularly Update Drivers: Ensure your hardware drivers are up-to-date to maximize performance and compatibility.
  • Manage Startup Programs: Limit the number of programs that launch automatically at startup to improve boot times and reduce system strain.
  • Disk Cleanup: Regularly clean up temporary files and unnecessary data to free up disk space and improve performance.
  • Defragment Hard Drive: Defragmenting your hard drive can help improve read/write speeds, particularly for older hard drives.
  • Use Task Manager: Monitor system resources and identify processes that are consuming excessive resources.

Conclusion: A Powerful and Versatile Operating System for the Modern User

Windows 10 64-bit is a robust and versatile operating system designed to meet the demands of modern computing. Its 64-bit architecture provides the foundation for enhanced performance, expanded memory capabilities, and wider software compatibility. By embracing Windows 10 64-bit, users can unlock a world of possibilities, from seamless multitasking and powerful gaming to creative applications and future-proofing their systems.

How to Navigate in Windows 10 - Windows 10 User Interface Overview - YouTube Windows Basics: Navigating Windows Buy WINDOWS 11 HOME User Manual: A Comprehensive Illustrated Guide to Navigating the New
How to Upgrade Windows 10 32Bit to 64Bit without Losing Data for FREE - YouTube Download windows 10 iso 64 bit pro - arabpag Updating from Windows 10 1507 to Windows 10 22H2 - YouTube
Comparing Windows 10 1507 tablet Mode to Windows 10 22H2 Tablet Mode - YouTube Windows 10 Lite 64 Bit Download - tablegawer

Closure

Thus, we hope this article has provided valuable insights into Navigating the Landscape of Windows 10 64-bit: A Comprehensive Guide. We appreciate your attention to our article. See you in our next article!

Mastering Your Music Library: A Comprehensive Guide To Rekordbox 5 For Windows 10

Mastering Your Music Library: A Comprehensive Guide to Rekordbox 5 for Windows 10

Introduction

With enthusiasm, let’s navigate through the intriguing topic related to Mastering Your Music Library: A Comprehensive Guide to Rekordbox 5 for Windows 10. Let’s weave interesting information and offer fresh perspectives to the readers.

Mastering Your Music Library: A Comprehensive Guide to Rekordbox 5 for Windows 10

How To Organize Music in rekordbox (Guide)

Rekordbox, the comprehensive music management and performance software developed by Pioneer DJ, empowers DJs and music enthusiasts to organize, prepare, and perform their music with unparalleled efficiency and creative control. While the software has evolved through various versions, Rekordbox 5 remains a popular choice for Windows 10 users due to its robust feature set and compatibility with a wide range of Pioneer DJ hardware. This article delves into the intricacies of Rekordbox 5, exploring its functionalities, installation process, and practical applications, providing a comprehensive understanding of its benefits for DJs and music lovers alike.

Understanding the Power of Rekordbox 5

Rekordbox 5 goes beyond simple music organization, offering a sophisticated suite of tools designed to streamline the DJing experience. Its key features include:

  • Music Library Management: Rekordbox 5 allows users to create and manage a comprehensive music library. It facilitates the import and organization of tracks, albums, and playlists, enabling seamless browsing and searching.
  • Advanced Track Analysis: The software automatically analyzes tracks, extracting crucial information like BPM, key, and waveform. This analysis empowers DJs to create seamless mixes by matching tracks based on their musical characteristics.
  • Performance Features: Rekordbox 5 integrates seamlessly with Pioneer DJ hardware, enabling DJs to control their music with precision. Features like Hot Cues, Looping, and Sample Decks provide diverse creative options during live performances.
  • Performance Preparation: The software allows DJs to prepare their sets by creating playlists, setting cue points, and adding performance-enhancing features to tracks. This meticulous preparation ensures a smooth and engaging DJ experience.
  • Cloud Integration: Rekordbox 5 supports cloud storage, enabling DJs to access their music library and performance settings from multiple devices. This feature ensures continuity and flexibility, allowing DJs to work on their sets anywhere, anytime.

Navigating the Download and Installation Process

To harness the power of Rekordbox 5 on a Windows 10 system, users must first download and install the software. The process is straightforward and can be completed in a few simple steps:

  1. Visit the Pioneer DJ Website: Navigate to the official Pioneer DJ website and locate the Rekordbox 5 download page.
  2. Download the Installer: Choose the appropriate version of the installer for Windows 10, ensuring compatibility with your system’s architecture (32-bit or 64-bit).
  3. Run the Installer: Double-click the downloaded installer file and follow the on-screen instructions to begin the installation process.
  4. Accept the License Agreement: Review and accept the software’s license agreement before proceeding with the installation.
  5. Choose Installation Location: Select the desired location for installing Rekordbox 5 on your computer.
  6. Complete the Installation: Allow the installer to complete the installation process. This may take a few minutes, depending on your system’s specifications.
  7. Launch Rekordbox 5: Once the installation is complete, launch Rekordbox 5 and begin exploring its features.

Unlocking the Potential: Practical Applications of Rekordbox 5

Rekordbox 5 offers a wide range of practical applications, making it an invaluable tool for DJs and music enthusiasts alike:

  • DJ Performance: Rekordbox 5 is the cornerstone of professional DJing, providing the essential tools for seamless mixing, creative manipulation, and engaging performances. Its intuitive interface and powerful features empower DJs to deliver captivating sets.
  • Music Production: Beyond DJing, Rekordbox 5 can also be used for music production. Its advanced track analysis and performance features can be incorporated into the music production workflow, enriching the creative process.
  • Music Library Management: For music enthusiasts, Rekordbox 5 offers a comprehensive solution for organizing and managing vast music libraries. Its intuitive tagging and sorting features ensure easy access to any desired track.
  • Music Exploration: The software’s powerful search and filtering functions make it an excellent tool for discovering new music. Users can explore their libraries based on genre, artist, mood, and other criteria.
  • Collaboration: Rekordbox 5’s cloud integration allows DJs and producers to collaborate on projects seamlessly. Users can share their libraries, playlists, and performance settings, fostering creative collaboration and exchange of ideas.

Frequently Asked Questions (FAQs) About Rekordbox 5

Q: What are the system requirements for running Rekordbox 5 on Windows 10?

A: To ensure optimal performance, Rekordbox 5 requires a Windows 10 operating system with at least 4GB of RAM, a 2.0 GHz processor, and 10GB of free hard disk space.

Q: Is Rekordbox 5 compatible with all Pioneer DJ hardware?

A: Rekordbox 5 is primarily designed for use with Pioneer DJ hardware, but compatibility may vary depending on the specific model. Consult the official Pioneer DJ website for detailed compatibility information.

Q: Can I use Rekordbox 5 without a Pioneer DJ controller?

A: While Rekordbox 5 functions best with Pioneer DJ hardware, it can be used as a standalone music management software without a controller. However, some performance features may be limited without a compatible controller.

Q: How do I update Rekordbox 5 to the latest version?

A: Pioneer DJ regularly releases updates for Rekordbox 5 to improve performance and add new features. To update, launch the software, go to the "Help" menu, and select "Check for Updates." Follow the on-screen instructions to download and install the latest version.

Q: Is there a free version of Rekordbox 5 available?

A: While a free version of Rekordbox is available, it offers limited features compared to the full version. The full version of Rekordbox 5 requires a paid license.

Q: What are the benefits of using Rekordbox 5 over other DJ software?

A: Rekordbox 5 stands out due to its seamless integration with Pioneer DJ hardware, its advanced track analysis capabilities, and its comprehensive performance features. It offers a well-rounded solution for DJs and music enthusiasts seeking a powerful and user-friendly software experience.

Tips for Mastering Rekordbox 5

  • Organize Your Library: Create a structured library by using tags, playlists, and folders to categorize your music.
  • Utilize Track Analysis: Leverage the software’s automatic track analysis to identify key, BPM, and waveform information for seamless mixing.
  • Explore Performance Features: Experiment with Hot Cues, Looping, and Sample Decks to enhance your performances and add creative flair.
  • Prepare Your Sets: Create playlists, set cue points, and add performance features to tracks before your gigs to ensure a smooth and engaging performance.
  • Stay Updated: Regularly check for updates to benefit from new features and performance enhancements.

Conclusion

Rekordbox 5 for Windows 10 is a powerful and versatile software that empowers DJs and music enthusiasts to manage, prepare, and perform their music with unparalleled efficiency and creative control. Its comprehensive features, user-friendly interface, and seamless integration with Pioneer DJ hardware make it an indispensable tool for those seeking to elevate their DJing experience or simply organize and manage their music library. By understanding its functionalities, exploring its practical applications, and following the tips provided, users can unlock the full potential of Rekordbox 5, transforming their music journey into a seamless and enriching experience.

Rekordbox 5.0 Full Feature Breakdown: How Good Is It? How To Organize Music in Rekordbox (Quick Guide) Pioneer DJ Releases Public Beta of Rekordbox 5
MIXO: Backup Rekordbox Library Rekordbox 5.5 Released, Adds Feedback Reducer Feature - Digital DJ Tips Rekordbox 5.0 Full Feature Breakdown: How Good Is It?
rekordbox 5 - Pioneer rekordbox 5 - Audiofanzine Rekordbox 5.0 Software Review - Digital DJ Tips

Closure

Thus, we hope this article has provided valuable insights into Mastering Your Music Library: A Comprehensive Guide to Rekordbox 5 for Windows 10. We hope you find this article informative and beneficial. See you in our next article!

Maintaining Optimal Performance: A Guide To Windows 10 Health

Maintaining Optimal Performance: A Guide to Windows 10 Health

Introduction

With great pleasure, we will explore the intriguing topic related to Maintaining Optimal Performance: A Guide to Windows 10 Health. Let’s weave interesting information and offer fresh perspectives to the readers.

Maintaining Optimal Performance: A Guide to Windows 10 Health

How to health check windows 10 for best performance

Windows 10, as a powerful and versatile operating system, demands regular attention to ensure optimal performance and longevity. The concept of "PC health" encompasses a range of practices and tools designed to maintain the stability, security, and efficiency of your Windows 10 machine. This article delves into the multifaceted aspects of PC health, exploring its significance, practical tools, and essential tips for maximizing your computing experience.

Understanding the Importance of PC Health

Neglecting PC health can lead to a multitude of issues, including:

  • Slow performance: A cluttered system, outdated drivers, or malware can significantly hinder system responsiveness and application launch times.
  • Frequent crashes: Unstable drivers, corrupted files, or insufficient system resources can cause unexpected system crashes, leading to data loss and frustration.
  • Security vulnerabilities: Outdated software and operating systems leave your computer vulnerable to malware, data breaches, and unauthorized access.
  • Reduced lifespan: Poor maintenance habits can shorten the lifespan of your hardware components, leading to premature failures and costly repairs.

Essential Tools for Maintaining Windows 10 Health

Windows 10 offers a suite of built-in tools designed to address various aspects of PC health. These tools provide users with the means to optimize system performance, enhance security, and troubleshoot potential issues.

1. Task Manager: This indispensable tool provides insights into system resource utilization, allowing you to identify and manage processes consuming excessive resources. By identifying and terminating resource-intensive applications or services, users can improve overall system responsiveness.

2. Storage Sense: This feature helps manage disk space by automatically deleting temporary files, emptying the Recycle Bin, and removing unused files from the Downloads folder. Regularly using Storage Sense ensures ample disk space for crucial system files and applications.

3. Windows Defender: As a built-in antivirus solution, Windows Defender provides real-time protection against malware threats. Regularly updating Windows Defender and running scans ensures robust protection against evolving cyber threats.

4. Windows Update: Keeping your operating system and software up-to-date is crucial for security and stability. Windows Update automatically downloads and installs critical security patches and feature updates, ensuring your system remains protected and performs optimally.

5. Device Manager: This tool provides access to drivers for all connected hardware components. Regularly updating drivers ensures compatibility and optimal performance, preventing issues related to outdated or corrupted drivers.

6. System Restore: This feature creates system snapshots, allowing users to revert their system to a previous state in case of software conflicts or other issues. Utilizing System Restore can help resolve unexpected system behavior and restore functionality.

7. Disk Cleanup: This utility helps reclaim disk space by removing temporary files, system files, and other unnecessary data. Regularly running Disk Cleanup ensures ample disk space and improves system performance.

8. Troubleshooters: Windows 10 includes various built-in troubleshooters for common issues like network connectivity, printer problems, and audio playback. These troubleshooters automatically diagnose and attempt to resolve identified issues, simplifying troubleshooting efforts.

Beyond Built-in Tools: Additional Steps for Enhanced PC Health

While Windows 10 provides a comprehensive set of tools, certain practices go beyond the built-in features, further enhancing PC health and longevity.

1. Regular System Maintenance: Schedule regular maintenance tasks, including running Disk Cleanup, defragmenting hard drives, and checking for updates. This proactive approach ensures system stability and prevents performance degradation.

2. Software Management: Remove unused applications and programs, as they can consume valuable disk space and resources. Regularly uninstalling unnecessary software keeps your system lean and efficient.

3. Secure Password Practices: Utilize strong passwords and enable two-factor authentication for sensitive accounts. Secure passwords and authentication methods protect your system from unauthorized access and data breaches.

4. Backup Strategies: Implement regular data backups to protect against data loss caused by hardware failures, software errors, or malware attacks. Consistent backups ensure data recovery in case of unexpected events.

5. Hardware Maintenance: Dusting your computer regularly and ensuring proper ventilation are crucial for maintaining hardware longevity. Overheating can lead to component failures, so maintaining proper cooling is essential.

6. Avoiding Unnecessary Software: Be cautious when installing software from unknown sources. Always verify the legitimacy of software before installation to avoid malware infections.

7. Using Reliable Antivirus Software: While Windows Defender offers basic protection, consider using a third-party antivirus solution for comprehensive malware detection and removal.

8. Regularly Monitoring System Performance: Keep an eye on system performance indicators like CPU usage, memory utilization, and disk space. Identifying potential bottlenecks early allows for timely optimization.

FAQs on PC Health in Windows 10

Q: How often should I run Disk Cleanup?

A: It is recommended to run Disk Cleanup at least once a month, or more frequently if you notice significant disk space usage.

Q: What is the difference between defragmentation and optimization?

A: Defragmentation rearranges fragmented files on a hard drive to improve access speed. Optimization refers to a broader set of tasks that improve system performance, including defragmentation, cleaning temporary files, and optimizing system settings.

Q: Is it necessary to update drivers regularly?

A: Yes, regularly updating drivers is crucial for ensuring compatibility, stability, and optimal performance. Outdated drivers can lead to various issues, including system crashes and hardware malfunctions.

Q: What should I do if my computer is running slow?

A: Start by running Disk Cleanup and checking for unnecessary applications. Analyze system resource usage in Task Manager to identify potential bottlenecks. If the issue persists, consider running a system scan for malware and updating drivers.

Q: How can I protect my computer from malware?

A: Keep your operating system and software up-to-date, use a reliable antivirus solution, be cautious when opening email attachments and clicking links, and avoid downloading software from untrusted sources.

Q: How often should I back up my data?

A: It is recommended to back up your data at least once a week, or more frequently for critical files. Consider using a cloud-based backup service for additional security and accessibility.

Tips for Maintaining Optimal PC Health

  • Run regular system scans: Schedule regular antivirus and malware scans to detect and remove potential threats.
  • Monitor system resources: Pay attention to CPU usage, memory utilization, and disk space to identify potential performance bottlenecks.
  • Keep software up-to-date: Enable automatic updates for Windows 10 and all installed software to receive critical security patches and bug fixes.
  • Clean up your system: Regularly delete temporary files, unused applications, and unnecessary data to improve performance and free up disk space.
  • Use a password manager: Store your passwords securely using a password manager to avoid using weak or reused passwords.
  • Enable two-factor authentication: Add an extra layer of security to your accounts by enabling two-factor authentication.
  • Be cautious online: Avoid clicking suspicious links and downloading files from untrusted sources to prevent malware infections.

Conclusion

Maintaining optimal PC health is crucial for ensuring a smooth, secure, and efficient computing experience. By utilizing the built-in tools provided by Windows 10 and adopting proactive maintenance practices, users can significantly enhance system performance, security, and longevity. Regularly addressing PC health concerns contributes to a more enjoyable and productive computing environment. Investing time and effort in maintaining your PC health translates to a reliable and efficient system that meets your needs for years to come.

How to create advanced system health report on Windows 10 - Pureinfotech How to Check Device Performance and Health in Windows 10 5 diagnostic tips to Improve Your Windows 10 Performance
Get a Health report of your Windows 10 PC or device, and see how it performs How to Check the Health of Your Windows 10 PC (And Keep It in Shape)  LaptrinhX Top 15 Most Powerful Tips To Optimize Windows 10 For Gaming
Pureinfotech - Windows 10 tips, one step at a time — How to check your device health on Windows 10 How to Check the Health of Your Windows 10/11 PC or Laptop

Closure

Thus, we hope this article has provided valuable insights into Maintaining Optimal Performance: A Guide to Windows 10 Health. We hope you find this article informative and beneficial. See you in our next article!

Understanding And Troubleshooting Out-of-Box Experience (OOBE) Bypass Issues In Windows 10

Understanding and Troubleshooting Out-of-Box Experience (OOBE) Bypass Issues in Windows 10

Introduction

With enthusiasm, let’s navigate through the intriguing topic related to Understanding and Troubleshooting Out-of-Box Experience (OOBE) Bypass Issues in Windows 10. Let’s weave interesting information and offer fresh perspectives to the readers.

Understanding and Troubleshooting Out-of-Box Experience (OOBE) Bypass Issues in Windows 10

HOW TO BYPASS OOBE - Out-of-Box Experience - YouTube

The Windows 10 Out-of-Box Experience (OOBE) is a critical stage in the setup process, guiding new users through initial configuration and personalization. While the OOBE is generally designed to be user-friendly, unforeseen circumstances can lead to issues that prevent users from completing the process. This article delves into the common reasons why the OOBE might not function as expected, providing comprehensive troubleshooting steps and alternative solutions.

Understanding the OOBE Bypass Problem

The term "OOBE bypass" refers to situations where the Windows 10 setup process encounters an error or a blockage that prevents the user from completing the initial setup. This can manifest in various ways, including:

  • Stuck at a specific screen: The setup process might freeze at a particular step, preventing the user from proceeding further.
  • Error messages: The setup process might display error messages, indicating an underlying issue that needs to be addressed.
  • Incomplete setup: The setup process might complete prematurely, leaving the system in an unusable state.

Common Causes of OOBE Bypass Issues

Several factors can contribute to OOBE bypass problems in Windows 10. Understanding these causes is crucial for effective troubleshooting:

  • Hardware incompatibility: Incompatible hardware components, such as outdated or faulty drivers, can lead to conflicts during the setup process.
  • Corrupted installation media: Damaged or corrupted installation files can cause errors during the setup process, preventing it from completing successfully.
  • Software conflicts: Existing software on the target system, particularly antivirus programs, might interfere with the setup process.
  • Boot order issues: Incorrect boot order settings in the BIOS can prevent the system from booting into the Windows 10 setup environment.
  • Disk partitioning errors: Errors in disk partitioning, such as missing or corrupted partitions, can disrupt the setup process.
  • Network connectivity issues: Problems with internet connectivity can hinder the download and installation of necessary drivers and updates during the setup process.
  • System configuration errors: Incorrect system configuration settings, such as incorrect time or date settings, can cause the setup process to fail.
  • Physical damage: Physical damage to the hard drive or other components can result in data corruption and lead to setup issues.

Troubleshooting Steps for OOBE Bypass Issues

Once the potential causes are identified, a systematic approach is essential for troubleshooting OOBE bypass problems:

  1. Verify Hardware Compatibility: Ensure that all hardware components are compatible with Windows 10. Check the system specifications and manufacturer websites for compatibility information.
  2. Check Installation Media Integrity: Verify the integrity of the installation media by using a checksum utility or by creating a new bootable USB drive.
  3. Disable Antivirus Software: Temporarily disable any antivirus programs installed on the target system to prevent potential conflicts.
  4. Adjust BIOS Boot Order: Access the BIOS settings and ensure that the boot order is set correctly, prioritizing the installation media.
  5. Check Disk Partitioning: Use a disk partitioning tool to check the disk for errors and ensure that the partitions are properly configured.
  6. Verify Network Connectivity: Ensure a stable internet connection for downloading necessary files and updates during the setup process.
  7. Correct System Configuration Settings: Verify and adjust the system configuration settings, such as time, date, and language, to ensure they are accurate.
  8. Run System Diagnostics: Perform a comprehensive system diagnostics test to check for any hardware failures or malfunctions.
  9. Use Windows 10 Recovery Options: Utilize the Windows 10 recovery options, such as system restore or refresh, to attempt to repair the installation.
  10. Perform a Clean Install: If all other troubleshooting steps fail, consider performing a clean installation of Windows 10 to eliminate any potential conflicts or errors.

Alternative Solutions for OOBE Bypass Issues

In certain scenarios, alternative solutions might be necessary to overcome OOBE bypass issues:

  • Using a different installation media: If the existing installation media is suspected of being corrupted, try using a different media source.
  • Booting into safe mode: Booting into safe mode can help isolate and address issues that might be preventing the setup process from completing.
  • Using a system repair disc: A system repair disc can help fix common boot and system errors that might be causing the OOBE bypass problem.
  • Contacting Microsoft support: If all other troubleshooting steps fail, contacting Microsoft support can provide expert assistance and guidance.

Frequently Asked Questions (FAQs) about OOBE Bypass Issues

Q: What is the difference between a clean install and a repair install?

A: A clean install erases all existing data and installs a fresh copy of Windows 10, while a repair install attempts to fix existing issues without deleting data.

Q: How can I check the integrity of my installation media?

A: You can use a checksum utility like MD5sum or SHA256sum to verify the integrity of the installation files.

Q: What should I do if I see an error message during the setup process?

A: Note down the error message and search for solutions online or contact Microsoft support for assistance.

Q: How can I prevent OOBE bypass issues in the future?

A: Ensure that your hardware components are compatible with Windows 10, use a reliable installation media source, and perform regular system maintenance to prevent potential issues.

Tips for Preventing OOBE Bypass Issues

  • Keep your hardware updated: Ensure that your system drivers and firmware are up-to-date to minimize compatibility issues.
  • Use a reliable installation media source: Create a bootable USB drive using the official Microsoft Media Creation Tool to ensure the integrity of the installation files.
  • Perform regular system maintenance: Regularly run system scans, clean temporary files, and update drivers to maintain system health and prevent errors.
  • Back up your data: Create regular backups of your important data to prevent data loss in case of system failures.

Conclusion

While OOBE bypass issues can be frustrating, understanding the underlying causes and implementing effective troubleshooting steps can help resolve these problems. By verifying hardware compatibility, checking installation media integrity, addressing software conflicts, and performing necessary system diagnostics, users can successfully complete the Windows 10 setup process and enjoy a smooth user experience. Remember to prioritize data backup and system maintenance to prevent future issues and ensure a stable and reliable operating environment.

Set Up Windows 10 Again with the Windows Out Of Box Experience (OOBE) - Ask Leo! How to Complete the Out of Box Experience (OOBE) in Windows 10 - Microsoft Community All about OOBE or Out of Box Experience in Windows 10 - Technoresult
Windows Out Of Box Experience: OOBESETTINGSMULTIPLEPAGE error on Windows 10  Learn [Solve IT] Out of Box Experience in Windows 10 How to: Complete the Windows 10 Out of Box Experience - Microsoft Community
How to Complete the Out of Box Experience (OOBE) in Windows 10 - Microsoft Community All about OOBE or Out of Box Experience in Windows 10 - Technoresult

Closure

Thus, we hope this article has provided valuable insights into Understanding and Troubleshooting Out-of-Box Experience (OOBE) Bypass Issues in Windows 10. We hope you find this article informative and beneficial. See you in our next article!

Rejuvenating Your Windows 10 System: A Guide To Refreshing Without Data Loss

Rejuvenating Your Windows 10 System: A Guide to Refreshing Without Data Loss

Introduction

In this auspicious occasion, we are delighted to delve into the intriguing topic related to Rejuvenating Your Windows 10 System: A Guide to Refreshing Without Data Loss. Let’s weave interesting information and offer fresh perspectives to the readers.

Rejuvenating Your Windows 10 System: A Guide to Refreshing Without Data Loss

How to Refresh Windows 10 Without Losing Apps or Data - YouTube

Windows 10, like any operating system, can experience performance degradation over time due to accumulating temporary files, outdated drivers, or even malware infections. These issues can lead to sluggish performance, program crashes, and even system instability. While a complete wipe and reinstall of Windows 10 is often the most effective solution, it can be daunting to contemplate losing valuable data. Fortunately, there are ways to refresh your Windows 10 system without sacrificing your precious files.

Understanding the Need for a System Refresh

A system refresh, also known as a clean install, offers a multitude of benefits. It effectively eliminates accumulated clutter, resolves software conflicts, and ensures a fresh start with the latest updates. This process can revitalize your system, enhancing its speed, stability, and overall responsiveness.

Exploring Your Options: Methods for Refreshing Windows 10

There are two primary approaches to refreshing Windows 10 without losing data:

1. Resetting Your PC:

This option provides a streamlined method to restore your system to its factory settings. It removes all applications and settings, effectively returning your computer to its initial state. However, it preserves your personal files, such as documents, pictures, and music. This method is ideal for resolving software conflicts, removing malware, or addressing performance issues without the hassle of manually reinstalling everything.

2. Performing a Clean Install:

A clean install involves completely erasing your hard drive and installing a fresh copy of Windows 10. This approach offers the most thorough system refresh, eliminating any lingering issues and ensuring a clean slate. To preserve your data, it’s crucial to back it up beforehand. This method is recommended when dealing with persistent problems or when you desire a completely fresh start.

Step-by-Step Guide: Resetting Your PC

1. Accessing the Recovery Options:

  • Open the Settings app by pressing Windows Key + I.
  • Navigate to Update & Security and select Recovery.
  • Under "Reset this PC," click Get Started.

2. Choosing Your Reset Options:

  • You will be presented with two options: "Keep my files" and "Remove everything." Select Keep my files to preserve your personal data.
  • The system will prompt you to confirm your choice. Click Next to proceed.

3. Resetting Your PC:

  • The system will now initiate the reset process, which might take some time.
  • During the reset, your PC will restart multiple times.
  • Once the process is complete, your system will boot into a fresh and clean state.

Step-by-Step Guide: Performing a Clean Install

1. Backing Up Your Data:

  • Before proceeding with a clean install, it is crucial to back up your data to an external drive or cloud storage service. This step ensures that your files are safe and accessible even if something goes wrong during the installation process.

2. Creating a Bootable USB Drive:

  • Download the latest Windows 10 ISO file from the official Microsoft website.
  • Use a tool like Rufus or the Windows USB/DVD Download Tool to create a bootable USB drive containing the Windows 10 installation files.

3. Booting from the USB Drive:

  • Restart your PC and enter the BIOS menu by pressing the appropriate key (usually F2, F10, or Del).
  • Configure the boot order to prioritize the USB drive.
  • Save the changes and exit the BIOS menu.

4. Installing Windows 10:

  • The Windows 10 setup will launch. Follow the on-screen instructions to complete the installation.
  • During the installation process, you will be asked to choose a partition for Windows 10. Select the appropriate partition and format it.
  • The installation process will take some time.

5. Restoring Your Data:

  • Once the installation is complete, you can restore your backed-up data to your computer.

Navigating Potential Challenges

While refreshing your Windows 10 system can be a beneficial process, it’s important to be aware of potential challenges:

1. Compatibility Issues:

  • Some older applications might not be compatible with the latest version of Windows 10. It’s advisable to check for compatibility updates before proceeding with the refresh.

2. Driver Conflicts:

  • Driver conflicts can occur after a fresh install. It’s crucial to update all drivers after the refresh to ensure optimal system performance.

3. Data Loss Concerns:

  • Although data loss is minimized with the "Keep my files" option during a reset, it’s still essential to back up your data as a precautionary measure.

FAQs: Addressing Common Questions

Q: What happens to my applications after a reset or clean install?

A: All applications installed on your system will be removed during a reset or clean install. You will need to reinstall them after the process is complete.

Q: Will my personal files be deleted during a clean install?

A: Yes, all files on your hard drive will be deleted during a clean install. This is why backing up your data is crucial.

Q: Can I perform a clean install without losing my applications?

A: No, a clean install will erase all data on your hard drive, including applications.

Q: What if I encounter problems during the reset or clean install?

A: It’s always advisable to back up your data before attempting any system refresh. If you encounter problems, you can consult Microsoft support or seek assistance from a qualified technician.

Tips for a Smooth System Refresh:

  • Ensure you have a reliable backup of your data before proceeding with any system refresh.
  • Check for compatibility updates for your applications before reinstalling them.
  • Update all drivers after the refresh to ensure optimal system performance.
  • Consider using a clean install for a more thorough system refresh, especially if you are experiencing persistent issues.
  • Consult Microsoft support or a qualified technician if you encounter any difficulties.

Conclusion: A Fresh Start for Your Windows 10 System

Refreshing your Windows 10 system can be a valuable endeavor to enhance performance, resolve software conflicts, and eliminate potential malware threats. By choosing the appropriate method, whether it’s a reset or a clean install, you can revitalize your system without sacrificing your valuable data. Remember to prioritize data backup, address potential challenges, and seek assistance if needed. With a well-executed refresh, you can enjoy a smoother, more efficient, and secure Windows 10 experience.

Reset or Refresh Windows 10 without Losing Programs and Data Reset/Refresh Windows 10 without Losing Programs  3 Ways! Windows 10 System Restore, Refresh, Reset, Fresh Start & Reinstall guide
Windows 10 Refresh & Reset Easily - Driver Easy How to refresh your Windows 10 PC with a clean installation - Pureinfotech How to Refresh Windows 10?
How To Update or Refresh Windows 10/11 Without Data Loss 2024 How to Recover Your PC Using System Restore on Windows 10  Petri

Closure

Thus, we hope this article has provided valuable insights into Rejuvenating Your Windows 10 System: A Guide to Refreshing Without Data Loss. We hope you find this article informative and beneficial. See you in our next article!

Windows 11 Pro: A Comprehensive Guide To The Latest Operating System

Windows 11 Pro: A Comprehensive Guide to the Latest Operating System

Introduction

With great pleasure, we will explore the intriguing topic related to Windows 11 Pro: A Comprehensive Guide to the Latest Operating System. Let’s weave interesting information and offer fresh perspectives to the readers.

Windows 11 Pro: A Comprehensive Guide to the Latest Operating System

Buy WINDOWS 11 PRO USER GUIDE: A Comprehensive User Guide for Beginners and Seniors to Master

Windows 11 Pro, the latest iteration of Microsoft’s flagship operating system, introduces a significant evolution in user experience, security, and performance. This article aims to provide a detailed overview of the features, benefits, and functionalities of Windows 11 Pro, catering to both tech-savvy users and those seeking a comprehensive understanding of the operating system’s capabilities.

A Fresh Visual Identity and Enhanced User Interface

Windows 11 Pro presents a refined and modern aesthetic, departing from the design language of its predecessors. The user interface boasts a simplified and intuitive layout, with a central taskbar and rounded corners for icons and windows, contributing to a cleaner and more streamlined visual experience. The Start menu has undergone a significant revamp, offering a more visually appealing and user-friendly approach to accessing applications and settings.

Performance and Efficiency: A Focus on Smooth Operation

Windows 11 Pro prioritizes performance and efficiency, leveraging advancements in hardware and software technology. The operating system is optimized for modern processors and storage devices, resulting in faster boot times, quicker application loading, and overall enhanced responsiveness. It seamlessly integrates with cloud services, enabling users to access files and applications from any device, further enhancing productivity and convenience.

Security and Privacy: Robust Protection for Your Data

Security remains a paramount concern in today’s digital landscape, and Windows 11 Pro addresses this with robust security features. The operating system incorporates advanced threat protection measures, including Windows Defender Antivirus, which provides real-time protection against malware and other security threats. Additionally, Windows 11 Pro includes features like Windows Hello, enabling secure biometric authentication through facial recognition or fingerprint scanning, enhancing user security and privacy.

Features and Functionality: A Comprehensive Overview

Windows 11 Pro is packed with features designed to enhance productivity, creativity, and overall user experience. Some notable features include:

  • Windows Sandbox: This secure environment allows users to test and run applications without affecting the main operating system, offering a safe space for experimentation.
  • Virtual Desktops: Windows 11 Pro allows users to create and manage multiple virtual desktops, enabling efficient organization and multitasking across different workspaces.
  • Snap Layouts: This feature facilitates efficient window management, enabling users to arrange multiple windows side-by-side with ease, optimizing screen space and improving workflow.
  • DirectStorage: This technology significantly enhances game loading times by enabling direct access to storage devices, minimizing bottlenecks and providing a smoother gaming experience.
  • Microsoft Store: The revamped Microsoft Store offers a wider selection of applications, including Android apps, enhancing the versatility and functionality of Windows 11 Pro.

Benefits of Windows 11 Pro: A Detailed Examination

Windows 11 Pro offers numerous benefits for individuals, businesses, and organizations, making it a compelling choice for various users:

  • Enhanced Productivity: Windows 11 Pro’s streamlined interface, improved multitasking capabilities, and advanced features contribute to a more efficient and productive workflow.
  • Improved Security: Robust security features, including Windows Defender Antivirus and Windows Hello, protect against threats and ensure secure access to sensitive data.
  • Enhanced User Experience: The modern design, intuitive interface, and streamlined workflow contribute to a user-friendly and enjoyable experience.
  • Versatility and Compatibility: Windows 11 Pro supports a wide range of hardware and software, ensuring compatibility with existing devices and applications.
  • Business-Focused Features: Features like BitLocker drive encryption, Azure Active Directory integration, and remote desktop capabilities cater to the needs of businesses and organizations.

FAQs: Addressing Common Queries about Windows 11 Pro

1. What are the system requirements for Windows 11 Pro?

Windows 11 Pro requires a modern processor with at least two cores, 4 GB of RAM, 64 GB of storage space, and a compatible graphics card. It also necessitates a UEFI-based system with Secure Boot enabled.

2. Can I upgrade from Windows 10 to Windows 11 Pro?

Yes, Windows 11 Pro can be installed as an upgrade from Windows 10, provided the system meets the minimum requirements. However, it is recommended to back up data before proceeding with the upgrade.

3. What are the differences between Windows 11 Home and Windows 11 Pro?

Windows 11 Pro offers additional features and functionalities tailored towards business and professional users. These include features like BitLocker encryption, remote desktop access, and Azure Active Directory integration.

4. Is Windows 11 Pro compatible with my existing applications and peripherals?

Windows 11 Pro is designed to be compatible with a wide range of applications and peripherals. However, it is always advisable to check the compatibility of specific applications and devices before upgrading.

5. How can I optimize Windows 11 Pro for performance?

To optimize Windows 11 Pro for performance, users can consider factors like RAM allocation, storage space management, and background application control. They can also utilize features like Windows Sandbox and virtual desktops for efficient multitasking.

Tips for Using Windows 11 Pro Effectively

  • Explore the Start Menu: Familiarize yourself with the redesigned Start menu, which provides quick access to frequently used applications and settings.
  • Utilize Snap Layouts: Optimize screen space and improve workflow by leveraging Snap Layouts for efficient window arrangement.
  • Experiment with Virtual Desktops: Create and manage multiple virtual desktops to organize and separate different workspaces.
  • Enable Windows Hello: Enhance security and convenience by setting up Windows Hello for biometric authentication.
  • Keep Your System Updated: Ensure that your operating system and applications are up-to-date to benefit from the latest security patches and performance improvements.

Conclusion: A Powerful and Versatile Operating System

Windows 11 Pro represents a significant advancement in operating system technology, offering a modern user experience, robust security features, and powerful functionalities. Its focus on performance, efficiency, and user-centric design makes it a compelling choice for individuals, businesses, and organizations seeking a reliable and versatile operating system. By embracing the features and functionalities of Windows 11 Pro, users can unlock new levels of productivity, creativity, and security in their digital endeavors.

Buy Windows 11 User Guide: A Complete Guide to Master the New Windows 11 OS with Tips and Tricks Windows 11: The Ultimate Guide to the Latest Operating System by Microsoft Buy Windows 11 User Guide for Beginners: A Comprehensive Guide to Master Windows 11 Operating
Windows 11 Operating System - NetAns Buy Windows 11 User Guide for Beginners and Seniors: A Complete User Guide with Step-by-Step "Get More Done with Windows 11 Pro: A Comprehensive Guide to Features, Benefits, and Why it
Buy Windows 11: Discover from Beginner to Expert with this Ultimate & Complete Step-by-Step User Unveiling Windows 11: A Comprehensive Review of Microsoft's Latest Operating System - Fashion's

Closure

Thus, we hope this article has provided valuable insights into Windows 11 Pro: A Comprehensive Guide to the Latest Operating System. We thank you for taking the time to read this article. See you in our next article!