Archives June 2024

Navigating And Accessing Drives In Windows 10: A Comprehensive Guide

Navigating and Accessing Drives in Windows 10: A Comprehensive Guide

Introduction

In this auspicious occasion, we are delighted to delve into the intriguing topic related to Navigating and Accessing Drives in Windows 10: A Comprehensive Guide. Let’s weave interesting information and offer fresh perspectives to the readers.

General Tips Drives in Navigation Pane - Add or Remove in Windows 10 - Windows 10 Tutorials

The ability to access and manage drives within a computer system is fundamental to efficient data handling. Windows 10, like its predecessors, provides a user-friendly interface for navigating and accessing various drives, including the "F" drive. This article aims to offer a comprehensive understanding of how to locate and utilize drives within the Windows 10 environment, with a specific focus on the "F" drive.

Understanding Drives in Windows 10

In Windows 10, drives are designated with letters, starting with "C" for the primary hard drive, typically where the operating system is installed. Subsequent drives, which can include internal hard drives, external hard drives, USB drives, or optical drives, are assigned letters in alphabetical order. The "F" drive, therefore, could represent a variety of storage devices.

Accessing Drives in Windows 10

There are several ways to access and navigate drives in Windows 10:
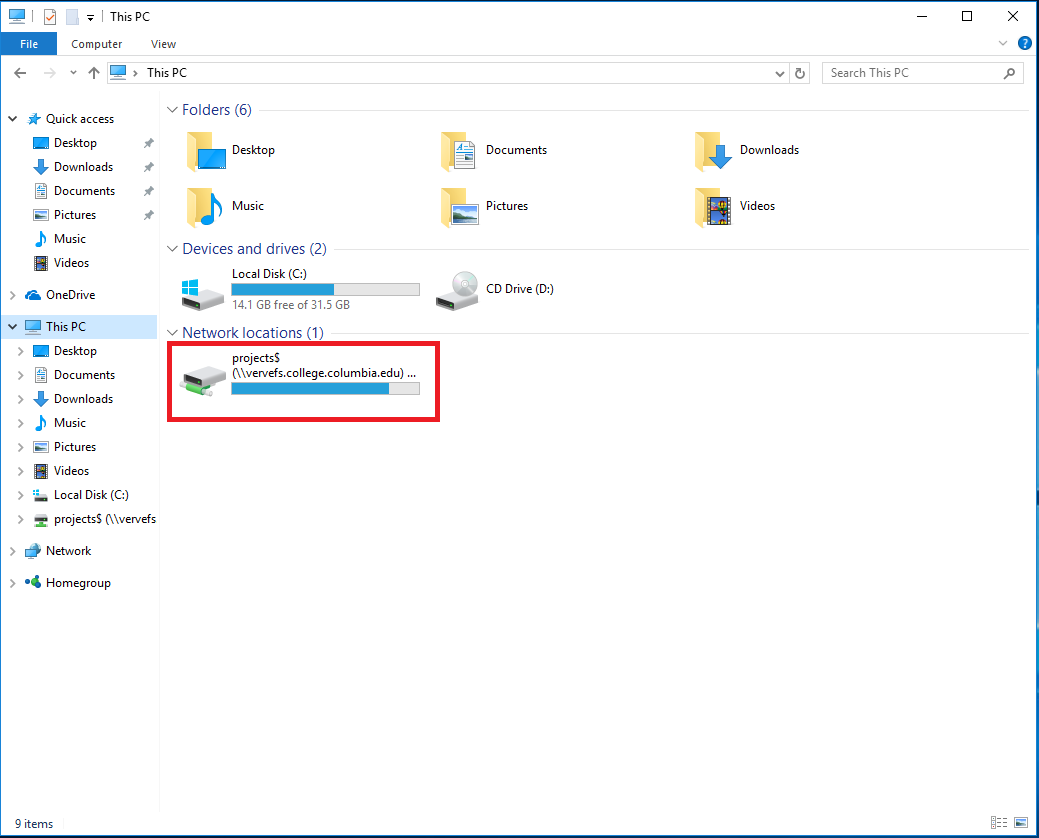
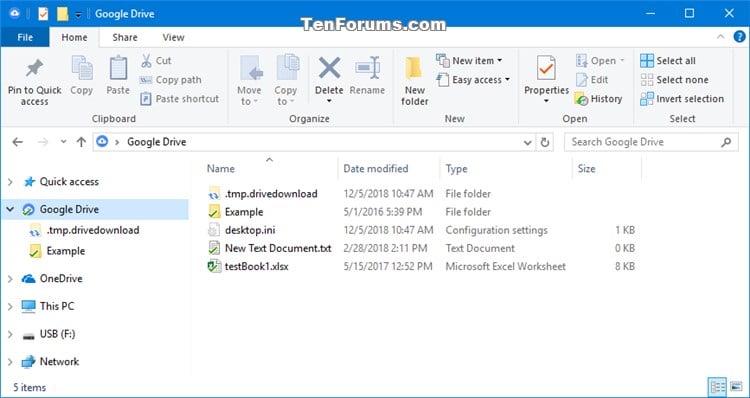
1. File Explorer:

  • The primary method for accessing drives is through the "File Explorer" (previously known as "Windows Explorer").
  • To open "File Explorer," click the "File Explorer" icon on the taskbar or use the keyboard shortcut "Windows Key + E."
  • The left pane of "File Explorer" displays a list of drives, including the "F" drive, if present. Simply click on the "F" drive to view its contents.
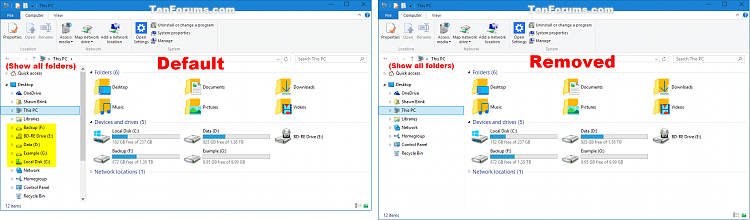
2. This PC:

  • Another method is through the "This PC" interface.
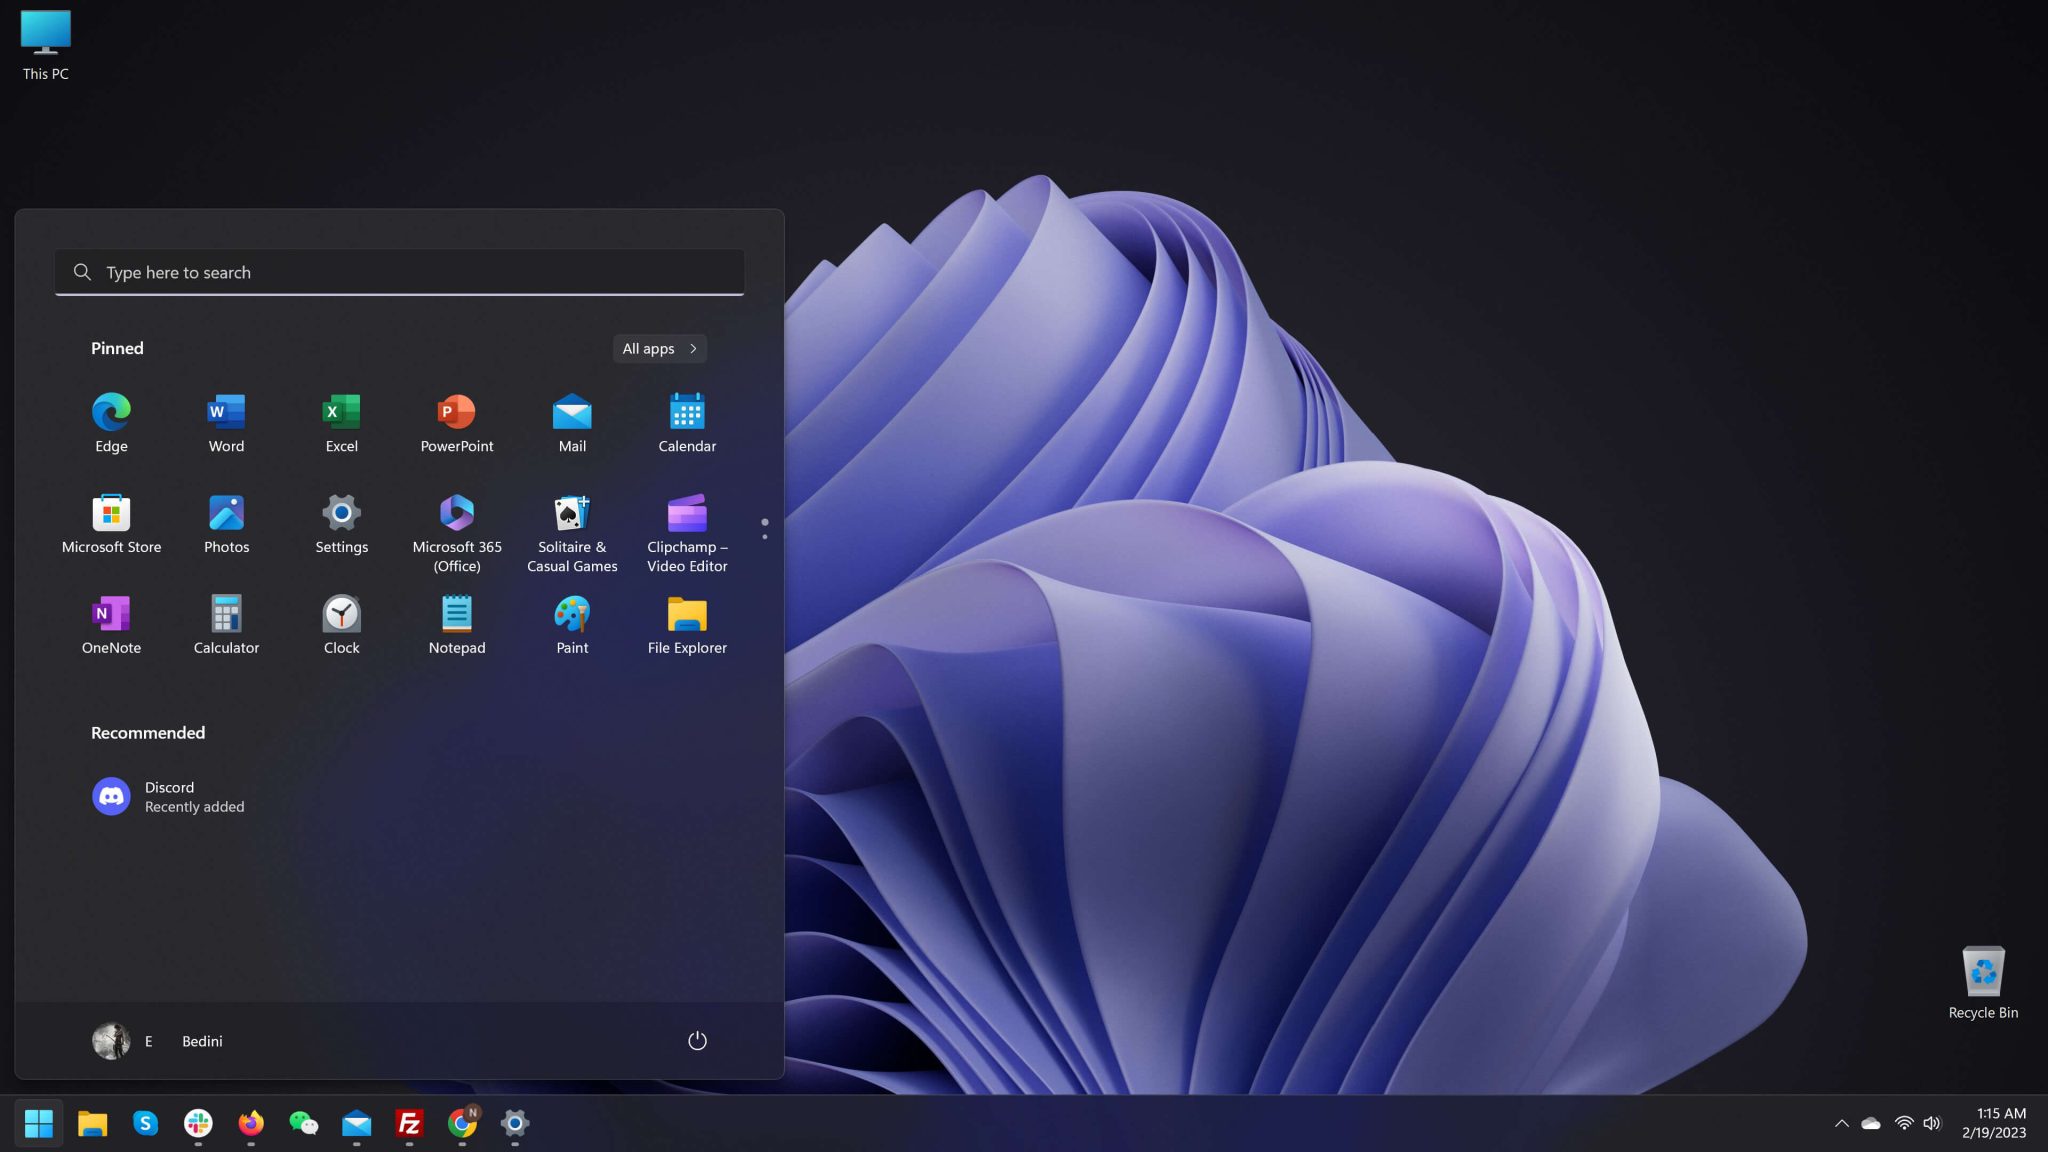
  • Open "This PC" by clicking the "This PC" icon on the desktop or by searching for it in the Start menu.
  • Similar to "File Explorer," "This PC" displays a list of drives, including the "F" drive, if present. Click on the "F" drive to access its contents.

3. Search Bar:

  • The Windows 10 search bar can be used to quickly locate specific drives.
  • Type "F drive" in the search bar and press Enter. This will display the "F" drive, if present, allowing you to access it.
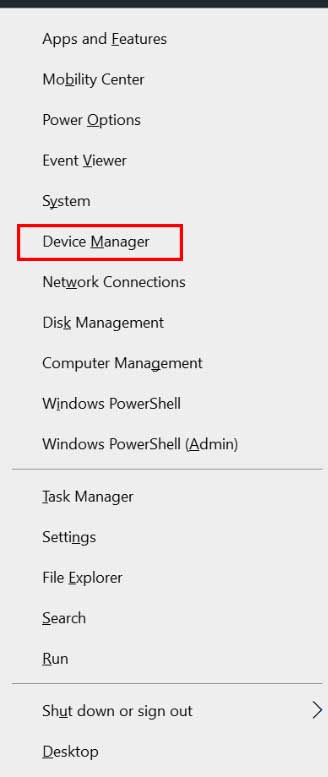
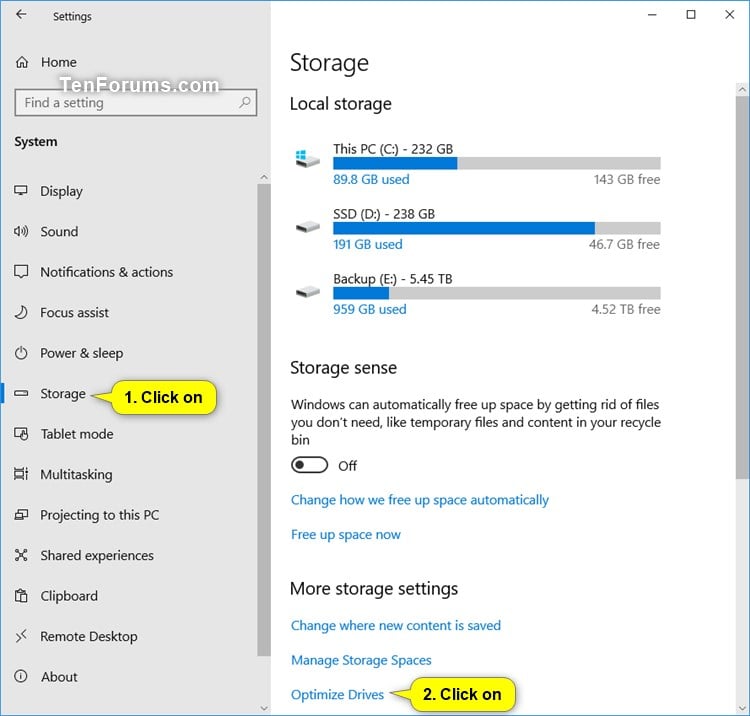
4. Disk Management:

  • The "Disk Management" tool offers a more advanced view of drives and partitions within the system.
  • Access "Disk Management" by searching for it in the Start menu.
  • "Disk Management" displays a visual representation of all drives, including their partitions and associated letters.

Why Accessing Drives is Important

Accessing drives in Windows 10 is crucial for several reasons:

  • Data Management: Drives serve as containers for storing and managing data, including files, folders, applications, and operating system files.
  • File Transfer: Drives facilitate the transfer of files between different storage devices, such as copying files from a USB drive to the hard drive.
  • Backup and Recovery: Drives are essential for creating backups of important data, ensuring data recovery in case of system failure or accidental data loss.
  • Application Installation: Some applications require installation on specific drives, often requiring users to select the desired drive during installation.

Understanding the "F" Drive

The "F" drive, like other drives, can be used to store a wide range of data. However, the specific function and content of the "F" drive vary depending on the system configuration and user preferences. Here are some common scenarios:

  • External Hard Drive: The "F" drive could represent an external hard drive connected to the computer via USB or other interfaces. This is a common use case for storing large amounts of data, backups, or media files.
  • Internal Hard Drive: In some cases, the "F" drive could be an additional internal hard drive installed in the computer. This could be used for storing specific data, applications, or operating system files.
  • Optical Drive: If the system has an optical drive (CD/DVD/Blu-ray), the "F" drive might be assigned to it. This allows users to read and write data to optical media.
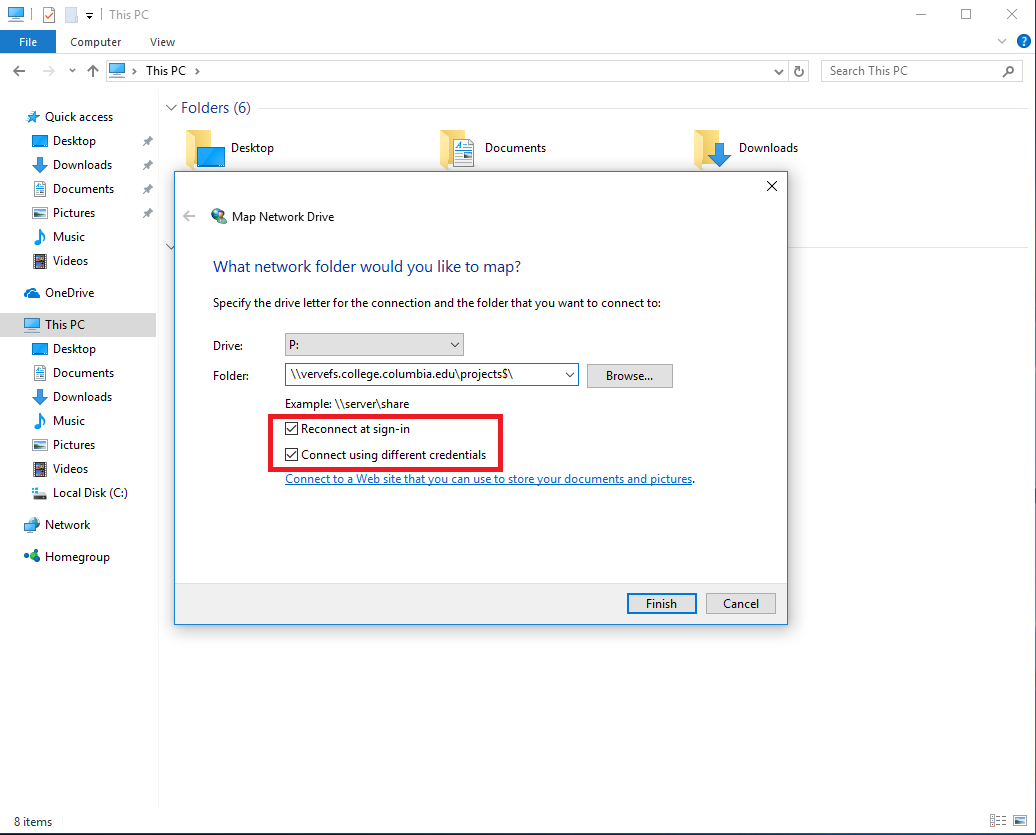
  • Network Drive: The "F" drive could be a network drive, mapped to a shared folder on another computer within the network. This allows users to access files stored on other computers remotely.

FAQs

1. What if the "F" drive is not visible?

  • The "F" drive may not be visible if it is not connected or if the computer does not recognize the device.
  • Ensure that the device is properly connected and powered on.
  • Check if the device drivers are installed correctly.
  • In some cases, the drive letter may have been changed or the drive might be hidden. Use "Disk Management" to check the drive letter and visibility settings.

2. How do I change the drive letter?

  • Right-click on the "F" drive in "Disk Management" and select "Change Drive Letter and Paths."
  • Choose a new drive letter and click "OK."

3. What happens if I format the "F" drive?

  • Formatting a drive erases all data stored on it.
  • It is crucial to back up any important data before formatting a drive.
  • Formatting a drive can also change its file system, which might affect compatibility with other devices.

4. What is the best way to manage data on the "F" drive?

  • Organize files into folders to improve accessibility and maintain order.
  • Regularly back up important data on the "F" drive to prevent data loss.
  • Use antivirus software to protect the "F" drive from malware and viruses.

Tips

  • Use descriptive folder names: This helps you easily identify and locate files within the "F" drive.
  • Regularly defragment the "F" drive: This can improve performance and speed up file access.
  • Use a file compression tool: Compressing files can reduce storage space requirements and make it easier to transfer large files.
  • Monitor drive space: Regularly check the available space on the "F" drive to ensure that you have enough storage for your data.

Conclusion

Accessing and managing drives is an integral part of using a Windows 10 computer. The "F" drive, like other drives, provides valuable storage space for data, applications, and backups. Understanding how to access, manage, and utilize drives effectively is crucial for maintaining data integrity, ensuring efficient file management, and maximizing the functionality of your Windows 10 system. By following the guidelines and tips outlined in this article, you can navigate and utilize drives within Windows 10 with confidence, ensuring a seamless and productive user experience.

How to Access an External Hard Drive on Windows 10 Add or Remove Duplicate Drives in Navigation Pane in Windows 10  Tutorials How to Map Network Drives in Windows 10  Columbia College Information Technology
Change Optimize Drives Schedule Settings in Windows 10 Navigating The Network: Understanding And Utilizing Network Drives - Map France of Lourdes labeled Add or Remove Google Drive from Navigation Pane in Windows 10  Tutorials
General Tips Drives in Navigation Pane - Add or Remove in Windows 10 - Windows 10 Tutorials Optimize and Defrag Drives in Windows 10  Tutorials

Closure

Thus, we hope this article has provided valuable insights into Navigating and Accessing Drives in Windows 10: A Comprehensive Guide. We hope you find this article informative and beneficial. See you in our next article!

Streamlining Windows 11 Deployment: A Comprehensive Guide To Utilizing Intune For Efficient Updates

Streamlining Windows 11 Deployment: A Comprehensive Guide to Utilizing Intune for Efficient Updates

Introduction

With enthusiasm, let’s navigate through the intriguing topic related to Streamlining Windows 11 Deployment: A Comprehensive Guide to Utilizing Intune for Efficient Updates. Let’s weave interesting information and offer fresh perspectives to the readers.

Streamlining Windows 11 Deployment: A Comprehensive Guide to Utilizing Intune for Efficient Updates

Upgrade to Windows 11 Using Intune Feature Update Deployment

The transition to Windows 11 presents organizations with a unique opportunity to enhance their operating system infrastructure. However, managing a large-scale deployment across numerous devices can be a daunting task. This is where Microsoft Intune emerges as a powerful solution, enabling administrators to seamlessly push out Windows 11 updates, ensuring consistent and secure environments.

This article delves into the intricate process of leveraging Intune for deploying Windows 11 updates, providing a comprehensive overview of its functionalities, benefits, and best practices. It will address crucial aspects such as prerequisites, configurations, deployment strategies, and troubleshooting tips.

Understanding the Power of Intune

Microsoft Intune is a cloud-based mobile device management (MDM) and mobile application management (MAM) solution that empowers organizations to manage and secure their devices and applications. Its versatility extends to Windows 10 and 11, providing a centralized platform for managing operating system updates, configurations, and application deployments.

Prerequisites for Successful Deployment

Before embarking on the journey of deploying Windows 11 updates via Intune, it is essential to ensure the fulfillment of certain prerequisites:

  • Intune Subscription: Organizations require a valid Microsoft Intune subscription to access its functionalities.
  • Azure Active Directory (Azure AD): Integration with Azure AD is crucial for device enrollment and identity management.
  • Windows 11 Compatibility: Verify that the target devices meet the minimum hardware and software requirements for Windows 11.
  • Windows 11 Image: Create a custom Windows 11 image or utilize the pre-built image from Microsoft, incorporating any desired customizations.
  • Device Enrollment: Devices must be enrolled in Intune for management and update distribution.

The Intune Deployment Process: A Step-by-Step Guide

The deployment process of Windows 11 updates through Intune involves a series of well-defined steps:

  1. Image Creation and Customization:

    • Create a Windows 11 image, either using a pre-built version or customizing it with desired applications and configurations.
    • Incorporate any necessary drivers and updates for optimal device compatibility.
  2. Intune Configuration:

    • Access the Intune portal and navigate to the "Devices" section.
    • Configure the "Windows 10/11 Upgrade" setting to enable the deployment of Windows 11 updates.
    • Define the target group for the update deployment, specifying the devices that will receive the update.
  3. Deployment Strategy:

    • Choose a suitable deployment strategy based on organizational needs and risk tolerance.
    • Options include:
      • Phased Rollout: Gradually deploy the update to a limited number of devices, allowing for monitoring and troubleshooting.
      • Pilot Group: Deploy the update to a specific group of users or devices for testing and feedback.
      • Full Deployment: Deploy the update to all targeted devices simultaneously.
  4. Update Distribution:

    • Configure the update deployment settings, including:
      • Update Ring: Select the update ring (e.g., Release Preview, Beta, Production) based on the desired release cycle.
      • Deployment Schedule: Specify the time and date for the update to be distributed.
      • Update Method: Choose between "Automatic" or "Manual" update installation.
  5. Monitoring and Reporting:

    • Utilize Intune’s reporting features to monitor the update deployment progress and identify any issues.
    • Analyze the update status, installation success rates, and error logs to ensure a smooth and successful rollout.

Benefits of Using Intune for Windows 11 Deployment

Deploying Windows 11 updates through Intune offers numerous advantages, including:

  • Centralized Management: Intune provides a unified platform for managing and updating devices, simplifying the deployment process.
  • Simplified Update Distribution: Intune automates the update distribution process, eliminating the need for manual intervention.
  • Controlled Deployment: Administrators can control the update deployment schedule, target specific devices, and monitor progress.
  • Improved Security: Intune ensures that devices receive the latest security updates and patches, enhancing overall security posture.
  • Cost-Effectiveness: Intune reduces administrative overhead and minimizes downtime associated with manual updates.

Frequently Asked Questions

Q: How do I ensure compatibility before deploying Windows 11 updates?

A: Before deploying Windows 11 updates, it is crucial to assess the compatibility of devices and applications. Refer to Microsoft’s official documentation for detailed compatibility information, including hardware and software requirements. Utilize tools like the PC Health Check app to assess individual device compatibility.

Q: Can I customize the Windows 11 image before deployment?

A: Yes, Intune allows for image customization. You can create a custom Windows 11 image by adding desired applications, configurations, and drivers. This ensures that devices are provisioned with the necessary software and settings.

Q: How do I manage user data during the update process?

A: Intune supports various data migration options. You can choose to retain user data, migrate it to a new location, or delete it. The specific approach depends on the chosen deployment strategy and user preferences.

Q: What happens if an update fails during the deployment process?

A: Intune provides robust error handling mechanisms. If an update fails, Intune will attempt to retry the installation. Administrators can review the error logs to identify the root cause and take corrective actions.

Tips for Successful Windows 11 Deployment

  • Thorough Planning: Develop a comprehensive deployment plan, considering device compatibility, user impact, and data migration strategies.
  • Pilot Deployment: Conduct a pilot deployment to a small group of devices to test the update process and identify potential issues.
  • Clear Communication: Communicate the update process and potential impacts to users, providing guidance and support.
  • Monitoring and Reporting: Regularly monitor the update deployment progress, analyze reports, and address any issues promptly.

Conclusion

Utilizing Intune for deploying Windows 11 updates empowers organizations with a robust and efficient solution for managing their operating system infrastructure. By leveraging Intune’s centralized management capabilities, automated deployment processes, and comprehensive reporting features, administrators can ensure a seamless and secure transition to Windows 11. The benefits of using Intune for this purpose are undeniable, resulting in improved security, reduced downtime, and enhanced user experience. Through careful planning, effective communication, and ongoing monitoring, organizations can confidently embrace the benefits of Windows 11 with the support of Intune’s powerful deployment capabilities.

Upgrade to Windows 11 Using Intune Feature Update Deployment Microsoft Intune - How to Deploy Updates Rings & Patches for Windows 10 & 11 using Endpoint Deploy Windows 11 now using Intune and Windows Insider for Business - Device Advice
Upgrade to Windows 11 Using Intune Feature Update Deployment Upgrade To Windows 11 Using Intune Feature Update Deployment Policy HTMD Blog Move to Windows 11 with Intune - MDM Tech Space
Deploy Windows 11 now using Intune and Windows Insider for Business - Device Advice Upgrade To Windows 11 Using Intune Feature Update Deployment Policy HTMD Blog

Closure

Thus, we hope this article has provided valuable insights into Streamlining Windows 11 Deployment: A Comprehensive Guide to Utilizing Intune for Efficient Updates. We hope you find this article informative and beneficial. See you in our next article!

Navigating The World Of R On Windows 11: A Comprehensive Guide

Navigating the World of R on Windows 11: A Comprehensive Guide

Introduction

In this auspicious occasion, we are delighted to delve into the intriguing topic related to Navigating the World of R on Windows 11: A Comprehensive Guide. Let’s weave interesting information and offer fresh perspectives to the readers.

Install R on Windows 11  TestingDocs.com

The R programming language, renowned for its statistical computing and data visualization prowess, has become an indispensable tool for researchers, data scientists, and analysts across various disciplines. Its versatility and open-source nature have fostered a thriving community, continually contributing to its development and expansion. This guide aims to provide a comprehensive understanding of R’s integration with Windows 11, exploring its installation, configuration, and utilization, while highlighting its significant benefits in the contemporary data-driven landscape.

Understanding the Power of R on Windows 11

Windows 11, with its user-friendly interface and robust performance, offers an ideal platform for harnessing the full potential of R. The combination of these two technologies empowers users to perform complex statistical analyses, build predictive models, and visualize data with unparalleled clarity.

Key Advantages of Using R on Windows 11:

  • Seamless Integration: Windows 11’s compatibility with R ensures a smooth installation and execution experience, minimizing technical hurdles.
  • Enhanced Performance: Windows 11’s optimized performance, coupled with R’s efficient algorithms, facilitates rapid data processing and analysis, enabling faster insights.
  • Rich Ecosystem: The vast array of R packages, readily available through CRAN (Comprehensive R Archive Network), provides access to specialized functions and libraries for specific data analysis needs.
  • Community Support: The vibrant R community offers extensive documentation, tutorials, and forums, providing invaluable assistance for users of all skill levels.
  • Visualizations: R’s powerful visualization capabilities, complemented by Windows 11’s high-resolution displays, enable the creation of aesthetically appealing and informative data representations.

Step-by-Step Installation Guide: Embarking on Your R Journey

  1. Download the R Installer: Visit the official CRAN website (https://cran.r-project.org/) and select the appropriate R version for your Windows 11 system.
  2. Execute the Installer: Double-click the downloaded installer file and follow the on-screen instructions. Choose a suitable installation directory and proceed with the installation.
  3. Configure R Environment: Once installed, open the R console (typically found in the Start menu). You can configure R’s working directory and other settings according to your preferences.
  4. Install RStudio (Optional): RStudio is a popular integrated development environment (IDE) that enhances the R experience by providing a user-friendly interface for code editing, debugging, and visualization. Download and install RStudio from its official website (https://rstudio.com/).

Unleashing the Potential: Leveraging R on Windows 11

1. Data Manipulation and Transformation:

R offers powerful tools for manipulating and transforming data. Libraries like dplyr and tidyr streamline data cleaning, filtering, and reshaping, while data.table provides efficient data handling for large datasets.

2. Statistical Analysis:

R’s statistical capabilities are extensive, enabling users to perform a wide range of analyses. Packages like stats provide fundamental statistical functions, while specialized packages like lmtest and car offer advanced regression and hypothesis testing capabilities.

3. Data Visualization:

R excels in creating visually appealing and informative data representations. Libraries like ggplot2 offer unparalleled flexibility in generating various chart types, while plotly enables interactive visualizations.

4. Machine Learning:

R’s machine learning capabilities are robust, with packages like caret and randomForest providing tools for classification, regression, and clustering.

5. Data Science Applications:

R’s versatility makes it suitable for diverse data science applications, including:

  • Predictive Modeling: Building models to forecast future outcomes based on historical data.
  • Sentiment Analysis: Analyzing text data to understand public opinion and sentiment.
  • Time Series Analysis: Identifying patterns and trends in time-dependent data.
  • Financial Modeling: Developing models for portfolio management and risk analysis.

Frequently Asked Questions (FAQs)

Q: What are the system requirements for running R on Windows 11?

A: R generally runs smoothly on most modern Windows 11 systems. It requires a minimum of 1GB of RAM and 1GB of disk space. However, for more complex tasks, it’s recommended to have at least 4GB of RAM and 10GB of free disk space.

Q: What are some popular R packages for specific tasks?

A:

  • Data Manipulation and Transformation: dplyr, tidyr, data.table
  • Statistical Analysis: stats, lmtest, car, MASS
  • Data Visualization: ggplot2, plotly, lattice, graphics
  • Machine Learning: caret, randomForest, e1071, nnet

Q: How can I update R on Windows 11?

A: To update R, simply download the latest version from the CRAN website and run the installer. The new version will automatically replace the existing one.

Q: What are some tips for learning R effectively?

A:

  • Start with Basics: Begin by learning the fundamental concepts of R programming, including data types, operators, and functions.
  • Practice Regularly: Consistent practice is crucial for mastering R. Work on small projects and gradually increase complexity.
  • Utilize Online Resources: Explore online tutorials, courses, and documentation to expand your knowledge.
  • Join the Community: Engage with the R community through forums and online groups to learn from experienced users.
  • Experiment and Explore: Don’t be afraid to experiment with different packages and functions to discover their capabilities.

Conclusion

R’s integration with Windows 11 offers a powerful and versatile platform for data analysis, statistical modeling, and visualization. Its open-source nature, extensive package library, and thriving community ensure a rich and rewarding experience for users. By following the installation guide and leveraging R’s capabilities, individuals can unlock the potential of data analysis and gain valuable insights from their data, ultimately contributing to informed decision-making in various domains.

Buy Windows 11 User Guide for Beginners: A Comprehensive Guide to Master Windows 11 Operating Install R on Windows 11  TestingDocs.com Windows 11 Comprehensive Guide And Cheat Sheet
Windows 11 Comprehensive Guide And Cheat Sheet Buy WINDOWS 11 PRO USER GUIDE: A Comprehensive User Guide for Beginners and Seniors to Master Install R on Windows 11  TestingDocs.com
Install R on Windows 11  TestingDocs.com Installing R on Windows 11  James D. McCaffrey

Closure

Thus, we hope this article has provided valuable insights into Navigating the World of R on Windows 11: A Comprehensive Guide. We hope you find this article informative and beneficial. See you in our next article!

Unveiling The Power Of PhotoImpression 6 For Windows 10: A Comprehensive Guide

Unveiling the Power of PhotoImpression 6 for Windows 10: A Comprehensive Guide

Introduction

With great pleasure, we will explore the intriguing topic related to Unveiling the Power of PhotoImpression 6 for Windows 10: A Comprehensive Guide. Let’s weave interesting information and offer fresh perspectives to the readers.

Unveiling the Power of PhotoImpression 6 for Windows 10: A Comprehensive Guide

Photoimpression For Windows 10 - newcreator

PhotoImpression 6, a renowned image editing software, has long been a favorite among users seeking a balance between simplicity and robust features. Its compatibility with Windows 10 further enhances its appeal, providing a user-friendly environment for image manipulation and enhancement. This comprehensive guide delves into the functionalities, benefits, and applications of PhotoImpression 6 on Windows 10, offering a detailed understanding of its capabilities.

Understanding PhotoImpression 6: A Versatile Tool for Image Editing

PhotoImpression 6 stands out as a versatile image editing software, offering a wide array of features that cater to diverse user needs. From basic editing tasks like cropping and resizing to advanced manipulations like color correction and special effects, PhotoImpression 6 empowers users to transform their images effortlessly. Its intuitive interface and comprehensive toolset make it accessible to both beginners and seasoned image editors.

Key Features of PhotoImpression 6 on Windows 10:

  • Image Editing Essentials: PhotoImpression 6 provides a robust set of essential image editing tools, including:
    • Cropping and Resizing: Precisely crop and resize images to achieve desired proportions and dimensions.
    • Brightness and Contrast Adjustment: Fine-tune image brightness and contrast for optimal clarity and visual appeal.
    • Color Correction: Adjust color balance, saturation, and hue to enhance image vibrancy and realism.
    • Red-Eye Removal: Eliminate distracting red-eye effects from portraits with a single click.
    • Sharpening and Blurring: Enhance image sharpness or create soft, artistic effects through sharpening and blurring tools.
  • Special Effects and Filters: PhotoImpression 6 offers a diverse collection of special effects and filters to add creative flair to images, including:
    • Artistic Effects: Transform images into paintings, sketches, and other artistic styles.
    • Frame and Border Options: Add decorative frames and borders to enhance image presentation.
    • Text and Graphics: Incorporate text and graphics into images for personalized messages and visual enhancements.
  • Advanced Image Manipulation: PhotoImpression 6 extends its capabilities beyond basic editing, enabling users to:
    • Layer Support: Work with multiple image layers to create complex compositions and achieve precise control over image elements.
    • Masking: Isolate specific areas of an image for targeted editing and manipulation.
    • Selection Tools: Select precise areas of an image for editing or manipulation with ease.
  • Image Optimization and Sharing: PhotoImpression 6 facilitates image optimization and sharing through:
    • File Format Support: Save images in various formats, including JPEG, PNG, GIF, and TIFF, ensuring compatibility with diverse platforms.
    • Direct Sharing: Share edited images directly to social media platforms or email.
  • User-Friendly Interface: PhotoImpression 6 prioritizes user experience with its intuitive and user-friendly interface. Its clear layout and comprehensive tooltips ensure a seamless and enjoyable editing process.

Benefits of Using PhotoImpression 6 on Windows 10:

  • Accessibility and Affordability: PhotoImpression 6 offers a cost-effective solution for image editing, making it accessible to a wide user base.
  • Ease of Use: Its intuitive interface and comprehensive tooltips cater to users of all skill levels, ensuring a smooth and enjoyable editing experience.
  • Versatile Features: PhotoImpression 6 provides a comprehensive suite of features for basic editing, advanced manipulations, and creative enhancements, catering to diverse user needs.
  • Windows 10 Compatibility: Seamless integration with Windows 10 ensures smooth operation and optimal performance.
  • Regular Updates: Continuous updates ensure ongoing improvement, adding new features and enhancements to enhance user experience.

Applications of PhotoImpression 6 in Diverse Fields:

PhotoImpression 6 finds applications across various fields, empowering individuals and businesses to enhance their visual content and achieve their goals.

  • Personal Use: Enhance personal photos, create personalized greeting cards, and design digital scrapbooks.
  • Professional Photography: Edit and enhance professional photographs, create stunning portfolios, and prepare images for printing and online display.
  • Graphic Design: Design marketing materials, logos, and other visual elements for websites, social media, and print media.
  • Education: Enhance educational materials, create engaging presentations, and edit images for research and academic purposes.
  • Business: Create professional-looking marketing materials, product images, and website graphics.

Frequently Asked Questions (FAQs) Regarding PhotoImpression 6 on Windows 10:

1. What are the system requirements for PhotoImpression 6 on Windows 10?

PhotoImpression 6 requires a Windows 10 operating system, a minimum of 1 GB RAM, and at least 500 MB of free hard disk space for installation.

2. Is PhotoImpression 6 compatible with all versions of Windows 10?

PhotoImpression 6 is compatible with most versions of Windows 10, including Windows 10 Home, Pro, and Enterprise. It is recommended to check the software’s official website for the latest compatibility information.

3. Does PhotoImpression 6 offer a free trial?

Yes, PhotoImpression 6 typically offers a free trial period, allowing users to explore its features and functionality before purchasing a license.

4. How can I get technical support for PhotoImpression 6?

Technical support for PhotoImpression 6 is usually available through the software’s official website or by contacting the developer directly.

5. Can I use PhotoImpression 6 for commercial purposes?

The terms and conditions of use for PhotoImpression 6 may vary depending on the license purchased. It is crucial to review the licensing agreement to determine whether commercial use is permitted.

Tips for Effective Image Editing with PhotoImpression 6 on Windows 10:

  • Start with a High-Quality Image: Begin with a high-resolution image to ensure optimal editing results.
  • Utilize Non-Destructive Editing: Use layers and masking to preserve the original image and make non-permanent edits.
  • Experiment with Different Tools: Explore the various editing tools and features to find the ones that best suit your needs.
  • Save Images in Appropriate Formats: Choose the appropriate file format based on the intended use and desired image quality.
  • Regularly Backup Your Work: Create backups of your edited images to prevent data loss.
  • Seek Inspiration and Tutorials: Explore online resources and tutorials to enhance your image editing skills.

Conclusion:

PhotoImpression 6 on Windows 10 stands as a powerful and user-friendly image editing software, offering a comprehensive suite of features for both casual and professional users. Its intuitive interface, versatile tools, and affordability make it an ideal choice for image enhancement, creative projects, and professional applications. By leveraging its capabilities, users can transform ordinary images into stunning visuals, expressing their creativity and achieving their visual goals.

Arcsoft PhotoImpression - Download Arcsoft PhotoImpression 6.5.9.110, 3.0 for Windows Photoimpression For Windows 10 - everlicious PhotoImpressionใจใฏไฝ•ใงใ™ใ‹๏ผŸ๏ผˆArcSoftใ‚ˆใ‚Š๏ผ‰
Arcsoft PhotoImpression - Download Arcsoft PhotoImpression 6.5.9.110, 3.0 for Windows ArcSoft PhotoImpression 6.0 Download - PhotoImpression.exe Photoimpression For Windows 10
I Like Warez Blog: DESCARGAR PHOTOIMPRESSION 6 BHAใ€็”ปๅƒ็ฎก็†ๆฉŸ่ƒฝใ‚’ๆญ่ผ‰ใ—ใŸใ€ŒPhotoImpression 6 PREMIUMใ€

Closure

Thus, we hope this article has provided valuable insights into Unveiling the Power of PhotoImpression 6 for Windows 10: A Comprehensive Guide. We thank you for taking the time to read this article. See you in our next article!

The Power Of R On Windows 10 64-bit: A Comprehensive Guide

The Power of R on Windows 10 64-bit: A Comprehensive Guide

Introduction

In this auspicious occasion, we are delighted to delve into the intriguing topic related to The Power of R on Windows 10 64-bit: A Comprehensive Guide. Let’s weave interesting information and offer fresh perspectives to the readers.

The Power of R on Windows 10 64-bit: A Comprehensive Guide

Simple Guide for Installing R on Windows 10

R, a free and open-source programming language and software environment, has become an indispensable tool for statisticians, data scientists, and researchers worldwide. Its robust capabilities for statistical computing, data visualization, and graphical modeling have propelled it to the forefront of data analysis.

This guide delves into the intricacies of using R on Windows 10 64-bit, focusing on its significance, advantages, and practical implementation.

Understanding R’s Importance

R’s popularity stems from its inherent strengths:

  • Comprehensive Statistical Capabilities: R boasts a vast array of built-in statistical functions and packages, covering a wide spectrum of statistical methods, from basic descriptive statistics to advanced machine learning algorithms.
  • Data Visualization Power: R offers unparalleled flexibility in creating high-quality, publication-ready visualizations. Packages like ggplot2 provide elegant and customizable graphical representations of data, enabling insightful data exploration and communication.
  • Extensibility and Open-Source Nature: R’s open-source nature fosters a vibrant community of developers who contribute to its continuous growth. Numerous packages, created and maintained by this community, extend R’s functionality to address specific domains and research needs.
  • Cross-Platform Compatibility: R runs seamlessly on various operating systems, including Windows, macOS, and Linux, ensuring accessibility and compatibility across different platforms.

R on Windows 10 64-bit: A Powerful Combination

The Windows 10 64-bit operating system, with its enhanced memory management and processing power, provides an ideal environment for running R. This combination unlocks significant advantages:

  • Increased Memory Allocation: 64-bit systems offer larger address spaces, allowing R to access more memory, enabling the analysis of larger datasets and complex models.
  • Improved Performance: The 64-bit architecture facilitates faster data processing and computation, leading to quicker execution of R scripts and algorithms.
  • Enhanced Package Support: The 64-bit environment supports a wider range of R packages, including those demanding more memory or computational resources.
  • Seamless Integration: Windows 10’s user-friendly interface and compatibility with various tools and software make it easy to integrate R into existing workflows.

Installation and Setup

Installing R on Windows 10 64-bit is a straightforward process:

  1. Download R: Visit the CRAN (Comprehensive R Archive Network) website and download the appropriate R version for Windows 64-bit.
  2. Installation: Run the downloaded installer and follow the on-screen instructions.
  3. Verify Installation: Launch R from the Start menu to confirm successful installation.

RStudio: An Essential Tool

While R itself is a powerful language, RStudio provides a user-friendly integrated development environment (IDE) that enhances the R experience. It offers features like:

  • Code Editor: A dedicated code editor with syntax highlighting, auto-completion, and code navigation.
  • Console: An interactive console for executing R commands and viewing output.
  • Workspace Management: Tools for managing variables, objects, and data.
  • Plots and Graphs: Integration with R’s graphics capabilities for visualization.
  • Package Management: Easy installation, update, and removal of R packages.

Getting Started with R

Begin exploring R by executing basic commands in the R console:

  • Print Statements: print("Hello, World!")
  • Mathematical Operations: 2 + 3
  • Variable Assignment: x <- 5
  • Data Structures: vector <- c(1, 2, 3)

Exploring R Packages

R’s strength lies in its vast collection of packages. To install a package, use the install.packages() function:

install.packages("ggplot2") 

Once installed, load the package using the library() function:

library(ggplot2)

Data Analysis with R

R excels in data analysis. Here are some fundamental concepts:

  • Data Import: Import data from various sources using functions like read.csv() or read.table().
  • Data Manipulation: Use functions like subset(), merge(), and transform() to manipulate and transform data.
  • Statistical Analysis: Apply statistical methods like t-tests, ANOVA, regression analysis, and more.
  • Visualization: Create insightful visualizations using packages like ggplot2 and lattice.

Example: Exploring a Dataset with R

Let’s explore a simple example using the iris dataset, which is built-in to R:

# Load the necessary package
library(ggplot2)

# View the first few rows of the dataset
head(iris)

# Create a scatter plot of Sepal Length vs. Sepal Width
ggplot(iris, aes(x = Sepal.Length, y = Sepal.Width, color = Species)) + 
  geom_point() 

# Calculate the mean Sepal Length for each species
aggregate(Sepal.Length ~ Species, data = iris, FUN = mean)

FAQs

Q: What are the key advantages of using R on Windows 10 64-bit?

A: 64-bit systems provide increased memory allocation, enhanced performance, wider package support, and seamless integration with Windows 10’s user-friendly environment.

Q: What are some popular R packages for data analysis and visualization?

A: Popular packages include ggplot2, dplyr, tidyr, stringr, caret, randomForest, glmnet, and many more.

Q: How do I update R and its packages on Windows 10?

A: To update R, download the latest version from CRAN and install it. To update packages, use the update.packages() function.

Q: Are there any resources for learning R?

A: Numerous online resources, tutorials, and courses are available for learning R, including the official R documentation, DataCamp, Coursera, and edX.

Tips for Efficient R Usage

  • Use RStudio: RStudio provides a user-friendly IDE, simplifying code development and workflow management.
  • Explore Packages: Leverage the vast collection of R packages to address specific tasks and domains.
  • Utilize Online Resources: Refer to online documentation, tutorials, and forums for guidance and support.
  • Practice Regularly: The best way to master R is through consistent practice and working on real-world projects.

Conclusion

R, running on Windows 10 64-bit, empowers users with a powerful and versatile tool for data analysis, visualization, and statistical modeling. Its comprehensive capabilities, open-source nature, and vast community support make it an indispensable asset for professionals and researchers across diverse fields. By leveraging R’s strengths and following the guidelines outlined in this guide, users can unlock its full potential and gain valuable insights from data.

Instalar R En Windows 10 64 Bits - YouTube Installing R on Windows10 - YouTube Simple Guide for Installing R on Windows 10
Simple Guide for Installing R on Windows 10 install-r-on-windows-10-step-2 - Manjaro dot site Sap ERP Books: How To Switch From 32-Bit Windows 10 To 64-Bit Windows 10
Simple Guide for Installing R on Windows 10 Simple Guide for Installing R on Windows 10

Closure

Thus, we hope this article has provided valuable insights into The Power of R on Windows 10 64-bit: A Comprehensive Guide. We hope you find this article informative and beneficial. See you in our next article!

Navigating The Evolving Landscape Of Windows 10: A Comprehensive Look At Recent Fixes And Enhancements

Navigating the Evolving Landscape of Windows 10: A Comprehensive Look at Recent Fixes and Enhancements

Introduction

With enthusiasm, let’s navigate through the intriguing topic related to Navigating the Evolving Landscape of Windows 10: A Comprehensive Look at Recent Fixes and Enhancements. Let’s weave interesting information and offer fresh perspectives to the readers.

Navigating the OS Landscape: A Practical Approach to Transitioning from Windows 10

Windows 10, Microsoft’s flagship operating system, continues to evolve with consistent updates designed to enhance user experience, address security vulnerabilities, and improve overall system performance. While the operating system itself remains fundamentally the same, these updates introduce significant changes, often addressing issues reported by users and incorporating new features. This article delves into the recent fixes and enhancements implemented in Windows 10, providing a comprehensive overview of their significance and benefits.

A Focus on Stability and Performance

Recent updates to Windows 10 prioritize stability and performance, addressing common user complaints and streamlining the overall user experience. One notable improvement lies in the reduction of system resource consumption, particularly in the areas of memory usage and processor utilization. This optimization results in smoother system operation, faster application loading times, and a more responsive user interface.

Another key area of focus is the enhancement of system reliability. Updates have addressed known issues that could lead to system crashes, freezes, or unexpected shutdowns. By identifying and resolving these issues, Microsoft ensures a more stable and predictable computing environment.

Security Enhancements: A Continuous Evolution

Security remains a paramount concern in the digital landscape, and Windows 10 updates consistently incorporate measures to bolster system security. These updates introduce new security features, refine existing ones, and address emerging vulnerabilities.

One significant development is the continuous improvement of Windows Defender, Microsoft’s built-in antivirus solution. Regular updates ensure that Windows Defender remains effective against the latest malware threats, providing robust protection against malicious software.

Furthermore, updates often include patches that address vulnerabilities discovered in the operating system’s core components. These patches are crucial in preventing malicious actors from exploiting weaknesses and gaining unauthorized access to user data or system resources.

User Interface Refinements and Feature Additions

While stability and security are key priorities, Windows 10 updates also introduce refinements to the user interface and add new features designed to enhance user productivity and convenience.

One example is the ongoing optimization of the Start Menu, a central element of the Windows 10 user experience. Updates often introduce improvements to the organization and functionality of the Start Menu, making it easier for users to navigate and access frequently used applications and settings.

New features, such as improved file management tools, enhanced multimedia capabilities, and improved integration with cloud services, are also regularly introduced. These additions are designed to simplify tasks, enhance productivity, and provide a more intuitive user experience.

Beyond the Headlines: Understanding the Importance of Updates

While the specific features and fixes included in each update may vary, the underlying goal remains consistent: to deliver a more reliable, secure, and user-friendly Windows 10 experience.

Keeping your Windows 10 system up-to-date is crucial for several reasons:

  • Enhanced Security: Updates patch vulnerabilities, preventing malicious actors from exploiting weaknesses and compromising your system.
  • Improved Stability: Updates address known issues that could lead to system crashes, freezes, or unexpected shutdowns, ensuring a more reliable computing environment.
  • Optimized Performance: Updates optimize system resource usage, resulting in faster application loading times, a more responsive user interface, and overall smoother system operation.
  • New Features and Functionality: Updates introduce new features and improvements to the user interface, enhancing productivity and providing a more intuitive user experience.

Frequently Asked Questions (FAQs) Regarding Windows 10 Updates

Q: How often are Windows 10 updates released?

A: Windows 10 updates are released on a regular schedule, typically on the second Tuesday of each month. However, critical security updates may be released outside of this schedule to address urgent vulnerabilities.

Q: How can I check for updates on my Windows 10 system?

A: To check for updates, open the "Settings" app, navigate to "Update & Security," and then select "Windows Update." Click on "Check for updates" to initiate the process.

Q: What are the different types of Windows 10 updates?

A: There are two main types of Windows 10 updates:

  • Feature updates: These updates introduce significant new features, functionality, and user interface changes. They are typically released twice a year.
  • Cumulative updates: These updates include smaller bug fixes, security patches, and performance improvements. They are released more frequently, usually on a monthly basis.

Q: Do I need to install all Windows 10 updates?

A: It is strongly recommended to install all Windows 10 updates, especially security updates. These updates are crucial for maintaining the security and stability of your system.

Q: What if I encounter problems after installing a Windows 10 update?

A: If you encounter problems after installing an update, you can try the following:

  • Restart your computer: A simple restart can often resolve minor issues.
  • Run the Windows Update troubleshooter: The Windows Update troubleshooter can help identify and resolve common update problems.
  • Check the Microsoft support website: The Microsoft support website provides information on known update issues and potential solutions.
  • Contact Microsoft support: If you are unable to resolve the issue yourself, you can contact Microsoft support for assistance.

Tips for Managing Windows 10 Updates

  • Schedule updates: You can schedule updates to be installed at a specific time, ensuring that they are installed when you are not using your computer.
  • Pause updates: You can temporarily pause updates if you need to delay them for a specific reason.
  • Control update delivery: You can choose to receive updates from Microsoft’s servers or from other sources.
  • Monitor update history: You can view a history of all installed updates and identify any potential issues that may have occurred.

Conclusion

Windows 10 is a dynamic operating system that constantly evolves to meet the changing needs of users. Regular updates are essential for maintaining a secure, stable, and feature-rich computing environment. By understanding the importance of these updates and following the recommendations outlined above, users can ensure a smooth and enjoyable Windows 10 experience.

Windows 10 Nature Landscape Windows Evolution: Navigating the Latest Features and Updates Windows 10: How the client operating system is evolving  Computer Weekly
HD wallpaper: Windows 10, abstract, landscape  Wallpaper Flare Of versions and branches - the evolving story of Windows Phone and Windows 10 Navigating the Evolving Information Management Landscape  ZircoDATA
PPT - Navigating the Evolving Landscape PowerPoint Presentation, free download - ID:12285721 Evolving Windows 10 at best price in Mumbai by SMS IT Solutions Private Limited  ID: 14729528388

Closure

Thus, we hope this article has provided valuable insights into Navigating the Evolving Landscape of Windows 10: A Comprehensive Look at Recent Fixes and Enhancements. We appreciate your attention to our article. See you in our next article!

Navigating The Labyrinth Of Windows 10 Repair: A Guide To Free Tools And Programs

Navigating the Labyrinth of Windows 10 Repair: A Guide to Free Tools and Programs

Introduction

With great pleasure, we will explore the intriguing topic related to Navigating the Labyrinth of Windows 10 Repair: A Guide to Free Tools and Programs. Let’s weave interesting information and offer fresh perspectives to the readers.

Windows 10 Repair Tool

Windows 10, despite its robust design, can occasionally encounter issues. These problems range from minor annoyances like slow performance or program crashes to more severe situations like system instability or data loss. Fortunately, a plethora of free tools and programs exist to help users troubleshoot and resolve these issues. This article delves into the world of Windows 10 repair software, providing a comprehensive guide to understanding, using, and benefiting from these invaluable resources.

Understanding the Need for Repair Tools

Windows 10, like any complex operating system, can be susceptible to various problems. These problems can arise from a multitude of factors:

  • Software Conflicts: Incompatible or outdated programs can cause system instability and performance issues.
  • Malware Infections: Viruses, spyware, and other malicious software can corrupt system files and compromise security.
  • Hardware Malfunctions: Faulty hardware components can lead to system crashes, blue screens of death (BSOD), and data loss.
  • System Errors: Software bugs, driver issues, and registry errors can disrupt normal system operations.
  • Incorrect Configuration: Improper system settings can negatively impact performance and functionality.

These issues can manifest in various ways, including:

  • Slow Performance: The system may take longer to load, respond to commands, or run applications.
  • Frequent Crashes: Programs may unexpectedly quit or the entire system may freeze or restart.
  • Error Messages: Windows may display error messages, indicating specific problems.
  • System Instability: The system may experience frequent crashes, freezes, or other erratic behavior.
  • Data Loss: Files may become inaccessible or corrupted.

Repair tools and programs are designed to address these issues by:

  • Scanning for and Repairing System Errors: They identify and resolve system errors, corrupt files, and registry issues.
  • Optimizing System Performance: They clean up unnecessary files, defragment hard drives, and optimize system settings for improved performance.
  • Removing Malware: They scan for and remove viruses, spyware, and other malicious software.
  • Troubleshooting Hardware Issues: They help identify and resolve hardware problems, such as driver conflicts or faulty components.
  • Restoring System Settings: They allow users to revert to a previous system state, undoing unwanted changes.

Types of Windows 10 Repair Tools and Programs

Windows 10 repair tools and programs can be categorized into several types, each addressing specific issues:

1. System Maintenance and Optimization Tools:

These tools focus on improving system performance and stability by cleaning up temporary files, defragmenting hard drives, optimizing system settings, and managing startup programs.

  • Windows Disk Cleanup: A built-in tool that removes temporary files, system files, and other unnecessary data to free up disk space.
  • Windows Defragmenter: A built-in tool that reorganizes fragmented files on the hard drive, improving access speed and performance.
  • CCleaner: A popular third-party tool that cleans up temporary files, invalid registry entries, and other system junk, optimizing system performance.
  • Advanced SystemCare: A comprehensive optimization suite that includes disk cleanup, registry cleaning, system optimization, and malware protection.

2. System Error Repair Tools:

These tools identify and resolve system errors, corrupt files, and registry issues, restoring system stability.

  • System File Checker (SFC): A built-in tool that scans for and repairs corrupt system files.
  • CHKDSK: A built-in tool that checks for and repairs errors on hard drives.
  • Registry Cleaner: A tool that scans and cleans the registry for invalid entries, improving system stability.
  • Wise Registry Cleaner: A popular registry cleaner that removes invalid entries, improves system performance, and optimizes registry settings.

3. Malware Removal Tools:

These tools scan for and remove viruses, spyware, and other malicious software, protecting the system from harmful threats.

  • Windows Defender: A built-in antivirus program that provides real-time protection against malware.
  • Malwarebytes: A popular anti-malware program that offers comprehensive protection against various threats.
  • Avast Free Antivirus: A free antivirus program that provides real-time protection, malware scanning, and other security features.
  • AVG AntiVirus Free: A free antivirus program that offers real-time protection, malware scanning, and a range of security tools.

4. System Restore and Backup Tools:

These tools allow users to revert to a previous system state, undoing unwanted changes or restoring the system after a problem.

  • System Restore: A built-in tool that allows users to restore the system to a previous point in time, undoing changes made to system files and settings.
  • Windows Backup: A built-in tool that allows users to create backups of system files, settings, and applications.
  • EaseUS Todo Backup Free: A free backup program that allows users to create system images, backup files and folders, and restore data.
  • AOMEI Backupper Standard: A free backup program that offers comprehensive backup and recovery features, including system image backup, file backup, and disk cloning.

5. Driver Update Tools:

These tools automatically update device drivers, ensuring compatibility and resolving potential conflicts.

  • Device Manager: A built-in tool that allows users to view and update device drivers.
  • Driver Booster: A third-party tool that automatically scans for and updates outdated device drivers.
  • Snappy Driver Installer (SDI): A free driver update tool that provides a simple and efficient way to update drivers.
  • Driver Easy: A driver update tool that scans for and updates outdated drivers, including drivers for hardware that is not recognized by Windows.

Choosing the Right Repair Tools

Selecting the appropriate repair tools depends on the specific issue encountered and the user’s technical proficiency.

  • For basic maintenance and optimization: Windows Disk Cleanup, Windows Defragmenter, and CCleaner are excellent choices.
  • For resolving system errors: System File Checker, CHKDSK, and Registry Cleaner are effective tools.
  • For malware protection: Windows Defender, Malwarebytes, Avast Free Antivirus, and AVG AntiVirus Free provide comprehensive protection.
  • For system restore and backup: System Restore, Windows Backup, EaseUS Todo Backup Free, and AOMEI Backupper Standard offer reliable solutions.
  • For driver updates: Device Manager, Driver Booster, Snappy Driver Installer, and Driver Easy simplify the process.

Using Repair Tools Effectively

To maximize the benefits of repair tools, follow these guidelines:

  • Understand the Tool’s Function: Before using a tool, read its documentation and understand its purpose and capabilities.
  • Run a Full System Scan: Start by running a full system scan to identify potential issues.
  • Follow Instructions Carefully: Pay close attention to instructions and prompts during the repair process.
  • Back Up Important Data: Before making any significant changes, back up important data to prevent accidental loss.
  • Restart the System: After using a repair tool, restart the system to apply changes and ensure stability.
  • Monitor System Performance: After using a repair tool, monitor system performance to assess its effectiveness.

Frequently Asked Questions (FAQs)

Q: Are these repair tools safe to use?

A: Most reputable repair tools are safe to use. However, it is essential to download software from trusted sources and avoid using tools from unknown or untrustworthy websites.

Q: Can I use multiple repair tools simultaneously?

A: Using multiple repair tools simultaneously can lead to conflicts and instability. It is generally recommended to use one tool at a time and monitor its impact on the system.

Q: Should I use all the repair tools available?

A: Not all repair tools are necessary for every situation. Use tools specifically addressing the encountered issue and avoid unnecessary scans or operations.

Q: How often should I use repair tools?

A: Regularly running system maintenance and optimization tools, such as Disk Cleanup and Defragmenter, can improve system performance. Running malware scans periodically is also crucial for security.

Q: What should I do if a repair tool fails to resolve the issue?

A: If a repair tool fails to resolve the issue, consider seeking professional help or consulting the tool’s documentation for further troubleshooting steps.

Tips for Using Repair Tools

  • Run a System Scan Before Installing New Software: Before installing new software, run a system scan to identify and resolve potential conflicts.
  • Use a Registry Cleaner Regularly: Regularly cleaning the registry can improve system performance and stability.
  • Keep Antivirus Software Up to Date: Regularly update antivirus software to ensure maximum protection against malware.
  • Back Up Data Regularly: Regularly back up important data to prevent data loss in case of system failure.
  • Create a System Restore Point: Before making significant changes, create a system restore point to revert to a previous state if necessary.

Conclusion

Repair tools and programs are invaluable resources for maintaining a healthy and efficient Windows 10 system. By understanding their functions, choosing the right tools, and using them effectively, users can address system issues, optimize performance, and ensure a smooth and reliable computing experience. Remember to use tools from reputable sources, follow instructions carefully, and back up important data before making any significant changes. With the right tools and knowledge, users can navigate the labyrinth of Windows 10 repair and keep their systems running smoothly.

Windows 10 Repair Tool Free Download Full Version How To Repair Windows 10 And 11 In 4 Steps Computerwo - vrogue.co Windows 10 Repair Tool
5 Best FREE Windows Repair Tools To Fix Any PC Problem �� - YouTube How to Repair Apps and Programs in Windows 10 & 11 Windows 10 Auto Repair Not Working
Windows Insider Build Lets You Repair System With Windows Update  Tom's Hardware Navigating The Labyrinth: A Comprehensive Guide To The Long Walk Map - Map France of Lourdes labeled

Closure

Thus, we hope this article has provided valuable insights into Navigating the Labyrinth of Windows 10 Repair: A Guide to Free Tools and Programs. We appreciate your attention to our article. See you in our next article!

Navigating The Digital Landscape: A Comprehensive Guide To QR Code Scanner Apps For Windows 11

Navigating the Digital Landscape: A Comprehensive Guide to QR Code Scanner Apps for Windows 11

Introduction

In this auspicious occasion, we are delighted to delve into the intriguing topic related to Navigating the Digital Landscape: A Comprehensive Guide to QR Code Scanner Apps for Windows 11. Let’s weave interesting information and offer fresh perspectives to the readers.

Unveiling the Power of QR Code Scanner Features: A Comprehensive Guide โ€“ QR Code Scanners

The ubiquitous presence of QR codes in modern life has made dedicated scanning applications essential tools for navigating the digital landscape. Windows 11, with its focus on user-friendliness and seamless integration, offers a plethora of options for scanning QR codes, providing users with a convenient and efficient way to access information, services, and experiences.

Understanding the Importance of QR Code Scanners in the Windows 11 Ecosystem

QR codes, short for Quick Response codes, are two-dimensional barcodes that hold encoded information. These codes have become increasingly prevalent, offering a simple and secure way to access a wide range of digital content. From accessing product information and online menus to making payments and connecting to Wi-Fi networks, QR codes streamline interactions with the digital world.

Windows 11, with its emphasis on user experience and integration, recognizes the importance of QR code scanning. The operating system provides native support for QR code scanning, allowing users to effortlessly decode these codes using their built-in camera or a dedicated app. This seamless integration enhances the user experience, making it effortless to navigate the digital landscape.

Exploring the Diverse Landscape of QR Code Scanner Apps for Windows 11

The Windows 11 ecosystem offers a diverse range of QR code scanner apps, catering to different user needs and preferences. These applications vary in features, design, and functionality, providing users with a selection tailored to their specific requirements.

Native QR Code Scanning Capabilities in Windows 11

Windows 11 incorporates native QR code scanning capabilities, eliminating the need for third-party apps in some cases. The operating system’s built-in camera app can directly scan QR codes, offering a simple and efficient solution for basic scanning needs.

Dedicated QR Code Scanner Apps for Enhanced Functionality

For users seeking more advanced features and customization, dedicated QR code scanner apps offer a wider range of functionalities. These applications often include features such as:

  • Batch scanning: Allows users to scan multiple QR codes simultaneously, saving time and effort.
  • History tracking: Records scanned QR codes, providing a convenient log for future reference.
  • Automatic code detection: Automatically recognizes QR codes within the camera’s field of view, eliminating the need for manual aiming.
  • Customization options: Allows users to adjust the scanner’s settings, such as the scan area and code type.
  • Advanced features: Some apps offer additional features like password management, file sharing, and secure data storage.

Choosing the Right QR Code Scanner App for Your Needs

Selecting the optimal QR code scanner app depends on individual needs and preferences. Factors to consider include:

  • Functionality: Determine the specific features required, such as batch scanning, history tracking, or advanced customization.
  • User interface: Choose an app with an intuitive and user-friendly interface for ease of use.
  • Performance: Opt for an app that scans codes quickly and accurately, ensuring a smooth user experience.
  • Security: Consider the app’s security measures, particularly if handling sensitive information.
  • Compatibility: Ensure the app is compatible with your Windows 11 device and operating system version.

Exploring Popular QR Code Scanner Apps for Windows 11

Several popular QR code scanner apps are available on the Microsoft Store, each offering unique features and benefits:

  • QR Code Reader: A simple and straightforward QR code scanner app with a clean interface and basic functionalities.
  • QR & Barcode Scanner: Offers a comprehensive set of features, including batch scanning, history tracking, and automatic code detection.
  • QR Code Scanner Pro: Provides advanced features such as password management, file sharing, and secure data storage.
  • QR Code Scanner Free: A free and user-friendly app with essential scanning capabilities.

Frequently Asked Questions (FAQs) Regarding QR Code Scanner Apps for Windows 11

Q: Do I need a dedicated QR code scanner app for Windows 11?

A: While Windows 11 offers native QR code scanning capabilities, dedicated apps often provide enhanced features, such as batch scanning, history tracking, and advanced customization options. The need for a dedicated app depends on individual requirements and preferences.

Q: How can I ensure the safety of my data when using a QR code scanner app?

A: Always download apps from trusted sources, such as the Microsoft Store. Pay attention to app permissions and avoid granting unnecessary access to sensitive information. Look for apps with strong security measures and encryption protocols.

Q: What are the benefits of using a QR code scanner app for Windows 11?

A: QR code scanner apps offer several benefits, including:

  • Convenience: Streamlined access to digital content and services.
  • Efficiency: Faster and more efficient way to scan QR codes compared to manual typing.
  • Enhanced functionality: Access to advanced features such as batch scanning, history tracking, and customization.
  • Improved user experience: Seamless integration with Windows 11 and intuitive interfaces.

Tips for Optimizing QR Code Scanning on Windows 11

  • Ensure proper lighting: Adequate lighting is crucial for accurate QR code scanning.
  • Position the QR code correctly: Align the QR code within the camera’s frame for optimal scanning.
  • Keep the camera steady: Minimize movement to avoid blurry images and scanning errors.
  • Use a dedicated QR code scanner app: Choose an app with advanced features for enhanced functionality.
  • Regularly update your apps: Ensure you have the latest app versions for optimal performance and security.

Conclusion: Embracing the Convenience and Efficiency of QR Code Scanners in the Windows 11 Ecosystem

QR code scanner apps have become indispensable tools in the digital age, providing users with a convenient and efficient way to access information and services. Windows 11, with its native support and diverse app ecosystem, empowers users to seamlessly integrate QR code scanning into their daily lives. By leveraging the functionality and features of these applications, users can enhance their digital experiences and navigate the ever-evolving landscape of QR codes with ease.

Qr Code Scanner For Windows Proreader-QR code scanner app ui ux design :: Behance How to Scan QR Code in Windows 11? โ€“ WebNots
Unveiling the Power of QR Code Scanner Features: A Comprehensive Guide โ€“ QR Code Scanners Solve TPM 2.0 Error Evaluating Windows 11 Navigating The Digital Landscape: A Comprehensive Guide To The Best Map And Directions Websites
QR Code Scanner & Scanner App - Apps on Google Play 4 Ways to Scan QR Codes on a Windows PC - Make Tech Easier

Closure

Thus, we hope this article has provided valuable insights into Navigating the Digital Landscape: A Comprehensive Guide to QR Code Scanner Apps for Windows 11. We appreciate your attention to our article. See you in our next article!

Managing User Accounts In Windows 11 Home: A Comprehensive Guide To Account Removal

Managing User Accounts in Windows 11 Home: A Comprehensive Guide to Account Removal

Introduction

In this auspicious occasion, we are delighted to delve into the intriguing topic related to Managing User Accounts in Windows 11 Home: A Comprehensive Guide to Account Removal. Let’s weave interesting information and offer fresh perspectives to the readers.

Managing User Accounts in Windows 11 Home: A Comprehensive Guide to Account Removal

How To Remove Microsoft Account From Windows 11 Guide  yorketech

Windows 11 Home, like its predecessors, provides a robust system for managing user accounts. This system allows for the creation of multiple accounts, each with its own unique settings, files, and permissions. While this flexibility is beneficial, it may become necessary to remove a user account from the system. This could be due to a variety of reasons, such as:

  • Account Inactivity: An account that is no longer in use can be removed to streamline system resources and improve security.
  • Data Security: Removing an account can be a crucial step in protecting sensitive information, especially if the account has been compromised or is no longer required.
  • System Optimization: Removing unnecessary accounts can enhance system performance and responsiveness by reducing the load on the operating system.
  • Account Sharing: In scenarios where a device is shared among multiple users, removing an account might be necessary to ensure privacy and prevent unauthorized access.

This guide will provide a comprehensive overview of the process involved in removing a user account from Windows 11 Home, outlining the various methods and considerations involved.

Understanding Account Types in Windows 11 Home

Before delving into the account removal process, it is crucial to understand the different account types present in Windows 11 Home:

  • Local Accounts: These accounts are created directly on the device and do not rely on an external service like Microsoft Account. They are typically used for standalone systems or when internet connectivity is limited.
  • Microsoft Accounts: These accounts are linked to an email address and provide access to various Microsoft services, including OneDrive, Xbox Live, and the Microsoft Store. They offer enhanced synchronization features and cloud storage capabilities.

The type of account being removed will influence the steps involved in the process. Removing a local account is a straightforward procedure, while removing a Microsoft account might require additional considerations.

Removing a Local Account in Windows 11 Home

Removing a local account is a relatively simple process that can be completed through the Settings app:

  1. Access Settings: Open the "Settings" app by pressing the Windows key + I.
  2. Navigate to Accounts: Click on "Accounts" from the left-hand menu.
  3. Select "Family & other users": Choose "Family & other users" from the options displayed on the right side of the window.
  4. Locate the Account: Identify the local account you wish to remove from the list of users.
  5. Select "Remove" and Confirm: Click on the "Remove" button next to the account name and confirm the removal by clicking "Delete account and data."

Important Note: Removing a local account will permanently delete all associated files, folders, and settings. It is crucial to back up any important data before proceeding with the removal process.

Removing a Microsoft Account in Windows 11 Home

Removing a Microsoft account from Windows 11 Home is a more complex process, as it involves considerations beyond simply deleting the account from the device. Here are the key steps involved:

  1. Sign Out of the Account: First, sign out of the Microsoft account from the current user session. This can be done by clicking on the user profile picture in the taskbar and selecting "Sign out."
  2. Access Settings: Open the "Settings" app by pressing the Windows key + I.
  3. Navigate to Accounts: Click on "Accounts" from the left-hand menu.
  4. Select "Your info": Choose "Your info" from the options displayed on the right side of the window.
  5. Select "Sign out of your Microsoft account": Click on the option to "Sign out of your Microsoft account" and follow the on-screen instructions.
  6. Remove Account from Device: After signing out, the account will be removed from the device. However, the account will still be associated with the device until it is explicitly removed from the Microsoft account settings.
  7. Manage Microsoft Account Settings: To completely remove the account from the device, you need to access the Microsoft account settings online. Navigate to the Microsoft account website (account.microsoft.com) and log in using the credentials of the account you wish to remove.
  8. Locate Devices: Go to the "Devices" section within the Microsoft account settings.
  9. Remove Device: Find the Windows 11 Home device from the list of associated devices and select the option to "Remove" the device.

Important Note: Removing a Microsoft account from a device will not delete the account itself. It will only disassociate the account from the device, allowing you to use it on other devices.

Considerations and Best Practices for Account Removal

While removing an account may seem like a straightforward process, several considerations should be taken into account to ensure a smooth and secure experience:

  • Data Backup: Before removing any account, it is crucial to back up all essential data associated with the account. This includes files, folders, documents, and any other important information.
  • Account Permissions: If the account being removed has administrator privileges, it is recommended to transfer these privileges to another account before proceeding with the removal. This ensures that the system remains manageable after the account is removed.
  • Shared Files and Folders: If the account being removed has access to shared files or folders, ensure that these resources are properly managed before removal. This may involve transferring ownership to another account or granting access to other users.
  • Software Licenses: Some software licenses may be tied to specific user accounts. Before removing an account, confirm that any associated licenses are transferred to another account or are still valid.
  • System Recovery: It is always a good practice to create a system recovery point before making significant changes to the system, including account removal. This allows you to restore the system to its previous state in case of any unforeseen issues.

Frequently Asked Questions (FAQs)

1. What happens to the data associated with the removed account?

Data associated with a removed local account is permanently deleted from the device. However, data associated with a removed Microsoft account remains on the cloud and can be accessed by logging in to the account from another device.

2. Can I recover a removed account?

Recovering a removed local account is generally not possible. However, if the account was a Microsoft account, you might be able to recover it by contacting Microsoft support.

3. Is it safe to remove an account that has been compromised?

Removing a compromised account is a crucial step in protecting your data and system security. It prevents the compromised account from being used to access your data or system resources.

4. What should I do if I cannot remove an account?

If you encounter difficulties removing an account, you can try restarting your computer or logging in as a different user with administrator privileges. If the issue persists, you may need to seek assistance from Microsoft support.

5. Can I remove the administrator account?

While it is technically possible to remove the administrator account, it is strongly discouraged. Removing the administrator account can make it difficult to manage the system and may lead to security vulnerabilities.

Tips for Account Removal

  • Review Account Permissions: Before removing an account, carefully review its permissions and ensure that the removal will not disrupt critical system functions.
  • Use a Third-Party Backup Tool: Consider using a third-party backup tool to ensure a complete and reliable backup of your data before removing an account.
  • Test the Removal Process: After removing an account, test the system to ensure that everything is working as expected.
  • Seek Professional Help: If you are unsure about the process or encounter difficulties, it is always recommended to seek assistance from a qualified IT professional.

Conclusion

Removing a user account from Windows 11 Home can be a necessary step for various reasons, including data security, system optimization, and account management. While the process is generally straightforward, it is essential to understand the different account types, their associated data, and the potential implications of removing an account. By following the steps outlined in this guide and considering the best practices, you can confidently remove user accounts from your Windows 11 Home device, ensuring a smooth and secure experience.

How to Remove User Accounts in Windows 11 How To Remove Other User Accounts From Windows 11 - YouTube How to remove Microsoft account in Windows 11
How to Manage User Account Settings in Windows 11 How to Remove a Microsoft Account from Windows 11 How to Remove a Microsoft Account from Windows 11
How to Remove Microsoft Account from Windows 11? - The Microsoft Windows11 How to remove Work or School account in Windows 11/10

Closure

Thus, we hope this article has provided valuable insights into Managing User Accounts in Windows 11 Home: A Comprehensive Guide to Account Removal. We hope you find this article informative and beneficial. See you in our next article!

The Red X On Windows 10 Desktop Icons: A Guide To Understanding And Resolving The Issue

The Red X on Windows 10 Desktop Icons: A Guide to Understanding and Resolving the Issue

Introduction

With great pleasure, we will explore the intriguing topic related to The Red X on Windows 10 Desktop Icons: A Guide to Understanding and Resolving the Issue. Let’s weave interesting information and offer fresh perspectives to the readers.

The Red X on Windows 10 Desktop Icons: A Guide to Understanding and Resolving the Issue

Fix Red X Cross On The Volume Icon In Windows 10 - YouTube

The appearance of a red "X" over a desktop icon in Windows 10 is a common issue that can cause frustration and disrupt workflow. This visual cue signifies a problem with the associated file or program, indicating that it is inaccessible or corrupted. Understanding the underlying causes and troubleshooting methods is crucial to restoring functionality and maintaining a smooth user experience.

Causes of the Red X:

The red "X" on a desktop icon can arise from a variety of factors, each requiring a specific approach to resolution. Here are some of the most common causes:

1. Missing or Corrupted Files:

  • File Deletion or Relocation: If the file associated with the icon has been accidentally deleted or moved to a different location, the icon will display the red "X," as Windows cannot locate the original file.
  • File Corruption: Files can become corrupted due to various factors, including power outages, hardware failures, or malware infections. This corruption can render the file unusable, leading to the red "X" icon.
  • Incomplete Installation: During program installation, files may be missing or corrupted, preventing the program from functioning correctly and resulting in the red "X" icon.

2. Program Errors or Conflicts:

  • Program Errors: Bugs or errors within the program itself can lead to functionality issues, including the inability to access the associated files.
  • Program Conflicts: Conflicts between programs or their dependencies can interfere with program execution and lead to the red "X" icon.

3. System Issues:

  • Registry Errors: Errors within the Windows registry, which stores system settings and program information, can affect program functionality and lead to the red "X" icon.
  • Driver Issues: Outdated or corrupted device drivers can lead to program incompatibilities and the red "X" icon.
  • Malware Infection: Malware can corrupt files, interfere with program execution, and even modify system settings, resulting in the red "X" icon.

Troubleshooting and Solutions:

Addressing the red "X" issue requires a systematic approach to identify and rectify the underlying cause. Here are some troubleshooting steps and solutions:

1. Restarting the Computer:

  • A simple restart can resolve temporary glitches and refresh system processes, potentially eliminating the red "X" icon.

2. Checking File Location:

  • If the file associated with the icon has been moved or deleted, locate the file in its new location or reinstall the program.
  • Right-click the icon, select "Properties," and check the "Target" field to verify the file path. If the path is incorrect, update it to reflect the actual file location.

3. Running a System Scan:

  • Use Windows built-in tools, such as "System File Checker" (SFC) or "Deployment Image Servicing and Management" (DISM), to scan for and repair corrupted system files.
  • Open "Command Prompt" as administrator and run the command sfc /scannow.

4. Repairing or Reinstalling the Program:

  • Access the program’s installation directory and locate the setup file. Run the setup file to repair the program or perform a clean reinstallation.
  • If the program is not installed, download and install it from a trusted source.

5. Updating Device Drivers:

  • Visit the manufacturer’s website to download and install the latest drivers for your hardware devices.
  • Use Windows Update to automatically update drivers, ensuring compatibility and stability.

6. Running a Malware Scan:

  • Use a reputable antivirus or anti-malware program to scan your system for malware infections. Remove any detected malware to restore system stability.

7. Checking for Registry Errors:

  • Use a registry cleaner tool to scan for and repair registry errors.
  • Be cautious with registry cleaners, as incorrect modifications can lead to system instability.

8. Creating a New User Account:

  • Create a new user account with administrator privileges.
  • If the red "X" icon persists in the original account, it may indicate a user-specific issue.

9. Contacting Program Support:

  • If the issue persists despite troubleshooting, contact the program developer or vendor for assistance.

FAQs on the Red X Icon:

1. What does the red "X" icon mean on my desktop in Windows 10?

  • The red "X" icon signifies a problem with the associated file or program, indicating that it is inaccessible or corrupted.

2. Why is there a red "X" on my desktop icons?

  • The red "X" can be caused by a variety of factors, including missing or corrupted files, program errors, system issues, or malware infections.

3. How do I fix the red "X" on my desktop icons?

  • Troubleshooting steps include restarting the computer, checking file location, running a system scan, repairing or reinstalling the program, updating device drivers, running a malware scan, checking for registry errors, creating a new user account, and contacting program support.

4. Is the red "X" icon a sign of a serious issue?

  • While the red "X" icon can be frustrating, it is not always indicative of a major problem. It may simply mean that a file is missing or corrupted.

5. Can I remove the red "X" icon without fixing the underlying issue?

  • You can temporarily remove the icon from your desktop, but the underlying issue will persist.

Tips for Preventing the Red X:

  • Regularly backup your data: Backups ensure that you can restore your files in case of data loss due to corruption or deletion.
  • Install programs from trusted sources: Download programs from reputable websites and avoid suspicious or unknown sources.
  • Keep your system updated: Install the latest Windows updates and program updates to address security vulnerabilities and bugs.
  • Run regular malware scans: Use a reliable antivirus or anti-malware program to protect your system from malicious software.

Conclusion:

The red "X" on a desktop icon in Windows 10 is a common issue that can be frustrating, but it is often solvable. Understanding the potential causes and employing a systematic troubleshooting approach can help identify and resolve the underlying problem. By following the steps outlined above, users can restore functionality and maintain a smooth user experience. Remember to practice preventive measures, such as regular backups and security updates, to minimize the risk of encountering this issue in the future.

How to Fix When Red X Volume Icon Appear in Windows 10 Fix Red X Cross on the Volume icon in Windows 10 - YouTube windows 10 - Why do all my desktop icons all have a red X in the lower left - Super User
Why Are There Red X's on My Folders Windows 10? Fix It Now! How to Fix Red X on Folders in Windows 10 - YouTube Fix Red X Cross on the Volume Icon in Windows 10 [Tutorial] - YouTube
How to Fix When Red X Volume Icon Appear in Windows 10 Fix The Desktop Icons Issue On Windows 10 - YouTube

Closure

Thus, we hope this article has provided valuable insights into The Red X on Windows 10 Desktop Icons: A Guide to Understanding and Resolving the Issue. We hope you find this article informative and beneficial. See you in our next article!