Archives June 2024

Net Framework 3 5 For Windows 11 Offline

net framework 3 5 for windows 11 offline

Introduction

With enthusiasm, let’s navigate through the intriguing topic related to net framework 3 5 for windows 11 offline. Let’s weave interesting information and offer fresh perspectives to the readers.

Net Framework 3.5: Enabling Legacy Applications on Windows 11

How to Install Net Framework 3.5 in Windows 11 Offline Installer Using CMD Command Line - YouTube

The evolution of operating systems is a constant process, each iteration bringing new features and advancements. However, this progress can sometimes leave older applications behind, as they may not be compatible with the latest software environments. This is where the .NET Framework 3.5 comes into play, providing a bridge between legacy applications and the modern Windows 11 operating system.

Understanding the .NET Framework 3.5

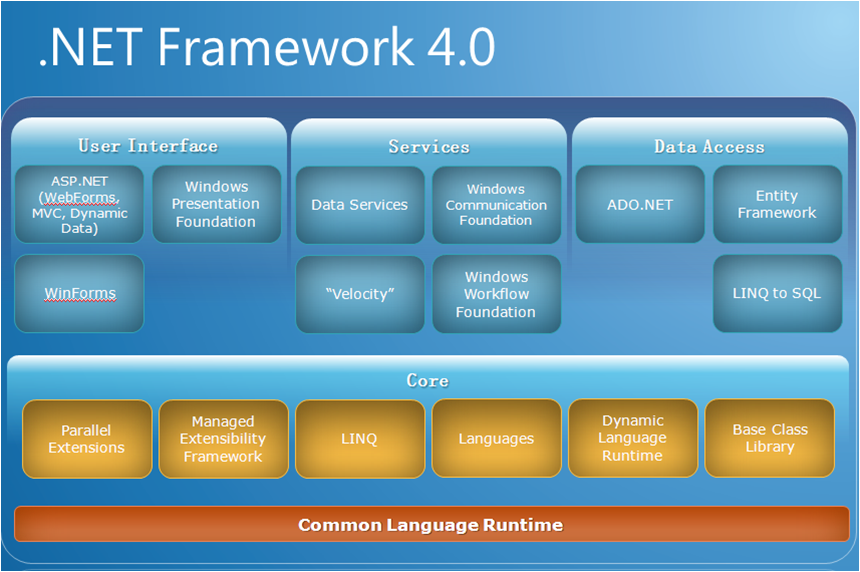
The .NET Framework is a software development framework developed by Microsoft. It provides a comprehensive environment for building and running applications on Windows. The framework encompasses a vast library of classes, tools, and services, enabling developers to create applications ranging from simple desktop utilities to complex enterprise-level systems.

The .NET Framework 3.5, released in 2008, is a significant version, introducing numerous new features and enhancements. It builds upon the foundation laid by previous versions, providing developers with an even more powerful and versatile platform. While newer versions of the .NET Framework have emerged since then, .NET Framework 3.5 remains crucial for running applications designed for this specific version.

The Need for .NET Framework 3.5 on Windows 11

Windows 11, the latest operating system from Microsoft, is a modern platform designed for performance and security. However, its focus on cutting-edge technology can sometimes lead to compatibility issues with older applications. Many applications, especially those developed before the advent of .NET Framework 4, rely heavily on the features and libraries provided by .NET Framework 3.5.

The absence of .NET Framework 3.5 on Windows 11 could result in these applications failing to launch, displaying errors, or exhibiting unexpected behavior. This can create significant challenges for users who depend on these applications for their daily tasks or business operations.

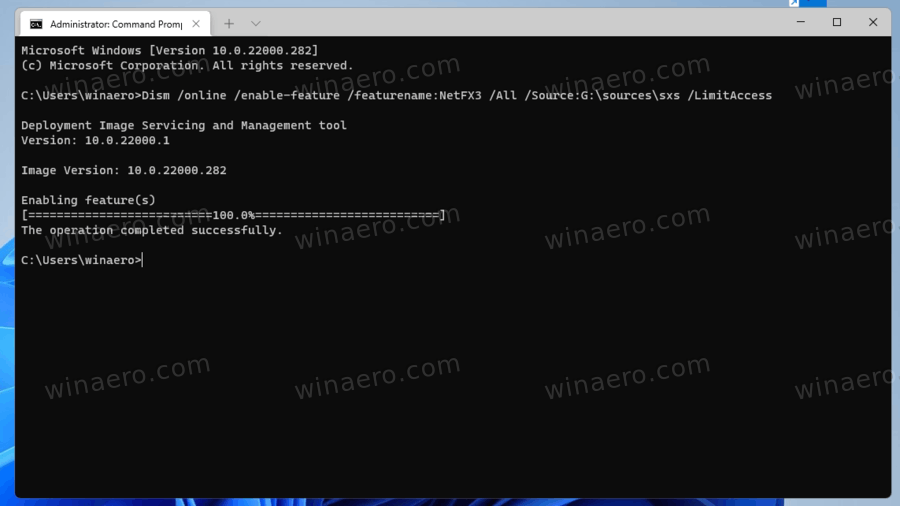
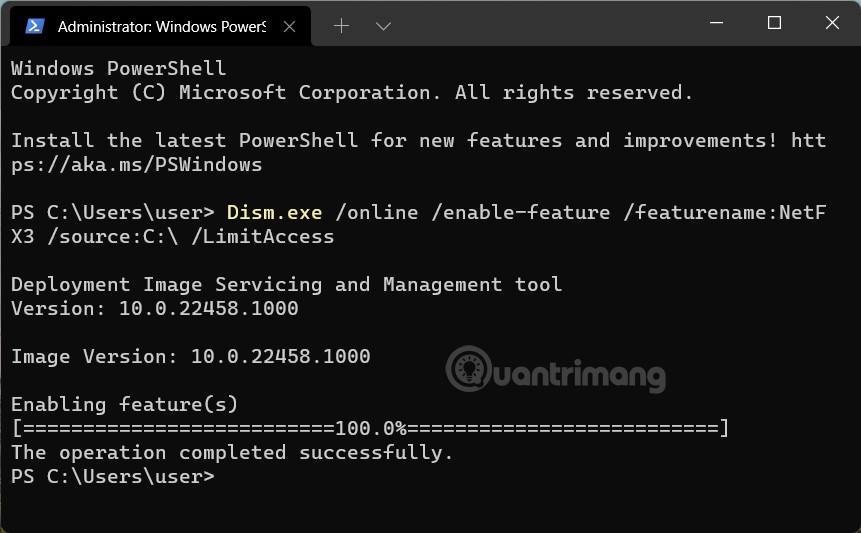
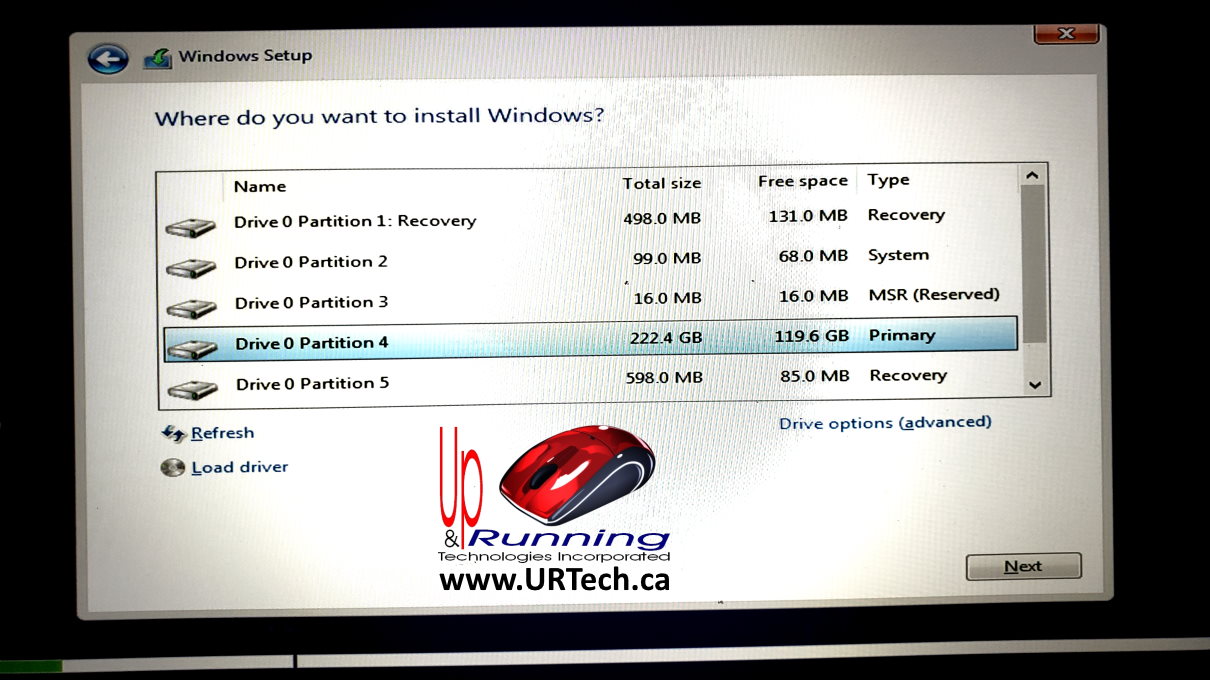
Enabling .NET Framework 3.5 on Windows 11: The Offline Approach

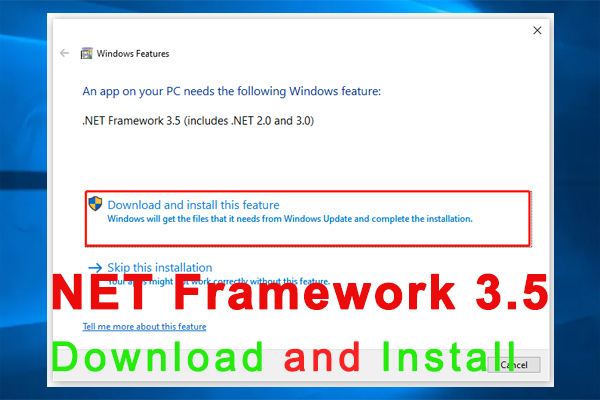
Windows 11 does not include .NET Framework 3.5 by default. However, Microsoft provides a mechanism to install it either online or offline. The offline method is particularly beneficial when internet connectivity is limited or unreliable.

Installing .NET Framework 3.5 Offline: A Step-by-Step Guide

  1. Download the .NET Framework 3.5 Offline Installer: Locate the offline installer package for .NET Framework 3.5 from a reliable source, such as the Microsoft website or a trusted software repository.

  2. Extract the Installer Files: Extract the contents of the downloaded package to a local directory.

  3. Open Windows Features: Navigate to "Control Panel" -> "Programs" -> "Programs and Features."

  4. Enable .NET Framework 3.5: Click on "Turn Windows features on or off." In the list of features, locate ".NET Framework 3.5 (includes .NET 2.0 and 3.0)" and check the box next to it.

  5. Specify the Installation Source: Click on "Specify an alternate source path" and browse to the directory where you extracted the offline installer files.

  6. Initiate Installation: Click on "OK" to begin the installation process.

  7. Complete the Installation: Windows will download the necessary files from the offline installer and complete the installation.

Importance and Benefits of .NET Framework 3.5 on Windows 11

Enabling .NET Framework 3.5 on Windows 11 offers several crucial advantages:

  • Legacy Application Compatibility: Ensures smooth operation of older applications designed for .NET Framework 3.5, preventing compatibility issues and ensuring continued functionality.

  • Business Continuity: For businesses that rely on legacy applications for critical processes, .NET Framework 3.5 ensures uninterrupted operations, avoiding disruptions and potential financial losses.

  • Data Integrity: Applications built on .NET Framework 3.5 often handle sensitive data. Enabling the framework ensures that these applications can access and process data correctly, preserving data integrity.

  • User Productivity: Enables users to continue using familiar and essential applications, maintaining their workflow and productivity without the need to find replacements or learn new software.

FAQs Regarding .NET Framework 3.5 on Windows 11

Q: Is .NET Framework 3.5 compatible with Windows 11?

A: Yes, .NET Framework 3.5 is compatible with Windows 11. Microsoft provides a mechanism to enable it on the operating system, ensuring compatibility with legacy applications.

Q: Why is .NET Framework 3.5 not included in Windows 11 by default?

A: Windows 11 is designed with a focus on modern applications and technologies. .NET Framework 3.5 is primarily used for older applications, and including it by default would increase the operating system’s size and potentially introduce compatibility issues with newer applications.

Q: Can I install .NET Framework 3.5 on Windows 11 without internet access?

A: Yes, you can install .NET Framework 3.5 offline using an installer package downloaded from a reliable source. This eliminates the need for an internet connection during the installation process.

Q: What are the potential risks of installing .NET Framework 3.5 on Windows 11?

A: Installing .NET Framework 3.5 on Windows 11 generally poses minimal risks. However, it is essential to download the installer from a trusted source to avoid malware or corrupted files. Additionally, always keep your operating system and security software updated to mitigate any potential security vulnerabilities.

Q: Can I uninstall .NET Framework 3.5 after installing it?

A: Yes, you can uninstall .NET Framework 3.5 from Windows 11 if you no longer need it. However, uninstalling it may cause compatibility issues with applications that rely on it.

Tips for Using .NET Framework 3.5 on Windows 11

  • Ensure Compatibility: Before installing .NET Framework 3.5, verify that the application you want to run is compatible with this version of the framework.

  • Update Regularly: Keep your Windows 11 operating system and security software updated to address potential vulnerabilities and ensure the best performance.

  • Consider Alternatives: If possible, explore alternative applications or newer versions that are compatible with the latest Windows environment.

  • Seek Professional Help: If you encounter difficulties or uncertainties during the installation process, consult a technical expert or refer to Microsoft’s documentation for assistance.

Conclusion

While Windows 11 is a modern and advanced operating system, it is essential to acknowledge the importance of legacy applications and the role of .NET Framework 3.5 in maintaining compatibility. By enabling this framework on Windows 11, users can ensure continued access to essential applications, preserving their workflow, productivity, and business continuity. As technology advances, it is crucial to strike a balance between embracing innovation and supporting the needs of existing applications and users.

Dot Net Framework 3 5 Offline Installer For Windows 11 - Infoupdate.org How to install .Net Framework 3.5 on Windows 11 .ISO Installer - YouTube Install Net Framework 3 5 On Windows 11 10 8 1 In Tutorials - Vrogue
How to Offline Install .NET Framework 3.5 in Windows 11 with DISM Installare .NET Framework 3.5 OFFLINE in Windows 11/10/8 - YouTube How To Download Net Framework 3 5 For Windows 1011 Offline - Vrogue
Dot Net Framework 3 5 Offline Installer For Windows 11 - Infoupdate.org Install Net Framework 3 5 On Windows 11 How To 10 8 1 - Vrogue

Closure

Thus, we hope this article has provided valuable insights into net framework 3 5 for windows 11 offline. We thank you for taking the time to read this article. See you in our next article!

Netframe 4.7.2 Windows 10

netframe 4.7.2 windows 10

Introduction

With great pleasure, we will explore the intriguing topic related to netframe 4.7.2 windows 10. Let’s weave interesting information and offer fresh perspectives to the readers.

A Comprehensive Guide to .NET Framework 4.7.2 on Windows 10

How to Download .NET Framework 4.7.2 on Windows 7/8/8.1/10 I How to install.NET Framework 4.7.2

.NET Framework 4.7.2 is a powerful and versatile software development framework designed for building a wide range of applications on Windows. It represents a significant evolution in the .NET ecosystem, bringing enhancements and improvements that enhance application performance, security, and developer productivity. This article delves into the key features, benefits, and implications of .NET Framework 4.7.2 on Windows 10, providing a comprehensive understanding of its role in modern software development.

Understanding .NET Framework

Before exploring the specifics of .NET Framework 4.7.2, it is essential to understand the foundation upon which it stands. .NET Framework is a software development platform designed by Microsoft to create and run applications on Windows. It provides a comprehensive set of tools, libraries, and runtime environments that streamline the development process and ensure application compatibility across various Windows versions.

Key Features and Enhancements in .NET Framework 4.7.2

.NET Framework 4.7.2 builds upon the robust foundation laid by its predecessors, introducing several key enhancements that address the evolving needs of developers and users. These include:

  • Improved Performance and Stability: .NET Framework 4.7.2 includes numerous performance optimizations, particularly in areas like garbage collection, memory management, and application startup times. These enhancements result in smoother application execution and improved overall user experience.

  • Enhanced Security: Security remains a paramount concern in modern software development. .NET Framework 4.7.2 strengthens security measures with new features and improvements, including enhanced support for cryptographic algorithms, improved security protocols, and robust protection against common vulnerabilities.

  • New APIs and Features: .NET Framework 4.7.2 introduces new APIs and features that empower developers to create more sophisticated and feature-rich applications. These additions include support for new hardware capabilities, improved accessibility features, and enhanced support for modern web technologies.

  • Improved Compatibility: .NET Framework 4.7.2 ensures backward compatibility with existing applications built on previous versions. This minimizes the need for extensive code rewrites, facilitating smooth migration and seamless integration with legacy systems.

  • Support for Windows 10: .NET Framework 4.7.2 is specifically designed to work seamlessly with Windows 10, taking advantage of its advanced features and capabilities. This ensures optimal performance and integration with the latest Windows operating system.

Benefits of Using .NET Framework 4.7.2 on Windows 10

The adoption of .NET Framework 4.7.2 on Windows 10 brings a multitude of benefits to developers and users alike. These advantages include:

  • Development Efficiency: .NET Framework 4.7.2 provides developers with a comprehensive set of tools and libraries, simplifying the development process and enabling faster time-to-market. Its robust framework and extensive documentation empower developers to build complex applications with ease.

  • Application Reliability: .NET Framework 4.7.2’s focus on performance and stability ensures that applications built upon it run smoothly and reliably. Its comprehensive error handling mechanisms and built-in debugging tools minimize the risk of unexpected crashes or errors.

  • Cross-Platform Compatibility: While .NET Framework is primarily designed for Windows, its integration with .NET Core opens doors for cross-platform development. Developers can leverage the power of .NET Framework to build applications that can run on multiple operating systems, including Linux and macOS.

  • Security Assurance: .NET Framework 4.7.2’s robust security features protect applications from malicious attacks and vulnerabilities. Its built-in security measures, combined with regular updates and patches, provide a secure environment for application execution.

  • Modern Application Development: .NET Framework 4.7.2 enables developers to create modern applications that leverage the latest technologies and trends. Its support for web services, cloud integration, and mobile development empowers developers to build applications that meet the demands of the contemporary digital landscape.

FAQs about .NET Framework 4.7.2 on Windows 10

1. Is .NET Framework 4.7.2 compatible with all versions of Windows 10?

.NET Framework 4.7.2 is primarily designed for Windows 10. It may be compatible with some older versions of Windows 10, but it’s best to consult the official Microsoft documentation for specific compatibility information.

2. Does .NET Framework 4.7.2 require any specific system requirements?

.NET Framework 4.7.2 has specific system requirements that ensure optimal performance and compatibility. These requirements include sufficient RAM, hard disk space, and processor speed. Refer to the official Microsoft documentation for detailed system requirements.

3. How can I install .NET Framework 4.7.2 on Windows 10?

Installing .NET Framework 4.7.2 is relatively straightforward. It can be downloaded and installed from the Microsoft website. Alternatively, it may be included in certain Windows 10 updates. Refer to the official Microsoft documentation for detailed installation instructions.

4. Are there any known issues or limitations with .NET Framework 4.7.2?

While .NET Framework 4.7.2 is generally considered stable and reliable, there may be occasional issues or limitations. Microsoft regularly releases updates and patches to address known problems. It’s recommended to keep your system updated with the latest patches to ensure optimal performance and security.

5. How can I get support for .NET Framework 4.7.2?

Microsoft provides comprehensive support resources for .NET Framework 4.7.2, including documentation, forums, and community support channels. You can access these resources through the official Microsoft website or the MSDN forums.

Tips for Using .NET Framework 4.7.2 on Windows 10

  • Keep Your System Updated: Regularly update your Windows 10 system and .NET Framework 4.7.2 to ensure optimal performance, security, and compatibility.

  • Utilize Official Documentation: Refer to the official Microsoft documentation for detailed information on .NET Framework 4.7.2, including installation instructions, troubleshooting guides, and API references.

  • Explore Community Resources: Engage with the .NET Framework community through forums, blogs, and online resources to access valuable insights, share knowledge, and seek assistance.

  • Utilize Visual Studio: Visual Studio is a powerful integrated development environment (IDE) that provides a comprehensive set of tools for developing and debugging applications using .NET Framework 4.7.2.

Conclusion

.NET Framework 4.7.2 is a significant evolution in the .NET ecosystem, offering developers and users a robust platform for building and running modern applications on Windows 10. Its enhancements in performance, security, and compatibility, combined with its comprehensive set of tools and libraries, make it an indispensable tool for any developer seeking to create reliable, efficient, and secure applications. By leveraging the power of .NET Framework 4.7.2, developers can unlock the full potential of Windows 10 and build applications that meet the demands of the modern digital landscape.

SCCM install of .NET Framework 4.7.2 to Win10 NET Framework 4.7.2 Download & Install for Windows 10/8.1/7 PCs - MiniTool Partition Wizard Net framework 4-7 2 silent install - editorrewa
Microsoft .Net Framework 4.7.2 Released - Hack Defender .NET Framework 4.7 ใ‚’ใ‚คใƒณใ‚นใƒˆใƒผใƒซใ™ใ‚‹ - Windows Tips Microsoft .Net Framework 4 Free Download
Netframe 4 5 Windows 10 .NET Framework 4.7.2 Offline Installer Download For Windows  Net framework, Programming tools

Closure

Thus, we hope this article has provided valuable insights into netframe 4.7.2 windows 10. We thank you for taking the time to read this article. See you in our next article!

Unlocking The Mystery: Why Your Windows 10 PC Locks Automatically

Unlocking the Mystery: Why Your Windows 10 PC Locks Automatically

Introduction

In this auspicious occasion, we are delighted to delve into the intriguing topic related to Unlocking the Mystery: Why Your Windows 10 PC Locks Automatically. Let’s weave interesting information and offer fresh perspectives to the readers.

Unlocking the Mystery: Why Your Windows 10 PC Locks Automatically

How to fix Windows 10 is locking itself Automatically - TechnoLily

The sudden locking of a Windows 10 PC, interrupting workflow or leaving users stranded, can be a frustrating experience. This phenomenon, while seemingly random, often stems from a combination of factors, ranging from system settings to security measures. This article delves into the common causes behind this behavior, offering insights into troubleshooting techniques and preventative measures.

Understanding the Dynamics of Automatic Locking

Windows 10, like many operating systems, incorporates features designed to enhance security and energy efficiency. One such feature is automatic locking, a mechanism that locks the computer after a period of inactivity. This is primarily intended to safeguard sensitive data from unauthorized access when the user is away from the machine.

Common Culprits: Unraveling the Causes

Several factors can trigger automatic locking in Windows 10. Identifying the root cause is crucial for effectively resolving the issue.

  • Power Settings: The "Power & Sleep" settings within Windows 10 control various energy-saving features, including screen timeout, sleep mode, and system lock. If the "Require a password on wakeup" option is enabled, the PC will lock automatically after a set period of inactivity.
  • Screen Saver: While seemingly innocuous, screen savers can also trigger automatic locking. Some screen saver configurations automatically lock the system after a certain duration.
  • Group Policy: In corporate environments or with specific user accounts, Group Policy settings can enforce automatic locking after inactivity. These policies are typically configured by system administrators.
  • Windows Hello: Windows Hello, the biometric authentication system, can also contribute to automatic locking. If enabled, the system might lock itself after a set period of inactivity if facial recognition or fingerprint scanning is not detected.
  • Security Updates: Windows updates, including security patches, occasionally introduce changes that might affect system behavior, including automatic locking.
  • Third-Party Software: Certain applications, particularly security software or system optimization tools, can implement their own automatic locking mechanisms, potentially conflicting with Windows settings.

Troubleshooting Strategies: Restoring Control

Once the potential causes are identified, troubleshooting steps can be taken to regain control over the automatic locking behavior.

  • Power & Sleep Settings: Accessing the "Power & Sleep" settings within the Control Panel or Windows Settings allows users to adjust the timeout period for screen dimming, sleep mode, and system lock. Disabling the "Require a password on wakeup" option can prevent the PC from locking after inactivity.
  • Screen Saver Settings: Modifying the screen saver settings, found within the "Personalization" section of Windows Settings, can prevent automatic locking. Deactivating the screen saver or disabling the "On resume, display logon screen" option can alleviate the issue.
  • Group Policy: For users with administrative privileges, reviewing the Group Policy settings can reveal whether automatic locking is enforced. Modifying or disabling relevant policies can address the issue.
  • Windows Hello: Within the "Sign-in options" section of Windows Settings, users can adjust the behavior of Windows Hello. Disabling automatic lock after inactivity can prevent the PC from locking itself.
  • Update Management: Ensuring that all Windows updates are installed and that the system is running the latest version can resolve issues related to update-induced changes.
  • Software Conflict Resolution: Temporarily disabling or uninstalling third-party applications that might be causing automatic locking can help isolate the problem.

Tips for Preventing Automatic Locking

While troubleshooting existing issues, preventative measures can be taken to avoid future occurrences of automatic locking:

  • Regular System Maintenance: Keeping the system updated and free of unnecessary applications can minimize the risk of software conflicts.
  • Power Management Optimization: Adjusting power settings to balance energy efficiency with user preferences can prevent unwanted automatic locking.
  • Security Software Evaluation: Reviewing security software settings and ensuring they are not overriding Windows settings can prevent conflicts.
  • User Account Management: For shared computers, creating individual user accounts with customized settings can prevent automatic locking issues.

Conclusion: Maintaining User Control

Automatic locking in Windows 10, while primarily intended to enhance security, can become a nuisance when it disrupts workflow or leaves users locked out of their machines. By understanding the common causes and employing the troubleshooting strategies outlined, users can regain control over their system’s behavior and prevent unnecessary automatic locking. Maintaining a well-maintained and optimized system, combined with a proactive approach to managing settings and software, can ensure a smooth and uninterrupted user experience.

How to Lock Your Windows 10 PC How to Automatically Lock Windows 10 Computer How to Automatically Lock Windows 10 Computer
How to use dynamic lock in windows 10  Automatic Lock Windows 10 - YouTube How To Keep Windows 10 From Locking Automatically Win - vrogue.co Here's How to Automatically Lock Your Windows 10 PC When You Step Away From It
What to Do If Windows 10 Keeps Locking Itself? โ€“ TechCult How To Lock Your Windows 10 PC Automatically After Inactivity  Windows, Windows 10, Locks

Closure

Thus, we hope this article has provided valuable insights into Unlocking the Mystery: Why Your Windows 10 PC Locks Automatically. We hope you find this article informative and beneficial. See you in our next article!

The Silent Upgrade: Troubleshooting Audio Issues After A Windows 10 Update

The Silent Upgrade: Troubleshooting Audio Issues After a Windows 10 Update

Introduction

With enthusiasm, let’s navigate through the intriguing topic related to The Silent Upgrade: Troubleshooting Audio Issues After a Windows 10 Update. Let’s weave interesting information and offer fresh perspectives to the readers.

The Silent Upgrade: Troubleshooting Audio Issues After a Windows 10 Update

Fix Audio problem after Windows update KB5015878 in Windows 10 - YouTube

The Windows 10 operating system, with its frequent updates designed to enhance performance and security, can sometimes introduce unexpected challenges. One such challenge is the loss of audio functionality following an upgrade. This issue, while frustrating, is often resolvable through a methodical approach to troubleshooting.

Understanding the Root of the Silence

The absence of sound after a Windows 10 upgrade can stem from various factors, each requiring a specific solution. Here are some common culprits:

  • Driver Conflicts: Windows updates often install new drivers for various hardware components, including audio devices. If these new drivers are incompatible with your existing hardware, audio functionality may be disrupted.
  • Corrupted Audio Files: The upgrade process might inadvertently damage or corrupt critical audio files within the Windows system, leading to a complete audio blackout.
  • Disabled Audio Services: Windows 10 includes numerous services that manage audio output. A recent update might have inadvertently disabled these services, hindering sound production.
  • Hardware Malfunction: While less likely, the update could have triggered a hardware malfunction within your audio device or motherboard, resulting in the loss of audio capabilities.
  • Conflicting Software: Newly installed or updated software, particularly those that utilize audio output, might be interfering with the system’s audio settings.

A Step-by-Step Guide to Reclaiming Your Sound

Navigating the troubleshooting process requires a systematic approach, starting with the simplest solutions and gradually progressing to more complex ones.

1. Restart Your Computer: The most basic troubleshooting step, restarting your computer often resolves temporary glitches that may have occurred during the update process.

2. Check Volume Settings: A seemingly obvious step, but it’s crucial to ensure the volume is not muted or set to a very low level. Check the system volume, as well as the volume control for your individual audio device.

3. Verify Audio Device Connections: Ensure your audio device is properly connected to your computer. Check for loose cables or connections, and try a different audio output (e.g., headphones, speakers) to rule out a device-specific issue.

4. Update Audio Drivers: Outdated or incompatible audio drivers are a common culprit. To update them:

* **Device Manager:**  Right-click the "Start" button, select "Device Manager," and expand the "Sound, video and game controllers" category. Right-click your audio device, select "Update driver," and follow the on-screen instructions.
* **Manufacturer Website:** Visit the website of your audio device manufacturer, search for the latest drivers for your specific model, and download and install them.

5. Roll Back Audio Drivers: If updating the driver did not resolve the issue, consider rolling back to the previous driver version. In the Device Manager, right-click your audio device, select "Properties," navigate to the "Driver" tab, and click "Roll Back Driver."

6. Run Audio Troubleshooter: Windows 10 includes a built-in troubleshooter specifically for audio issues. Access it by searching for "Troubleshooting" in the Start menu, selecting "Playing Audio," and following the on-screen instructions.

7. Check for Software Conflicts: If you installed new software around the time of the update, consider temporarily disabling or uninstalling it to see if it’s interfering with audio functionality.

8. Disable Enhancements: Certain audio enhancements within Windows 10 can sometimes cause conflicts. To disable them:

* Right-click the speaker icon in the taskbar and select "Sounds."
* Select your audio device, click "Properties," and navigate to the "Enhancements" tab.
* Uncheck all the boxes and click "Apply" and "OK."

9. Reinstall Audio Drivers: If the above steps fail, reinstalling your audio drivers might be necessary. In the Device Manager, right-click your audio device, select "Uninstall device," and follow the on-screen instructions. After uninstalling, restart your computer, and Windows will automatically reinstall the drivers.

10. System Restore: If the problem persists, consider performing a system restore to a point before the update. This will revert your system to an earlier state, potentially resolving the audio issue.

11. Reset Audio Settings: If the problem persists, resetting audio settings can sometimes resolve the issue. To do this, open the "Sound" settings in the "Control Panel," select "Playback," and right-click on the default audio device. Select "Set as Default Device" and then click "Apply" and "OK."

12. Check for Hardware Issues: If all else fails, consider a hardware issue. Ensure your audio device is working correctly by testing it on another computer. If the issue persists, you may need to contact a technician for further diagnosis and repair.

FAQs: Addressing Common Concerns

Q: What if the audio troubleshooter doesn’t find any problems?
A: Even if the troubleshooter doesn’t identify an issue, it’s worth running it as it can sometimes resolve underlying problems. If the issue persists, proceed with the other troubleshooting steps.

Q: Is there a way to restore the previous version of Windows 10?
A: Yes, you can perform a clean install of Windows 10, preserving your personal files and settings. This process will effectively reset your system to a factory state, potentially resolving the audio issue.

Q: What if I’m still unable to resolve the audio issue?
A: If all troubleshooting steps fail, consider contacting Microsoft support for assistance. They can provide tailored guidance based on your specific situation.

Tips for Preventing Future Audio Issues

  • Disable Automatic Driver Updates: While automatic updates are generally beneficial, they can sometimes cause driver conflicts. Consider disabling automatic driver updates for your audio device to avoid potential issues.
  • Backup Your System: Before installing any major updates, create a system restore point. This will allow you to revert your system to a previous state if an update causes problems.
  • Check for Updates Regularly: Keep your system up-to-date with the latest Windows updates and driver releases. This will minimize the risk of compatibility issues.

Conclusion: A Return to Sound

Loss of audio functionality following a Windows 10 upgrade can be frustrating, but a systematic approach to troubleshooting can often restore your sound. By following the steps outlined in this guide, you can diagnose and address the root cause of the issue, enabling you to enjoy the full multimedia experience of your computer once again. Remember, if all else fails, seeking professional assistance can provide the necessary expertise to resolve the problem and restore your audio capabilities.

How to Fix: No Sound After Windows 10/11 Update - Sound Missing 2024 [Solved] - YouTube How to Fix No Sound After Windows 10 Update - YouTube How to fix audio after applying system update (KB5015878) on Windows 10
How to Fix Sound or Audio Problems on Windows 10  windows 10 sound issues after update - 2019 Fix Audio problem after Windows update KB5015878 in Windows 10 - YouTube How to fix audio after applying system update (KB5015878) on Windows 10  Windows Central
How to Fix Sound Problems After Windows 10 Upgrade Solved How to fix audio after applying system update (KB5015878) on Windows 10

Closure

Thus, we hope this article has provided valuable insights into The Silent Upgrade: Troubleshooting Audio Issues After a Windows 10 Update. We hope you find this article informative and beneficial. See you in our next article!

Optimizing Windows 10: A Comprehensive Guide To Unleashing Your Computer’s Potential

Optimizing Windows 10: A Comprehensive Guide to Unleashing Your Computer’s Potential

Introduction

With enthusiasm, let’s navigate through the intriguing topic related to Optimizing Windows 10: A Comprehensive Guide to Unleashing Your Computer’s Potential. Let’s weave interesting information and offer fresh perspectives to the readers.

Optimizing Windows 10: A Comprehensive Guide to Unleashing Your Computer’s Potential

HOW TO OPTIMIZED WINDOWS 10 STEP BY STEP GUIDE (WINDOWS 10 OPTIMIZATION) [WINDOWS 10 BOOSTER

Windows 10, despite its robust features and widespread adoption, can sometimes fall victim to performance bottlenecks and unnecessary resource consumption. This can lead to sluggish response times, application crashes, and an overall frustrating user experience. Fortunately, by strategically adjusting various settings, users can significantly enhance their Windows 10 experience, unlocking its full potential and enjoying a smoother, more efficient workflow.

Understanding the Importance of Optimization

Optimization, in the context of Windows 10, refers to the process of fine-tuning system settings and configurations to achieve optimal performance. This involves identifying and addressing factors that hinder system responsiveness and resource utilization. By optimizing Windows 10, users can achieve several benefits, including:

  • Improved System Performance: A well-optimized Windows 10 system boots faster, loads applications quicker, and responds more promptly to user input. This translates to a more fluid and enjoyable computing experience.
  • Enhanced Battery Life: By reducing unnecessary background processes and resource-intensive features, users can extend their device’s battery life, particularly on laptops and tablets.
  • Increased Storage Space: Optimizing Windows 10 can free up valuable disk space by identifying and removing unnecessary files, temporary data, and system clutter.
  • Enhanced Security: By disabling unnecessary services and features, users can minimize potential security vulnerabilities, making their system less susceptible to malware and other threats.

A Comprehensive Guide to Optimizing Windows 10 Settings

This comprehensive guide will delve into various aspects of optimizing Windows 10 settings, covering both the core system settings and specific areas like power management, startup programs, and visual effects.

1. General System Settings:

  • Automatic Updates: Windows Update plays a crucial role in maintaining system security and stability. However, frequent updates can sometimes disrupt workflows and consume significant bandwidth. Users can adjust update settings to control the frequency and timing of updates, ensuring they receive the latest security patches without interrupting productivity.
  • Background Apps: Windows 10 allows applications to run in the background even when not actively used. These background processes can consume system resources and impact performance. By disabling unnecessary background apps, users can free up resources and improve system responsiveness.
  • Data Collection and Privacy: Windows 10 collects user data to personalize experiences and improve services. However, users may have concerns about data privacy. By adjusting privacy settings, users can control the type and amount of data collected by Windows 10, ensuring their information is handled responsibly.
  • Storage Management: Windows 10 includes a built-in storage management tool that helps users identify and remove unnecessary files, temporary data, and other system clutter. Regularly using this tool can free up valuable disk space and improve overall system performance.

2. Power Management:

  • Power Plans: Windows 10 offers several power plans that adjust system settings to optimize battery life or performance. Users can select the power plan that best suits their needs and usage patterns.
  • Screen Brightness: Reducing screen brightness can significantly extend battery life, particularly on laptops and tablets. Users can adjust screen brightness manually or configure automatic adjustments based on ambient light conditions.
  • Sleep Mode: Enabling sleep mode allows the system to enter a low-power state, conserving battery life when not in active use. Users can customize sleep settings, including the duration of inactivity before entering sleep mode.

3. Startup Programs:

  • Startup Programs: Many applications are configured to launch automatically at system startup. These startup programs can consume system resources and slow down the boot process. Users can disable unnecessary startup programs to improve boot times and system performance.
  • Startup Delay: Users can configure a delay for specific startup programs, allowing the system to load essential components before launching less critical applications. This can help improve boot times and prevent resource contention during startup.

4. Visual Effects:

  • Visual Effects: Windows 10 offers various visual effects that enhance the user interface, but these effects can consume system resources. Users can disable or adjust visual effects to improve performance, particularly on older or less powerful systems.
  • Transparency Effects: Transparency effects can create a visually appealing interface, but they can also strain system resources. Users can disable transparency effects to improve performance and reduce system load.

5. Advanced Settings:

  • System Services: Windows 10 runs numerous system services in the background to support various functionalities. Some services may not be essential for everyday use and can be disabled to improve performance.
  • Virtual Memory: Virtual memory allows the system to use hard disk space as additional RAM when physical memory is insufficient. By adjusting virtual memory settings, users can optimize system performance by allocating sufficient virtual memory to meet their needs.

6. Third-Party Optimization Tools:

While Windows 10 offers built-in tools for optimization, various third-party software applications provide more comprehensive and advanced features. These tools can help users identify and resolve performance bottlenecks, clean up system clutter, and optimize various system settings. However, it’s essential to use reputable and trustworthy tools to avoid potential security risks.

FAQs: Optimizing Windows 10 Settings

Q: What are the most significant benefits of optimizing Windows 10 settings?

A: Optimizing Windows 10 settings can lead to several benefits, including improved system performance, extended battery life, increased storage space, and enhanced security.

Q: Is it safe to disable system services in Windows 10?

A: Disabling system services can improve performance, but users should exercise caution. Disabling essential services can lead to system instability or functionality issues. It’s crucial to research and understand the purpose of each service before disabling it.

Q: What are some common signs that my Windows 10 system needs optimization?

A: Common signs include slow boot times, sluggish application performance, frequent system crashes, and low battery life.

Q: Can I restore my Windows 10 settings to their default values?

A: Yes, users can reset Windows 10 settings to their default values. This can be done through the "Reset this PC" option in the Settings app. However, this process will erase all data and applications from the system.

Tips for Optimizing Windows 10 Settings:

  • Regularly Clean Up System Clutter: Delete unnecessary files, temporary data, and system clutter to free up disk space and improve performance.
  • Disable Unnecessary Startup Programs: Reduce the number of programs that launch automatically at startup to improve boot times and system responsiveness.
  • Adjust Power Settings: Choose a power plan that suits your usage patterns and optimizes battery life or performance.
  • Monitor System Resources: Use the Task Manager to monitor system resource usage and identify potential performance bottlenecks.
  • Keep Your System Updated: Install the latest Windows updates and security patches to ensure system stability and security.

Conclusion:

Optimizing Windows 10 settings is a crucial step in unleashing the full potential of your computer. By carefully adjusting system settings, users can improve performance, extend battery life, free up disk space, and enhance security. This comprehensive guide has provided a detailed overview of key settings and areas for optimization, empowering users to customize their Windows 10 experience and achieve a smoother, more efficient workflow. Remember to approach optimization with caution, understanding the potential consequences of disabling specific settings, and always prioritize system stability and security.

Powerful Windows 10 Optimization Tool - YouTube Unleashing Your PCโ€™s Full Potential: A Guide to Windows PC Optimisation  by Bosun Sogeke  Medium Optimizing Windows 10
25 Best Methods To Optimize Windows 10 Performance Optimizing Windows 10 �� How to Optimize Windows 10 For GAMING & Performance The Ultimate GUIDE - YouTube
OPTIMIZE YOUR WINDOWS 10  STEP-BY-STEP - YouTube The 10 Best Ways to Optimize Windows 10

Closure

Thus, we hope this article has provided valuable insights into Optimizing Windows 10: A Comprehensive Guide to Unleashing Your Computer’s Potential. We thank you for taking the time to read this article. See you in our next article!

Unlinking OneDrive From Windows 10: Understanding The Process And Its Implications

Unlinking OneDrive from Windows 10: Understanding the Process and Its Implications

Introduction

In this auspicious occasion, we are delighted to delve into the intriguing topic related to Unlinking OneDrive from Windows 10: Understanding the Process and Its Implications. Let’s weave interesting information and offer fresh perspectives to the readers.

Unlinking OneDrive from Windows 10: Understanding the Process and Its Implications

How To Unlink OneDrive Account from Windows 10 PC - YouTube

OneDrive, Microsoft’s cloud storage service, is deeply integrated into Windows 10. While it offers convenient file syncing and accessibility across devices, some users may prefer to manage their files independently or opt for alternative cloud storage solutions. This article will explore the methods for removing OneDrive from Windows 10, outlining the process, its potential benefits, and addressing common concerns.

Understanding the Integration:

OneDrive’s integration into Windows 10 goes beyond simply providing a folder for file storage. It acts as the default location for saving documents, pictures, and other files, influencing the user’s file management experience. This integration offers several advantages, such as:

  • Automatic File Syncing: OneDrive seamlessly synchronizes files between your computer and the cloud, ensuring access from any device.
  • File Recovery and Backup: OneDrive automatically backs up your files, offering a recovery option in case of accidental deletion or device failure.
  • Collaboration and Sharing: OneDrive facilitates easy file sharing and collaboration with others, making it convenient for teamwork and project management.

Reasons for Removal:

While OneDrive offers advantages, there are valid reasons why users might choose to remove it from their Windows 10 system:

  • Privacy Concerns: Some users might be hesitant about storing sensitive data in the cloud, preferring local storage for increased privacy control.
  • Storage Limitations: Free OneDrive accounts have limited storage space, which might not suffice for certain users’ needs.
  • Preference for Alternative Solutions: Individuals might favor other cloud storage services, such as Google Drive or Dropbox, due to their features or pricing models.
  • System Performance: Some users experience performance issues with OneDrive, especially on older or resource-constrained machines. Removing OneDrive might alleviate these issues.
  • Control over File Management: Removing OneDrive allows users to manage their files entirely locally, without the cloud integration influencing their workflow.

Methods for Removing OneDrive:

There are several methods for removing OneDrive from Windows 10, each offering different levels of control and impact:

1. Unlinking OneDrive:

This method involves disconnecting OneDrive from your Windows 10 account without deleting the OneDrive folder or its contents. It effectively stops syncing and integration while preserving your files.

  • Unlinking via Settings:

    1. Open Settings by pressing Windows Key + I.
    2. Navigate to Accounts > Sync your settings.
    3. Under OneDrive, toggle the switch to Off.
    4. Click Sign Out to unlink your account.
  • Unlinking via File Explorer:

    1. Open File Explorer and locate the OneDrive folder.
    2. Right-click on the OneDrive folder and select Properties.
    3. Navigate to the General tab and click Stop Syncing.
    4. Confirm the action by clicking Stop Syncing.

2. Removing the OneDrive App:

This method involves uninstalling the OneDrive application from your system. It effectively removes the OneDrive folder and its contents from your computer.

  • Using Settings:

    1. Open Settings by pressing Windows Key + I.
    2. Navigate to Apps > Apps & features.
    3. Search for "OneDrive" and select it from the list.
    4. Click Uninstall and follow the on-screen prompts.
  • Using Control Panel:

    1. Open Control Panel.
    2. Navigate to Programs > Programs and Features.
    3. Locate "OneDrive" in the list and select it.
    4. Click Uninstall and follow the on-screen prompts.

3. Using Third-Party Tools:

Several third-party tools are available that can assist in removing OneDrive from your system. These tools offer additional options and control over the removal process. However, it’s crucial to use reputable and trustworthy tools to avoid potential security risks.

Important Considerations:

  • Data Backup: Before removing OneDrive, ensure you have a backup of all important files stored within the OneDrive folder. This is crucial to avoid data loss, as removing OneDrive will delete the folder and its contents from your computer.
  • Alternative Storage: If you choose to remove OneDrive, consider alternative storage solutions to manage your files. Explore other cloud storage services or consider utilizing external hard drives for local storage.
  • System Impact: Removing OneDrive might affect certain Windows 10 features that rely on cloud integration, such as automatic file recovery or document sharing.

Frequently Asked Questions:

Q: Can I remove OneDrive without losing my files?

A: No, removing OneDrive will delete the OneDrive folder and its contents from your computer. It is crucial to back up your files before proceeding with the removal process.

Q: Will removing OneDrive affect my Windows 10 updates?

A: Removing OneDrive should not affect Windows 10 updates. However, it might impact certain features that rely on cloud integration, such as automatic file recovery or document sharing.

Q: Can I re-install OneDrive after removing it?

A: Yes, you can re-install OneDrive after removing it. You can download the latest version from the Microsoft website and follow the installation instructions.

Q: What happens to my files stored in OneDrive after removing it?

A: Your files will remain stored in your OneDrive account in the cloud. You can access them from any device by logging into your OneDrive account.

Tips for Removing OneDrive:

  • Back up your files: Ensure you have a backup of all important files stored in the OneDrive folder before proceeding with the removal process.
  • Review the removal methods: Choose the method that best suits your needs and preferences, considering the impact on your files and system.
  • Consider alternatives: If you decide to remove OneDrive, explore alternative storage solutions, such as other cloud services or external hard drives.
  • Use reputable tools: If using third-party tools, ensure they are from trustworthy sources to avoid security risks.

Conclusion:

Removing OneDrive from Windows 10 offers users more control over their file management and privacy. However, it’s crucial to understand the implications and take necessary precautions to avoid data loss. By backing up your files and choosing the appropriate removal method, you can effectively unlink OneDrive from your system without compromising your data. It’s important to weigh the benefits of OneDrive’s integration against your individual needs and preferences to make an informed decision about its presence on your Windows 10 system.

Micro Center - How to unlink Microsoft One Drive from Windows 10 How to Unlink OneDrive from Windows 10/11 PC How to Remove OneDrive From Windows 10 Computers
Fix: OneDrive is processing changes in Windows 10 Unlink Microsoft Onedrive to Save Your Files on Your Hard Drive Windows 10 OneDrive - How to Unlink Personal OneDrive or Business OneDrive from Windows 10
How To Unlink Onedrive From Windows 10 11 Pc  twinfinite How To Link or Unlink OneDrive With Microsoft Account in Windows 10 - YouTube

Closure

Thus, we hope this article has provided valuable insights into Unlinking OneDrive from Windows 10: Understanding the Process and Its Implications. We hope you find this article informative and beneficial. See you in our next article!

Understanding Disk Partitioning During Windows 10 Installation: A Comprehensive Guide

Understanding Disk Partitioning During Windows 10 Installation: A Comprehensive Guide

Introduction

In this auspicious occasion, we are delighted to delve into the intriguing topic related to Understanding Disk Partitioning During Windows 10 Installation: A Comprehensive Guide. Let’s weave interesting information and offer fresh perspectives to the readers.

Understanding Disk Partitioning During Windows 10 Installation: A Comprehensive Guide

How To Partition Hard Disk During Windows 10 Installation at robertajdrumo blog

Installing Windows 10 involves a crucial step that often perplexes new users: disk partitioning. This seemingly complex process is essential for organizing your computer’s storage space effectively, ensuring optimal performance and data management. This article delves into the intricacies of disk partitioning during Windows 10 installation, providing a clear understanding of its importance, benefits, and practical considerations.

The Fundamentals of Disk Partitioning

Imagine your computer’s hard drive as a vast expanse of land. Disk partitioning is akin to dividing this land into distinct plots, each dedicated to a specific purpose. Each partition acts as a separate storage unit, allowing you to organize your files, operating systems, and applications in a structured manner.

The Importance of Partitioning

While installing Windows 10 without partitioning is possible, it comes with several limitations. Here’s why partitioning is highly recommended:

  • Data Security and Integrity: By dedicating a partition solely for the operating system (OS), you create a secure environment that is less vulnerable to data loss or corruption. If your OS partition encounters issues, your data stored on other partitions remains intact.
  • Performance Enhancement: Allocating a separate partition for your OS allows it to run more efficiently, as it is not bogged down by other files and programs. This results in faster boot times and overall system performance.
  • Storage Management: Partitioning enables you to manage your storage space effectively. You can create dedicated partitions for specific data types, like photos, videos, or documents, making it easier to locate and organize them.
  • Dual Booting: Partitioning allows you to install multiple operating systems on a single computer, giving you the flexibility to choose your preferred OS based on your needs.
  • Data Recovery: In case of system failure, recovering data from a partitioned hard drive is often easier and more efficient than attempting to recover data from a single, unpartitioned drive.

Understanding Partition Types

During Windows 10 installation, you are presented with various partition types:

  • Primary Partition: A primary partition can be marked as active, which means it contains the boot loader for your operating system. A hard drive can have up to four primary partitions.
  • Logical Partition: Logical partitions are created within an extended partition, which is a special type of primary partition. A hard drive can have an unlimited number of logical partitions within its extended partition.
  • System Reserved Partition: A small partition (usually 100MB) created automatically during Windows 10 installation. This partition holds essential boot files and system data.

The Partitioning Process

During the Windows 10 installation, you will be presented with a screen displaying your available disk space. You can choose to:

  • Accept the Default Partition: The installer will automatically create the necessary partitions for a standard installation. This is the simplest option, but it offers limited customization.
  • Create Custom Partitions: This option provides greater control over your storage space. You can decide the size and purpose of each partition, ensuring optimal organization for your needs.

Tips for Partitioning During Windows 10 Installation

  • Plan Before You Partition: Before proceeding with partitioning, consider your specific storage needs and plan the size and purpose of each partition.
  • Allocate Sufficient Space for the OS: Ensure the partition dedicated to Windows 10 has enough space for the operating system files and future updates. A minimum of 50GB is recommended.
  • Leave Room for Growth: Allocate additional space for data storage, considering your future needs and potential file growth.
  • Use a Partition Manager: Consider using a third-party partition manager like EaseUS Partition Master or AOMEI Partition Assistant to create, resize, or delete partitions before installing Windows 10. This offers greater flexibility and control.

FAQs Regarding Partitioning During Windows 10 Installation

Q: Can I create partitions after installing Windows 10?

A: Yes, you can create partitions after installing Windows 10 using a partition manager. However, it is generally recommended to partition your hard drive before installing Windows 10 for optimal performance and data management.

Q: How many partitions should I create?

A: The number of partitions depends on your individual needs and storage requirements. A common approach is to create a dedicated partition for the OS, another for data storage, and potentially an additional partition for backups or specific applications.

Q: What happens if I delete a partition?

A: Deleting a partition will erase all data stored within it. Ensure you back up any important data before deleting a partition.

Q: Can I merge partitions?

A: Yes, you can merge partitions using a partition manager. However, this should be done cautiously, as it can potentially lead to data loss if not performed correctly.

Q: Can I resize partitions?

A: Yes, you can resize partitions using a partition manager. However, resizing a partition that contains active files can lead to data loss. It is recommended to back up your data before resizing partitions.

Conclusion

Disk partitioning is an essential aspect of Windows 10 installation, offering numerous benefits for data security, performance enhancement, storage management, and system flexibility. By understanding the fundamentals of partitioning and following the tips outlined in this guide, you can effectively organize your storage space and optimize your Windows 10 experience. Remember to approach the partitioning process with caution, planning ahead and utilizing reliable tools to ensure data integrity and system stability.

How to partition Windows 10 - Tech Advisor How to Partition a Hard Drive in Windows 10 (2 Methods) How to repartition a hard drive in windows 10
SOLVED: Windows 10 Hard Drive Partitions Explained In Simple Terms โ€“ Up & Running Inc โ€“ Tech How How to Make Disk Partition to Install Windows 10/8/7 How To Create a Custom Partition to Install Windows [Full Guide]
Understanding Different Disk Partitions In Windows 10 SOLVED: Windows 10 Hard Drive Partitions Explained In Simple Terms โ€“ Up & Running Inc โ€“ Tech How

Closure

Thus, we hope this article has provided valuable insights into Understanding Disk Partitioning During Windows 10 Installation: A Comprehensive Guide. We hope you find this article informative and beneficial. See you in our next article!

Navigating Windows 11 Updates: A Comprehensive Guide

Navigating Windows 11 Updates: A Comprehensive Guide

Introduction

In this auspicious occasion, we are delighted to delve into the intriguing topic related to Navigating Windows 11 Updates: A Comprehensive Guide. Let’s weave interesting information and offer fresh perspectives to the readers.

Windows 11: A Comprehensive Guide about Features and Updates Perunity - Latest Business Story

Windows 11, Microsoft’s latest operating system, offers a plethora of features and enhancements, but its continued evolution relies heavily on regular updates. These updates ensure optimal performance, security, and compatibility, delivering a seamless user experience. Understanding how to manage these updates is crucial for maximizing the potential of Windows 11.

Understanding Windows 11 Updates

Windows 11 updates fall into two primary categories:

  • Feature Updates: These updates introduce significant new features, functionality, and design changes to the operating system. They are typically released once or twice a year.
  • Quality Updates: These updates focus on improving system stability, security, and performance. They address bugs, vulnerabilities, and other issues, often released monthly.

Methods for Managing Windows 11 Updates

Windows 11 provides users with multiple options to control update installations:

  • Automatic Updates: This is the default setting, where Windows automatically downloads and installs updates in the background. This ensures that your system is always up-to-date and secure.
  • Scheduled Updates: Users can schedule updates to install at specific times, allowing for greater control over system downtime.
  • Manual Updates: Users can manually check for and install updates through the Windows Update settings. This offers the most granular control over the update process.

Benefits of Keeping Windows 11 Up-to-Date

Staying current with Windows 11 updates offers numerous advantages:

  • Enhanced Security: Updates address security vulnerabilities, protecting your system from malware, ransomware, and other threats.
  • Improved Performance: Updates optimize system performance, resolving bugs and improving stability, resulting in a smoother and more efficient user experience.
  • New Features and Functionality: Feature updates introduce new capabilities, enhancing the overall user experience and expanding the possibilities of Windows 11.
  • Compatibility: Updates ensure compatibility with the latest hardware and software, maximizing system efficiency and performance.

Troubleshooting Update Issues

While updates are essential, they can sometimes cause problems. Here are some common issues and solutions:

  • Slow Download Speeds: Check your internet connection and consider using a wired connection for faster download speeds.
  • Update Errors: Restart your computer and try again. If the issue persists, use the Windows Update Troubleshooter.
  • Insufficient Disk Space: Ensure sufficient disk space for the update download and installation.
  • Compatibility Issues: Check for compatibility issues with your hardware or software before installing the update.

FAQs about Windows 11 Updates

Q: Can I pause or delay updates?

A: Yes, you can pause updates for up to 35 days. You can also choose to delay feature updates for up to 365 days.

Q: How do I check for available updates?

A: Open Settings > Windows Update and click "Check for updates."

Q: What if I am experiencing problems after an update?

A: You can use the System Restore feature to revert your computer to a previous state before the update. Alternatively, you can contact Microsoft support for assistance.

Q: How do I disable automatic updates?

A: This is not recommended, as it leaves your system vulnerable to security threats. However, you can temporarily disable automatic updates through the Windows Update settings.

Tips for Managing Windows 11 Updates

  • Back up your data regularly: This ensures that you can restore your system in case of any issues during the update process.
  • Check for compatibility: Before installing any update, check for compatibility with your hardware and software to avoid potential conflicts.
  • Monitor update history: Keep track of installed updates and their impact on your system.
  • Use a reliable internet connection: Ensure a stable and fast internet connection for smooth and efficient update downloads and installations.
  • Follow official Microsoft documentation: Refer to Microsoft’s official documentation for detailed information and troubleshooting guides.

Conclusion

Windows 11 updates are a crucial part of maintaining a secure, stable, and feature-rich operating system. By understanding the different types of updates, managing them effectively, and addressing potential issues promptly, users can maximize the benefits of Windows 11 and enjoy a seamless and productive experience. Regular updates ensure that your system stays protected, performs optimally, and remains compatible with the latest technology. Remember to stay informed, back up your data, and follow official Microsoft guidelines for a smooth and successful update journey.

Your Ultimate Guide on How to update Windows 11 from Windows 10/7/8.1. How to Update Windows 11 from Windows Update - YouTube Microsoft windows 11 updates - trendyptu
Windows 11 Update How to check for Windows 11 updates  PCWorld How to Update Apps on Windows 11 - YouTube
How to Manual Update Windows 11 - YouTube Buy WINDOWS 11 HOME User Manual: A Comprehensive Illustrated Guide to Navigating the New

Closure

Thus, we hope this article has provided valuable insights into Navigating Windows 11 Updates: A Comprehensive Guide. We thank you for taking the time to read this article. See you in our next article!

Unlinking Your Microsoft Account From Windows 10: A Comprehensive Guide

Unlinking Your Microsoft Account from Windows 10: A Comprehensive Guide

Introduction

In this auspicious occasion, we are delighted to delve into the intriguing topic related to Unlinking Your Microsoft Account from Windows 10: A Comprehensive Guide. Let’s weave interesting information and offer fresh perspectives to the readers.

Unlinking Your Microsoft Account from Windows 10: A Comprehensive Guide

How to unlink microsoft account from windows 10 - realtimetoo

In the contemporary computing landscape, Microsoft accounts have become ubiquitous, offering seamless integration across various Windows devices and services. However, there are instances where users may choose to sever this connection, opting for a more traditional local account experience. This article will delve into the intricacies of removing a Microsoft account from a Windows 10 PC, exploring its implications, benefits, and the necessary steps involved.

Understanding the Implications of Removing a Microsoft Account

Before embarking on the process of removing a Microsoft account, it is crucial to comprehend the potential consequences and implications. Removing your Microsoft account from a Windows 10 PC will result in the following changes:

  • Loss of Cloud Synchronization: Files, settings, and applications linked to your Microsoft account will no longer synchronize across your devices. This includes OneDrive storage, personalized settings, and applications downloaded from the Microsoft Store.
  • Limited Access to Features: Certain features and services reliant on your Microsoft account, such as Windows Update, Cortana, and Microsoft Store purchases, will become inaccessible.
  • Data Retention: While your account is removed from the device, data associated with your account, such as emails, contacts, and calendar entries, may still be stored on the local hard drive. This data can be manually deleted if desired.
  • Local Account Restrictions: A local account lacks the privileges and functionalities associated with a Microsoft account. For example, access to features like Windows Hello for facial or fingerprint login, and the ability to remotely manage your PC, will be unavailable.

Reasons for Removing a Microsoft Account

While Microsoft accounts offer numerous benefits, there are valid reasons why users might choose to remove them from their Windows 10 PCs. These reasons can be categorized as follows:

  • Privacy Concerns: Some users may prioritize privacy and choose to avoid the potential data collection associated with a Microsoft account. Local accounts offer a more isolated computing experience, limiting the data shared with Microsoft.
  • Account Security: In cases where a Microsoft account has been compromised or is suspected of being compromised, removing it from the device can help mitigate the risk of unauthorized access.
  • System Troubleshooting: Removing a Microsoft account can be a troubleshooting step when encountering issues related to account synchronization or application compatibility.
  • Legacy System Transition: Users migrating from an older Windows version without a Microsoft account may choose to maintain a local account for familiarity and consistency.
  • Multiple User Accounts: In multi-user environments, a local account can provide a more distinct and independent user experience, separate from the primary Microsoft account.

The Step-by-Step Process of Removing a Microsoft Account

Removing a Microsoft account from a Windows 10 PC is a straightforward process that can be accomplished through the Settings app. Here’s a detailed guide:

  1. Open Settings: Click the Start button, then select the "Settings" gear icon.
  2. Navigate to Accounts: In the Settings window, click on "Accounts".
  3. Select "Your Info": Within the Accounts section, click on "Your Info".
  4. Choose "Sign in with a local account instead": Locate the "Sign in with a local account instead" option and click on it.
  5. Enter your Microsoft account password: You will be prompted to enter the password associated with your Microsoft account. This is necessary to confirm the removal request.
  6. Create a Local Account: You will be guided to create a new local account. Choose a username, password, and any other required information for the local account.
  7. Confirm and Sign Out: Once you have successfully created the local account, confirm the removal of your Microsoft account. You will be signed out of your Microsoft account and automatically signed into the newly created local account.

Additional Considerations

  • Data Backup: Before proceeding with the removal process, it is highly recommended to back up any important data stored on your PC, especially files saved in OneDrive or other cloud storage linked to your Microsoft account.
  • Application Compatibility: Certain applications may require a Microsoft account for functionality. Ensure you understand the implications for any applications you rely on before removing your account.
  • Re-Adding a Microsoft Account: If you decide to re-add a Microsoft account later, you will need to create a new local account and follow the steps outlined above to remove the existing local account.

FAQs: Unlinking Your Microsoft Account from Windows 10

Q: Can I remove my Microsoft account without creating a local account?

A: No, removing a Microsoft account requires creating a new local account to ensure continued access to your PC.

Q: Will I lose all my data if I remove my Microsoft account?

A: While files stored locally on your PC will remain, data stored in the cloud, such as OneDrive files, will no longer be accessible. It is crucial to back up any critical data before removing your account.

Q: Can I re-add my Microsoft account after removing it?

A: Yes, you can re-add your Microsoft account at any time by following the steps outlined above to remove the existing local account and then signing in with your Microsoft account.

Q: What happens to my Microsoft Store purchases after removing my account?

A: You will lose access to applications downloaded from the Microsoft Store. However, you can re-download them if you re-add your Microsoft account later.

Q: Will I lose my Windows 10 license if I remove my Microsoft account?

A: No, your Windows 10 license remains associated with your PC, regardless of the account you use to sign in.

Q: Can I remove a Microsoft account from a shared PC?

A: Yes, you can remove a Microsoft account from a shared PC. However, it is important to understand that removing a Microsoft account will also remove access to the associated data and applications for all users.

Tips for Removing a Microsoft Account

  • Review Your Data: Before removing your Microsoft account, carefully review your data and ensure you have backed up any essential files, settings, or applications.
  • Check Application Compatibility: Verify that your critical applications will function correctly with a local account.
  • Consider Alternatives: If privacy is a primary concern, explore alternative solutions, such as using a dedicated privacy-focused browser or utilizing a VPN.
  • Consult Microsoft Support: If you encounter any difficulties or have questions, contact Microsoft support for assistance.

Conclusion

Removing a Microsoft account from a Windows 10 PC can be a necessary step for various reasons, ranging from privacy concerns to troubleshooting issues. Understanding the implications, benefits, and the step-by-step process involved is crucial to make an informed decision. By carefully considering the potential consequences and taking appropriate precautions, users can successfully unlink their Microsoft account from their Windows 10 PC and transition to a local account experience.

How to unlink microsoft account from windows 10 - realtimetoo Working Methods to Unlink Microsoft Account on Windows 10 How Delete or Unlink Microsoft Account from Windows 10 โ€“ IntoPut
How Unlink Microsoft Account from Windows 10 (Switch to Local Account) How Unlink Microsoft Account from Windows 10 (Switch to Local Account) How to unlink windows 10 from microsoft account - poothai
How to unlink windows 10 from microsoft account - denverfreeloads Windows 10 unlink microsoft account - netwatcher

Closure

Thus, we hope this article has provided valuable insights into Unlinking Your Microsoft Account from Windows 10: A Comprehensive Guide. We hope you find this article informative and beneficial. See you in our next article!

The Silent Update: Troubleshooting Audio Issues After Windows 10 Updates

The Silent Update: Troubleshooting Audio Issues After Windows 10 Updates

Introduction

With great pleasure, we will explore the intriguing topic related to The Silent Update: Troubleshooting Audio Issues After Windows 10 Updates. Let’s weave interesting information and offer fresh perspectives to the readers.

The Silent Update: Troubleshooting Audio Issues After Windows 10 Updates

How to Fix No Sound After Windows 10 Update - YouTube

Windows 10 updates, while crucial for system security and performance enhancements, can sometimes lead to unexpected glitches. One such common issue is the loss of audio functionality after an update. This article explores the reasons behind this silent predicament, provides comprehensive troubleshooting steps, and offers valuable insights into preventing such problems in the future.

Understanding the Silent Update: Causes and Context

The absence of sound after a Windows 10 update can be attributed to a variety of factors, ranging from simple driver conflicts to more complex system-level issues. Here are some of the most common culprits:

  • Outdated or Incompatible Drivers: Updates can introduce new features that may require updated drivers for audio devices. If the existing drivers are outdated or incompatible with the new update, audio functionality may be disrupted.
  • Corrupted System Files: Windows updates involve significant changes to the operating system. Errors during the update process can lead to corrupted system files, including those responsible for audio management.
  • Conflicting Software: Newly installed programs or updates to existing software can sometimes interfere with audio drivers or system settings, leading to sound issues.
  • Hardware Malfunction: While less common, a faulty audio device or a loose connection can also contribute to the absence of sound.
  • Windows Audio Service Issues: The Windows Audio service is responsible for managing audio playback and recording. If this service is disabled or malfunctioning, audio output may be affected.
  • System Settings Modifications: Windows updates can sometimes inadvertently change audio settings, such as the default output device or volume levels, resulting in silent speakers.

Troubleshooting the Silent Update: A Step-by-Step Approach

Resolving audio issues after a Windows 10 update involves a systematic approach, starting with simple troubleshooting steps and progressing to more advanced solutions.

1. Restart Your Computer: Often, a simple restart can resolve temporary glitches and refresh system processes.

2. Check for System Updates: Ensure that your system has the latest Windows updates installed. Sometimes, subsequent updates address issues introduced by previous updates.

3. Verify Audio Device Settings:

  • Check the Volume: Ensure that the system volume and the volume of the audio device are not muted.
  • Select the Correct Output Device: Verify that the correct audio device is selected as the output device in Windows settings.
  • Disable and Re-enable Audio Device: In the Sound settings, right-click the audio device and select "Disable." Then, right-click again and select "Enable." This can sometimes refresh the device connection.

4. Update Audio Drivers:

  • Manually Update: Visit the manufacturer’s website for your audio device and download the latest drivers. Install the drivers, and restart your computer.
  • Use Windows Update: Open Windows Settings, go to "Update & Security," and click on "Check for Updates." Windows may automatically download and install the latest drivers.
  • Device Manager: In Device Manager, right-click the audio device, select "Update driver," and follow the on-screen instructions.

5. Run Audio Troubleshooter:

  • Open Windows Settings, go to "Update & Security," and click on "Troubleshoot."
  • Select "Playing Audio" from the list of troubleshooters and follow the on-screen instructions. The troubleshooter will attempt to identify and resolve any issues with audio playback.

6. Check for Conflicts with Software:

  • Uninstall Recent Software: If you recently installed new software or updated existing programs, try uninstalling them to see if the issue is resolved.
  • Run a Clean Boot: A clean boot starts Windows with minimal software and services running. This can help isolate the cause of the audio issue.

7. Repair or Reset Windows:

  • Repair Install: Perform a repair install of Windows to fix corrupted system files.
  • Reset Windows: If the problem persists, consider resetting Windows to factory settings. This will erase all data, so back up your important files before proceeding.

8. Hardware Troubleshooting:

  • Check Connections: Ensure that all cables connecting the audio device to your computer are securely connected.
  • Test Other Audio Devices: Try connecting a different audio device, such as headphones or external speakers, to see if the issue is specific to the original device.

9. Check Windows Audio Service:

  • Open the "Run" dialog box (Windows key + R) and type "services.msc."
  • Locate the "Windows Audio" service, right-click it, and select "Properties."
  • Ensure that the service is set to "Automatic" and that it is started.

10. Reset Audio Settings:

  • Open Windows Settings, go to "System," and click on "Sound."
  • Click on "Sound Control Panel" in the related settings section.
  • In the "Playback" tab, right-click an empty area and select "Show Disabled Devices."
  • Right-click the audio device, select "Properties," and navigate to the "Advanced" tab.
  • Click on "Restore Defaults."

FAQs: Addressing Common Concerns

Q: My computer was working fine before the update. Why did the audio stop working after the update?

A: Windows updates can introduce new features or changes to the operating system that require updated drivers or software. If the existing drivers or software are not compatible with the new update, it can lead to audio issues.

Q: I tried updating the drivers, but it didn’t solve the problem. What should I do?

A: If updating drivers doesn’t resolve the issue, consider using the Windows Audio Troubleshooter, running a clean boot, or performing a repair install of Windows.

Q: I don’t want to reset my computer. Are there any other solutions?

A: While resetting Windows is a drastic solution, you can try other troubleshooting steps like running a clean boot, repairing system files, or checking for software conflicts.

Q: I’m using a new audio device. Could that be the problem?

A: It’s possible that the new audio device is not compatible with your system or requires specific drivers. Ensure you have the latest drivers for the device installed.

Q: How can I prevent this from happening again?

A: To minimize the risk of audio issues after future updates, keep your system updated with the latest drivers and software, and back up your important files regularly. You can also delay or pause updates if you’re concerned about potential issues.

Tips for Preventing Audio Issues:

  • Keep Drivers Updated: Regularly check for and install the latest drivers for your audio device.
  • Back Up Your System: Create regular backups of your system to restore your data in case of issues.
  • Delay or Pause Updates: If you’re hesitant about a new update, you can delay or pause it for a few days to observe any reported issues.
  • Use a Stable Internet Connection: Ensure you have a stable internet connection during the update process to prevent download errors or interruptions.

Conclusion: Maintaining Audio Harmony

While audio issues after a Windows 10 update can be frustrating, they are often resolvable. By following the troubleshooting steps outlined in this article, you can identify and address the root cause of the problem and restore your audio functionality. Remember, preventive measures like keeping drivers updated and backing up your system can significantly reduce the likelihood of encountering such issues in the future.

How to Fix: No Sound After Windows 10/11 Update - Sound Missing 2024 [Solved] - YouTube Fix Audio problem after Windows update KB5015878 in Windows 10 - YouTube How to Fix Sound or Audio Problems on Windows 10  windows 10 sound issues after update - 2019
How to fix audio after applying system update (KB5015878) on Windows 10  Windows Central How to fix audio after applying system update (KB5015878) on Windows 10 Fix Audio problem after Windows update KB5015878 in Windows 10 - YouTube
How to Fix Windows 10 Audio Sound Problems [3 Solutions] - YouTube How To Resolve/Fix Audio or Sound Problems After Update Windows 10 in 2020? - YouTube

Closure

Thus, we hope this article has provided valuable insights into The Silent Update: Troubleshooting Audio Issues After Windows 10 Updates. We appreciate your attention to our article. See you in our next article!