Archives June 2024

A Comprehensive Guide To Installing R On Windows 10 (64-bit)

A Comprehensive Guide to Installing R on Windows 10 (64-bit)

Introduction

In this auspicious occasion, we are delighted to delve into the intriguing topic related to A Comprehensive Guide to Installing R on Windows 10 (64-bit). Let’s weave interesting information and offer fresh perspectives to the readers.

A Comprehensive Guide to Installing R on Windows 10 (64-bit)

Simple Guide for Installing R on Windows 10

R, a free and open-source programming language and software environment, has become a cornerstone for statistical computing and data visualization. Its versatility and extensive package library make it an invaluable tool for researchers, data scientists, and anyone seeking to analyze and interpret data. This guide provides a step-by-step explanation of installing R on a Windows 10 (64-bit) system, ensuring a smooth and efficient setup.

Understanding the Importance of R

R’s prominence in the data science landscape stems from several key advantages:

  • Comprehensive Statistical Capabilities: R offers a vast array of statistical functions, covering everything from basic descriptive statistics to advanced modeling techniques like regression, classification, and time series analysis.
  • Powerful Visualization Tools: R’s graphics capabilities are highly regarded, allowing users to create visually appealing and informative plots, charts, and graphs to communicate insights effectively.
  • Extensive Package Ecosystem: The Comprehensive R Archive Network (CRAN) houses thousands of user-contributed packages, extending R’s functionality to encompass diverse fields like bioinformatics, finance, machine learning, and more.
  • Active Community and Support: R boasts a vibrant and supportive community, providing ample resources, forums, and documentation to assist users in their learning and problem-solving endeavors.
  • Open Source and Free: R is freely available for download and use, making it accessible to users of all backgrounds and budgets.

Downloading and Installing R

  1. Accessing the Official Website: The first step is to navigate to the official R project website at https://cran.r-project.org/.
  2. Choosing the Appropriate Installer: On the website, locate the "Download R for Windows" section. Select the installer corresponding to your operating system (Windows 10, 64-bit). The most recent version is generally recommended, but older versions may be necessary for compatibility reasons.
  3. Initiating the Installation: Once the installer is downloaded, double-click it to begin the installation process.
  4. Following the On-Screen Instructions: The installation wizard will guide you through the process, presenting options for installation location, language settings, and other preferences.
  5. Completing the Installation: After completing the steps, the R installation will be finalized. You can access R through the Start menu or by typing "R" in the search bar.

Verifying the Installation

After installing R, it’s crucial to confirm that it’s working correctly. This can be achieved by:

  1. Launching R: Open R by selecting it from the Start menu or searching for it.
  2. Running a Simple Command: In the R console, type print("Hello, World!") and press Enter. The output should display "Hello, World!" indicating that R is installed and functional.
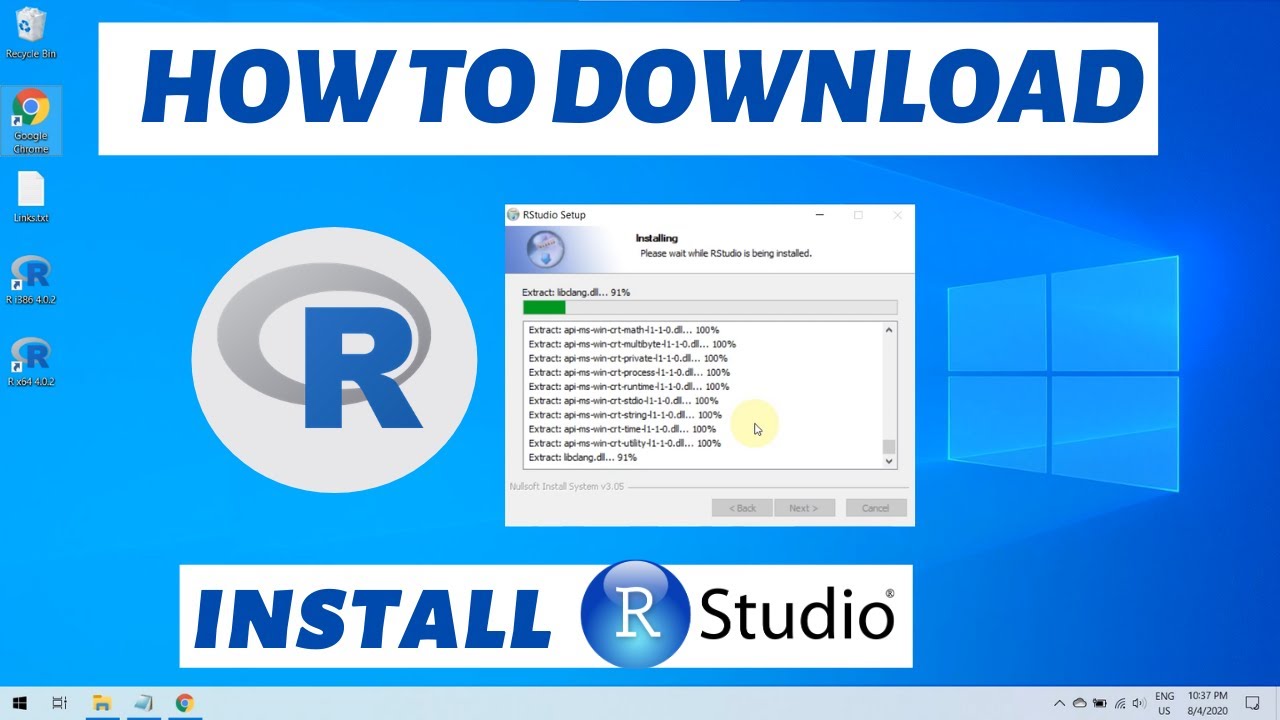
Installing RStudio

While R itself is a powerful tool, RStudio is a popular integrated development environment (IDE) that simplifies the coding and analysis process.

  1. Downloading RStudio: Visit the RStudio website at https://www.rstudio.com/ and navigate to the "Products" section. Download the free RStudio Desktop version.
  2. Launching the Installer: Run the RStudio installer and follow the on-screen instructions to complete the installation.
  3. Starting RStudio: Once installed, launch RStudio. You’ll be presented with a user-friendly interface, including a console, script editor, environment pane, and more.

Understanding RStudio’s Interface

RStudio offers a streamlined environment for working with R. Here’s a breakdown of its key components:

  • Console: The console is the primary interaction point with R, where commands are entered and results are displayed.
  • Script Editor: The script editor allows you to write and save R code in a structured manner.
  • Environment Pane: This pane displays the variables, data frames, and other objects currently loaded in your R session.
  • Plots Pane: The plots pane displays the results of graphical commands, providing a visual representation of your data.
  • Help Pane: The help pane provides access to R documentation and tutorials.

Essential R Commands

To get started with R, you’ll need to familiarize yourself with some fundamental commands:

  • install.packages(): This command is used to install R packages from CRAN or other repositories.
  • library(): This command loads installed packages into your current R session.
  • data(): This command loads built-in datasets that are included with R.
  • read.csv(): This command reads data from a comma-separated value (CSV) file.
  • summary(): This command provides basic descriptive statistics for a dataset.
  • plot(): This command creates basic plots, such as scatterplots and histograms.

Tips for Using R Effectively

  • Start with the Basics: Begin by exploring R’s fundamental concepts, such as data types, variables, operators, and functions.
  • Leverage Online Resources: Utilize online resources like tutorials, documentation, and forums to learn new techniques and troubleshoot problems.
  • Experiment and Practice: The best way to master R is by experimenting with code, trying out different commands, and working through practical examples.
  • Organize Your Code: Use comments and clear naming conventions to make your code readable and maintainable.
  • Explore R Packages: Discover the vast array of R packages available on CRAN and other repositories to extend R’s capabilities.

Frequently Asked Questions (FAQs)

1. What is the difference between R and RStudio?

R is the programming language and software environment, while RStudio is an integrated development environment (IDE) that provides a user-friendly interface for working with R.

2. Do I need to install R before installing RStudio?

Yes, RStudio requires R to be installed on your system. Install R first, and then install RStudio.

3. How do I update R?

To update R, go to the "Download R for Windows" section on the official R project website. Download the latest version and run the installer. The update process will automatically replace the previous version with the new one.

4. What are R packages, and how do I use them?

R packages are collections of functions, data, and documentation that extend R’s functionality. To use a package, first install it using install.packages(), and then load it into your session using library().

5. Where can I find help and support for R?

R has a large and active community, providing numerous resources for help and support. You can find tutorials, documentation, and forums on the official R project website, CRAN, and other online platforms.

Conclusion

Installing R on a Windows 10 (64-bit) system is a straightforward process, empowering you to harness its statistical and data visualization capabilities. Whether you’re a researcher, data scientist, or simply curious about data analysis, R provides a powerful and versatile tool to explore the world of data. By following the steps outlined in this guide and utilizing the available resources, you can embark on your journey into the world of R and unlock its potential for data-driven insights.

Simple Guide for Installing R on Windows 10 Installing R and RStudio on Windows 10  R Programming Tutorial For Beginners  Easy setup guide Simple Guide for Installing R on Windows 10
How to download R and install Rstudio on Windows 10 2021 - YouTube Installing R on Windows10 - YouTube How to Install R on Windows 10 - YouTube
Simple Guide for Installing R on Windows 10 Simple Guide for Installing R on Windows 10

Closure

Thus, we hope this article has provided valuable insights into A Comprehensive Guide to Installing R on Windows 10 (64-bit). We hope you find this article informative and beneficial. See you in our next article!

Unlocking The Power Of Bonjour On Windows 11: A Comprehensive Guide

Unlocking the Power of Bonjour on Windows 11: A Comprehensive Guide

Introduction

In this auspicious occasion, we are delighted to delve into the intriguing topic related to Unlocking the Power of Bonjour on Windows 11: A Comprehensive Guide. Let’s weave interesting information and offer fresh perspectives to the readers.

Unlocking the Power of Bonjour on Windows 11: A Comprehensive Guide

What Is Bonjour Service On Windows 10 & 11? [Complete Guide]

In the realm of modern computing, seamless communication between devices is paramount. Windows 11, with its focus on enhanced connectivity, introduces a powerful tool for achieving this: Bonjour. While not a traditional application in the conventional sense, Bonjour acts as a network discovery protocol, quietly facilitating communication between devices on a local network. This article delves into the intricacies of Bonjour on Windows 11, explaining its functionalities, benefits, and implications for users.

Bonjour: The Foundation of Network Discovery

Bonjour, also known as Apple’s Zero-Configuration Networking (ZeroConf), is a protocol designed to simplify device discovery and communication on a local network. Unlike traditional network configurations that require manual IP address assignments and complex settings, Bonjour operates on a self-configuring principle. This means devices can automatically find and connect to each other without the need for manual intervention.

How Bonjour Works: A Behind-the-Scenes Look

At its core, Bonjour relies on multicast Domain Name System (mDNS) and Service Location Protocol (SLP) to facilitate communication. When a device joins a network, it broadcasts its presence and capabilities using mDNS. Other devices on the same network can then discover and connect to this device based on its advertised services.

For instance, if a printer is connected to a network, it will use Bonjour to broadcast its presence as a printing service. Other devices on the network, such as computers or mobile phones, can then automatically detect and connect to the printer without needing to know its IP address or configure any complex settings.

The Benefits of Bonjour on Windows 11

The integration of Bonjour on Windows 11 unlocks a range of advantages for users:

  • Simplified Device Discovery: Bonjour eliminates the need for manual network configuration, making it easier for devices to find and connect with each other. This simplifies the process of connecting to printers, media servers, and other network-enabled devices.
  • Enhanced Compatibility: Bonjour is a widely adopted protocol, making it compatible with a wide range of devices and applications. This allows Windows 11 users to seamlessly connect to devices from various manufacturers.
  • Improved Network Management: By automating device discovery and communication, Bonjour reduces the complexity of network management. This simplifies tasks like sharing files, streaming media, and controlling network devices.
  • Boosting Productivity: The streamlined network communication facilitated by Bonjour allows users to focus on their work or tasks without being bogged down by complex network configurations.

Bonjour in Action: Real-World Applications

Bonjour’s influence extends beyond simple device discovery. It plays a crucial role in enabling various functionalities on Windows 11:

  • AirPlay Support: Windows 11 users can leverage Bonjour to connect to Apple AirPlay-enabled devices, such as Apple TVs or HomePods. This allows users to stream audio and video content from their Windows 11 computers to these devices.
  • Apple HomeKit Integration: Bonjour enables Windows 11 devices to communicate with HomeKit-enabled smart home accessories. This allows users to control their smart home devices from their Windows 11 computers.
  • Game Networking: Some games utilize Bonjour for network discovery and communication between players on a local network. This allows for seamless multiplayer gaming experiences without the need for external servers.
  • Printing and File Sharing: Bonjour simplifies the process of connecting to network printers and sharing files between devices on a local network.

FAQs about Bonjour on Windows 11

Q: Do I need to install Bonjour on Windows 11?

A: Bonjour is natively integrated into Windows 11. You don’t need to install it separately.

Q: How do I know if Bonjour is working on my Windows 11 computer?

A: You can check by opening the "Control Panel" and navigating to "Network and Sharing Center." Look for the "Bonjour Service" listed under "Network Connections."

Q: Can I disable Bonjour on Windows 11?

A: Yes, you can disable Bonjour if you don’t need its functionalities. However, this may affect your ability to connect to certain devices or use specific features.

Q: What are some troubleshooting tips for Bonjour on Windows 11?

A: If you encounter issues with Bonjour, consider the following:

  • Ensure the Bonjour Service is running: Check if the "Bonjour Service" is enabled in the "Services" section of the "Control Panel."
  • Restart the network adapter: Restarting your network adapter may resolve any temporary issues.
  • Check for firewall interference: Ensure that your firewall isn’t blocking Bonjour traffic.
  • Update your network drivers: Outdated network drivers can cause compatibility issues.

Conclusion: Bonjour – A Silent Powerhouse

Bonjour, while often operating behind the scenes, plays a vital role in enhancing connectivity and user experience on Windows 11. Its seamless device discovery and communication capabilities simplify network management, boost productivity, and unlock a range of functionalities. By understanding the intricacies of Bonjour and its applications, users can fully leverage its potential and enjoy a more interconnected and efficient computing experience.

What Is Bonjour Service On Windows 10 & 11? [Complete Guide] Bonjour Service in Windows 11: What Is It & Why do I Need It? [SOLVED] Bonjour Service Errors on Windows 11
What Is Bonjour Service On Windows 10 & 11? [Complete Guide] What Is Bonjour Service On Windows 10 11 Complete Gui - vrogue.co Bonjour Service Windows 11
What Is Bonjour Service On Windows 10 11 Complete Gui - vrogue.co Comment télécharger le service Bonjour Windows 11 [Étapes] – PC Transformation

Closure

Thus, we hope this article has provided valuable insights into Unlocking the Power of Bonjour on Windows 11: A Comprehensive Guide. We thank you for taking the time to read this article. See you in our next article!

A Comprehensive Guide To ASUS Q Installer: Simplifying The Installation Process

A Comprehensive Guide to ASUS Q Installer: Simplifying the Installation Process

Introduction

With enthusiasm, let’s navigate through the intriguing topic related to A Comprehensive Guide to ASUS Q Installer: Simplifying the Installation Process. Let’s weave interesting information and offer fresh perspectives to the readers.

A Comprehensive Guide to ASUS Q Installer: Simplifying the Installation Process

ASUS Q-Installerでパソコンの初期設定が簡単に!  プロガジ

ASUS, a renowned manufacturer of consumer electronics, offers a suite of software tools designed to enhance the user experience. Among these, Q Installer stands out as a user-friendly application that streamlines the process of installing essential drivers and software for ASUS products. This article delves into the intricacies of Q Installer, highlighting its functionalities, benefits, and how it simplifies the setup process for ASUS users.

Understanding the Role of Q Installer

Q Installer is a vital component of the ASUS software ecosystem, acting as a one-stop solution for installing crucial software and drivers. It eliminates the need for users to manually search for and install individual components, saving valuable time and effort. This software utility is particularly beneficial for novice users who may lack the technical expertise to navigate complex installation procedures.

Key Features of Q Installer

Q Installer boasts a range of features designed to simplify the installation process:

  • Automated Driver Detection and Installation: Q Installer automatically identifies the connected ASUS device and downloads the necessary drivers, eliminating the need for manual searching and compatibility checks.
  • Software Bundling: Q Installer offers a curated selection of essential software applications tailored to specific ASUS products. This includes utilities for system optimization, security enhancements, and productivity tools.
  • User-Friendly Interface: Q Installer presents a straightforward and intuitive interface, making it easy for users of all technical backgrounds to navigate and complete the installation process.
  • Language Support: Q Installer is available in multiple languages, ensuring accessibility for users worldwide.
  • Regular Updates: ASUS regularly updates Q Installer to ensure compatibility with the latest hardware and software releases, guaranteeing optimal performance and security.

Benefits of Using Q Installer

The use of Q Installer offers several advantages for ASUS users:

  • Time Efficiency: Q Installer streamlines the installation process, saving users significant time compared to manually searching for and installing individual drivers and software.
  • Convenience: Q Installer simplifies the setup process, making it accessible even for users with limited technical expertise.
  • Enhanced System Performance: By installing the correct drivers and software, Q Installer optimizes system performance, ensuring smooth operation and optimal functionality.
  • Security Improvements: Q Installer includes security applications that protect the system from malware and other threats, enhancing overall system security.
  • Streamlined User Experience: Q Installer provides a comprehensive software package, ensuring a seamless and user-friendly experience for ASUS products.

Downloading and Installing Q Installer

Q Installer is readily available for download from the official ASUS website. To download and install Q Installer, follow these steps:

  1. Visit the ASUS Support Website: Navigate to the ASUS support website and enter your product model number or search for Q Installer directly.
  2. Locate the Q Installer Download: Find the download link for Q Installer, ensuring compatibility with your operating system.
  3. Download and Install: Download the Q Installer file and execute the installer. Follow the on-screen instructions to complete the installation process.

FAQs about Q Installer

Q: Is Q Installer compatible with all ASUS products?

A: Q Installer is compatible with a wide range of ASUS products, including laptops, desktops, motherboards, and other devices. However, compatibility may vary depending on the specific product model and operating system.

Q: Can I use Q Installer to install drivers for non-ASUS devices?

A: Q Installer is specifically designed for ASUS products. It cannot be used to install drivers for devices from other manufacturers.

Q: Does Q Installer require an internet connection?

A: Yes, Q Installer requires an internet connection to download drivers and software.

Q: Can I uninstall Q Installer after completing the installation process?

A: While Q Installer is designed to streamline the initial setup process, it is generally recommended to keep it installed for future driver updates and software management.

Tips for Using Q Installer

  • Ensure a Stable Internet Connection: A stable internet connection is crucial for efficient driver and software downloads.
  • Read the Installation Instructions: Carefully review the on-screen instructions during the installation process to ensure proper configuration.
  • Keep Q Installer Updated: Regularly check for updates to Q Installer to maintain compatibility with the latest hardware and software releases.
  • Contact ASUS Support: If you encounter any issues or have questions about Q Installer, contact ASUS support for assistance.

Conclusion

Q Installer is an indispensable tool for ASUS users, simplifying the installation process and ensuring optimal performance and functionality. By automating driver detection and installation, bundling essential software, and providing a user-friendly interface, Q Installer empowers users of all technical levels to quickly and efficiently set up their ASUS products. Its comprehensive features, ease of use, and regular updates make it a valuable asset for enhancing the overall user experience with ASUS devices.

officialsite Asus Q-Installer что это?  HelpAdmins.ru TUF Z390-PRO GAMING|Motherboards|ASUS Global
Should I Install the Asus Q Installer? - What Box Game Расскажем о Asus q installer что это Статья про Что такое Asus Q Installer с аудио подкастом
Asus Q-Installer что это?  HelpAdmins.ru ASUS Q-Installerでパソコンの初期設定が簡単に!  プロガジ

Closure

Thus, we hope this article has provided valuable insights into A Comprehensive Guide to ASUS Q Installer: Simplifying the Installation Process. We thank you for taking the time to read this article. See you in our next article!

A Deep Dive Into Windows 10’s PC Health Check Tool: Optimizing System Performance And Ensuring Compatibility

A Deep Dive into Windows 10’s PC Health Check Tool: Optimizing System Performance and Ensuring Compatibility

Introduction

With great pleasure, we will explore the intriguing topic related to A Deep Dive into Windows 10’s PC Health Check Tool: Optimizing System Performance and Ensuring Compatibility. Let’s weave interesting information and offer fresh perspectives to the readers.

A Deep Dive into Windows 10’s PC Health Check Tool: Optimizing System Performance and Ensuring Compatibility

Pc Health Check Tool To Know Windows 10 Can Be Upgraded To Windows 11  Images and Photos finder

Windows 10, Microsoft’s ubiquitous operating system, boasts a wide array of built-in tools designed to enhance user experience and system stability. Among these, the PC Health Check application stands out as a valuable resource for both novice and advanced users. This tool provides a comprehensive assessment of a computer’s health, identifying potential issues that may hinder performance, security, or compatibility with future Windows updates.

Understanding the Purpose and Functionality

The PC Health Check application serves as a diagnostic tool, analyzing various aspects of a computer’s hardware and software to provide users with insights into its overall health. It functions as a proactive measure, enabling users to identify and address potential problems before they escalate into significant performance bottlenecks or system instability.

Key Features and Benefits:

  1. System Compatibility Assessment: The application’s primary function is to evaluate a computer’s hardware and software configuration against the minimum system requirements for future Windows updates. This ensures users can seamlessly transition to newer versions of Windows without encountering compatibility issues.

  2. Hardware and Software Analysis: The tool conducts a thorough examination of the computer’s hardware components, including processor, memory, storage, and graphics card. It also analyzes installed software, identifying any outdated or potentially problematic applications.

  3. Performance Optimization Recommendations: Based on the analysis, the application offers personalized recommendations for optimizing system performance. This may include suggestions for upgrading hardware, updating drivers, or removing unnecessary software.

  4. Security and Stability Check: The PC Health Check application also evaluates the system’s security posture, identifying potential vulnerabilities and recommending appropriate measures to enhance protection. It assesses system stability, detecting potential issues that might lead to crashes or errors.

Navigating the PC Health Check Application

Accessing the PC Health Check application is straightforward. It is typically available in the Windows Store and can be downloaded and installed free of charge. Upon launch, the application presents a user-friendly interface with clear instructions and easy-to-understand results.

1. System Compatibility Check: The application initiates a compatibility check by analyzing the computer’s hardware and software against the minimum system requirements for the latest Windows update. The results are displayed clearly, indicating whether the system is compatible or requires upgrades.

2. Hardware and Software Analysis: The application delves into a detailed analysis of the computer’s hardware and software. It provides insights into the performance of individual components, highlighting potential bottlenecks or areas requiring attention. It also identifies outdated software and recommends updates or removal.

3. Performance Optimization Recommendations: Based on the analysis, the application provides personalized recommendations for optimizing system performance. These suggestions may include updating drivers, removing unnecessary software, or upgrading hardware components.

4. Security and Stability Assessment: The PC Health Check application also analyzes the system’s security posture, identifying potential vulnerabilities and recommending appropriate security measures. It assesses system stability, detecting potential issues that might lead to crashes or errors.

Addressing Issues and Enhancing System Performance

The PC Health Check application provides a valuable roadmap for addressing potential issues and enhancing system performance. Users can follow the application’s recommendations to:

  • Upgrade Hardware: If the application identifies outdated or underperforming hardware components, upgrading them can significantly enhance system performance and ensure compatibility with future Windows updates.
  • Update Drivers: Outdated drivers can lead to compatibility issues and performance degradation. The application identifies drivers requiring updates and provides links to download the latest versions.
  • Remove Unnecessary Software: Cluttered systems with numerous unnecessary programs can slow down performance. The application identifies software that can be safely removed to free up resources and optimize system speed.
  • Enhance Security: The application’s security assessment helps identify vulnerabilities and provides recommendations for strengthening security measures, protecting the system from malware and other threats.
  • Improve System Stability: By identifying potential issues that could lead to crashes or errors, the application helps users proactively address these problems, ensuring a more stable and reliable system.

FAQs about the PC Health Check Application

Q: What are the minimum system requirements for using the PC Health Check application?

A: The PC Health Check application itself has minimal system requirements. It is compatible with Windows 10 and requires a basic internet connection to access the application and download updates.

Q: Is the PC Health Check application compatible with all versions of Windows 10?

A: The PC Health Check application is compatible with the latest versions of Windows 10. However, it may not be compatible with older versions or specific builds.

Q: Can I use the PC Health Check application to troubleshoot specific performance issues?

A: While the PC Health Check application provides insights into overall system health and performance, it is not a comprehensive troubleshooting tool. For specific performance issues, additional troubleshooting steps may be required.

Q: Does the PC Health Check application collect personal data?

A: The PC Health Check application collects limited data for diagnostic purposes, including hardware and software information. This data is not shared with third parties and is used solely to provide users with personalized recommendations.

Q: Can I disable or uninstall the PC Health Check application?

A: Yes, you can disable or uninstall the PC Health Check application through the Windows Settings menu. However, doing so may limit access to essential system information and recommendations.

Tips for Optimizing System Performance with the PC Health Check Application

  • Regularly Run the Application: Running the PC Health Check application regularly ensures you stay informed about your system’s health and identify potential issues proactively.
  • Follow Recommendations: The application provides valuable recommendations for optimizing system performance and addressing potential issues. Follow these recommendations to enhance your computer’s efficiency and stability.
  • Keep Drivers Updated: Regularly updating drivers can prevent compatibility issues and improve system performance. The PC Health Check application can help identify drivers requiring updates.
  • Remove Unnecessary Software: Cluttered systems with numerous unnecessary programs can slow down performance. The application identifies software that can be safely removed to free up resources.
  • Run System Maintenance: Regularly performing system maintenance tasks, such as disk cleanup and defragmentation, can improve system performance and stability.

Conclusion

The PC Health Check application is a valuable tool for Windows 10 users, providing insights into system health, identifying potential issues, and offering recommendations for optimization. By utilizing this tool, users can proactively address problems, enhance system performance, and ensure compatibility with future Windows updates. The application’s user-friendly interface and comprehensive analysis make it accessible to users of all skill levels, empowering them to maintain a healthy and efficient computing environment.

Microsoft began to push the PC Health Check tool to Windows 10 users Windows Pc Health Check Setup Windows 10: Health Check for Your PC - YouTube
How to download pc health check app in windows 10 - productver Microsoft "PC Health Check App"  How to check your Windows 10 system compatibility for Windows 11 How to download pc health check app in windows 10 - productver
Free Computer Health Check Software / 10 Tools To Check Every Hardware Detail Of Your Computer Windows 10 Users to Receive PC Health Check App as a Native Update, With New Features

Closure

Thus, we hope this article has provided valuable insights into A Deep Dive into Windows 10’s PC Health Check Tool: Optimizing System Performance and Ensuring Compatibility. We hope you find this article informative and beneficial. See you in our next article!

Understanding Windows 10 Activation: A Comprehensive Guide

Understanding Windows 10 Activation: A Comprehensive Guide

Introduction

With enthusiasm, let’s navigate through the intriguing topic related to Understanding Windows 10 Activation: A Comprehensive Guide. Let’s weave interesting information and offer fresh perspectives to the readers.

Understanding Windows 10 Activation: A Comprehensive Guide

Windows 10 Activation: A Step-by-Step Guide on How to Activate Windows 10 - CSA

Windows 10, Microsoft’s latest operating system, is a complex piece of software designed to manage your computer’s hardware and software. While it offers a wide range of features and functionalities, its full potential is unlocked through a process known as activation. Activation ensures that your copy of Windows 10 is genuine and authorized for use, granting access to crucial features and updates.

The Importance of Activation

Activation is not simply a formality. It is a critical step that ensures a smooth and secure computing experience. Here are some key reasons why activation is vital:

  • Access to Updates: Regular updates are essential for maintaining system stability, security, and performance. Activated versions of Windows 10 receive these updates automatically, ensuring your system is protected against vulnerabilities and equipped with the latest features.
  • Enhanced Security: Activation plays a role in safeguarding your system from unauthorized access and malicious software. Activated versions are more likely to be detected by security software, and they benefit from regular security updates.
  • Feature Availability: Many advanced features, including personalization options, cloud storage integration, and certain applications, are only available to activated users. This ensures that you have access to the full range of functionalities that Windows 10 offers.
  • Legal Compliance: Using an unactivated version of Windows 10 is a violation of Microsoft’s licensing terms. This can lead to legal consequences and potentially limit access to support and future updates.

Methods of Activation

There are several ways to activate Windows 10, each with its own unique approach:

  • Product Key Activation: This is the most common method. A 25-character product key is provided with new computers or purchased separately. This key is entered during the setup process or via the "Activate Windows" setting within the operating system.
  • Digital Licensing: This method is often used with new computers. The license is tied to your Microsoft account and device, eliminating the need for a physical product key. It automatically activates Windows 10 during setup.
  • Phone Activation: If you cannot activate via a product key or digital license, you can activate by phone. This involves calling Microsoft’s activation hotline and providing specific details about your system.
  • Volume Licensing: Organizations with multiple computers may use volume licensing agreements, which provide a centralized method for managing and activating multiple copies of Windows 10.

Troubleshooting Activation Issues

If you encounter activation issues, there are several troubleshooting steps you can take:

  • Verify your internet connection: Activation requires an active internet connection.
  • Check your product key: Ensure that the product key you entered is correct and has not been used on another device.
  • Run the Windows Activation Troubleshooter: This built-in tool can help diagnose and resolve common activation issues.
  • Contact Microsoft Support: If you are unable to resolve the issue, contact Microsoft support for assistance.

FAQs

Q: What happens if I don’t activate Windows 10?

A: You will be able to use Windows 10, but you will have limited functionality. You will not receive updates, some features will be disabled, and your system may be vulnerable to security threats.

Q: Can I activate Windows 10 on multiple computers with the same product key?

A: No, a single product key can only be used to activate one computer at a time.

Q: What if I lost my product key?

A: If you purchased Windows 10 with a product key, you can usually retrieve it from your Microsoft account or the original purchase receipt.

Q: Can I activate Windows 10 without a product key?

A: While there are ways to activate Windows 10 without a product key, these methods are generally considered unethical and illegal. It is recommended to obtain a genuine product key for legal and secure use.

Tips for Activation

  • Keep your product key safe: Store your product key in a secure location and avoid sharing it with others.
  • Check for digital licenses: If you purchased a new computer with Windows 10, ensure that it has a digital license associated with your Microsoft account.
  • Back up your system: Before activating Windows 10, it is always a good practice to create a system backup to safeguard your data in case of unexpected issues.

Conclusion

Activating Windows 10 is a vital step that ensures a secure, functional, and fully-featured computing experience. By understanding the importance of activation, the various methods available, and troubleshooting steps, you can ensure that your Windows 10 installation is properly activated and optimized for optimal performance and security.

Microsoft Windows 10 - Key Activation Guide - G2A.COM Activating Windows 10 for Free: A Comprehensive Guide - devopszones How to Use KMSpico for Windows 10 Activation  Step-by-Step Guide
Activer Windows 10 Microsoft's official Windows 10 Activation Guide - gHacks Tech News How do I activate Windows 10: A Comprehensive Instruction
How to Activate Windows 10 - Microsoft Support - Tech News Era Windows 10 Activation and Product Key - All You Need to Know

Closure

Thus, we hope this article has provided valuable insights into Understanding Windows 10 Activation: A Comprehensive Guide. We thank you for taking the time to read this article. See you in our next article!

Connecting Windows 10 PCs: A Comprehensive Guide To Networked Collaboration

Connecting Windows 10 PCs: A Comprehensive Guide to Networked Collaboration

Introduction

With great pleasure, we will explore the intriguing topic related to Connecting Windows 10 PCs: A Comprehensive Guide to Networked Collaboration. Let’s weave interesting information and offer fresh perspectives to the readers.

Connecting Windows 10 PCs: A Comprehensive Guide to Networked Collaboration

How to Connect Two Computers and share files using LAN Cable on WINDOWS 10 - YouTube

In the contemporary digital landscape, seamless connectivity between devices is paramount for efficient workflow and enhanced productivity. Windows 10, Microsoft’s flagship operating system, offers a robust suite of features that facilitate the connection of PCs within a network, enabling shared resources, collaborative work, and streamlined communication. This article delves into the various methods and considerations for connecting Windows 10 PCs, highlighting the advantages and applications of a well-configured network.

Understanding Network Types: The Foundation of Connectivity

Before embarking on the process of connecting PCs, it is essential to comprehend the different types of networks available. Primarily, two categories exist:

1. Wired Networks: Utilizing physical cables, wired networks offer a stable and reliable connection with high bandwidth capabilities. Ethernet cables, typically RJ-45 connectors, are the standard medium for wired connections.

2. Wireless Networks: Relying on radio waves, wireless networks provide flexibility and mobility. Wi-Fi, the most prevalent wireless technology, utilizes routers to establish a wireless connection between devices.

Each network type has its advantages and disadvantages. Wired networks excel in performance and stability, while wireless networks offer convenience and mobility. The choice between these two depends on individual needs and environmental constraints.

Setting Up a Network: A Step-by-Step Guide

Once the network type is chosen, the next step involves setting up the network infrastructure. This process typically involves the following steps:

1. Connecting Devices to the Network:

  • Wired Networks: Connect each PC to the network using an Ethernet cable plugged into the network interface card (NIC) on the PC and the router or switch.
  • Wireless Networks: Ensure each PC has a Wi-Fi adapter and is within range of the router. Connect to the network by selecting the SSID (network name) and entering the password.

2. Configuring Network Settings:

  • Wired Networks: No specific configuration is usually required, as the network connection is established automatically.
  • Wireless Networks: Ensure the Wi-Fi network is secured with a strong password to prevent unauthorized access.

3. Verifying Network Connectivity:

  • Ping Test: Use the "ping" command in the command prompt to test connectivity between PCs. A successful ping indicates a connection is established.
  • Network Sharing: Verify that file and printer sharing is enabled on each PC within the network.

Sharing Resources: Unlocking Collaboration Potential

A well-configured network allows for seamless sharing of resources between connected PCs. These resources include:

  • Files and Folders: Share documents, images, and other files across the network, enabling collaborative editing and project management.
  • Printers: Access shared printers from any PC within the network, eliminating the need for individual printers on each device.
  • Internet Connection: Share a single internet connection across multiple PCs, optimizing resource utilization.

Sharing resources enhances collaboration and productivity, allowing users to work together on projects, access shared information, and streamline workflow processes.

Enhancing Network Security: Protecting Your Data

Network security is paramount, especially when sensitive data is shared. Implementing security measures is crucial to protect the network from unauthorized access and cyber threats:

  • Strong Passwords: Utilize complex and unique passwords for both the network and individual user accounts.
  • Firewall: Enable the built-in Windows firewall to block unauthorized access and malicious software.
  • Antivirus Software: Install and maintain a reliable antivirus program to detect and remove malware.
  • Network Security Software: Consider implementing a dedicated network security software for enhanced protection, particularly for larger networks.

By prioritizing network security, users can safeguard their data and ensure a secure and reliable network environment.

Troubleshooting Network Issues: Resolving Common Problems

Network connectivity issues can arise, causing disruptions in workflow and productivity. Identifying and resolving these issues is crucial for maintaining a functional network. Common network problems include:

  • Connection Loss: Check for loose cables, router issues, and potential Wi-Fi interference.
  • Slow Network Speed: Analyze bandwidth usage, network congestion, and potential bottlenecks.
  • Access Restrictions: Verify sharing settings, user permissions, and firewall configurations.

Troubleshooting network problems often involves a systematic approach, starting with basic checks and gradually narrowing down the potential causes.

FAQs: Addressing Common Questions

1. What are the different types of network connections available in Windows 10?

Windows 10 supports both wired and wireless network connections. Wired connections utilize Ethernet cables for a stable and high-bandwidth connection, while wireless connections rely on Wi-Fi for mobility and convenience.

2. How can I share files and folders between PCs on a network?

Windows 10 offers built-in file sharing capabilities. Right-click on the folder you want to share, select "Properties," and then go to the "Sharing" tab. From there, you can grant access to specific users or groups.

3. How can I secure my home network?

Utilize strong passwords for your router and user accounts. Enable the built-in Windows firewall and install a reliable antivirus program. Consider implementing a dedicated network security software for enhanced protection.

4. What are some common network troubleshooting tips?

Start with basic checks like verifying cable connections, restarting devices, and checking for router issues. If the problem persists, analyze network settings, firewall configurations, and potential software conflicts.

5. How can I improve network performance?

Optimize bandwidth usage by limiting unnecessary background processes and software updates. Ensure your router is up-to-date with the latest firmware. Consider using a wired connection for critical tasks requiring high bandwidth.

Tips: Maximizing Network Efficiency

1. Regularly Update Network Drivers: Keep your network drivers updated for optimal performance and compatibility.
2. Optimize Network Settings: Adjust network settings to prioritize specific applications or tasks for improved speed and responsiveness.
3. Utilize Network Monitoring Tools: Employ network monitoring tools to identify potential issues, bottlenecks, and bandwidth usage patterns.
4. Securely Configure Network Devices: Ensure all network devices, including routers and switches, are protected with strong passwords and updated firmware.
5. Implement Network Segmentation: Divide your network into smaller segments to enhance security and isolate potential issues.

Conclusion: Connecting for Collaboration and Productivity

Connecting Windows 10 PCs within a network provides numerous advantages, including seamless resource sharing, enhanced collaboration, and streamlined communication. By understanding the different network types, implementing appropriate security measures, and effectively troubleshooting issues, users can create a robust and efficient network environment that facilitates productivity and fosters a collaborative work culture. As technology continues to evolve, the importance of network connectivity will only increase, making it an essential skill for navigating the digital landscape.

Setting Up Windows Computers to Connect to a Network - dummies How to Connect Two Computers Using a LAN Cable in Windows 10 - Make Tech Easier Connect App Windows 10
How to Share Files between Two Computers Using LAN Cable - TechWiser Connect Windows 10 to Wired, Wireless and P2P Networks How to Connect Two Computers Via Networking & Share File, Folder & Printer Windows 10 - YouTube
Connecting your Windows 10 Computer to the Wi-fi Network. - YouTube Network connect windows 10 - jujamye

Closure

Thus, we hope this article has provided valuable insights into Connecting Windows 10 PCs: A Comprehensive Guide to Networked Collaboration. We thank you for taking the time to read this article. See you in our next article!

Beyond The Basics: Exploring Windows 10’s Startup Settings

Beyond the Basics: Exploring Windows 10’s Startup Settings

Introduction

With enthusiasm, let’s navigate through the intriguing topic related to Beyond the Basics: Exploring Windows 10’s Startup Settings. Let’s weave interesting information and offer fresh perspectives to the readers.

Beyond the Basics: Exploring Windows 10’s Startup Settings

Startup Settings (What It Is and How To Use It)

Windows 10 offers a wealth of customization options, allowing users to tailor their experience to suit their specific needs. While the traditional Startup tab in Task Manager provides a familiar gateway to managing applications that launch at system startup, there are numerous other settings that significantly impact the initial boot process and overall system behavior.

This article delves into these less-known startup configurations, providing a comprehensive guide to understanding their functionality, benefits, and potential impact on Windows 10 performance.

1. System Configuration (msconfig): A Deeper Dive into Startup Control

The System Configuration utility, accessible by typing "msconfig" in the search bar, provides a granular level of control over system startup behavior. Unlike the Startup tab in Task Manager, msconfig offers a broader range of options, including:

  • General Tab: This tab allows users to choose between a Normal startup, a Diagnostic startup (for troubleshooting), or a Selective startup (allowing specific services and startup items to be enabled or disabled).
  • Boot Tab: This tab manages boot options, such as the operating system to boot, the timeout for selecting an OS, and the boot mode (Legacy BIOS or UEFI).
  • Services Tab: This tab lists all Windows services and allows users to disable or enable them selectively. Disabling unnecessary services can improve system performance, but it’s crucial to understand the function of each service before disabling it.
  • Startup Tab: This tab mirrors the Startup tab in Task Manager, providing a list of applications that launch at system startup and enabling users to disable them.
  • Tools Tab: This tab provides access to various system utilities, including System Restore, Disk Cleanup, and System File Checker.

2. Windows 10 Startup Programs: A Deeper Dive

The Startup tab in Task Manager and the "Startup" section in the System Configuration utility provide a user-friendly interface for managing applications that launch automatically at system startup. These programs, while convenient for quick access, can significantly impact boot times and system performance, especially if numerous applications are set to launch automatically.

  • Understanding the Impact of Startup Programs: Each program added to the startup list consumes system resources, potentially slowing down the boot process and affecting overall system performance. This impact is particularly noticeable on older or less powerful hardware.
  • Managing Startup Programs: Users can manage startup programs through the Startup tab in Task Manager or the "Startup" section in the System Configuration utility. Disabling unnecessary startup programs can significantly improve boot times and system performance.
  • Identifying Unnecessary Programs: It’s essential to carefully examine the list of startup programs and identify any unnecessary applications. This can be done by checking the program’s name, publisher, and its impact on system performance.

3. Windows 10 Startup Services: A Deeper Dive

Windows services play a crucial role in the background operation of the operating system, providing essential functionalities such as network connectivity, security updates, and system maintenance. While many services are essential for normal system operation, some can be disabled without impacting functionality.

  • Understanding the Impact of Startup Services: Disabling unnecessary services can improve system performance, particularly on older or less powerful hardware. However, it’s crucial to understand the function of each service before disabling it to avoid disrupting essential system operations.
  • Managing Startup Services: Users can manage startup services using the "Services" tab in the System Configuration utility (msconfig). This tab lists all Windows services and allows users to disable or enable them selectively.
  • Identifying Unnecessary Services: Identifying unnecessary services can be challenging, requiring a thorough understanding of each service’s function. Online resources and forums can provide guidance on identifying services that can be safely disabled.

4. Windows 10 Startup Scripts: A Deeper Dive

Startup scripts are automated sequences of commands that run when the system boots up. These scripts can be used to automate various tasks, such as configuring network settings, launching specific applications, or performing system maintenance.

  • Understanding the Impact of Startup Scripts: Startup scripts can be beneficial for automating tasks and enhancing system functionality. However, poorly written or unnecessary scripts can significantly impact system performance, especially during the boot process.
  • Managing Startup Scripts: Startup scripts are typically stored in the "Startup" folder within the user’s profile directory. Users can manage startup scripts by adding or removing script files from this folder or by modifying the content of existing scripts.
  • Identifying Unnecessary Scripts: It’s essential to carefully examine startup scripts and ensure their continued relevance. Unnecessary or outdated scripts should be removed or disabled to prevent performance degradation.

5. Windows 10 Fast Startup: A Deeper Dive

Fast Startup, a feature introduced in Windows 8, significantly reduces boot times by utilizing a hybrid shutdown approach. Instead of performing a complete shutdown, Fast Startup saves the system’s current state to a hibernation file, allowing for a quicker restart.

  • Understanding the Impact of Fast Startup: Fast Startup provides a noticeable improvement in boot times, particularly on systems with slower hard drives or SSDs. However, it can sometimes lead to compatibility issues with certain applications or hardware.
  • Managing Fast Startup: Fast Startup can be enabled or disabled through the "Power Options" settings. Users can access these settings by searching for "Power Options" in the search bar and navigating to "Choose what the power buttons do."
  • Considerations for Fast Startup: While Fast Startup is generally beneficial, it’s important to be aware of potential compatibility issues. If experiencing problems with specific applications or hardware after enabling Fast Startup, consider disabling it temporarily to see if the issue resolves.

6. Windows 10 Boot Options: A Deeper Dive

Windows 10 offers a range of boot options that can be customized to suit individual preferences and system requirements. These options are accessible through the "Advanced Startup Options" menu, which can be accessed by pressing F8 during the boot process or by using the "Restart" option in the "Settings" menu.

  • Understanding the Impact of Boot Options: Boot options allow users to customize the system’s boot behavior, such as selecting a specific boot device, enabling or disabling specific boot options, or accessing advanced troubleshooting tools.
  • Managing Boot Options: Boot options can be managed through the "Advanced Startup Options" menu or by using the "msconfig" utility. These options allow users to adjust boot order, set a timeout for selecting an operating system, or enable or disable specific boot features.
  • Considerations for Boot Options: It’s crucial to understand the function of each boot option before making any changes. Incorrectly configuring boot options can lead to system instability or boot failures.

FAQs on Other Startup Settings in Windows 10

Q: How can I optimize my Windows 10 startup for faster boot times?

A: Optimizing Windows 10 startup for faster boot times involves a combination of strategies, including:

  • Disabling unnecessary startup programs: This can be achieved through the Startup tab in Task Manager or the "Startup" section in the System Configuration utility.
  • Disabling unnecessary services: Use the "Services" tab in the System Configuration utility to identify and disable services that are not essential for system operation.
  • Removing unnecessary startup scripts: Examine the "Startup" folder within the user’s profile directory and remove or disable any unnecessary or outdated scripts.
  • Enabling Fast Startup: This feature utilizes a hybrid shutdown approach, significantly reducing boot times.
  • Ensuring sufficient disk space: A cluttered hard drive can slow down the boot process. Consider deleting unnecessary files or moving large files to an external drive.
  • Updating system drivers: Outdated drivers can impact system performance, including boot times. Regularly update drivers to ensure optimal performance.

Q: What are the potential risks associated with disabling startup programs, services, or scripts?

A: While disabling unnecessary startup programs, services, or scripts can improve system performance, it’s crucial to understand the potential risks involved:

  • Essential services or programs may be disabled: Disabling essential services or programs can lead to system instability or functionality issues. It’s crucial to carefully research the function of each item before disabling it.
  • Compatibility issues may arise: Disabling certain programs or services may cause compatibility issues with other applications or hardware.
  • Security vulnerabilities may be introduced: Disabling security-related services or programs can increase the system’s vulnerability to malware or other security threats.

Q: How can I troubleshoot startup issues in Windows 10?

A: Troubleshooting startup issues in Windows 10 often involves a systematic approach:

  • Use the "Safe Mode" boot option: Safe Mode boots the system with a minimal set of drivers and programs, allowing users to diagnose and troubleshoot startup issues.
  • Run a System Restore: System Restore allows users to revert the system to a previous state, potentially resolving issues caused by recent software changes.
  • Use the "Startup Repair" tool: Startup Repair automatically scans and attempts to repair system errors that may be causing startup issues.
  • Check for hardware failures: Hardware failures can also cause startup issues. Consider running hardware diagnostics to identify any potential problems.
  • Reinstall Windows 10: If all other troubleshooting steps fail, reinstalling Windows 10 may be necessary to resolve persistent startup issues.

Tips for Managing Startup Settings in Windows 10

  • Start with a clean slate: Before making significant changes to startup settings, consider creating a system restore point to revert to a previous state if necessary.
  • Research thoroughly: Before disabling any startup programs, services, or scripts, research their function to ensure they are not essential for system operation.
  • Monitor system performance: After making changes to startup settings, monitor system performance, including boot times, to assess the impact of the changes.
  • Use reputable tools: Utilize reliable and trusted tools for managing startup settings, such as the System Configuration utility (msconfig) or the Startup tab in Task Manager.
  • Seek professional help: If you’re unsure about making changes to startup settings or encountering persistent issues, consider seeking professional help from a qualified technician.

Conclusion

Windows 10’s startup settings offer a wide range of options for customizing the system’s boot behavior and overall performance. Understanding and managing these settings effectively can significantly improve boot times, enhance system performance, and ensure a smooth and efficient user experience. However, it’s crucial to proceed with caution, research thoroughly, and monitor system performance after making any changes to avoid unintended consequences. By carefully navigating these settings and implementing best practices, users can optimize their Windows 10 experience for optimal performance and functionality.

Customize and manage the Windows 10 Start and taskbar layout - Configure Windows  Microsoft Learn A Complete Guide to the Windows Startup Settings How To View All Startup Programs On Windows 10 - Bitwarsoft
choose start in windows 10 – Colororient Start Screen Settings on Windows 10 How to change the start button settings within Windows 10 - YouTube
Windows 10 Start Menu & Start Screen Customization - Easy Tutorial Review - YouTube How to Use the Windows 10 Start Menu: 6 Steps (with Pictures)

Closure

Thus, we hope this article has provided valuable insights into Beyond the Basics: Exploring Windows 10’s Startup Settings. We appreciate your attention to our article. See you in our next article!

Seamless Sharing: Exploring The Benefits Of Nearby Sharing On Windows 10

Seamless Sharing: Exploring the Benefits of Nearby Sharing on Windows 10

Introduction

With enthusiasm, let’s navigate through the intriguing topic related to Seamless Sharing: Exploring the Benefits of Nearby Sharing on Windows 10. Let’s weave interesting information and offer fresh perspectives to the readers.

Seamless Sharing: Exploring the Benefits of Nearby Sharing on Windows 10

Seamless File Sharing: Google Nearby Share for Windows

In the digital age, the ability to share files between devices quickly and efficiently is paramount. Windows 10, with its focus on user-friendliness and seamless integration, introduced "Nearby Sharing" as a convenient tool for transferring data between compatible devices. This feature, built into the operating system, empowers users to share files, photos, videos, and even links with other Windows 10 devices in close proximity.

Understanding Nearby Sharing

Nearby Sharing functions as a peer-to-peer data transfer protocol, enabling direct file sharing between Windows 10 devices without relying on cloud services or external applications. It leverages Bluetooth and Wi-Fi to establish a secure connection between the sharing devices, ensuring a fast and reliable transfer process.

Benefits of Using Nearby Sharing

The implementation of Nearby Sharing in Windows 10 offers a range of advantages for users seeking efficient data transfer solutions:

  • Simplicity: Unlike traditional methods involving email attachments or cloud storage services, Nearby Sharing streamlines the sharing process, requiring minimal user interaction.
  • Speed: The direct connection established between devices via Nearby Sharing ensures rapid file transfers, eliminating the delays associated with cloud-based solutions.
  • Security: Data transferred using Nearby Sharing is encrypted, ensuring privacy and protection against unauthorized access.
  • Convenience: Nearby Sharing eliminates the need for cumbersome cables or external storage devices, making it a highly convenient option for transferring files between nearby devices.
  • Versatility: The feature supports a wide range of file types, including documents, images, videos, and even links.

How to Enable and Use Nearby Sharing

Enabling and utilizing Nearby Sharing on Windows 10 is a straightforward process:

  1. Enable Nearby Sharing: Access the "Settings" app on your Windows 10 device, navigate to "System," and select "Shared experiences." Ensure "Nearby sharing" is toggled on.
  2. Select Devices: When sharing a file, click the "Share" button in the relevant app and choose "Nearby Sharing." Select the recipient device from the list of available devices in the vicinity.
  3. Accept Transfer: The receiving device will display a notification requesting confirmation of the file transfer. Accept the transfer to receive the shared content.

Tips for Optimizing Nearby Sharing

To enhance the performance and reliability of Nearby Sharing, consider the following tips:

  • Ensure Bluetooth and Wi-Fi are Enabled: Nearby Sharing relies on these technologies for connection. Ensure they are active on both the sending and receiving devices.
  • Maintain Device Proximity: For optimal transfer speeds, keep the sharing devices within close proximity.
  • Check for Updates: Ensure both devices are running the latest Windows 10 updates to benefit from the latest Nearby Sharing enhancements.
  • Verify Device Compatibility: Nearby Sharing is compatible with Windows 10 devices running the latest updates. Confirm that both devices meet the compatibility requirements.
  • Manage Sharing Preferences: Customize your sharing settings to control the visibility of your device and the types of files you are willing to share.

Frequently Asked Questions (FAQs)

Q1: What are the system requirements for using Nearby Sharing?

A: Nearby Sharing requires a Windows 10 device with Bluetooth and Wi-Fi capabilities. Ensure your device is running the latest Windows 10 updates for optimal compatibility.

Q2: Is Nearby Sharing secure?

A: Yes, Nearby Sharing utilizes encryption to protect data during transfer. Data is only accessible to the intended recipient, ensuring privacy and security.

Q3: What types of files can I share using Nearby Sharing?

A: Nearby Sharing supports a wide range of file types, including documents, images, videos, and links.

Q4: Can I share files with Android or iOS devices?

A: Currently, Nearby Sharing is limited to file transfers between Windows 10 devices. However, there are third-party applications available that enable cross-platform file sharing.

Q5: How can I troubleshoot connection issues with Nearby Sharing?

A: If you encounter connection issues, ensure both devices have Bluetooth and Wi-Fi enabled and are within close proximity. Verify that both devices are running the latest Windows 10 updates. Restarting both devices might also resolve the issue.

Conclusion

Nearby Sharing represents a significant advancement in file sharing technology, offering users a convenient, fast, and secure method for transferring data between Windows 10 devices. Its simplicity, speed, and security make it a valuable tool for individuals and businesses alike. By understanding the benefits, enabling the feature, and following the provided tips, users can leverage Nearby Sharing to streamline their data transfer processes and enhance their overall productivity.

Nearby Share is Finally Available on Windows, Allowing for a Seamless File Sharing Experience How to Use Nearby Sharing to Share Files in Windows 10 How to Use Nearby Sharing in Windows 10
How to Use Nearby Sharing in Windows 10 How to transfer files using Nearby Sharing in Windows 10? What Is "Near Share" In Windows 10? How To Share Files Wirelessly
How to Use Nearby Sharing to Share Files in Windows 10 How to use Nearby sharing on Windows 10 or 11 and Microsoft Edge - YouTube

Closure

Thus, we hope this article has provided valuable insights into Seamless Sharing: Exploring the Benefits of Nearby Sharing on Windows 10. We hope you find this article informative and beneficial. See you in our next article!

Maintaining Constant Connectivity: Preventing Wi-Fi Sleep Mode In Windows 10

Maintaining Constant Connectivity: Preventing Wi-Fi Sleep Mode in Windows 10

Introduction

In this auspicious occasion, we are delighted to delve into the intriguing topic related to Maintaining Constant Connectivity: Preventing Wi-Fi Sleep Mode in Windows 10. Let’s weave interesting information and offer fresh perspectives to the readers.

Maintaining Constant Connectivity: Preventing Wi-Fi Sleep Mode in Windows 10

How to Keep WiFi on During Sleep in Windows 10

In the modern digital landscape, consistent and reliable internet access is paramount. Whether for work, entertainment, or communication, interruptions in connectivity can be frustrating and disruptive. Windows 10, in its quest for power optimization, employs a feature known as "Wi-Fi sleep mode," which can automatically disable the Wi-Fi adapter to conserve battery life. While this feature is beneficial for mobile devices, it can be detrimental to users who require continuous internet access on their desktop or laptop computers.

This article delves into the intricacies of Wi-Fi sleep mode in Windows 10, exploring its mechanisms, potential drawbacks, and methods for disabling it. We will examine why preventing Wi-Fi from entering sleep mode can be essential for maintaining uninterrupted connectivity, enhancing productivity, and ensuring smooth operation of online applications and services.

Understanding Wi-Fi Sleep Mode

Wi-Fi sleep mode is a power management feature designed to conserve battery life on wireless devices. When enabled, the Wi-Fi adapter periodically enters a low-power state, reducing energy consumption. This is particularly beneficial for laptops and tablets, where battery life is a crucial consideration.

However, in desktop computers or laptops connected to a constant power source, the benefits of Wi-Fi sleep mode are less pronounced. Continuous internet access is often paramount for these devices, and the intermittent disconnections caused by sleep mode can lead to frustrating interruptions.

The Impact of Wi-Fi Sleep Mode on Connectivity

The primary drawback of Wi-Fi sleep mode is its potential to disrupt internet connectivity. When the Wi-Fi adapter enters sleep mode, the device loses its connection to the wireless network. This can lead to:

  • Interrupted downloads and uploads: Ongoing file transfers may be halted, requiring manual restarts.
  • Delayed responses in online applications: Real-time applications like video conferencing or online gaming may experience lag or disconnections.
  • Loss of connection during critical tasks: Tasks requiring continuous internet access, such as online meetings or live streaming, may be interrupted.
  • Inability to receive important notifications: Time-sensitive notifications from email, messaging, or social media platforms may be missed.

Disabling Wi-Fi Sleep Mode in Windows 10

Fortunately, Windows 10 provides several methods to disable Wi-Fi sleep mode, ensuring uninterrupted connectivity.

1. Through Power Options:

  • Navigate to the Control Panel: Open the Control Panel by searching for it in the Windows search bar.
  • Access Power Options: Select "Power Options" from the Control Panel.
  • Choose a Power Plan: Select the currently active power plan or choose a different one.
  • Modify Plan Settings: Click "Change plan settings" to modify the selected power plan.
  • Advanced Power Settings: Click "Change advanced power settings" to access further customization options.
  • Locate Wireless Adapter Settings: Navigate to the "Wireless Adapter Settings" section.
  • Disable Power Saving Mode: Set the "Power Saving Mode" option to "Maximum Performance" or "Disable."

2. Through Device Manager:

  • Open Device Manager: Search for "Device Manager" in the Windows search bar and open it.
  • Expand Network Adapters: Expand the "Network Adapters" category to view available Wi-Fi adapters.
  • Right-Click on the Adapter: Right-click on the Wi-Fi adapter you want to modify.
  • Select Properties: Choose "Properties" from the context menu.
  • Power Management Tab: Select the "Power Management" tab.
  • Uncheck Power Saving Mode: Uncheck the box labeled "Allow the computer to turn off this device to save power."

3. Using Command Prompt:

  • Open Command Prompt: Open the Command Prompt as administrator by searching for "cmd" in the Windows search bar and right-clicking on the result to select "Run as administrator."
  • Execute the Command: Enter the following command and press Enter:
    powercfg -change -monitor-timeout-ac 0

    This command disables the monitor’s sleep mode, effectively preventing the Wi-Fi adapter from entering sleep mode as well.

4. Using Third-Party Software:

  • Install a Utility: Several third-party utilities are available that offer advanced power management options, including disabling Wi-Fi sleep mode.
  • Configure the Utility: Configure the chosen utility to disable Wi-Fi sleep mode according to your preferences.

5. Through Registry Editor (Advanced):

  • Open Registry Editor: Search for "regedit" in the Windows search bar and open it.
  • Navigate to the Registry Key: Navigate to the following registry key:
    HKEY_LOCAL_MACHINESYSTEMCurrentControlSetControlPower
  • Create a New DWORD Value: Right-click in the right pane and select "New" > "DWORD (32-bit) Value."
  • Name the Value: Name the new value "CsEnabled."
  • Set the Value: Double-click the "CsEnabled" value and set its value to "0" in the "Value data" field.

Note: Modifying the Windows Registry can be complex and requires caution. Incorrect modifications can lead to system instability. It is recommended to back up the registry before making any changes.

FAQs Regarding Wi-Fi Sleep Mode in Windows 10

Q: Does disabling Wi-Fi sleep mode affect battery life?

A: Disabling Wi-Fi sleep mode may slightly increase power consumption, especially on laptops. However, the impact on battery life is generally minimal compared to other power-intensive tasks like running demanding applications or playing games.

Q: Can I disable Wi-Fi sleep mode only when connected to a specific network?

A: Windows 10 does not offer a built-in option to disable Wi-Fi sleep mode selectively based on the network connection. However, some third-party utilities may provide this functionality.

Q: Is it necessary to disable Wi-Fi sleep mode for all Wi-Fi adapters?

A: Disabling Wi-Fi sleep mode is only necessary for the adapter used for internet access. Other adapters, such as Bluetooth or printer adapters, can remain in sleep mode without affecting internet connectivity.

Q: What are the potential downsides of disabling Wi-Fi sleep mode?

A: Disabling Wi-Fi sleep mode may slightly increase power consumption, especially on laptops. However, this impact is generally minimal compared to other power-intensive tasks.

Q: Can I re-enable Wi-Fi sleep mode after disabling it?

A: Yes, you can re-enable Wi-Fi sleep mode by following the same steps used to disable it, but reversing the settings.

Tips for Preventing Wi-Fi Sleep Mode in Windows 10

  • Monitor Network Activity: Regularly monitor network activity to identify potential issues caused by Wi-Fi sleep mode.
  • Consider Using a Wired Connection: If possible, consider using a wired Ethernet connection for more reliable and consistent internet access.
  • Explore Third-Party Utilities: Utilize third-party utilities for advanced power management options, including selective Wi-Fi sleep mode control.
  • Keep Your Drivers Updated: Ensure your Wi-Fi adapter drivers are up-to-date to avoid compatibility issues and optimize performance.
  • Check for Windows Updates: Install the latest Windows updates to benefit from potential bug fixes and performance improvements.

Conclusion

While Wi-Fi sleep mode is a beneficial feature for mobile devices, it can pose challenges for users who rely on constant internet access on their desktop or laptop computers. Disabling Wi-Fi sleep mode in Windows 10 can significantly improve connectivity reliability, enhance productivity, and prevent interruptions during critical tasks. By understanding the mechanisms of Wi-Fi sleep mode, its potential drawbacks, and the available methods for disabling it, users can ensure uninterrupted internet access and optimize their online experience.

How to Enable or Disable Sleep Mode in Windows 10 - YouTube Prevent Sleep Mode Disconnect the Wifi. Windows 10 - YouTube How To Enable Sleep Mode On Windows 10 If Only Your
Stay Connected to Internet in Sleep mode of Windows 10 / 11 How to in sleep mode windows 10 - goldkum How to turn off Wi-Fi during sleep in Windows 10 [Tip]  dotTech
How to Keep Internet Connection Active When in Sleep Mode on Windows 10 How to Enable Sleep Mode in Windows 10 to Save Power

Closure

Thus, we hope this article has provided valuable insights into Maintaining Constant Connectivity: Preventing Wi-Fi Sleep Mode in Windows 10. We appreciate your attention to our article. See you in our next article!

Adobe Photoshop: A Powerful Tool For Image Editing And Manipulation

Adobe Photoshop: A Powerful Tool for Image Editing and Manipulation

Introduction

With enthusiasm, let’s navigate through the intriguing topic related to Adobe Photoshop: A Powerful Tool for Image Editing and Manipulation. Let’s weave interesting information and offer fresh perspectives to the readers.

Adobe Photoshop: A Powerful Tool for Image Editing and Manipulation

Introduction to Photo Manipulation in Adobe Photoshop - How to Cut Out an Image in Photoshop

Adobe Photoshop, a cornerstone of the digital imaging world, continues to evolve, delivering cutting-edge features and enhancements with each new release. The latest version, tailored specifically for Windows 10, stands as a testament to Adobe’s commitment to providing a comprehensive and intuitive platform for professionals and enthusiasts alike.

A Glimpse into the Latest Version

The latest version of Photoshop for Windows 10 boasts a plethora of advancements, designed to elevate the image editing experience to new heights.

  • Enhanced Performance: The software leverages the power of modern hardware, resulting in faster processing speeds and seamless workflow. This translates to quicker rendering times, smoother brushstrokes, and an overall more responsive user experience.

  • AI-Powered Features: Artificial intelligence plays a pivotal role in the latest version, automating complex tasks and streamlining workflows. Features like "Object Selection" and "Neural Filters" harness the power of AI to simplify object selection, enhance images, and create artistic effects with minimal effort.

  • Intuitive Interface: The user interface has been refined, providing a cleaner and more intuitive experience. The familiar layout remains, while new features are seamlessly integrated, ensuring a smooth learning curve for existing users.

  • Enhanced Collaboration Tools: Collaboration features have been expanded, enabling seamless teamwork on projects. Users can share projects, provide feedback, and work simultaneously, fostering a more collaborative and efficient workflow.

Key Features and Their Benefits

1. Object Selection: This revolutionary feature utilizes AI to automatically detect and select objects within an image with remarkable accuracy. This eliminates the need for tedious manual selections, saving time and effort.

  • Benefits:
    • Efficiency: Saves time and effort by automating object selection.
    • Precision: Provides accurate and detailed selections for precise editing.
    • Versatility: Applicable to a wide range of objects, from simple shapes to complex compositions.

2. Neural Filters: These AI-powered filters offer a range of creative effects, from realistic enhancements to artistic transformations.

  • Benefits:
    • Creativity: Unlocks a world of artistic possibilities with a single click.
    • Efficiency: Automates complex image adjustments, saving time and effort.
    • Versatility: Offers a wide range of filters to suit various creative needs.

3. Enhanced Brush Engine: The brush engine has been significantly improved, providing smoother, more realistic brushstrokes.

  • Benefits:
    • Realism: Creates more natural and lifelike brushstrokes.
    • Control: Offers greater control over brush size, opacity, and flow.
    • Efficiency: Reduces the need for multiple brush strokes, speeding up the painting process.

4. Improved Layer Management: The layer management system has been streamlined, making it easier to organize and work with multiple layers.

  • Benefits:
    • Organization: Provides a clearer and more organized layer structure.
    • Efficiency: Simplifies the process of managing and editing multiple layers.
    • Flexibility: Offers greater flexibility in manipulating and combining different elements within an image.

5. Enhanced Cloud Integration: The latest version seamlessly integrates with Adobe Creative Cloud, enabling users to access their projects, assets, and resources from anywhere.

  • Benefits:
    • Accessibility: Provides access to projects and resources from any device.
    • Collaboration: Facilitates seamless collaboration on projects with team members.
    • Storage: Offers ample cloud storage for projects and assets.

FAQs

Q: What are the system requirements for running the latest version of Photoshop for Windows 10?
A: The system requirements vary depending on the specific version. However, generally, you will need a 64-bit processor, a minimum of 8GB of RAM, and at least 2GB of available hard disk space.

Q: Is the latest version of Photoshop compatible with previous versions?
A: While the latest version is generally compatible with previous versions, there may be some minor compatibility issues. It is always recommended to consult Adobe’s official documentation for detailed compatibility information.

Q: What are the benefits of using the latest version of Photoshop?
A: The latest version offers numerous benefits, including enhanced performance, AI-powered features, a streamlined interface, improved collaboration tools, and a wide range of creative options.

Q: How can I upgrade to the latest version of Photoshop?
A: You can upgrade to the latest version by purchasing a subscription to Adobe Creative Cloud. Alternatively, you can download a free trial to experience the latest features before making a purchase.

Tips for Using the Latest Version

  • Explore AI-Powered Features: Take advantage of the AI-powered features like "Object Selection" and "Neural Filters" to simplify your workflow and enhance your creativity.
  • Utilize the Enhanced Brush Engine: Experiment with the improved brush engine to create more realistic and expressive brushstrokes.
  • Streamline Layer Management: Utilize the enhanced layer management system to organize your projects efficiently and avoid confusion.
  • Leverage Cloud Integration: Take advantage of the seamless cloud integration to access your projects, assets, and resources from any device.
  • Stay Updated with Adobe’s Resources: Consult Adobe’s official documentation, tutorials, and community forums for the latest information and tips on using the software effectively.

Conclusion

The latest version of Photoshop for Windows 10 represents a significant leap forward in image editing and manipulation. The integration of AI, the streamlined interface, and the enhanced performance make it an invaluable tool for professionals and enthusiasts alike. Whether you are a seasoned designer or a novice explorer, the latest version of Photoshop offers a powerful and intuitive platform to unleash your creativity and bring your visions to life.

Adobe rolled out Photoshop CC, enhancing the image editing application with powerful new [ Photoshop Manipulation ] Simple Photo Editing For Beginners - YouTube 50 Amazing Photoshop Photo Manipulation Tutorials  Tutorials  Graphic Design Junction
Photoshop Tutorials: Learn Photoshop Manipulation  Tutorials  Graphic Design Junction Top 5 Photoshop Tools You Must Know to Edit Your Photos - Bizglide.in Revolutionize Your Image Editing with Adobe Photoshop's Generative Fill: A Step-by-Step Guide to
Adobe Photoshop Image Processing Demonstration - Highlands Community Association How to Use Pen Tool in Adobe Photoshop and The Benefit of Using the pen tool

Closure

Thus, we hope this article has provided valuable insights into Adobe Photoshop: A Powerful Tool for Image Editing and Manipulation. We appreciate your attention to our article. See you in our next article!