Archives June 2024

Understanding The Power Of Nearby Sharing In Windows 10

Understanding the Power of Nearby Sharing in Windows 10

Introduction

With great pleasure, we will explore the intriguing topic related to Understanding the Power of Nearby Sharing in Windows 10. Let’s weave interesting information and offer fresh perspectives to the readers.

Understanding the Power of Nearby Sharing in Windows 10

How to Use Nearby Sharing to Share Files in Windows 10

Windows 10 introduced a robust feature known as "Nearby Sharing" that revolutionizes the way users share files and content between devices. This technology, leveraging Bluetooth and Wi-Fi Direct, enables seamless transfer of files, photos, videos, and even links without the need for internet connectivity or complex configuration.

How Nearby Sharing Works

At its core, Nearby Sharing leverages a combination of Bluetooth and Wi-Fi Direct to establish a secure, ad-hoc network between devices. This network operates independently of the internet, allowing for rapid and efficient file transfers.

  1. Device Discovery: When a user initiates a share, their device broadcasts a signal advertising its availability for Nearby Sharing. Nearby devices, also enabled for sharing, detect this signal and initiate a connection.

  2. Connection Establishment: Using a combination of Bluetooth and Wi-Fi Direct, the devices establish a secure, temporary network. This network, while operational for the duration of the file transfer, does not require any internet connection or user intervention.

  3. File Transfer: Once the connection is established, the sending device transmits the selected file to the receiving device. This transfer is encrypted for security and utilizes the available bandwidth of the established network, ensuring rapid transfer speeds.

Key Benefits of Nearby Sharing:

  • Simplicity: Nearby Sharing eliminates the need for complex configuration or third-party apps. Users can easily share files by simply selecting the "Share" option and choosing the desired recipient device.

  • Speed and Efficiency: Operating independently of the internet, Nearby Sharing allows for significantly faster file transfers compared to cloud-based sharing methods.

  • Security: All data transmitted through Nearby Sharing is encrypted, ensuring secure and private file transfers between authorized devices.

  • Versatility: Users can share a wide range of content, including files, photos, videos, and even links to websites and applications.

  • Accessibility: The feature is integrated into the Windows 10 operating system, making it readily available to all users without requiring any additional software installations.

Enabling and Using Nearby Sharing:

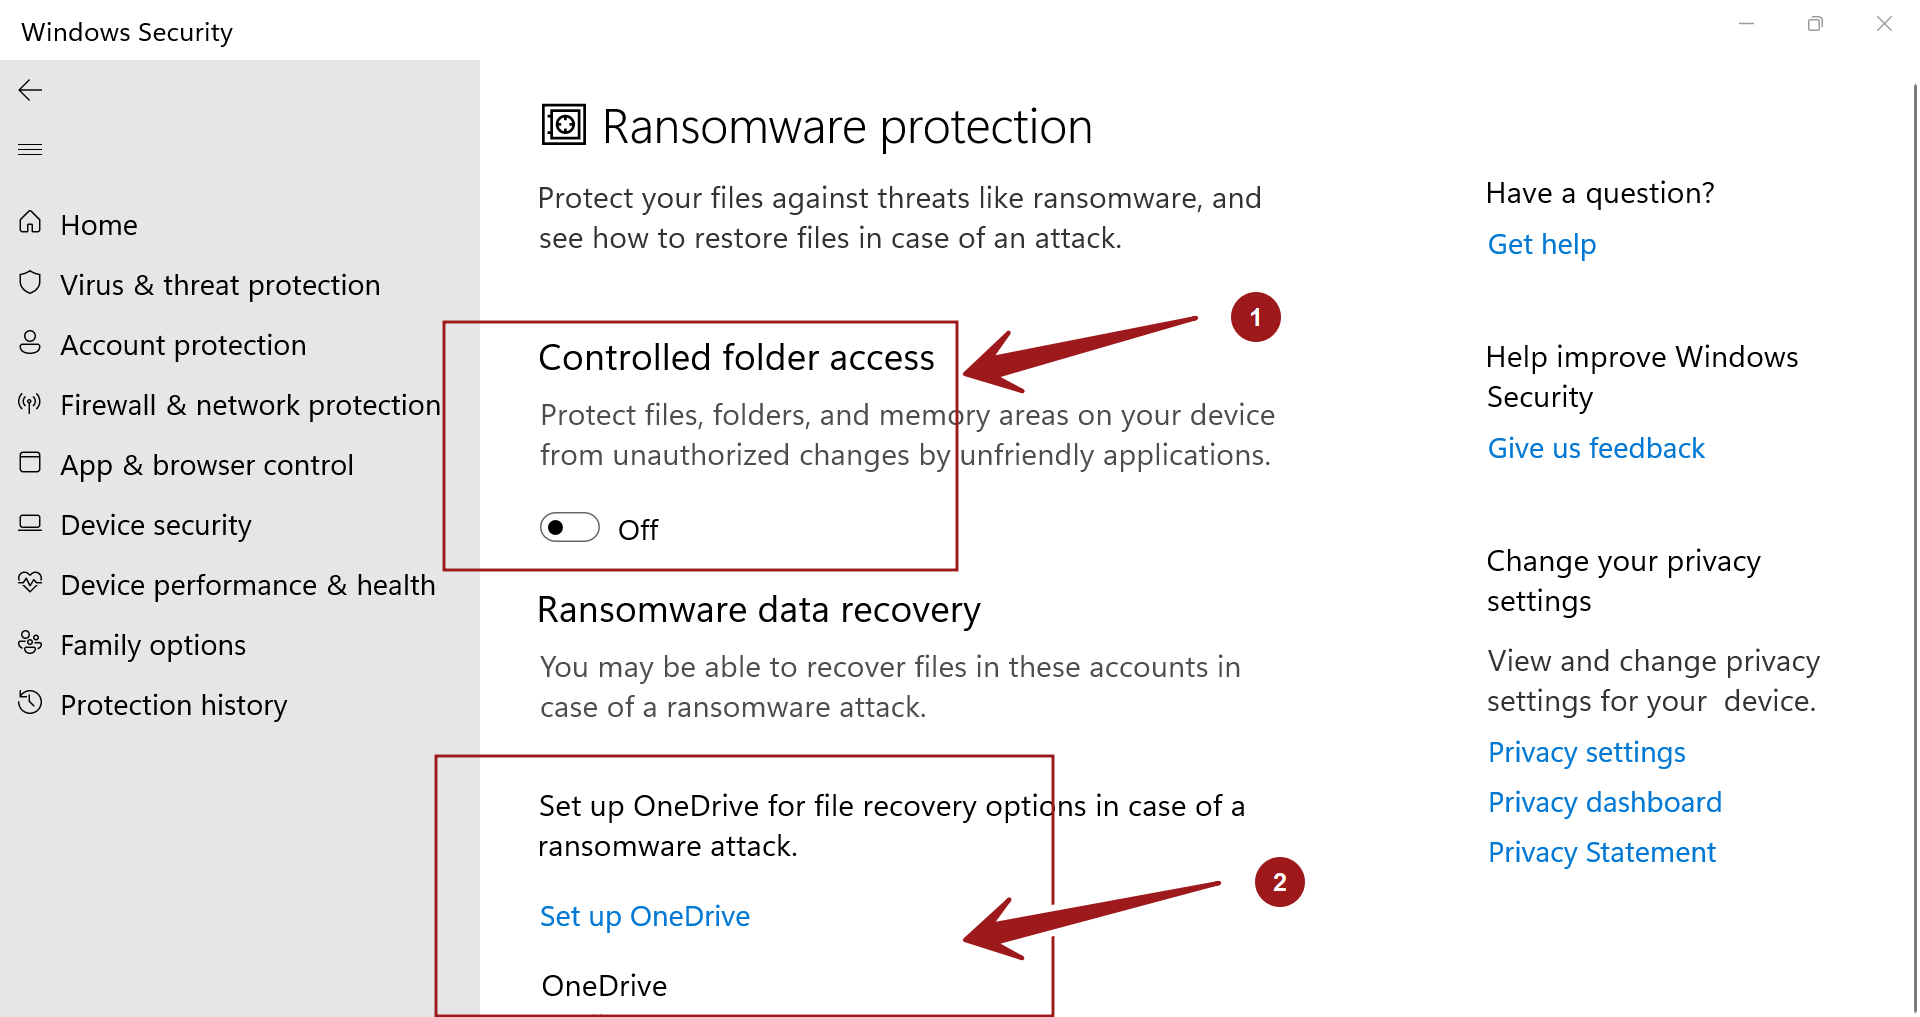
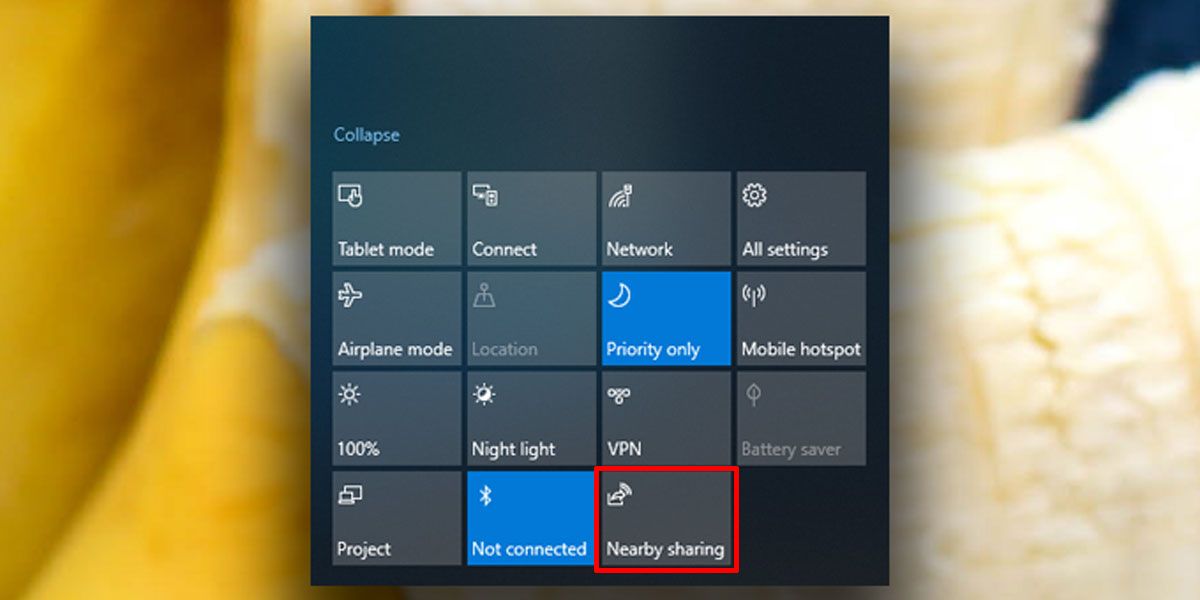
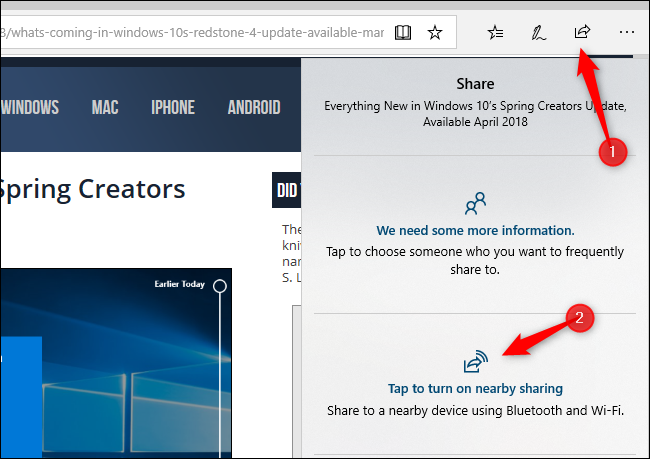
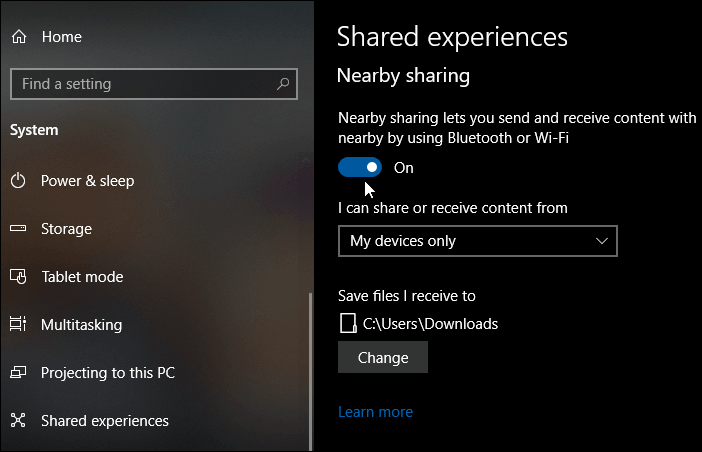
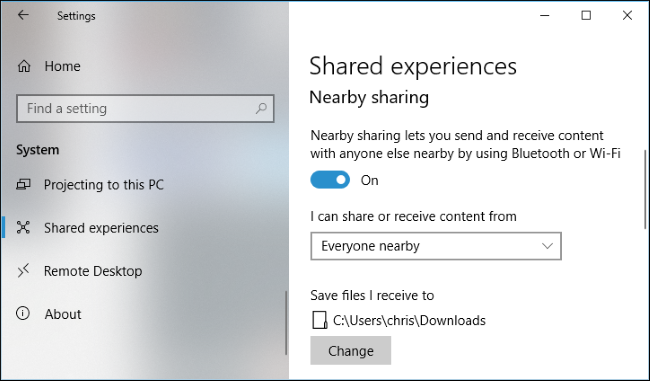
  • Enabling Nearby Sharing: To activate Nearby Sharing, navigate to the "Settings" app, select "System," and then "Shared experiences." Enable the "Nearby Sharing" option and choose the desired sharing settings, such as allowing only contacts to share or allowing all nearby devices.

  • Sharing Files: To share a file, open the file in its respective application, click the "Share" button, and select the desired recipient device from the list of available devices.

  • Receiving Files: When a nearby device attempts to share a file, a notification will appear on the receiving device. Users can accept or decline the file transfer based on their preference.

Beyond File Sharing:

While primarily known for its file sharing capabilities, Nearby Sharing extends its functionality to other areas:

  • Sharing Links: Users can share links to websites, documents, and applications with nearby devices.

  • Device Discovery: The feature can be used to discover other nearby devices, facilitating communication and collaboration.

  • Cross-Platform Compatibility: While primarily associated with Windows 10, Nearby Sharing can also be used to share files between Android devices, further expanding its reach.

FAQ’s Regarding Nearby Sharing:

Q1: What is the range of Nearby Sharing?

A: The range of Nearby Sharing is typically limited to around 30 feet, but can be influenced by factors such as environmental interference and device capabilities.

Q2: Is Nearby Sharing secure?

A: Yes, Nearby Sharing utilizes encryption to protect data during transfer. However, it’s essential to ensure that only trusted devices are allowed to share files.

Q3: Can I share files with devices running different operating systems?

A: While primarily designed for Windows 10 devices, Nearby Sharing can be used to share files with Android devices.

Q4: How do I disable Nearby Sharing?

A: To disable Nearby Sharing, navigate to the "Settings" app, select "System," and then "Shared experiences." Toggle the "Nearby Sharing" option off.

Q5: Can I use Nearby Sharing without an internet connection?

A: Yes, Nearby Sharing operates independently of the internet, allowing for file transfers even when offline.

Tips for Using Nearby Sharing:

  • Enable Nearby Sharing on both devices: Ensure that both the sending and receiving devices have Nearby Sharing enabled.

  • Check for device compatibility: Verify that both devices support Nearby Sharing.

  • Ensure devices are within range: Ensure that the devices are within the effective range of the technology, typically around 30 feet.

  • Review sharing settings: Carefully review the sharing settings to ensure that only trusted devices can share files.

  • Consider alternative methods for larger files: For transferring large files, consider using cloud-based storage services or external drives.

Conclusion:

Nearby Sharing in Windows 10 offers a convenient and efficient method for transferring files and content between devices. Its simplicity, speed, security, and versatility make it a valuable tool for users seeking seamless and secure file sharing solutions. With its continued development and potential for cross-platform compatibility, Nearby Sharing is poised to become an integral part of the digital sharing ecosystem, further enhancing the user experience and streamlining digital interactions.

How to Use Nearby Sharing in Windows 10 How To Use Near Share In Windows 10 How to Use Nearby Sharing in Windows 10
How to Use Nearby Sharing on Windows 10 How To Transfer Files Using Nearby Sharing On Windows 10 nearby-share-windows-10 - Info Franรงais  Remo Software
What Is "Near Share" In Windows 10? How To Share Files Wirelessly [Step by Step Guide] How to Use Nearby Share on Windows?

Closure

Thus, we hope this article has provided valuable insights into Understanding the Power of Nearby Sharing in Windows 10. We hope you find this article informative and beneficial. See you in our next article!

Understanding And Managing Partitions In Windows 10: A Comprehensive Guide

Understanding and Managing Partitions in Windows 10: A Comprehensive Guide

Introduction

In this auspicious occasion, we are delighted to delve into the intriguing topic related to Understanding and Managing Partitions in Windows 10: A Comprehensive Guide. Let’s weave interesting information and offer fresh perspectives to the readers.

Understanding and Managing Partitions in Windows 10: A Comprehensive Guide

Understanding Different Disk Partitions In Windows 10

The installation of Windows 10 on a computer typically involves the creation of one or more partitions on the hard drive. These partitions are essentially logical divisions of the physical storage space, allowing for a more organized and efficient management of data. This article delves into the intricacies of partitions in Windows 10, exploring their significance, the various types available, and the tools for managing them after installation.

What are Partitions and Why are They Important?

Partitions act as containers for different operating systems, applications, and data. They are akin to separate rooms within a house, each with its own designated purpose. Without partitions, the entire hard drive would be a single, monolithic space, making it difficult to manage and potentially leading to data conflicts.

Key Benefits of Partitions:

  • Enhanced Data Organization: Partitions enable users to segregate different types of data, such as operating systems, applications, and personal files. This promotes a structured file system and simplifies data retrieval.
  • Improved System Security: Separating the operating system from user data enhances security. If a virus or malware infection compromises one partition, the other partitions remain unaffected.
  • Enhanced Performance: By allocating specific storage space for different tasks, partitions optimize the performance of the operating system and applications. This can lead to faster boot times and improved application responsiveness.
  • Multiple Operating Systems: Partitions are essential for dual-booting, allowing users to install and run multiple operating systems on the same computer.
  • Data Recovery: In the event of a system failure, recovering data from a separate partition is often easier and less prone to data loss.
  • Flexible Storage Allocation: Partitions allow users to adjust the storage space allocated to different applications and files according to their needs.

Types of Partitions in Windows 10

Windows 10 recognizes several types of partitions, each serving a specific purpose:

1. Primary Partitions:

  • These are the most common type of partitions, typically used to store the operating system and user data.
  • A hard drive can have up to four primary partitions.

2. Extended Partitions:

  • Extended partitions are used to create logical drives within a single partition.
  • They are not directly accessible by the operating system and require the creation of logical drives within them.

3. Logical Drives:

  • Logical drives are created within an extended partition and are directly accessible by the operating system.
  • They are essentially individual storage spaces within the extended partition.

4. System Partitions:

  • System partitions are specifically designed to store system files, such as the boot files and registry.
  • These partitions are usually small and are typically hidden from the user.

5. Boot Partitions:

  • Boot partitions are used to store the files required to boot the operating system.
  • These partitions are typically small and are usually created during the initial installation of Windows.

Managing Partitions in Windows 10

Windows 10 offers several built-in tools for managing partitions, allowing users to create, resize, format, and delete partitions as needed.

1. Disk Management:

  • This tool is accessible through the Windows Control Panel and provides a graphical interface for managing partitions.
  • It allows users to create, delete, format, and resize partitions, as well as change drive letters.

2. Command Prompt:

  • The Command Prompt offers a more advanced method for managing partitions using command-line commands.
  • It allows users to perform more complex operations, such as converting partitions between GPT and MBR formats.

3. Third-Party Partition Managers:

  • Several third-party partition managers offer more comprehensive features and advanced options for managing partitions.
  • These tools often provide a more user-friendly interface and additional functionalities compared to the built-in tools.

Frequently Asked Questions (FAQs)

Q1: How many partitions should I create?

A: The number of partitions depends on individual needs and preferences. A common approach is to create a separate partition for the operating system and another for user data.

Q2: Can I create a new partition without losing data?

A: Creating a new partition usually requires unallocated space on the hard drive. If the hard drive is full, you may need to resize existing partitions or delete data to create new partitions.

Q3: What is the difference between GPT and MBR partitioning schemes?

A: GPT (GUID Partition Table) is a newer partitioning scheme that offers larger partition sizes and supports more than four primary partitions. MBR (Master Boot Record) is the older scheme, limited to four primary partitions and smaller partition sizes.

Q4: Can I change the drive letter of a partition?

A: Yes, you can change the drive letter of a partition using Disk Management or the Command Prompt.

Q5: What happens if I delete a partition?

A: Deleting a partition will erase all data stored on it. It is crucial to back up important data before deleting any partitions.

Q6: Can I recover data from a deleted partition?

A: Data recovery from a deleted partition is possible using specialized data recovery software. However, the success rate depends on factors such as the type of data loss and the time elapsed since deletion.

Tips for Managing Partitions in Windows 10

  • Back up data: Always back up important data before making any changes to partitions.
  • Use reputable tools: Stick to reliable partition management tools, whether built-in or third-party.
  • Understand the risks: Deleting or resizing partitions can lead to data loss. Proceed with caution.
  • Seek professional help: If unsure about partition management, consult a qualified technician.

Conclusion

Partitions play a crucial role in organizing and managing data in Windows 10. Understanding the different types of partitions, their benefits, and the tools for managing them empowers users to optimize their storage space, enhance system security, and improve overall system performance. By employing a structured approach to partition management, users can ensure a seamless and efficient computing experience.

How to partition Windows 10 - Tech Advisor Understanding Different Disk Partitions In Windows 10 How to Use Disk Management to Create and Manage Partitions in Windows 10 โ€“ Tech guide
How to Use Disk Management to Create and Manage Partitions in Windows 10 โ€“ Tech guide How to partition a hard drive in Windows 10 - IONOS How To Merge Disk Partitions In Windows 10 Complete Guide  yorketech
Get Comprehensive Understanding of Windows 10 Recovery Partition - MiniTool Partition Wizard How to repartition a hard drive in windows 10

Closure

Thus, we hope this article has provided valuable insights into Understanding and Managing Partitions in Windows 10: A Comprehensive Guide. We appreciate your attention to our article. See you in our next article!

Project Igi 1 Download For Pc Windows 10

project igi 1 download for pc windows 10

Introduction

With enthusiasm, let’s navigate through the intriguing topic related to project igi 1 download for pc windows 10. Let’s weave interesting information and offer fresh perspectives to the readers.

A Timeless Classic: Project I.G.I. on Windows 10

Project IGI 1 Download Full Game For Pc  Games

Project I.G.I., developed by Innerloop Studios and released in 2000, remains a beloved first-person shooter (FPS) title for many gamers. Its innovative gameplay, immersive storyline, and memorable characters have cemented its place in gaming history. However, navigating the compatibility of this classic game with modern operating systems like Windows 10 can pose challenges. This article aims to provide a comprehensive guide to enjoying Project I.G.I. on Windows 10, addressing potential hurdles and offering solutions.

Understanding the Compatibility Challenges

Project I.G.I. was designed for older operating systems, primarily Windows 98 and Windows XP. Running it on newer systems like Windows 10 can lead to compatibility issues due to significant technological advancements and changes in operating system architecture. These issues manifest in various forms:

  • DirectX incompatibility: Project I.G.I. utilizes DirectX 7, an older version of the graphics API that is not natively supported by Windows 10.
  • Driver issues: Modern graphics drivers, designed for newer games and technologies, might not fully support older games like Project I.G.I., leading to crashes or graphical glitches.
  • Resolution limitations: The game might not support high resolutions available on modern monitors, resulting in stretched or distorted visuals.
  • Performance issues: The game might run slowly or experience stuttering due to resource conflicts or incompatibilities with newer hardware.

Overcoming the Hurdles: A Comprehensive Guide

Despite these challenges, enjoying Project I.G.I. on Windows 10 is achievable with the right approach. Here’s a step-by-step guide to navigate the process:

  1. Obtain a Legitimate Copy: The first step is to acquire a legitimate copy of the game. This can be done through various avenues:

    • Original CD: If you own the original CD, it’s the most straightforward option.
    • Digital Distribution Platforms: Platforms like GOG.com and Steam offer digital versions of the game, providing a convenient and legal way to obtain it.
    • Emulation: Emulators like DOSBox can run the game on Windows 10, but this requires familiarity with emulation software.
  2. Install the Game: Once you have the game, the installation process is typically straightforward. However, depending on the chosen method, you might need to take additional steps:

    • CD Installation: Insert the CD and follow the on-screen prompts.
    • Digital Download: Install the game from the digital distribution platform.
    • Emulation: Install DOSBox and configure it to run the game.
  3. Compatibility Fixes: The crucial step involves addressing compatibility issues. Here are some common solutions:

    • Compatibility Mode: Right-click on the game’s executable file, select "Properties," and navigate to the "Compatibility" tab. Choose the "Run this program in compatibility mode for" option and select Windows XP or Windows 98.
    • DirectX Update: While Project I.G.I. uses DirectX 7, updating to the latest version of DirectX might resolve some compatibility issues.
    • Driver Updates: Ensure your graphics card drivers are up-to-date. However, be cautious as newer drivers might not always be ideal for older games.
    • Resolution Settings: Adjust the game’s resolution settings to match your monitor’s resolution. You might need to use a third-party tool or edit configuration files to achieve this.
    • Performance Tweaks: Consider adjusting in-game settings like graphics quality, texture resolution, and anti-aliasing to optimize performance.
  4. Troubleshooting: If you encounter issues like crashes, graphical glitches, or poor performance, further troubleshooting is necessary:

    • System Requirements: Ensure your PC meets the minimum system requirements for the game.
    • Firewall and Antivirus: Temporarily disable your firewall and antivirus software to rule out any interference.
    • Reinstall the Game: Reinstall the game to fix corrupted files.
    • Online Forums and Communities: Seek assistance from online forums and communities dedicated to Project I.G.I. for specific solutions.

Beyond the Basics: Enhancing Your Experience

While the above steps focus on basic compatibility, additional measures can enhance your Project I.G.I. experience on Windows 10:

  • Custom Mods: The modding community offers a wealth of mods that can enhance gameplay, graphics, and even add new content.
  • Widescreen Support: Mods like "Widescreen Fix" can enable widescreen resolutions, improving the visual experience on modern monitors.
  • Improved Controls: Mods can offer re-mapped controls, making the game more intuitive to play with modern gaming peripherals.

FAQs

Q: Can I play Project I.G.I. online with others?

A: While the original game doesn’t support online multiplayer, dedicated servers and mods exist that enable online play.

Q: Is it legal to download Project I.G.I. from unofficial websites?

A: Downloading the game from unofficial websites is illegal and can expose your computer to malware. Always obtain the game from legitimate sources.

Q: What are the minimum system requirements for Project I.G.I.?

A: The minimum system requirements are:

  • Operating System: Windows 98/ME/XP
  • Processor: Pentium II 350 MHz
  • RAM: 128 MB
  • Graphics: 3D Graphics Card with 16 MB RAM
  • Hard Drive: 1 GB free space

Tips

  • Back Up Your Saves: Before making any changes to the game or using mods, back up your save files to avoid losing progress.
  • Experiment with Settings: Don’t be afraid to experiment with compatibility settings, resolution settings, and graphics settings to find the optimal configuration for your system.
  • Stay Informed: Keep an eye out for updates and patches that might improve compatibility or address known issues.

Conclusion

Project I.G.I. remains a timeless classic, offering a thrilling experience for FPS enthusiasts. While running it on Windows 10 requires some effort, the rewards are well worth it. By following the steps outlined in this guide, you can overcome compatibility challenges, enjoy the game’s immersive storyline and action-packed gameplay, and relive the nostalgia of this iconic title. Remember, the dedication of the modding community and the availability of digital distribution platforms make enjoying Project I.G.I. on Windows 10 a realistic and rewarding endeavor.

Project IGI 1 Game Free Download Full Version Pc  Free Games Download Project IGI 1 Full Game Download Free For Windows 10/8/7/XP Project IGI 1 Game Free Download Full Version Pc  Free Games Download
Project IGI 1 Game Download For PC  Ocean Of Games Project IGI 1 Full Game Download Free For Windows 10/8/7/XP project igi 1 pc game free download full version - Real Games Collection
Download Igi 1 For Windows 10 - retpasonic Project IGI 1 Game Download Free For PC Full Version - downloadpcgames88.com

Closure

Thus, we hope this article has provided valuable insights into project igi 1 download for pc windows 10. We appreciate your attention to our article. See you in our next article!

The Power Of Bite-Sized Gaming: Exploring PC Games Under 50MB

The Power of Bite-Sized Gaming: Exploring PC Games Under 50MB

Introduction

With enthusiasm, let’s navigate through the intriguing topic related to The Power of Bite-Sized Gaming: Exploring PC Games Under 50MB. Let’s weave interesting information and offer fresh perspectives to the readers.

The Power of Bite-Sized Gaming: Exploring PC Games Under 50MB

Top 10 PC Games Under 50MB - YouTube

In the realm of digital entertainment, where gigabytes and terabytes reign supreme, a curious niche exists: PC games that weigh in under 50MB. These diminutive titles, often overlooked in the shadow of their colossal counterparts, possess a unique charm and offer a compelling alternative to the resource-intensive behemoths that dominate the gaming landscape.

A World of Compact Entertainment:

These games, despite their modest file sizes, are capable of delivering engaging experiences that transcend their diminutive stature. They are not merely trivial time-wasters; they are testaments to the power of creative ingenuity and the ability to craft captivating experiences within stringent constraints.

Why Small Matters:

The allure of these compact games lies in their accessibility. They are easily downloaded, installed, and launched, making them perfect for those with limited bandwidth or storage space. Their lightweight nature also allows them to run smoothly on older hardware, opening up a world of gaming to those who may not have access to cutting-edge technology.

A Diverse Landscape:

The world of sub-50MB PC games is surprisingly diverse. From classic arcade titles to modern indie gems, these games offer a wide range of genres and gameplay styles.

  • Retro Revivals: Many classic arcade games, like Pac-Man, Tetris, and Space Invaders, can be enjoyed in their original form or with modern twists, all within a minuscule footprint.
  • Indie Innovations: The independent game development scene has embraced the potential of small-scale games, creating innovative and engaging experiences that push the boundaries of creativity within strict limitations.
  • Casual Delights: Games designed for quick, casual play, like puzzle games, card games, and simple platformers, thrive in this space, offering a perfect way to unwind or fill a few spare minutes.

Beyond the File Size:

The appeal of these games extends beyond their compact nature. They often represent a return to the core principles of gaming: simple, engaging gameplay, captivating stories, and a focus on core mechanics. This stripped-down approach can be refreshing in an era of increasingly complex and bloated titles.

Benefits of Small-Scale Gaming:

  • Accessibility: Low barrier to entry for players with limited resources.
  • Speed: Rapid download and installation times allow for immediate enjoyment.
  • Simplicity: Focus on core gameplay mechanics, often resulting in more polished and streamlined experiences.
  • Innovation: Independent developers often push creative boundaries within limited constraints.
  • Nostalgia: Reviving classic arcade titles and offering a glimpse into gaming’s past.

FAQs About PC Games Under 50MB:

1. Are these games truly "free" to play?

While many sub-50MB games are free, some may offer optional in-app purchases or require a one-time purchase for full access. It is always advisable to check the game’s description and terms of service for specific details.

2. Are these games suitable for all ages?

The content and age appropriateness of these games vary widely. Some are designed for all ages, while others may contain mature themes or violence. Parents should always check the game’s rating or description before allowing children to play.

3. What are some examples of popular sub-50MB games?

Popular examples include:

  • Tetris: A timeless classic, perfect for casual play.
  • SuperTuxKart: A fun and engaging kart racer with a charming art style.
  • FreeCol: A strategy game that allows players to build colonies and empires.
  • OpenTTD: A modern take on the classic transport tycoon simulation.
  • Minecraft (Lite): A simplified version of the popular sandbox game, perfect for beginners.

4. Where can I find these games?

Many websites and platforms offer free and paid sub-50MB games. Popular options include:

  • Itch.io: A platform dedicated to indie games, offering a vast library of small-scale titles.
  • Game Jolt: A website for independent game developers, featuring a diverse selection of games.
  • Kongregate: A platform for online games, with a dedicated section for smaller titles.
  • Newgrounds: A website for flash games, featuring a wide range of classic and modern titles.
  • Steam: While primarily known for larger games, Steam also hosts a selection of smaller titles.

Tips for Finding and Playing Sub-50MB Games:

  • Explore Indie Game Platforms: Websites like Itch.io and Game Jolt are treasure troves of creative and engaging small-scale games.
  • Seek Out Retro Classics: Many classic arcade games are available for free or at minimal cost, offering a nostalgic gaming experience.
  • Utilize Game Aggregators: Websites like Kongregate and Newgrounds provide curated collections of small-scale games, making it easier to discover hidden gems.
  • Read Reviews and Ratings: Check user reviews and ratings to gauge the quality and gameplay experience of a particular game.
  • Experiment and Have Fun: Don’t be afraid to try something new and explore the diverse world of sub-50MB games.

Conclusion:

The world of PC games under 50MB offers a compelling alternative to the mainstream gaming landscape. They are accessible, engaging, and often surprisingly innovative, proving that great gaming experiences can be achieved even within the confines of limited resources. Whether you’re seeking nostalgic classics, creative indie gems, or simply a quick and casual gaming fix, the realm of compact PC games holds something for everyone. So, venture beyond the megabytes and discover the hidden treasures of bite-sized gaming.

Top 10 PC Games Under 50MB - Dactic Official Pc Games Under 50Mb Highly Compressed - universitynonli #7 Highly Compressed PC Games Under 50MB [Working!]
Top 10 PC Games Under 50MB - Dactic Official Top 10 PC Games Under 50MB - Dactic Official Top 10 PC Games Under 50MB - Dactic Official
Top 10 PC Games Under 50MB - Dactic Official #7 Highly Compressed PC Games Under 50MB [Working!]

Closure

Thus, we hope this article has provided valuable insights into The Power of Bite-Sized Gaming: Exploring PC Games Under 50MB. We hope you find this article informative and beneficial. See you in our next article!

PhotoImpression: A Comprehensive Guide To Digital Image Enhancement

PhotoImpression: A Comprehensive Guide to Digital Image Enhancement

Introduction

With great pleasure, we will explore the intriguing topic related to PhotoImpression: A Comprehensive Guide to Digital Image Enhancement. Let’s weave interesting information and offer fresh perspectives to the readers.

PhotoImpression: A Comprehensive Guide to Digital Image Enhancement

Download PhotoImpression 6.5

Introduction

PhotoImpression, a robust and feature-rich image editing software, has been a popular choice for both amateur and professional photographers for many years. Its comprehensive suite of tools allows users to enhance, modify, and manipulate digital images with ease, achieving professional-grade results without the need for complex technical knowledge. While a paid version offers advanced features, PhotoImpression also provides a free version with a generous set of tools, making it an accessible choice for individuals seeking to improve their image editing skills.

Understanding PhotoImpression’s Free Version

The free version of PhotoImpression, while not as extensive as its paid counterpart, offers a powerful collection of tools for basic image editing and enhancement. This version serves as an excellent entry point for beginners, allowing them to explore the software’s capabilities and develop their image editing skills before potentially upgrading to the full version.

Core Features of the Free Version

The free version of PhotoImpression includes a range of essential image editing tools, such as:

  • Basic Adjustments: Brightness, contrast, saturation, color balance, and sharpness adjustments are readily available, enabling users to refine the overall appearance of their images.
  • Cropping and Resizing: Precisely cropping and resizing images is essential for creating visually appealing compositions and optimizing them for different platforms.
  • Red Eye Removal: This tool efficiently removes the distracting red-eye effect often encountered in flash photography.
  • Filters and Effects: A selection of basic filters and effects, including black and white, sepia, and blur, allows users to apply creative styles to their images.
  • Text and Shapes: Adding text and shapes to images is useful for creating informative captions, adding artistic elements, or personalizing images for specific purposes.

Benefits of Utilizing the Free Version

The free version of PhotoImpression offers numerous benefits, making it a valuable tool for individuals seeking to enhance their images:

  • Accessibility: The free version eliminates the cost barrier, allowing anyone to access a powerful image editing software without financial commitment.
  • Learning Curve: The free version serves as an excellent introduction to image editing, providing a platform to learn basic techniques and explore different tools.
  • Experimentation: Users can experiment with various editing techniques and styles without the fear of financial repercussions, fostering creativity and skill development.
  • Basic Image Enhancement: The free version provides sufficient tools for basic image enhancement, such as removing blemishes, adjusting lighting, and applying basic filters.
  • Social Media Optimization: The free version enables users to optimize images for social media platforms, ensuring their content is visually appealing and engaging.

Understanding the Limitations of the Free Version

While the free version of PhotoImpression provides a robust set of tools, it does have limitations:

  • Limited Features: The free version lacks advanced features such as layers, masks, advanced filters, and professional-grade tools found in the paid version.
  • Watermarks: Edited images may contain watermarks, which can be distracting and may not be suitable for professional use.
  • Limited Export Options: The free version might have limitations on the image formats and resolutions that can be exported.
  • No Support: Users of the free version typically do not have access to dedicated customer support or technical assistance.

Exploring the Advantages of Upgrading to the Paid Version

For users who require advanced features and professional-grade image editing capabilities, upgrading to the paid version of PhotoImpression offers significant advantages:

  • Expanded Toolset: The paid version unlocks a vast array of advanced features, including layers, masks, advanced filters, and professional-grade tools.
  • Watermark Removal: Upgrading removes watermarks from edited images, allowing for professional-quality output.
  • Enhanced Export Options: The paid version offers greater flexibility in exporting images, including support for a wider range of formats and resolutions.
  • Dedicated Support: Paid users have access to dedicated customer support and technical assistance, ensuring a smoother user experience.

FAQs about PhotoImpression’s Free Version

Q: Is the free version of PhotoImpression fully functional?

A: The free version offers a robust set of basic image editing tools and is fully functional, but it has limitations compared to the paid version.

Q: Can I use the free version for commercial purposes?

A: The free version might have limitations on commercial use, such as watermarks or restricted export options. Consult the software’s terms and conditions for specific details.

Q: What are the main differences between the free and paid versions?

A: The paid version offers advanced features, such as layers, masks, advanced filters, and professional-grade tools, along with watermark removal and enhanced export options.

Q: Does the free version require a registration?

A: The free version might require a registration or email address for download and use.

Q: Is there a time limit for using the free version?

A: The free version typically does not have a time limit, but it may have limitations on the number of edits or features available.

Tips for Maximizing the Free Version of PhotoImpression

  • Explore the Interface: Familiarize yourself with the software’s interface, tools, and menus to navigate efficiently.
  • Practice Basic Editing: Start with basic editing techniques such as cropping, resizing, and adjusting brightness and contrast.
  • Experiment with Filters: Explore the available filters and effects to discover creative possibilities for enhancing your images.
  • Use Online Resources: Utilize online tutorials, articles, and forums to learn advanced techniques and troubleshoot issues.
  • Consider Upgrading: If your editing needs exceed the capabilities of the free version, consider upgrading to the paid version for a more comprehensive experience.

Conclusion

PhotoImpression’s free version provides an accessible and powerful entry point for individuals seeking to enhance their digital images. While it may have limitations compared to the paid version, it offers a robust set of tools for basic image editing and experimentation. By understanding its features, benefits, and limitations, users can effectively leverage the free version to improve their image editing skills and achieve visually appealing results. Whether users choose to stick with the free version or upgrade to the paid version, PhotoImpression remains a valuable tool for enhancing digital images and unleashing creative potential.

ArcSoft PhotoImpression download for free - SoftDeluxe Photoimpression 4.1 Quick Start Guide ArcSoft PhotoImpression 5 Quick Start Guide - Visioneer
ArcSoft PhotoImpression Gold  Image editors PhotoImpression 4.1 Quick Start Guide  Manualzz Photoimpression 4.1 Quick Start Guide
Tutorial photoimpression 5 - YouTube PhotoImpression 3.0 - Macintosh Repository

Closure

Thus, we hope this article has provided valuable insights into PhotoImpression: A Comprehensive Guide to Digital Image Enhancement. We appreciate your attention to our article. See you in our next article!

Safeguarding Windows 11: A Comprehensive Guide To Ransomware Protection

Safeguarding Windows 11: A Comprehensive Guide to Ransomware Protection

Introduction

With great pleasure, we will explore the intriguing topic related to Safeguarding Windows 11: A Comprehensive Guide to Ransomware Protection. Let’s weave interesting information and offer fresh perspectives to the readers.

Safeguarding Windows 11: A Comprehensive Guide to Ransomware Protection

Windows 11 Ransomware Protection Guide โ€“ Cyberwarzone

Ransomware, a malicious software designed to encrypt user data and hold it hostage for a ransom payment, poses a significant threat to individuals and organizations alike. The rapid evolution of ransomware tactics necessitates a proactive and comprehensive approach to security, especially in the context of Windows 11. This article delves into the multifaceted landscape of ransomware protection within Windows 11, examining the integrated security features, best practices, and essential considerations for safeguarding your digital assets.

Understanding the Ransomware Threat

Ransomware operates by infiltrating a device, typically through phishing emails, malicious links, or software vulnerabilities. Once installed, it encrypts critical files, rendering them inaccessible. The perpetrators then demand a ransom payment, often in cryptocurrency, to decrypt the data. The consequences of a ransomware attack can be devastating, leading to data loss, business disruption, financial losses, and reputational damage.

Windows 11’s Built-in Security Arsenal

Windows 11 offers a robust suite of security features designed to mitigate the risks posed by ransomware. These integrated tools serve as the foundation for a comprehensive defense strategy:

  • Windows Defender Antivirus: This real-time protection system constantly scans for and removes malware, including ransomware, before it can inflict damage.
  • Microsoft Defender for Endpoint: A more advanced endpoint protection solution, Microsoft Defender for Endpoint provides threat detection, investigation, and response capabilities, going beyond traditional antivirus protection. It leverages machine learning and behavioral analysis to identify and neutralize sophisticated ransomware attacks.
  • Windows Security: This central hub consolidates security settings, providing access to features like firewall management, virus protection, and ransomware protection.
  • Controlled Folder Access: This feature restricts unauthorized applications from accessing sensitive folders, effectively hindering ransomware from encrypting critical data.
  • Windows Sandbox: This isolated environment allows users to safely test suspicious files or applications without risking their primary system.
  • Windows Hello: Biometric authentication, such as facial recognition or fingerprint scanning, strengthens account security and mitigates the risk of unauthorized access.

Beyond the Built-in Features: A Multifaceted Approach

While Windows 11’s native security features offer a strong foundation, a truly robust ransomware protection strategy requires a multifaceted approach. Implementing the following best practices complements the built-in defenses:

  • Regular Software Updates: Keeping operating systems, applications, and drivers updated is crucial, as updates often include security patches that address known vulnerabilities exploited by ransomware.
  • Strong Passwords and Multi-factor Authentication: Employing strong, unique passwords for all accounts and enabling multi-factor authentication (MFA) significantly reduces the likelihood of unauthorized access.
  • Backups and Data Recovery: Regularly backing up critical data to an offline location, such as an external hard drive, is essential for data recovery in the event of a ransomware attack.
  • User Education and Awareness: Training users to recognize and avoid phishing attempts, suspicious links, and unsafe downloads is critical in preventing ransomware infection.
  • Security Software and Tools: Consider implementing additional security software, such as endpoint detection and response (EDR) solutions, for advanced threat protection and incident response capabilities.

Frequently Asked Questions (FAQs)

Q: Can Windows 11 fully protect against all ransomware attacks?

A: While Windows 11 offers robust security features, no system is completely immune to ransomware. Attackers constantly evolve their tactics, so a layered approach and ongoing vigilance are essential.

Q: What happens if my computer gets infected with ransomware?

A: If your computer is infected with ransomware, you should immediately disconnect from the internet to prevent further spread. Do not attempt to pay the ransom, as there is no guarantee you will regain access to your data. Instead, focus on data recovery by restoring from backups and seeking professional assistance from security experts.

Q: How can I tell if my computer is infected with ransomware?

A: Signs of a ransomware infection include:

  • Inability to access files: Files suddenly become inaccessible or appear encrypted.
  • Ransom demands: You receive a message demanding payment in exchange for decrypting your data.
  • Unusual system behavior: Your computer becomes sluggish, unresponsive, or displays unusual error messages.

Tips for Enhanced Ransomware Protection

  • Enable Controlled Folder Access: This feature effectively prevents ransomware from encrypting critical data.
  • Regularly Review Security Settings: Ensure all security features are enabled and configured appropriately.
  • Be Wary of Suspicious Emails and Links: Avoid clicking on links or opening attachments from unknown senders.
  • Implement a Strong Password Policy: Encourage users to create strong, unique passwords for all accounts.
  • Use a Password Manager: A password manager securely stores and manages passwords, reducing the risk of weak or compromised credentials.
  • Stay Informed About Latest Threats: Keep abreast of emerging ransomware threats and adapt security measures accordingly.

Conclusion

Ransomware remains a persistent threat, but Windows 11’s comprehensive security features, combined with proactive measures, can significantly reduce the risk of infection. By understanding the threat landscape, implementing robust security practices, and fostering a culture of security awareness, individuals and organizations can effectively safeguard their digital assets and minimize the impact of ransomware attacks.

Ransomware Protection on Windows 11  TestingDocs.com Ransomware Protection on Windows 11  TestingDocs.com Protect Windows 10 and Windows 11 Machines From Ransomware
How to enable ransomware protection on Windows 11 - Pureinfotech Ransomware Protection on Windows 11  TestingDocs.com How to Enable Ransomware Protection with Windows 11? - Ask Dave Taylor
Ransomware Protection on Windows 11  TestingDocs.com Best Tips Of Windows 11 Changes Vs Ransomware Attacks - EIP

Closure

Thus, we hope this article has provided valuable insights into Safeguarding Windows 11: A Comprehensive Guide to Ransomware Protection. We thank you for taking the time to read this article. See you in our next article!

The Windows 10 PG PC Interface: A Comprehensive Overview

The Windows 10 PG PC Interface: A Comprehensive Overview

Introduction

With enthusiasm, let’s navigate through the intriguing topic related to The Windows 10 PG PC Interface: A Comprehensive Overview. Let’s weave interesting information and offer fresh perspectives to the readers.

The Windows 10 PG PC Interface: A Comprehensive Overview

SCADA World: How to set the PG/PC interface in Windows 10?

The Windows 10 operating system, renowned for its user-friendly interface and robust features, offers a specialized interface tailored for gaming PCs, often referred to as the "PG PC Interface." This interface, while not a separate entity from the standard Windows 10 environment, presents a tailored experience designed to enhance gaming performance and optimize the user’s gaming experience.

Understanding the PG PC Interface

The PG PC interface, essentially a collection of pre-configured settings and features within Windows 10, caters to the unique needs of gaming PCs. These needs include:

  • Enhanced Performance: Gaming demands high processing power, efficient resource allocation, and minimal system latency. The PG PC interface prioritizes these aspects by automatically optimizing system settings for gaming.
  • Personalized Control: Gamers often prefer granular control over their gaming experience. The PG PC interface provides access to advanced settings and tools for fine-tuning performance, customizing visual effects, and managing game-specific configurations.
  • Seamless Integration: The interface seamlessly integrates with popular gaming platforms and peripherals, ensuring a smooth and intuitive gaming experience.

Key Features of the PG PC Interface

The PG PC interface encompasses a range of features designed to elevate the gaming experience:

1. Game Mode: This dedicated mode prioritizes game performance by allocating system resources efficiently. It minimizes background activity, reduces latency, and ensures that games receive the necessary processing power for smooth gameplay.

2. Xbox Integration: Windows 10’s PG PC interface seamlessly integrates with the Xbox ecosystem. Gamers can access their Xbox Live account, play Xbox games, and use their Xbox controller with their PC.

3. Windows Store for Games: The Windows Store offers a vast library of PC games, including exclusive titles and popular franchises. The PG PC interface ensures a smooth and intuitive experience when browsing, downloading, and playing games from the Windows Store.

4. DirectX 12 Support: DirectX 12, the latest version of Microsoft’s graphics API, enables developers to create visually stunning and performance-optimized games. The PG PC interface fully supports DirectX 12, ensuring optimal performance for modern games.

5. Game Bar: This built-in tool provides quick access to essential gaming features, including screen recording, game performance monitoring, and audio adjustments. The Game Bar enhances the gaming experience by offering convenient tools without interrupting gameplay.

6. Gaming-Focused Settings: The PG PC interface includes dedicated settings for customizing the gaming experience. These settings allow users to adjust visual effects, performance settings, and input configurations to suit their preferences.

7. Game DVR: This feature enables gamers to record and share their gameplay experiences. The Game DVR allows users to capture gameplay footage, take screenshots, and broadcast their gameplay live.

8. Windows Mixed Reality Support: For those venturing into the world of virtual reality, the PG PC interface supports Windows Mixed Reality headsets. This integration allows gamers to enjoy immersive VR experiences on compatible hardware.

Benefits of the PG PC Interface

The PG PC interface offers numerous benefits to gamers, contributing to a more enjoyable and efficient gaming experience:

  • Enhanced Performance: The optimized settings and resource allocation prioritize gaming performance, resulting in smoother gameplay and reduced lag.
  • Personalized Control: The interface allows gamers to fine-tune settings and customize their gaming experience to their liking.
  • Seamless Integration: The integration with gaming platforms and peripherals ensures a smooth and intuitive gaming experience.
  • Enhanced Features: The built-in features like Game Mode, Game Bar, and Game DVR enhance the gaming experience with convenient tools and features.
  • Optimized for Modern Games: The PG PC interface supports the latest technologies like DirectX 12 and Windows Mixed Reality, ensuring compatibility with modern games.

FAQs about the PG PC Interface

1. Is the PG PC Interface a separate operating system?

No, the PG PC interface is not a separate operating system. It’s a collection of optimized settings and features within Windows 10 designed for gaming PCs.

2. Does every Windows 10 PC have the PG PC Interface?

While most Windows 10 PCs have the necessary features, some might not have all the specific settings and tools tailored for gaming. However, most modern gaming PCs come pre-configured with the PG PC interface.

3. How do I enable the PG PC Interface?

The PG PC interface is typically enabled by default on Windows 10 PCs. However, you can access and configure its features through the Windows settings menu.

4. Can I disable the PG PC Interface?

Yes, you can disable the PG PC interface if you prefer the standard Windows 10 settings. However, disabling it might result in reduced performance and less optimized gaming experience.

5. Is the PG PC Interface compatible with all games?

The PG PC interface is designed to work with most modern games. However, some older or less optimized games might not benefit from its features.

Tips for Optimizing the PG PC Interface

  • Update Drivers: Ensure your graphics card and other hardware drivers are up to date for optimal performance.
  • Close Background Processes: Minimize background programs to allocate more resources to your games.
  • Adjust Game Settings: Experiment with in-game settings to find the optimal balance between performance and visual quality.
  • Use Game Mode: Enable Game Mode to prioritize game performance and minimize distractions.
  • Customize Game Bar: Configure the Game Bar to your liking, adding or removing features and shortcuts.

Conclusion

The Windows 10 PG PC interface represents a significant step towards enhancing the gaming experience on Windows PCs. By offering optimized settings, tailored features, and seamless integration with gaming platforms and peripherals, it provides gamers with a powerful and user-friendly environment for enjoying their favorite titles. While not a separate operating system, the PG PC interface represents a dedicated effort by Microsoft to cater to the specific needs of gamers, ensuring a smooth, immersive, and performance-driven gaming experience.

How to set IP address of your PC or Siemens PG in Windows 10  Set PG/PC IP address  AEAB NOIDA What's new in Windows 10?  Digital Unite Windows 10 Interface Diagram  Quizlet
How to set PG/PC interface in TIA portal - YouTube Windows 10 Guide - Microsoft Win 10 Tutorial Using the Windows 10 Interface  Taking a Tour of the Windows 10 Interface  InformIT
Interface Windows 10 - YouTube ุดุฑุญ Setting PG/PC interface ุจุงู„ุนุฑุจูŠ ููŠ ุจุฑู†ุงู…ุฌ SIMATIC Manager - YouTube

Closure

Thus, we hope this article has provided valuable insights into The Windows 10 PG PC Interface: A Comprehensive Overview. We hope you find this article informative and beneficial. See you in our next article!