Archives May 2024

Navigating The News And Interests Feed In Windows 11: A Guide To Customization And Control

Navigating the News and Interests Feed in Windows 11: A Guide to Customization and Control

Introduction

In this auspicious occasion, we are delighted to delve into the intriguing topic related to Navigating the News and Interests Feed in Windows 11: A Guide to Customization and Control. Let’s weave interesting information and offer fresh perspectives to the readers.

Personalize your interests for Widgets in Windows 11

Windows 11, with its focus on visual appeal and user-friendliness, introduced the "News and Interests" feed, a dynamic panel designed to keep users informed and engaged. This feature, accessible from the taskbar, offers a curated stream of news headlines, weather updates, and personalized content. However, for users who prioritize a streamlined interface or prefer a more focused work environment, the News and Interests feed can become a distraction. This article delves into the various methods for managing and customizing the News and Interests feed, empowering users to tailor their Windows 11 experience to their specific needs.

Understanding the Functionality and Customization Options

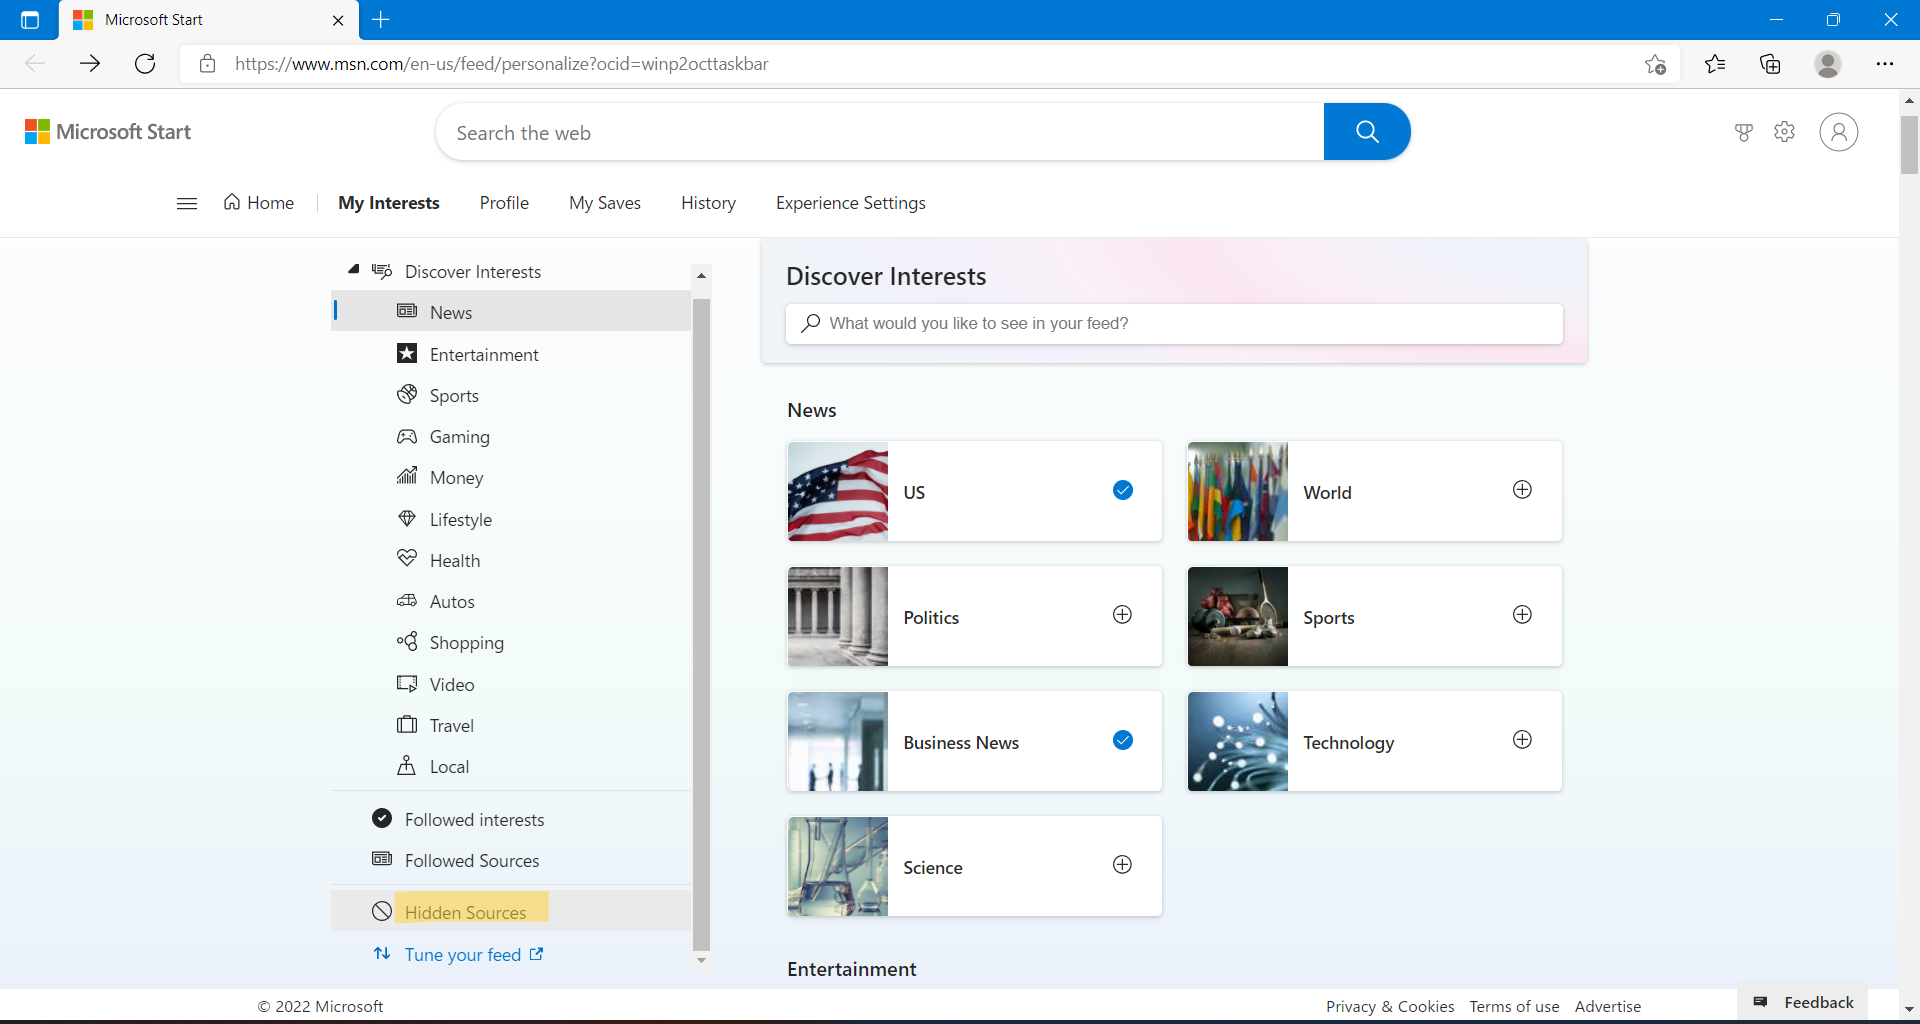
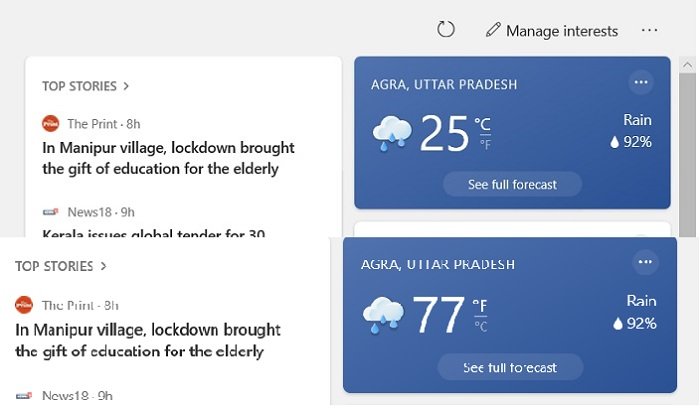
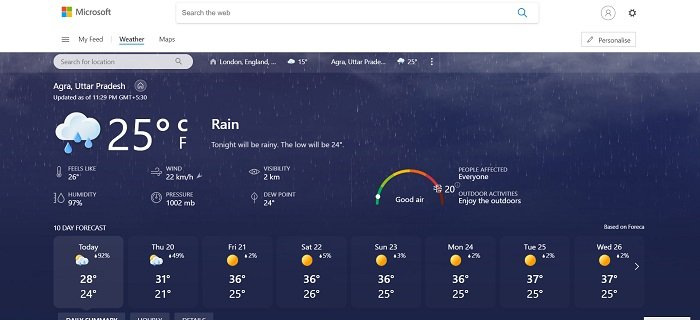
The News and Interests feed, by default, displays a mix of news articles, weather forecasts, and personalized recommendations based on user activity and preferences. This information is sourced from various reputable news providers and tailored to the user’s location and interests. However, the level of personalization can be adjusted to suit individual preferences.

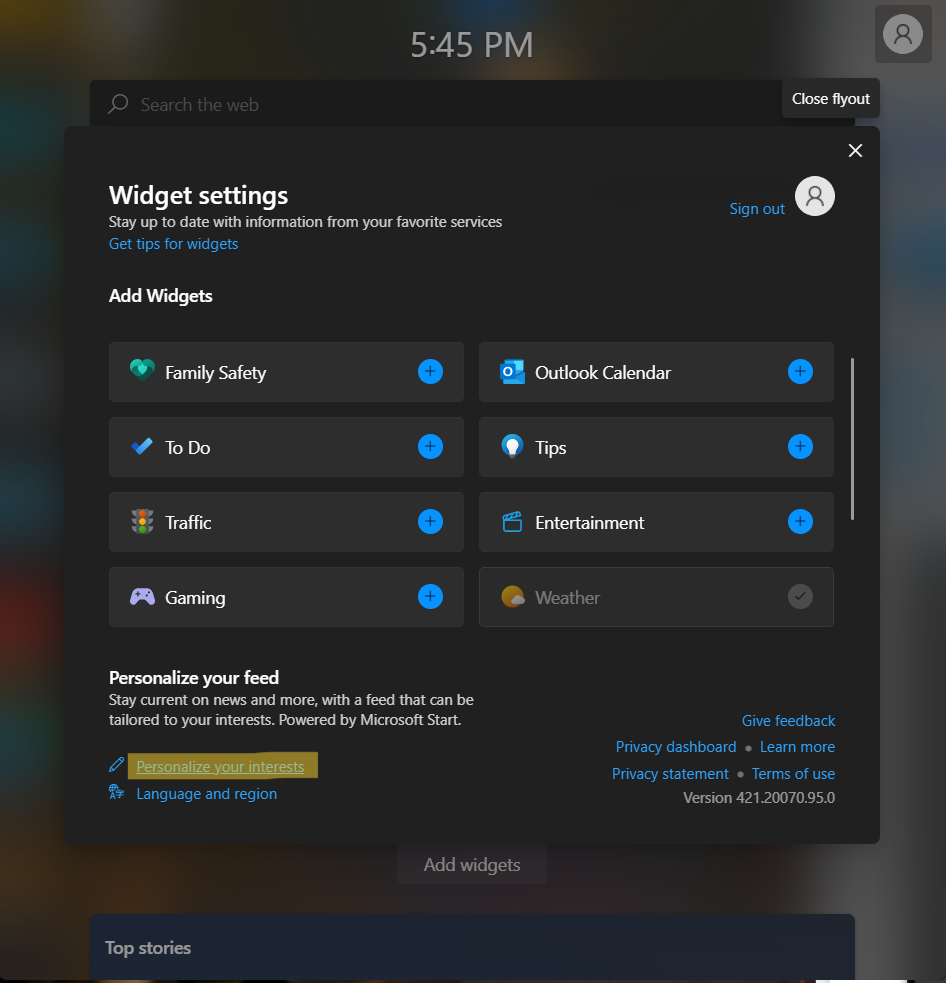
Users have the option to customize the feed’s content, including:

  • Choosing news sources: Users can select their preferred news providers from a wide range of options, ensuring that the information presented aligns with their interests.
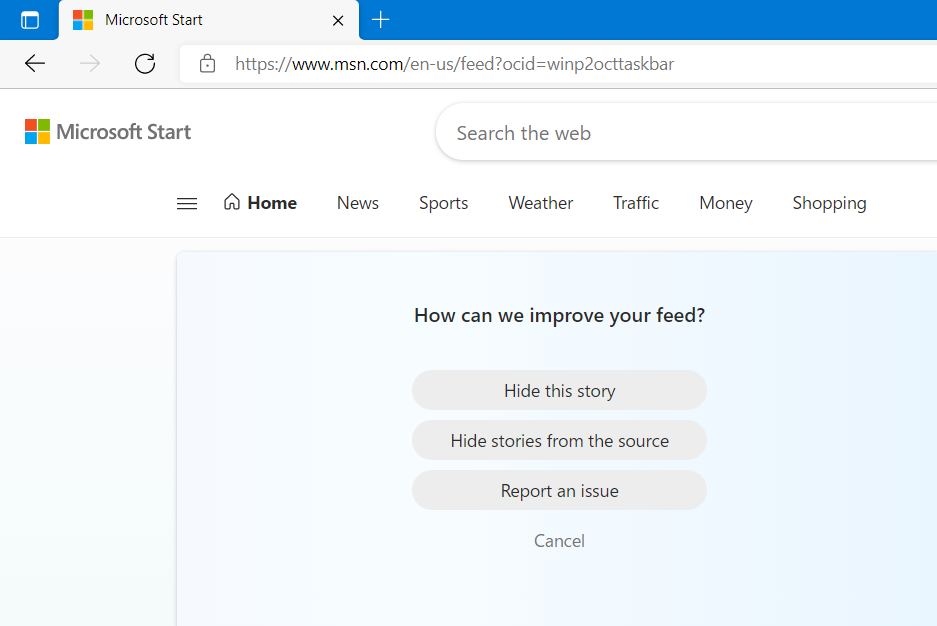
  • Filtering content: The feed can be filtered based on specific topics, such as technology, business, or entertainment, allowing users to focus on areas of particular interest.
  • Adjusting the frequency of updates: Users can control how often the feed refreshes with new information, preventing unnecessary interruptions or distractions.

Methods for Disabling or Minimizing the News and Interests Feed

For users who wish to disable the News and Interests feed entirely, several options are available:

  • Using the taskbar settings: Right-clicking on the taskbar provides access to "Taskbar settings." Within this menu, users can toggle the "News and Interests" option on or off, effectively removing the feed from the taskbar.
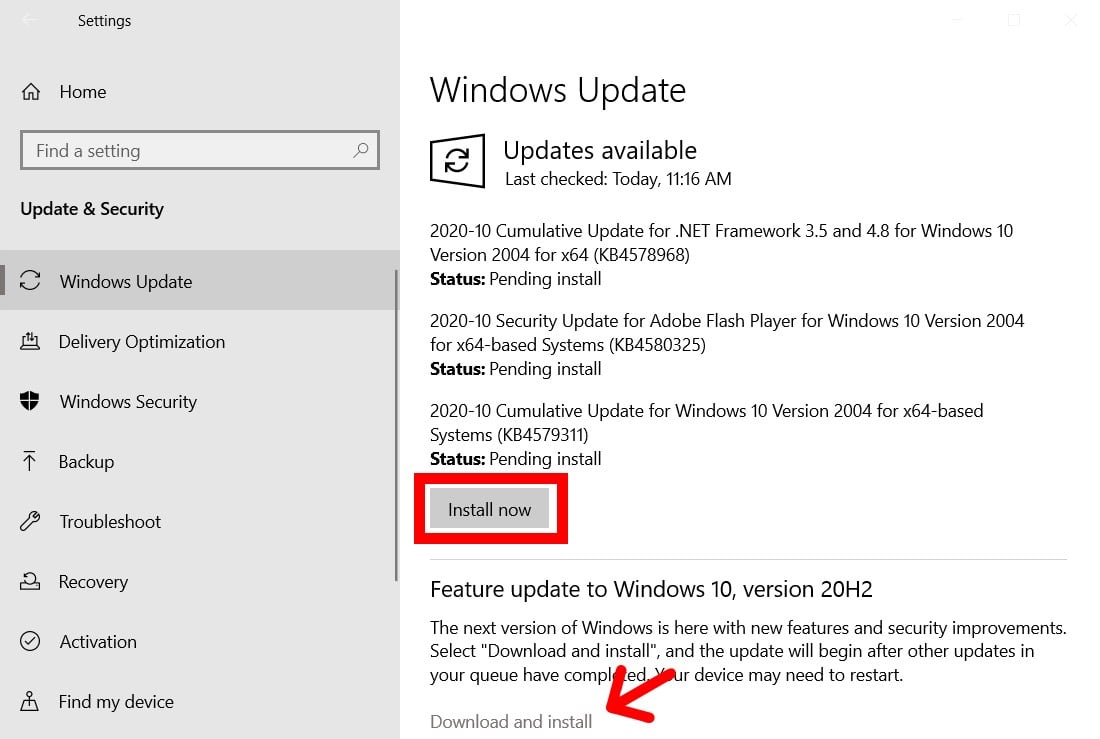
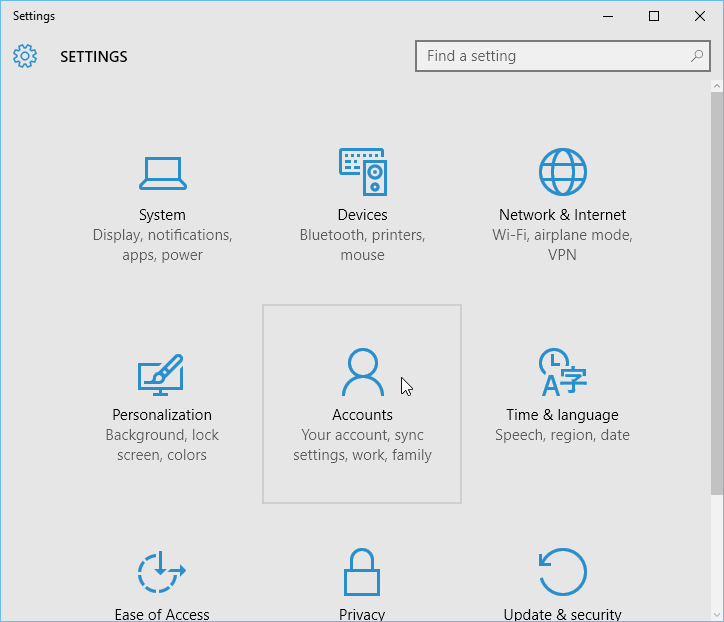
  • Disabling through the Windows settings: Navigating to "Settings" > "Personalization" > "Taskbar" offers a more comprehensive control panel for taskbar customization. Here, users can disable the News and Interests feature, as well as fine-tune its appearance and behavior.
  • Utilizing third-party tools: Several third-party applications offer advanced customization options for Windows 11, including the ability to disable or modify the News and Interests feed. These tools may provide more granular control over the feed’s functionality, allowing users to tailor it to their specific needs.

FAQ: Addressing Common Concerns

Q: Can I disable the News and Interests feed without affecting other taskbar features?

A: Yes, disabling the News and Interests feed does not impact other taskbar functionalities, such as the system tray or the search bar. It simply removes the dedicated panel for news and interest updates.

Q: Does disabling the News and Interests feed affect the functionality of other Windows features?

A: No, disabling the News and Interests feed does not impact the functionality of other Windows features. It is an independent component of the operating system and can be managed without affecting other aspects of the user experience.

Q: Are there any alternative ways to access news and information within Windows 11?

A: Users can access news and information through dedicated apps or websites. The Microsoft Store offers a variety of news apps, and users can access their preferred news websites through their web browser.

Tips for Optimizing the News and Interests Feed

  • Utilize the "Customize" button: The News and Interests feed offers a "Customize" button that provides access to various options for tailoring the content and appearance of the feed.
  • Experiment with different news sources: Explore the diverse range of news providers available to find sources that align with your interests and provide reliable information.
  • Adjust the refresh frequency: Determine the optimal refresh rate for the News and Interests feed based on your usage patterns and preferences. A less frequent refresh can minimize distractions and conserve system resources.

Conclusion: A Personalized Windows 11 Experience

Windows 11’s News and Interests feed offers a convenient way to stay informed and engaged. However, its presence can be distracting for users who prioritize a streamlined work environment. By understanding the various customization options and methods for disabling or minimizing the feed, users can tailor their Windows 11 experience to their specific needs, creating a more focused and productive environment. The ability to control the News and Interests feed allows users to prioritize their tasks and maximize their productivity, ultimately enhancing their overall Windows 11 experience.

Personalize your interests for Widgets in Windows 11 Personalize your interests for Widgets in Windows 11 Personalize your interests for Widgets in Windows 11
How to Disable the News and Interests Taskbar Widget in Windows 11 How to customize the News and Interests taskbar widget in Windows 11/10 Personalize News Feed on Widgets Board in Windows 11 Tutorial  Windows 11 Forum
Windows 11 news - tradesmilo How to customize the News and Interests taskbar widget in Windows 11/10

Closure

Thus, we hope this article has provided valuable insights into Navigating the News and Interests Feed in Windows 11: A Guide to Customization and Control. We hope you find this article informative and beneficial. See you in our next article!

Unburdening Windows 11: A Guide To Removing Pre-installed Applications

Unburdening Windows 11: A Guide to Removing Pre-installed Applications

Introduction

With enthusiasm, let’s navigate through the intriguing topic related to Unburdening Windows 11: A Guide to Removing Pre-installed Applications. Let’s weave interesting information and offer fresh perspectives to the readers.

Unburdening Windows 11: A Guide to Removing Pre-installed Applications

How To Remove Preinstalled Apps In Windows 11 - Vrogue

Windows 11, like its predecessors, comes pre-loaded with a suite of applications designed to enhance user experience. While these applications can be useful, they often consume valuable disk space, introduce potential security vulnerabilities, and can contribute to system slowdowns. This article provides a comprehensive guide to removing these pre-installed applications, outlining the process, benefits, and considerations involved.

Understanding Pre-installed Applications

Pre-installed applications, often referred to as bloatware, are software programs bundled with a new operating system or device. These applications are typically developed by Microsoft or third-party companies and serve various purposes, ranging from productivity tools to entertainment apps. While some pre-installed applications may be beneficial, others are often seen as unnecessary or even detrimental.

Reasons for Removing Pre-installed Applications

Several compelling reasons motivate users to remove pre-installed applications from their Windows 11 systems. These include:

  • Disk Space Optimization: Pre-installed applications can occupy significant disk space, particularly on systems with limited storage capacity. Removing these applications frees up valuable storage for user-installed programs, files, and data.
  • Performance Enhancement: Unnecessary applications running in the background can consume system resources, leading to slower performance and increased battery drain. Removing these applications can improve system responsiveness and efficiency.
  • Security Considerations: Some pre-installed applications may contain vulnerabilities that could be exploited by malicious actors. Removing these applications reduces the potential attack surface, enhancing system security.
  • Customization and Control: Removing pre-installed applications allows users to customize their Windows 11 environment, removing unwanted or unused applications and streamlining the user experience.

Methods for Removing Pre-installed Applications

Windows 11 offers several methods for removing pre-installed applications:

  • Using the "Apps" Settings: This method is the most straightforward and user-friendly option. Navigate to "Settings" > "Apps" > "Apps & Features" and select the application you wish to remove. Click "Uninstall" and confirm the action.
  • Using the "Programs and Features" Control Panel: This traditional method provides a more detailed view of installed applications. Access the "Programs and Features" control panel by searching for it in the Windows search bar. Locate the application you want to remove, select it, and click "Uninstall."
  • Using PowerShell: For advanced users, PowerShell offers greater control and flexibility in managing installed applications. Open PowerShell with administrator privileges and use the Get-AppxPackage cmdlet to list all installed applications. Identify the package name of the application you want to remove and use the Remove-AppxPackage cmdlet to uninstall it.
  • Using Third-Party Uninstaller Tools: Several third-party uninstaller tools are available, offering advanced features like complete removal of application files and registry entries. However, caution is advised when using these tools, as incorrect usage could damage the system.

Considerations Before Removing Applications

Before removing any pre-installed applications, consider the following:

  • Essential Applications: Some pre-installed applications may be essential for the proper functioning of Windows 11. These applications should not be removed.
  • System Stability: Removing certain applications, particularly those related to system security or hardware drivers, could negatively impact system stability. It is crucial to understand the role of each application before removing it.
  • Data Loss: Removing an application may result in the loss of associated data. Ensure that any important data is backed up before removing the application.

FAQs Regarding Removing Pre-installed Applications

Q: Can I remove all pre-installed applications?

A: While it is possible to remove most pre-installed applications, removing essential system applications can lead to system instability and functionality issues. It is recommended to carefully evaluate each application before removing it.

Q: Are there any applications that I should never remove?

A: Some critical system applications, such as Windows Defender, Windows Update, and the operating system core components, should never be removed. Removing these applications can render your system unusable.

Q: What happens if I remove a pre-installed application and later need it?

A: Most pre-installed applications can be reinstalled from the Microsoft Store or through the Windows Update process. However, some applications may require a system restore or a fresh installation of Windows 11 to be restored.

Q: Can removing pre-installed applications void my warranty?

A: Removing pre-installed applications typically does not void your warranty. However, it is recommended to consult your device manufacturer’s warranty policy for specific details.

Tips for Removing Pre-installed Applications

  • Back up your system before removing any applications. This ensures that you can restore your system to its previous state if any issues arise.
  • Research the purpose of each application before removing it. Understand its functionality and potential impact on system stability.
  • Use the built-in Windows tools for removing applications whenever possible. These tools are designed to ensure safe and efficient removal.
  • Avoid using third-party uninstaller tools unless absolutely necessary. These tools can be complex and may lead to unintended consequences.

Conclusion

Removing pre-installed applications from Windows 11 can significantly enhance system performance, optimize disk space, and improve security. By carefully evaluating the purpose and potential impact of each application, users can tailor their Windows 11 experience to their specific needs and preferences. Remember to proceed with caution and prioritize system stability and data security throughout the process.

How to Remove Preinstalled Apps in Windows 11 Remove Pre-Installed Apps on Win 11: Streamline Your Experience How to Remove Pre-Installed Apps from Windows 11
How To Remove Preinstalled Apps In Windows 11 - www.vrogue.co Remove Pre-Installed Apps on Win 11: Streamline Your Experience Windows 11 uninstall preinstalled apps
Windows 11: How to Remove Pre-installed, Including Hidden Apps - Techtrickz Installed Apps Windows 11

Closure

Thus, we hope this article has provided valuable insights into Unburdening Windows 11: A Guide to Removing Pre-installed Applications. We thank you for taking the time to read this article. See you in our next article!

R Software For Windows 11: A Comprehensive Guide

R Software for Windows 11: A Comprehensive Guide

Introduction

With enthusiasm, let’s navigate through the intriguing topic related to R Software for Windows 11: A Comprehensive Guide. Let’s weave interesting information and offer fresh perspectives to the readers.

R Software for Windows 11: A Comprehensive Guide

Install R on Windows 11  TestingDocs.com

R is a powerful and versatile programming language and free software environment for statistical computing and graphics. Its popularity in the realm of data science and analytics stems from its comprehensive capabilities, extensive package library, and active community support. This guide explores R’s installation, functionalities, and applications on Windows 11, providing a comprehensive overview for both beginners and experienced users.

Understanding R: A Foundation for Data Analysis

R’s core strength lies in its ability to handle statistical analysis, data visualization, and model building. It provides a wide range of functions for:

  • Data Manipulation and Transformation: R offers tools for cleaning, filtering, merging, and transforming data, preparing it for analysis.
  • Statistical Analysis: From basic descriptive statistics to complex hypothesis testing and regression analysis, R provides a comprehensive toolkit for exploring data patterns and drawing inferences.
  • Data Visualization: R excels in creating informative and visually appealing charts and graphs, enabling effective communication of data insights.
  • Modeling and Machine Learning: R supports a wide array of statistical models, including linear and logistic regression, decision trees, and support vector machines, for building predictive models and uncovering hidden relationships within data.

Installing R on Windows 11: A Step-by-Step Guide

Installing R on Windows 11 is a straightforward process. Follow these steps:

  1. Download the R Installer: Visit the official CRAN (Comprehensive R Archive Network) website (https://cran.r-project.org/) and download the latest version of R for Windows.
  2. Run the Installer: Execute the downloaded installer file. Follow the on-screen prompts to install R on your system.
  3. Verify Installation: After the installation completes, open R by searching for it in the Windows Start menu. You should see the R console window, indicating a successful installation.

RStudio: A User-Friendly Interface for R

While R provides a powerful command-line interface, RStudio offers a more user-friendly environment for working with R. It enhances productivity by providing:

  • Code Editor: RStudio’s code editor provides syntax highlighting, autocompletion, and code navigation features, making coding more efficient and error-free.
  • Interactive Console: The interactive console allows you to execute R commands and view the output directly.
  • Workspace Management: RStudio facilitates managing your R projects, scripts, and data files effectively.
  • Visualizations: It provides integrated tools for creating and exploring data visualizations within the R environment.

To install RStudio, visit its official website (https://rstudio.com/products/rstudio/download/) and download the free version for Windows. Follow the installation instructions, and you’ll be ready to start using RStudio.

R Packages: Expanding R’s Capabilities

R’s true power lies in its extensive package library, which offers pre-built functions and tools for various tasks. Installing and using packages is a fundamental aspect of working with R.

  1. Installing Packages: You can install packages directly from the R console using the install.packages() function. For example, to install the ggplot2 package for data visualization, use the following command:

    install.packages("ggplot2")
  2. Loading Packages: Once installed, you need to load the packages into your R session before using their functions. Use the library() function to load a package. For instance, to load the ggplot2 package:

    library(ggplot2)

Exploring R’s Functionality: A Practical Example

Let’s explore R’s capabilities through a simple example: analyzing a dataset of student grades.

1. Importing Data:

First, you need to import the data into R. You can use the read.csv() function for reading data from a CSV file. Assuming your data is stored in a file named "grades.csv," use the following code:

grades <- read.csv("grades.csv")

2. Exploring Data:

Use the head() and summary() functions to get a glimpse of the data.

head(grades) # Displays the first few rows of the data
summary(grades) # Provides summary statistics for each variable

3. Creating a Visualization:

Let’s create a histogram to visualize the distribution of student scores in a particular subject.

library(ggplot2)

ggplot(grades, aes(x = MathScore)) +
  geom_histogram(binwidth = 5) +
  labs(title = "Distribution of Math Scores",
       x = "Math Score",
       y = "Frequency")

4. Performing Statistical Analysis:

You can calculate the mean, standard deviation, or perform other statistical tests on the data using R’s built-in functions. For example, to calculate the mean Math score:

mean(grades$MathScore)

R for Data Science and Machine Learning

R’s capabilities extend beyond basic statistical analysis. It is a powerful tool for data science and machine learning tasks.

  • Data Mining: R can be used to extract valuable insights from large datasets, identifying patterns and trends.
  • Predictive Modeling: R supports a wide range of algorithms for building predictive models, enabling you to forecast future outcomes based on historical data.
  • Machine Learning: R is widely used for implementing machine learning algorithms, including classification, regression, and clustering, for tasks like image recognition, sentiment analysis, and fraud detection.

FAQs on R Software for Windows 11

1. Is R free to use?
Yes, R is an open-source software, meaning it is free to download, use, and distribute.

2. What are the system requirements for running R on Windows 11?
R has minimal system requirements. A modern computer with a reasonable amount of RAM and storage space is sufficient.

3. Can I use R for data visualization?
Yes, R has excellent data visualization capabilities. Packages like ggplot2 provide a wide range of charting options.

4. What is the best way to learn R?
There are many resources available for learning R, including online courses, tutorials, and books. The R community also offers extensive documentation and support forums.

5. Is R suitable for beginners?
While R can be challenging for absolute beginners, its extensive documentation and online resources make it accessible for learning.

Tips for Using R Software on Windows 11

  • Start with a Simple Project: Begin with a small project to familiarize yourself with R’s syntax and functionalities.
  • Explore the R Packages: Utilize the package library to discover tools for specific tasks.
  • Practice Regularly: Consistent practice is key to mastering R.
  • Seek Help When Needed: The R community is very active and helpful. Utilize forums and online resources to resolve any issues.
  • Stay Updated: Regularly update R and its packages to benefit from new features and bug fixes.

Conclusion

R software for Windows 11 empowers users with a robust and versatile tool for data analysis, visualization, and model building. Its open-source nature, extensive package library, and active community support make it a valuable resource for both beginners and experienced data scientists. By mastering R’s functionalities, users can unlock the power of data to gain valuable insights, make informed decisions, and drive innovation.

Install R On Windows 11, 46% OFF How to download R and install RStudio on Windows 11 - TechDecode Tutorials Install R on Windows 11  TestingDocs.com
R Software For Windows 11 2024 - Win 11 Home Upgrade 2024 Buy Windows 11 User Guide for Beginners: A Comprehensive Guide to Master Windows 11 Operating Buy WINDOWS 11 PRO USER GUIDE: A Comprehensive User Guide for Beginners and Seniors to Master
R Software For Windows 11 - Get Latest Windows 11 Update Windows 11: A Comprehensive Guide about Features and Updates Perunity - Latest Business Story

Closure

Thus, we hope this article has provided valuable insights into R Software for Windows 11: A Comprehensive Guide. We appreciate your attention to our article. See you in our next article!

Troubleshooting Program Loading Issues In Windows 10: A Comprehensive Guide

Troubleshooting Program Loading Issues in Windows 10: A Comprehensive Guide

Introduction

With enthusiasm, let’s navigate through the intriguing topic related to Troubleshooting Program Loading Issues in Windows 10: A Comprehensive Guide. Let’s weave interesting information and offer fresh perspectives to the readers.

Troubleshooting Program Loading Issues in Windows 10: A Comprehensive Guide

Troubleshooting Windows 10

The inability to launch a program in Windows 10 can be a frustrating experience, hindering productivity and access to essential tools. This guide delves into the common causes behind such issues and provides a comprehensive set of troubleshooting steps to resolve them. Understanding these causes and solutions empowers users to diagnose and rectify program loading problems effectively.

Common Causes of Program Loading Issues in Windows 10

Several factors can prevent a program from loading in Windows 10, ranging from simple configuration errors to more complex system issues. Identifying the underlying cause is crucial for selecting the appropriate resolution strategy.

1. Insufficient System Resources:

  • Memory (RAM): Programs require a certain amount of RAM to function. If the system lacks sufficient memory, programs may struggle to load or crash.
  • Disk Space: Programs need adequate disk space for installation and data storage. Insufficient space can lead to loading difficulties.

2. Corrupted or Missing Program Files:

  • Incomplete Installation: A faulty installation process can leave program files incomplete or corrupted.
  • Malware Infection: Malicious software can damage or modify program files, preventing them from launching.
  • System Updates: Windows updates occasionally introduce compatibility issues with certain programs, leading to loading problems.

3. Compatibility Issues:

  • Operating System Version: Some programs might not be compatible with the specific Windows 10 version installed on the system.
  • Hardware Drivers: Outdated or incompatible device drivers can interfere with program operation, leading to loading issues.

4. Program Configuration Errors:

  • Incorrect Settings: Program settings, such as compatibility modes or permissions, can be misconfigured, preventing the program from launching.
  • Registry Issues: Errors in the Windows Registry, which stores program settings, can interfere with program loading.

5. System Errors:

  • File System Errors: Corruptions in the file system can affect program loading.
  • System File Corruption: Damaged or corrupted system files can lead to widespread issues, including program loading problems.

Troubleshooting Steps for Program Loading Issues

Addressing program loading issues requires a systematic approach, starting with basic checks and progressing to more advanced solutions.

1. Basic Troubleshooting:

  • Restart the Computer: A simple restart can resolve temporary glitches that might be preventing the program from loading.
  • Check for Updates: Ensure both the program and Windows 10 are updated to their latest versions. Updates often include bug fixes and compatibility improvements.
  • Run as Administrator: Some programs require administrator privileges to function properly. Right-click the program icon, select "Run as administrator," and attempt to launch it.
  • Reinstall the Program: A clean reinstall can resolve issues caused by corrupted or incomplete installation files. Uninstall the program completely and then download and install the latest version from the official source.
  • Check for System Errors: Use the Windows 10 built-in "System File Checker" tool to scan for and repair corrupted system files.

2. Advanced Troubleshooting:

  • Check for Disk Space: Ensure sufficient free disk space is available for the program to function properly.
  • Check for Memory Leaks: Memory leaks can occur when programs fail to release allocated memory, leading to performance issues and loading problems. Use the Task Manager to monitor memory usage and identify potential memory leaks.
  • Disable Antivirus Software: Temporarily disable antivirus software to check if it is interfering with the program’s operation. However, be cautious as this can leave your system vulnerable to malware.
  • Run a System Restore: If the issue arose after a recent system change, restoring the system to a previous point can resolve the problem.
  • Check for Compatibility Issues: Ensure the program is compatible with the installed Windows 10 version and hardware. Check the program’s official website or documentation for compatibility information.
  • Update Device Drivers: Outdated or incompatible device drivers can cause program loading issues. Update drivers to the latest versions through the device manufacturer’s website or Windows Update.

3. Specialized Troubleshooting:

  • Check Program Logs: Some programs generate log files that contain information about errors or issues. Examine these logs for clues about the cause of the loading problem.
  • Use System Event Viewer: The Event Viewer in Windows 10 records system events, including errors and warnings. Review the Event Viewer logs for entries related to the program’s loading issue.
  • Consult Program Documentation: Refer to the program’s documentation for troubleshooting tips specific to that software.
  • Contact Program Developer: If all else fails, contact the program developer for support and assistance.

FAQs

Q: What if the program loads but crashes soon after?

A: This indicates a potential issue with the program itself or its compatibility with the system. Try the following:

  • Check for program updates: Ensure the program is up-to-date.
  • Run the program in compatibility mode: Some older programs might require compatibility mode to run smoothly on Windows 10.
  • Reinstall the program: A clean reinstall can resolve issues caused by corrupted files.
  • Contact the program developer: Seek assistance from the program developer for specific troubleshooting steps.

Q: How do I know if the issue is related to insufficient memory?

A: Observe the system’s performance during program loading. If the computer becomes sluggish, lags, or displays error messages related to low memory, it suggests insufficient RAM.

Q: How do I check for corrupted system files?

A: Use the "System File Checker" tool in Windows 10. Open Command Prompt as administrator and type "sfc /scannow". This will scan for and repair corrupted system files.

Q: What should I do if the program is not compatible with my Windows 10 version?

A: Check the program’s official website or documentation for compatibility information. If the program is not compatible, you might need to consider alternative programs or upgrade your Windows 10 version.

Tips

  • Keep your system updated: Regularly install Windows updates and program updates to ensure compatibility and address known issues.
  • Monitor system resources: Regularly check memory and disk space usage to ensure sufficient resources for program operation.
  • Run antivirus scans: Regularly scan your system for malware to prevent file corruption and system instability.
  • Create a system restore point: Before making any significant system changes, create a system restore point to revert to a previous stable state if necessary.
  • Back up important data: Regularly back up important files and data to prevent data loss in case of system issues.

Conclusion

Successfully resolving program loading issues in Windows 10 requires a methodical approach, starting with basic checks and progressing to more advanced solutions. Understanding the common causes of such issues and applying the appropriate troubleshooting steps empowers users to regain access to essential programs and maintain a stable computing environment. By following the guidelines outlined in this guide, users can effectively diagnose and rectify program loading problems, ensuring smooth and efficient system operation.

Troubleshooting Windows 10 Troubleshooting Windows 10 Troubleshooting Windows 10
How to fix common problems automatically on Windows 10 - Pureinfotech How to Troubleshoot Windows 10 Problems? - TECHNIG Find, start and run the Troubleshooting in Windows-10?
How to fix Windows 10 Install or Uninstall Programs issue [Troubleshooting Guide] - EasyPCMod How to Fix Windows 10 Startup Problems (4 Ways) - YouTube

Closure

Thus, we hope this article has provided valuable insights into Troubleshooting Program Loading Issues in Windows 10: A Comprehensive Guide. We hope you find this article informative and beneficial. See you in our next article!

Navigating The Path To Success: A Comprehensive Guide To The Office 365 Deployment Toolkit

Navigating the Path to Success: A Comprehensive Guide to the Office 365 Deployment Toolkit

Introduction

In this auspicious occasion, we are delighted to delve into the intriguing topic related to Navigating the Path to Success: A Comprehensive Guide to the Office 365 Deployment Toolkit. Let’s weave interesting information and offer fresh perspectives to the readers.

Office 365 Deployment Step by Step free PDF - KING OF EXCEL

The transition to a cloud-based environment, particularly with a suite as comprehensive as Microsoft Office 365, presents a unique set of challenges. Organizations must navigate the complexities of user adoption, data migration, security considerations, and ongoing management. To streamline this process and ensure a successful implementation, Microsoft provides a valuable resource: the Office 365 Deployment Toolkit.

This toolkit is not simply a collection of tools; it is a strategic guide designed to facilitate a smooth and efficient transition to Office 365. Its comprehensive approach encompasses various aspects of the deployment process, offering guidance, templates, and automation tools to help organizations achieve their desired outcomes.

Understanding the Toolkit’s Value

The Office 365 Deployment Toolkit recognizes that successful deployment goes beyond simply installing software. It necessitates a well-defined plan, clear communication, and robust support structures. The toolkit provides the framework and resources to address these critical elements.

Key Components of the Toolkit

The Office 365 Deployment Toolkit comprises several key components, each contributing to a successful implementation:

  • Deployment Planning Guide: This guide provides a structured approach to planning the deployment, covering aspects like scope definition, stakeholder identification, and resource allocation. It serves as a roadmap for organizations to establish a clear vision and strategy.
  • Deployment Checklist: The checklist acts as a comprehensive guide, ensuring that organizations address all necessary steps and considerations during the deployment process. It helps maintain focus and minimizes the risk of overlooking critical tasks.
  • Migration Tools: The toolkit provides tools for migrating data from existing systems to Office 365. These tools facilitate a smooth transition, minimizing disruption and ensuring data integrity.
  • User Adoption Resources: Recognizing the importance of user buy-in, the toolkit offers resources to guide organizations in fostering user adoption. This includes templates for communication plans, training materials, and user guides.
  • Security and Compliance Tools: Security and compliance are paramount in any cloud environment. The toolkit provides tools and guidance to ensure that organizations meet their security and compliance requirements, safeguarding sensitive information.
  • Troubleshooting and Support Resources: The toolkit includes resources to address common challenges and provide support during the deployment process. This ensures that organizations have access to relevant information and assistance when needed.

Benefits of Utilizing the Toolkit

The Office 365 Deployment Toolkit offers several significant benefits to organizations embarking on their Office 365 journey:

  • Reduced Deployment Time: The toolkit streamlines the deployment process by providing a structured approach and pre-built tools, accelerating the overall timeline.
  • Improved Project Management: The toolkit’s comprehensive framework ensures that projects are well-defined, managed efficiently, and remain on track.
  • Enhanced User Adoption: The toolkit’s user adoption resources foster a positive user experience, encouraging users to embrace Office 365 and its benefits.
  • Stronger Security Posture: The toolkit’s security and compliance tools help organizations establish a robust security framework, safeguarding sensitive data and maintaining compliance.
  • Reduced Costs: By streamlining the deployment process and minimizing potential issues, the toolkit contributes to a cost-effective implementation.

FAQs about the Office 365 Deployment Toolkit

1. What are the prerequisites for using the Office 365 Deployment Toolkit?

The toolkit is compatible with various operating systems and requires a basic understanding of Office 365 concepts. Organizations should have a clear understanding of their specific requirements and goals for deploying Office 365.

2. Is the Office 365 Deployment Toolkit free to use?

Yes, the Office 365 Deployment Toolkit is available for free to all Office 365 subscribers.

3. How often is the Office 365 Deployment Toolkit updated?

Microsoft regularly updates the toolkit to reflect the latest changes and features in Office 365.

4. What types of support are available for the Office 365 Deployment Toolkit?

Microsoft offers various support options, including online documentation, community forums, and dedicated support channels for Office 365 deployments.

5. Can the Office 365 Deployment Toolkit be customized for specific organizational needs?

The toolkit provides a flexible framework that can be adapted to meet the specific requirements and goals of each organization.

Tips for Effective Utilization of the Toolkit

  • Start with a Clear Vision: Define your organization’s goals and objectives for deploying Office 365.
  • Engage Key Stakeholders: Involve relevant stakeholders from across the organization in the planning and implementation process.
  • Prioritize User Adoption: Focus on strategies to encourage user adoption and address potential challenges.
  • Leverage the Toolkit’s Resources: Utilize the toolkit’s comprehensive resources to guide your deployment process.
  • Monitor Progress and Adapt: Regularly review the progress of your deployment and make adjustments as needed.

Conclusion

The Office 365 Deployment Toolkit serves as an invaluable resource for organizations embarking on their Office 365 journey. Its comprehensive approach, coupled with its user-friendly resources, empowers organizations to navigate the complexities of deployment and achieve a successful transition. By leveraging the toolkit’s tools and guidance, organizations can ensure a smooth implementation, maximize user adoption, and reap the full benefits of Office 365.

Office Deployment Tool: How to Use It to Install Office 365 Office 365 Deployment Guide Learning how to use Office Deployment Toolkit 2016  techspeeder
Office Deployment Tool for 2024 - Microsoft Office 365 Deployment Office 365 Deployment Step by Step free PDF - KING OF EXCEL Install Office 365 using the Office Deployment Tool - TechLabs
Deploying Office 365 with Office Deployment Tool (ODT) - Tech Blog, News, How To's and More. Microsoft Office 365 Deployment Guide - PDFCOFFEE.COM

Closure

Thus, we hope this article has provided valuable insights into Navigating the Path to Success: A Comprehensive Guide to the Office 365 Deployment Toolkit. We appreciate your attention to our article. See you in our next article!

Navigating The Labyrinth: Reclaiming Access To Your Windows 10 Account

Navigating the Labyrinth: Reclaiming Access to Your Windows 10 Account

Introduction

In this auspicious occasion, we are delighted to delve into the intriguing topic related to Navigating the Labyrinth: Reclaiming Access to Your Windows 10 Account. Let’s weave interesting information and offer fresh perspectives to the readers.

How To Create And Manage User Accounts Windows 10 Win - vrogue.co

Forgetting a password is a common frustration, and Windows 10 users are not immune to this experience. When the familiar PIN, used to swiftly unlock the operating system, slips from memory, it can feel like a digital roadblock, barring access to essential files, applications, and settings. This situation, often referred to as "forgotten PIN," necessitates a methodical approach to regain control over your Windows 10 account.

Understanding the PIN’s Role:

The PIN, short for Personal Identification Number, serves as a simplified password for Windows 10. It offers a faster and more convenient way to log in compared to typing out a complex password. However, this ease of access comes with a potential downside: forgetting the PIN can lead to account lockout.

Methods to Reclaim Account Access:

There are several pathways to navigate this predicament, each with its own set of requirements and limitations. Understanding these options is crucial for choosing the most effective method for your specific situation.

1. Microsoft Account Recovery:

  • Premise: If the forgotten PIN is associated with a Microsoft account, the recovery process leverages the account’s email address or phone number.
  • Procedure:
    • Access the Microsoft account recovery page.
    • Enter the email address or phone number linked to the account.
    • Follow the on-screen instructions, which typically involve receiving a verification code and providing security information.
    • Once verified, you can reset the PIN or choose a new one.
  • Limitations: Requires access to the email address or phone number associated with the account.

2. Local Account Password Reset:

  • Premise: This method applies to accounts created directly on the Windows 10 device, not linked to a Microsoft account.
  • Procedure:
    • Boot the computer into Advanced Startup Options. This can be achieved by restarting the computer and repeatedly pressing the F8 key or by using the "Shift" key while clicking the "Restart" option in the Start menu.
    • Navigate to "Troubleshoot" > "Advanced options" > "Command Prompt."
    • In the Command Prompt, type "net user [username] *", replacing "[username]" with the actual username.
    • Enter a new password when prompted.
    • Close the Command Prompt and restart the computer.
  • Limitations: Requires access to the local computer.

3. Resetting the PC:

  • Premise: This option is a last resort, as it erases all data from the device.
  • Procedure:
    • Access Advanced Startup Options as described in method 2.
    • Navigate to "Troubleshoot" > "Reset this PC."
    • Choose "Remove everything" and select the desired data removal options.
    • Follow the on-screen instructions to complete the reset process.
  • Limitations: Data loss is inevitable.

4. Contacting Microsoft Support:

  • Premise: Microsoft support can assist in recovering accounts, but they may require additional information for verification purposes.
  • Procedure:
    • Visit the Microsoft support website or call their support hotline.
    • Explain the situation and provide any relevant details, such as the email address or phone number associated with the account.
    • Follow the instructions provided by the support representative.
  • Limitations: May require waiting time and potential documentation.

Frequently Asked Questions (FAQs):

Q: What if I don’t remember the email address or phone number associated with my account?

A: If you lack access to the recovery information, Microsoft account recovery becomes challenging. Consider contacting Microsoft support for assistance, providing any available details about the account.

Q: Can I reset my PIN without knowing the current one?

A: Yes, if the account is linked to a Microsoft account, you can reset the PIN through the Microsoft account recovery process. For local accounts, using the Command Prompt within Advanced Startup Options allows password reset.

Q: What if I’ve forgotten my password for both the PIN and my Microsoft account?

A: This situation is more complex. It’s crucial to gather as much information as possible about the account, such as the email address, phone number, or any security questions. Contacting Microsoft support is recommended for guidance.

Q: Is there a way to prevent forgetting my PIN in the future?

A: While completely eliminating forgetfulness is impossible, adopting good practices can significantly reduce the risk:

- **Use a memorable PIN:** Avoid common numbers or patterns that are easily guessed.
- **Write it down:** Keep a record of the PIN in a secure location, separate from the device.
- **Use a password manager:** Securely store your PIN and other passwords using a dedicated password manager.

Tips for Avoiding Future PIN Issues:

  • Enable "Sign in with a picture": This option allows using a personalized picture for account verification instead of a PIN.
  • Set up a strong password for your Microsoft account: A robust password acts as a backup security layer.
  • Keep your recovery information updated: Ensure the email address and phone number associated with your account are current and accessible.
  • Use a password manager: A password manager can securely store all your login credentials, eliminating the need to memorize multiple PINs and passwords.

Conclusion:

Forgetting your Windows 10 PIN can be a frustrating experience, but it’s not insurmountable. By understanding the available methods, you can regain access to your account and prevent future occurrences. Remember, proactive measures, like using memorable PINs and keeping recovery information up-to-date, can significantly reduce the likelihood of encountering this common issue.

Navigating The Labyrinth System Requirements - Can I Run It? - PCGameBenchmark Navigating The Labyrinth Screenshots ยท SteamDB Navigating The Labyrinth on Steam
Navigating The Labyrinth Screenshots ยท SteamDB Navigating the Labyrinth: An Executive Guide to Data Management (English Edition) eBook How to reclaim space after upgrading to Windows 10 2022 Update in 2022  Upgrade, Upgrade to
WINDOWS Labyrinth - YouTube Labyrinth Windows Developer Preview - YouTube

Closure

Thus, we hope this article has provided valuable insights into Navigating the Labyrinth: Reclaiming Access to Your Windows 10 Account. We hope you find this article informative and beneficial. See you in our next article!

Troubleshooting R In Windows 10: A Comprehensive Guide

Troubleshooting R in Windows 10: A Comprehensive Guide

Introduction

In this auspicious occasion, we are delighted to delve into the intriguing topic related to Troubleshooting R in Windows 10: A Comprehensive Guide. Let’s weave interesting information and offer fresh perspectives to the readers.

Troubleshooting R in Windows 10: A Comprehensive Guide

Microsoft Windows 10 Troubleshooting Guide โ€“ J.R. Clarke Public Library

R, a powerful programming language and free software environment for statistical computing and graphics, is a vital tool for data scientists, statisticians, and researchers. However, users sometimes encounter difficulties running R on Windows 10. This article aims to provide a comprehensive guide to troubleshoot these issues, ensuring a smooth and efficient R experience.

Understanding Potential Issues

When R fails to function as expected on Windows 10, it’s crucial to identify the underlying cause. Common culprits include:

  • Installation Errors: Incorrect installation procedures, incomplete downloads, or conflicts with existing software can lead to R malfunctioning.
  • Missing Dependencies: R relies on various packages and libraries to perform specific tasks. Missing or outdated dependencies can cause errors and prevent functionality.
  • Path Issues: Windows needs to locate R’s executable files and associated libraries. Incorrectly configured paths can impede R’s execution.
  • Environment Variables: Properly configured environment variables are essential for smooth R operation. Incorrect settings can lead to errors and unexpected behavior.
  • Software Conflicts: Conflicts with other installed software, particularly those that interact with R’s core functionalities, can disrupt R’s performance.
  • Operating System Updates: Windows updates can sometimes introduce compatibility issues with R.
  • Antivirus Interference: Antivirus software can sometimes mistakenly identify R’s processes as threats, interfering with its execution.

Troubleshooting Steps

Addressing R-related issues in Windows 10 requires a systematic approach. The following steps provide a roadmap for diagnosing and resolving common problems:

1. Verify Installation:

  • Re-install R: Start by ensuring a clean installation. Uninstall any existing R versions and download the latest stable release from the official CRAN website (https://cran.r-project.org/). Follow the installation wizard meticulously.
  • Install RStudio: Consider using RStudio, a user-friendly integrated development environment (IDE) specifically designed for R. It provides a streamlined interface for coding, managing projects, and visualizing results.

2. Check Dependencies:

  • Install Necessary Packages: Identify the specific packages required for your projects. Use the install.packages() function within R to install them.
  • Update Existing Packages: Regularly update installed packages using the update.packages() function to ensure compatibility and access the latest features.
  • Use Package Manager: Consider using a package manager like packrat or renv to manage dependencies effectively, ensuring consistent project environments.

3. Configure Path Variables:

  • Add R to System Path: Ensure that Windows can locate R’s executable files. Navigate to System Properties > Advanced System Settings > Environment Variables > System Variables and locate the Path variable. Click Edit and add the directory containing R’s executable (typically C:Program FilesRR-x.x.xbin) to the list of paths.
  • Restart System: Restart your computer to apply the changes.

4. Manage Environment Variables:

  • Set R_HOME: Define the location of your R installation. Create a new system variable named R_HOME and set its value to the directory containing R’s installation (e.g., C:Program FilesRR-x.x.x).
  • Verify R_LIBS: Ensure the R_LIBS environment variable is set correctly. This variable defines the location of user-specific libraries. The default value is usually C:UsersYourUsernameDocumentsRwin-libraryx.x.

5. Address Software Conflicts:

  • Identify Conflicting Software: Review recently installed software or applications that might interfere with R’s functionality. Consider temporarily disabling or uninstalling them to see if the issue resolves.
  • Use Compatibility Mode: If older software is causing conflicts, try running R in compatibility mode. Right-click the R executable, select Properties > Compatibility and check the box for Run this program in compatibility mode for:. Select the appropriate operating system version from the dropdown menu.

6. Troubleshoot Windows Updates:

  • Rollback Updates: If recent Windows updates seem to have caused R issues, consider rolling back to a previous version. Navigate to Settings > Update & Security > Windows Update > View update history and select Uninstall updates.
  • Check for Updates: Ensure that both Windows and R are up-to-date. Install the latest updates to address potential compatibility issues.

7. Address Antivirus Interference:

  • Temporarily Disable Antivirus: If antivirus software is interfering with R’s execution, temporarily disable it to see if the issue resolves.
  • Add Exclusions: Add R’s installation directory and its executables to your antivirus’s exclusion list. This will prevent the antivirus from mistakenly identifying R as a threat.

8. Seek Support:

  • Consult Online Resources: Numerous online forums, communities, and documentation resources are available for R users. Search for specific error messages or issues to find solutions and guidance.
  • Contact R Support: If all else fails, consider contacting the R development team or seeking support from the R community.

FAQs

1. Why is R not working after a Windows update?

Windows updates can sometimes introduce compatibility issues with R, leading to unexpected behavior or errors. Ensure that both Windows and R are up-to-date, and consider rolling back recent updates if necessary.

2. How do I fix the "R cannot find the executable" error?

This error typically indicates an issue with the system path configuration. Verify that the directory containing R’s executable files is correctly added to the system path environment variable.

3. Why is R taking a long time to load?

Slow loading times can be caused by several factors, including insufficient system resources, outdated packages, or a large number of packages installed. Ensure your computer meets the minimum system requirements for R, update packages regularly, and consider using a package manager to streamline dependency management.

4. How do I install packages in R?

Use the install.packages() function within R to install packages from CRAN or other repositories. For example, to install the ggplot2 package, type install.packages("ggplot2") in the R console.

5. What is RStudio, and why should I use it?

RStudio is a user-friendly IDE specifically designed for R. It provides a comprehensive interface for coding, managing projects, visualizing results, and interacting with R’s functionalities.

Tips

  • Use RStudio: RStudio provides a streamlined environment for working with R, simplifying coding, project management, and visualization.
  • Keep R and Packages Updated: Regularly update both R and its packages to ensure compatibility and access the latest features.
  • Manage Dependencies with Package Managers: Tools like packrat and renv help maintain consistent project environments and manage dependencies effectively.
  • Consult Online Resources: Utilize online forums, communities, and documentation for troubleshooting and seeking guidance.

Conclusion

Troubleshooting R in Windows 10 involves understanding potential issues, implementing systematic steps, and utilizing available resources. By verifying installation, checking dependencies, configuring path variables, managing environment variables, addressing software conflicts, troubleshooting Windows updates, and addressing antivirus interference, users can resolve most R-related issues effectively. Remember to keep R and its packages updated, utilize RStudio for a streamlined experience, and seek support from online communities and documentation when needed.

How To Open Troubleshooting In Windows 10 How to access Windows 10 troubleshooting tools step by step  TechTarget How to access Windows 10 troubleshooting tools step by step  TechTarget
Windows 10 Quick Tips - Troubleshooting  Daves Computer Tips 13 Troubleshooting Tools to Fix Windows 10  MakeUseOf How to Enable Recommended Troubleshooting in Windows 10
How to access Windows 10 troubleshooting tools step by step How to use Recommended Troubleshooting on Windows 10 May 2019 Update  Windows Central

Closure

Thus, we hope this article has provided valuable insights into Troubleshooting R in Windows 10: A Comprehensive Guide. We thank you for taking the time to read this article. See you in our next article!

The Windows 10 Game Bar: Enhancing Your Gaming Experience

The Windows 10 Game Bar: Enhancing Your Gaming Experience

Introduction

With enthusiasm, let’s navigate through the intriguing topic related to The Windows 10 Game Bar: Enhancing Your Gaming Experience. Let’s weave interesting information and offer fresh perspectives to the readers.

The Windows 10 Game Bar: Enhancing Your Gaming Experience

How to Use Windows 10 Game Bar

The Windows 10 Game Bar, a built-in feature, offers a comprehensive suite of tools designed to enhance the gaming experience directly within the Windows environment. It provides a layer of functionality that allows players to access various features, monitor system performance, and interact with other players without leaving the game.

Understanding the Game Bar

The Game Bar is a user interface that overlays on top of active games, providing a range of functionalities. It is accessed by pressing the Windows key + G during gameplay. The Game Bar interface is divided into various sections, each offering specific tools:

  • Capture: This section allows users to capture screenshots, record gameplay videos, and broadcast live streams directly from the game. The capture tools are integrated with the Xbox app, enabling seamless sharing and storage of captured content.
  • Performance: This section provides real-time monitoring of system performance, including CPU usage, GPU utilization, frame rate, and network latency. This information helps players understand their system’s capabilities and identify potential bottlenecks.
  • Audio: The audio section allows players to adjust the volume of the game, microphone, and other audio sources, enabling fine-tuning of the audio experience.
  • Social: The social section allows players to connect with friends, view their activity, and join multiplayer sessions. This feature integrates with the Xbox Live platform, facilitating social interactions within the gaming environment.
  • Widgets: The Game Bar also supports widgets, which are small applications that provide additional information or functionality. These widgets can display system statistics, chat with friends, or control external devices.

Benefits of Using the Game Bar

The Game Bar offers numerous advantages for gamers, enhancing their experience in various ways:

  • Streamlined Gameplay: The Game Bar provides a convenient and accessible way to manage essential gaming features without leaving the game. This eliminates the need to switch between applications, minimizing disruptions to gameplay.
  • Performance Monitoring: Real-time performance monitoring allows players to understand their system’s capabilities and identify potential issues. This knowledge can help optimize game settings for better performance and prevent lag or stuttering.
  • Content Creation: The integrated capture tools simplify the process of creating screenshots, recording gameplay videos, and live streaming. This empowers players to share their gaming experiences with others easily.
  • Social Integration: The social features allow players to connect with friends, join multiplayer sessions, and share their gaming achievements. This fosters a sense of community and enhances the overall social aspect of gaming.
  • Customizability: The Game Bar is customizable, allowing players to personalize its appearance and functionality to suit their preferences. This ensures a tailored experience that aligns with individual needs and gaming styles.

Exploring Game Bar Features in Detail

Capture Tools:

  • Screenshots: The Game Bar allows players to capture high-quality screenshots of their gameplay with a single keystroke. This provides a convenient way to document memorable moments, share achievements, or create visual content.
  • Game Recording: The Game Bar allows players to record their gameplay sessions, capturing their entire experience. This feature is ideal for creating gameplay videos, tutorials, or showcasing skills.
  • Live Streaming: The Game Bar integrates with the Xbox app to facilitate live streaming. Players can broadcast their gameplay to a wider audience, sharing their experience with viewers in real-time.

Performance Monitoring:

  • CPU and GPU Usage: The Game Bar displays real-time information about CPU and GPU utilization, indicating how much processing power is being used. This helps players understand the system’s workload and identify potential bottlenecks.
  • Frame Rate: The Game Bar displays the current frame rate, indicating how smoothly the game is running. A higher frame rate translates to smoother gameplay and a more immersive experience.
  • Network Latency: The Game Bar displays the network latency, indicating the time delay between the player’s actions and the game’s response. This information is crucial for online multiplayer games, as high latency can lead to lag and disruptions.

Audio Controls:

  • Volume Control: The Game Bar allows players to adjust the volume of the game, microphone, and other audio sources. This enables fine-tuning of the audio experience, ensuring optimal sound levels for gameplay.
  • Audio Output Selection: The Game Bar allows players to select the desired audio output device, directing the game’s sound to speakers, headphones, or other devices.

Social Integration:

  • Friends List: The Game Bar displays the player’s friends list, allowing them to see who is online and what they are playing.
  • Multiplayer Sessions: The Game Bar allows players to join multiplayer sessions with friends, facilitating collaborative gameplay.
  • Achievement Sharing: The Game Bar allows players to share their achievements with friends and on social media, showcasing their progress and celebrating milestones.

Widgets:

  • System Statistics: Widgets can display various system statistics, such as CPU temperature, RAM usage, and disk space. This provides a comprehensive overview of the system’s performance.
  • Chat: Widgets can enable chat with friends, allowing players to communicate without leaving the game.
  • External Device Control: Widgets can control external devices, such as streaming software, lighting setups, or other peripherals.

Frequently Asked Questions

Q: How do I access the Game Bar?

A: To access the Game Bar, press the Windows key + G while playing a game.

Q: Can I customize the Game Bar?

A: Yes, the Game Bar is customizable. You can choose which features to display, adjust the overlay’s transparency, and personalize its appearance.

Q: Does the Game Bar work with all games?

A: The Game Bar is designed to work with most Windows games. However, some games may not support all Game Bar features.

Q: Can I use the Game Bar to record gameplay on a specific application?

A: The Game Bar is primarily designed for recording gameplay within games. While it can capture the entire screen, it may not be ideal for recording specific applications.

Q: Can I use the Game Bar to broadcast gameplay on Twitch or YouTube?

A: Yes, the Game Bar integrates with the Xbox app to facilitate live streaming on platforms like Twitch and YouTube.

Q: Can I use the Game Bar with a controller?

A: Yes, the Game Bar supports controller input, allowing players to navigate its features using a gamepad.

Q: Is the Game Bar available on all Windows 10 versions?

A: The Game Bar is available on Windows 10 versions 1607 (Anniversary Update) and later.

Tips for Using the Game Bar Effectively

  • Customize the Overlay: Adjust the Game Bar’s appearance and functionality to suit your preferences, ensuring a tailored experience.
  • Use Keyboard Shortcuts: Learn the keyboard shortcuts for common Game Bar features, such as capturing screenshots and starting recordings.
  • Monitor Performance: Regularly check performance statistics to identify potential bottlenecks and optimize game settings for better performance.
  • Explore Widgets: Experiment with different widgets to enhance your gaming experience with additional information and functionality.
  • Utilize Social Features: Connect with friends, join multiplayer sessions, and share your achievements to foster a sense of community.

Conclusion

The Windows 10 Game Bar is a valuable tool for gamers, offering a comprehensive suite of features that enhance the gaming experience. From capturing screenshots and recording gameplay to monitoring performance and connecting with friends, the Game Bar empowers players to manage their gaming sessions effectively and engage with the gaming community seamlessly. Its user-friendly interface and customizable options ensure a tailored experience that caters to individual preferences and gaming styles. By embracing the Game Bar, players can unlock a new level of functionality and control, enriching their gaming journeys and maximizing their enjoyment.

How to Use Windows 10 Game Bar Enhance your Windows gaming experience with the Game Bar How to Use Windows 10 Game Bar to Record Gameplay on PC
How to Use the Windows 10 Game Bar How to use the Game Bar on Windows 10  windows 10 game bar - tin hoc van phong The new Windows 10 Game Bar is rolling out for users on the Windows 10 May 2019 Update (Updated
How to Use Windows 10's Game Bar to Record A Game How to Use Windows 10 Game Bar

Closure

Thus, we hope this article has provided valuable insights into The Windows 10 Game Bar: Enhancing Your Gaming Experience. We hope you find this article informative and beneficial. See you in our next article!

The Future Of Productivity: Exploring The Evolution Of Microsoft Office

The Future of Productivity: Exploring the Evolution of Microsoft Office

Introduction

In this auspicious occasion, we are delighted to delve into the intriguing topic related to The Future of Productivity: Exploring the Evolution of Microsoft Office. Let’s weave interesting information and offer fresh perspectives to the readers.

The Future of Productivity: Exploring the Evolution of Microsoft Office

Microsoft Office 365 - The Future of Productivity

The landscape of productivity software is constantly evolving, driven by technological advancements and changing user needs. While Microsoft Office has long been the cornerstone of office productivity, speculation abounds about its future trajectory. The concept of "Office 2025" is a hypothetical projection, reflecting a desire to understand how Microsoft might adapt its suite to meet the demands of a rapidly changing world.

Understanding the Evolution of Microsoft Office

To grasp the potential of "Office 2025," it’s essential to recognize the significant transformations Microsoft Office has undergone. From its origins as a desktop-bound suite to its current cloud-centric approach, Office has consistently adapted to new technologies and user preferences.

Key Trends Shaping the Future of Office Software

Several key trends are shaping the future of productivity software, influencing the potential direction of "Office 2025":

  • Cloud-First Approach: The shift towards cloud-based solutions is undeniable. Users increasingly prefer the flexibility, accessibility, and collaborative features offered by cloud platforms.
  • Artificial Intelligence (AI) Integration: AI is rapidly transforming various industries, including productivity software. Expect to see AI-powered features like automated tasks, intelligent assistants, and enhanced document analysis integrated into future versions of Office.
  • Enhanced Collaboration and Communication: The modern workplace demands seamless collaboration and communication. Future Office versions will likely prioritize features that facilitate real-time co-editing, integrated communication tools, and improved project management capabilities.
  • Cross-Platform Compatibility: As users utilize a variety of devices, cross-platform compatibility is becoming increasingly crucial. Future versions of Office will need to function seamlessly across desktops, laptops, tablets, and mobile devices.
  • Focus on User Experience: User experience is paramount. Future Office versions will likely prioritize intuitive interfaces, personalized workflows, and customizable features to cater to diverse user needs.

Hypothetical Scenarios for "Office 2025"

While "Office 2025" is a hypothetical concept, it’s possible to speculate on potential features and functionalities that could emerge:

  • AI-Powered Assistants: Imagine a virtual assistant that can understand your tasks, suggest relevant information, and even automate repetitive processes.
  • Smart Content Creation: AI could analyze existing data and suggest content ideas, draft emails, or even create presentations based on your input.
  • Enhanced Collaboration Tools: Real-time co-editing, integrated video conferencing, and shared workspaces could become even more intuitive and seamless.
  • Personalized Workflows: Office could learn your preferences and habits, automatically organizing tasks, prioritizing deadlines, and suggesting relevant information.
  • Augmented Reality (AR) Integration: AR could be used to enhance document visualization, provide interactive training, and facilitate remote collaboration.

Importance of Adaptability and Innovation

The success of Microsoft Office in the future hinges on its ability to adapt to evolving trends and embrace innovation. By leveraging cloud technologies, integrating AI capabilities, and prioritizing user experience, Microsoft can ensure that its productivity suite remains relevant and indispensable in the years to come.

Frequently Asked Questions (FAQs)

Q1: Will Microsoft Office become entirely cloud-based in the future?

A: While a complete shift to the cloud is likely, Microsoft will likely continue to offer hybrid options for users who prefer local installations or have specific security requirements.

Q2: How will AI impact the use of Microsoft Office?

A: AI is expected to revolutionize productivity software. It will automate tasks, provide intelligent assistance, and enhance document analysis, ultimately making users more efficient.

Q3: What are the potential benefits of "Office 2025"?

A: "Office 2025" could offer significant benefits, including increased productivity, improved collaboration, enhanced creativity, and a more personalized user experience.

Q4: Will "Office 2025" be accessible to all users?

A: Microsoft aims to make its software accessible to a wide audience. However, access to advanced AI features may require specific hardware or subscription tiers.

Q5: What are the challenges facing the future of Microsoft Office?

A: Challenges include ensuring data security, maintaining user privacy, and navigating the rapidly evolving technological landscape.

Tips for Staying Ahead of the Curve

  • Embrace cloud-based solutions: Transition to cloud-based versions of Microsoft Office to benefit from flexibility, accessibility, and collaboration features.
  • Explore AI-powered tools: Experiment with AI-powered features within Microsoft Office, such as automated tasks, intelligent assistants, and smart content creation.
  • Stay informed about industry trends: Keep abreast of the latest advancements in productivity software, including AI, cloud computing, and collaborative tools.
  • Personalize your workflow: Utilize customization options and personalize your workflow to optimize productivity and efficiency.
  • Embrace continuous learning: Stay updated on new features and functionalities in Microsoft Office to maximize your productivity potential.

Conclusion

While "Office 2025" is a hypothetical concept, it reflects the ongoing evolution of productivity software. By leveraging cloud technologies, integrating AI capabilities, and prioritizing user experience, Microsoft can ensure that its suite remains relevant and indispensable in the future. The future of productivity is likely to be shaped by collaboration, innovation, and a focus on empowering users to achieve their goals.

The Future According To Microsoft - Productivity Future Vision (2020) - YouTube Future of Productivity-Microsoft Office 2019 & Office 2021 in Poland 5 Office 365 Business Tools to Skyrocket Your Productivity
Microsoft And The Future Of Productivity Evolution of Office Productivity Suites: An Overview of Office 365 and G Suite Microsoft And The Future Of Productivity
Microsoft And The Future Of Productivity Microsoft And The Future Of Productivity

Closure

Thus, we hope this article has provided valuable insights into The Future of Productivity: Exploring the Evolution of Microsoft Office. We appreciate your attention to our article. See you in our next article!

Navigating Windows 10 Updates: A Comprehensive Guide

Navigating Windows 10 Updates: A Comprehensive Guide

Introduction

In this auspicious occasion, we are delighted to delve into the intriguing topic related to Navigating Windows 10 Updates: A Comprehensive Guide. Let’s weave interesting information and offer fresh perspectives to the readers.

Navigating the Windows 10 Upgrade: A Comprehensive Guide - Fashion Magazine

Windows 10, Microsoft’s flagship operating system, is designed to be a dynamic platform, constantly evolving to offer users the latest features, security enhancements, and performance improvements. This dynamism is achieved through regular updates, which are crucial for maintaining a secure and efficient computing experience. However, navigating the intricacies of Windows 10 updates can be daunting for some users. This article aims to demystify the process, providing a comprehensive understanding of Windows 10 updates, their importance, and how to manage them effectively.

Understanding Windows 10 Updates

Windows 10 updates are categorized into three main types:

  • Feature Updates: These are major releases that introduce new features, significant design changes, and substantial improvements to the operating system. They are typically released twice a year, in the spring and fall.
  • Quality Updates: These updates focus on improving the stability, security, and performance of Windows 10. They are released on a monthly basis, often on the second Tuesday of each month, known as "Patch Tuesday."
  • Cumulative Updates: These updates combine features and quality improvements into a single package, offering a more streamlined update process.

The Importance of Windows 10 Updates

Staying up-to-date with Windows 10 updates is crucial for several reasons:

  • Enhanced Security: Updates often include patches that address vulnerabilities and security flaws, protecting your system from malware, viruses, and other threats.
  • Improved Performance: Updates can optimize system performance, enhance resource management, and improve overall responsiveness.
  • New Features and Functionality: Feature updates introduce new functionalities, applications, and user interface enhancements, enriching the user experience.
  • Compatibility: Updates ensure compatibility with the latest hardware, software, and online services, ensuring a seamless and trouble-free computing experience.

Managing Windows 10 Updates

Windows 10 is designed to automatically download and install updates in the background. However, users have control over the update process through various options:

  • Automatic Updates: This is the default setting, where updates are downloaded and installed automatically without user intervention.
  • Active Hours: Users can specify a period during which updates will not be installed, allowing for uninterrupted work or leisure time.
  • Metered Connections: This option allows users to limit update downloads on metered internet connections, such as mobile hotspots or limited data plans.
  • Manual Updates: Users can manually check for and install updates through the Windows Update settings.

Troubleshooting Update Issues

While Windows 10 updates are generally seamless, some users may encounter issues during the update process. Common problems include:

  • Slow download speeds: This can be caused by network congestion, insufficient bandwidth, or internet connectivity issues.
  • Installation errors: These can occur due to corrupted files, insufficient disk space, or compatibility problems.
  • Update failures: These can be triggered by system conflicts, hardware issues, or incompatible software.

To address these issues, users can:

  • Restart their computer: A simple restart can often resolve temporary glitches and allow updates to proceed smoothly.
  • Check internet connectivity: Ensure a stable and reliable internet connection for successful update downloads.
  • Free up disk space: Delete unnecessary files and programs to ensure sufficient space for the update.
  • Run the Windows Update Troubleshooter: This built-in tool can diagnose and fix common update problems.
  • Contact Microsoft support: If the issue persists, contact Microsoft support for assistance.

FAQs about Windows 10 Updates

Q: What happens if I don’t update Windows 10?

A: While it’s possible to use Windows 10 without updating, it’s highly discouraged. Not updating leaves your system vulnerable to security threats, performance issues, and incompatibility with new software and services.

Q: Will updating Windows 10 affect my data?

A: Windows 10 updates typically do not affect personal files or applications. However, it’s always advisable to back up important data before initiating a major update.

Q: How much time does a Windows 10 update take?

A: Update download and installation time varies depending on the size of the update, internet speed, and system resources. It can range from a few minutes to several hours.

Q: Can I pause or stop a Windows 10 update?

A: Yes, you can pause or stop an update in progress through the Windows Update settings. However, pausing or stopping updates for extended periods is not recommended for security and performance reasons.

Q: What if I’m not happy with a new Windows 10 update?

A: While it’s generally not possible to "roll back" to a previous version of Windows 10, Microsoft offers a "feature update rollback" option for a limited time after a major update is installed.

Tips for Managing Windows 10 Updates

  • Schedule updates for non-peak hours: Plan updates for evenings or weekends when your computer is not in use.
  • Check for available disk space: Ensure sufficient free space before initiating an update.
  • Back up important data: Create backups of your files and applications before installing major updates.
  • Monitor the update process: Keep an eye on the progress bar and any error messages that may appear.
  • Restart your computer after updating: This helps ensure that the update is applied correctly and the system is running smoothly.

Conclusion

Windows 10 updates are essential for maintaining a secure, efficient, and up-to-date computing experience. By understanding the different types of updates, their importance, and how to manage them effectively, users can ensure that their systems are protected, perform optimally, and benefit from the latest features and improvements. Regular updates are a vital aspect of responsible computing, safeguarding users from security risks and enhancing their overall computing experience. By staying informed and proactive, users can navigate the world of Windows 10 updates with confidence and enjoy the full potential of this dynamic operating system.

The complete guide to Windows 10 updates - Digital Citizen How To Update Windows 10: From Download To Installation How to manage Windows 10 updates to prevent them from ruining your life  PCWorld
How to view available microsoft updates for windows 10 - gashacker How to Update Apps in Windows 10 (Complete Guide) How to Change Windows Update Settings
How to Update Your Windows 10 Computer : HelloTech How Windows Update Wisdom: Navigating Updates in Windows 10

Closure

Thus, we hope this article has provided valuable insights into Navigating Windows 10 Updates: A Comprehensive Guide. We thank you for taking the time to read this article. See you in our next article!