Archives April 2024

Overscan In Windows 11: Understanding And Resolving Display Issues

Overscan in Windows 11: Understanding and Resolving Display Issues

Introduction

With great pleasure, we will explore the intriguing topic related to Overscan in Windows 11: Understanding and Resolving Display Issues. Let’s weave interesting information and offer fresh perspectives to the readers.

Overscan in Windows 11: Understanding and Resolving Display Issues

Fix Overscan in Windows 11/10 to Fit to Screen

Overscan, a phenomenon prevalent in older television technology, can manifest as a display issue in Windows 11. This article explores the concept of overscan, its potential causes in the Windows 11 environment, and outlines effective methods to address it.

Understanding Overscan

Overscan, in essence, is a display setting that extends the visible area of a screen beyond the intended boundaries. This occurs when the television receiver displays more information than what is actually transmitted by the signal source. The consequence is that a portion of the image, typically at the edges, is cut off, leaving a truncated view.

While this effect was once a common feature of analog television sets, it poses challenges in modern digital display setups, particularly in Windows 11. The issue arises when a display device, such as a monitor or television, interprets the signal as requiring overscan, leading to the clipping of content at the edges of the screen.

Causes of Overscan in Windows 11

Overscan in Windows 11 can be attributed to several factors:

  • Display Driver Issues: Outdated or incompatible display drivers can cause the system to incorrectly interpret the signal, leading to overscan.
  • Monitor Settings: Certain monitor settings, particularly those related to aspect ratio or overscan adjustment, can trigger the issue.
  • Windows Display Settings: Incorrectly configured Windows display settings, such as the scaling or resolution options, can also contribute to overscan.
  • Hardware Compatibility: Some hardware components, such as older graphics cards or monitors, might not be fully compatible with Windows 11’s display settings, potentially causing overscan.

Identifying Overscan in Windows 11

Recognizing overscan in Windows 11 is relatively straightforward. The most noticeable symptom is the truncation of content at the edges of the screen. You might observe:

  • Missing elements of windows, menus, or icons.
  • Text or images being cut off at the edges.
  • A black border surrounding the visible content.

Addressing Overscan in Windows 11

Resolving overscan in Windows 11 involves a systematic approach, targeting potential causes. The following steps can be implemented:

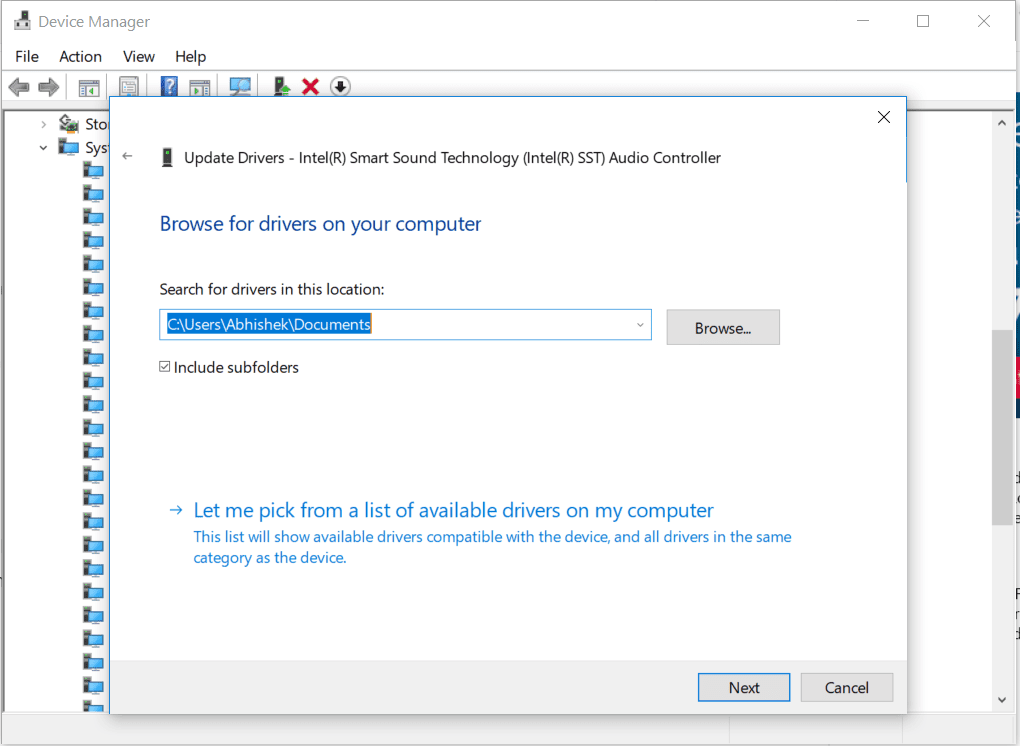
1. Updating Display Drivers:

  • Accessing Device Manager: Navigate to the "Device Manager" by searching for it in the Windows search bar.
  • Identifying Display Adapters: Locate and expand the "Display Adapters" category.
  • Updating Drivers: Right-click on the relevant display adapter and select "Update driver." Follow the on-screen prompts to install the latest drivers.

2. Adjusting Monitor Settings:

  • Accessing Monitor Settings: Right-click on the desktop and select "Display settings."
  • Identifying Monitor Options: Locate the "Display" section and select your monitor.
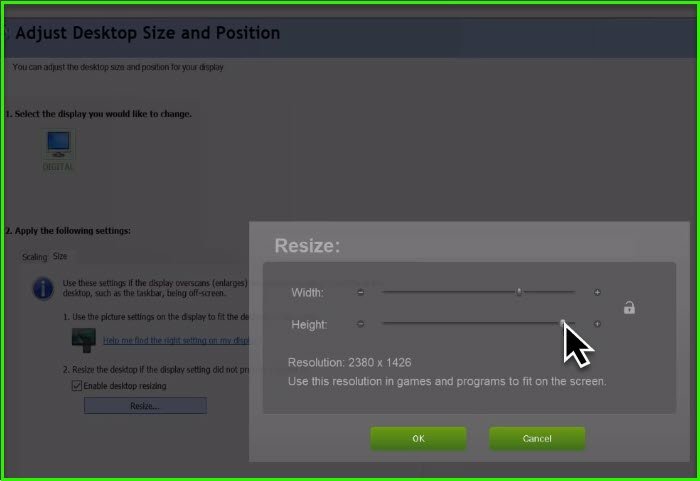
  • Adjusting Overscan: Look for "Overscan" or "Aspect Ratio" settings within the monitor’s options and adjust them accordingly. Experiment with different settings to determine the optimal configuration.

3. Modifying Windows Display Settings:

  • Accessing Display Settings: Navigate to "Display settings" by searching for it in the Windows search bar.
  • Adjusting Resolution: Ensure that the selected resolution matches the native resolution of your monitor.
  • Scaling Options: Explore the "Scaling" options under "Advanced display settings" to fine-tune the display scaling.

4. Checking Hardware Compatibility:

  • Identifying Hardware Components: Review the specifications of your graphics card and monitor to ensure compatibility with Windows 11.
  • Updating Firmware: Check for available firmware updates for your graphics card or monitor, as these updates might address compatibility issues.

FAQs: Overscan in Windows 11

Q: Why does overscan occur in Windows 11, even on modern monitors?

A: While modern monitors are designed to eliminate overscan, certain settings or driver issues can still trigger it. The display signal might be misinterpreted by the monitor or the system, leading to the issue.

Q: How can I tell if the overscan is caused by the monitor or the system?

A: Experimenting with monitor settings and Windows display settings can help isolate the source of the issue. If adjusting monitor settings resolves the problem, the overscan is likely caused by the monitor. Conversely, if adjusting Windows settings corrects the issue, the problem might stem from the system.

Q: Is overscan a common issue in Windows 11?

A: While not as prevalent as in older systems, overscan can still occur in Windows 11. It’s often triggered by specific configurations or compatibility issues.

Q: Can I permanently disable overscan in Windows 11?

A: While there isn’t a universal "disable overscan" option, you can usually adjust monitor settings or Windows display settings to effectively eliminate the effect.

Tips for Avoiding Overscan in Windows 11

  • Use the Recommended Resolution: Set your monitor’s resolution to its native resolution, which is typically listed in its specifications.
  • Update Drivers Regularly: Ensure that your display drivers are up-to-date.
  • Check Monitor Settings: Review your monitor’s settings to ensure that overscan is disabled or adjusted appropriately.
  • Experiment with Display Settings: Adjust Windows display settings, including scaling and resolution, to find the optimal configuration.
  • Seek Professional Help: If you encounter persistent overscan issues, consult with a technical support professional for assistance.

Conclusion

Overscan, a legacy issue from analog television technology, can manifest as a display problem in Windows 11. By understanding its causes and implementing the outlined solutions, users can effectively address overscan and enjoy a seamless display experience. Regular driver updates, careful monitor settings adjustments, and proper Windows display configurations are crucial in preventing and resolving this issue. By adhering to these guidelines, users can ensure a visually accurate and complete display experience in Windows 11.

Fix: "Overscan in Windows 11/10 to Fit the Screen" issue Overscaling Or Overscan in Windows 10 and Windows 11 [Fixed] Fix Overscan in Windows 11/10 to Fit to Screen
Overscaling Or Overscan in Windows 10 and Windows 11 [Fixed] Overscaling Or Overscan in Windows 10 and Windows 11 [Fixed]

Closure

Thus, we hope this article has provided valuable insights into Overscan in Windows 11: Understanding and Resolving Display Issues. We hope you find this article informative and beneficial. See you in our next article!

Net Framework 3 5 Won’t Install Windows 11

net framework 3 5 won’t install windows 11

Introduction

With great pleasure, we will explore the intriguing topic related to net framework 3 5 won’t install windows 11. Let’s weave interesting information and offer fresh perspectives to the readers.

Understanding the Compatibility Challenge: Why .NET Framework 3.5 Might Prevent Windows 11 Installation

How to Install .NET Framework 3.5 on Windows 11/10 PC - YouTube

Windows 11, the latest operating system from Microsoft, offers a range of improvements and new features. However, its compatibility with older software can pose challenges for some users. One such hurdle arises when attempting to install Windows 11 on a system with .NET Framework 3.5 already installed.

.NET Framework 3.5, a crucial component of Windows operating systems, provides a platform for building and running applications. While it is a robust framework with a vast library of applications, its compatibility with Windows 11 is limited. This incompatibility can manifest as an error during the installation process, preventing the user from successfully upgrading to Windows 11.

Delving Deeper into the Issue:

The primary reason for this incompatibility lies in the architectural differences between .NET Framework 3.5 and Windows 11. Windows 11, designed for modern hardware and software, prioritizes security and performance. This focus on efficiency often necessitates changes in the underlying system architecture, which can lead to conflicts with older components like .NET Framework 3.5.

The Importance of .NET Framework 3.5:

Despite the compatibility issues, .NET Framework 3.5 remains significant for numerous reasons. It forms the foundation for countless applications, including:

  • Legacy Software: Many applications developed for earlier Windows versions rely heavily on .NET Framework 3.5. These applications, often critical for business operations or personal use, may not function correctly or at all without this framework.
  • Government and Enterprise Applications: Government agencies and large enterprises often utilize custom-built applications that depend on .NET Framework 3.5. These applications, crucial for critical functions, cannot be easily replaced or upgraded.
  • Educational Institutions: Educational institutions rely on .NET Framework 3.5 for various software applications, including learning management systems and research tools. Replacing these applications with newer alternatives can be disruptive and costly.

Addressing the Incompatibility:

While installing Windows 11 with .NET Framework 3.5 can be challenging, there are solutions to navigate this compatibility issue:

  1. Uninstall .NET Framework 3.5: This is the most straightforward solution, but it comes with potential drawbacks. Uninstalling .NET Framework 3.5 might render certain applications unusable, leading to disruptions in workflow and productivity.
  2. Virtualization: Running older applications within a virtualized environment allows users to maintain their existing software while upgrading to Windows 11. This approach involves creating a virtual machine (VM) within Windows 11, where .NET Framework 3.5 can be installed and used.
  3. Compatibility Mode: Some applications may be compatible with Windows 11 through compatibility mode. This feature allows older applications to run on newer operating systems by emulating the environment of their original operating system.
  4. Application Updates: Developers may offer updated versions of their applications that are compatible with Windows 11. Checking for updates from the software provider can resolve compatibility issues.

FAQs:

Q: What specific error message appears when .NET Framework 3.5 is present?

A: The error message may vary, but it typically indicates an incompatibility issue with the operating system. Common messages include "This PC can’t run Windows 11" or "Your PC doesn’t meet the minimum system requirements."

Q: Can I install Windows 11 and then install .NET Framework 3.5 later?

A: Installing .NET Framework 3.5 after upgrading to Windows 11 might not guarantee compatibility. While the framework may install, some applications may still encounter issues.

Q: What are the risks of uninstalling .NET Framework 3.5?

A: Uninstalling .NET Framework 3.5 can lead to the following risks:

  • Application Incompatibility: Applications relying on .NET Framework 3.5 may fail to function correctly or at all.
  • Data Loss: Uninstalling .NET Framework 3.5 might impact data stored within applications dependent on this framework.
  • System Instability: Removing essential components like .NET Framework 3.5 can potentially destabilize the system.

Tips:

  • Back up your data: Before attempting any changes, ensure you have a backup of your important data to prevent data loss.
  • Research application compatibility: Investigate the compatibility of your essential applications with Windows 11.
  • Contact software developers: Reach out to software providers for information on updates or alternative solutions.
  • Seek professional assistance: If you are unsure about the process or potential consequences, consult a qualified IT professional.

Conclusion:

The incompatibility between .NET Framework 3.5 and Windows 11 can present a significant challenge for users. While upgrading to Windows 11 offers benefits, it’s crucial to consider the potential impact on applications that rely on .NET Framework 3.5. By understanding the issue, exploring available solutions, and taking necessary precautions, users can navigate this compatibility challenge effectively and ensure a smooth transition to Windows 11.

How to install .Net Framework 3.5 on Windows 11 .ISO Installer - YouTube How to Download & Install .NET Framework 3.5 on Windows 11 - YouTube How To Install .NET Framework 3 5 on Windows 11 [Tutorial] - YouTube
How To Install Net Framework 3 5 On Windows 11 - vrogue.co Install Net Framework 3 5 On Windows 11 How To 10 8 1 - Vrogue Install Net Framework 3 5 On Windows 11 How To 10 8 1 - Vrogue
Install Net Framework 3 5 On Windows 11 10 8 1 How To 4 Thecoderworld - Vrogue Install and Activate .NET Framework 3.5 Windows 11 - YouTube

Closure

Thus, we hope this article has provided valuable insights into net framework 3 5 won’t install windows 11. We thank you for taking the time to read this article. See you in our next article!

Resolving The "No Audio Devices Installed" Error In Windows 10: A Comprehensive Guide

Resolving the "No Audio Devices Installed" Error in Windows 10: A Comprehensive Guide

Introduction

With great pleasure, we will explore the intriguing topic related to Resolving the "No Audio Devices Installed" Error in Windows 10: A Comprehensive Guide. Let’s weave interesting information and offer fresh perspectives to the readers.

Resolving the "No Audio Devices Installed" Error in Windows 10: A Comprehensive Guide

How To Fix 'No Audio Device is Installed' in Windows 10 - WinErrorFixer.Com

The "No Audio Devices Installed" error in Windows 10 can be a frustrating experience, silencing the soundscape of your computer and hindering multimedia enjoyment. This error message can stem from a variety of factors, ranging from simple driver issues to more complex hardware malfunctions. Understanding the possible causes and implementing the appropriate troubleshooting steps is crucial for restoring audio functionality. This comprehensive guide will equip you with the knowledge and tools to address this error effectively.

Understanding the "No Audio Devices Installed" Error

This error message signifies that Windows 10 is unable to detect any audio output devices, rendering your computer mute. The underlying cause may be:

  • Driver Issues: Outdated, corrupted, or missing audio drivers can prevent Windows from recognizing your sound card or speakers.
  • Hardware Malfunction: A faulty sound card, damaged audio jack, or loose connection can physically impede audio output.
  • Software Conflicts: Incompatible software or conflicting settings might interfere with audio drivers and functionality.
  • Windows Updates: Recent Windows updates may introduce bugs or incompatibilities affecting audio drivers.
  • System Settings: Incorrect audio settings, like muted speakers or disabled output devices, can lead to the error.

Troubleshooting Steps: A Systematic Approach

Tackling the "No Audio Devices Installed" error requires a methodical approach. Begin with the simplest solutions and progress to more complex troubleshooting if necessary.

1. Restart Your Computer:

A simple restart can resolve temporary glitches or software conflicts that might be causing the audio issue.

2. Check Audio Settings:

  • Volume Control: Ensure your speakers are not muted and the volume is turned up.
  • Device Selection: Verify that the correct audio output device is selected in the Windows sound settings. Navigate to Settings > System > Sound and select the desired output device from the list.
  • Default Device: Make sure the chosen device is set as the default output device.

3. Update Audio Drivers:

Outdated or corrupted drivers can be the culprit. Here’s how to update them:

  • Device Manager:
    • Open the Device Manager by searching for it in the Windows search bar.
    • Expand the Sound, video and game controllers category.
    • Right-click on your audio device and select Update driver.
    • Choose Search automatically for updated driver software.
  • Manufacturer Website:
    • Visit the manufacturer’s website for your sound card or motherboard.
    • Download the latest audio drivers specifically for your device and operating system.
    • Install the downloaded drivers following the manufacturer’s instructions.

4. Troubleshoot Audio Problems:

Windows offers a built-in troubleshooter that can automatically identify and fix common audio issues.

  • Go to Settings > System > Sound.
  • Click on Troubleshoot sound problems.
  • Follow the onscreen instructions and let the troubleshooter diagnose and resolve any issues.

5. Run a System Scan:

Malware or system errors can interfere with audio functionality.

  • Windows Defender: Run a full system scan with Windows Defender to detect and remove any malicious software.
  • System File Checker (SFC): Execute the SFC scan to repair corrupted system files. Open Command Prompt as administrator and run the command sfc /scannow.

6. Reinstall Audio Drivers:

If updating drivers doesn’t resolve the issue, reinstalling them might be necessary.

  • Device Manager:
    • Open the Device Manager and locate your audio device.
    • Right-click on it and select Uninstall device.
    • Restart your computer.
    • Windows will automatically reinstall the drivers upon restart.

7. Roll Back Windows Update:

If the audio issue arose after a recent Windows update, rolling back the update might be the solution.

  • Go to Settings > Update & Security > Windows Update.
  • Click on View update history.
  • Select Uninstall updates.
  • Choose the problematic update and uninstall it.

8. Check for Hardware Issues:

  • Sound Card: If the sound card is faulty, consider replacing it.
  • Audio Jack: Ensure the audio jack is properly connected and free from damage.
  • Speakers: Test your speakers with a different device to rule out a speaker issue.

9. Reset Audio Settings:

Resetting audio settings to their default values can sometimes resolve conflicts or incorrect configurations.

  • Go to Settings > System > Sound.
  • Click on Sound control panel.
  • Select the Playback tab.
  • Right-click anywhere in the empty space and choose Show Disabled Devices.
  • Right-click on your audio device and select Enable.
  • Set the device as the default device and test if the audio works.

10. Consider Reinstalling Windows:

If all other troubleshooting steps fail, reinstalling Windows might be the last resort. This will wipe your hard drive and reinstall a fresh copy of Windows, potentially resolving any underlying system issues.

FAQs: Addressing Common Queries

Q: What if I don’t see any audio devices listed in the sound settings?

A: This could indicate a driver issue or a hardware problem. Ensure you have installed the latest drivers for your sound card. If the issue persists, check for hardware malfunctions.

Q: How do I identify my sound card model?

A: You can identify your sound card model through the Device Manager. Open the Device Manager, expand the Sound, video and game controllers category, and right-click on your audio device to view its properties. The model name will be listed under the General tab.

Q: Can I use external speakers if my internal audio is not working?

A: Yes, you can connect external speakers via USB or a 3.5mm audio jack. Ensure the speakers are powered on and connected properly.

Q: Why is my audio output distorted or crackling?

A: This could be caused by outdated drivers, corrupted system files, or hardware problems. Try updating or reinstalling your audio drivers, running a system scan, and checking for hardware issues.

Tips: Proactive Audio Maintenance

  • Regular Driver Updates: Keep your audio drivers up to date to ensure optimal performance and compatibility.
  • System Maintenance: Regularly run system scans and clean up your computer to prevent software conflicts and errors.
  • Proper Hardware Connection: Ensure all audio cables are securely connected and free from damage.
  • Monitor System Updates: Be aware of any Windows updates that may affect audio functionality and consider rolling back updates if necessary.

Conclusion: A Silent Issue Resolved

The "No Audio Devices Installed" error can be a frustrating obstacle, but with a methodical approach and the right troubleshooting steps, you can regain your computer’s audio capabilities. Remember to start with the simplest solutions and progress to more complex methods as needed. By understanding the possible causes and implementing the appropriate fixes, you can effectively resolve this issue and restore the soundscape of your Windows 10 experience.

How to Fix "No Audio Output Device Installed" Error in Windows 10 FIXED] No Audio Output Device is Installed in Windows 10 How To Fix No Audio Device Installed Problem In Windows 10 - YouTube
No Audio Output Device Is Installed In Windows 10- FIX (Working -2020) How to Resolve "No Audio Output Device is Installed" Error in Windows 10 PC - IR Cache No Audio Output Device Is Installed On Windows 10 PC (Best 10 Fixes)
How to Fix 'No Audio Output Device is Installed' Error Windows 10?  Tech Tip Trick No Audio Output Device Is Installed In Windows 10- FIX (Working -2020)

Closure

Thus, we hope this article has provided valuable insights into Resolving the "No Audio Devices Installed" Error in Windows 10: A Comprehensive Guide. We thank you for taking the time to read this article. See you in our next article!

Windows 11: A Comprehensive Look At User Reception And Performance

Windows 11: A Comprehensive Look at User Reception and Performance

Introduction

With great pleasure, we will explore the intriguing topic related to Windows 11: A Comprehensive Look at User Reception and Performance. Let’s weave interesting information and offer fresh perspectives to the readers.

Windows 11: A Comprehensive Look at User Reception and Performance

Buy Windows 11 For Beginners: Windows 11 User Guide to Mastering All the Features and Functions

Windows 11, the latest iteration of Microsoft’s flagship operating system, has been met with a mixed reception since its release in October 2021. While some users have embraced its new features and visual enhancements, others have voiced concerns regarding performance, compatibility, and the overall user experience. This article delves into the various aspects of Windows 11 reception, examining user reviews, expert opinions, and performance benchmarks to provide a comprehensive understanding of its strengths and weaknesses.

User Reviews: A Mixed Bag of Praise and Criticism

User reviews across various platforms paint a picture of a divided user base. Many users appreciate the redesigned Start Menu, the enhanced multitasking capabilities with Snap Layouts, and the sleek, modern aesthetic. The integration of Android apps through the Amazon Appstore has also been welcomed by some, expanding the functionality of the operating system.

However, a significant portion of the user base has expressed dissatisfaction with the new operating system. Common complaints include:

  • Performance Issues: Many users report experiencing slower boot times, sluggish application performance, and increased battery consumption compared to Windows 10. This is particularly noticeable on older hardware, as Windows 11 has more stringent system requirements.
  • Compatibility Concerns: Some older software and hardware are incompatible with Windows 11, causing frustration for users who rely on these programs or devices. This has led to concerns about the upgrade path for users with legacy systems.
  • Lack of Customization: While the new interface offers a visually appealing experience, some users find the limited customization options frustrating. The removal of features like the ability to move the taskbar to the top or sides of the screen has also been met with criticism.
  • Security Concerns: The introduction of the new security features like Windows Hello for Business and the Secure Boot feature has been praised by security experts, but some users have expressed concerns about potential privacy implications.

Expert Opinions: A Balanced Perspective

Tech reviewers and industry experts have offered a more nuanced perspective on Windows 11. While acknowledging its strengths like the improved user interface and enhanced security features, they have also highlighted its shortcomings.

Performance: Benchmark tests have shown that Windows 11 offers comparable performance to Windows 10 on modern hardware. However, on older systems, the performance difference is more pronounced, with Windows 11 often lagging behind. This is largely attributed to the more demanding system requirements and the increased overhead of the new features.

Compatibility: The compatibility issues with older software and hardware have been a major concern. While Microsoft has released a compatibility checker tool, it is not always accurate, leading to unexpected problems during the upgrade process.

Overall User Experience: While the new Start Menu and Snap Layouts have been praised for their functionality, some users find the overall user experience less intuitive than Windows 10. The removal of features like the ability to move the taskbar and the simplified context menu have also been criticized.

The Importance of User Feedback

The diverse reception to Windows 11 highlights the importance of user feedback in the development process. Microsoft has acknowledged the concerns raised by users and has been actively working on addressing them through updates and patches. The company has also committed to improving the user experience and expanding the compatibility of the operating system.

Frequently Asked Questions (FAQs) about Windows 11 Ratings

Q1: Is Windows 11 worth upgrading to?

A: The answer depends on your individual needs and hardware. If you have a modern PC that meets the system requirements and are looking for a visually appealing and feature-rich operating system, Windows 11 may be a good choice. However, if you have an older computer or rely on software that is not compatible with Windows 11, it is best to stick with Windows 10.

Q2: How does Windows 11’s performance compare to Windows 10?

A: On modern hardware, Windows 11 offers comparable performance to Windows 10. However, on older systems, Windows 11 can be noticeably slower due to its higher system requirements.

Q3: What are the key features of Windows 11?

A: Windows 11 features a redesigned Start Menu, enhanced multitasking capabilities with Snap Layouts, a new Widgets panel, and the ability to run Android apps through the Amazon Appstore. It also includes improved security features like Windows Hello for Business and the Secure Boot feature.

Q4: Are there any compatibility issues with Windows 11?

A: Yes, some older software and hardware are incompatible with Windows 11. Microsoft has released a compatibility checker tool, but it is not always accurate. It is recommended to check for compatibility before upgrading to Windows 11.

Q5: Is Windows 11 secure?

A: Windows 11 includes enhanced security features like Windows Hello for Business and the Secure Boot feature, which aim to protect against malware and other threats. However, as with any operating system, it is important to take precautions and use strong passwords, keep software updated, and avoid suspicious links and downloads.

Tips for Using Windows 11 Effectively

  • Check System Requirements: Before upgrading to Windows 11, ensure your computer meets the minimum system requirements.
  • Back Up Your Data: Always back up your important data before upgrading to a new operating system.
  • Use the Compatibility Checker: Use Microsoft’s compatibility checker tool to identify any potential issues with your software and hardware.
  • Explore the New Features: Take the time to explore the new features of Windows 11, such as the redesigned Start Menu, Snap Layouts, and Widgets.
  • Customize Your Settings: While the customization options are limited, you can still personalize your Windows 11 experience by changing the theme, wallpaper, and other settings.

Conclusion

Windows 11 represents a significant update to the Windows operating system, offering a refreshed user interface, enhanced security features, and new functionalities. However, the upgrade path is not without its challenges. Performance issues on older hardware, compatibility concerns with legacy software and devices, and the lack of customization options have raised concerns among some users.

Ultimately, the decision to upgrade to Windows 11 depends on individual needs and preferences. Users with modern hardware who are looking for a visually appealing and feature-rich operating system may find it an attractive option. However, those with older systems or who rely on software that is not compatible with Windows 11 may be better off sticking with Windows 10.

As Windows 11 continues to evolve through updates and patches, it will be interesting to see how Microsoft addresses the concerns raised by users and improves the overall user experience. The future of Windows 11 depends on its ability to adapt to user feedback and provide a robust, secure, and user-friendly platform for both individuals and businesses.

Buy Windows 11 User Guide for Beginners: A Comprehensive Guide to Master Windows 11 Operating Buy Windows 11 User Guide Updated 2023: A Complete Step-by-Step Manual for Beginners and Seniors Buy Windows 11 User Guide: A Complete Guide to Master the New Windows 11 OS with Tips and Tricks
Buy WINDOWS 11 PRO USER GUIDE: A Comprehensive User Guide for Beginners and Seniors to Master Administrative Tools in Windows 11 [ Updated 2024 ]  TestingDocs.com Buy Windows 112021 User Guide: A Complete 2021 Guide with Tips and Tricks for the New Microsoft
Buy Windows 11 User’s Manual: Hidden Features You didn’t Know Existed in Windows 11 and How to Buy Windows 11 User Guide: 2021-2022 Complete Windows 11 User Guide. 55 Best Features and Tips

Closure

Thus, we hope this article has provided valuable insights into Windows 11: A Comprehensive Look at User Reception and Performance. We hope you find this article informative and beneficial. See you in our next article!

PhotoImpression 4: A Comprehensive Guide To The Classic Mac Image Editor

PhotoImpression 4: A Comprehensive Guide to the Classic Mac Image Editor

Introduction

With great pleasure, we will explore the intriguing topic related to PhotoImpression 4: A Comprehensive Guide to the Classic Mac Image Editor. Let’s weave interesting information and offer fresh perspectives to the readers.

PhotoImpression 4: A Comprehensive Guide to the Classic Mac Image Editor

Photoimpression 4 Full Version - herofclass

PhotoImpression 4, a venerable image editing software for Macintosh computers, holds a special place in the hearts of many digital artists and photographers. Released in 1999, it offered a user-friendly interface and powerful tools that made image manipulation accessible to a wide audience. While newer, more advanced software has emerged since then, PhotoImpression 4 remains a valuable tool for those seeking a classic, intuitive approach to image editing. This article provides a comprehensive guide to PhotoImpression 4, exploring its features, benefits, and relevance in the modern digital landscape.

Understanding PhotoImpression 4’s Legacy:

PhotoImpression 4 emerged during a pivotal period in digital imaging. The late 1990s saw the widespread adoption of personal computers and digital cameras, making image editing a popular hobby and professional necessity. PhotoImpression 4 capitalized on this trend, offering a user-friendly interface that made complex image manipulation accessible to individuals with varying levels of technical expertise.

Key Features and Functionality:

PhotoImpression 4 boasts a diverse range of features, allowing users to perform various image editing tasks:

  • Basic Image Editing: PhotoImpression 4 provides fundamental tools for adjusting brightness, contrast, color balance, and saturation. Users can crop, resize, and rotate images, as well as apply sharpening and blurring effects.
  • Special Effects: The software offers a variety of special effects, including artistic filters, textures, and distortions. These tools allow users to enhance the aesthetic appeal of their images or create unique visual styles.
  • Layer Support: PhotoImpression 4 offers limited layer support, allowing users to work with multiple image layers and create complex compositions. This feature facilitates non-destructive editing, where changes can be made to individual layers without affecting the original image data.
  • Text and Graphics: PhotoImpression 4 allows users to add text and graphics to their images. Users can customize fonts, colors, and styles to create eye-catching captions or overlays.
  • Image Optimization: The software provides tools for optimizing images for web use, ensuring that images are appropriately sized and formatted for online viewing.

Benefits of Using PhotoImpression 4:

Despite its age, PhotoImpression 4 continues to offer several advantages:

  • User-Friendly Interface: PhotoImpression 4’s intuitive design and easy-to-navigate interface make it accessible to both beginners and experienced users. The software’s straightforward layout and clear tool descriptions minimize the learning curve.
  • Lightweight and Efficient: PhotoImpression 4 is a relatively lightweight program, requiring minimal system resources. It runs efficiently on older Macintosh computers, making it a viable option for users with limited hardware.
  • Classic Image Editing Style: PhotoImpression 4’s approach to image editing reflects a classic, pre-Photoshop era. This style emphasizes intuitive tools and a focus on basic image manipulation, providing a distinct and nostalgic experience.
  • Nostalgia and Sentimentality: For many users, PhotoImpression 4 holds nostalgic value. It evokes memories of early digital image editing and represents a significant chapter in the evolution of digital art.

Relevance in the Modern Digital Landscape:

While PhotoImpression 4 may not offer the advanced features of modern image editing software, it remains relevant for specific purposes:

  • Nostalgia and Personal Projects: Users seeking a nostalgic image editing experience or working on personal projects that require a classic aesthetic may find PhotoImpression 4 a suitable choice.
  • Educational Purposes: PhotoImpression 4 can be a valuable tool for teaching basic image editing principles. Its user-friendly interface and straightforward tools provide a gentle introduction to the world of digital image manipulation.
  • Legacy Image Editing: For users who have existing projects created in PhotoImpression 4, the software remains essential for maintaining compatibility and editing older images.

Downloading PhotoImpression 4 for Mac:

Finding a legitimate download of PhotoImpression 4 for Mac can be challenging. The software is no longer commercially available, and finding a reliable source requires careful research. Users should be cautious of unofficial websites or downloads that may contain malware or viruses.

FAQs:

Q: Is PhotoImpression 4 still supported by Apple?

A: No, PhotoImpression 4 is no longer supported by Apple. The software is considered legacy software and is not compatible with the latest macOS operating systems.

Q: Can I use PhotoImpression 4 on a modern Mac?

A: While PhotoImpression 4 may technically run on some modern Macs, it is not officially supported and may experience compatibility issues. It is recommended to use the software on older Macintosh computers running compatible operating systems.

Q: Are there any alternatives to PhotoImpression 4?

A: Several modern image editing software options are available, including Adobe Photoshop, GIMP, and Affinity Photo. These programs offer a wider range of features and advanced tools for image manipulation.

Tips for Using PhotoImpression 4:

  • Explore the Interface: Take time to familiarize yourself with the software’s interface and tools. Experiment with different features to understand their functionality.
  • Use Layers Sparingly: While PhotoImpression 4 offers limited layer support, use them strategically to create complex compositions without sacrificing performance.
  • Save Regularly: It is always a good practice to save your work frequently, especially when working with older software that may be prone to crashes.
  • Consider Alternatives: If you require advanced features or compatibility with modern operating systems, consider exploring alternative image editing software options.

Conclusion:

PhotoImpression 4, a classic image editing software for Macintosh computers, holds a special place in the history of digital art. While newer software has surpassed its capabilities, PhotoImpression 4 remains a valuable tool for those seeking a user-friendly interface, a nostalgic experience, or a straightforward approach to image editing. Its legacy continues to inspire and engage users, highlighting the enduring appeal of classic software and its impact on the evolution of digital creativity.

Arcsoft Photoimpression 4 Software - fasrtalent hasemowl.blogg.se - Photoimpression 4 manual Photoimpression 4.1 Quick Start Guide
PhotoImpression 4.1 Quick Start Guide  Manualzz Arcsoft photoimpression 4 free download full version - passlwholesale Photoimpression 4.1 Quick Start Guide
Photoimpression 4.1 Quick Start Guide Photoimpression 4.1 Quick Start Guide

Closure

Thus, we hope this article has provided valuable insights into PhotoImpression 4: A Comprehensive Guide to the Classic Mac Image Editor. We thank you for taking the time to read this article. See you in our next article!

A Comprehensive Guide To QBittorrent On Windows 10 64-bit: A Powerful And User-Friendly Torrent Client

A Comprehensive Guide to qBittorrent on Windows 10 64-bit: A Powerful and User-Friendly Torrent Client

Introduction

In this auspicious occasion, we are delighted to delve into the intriguing topic related to A Comprehensive Guide to qBittorrent on Windows 10 64-bit: A Powerful and User-Friendly Torrent Client. Let’s weave interesting information and offer fresh perspectives to the readers.

A Comprehensive Guide to qBittorrent on Windows 10 64-bit: A Powerful and User-Friendly Torrent Client

Qbittorrent 64 bit windows 10 - orangenaw

In the realm of digital content acquisition, torrenting remains a popular method, offering access to a vast array of files, from movies and music to software and e-books. While various torrent clients exist, qBittorrent stands out as a robust, open-source, and user-friendly option, particularly well-suited for Windows 10 64-bit systems. This guide aims to provide a comprehensive understanding of qBittorrent, its features, installation process, and best practices for maximizing its potential.

Understanding the Essence of qBittorrent: A Free and Feature-Rich Torrent Client

qBittorrent, a free and open-source torrent client, distinguishes itself through its lightweight design, comprehensive feature set, and commitment to user privacy. Unlike some commercial alternatives, qBittorrent does not rely on intrusive advertising or bundled software, ensuring a clean and focused user experience. Its open-source nature fosters transparency, allowing users to inspect and contribute to the codebase, fostering trust and community involvement.

Key Features of qBittorrent: A Glimpse into its Functionality

qBittorrent offers a diverse range of features designed to enhance torrenting efficiency and user experience:

  • User Interface: qBittorrent boasts a clean and intuitive interface, readily accessible to both novice and experienced users. Its straightforward design simplifies navigation, ensuring a smooth and efficient workflow.
  • Torrent Search: While not directly integrated with search engines, qBittorrent supports the use of third-party search tools, enabling users to conveniently discover and add torrents directly within the client.
  • Torrent Management: qBittorrent empowers users with granular control over torrent downloads. Features such as scheduling, priority setting, and selective file downloads allow users to customize download behavior and optimize resource allocation.
  • Bandwidth Management: qBittorrent provides sophisticated bandwidth management tools, allowing users to set download and upload limits, prioritize specific torrents, and configure global bandwidth allocation, ensuring a smooth internet experience.
  • Magnet Link Support: qBittorrent seamlessly supports magnet links, enabling users to directly access torrents without the need for .torrent files, streamlining the download process.
  • Encryption: qBittorrent offers encryption capabilities, enhancing user privacy and security by obscuring download activities from potential prying eyes.
  • IP Filtering: qBittorrent integrates IP filtering features, enabling users to block connections from specific IP addresses or ranges, enhancing security and preventing unwanted interactions.
  • Advanced Features: qBittorrent includes advanced features like RSS feed support, allowing users to automatically download new torrents based on their interests, and remote control capabilities, enabling management of downloads from any device.

Downloading and Installing qBittorrent on Windows 10 64-bit: A Step-by-Step Guide

Installing qBittorrent on Windows 10 64-bit is a straightforward process:

  1. Download: Visit the official qBittorrent website (https://www.qbittorrent.org/) and download the latest version of the installer for Windows 64-bit.
  2. Run the Installer: Double-click the downloaded installer file and follow the on-screen instructions.
  3. Accept License Agreement: Carefully review the license agreement and accept it to proceed with the installation.
  4. Choose Installation Directory: Select the desired installation location for qBittorrent. The default location is usually sufficient.
  5. Complete Installation: Click "Install" to begin the installation process. Wait for the installation to complete.
  6. Launch qBittorrent: Once the installation is finished, you can launch qBittorrent by clicking the newly created desktop shortcut or finding it in the Start menu.

Configuring qBittorrent for Optimal Performance: Tailoring the Client to Your Needs

After installation, it’s essential to configure qBittorrent to optimize its performance and customize its behavior according to your preferences:

  1. General Settings: Navigate to "Options" > "General" and adjust settings like the default download directory, language, and notification preferences.
  2. Download and Upload Settings: Access "Options" > "Downloads" and "Uploads" to define download and upload limits, priority settings, and scheduling options.
  3. Bandwidth Management: In "Options" > "Speed" configure bandwidth allocation, prioritize specific torrents, and set global download and upload limits.
  4. Interface Customization: Customize the appearance of qBittorrent in "Options" > "Interface" by selecting themes, adjusting font sizes, and modifying window behavior.
  5. Advanced Settings: Explore advanced settings in "Options" > "Advanced" to fine-tune network behavior, enable specific features, and customize the client’s behavior further.

Exploring the World of Torrents: Utilizing qBittorrent for Downloads

With qBittorrent installed and configured, you can begin exploring the vast world of torrents:

  1. Finding Torrents: Use third-party search tools or websites to locate desired torrents. Ensure you are using reputable sources to minimize the risk of malware or unwanted downloads.
  2. Adding Torrents: Copy the magnet link or .torrent file and paste it into qBittorrent’s "Add Torrent" window. Alternatively, drag and drop the .torrent file directly into the client.
  3. Managing Downloads: Once a torrent is added, qBittorrent automatically begins downloading the files. Monitor the download progress, adjust priorities, and manage individual files as needed.
  4. Completing Downloads: Upon completion, torrents are automatically moved to the designated download directory. You can then access and use the downloaded files.

Frequently Asked Questions (FAQs) about qBittorrent: Addressing Common Queries

Q: Is qBittorrent safe to use?

A: qBittorrent is generally considered safe, as it’s open-source, allowing for independent audits and community scrutiny. However, as with any torrent client, it’s crucial to use reputable torrent sources and practice caution with downloaded files.

Q: What are the differences between qBittorrent and other torrent clients?

A: qBittorrent stands out due to its lightweight design, open-source nature, lack of intrusive ads, and comprehensive feature set. Compared to some commercial clients, it offers a more user-friendly experience and a commitment to privacy.

Q: Is qBittorrent legal to use?

A: The legality of torrenting depends on the specific content being downloaded. Downloading copyrighted material without permission is illegal in most jurisdictions. Using qBittorrent for legal downloads, such as open-source software or public domain content, is generally acceptable.

Q: How do I protect my privacy while using qBittorrent?

A: Use a VPN service to encrypt your internet traffic and mask your IP address, enhancing privacy and security. Additionally, consider using a dedicated torrenting account with minimal personal information.

Q: Can I use qBittorrent on multiple devices?

A: Yes, qBittorrent can be installed on multiple devices, including Windows, macOS, Linux, and Android. However, it’s essential to ensure that your internet connection can handle multiple simultaneous downloads.

Tips for Optimizing qBittorrent: Enhancing Download Efficiency and Security

  • Use a VPN: Employ a VPN service to encrypt your internet traffic and mask your IP address, protecting your privacy and security while torrenting.
  • Prioritize Downloads: Set download priorities for essential torrents to ensure they receive the most bandwidth and complete quickly.
  • Limit Bandwidth Usage: Configure download and upload limits to prevent qBittorrent from consuming excessive bandwidth and impacting other internet activities.
  • Schedule Downloads: Use the scheduler to limit downloads to specific times, minimizing impact on your internet connection and network performance.
  • Regularly Update qBittorrent: Keep qBittorrent up-to-date with the latest version to benefit from bug fixes, security enhancements, and new features.
  • Use a Firewall: Enable your system’s firewall and consider using a dedicated firewall application to prevent unauthorized access and protect your computer from potential threats.
  • Be Cautious with Downloaded Files: Always scan downloaded files with a reputable antivirus program before opening them, especially when downloading from unfamiliar sources.

Conclusion: Embracing the Power of qBittorrent on Windows 10 64-bit

qBittorrent emerges as a powerful and user-friendly torrent client, offering a comprehensive feature set, open-source transparency, and a commitment to user privacy. Its lightweight design, intuitive interface, and advanced management capabilities make it an ideal choice for Windows 10 64-bit users seeking a reliable and efficient torrenting experience. By understanding its features, configuring it effectively, and practicing safe torrenting habits, users can leverage qBittorrent to access a vast world of digital content while prioritizing privacy and security.

qBittorrent (64-bit) Download (2024 Latest) Qbittorrent for windows 10 - ersap How To Install qBittorrent in Windows 10 - YouTube
Qbittorrent 64 Bit Windows 10 다운로드 qBittorrent Windows 10 (32/64 bit) 한국어 Qbittorrent windows 10 - productionsgai
qBittorrent 64-bit 4.3.4.1 für Windows downloaden - Filehippo.com qBittorrent (64-bit) Download (2024 Latest)

Closure

Thus, we hope this article has provided valuable insights into A Comprehensive Guide to qBittorrent on Windows 10 64-bit: A Powerful and User-Friendly Torrent Client. We hope you find this article informative and beneficial. See you in our next article!

Windows 10 As A Network Server: A Comprehensive Guide

Windows 10 as a Network Server: A Comprehensive Guide

Introduction

With enthusiasm, let’s navigate through the intriguing topic related to Windows 10 as a Network Server: A Comprehensive Guide. Let’s weave interesting information and offer fresh perspectives to the readers.

Windows 10 as a Network Server: A Comprehensive Guide

Guide to Windows 10 Network and Sharing Center – WebNots

Windows 10, while primarily known as a desktop operating system, possesses the capability to function as a robust network server. This versatility allows users to leverage the familiar Windows environment to manage and share resources across a network, catering to both home and business needs. This article delves into the functionalities, benefits, and considerations involved in using Windows 10 as a network server.

Understanding the Capabilities

Windows 10 offers a range of features that enable it to act as a network server, providing centralized control and access to resources. These functionalities include:

  • File Sharing: Windows 10 allows users to share files and folders across the network, making it convenient for collaborative work, data storage, and file access from multiple devices.
  • Print Sharing: Users can configure printers connected to the Windows 10 server to be accessible to other devices on the network, eliminating the need for individual printer installations.
  • Remote Desktop: Windows 10’s Remote Desktop feature allows users to access and control the server remotely, providing flexibility and convenience for administration and troubleshooting.
  • Active Directory Domain Services (AD DS): This feature, available in Windows 10 Pro and Enterprise editions, provides centralized user management, authentication, and authorization for larger networks.
  • DNS Server: Windows 10 can act as a DNS server, resolving domain names to IP addresses, crucial for network communication and website access.
  • DHCP Server: This feature allows the server to automatically assign IP addresses to devices on the network, simplifying network configuration and management.
  • Web Server (IIS): Windows 10 includes the Internet Information Services (IIS) web server, enabling the hosting of websites and web applications.

Benefits of Using Windows 10 as a Network Server

Utilizing Windows 10 as a network server offers several advantages:

  • Familiarity: The user-friendly Windows interface and intuitive management tools make it easier for users familiar with Windows to manage the server.
  • Cost-Effectiveness: Windows 10 offers a cost-effective solution compared to dedicated server operating systems, particularly for small and medium-sized businesses.
  • Versatility: Windows 10’s diverse feature set caters to a wide range of network needs, from basic file sharing to complex domain management.
  • Security: Windows 10 incorporates robust security features, including built-in antivirus protection, firewall, and regular security updates, enhancing network security.
  • Scalability: While Windows 10 is suitable for small networks, it can also be scaled to accommodate larger networks with increased resource demands.

Considerations for Implementing a Windows 10 Server

While Windows 10 offers a compelling option for network servers, certain factors should be considered before implementation:

  • Hardware Requirements: The server needs sufficient hardware resources, including processing power, RAM, and storage capacity, to handle network traffic and user demands.
  • Network Bandwidth: Ensure sufficient network bandwidth to support the expected data transfer rates and user activity on the network.
  • Security Measures: Implement appropriate security measures, such as strong passwords, user account restrictions, and regular security updates, to protect the server and network from unauthorized access.
  • Backup and Recovery: Establish a reliable backup and recovery strategy to safeguard data and ensure data integrity in case of hardware failure or data corruption.
  • Technical Expertise: While Windows 10 is relatively user-friendly, some technical knowledge is required to configure and manage the server effectively.

FAQs

Q: What is the difference between a Windows 10 Home and a Windows 10 Pro edition for server purposes?

A: Windows 10 Pro offers features like AD DS, which are crucial for managing larger networks and user accounts. Windows 10 Home lacks these features and is primarily suitable for smaller, home-based networks.

Q: Can I use a standard Windows 10 PC as a server?

A: Yes, a standard Windows 10 PC can be used as a server. However, it’s recommended to select a PC with sufficient hardware resources and prioritize stability over performance-oriented features.

Q: Is Windows 10 Server as secure as dedicated server operating systems?

A: Windows 10 incorporates robust security features, but dedicated server operating systems often offer more granular security controls and specialized security features. The choice depends on the specific security requirements of the network.

Q: How do I set up a Windows 10 server?

A: Setting up a Windows 10 server involves several steps, including configuring network settings, sharing resources, and installing necessary services. Detailed guides and tutorials are available online to assist with the process.

Tips for Optimizing a Windows 10 Server

  • Disable unnecessary services: Review and disable services that are not essential for the server’s functionality to improve performance and resource utilization.
  • Optimize storage configuration: Use RAID configurations for data redundancy and performance enhancement.
  • Implement network security measures: Configure firewalls, restrict user access, and regularly update security software to protect the network.
  • Monitor server performance: Use built-in tools or third-party monitoring software to track server performance, identify bottlenecks, and ensure optimal operation.
  • Regularly backup data: Implement a comprehensive backup strategy to safeguard data and enable quick recovery in case of data loss.

Conclusion

Windows 10’s versatility extends beyond its traditional role as a desktop operating system, enabling it to function as a capable network server. Its user-friendly interface, cost-effectiveness, and diverse feature set make it an attractive option for managing and sharing resources across a network. By carefully considering hardware requirements, security measures, and network needs, users can leverage Windows 10 to create a reliable and efficient network server environment. However, remember to weigh the specific requirements of your network against the capabilities of Windows 10 to ensure the best fit for your needs.

Ultimate Guide to Windows Server Including Versions & Dev History Windows 10 network topology mapper design tool - bettaguides Windows 10: Network & Internet settings explained - Pureinfotech
Setting Up Windows Computers to Connect to a Network - dummies What Is a Network Server and How Does It Work?  ServerWatch Guide to Network and Sharing Center in Windows 7, 8, 10
Монитор Сети Windows 10 – Telegraph What Can You Do in Network and Sharing Center in Windows 10?

Closure

Thus, we hope this article has provided valuable insights into Windows 10 as a Network Server: A Comprehensive Guide. We appreciate your attention to our article. See you in our next article!

Understanding The Red Circle Around Your Windows 10 Mouse Pointer

Understanding the Red Circle Around Your Windows 10 Mouse Pointer

Introduction

With great pleasure, we will explore the intriguing topic related to Understanding the Red Circle Around Your Windows 10 Mouse Pointer. Let’s weave interesting information and offer fresh perspectives to the readers.

Understanding the Red Circle Around Your Windows 10 Mouse Pointer

how to get a red circle around your mouse (read description) ��⭕ - YouTube

In the intricate world of Windows 10, the appearance of a red circle around the mouse pointer can be a perplexing sight. This seemingly simple visual cue often sparks curiosity and concern among users, leading them to seek answers about its meaning and potential implications. This article aims to demystify the red circle, providing a comprehensive understanding of its significance, causes, and solutions.

The Red Circle: A Visual Indicator of Restrictions

The red circle surrounding the mouse pointer in Windows 10 is a visual indicator of a specific type of restriction imposed on the user’s interaction with the system. This restriction, known as "restricted mode," is designed to limit the user’s ability to perform certain actions, primarily for security and safety purposes.

Common Causes of Restricted Mode

The red circle can appear due to various factors, each contributing to the activation of restricted mode. Understanding these causes is crucial for effectively resolving the issue:

  • Parental Control Settings: Parents or guardians often use parental control features to restrict access to specific content or applications. This restriction might manifest as a red circle around the mouse pointer, indicating that the user’s access is limited by parental settings.
  • Administrative Account Restrictions: Administrators can configure user accounts with specific restrictions. These restrictions, such as limiting file access or preventing installation of software, can trigger the red circle, indicating that the user’s actions are restricted by administrative policies.
  • System Protection Measures: In certain situations, Windows 10 might activate restricted mode to protect the system from potential harm. This could occur during critical system updates or when encountering potential security threats.
  • Specific Application Restrictions: Some applications might implement their own restrictions, limiting user interactions within the application itself. This could manifest as a red circle within the application window, indicating restricted access within that specific environment.
  • Hardware Issues: In rare cases, hardware malfunctions, such as a faulty mouse or touchpad, can trigger the red circle. This is often accompanied by other issues, such as erratic mouse movement or unresponsive clicks.

Decoding the Red Circle: Understanding the Context

The red circle itself doesn’t provide a detailed explanation of the underlying cause. To understand the reason behind the restriction, it is essential to analyze the context in which it appears:

  • System-wide Restriction: If the red circle appears across the entire system, affecting all applications and actions, it likely indicates a system-wide restriction imposed by parental controls, administrative policies, or system protection measures.
  • Application-specific Restriction: If the red circle appears only within a specific application window, it suggests that the restriction is specific to that application and might be implemented by the application itself or due to user-defined settings.
  • Hardware-related Restriction: If the red circle is accompanied by other hardware-related issues, it might indicate a malfunctioning mouse or touchpad.

Troubleshooting the Red Circle: A Step-by-Step Guide

Resolving the red circle requires identifying the underlying cause and addressing it accordingly. Here’s a systematic approach to troubleshoot the issue:

  1. Check for Parental Control Settings: Review parental control settings in your Windows 10 account. If parental controls are enabled, you might need to adjust the settings or temporarily disable them to remove the restriction.
  2. Verify Administrative Account Restrictions: If you are using a standard user account, check for any restrictions imposed by the administrator. Contact the administrator to request adjustments or temporary removal of restrictions.
  3. Examine System Protection Measures: If the red circle appears during critical system updates or potential security threats, it is likely a system protection measure. Wait for the process to complete or consult official documentation for troubleshooting.
  4. Review Application Settings: Check the settings within the specific application where the red circle appears. Look for any restrictions or user-defined settings that might be causing the issue.
  5. Troubleshoot Hardware Issues: If the red circle is accompanied by other hardware-related issues, try restarting your computer, connecting a different mouse or touchpad, or updating your device drivers.

FAQs: Addressing Common Concerns

Q: Can I permanently remove the red circle?

A: The red circle is a visual indicator of a restriction. Removing it permanently might require disabling the underlying restriction, which could potentially compromise system security or user safety. It is recommended to address the cause of the restriction rather than attempting to remove the visual cue permanently.

Q: Will the red circle affect my system performance?

A: The red circle itself doesn’t directly impact system performance. However, the underlying restriction it represents might limit certain functionalities, potentially affecting your ability to perform specific tasks.

Q: Can the red circle be a sign of a virus or malware infection?

A: While the red circle might appear during system protection measures, it is not a direct indicator of a virus or malware infection. However, if you suspect a malware infection, it’s crucial to run a full system scan with a reputable antivirus program.

Tips: Maintaining System Security and User Safety

  • Regularly Review Parental Control Settings: Ensure that parental control settings are appropriate for the user’s age and maturity level.
  • Understand Administrative Account Restrictions: Be aware of any restrictions imposed on your user account and communicate with the administrator for adjustments if needed.
  • Keep Your System Updated: Regularly install system updates and security patches to protect your system from potential threats.
  • Use Reputable Antivirus Software: Install and maintain a reputable antivirus program to protect your system from malware infections.
  • Be Cautious with Downloads and Installations: Only download and install software from trusted sources to minimize the risk of malware infections.

Conclusion: Maintaining a Secure and Functional System

The red circle around the mouse pointer in Windows 10 is a visual indicator of restricted access. Understanding the causes, analyzing the context, and employing appropriate troubleshooting steps can effectively resolve the issue. By addressing the underlying restriction and maintaining a secure and functional system, users can ensure a smooth and efficient computing experience. Remember, the red circle is a sign that the system is actively protecting itself or enforcing user restrictions. By understanding its purpose and taking proactive measures, you can ensure a safe and secure digital environment.

How to get the red circle around your cursor commentary - YouTube How to Get Circle Around Mouse Pointer in Windows 10 - YouTube How to Get Circle Around Mouse Pointer in Windows PC (No Software) - YouTube
How to get red circle around mouse pointer by using real world app editor - YouTube How to Get a Red Circle around Mouse Pointer or cursor in Windows 11/10 How to Get a Red Circle around Mouse Pointer or cursor in Windows 11/10
How To Get A Circle Around Your Mouse Cursor or Mouse Pointer Focus - YouTube How to change cursor color and get red circle around your cursor for (School Chromebook - YouTube

Closure

Thus, we hope this article has provided valuable insights into Understanding the Red Circle Around Your Windows 10 Mouse Pointer. We appreciate your attention to our article. See you in our next article!

Enhancing Windows 10 Performance: A Comprehensive Guide

Enhancing Windows 10 Performance: A Comprehensive Guide

Introduction

With great pleasure, we will explore the intriguing topic related to Enhancing Windows 10 Performance: A Comprehensive Guide. Let’s weave interesting information and offer fresh perspectives to the readers.

Enhancing Windows 10 Performance: A Comprehensive Guide

How to Enhance Your Windows 10 Performance  Cyberogism

Windows 10, while a robust and versatile operating system, can sometimes experience performance hiccups, leading to sluggishness, slow startup times, and general frustration. However, optimizing Windows 10 can significantly improve its responsiveness and efficiency, leading to a smoother and more enjoyable computing experience.

This guide will delve into various methods for enhancing Windows 10 performance, addressing common issues and offering actionable solutions.

Understanding the Importance of Optimization

A well-optimized Windows 10 system delivers numerous benefits:

  • Faster Startup and Shutdown: A streamlined system boots up and shuts down quickly, minimizing waiting time and enhancing productivity.
  • Improved Responsiveness: Applications launch faster, files open promptly, and multitasking becomes smoother, leading to a more efficient workflow.
  • Enhanced Battery Life: By reducing resource consumption, optimization can extend battery life on laptops and tablets.
  • Increased Stability: A well-maintained system is less prone to crashes and errors, ensuring a more reliable computing experience.
  • Extended Hardware Lifespan: By reducing strain on components, optimization can prolong the life of your hardware.

Methods for Optimizing Windows 10

1. Disk Cleanup and Storage Management

  • Disk Cleanup: Over time, temporary files, system files, and other unnecessary data accumulate on your hard drive, consuming valuable storage space and slowing down performance. Windows 10 includes a built-in Disk Cleanup tool that can remove these files. Access it by searching "Disk Cleanup" in the Start menu.
  • Storage Sense: This feature automatically identifies and removes temporary files, downloads, and other unnecessary data on a regular schedule. To enable it, go to Settings > System > Storage and turn on Storage Sense.
  • Manage Applications: Uninstall unused applications and remove unnecessary files from your Downloads folder to free up storage space.
  • Consider an SSD: If your system uses a hard disk drive (HDD), upgrading to a solid-state drive (SSD) can dramatically improve startup times, application loading speeds, and overall responsiveness.

2. System Updates and Maintenance

  • Windows Updates: Regularly installing the latest Windows updates ensures you have the most recent security patches, bug fixes, and performance enhancements. To check for updates, go to Settings > Update & Security > Windows Update and click "Check for updates."
  • Driver Updates: Outdated drivers can cause compatibility issues and performance problems. Keep your drivers updated by visiting the manufacturer’s website for your specific hardware components.
  • Defragmentation: While less relevant with SSDs, defragmenting your HDD can improve performance by organizing fragmented files on the drive. You can schedule automatic defragmentation in Windows 10 by searching "Defragment and Optimize Drives" in the Start menu.
  • System File Checker: This tool can scan and repair corrupted system files that may be causing performance issues. Run it by opening Command Prompt as administrator and typing "sfc /scannow."

3. Background Processes and Startup Programs

  • Task Manager: The Task Manager allows you to identify resource-intensive processes running in the background and terminate them to improve performance. Access it by pressing Ctrl+Shift+Esc.
  • Startup Programs: Programs that automatically launch when you start your computer can consume resources and slow down boot times. To manage startup programs, open Task Manager and go to the "Startup" tab. Disable unnecessary programs to reduce startup time.
  • Services: Some Windows services may not be required for everyday use and can be safely disabled to improve performance. However, proceed with caution as disabling essential services can impact system functionality.
  • Visual Effects: While visually appealing, some Windows effects can strain system resources. You can adjust visual effects settings to improve performance by searching "Adjust the appearance and performance of Windows" in the Start menu.

4. Power Management and Energy Optimization

  • Power Plan: Windows 10 offers various power plans that adjust performance and energy consumption. Choose a balanced plan for optimal performance or a power-saving plan to extend battery life. To access power plan settings, search "Power Options" in the Start menu.
  • Sleep Mode: Enabling sleep mode allows your computer to enter a low-power state while preserving your work. To configure sleep settings, go to Settings > System > Power & sleep.
  • Screen Brightness: Reduce screen brightness to save battery life and reduce energy consumption.

5. Troubleshooting and Advanced Optimization

  • System Restore: If performance issues arise after making system changes, you can use System Restore to revert your computer to a previous state. To access System Restore, search "Create a restore point" in the Start menu.
  • Clean Boot: Performing a clean boot allows you to start Windows 10 with a minimal set of drivers and programs, helping isolate performance issues. To perform a clean boot, follow the steps outlined in the Microsoft support documentation.
  • Registry Cleaning: The Windows Registry stores system settings and configuration data. Over time, it can become cluttered with unnecessary entries, impacting performance. While using registry cleaners can be risky, some reputable tools can help optimize the registry. Use these tools with caution and always back up your system before making changes.

Frequently Asked Questions

Q: How often should I optimize my Windows 10 system?

A: It is recommended to perform routine optimization tasks, such as Disk Cleanup and Storage Sense, on a regular basis, ideally once a week or at least once a month. You should also check for Windows updates and driver updates periodically.

Q: Is it necessary to defragment my SSD?

A: No, defragmentation is not necessary for SSDs. SSDs use a different technology and do not experience fragmentation in the same way as HDDs.

Q: Can I disable too many services in Windows 10?

A: Disabling essential services can lead to system instability and errors. Only disable services that you are certain are not critical for your system’s functionality.

Q: Should I use a registry cleaner?

A: While registry cleaners can sometimes improve performance, they can also cause system instability if used incorrectly. Use these tools with caution and only from reputable sources.

Tips for Optimizing Windows 10

  • Avoid unnecessary programs: Limit the number of programs running in the background to reduce resource consumption.
  • Close unused tabs: Keep only the necessary browser tabs open to minimize memory usage.
  • Use a lightweight antivirus: Choose a lightweight antivirus solution that does not significantly impact system performance.
  • Monitor resource usage: Use the Task Manager to monitor resource usage and identify processes that are consuming excessive resources.
  • Regularly clean your system: Delete temporary files, uninstall unused applications, and manage storage space to keep your system running smoothly.

Conclusion

Optimizing Windows 10 is an ongoing process that requires attention to detail and regular maintenance. By implementing the strategies outlined in this guide, you can significantly improve the performance, responsiveness, and stability of your Windows 10 system, leading to a more enjoyable and productive computing experience. Remember to always back up your system before making any significant changes and proceed with caution when using advanced optimization tools. With a little effort and attention to detail, you can ensure your Windows 10 system runs smoothly and efficiently for years to come.

�� How to Enable Windows 10 ULTIMATE Performance mode Guide - YouTube TIPS TO IMPROVE PC PERFORMANCE IN WINDOWS 10  READYBOOST - YouTube How to Enable Windows 10 Ultimate Performance Mode  Ultimate performance mode  Power Settings
How to Speed Up Your Windows 10 Performance (Best Settings Ever) How To Change Performance Options In Windows 10  Daves Computer Tips Cómo habilitar el modo Ultimate Performance en Windows 10 – Zobme
How to Enable Ultimate Performance Mode in Windows 10 (New) - YouTube How To Enable Ultimate Performance Mode On Windows 10  Images and Photos finder

Closure

Thus, we hope this article has provided valuable insights into Enhancing Windows 10 Performance: A Comprehensive Guide. We thank you for taking the time to read this article. See you in our next article!

Embarking On The Journey Of R Programming: A Comprehensive Guide For Windows 10 64-bit Users

Embarking on the Journey of R Programming: A Comprehensive Guide for Windows 10 64-bit Users

Introduction

In this auspicious occasion, we are delighted to delve into the intriguing topic related to Embarking on the Journey of R Programming: A Comprehensive Guide for Windows 10 64-bit Users. Let’s weave interesting information and offer fresh perspectives to the readers.

Embarking on the Journey of R Programming: A Comprehensive Guide for Windows 10 64-bit Users

R Programming - a Comprehensive Guide (ebook), Editor Ijsmi  1230004088028  Boeken  bol

R, a powerful and versatile programming language, has gained immense popularity in the realm of data science, statistics, and machine learning. Its open-source nature, extensive libraries, and intuitive syntax have made it a go-to choice for researchers, analysts, and developers alike. This guide provides a comprehensive overview of downloading and installing R on a Windows 10 64-bit system, empowering users to embark on their R programming journey.

Understanding R’s Significance

R’s importance stems from its ability to handle complex statistical analysis, data visualization, and machine learning tasks with remarkable efficiency. Its vast collection of packages, known as CRAN (Comprehensive R Archive Network), offers a rich ecosystem of tools for various applications, including:

  • Statistical Analysis: R excels in performing statistical tests, modeling, and data exploration, providing a robust framework for analyzing and interpreting data.
  • Data Visualization: R offers powerful libraries like ggplot2, enabling users to create stunning and informative visualizations, transforming data into easily comprehensible insights.
  • Machine Learning: R provides libraries like caret and randomForest, facilitating the implementation of various machine learning algorithms for tasks such as classification, regression, and clustering.

Downloading and Installing R on Windows 10 64-bit

  1. Accessing the Official Website: The first step involves visiting the official CRAN website (https://cran.r-project.org/).

  2. Selecting the Appropriate Download Link: Navigate to the "Download R for Windows" section and choose the "base" version. The "base" version provides the core R functionality, while additional packages can be installed later.

  3. Initiating the Download: Click on the download link corresponding to your Windows 10 64-bit system. The download process begins, saving the installer file to your chosen location.

  4. Running the Installer: Once the download is complete, locate the installer file and double-click it to launch the installation process.

  5. Following the Installation Steps: The installer will guide you through the installation process. Accept the default settings unless you have specific preferences.

  6. Completing the Installation: After completing the steps, R will be installed on your system. You can verify the installation by searching for "R" in the Windows search bar.

Verifying the Installation

To confirm that R has been installed successfully, open the R console by searching for "R" in the Windows search bar. The R console, a command-line interface, will appear, allowing you to execute R commands.

Exploring the R Environment

The R console serves as the primary environment for interacting with R. Here, you can enter R commands, execute code, and view results. The console provides basic functionality, while the RStudio IDE offers a more comprehensive and user-friendly development environment.

Installing RStudio

RStudio is a popular integrated development environment (IDE) specifically designed for R. It enhances the R programming experience by providing a graphical interface, code completion, debugging tools, and project management features.

  1. Downloading RStudio: Visit the official RStudio website (https://rstudio.com/products/rstudio/download/) and select the "RStudio Desktop" option.

  2. Choosing the Appropriate Version: Choose the version compatible with your Windows 10 64-bit system.

  3. Initiating the Download: Click on the download link, saving the installer file to your chosen location.

  4. Running the Installer: Double-click the installer file to launch the installation process.

  5. Following the Installation Steps: The installer will guide you through the steps. Accept the default settings unless you have specific preferences.

  6. Completing the Installation: Once the installation is complete, RStudio will be ready to use.

Getting Started with R Programming

Now that R and RStudio are installed, you can begin exploring the world of R programming. Here are some essential concepts to get started:

  • Variables: Variables store data in R. You can assign values to variables using the assignment operator (<-). For example:

    my_variable <- 10
  • Data Types: R supports various data types, including numeric, character, logical, and data frames.

  • Operators: R provides operators for performing arithmetic, logical, and comparison operations.

  • Functions: Functions are reusable blocks of code that perform specific tasks. R has built-in functions like sum(), mean(), and sd(), and you can also create your own functions.

  • Packages: Packages are collections of functions and data that extend R’s functionality. You can install packages using the install.packages() function. For example:

    install.packages("ggplot2")

Understanding the Importance of R Packages

R’s strength lies in its extensive package ecosystem. These packages provide specialized tools for various tasks, expanding R’s capabilities beyond its core functionality. Some notable packages include:

  • ggplot2: A powerful library for creating high-quality data visualizations.
  • dplyr: A data manipulation package that simplifies data wrangling tasks.
  • tidyr: A package for tidying data, making it easier to analyze.
  • caret: A machine learning package for training and evaluating models.
  • randomForest: A package for implementing random forest algorithms.

Tips for Effective R Programming

  • Start with the Basics: Begin by understanding core R concepts like variables, data types, operators, and functions.

  • Practice Regularly: Consistent practice is crucial for mastering R programming.

  • Explore R Packages: Discover and utilize relevant packages to enhance your workflow.

  • Utilize Online Resources: Leverage online tutorials, documentation, and forums for support and learning.

  • Experiment and Iterate: Don’t be afraid to experiment with different approaches and iterate on your code.

FAQs

Q: What is the best way to learn R programming?

A: There are numerous resources available for learning R, including online courses, tutorials, books, and communities. Consider starting with a beginner-friendly course or tutorial, gradually progressing to more advanced topics.

Q: Is R suitable for machine learning?

A: Yes, R is widely used for machine learning, offering packages like caret, randomForest, and xgboost, which support various algorithms.

Q: What are the benefits of using RStudio?

A: RStudio provides a user-friendly interface, code completion, debugging tools, and project management features, significantly enhancing the R programming experience.

Q: How do I update R on my system?

A: To update R, visit the CRAN website and download the latest version. Run the installer, and follow the instructions to update your existing installation.

Conclusion

Downloading and installing R on a Windows 10 64-bit system opens a door to a world of possibilities in data analysis, statistics, and machine learning. This comprehensive guide has provided a step-by-step process, empowering users to embark on their R programming journey. By understanding R’s significance, leveraging its extensive packages, and applying effective programming practices, users can unlock the immense potential of this versatile language and harness its power to tackle complex data-driven challenges.

A Comprehensive Guide for Beginners: Embarking on Your Programming Journey Data Science with R Programming: A Comprehensive Guide - Brainalyst R programming language - Introduction and basics
R Programming Language Download windows 10  Tutorial Jinni 9 Best R Programming Certification Courses - (Updated 2024) Learn R Programming for Complete Beginners
R Programming Language - Be a Data Science Super Hero with R! - DataFlair Learn R Programming - GeeksforGeeks

Closure

Thus, we hope this article has provided valuable insights into Embarking on the Journey of R Programming: A Comprehensive Guide for Windows 10 64-bit Users. We hope you find this article informative and beneficial. See you in our next article!