Archives April 2024

Unlinking A Microsoft Account From Windows 11: A Comprehensive Guide

Unlinking a Microsoft Account from Windows 11: A Comprehensive Guide

Introduction

With great pleasure, we will explore the intriguing topic related to Unlinking a Microsoft Account from Windows 11: A Comprehensive Guide. Let’s weave interesting information and offer fresh perspectives to the readers.

Unlinking a Microsoft Account from Windows 11: A Comprehensive Guide

How To Sign In To Microsoft Account on Windows 11/10

The seamless integration of Microsoft accounts within Windows 11 offers numerous benefits, including cloud storage synchronization, personalized settings, and access to Microsoft services. However, there are situations where removing a Microsoft account from a Windows 11 device becomes necessary or desirable. This guide aims to provide a comprehensive understanding of the process, its implications, and the reasons behind this action.

Understanding the Implications of Removing a Microsoft Account

Before proceeding, it is crucial to understand the consequences of removing a Microsoft account from a Windows 11 PC. This action will result in the following:

  • Loss of Cloud Synchronization: All data and settings linked to the Microsoft account, such as OneDrive files, personalized themes, and app settings, will no longer be automatically synchronized.
  • Limited Access to Microsoft Services: Features like Windows Update, Microsoft Store, and Xbox services may be limited or require a different Microsoft account to function.
  • Local Account Creation: The device will transition to a local account, requiring a separate username and password for login. This account will not be linked to any Microsoft services.

Reasons for Removing a Microsoft Account

Several scenarios might prompt users to consider removing their Microsoft account from a Windows 11 device:

  • Privacy Concerns: Some users might prefer a local account to maintain a greater level of privacy and control over their data.
  • Account Sharing: If a device is shared among multiple individuals, removing the primary account allows each user to create their own local account with personalized settings.
  • Troubleshooting Issues: Removing and re-adding a Microsoft account can sometimes resolve software issues or conflicts.
  • Selling or Donating the Device: Before selling or donating a PC, removing the Microsoft account ensures that the new owner has a clean slate and can set up their own account.
  • Switching to a Different Account: If a user intends to use a different Microsoft account for their Windows 11 device, removing the existing account is necessary.

Methods for Removing a Microsoft Account

Windows 11 provides two primary methods for removing a Microsoft account:
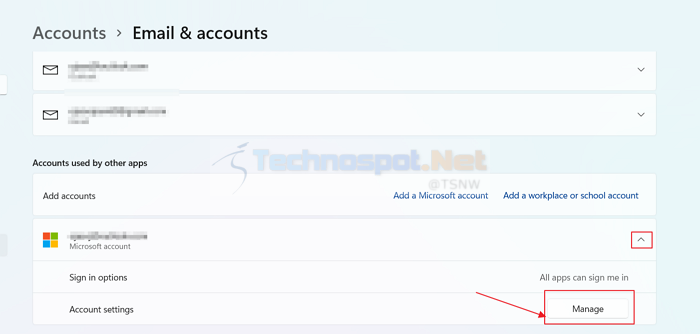
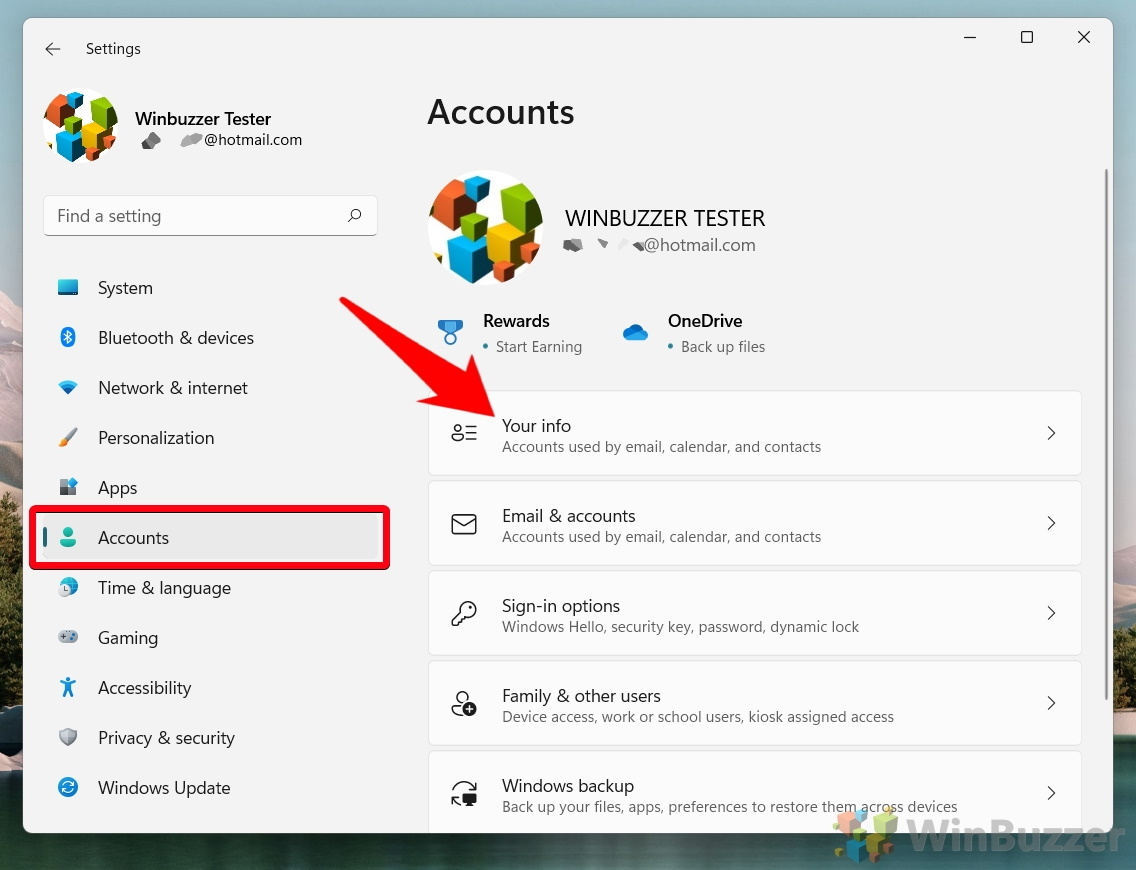
1. Using Settings:

  • Navigate to Settings: Open the Windows Start menu and click on the gear icon to access Settings.
  • Select Accounts: In the Settings window, click on "Accounts."
  • Choose Your Account: Under "Your info," select the Microsoft account you wish to remove.
  • Click "Sign out" or "Remove Account": Depending on the specific account type, you will see either "Sign out" or "Remove Account." Click the appropriate option.
  • Confirm Removal: A confirmation dialog box will appear. Confirm the removal by clicking "Yes."

2. Using Control Panel:

  • Open Control Panel: Search for "Control Panel" in the Windows Start menu and open it.
  • Navigate to User Accounts: Click on "User Accounts."
  • Choose "Manage another account": Select this option to access the account management panel.
  • Select the Account: Choose the Microsoft account you want to remove.
  • Click "Remove the account": This option will initiate the removal process.
  • Confirm Removal: A confirmation dialog box will appear. Confirm the removal by clicking "Yes."

Additional Considerations:

  • Account Recovery: Before removing the account, ensure you have access to the email address associated with it. This is essential for account recovery if needed.
  • Data Backup: Back up any important data stored on the device, as removing the Microsoft account will disconnect it from cloud storage.
  • Local Account Security: Once the Microsoft account is removed, the device will be secured by the local account password. Ensure you choose a strong and unique password.

FAQs: Addressing Common Concerns

Q: What happens to my files stored in OneDrive after removing my Microsoft account?

A: Files stored in OneDrive will remain accessible through the web interface or the OneDrive app using the same account credentials. However, they will no longer be automatically synchronized with the local device.

Q: Can I re-add my Microsoft account later?

A: Yes, you can re-add your Microsoft account to the device at any time by signing in through the Settings app.

Q: Will removing my Microsoft account affect my other Microsoft services?

A: Removing the account from your Windows 11 device will not affect your access to other Microsoft services like Outlook, Office 365, or Xbox Live.

Q: Can I transfer my files from a Microsoft account to a local account?

A: You can manually copy files from OneDrive to your local storage or use file transfer tools to move data between accounts.

Tips for a Seamless Transition

  • Plan Ahead: Before removing the Microsoft account, take the time to understand the implications and back up any critical data.
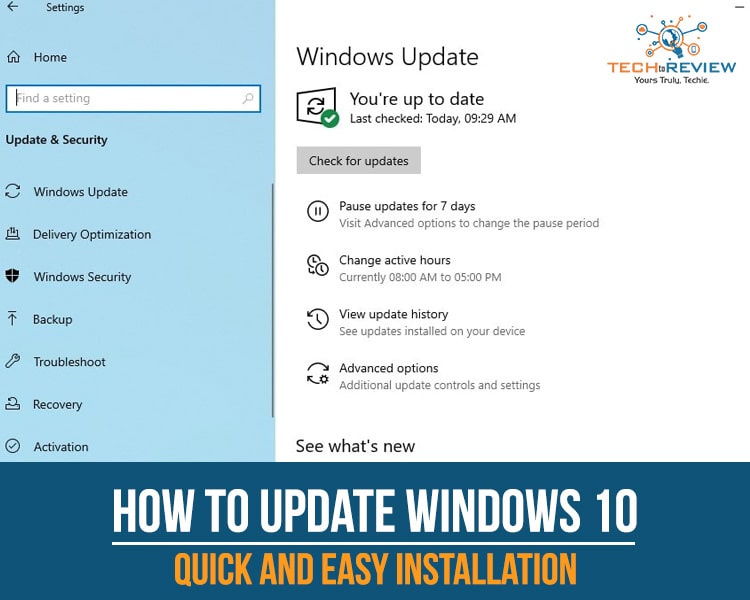
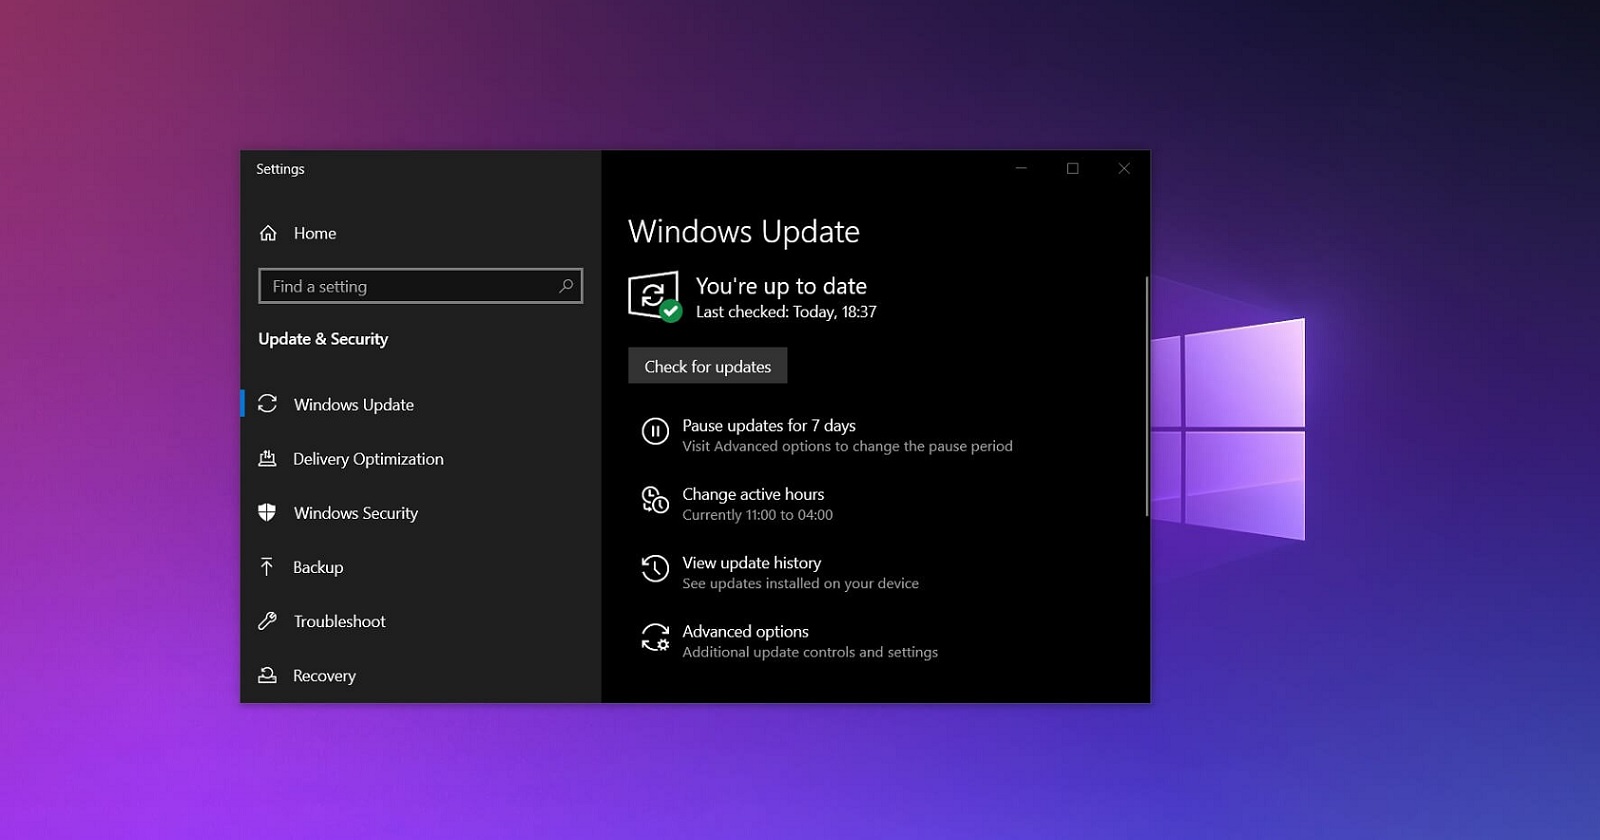
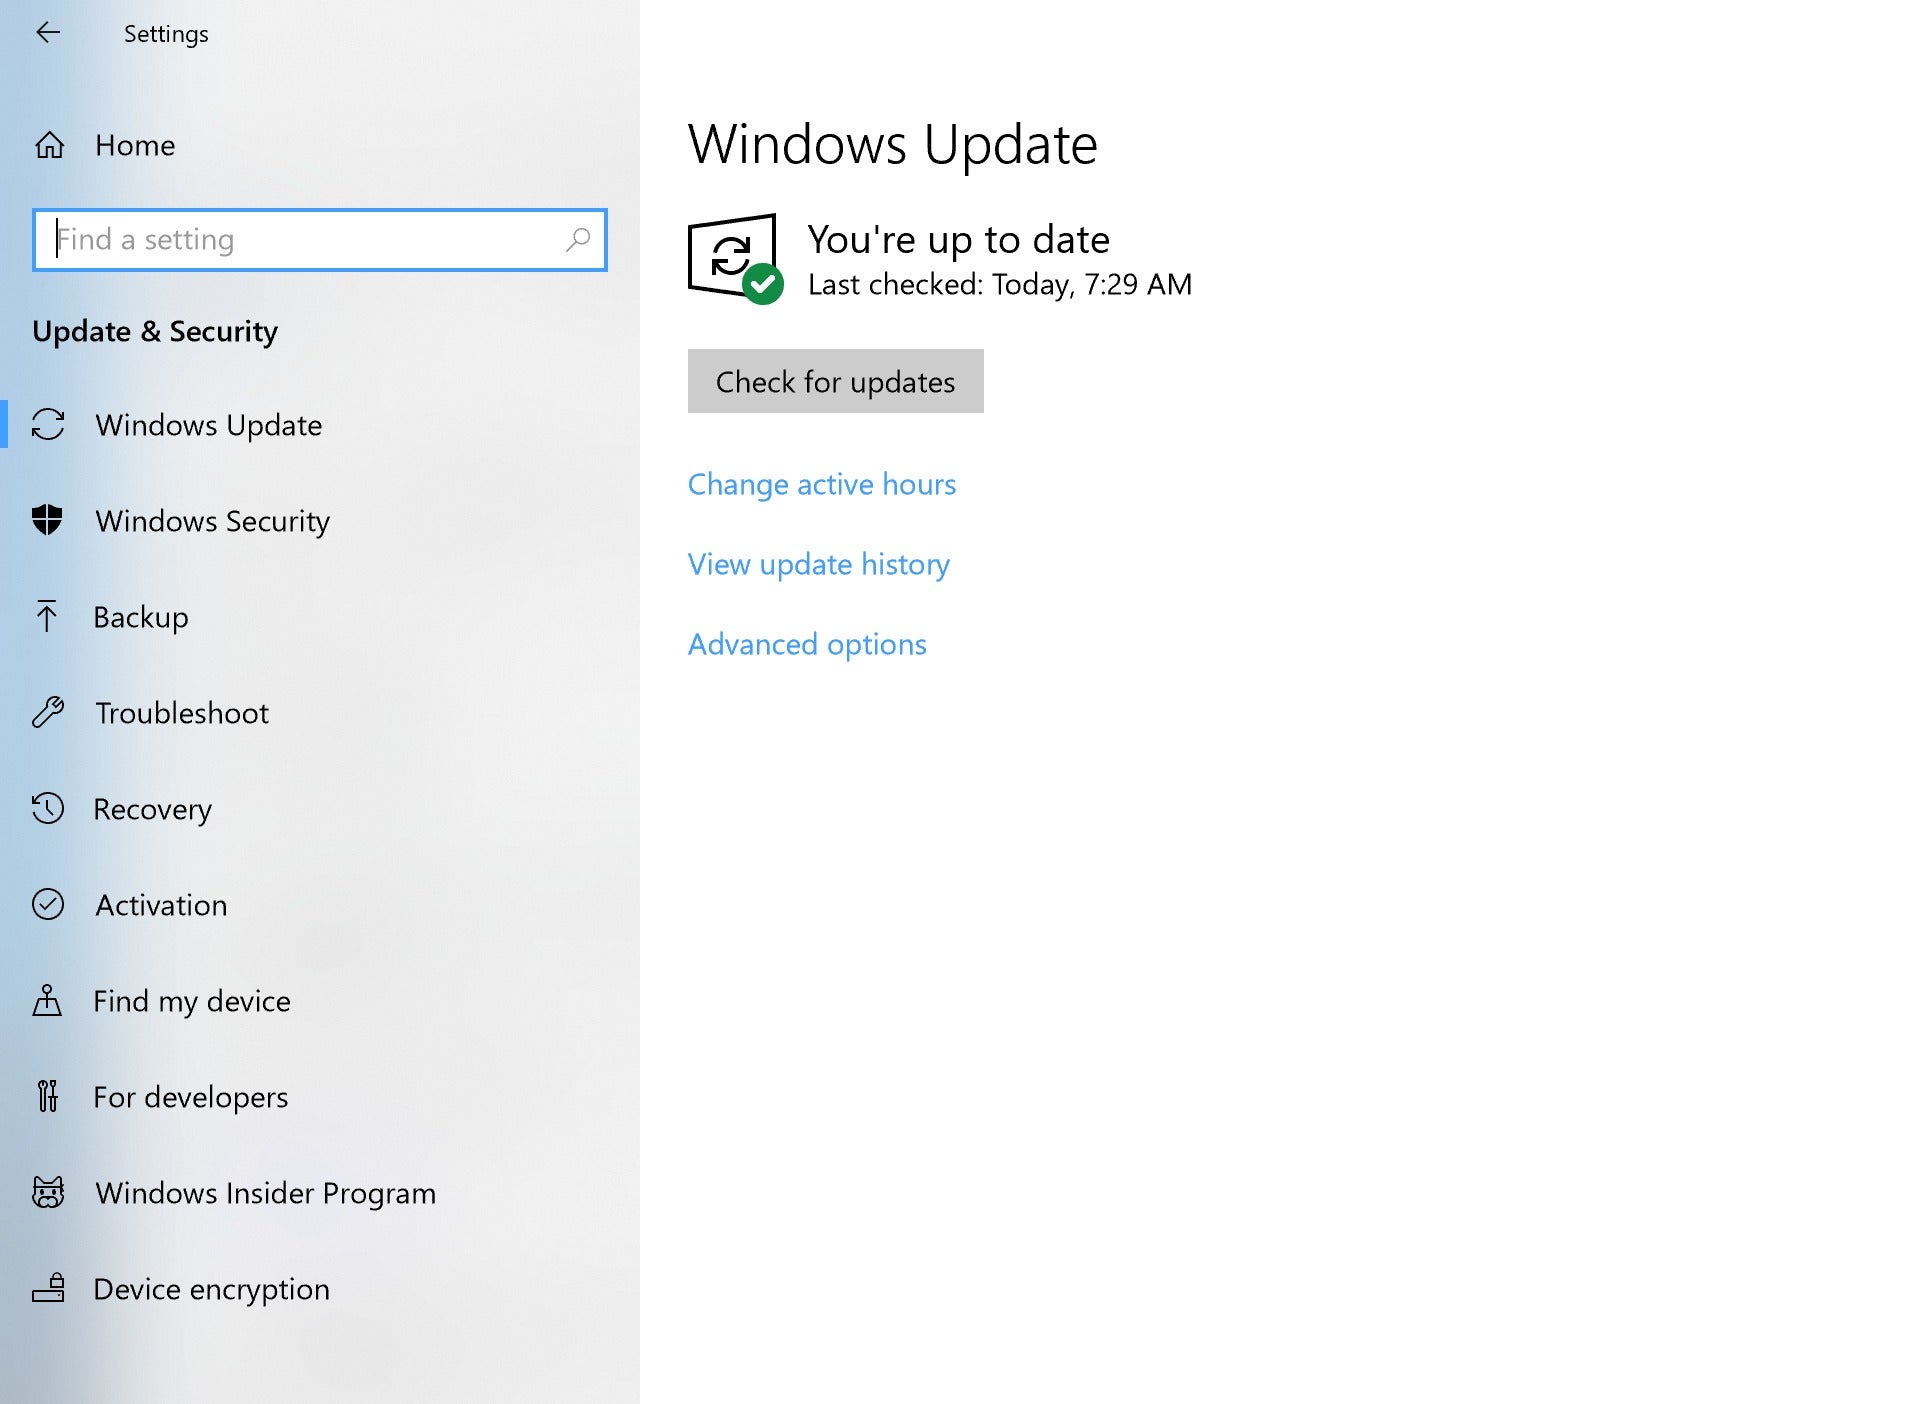
  • Check for Updates: Ensure your Windows 11 device is up-to-date before proceeding with the removal.
  • Use File Transfer Tools: Utilize file transfer utilities to move data between accounts, especially for large files.
  • Consider a Local Account Backup: Create a backup of the local account to ensure data security and facilitate account recovery if needed.

Conclusion:

Removing a Microsoft account from a Windows 11 device can be a necessary step for various reasons, including privacy concerns, account sharing, troubleshooting, or device disposal. By understanding the implications and following the provided instructions, users can effectively remove their Microsoft account while preserving data and maintaining device security. Remember to back up important files, choose strong passwords for local accounts, and carefully consider the impact of this action before proceeding.

How to unlink microsoft account from computer - burgertoo How to Link and Unlink Onedrive with microsoft account in Windows 11 - YouTube How to Remove Microsoft Account from Windows 11 [Guide]  Beebom
How do I unlink a separate Microsoft account from Windows 11? - Microsoft Community Cant Reactivate Windows 11 Pro Digital License After Unlinking Device from Microsoft Account How do I unlink my Microsoft Account from my computer?
Link or Unlink OneDrive with Microsoft Account in Windows 11 - YouTube How to unlink microsoft account from computer - kartzoom

Closure

Thus, we hope this article has provided valuable insights into Unlinking a Microsoft Account from Windows 11: A Comprehensive Guide. We appreciate your attention to our article. See you in our next article!

Navigating The Labyrinth: A Comprehensive Guide To Windows 11 Settings

Navigating the Labyrinth: A Comprehensive Guide to Windows 11 Settings

Introduction

With enthusiasm, let’s navigate through the intriguing topic related to Navigating the Labyrinth: A Comprehensive Guide to Windows 11 Settings. Let’s weave interesting information and offer fresh perspectives to the readers.

Buy Windows 11 User Guide: A Complete Guide to Master the New Windows 11 OS with Tips and Tricks

Windows 11, with its sleek design and enhanced features, offers a user experience that is both intuitive and powerful. However, beneath the surface lies a complex network of settings that can sometimes feel overwhelming, particularly for those who are new to the operating system or are accustomed to previous versions of Windows. This guide aims to provide a comprehensive exploration of Windows 11 settings, demystifying their functions and offering practical insights to enhance your computing experience.

Understanding the Settings App:

The Windows 11 Settings app serves as the central hub for customizing your operating system. Accessible through the Start menu or by pressing the Windows key + I, it provides a streamlined interface to manage various aspects of your PC, from system performance to privacy and security.

Essential Settings to Master:

1. System: This section encompasses core system functionalities, including:

  • Display: Adjust screen resolution, brightness, and color settings for optimal visual experience.
  • Sound: Control audio output devices, adjust volume levels, and personalize sound effects.
  • Notifications: Manage system notifications, configure their appearance, and determine which apps can send notifications.
  • Power & Battery: Optimize power consumption, adjust sleep settings, and manage battery life.
  • Storage: Monitor disk space usage, manage storage drives, and optimize storage performance.
  • Bluetooth & Devices: Connect and manage Bluetooth devices, configure wireless connections, and access device settings.
  • Printing: Configure printers, manage print queues, and access printing preferences.
  • About: Access system information, including hardware specifications, version details, and system updates.

2. Personalization: Customize the visual appearance and functionality of your Windows experience:

  • Themes: Choose from pre-defined themes or create custom themes to personalize your desktop.
  • Background: Set a background image, solid color, or slideshow for your desktop.
  • Colors: Customize accent colors, app mode, and title bar colors to match your preferences.
  • Start: Customize the Start menu layout, pin frequently used apps, and manage the appearance of live tiles.
  • Taskbar: Manage taskbar icons, adjust taskbar size, and configure taskbar settings.
  • Lock Screen: Set a background image, choose a lock screen app, and manage lock screen notifications.

3. Apps: Manage installed applications, control their permissions, and configure default settings:

  • Apps & Features: Uninstall or modify installed applications, view app usage, and manage app permissions.
  • Default Apps: Set default applications for various file types, protocols, and actions.
  • Offline Maps: Download offline maps for navigation and exploration.
  • Optional Features: Install or remove optional features, such as Windows Subsystem for Linux or .NET Framework.

4. Accounts: Manage user accounts, sign in options, and privacy settings:

  • Your Account: Access your Microsoft account settings, manage sign-in options, and synchronize data across devices.
  • Family & Other Users: Add or manage user accounts, set parental controls, and manage guest access.
  • Sync Your Settings: Configure settings synchronization across your devices, including themes, passwords, and other preferences.

5. Privacy & Security: Control data collection, manage privacy settings, and enhance system security:

  • General: Manage location services, microphone access, camera access, and other privacy-related settings.
  • App Permissions: Control app access to specific features, such as camera, microphone, location, and contacts.
  • Windows Security: Manage antivirus protection, firewall settings, and other security features.
  • Recovery: Configure system recovery options, create a recovery drive, and manage system backups.

6. Update & Security: Manage system updates, configure security settings, and access recovery options:

  • Windows Update: Check for and install system updates, configure update settings, and manage update history.
  • Windows Security: Manage antivirus protection, firewall settings, and other security features.
  • Recovery: Configure system recovery options, create a recovery drive, and manage system backups.

7. Accessibility: Configure accessibility settings to enhance usability for individuals with disabilities:

  • Narrator: Use a screen reader to navigate the computer and access content.
  • Magnifier: Enlarge the screen to improve visibility.
  • High Contrast: Enhance visual contrast to improve readability.
  • Keyboard: Configure keyboard shortcuts and input settings.
  • Mouse: Customize mouse settings, including pointer speed and sensitivity.

Beyond the Basics: Advanced Settings and Customization

1. Performance Options: Optimize system performance and resource allocation:

  • Visual Effects: Adjust visual effects to balance performance and aesthetics.
  • Advanced System Settings: Access advanced system settings, including system properties, environment variables, and performance options.
  • Startup: Manage programs that launch automatically at startup.
  • Power Options: Fine-tune power settings for optimal power consumption and performance.

2. Network & Internet: Configure network settings, manage Wi-Fi connections, and access network troubleshooting tools:

  • Wi-Fi: Manage Wi-Fi networks, connect to hidden networks, and configure Wi-Fi settings.
  • Ethernet: Configure wired network connections, manage network adapters, and access network properties.
  • VPN: Configure and manage virtual private networks for secure internet access.
  • Mobile Hotspot: Share your internet connection with other devices.

3. Time & Language: Configure date and time settings, manage language preferences, and adjust regional settings:

  • Region: Configure language, region, and time zone settings.
  • Language: Add and manage languages, set preferred languages, and configure input methods.
  • Date & Time: Configure date and time settings, synchronize with internet time, and manage time zone settings.

4. Gaming: Configure gaming settings, manage game bar features, and access game mode settings:

  • Game Mode: Optimize system performance for gaming.
  • Game Bar: Manage game bar features, such as recording gameplay and capturing screenshots.
  • Xbox Game Pass: Access Xbox Game Pass subscriptions and manage game libraries.

5. Developer Settings: Access developer tools and features, including debugging tools and SDKs:

  • For Developers: Enable developer mode, access developer tools, and manage developer settings.
  • Windows SDK: Install and manage Windows Software Development Kits.
  • Developer Features: Access advanced development features, such as debugging tools and simulators.

Frequently Asked Questions (FAQs) about Windows 11 Settings

Q: How can I change my desktop background in Windows 11?

A: Navigate to Settings > Personalization > Background and select your preferred background image, solid color, or slideshow.

Q: How do I adjust the screen brightness in Windows 11?

A: You can use the brightness slider in the Action Center (accessible by clicking the notification icon in the taskbar) or adjust it through Settings > System > Display.

Q: How can I connect a Bluetooth device to my Windows 11 PC?

A: Go to Settings > Bluetooth & Devices and turn on Bluetooth. Then, put your Bluetooth device in pairing mode and select it from the list of available devices.

Q: How do I manage notifications in Windows 11?

A: Access Settings > System > Notifications to manage notification settings for individual apps and adjust notification preferences.

Q: How can I uninstall an app in Windows 11?

A: Navigate to Settings > Apps > Apps & Features, find the app you want to uninstall, and click Uninstall.

Q: How do I change the default browser in Windows 11?

A: Go to Settings > Apps > Default Apps, select Web Browser, and choose your preferred browser from the list.

Q: How can I access system information in Windows 11?

A: Open Settings > System > About to view system information, including hardware specifications, version details, and system updates.

Tips for Efficiently Navigating Windows 11 Settings:

  • Utilize the search bar: The search bar at the top of the Settings app allows you to quickly find specific settings by typing keywords.
  • Explore the navigation pane: The navigation pane on the left side of the Settings app provides a clear overview of all available settings categories.
  • Use keyboard shortcuts: Keyboard shortcuts can streamline navigation and access specific settings quickly. For example, Windows key + I opens the Settings app, and Windows key + X opens the Quick Link menu.
  • Familiarize yourself with common settings: Spend time exploring the most frequently used settings to become comfortable with their locations and functions.
  • Consult online resources: Numerous online resources, including Microsoft’s official documentation, provide detailed explanations and tutorials on specific settings.

Conclusion:

Mastering Windows 11 settings is essential for unlocking the full potential of your PC and tailoring it to your specific needs. By understanding the different categories and options within the Settings app, you can personalize your computing experience, optimize system performance, enhance security, and ensure smooth operation. This guide provides a comprehensive starting point for navigating the intricate world of Windows 11 settings, empowering you to personalize and optimize your computing environment for maximum efficiency and satisfaction. Remember, continuous exploration and experimentation are key to discovering the hidden depths of Windows 11 settings and maximizing your computing experience.

Buy Windows 11 User Guide for Beginners: A Comprehensive Guide to Master Windows 11 Operating Navigating The Labyrinth: A Comprehensive Guide To Legend Piece Map Levels - France Location on Navigating The Labyrinth: A Comprehensive Guide To Map Run 6 - Map France of Lourdes labeled
Navigating The Labyrinth: A Comprehensive Guide To The Full Run 3 Map - Map France of Lourdes Navigating The Labyrinth System Requirements - Can I Run It? - PCGameBenchmark Navigating The Labyrinth Screenshots ยท SteamDB
Navigating The Labyrinth on Steam Navigating The Labyrinth: A Comprehensive Guide To The Long Walk Map - Map France of Lourdes labeled

Closure

Thus, we hope this article has provided valuable insights into Navigating the Labyrinth: A Comprehensive Guide to Windows 11 Settings. We appreciate your attention to our article. See you in our next article!

Erasing The Footprint: A Comprehensive Guide To Removing Windows 11 From Your System

Erasing the Footprint: A Comprehensive Guide to Removing Windows 11 from Your System

Introduction

With enthusiasm, let’s navigate through the intriguing topic related to Erasing the Footprint: A Comprehensive Guide to Removing Windows 11 from Your System. Let’s weave interesting information and offer fresh perspectives to the readers.

Erasing the Footprint: A Comprehensive Guide to Removing Windows 11 from Your System

10 Tips to Reduce and Protect Your Digital Footprint in 2024

The decision to remove Windows 11 from a system is often driven by a desire for a fresh start, the need to switch to a different operating system, or the intention to repurpose the hardware. Regardless of the motivation, the process of completely removing Windows 11 requires a thorough understanding of the steps involved and the potential consequences. This comprehensive guide aims to provide a clear and detailed roadmap for safely and effectively removing Windows 11 from a system, ensuring a clean slate for future endeavors.

Understanding the Process: A Multi-faceted Approach

Removing Windows 11 from a system involves more than simply deleting files. It entails erasing the operating system’s core components, including the boot loader, system files, and registry entries. This process can be achieved through various methods, each with its own advantages and considerations.

1. Reinstallation with a Clean Install:

This method involves installing a fresh copy of Windows 11, effectively replacing the existing installation. This process overwrites the old operating system, ensuring a clean slate. It is a relatively straightforward approach, particularly for users familiar with Windows installations.

2. Formatting the Hard Drive:

This method involves completely erasing the entire hard drive, including all data and operating systems. This is the most thorough approach, ensuring complete removal of Windows 11 and all its associated files. However, it also involves data loss, requiring a backup of essential files before proceeding.

3. Using Third-Party Tools:

Specialized software tools designed for removing operating systems can automate the process, streamlining the removal of Windows 11. These tools often offer features like secure data wiping, ensuring the complete removal of sensitive information. However, it is crucial to select reputable software from trusted sources to avoid potential security risks.

The Importance of Backup:

Before embarking on any method of removing Windows 11, it is crucial to back up all essential data. This includes personal files, documents, applications, and any other information that needs to be preserved. This precaution safeguards against accidental data loss during the removal process.

Step-by-Step Guide: A Detailed Breakdown of the Process

1. Backing Up Data:

  • Identify Essential Files: Determine the files that need to be backed up. This includes documents, photos, videos, music, and any other important data.
  • Choose a Backup Method: Select a suitable backup method, such as external hard drives, cloud storage, or network drives.
  • Perform the Backup: Execute the backup process, ensuring all essential files are safely stored in the chosen location.

2. Choosing the Removal Method:

  • Clean Install: If a fresh start is desired, a clean install of Windows 11 is a suitable option.
  • Formatting the Hard Drive: For complete removal of Windows 11 and all data, formatting the hard drive is the most thorough approach.
  • Third-Party Tools: If seeking automation and advanced features, consider using specialized software tools for removing operating systems.

3. Executing the Removal:

  • Clean Install: Download the Windows 11 installation media and boot from it. Follow the on-screen instructions to perform a clean install.
  • Formatting the Hard Drive: Access the BIOS or UEFI settings and select the option to format the hard drive. Choose a formatting method, such as NTFS or FAT32, and proceed with the formatting process.
  • Third-Party Tools: Install the chosen software and follow its instructions to remove Windows 11. Ensure the tool is reputable and trusted.

4. Post-Removal Steps:

  • Verify Removal: After the removal process, restart the system and verify that Windows 11 is no longer present.
  • Install New Operating System: If desired, install a new operating system, such as Linux or another version of Windows.
  • Restore Data: Restore the backed-up data to the newly formatted hard drive or the new operating system.

Potential Challenges and Considerations:

  • Data Loss: Formatting the hard drive results in complete data loss, making backup essential.
  • System Compatibility: Ensure the chosen operating system is compatible with the hardware before attempting installation.
  • Software Licensing: Understand the licensing requirements for the new operating system.
  • Driver Issues: Ensure compatible drivers are available for the hardware components after installing a new operating system.

Frequently Asked Questions:

Q: Is it possible to completely remove Windows 11 without data loss?

A: No, formatting the hard drive, the most thorough method for removing Windows 11, results in complete data loss. A clean install of Windows 11 does not erase all data but overwrites the existing operating system.

Q: Can I remove Windows 11 without reinstalling an operating system?

A: While it is possible to remove Windows 11 without installing a new operating system, the system will be unusable without a functional operating system.

Q: What happens to my data if I format the hard drive?

A: Formatting the hard drive erases all data on the drive, making it essential to back up all essential files before proceeding.

Q: Are there any risks involved in removing Windows 11?

A: Removing Windows 11 can lead to data loss if a backup is not performed. Additionally, incompatible hardware drivers can cause issues after installing a new operating system.

Tips for Successful Removal:

  • Back up all data before proceeding.
  • Choose a reputable third-party tool if using software for removal.
  • Understand the licensing requirements for the new operating system.
  • Ensure compatible drivers are available for the hardware components.

Conclusion:

Removing Windows 11 from a system requires a thorough understanding of the process and careful consideration of potential consequences. By following the steps outlined in this guide, users can effectively remove Windows 11 from their systems, ensuring a clean slate for future endeavors. It is crucial to prioritize data backup, select the appropriate removal method, and address any potential challenges to ensure a smooth and successful removal process.

How To Remove Digital Footprints: Your Updated Guide A Comprehensive Guide to Deleting Your Digital Footprint in 2023 - Free Disposable Temporary Email A Comprehensive Guide to Removing Your Digital Footprints
Windows 11 reduces disk footprint for better performance How to Remove Windows 11 from Dual Boot Safely Remove windows 11 download - meganelo
Tips for Deleting Your Digital Footprint - TechBullion How To Remove Digital Footprints: Your Updated Guide

Closure

Thus, we hope this article has provided valuable insights into Erasing the Footprint: A Comprehensive Guide to Removing Windows 11 from Your System. We appreciate your attention to our article. See you in our next article!

The Perpetually Restarting PC: Unraveling The Loop Of Frustration

The Perpetually Restarting PC: Unraveling the Loop of Frustration

Introduction

With great pleasure, we will explore the intriguing topic related to The Perpetually Restarting PC: Unraveling the Loop of Frustration. Let’s weave interesting information and offer fresh perspectives to the readers.

The Perpetually Restarting PC: Unraveling the Loop of Frustration

How to Fix a Windows 10 Restart Loop

The dreaded restart loop. A scenario familiar to many computer users, it manifests as a relentless cycle of powering on, displaying the familiar Windows logo, and then abruptly restarting, only to repeat the process endlessly. This frustrating behavior can stem from a variety of underlying issues, each demanding a distinct approach to resolution.

Understanding the causes behind this cyclical predicament is paramount to effectively tackling it. A comprehensive examination of the potential culprits can illuminate the path towards restoring your PC’s functionality.

Common Culprits Behind the Restart Loop:

  1. Faulty Hardware: A malfunctioning component can trigger the restart loop. This could include:

    • Failing Hard Drive: A hard drive nearing its end of life can exhibit erratic behavior, leading to data corruption and system instability, ultimately resulting in the restart loop.
    • Defective RAM: Damaged or incompatible RAM modules can cause memory errors, forcing the system to reboot repeatedly.
    • Overheating Components: Components like the CPU or GPU can overheat, leading to system crashes and restarts.
    • Power Supply Issues: A faulty power supply can provide insufficient or unstable power, leading to unpredictable system behavior, including restarts.
    • Loose Connections: Loose connections within the PC’s internal components can disrupt data flow, causing the system to malfunction and reboot.
  2. Software Conflicts: Incompatible or corrupted software can disrupt the system’s stability, leading to restarts. This could include:

    • Driver Issues: Outdated, corrupted, or incompatible drivers can cause conflicts, leading to system instability and restarts.
    • Malware Infection: Malware can corrupt system files, interfere with system processes, and trigger restarts.
    • Software Conflicts: Incompatible software programs can clash with each other, causing system instability and restarts.
  3. Operating System Issues: Problems within the operating system itself can trigger the restart loop. These issues could include:

    • Corrupted System Files: System files can become corrupted due to various factors, such as hardware failures, malware, or improper updates.
    • Boot Sector Errors: Errors in the boot sector, which contains essential system information, can prevent the operating system from loading properly, leading to restarts.
    • Incorrect System Settings: Improper system configurations, such as incorrect BIOS settings or conflicting boot order, can lead to system instability and restarts.

Diagnosing the Cause:

Identifying the root cause of the restart loop is crucial for effective troubleshooting. A systematic approach can help pinpoint the culprit:

  1. Check for Error Messages: Pay close attention to any error messages displayed during the boot process. These messages can provide valuable clues about the underlying issue.
  2. Monitor System Temperatures: Use system monitoring software to check the temperatures of your CPU, GPU, and other components. Excessive temperatures can indicate overheating issues.
  3. Run a Memory Test: Use a memory testing tool to diagnose potential RAM problems.
  4. Check Hard Drive Health: Utilize hard drive diagnostic tools to assess the health of your hard drive.
  5. Scan for Malware: Run a comprehensive malware scan using reputable antivirus software.
  6. Check for Software Conflicts: Identify any recently installed software or drivers that could be causing conflicts.
  7. Review System Logs: Examine system logs for error messages or unusual events that could indicate the cause of the restart loop.

Troubleshooting Strategies:

Once the potential cause has been identified, specific troubleshooting strategies can be employed:

  1. Hardware Issues:

    • Replace Faulty Components: If a hardware component is suspected to be faulty, replace it with a known working component.
    • Check Connections: Ensure all internal connections are secure and free from corrosion.
    • Clean Components: Clean dust and debris from components, particularly the CPU heatsink and fan.
    • Reseat Components: Reseat RAM modules, graphics cards, and other expansion cards to ensure proper contact.
  2. Software Issues:

    • Uninstall Conflicting Software: Remove any recently installed software or drivers that could be causing conflicts.
    • Update Drivers: Ensure all drivers are up-to-date and compatible with your system.
    • Run a System Restore: Restore your system to a previous point in time before the restart loop began.
    • Perform a Clean Boot: Boot your system in a minimal configuration to isolate any software conflicts.
    • Scan for Malware: Run a thorough malware scan to eliminate any potential infections.
  3. Operating System Issues:

    • Repair System Files: Use the System File Checker (SFC) tool to scan for and repair corrupted system files.
    • Run a Boot-Time Repair: Use the Windows Recovery Environment to perform a boot-time repair.
    • Reinstall Operating System: If other troubleshooting steps fail, consider reinstalling the operating system.

FAQs: Addressing Common Queries

Q: Can a restart loop be caused by a power surge?

A: Yes, a power surge can damage hardware components, including the motherboard, hard drive, or RAM, potentially leading to a restart loop.

Q: Can a restart loop occur due to a faulty CMOS battery?

A: While a faulty CMOS battery won’t directly cause a restart loop, it can lead to incorrect system settings, potentially contributing to instability and restarts.

Q: Is a restart loop always a sign of a serious problem?

A: Not necessarily. Sometimes, a simple software conflict or a driver issue can trigger a restart loop. However, persistent restarts often indicate a deeper underlying problem.

Q: Can a restart loop be caused by a virus?

A: Yes, certain types of malware can disrupt system processes, corrupt files, and trigger restarts.

Q: What are some preventive measures to avoid a restart loop?

A: Regularly updating drivers, running antivirus scans, keeping your system clean, and maintaining proper cooling can help prevent restart loops.

Tips for Effective Troubleshooting:

  • Document the Symptoms: Record the exact error messages, the frequency of restarts, and any other relevant information.
  • Isolate the Problem: Try booting the system in safe mode or with minimal hardware to isolate the cause.
  • Seek Professional Help: If you’re unable to resolve the issue yourself, consult a qualified technician.
  • Backup Your Data: Regularly back up your important data to prevent loss in case of system failure.

Conclusion:

A restart loop can be a frustrating and perplexing issue. Understanding the potential causes and employing systematic troubleshooting strategies can help pinpoint the root cause and restore your PC’s functionality. While some issues might require professional assistance, many can be addressed through careful diagnosis and appropriate action. Remember, a proactive approach to system maintenance, including regular updates, antivirus scans, and proper cooling, can significantly reduce the likelihood of encountering this recurring problem.

Windows 11 Upgrade Loop - Get Latest Windows 11 Update Windows 11 Restart Loop How to Fix a Windows 10 Restart Loop
The computer restarted unexpectedly or encountered an unexpected loop error on Windows 10/11 How to Fix Computer that Keeps Restarting? PC Rebooting Issue - YouTube - Your PC Ran Into a Problem and Needs to Restart [Fixed] - What Does "Your PC Ran Into a
How to Fix Acer Computer Boot Loop, Restarting & Stuck Loading Issues Windows 11 Restart Loop

Closure

Thus, we hope this article has provided valuable insights into The Perpetually Restarting PC: Unraveling the Loop of Frustration. We thank you for taking the time to read this article. See you in our next article!

Unlinking Your Microsoft Account From Windows 11: A Comprehensive Guide

Unlinking Your Microsoft Account from Windows 11: A Comprehensive Guide

Introduction

In this auspicious occasion, we are delighted to delve into the intriguing topic related to Unlinking Your Microsoft Account from Windows 11: A Comprehensive Guide. Let’s weave interesting information and offer fresh perspectives to the readers.

Unlinking Your Microsoft Account from Windows 11: A Comprehensive Guide

Link or Unlink OneDrive with Microsoft Account in Windows 11 - YouTube

Windows 11, like its predecessors, is deeply integrated with Microsoft accounts. While this integration offers numerous benefits, such as cloud synchronization, app access, and seamless updates, it can also feel restrictive for some users. This guide explores the process of unlinking your Microsoft account from Windows 11, delving into the reasons why you might choose to do so, the implications, and the steps involved.

Understanding the Implications of Unlinking

Before proceeding, it is crucial to understand the consequences of removing your Microsoft account from Windows 11.

  • Loss of Cloud Synchronization: Your files, settings, and applications will no longer be synchronized across devices. This means any data stored in the cloud will not be accessible on your Windows 11 device.
  • Limited App Access: You will lose access to apps purchased from the Microsoft Store and installed using your Microsoft account.
  • Reduced Functionality: Features like "Find My Device" and "Your Phone" will become unavailable.
  • No Automatic Updates: Windows updates will not be automatically downloaded and installed. You will need to manually check for and install updates.
  • Loss of Microsoft Account Benefits: You will no longer enjoy the advantages of a Microsoft account, including access to OneDrive, Outlook, and other Microsoft services.

Despite the potential downsides, there are valid reasons why you might consider unlinking your Microsoft account from Windows 11.

  • Privacy Concerns: Some users are wary of the data collected by Microsoft through their account. Unlinking your account can minimize the amount of information shared with the company.
  • Control Over Data: Unlinking allows you to manage your data locally, without relying on cloud storage. This offers greater control over your personal information.
  • Troubleshooting: If you encounter issues related to your Microsoft account, unlinking it can help diagnose and resolve problems.
  • Legacy Systems: If you are using an older PC with limited resources, unlinking your account can improve performance by reducing background processes.
  • Alternative Accounts: You might prefer to use a local account for greater security or to avoid the limitations of a Microsoft account.

The Process of Unlinking Your Microsoft Account

Unlinking your Microsoft account from Windows 11 is a straightforward process. However, it is essential to back up your important data before proceeding.

Step 1: Accessing Account Settings

  1. Open the Settings app by pressing Windows key + I.
  2. Navigate to Accounts in the left-hand menu.

Step 2: Choosing "Sign in with a local account instead"

  1. Select Your info from the options on the right side.
  2. Click on Sign in with a local account instead.

Step 3: Creating a Local Account

  1. You will be prompted to create a local account. Choose a username and password for this account.
  2. Click Next to proceed.
  3. You will be asked to confirm your choice. Click Next again to finalize the process.

Step 4: Final Confirmation

  1. Windows will now attempt to switch to your new local account.
  2. You will be prompted to restart your computer. This step is necessary for the changes to take effect.

Once your computer restarts, you will be signed in with your newly created local account. Your Microsoft account will be unlinked, and you will no longer be signed in with it.

Frequently Asked Questions

Q: Can I re-link my Microsoft account later?

A: Yes, you can re-link your Microsoft account at any time by following the same steps but choosing "Sign in with a Microsoft account instead" in the "Your info" section of the Accounts settings.

Q: What happens to my files and apps after unlinking?

A: Files stored on your local drive will remain accessible. However, files stored in OneDrive will only be accessible through your Microsoft account on other devices. Apps downloaded from the Microsoft Store will no longer be available.

Q: Will I lose access to my email and other Microsoft services?

A: You will still be able to access your email and other Microsoft services through a web browser or by using separate applications, but they will not be integrated into Windows 11.

Q: Can I use a Microsoft account for one user and a local account for another?

A: Yes, you can have multiple accounts on your Windows 11 device, including both Microsoft and local accounts. This allows for separate user profiles with different settings and data.

Q: How do I transfer my files to a local account?

A: You can manually copy files from your OneDrive folder to your local drive or use a file transfer tool. However, this will not transfer any settings or applications.

Tips for Unlinking Your Microsoft Account

  • Back up your data: Before unlinking your account, ensure you have backed up all important files and settings.
  • Download apps locally: If you rely on any apps downloaded from the Microsoft Store, consider downloading them directly from the developer’s website to ensure continued access.
  • Consider using a cloud storage alternative: If you wish to continue using cloud storage, explore alternatives like Google Drive or Dropbox.
  • Review your settings: Before unlinking, review your privacy settings and ensure you are comfortable with the level of data sharing.
  • Contact Microsoft support: If you encounter any issues or have questions during the process, contact Microsoft support for assistance.

Conclusion

Unlinking your Microsoft account from Windows 11 can be a beneficial step for users seeking greater privacy, control over their data, or troubleshooting solutions. However, it is essential to understand the implications of this decision and to take appropriate precautions to ensure a smooth transition. By carefully considering your needs and following the outlined steps, you can successfully unlink your Microsoft account and enjoy a more personalized Windows 11 experience.

How do I unlink a separate Microsoft account from Windows 11? - Microsoft Community How to Remove Microsoft Account from Windows 11 [Guide]  Beebom How to unlink microsoft account from computer - kartzoom
How do I unlink a separate Microsoft account from Windows 11? - Microsoft Community How do I unlink a Microsoft account from my PC? - Microsoft Community Cant Reactivate Windows 11 Pro Digital License After Unlinking Device from Microsoft Account
How do I unlink my Microsoft Account from my computer? How to Remove a Microsoft Account from Windows 11

Closure

Thus, we hope this article has provided valuable insights into Unlinking Your Microsoft Account from Windows 11: A Comprehensive Guide. We thank you for taking the time to read this article. See you in our next article!

Understanding Overscan Adjustment In Windows 11: Optimizing Your Display Experience

Understanding Overscan Adjustment in Windows 11: Optimizing Your Display Experience

Introduction

With great pleasure, we will explore the intriguing topic related to Understanding Overscan Adjustment in Windows 11: Optimizing Your Display Experience. Let’s weave interesting information and offer fresh perspectives to the readers.

Understanding Overscan Adjustment in Windows 11: Optimizing Your Display Experience

Fix Overscan in Windows 11/10 to Fit to Screen

In the realm of digital displays, achieving a perfect visual experience hinges on the accurate representation of the intended image. Overscan, a phenomenon where the displayed image extends beyond the physical boundaries of the screen, can disrupt this harmony, leading to cropped content, distorted proportions, and an overall less-than-ideal viewing experience. Windows 11, with its focus on user-centricity and visual refinement, introduces robust tools to address overscan and empower users to tailor their display settings for optimal visual fidelity.

Overscan: A Deeper Dive

Overscan, in its simplest form, refers to the display of an image beyond the physical limits of the screen. This occurs when the display’s electronic circuitry expands the image signal, resulting in the image exceeding the screen’s active area. While historically intended to compensate for limitations in older television technology, overscan can pose significant issues in modern displays, particularly for computer monitors.

The Challenges of Overscan

Overscan can manifest in several ways, each impacting the user experience:

  • Cropped Content: Overscan can obscure crucial elements of the image, such as text, icons, or essential details, leading to incomplete information and frustration.
  • Distorted Aspect Ratios: The expanded image can distort the intended proportions of the content, resulting in stretched or squashed visuals, compromising the aesthetic appeal and potentially affecting the intended design.
  • Reduced Viewing Area: Overscan effectively reduces the usable display area, limiting the amount of content that can be displayed on the screen. This can be particularly problematic for users who rely on extensive screen real estate for productivity tasks or entertainment.

Windows 11: Empowering Display Control

Windows 11 acknowledges the importance of accurate image representation and provides users with granular control over their display settings, including the ability to address overscan. This empowers users to fine-tune their display experience to match their specific needs and preferences.

Understanding Display Settings in Windows 11

Windows 11’s display settings offer a comprehensive suite of options to customize the visual experience. To access these settings:

  1. Open Settings: Click the Start button and select "Settings."
  2. Navigate to System: Choose "System" from the left-hand menu.
  3. Select Display: Click "Display" to access display-related settings.

Addressing Overscan in Windows 11

Windows 11 offers two primary methods to address overscan:

1. Scaling and Layout Settings:

  • Scaling: Windows 11 allows users to adjust the scaling of their display to accommodate different screen resolutions and sizes. This setting can effectively compensate for overscan by ensuring that the image fits within the physical boundaries of the screen.
  • Layout: Windows 11 offers a "Layout" option within the "Scaling and layout" settings. This feature allows users to fine-tune the placement of elements on the screen, ensuring that all content is visible and not obscured by overscan.

2. Advanced Display Settings:

  • Display Adapter Properties: Users can access more advanced display settings by right-clicking on their desktop and selecting "Display settings." This opens the "Display settings" window, where users can access "Advanced display settings" for their primary display.
  • Monitor Settings: Within "Advanced display settings," users can access the "Monitor" tab, which provides access to specific settings for their connected display. These settings often include an option to adjust the display’s overscan, enabling users to fine-tune the image’s boundaries and ensure accurate representation.

The Benefits of Overscan Adjustment

Adjusting overscan settings in Windows 11 offers numerous benefits for users:

  • Enhanced Visual Fidelity: Correcting overscan ensures that the displayed image accurately reflects the intended content, preserving its original proportions and detail.
  • Improved User Experience: By eliminating cropped content and distorted visuals, overscan adjustment enhances the user experience, making it easier to consume information and engage with digital content.
  • Increased Productivity: By maximizing the usable display area, overscan adjustment allows users to view more content on their screen, boosting productivity for tasks involving extensive information display.
  • Optimized Viewing Pleasure: Overscan adjustment ensures that entertainment content, such as movies and games, is displayed as intended, enhancing the viewing experience and maximizing enjoyment.

FAQs: Overscan Adjustment in Windows 11

Q: How do I determine if my display is experiencing overscan?

A: Look for visual cues such as cropped content, distorted proportions, or a noticeable black border around the image. If you notice any of these signs, it’s likely that overscan is occurring.

Q: Can I adjust overscan settings for all connected displays?

A: Windows 11 allows you to adjust overscan settings for each connected display individually. This ensures that you can tailor the settings to match the specific characteristics of each display.

Q: What if I can’t find overscan settings in my display’s driver?

A: If the display driver doesn’t offer specific overscan settings, you can still adjust scaling and layout settings within Windows 11 to compensate for overscan.

Q: Is it necessary to adjust overscan settings for all displays?

A: While overscan adjustment is not universally required, it is recommended to check and adjust settings for each display, especially if you experience any of the issues mentioned above.

Tips for Optimizing Overscan Adjustment

  • Experiment with Different Settings: Explore various scaling and layout options to find the best configuration for your specific display and content.
  • Use Test Images: Utilize test images with clear borders and patterns to visually assess the effects of overscan adjustment.
  • Consult Display Documentation: Refer to the documentation for your display to understand its specific overscan settings and capabilities.
  • Seek Assistance: If you encounter difficulties adjusting overscan settings, consult online resources or contact the manufacturer of your display for support.

Conclusion: Achieving Optimal Display Performance

Overscan adjustment is a crucial aspect of optimizing the display experience in Windows 11. By understanding the challenges posed by overscan and leveraging the tools provided by Windows 11, users can ensure that their content is displayed accurately, enhancing visual fidelity, improving user experience, and maximizing productivity and entertainment enjoyment. With the right knowledge and configuration, users can unlock the full potential of their displays and enjoy a truly immersive and satisfying visual experience.

Overscaling Or Overscan in Windows 10 and Windows 11 [Fixed] Overscaling Or Overscan in Windows 10 and Windows 11 [Fixed] Fix Overscan in Windows 11/10 to Fit to Screen
Overscaling Or Overscan in Windows 10 and Windows 11 [Fixed] Overscaling Or Overscan in Windows 10 and Windows 11 [Fixed] Fix: "Overscan in Windows 11/10 to Fit the Screen" issue
Fix Overscan in Windows 11/10 to Fit to Screen Overscaling Or Overscan in Windows 10 and Windows 11 [Fixed]

Closure

Thus, we hope this article has provided valuable insights into Understanding Overscan Adjustment in Windows 11: Optimizing Your Display Experience. We hope you find this article informative and beneficial. See you in our next article!

Obtaining A Windows 10 Operating System: A Comprehensive Guide

Obtaining a Windows 10 Operating System: A Comprehensive Guide

Introduction

In this auspicious occasion, we are delighted to delve into the intriguing topic related to Obtaining a Windows 10 Operating System: A Comprehensive Guide. Let’s weave interesting information and offer fresh perspectives to the readers.

Obtaining a Windows 10 Operating System: A Comprehensive Guide

Windows 10 Operating System Utility: A Guide to Built-in Utility Programs and Their Functions

Windows 10, Microsoft’s flagship operating system, has become a ubiquitous presence in the world of personal computing. Its widespread adoption is a testament to its user-friendly interface, robust security features, and extensive application compatibility. While many users opt for a paid version, obtaining a legitimate copy of Windows 10 without incurring any cost is possible through various avenues. This guide provides a comprehensive understanding of the options available for acquiring Windows 10 free of charge, emphasizing the importance of legitimate software acquisition and highlighting potential pitfalls.

Understanding the Legality of Free Windows 10 Acquisition

The primary method for obtaining Windows 10 is through purchase, either as a standalone operating system or as part of a new computer purchase. However, Microsoft offers specific programs and scenarios where acquiring Windows 10 without direct payment is permissible.

1. Windows 10 Upgrade Program:

This program, launched in 2015, allowed users with genuine copies of Windows 7 or Windows 8.1 to upgrade to Windows 10 for free. While this program has officially ended, some users might still be able to access it depending on their specific circumstances and the age of their computer.

2. Windows 10 for Education:

Educational institutions can access free versions of Windows 10 for their students and staff. This program is designed to facilitate learning and research activities within educational settings.

3. Windows 10 for Developers:

Developers can obtain a free version of Windows 10 for development purposes. This version, known as Windows 10 Insider Preview, allows developers to test new features and provide feedback to Microsoft.

4. Windows 10 for Specific Devices:

Microsoft may offer free versions of Windows 10 for specific devices, such as tablets or low-cost computers, as part of promotional campaigns or partnerships.

5. Free Trials:

Microsoft offers free trials of Windows 10 for a limited period. These trials allow users to experience the operating system before making a purchase decision.

Navigating the Legitimate Free Windows 10 Landscape

It is crucial to be aware of the various legitimate avenues for obtaining Windows 10 free of charge. Beware of websites offering "free" downloads that may contain malware or pirated software.

Potential Pitfalls and Risks of Illegitimate Downloads:

  • Malware and Viruses: Illegitimate downloads often contain malicious software that can compromise your computer’s security and steal your personal information.
  • Performance Issues: Pirated versions of Windows 10 may lack essential security updates and patches, leading to performance issues and vulnerabilities.
  • Legal Consequences: Downloading or using pirated software can have serious legal consequences, including fines and even jail time.

FAQs: Understanding Windows 10 Acquisition

1. Can I upgrade my existing Windows 7 or Windows 8.1 to Windows 10 for free?

  • The free upgrade program for Windows 10 has officially ended. However, some users might still be able to upgrade depending on their specific circumstances and the age of their computer.

2. Is it legal to download a "free" version of Windows 10 from a website?

  • Downloading Windows 10 from websites other than official Microsoft sources is generally not legal and may expose your computer to malware.

3. What are the benefits of using a legitimate copy of Windows 10?

  • Legitimate copies of Windows 10 receive regular security updates and patches, ensuring a secure and stable operating system.
  • You are entitled to technical support from Microsoft for any issues you may encounter.
  • You avoid legal consequences associated with using pirated software.

4. How can I verify if my Windows 10 installation is genuine?

  • You can verify the authenticity of your Windows 10 installation by checking the "System" information in the "Settings" app. Look for the "Windows Edition" and "Product ID" details.

Tips for Obtaining a Legitimate Free Windows 10

  • Check Microsoft’s Official Website: Microsoft’s official website is the most reliable source for obtaining legitimate versions of Windows 10.
  • Explore Educational Programs: If you are a student or staff member at an educational institution, inquire about potential programs offering free versions of Windows 10.
  • Consider Free Trial Options: Free trials allow you to experience Windows 10 before committing to a purchase.
  • Stay Updated on Microsoft Promotions: Microsoft occasionally offers promotions and discounts for Windows 10.
  • Avoid Unverified Sources: Be wary of websites offering "free" downloads of Windows 10 that are not from official Microsoft sources.

Conclusion: Navigating the Path to Legitimate Windows 10 Acquisition

Acquiring Windows 10 free of charge is possible through legitimate avenues, but it requires careful navigation and awareness of potential pitfalls. Understanding the legal implications of obtaining software and prioritizing security are paramount. By utilizing the official channels and programs provided by Microsoft, users can ensure a secure and functional Windows 10 experience without compromising their system’s integrity or facing legal repercussions.

Amazon.com: WINDOWS 10 Guide: Detailed Guide to Your New Operating System eBook: Matthew Clark Windows Operating System: A Complete Overview PPT - Introduction to Windows 10 Operating System PowerPoint Presentation - ID:11955548
Installation Guide for Windows 10 Operating System Free Download with Key Five Best Features of the Windows 10 Operating System  Tech Crash - Your One-Stop Shop for All 005 Installing Windows 10 Operating System (Step by Step) - YouTube
how to install windows 10 operating system - Free Knowledge [Solved] Windows 10 Choose an Operating System (100% Working) - wingeek

Closure

Thus, we hope this article has provided valuable insights into Obtaining a Windows 10 Operating System: A Comprehensive Guide. We appreciate your attention to our article. See you in our next article!

Navigating The Landscape Of Windows 10 Updates: A Comprehensive Guide

Navigating the Landscape of Windows 10 Updates: A Comprehensive Guide

Introduction

In this auspicious occasion, we are delighted to delve into the intriguing topic related to Navigating the Landscape of Windows 10 Updates: A Comprehensive Guide. Let’s weave interesting information and offer fresh perspectives to the readers.

Navigating the Windows 10 Upgrade: A Comprehensive Guide - Fashion Magazine

The ever-evolving landscape of operating systems necessitates regular updates to ensure optimal performance, security, and functionality. Windows 10, Microsoft’s flagship operating system, is no exception. Updates are crucial for patching vulnerabilities, enhancing user experience, and introducing new features. However, the question of acquiring a legitimate Windows 10 license, especially for free, often arises. This article aims to shed light on the intricacies of Windows 10 updates, addressing the common misconception of free active product keys and providing practical insights into acquiring and maintaining a legitimate license.

Understanding Windows 10 Updates:

Windows 10 updates are categorized into two primary types:

  • Feature Updates: These updates introduce significant changes, including new features, interface enhancements, and improved performance. They are typically released twice a year, with major versions denoted by year and month (e.g., Windows 10 version 21H2).
  • Quality Updates: These updates focus on addressing security vulnerabilities, bug fixes, and performance improvements. They are released monthly and are typically smaller in size compared to feature updates.

The Myth of Free Active Product Keys:

The allure of free active product keys for Windows 10 is undeniable. However, it is crucial to understand that obtaining a legitimate Windows 10 license without purchasing it directly from Microsoft or an authorized reseller is highly improbable.

Here’s why:

  • Copyright Infringement: Using an unauthorized product key constitutes copyright infringement, which can lead to legal consequences.
  • Security Risks: Downloaded product keys from dubious sources often contain malware or viruses that can compromise your system’s security.
  • Functionality Limitations: While some unauthorized product keys may initially activate Windows 10, they often result in limited functionality, such as restricted access to features or updates.
  • Lack of Support: Microsoft does not provide support for systems activated with unauthorized product keys.

Legitimate Ways to Obtain a Windows 10 License:

  1. Purchase from Microsoft: The most reliable way to obtain a legitimate Windows 10 license is by purchasing it directly from Microsoft. This guarantees a genuine product key and access to all features and updates.

  2. Purchase from Authorized Resellers: Reputable computer retailers and online stores often sell authorized Windows 10 licenses. Ensure you purchase from a trusted source.

  3. Upgrade from a Previous Version: If you have a valid license for a previous version of Windows, you may be eligible for a free upgrade to Windows 10.

  4. Windows 10 Education: Educational institutions may offer discounted or free licenses for students and faculty.

  5. Windows 10 Pro for Workstations: This edition offers advanced features for workstations, and some employers may provide licenses to their employees.

Maintaining a Legitimate Windows 10 License:

  • Keep Your System Updated: Regularly install updates, including both feature and quality updates, to ensure your system remains secure and receives the latest features.
  • Backup Your Data: Regularly back up your important data to prevent loss in case of system failure.
  • Avoid Using Pirated Software: Stick to legitimate sources for software and applications to avoid security risks and legal issues.
  • Be Cautious of Online Offers: Exercise caution when encountering offers for free Windows 10 licenses online. Verify the source and legitimacy of the offer before proceeding.

Frequently Asked Questions:

  • Q: Can I use a Windows 10 product key from a previous computer on my new computer?

    A: No. Product keys are tied to specific hardware configurations, and using a key from a different computer is considered unauthorized.

  • Q: Is it legal to use a Windows 10 product key that I found online?

    A: No. Using a product key that is not legitimately obtained is illegal and can lead to legal consequences.

  • Q: What happens if I don’t update my Windows 10 system?

    A: Your system may become vulnerable to security threats, experience performance issues, and miss out on new features and improvements.

  • Q: How do I know if my Windows 10 license is legitimate?

    A: You can check your license status by going to "Settings" > "Update & Security" > "Activation." If your license is legitimate, it will indicate that Windows is activated.

Tips for Managing Windows 10 Updates:

  • Schedule Updates: Configure automatic updates to occur during off-peak hours to minimize disruptions.
  • Check for Updates Regularly: Manually check for updates to ensure your system is up-to-date.
  • Download Updates Over Wi-Fi: To avoid exceeding data limits, download updates over a Wi-Fi connection.
  • Use a Wired Connection: If possible, use a wired internet connection for faster and more stable updates.
  • Monitor Update Progress: Keep an eye on the update progress to ensure it is proceeding smoothly.
  • Restart Your Computer After Updates: Restarting your computer after updates allows the changes to take effect.

Conclusion:

Navigating the intricacies of Windows 10 updates requires a balanced approach. While the allure of free active product keys may be tempting, it is crucial to prioritize legitimacy and security. By adhering to legal avenues for acquiring a Windows 10 license and maintaining a secure system through regular updates, users can enjoy a stable, secure, and feature-rich computing experience. Remember, a legitimate license not only guarantees access to all features and updates but also protects you from potential legal and security risks.

Buy Windows 10 2021: A Complete Guide to Microsoft Windows 10 with the Latest Tips and Updates How To Update Windows 10: From Download To Installation How to view available microsoft updates for windows 10 - kartvse
How to handle Windows 10 and 11 updates  Computerworld How to manage Windows 10 updates to prevent them from ruining your life - Good Gear Guide Australia How to Update Apps in Windows 10 (Complete Guide)
The Windows 10 Update Checklist: 5 Things to Do After Major Updates Windows 10 21h2 Download And Installation Guide

Closure

Thus, we hope this article has provided valuable insights into Navigating the Landscape of Windows 10 Updates: A Comprehensive Guide. We hope you find this article informative and beneficial. See you in our next article!

Page Maker Software For Windows 10: A Comprehensive Guide

Page Maker Software for Windows 10: A Comprehensive Guide

Introduction

With enthusiasm, let’s navigate through the intriguing topic related to Page Maker Software for Windows 10: A Comprehensive Guide. Let’s weave interesting information and offer fresh perspectives to the readers.

Page Maker Software for Windows 10: A Comprehensive Guide

Adobe Pagemaker Download For Pc - cleverregistry

The digital landscape has revolutionized the way we create and disseminate information. From intricate marketing materials to captivating presentations, the need for robust software capable of producing visually appealing and impactful documents has become paramount. Page maker software, designed specifically for this purpose, has emerged as an essential tool for professionals across various industries.

This comprehensive guide delves into the world of page maker software for Windows 10, exploring its capabilities, benefits, and considerations for choosing the right software to meet specific needs.

Understanding Page Maker Software

Page maker software, also known as desktop publishing (DTP) software, empowers users to design and create visually rich documents that go beyond the limitations of traditional word processors. It provides a platform for combining text, images, graphics, and other elements into professional-looking layouts, ready for print or digital distribution.

Key Features of Page Maker Software

Page maker software offers a diverse range of features that cater to both novice and experienced users. Some of the core functionalities include:

  • Page Layout and Design: The ability to create and manipulate pages with precise control over margins, columns, and spacing.
  • Text Formatting: Comprehensive options for text styling, including font selection, size, color, alignment, and advanced formatting like kerning and leading.
  • Image Editing and Manipulation: Tools for resizing, cropping, adjusting brightness and contrast, and applying special effects to images.
  • Object Placement and Alignment: Precise positioning and alignment of text, images, and other objects within a layout.
  • Graphics Creation: Basic drawing tools for creating shapes, lines, and simple illustrations.
  • Color Management: Tools for selecting, mixing, and managing color palettes for consistent branding and visual appeal.
  • Master Pages: Templates for standardizing elements like headers, footers, and page numbering across multiple pages.
  • Layers: A feature that allows for organizing and managing multiple elements within a document without affecting each other.
  • Export Options: Support for exporting documents in various formats, including PDF, JPEG, PNG, and others, suitable for both print and digital distribution.

Benefits of Using Page Maker Software

The use of page maker software brings numerous advantages to individuals and organizations:

  • Enhanced Visual Appeal: Professional-looking layouts with precise control over typography, image placement, and color schemes contribute to a more engaging and impactful presentation of information.
  • Increased Efficiency: Templates, master pages, and automated features streamline the design process, saving time and effort.
  • Customization and Control: Users have complete control over every aspect of the document design, allowing for unique and personalized creations.
  • Versatility: Page maker software caters to a wide range of applications, from creating marketing brochures and newsletters to designing presentations and reports.
  • Professionalism: The use of page maker software signals professionalism and attention to detail, leaving a positive impression on audiences.

Choosing the Right Page Maker Software

With a multitude of page maker software options available, selecting the right one depends on individual needs and budget. Factors to consider include:

  • Ease of Use: Consider the learning curve and the software’s user interface. Some options are more intuitive and easier to learn than others.
  • Feature Set: Evaluate the features offered by each software and determine if they align with your specific requirements.
  • Price: Page maker software can range from free open-source options to expensive professional suites. Determine your budget and prioritize features accordingly.
  • Platform Compatibility: Ensure the software is compatible with your operating system (Windows 10 in this case) and other relevant hardware and software.
  • Community Support and Resources: Access to tutorials, online forums, and user communities can be valuable for learning and troubleshooting.

Popular Page Maker Software for Windows 10

Several popular page maker software options are available for Windows 10 users, each with its strengths and target audience.

  • Adobe InDesign: A leading professional page maker software renowned for its powerful features, extensive customization options, and industry-standard compatibility.
  • Affinity Publisher: A more affordable alternative to InDesign, offering a user-friendly interface and robust design capabilities.
  • Scribus: A free and open-source page maker software that provides a comprehensive feature set for professional-quality layouts.
  • Canva: A cloud-based design platform that offers a user-friendly drag-and-drop interface and a wide range of templates for creating various types of documents.
  • Microsoft Publisher: A user-friendly page maker software included in Microsoft Office suites, suitable for creating brochures, newsletters, and other marketing materials.

FAQs about Page Maker Software for Windows 10

1. What is the best page maker software for beginners?

For beginners, Canva offers a user-friendly interface and a wide range of templates, making it easy to create visually appealing documents without extensive design knowledge. Microsoft Publisher is another good option for beginners due to its intuitive design and integration with Microsoft Office.

2. Can I create professional-looking documents with free page maker software?

Yes, free page maker software like Scribus and OpenOffice Draw can produce professional-looking documents. However, they may lack some advanced features found in paid software.

3. What are the system requirements for running page maker software on Windows 10?

System requirements vary depending on the specific software. Generally, a modern computer with a reasonable amount of RAM, storage space, and a compatible graphics card will suffice.

4. Can I use page maker software to create websites?

While some page maker software offers basic web design features, they are not primarily designed for website creation. Dedicated web design software or content management systems are more suitable for website development.

5. How do I learn to use page maker software?

Most page maker software comes with comprehensive tutorials and online resources. User forums and online communities can also provide valuable support and guidance.

Tips for Using Page Maker Software Effectively

  • Plan your layout: Before starting, sketch out your design to ensure a clear and organized layout.
  • Use high-quality images: Invest in high-resolution images to enhance the visual appeal of your documents.
  • Maintain consistency: Use consistent fonts, colors, and spacing throughout your design for a cohesive look.
  • Pay attention to typography: Choose fonts that are legible and appropriate for your target audience.
  • Use white space effectively: White space helps to break up text and create a more visually appealing layout.
  • Proofread carefully: Before finalizing your document, carefully proofread for any errors in text or formatting.

Conclusion

Page maker software has become an indispensable tool for creating visually compelling and impactful documents. From professional designers to individuals seeking to enhance their communication, the benefits of using page maker software are undeniable. By understanding the features, benefits, and considerations involved in choosing the right software, users can leverage these powerful tools to produce high-quality documents that effectively convey their message and leave a lasting impression.

Adobe pagemaker 7 windows 10 - hromchi Pagemaker For Windows 10 - teamatlas Adobe pagemaker for windows 10 free download - squaredserg
Download Adobe Pagemaker for Windows 10, 8, 7 (2020 Latest) Adobe PageMaker latest version - Get best Windows software Adobe Pagemaker Windows 10 - downmup
Download Adobe PageMaker for Windows 11/10/8/7 (Latest version 2020) - Downloads Guru Adobe Pagemaker 7.0 for windows

Closure

Thus, we hope this article has provided valuable insights into Page Maker Software for Windows 10: A Comprehensive Guide. We hope you find this article informative and beneficial. See you in our next article!

Microsoft Word 2025: A Glimpse Into The Future Of Document Creation

Microsoft Word 2025: A Glimpse into the Future of Document Creation

Introduction

With enthusiasm, let’s navigate through the intriguing topic related to Microsoft Word 2025: A Glimpse into the Future of Document Creation. Let’s weave interesting information and offer fresh perspectives to the readers.

Microsoft Word 2025: A Glimpse into the Future of Document Creation

The Future of Document Creation and Distribution

The evolution of Microsoft Word has consistently redefined how we create and interact with documents. As we approach 2025, the next iteration promises an even more powerful and intuitive experience, driven by advancements in artificial intelligence (AI) and cloud computing. This article explores the anticipated new features in Microsoft Word 2025, examining their potential impact and benefits for users across diverse fields.

1. AI-Powered Content Generation and Editing:

One of the most significant advancements in Word 2025 is the integration of advanced AI capabilities. This will empower users to generate high-quality content with unprecedented ease. Word 2025 will offer a range of AI-powered features:

  • Smart Content Suggestions: The software will analyze existing text and context to suggest relevant content, phrases, and even entire paragraphs, streamlining the writing process.
  • Automated Formatting: AI algorithms will automatically format documents based on user preferences and style guides, ensuring consistency and professional presentation.
  • Real-time Grammar and Style Correction: AI will provide comprehensive grammar and style feedback, offering suggestions for improved clarity, conciseness, and readability.
  • Content Summarization and Translation: Users can quickly summarize lengthy documents or translate them into multiple languages, enhancing accessibility and efficiency.

2. Enhanced Collaboration and Co-Authoring:

Word 2025 will further enhance collaboration capabilities, enabling seamless teamwork on documents regardless of location. Key features include:

  • Real-time Co-authoring with Version Control: Multiple users can simultaneously edit a document, with changes tracked and visualized in real-time, eliminating confusion and ensuring a cohesive final product.
  • Integrated Communication Tools: Built-in chat and video conferencing options will facilitate direct communication within the document, streamlining collaboration and reducing external communication barriers.
  • Shared Workspace and Project Management: Word 2025 will offer a dedicated workspace for collaborative projects, enabling task assignment, progress tracking, and file sharing within the document environment.

3. Immersive Document Experiences:

Word 2025 will push the boundaries of document interactivity and engagement, providing users with richer and more dynamic experiences:

  • Interactive Content and Media Integration: The software will seamlessly integrate various media formats, including audio, video, and 3D models, allowing for immersive and engaging content creation.
  • Augmented Reality (AR) and Virtual Reality (VR) Integration: Word 2025 will explore the potential of AR and VR, enabling users to create documents that can be viewed and interacted with in immersive environments.
  • Dynamic Data Visualization: Word 2025 will offer advanced tools for creating dynamic charts, graphs, and data visualizations, enhancing the clarity and impact of information presented within documents.

4. Enhanced Accessibility and Inclusivity:

Microsoft is committed to making Word 2025 accessible to all users. Key features will include:

  • Improved Accessibility Features: Enhanced screen reader compatibility, alternative input methods, and customizable display options will ensure a more inclusive experience for users with disabilities.
  • Multilingual Support: Word 2025 will provide comprehensive support for a wide range of languages, enabling users to create documents in their preferred language and access content in diverse languages.
  • Universal Design Principles: The user interface and features will be designed with accessibility principles in mind, ensuring an intuitive and usable experience for all.

5. Personalized and Adaptive Learning:

Word 2025 will leverage AI to provide personalized learning experiences tailored to individual user needs and skill levels:

  • Adaptive Learning Path: The software will track user progress and offer targeted tutorials and exercises, guiding them through specific skills and features.
  • Personalized Recommendations: Based on user preferences and past activity, Word 2025 will provide relevant recommendations for templates, styles, and features, streamlining the document creation process.
  • AI-Powered Writing Assistance: The software will offer real-time feedback on writing style, vocabulary, and grammar, providing personalized recommendations for improvement.

FAQs about New Features in Microsoft Word 2025

Q: Will Word 2025 be compatible with older versions of Word?

A: Microsoft will likely ensure backward compatibility with previous versions, allowing users to open and edit older documents. However, some advanced features may require the latest version of Word.

Q: How will AI-powered content generation affect the quality of writing?

A: AI is intended to assist writers, not replace them. The quality of generated content will depend on the quality of the input data and the user’s ability to refine and edit the suggestions.

Q: Will Word 2025 be available on all platforms?

A: Microsoft will likely offer Word 2025 across a range of platforms, including Windows, macOS, iOS, and Android.

Q: Will there be security concerns with AI-powered features?

A: Microsoft will prioritize security and privacy in the development of AI features. Data protection measures will be implemented to safeguard user information and prevent unauthorized access.

Tips for Utilizing New Features in Microsoft Word 2025

  • Embrace AI Assistance: Utilize AI-powered features to enhance your writing process, but maintain critical thinking and editorial control over your content.
  • Experiment with Collaboration Tools: Explore the new collaboration features to streamline teamwork and enhance communication within projects.
  • Leverage Interactive Content: Utilize multimedia and dynamic data visualization to create engaging and impactful documents.
  • Customize Your Experience: Take advantage of personalized learning features and accessibility options to tailor Word 2025 to your individual needs.

Conclusion

Microsoft Word 2025 promises to revolutionize the way we create and interact with documents. By harnessing the power of AI, cloud computing, and immersive technologies, Word 2025 will empower users with unprecedented tools for content generation, collaboration, and communication. The advancements in accessibility and personalization will ensure a more inclusive and user-friendly experience for all. As the future of document creation unfolds, Word 2025 stands ready to redefine the boundaries of what’s possible.

Document creation - past and future Assignment: Create Document with Tables and Images  Computer Applications for Managers How to save a document as a template in Microsoft Word
Create a two-column document template in Microsoft Word - CNET A Glimpse into the Future Economy after the Pandemic - UPCEA Generational Preferences: A Glimpse into the Future Office Infographic  Workplace Research
Microsoft: A Glimpse Into The Future, A Reflection Of The Past (NASDAQ:MSFT)  Seeking Alpha 5 Types Of FX Risk Management Strategies  The Enterprise World

Closure

Thus, we hope this article has provided valuable insights into Microsoft Word 2025: A Glimpse into the Future of Document Creation. We hope you find this article informative and beneficial. See you in our next article!