Archives April 2024

The Heat Is On: Understanding And Managing Laptop Overheating

The Heat is On: Understanding and Managing Laptop Overheating

Introduction

With enthusiasm, let’s navigate through the intriguing topic related to The Heat is On: Understanding and Managing Laptop Overheating. Let’s weave interesting information and offer fresh perspectives to the readers.

The Heat is On: Understanding and Managing Laptop Overheating

Understanding & Fixing Laptop Overheating Issues - Jnetics Solutions

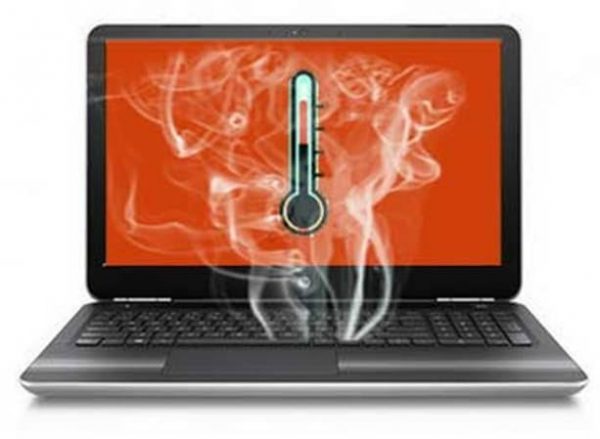
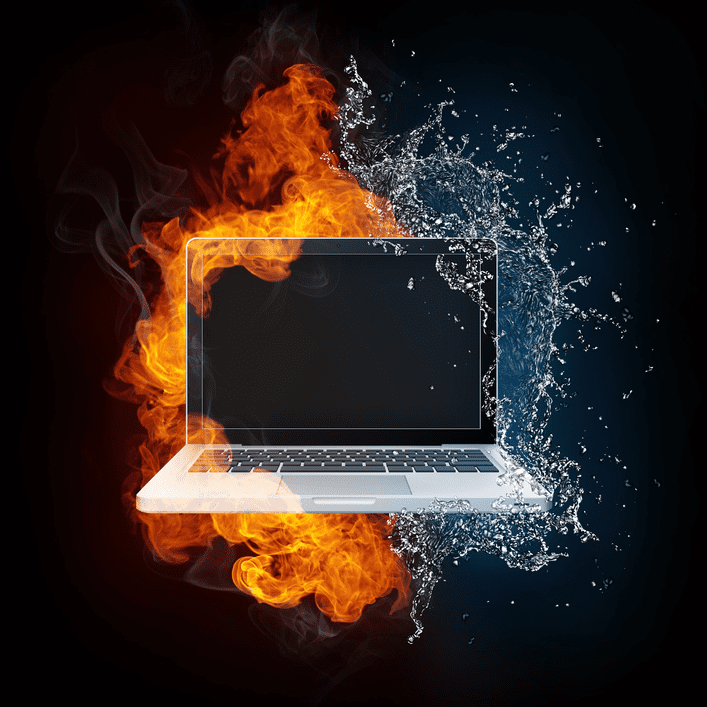
Laptops, with their portability and versatility, have become indispensable tools for work, entertainment, and communication. However, their compact design presents a unique challenge: managing heat. When the internal components of a laptop reach excessive temperatures, it can lead to a range of issues, from performance degradation to irreversible hardware damage. This article will delve into the intricacies of laptop overheating, exploring its causes, consequences, and effective solutions.

Understanding the Root of the Problem: Why Laptops Overheat

Laptop overheating is a complex phenomenon, influenced by a multitude of factors. Understanding the underlying causes is crucial for identifying and mitigating the issue:

1. Design Constraints: The compact nature of laptops necessitates a delicate balance between functionality and physical space. This often leads to a tight fit for components, limiting airflow and hindering heat dissipation.

2. Component Heat Generation: Modern processors, GPUs, and other components are designed for high performance, which inevitably generates significant heat. This heat, if not properly managed, can lead to overheating.

3. Software and Usage Patterns: Demanding applications, heavy multitasking, and prolonged gaming sessions can place a considerable strain on the laptop’s components, leading to increased heat generation.

4. Environmental Factors: Ambient temperature, lack of ventilation, and dust accumulation can all contribute to overheating. A hot environment or a dusty laptop can impede heat dissipation.

5. Hardware Malfunctions: Faulty fans, clogged vents, or malfunctioning thermal paste can significantly hinder the cooling process, leading to excessive temperatures.

The Consequences of Excessive Heat: A Cascade of Problems

Overheating is not a mere inconvenience; it can have severe consequences for your laptop’s performance and longevity:

1. Performance Degradation: High temperatures can cause components to throttle their performance to prevent damage. This results in slower processing speeds, reduced graphics performance, and overall sluggish operation.

2. Hardware Damage: Persistent overheating can lead to irreparable damage to components, including the motherboard, processor, and graphics card. This can necessitate costly repairs or even a complete replacement.

3. Data Loss: In extreme cases, overheating can cause data corruption or even system crashes, potentially leading to data loss.

4. Reduced Battery Life: Excessive heat can strain the battery, leading to a decrease in its lifespan and overall capacity.

5. System Instability: Overheating can cause system instability, leading to frequent crashes, freezes, and blue screens of death.

6. Noise and Discomfort: Overheated laptops often produce excessive fan noise, which can be distracting and uncomfortable.

Identifying the Signs: Recognizing Overheating in Your Laptop

Recognizing the early signs of overheating is crucial for taking timely action and preventing further damage. Here are some common indicators:

  • Excessive Fan Noise: A sudden increase in fan speed or a loud, unusual fan noise can indicate overheating.
  • Slow Performance: Noticeable lag, sluggish response times, or reduced graphics performance can be a sign of components throttling due to heat.
  • System Crashes and Freezes: Frequent crashes, freezes, or blue screens of death can be related to overheating.
  • Hot to the Touch: The laptop’s chassis, especially around the keyboard and bottom, feels unusually hot.
  • Warning Messages: Some laptops display on-screen warning messages or error codes indicating overheating.

Taking Action: Addressing Overheating Issues

Once overheating is identified, prompt action is necessary to prevent further damage and restore optimal performance. Here are some strategies to address the issue:

1. Software Optimization:

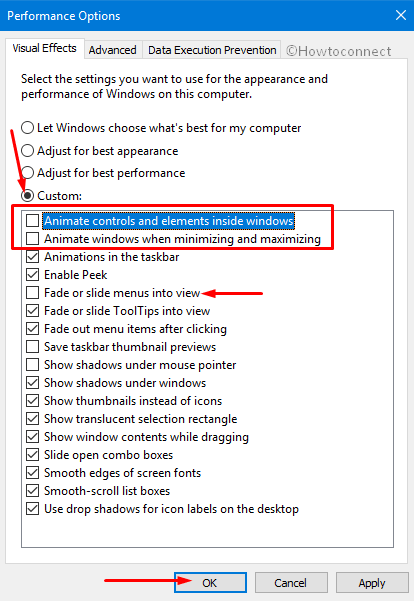
  • Close Unnecessary Programs: Minimize the number of applications running in the background to reduce CPU and GPU load.
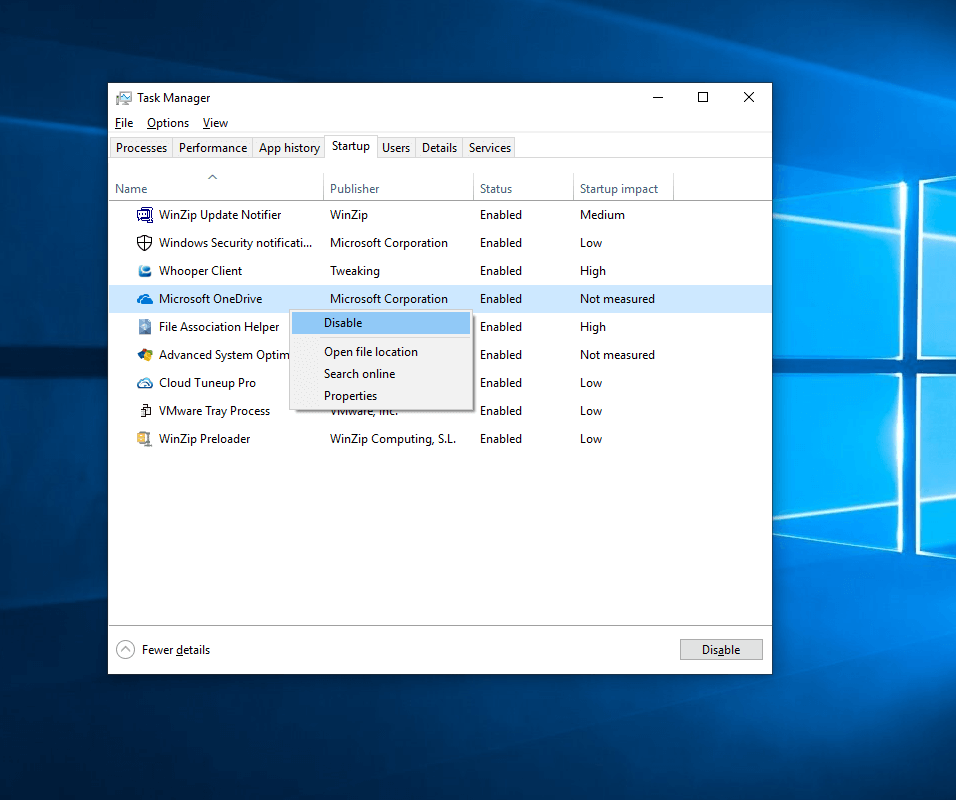
  • Update Drivers: Outdated drivers can cause performance issues and increase heat generation.
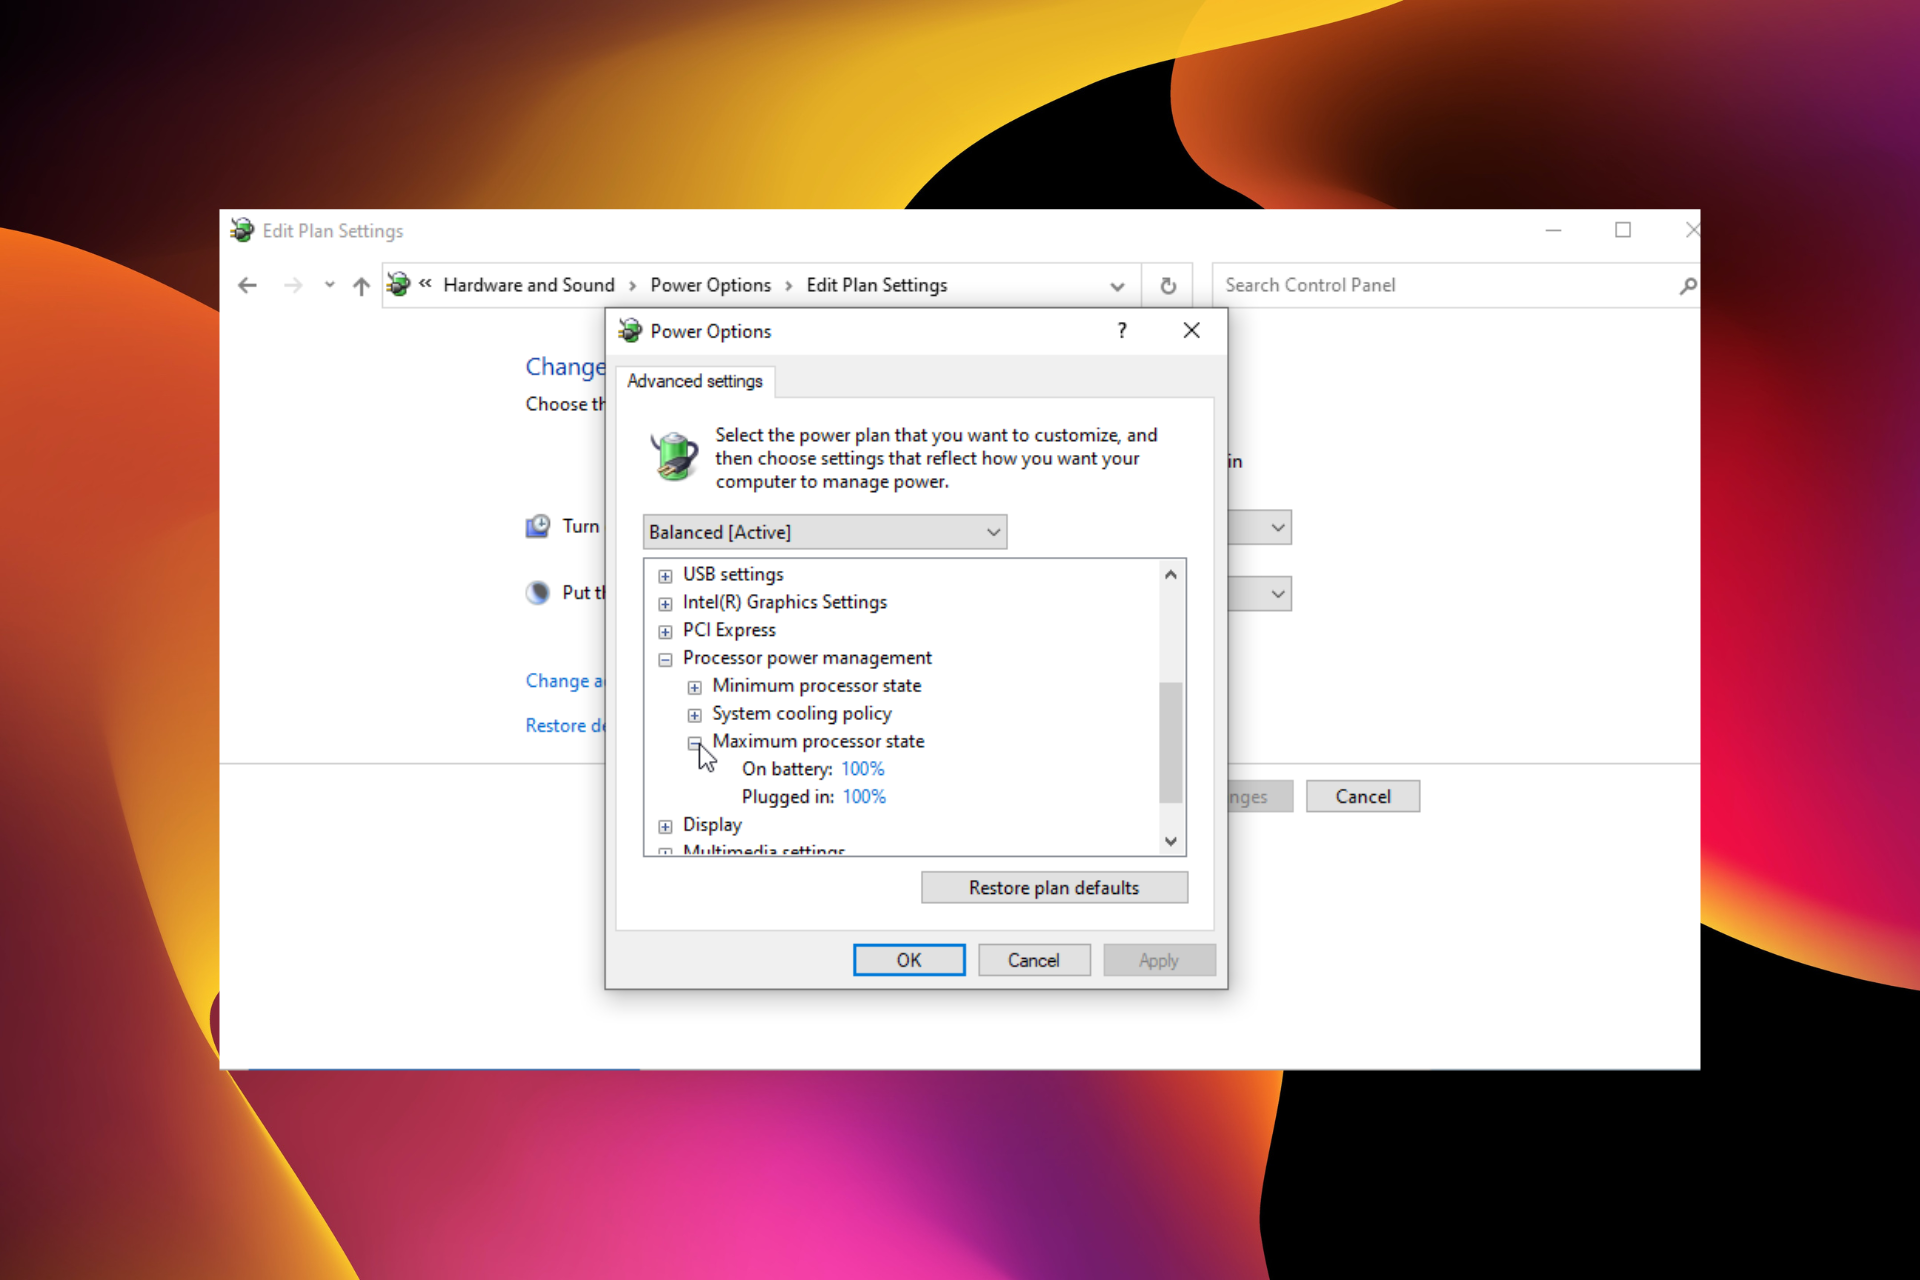
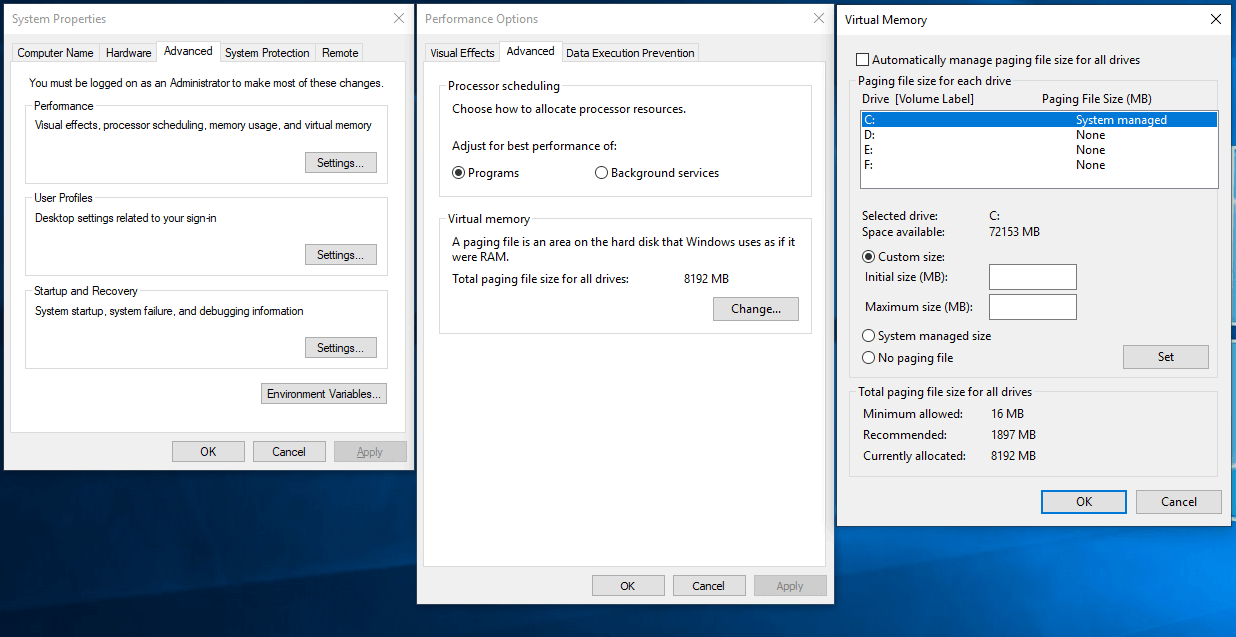
  • Adjust Power Settings: Set the laptop to a power-saving mode to reduce performance demands and heat output.
  • Utilize Performance Monitoring Tools: Monitor system temperatures and identify resource-intensive applications.

2. Hardware Solutions:

  • Ensure Proper Ventilation: Place the laptop on a flat surface with adequate airflow. Avoid using it on soft surfaces like blankets or beds.
  • Clean the Vents: Regularly clean the vents and fan blades to remove dust and debris that can hinder airflow.
  • Use a Cooling Pad: A cooling pad with fans can provide additional airflow and help dissipate heat.
  • Repaste the CPU: Over time, the thermal paste between the CPU and heatsink can dry out, reducing its effectiveness. Repaste the CPU with fresh thermal paste to improve heat transfer.
  • Consider a Laptop Stand: A laptop stand can elevate the laptop, improving airflow and reducing overheating.

3. Environmental Considerations:

  • Avoid Extreme Temperatures: Do not use the laptop in extremely hot or cold environments.
  • Limit Direct Sunlight: Avoid exposing the laptop to direct sunlight, which can significantly increase its internal temperature.

Frequently Asked Questions: Addressing Common Concerns

1. Is Overheating a Normal Occurrence?

While some heat generation is normal during operation, excessive heat is not. If your laptop consistently reaches high temperatures, it’s a sign of an underlying issue.

2. How Hot is Too Hot?

The optimal operating temperature for laptops varies depending on the model and components. However, exceeding 85ยฐC (185ยฐF) for extended periods can be detrimental.

3. Can I Overclock My Laptop to Improve Performance?

Overclocking can increase performance but also generates more heat. It’s not recommended for laptops without proper cooling solutions.

4. How Often Should I Clean the Vents?

Regular cleaning is essential. Aim to clean the vents every few months or more frequently if you use your laptop in dusty environments.

5. Can I Use a Hair Dryer to Clean the Vents?

Using a hairdryer can damage internal components due to static electricity and heat. It’s not recommended.

6. How Can I Check My Laptop’s Temperature?

There are various free software tools available that monitor system temperatures. Some laptop manufacturers also provide their own monitoring applications.

7. Can I Use a Laptop in My Bed?

While convenient, using a laptop on soft surfaces like beds can obstruct airflow and lead to overheating. It’s best to use a hard, flat surface.

8. What Should I Do If My Laptop Overheats Despite My Efforts?

If overheating persists despite taking steps to address it, it’s best to consult a qualified technician for diagnosis and repair.

Tips for Preventing Overheating: Proactive Measures

  • Limit Multitasking: Avoid running multiple demanding applications simultaneously.
  • Use High-Quality Cooling Accessories: Invest in a high-quality cooling pad with powerful fans.
  • Avoid Blocking Vents: Ensure the laptop’s vents are not blocked by objects or surfaces.
  • Keep the Laptop Clean: Regularly clean the vents and fan blades to maintain optimal airflow.
  • Monitor System Temperatures: Utilize performance monitoring tools to track system temperatures and identify potential overheating issues.

Conclusion: Maintaining Optimal Laptop Performance

Laptop overheating is a serious issue that can significantly impact performance, longevity, and data integrity. By understanding the causes, recognizing the signs, and implementing appropriate solutions, you can effectively manage heat and ensure your laptop operates smoothly and reliably.

Regular maintenance, software optimization, and responsible usage practices are essential for preventing overheating and maximizing the lifespan of your valuable investment. If overheating persists despite your efforts, seeking professional assistance from a qualified technician is recommended. By taking a proactive approach, you can enjoy the benefits of your laptop without the worry of excessive heat.

Laptop Overheating Repair and Mac Overheating Repair  Geeks Callout How to Fix An Overheating Laptop - YouTube How to Handle Laptop Overheating - TechPP
Reason why your Laptop is Overheating and auto shutdown - How to fix - YouTube Laptop Overheating When Playing Games [SOLVED With Pictures] - PopSmartphone How to Fix an Overheating Laptop from Its Internals - Make Tech Easier
10 Ways to Fix Laptop Overheating While Gaming What Causes Overheating In PCs Or Laptops ~ Online Computer Tech Tips

Closure

Thus, we hope this article has provided valuable insights into The Heat is On: Understanding and Managing Laptop Overheating. We appreciate your attention to our article. See you in our next article!

Optimizing Windows 10 Performance With Q-Reduce Lite: A Comprehensive Guide

Optimizing Windows 10 Performance with Q-Reduce Lite: A Comprehensive Guide

Introduction

With enthusiasm, let’s navigate through the intriguing topic related to Optimizing Windows 10 Performance with Q-Reduce Lite: A Comprehensive Guide. Let’s weave interesting information and offer fresh perspectives to the readers.

Optimizing Windows 10 Performance with Q-Reduce Lite: A Comprehensive Guide

Optimizing Windows 10

Windows 10, while a robust operating system, can sometimes experience performance hiccups, particularly as it ages or when burdened with numerous applications and processes. These performance issues can manifest as slow startup times, lagging applications, and general sluggishness, hindering user productivity. To address these concerns, various optimization tools have emerged, and Q-Reduce Lite stands as a prominent contender for Windows 10 users seeking a streamlined and efficient system experience.

Understanding Q-Reduce Lite: A Performance Enhancement Tool

Q-Reduce Lite is a lightweight, user-friendly software designed to enhance Windows 10 performance by identifying and managing resource-intensive processes and applications. It operates by analyzing system activity, detecting processes that consume excessive resources, and offering options to optimize their behavior. This approach allows users to regain control over their system’s performance without resorting to complex configurations or technical expertise.

Key Features and Functionality

Q-Reduce Lite provides a range of features designed to improve Windows 10 performance, encompassing:

  • Process Management: The core functionality of Q-Reduce Lite lies in its ability to monitor and manage running processes. It identifies resource-hungry processes, allowing users to prioritize essential tasks and terminate unnecessary ones. This granular control over system processes empowers users to optimize resource allocation and prevent performance bottlenecks.

  • Startup Optimization: Q-Reduce Lite analyzes the applications that launch at system startup, identifying those that consume valuable resources unnecessarily. Users can disable or delay the launch of non-essential applications, resulting in faster boot times and reduced resource consumption.

  • System Resource Monitoring: The software provides real-time insights into system resource utilization, including CPU, memory, and disk activity. This comprehensive monitoring allows users to identify potential performance bottlenecks and proactively manage resource allocation.

  • System Optimization Tools: Q-Reduce Lite integrates tools for general system optimization, such as disk cleanup, registry optimization, and defragmentation. These features help ensure a clean and efficient system environment, further enhancing performance.

Benefits of Using Q-Reduce Lite

Utilizing Q-Reduce Lite offers a multitude of benefits for Windows 10 users, including:

  • Improved System Performance: By managing resource-intensive processes and optimizing system settings, Q-Reduce Lite significantly enhances overall system performance, leading to faster boot times, smoother application responsiveness, and reduced lag.

  • Increased Productivity: A faster and more responsive system translates to increased productivity, as users can efficiently execute tasks without encountering performance bottlenecks.

  • Enhanced System Stability: By managing system resources effectively, Q-Reduce Lite can contribute to a more stable system environment, reducing the likelihood of crashes and errors.

  • Extended System Lifespan: By optimizing resource allocation and reducing strain on system components, Q-Reduce Lite can contribute to extending the lifespan of older systems.

  • User-Friendly Interface: Q-Reduce Lite boasts a simple and intuitive interface, making it accessible to users of all technical skill levels. The software’s straightforward design allows users to easily navigate its features and implement desired optimizations.

FAQs Regarding Q-Reduce Lite

Q: Is Q-Reduce Lite compatible with all versions of Windows 10?

A: Q-Reduce Lite is designed specifically for Windows 10 and is compatible with all its major versions, including Home, Pro, and Enterprise editions.

Q: Does Q-Reduce Lite require any specific hardware requirements?

A: Q-Reduce Lite is a lightweight software that does not impose significant demands on system resources. It is compatible with most modern computers and can run smoothly even on systems with limited hardware.

Q: Is Q-Reduce Lite free to use?

A: Q-Reduce Lite is available as a free software, allowing users to experience its benefits without any cost. However, a paid version may offer additional features or advanced functionalities.

Q: Can Q-Reduce Lite compromise system security?

A: Q-Reduce Lite is a reputable and trusted software that does not pose any security threats. It is designed to enhance system performance without compromising security measures.

Q: Does Q-Reduce Lite require any special configuration?

A: Q-Reduce Lite is designed to be user-friendly and does not require any complex configuration. Users can easily install and use the software without needing technical expertise.

Tips for Using Q-Reduce Lite Effectively

  • Regular System Scans: It is recommended to perform regular system scans with Q-Reduce Lite to identify and manage resource-intensive processes and optimize system settings.

  • Prioritize Essential Applications: Users should prioritize essential applications and processes, ensuring they have sufficient resources to operate smoothly.

  • Disable Unnecessary Startup Items: By disabling or delaying the launch of non-essential applications at startup, users can significantly improve boot times and reduce resource consumption.

  • Monitor System Resource Utilization: Regularly monitor system resource utilization to identify potential performance bottlenecks and proactively manage resource allocation.

  • Use Disk Cleanup and Defragmentation Tools: Utilize the built-in disk cleanup and defragmentation tools to ensure a clean and efficient system environment.

Conclusion

Q-Reduce Lite emerges as a valuable tool for Windows 10 users seeking to optimize system performance and enhance productivity. Its ability to manage resource-intensive processes, optimize startup items, and provide comprehensive system monitoring empowers users to regain control over their system’s performance without requiring technical expertise. By leveraging the features of Q-Reduce Lite, users can experience a faster, more responsive, and efficient Windows 10 environment, maximizing productivity and enjoying a smoother computing experience.

How to Optimize Windows 10 for Best Performance 25 Best Methods To Optimize Windows 10 Performance �� How to Optimize Windows 10 Performance ! (Part 1) - YouTube
How to Optimize Windows 10 Performance to Get Ultra-Fast Speed How to Optimize Windows 10 for Best Performance Optimize windows performance - by Technotaught
How to optimize windows 10 for performance (My Way) - YouTube How to Optimize Windows 10 For Better Performance? -Technig

Closure

Thus, we hope this article has provided valuable insights into Optimizing Windows 10 Performance with Q-Reduce Lite: A Comprehensive Guide. We hope you find this article informative and beneficial. See you in our next article!

Empowering Windows 11 Administration: A Guide To Installing RSAT With PowerShell

Empowering Windows 11 Administration: A Guide to Installing RSAT with PowerShell

Introduction

With great pleasure, we will explore the intriguing topic related to Empowering Windows 11 Administration: A Guide to Installing RSAT with PowerShell. Let’s weave interesting information and offer fresh perspectives to the readers.

Empowering Windows 11 Administration: A Guide to Installing RSAT with PowerShell

Full Guide  How to Download and Install RSAT in Windows 11

Windows 11’s robust feature set includes the ability to manage other Windows systems within a network. To unlock this functionality, administrators require the Remote Server Administration Tools (RSAT). These tools provide a comprehensive suite of management utilities, enabling control over various aspects of remote Windows machines, from user accounts and group policies to server roles and features.

While the traditional method of installing RSAT involves navigating through Windows features, PowerShell offers a streamlined and efficient approach. This article explores the power of PowerShell in installing RSAT on Windows 11, providing a detailed guide for administrators seeking to manage remote systems effectively.

Understanding the Power of PowerShell for RSAT Installation

PowerShell, a powerful scripting language for automating tasks, offers several advantages over manual installation methods:

  • Automation: PowerShell scripts enable the automated installation of RSAT, eliminating the need for manual steps across multiple machines. This saves significant time and effort, especially in large network environments.
  • Centralized Management: Scripts can be centrally stored and executed, ensuring consistent and standardized installation across the entire network. This eliminates potential inconsistencies arising from manual installations.
  • Error Handling: PowerShell scripts can be equipped with robust error handling mechanisms, ensuring that installation processes are completed successfully. This reduces the risk of errors and facilitates troubleshooting.
  • Flexibility: PowerShell scripts can be customized to meet specific installation requirements, allowing for fine-grained control over the installation process.

PowerShell Commands for Installing RSAT

The following PowerShell commands are used to install RSAT on Windows 11. These commands can be executed directly in a PowerShell console or incorporated into a script for automated installations.

1. Enabling Feature Installation

Before installing RSAT, ensure that the "Windows Features" functionality is enabled. This is done by running the following command:

Enable-WindowsOptionalFeature -Online -FeatureName RSAT-Tools

This command instructs Windows to enable the RSAT features, which are categorized as optional features.

2. Installing Specific RSAT Components

RSAT is comprised of various tools grouped into different feature categories. To install specific tools, use the following command structure:

Enable-WindowsOptionalFeature -Online -FeatureName <FeatureName>

Replace <FeatureName> with the specific RSAT feature name. For example, to install the Active Directory Domain Services tools, use the following command:

Enable-WindowsOptionalFeature -Online -FeatureName RSAT-AD-Tools

Here are some commonly used RSAT features and their corresponding names:

  • Active Directory Domain Services Tools: RSAT-AD-Tools
  • Active Directory Lightweight Directory Services Tools: RSAT-ADLDS-Tools
  • DNS Server Tools: RSAT-DNS-Tools
  • Group Policy Management Tools: RSAT-GroupPolicy-Tools
  • Hyper-V Tools: RSAT-Hyper-V-Tools
  • Print Server Tools: RSAT-PrintServer-Tools
  • Remote Desktop Services Tools: RSAT-RDS-Tools
  • Windows Server Update Services Tools: RSAT-WSUS-Tools

3. Verifying Installation

After executing the installation commands, verify the installation by checking the "Windows Features" control panel. Alternatively, use the following PowerShell command to list all enabled features:

Get-WindowsOptionalFeature -Online

This command will display a list of all enabled features, including the installed RSAT components.

Important Considerations

  • Administrative Privileges: Executing PowerShell commands for RSAT installation requires administrator privileges. Ensure you are running PowerShell as an administrator.
  • Network Connectivity: If managing remote servers, ensure proper network connectivity between the machine installing RSAT and the target servers.
  • Feature Availability: Not all RSAT features are available in every version of Windows 11. Refer to the official Microsoft documentation for specific feature availability.
  • Reboot Requirement: Installing RSAT may require a system reboot. The installation process will prompt you if a reboot is necessary.

FAQs

Q: What are the benefits of installing RSAT using PowerShell?

A: PowerShell offers several advantages over manual installation methods, including:

  • Automation: Scripting enables efficient installation across multiple machines.
  • Centralized Management: Scripts can be stored and executed centrally, ensuring consistency.
  • Error Handling: Scripts can include error handling mechanisms, reducing installation failures.
  • Flexibility: Scripts can be customized to meet specific installation requirements.

Q: Can I install specific RSAT features instead of the entire suite?

A: Yes, PowerShell allows you to install individual RSAT features using the Enable-WindowsOptionalFeature command with the specific feature name.

Q: What if I encounter errors during installation?

A: Review the error message for clues. Check for sufficient administrative privileges, network connectivity, and correct feature names. If necessary, consult the official Microsoft documentation or online resources for troubleshooting guidance.

Q: Are there any pre-requisites for installing RSAT?

A: The primary prerequisite is a Windows 11 operating system. Depending on the specific RSAT features being installed, additional pre-requisites may be required. Refer to the official Microsoft documentation for detailed requirements.

Tips

  • Create a Script: For repeated installations or large-scale deployments, create a PowerShell script to automate the process.
  • Utilize Error Handling: Incorporate error handling mechanisms in your script to prevent unexpected failures and facilitate troubleshooting.
  • Document Your Script: Clearly document the purpose and steps involved in your script to ensure maintainability and understanding.
  • Test Thoroughly: Before deploying your script in a production environment, thoroughly test it in a controlled environment to ensure it functions as expected.

Conclusion

PowerShell provides a powerful and efficient method for installing RSAT on Windows 11. By leveraging the automation capabilities of PowerShell, administrators can streamline RSAT installations, ensure consistency across their network, and reduce the potential for errors. Understanding the key commands and incorporating best practices can significantly enhance the management of remote systems within a Windows 11 environment.

How to Install RSAT Tools in Windows 11? โ€“ DigitBin Full Guide  How to Download and Install RSAT in Windows 11 How to Install RSAT on Windows 11 PCs โ€“ Stack IT News
How to Install and View Remote Server Administration Tools (RSAT) In Windows 11 Full Guide  How to Download and Install RSAT in Windows 11 Installing RSAT Administration Tools on Windows 10 and 11  Windows OS Hub
Install RSAT on Windows 11 [3 Different Ways] Install the Windows Remote Server Administration Tools (RSAT) in Windows 11 - YouTube

Closure

Thus, we hope this article has provided valuable insights into Empowering Windows 11 Administration: A Guide to Installing RSAT with PowerShell. We thank you for taking the time to read this article. See you in our next article!

Understanding The Absence Of OneDrive In The Windows 11 Notification Area

Understanding the Absence of OneDrive in the Windows 11 Notification Area

Introduction

In this auspicious occasion, we are delighted to delve into the intriguing topic related to Understanding the Absence of OneDrive in the Windows 11 Notification Area. Let’s weave interesting information and offer fresh perspectives to the readers.

Understanding the Absence of OneDrive in the Windows 11 Notification Area

Notification area Windows 11 taskbar?

The absence of the OneDrive icon in the notification area of Windows 11 can be a perplexing experience for users who rely on the cloud storage service for seamless file synchronization and access. This seemingly minor issue can lead to frustration and inconvenience, particularly for individuals accustomed to the visual cues and quick access provided by the notification area icon.

Understanding the Importance of the OneDrive Icon

The OneDrive icon in the notification area serves as a visual indicator of the service’s status and provides users with quick access to essential functionalities. It allows for:

  • File Synchronization Status: The icon displays the synchronization status, indicating whether files are being uploaded, downloaded, or encountering issues.
  • Quick Access to OneDrive: Users can readily access the OneDrive folder and its contents through the icon, enabling effortless file management.
  • Notifications and Alerts: The icon provides important notifications about potential issues, such as synchronization errors or storage space limitations.
  • Control over OneDrive Settings: The icon allows users to access OneDrive settings, enabling them to adjust synchronization options, manage storage space, and configure other preferences.

Common Causes for OneDrive’s Absence in the Notification Area

While the absence of the OneDrive icon can be disconcerting, it is usually a result of easily resolvable issues. The most common causes include:

  • Disabled OneDrive Integration: Users might have unknowingly disabled OneDrive integration during the Windows 11 setup process or through subsequent settings adjustments.
  • Hidden Icon: The OneDrive icon might be hidden due to system settings that limit the number of icons displayed in the notification area.
  • System Error: Occasionally, system errors or conflicts can prevent OneDrive from properly registering its icon in the notification area.
  • Outdated OneDrive Version: An outdated version of OneDrive might lack the necessary components to display the icon correctly.
  • Third-Party Software Interference: Some third-party software applications can interfere with OneDrive’s functionality, leading to the icon’s disappearance.

Troubleshooting Steps to Restore the OneDrive Icon

Addressing the absence of the OneDrive icon in the notification area typically involves a few simple troubleshooting steps:

  1. Enable OneDrive Integration: Ensure that OneDrive integration is enabled within Windows 11 settings. This can be done by navigating to Settings > Accounts > Sync your settings and ensuring the toggle for OneDrive is switched on.

  2. Unhide the Icon: Check if the OneDrive icon is hidden due to system settings. Access the notification area settings by right-clicking the empty space in the notification area and selecting Show hidden icons. If the OneDrive icon is present, ensure it is checked to display it in the notification area.

  3. Restart OneDrive: Restarting OneDrive can often resolve minor issues that prevent the icon from appearing. This can be achieved by right-clicking the OneDrive icon in the taskbar (if present) and selecting Exit. Then, search for "OneDrive" in the Start menu and launch the application.

  4. Update OneDrive: Ensure that you are using the latest version of OneDrive. Check for updates within the OneDrive application or through the Microsoft Store.

  5. Run OneDrive Troubleshooter: Windows 11 offers a built-in troubleshooter for OneDrive. To access it, navigate to Settings > System > Troubleshoot > Other troubleshooters and select Run for the "OneDrive" troubleshooter.

  6. Reinstall OneDrive: If the troubleshooting steps fail to resolve the issue, reinstalling OneDrive might be necessary. This involves uninstalling the current version through the Control Panel and then downloading and installing the latest version from the Microsoft website.

  7. Check for Conflicts: Consider potential conflicts with third-party software applications. Temporarily disable or uninstall any recently installed software that might interfere with OneDrive’s functionality.

FAQs

Q: Why is the OneDrive icon missing from the notification area, and how can I fix it?

A: The absence of the OneDrive icon can be caused by various factors, including disabled OneDrive integration, hidden icons, system errors, outdated OneDrive versions, or conflicts with third-party software. To restore the icon, you can enable OneDrive integration, unhide the icon, restart OneDrive, update OneDrive, run the OneDrive troubleshooter, reinstall OneDrive, or check for conflicts with other applications.

Q: Is there a way to force the OneDrive icon to appear in the notification area?

A: While there isn’t a direct method to force the icon to appear, you can try the troubleshooting steps mentioned above to resolve the underlying issue. If the icon still doesn’t appear, you might need to contact Microsoft support for further assistance.

Q: Will the absence of the OneDrive icon affect my file synchronization?

A: The absence of the icon does not necessarily mean that file synchronization is not working. OneDrive might still be synchronizing files in the background even without the icon displayed in the notification area. However, the lack of the icon hinders your ability to monitor synchronization status, access OneDrive quickly, or receive notifications.

Q: Is there a way to access OneDrive settings without the icon?

A: Yes, you can access OneDrive settings without the icon by searching for "OneDrive" in the Start menu and opening the application. From there, you can access settings through the menu or by right-clicking the OneDrive icon in the taskbar (if present).

Tips

  • Enable OneDrive Integration: Ensure that OneDrive integration is enabled in Windows 11 settings to ensure seamless file synchronization and access.
  • Monitor System Settings: Regularly check system settings to ensure that the OneDrive icon is not hidden or affected by icon display limitations.
  • Keep OneDrive Updated: Install the latest version of OneDrive to benefit from new features and bug fixes, which can prevent icon-related issues.
  • Check for Conflicts: Be mindful of potential conflicts with third-party software applications and consider temporarily disabling or uninstalling any suspect software.
  • Utilize the OneDrive Troubleshooter: Leverage the built-in OneDrive troubleshooter to automatically diagnose and resolve common issues.

Conclusion

The absence of the OneDrive icon in the Windows 11 notification area can be a minor inconvenience, but it can be easily resolved through a few simple troubleshooting steps. By understanding the common causes and following the recommended solutions, users can restore the icon’s functionality and ensure seamless access to OneDrive’s essential features. The presence of the icon provides users with valuable insights into OneDrive’s status, facilitates quick access to files and settings, and enhances the overall user experience.

How To Turn Off Onedrive On This Day Memories Notification In Windows 11 10  itechguides How to disable OneDrive in Windows 11 (5 Best ways) How to Stop or Disable OneDrive Backup in Windows 11 - EaseUS
Disable Onedrive From Windows 11 - Image to u How To Turn Off Onedrive On This Day Memories Notification In Windows 11 10  itechguides How To Disable Onedrive On Windows 11  grovetech
Customize Windows 11 Taskbar Notification Area - Device Management Blog How To Disable Onedrive On Windows 11  grovetech

Closure

Thus, we hope this article has provided valuable insights into Understanding the Absence of OneDrive in the Windows 11 Notification Area. We hope you find this article informative and beneficial. See you in our next article!

Navigating The Gateway To Productivity: A Comprehensive Guide To The Microsoft Office 365 Login On Windows 10

Navigating the Gateway to Productivity: A Comprehensive Guide to the Microsoft Office 365 Login on Windows 10

Introduction

With great pleasure, we will explore the intriguing topic related to Navigating the Gateway to Productivity: A Comprehensive Guide to the Microsoft Office 365 Login on Windows 10. Let’s weave interesting information and offer fresh perspectives to the readers.

How To Login to Office 365 Account? Office 365 Login - Sign In to Microsoft Office Apps  office

The Microsoft Office 365 login window on Windows 10 serves as the digital gateway to a suite of powerful productivity tools, encompassing email, document creation, collaboration platforms, and more. This article aims to demystify the login process, highlighting its significance and benefits for individuals and organizations alike.

Understanding the Login Window:

The Office 365 login window presents a familiar interface, requiring users to enter their email address or username, followed by their password. This process verifies the user’s identity, granting access to their personalized Office 365 workspace.

Importance and Benefits:

The Office 365 login window is crucial for several reasons:

  • Secure Access: It acts as a first line of defense against unauthorized access to sensitive data, ensuring data privacy and security.
  • Personalized Workspace: Upon successful login, users are presented with their personalized workspace, tailored to their specific needs and preferences.
  • Unified Platform: The login window serves as a central access point to the entire Office 365 suite, allowing seamless navigation between various applications and services.
  • Collaboration and Communication: The login enables users to collaborate with colleagues, share documents, and communicate effectively through features like Microsoft Teams and Outlook.
  • Enhanced Productivity: The suite’s integrated tools and services streamline workflows, enhancing productivity and efficiency across various tasks.

Navigating the Login Process:

  1. Locate the Login Window: The login window can be accessed through various methods, including:
    • Dedicated Office 365 Applications: Launching applications like Word, Excel, or PowerPoint will prompt the login window.
    • Web Browser: Accessing the Office 365 portal through a web browser will also trigger the login window.
    • Microsoft Teams: Logging into Microsoft Teams requires authentication through the Office 365 login window.
  2. Enter Credentials: Enter the email address or username associated with your Office 365 account, followed by your password.
  3. Two-Factor Authentication (Optional): Depending on your account settings, you may be prompted for an additional verification step, such as a code sent to your phone or email.
  4. Access Your Workspace: Upon successful authentication, you will be granted access to your personalized Office 365 workspace.

Troubleshooting Common Login Issues:

  • Forgotten Password: If you forget your password, click the "Forgot Password" link on the login window and follow the instructions to reset it.
  • Incorrect Credentials: Double-check your email address or username and password for any typos.
  • Network Connectivity: Ensure a stable internet connection for smooth login access.
  • Account Lockout: If you enter the wrong password multiple times, your account may be temporarily locked. Contact your IT administrator for assistance.

FAQs:

1. Can I access Office 365 on multiple devices?

Yes, you can access Office 365 on multiple devices using the same login credentials. This enables seamless access to your files and applications across various platforms.

2. What happens if I lose my phone and have two-factor authentication enabled?

If you lose your phone and have two-factor authentication enabled, you will need to contact your IT administrator to temporarily disable two-factor authentication for your account. They can then assist you in recovering your account and setting up a new authentication method.

3. How do I change my password?

You can change your password by navigating to your account settings within the Office 365 portal. Follow the instructions to update your password securely.

4. What are the benefits of using Office 365 over traditional software?

Office 365 offers several advantages over traditional software, including:

  • Cloud-Based Storage: Data is stored securely in the cloud, eliminating the need for local storage and facilitating access from any device.
  • Automatic Updates: Updates are automatically applied, ensuring you always have the latest features and security patches.
  • Collaboration Features: Enhanced collaboration tools like Microsoft Teams and shared workspaces facilitate seamless teamwork.
  • Scalability: Easily adjust your subscription plan based on your needs, ensuring cost-effectiveness.

Tips for Secure Login:

  • Use a Strong Password: Choose a unique and complex password, including a combination of uppercase and lowercase letters, numbers, and symbols.
  • Enable Two-Factor Authentication: Add an extra layer of security by enabling two-factor authentication, requiring a code from your phone or email for login.
  • Beware of Phishing Attempts: Be cautious of suspicious emails or websites requesting your login credentials. Never enter your password on unfamiliar or untrusted websites.
  • Keep Software Updated: Regularly update your operating system and software to patch security vulnerabilities.

Conclusion:

The Office 365 login window serves as a crucial gateway to a comprehensive suite of productivity tools, empowering individuals and organizations to achieve their goals effectively. By understanding the login process, troubleshooting common issues, and adhering to best practices for security, users can unlock the full potential of Office 365 and maximize their productivity.

A Complete Guide to Microsoft Office 365 Login - Evolvous How to login to Office 365 - GCIT Microsoft Office 365 Admin Login - User Guide - Techilife
Microsoft Office 365 Login Tutorial Video  Office 365 Sign In - YouTube Microsoft outlook office 365 login - holoseroffice Office 365 Login Boost Your Productivity With Office 365
Microsoft office 365 login - cuploxa Microsoft 365 Login Latest Guide And Tips WPS Office, 40% OFF

Closure

Thus, we hope this article has provided valuable insights into Navigating the Gateway to Productivity: A Comprehensive Guide to the Microsoft Office 365 Login on Windows 10. We hope you find this article informative and beneficial. See you in our next article!

Optimizing RAM In Windows 11: A Comprehensive Guide

Optimizing RAM in Windows 11: A Comprehensive Guide

Introduction

With great pleasure, we will explore the intriguing topic related to Optimizing RAM in Windows 11: A Comprehensive Guide. Let’s weave interesting information and offer fresh perspectives to the readers.

Optimizing RAM in Windows 11: A Comprehensive Guide

How to Check RAM on Windows 11 [Step by Step Guide]

Windows 11, like its predecessors, relies heavily on Random Access Memory (RAM) to function efficiently. RAM acts as the temporary storage space for actively used data, allowing the operating system and applications to access information quickly. When RAM becomes overloaded or fragmented, it can lead to sluggish performance, program crashes, and overall frustration. This article delves into the intricacies of optimizing RAM usage in Windows 11, exploring methods to enhance system responsiveness and ensure a smoother user experience.

Understanding RAM and Its Role in Windows 11

RAM, or Random Access Memory, is a type of volatile memory that the computer uses to store data that is actively being accessed. It is a vital component for efficient system operation, as it allows the CPU to access data quickly and without interruption. When a program or process needs to access data, it first checks if the data is already stored in RAM. If it is, the CPU can access it instantly. If not, the data needs to be loaded from the hard drive, which is significantly slower.

In Windows 11, RAM plays a crucial role in:

  • Running multiple applications simultaneously: When you open multiple applications, each application needs its own space in RAM to store its data and instructions. The more applications you have running, the more RAM you will need.
  • Ensuring smooth multitasking: When you switch between applications, the data and instructions for the current application need to be loaded into RAM quickly. This is why having enough RAM is crucial for seamless multitasking.
  • Providing temporary storage for data: Many applications use RAM as a temporary storage space for data that is being processed. This allows the application to access the data quickly and efficiently.

Signs of Insufficient or Inefficient RAM Usage

Several symptoms can indicate that your computer is struggling with insufficient or inefficient RAM usage. These include:

  • Slow performance: The most common indicator is a noticeable slowdown in general system responsiveness. Applications may take longer to load, and the system might feel sluggish even when performing basic tasks.
  • Frequent freezing or crashing: Insufficient RAM can lead to frequent system freezes or crashes, especially when running resource-intensive applications or multiple programs simultaneously.
  • High disk activity: If your hard drive is constantly working overtime, it could be a sign that the system is trying to compensate for insufficient RAM by constantly swapping data between RAM and the hard drive.
  • Excessive page file usage: The page file, also known as virtual memory, is a temporary storage space on your hard drive that Windows uses when it runs out of RAM. High page file usage indicates that your computer is struggling to manage data in RAM.

Optimizing RAM in Windows 11: Practical Strategies

While upgrading to a higher capacity RAM module is the most straightforward solution for insufficient RAM, there are several effective methods to optimize existing RAM and enhance system performance:

1. Closing Unnecessary Programs:

  • Background processes: Many applications run in the background, consuming RAM even when not actively used. Identify and close unnecessary background programs through the Task Manager (Ctrl+Shift+Esc).
  • Startup programs: Several programs are configured to start automatically when Windows boots. Review and disable unnecessary startup programs through the Task Manager or System Configuration utility (msconfig).

2. Managing System Resources:

  • Disk cleanup: Regularly clean up temporary files, system cache, and other unnecessary data using the built-in Disk Cleanup tool. This frees up disk space and potentially improves system responsiveness.
  • Defragmentation: Defragmenting your hard drive can improve access speeds, indirectly benefiting system performance by reducing the time spent loading data from the hard drive.
  • Virtual memory optimization: Adjust the size of the page file, which acts as virtual memory, to ensure optimal balance between performance and disk space utilization.

3. Employing System Settings:

  • Visual effects: Reduce visual effects like animations and transparency to minimize resource consumption. Adjust these settings in the System Properties dialog (right-click This PC > Properties).
  • Power plan: Choose a balanced power plan that prioritizes performance over power saving. This can help ensure that your system has sufficient resources to handle demanding tasks.
  • Windows updates: Keep your system up-to-date with the latest Windows updates, as they often include performance improvements and bug fixes.

4. Utilizing Third-Party Tools:

  • RAM cleaning utilities: While not universally recommended, some third-party tools claim to optimize RAM usage by clearing unused memory. Use such tools with caution, as they might not offer significant performance gains and could potentially interfere with system stability.
  • System monitoring tools: Use tools like Task Manager or third-party system monitors to track RAM usage in real time and identify resource-intensive applications or processes.

FAQs on RAM Optimization in Windows 11

1. Is it necessary to use a RAM optimizer for Windows 11?

While RAM optimizers can sometimes provide minor performance improvements, they are not essential for most users. Windows 11 has built-in mechanisms for managing RAM effectively. Using a RAM optimizer can even lead to potential stability issues or conflicts with other system components.

2. How much RAM is recommended for Windows 11?

The recommended amount of RAM for Windows 11 depends on your usage patterns. For basic tasks like web browsing and email, 8GB of RAM is generally sufficient. For more demanding tasks like gaming, video editing, or running multiple applications simultaneously, 16GB or more is recommended.

3. How can I check how much RAM is installed on my computer?

You can check your RAM usage and installed RAM capacity by opening the Task Manager (Ctrl+Shift+Esc) and navigating to the "Performance" tab. The "Memory" section will display the current RAM usage and total installed RAM.

4. Can I install more RAM in my computer?

Yes, you can usually upgrade your computer’s RAM by adding more modules. Check your computer’s documentation or motherboard specifications to determine the maximum supported RAM capacity and compatible RAM types.

5. Does using a RAM optimizer affect the lifespan of my RAM?

No, using a RAM optimizer does not affect the lifespan of your RAM. RAM is a physical component with a finite lifespan, but its longevity is not affected by software applications.

Tips for Optimizing RAM in Windows 11

  • Monitor RAM usage regularly: Use the Task Manager or system monitoring tools to keep track of RAM usage and identify any potential issues.
  • Close unnecessary programs: Make a habit of closing applications you are not actively using to free up RAM.
  • Clean up your hard drive: Regularly delete temporary files, system cache, and other unnecessary data to improve disk space and potentially enhance system responsiveness.
  • Keep your system updated: Ensure that you have the latest Windows updates installed, as they often include performance improvements and bug fixes.
  • Consider upgrading your RAM: If you frequently encounter performance issues due to insufficient RAM, consider upgrading to a higher capacity RAM module.

Conclusion

Optimizing RAM usage in Windows 11 is crucial for achieving a smooth and responsive user experience. While upgrading to a larger RAM module is the most effective solution for insufficient RAM, numerous strategies can enhance existing RAM and improve system performance. By understanding the factors that influence RAM usage and implementing the recommended optimization techniques, users can ensure that their Windows 11 system operates efficiently and meets their individual needs. Remember, a well-maintained and optimized system translates to a more enjoyable and productive computing experience.

Why Does Windows 11 Use So Much RAM? Learn How to Optimize Performance How to Increase RAM in Windows 11 [ No Real RAM Installation Required ] Speed Up Windows 11 High Memory Usage in Windows 11: How to Reduce it in 6 Steps
How to Automatically Optimize RAM on Windows 11 How to check RAM on Windows 11 - PC Guide How To Increase Ram in Windows 11  Optimize Windows 11 for Best Performance - YouTube
How to Check RAM on Windows 11 [Step by Step Guide] How To Fix High RAM/Memory Usage on Windows 11 [Complete Guide] - YouTube

Closure

Thus, we hope this article has provided valuable insights into Optimizing RAM in Windows 11: A Comprehensive Guide. We hope you find this article informative and beneficial. See you in our next article!

Windows 11 Home: A Comprehensive Overview

Windows 11 Home: A Comprehensive Overview

Introduction

With great pleasure, we will explore the intriguing topic related to Windows 11 Home: A Comprehensive Overview. Let’s weave interesting information and offer fresh perspectives to the readers.

Windows 11 Home: A Comprehensive Overview

Windows 11 Home Overview  Microsoft Windows 11 - YouTube

Windows 11 Home, the consumer-focused version of Microsoft’s latest operating system, represents a significant evolution in the Windows experience. It boasts a refined user interface, enhanced security features, and a range of new capabilities designed to empower users and elevate their computing experience. This article delves into the key aspects of Windows 11 Home, providing a comprehensive understanding of its features, benefits, and overall impact on the modern computing landscape.

A Fresh Look and Feel:

Windows 11 Home introduces a visually striking and intuitive user interface that prioritizes clarity and functionality. The Start menu has been redesigned, featuring a centralized location for pinned applications and a dynamic list of recently used programs. The taskbar has been repositioned at the bottom of the screen, providing a familiar and accessible location for quick access to open applications and system functions. The overall design aesthetic emphasizes clean lines, vibrant colors, and a modern, minimalist approach. This refined visual language enhances the user experience, making navigation and interaction with the operating system smoother and more enjoyable.

Enhanced Security and Privacy:

Security and privacy are paramount in today’s digital landscape, and Windows 11 Home incorporates robust features to protect users and their data. Windows Hello, the biometric authentication system, provides secure and convenient login options using facial recognition or fingerprint scanning. Microsoft Defender, the integrated antivirus solution, offers real-time protection against malware and other online threats. Secure boot and virtualization-based security further enhance system security by preventing malicious software from accessing the operating system’s core functions. Windows 11 Home also includes a variety of privacy settings, allowing users to control how their data is collected and used by applications and services.

Immersive Multimedia Experience:

Windows 11 Home elevates the multimedia experience with features designed to enhance entertainment and productivity. The operating system supports HDR (High Dynamic Range) displays, delivering vibrant and lifelike visuals. Auto HDR, a new feature, automatically enhances the visual quality of games and applications that do not natively support HDR. The integrated Windows Media Player provides a seamless way to play videos and music, while the Xbox app allows users to stream and play games from their Xbox consoles.

Improved Gaming Performance:

Gaming is an integral part of the modern computing experience, and Windows 11 Home delivers a significant boost in gaming performance. DirectStorage, a new technology, enables faster loading times and smoother gameplay by allowing games to access data directly from storage devices. Auto HDR enhances the visual fidelity of games, making them more immersive and captivating. The Xbox app provides access to a vast library of games, including Xbox Game Pass, a subscription service that offers unlimited access to a rotating selection of games.

Seamless Integration with Microsoft Ecosystem:

Windows 11 Home integrates seamlessly with other Microsoft services and devices, enhancing productivity and convenience. Microsoft 365, the cloud-based productivity suite, offers access to applications like Word, Excel, PowerPoint, and Outlook. OneDrive, the cloud storage service, provides a convenient way to store and share files across multiple devices. Windows 11 Home also supports Android apps, allowing users to access a wide range of mobile applications directly on their desktops.

Benefits of Windows 11 Home:

  • Modern and Intuitive User Interface: The redesigned user interface enhances usability and provides a visually appealing experience.
  • Enhanced Security and Privacy: Robust security features protect users and their data from online threats.
  • Immersive Multimedia Experience: HDR support, Auto HDR, and Windows Media Player elevate the entertainment and productivity experience.
  • Improved Gaming Performance: DirectStorage and Auto HDR enhance gaming performance and immersion.
  • Seamless Integration with Microsoft Ecosystem: Integration with Microsoft services and devices enhances productivity and convenience.

FAQs on Windows 11 Home:

1. What are the minimum system requirements for Windows 11 Home?

Windows 11 Home requires a processor with at least two cores running at 1 GHz or faster, 4 GB of RAM, 64 GB of storage space, and a compatible graphics card. It also requires a display with a minimum resolution of 1366 x 768 pixels.

2. Is Windows 11 Home compatible with my existing hardware?

The compatibility of Windows 11 Home with your existing hardware depends on the specific components in your system. You can check the official Microsoft website for a comprehensive list of supported devices and system requirements.

3. How do I upgrade to Windows 11 Home?

You can upgrade to Windows 11 Home from a compatible version of Windows 10. Microsoft provides a free upgrade tool that will assess your system’s compatibility and guide you through the upgrade process.

4. What are the key differences between Windows 11 Home and Windows 11 Pro?

Windows 11 Pro offers additional features and functionality, including support for BitLocker encryption, remote desktop access, and domain join. Windows 11 Home is designed for personal and home users, while Windows 11 Pro is targeted towards businesses and professionals.

5. Is Windows 11 Home free?

Windows 11 Home is not free. It is available for purchase as a standalone operating system or as part of a new computer purchase.

Tips for Optimizing Windows 11 Home:

  • Keep your system updated: Regular updates ensure the latest security patches and performance enhancements.
  • Use a reliable antivirus solution: Protect your system from malware and other online threats.
  • Manage your storage space: Regularly delete unnecessary files and applications to free up space.
  • Customize your settings: Adjust settings to optimize performance and personalize your experience.
  • Use the Windows 11 Home features: Explore and utilize the new features to enhance your productivity and entertainment.

Conclusion:

Windows 11 Home is a significant upgrade that delivers a modern, secure, and user-friendly computing experience. Its refined user interface, enhanced security features, immersive multimedia experience, and seamless integration with the Microsoft ecosystem make it a compelling choice for both personal and professional use. By embracing its features and utilizing its capabilities, users can unlock the full potential of Windows 11 Home and enhance their computing experience. As technology continues to evolve, Windows 11 Home will undoubtedly remain at the forefront of the operating system landscape, providing a platform for innovation and progress in the digital world.

Windows 11  overview and new features - YouTube Windows 11 Overview - Windows 11 Features, Price, System Requirement Buy WINDOWS 11 HOME User Manual: A Comprehensive Illustrated Guide to Navigating the New
Windows 11 Overview Windows-11: Overview, System requirements, Steps to Install and setup.  Story Network Buy Windows 11 User Guide for Beginners: A Comprehensive Guide to Master Windows 11 Operating
Windows 11: A Comprehensive Guide Windows 11 Overview - Windows 11 Features, Price, System Requirement

Closure

Thus, we hope this article has provided valuable insights into Windows 11 Home: A Comprehensive Overview. We thank you for taking the time to read this article. See you in our next article!

Navigating The Path To A Free Windows 11 Installation: A Comprehensive Guide

Navigating the Path to a Free Windows 11 Installation: A Comprehensive Guide

Introduction

In this auspicious occasion, we are delighted to delve into the intriguing topic related to Navigating the Path to a Free Windows 11 Installation: A Comprehensive Guide. Let’s weave interesting information and offer fresh perspectives to the readers.

Windows 11 installation process - Step by Step  How to install Windows 11  Windows 11

The allure of a free Windows 11 installation is undeniable. For individuals seeking to upgrade their existing system or embark on a fresh build, the prospect of bypassing the cost barrier is undeniably attractive. However, the journey towards a free installation can be fraught with complexities, requiring a nuanced understanding of the available options and a cautious approach to ensure a smooth and secure experience.

This comprehensive guide delves into the intricacies of acquiring a free Windows 11 installation, providing clarity on the various methods, their inherent advantages and limitations, and crucial considerations for a successful endeavor.

Understanding the Free Windows 11 Landscape

The concept of a "free" Windows 11 installation encompasses several distinct scenarios, each with its own set of prerequisites and potential caveats.

  • Upgrade Path: Windows 11 offers a free upgrade path for eligible Windows 10 users. This approach leverages existing licenses and allows for a seamless transition to the new operating system. However, it is crucial to note that eligibility is determined by specific hardware requirements, and not all Windows 10 installations qualify for the free upgrade.
  • OEM Licenses: Original Equipment Manufacturers (OEMs) often bundle Windows 11 licenses with new devices. These licenses are typically tied to the specific hardware and may not be transferable to other systems. However, in some cases, OEM licenses can be used for a clean installation on a different machine, although the process can be intricate and subject to limitations.
  • Volume Licensing: Organizations with multiple computers can leverage volume licensing agreements to obtain Windows 11 at a discounted rate or even for free, depending on the specific agreement. This option is typically reserved for businesses and educational institutions.
  • Free Trial: Microsoft offers a free trial of Windows 11 for a limited period. This trial version provides full access to the operating system’s features but is intended for evaluation purposes and eventually requires activation with a valid license.
  • Third-Party Sources: While numerous websites claim to offer free Windows 11 downloads, it is crucial to exercise extreme caution. Many such sources may distribute pirated or counterfeit software, posing significant security risks to users and their data.

Navigating the Free Upgrade Path: A Detailed Examination

The free upgrade path from Windows 10 to Windows 11 represents the most straightforward and reliable method for acquiring a free installation. However, it is essential to understand the eligibility criteria and potential challenges associated with this approach.

Eligibility Requirements:

  • Hardware Compatibility: Windows 11 has specific hardware requirements that must be met for a successful upgrade. These include:
    • Processor: 1 gigahertz (GHz) or faster with 2 or more cores
    • RAM: 4 gigabytes (GB)
    • Storage: 64 GB or larger
    • System Firmware: UEFI, Secure Boot capable
    • TPM: Trusted Platform Module (TPM) version 2.0
    • Display: High Definition (720p) display with at least 9 inches diagonally
    • Graphics Card: DirectX 12 compatible graphics card
  • Windows 10 Edition: The upgrade path is available for Windows 10 Home, Pro, Pro Education, and Pro for Workstations editions.
  • Activation Status: The Windows 10 installation must be activated with a valid license.

Upgrade Process:

  1. Check for Compatibility: Ensure your system meets the minimum hardware requirements.
  2. Update Windows 10: Ensure your system is running the latest version of Windows 10.
  3. Download and Install: Open Windows Update and check for the Windows 11 upgrade.
  4. Follow On-Screen Instructions: The upgrade process will guide you through the necessary steps.

Potential Challenges:

  • Hardware Incompatibility: If your system does not meet the hardware requirements, the upgrade will not be available.
  • Activation Issues: If your Windows 10 installation is not activated, the upgrade may fail.
  • System Errors: The upgrade process can sometimes encounter errors, requiring troubleshooting or a clean installation.

Leveraging OEM Licenses: A More Complex Approach

OEM licenses, bundled with new computers, can be utilized for a clean installation on a different machine, but this process is often more involved and subject to limitations.

Considerations:

  • License Transferability: OEM licenses are typically tied to the specific hardware and may not be transferable to another system.
  • Activation Restrictions: The activation process may require a digital product key or a specific activation method associated with the original device.
  • Manufacturer Policies: OEM manufacturers may have specific policies regarding license transfers, which need to be reviewed carefully.

Volume Licensing: A Solution for Organizations

Volume licensing agreements provide businesses and educational institutions with access to Windows 11 at discounted rates or even for free, depending on the specific agreement. These agreements often offer flexibility in terms of license allocation and usage.

Benefits:

  • Cost Savings: Organizations can significantly reduce software costs through volume licensing.
  • Flexibility: These agreements offer flexibility in terms of license allocation and usage.
  • Support and Management: Volume licensing agreements often include access to support and management tools.

Free Trial: A Limited-Time Opportunity

Microsoft offers a free trial of Windows 11 for a limited period. This trial version allows users to explore the operating system’s features but eventually requires activation with a valid license.

Advantages:

  • Explore Windows 11: Users can experience the new features and interface before committing to a full installation.
  • Evaluate Compatibility: The trial provides an opportunity to test compatibility with existing software and hardware.

Disadvantages:

  • Limited Time: The trial period is limited, requiring activation with a valid license after expiration.
  • Incomplete Functionality: Certain features may be restricted during the trial period.

Navigating Third-Party Sources: A Word of Caution

While numerous websites claim to offer free Windows 11 downloads, it is crucial to exercise extreme caution. Many such sources may distribute pirated or counterfeit software, posing significant security risks.

Potential Risks:

  • Malware and Viruses: Pirated software often contains malware and viruses that can harm your system.
  • Data Theft: Counterfeit software can be used to steal your personal information.
  • Legal Consequences: Downloading and using pirated software is illegal and can lead to legal penalties.

Recommendations:

  • Stick to Official Sources: Obtain Windows 11 from reputable sources like the Microsoft Store or the official Microsoft website.
  • Verify Authenticity: Check for digital signatures and other security measures to verify the authenticity of the software.
  • Use Antivirus Software: Ensure you have a reliable antivirus solution installed and updated regularly.

FAQs about Free Windows 11 Installation

Q: Can I upgrade my Windows 10 laptop to Windows 11 for free?

A: If your laptop meets the minimum hardware requirements and your Windows 10 installation is activated, you may be eligible for a free upgrade to Windows 11.

Q: How do I know if my computer is compatible with Windows 11?

A: Microsoft provides a PC Health Check app that can assess your system’s compatibility. You can also check the official Windows 11 system requirements for detailed information.

Q: What if my Windows 10 installation is not activated?

A: If your Windows 10 installation is not activated, you will not be able to upgrade to Windows 11 for free. You will need to purchase a valid Windows 11 license.

Q: Can I use a Windows 11 key from a previous computer on a new one?

A: This depends on the type of license. OEM licenses are typically tied to the specific hardware and may not be transferable. Retail licenses may be transferable, but the process can be complex and subject to limitations.

Q: Is it safe to download Windows 11 from third-party websites?

A: No, it is not safe. Many third-party websites distribute pirated or counterfeit software, which can contain malware and viruses. Stick to official sources like the Microsoft Store or the official Microsoft website.

Tips for a Smooth Free Windows 11 Installation

  • Backup Your Data: Before upgrading, back up your important data to prevent loss.
  • Check Compatibility: Ensure your system meets the minimum hardware requirements.
  • Update Windows 10: Ensure your system is running the latest version of Windows 10.
  • Free Up Disk Space: Ensure you have sufficient disk space for the upgrade process.
  • Disconnect from the Internet: Disconnecting from the internet during the upgrade process can minimize interruptions.
  • Use a USB Drive: Consider using a USB drive to create an installation media if the upgrade process encounters errors.

Conclusion

Acquiring a free Windows 11 installation is achievable, but it requires a clear understanding of the available options and a cautious approach. The free upgrade path for eligible Windows 10 users presents the most straightforward and reliable method, while OEM licenses offer a more complex route with potential limitations. Volume licensing agreements provide organizations with cost-effective solutions, while the free trial offers a limited-time opportunity to explore the operating system. It is crucial to avoid third-party sources, as they pose significant security risks. By carefully navigating the options and adhering to best practices, users can successfully obtain a free Windows 11 installation while ensuring a secure and reliable experience.

Install Windows 11 - Download Windows 11 Installation Step by Step - YouTube Windows 11 Installation Guideline and First Look - YouTube The Ultimate Guide to Installing Windows 11  Petri
Windows 11 Complete Installation Step By Step Youtube - Vrogue Buy Windows 11 User Guide for Beginners: A Comprehensive Guide to Master Windows 11 Operating How to Download and Install Windows 11 Right Now (Leaked Build)
PPT - A Comprehensive Installation Guide to Windows 11 ARM With ISO PowerPoint Presentation - ID How To Install Windows 11 ISO [Developer Preview]: 3 Working Methods!

Closure

Thus, we hope this article has provided valuable insights into Navigating the Path to a Free Windows 11 Installation: A Comprehensive Guide. We hope you find this article informative and beneficial. See you in our next article!

Navigating The World Of PC Games: A Guide To Downloading And Enjoying Games On Windows 11

Navigating the World of PC Games: A Guide to Downloading and Enjoying Games on Windows 11

Introduction

With great pleasure, we will explore the intriguing topic related to Navigating the World of PC Games: A Guide to Downloading and Enjoying Games on Windows 11. Let’s weave interesting information and offer fresh perspectives to the readers.

Windows 11 For Gaming

The realm of PC gaming has evolved into a vibrant ecosystem, offering an unparalleled level of customization, performance, and access to a vast library of titles. Windows 11, the latest operating system from Microsoft, further enhances this experience by providing a refined platform for gaming, supporting cutting-edge technologies and optimizing for smooth gameplay. This comprehensive guide explores the intricacies of downloading and playing PC games on Windows 11, addressing common queries and offering practical tips for an enriching gaming experience.

Understanding the Download Process: A Step-by-Step Guide

The process of obtaining and installing PC games on Windows 11 involves navigating various platforms and understanding the different distribution models. Here’s a breakdown of the key steps:

  1. Choosing a Distribution Platform: The first step involves selecting a trusted platform for acquiring games. Several options exist, each with its unique features and advantages:

    • Steam: A behemoth in the gaming world, Steam offers a vast library of titles, robust community features, and a user-friendly interface. It utilizes a client-based system, requiring users to download and install the Steam client before purchasing and accessing games.
    • Epic Games Store: A rising competitor to Steam, Epic Games Store provides a growing library of games, often offering free titles and exclusive deals. It operates similarly to Steam, requiring the installation of a dedicated client.
    • GOG.com: Focusing on DRM-free games, GOG.com offers a curated selection of classic and modern titles, allowing users to download and play without the need for constant online verification.
    • Microsoft Store: Windows 11’s native store, Microsoft Store, offers a selection of games, including some exclusive titles. It integrates seamlessly with the operating system and allows for easy installation and updates.
    • Direct Download from Developer Websites: Some developers offer direct downloads of their games from their official websites, bypassing third-party platforms. This option provides more control over the installation process but may lack the convenience of integrated updates and community features.
  2. Purchasing or Acquiring the Game: Once a platform is chosen, users can browse the available titles and select their desired game. Most platforms offer a variety of purchase options, including:

    • Full Purchase: This option grants permanent ownership of the game, allowing users to download and play it as often as they wish.
    • Subscription Services: Platforms like Xbox Game Pass offer access to a curated library of games for a monthly subscription fee, providing a cost-effective way to explore a wide range of titles.
    • Free-to-Play Games: Many games are available for free, supported by in-game purchases or advertising. These options provide a low-cost entry point into the gaming world.
  3. Downloading and Installing the Game: After purchasing or acquiring a game, the platform will initiate the download process. This involves transferring the game files to the user’s computer, typically stored in a dedicated folder. Once the download is complete, the game can be installed, usually by running a setup file.

  4. Game Updates and Patches: Games often receive updates and patches to address bugs, improve performance, or introduce new content. These updates are automatically downloaded and installed through the platform’s client, ensuring a seamless experience.

Optimizing Windows 11 for Gaming: Enhancing Performance and Enjoyment

Windows 11 offers a range of features specifically designed to enhance the gaming experience. By utilizing these features and implementing some best practices, users can optimize their system for smooth gameplay and visual fidelity:

  1. Utilizing the Xbox Game Bar: Windows 11’s built-in Xbox Game Bar provides a convenient overlay for accessing gaming-related functions, including capturing screenshots and videos, adjusting audio settings, and monitoring system performance.

  2. Enabling Game Mode: Game Mode prioritizes resources for running games, minimizing background activity and improving performance. It can be enabled through the Windows Settings app under the "Gaming" section.

  3. Adjusting Graphics Settings: Games often offer a range of graphics settings, allowing users to balance visual fidelity with performance. By adjusting settings like resolution, texture quality, and anti-aliasing, users can optimize the game for their system’s capabilities.

  4. Updating Drivers: Keeping graphics card drivers up-to-date is crucial for optimal performance. Manufacturers regularly release driver updates that improve compatibility, fix bugs, and enhance performance.

  5. Managing Background Processes: Closing unnecessary applications and disabling background processes can free up system resources for gaming, resulting in smoother gameplay.

  6. Overclocking (Advanced): For experienced users, overclocking components like the CPU and GPU can boost performance, but this requires careful monitoring and can potentially void warranties.

FAQs: Addressing Common Queries

Q: Are there any free PC games available on Windows 11?

A: Yes, several free-to-play games are available on Windows 11, including popular titles like League of Legends, Fortnite, and Dota 2. These games can be downloaded directly from their respective platforms or the Microsoft Store.

Q: What are the minimum system requirements for PC games?

A: Each game has specific minimum system requirements, outlining the minimum hardware specifications needed to run the game at a playable level. These requirements typically include details about the CPU, RAM, graphics card, and storage space.

Q: How can I improve the performance of my PC for gaming?

A: Besides the optimization tips mentioned earlier, upgrading hardware components like the graphics card, RAM, or CPU can significantly improve gaming performance. Additionally, ensuring sufficient cooling and ventilation for the system can prevent overheating and maintain optimal performance.

Q: What are the benefits of using a dedicated gaming platform like Steam or Epic Games Store?

A: These platforms offer several benefits, including:

* **Convenience:** Centralized access to a vast library of games, with easy installation and updates.
* **Community Features:** Forums, chat rooms, and friend lists for connecting with other gamers.
* **Sales and Discounts:** Regular promotions and discounts on games, offering significant savings.
* **Automatic Updates:** Keeping games up-to-date with the latest patches and content.

Q: Can I play online multiplayer games on Windows 11?

A: Yes, Windows 11 fully supports online multiplayer gaming. Most games offer dedicated servers for online play, allowing players to connect and compete with others from around the world.

Tips for a Seamless Gaming Experience on Windows 11

  1. Prioritize Game Performance: Adjust Windows 11 settings to favor gaming performance, such as disabling unnecessary background processes and enabling Game Mode.

  2. Keep Drivers Up-to-Date: Regularly update graphics card drivers and other system drivers for optimal compatibility and performance.

  3. Optimize Graphics Settings: Adjust in-game graphics settings to balance visual fidelity with performance, ensuring a smooth gaming experience.

  4. Utilize the Xbox Game Bar: Leverage the Xbox Game Bar’s features for capturing screenshots and videos, adjusting audio settings, and monitoring system performance.

  5. Explore Subscription Services: Consider subscription services like Xbox Game Pass for access to a vast library of games at a fixed monthly cost.

Conclusion: Embracing the World of PC Gaming on Windows 11

Windows 11 provides a robust and optimized platform for PC gaming, offering a rich and immersive experience. By understanding the download process, optimizing the system for performance, and leveraging the available features, users can fully embrace the world of PC games and enjoy countless hours of entertainment. Whether exploring vast open worlds, engaging in competitive multiplayer battles, or delving into captivating narratives, Windows 11 empowers gamers to immerse themselves in the captivating world of digital entertainment.

10 Best Offline Games for Windows 11 How to Play Old PC Games on Windows 11?  LaptrinhX The Ultimate Guide to Downloading PC Games: Getting Started โ€“ WordPress Website
18 Best Apps & Websites to Download Games for PC Best free games downloading sites for pc - faloapp How To Start Playing Google Play Games Beta on PC for Free! (Windows 10/11) - YouTube
10 Best PC Games download Sites  Review & Comparison  Pros n Cons How to Play Android Games on Windows 11 With Google Play Games

Closure

Thus, we hope this article has provided valuable insights into Navigating the World of PC Games: A Guide to Downloading and Enjoying Games on Windows 11. We thank you for taking the time to read this article. See you in our next article!

Restoring Data After A Windows 10 Factory Reset: A Comprehensive Guide

Restoring Data After a Windows 10 Factory Reset: A Comprehensive Guide

Introduction

With enthusiasm, let’s navigate through the intriguing topic related to Restoring Data After a Windows 10 Factory Reset: A Comprehensive Guide. Let’s weave interesting information and offer fresh perspectives to the readers.

Restoring Data After a Windows 10 Factory Reset: A Comprehensive Guide

2 Methods to Recover Data After Factory Reset on Windows 10

A factory reset on a Windows 10 computer is a powerful tool for troubleshooting issues and restoring the operating system to its default state. However, this process often leads to the complete erasure of all user data, including files, applications, and settings. While the loss of data can be a significant inconvenience, it is not always irreversible. This article delves into the various methods and considerations for recovering files after a factory reset on Windows 10.

Understanding the Factory Reset Process

A factory reset on Windows 10 essentially reinstalls the operating system, erasing all data partitions and replacing them with a fresh copy. This process is designed to remove any corrupted files, malicious software, or configuration errors that may be causing problems. However, it also eliminates all user-generated content, including documents, photos, music, and software installations.

Data Recovery Options

The effectiveness of data recovery after a factory reset depends on several factors, including the type of storage device, the method used for the reset, and the time elapsed since the reset. Here are the primary options for retrieving lost data:

1. Data Recovery Software:

Specialized data recovery software can scan the hard drive or other storage devices for deleted files. These programs work by analyzing the file system and searching for remnants of deleted files. While not always guaranteed, this method can be successful in recovering data that has been overwritten or fragmented.

2. Backup Solutions:

The most reliable way to protect data is to create regular backups. Cloud storage services, external hard drives, or network drives provide secure storage for important files. If a backup was made before the factory reset, restoring the data from the backup is the most straightforward and effective recovery method.

3. Previous Versions of Files:

Windows 10’s built-in file versioning feature automatically saves previous versions of files. This feature can be accessed through the File History function, which is enabled by default. If a backup was not created, checking for previous versions of files can be a viable option, but it’s important to note that this feature only saves versions of files that have been modified within the specified backup period.

4. Data Recovery Services:

For complex data recovery scenarios, professional data recovery services offer specialized expertise and advanced equipment. These services can handle situations involving physical damage to the storage device, complex file system corruption, or data encryption. However, these services can be expensive, and the success rate is not guaranteed.

Factors Affecting Data Recovery

The likelihood of successful data recovery after a factory reset is influenced by several factors:

  • Time Since Reset: The longer the time elapsed since the factory reset, the higher the chances of data being overwritten by new files, making recovery more difficult.
  • Type of Storage Device: Solid-state drives (SSDs) are more susceptible to data loss after a factory reset compared to traditional hard disk drives (HDDs) due to their faster write speeds.
  • Method of Reset: If the factory reset was performed through the Windows settings menu, the data on the hard drive is likely to be overwritten completely. However, if the reset was performed using a recovery partition or a USB drive, there might be a chance of retrieving data.
  • File System Corruption: If the file system on the storage device is corrupted, data recovery becomes more challenging.

Tips for Successful Data Recovery

  • Act Quickly: The sooner you attempt data recovery, the better the chances of success.
  • Avoid Writing to the Drive: Do not install any new software or save any files on the drive where you want to recover data. This prevents overwriting of deleted files.
  • Use a Reliable Data Recovery Software: Choose a reputable data recovery software and follow the instructions carefully.
  • Consider Professional Services: If the data is crucial and the recovery process seems too complex, consult a professional data recovery service.

FAQs

Q: Can I recover files from a factory reset without a backup?

A: While it’s possible to recover files without a backup, the success rate is significantly lower. Data recovery software or file versioning features may be able to retrieve some data, but the amount and quality of recovered files can vary greatly.

Q: Is it possible to recover deleted files from a factory reset if I have a new operating system installed?

A: Yes, it’s possible to recover deleted files even after installing a new operating system. Data recovery software can scan the entire hard drive, regardless of the installed operating system. However, the chances of successful recovery decrease with the installation of a new operating system.

Q: What happens to my files after a factory reset?

A: During a factory reset, the entire hard drive is formatted and overwritten with a fresh copy of the operating system. This process permanently deletes all user data, including files, applications, and settings.

Q: Is it possible to prevent data loss during a factory reset?

A: The most effective way to prevent data loss during a factory reset is to create a complete backup of all important files before performing the reset. Cloud storage, external hard drives, or network drives are suitable options for backups.

Conclusion

Data recovery after a factory reset on Windows 10 can be a challenging process, but it is not impossible. By understanding the various recovery methods, the factors influencing success, and the importance of preventative measures, users can increase their chances of retrieving lost data. While data recovery software and professional services offer valuable solutions, the best approach is to prioritize data backup as a fundamental part of digital hygiene. By implementing regular backup routines, users can safeguard their valuable data and minimize the risk of irreversible data loss.

How to Recover Files After Factory Reset Windows 10 (2024) Quickly Recover Files after Factory Reset on Windows 10/8/7 How to Recover Files After Factory Reset Windows 10 (2024)
How to Recover Files After Factory Reset on Windows 10/11 How System Restore & Factory Reset Work in Windows 10 Free Guide How to Recover Files After Factory Reset on Windows OS?
Recover Data After Windows 10 Reset - YouTube How Can I Recover Files after Factory Reset Windows 10

Closure

Thus, we hope this article has provided valuable insights into Restoring Data After a Windows 10 Factory Reset: A Comprehensive Guide. We thank you for taking the time to read this article. See you in our next article!