Archives April 2024

Navigating The Digital Landscape: A Guide To Online Driver Installation For Windows 10

Navigating the Digital Landscape: A Guide to Online Driver Installation for Windows 10

Introduction

In this auspicious occasion, we are delighted to delve into the intriguing topic related to Navigating the Digital Landscape: A Guide to Online Driver Installation for Windows 10. Let’s weave interesting information and offer fresh perspectives to the readers.

How to Install Windows Drivers Using DriverPack Solution, AIDA and Online Updates - HubPages

In the intricate world of modern computing, hardware and software must seamlessly coexist. This delicate balance relies heavily on drivers, specialized programs that enable the operating system to communicate with and control connected devices. For Windows 10 users, the process of obtaining and installing drivers has evolved significantly, with online resources becoming the preferred method. This shift presents both advantages and complexities, requiring a nuanced understanding of the process and its implications.

The Importance of Drivers in a Digital Ecosystem

Imagine a symphony orchestra without sheet music. Each instrument, though capable of producing sound, would lack the instructions to harmonize and create a cohesive performance. Similarly, without drivers, hardware components – the instruments of your computer – remain silent and unusable. Drivers act as the sheet music, providing the operating system with the necessary instructions to interact with specific devices, such as graphics cards, sound cards, printers, and network adapters.

The Evolution of Driver Acquisition: From Disks to the Cloud

Historically, drivers were distributed on physical media, typically CDs or DVDs. This approach, while reliable, presented limitations. Users needed to physically access the disk, requiring storage space and potentially hindering portability. Moreover, driver updates were often cumbersome, necessitating manual downloads and installations.

The advent of the internet revolutionized driver acquisition. Online repositories, maintained by hardware manufacturers and third-party providers, offer a vast library of drivers, readily accessible through a simple search. This shift has significantly streamlined the process, enabling users to obtain the latest drivers with minimal effort.

Online Driver Installation: A Simplified Approach

Windows 10, with its inherent focus on user-friendliness, further enhances the online driver installation experience. The operating system employs a sophisticated driver management system, automatically detecting connected devices and attempting to locate and install compatible drivers from its internal repository or online sources.

This automatic driver installation process, while convenient, can sometimes lead to outdated or incompatible drivers, potentially impacting device performance and system stability. To ensure optimal functionality, users should proactively seek and install the latest drivers directly from the manufacturer’s website.

Navigating the Online Landscape: A Step-by-Step Guide

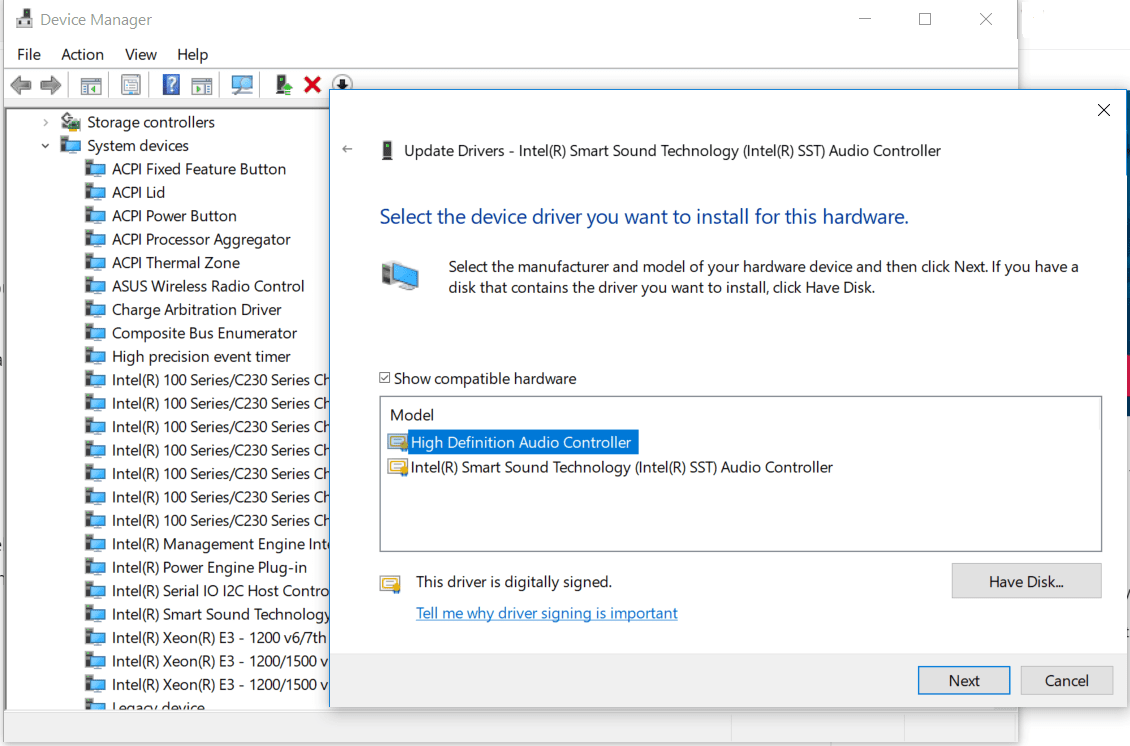
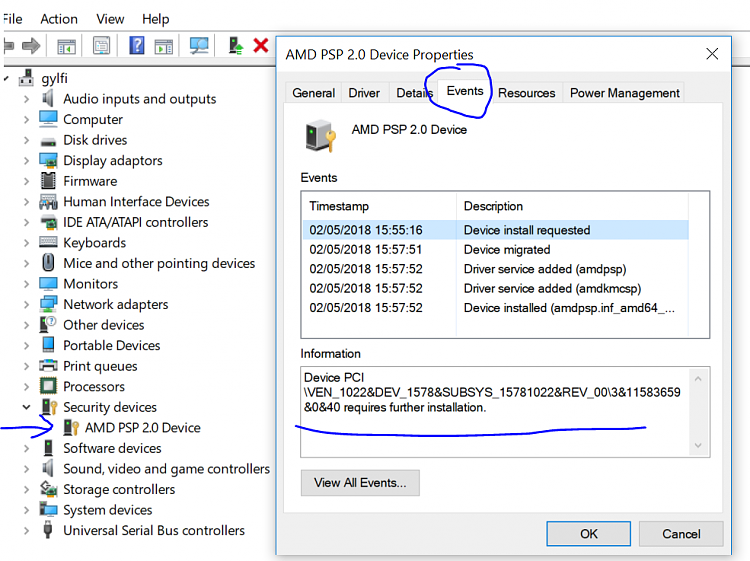
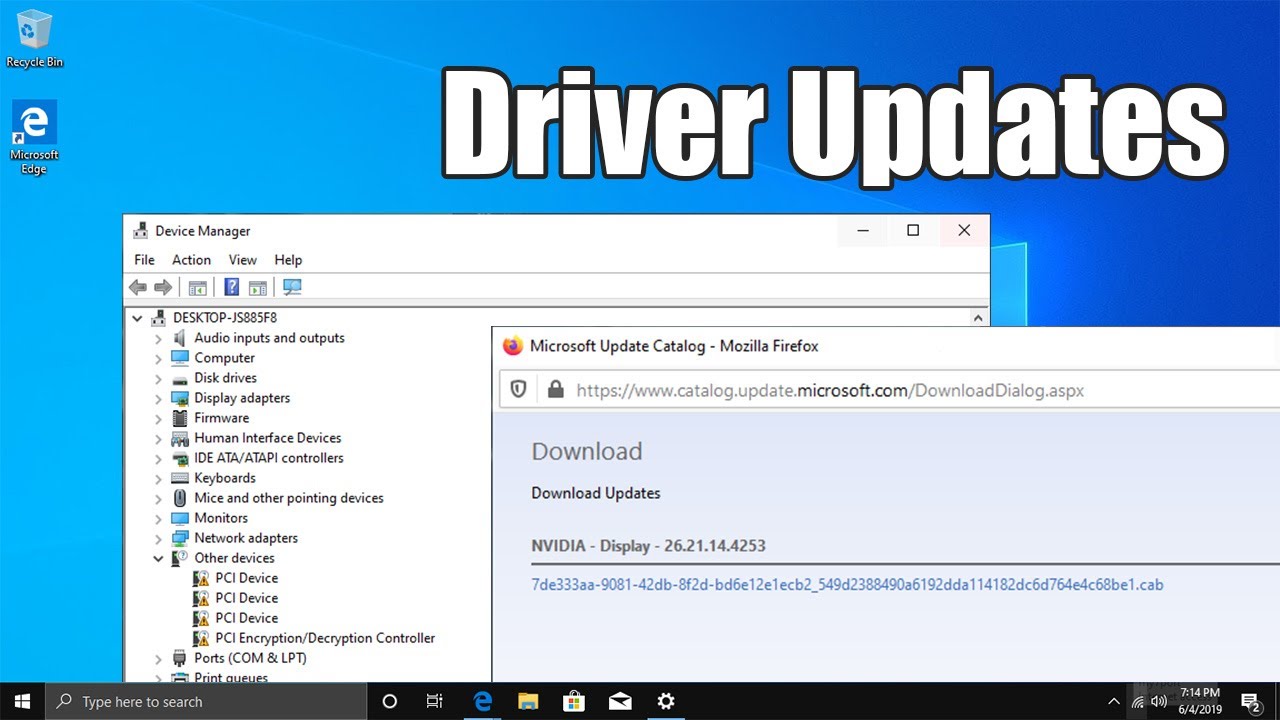
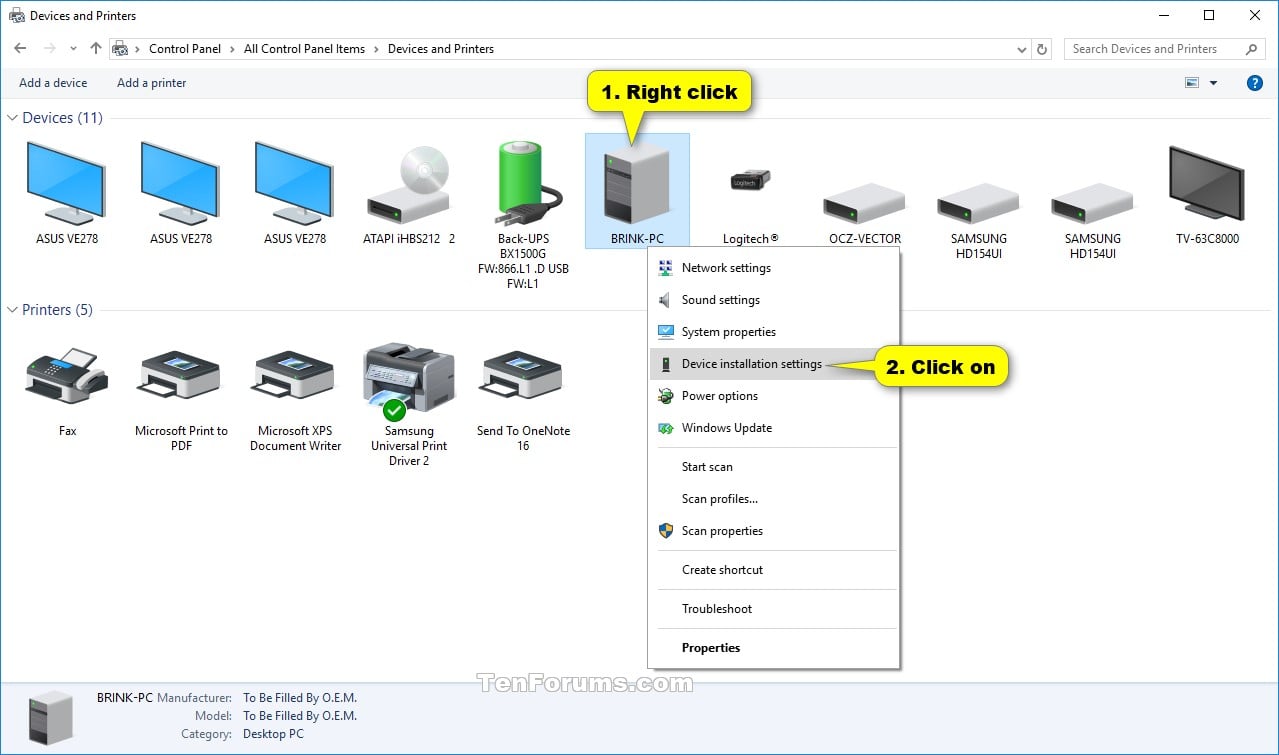
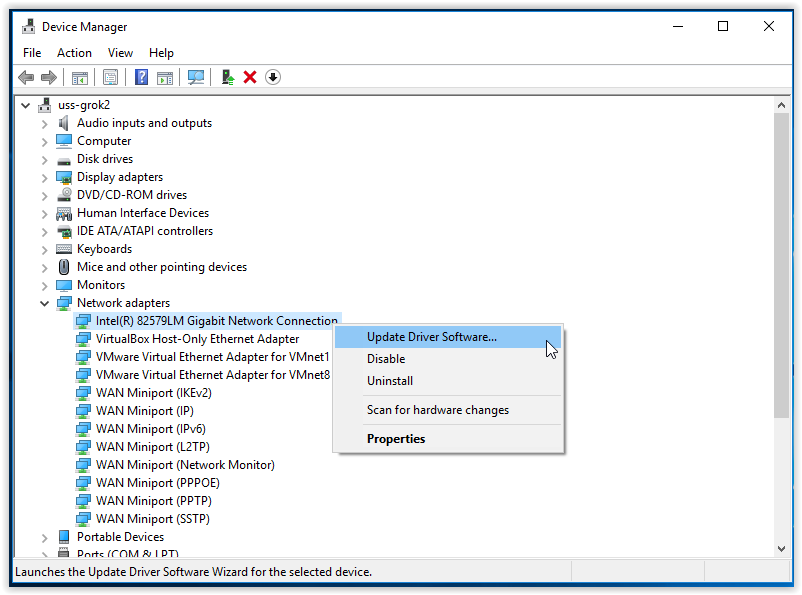
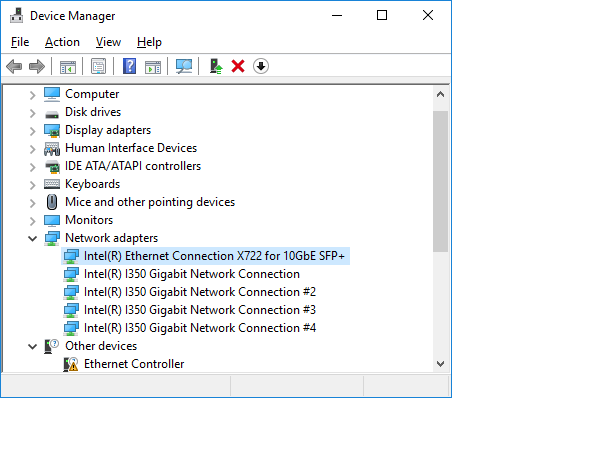
  1. Identify the Device: Begin by identifying the specific hardware component requiring a driver update. This information is often printed on the device itself or can be found in the device manager within Windows 10.

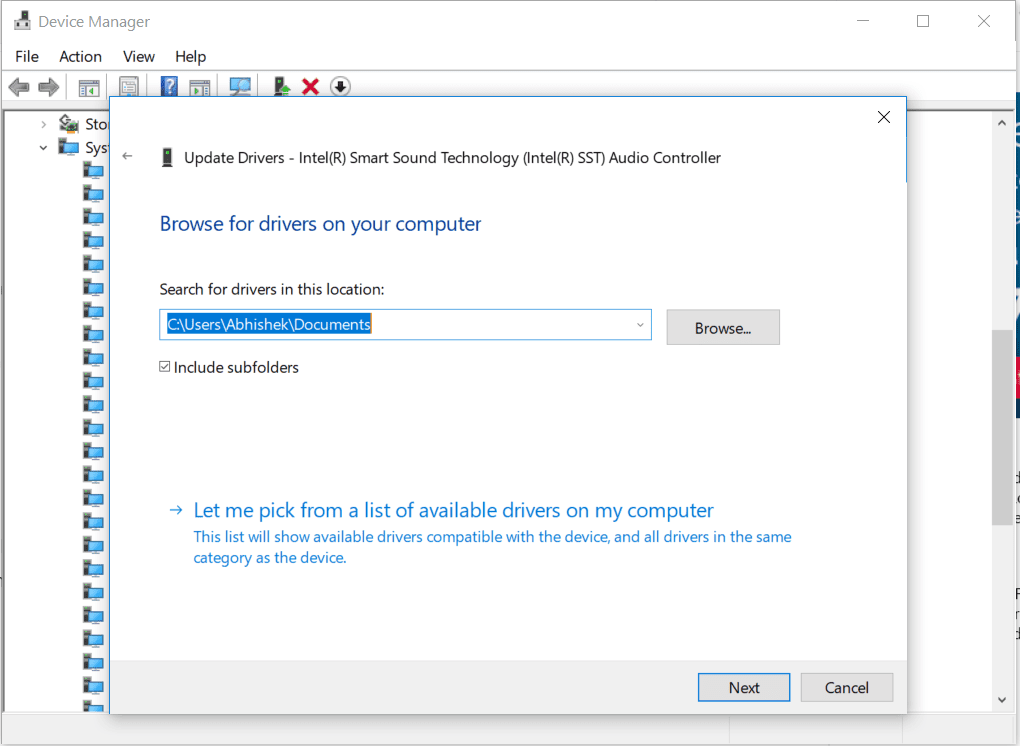
  2. Manufacturer’s Website: The most reliable source for drivers is the official website of the hardware manufacturer. Navigate to the support section and use the search function to locate drivers for your specific device model.

  3. Driver Download: Once located, download the driver package to your computer. Ensure the downloaded file is compatible with your version of Windows 10 (32-bit or 64-bit).

  4. Driver Installation: After the download is complete, run the installation file. Follow the on-screen instructions, providing necessary permissions and accepting any license agreements.

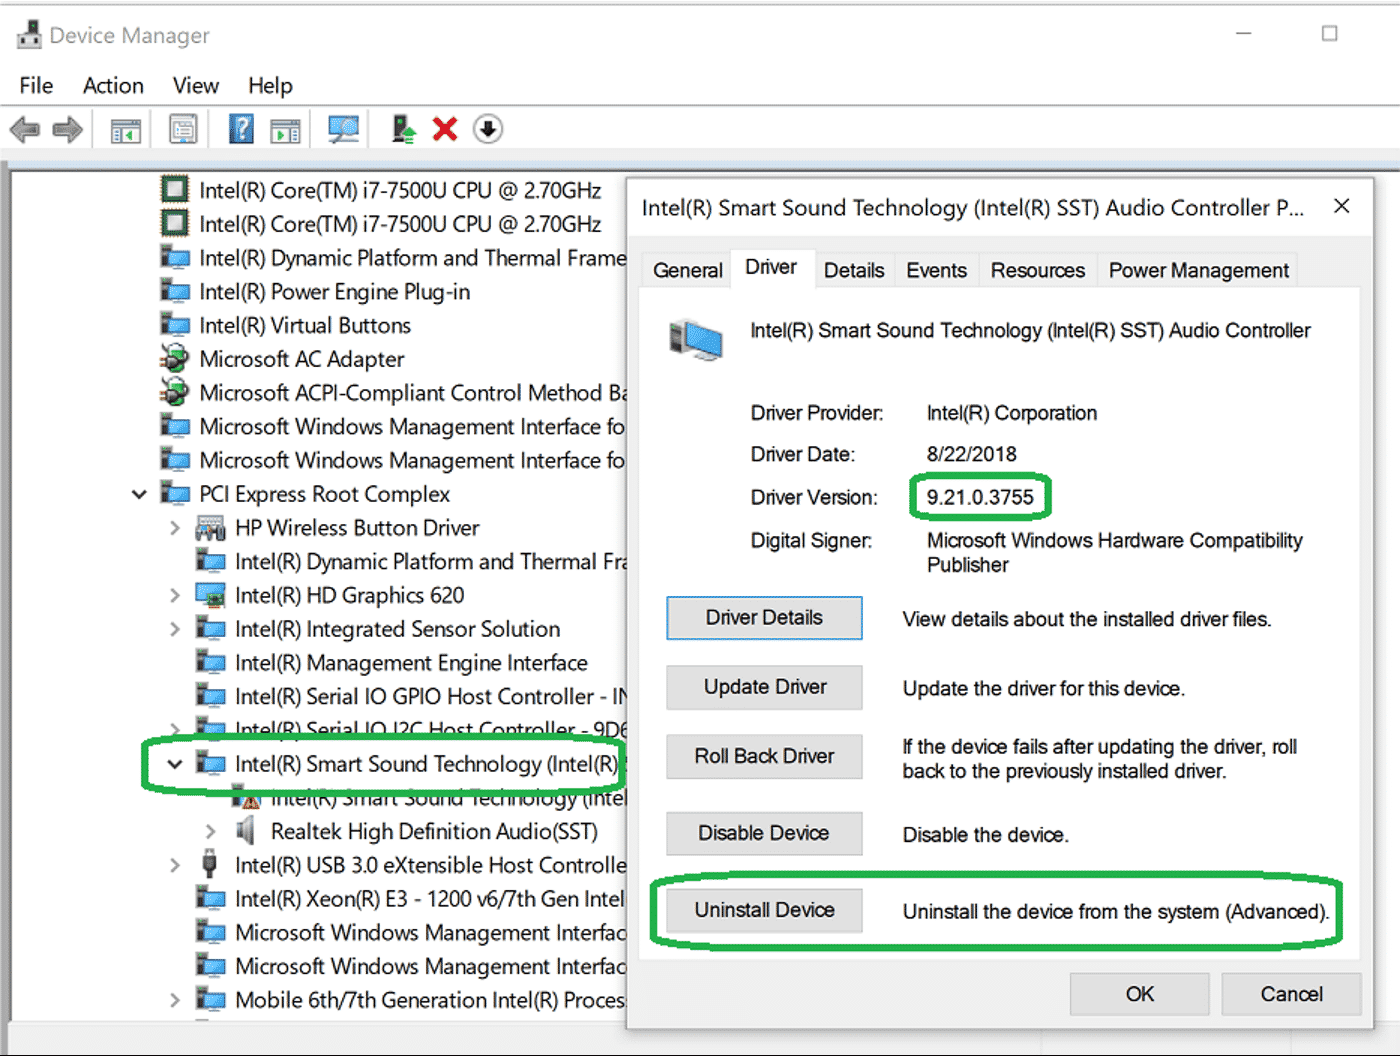
  5. Device Verification: After installation, verify that the device is functioning correctly. Open the device manager and check if the driver is successfully installed and recognized by the system.

Beyond the Basics: Advanced Techniques and Considerations

Driver Updates: Regular driver updates are crucial for maintaining optimal performance and security. Manufacturers release updates to address bugs, improve compatibility, and enhance device functionality. Windows Update can automatically download and install driver updates, but it’s often advisable to manually check for updates directly from the manufacturer’s website.

Driver Rollback: If a driver update causes issues, you can usually revert to a previous version. Access the device manager, locate the problematic device, and select "Roll Back Driver" from the properties menu.

Third-Party Driver Download Sites: While convenient, using third-party websites for driver downloads can pose risks. These sites may offer outdated, corrupted, or even malicious drivers. It is recommended to prioritize official manufacturer websites for driver downloads.

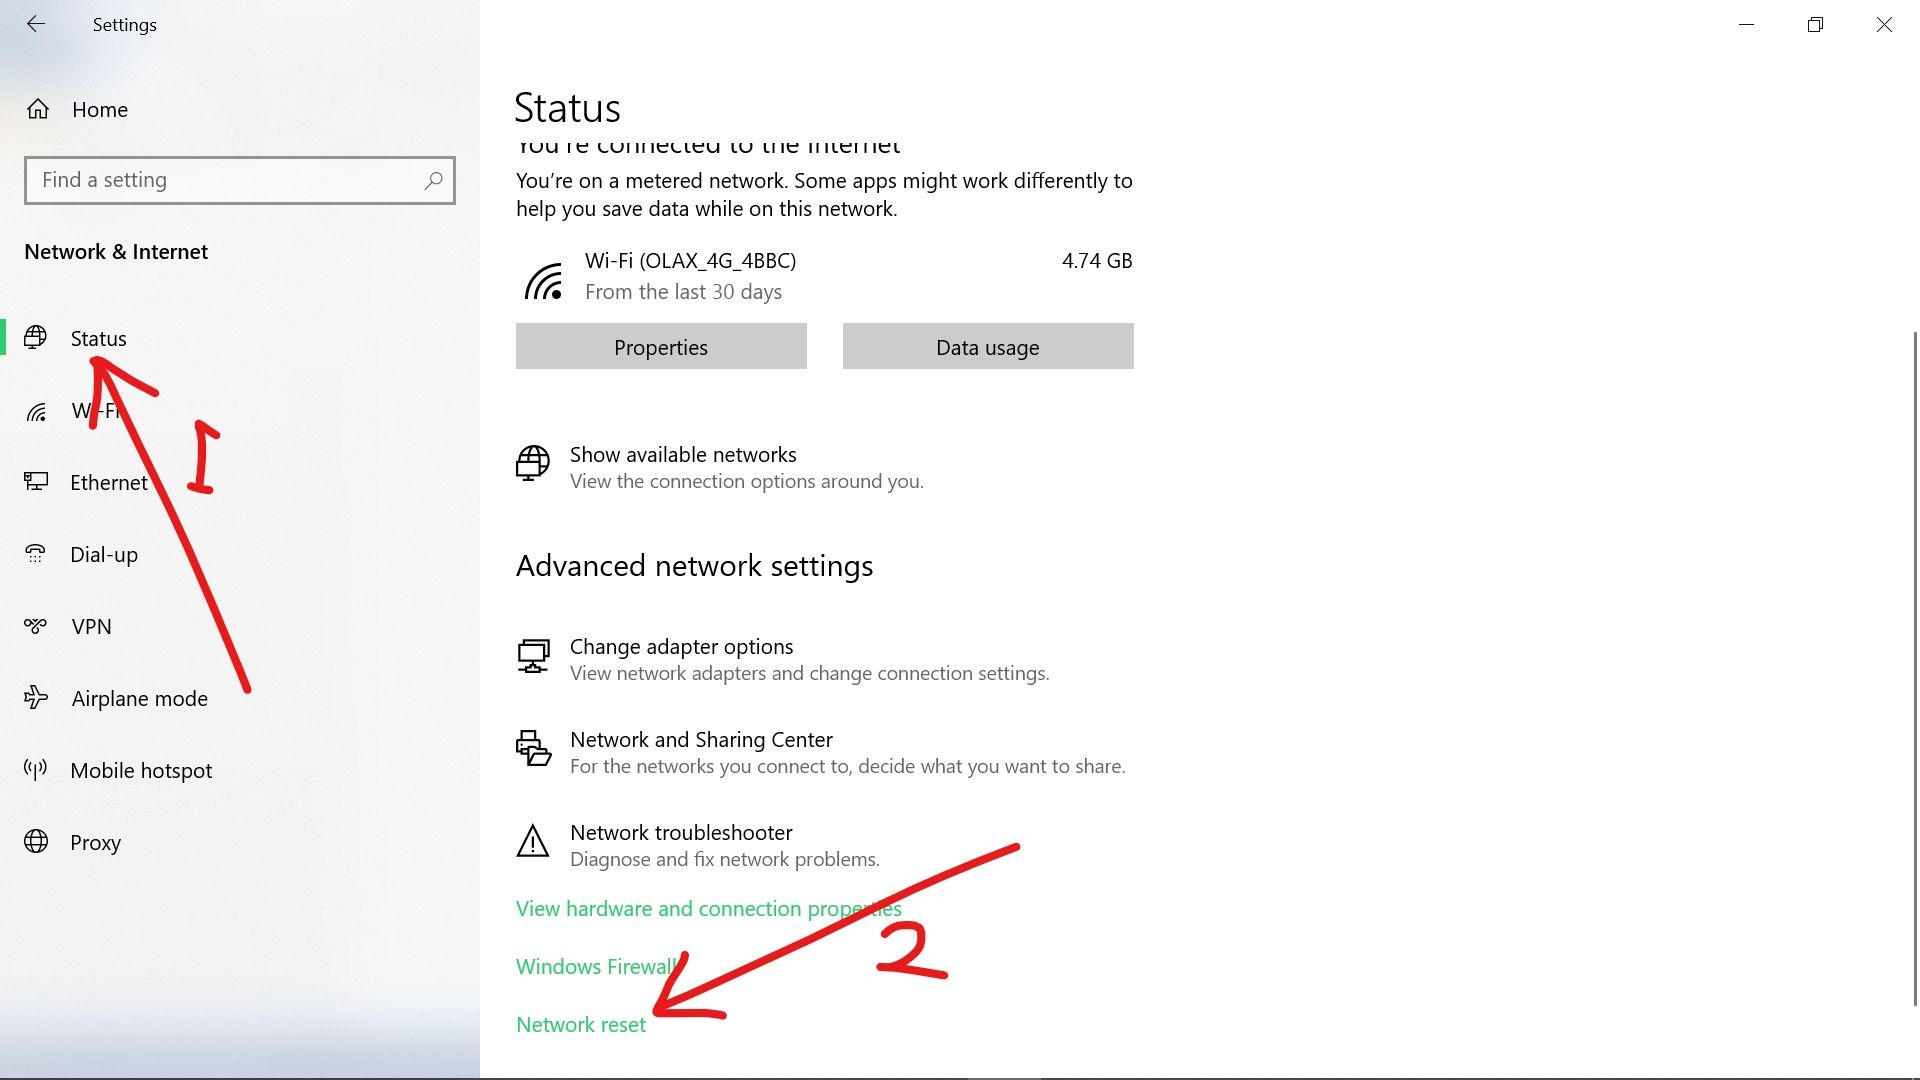
Troubleshooting Driver Issues: If a driver installation leads to system instability or device malfunction, consider the following troubleshooting steps:

  • Restart your computer: A simple restart can often resolve temporary driver conflicts.
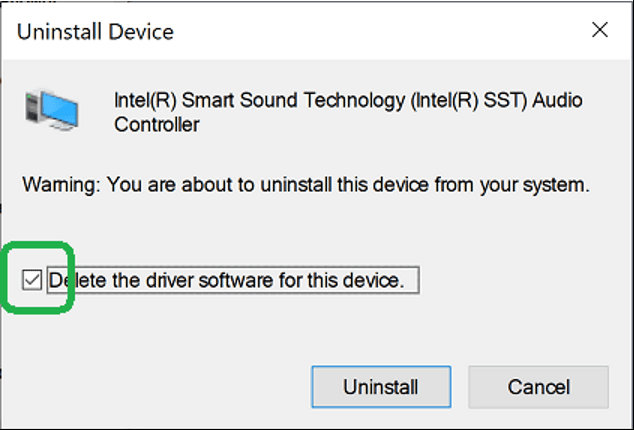
  • Uninstall and reinstall the driver: Remove the problematic driver and reinstall it from the manufacturer’s website.
  • Check for system updates: Ensure your Windows 10 operating system is up to date, as system updates can address driver compatibility issues.
  • Contact the manufacturer: If all else fails, reach out to the hardware manufacturer’s technical support for assistance.

FAQs: Addressing Common Concerns

Q: What happens if I don’t update my drivers?

A: Outdated drivers can lead to performance issues, compatibility problems, and security vulnerabilities. It’s essential to keep drivers updated to ensure optimal functionality and security.

Q: Can I install drivers for a different device on my computer?

A: Installing drivers for a different device is generally not recommended. Drivers are specifically designed for individual hardware components, and installing incompatible drivers can lead to system instability or device malfunction.

Q: What if I accidentally delete a driver?

A: If you accidentally delete a driver, the operating system may attempt to automatically reinstall it. If not, you can download and install the driver from the manufacturer’s website.

Q: How do I know if I have the latest drivers?

A: The easiest way to check is to visit the manufacturer’s website and compare the version number of the driver you have installed with the latest available version.

Tips for Successful Online Driver Installation

  • Backup your system: Before installing any drivers, create a system restore point or backup your data to protect against potential issues.
  • Read the installation instructions: Carefully review the installation instructions provided by the manufacturer to ensure proper installation.
  • Disconnect unnecessary devices: Disconnect any peripherals not essential for the driver installation to minimize potential conflicts.
  • Restart your computer after installation: Restarting your computer after installing a driver helps ensure the driver is properly loaded and integrated into the system.

Conclusion: Embracing the Digital Evolution

Online driver installation has revolutionized the way we interact with our computers. By leveraging the vast resources available online, users can easily access and install the latest drivers, ensuring optimal performance and compatibility. While the process is generally straightforward, it’s crucial to understand the importance of driver updates, the potential risks associated with third-party websites, and the troubleshooting steps to address any issues that may arise. By embracing this digital evolution, users can navigate the complex world of driver management with confidence, ensuring their computer systems operate smoothly and efficiently.

Windows 10 How To Configure Windows 10 After Installation Windows 10 How to Install/Update Drivers in Windows 10 - YouTube Navigating the Digital Landscape E-Book
How to Enable or Disable Automatic Driver Installation in Windows 10 Device Driver Automatic Installation - Turn On or Off in Windows 10 - Windows 10 Windows Update How to Enable or Disable Automatic Driver Installation in Windows 10
Learn to install windows 10 from usb with driver 2020 (Step by Step) - YouTube How To Enable Or Disable Automatic Driver Installation In Windows 10 Updates - Vrogue

Closure

Thus, we hope this article has provided valuable insights into Navigating the Digital Landscape: A Guide to Online Driver Installation for Windows 10. We appreciate your attention to our article. See you in our next article!

Enhancing The Command Line Experience: A Deep Dive Into Oh My Zsh On Windows 11

Enhancing the Command Line Experience: A Deep Dive into Oh My Zsh on Windows 11

Introduction

With great pleasure, we will explore the intriguing topic related to Enhancing the Command Line Experience: A Deep Dive into Oh My Zsh on Windows 11. Let’s weave interesting information and offer fresh perspectives to the readers.

Enhancing the Command Line Experience: A Deep Dive into Oh My Zsh on Windows 11

Installing Zsh and Oh-my-zsh on Windows 11 with WSL2 - DEV Community

The command line interface (CLI) remains a fundamental tool for developers, system administrators, and power users alike. While Windows 11’s built-in command prompt provides basic functionality, users often seek a more streamlined, customizable, and feature-rich experience. This is where Oh My Zsh steps in, offering a powerful and extensible framework for transforming the Windows 11 command line into a highly personalized and efficient tool.

What is Oh My Zsh?

Oh My Zsh is not simply a shell; it is a community-driven framework that enhances the Zsh shell, adding a plethora of features, themes, and plugins. Zsh, or the Z shell, is a powerful Unix-like shell known for its advanced features and customization options. Oh My Zsh acts as a bridge, making Zsh more accessible and user-friendly by providing a curated collection of plugins and themes, streamlining the setup process.

Why Choose Oh My Zsh on Windows 11?

The benefits of using Oh My Zsh on Windows 11 are manifold:

  • Enhanced Productivity: Oh My Zsh’s plugins streamline common tasks, automating repetitive commands and providing shortcuts for frequently used tools. This saves valuable time and improves efficiency, particularly for developers and system administrators.
  • Enhanced Customization: With a vast library of themes, users can personalize their command line environment to match their preferences and workflows. This includes altering colors, fonts, and layout, creating a visually appealing and functional workspace.
  • Improved Functionality: Oh My Zsh extends the capabilities of the Zsh shell with a wide range of plugins. These plugins provide access to powerful features like Git integration, command history search, auto-completion, and more.
  • Simplified Setup: Oh My Zsh’s framework simplifies the installation and configuration process, making it easier for users to adopt Zsh and its powerful features without extensive manual configuration.

Installing and Configuring Oh My Zsh on Windows 11

Installing Oh My Zsh on Windows 11 is a straightforward process:

  1. Install Git: Oh My Zsh relies on Git for managing its plugins and themes. Ensure Git is installed on your Windows 11 system.
  2. Download the Installer: Download the Oh My Zsh installer from the official website.
  3. Run the Installer: Execute the installer and follow the on-screen instructions.
  4. Configure Your Shell: Upon successful installation, you can modify your shell’s settings in the ~/.zshrc file. This file allows customization of themes, plugins, and other preferences.

Exploring the Features of Oh My Zsh

Plugins: Oh My Zsh’s plugins are the heart of its functionality. They extend the shell’s capabilities, adding features and shortcuts for various tasks. Some popular plugins include:

  • Git: Provides seamless Git integration, offering commands for managing repositories, staging changes, and committing code.
  • Zsh-autosuggestions: Offers intelligent command suggestions based on previous commands and context.
  • Zsh-syntax-highlighting: Adds syntax highlighting to commands, making them more readable and easier to debug.
  • Zsh-history-substring-search: Enables fast and efficient search through command history using substrings.
  • Zsh-kubectl: Provides shortcuts and auto-completion for interacting with Kubernetes clusters.

Themes: Themes define the visual appearance of your command line. Oh My Zsh offers a vast library of themes, allowing you to customize colors, fonts, and layouts to suit your preferences. Some popular themes include:

  • Powerlevel10k: A highly customizable theme with advanced features like status indicators and progress bars.
  • Agnoster: A minimalist theme known for its clean and efficient design.
  • Solarized: A theme designed to be visually appealing and accessible, with color palettes optimized for readability.
  • Dracula: A dark theme with vibrant colors and high contrast, ideal for low-light environments.

Customizing Your Oh My Zsh Experience

Oh My Zsh offers extensive customization options. Users can tailor their environment by:

  • Choosing Plugins: Selecting plugins based on their needs and workflows.
  • Choosing Themes: Selecting a theme that suits their preferences and visual style.
  • Modifying the .zshrc File: Directly editing the .zshrc file to adjust settings, define aliases, and customize the shell’s behavior.
  • Creating Custom Plugins: Developing custom plugins to extend Oh My Zsh’s functionality for specific needs.

FAQs about Oh My Zsh on Windows 11

Q: Is Oh My Zsh compatible with Windows 11?

A: Yes, Oh My Zsh is fully compatible with Windows 11. It requires Git, which is readily available for Windows.

Q: How do I install Oh My Zsh on Windows 11?

A: The installation process is straightforward. Download the installer from the official website and follow the on-screen instructions.

Q: Can I use Oh My Zsh with other shells?

A: Oh My Zsh is specifically designed for the Zsh shell. However, there are similar frameworks available for other shells like Bash.

Q: What are the system requirements for Oh My Zsh on Windows 11?

A: Oh My Zsh has minimal system requirements. It requires a recent version of Windows 11 and Git.

Q: How do I customize my Oh My Zsh environment?

A: You can customize Oh My Zsh by choosing plugins and themes, editing the .zshrc file, and even creating custom plugins.

Q: Are there any security concerns associated with using Oh My Zsh?

A: As with any third-party software, it is essential to download and install Oh My Zsh from trusted sources. Ensure your system is up-to-date with security patches.

Tips for Using Oh My Zsh on Windows 11

  • Explore the Plugin Library: Browse the available plugins and select those that align with your workflows and needs.
  • Experiment with Themes: Try different themes to find one that matches your visual preferences.
  • Use the .zshrc File Effectively: Leverage the .zshrc file to create aliases, customize settings, and enhance your command line experience.
  • Join the Community: Engage with the Oh My Zsh community for support, tips, and inspiration.

Conclusion

Oh My Zsh transforms the Windows 11 command line into a powerful, customizable, and efficient tool. Its vast library of plugins and themes provides a rich and extensible environment for developers, system administrators, and power users alike. By embracing Oh My Zsh, users can unlock the full potential of the Zsh shell, streamlining their workflows, enhancing their productivity, and enjoying a personalized command line experience. The framework’s ease of use, vast community support, and continuous development ensure that Oh My Zsh remains a valuable asset for any Windows 11 user seeking to optimize their command line interaction.

How to install Oh My Zsh on Windows 11 without WSL  Luna's Piece How to set up an amazing terminal for data science with oh-my-zsh plugins  Engineering for Data Using zsh on Windows  Walter Teng
Windows 11 has a new default command line experience  Windows Central OH MY ZSH Tutorial - Bring Your Terminal To Another Level - YouTube Installing Zsh And Oh My Zsh In Windows Git Bash Domi - vrogue.co
Oh My ZSH dans Windows Terminal – Dayo Power up your Terminal using Oh-my-Zsh + iTerm2  by Adesh Gautam  The Startup  Medium

Closure

Thus, we hope this article has provided valuable insights into Enhancing the Command Line Experience: A Deep Dive into Oh My Zsh on Windows 11. We thank you for taking the time to read this article. See you in our next article!

Navigating The Network: Understanding And Downloading Network Adapter Drivers In Windows 10

Navigating the Network: Understanding and Downloading Network Adapter Drivers in Windows 10

Introduction

With great pleasure, we will explore the intriguing topic related to Navigating the Network: Understanding and Downloading Network Adapter Drivers in Windows 10. Let’s weave interesting information and offer fresh perspectives to the readers.

Windows 10: Manually Install a Network Adapter Driver - GROK Knowledge Base

The digital landscape is built upon connectivity. From accessing the internet to connecting with colleagues and sharing files, our modern lives are heavily reliant on seamless network communication. At the heart of this communication lies the network adapter, a crucial hardware component that acts as the bridge between your computer and the network. To ensure smooth and efficient network operation, it is essential to have the correct and up-to-date network adapter driver installed on your Windows 10 device.

Understanding Network Adapter Drivers: The Unsung Heroes of Connectivity

Network adapter drivers are specialized software programs that act as interpreters, translating instructions between your operating system (Windows 10) and the network adapter hardware. They allow your computer to recognize and communicate with the network adapter, enabling it to send and receive data over the network.

The Importance of Correct and Updated Drivers

  • Optimal Network Performance: The right driver ensures your network adapter operates at peak efficiency, maximizing data transfer speeds and minimizing network latency. Outdated drivers, on the other hand, can lead to slow internet speeds, frequent disconnections, and other connectivity issues.
  • Enhanced Security: Network adapter drivers often contain security patches and updates that protect your computer from vulnerabilities and malicious attacks. Outdated drivers leave your system exposed to potential threats.
  • Improved Compatibility: New driver releases often include support for the latest network standards and technologies, ensuring your computer can connect to the most recent networks and devices.
  • Hardware Functionality: Network adapter drivers enable the full functionality of your network adapter hardware. Without the correct driver, your adapter might not be recognized by your computer, rendering it unusable.

Identifying and Downloading the Right Driver

  1. Identifying Your Network Adapter: The first step is to determine the specific model of your network adapter. This information can be found in the Device Manager:

    • Press the Windows key + R to open the Run dialog box.
    • Type devmgmt.msc and press Enter.
    • Expand the Network adapters category.
    • Right-click on your network adapter and select Properties.
    • Navigate to the General tab. The Device name will indicate the model of your network adapter.
  2. Manufacturer’s Website: Once you know your network adapter model, visit the manufacturer’s website (e.g., Intel, Realtek, Broadcom) and navigate to the driver download section. Use the model number to locate the specific driver for your network adapter.

  3. Windows Update: Windows Update automatically searches for and installs driver updates. To check for updates:

    • Open Settings (Windows key + I).
    • Click Update & Security.
    • Click Check for updates.
  4. Third-Party Driver Download Websites: Websites like DriverPack Solution, Driver Agent, and others offer a wide range of drivers, including network adapter drivers. However, exercise caution when downloading drivers from third-party sources. Always verify the website’s legitimacy and ensure the downloaded files are from a trusted source.

Tips for a Smooth Driver Installation Experience

  • Back up Your System: Before installing any new driver, it is advisable to create a system restore point. This allows you to revert back to a previous state if the new driver causes issues.
  • Disconnect from the Network: If possible, disconnect from the internet or your local network before installing the driver. This minimizes the risk of network interruptions during the installation process.
  • Follow the Installation Instructions: Each driver will have its own installation instructions. Carefully follow these instructions to ensure a successful installation.
  • Restart Your Computer: After installing the driver, restart your computer to apply the changes and ensure the driver is properly loaded.
  • Check for Updates Regularly: Regularly check for driver updates to ensure you have the latest version and benefit from the latest performance enhancements and security fixes.

Troubleshooting Common Network Adapter Driver Issues

  • Network Connection Problems: If you experience issues connecting to the internet or your local network after installing a driver, try rolling back the driver to a previous version. You can do this in the Device Manager by right-clicking on the network adapter, selecting Properties, and navigating to the Driver tab. Click Roll Back Driver.
  • Driver Conflicts: If the new driver conflicts with other software on your system, you might experience network issues. Try temporarily disabling other network-related software to see if this resolves the problem.
  • Corrupted Drivers: Corrupted drivers can cause network issues. Reinstalling the driver or updating to a newer version may resolve the problem.
  • Hardware Malfunction: If all else fails, the issue might be related to a hardware malfunction. Contact the manufacturer of your network adapter for support.

FAQs

  • Q: How do I know if I need to update my network adapter driver?

    • A: If you experience slow internet speeds, frequent disconnections, or other network issues, updating your driver might resolve the problem. You can also check the manufacturer’s website for driver updates.
  • Q: Is it safe to download drivers from third-party websites?

    • A: Exercise caution when downloading drivers from third-party websites. Ensure the website is legitimate and the downloaded files are from a trusted source.
  • Q: What should I do if my network adapter driver is not working properly?

    • A: Try rolling back the driver to a previous version, reinstalling the driver, or updating to a newer version. If the issue persists, contact the manufacturer of your network adapter for support.

Conclusion

Network adapter drivers are essential for seamless network communication on your Windows 10 device. By understanding their importance, identifying the correct driver, and following best practices for installation and troubleshooting, you can ensure optimal network performance, enhanced security, and a smooth digital experience. Regularly checking for driver updates is crucial to maintain the best possible network connectivity and safeguard your system from vulnerabilities. Investing time in understanding and managing your network adapter drivers is an investment in the reliability and efficiency of your digital life.

How to install network adapter driver windows 10 - wellmusli Download or reinstall Intel network driver update in Windows 10 [Steps] – Techs & Gizmos Windows 10 Install Network Adapter Driver
Ethernet network adapter driver windows 10 - commonvast How to Update Network Adapter Drivers in Windows 10 - YouTube How to install a network adapter driver windows 10 - spherekurt
How to Manually Install Intel® Network Adapter Drivers in Windows* How to Update Network Adapter Driver Windows 11/10

Closure

Thus, we hope this article has provided valuable insights into Navigating the Network: Understanding and Downloading Network Adapter Drivers in Windows 10. We hope you find this article informative and beneficial. See you in our next article!

Seamless Sharing: Exploring The Capabilities Of Windows 10’s "Nearby Sharing" Feature

Seamless Sharing: Exploring the Capabilities of Windows 10’s "Nearby Sharing" Feature

Introduction

In this auspicious occasion, we are delighted to delve into the intriguing topic related to Seamless Sharing: Exploring the Capabilities of Windows 10’s "Nearby Sharing" Feature. Let’s weave interesting information and offer fresh perspectives to the readers.

Seamless Sharing: Exploring the Capabilities of Windows 10’s "Nearby Sharing" Feature

Seamless File Sharing: Google Nearby Share for Windows

In the contemporary digital landscape, seamless file transfer between devices has become a fundamental requirement. Windows 10, with its intuitive design and robust functionality, offers a convenient solution for this need: "Nearby Sharing." This feature, integrated directly into the operating system, enables users to effortlessly share files, photos, videos, and even links with nearby devices running Windows 10, Android, or iOS.

Understanding the Mechanics of Nearby Sharing

Nearby Sharing, at its core, leverages Bluetooth technology to establish a secure connection between devices within close proximity. This connection serves as the conduit for transferring data, ensuring a fast and reliable transfer process. The feature operates on the principle of peer-to-peer communication, meaning that no intermediary server or cloud service is involved. This direct connection between devices enhances privacy and security, minimizing the risk of data interception or compromise.

The Advantages of Embracing Nearby Sharing

The adoption of Nearby Sharing offers a multitude of benefits, enhancing the overall user experience:

  • Effortless File Sharing: The process of sharing files is simplified significantly. Users can readily share files, photos, and videos with other devices without the need for complex configurations or external applications. This streamlined approach promotes efficiency and user convenience.

  • Enhanced Collaboration: Nearby Sharing fosters a collaborative environment, facilitating seamless data exchange among individuals or teams. Whether it’s sharing project files, presentations, or creative content, Nearby Sharing provides a convenient and secure platform for collaboration.

  • Streamlined Content Transfer: Sharing content across different operating systems becomes effortless. Users can seamlessly transfer files between Windows 10, Android, and iOS devices, breaking down the barriers between platforms. This interoperability significantly enhances the user experience, promoting seamless integration across devices.

  • Privacy and Security: Nearby Sharing prioritizes user privacy and data security. The feature operates on a peer-to-peer basis, eliminating the need for data to be transmitted through external servers or cloud platforms. This direct connection ensures that data remains secure and protected from unauthorized access.

  • Increased Accessibility: Nearby Sharing is readily accessible, integrated directly into the Windows 10 operating system. Users can easily activate and utilize the feature without the need for additional software or installations. This accessibility ensures a user-friendly experience, removing any potential barriers to adoption.

Setting Up and Using Nearby Sharing

Setting up and using Nearby Sharing is a straightforward process, requiring minimal effort from the user:

  1. Enabling Nearby Sharing: The first step involves enabling Nearby Sharing on the Windows 10 device. This can be accomplished by navigating to "Settings" > "System" > "Shared experiences" and toggling the "Nearby sharing" option to "On."

  2. Selecting Sharing Options: Users can further customize Nearby Sharing by choosing the types of content they wish to share. This can include files, photos, videos, or links. Additionally, users can configure the devices that are allowed to receive content from their device.

  3. Sharing Content: Once Nearby Sharing is enabled, users can share content by simply dragging and dropping the desired files or folders onto the "Nearby sharing" icon in the notification area. Alternatively, users can right-click on the desired content and select the "Share" option.

  4. Receiving Content: To receive content, users need to ensure that Nearby Sharing is enabled on their device and that they are within range of the sending device. The receiving device will display a notification prompting the user to accept the incoming content. Upon acceptance, the content will be downloaded to the receiving device.

FAQs Regarding Nearby Sharing

Q: What is the range of Nearby Sharing?

A: The range of Nearby Sharing depends on the Bluetooth capabilities of the devices involved. In general, the maximum range is approximately 30 feet.

Q: Is Nearby Sharing secure?

A: Yes, Nearby Sharing utilizes Bluetooth technology, which is a secure communication protocol. Data transferred through Nearby Sharing is encrypted, protecting it from unauthorized access.

Q: Can I share files with devices running older versions of Windows?

A: No, Nearby Sharing is only compatible with devices running Windows 10, Android, or iOS.

Q: What types of files can I share using Nearby Sharing?

A: You can share a wide range of files, including documents, photos, videos, and links.

Q: Can I share folders using Nearby Sharing?

A: Yes, you can share entire folders using Nearby Sharing.

Q: What happens if I have multiple devices with Nearby Sharing enabled?

A: If multiple devices are within range and have Nearby Sharing enabled, the sending device will display a list of available devices. You can then select the specific device you wish to share with.

Tips for Optimizing Nearby Sharing

  • Ensure Bluetooth is Enabled: Verify that Bluetooth is enabled on both the sending and receiving devices.

  • Check Device Compatibility: Ensure that both devices are compatible with Nearby Sharing.

  • Maintain Proximity: Keep the devices within close proximity for optimal performance.

  • Update Device Drivers: Ensure that the Bluetooth drivers on both devices are up-to-date.

  • Clear Cache: If encountering issues, clear the Nearby Sharing cache by navigating to "Settings" > "System" > "Shared experiences" and selecting "Clear cache."

Conclusion

Windows 10’s Nearby Sharing feature revolutionizes file transfer, offering a seamless and secure way to share content between devices. Its ease of use, versatility, and focus on privacy make it an invaluable tool for individuals and businesses alike. By embracing this feature, users can streamline their workflow, enhance collaboration, and enjoy a more connected and efficient digital experience.

How to use Nearby Sharing feature on Windows 10 How to Use Nearby Sharing on Windows 10 How to use Nearby sharing on Windows 10 or 11 and Microsoft Edge - YouTube
Share Files Using nearby sharing on windows 10 - Technoresult Use Windows Nearby Sharing to Share Files Between Your Devices - YouTube How to Use Nearby Sharing to Share Files in Windows 10
How to Use Nearby Sharing on Windows 10 Use Nearby sharing in Windows 10  HUAWEI Support Global

Closure

Thus, we hope this article has provided valuable insights into Seamless Sharing: Exploring the Capabilities of Windows 10’s "Nearby Sharing" Feature. We thank you for taking the time to read this article. See you in our next article!

The Enigma Of Unwanted Sounds: Diagnosing And Resolving Random Noises In Windows 10

The Enigma of Unwanted Sounds: Diagnosing and Resolving Random Noises in Windows 10

Introduction

With enthusiasm, let’s navigate through the intriguing topic related to The Enigma of Unwanted Sounds: Diagnosing and Resolving Random Noises in Windows 10. Let’s weave interesting information and offer fresh perspectives to the readers.

The Enigma of Unwanted Sounds: Diagnosing and Resolving Random Noises in Windows 10

How to Fix Windows 10 Making Random Sounds - YouTube

The sudden appearance of random, unexpected sounds on a Windows 10 computer can be a frustrating and perplexing experience. These noises, often described as "dings," "beeps," or "clicks," can occur intermittently, interrupting workflow and creating a sense of unease. While seemingly innocuous, these sounds often signal underlying issues within the operating system or hardware, requiring investigation and resolution.

This article aims to provide a comprehensive understanding of the causes behind these random noises, explore methods for identifying the source, and offer practical solutions for eliminating them. By understanding the potential culprits and employing a systematic approach, users can effectively address these auditory disruptions and restore peace to their computing experience.

Understanding the Source of the Sounds

The random noises encountered in Windows 10 can stem from a variety of sources, each requiring a specific approach for diagnosis and resolution. The most common culprits include:

1. System Notifications: Windows 10 utilizes a wide range of sounds to alert users to various events. These sounds, often referred to as "system notifications," can include:

  • New email notifications: A distinctive chime or notification sound signals the arrival of new emails.
  • System updates: A unique sound may accompany the initiation or completion of system updates.
  • Program updates: Similar to system updates, individual programs may also employ sounds to indicate updates or other events.
  • Low battery warnings: A repetitive beep or chime can alert users to low battery levels.
  • Error messages: A sharp, insistent sound often signals an error or system failure.

2. Hardware Malfunctions: Certain hardware components, when malfunctioning, can produce audible sounds. These include:

  • Hard drive errors: Clicking or grinding noises from the hard drive can indicate a failing component.
  • Fan malfunctions: Unusually loud or erratic fan noise can signal a failing fan or overheating issue.
  • Loose connections: Clicking or crackling noises may be caused by loose connections within the system.
  • Speaker issues: Distorted or intermittent sounds from the speakers can indicate a malfunctioning speaker or audio driver.

3. Software Conflicts: Incompatibility or conflicts between software programs can lead to unexpected sounds. These include:

  • Driver conflicts: Outdated or incompatible device drivers can cause intermittent sounds.
  • Software bugs: Bugs within specific programs may trigger unexpected sounds.
  • Third-party applications: Certain third-party applications, particularly those with audio components, may introduce unwanted sounds.

4. External Sources: The source of the random noises may lie outside the computer itself. These include:

  • External devices: Peripherals like printers, scanners, or external hard drives can produce sounds during operation.
  • Environmental factors: External noises, such as construction or traffic, can be amplified by the computer’s speakers.

Diagnosing the Source of the Sounds

Pinpointing the source of the random noises requires a systematic approach, involving observation, investigation, and troubleshooting. The following steps can help identify the culprit:

1. Observe the Sounds: Pay close attention to the timing, frequency, and characteristics of the sounds. Note when they occur, what actions precede them, and any accompanying visual cues like flashing lights or error messages.

2. Identify Potential Sources: Based on the observed characteristics, consider the potential sources listed above. For example, if the sounds occur during system updates, it may be a system notification. If they coincide with a specific program launch, it could be a software conflict.

3. Disable Notifications: Temporarily disable system notifications to determine if they are the source of the sounds. This can be done through the Windows "Settings" app under "System" > "Sound."

4. Check Hardware: Inspect the computer’s hardware for signs of malfunction. Listen for unusual noises from the hard drive, fans, or speakers. Check for loose connections and ensure proper ventilation.

5. Run Diagnostics: Utilize built-in or third-party diagnostic tools to scan for hardware errors. These tools can assess hard drive health, fan performance, and other critical components.

6. Update Drivers: Ensure all device drivers are up to date. Outdated drivers can cause conflicts and lead to unexpected sounds.

7. Uninstall Suspect Software: If the sounds occur in conjunction with a specific program, try uninstalling it to see if the issue resolves.

8. Check External Devices: Disconnect external devices one by one to determine if any are responsible for the sounds.

9. Adjust Sound Settings: Adjust the system’s sound settings to ensure that the volume levels are appropriate and that the desired sound schemes are selected.

Resolving the Random Noises

Once the source of the random noises has been identified, the appropriate steps can be taken to address the issue. The following solutions correspond to the potential causes outlined earlier:

1. System Notifications:

  • Disable Specific Sounds: Within the Windows "Settings" app, under "System" > "Sound," users can customize individual sound notifications or disable them altogether.
  • Adjust Notification Volume: Lower the volume of specific notifications to reduce their intrusiveness.
  • Change Sound Schemes: Select a different sound scheme or create a custom one with desired sounds.

2. Hardware Malfunctions:

  • Replace Failing Components: If a hardware component is identified as faulty, replace it with a new one.
  • Clean Fans and Vents: Dust accumulation can impede fan performance and cause overheating. Clean the fans and vents regularly to ensure proper airflow.
  • Tighten Connections: Ensure all connections within the system are secure.

3. Software Conflicts:

  • Update Drivers: Install the latest drivers for all devices to resolve compatibility issues.
  • Uninstall Conflicting Programs: Remove any software programs suspected of causing the sounds.
  • Run System File Checker: Utilize the "System File Checker" tool to repair corrupted system files that may be contributing to the issue.

4. External Sources:

  • Disconnect Devices: If an external device is identified as the source, disconnect it or replace it with a functioning one.
  • Address Environmental Factors: Reduce or eliminate external noise sources to minimize their impact.

FAQs about Random Noises in Windows 10

Q: Can random noises indicate a serious hardware problem?

A: While some noises may be harmless, others can indicate serious hardware issues. Clicking or grinding noises from the hard drive, for example, can signal a failing component requiring immediate attention.

Q: How do I know if the noise is coming from the speakers or the system itself?

A: If the noise persists even when the speakers are muted or disconnected, it likely originates from the system itself. If the noise is only present when the speakers are active, it could be a speaker issue.

Q: Can I prevent random noises from occurring in the future?

A: While it’s impossible to guarantee the complete absence of random noises, regular maintenance, driver updates, and system scans can significantly reduce their occurrence.

Tips for Avoiding Random Noises in Windows 10

  • Regular Maintenance: Perform regular system maintenance tasks like disk cleanup, defragmentation, and virus scans to maintain system health.
  • Driver Updates: Keep all device drivers updated to ensure compatibility and stability.
  • Software Updates: Install system and software updates promptly to address potential bugs and security vulnerabilities.
  • Clean Hardware: Regularly clean the computer’s fans, vents, and other components to prevent dust accumulation and overheating.
  • Monitor System Health: Utilize system monitoring tools to track hardware performance and identify potential issues early.
  • Backup Data: Regularly back up important data to protect against data loss in case of hardware failure.

Conclusion

Random noises in Windows 10, while often disconcerting, can be effectively addressed with a systematic approach. By understanding the potential sources, employing appropriate diagnostic techniques, and applying relevant solutions, users can restore peace and quiet to their computing experience. Regular maintenance, driver updates, and system monitoring can further help prevent these noises from occurring in the future.

How to Find and Fix Windows 10 Making Random Sounds How to Find and Fix Windows 10 Making Random Sounds How to Fix Audio Sound Problem on Windows 10 [Work 100%] - YouTube
Troubleshooting Tips for Resolving No Sound Issues with High-Definition Audio Devices on Windows Troubleshooting Audio Systems: Unwanted System Noises - YouTube Remove Unwanted Background Noise Using WavePad Audio Editor  Do More With Software
How to use Audio Noise Reduction in Davinci Resolve. walkthrough/In-depth guide - YouTube Windows 10 Microphone Not Working Error [5 FIXES] - Automaticable

Closure

Thus, we hope this article has provided valuable insights into The Enigma of Unwanted Sounds: Diagnosing and Resolving Random Noises in Windows 10. We appreciate your attention to our article. See you in our next article!

Net Framework 3 5 Download For Windows 10

net framework 3 5 download for windows 10

Introduction

With great pleasure, we will explore the intriguing topic related to net framework 3 5 download for windows 10. Let’s weave interesting information and offer fresh perspectives to the readers.

How to Install .NET Framework 3.5 on Windows 10

While modern software development primarily focuses on newer frameworks like .NET 6 and .NET Core, there are scenarios where legacy applications rely on the robust functionality of .NET Framework 3.5. This framework, released in 2007, provides a foundation for a vast array of applications, particularly those developed prior to the transition to newer .NET versions. Windows 10, despite its modern design and features, still retains compatibility with this older framework, making it a crucial component for maintaining older software functionality.

The Importance of .NET Framework 3.5 on Windows 10

.NET Framework 3.5, while considered legacy, holds significance for several reasons:

  • Legacy Application Compatibility: Numerous software applications, particularly business-oriented tools, were developed using .NET Framework 3.5. These applications, ranging from accounting software to CRM systems, rely on the framework’s libraries and components to function correctly. Without it, these applications may encounter errors or fail to execute entirely.
  • Integration with Older Systems: In environments where older systems and applications are still in use, .NET Framework 3.5 serves as a bridge, enabling communication and data exchange between modern Windows 10 systems and legacy software. This is particularly relevant in organizations with established workflows that rely on a blend of old and new technologies.
  • Specialized Functionality: .NET Framework 3.5 offers specific features and libraries not readily available in newer frameworks. This includes features like Windows Communication Foundation (WCF), Windows Workflow Foundation (WF), and ASP.NET AJAX, which are still widely used in certain applications.

Understanding the Installation Process

Installing .NET Framework 3.5 on Windows 10 is a straightforward process, but it requires careful attention to the nuances of the operating system’s architecture. The installation process can be categorized into two primary methods:

1. Using Windows Features:

  • This method leverages the built-in functionality of Windows 10 to install .NET Framework 3.5. It is the recommended approach for most users, as it ensures compatibility and utilizes the system’s native capabilities.
  • Steps:
    • Open the "Control Panel" and navigate to "Programs and Features".
    • Select "Turn Windows features on or off".
    • Locate and check the box next to ".NET Framework 3.5 (includes .NET 2.0 and 3.0)".
    • Click "OK" to initiate the installation process.
    • The system will download and install the necessary files from Windows Update.

2. Using Offline Installation:

  • This method involves manually downloading and installing .NET Framework 3.5 from a standalone source, often a Microsoft website or a reliable third-party repository. This approach is typically used when internet connectivity is limited or when specific versions of the framework are required.
  • Steps:
    • Download the .NET Framework 3.5 offline installer from a trusted source.
    • Run the downloaded installer file.
    • Follow the on-screen instructions to complete the installation process.
    • Ensure that the downloaded installer is compatible with your Windows 10 version and architecture (32-bit or 64-bit).

Common Challenges and Solutions

While the installation process is generally straightforward, users may encounter certain challenges:

  • Internet Connectivity Issues: The installation process requires an internet connection to download the necessary files. If connectivity is unreliable, the installation may fail or become stalled.
  • Missing Updates: Windows Update may not have the required .NET Framework 3.5 files. This can occur if the system has been offline for an extended period or has incomplete updates.
  • Compatibility Conflicts: In rare cases, .NET Framework 3.5 may conflict with other software installed on the system. This can lead to unexpected errors or application crashes.

Troubleshooting Tips:

  • Check Internet Connection: Ensure a stable internet connection is available throughout the installation process.
  • Run Windows Update: Update your Windows 10 system to the latest version to ensure the availability of required files.
  • Use Offline Installer: If online installation fails, consider using an offline installer to bypass internet connectivity issues.
  • Verify Compatibility: Double-check that the downloaded offline installer matches your Windows 10 version and architecture.
  • Restart the System: After installation, restart your computer to ensure the changes take effect.

FAQs

Q: Is it necessary to install .NET Framework 3.5 on Windows 10?

A: While Windows 10 comes with newer .NET versions, installing .NET Framework 3.5 is essential if you need to run legacy applications that were developed using this framework.

Q: Can I install .NET Framework 3.5 alongside newer versions?

A: Yes, .NET Framework 3.5 can coexist with newer versions of .NET on Windows 10. They operate independently, allowing you to run applications that require either version.

Q: What happens if I uninstall .NET Framework 3.5?

A: Uninstalling .NET Framework 3.5 will prevent applications that rely on it from functioning correctly. Ensure that you only uninstall it if you are certain that you will no longer need it.

Q: Is .NET Framework 3.5 supported by Microsoft?

A: Microsoft continues to provide security updates and patches for .NET Framework 3.5, ensuring its continued stability and security.

Conclusion

.NET Framework 3.5, despite its age, remains a crucial component for maintaining compatibility with legacy applications on Windows 10. Understanding its importance and the installation process is essential for users who need to run older software or integrate legacy systems with their modern environments. By following the provided instructions and troubleshooting tips, users can successfully install and utilize .NET Framework 3.5, ensuring the smooth operation of their critical applications.

Net Framework 3.5 for Windows 10 - Download & Install Guide How to Download & Install .Net Framework 3.5 On Windows 10 - YouTube Microsoft .NET Framework 3.5 Download & Install for Windows 10/11
.NET Framework 3.5 Offline Installer for Windows 10 and 8.x  TechGainer how to install net framework 3.5 on windows 10,8.1,7 / How To Enable / Install .NET Framework 3. How To Install net Framework 3.5 on Windows 10 version 22H2
Cara Install Net Framework 35 Di Windows 10 Paling Mudah How to Install Net Framework 3.5 in Windows 10 (Fast and Easy) - YouTube

Closure

Thus, we hope this article has provided valuable insights into net framework 3 5 download for windows 10. We hope you find this article informative and beneficial. See you in our next article!

A Comprehensive Guide To QR Codes In Windows 10

A Comprehensive Guide to QR Codes in Windows 10

Introduction

With great pleasure, we will explore the intriguing topic related to A Comprehensive Guide to QR Codes in Windows 10. Let’s weave interesting information and offer fresh perspectives to the readers.

A Comprehensive Guide to QR Codes in Windows 10

generate qr code in windows 10 - Knowledge Sharing Tech

QR codes, ubiquitous in our digital world, have become a valuable tool for information sharing and interaction. Windows 10, with its diverse functionalities, offers several ways to interact with these codes, enhancing user experience and streamlining various tasks. This article explores the various aspects of QR code utilization within the Windows 10 ecosystem, highlighting their benefits and practical applications.

Understanding QR Codes: A Brief Overview

QR (Quick Response) codes are two-dimensional barcodes that can store various types of data, including URLs, text, contact information, and even images. These codes are readily scanned by smartphone cameras or dedicated QR code scanners, providing instant access to the encoded information. Their ease of use and versatility have made them a popular choice for various applications, from marketing campaigns to product authentication.

QR Codes in Windows 10: Exploring the Possibilities

Windows 10 offers multiple avenues for interacting with QR codes, ranging from simple scanning to advanced code generation.

1. Built-in QR Code Scanning:

Windows 10’s native camera app comes equipped with the ability to scan QR codes. This functionality is integrated into the camera interface, allowing users to effortlessly scan a code and access the linked information. This simple feature eliminates the need for external QR code scanner apps, making it convenient for everyday tasks like accessing websites or downloading apps.

2. QR Code Scanning through Third-Party Apps:

Beyond the built-in camera app, numerous third-party QR code scanner apps are available in the Microsoft Store. These apps often offer additional features like code history, code creation, and even advanced functionalities like batch scanning for multiple QR codes. Users can choose the app that best suits their specific needs and preferences.

3. QR Code Generation:

Windows 10 itself does not natively support QR code generation. However, various online tools and desktop applications readily generate QR codes for different purposes. Users can input text, URLs, or other data to create personalized QR codes that can be used for sharing information, accessing websites, or even launching applications.

4. QR Codes in Windows 10 Apps:

Several Windows 10 apps utilize QR codes for various purposes. For instance, Microsoft Edge, the default web browser, allows users to share web pages or bookmarks by generating QR codes. This enables easy sharing of content across different devices. Similarly, other apps may incorporate QR code scanning for authentication, data transfer, or accessing specific features.

Benefits of QR Codes in Windows 10

The integration of QR code functionality in Windows 10 offers numerous benefits for users:

1. Enhanced Information Access: QR codes provide a quick and easy way to access information stored online. Users can scan a code on a product package, a business card, or a promotional poster to instantly retrieve details, product information, or even online content.

2. Streamlined Data Sharing: Sharing URLs, contact information, or even complex data becomes effortless with QR codes. Users can simply generate a QR code and share it with others, eliminating the need for manual input or copying and pasting.

3. Improved User Experience: QR codes simplify interactions with digital content. Whether it’s accessing a website, downloading an app, or connecting to a Wi-Fi network, QR codes provide a user-friendly and intuitive experience.

4. Enhanced Security: QR codes can be used for authentication purposes, ensuring secure access to devices or online accounts. This feature is particularly valuable in scenarios requiring secure logins or data transfer.

5. Increased Accessibility: QR codes cater to diverse needs and accessibility requirements. Users with visual impairments can use screen readers to access the information stored in QR codes, making it a more inclusive technology.

Practical Applications of QR Codes in Windows 10

The versatility of QR codes makes them applicable in various contexts:

1. Marketing and Advertising: QR codes are widely used in marketing campaigns to drive traffic to websites, promote products, or offer exclusive deals. They can be printed on flyers, brochures, or product packaging to engage consumers and provide instant access to relevant information.

2. Business and Education: QR codes streamline information sharing in business settings, allowing employees to access company intranets, training materials, or even customer data. In education, QR codes can be used to provide access to online resources, assignments, or even interactive quizzes.

3. Healthcare and Social Services: QR codes are increasingly used in healthcare for patient information sharing, appointment scheduling, or even accessing medical records. In social services, QR codes can be used to connect individuals with relevant resources, support groups, or emergency services.

4. Event Management and Ticketing: QR codes are widely used in event management for ticketing, registration, and even access control. They can be scanned at entry points to verify tickets, track attendance, or even provide access to event-specific information.

5. Product Authentication and Tracking: QR codes can be used to authenticate products, verify their origin, and track their journey from manufacturing to the end user. This helps combat counterfeiting and ensures product authenticity.

Frequently Asked Questions (FAQs)

1. What are the limitations of using QR codes in Windows 10?

While QR codes offer numerous benefits, they also have certain limitations. For instance, scanning a QR code requires a smartphone or tablet with a camera, making it unsuitable for users without such devices. Additionally, the quality of the QR code can affect its scannability. Poorly printed or damaged QR codes may be difficult to scan.

2. How can I ensure the security of QR codes used in Windows 10?

To ensure the security of QR codes, it is crucial to use reputable QR code generators and scanners. Avoid scanning codes from unknown sources, as they may contain malicious links or data. Additionally, consider using QR codes with authentication features for sensitive applications.

3. Are QR codes compatible with all Windows 10 devices?

QR code functionality is generally available on most Windows 10 devices equipped with a camera. However, older devices or those with limited hardware capabilities may not support QR code scanning. It is recommended to check device specifications or consult with the device manufacturer for compatibility information.

4. What are the best QR code scanner apps for Windows 10?

Several excellent QR code scanner apps are available in the Microsoft Store. Some popular options include QR Code Reader, QR Scanner, and Barcode Scanner. These apps offer a range of features, including code history, code generation, and even advanced functionalities like batch scanning.

5. How can I create my own QR codes in Windows 10?

While Windows 10 does not natively support QR code generation, numerous online tools and desktop applications can create QR codes. Popular options include QRStuff, QR Code Tiger, and QR Code Generator. These tools allow users to input data, customize the code design, and download the generated QR code.

Tips for Using QR Codes Effectively in Windows 10

1. Optimize QR Code Design: Ensure QR codes are clearly printed and easily scannable. Use high-resolution images and avoid cluttered backgrounds that may interfere with scanning.

2. Use Reliable QR Code Generators: Choose reputable QR code generators that offer secure and reliable services. Avoid using free generators that may include malicious links or data.

3. Test QR Codes Before Deployment: Before using QR codes in a public setting, test them thoroughly to ensure they scan correctly and lead to the intended destination.

4. Monitor QR Code Performance: Track the performance of QR codes by analyzing scan rates and user engagement. This data can help optimize campaigns and improve user experience.

5. Consider Accessibility: When designing QR codes, consider accessibility requirements. Ensure that the information stored in QR codes is accessible to users with visual impairments or other disabilities.

Conclusion

QR codes have become an integral part of the digital landscape, offering a convenient and efficient way to access information and share data. Windows 10, with its diverse functionalities, provides users with various ways to interact with QR codes, enhancing user experience and streamlining various tasks. By understanding the benefits and practical applications of QR codes in Windows 10, users can leverage this technology to improve their daily lives, enhance business operations, and engage with the digital world in new and innovative ways.

How to Scan QR Code on Windows Laptops  Windows 11 or 10 - YouTube Cómo Leer Códigos QR en Windows 10 】 El Mejor Lector QR QR code Scanner for Windows 10, 11  Camera and Image Scan - YouTube
�� Windows So lesen oder scannen Sie einfach einen QR-Code auf meinem Windows 10-PC Vor einigen QR Code for Windows 10 for Windows 10 Mobile Windows QR Code
How To Scan Qr Code In Laptop Windows 11 And Windows 10 Easy Way - YouTube Где найти qr код на компьютере windows 10 - Информационный сайт о Windows 10

Closure

Thus, we hope this article has provided valuable insights into A Comprehensive Guide to QR Codes in Windows 10. We hope you find this article informative and beneficial. See you in our next article!

Navigating The Challenges Of Windows 11: A Comprehensive Guide

Navigating the Challenges of Windows 11: A Comprehensive Guide

Introduction

In this auspicious occasion, we are delighted to delve into the intriguing topic related to Navigating the Challenges of Windows 11: A Comprehensive Guide. Let’s weave interesting information and offer fresh perspectives to the readers.

Buy Windows 11 User Guide: A Complete Guide to Master the New Windows 11 OS with Tips and Tricks

Windows 11, the latest iteration of Microsoft’s operating system, boasts a sleek new design and enhanced features. However, its transition from Windows 10 has presented a unique set of challenges for users, ranging from compatibility issues to performance concerns. This article aims to provide a comprehensive guide to common Windows 11 problems and offer effective solutions, empowering users to navigate these challenges and fully leverage the potential of this modern operating system.

Common Windows 11 Challenges and Solutions

1. System Requirements and Compatibility Issues:

Windows 11 has specific hardware requirements, including a compatible processor, sufficient RAM, and a secure boot enabled. Older PCs may struggle to meet these criteria, resulting in performance issues or outright incompatibility.

Solution:

  • Check System Requirements: Before upgrading, ensure your PC meets the minimum and recommended system requirements outlined by Microsoft. These can be found on the official Windows website.
  • Consider a Hardware Upgrade: If your PC falls short, consider upgrading components like RAM or the processor to meet the necessary specifications.
  • Utilize Windows 11 Compatibility Checker: This free tool, available on the Microsoft website, assesses your device’s compatibility with Windows 11.

2. Performance Issues and Optimization:

While Windows 11 is designed for efficient operation, users may encounter slowdowns or lagging during demanding tasks. This could stem from insufficient system resources, outdated drivers, or resource-intensive background processes.

Solution:

  • Optimize System Performance: Manage startup programs, disable unnecessary background apps, and utilize the built-in "Performance" settings to prioritize system resources for demanding tasks.
  • Update Drivers: Outdated drivers can lead to compatibility issues and performance degradation. Regularly update drivers for graphics cards, network adapters, and other hardware components.
  • Disk Cleanup and Defragmentation: Regularly clean up temporary files and defragment hard drives to optimize storage space and improve overall performance.

3. Software Compatibility Problems:

Some older software applications may not be compatible with Windows 11’s newer architecture. This can lead to functionality issues, crashes, or outright incompatibility.

Solution:

  • Check for Software Updates: Developers often release updates to address compatibility issues with newer operating systems. Check for updates for any incompatible software.
  • Consider Alternative Software: If updates are unavailable, explore alternative software solutions that are compatible with Windows 11.
  • Utilize Compatibility Mode: In some cases, running older software in compatibility mode can help overcome compatibility issues. This feature can be accessed through the program’s properties.

4. Security and Privacy Concerns:

Windows 11 offers enhanced security features, but users should be aware of potential vulnerabilities and privacy concerns. These can include malware threats, data breaches, and unauthorized access.

Solution:

  • Install a Robust Antivirus: Utilize a reputable antivirus program to protect against malware and other threats. Keep the antivirus software updated for optimal protection.
  • Enable Windows Defender: Windows 11 comes equipped with built-in security features, including Windows Defender, which provides real-time protection against threats.
  • Review Privacy Settings: Carefully review and adjust privacy settings to control data collection and access to personal information.

5. Network Connectivity Issues:

Users may experience intermittent network connectivity problems, including slow internet speeds or difficulty connecting to Wi-Fi networks. This could be due to driver issues, network configuration errors, or interference.

Solution:

  • Update Network Drivers: Ensure network adapters and Wi-Fi drivers are up-to-date.
  • Troubleshoot Network Settings: Utilize the built-in Windows network troubleshooter to identify and resolve common connectivity issues.
  • Restart Network Devices: Restart your modem and router to refresh the network connection.

6. UI and Navigation Challenges:

Windows 11’s redesigned user interface and navigation features may initially feel unfamiliar to users accustomed to previous versions. This can lead to confusion and difficulty finding specific features.

Solution:

  • Utilize the Start Menu: Familiarize yourself with the redesigned Start menu and its new features, including pinned apps and recently used files.
  • Explore the Taskbar: The taskbar houses key features like the search bar, notifications, and system tray icons.
  • Utilize the Help and Support Resources: Microsoft offers extensive documentation, tutorials, and support resources to help users navigate Windows 11.

FAQs

Q: How can I upgrade to Windows 11 from Windows 10?

A: You can upgrade to Windows 11 through the Windows Update settings, provided your device meets the minimum system requirements. Alternatively, you can download and install the Windows 11 ISO file from Microsoft’s website.

Q: Can I downgrade back to Windows 10 after upgrading to Windows 11?

A: Yes, you can downgrade back to Windows 10 within a limited timeframe after upgrading. This can be done through the "Recovery" settings or by using a bootable USB drive containing the Windows 10 installation media.

Q: What are the key differences between Windows 11 and Windows 10?

A: Windows 11 features a redesigned user interface, a new Start menu, improved multitasking capabilities, enhanced security features, and support for Android apps.

Q: Is Windows 11 a free upgrade for existing Windows 10 users?

A: The upgrade to Windows 11 was initially free for eligible Windows 10 users, but this offer may have expired.

Q: How can I troubleshoot specific Windows 11 issues?

A: Microsoft offers a comprehensive troubleshooting guide on its website, covering a wide range of common issues. You can also consult online forums, community websites, and technical support resources for assistance.

Tips

  • Back Up Your Data: Before making significant changes to your system, ensure you have a backup of important data to prevent accidental loss.
  • Keep Your System Updated: Regularly update Windows 11 and installed software to ensure optimal performance and security.
  • Monitor System Resources: Regularly check system resources like CPU usage, RAM, and storage space to identify potential bottlenecks.
  • Customize Your Settings: Personalize your Windows 11 experience by adjusting settings related to the Start menu, taskbar, themes, and notification preferences.

Conclusion

Navigating the transition to Windows 11 can be a challenging but rewarding experience. By understanding common problems and utilizing the solutions outlined in this guide, users can effectively troubleshoot issues, optimize performance, and unlock the full potential of this modern operating system. Remember to prioritize security, keep your system updated, and explore resources available from Microsoft and the broader tech community for continued support.

Buy Windows 11: Discover From Beginner to Expert with this Ultimate & Complete Step-by-Step User Buy Windows 11 User Guide for Beginners: A Comprehensive Guide to Master Windows 11 Operating Buy WINDOWS 11 COMPLETE GUIDE: Taking You from Windows 11 Novice to Professional In 33 Chapters
Windows 11 The Complete Manual Issue 1 2022 Pdf – GFXFather Buy Windows 11 User Guide: 2021-2022 Complete Windows 11 User Guide. 55 Best Features and Tips Mastering Windows 11: A Comprehensive Guide to Operating Systems: "Mastering the Essentials: A
WINDOWS 11 HOME User Guide: A Complete and well-Illustrated Guide to Navigating the New Features Buy WINDOWS 11 PRO USER GUIDE: A Comprehensive User Guide for Beginners and Seniors to Master

Closure

Thus, we hope this article has provided valuable insights into Navigating the Challenges of Windows 11: A Comprehensive Guide. We appreciate your attention to our article. See you in our next article!

The "No Audio Devices Installed" Error In Windows 10: A Comprehensive Guide

The "No Audio Devices Installed" Error in Windows 10: A Comprehensive Guide

Introduction

In this auspicious occasion, we are delighted to delve into the intriguing topic related to The "No Audio Devices Installed" Error in Windows 10: A Comprehensive Guide. Let’s weave interesting information and offer fresh perspectives to the readers.

The "No Audio Devices Installed" Error in Windows 10: A Comprehensive Guide

FIXED] No Audio Output Device is Installed in Windows 10

The dreaded "No audio devices installed" error message in Windows 10 can leave users frustrated and unable to enjoy the auditory aspects of their computer experience. This message typically indicates a problem with the system’s ability to recognize and utilize audio hardware. Understanding the root causes of this error is crucial for effective troubleshooting and resolution.

Understanding the Causes

The "No audio devices installed" error can arise from a variety of factors, including:

  • Hardware Issues:
    • Faulty Audio Driver: The audio driver, a piece of software that allows the operating system to communicate with the sound card, may be outdated, corrupted, or incompatible with the current Windows version.
    • Hardware Malfunction: The sound card itself might be defective or experiencing a physical issue, preventing it from functioning correctly.
    • Loose Connections: Improperly connected audio cables or loose connections within the computer can disrupt the audio signal flow.
    • Disabled Audio Device: The audio device might be unintentionally disabled in the device manager or through specific system settings.
  • Software Issues:
    • Windows Update Errors: Recent Windows updates might have introduced conflicts or corrupted audio-related files, leading to the error.
    • System File Corruption: Corrupted system files can interfere with the proper functioning of audio drivers and hardware.
    • Third-party Software Conflicts: Certain software applications, especially those related to audio or multimedia, might be interfering with the audio output.
  • Other Potential Causes:
    • Incorrect Audio Output Settings: The system might be configured to use an output device that is not connected or does not exist.
    • BIOS Settings: The BIOS, the fundamental software that manages the computer’s hardware, might have incorrect audio settings.

Troubleshooting the Error: A Step-by-Step Guide

  1. Check for Loose Connections: Ensure that all audio cables are securely connected to both the computer and the audio output device (speakers, headphones).
  2. Restart the Computer: A simple restart can sometimes resolve temporary software glitches that might be causing the error.
  3. Update Audio Drivers:
    • Device Manager: Open the Device Manager by searching for it in the Windows search bar. Locate "Sound, video and game controllers," expand the category, and right-click on the audio device. Select "Update driver," and follow the on-screen instructions.
    • Manufacturer’s Website: Visit the website of the sound card manufacturer and download the latest audio drivers specifically designed for your computer model and operating system.
  4. Reinstall Audio Drivers:
    • Device Manager: Right-click on the audio device in the Device Manager and select "Uninstall device." Restart your computer, and Windows will automatically attempt to reinstall the driver.
    • Manufacturer’s Website: After uninstalling the driver, download the latest version from the manufacturer’s website and install it manually.
  5. Run the Windows Audio Troubleshooter:
    • Settings: Go to "Settings" > "System" > "Sound."
    • Troubleshooter: Click on "Troubleshoot sound problems" to launch the built-in troubleshooter. Follow the prompts to diagnose and fix any detected issues.
  6. Check Device Manager for Errors:
    • Device Manager: Open the Device Manager and look for any yellow exclamation marks next to the audio device. These indicate driver or hardware problems. Right-click on the device and select "Properties" to view error details.
  7. Disable and Re-enable Audio Device:
    • Device Manager: Right-click on the audio device in the Device Manager and select "Disable device." Then, right-click again and select "Enable device."
  8. Check System Audio Settings:
    • Settings: Go to "Settings" > "System" > "Sound."
    • Output Device: Ensure that the correct audio output device is selected under "Choose your output device."
  9. Reset Windows Audio Settings:
    • Command Prompt: Open the Command Prompt as administrator.
    • Command: Type "netsh winsock reset" and press Enter. Then, type "netsh int ip reset" and press Enter. Restart your computer.
  10. Check BIOS Settings:
    • BIOS Setup: Access the BIOS setup by pressing the appropriate key during boot-up (usually Delete or F2).
    • Audio Settings: Look for audio-related settings in the BIOS and ensure that the sound card is enabled and configured correctly. Refer to your motherboard’s manual for specific BIOS settings.
  11. Run System File Checker (SFC):
    • Command Prompt: Open the Command Prompt as administrator.
    • Command: Type "sfc /scannow" and press Enter. This will scan for and attempt to repair any corrupted system files.
  12. Perform a Clean Boot:
    • System Configuration: Search for "msconfig" in the Windows search bar and open the System Configuration utility.
    • Selective Startup: Go to the "General" tab and select "Selective startup." Deselect "Load startup items" and ensure that "Load system services" and "Use original boot configuration" are checked.
    • Disable Startup Programs: Go to the "Services" tab, check "Hide all Microsoft services," and click "Disable all." Then, go to the "Startup" tab and click "Open Task Manager." Disable any unnecessary startup programs. Restart your computer.
  13. Contact Hardware Manufacturer: If none of the above steps resolve the issue, it is likely a hardware problem. Contact the manufacturer of your sound card or motherboard for assistance.

FAQs

Q: What are the most common causes of the "No audio devices installed" error in Windows 10?

A: The most frequent culprits are outdated or corrupted audio drivers, hardware malfunctions, and loose connections.

Q: How can I determine if the issue is with the hardware or software?

A: If you have tried reinstalling the audio drivers and the error persists, it is likely a hardware problem. You can also check the Device Manager for any error codes associated with the sound card.

Q: Can I use a different audio output device to bypass the error?

A: Yes, if your computer has multiple audio output options (e.g., internal speakers, headphone jack, external speakers), you can try switching to a different device.

Q: Should I perform a clean install of Windows 10 if the error persists?

A: A clean install should only be considered as a last resort, as it involves reinstalling the entire operating system and losing all data. It is generally recommended to exhaust other troubleshooting options before resorting to a clean install.

Tips

  • Regularly Update Drivers: Keep your audio drivers up to date by checking for new versions on the manufacturer’s website.
  • Monitor for Windows Updates: Be aware of potential conflicts caused by recent Windows updates and revert to a previous version if necessary.
  • Avoid Unnecessary Software Installation: Be cautious about installing third-party software that might interfere with audio functionality.
  • Properly Connect Audio Devices: Ensure that all audio cables are securely connected and that the audio output device is properly powered.

Conclusion

The "No audio devices installed" error in Windows 10 can be a frustrating problem, but it can usually be resolved through careful troubleshooting. By systematically working through the steps outlined above, users can identify the root cause of the error and implement the appropriate solution. Remember to consult the documentation provided by the sound card manufacturer and seek professional assistance if necessary. By understanding the underlying causes and applying effective troubleshooting techniques, users can restore audio functionality and enjoy the full multimedia experience offered by their Windows 10 system.

How To Fix 'No Audio Device is Installed' in Windows 10 - WinErrorFixer.Com How to Fix "No Audio Output Device Installed" Error in Windows 10 No Audio Output Device Is Installed On Windows 10 PC (Best 10 Fixes)
How to Fix No Audio Output Device Is Installed Error in Windows 10  Naneedigital How to Fix 'No Audio Output Device is Installed' Error Windows 10?  Tech Tip Trick No Audio Output Device Is Installed In Windows 10- FIX (Working -2020)
No Audio Output Device Is Installed In Windows 10- FIX (Working -2020) No Audio Output Device Is Installed In Windows 10- FIX (Working -2020)

Closure

Thus, we hope this article has provided valuable insights into The "No Audio Devices Installed" Error in Windows 10: A Comprehensive Guide. We hope you find this article informative and beneficial. See you in our next article!

A Comprehensive Guide To Photoshop On Windows 11: Exploring The Power Of Image Editing

A Comprehensive Guide to Photoshop on Windows 11: Exploring the Power of Image Editing

Introduction

With great pleasure, we will explore the intriguing topic related to A Comprehensive Guide to Photoshop on Windows 11: Exploring the Power of Image Editing. Let’s weave interesting information and offer fresh perspectives to the readers.

A Comprehensive Guide to Photoshop on Windows 11: Exploring the Power of Image Editing

Photoshop windows 11 - nrasi

Adobe Photoshop, the industry-leading image editing software, has become an indispensable tool for professionals and enthusiasts alike. Its powerful features and versatility enable users to manipulate images, create stunning graphics, and bring their creative visions to life. This guide provides a comprehensive overview of Photoshop on Windows 11, exploring its capabilities, benefits, and how to access it.

Understanding Photoshop: A Glimpse into its Capabilities

Photoshop’s reputation as a powerful image editing software stems from its extensive suite of tools and features. These tools encompass a wide range of capabilities, enabling users to:

  • Image Enhancement: Adjust brightness, contrast, color balance, and other image properties to enhance overall quality and aesthetics.
  • Retouching and Restoration: Remove blemishes, wrinkles, and other imperfections, restoring images to their original glory or creating artistic effects.
  • Manipulation and Composition: Combine multiple images, resize, rotate, and crop images to create compelling compositions.
  • Painting and Drawing: Utilize brushes, pencils, and other tools to paint, draw, and create original artwork.
  • Text and Typography: Integrate text elements, manipulate fonts, and create visually appealing typography for diverse applications.
  • Layers and Masks: Work with multiple layers, applying masks to isolate specific areas and achieve complex effects.
  • Filters and Effects: Apply a vast array of filters and effects to transform images, adding artistic flair or achieving specific visual styles.
  • Web Design and Graphic Design: Create website mockups, logos, banners, and other graphic design elements.

The Benefits of Using Photoshop on Windows 11

The integration of Photoshop with Windows 11 offers a seamless and optimized experience, maximizing its potential and delivering significant benefits:

  • Enhanced Performance: Windows 11’s optimized system resources and hardware capabilities ensure smooth and efficient operation of Photoshop, enabling faster processing and rendering.
  • Improved User Interface: The intuitive interface of Photoshop blends seamlessly with the modern design aesthetic of Windows 11, offering a familiar and user-friendly experience.
  • Streamlined Workflow: The integration of Photoshop with other Windows 11 applications, such as the File Explorer and Microsoft Edge, facilitates a streamlined workflow, allowing for easy file management and access.
  • Enhanced Collaboration: Windows 11’s collaborative features, such as shared folders and cloud storage integration, enable seamless teamwork and project sharing within Photoshop.
  • Comprehensive Ecosystem: Photoshop integrates with other Adobe products, such as Illustrator, Premiere Pro, and After Effects, creating a comprehensive creative ecosystem for diverse projects.

Exploring the Options: Understanding Photoshop Access

While Photoshop is a paid software, there are several ways to access and utilize its capabilities:

  • Adobe Creative Cloud Subscription: This subscription-based model provides access to the latest version of Photoshop, alongside a suite of other Adobe creative applications, for a monthly or annual fee.
  • Adobe Photoshop Elements: This consumer-focused version offers a simplified interface and a subset of Photoshop’s features, providing a more affordable option for casual users.
  • Free Trials: Adobe offers free trial periods for Photoshop, allowing users to explore its capabilities before committing to a subscription.
  • Open-Source Alternatives: Several free and open-source image editing software options are available, offering comparable functionalities to Photoshop, albeit with varying levels of sophistication.

Accessing Photoshop Through Adobe Creative Cloud

The most comprehensive way to access Photoshop is through an Adobe Creative Cloud subscription. This subscription model provides access to the latest version of Photoshop, ensuring users have the most up-to-date features and functionalities.

Key Considerations for Photoshop on Windows 11:

  • System Requirements: Ensure your Windows 11 computer meets the minimum system requirements for Photoshop to run smoothly. These specifications include processor, RAM, storage space, and graphics card requirements.
  • Performance Optimization: Adjust Photoshop settings, such as memory allocation and scratch disk location, to optimize performance and prevent potential crashes or slowdowns.
  • Regular Updates: Install regular updates for Photoshop to benefit from bug fixes, performance improvements, and new features.
  • Learning Resources: Utilize online tutorials, courses, and documentation to enhance your Photoshop skills and explore its advanced capabilities.

FAQs Regarding Photoshop on Windows 11

Q: Is Photoshop compatible with Windows 11?

A: Yes, Photoshop is fully compatible with Windows 11. Adobe regularly updates Photoshop to ensure compatibility with the latest operating systems, including Windows 11.

Q: Can I download Photoshop for free on Windows 11?

A: Photoshop is not available for free download. However, Adobe offers free trial periods, allowing users to experience Photoshop’s capabilities before committing to a subscription.

Q: What are the minimum system requirements for Photoshop on Windows 11?

A: The minimum system requirements for Photoshop on Windows 11 include:

  • Processor: Intel or AMD processor with 64-bit support
  • RAM: 8 GB of RAM (16 GB recommended)
  • Storage: 4 GB of available hard-disk space for installation
  • Graphics: OpenGL 4.0 or later
  • Operating System: Windows 11

Q: Can I use Photoshop on multiple devices with a single subscription?

A: Yes, a single Adobe Creative Cloud subscription allows you to install and use Photoshop on multiple devices, typically up to two devices simultaneously.

Q: How do I install Photoshop on Windows 11?

A: To install Photoshop on Windows 11, follow these steps:

  1. Subscribe to Adobe Creative Cloud.
  2. Download the Photoshop installer from the Adobe Creative Cloud website.
  3. Run the installer and follow the on-screen instructions.

Tips for Using Photoshop on Windows 11

  • Utilize Keyboard Shortcuts: Learn and utilize keyboard shortcuts to streamline your workflow and enhance efficiency.
  • Explore Layers and Masks: Mastering layers and masks is crucial for achieving complex image manipulations and effects.
  • Experiment with Filters and Effects: Explore the vast array of filters and effects available in Photoshop to enhance your images and create unique styles.
  • Practice Regularly: Consistent practice is essential for mastering Photoshop’s capabilities and developing your creative skills.

Conclusion

Photoshop on Windows 11 empowers users to unleash their creative potential, transforming images, creating stunning graphics, and bringing their ideas to life. Its comprehensive features, user-friendly interface, and integration with Windows 11 make it an indispensable tool for professionals and enthusiasts alike. Whether you’re a seasoned graphic designer or a budding artist, exploring the capabilities of Photoshop on Windows 11 can unlock a world of creative possibilities.

Can we run PHOTOSHOP on WINDOWS 11  check with photoshop 2021  PC. NET - YouTube A Comprehensive Guide to Photoshop Editing Techniques The Complete Photoshop Image Editing Manual - 15th Edition 2022 » GFxtra
A Complete Beginner's Guide to Adobe Photoshop Creative Cloud Cara Install Aplikasi Adobe Photoshop 2020 di windows 11 - YouTube WINDOWS 11 Can we run Photoshop, Premear Pro, Illustrator and IDM  check with photoshop 2021
"Mastering Photoshop: A Comprehensive Guide to Professional Photo Editing - YouTube How to Learn Photoshop: A Comprehensive Guide for Beginners

Closure

Thus, we hope this article has provided valuable insights into A Comprehensive Guide to Photoshop on Windows 11: Exploring the Power of Image Editing. We appreciate your attention to our article. See you in our next article!