Archives March 2024

Navigating The Digital Landscape: QR Code Readers For Windows 10

Navigating the Digital Landscape: QR Code Readers for Windows 10

Introduction

With enthusiasm, let’s navigate through the intriguing topic related to Navigating the Digital Landscape: QR Code Readers for Windows 10. Let’s weave interesting information and offer fresh perspectives to the readers.

4 Best QR Code Reader for Windows (Updated)

In the modern digital age, QR codes have become ubiquitous, seamlessly bridging the gap between the physical and digital realms. These visually encoded squares, often found on product packaging, advertisements, and even business cards, contain a wealth of information, from website URLs to contact details, and even payment links. To unlock this digital treasure trove, a QR code reader is essential. Fortunately, Windows 10 users have access to a multitude of free options, each offering a unique set of features and functionalities.

Understanding the Power of QR Code Readers

QR code readers, also known as QR scanners, are software applications that use a device’s camera to interpret the information embedded within a QR code. This process involves capturing the code’s visual pattern and converting it into a readable format, often a URL, text, or a specific action. The convenience and versatility of QR code readers have made them indispensable tools for various applications, including:

  • Accessing Websites and Online Content: QR codes offer a quick and effortless way to access websites, articles, and other online content. This is particularly beneficial for users who find typing long URLs tedious or challenging.
  • Sharing Contact Information: Businesses and individuals can easily share contact details, such as phone numbers, email addresses, and social media links, through QR codes. This eliminates the need for manual data entry and promotes seamless communication.
  • Making Payments: QR codes have revolutionized the payment landscape, enabling quick and secure transactions. Users can scan a QR code at a point of sale to make payments using their mobile wallets or bank accounts.
  • Accessing Digital Coupons and Promotions: Retailers and advertisers utilize QR codes to distribute digital coupons, promotions, and loyalty programs, offering customers exclusive deals and enhancing the shopping experience.
  • Generating Digital Business Cards: QR codes can replace traditional business cards, offering a more modern and efficient way to share professional information. They can link to a user’s online portfolio, website, or social media profiles, allowing for instant connections.
  • Downloading Apps and Software: QR codes can be used to direct users to app stores, facilitating the quick and convenient download of software applications. This simplifies the installation process and eliminates the need to manually search for apps.
  • Gaining Access to Secure Information: QR codes can be used to access sensitive information, such as medical records or financial statements, by providing an additional layer of security through authentication processes.

Exploring the Diverse Landscape of Free QR Code Readers for Windows 10

The Windows 10 ecosystem offers a wide array of free QR code readers, each tailored to specific user needs and preferences. Here’s a breakdown of some of the most popular options:
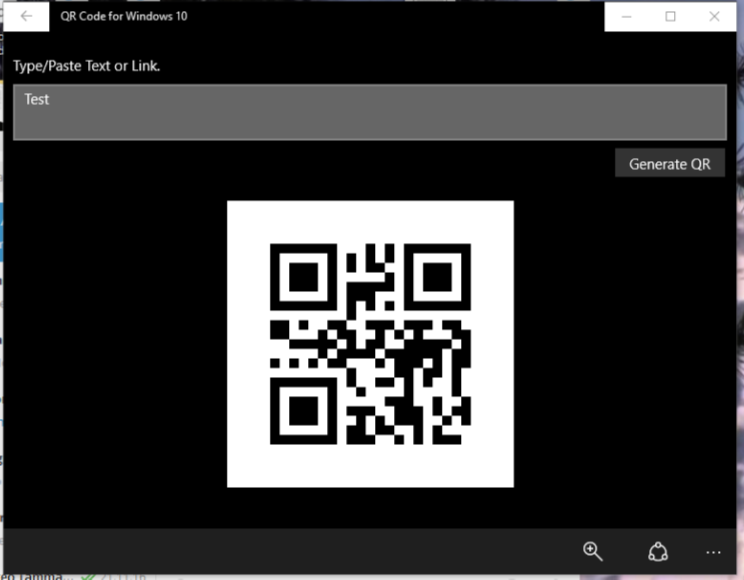
1. Microsoft Edge:

The default web browser on Windows 10, Microsoft Edge, comes equipped with a built-in QR code reader. This makes it incredibly convenient for users, as no additional software installation is required. To scan a QR code, simply open the Edge browser, click the "More actions" button (three dots) in the top-right corner, and select "Scan QR Code." Edge will automatically launch the camera and detect the QR code, displaying the encoded information within the browser window.

2. QR Code Reader by Scanova:

This highly-rated app from Scanova offers a user-friendly interface and a wide range of features. It can read QR codes, barcodes, and even data matrix codes, making it versatile for various applications. Additional features include the ability to save scan history, share scan results, and create custom QR codes.

3. QR Code Reader by NeoReader:

NeoReader is another popular choice, known for its speed and accuracy. It can scan QR codes, barcodes, and data matrix codes, offering a comprehensive scanning solution. The app also allows users to customize the scanning experience, including selecting the camera resolution and enabling flash support.

4. QR Code Reader by i-nigma:

i-nigma is a feature-rich QR code reader that provides a robust scanning experience. It supports multiple barcode formats, including QR codes, barcodes, and data matrix codes. The app also offers advanced features like the ability to create QR codes, manage scan history, and integrate with social media platforms.

5. QR Code Reader by Qrafter:

Qrafter stands out for its minimalist design and intuitive interface. It focuses on providing a simple and efficient scanning experience, making it ideal for users who prioritize ease of use. The app supports QR codes and barcodes, allowing users to quickly access the encoded information.

Choosing the Right QR Code Reader

Selecting the best QR code reader for your needs depends on factors such as:

  • Frequency of Use: If you only occasionally scan QR codes, a simple built-in reader like the one in Microsoft Edge might suffice. However, if you frequently scan QR codes, a dedicated app with advanced features might be more beneficial.
  • Barcode Support: If you need to scan barcodes in addition to QR codes, ensure the chosen app supports the desired barcode formats.
  • Customization Options: Some apps offer customization features, such as the ability to adjust camera resolution, enable flash support, or change the scanning interface.
  • Additional Features: Some QR code readers offer additional features, such as the ability to create custom QR codes, manage scan history, or integrate with other apps.

FAQs

1. Is it safe to scan QR codes?

Scanning QR codes from reputable sources is generally safe. However, be cautious when scanning codes from unknown sources, as they may contain malicious links or viruses.

2. Can I create my own QR codes?

Yes, there are numerous online QR code generators available, allowing users to create custom QR codes for various purposes, such as website URLs, contact information, and social media profiles.

3. What are the different types of QR codes?

QR codes come in various versions, each with specific capabilities. Some common types include:

  • Version 1: The most basic version, capable of encoding up to 128 characters.
  • Version 40: The highest version, capable of encoding up to 7089 characters.
  • Micro QR Code: A smaller version of QR code, suitable for limited space.
  • QR Code with Error Correction: Encodes additional data for error correction, making it more robust against damage.

4. How do I use a QR code reader?

Most QR code readers function similarly:

  1. Open the QR code reader app.
  2. Point the device’s camera at the QR code.
  3. The app will automatically detect and scan the code.
  4. The encoded information will be displayed on the screen.

Tips for Using QR Code Readers

  • Ensure proper lighting: Adequate lighting is crucial for accurate QR code scanning.
  • Hold the device steady: Shaky hands can hinder the scanning process.
  • Clean the camera lens: A dirty lens can affect scan accuracy.
  • Use a dedicated QR code reader app: For frequent scanning, a dedicated app offers a more streamlined experience.
  • Verify the source of the QR code: Always be cautious when scanning codes from unknown sources.

Conclusion

QR code readers have become an integral part of our digital lives, facilitating seamless access to information and online services. With a wide range of free options available for Windows 10 users, finding the right QR code reader for your needs is easier than ever. Whether you’re a casual user or a frequent scanner, a reliable QR code reader can enhance your digital experience and unlock the potential of these ubiquitous codes.

CodeTwo QR Code Desktop Reader - Windows 10 Download generate qr code in windows 10 - Knowledge Sharing Tech Yes, you can read QR Codes on Windows
QR Code Desktop QR Code for Windows 10  FREE Windows Phone app market nBarcode Reader: un lecteur de QR Code pour Windows 10  Le propulseur de Ticeman
10 Best Qr Code Reader Windows 10 Desktops 2024  There's One Clear Winner  BestReviews.Guide 10 Best Qr Code Reader Windows 10 Desktops 2023  There's One Clear Winner  BestReviews.Guide

Closure

Thus, we hope this article has provided valuable insights into Navigating the Digital Landscape: QR Code Readers for Windows 10. We hope you find this article informative and beneficial. See you in our next article!

The Importance Of A Dedicated Storage Drive: Understanding Your "H Drive"

The Importance of a Dedicated Storage Drive: Understanding Your "H Drive"

Introduction

With great pleasure, we will explore the intriguing topic related to The Importance of a Dedicated Storage Drive: Understanding Your "H Drive". Let’s weave interesting information and offer fresh perspectives to the readers.

The Importance of a Dedicated Storage Drive: Understanding Your "H Drive"

Storage 101: Understanding the Hard-Disk Drive - Simple Talk

In the realm of personal computing, the concept of a "H Drive" often refers to a secondary hard drive, separate from the primary drive (typically labeled "C"). While the "C" drive serves as the core operating system and program installation location, the "H" drive acts as a designated storage space for data, files, and applications, offering numerous benefits and advantages.

Understanding the Concept

A secondary hard drive, often referred to as an "H" drive, provides a dedicated storage space for files and applications that are not directly related to the operating system. This separation serves several key purposes:

  • Organization: By segregating data from the operating system, users can maintain a more organized and efficient file system. This allows for easier navigation, retrieval, and management of files.
  • Performance: Separating data from the operating system can improve system performance by reducing the burden on the primary drive. This is particularly beneficial for tasks that require significant disk access, such as video editing or large file transfers.
  • Protection: In the event of a system failure or hard drive malfunction, the data stored on the secondary drive is less likely to be affected. This provides a crucial layer of data redundancy and protection.
  • Capacity: Secondary drives can provide significantly more storage capacity compared to the primary drive. This allows for the storage of large files, such as videos, photos, and backups, without overwhelming the primary drive.

Benefits of Using a Dedicated Storage Drive

The use of a dedicated storage drive offers several advantages for both casual and professional users:

  • Enhanced Data Security: By storing critical data on a separate drive, users can mitigate the risk of data loss due to system crashes or hardware failures.
  • Improved System Performance: Separating data from the operating system reduces the strain on the primary drive, leading to faster boot times, smoother application launches, and quicker file access.
  • Efficient File Management: A dedicated storage drive enables users to organize their files into distinct folders and categories, making it easier to locate and manage data.
  • Increased Storage Capacity: Secondary drives provide ample space for storing large files, backups, and media libraries without compromising the performance of the primary drive.
  • Flexibility and Scalability: Users can easily upgrade or replace secondary drives without affecting the operating system or primary drive. This offers flexibility and scalability for evolving storage needs.

FAQs Regarding a Dedicated Storage Drive

Q: What is the best way to connect a secondary drive to my computer?

A: Secondary drives can be connected via various interfaces, including SATA, USB, and NVMe. The choice depends on the specific computer and the desired performance level. SATA connections typically offer the fastest speeds, while USB is more convenient for external drives.

Q: How do I format a new secondary drive?

A: Formatting a new drive prepares it for use by creating a file system. The most common file systems for Windows are NTFS and FAT32. NTFS offers better security and features, while FAT32 is compatible with a wider range of devices.

Q: Should I use my secondary drive for backups?

A: Yes, a dedicated storage drive is an ideal location for storing backups of your important data. Regularly backing up your files to a separate drive ensures data safety and recovery in case of a system failure.

Q: What are some recommended uses for a dedicated storage drive?

A: Secondary drives are suitable for various purposes, including:

  • Storing large media files: Videos, photos, and music can be stored on the secondary drive to free up space on the primary drive.
  • Creating backups: Regular backups of system files, documents, and other important data should be stored on a separate drive.
  • Installing applications: Certain applications, especially those that require large storage space or frequent updates, can be installed on the secondary drive.
  • Running virtual machines: Virtual machines, which allow you to run different operating systems simultaneously, can be stored on a secondary drive.

Tips for Using a Dedicated Storage Drive Effectively

  • Regularly back up your data: Ensure that you regularly back up your important files to the secondary drive to safeguard against data loss.
  • Organize your files: Create a logical folder structure on the secondary drive to keep your files organized and easily accessible.
  • Monitor drive health: Regularly check the health of your secondary drive using system monitoring tools or dedicated hard drive diagnostic software.
  • Use a reliable file management system: Employ a robust file management system to efficiently organize, search, and manage your files on the secondary drive.
  • Consider using encryption: Protect sensitive data by encrypting the secondary drive to prevent unauthorized access.

Conclusion

A dedicated storage drive, often referred to as an "H" drive, offers a valuable solution for managing and protecting data in a modern computing environment. By separating data from the operating system, users can enjoy improved performance, enhanced security, and greater storage capacity. Understanding the benefits and proper implementation of a secondary drive can significantly enhance the overall efficiency and reliability of your computer system.

Storage 101: Understanding the Hard-Disk Drive - Simple Talk What Is Hard Disk Drive (HDD) And How It Works?  DESKDECODE.COM Importance of Hard Disk Drive Uses and Roles - A Savvy Web
What is a hard drive? Everything you should know about the computer storage device  LaptrinhX Understanding Hard Disk Drives - Central Valley Computer Parts Understanding Drive Storage
Hard Drive: Understanding the Basics Understanding High-Storage Dedicated Servers  InMotion Hosting

Closure

Thus, we hope this article has provided valuable insights into The Importance of a Dedicated Storage Drive: Understanding Your "H Drive". We thank you for taking the time to read this article. See you in our next article!

Understanding And Managing Programs That Launch Automatically On Windows 10

Understanding and Managing Programs that Launch Automatically on Windows 10

Introduction

In this auspicious occasion, we are delighted to delve into the intriguing topic related to Understanding and Managing Programs that Launch Automatically on Windows 10. Let’s weave interesting information and offer fresh perspectives to the readers.

Understanding and Managing Programs that Launch Automatically on Windows 10

How to see auto startup programs in Windows 10/11 (Apps)?

Windows 10, like its predecessors, offers the convenience of automatically launching specific applications and services when the operating system starts. This functionality, often referred to as "startup programs," can significantly streamline user workflows by ensuring essential tools are readily available. However, unchecked, it can also lead to performance issues, sluggish boot times, and even security vulnerabilities. This article delves into the intricacies of startup programs on Windows 10, examining their purpose, potential benefits and drawbacks, and providing comprehensive guidance on managing them effectively.

The Role of Startup Programs in Windows 10

Startup programs are applications or services configured to launch automatically when Windows 10 boots up. They serve various purposes, ranging from essential system functions to enhancing user productivity.

Essential System Services:

  • System processes: These are core components of Windows 10, responsible for fundamental operations like managing the operating system, handling hardware interactions, and ensuring network connectivity. These services are typically crucial for the proper functioning of the system and are often launched automatically.
  • Security software: Antivirus and firewall applications require constant monitoring and protection. Launching them at startup ensures continuous security against potential threats.
  • Hardware drivers: Specific devices, such as printers, scanners, and network adapters, often require dedicated drivers to function correctly. These drivers are typically launched at startup to ensure seamless integration with the operating system.

User Productivity Tools:

  • Cloud storage synchronization: Applications like Dropbox, OneDrive, and Google Drive automatically synchronize files and folders across devices, making it convenient to access data from anywhere. Launching them at startup ensures continuous synchronization.
  • Messaging and communication apps: Instant messaging platforms like WhatsApp, Telegram, and Skype often require continuous background activity to receive notifications and messages. Launching them at startup ensures prompt communication.
  • Productivity suites: Software like Microsoft Office, Adobe Creative Cloud, and various development environments often benefit from being readily available for use. Launching them at startup saves time and allows users to quickly access their tools.

The Potential Impact of Startup Programs

While beneficial for certain applications, excessive startup programs can significantly impact system performance.

Negative Impacts:

  • Slower boot times: Each program launched at startup consumes system resources, slowing down the boot process and delaying access to the desktop.
  • Increased memory usage: Applications running in the background consume memory, potentially leading to performance issues and system instability if too many programs are launched at startup.
  • Security risks: Malicious software can exploit startup programs to gain unauthorized access to the system, potentially compromising user data and privacy.

Managing Startup Programs for Optimal Performance

To ensure a smooth and efficient Windows 10 experience, it is crucial to carefully manage startup programs.

Identifying Unnecessary Startup Programs:

  • Task Manager: Windows Task Manager offers a dedicated "Startup" tab, providing a list of programs configured to launch automatically. Analyze the list and identify any programs that are not essential for your daily use or those you rarely need at startup.
  • System Configuration (msconfig): The System Configuration utility (msconfig) provides a more comprehensive list of startup programs and services, allowing users to selectively disable specific entries.
  • Third-party utilities: Several dedicated utilities are available to analyze startup programs, identify potential conflicts, and optimize system performance.

Disabling Unnecessary Startup Programs:

  • Task Manager: The "Startup" tab in Task Manager allows users to disable programs with a simple toggle switch.
  • System Configuration (msconfig): The "Startup" tab in msconfig provides more granular control, allowing users to disable specific programs or services.
  • Third-party utilities: Some utilities offer advanced features like program dependency analysis, ensuring that disabling one program does not negatively impact other applications.

Additional Tips for Managing Startup Programs:

  • Regularly review startup programs: It is recommended to periodically review startup programs and disable any unnecessary entries to maintain optimal system performance.
  • Use the "Delay Load Drivers" option: Windows 10 allows users to delay the loading of specific drivers, reducing the initial boot time and improving overall system responsiveness.
  • Consider using a lightweight antivirus: While essential, some antivirus programs can be resource-intensive. Consider using a lightweight antivirus that offers sufficient protection without impacting system performance.
  • Optimize system settings: Utilize Windows 10’s built-in performance optimization tools to fine-tune system settings, reduce background processes, and improve overall system responsiveness.

Frequently Asked Questions (FAQs) about Startup Programs in Windows 10

Q: How can I tell if a program is essential or unnecessary for my system?

A: The best way to determine the importance of a program is to research its purpose. If you are unfamiliar with a program, search online for its function and whether it is essential for your system’s operation.

Q: What are the potential risks of disabling a startup program?

A: Disabling essential system services or drivers can lead to system instability, application malfunctions, or hardware issues. Always research the purpose of a program before disabling it.

Q: Can I disable startup programs from third-party applications?

A: Yes, many applications allow users to customize their startup behavior. Refer to the application’s settings or documentation for instructions on managing startup options.

Q: Is it safe to disable all startup programs?

A: No, disabling all startup programs can negatively impact system functionality and stability. Only disable programs you are certain are unnecessary.

Q: How do I ensure that my system is secure from malicious startup programs?

A: Keep your operating system and antivirus software up to date, be cautious about downloading files from unknown sources, and regularly scan your system for malware.

Conclusion

Managing startup programs effectively is crucial for maintaining optimal system performance and security on Windows 10. By carefully analyzing and disabling unnecessary programs, users can significantly improve boot times, reduce memory consumption, and minimize potential security risks. Regular review and optimization of startup programs are recommended to ensure a smooth and efficient Windows 10 experience.

How To Automatically Launch Some Programs At Startup In Windows 10? Auto Run a program when Windows 10/11 starts, how to? How to Change Which Programs Run Automatically at Startup in Windows 10
How to launch apps automatically during startup on Windows 10  Windows Central How To Autorun Programs On Startup In Windows  Automatically Start Programs in Windows 10 How to Change Which Programs Run Automatically at Startup in Windows 10
Start programs automatically in Windows 10  PRO 4 Ways to Manage  Change Startup Programs in Windows 10

Closure

Thus, we hope this article has provided valuable insights into Understanding and Managing Programs that Launch Automatically on Windows 10. We hope you find this article informative and beneficial. See you in our next article!

A Retrospective On "Now That’s What I Call Music!" – A Cultural Phenomenon

A Retrospective on "Now That’s What I Call Music!" – A Cultural Phenomenon

Introduction

With enthusiasm, let’s navigate through the intriguing topic related to A Retrospective on "Now That’s What I Call Music!" – A Cultural Phenomenon. Let’s weave interesting information and offer fresh perspectives to the readers.

A Retrospective on "Now That’s What I Call Music!" – A Cultural Phenomenon

Now That's What I Call Music! 1984 (UK 1999) - Now That's What I Call Music Wiki

The "Now That’s What I Call Music!" series, commonly known as "Now That’s What I Call" or simply "Now," has become a cultural phenomenon, a defining soundtrack for generations. This compilation album series, launched in 1983, has consistently captured the zeitgeist, offering a snapshot of popular music trends across various genres. Its impact transcends mere music sales, shaping listening habits, fostering musical discovery, and influencing the evolution of the music industry itself.

The Birth of a Compilation Giant:

The concept of "Now That’s What I Call Music!" originated in the UK, driven by the desire to create a compilation album that reflected the diverse and dynamic landscape of popular music. The initial release, featuring artists like Michael Jackson, Blondie, and The Police, proved to be a massive success, paving the way for a long-running franchise.

The Formula for Success:

The series’ enduring appeal lies in its carefully curated selection of tracks. Each album is a meticulously crafted playlist, encompassing a broad spectrum of genres, from pop and rock to dance and R&B. The inclusion of both established artists and rising stars ensures a diverse and engaging listening experience.

A Reflection of Popular Culture:

"Now That’s What I Call Music!" acts as a cultural mirror, reflecting the evolving tastes and trends of each era. The series has captured the rise of grunge, the dominance of boy bands, the emergence of hip-hop, and the explosion of electronic dance music. By showcasing the most popular songs of the time, "Now" provides a valuable historical record of music trends.

Beyond the Music:

The series has also played a significant role in shaping the music industry. The success of "Now" has demonstrably influenced the marketing strategies of record labels, leading to a greater emphasis on compilation albums as a promotional tool. The franchise has also contributed to the rise of digital music platforms, with "Now" albums being among the first to be made available for digital download.

The Legacy of "Now That’s What I Call Music!":

The series continues to thrive, with new releases appearing regularly, capturing the current musical landscape. Its impact on popular culture is undeniable, with "Now That’s What I Call Music!" becoming synonymous with chart-topping hits and musical trends. The series has left an indelible mark on the music industry, serving as a testament to the enduring power of compilation albums and their ability to connect with audiences across generations.

FAQs:

Q: How many "Now That’s What I Call Music!" albums have been released?

A: The series has released over 100 albums worldwide, with each country having its own individual releases.

Q: What are some of the most popular "Now That’s What I Call Music!" albums?

A: Some of the most successful albums include "Now That’s What I Call Music! 1," "Now That’s What I Call Music! 2," and "Now That’s What I Call Music! 3," all of which sold millions of copies.

Q: How are the songs selected for each "Now That’s What I Call Music!" album?

A: The selection process involves collaboration between record labels, music industry professionals, and chart analysts. The goal is to include the most popular and commercially successful songs of the time.

Q: What is the significance of "Now That’s What I Call Music!" in the history of music?

A: The series has played a pivotal role in shaping the music industry, influencing marketing strategies, promoting digital music consumption, and serving as a cultural touchstone for generations.

Tips for Enjoying "Now That’s What I Call Music!":

  • Explore different eras: The series spans several decades, offering a diverse range of musical styles. Discover the music of different eras and see how popular music has evolved.
  • Use "Now" as a gateway to new artists: The series often features rising stars alongside established acts. Use this as an opportunity to discover new artists and expand your musical horizons.
  • Enjoy the nostalgia: For many, "Now That’s What I Call Music!" evokes a sense of nostalgia, bringing back memories of specific times and events. Embrace the nostalgic element and relive those musical moments.

Conclusion:

"Now That’s What I Call Music!" is more than just a compilation album series; it is a cultural phenomenon that has shaped the music industry, influenced listening habits, and captured the spirit of its time. Its enduring success lies in its ability to reflect the ever-changing landscape of popular music, providing a snapshot of the musical trends and tastes of each era. The series continues to thrive, serving as a testament to the enduring power of compilation albums and their ability to connect with audiences across generations.

Now That's What I Call Music! 1983 (UK 1999) - Now That's What I Call Music Wiki Now That's What I Call Music 4 (UK 1984) - Now That's What I Call Music Wiki Now That's What I Call Music! Years (UK 2004) - Now That's What I Call Music Wiki
Now That's What I Call Music! 1983 (UK 1993) - Now That's What I Call Music Wiki Now That's What I Call Music! 25 Years - Various Artists Various Artists - NOW That’s What I Call Music! 26 [US] Lyrics and Tracklist  Genius
Now That's What I Call A Decade 2000s (USA 2022 CD) - Now That's What I Call Music Wiki Now That's What I Call Music! 1985 (UK 1999) - Now That's What I Call Music Wiki

Closure

Thus, we hope this article has provided valuable insights into A Retrospective on "Now That’s What I Call Music!" – A Cultural Phenomenon. We hope you find this article informative and beneficial. See you in our next article!

Seamless Sharing In Windows 10: Exploring The Power Of Nearby Sharing

Seamless Sharing in Windows 10: Exploring the Power of Nearby Sharing

Introduction

In this auspicious occasion, we are delighted to delve into the intriguing topic related to Seamless Sharing in Windows 10: Exploring the Power of Nearby Sharing. Let’s weave interesting information and offer fresh perspectives to the readers.

Seamless Sharing in Windows 10: Exploring the Power of Nearby Sharing

Seamless File Sharing: Google Nearby Share for Windows

Windows 10’s "Nearby Sharing" feature revolutionizes the way users transfer files, photos, and links between devices. This innovative technology, built into the operating system, leverages Bluetooth and Wi-Fi to establish a secure and direct connection between nearby devices. By eliminating the need for cloud services or external storage devices, Nearby Sharing offers a convenient, efficient, and privacy-conscious approach to data exchange.

Understanding the Mechanics of Nearby Sharing

At its core, Nearby Sharing relies on the Bluetooth Low Energy (BLE) standard, enabling devices to discover and connect with each other within a limited range. While BLE facilitates the initial connection, the actual data transfer takes place over a secure Wi-Fi Direct connection. This dual approach ensures a robust and reliable transfer process.

Enabling and Configuring Nearby Sharing

To activate Nearby Sharing, users need to navigate to the "Settings" app, select "System," then "Shared experiences," and toggle the "Nearby Sharing" option to "On." Additionally, users can choose which devices can discover their device and specify the types of content they are willing to share.

Key Benefits of Utilizing Nearby Sharing

  • Convenience and Speed: Nearby Sharing eliminates the cumbersome process of uploading and downloading files through cloud services or external drives. The direct connection between devices ensures swift and efficient data transfers.
  • Enhanced Privacy: Unlike cloud-based sharing methods, Nearby Sharing does not involve third-party servers or intermediaries. Data remains entirely within the user’s control, enhancing privacy and security.
  • Seamless Integration: Nearby Sharing is seamlessly integrated into Windows 10, allowing users to share content directly from various applications, including the File Explorer, Microsoft Edge, and Photos app.
  • Cross-Platform Compatibility: While primarily designed for Windows 10 devices, Nearby Sharing also extends its functionality to Android devices. Users can seamlessly transfer files between Windows 10 and Android devices, expanding its utility.

Unveiling the Potential of Nearby Sharing

Beyond its ease of use and privacy benefits, Nearby Sharing unlocks a multitude of possibilities across various scenarios:

  • Collaborative Workflows: Teams can effortlessly share files, documents, and project updates directly between their devices, fostering efficient collaboration and communication.
  • Content Sharing with Friends and Family: Sharing photos, videos, and music with loved ones becomes effortless, eliminating the need for complex file transfer processes.
  • Quick Information Exchange: Sharing web links, contact information, or notes between devices becomes a simple and instantaneous process.
  • Educational Applications: Teachers can easily share learning materials and assignments with students, fostering an interactive and engaging learning environment.

Addressing Common Concerns and FAQs

Q: Is Nearby Sharing secure?

A: Nearby Sharing utilizes a secure Wi-Fi Direct connection, ensuring that data is transferred securely between devices. Additionally, the feature allows users to specify which devices can discover their device, further enhancing security.

Q: How far can I share files using Nearby Sharing?

A: The range of Nearby Sharing is typically limited to a few meters due to the use of Bluetooth. However, the actual range can vary depending on environmental factors and the devices involved.

Q: Can I use Nearby Sharing with non-Windows devices?

A: While Nearby Sharing primarily works with Windows 10 devices, it also supports Android devices. Users can transfer files between Windows 10 and Android devices seamlessly.

Q: What types of files can I share using Nearby Sharing?

A: Nearby Sharing supports various file types, including documents, photos, videos, music, and more. The specific file types supported may vary depending on the applications used.

Q: Is Nearby Sharing a replacement for cloud services?

A: Nearby Sharing is not intended to replace cloud services entirely. It provides a convenient and secure alternative for sharing files directly between nearby devices, particularly for small-scale data transfers.

Tips for Optimizing Nearby Sharing

  • Ensure Bluetooth and Wi-Fi are enabled: For Nearby Sharing to function correctly, ensure that both Bluetooth and Wi-Fi are enabled on your devices.
  • Keep devices within range: The range of Nearby Sharing is limited, so ensure that devices are within a few meters of each other.
  • Check for compatibility: While Nearby Sharing works with Windows 10 and Android devices, compatibility may vary between specific models and versions.
  • Enable Nearby Sharing on all devices: Ensure that Nearby Sharing is enabled on both the sending and receiving devices for successful transfers.
  • Choose the appropriate sharing options: Users can specify which devices can discover their device and the types of content they are willing to share.

Conclusion: Embracing the Future of Sharing

Nearby Sharing in Windows 10 represents a significant leap forward in data sharing. By leveraging Bluetooth and Wi-Fi, the feature provides a secure, convenient, and efficient alternative to traditional methods. Its seamless integration into the operating system and cross-platform compatibility make it a powerful tool for individuals, teams, and educational institutions alike. As technology continues to evolve, Nearby Sharing is poised to become an integral part of the digital landscape, facilitating seamless data exchange and collaboration.

Nearby Share is Finally Available on Windows, Allowing for a Seamless File Sharing Experience How to Use Nearby Sharing on Windows 10 How to Use Nearby Sharing to Share Files in Windows 10
What Is "Near Share" In Windows 10? How To Share Files Wirelessly How to Use Nearby Sharing in Windows 10 How to Use Nearby Sharing in Windows 10
Use Windows Nearby Sharing to Share Files Between Your Devices - YouTube How to use Nearby sharing on Windows 10 or 11 and Microsoft Edge - YouTube

Closure

Thus, we hope this article has provided valuable insights into Seamless Sharing in Windows 10: Exploring the Power of Nearby Sharing. We thank you for taking the time to read this article. See you in our next article!

Navigating The Future Of Windows 10: A Comprehensive Guide To Upcoming Updates

Navigating the Future of Windows 10: A Comprehensive Guide to Upcoming Updates

Introduction

With great pleasure, we will explore the intriguing topic related to Navigating the Future of Windows 10: A Comprehensive Guide to Upcoming Updates. Let’s weave interesting information and offer fresh perspectives to the readers.

Buy Windows 10 2021: A Complete Guide to Microsoft Windows 10 with the Latest Tips and Updates

Microsoft’s Windows 10 operating system, a cornerstone of modern computing, continuously evolves through a series of updates designed to enhance user experience, improve security, and integrate new features. These updates are not merely cosmetic changes; they represent a dynamic process of refining and adapting Windows 10 to meet the evolving demands of users and the ever-changing technological landscape.

While Microsoft does not disclose specific release dates for future updates, it provides insights into the key areas of focus and the general direction of development. This allows users to anticipate potential changes and prepare for the enhancements that lie ahead.

Understanding the Update Process

Windows 10 updates are delivered through two primary channels:

  • Feature Updates: These are substantial updates that introduce significant new features, functionality, and design changes. They are typically released twice a year, usually in the spring and fall.
  • Quality Updates: These updates focus on addressing bugs, improving security, and providing stability enhancements. They are released on a monthly basis, ensuring a constant stream of refinements and patches.

Key Areas of Focus for Upcoming Updates

Microsoft’s roadmap for Windows 10 emphasizes several key areas of development:

1. Security and Privacy:

  • Enhanced Security Measures: Microsoft is committed to bolstering Windows 10’s security posture through continuous improvement of its built-in security features. This includes strengthening defenses against malware, phishing attacks, and other cyber threats.
  • Privacy Controls: Upcoming updates will further enhance user control over data collection and usage, empowering users to manage their privacy settings with greater precision.

2. Performance and Efficiency:

  • Improved System Optimization: Updates will focus on optimizing system performance, reducing resource consumption, and enhancing overall system responsiveness. This includes streamlining background processes, optimizing memory management, and improving power efficiency.
  • Enhanced Hardware Integration: Future updates will optimize compatibility with the latest hardware, ensuring seamless integration and maximizing performance for users with modern devices.

3. User Experience and Accessibility:

  • Modernized User Interface: Microsoft continues to refine the user interface, making it more intuitive, visually appealing, and accessible to a wider range of users.
  • Accessibility Enhancements: Upcoming updates will prioritize accessibility features, ensuring that Windows 10 is usable and inclusive for users with diverse needs and disabilities.

4. Cloud Integration and Collaboration:

  • Deepened Cloud Integration: Windows 10 will further leverage cloud services, offering seamless integration with Microsoft’s ecosystem and enhancing productivity through cloud-based storage, collaboration tools, and data synchronization.
  • Enhanced Collaboration Features: Updates will introduce new features and improvements to collaboration tools, facilitating seamless communication and teamwork across diverse platforms.

5. Artificial Intelligence (AI) Integration:

  • AI-Powered Features: Microsoft is actively incorporating AI into Windows 10, enabling features like intelligent search, personalized recommendations, and context-aware assistance.
  • Enhanced Productivity Tools: AI-powered tools will streamline workflows, automate repetitive tasks, and provide users with intelligent insights to enhance productivity.

Frequently Asked Questions (FAQs)

1. How do I know when an update is available?

Windows 10 automatically checks for and installs updates in the background. You can manually check for updates by going to Settings > Update & Security > Windows Update.

2. What if I don’t want to install an update?

While it is generally recommended to keep your system up-to-date, you can choose to postpone updates for a specific period. However, it’s important to note that postponing updates can leave your system vulnerable to security risks.

3. Will updating Windows 10 affect my data?

Windows updates generally do not affect your personal data. However, it is always advisable to back up your important files before installing any major updates.

4. How much storage space do I need for updates?

The amount of storage space required for updates varies depending on the size of the update. It is recommended to have at least 10 GB of free space available on your system drive.

5. How can I ensure a smooth update process?

For a smooth update process, ensure that your system meets the minimum requirements for the update, back up your important data, and connect to a stable internet connection.

Tips for Managing Windows 10 Updates

  • Stay informed: Keep track of the latest updates and announcements from Microsoft to understand the features and benefits of upcoming updates.
  • Check for updates regularly: Ensure your system is up-to-date by checking for updates manually or enabling automatic updates.
  • Back up your data: Create regular backups of your important files to avoid data loss in case of any unexpected issues during the update process.
  • Manage update settings: Adjust your update settings to control when updates are downloaded and installed to minimize disruption to your workflow.
  • Troubleshoot issues: If you encounter any issues during the update process, consult Microsoft’s support resources for troubleshooting tips and solutions.

Conclusion

Windows 10 is a dynamic and evolving operating system that continuously adapts to the changing needs of users and the evolving technological landscape. The upcoming updates will introduce a wide range of enhancements, including improved security, performance optimizations, enhanced user experience, deeper cloud integration, and AI-powered features. By understanding the key areas of focus and actively managing the update process, users can leverage the full potential of Windows 10 and navigate the future of computing with confidence.

The Complete Guide To Windows 10 Updates Digital Citizen - Riset The future of Windows 10 - YouTube Windows 10 Upcoming Anniversary Update Features
Windows 10 update CONFIRMED - Microsoft Redstone 3 plans revealed  Tech  Life & Style Here's what's coming in the future versions of Windows 10 How to Update Apps in Windows 10 (Complete Guide)
Future Windows 10 Updates Will Be Based on User Feedback The 'Future Vision' of Windows 10 is everything we could hope for

Closure

Thus, we hope this article has provided valuable insights into Navigating the Future of Windows 10: A Comprehensive Guide to Upcoming Updates. We hope you find this article informative and beneficial. See you in our next article!

Picasa 3: A Legacy Of Photo Management For Windows 11 (64-bit)

Picasa 3: A Legacy of Photo Management for Windows 11 (64-bit)

Introduction

With great pleasure, we will explore the intriguing topic related to Picasa 3: A Legacy of Photo Management for Windows 11 (64-bit). Let’s weave interesting information and offer fresh perspectives to the readers.

Picasa 3: A Legacy of Photo Management for Windows 11 (64-bit)

Picasa 3 Download - Latest (2022) For Windows/Android/Mac

Picasa 3, though discontinued by Google in 2016, remains a cherished tool for many photo enthusiasts. Its intuitive interface, comprehensive editing features, and seamless integration with Google services made it a popular choice for organizing and enhancing digital images. While Picasa 3 is no longer actively supported, it can still be downloaded and used on Windows 11 (64-bit) systems, offering a valuable alternative to newer photo management software.

Understanding Picasa 3: A Brief Overview

Picasa 3 is a free photo management and editing software developed by Google. It offered a user-friendly approach to organizing, editing, and sharing photos. Key features included:

  • Image Organization: Picasa 3 allowed users to import photos from various sources, including cameras, memory cards, and online services. It automatically organized images based on dates and locations, making it easy to browse and locate specific photos.
  • Basic Editing Tools: The software provided a range of editing tools, including cropping, resizing, red-eye removal, and basic color adjustments. Users could enhance their photos with filters, effects, and text overlays.
  • Sharing Options: Picasa 3 facilitated easy sharing of photos through email, social media platforms, and Google services like Picasa Web Albums and Google+.
  • Face Recognition: A unique feature of Picasa 3 was its ability to recognize faces in photos, allowing users to tag individuals and easily search for photos based on specific people.

Downloading and Installing Picasa 3 on Windows 11 (64-bit)

While Picasa 3 is no longer available for official download from Google, it can be obtained from third-party sources. However, users should proceed with caution, ensuring they download the software from reputable websites to avoid potential security risks.

Installation Process:

  1. Download the Picasa 3 installer: Locate a reliable source online and download the appropriate installer file for Windows 11 (64-bit).
  2. Run the installer: Double-click the downloaded file to initiate the installation process.
  3. Follow the on-screen instructions: The installer will guide you through the installation steps, including selecting the installation directory and accepting the license agreement.
  4. Complete the installation: Once the installation is complete, Picasa 3 will be ready to use.

Important Considerations:

  • Compatibility: While Picasa 3 is compatible with Windows 11 (64-bit), it is essential to ensure that the downloaded version is compatible with your specific system configuration.
  • Security: Downloading software from unofficial sources can pose security risks. Ensure you download from a trusted and reputable source to minimize the risk of malware or viruses.
  • Limited Support: Since Picasa 3 is discontinued, users will not receive official support from Google. If any issues arise, troubleshooting may require searching for solutions online or seeking assistance from the community.

Benefits of Using Picasa 3 on Windows 11 (64-bit)

Despite its discontinuation, Picasa 3 offers several advantages for photo management on Windows 11 (64-bit) systems:

  • User-friendly interface: Picasa 3 boasts a simple and intuitive interface that is easy to navigate, even for beginners.
  • Comprehensive features: The software provides a wide range of features for organizing, editing, and sharing photos, catering to both casual and advanced users.
  • Offline accessibility: Picasa 3 allows users to manage and edit photos offline, eliminating the need for an internet connection.
  • No subscription fees: As a discontinued freeware, Picasa 3 does not require any subscription fees, making it a cost-effective option.

FAQs about Picasa 3 on Windows 11 (64-bit)

Q: Is Picasa 3 still supported by Google?

A: No, Google officially discontinued Picasa 3 in 2016. It is no longer supported and receives no updates.

Q: Is it safe to download Picasa 3 from third-party websites?

A: Downloading from third-party sources can pose security risks. Ensure you download from a reputable and trusted website to minimize the risk of malware or viruses.

Q: Can I use Picasa 3 to manage photos from my smartphone?

A: Yes, Picasa 3 can import photos from various sources, including smartphones. However, it may require additional software or drivers to ensure compatibility.

Q: What are the alternatives to Picasa 3?

A: Several alternatives to Picasa 3 are available, including Google Photos, Adobe Photoshop Lightroom, and Apple Photos.

Tips for Using Picasa 3 on Windows 11 (64-bit)

  • Regularly back up your photos: Picasa 3 allows you to create backups of your photos. It is essential to back up your photos regularly to prevent data loss.
  • Use the search function: Picasa 3’s search function allows you to quickly locate specific photos based on keywords, dates, locations, or faces.
  • Experiment with editing tools: Picasa 3 offers a range of editing tools. Experiment with different tools and settings to achieve the desired results.
  • Share your photos: Picasa 3 makes it easy to share photos through email, social media platforms, and Google services.

Conclusion

While Picasa 3 is a discontinued software, it remains a viable option for photo management on Windows 11 (64-bit) systems. Its user-friendly interface, comprehensive features, and offline accessibility make it an attractive choice for users who prefer a traditional approach to photo organization and editing. However, users should be aware of the lack of official support and potential security risks associated with downloading from third-party sources. By exercising caution and using reputable sources, users can enjoy the benefits of Picasa 3 while managing their digital memories effectively.

Download Picasa 3 Photo Viewer & Editor For All Windows (2022) Picasa 3 Software - consultnewline picasa 3 - Photo's Manager - YouTube
Picasa 3 Download For Windows 10 - goodsitespot Download picasa 3 - talesnimfa Picasa'yı (2022) ücretsiz Windows (11/7/10/8), 32/64-bit indirin
Picasa 3 скачать бесплатно на русском Descargas Internet y PC: Descarga Picasa 3

Closure

Thus, we hope this article has provided valuable insights into Picasa 3: A Legacy of Photo Management for Windows 11 (64-bit). We hope you find this article informative and beneficial. See you in our next article!

A Deep Dive Into Windows 11: Unveiling The Latest Enhancements

A Deep Dive into Windows 11: Unveiling the Latest Enhancements

Introduction

With enthusiasm, let’s navigate through the intriguing topic related to A Deep Dive into Windows 11: Unveiling the Latest Enhancements. Let’s weave interesting information and offer fresh perspectives to the readers.

A Deep Dive into Windows 11: Unveiling the Latest Enhancements

Exploring The Features Of Windows 11: A Deep Dive

Windows 11, the latest iteration of Microsoft’s operating system, has arrived with a host of new features and refinements designed to enhance the user experience across various aspects. This article delves into the significant changes and improvements introduced in Windows 11, exploring their impact on productivity, creativity, and overall user satisfaction.

A Fresh Visual Identity:

Windows 11 boasts a redesigned interface with a modern, minimalist aesthetic. Rounded corners on windows and icons, a centered taskbar, and a streamlined Start menu create a visually cohesive and intuitive experience. The new design emphasizes clarity and simplicity, making navigation and task management more efficient.

Enhanced Multitasking Capabilities:

Windows 11 prioritizes multitasking with features like Snap Layouts and Snap Groups. Snap Layouts offer pre-defined window arrangements, allowing users to quickly arrange multiple applications for optimal screen real estate. Snap Groups save these layouts, enabling users to seamlessly switch between multiple tasks with a single click.

Focus on Productivity:

Microsoft has introduced a suite of features aimed at boosting productivity. The new "Focus" mode helps users minimize distractions by silencing notifications and dimming non-essential windows, allowing them to concentrate on their work. The "Do Not Disturb" mode provides a similar experience, offering greater control over interruptions.

Improved Gaming Experience:

Windows 11 elevates the gaming experience with advancements like DirectX 12 Ultimate, Auto HDR, and Variable Refresh Rate (VRR). DirectX 12 Ultimate enhances graphical fidelity and performance, while Auto HDR automatically applies high dynamic range to games for richer visuals. VRR ensures smoother gameplay by synchronizing the display refresh rate with the game’s frame rate, eliminating screen tearing and stuttering.

Enhanced Security and Privacy:

Windows 11 prioritizes security and privacy with features like Windows Hello for biometric login, Microsoft Defender for comprehensive protection, and enhanced privacy controls. Windows Hello allows users to sign in using facial recognition or fingerprint scanning, providing a secure and convenient authentication method. Microsoft Defender actively scans for threats and protects against malware, while improved privacy controls give users greater control over their data and online activity.

A Unified Experience Across Devices:

Windows 11 fosters a seamless experience across multiple devices. The "Phone Link" feature allows users to seamlessly integrate their Android phone with their Windows PC, enabling them to make calls, send messages, and access their phone’s notifications directly from their computer. "Microsoft Teams" integration allows for seamless communication and collaboration across platforms.

The Power of the Cloud:

Windows 11 leverages the power of the cloud with features like "OneDrive" for cloud storage and synchronization, "Microsoft 365" integration for productivity tools, and "Windows Update" for seamless updates and security patches. These cloud-based features provide users with access to their files and applications from any device, ensuring data accessibility and security.

FAQs on Windows 11:

Q: What are the minimum system requirements for Windows 11?

A: Windows 11 requires a 1 GHz or faster processor with two or more cores, 4 GB of RAM, 64 GB of storage space, a compatible graphics card, and a UEFI firmware with Secure Boot enabled.

Q: Is Windows 11 a free upgrade for all users?

A: Windows 11 is not a free upgrade for all users. While eligible devices running Windows 10 can upgrade for free, older devices may require a purchase.

Q: What are the main differences between Windows 10 and Windows 11?

A: Windows 11 features a redesigned interface, enhanced multitasking capabilities, improved gaming performance, and enhanced security and privacy features compared to Windows 10.

Q: Can I still use Windows 10 after upgrading to Windows 11?

A: Yes, you can downgrade back to Windows 10 within a limited time frame after upgrading to Windows 11.

Q: How can I customize the appearance of Windows 11?

A: Windows 11 offers various customization options, including themes, colors, fonts, and accent colors. You can adjust these settings through the "Personalization" settings.

Tips for Windows 11:

  • Explore the new Start menu: Familiarize yourself with the redesigned Start menu and its features, including the "Pinned" section for frequently used apps.
  • Take advantage of Snap Layouts and Snap Groups: Optimize your multitasking experience by utilizing these features for efficient window arrangement.
  • Customize your taskbar: Pin your favorite apps to the taskbar, adjust the size and location of icons, and customize the taskbar’s appearance.
  • Enable Focus mode and Do Not Disturb: Enhance your productivity by minimizing distractions and interruptions with these modes.
  • Utilize Windows Hello for secure login: Enhance security and convenience by using facial recognition or fingerprint scanning for authentication.

Conclusion:

Windows 11 represents a significant evolution in the Windows operating system, introducing a host of new features and enhancements that aim to improve user experience, productivity, and security. From its refreshed visual identity to its enhanced multitasking capabilities and advanced gaming features, Windows 11 offers a comprehensive and modern operating system for users of all levels. By embracing the new features and exploring its potential, users can unlock a more efficient, creative, and secure computing experience.

10 settings to get you started with Windows 11  Popular Science Feature Deep Dive – Windows 11 Readiness Windows 11 Deep Dive Checking Out The New Snipping To - vrogue.co
Windows 11 deep dive: Checking out the Widgets pane Windows 11 deep dive: How to use virtual desktops Link to Windows and Phone Link on Windows 11  Deep Dive - YouTube
What is Windows 11 in S mode?  Deep Dive - YouTube Windows 11 Build 22621.1926 brings Exciting New Features and Improvements in the Release Preview

Closure

Thus, we hope this article has provided valuable insights into A Deep Dive into Windows 11: Unveiling the Latest Enhancements. We appreciate your attention to our article. See you in our next article!

The Legacy Of Nero 6: Exploring Its Compatibility And Relevance In A Modern Windows 10 Environment

The Legacy of Nero 6: Exploring Its Compatibility and Relevance in a Modern Windows 10 Environment

Introduction

With enthusiasm, let’s navigate through the intriguing topic related to The Legacy of Nero 6: Exploring Its Compatibility and Relevance in a Modern Windows 10 Environment. Let’s weave interesting information and offer fresh perspectives to the readers.

The Legacy of Nero 6: Exploring Its Compatibility and Relevance in a Modern Windows 10 Environment

Ahead Software Nero 6 - The Suite, utilities software - BMSoftware

The digital landscape has undergone a dramatic transformation since the release of Nero 6 in 2004. While this software suite once held a dominant position in the world of optical media management, its compatibility with the modern Windows 10 operating system has become a subject of ongoing discussion. This article aims to provide a comprehensive overview of Nero 6, exploring its capabilities, compatibility challenges, and potential alternatives in the context of a contemporary Windows 10 environment.

Understanding Nero 6: A Brief Historical Context

Nero 6, developed by Ahead Software, was a groundbreaking suite for managing optical media. It offered a range of tools, including CD/DVD burning, ripping, and copying, along with features for creating audio and video discs, as well as data backup and archiving. The software’s user-friendly interface and robust functionality made it a popular choice for both home users and professionals.

The Evolution of Technology and the Compatibility Challenge

The transition from Windows XP, the primary operating system during Nero 6’s heyday, to Windows 10 has brought about significant changes in hardware and software technology. The shift towards digital media storage and streaming services has diminished the reliance on optical media, leading to reduced demand for software like Nero 6.

Furthermore, the evolution of operating systems and security protocols has created compatibility issues for older software applications. While Nero 6 might have functioned flawlessly on Windows XP, its compatibility with Windows 10 is not guaranteed. The software may encounter difficulties running on a modern system due to:

  • Driver Compatibility: Windows 10 may not have the necessary drivers to support the hardware components required for Nero 6 to function properly.
  • Operating System Changes: Windows 10’s architecture and security features differ significantly from earlier versions, potentially leading to conflicts with Nero 6’s code.
  • Software Updates: The absence of regular updates for Nero 6 means it lacks support for newer hardware and software technologies, potentially impacting performance and stability.

Addressing Compatibility Concerns: Exploring Options

While running Nero 6 on Windows 10 might be challenging, several strategies can be explored to address compatibility issues:

  1. Compatibility Mode: Windows 10 includes a compatibility mode feature that allows users to run older programs designed for previous versions of Windows. This mode emulates the environment of the original operating system, potentially enabling Nero 6 to function correctly.

  2. Virtual Machine: Creating a virtual machine within Windows 10 can provide an isolated environment for running older software. This approach allows users to install Windows XP within a virtual machine and then run Nero 6 on the emulated operating system. However, this method requires additional resources and technical knowledge.

  3. Alternative Software: The modern digital landscape offers a range of alternative software solutions for managing optical media and creating discs. Modern software packages often provide more advanced features and compatibility with Windows 10, making them suitable replacements for Nero 6.

FAQs Regarding Nero 6 and Windows 10

Q: Can I still use Nero 6 on Windows 10?

A: It is possible to run Nero 6 on Windows 10, but it is not guaranteed. Compatibility issues may arise, and running the software may require workarounds or alternative methods.

Q: What are some potential issues I might encounter when using Nero 6 on Windows 10?

A: Potential issues include driver incompatibility, operating system conflicts, and lack of support for newer technologies.

Q: What are some alternatives to Nero 6 for Windows 10?

A: Alternatives include software packages like Ashampoo Burning Studio, ImgBurn, CDBurnerXP, and BurnAware. These programs offer similar functionality to Nero 6, often with enhanced features and compatibility with modern operating systems.

Q: Is it worth using Nero 6 on Windows 10?

A: The decision to use Nero 6 on Windows 10 depends on individual needs and circumstances. If users have specific requirements for using Nero 6 and are willing to invest the time and effort to address compatibility issues, it might be a viable option. However, newer software alternatives often provide more comprehensive features and a smoother experience on Windows 10.

Tips for Using Nero 6 on Windows 10

  • Compatibility Mode: Enable compatibility mode for Nero 6’s executable files to potentially improve its functionality on Windows 10.
  • Driver Updates: Check for and install updated drivers for any hardware components involved in using Nero 6.
  • Administrative Privileges: Run Nero 6 with administrative privileges to potentially resolve permission issues.
  • Software Updates: Consider searching for unofficial updates or patches for Nero 6 to address compatibility problems.
  • Virtual Machine: Create a virtual machine running Windows XP to provide a compatible environment for Nero 6.

Conclusion: The Enduring Legacy of Nero 6

While Nero 6 holds a significant place in the history of optical media management, its compatibility with modern operating systems like Windows 10 is limited. While it might still be possible to use Nero 6 on a Windows 10 machine, the challenges and workarounds involved may outweigh the benefits. The shift towards digital media storage and the availability of alternative software solutions have made it more practical to explore newer options for managing optical media on Windows 10. Nevertheless, the impact of Nero 6 on the digital landscape remains undeniable, serving as a testament to its legacy as a pioneering software suite in the era of optical media.

Nero 6 Ultra Edition Version 6.6 Keeps on Winning - ecoustics.com Download Nero 6 with Keygen  All Software Nero windows 10 compatibility - locatorbilla
Nero windows 10 compatibility - locatorbilla Nero 6 dvd software - ludadel Nero Burning Rom 6.6.0.14 - Download inside - WinFuture.de
Nero windows 10 compatibility - loxaconcierge Nero 6 backup - lanaforce

Closure

Thus, we hope this article has provided valuable insights into The Legacy of Nero 6: Exploring Its Compatibility and Relevance in a Modern Windows 10 Environment. We hope you find this article informative and beneficial. See you in our next article!

Reversing The Upgrade: Returning To Windows 10 From Windows 11

Reversing the Upgrade: Returning to Windows 10 from Windows 11

Introduction

With enthusiasm, let’s navigate through the intriguing topic related to Reversing the Upgrade: Returning to Windows 10 from Windows 11. Let’s weave interesting information and offer fresh perspectives to the readers.

Reversing the Upgrade: Returning to Windows 10 from Windows 11

How to Return to Windows 10 from Windows 11 and Roll Back it

While Windows 11 offers a range of new features and a refreshed visual aesthetic, not every user finds it an ideal upgrade. Factors such as hardware incompatibility, performance issues, or simply a preference for the familiar Windows 10 interface can lead users to seek a return to the previous operating system. This article provides a comprehensive guide to the process of reverting from Windows 11 to Windows 10, outlining the methods, considerations, and potential challenges involved.

Understanding the Reversion Process

Reverting from Windows 11 to Windows 10 is not simply a matter of uninstalling the newer operating system. It involves restoring the system to a previous state, effectively "rolling back" the upgrade. This process can be achieved through various methods, each with its own nuances and potential implications.

Methods for Reverting to Windows 10

  1. Using the "Go Back" Option (Within 10 Days of Upgrade): Windows 11 provides a built-in "Go Back" option for a limited period after the upgrade. This method utilizes a system restore point created during the upgrade process. It is the most straightforward and efficient method, but it’s only available within the first ten days after installing Windows 11.

  2. Clean Installation of Windows 10: This method involves completely erasing the hard drive and installing a fresh copy of Windows 10. This is the most comprehensive approach, ensuring a clean slate and removing any remnants of Windows 11. However, it requires a full backup of all data before proceeding, as it will result in data loss if not performed properly.

  3. Using a System Image Backup: If a system image backup was created before upgrading to Windows 11, restoring from this backup can effectively return the system to the previous state. This method preserves data and settings, but requires a pre-existing backup and may not be feasible for all users.

  4. Using a Recovery Drive: A recovery drive can be used to reinstall Windows 10. This method is similar to a clean installation but may be less disruptive, depending on the recovery drive’s contents.

Considerations and Potential Challenges

While reverting to Windows 10 is possible, it’s crucial to be aware of the following considerations:

  • Time Limit: The "Go Back" option is only available within ten days of the upgrade. After this period, the option becomes unavailable.
  • Data Loss: Clean installations and recovery drive methods can potentially lead to data loss if proper backups are not in place.
  • Driver Compatibility: After reverting to Windows 10, some drivers may need to be reinstalled to ensure proper functionality.
  • Software Compatibility: Some applications may not be fully compatible with Windows 10 after reverting from Windows 11.
  • Windows 11 Features: Reverting to Windows 10 means losing access to features exclusive to Windows 11.

FAQs

Q: Can I revert to Windows 10 after more than 10 days?

A: The "Go Back" option is only available within the first ten days after upgrading to Windows 11. After this period, you will need to rely on other methods like clean installation or system image restoration.

Q: Will I lose all my data when reverting to Windows 10?

A: The "Go Back" option generally preserves data, but clean installations and recovery drive methods may require a backup to avoid data loss.

Q: What if I have a Windows 11 product key?

A: Reverting to Windows 10 does not affect the validity of your Windows 11 product key. You can use it to activate Windows 11 again if you decide to upgrade in the future.

Q: Can I upgrade back to Windows 11 after reverting to Windows 10?

A: Yes, you can upgrade to Windows 11 again after reverting to Windows 10. You will need to ensure your system meets the minimum requirements for Windows 11.

Tips

  • Backup Your Data: Before attempting any method, ensure you have a complete backup of all important data.
  • Create a Recovery Drive: Create a recovery drive for your Windows 10 installation to facilitate a potential reinstall.
  • Check Driver Compatibility: After reverting to Windows 10, check for and install necessary drivers for your hardware components.
  • Test Software Compatibility: Verify that your essential software applications are compatible with Windows 10.
  • Consider the "Go Back" Option: If possible, use the "Go Back" option within the first ten days after upgrading for the most straightforward and efficient reversion.

Conclusion

Reverting from Windows 11 to Windows 10 is a viable option for users who encounter issues with the newer operating system or prefer the familiarity of Windows 10. It’s essential to understand the methods available, the potential challenges involved, and to take appropriate precautions, such as backing up data and creating a recovery drive. By carefully considering the various factors and following the recommended steps, users can successfully return to Windows 10 and regain a familiar and stable computing experience.

How To Convert Windows 10 Into Windows 11 Without Upgrade - Vrogue Return or Roll Back Windows 11 to Windows 10  4 Ways Windows 10 to Windows 11  Genuine Upgrade Step-By-Step - YouTube
How to Upgrade from Windows 10 to Windows 11 - Microsoft Community Windows 11 upgrade from windows 10 - planningose How to return Windows 10 UI into Windows 11 - YouTube
upgrade from Windows 10 to Windows 11 for free [Full Guide] What is "Optional updates" on Windows 11?  Gear up Windows 11 & 10

Closure

Thus, we hope this article has provided valuable insights into Reversing the Upgrade: Returning to Windows 10 from Windows 11. We appreciate your attention to our article. See you in our next article!