Archives February 2024

Enhancing Windows 10 Performance Post-Update: A Comprehensive Guide

Enhancing Windows 10 Performance Post-Update: A Comprehensive Guide

Related Articles: Enhancing Windows 10 Performance Post-Update: A Comprehensive Guide

Introduction

With enthusiasm, let’s navigate through the intriguing topic related to Enhancing Windows 10 Performance Post-Update: A Comprehensive Guide. Let’s weave interesting information and offer fresh perspectives to the readers.

Enhancing Windows 10 Performance Post-Update: A Comprehensive Guide

How To Optimize Windows 10 For GAMING Performance In 2024

Windows 10 updates, while crucial for security and feature enhancements, can sometimes lead to performance degradation. This is often due to the introduction of new features, system changes, or compatibility issues. However, optimizing your system after an update can restore and even enhance its performance, resulting in a smoother and more efficient user experience.

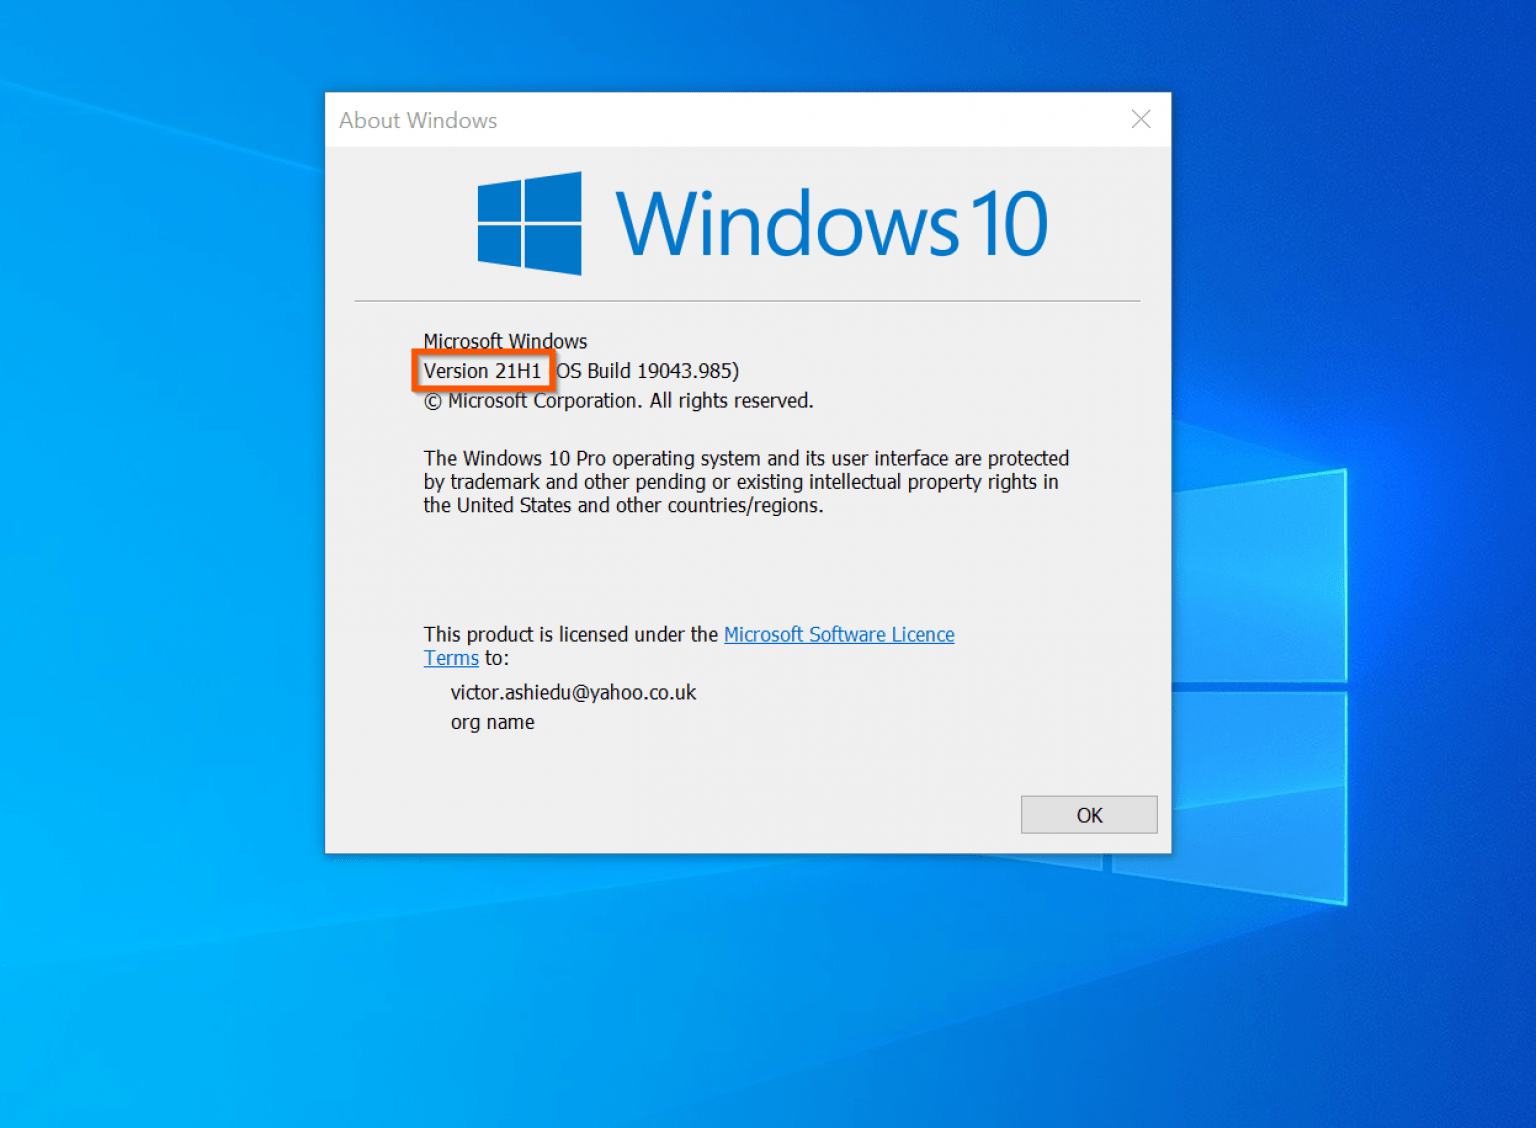
Understanding the Impact of Updates

Windows updates, particularly major feature updates, can significantly alter the system’s architecture, introducing new processes, drivers, and configurations. This can strain resources, causing slower startup times, sluggish application response, and even system instability.

The Importance of Optimization

Optimizing Windows 10 after an update is essential for several reasons:

  • Improved Responsiveness: A well-optimized system responds quickly to commands, ensuring a seamless user experience.
  • Enhanced Stability: Optimized settings and resource management contribute to a more stable system, reducing crashes and errors.
  • Increased Efficiency: By streamlining processes and minimizing resource consumption, optimization improves overall system performance.
  • Extended Lifespan: A properly optimized system runs more efficiently, potentially extending the lifespan of hardware components.
  • Enhanced Security: Optimization often involves addressing potential security vulnerabilities, strengthening the system’s defenses.

Effective Optimization Strategies

1. Run Disk Cleanup:

  • Purpose: Removes temporary files, system files, and other unnecessary data that can clutter the hard drive and slow down the system.
  • Method: Access Disk Cleanup by searching for it in the Start menu. Select the appropriate drive and choose the files to be deleted.
  • Impact: Frees up valuable disk space and improves system responsiveness.

2. Defragment the Hard Drive:

  • Purpose: Rearranges fragmented files on the hard drive, making them more accessible and improving read/write speeds.
  • Method: Access Disk Defragmenter by searching for it in the Start menu. Select the drive to be defragmented and initiate the process.
  • Impact: Optimizes file access, leading to faster loading times and overall improved performance.
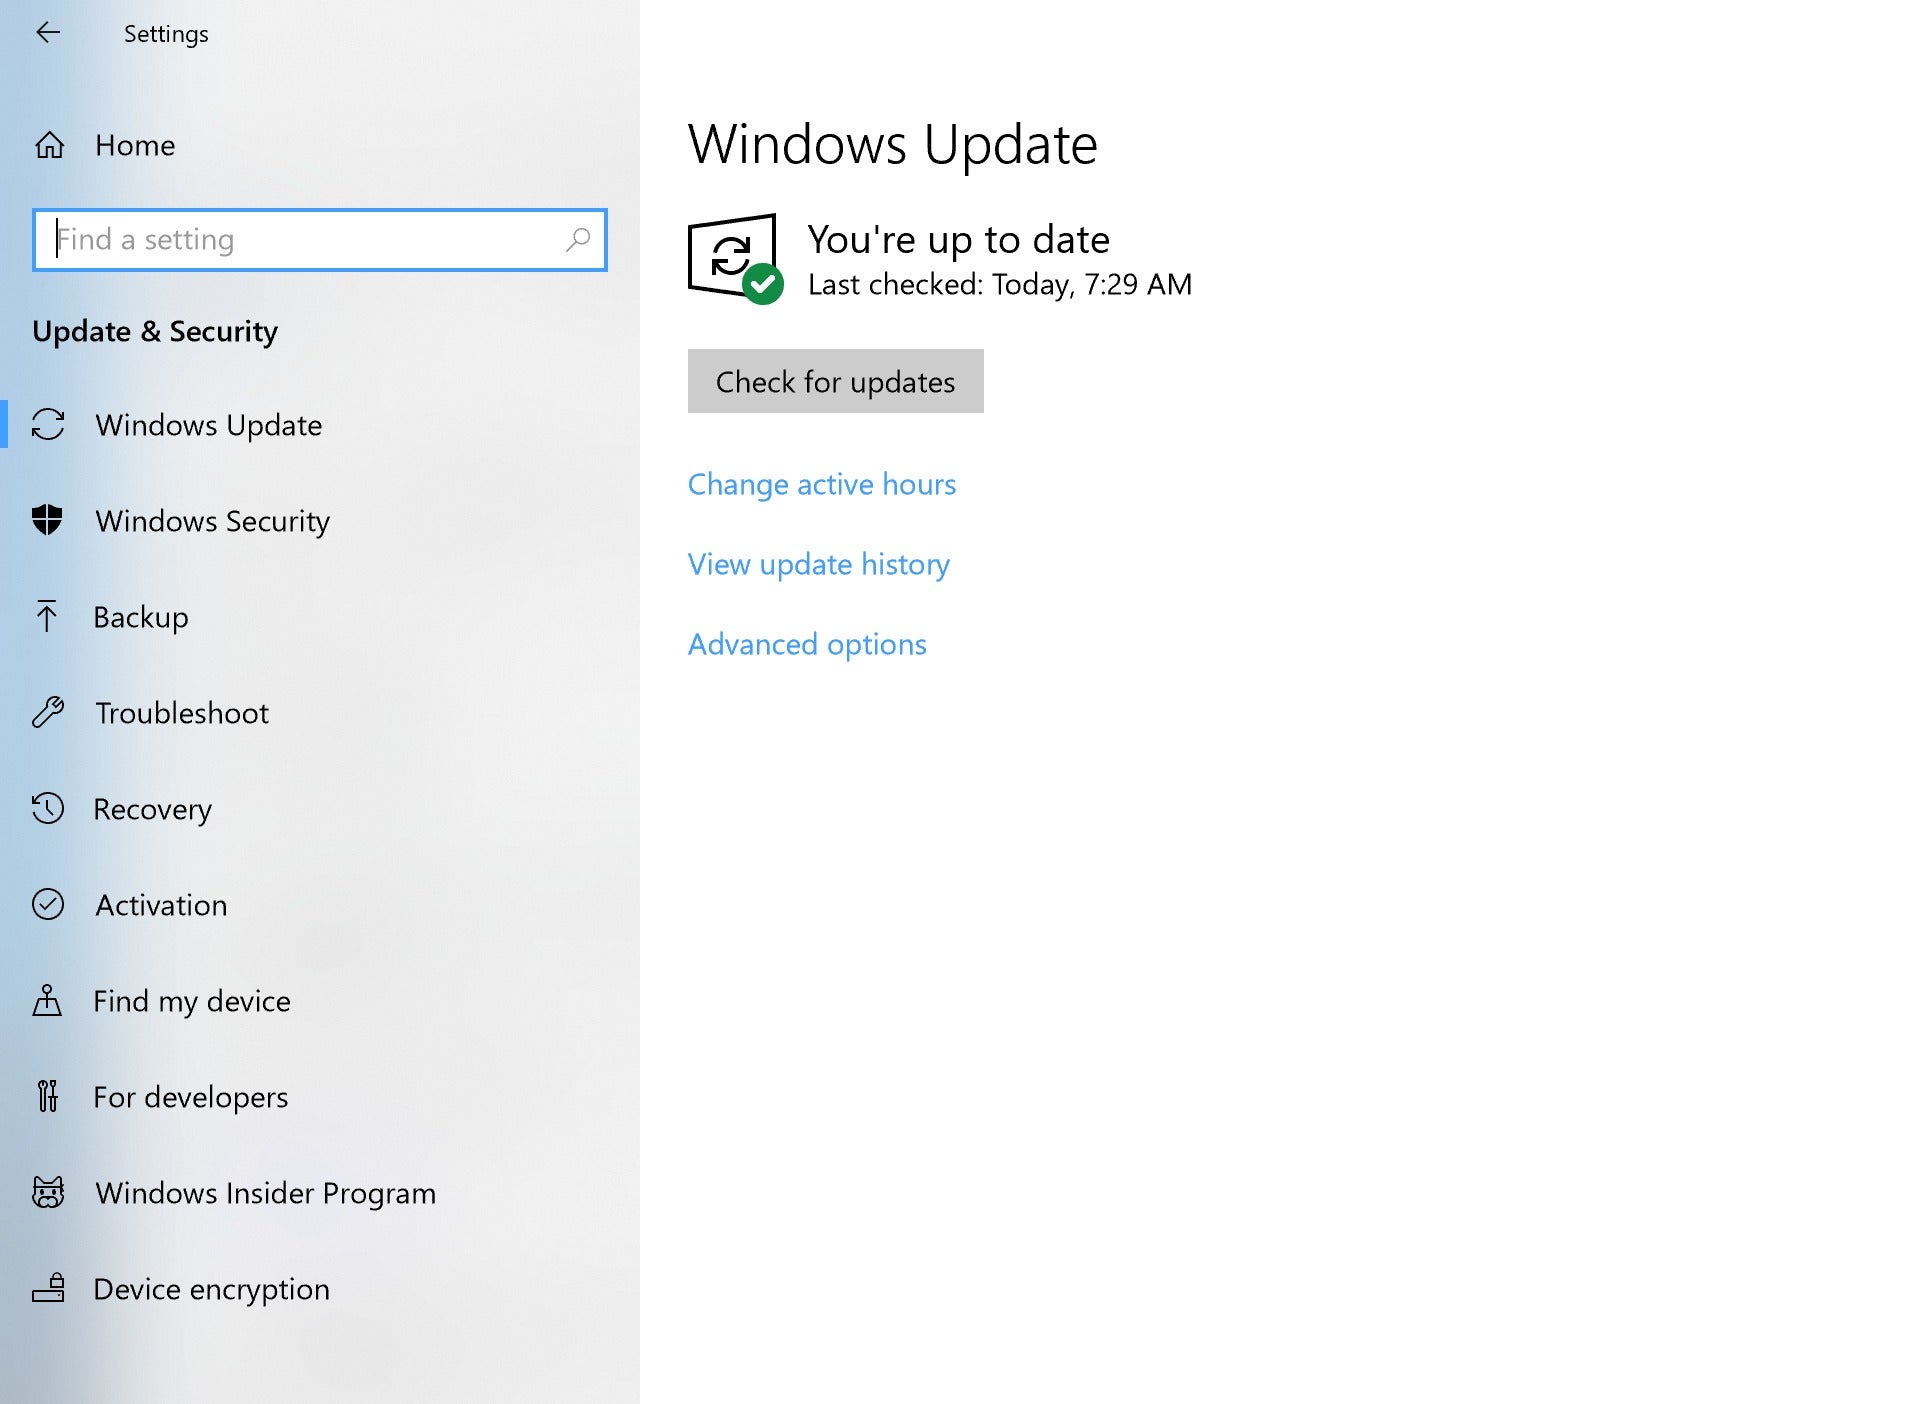
3. Update Drivers:

  • Purpose: Ensures that all drivers, particularly those related to graphics, network, and storage, are up to date and compatible with the latest system updates.
  • Method: Use the Device Manager (accessible through the Control Panel) to check for updates for each device. Alternatively, visit the manufacturer’s website for the latest drivers.
  • Impact: Ensures optimal device functionality and compatibility with the updated operating system.

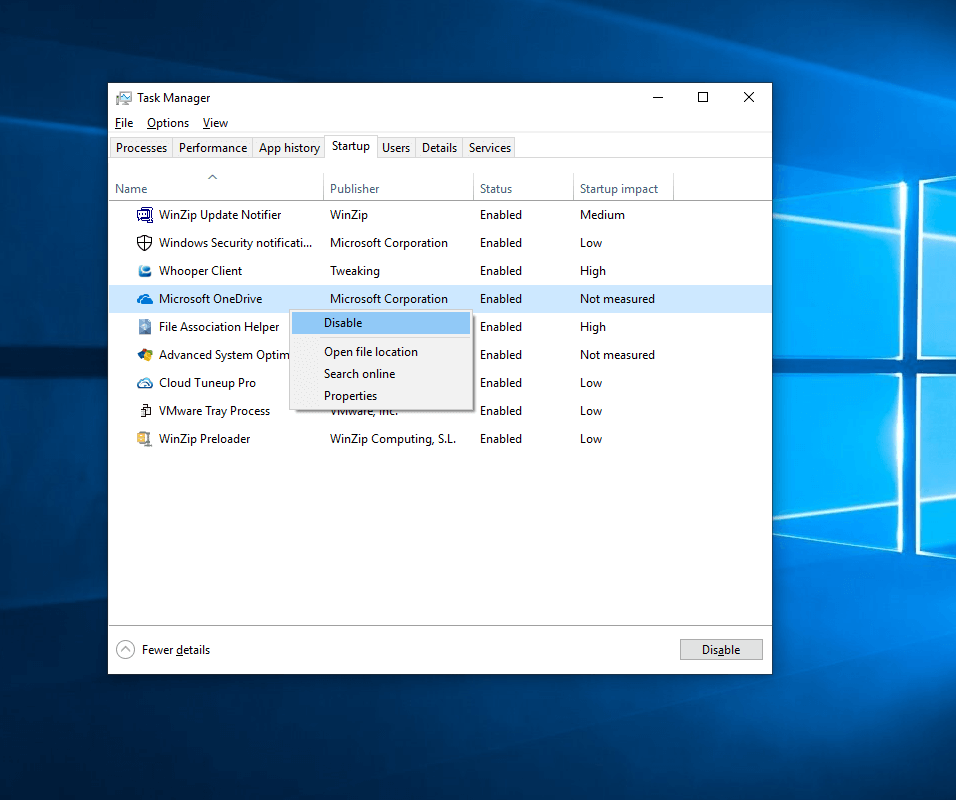
4. Disable Unnecessary Startup Programs:

  • Purpose: Reduces the number of programs that launch automatically during startup, minimizing resource consumption and speeding up the boot process.
  • Method: Access Task Manager (Ctrl+Shift+Esc) and navigate to the "Startup" tab. Disable programs that are not essential for the system’s operation.
  • Impact: Reduces startup time and frees up system resources for other tasks.

5. Adjust Visual Effects:

  • Purpose: Reduces the visual complexity of the user interface, minimizing resource consumption and improving performance.
  • Method: Access "System" settings in the Start menu, navigate to "About" and click "Advanced system settings". Select "Performance" tab and choose the desired visual settings.
  • Impact: Improves system responsiveness and performance, particularly on systems with limited resources.

6. Optimize Power Settings:

  • Purpose: Adjust power settings to prioritize performance over energy saving, particularly when using demanding applications.
  • Method: Access "Power Options" in the Control Panel and select a power plan that prioritizes performance.
  • Impact: Improves system performance by allocating more power to the processor and other components.

7. Utilize System Optimization Tools:

  • Purpose: Employ dedicated system optimization tools to perform a comprehensive analysis and apply various performance enhancements.
  • Method: Use reputable third-party tools like CCleaner, Advanced SystemCare, or IObit Smart Defrag. Follow the instructions provided by the software.
  • Impact: Offers a convenient and comprehensive approach to optimize various system aspects, including disk cleanup, driver updates, and registry cleaning.

8. Consider System Restore:

  • Purpose: In case of significant performance issues or instability after an update, performing a system restore to a previous point can revert the system to a working state.
  • Method: Access "System Restore" through the Control Panel and select a restore point created before the update. Follow the instructions to complete the process.
  • Impact: Restores the system to a previous working state, potentially resolving performance issues caused by the update.

9. Monitor and Manage Resources:

  • Purpose: Regularly monitor system resource usage (CPU, RAM, disk space) to identify potential bottlenecks and optimize resource allocation.
  • Method: Utilize the Task Manager to track resource usage and identify processes consuming excessive resources.
  • Impact: Helps identify and address potential performance issues related to resource consumption.

10. Regular Maintenance:

  • Purpose: Implement a regular maintenance routine to optimize system performance and prevent future issues.
  • Method: Regularly run disk cleanup, defragmentation, driver updates, and other optimization tasks as needed.
  • Impact: Maintains optimal system performance and reduces the likelihood of performance degradation.

FAQs

Q: How often should I optimize my Windows 10 system after an update?

A: It is recommended to optimize your system immediately after a significant update, such as a feature update. Regular maintenance, including disk cleanup and defragmentation, should be performed at least once a month.

Q: Are third-party optimization tools safe to use?

A: While reputable third-party tools can be beneficial, it is important to choose trusted and reliable software. Avoid tools that promise unrealistic performance gains or make excessive system changes.

Q: Can I optimize my system without using third-party tools?

A: Yes, Windows 10 offers built-in tools for optimizing system performance, such as Disk Cleanup, Defragmenter, and Task Manager. However, third-party tools often provide more comprehensive and automated solutions.

Q: What should I do if my system performance is still poor after optimization?

A: If performance issues persist after optimization, consider checking for hardware problems, updating BIOS, or contacting Microsoft support for assistance.

Tips

  • Prioritize essential programs: Identify and disable unnecessary startup programs to minimize resource consumption.
  • Use a clean boot: Start the system with minimal programs running to diagnose potential performance issues.
  • Scan for malware: Regularly scan for malware to ensure that malicious software is not affecting system performance.
  • Consider upgrading hardware: If the system is outdated, upgrading components like RAM or storage can significantly improve performance.

Conclusion

Optimizing Windows 10 after an update is crucial for maintaining a smooth and efficient user experience. By implementing the strategies outlined above, users can significantly improve system responsiveness, stability, and overall performance. Regular maintenance and resource management are essential for long-term system health and optimal performance. By proactively addressing potential performance issues, users can ensure a seamless and enjoyable computing experience.

Tips to Improve PC Performance on Windows 10 20 Best Windows 10 Performance Tweaks For Better Performance How To Optimize Windows 10 For Best Performance - Riset
TIPS TO IMPROVE PC PERFORMANCE IN WINDOWS 10  READYBOOST - YouTube Windows 10 upgrade quick fixes - Windows Client  Microsoft Learn Windows 10 vs Windows 11 for Content Creation: 8 Month Update  Puget Systems
How to manage Windows 10 updates to prevent them from ruining your life - IPS Inter Press How To Install Windows 10 21H1 Update Manually  Itechguides.com

Closure

Thus, we hope this article has provided valuable insights into Enhancing Windows 10 Performance Post-Update: A Comprehensive Guide. We hope you find this article informative and beneficial. See you in our next article!

Accessing Your Mac From Windows 10: A Comprehensive Guide

Accessing Your Mac from Windows 10: A Comprehensive Guide

Introduction

With enthusiasm, let’s navigate through the intriguing topic related to Accessing Your Mac from Windows 10: A Comprehensive Guide. Let’s weave interesting information and offer fresh perspectives to the readers.

Accessing Your Mac from Windows 10: A Comprehensive Guide

How to find your PC's MAC address on Windows 10  Windows Central

The ability to remotely access a Mac from a Windows 10 computer offers a plethora of benefits for individuals and businesses alike. Whether you need to manage files, run applications, or simply access your Mac from a different location, remote access solutions provide a convenient and efficient way to bridge the gap between operating systems. This article delves into the various methods available for accessing a Mac from a Windows 10 machine, highlighting the advantages and considerations associated with each approach.

Understanding the Basics of Remote Access

Remote access, in essence, allows you to control a computer from a different location. This is achieved by establishing a secure connection between the two machines, enabling you to see and interact with the remote computer’s desktop as if you were physically sitting in front of it. This capability has become increasingly essential in today’s interconnected world, facilitating remote work, collaboration, and technical support.

Methods for Accessing a Mac from Windows 10

There are several popular methods for accessing a Mac from a Windows 10 computer, each with its own strengths and weaknesses. Let’s explore the most common options:

1. Apple Remote Desktop

Apple Remote Desktop is a powerful tool specifically designed for managing and accessing macOS devices. It offers a wide range of features, including:

  • Remote control: Allows you to take full control of a remote Mac, including the ability to interact with applications, files, and settings.
  • Screen sharing: Enables you to view the remote Mac’s screen in real-time, facilitating collaborative work or troubleshooting.
  • File transfer: Facilitates the transfer of files between the Windows 10 computer and the remote Mac.
  • Remote management: Provides tools for managing user accounts, software updates, and other system-level tasks.

Advantages:

  • Comprehensive features: Offers a wide range of capabilities for both remote control and management.
  • Security: Includes robust security features to protect sensitive data during remote access.
  • Ease of use: Provides a user-friendly interface that is relatively easy to navigate.

Disadvantages:

  • Cost: Requires a license for both the host and client machines.
  • Mac-specific: Primarily designed for managing and accessing macOS devices.

2. Microsoft Remote Desktop

Microsoft Remote Desktop is a versatile tool included in Windows 10, primarily used for accessing Windows computers remotely. However, it also supports accessing Macs with macOS 10.15 (Catalina) or later.

Advantages:

  • Free: Included with Windows 10, making it a cost-effective option.
  • Cross-platform: Supports access to both Windows and Mac computers.
  • Simple setup: Relatively easy to configure and use.

Disadvantages:

  • Limited features: Offers a more limited set of features compared to Apple Remote Desktop, especially for Mac management.
  • Compatibility: Requires macOS 10.15 (Catalina) or later on the Mac.

3. Third-Party Remote Access Solutions

A plethora of third-party remote access solutions are available, offering a variety of features and pricing options. Some popular choices include:

  • TeamViewer: A widely used remote access tool known for its ease of use and cross-platform compatibility.
  • LogMeIn: Provides a comprehensive suite of remote access and collaboration tools.
  • AnyDesk: Offers a fast and secure remote access solution with a user-friendly interface.

Advantages:

  • Flexibility: Provides a range of features and pricing options to suit different needs.
  • Cross-platform compatibility: Allows access to various operating systems, including Windows, Mac, Linux, and mobile devices.
  • Advanced features: Often includes additional features such as file transfer, remote printing, and chat.

Disadvantages:

  • Cost: Many third-party solutions require a subscription or licensing fee.
  • Security: Some free solutions may have security concerns or limited features.

Choosing the Right Method

The best method for accessing a Mac from Windows 10 depends on your specific requirements and preferences. Consider the following factors:

  • Budget: Free solutions like Microsoft Remote Desktop may be suitable for basic access, while paid options like Apple Remote Desktop or third-party solutions offer more comprehensive features.
  • Features: Determine the specific features you need, such as remote control, file transfer, or management capabilities.
  • Security: Ensure the chosen method offers adequate security measures to protect sensitive data.
  • Compatibility: Check the compatibility requirements for each method, as some may have specific operating system or version restrictions.

Setting Up Remote Access

The setup process for remote access varies depending on the chosen method. However, the general steps involve:

  1. Enabling remote access on the Mac: Configure the Mac to accept incoming connections.
  2. Installing the necessary software: Install the remote access software on both the Windows 10 computer and the Mac.
  3. Connecting to the Mac: Use the remote access software to establish a connection to the Mac.

Security Considerations

Security is paramount when accessing a remote computer. Ensure you take the following precautions:

  • Strong passwords: Use strong and unique passwords for all accounts involved in remote access.
  • Two-factor authentication: Enable two-factor authentication for additional security.
  • Firewall: Enable the firewall on both the Windows 10 computer and the Mac to prevent unauthorized access.
  • VPN: Consider using a VPN for added security when connecting to the Mac over the internet.
  • Software updates: Keep all software, including the remote access software, up-to-date to patch security vulnerabilities.

Benefits of Remote Access

Remotely accessing a Mac from Windows 10 offers numerous advantages, including:

  • Convenience: Allows you to access your Mac from any location with an internet connection.
  • Flexibility: Enables you to work remotely or access files and applications on your Mac from a different computer.
  • Collaboration: Facilitates seamless collaboration on projects with colleagues or clients who use different operating systems.
  • Troubleshooting: Allows you to remotely troubleshoot technical issues on your Mac.
  • Management: Provides tools for managing user accounts, software updates, and other system-level tasks on your Mac.

FAQs

Q: Can I access a Mac from Windows 10 without installing any software?

A: While it’s possible to access a Mac remotely using web-based tools, these solutions often have limited functionality and security concerns. Installing dedicated remote access software is generally recommended for a secure and reliable connection.

Q: How do I ensure a secure connection when accessing a Mac from Windows 10?

A: Use strong passwords, enable two-factor authentication, and consider using a VPN for added security. Keep all software, including the remote access software, up-to-date to patch security vulnerabilities.

Q: What are the minimum system requirements for accessing a Mac from Windows 10?

A: The minimum system requirements vary depending on the chosen remote access method. Refer to the documentation for each software for specific requirements.

Q: Can I access a Mac from Windows 10 if it’s turned off?

A: No, you cannot access a Mac remotely if it is turned off. The Mac must be powered on and connected to the internet for remote access to work.

Tips for Successful Remote Access

  • Test the connection: Before relying on remote access for critical tasks, test the connection to ensure it is stable and secure.
  • Optimize performance: Ensure both the Windows 10 computer and the Mac have sufficient processing power and bandwidth for a smooth remote access experience.
  • Use a wired connection: Whenever possible, use a wired Ethernet connection for a more stable and secure connection.
  • Minimize distractions: Close unnecessary applications and programs on both the Windows 10 computer and the Mac to improve performance.
  • Regularly review security settings: Periodically review security settings for both the Windows 10 computer and the Mac to ensure they are up-to-date and secure.

Conclusion

Remotely accessing a Mac from Windows 10 offers a powerful and versatile way to bridge the gap between operating systems. By choosing the appropriate method and taking necessary security precautions, you can leverage the benefits of remote access to enhance productivity, facilitate collaboration, and manage your Mac from any location. Whether for personal use or business needs, remote access solutions provide a valuable tool for navigating the increasingly interconnected world of technology.

How To Remotely Access A Mac On Windows - Tech Advisor How To Find Your MAC Address in Windows 10? How Access the Files on Your Mac From Windows - Simple Help
How to remotely access mac windows 10 - deltasole How Access the Files on Your Mac From Windows - Simple Help How Access the Files on Your Mac From Windows - Simple Help
Remote access a mac from windows How to remotely access mac from windows - headserre

Closure

Thus, we hope this article has provided valuable insights into Accessing Your Mac from Windows 10: A Comprehensive Guide. We thank you for taking the time to read this article. See you in our next article!

Quake III Arena: A Timeless Classic Thriving On Windows 10

Quake III Arena: A Timeless Classic Thriving on Windows 10

Introduction

In this auspicious occasion, we are delighted to delve into the intriguing topic related to Quake III Arena: A Timeless Classic Thriving on Windows 10. Let’s weave interesting information and offer fresh perspectives to the readers.

Quake III Arena: A Timeless Classic Thriving on Windows 10

Quake III: Arena Screenshots for Windows - MobyGames

Quake III Arena, released in 1999, stands as a titan of the first-person shooter (FPS) genre. Its influence on the industry remains undeniable, shaping gameplay mechanics, fostering competitive esports, and igniting a passion for fast-paced, skill-based action. While the game’s age might lead some to believe it’s relegated to the annals of gaming history, Quake III Arena thrives on Windows 10, offering a vibrant community and an enduring legacy.

A Legacy of Speed and Skill

Quake III Arena’s enduring appeal stems from its core gameplay: lightning-fast movement, precise weapon handling, and a deep understanding of map geometry. Players navigate arenas with unmatched agility, utilizing rocket jumps, bunny hopping, and strafe jumping to outmaneuver opponents. The game’s intricate level design encourages strategic positioning and tactical awareness, creating a captivating dance of skill and reflexes.

The Power of Modding

One of Quake III Arena’s greatest strengths lies in its open architecture, allowing for extensive modding. The community has created a vast library of custom maps, game modes, and even entire game expansions. These modifications extend the game’s lifespan, offering endless possibilities for experimentation and gameplay diversity.

A Thriving Competitive Scene

Quake III Arena continues to boast a thriving competitive scene. Dedicated players gather online, participating in tournaments and leagues, pushing the boundaries of skill and strategy. The game’s simplicity, coupled with its intricate mechanics, fosters a competitive spirit that transcends generations.

The Appeal of Quake III Arena on Windows 10

While initially designed for older operating systems, Quake III Arena seamlessly integrates into the modern Windows 10 environment. Its compatibility with the latest hardware allows for smooth gameplay, enhanced graphics, and a revitalized visual experience.

Benefits of Playing Quake III Arena on Windows 10

  • Improved Performance: Modern hardware significantly enhances Quake III Arena’s performance, resulting in smoother gameplay and higher frame rates.
  • Enhanced Graphics: Windows 10 allows for the use of high-resolution textures and visual enhancements, breathing new life into the game’s visuals.
  • Expanded Community: Windows 10 provides access to a wider range of online communities and servers, fostering a vibrant and active player base.
  • Compatibility with Modern Peripherals: Windows 10 ensures compatibility with modern gaming peripherals, such as high-performance mice, keyboards, and controllers.
  • Accessibility: Windows 10’s user-friendly interface and widespread availability make it easier than ever to access and play Quake III Arena.

FAQs Regarding Quake III Arena on Windows 10

Q: How can I run Quake III Arena on Windows 10?

A: While the game is not officially supported on Windows 10, several methods allow for seamless integration. These include:

  • Using a compatibility mode: Right-click the game’s executable file and select "Properties." Navigate to the "Compatibility" tab and choose a previous Windows version.
  • Utilizing a virtual machine: Install an older version of Windows within a virtual machine and run the game there.
  • Downloading and installing a Windows 10-compatible version: Various online communities and forums offer pre-configured versions of Quake III Arena that are optimized for Windows 10.

Q: Are there any specific system requirements for running Quake III Arena on Windows 10?

A: While Quake III Arena is relatively lightweight, it’s recommended to have a modern computer with at least:

  • Processor: Intel Core i3 or AMD Ryzen 3
  • RAM: 4 GB
  • Graphics Card: Integrated graphics card (for minimum settings) or a dedicated card for higher resolutions and visual effects.
  • Operating System: Windows 10 (64-bit)

Q: What are some of the popular mods for Quake III Arena on Windows 10?

A: The Quake III Arena community boasts a vast library of mods, including:

  • CPMA: A comprehensive mod that adds new weapons, game modes, and maps, enhancing the gameplay experience.
  • OpenArena: A free, open-source game based on Quake III Arena’s engine, offering a modern take on classic gameplay.
  • Quake III Arena: Team Arena: An official expansion pack that introduces team-based gameplay and new maps, adding a layer of strategic depth.

Tips for Playing Quake III Arena on Windows 10

  • Optimize graphics settings: Adjust the graphics settings to balance visual fidelity with performance.
  • Utilize mouse sensitivity and in-game settings: Experiment with different mouse sensitivity and in-game settings to find a configuration that suits your playstyle.
  • Practice movement techniques: Mastering rocket jumps, bunny hopping, and strafe jumping is crucial for success in Quake III Arena.
  • Learn the maps: Familiarize yourself with the game’s maps, understanding their layouts and strategic points.
  • Join online communities and forums: Connect with other players, share tips, and participate in online events.

Conclusion

Quake III Arena, a timeless classic, continues to thrive on Windows 10, offering a unique blend of speed, skill, and competitive spirit. Its enduring legacy lies in its core gameplay, its vibrant community, and its potential for endless customization. For those seeking a fast-paced, adrenaline-fueled experience, Quake III Arena on Windows 10 stands as a testament to the enduring power of classic gaming. The game’s simplicity, coupled with its complex mechanics, continues to attract players of all skill levels, ensuring its place in the pantheon of gaming history.

Quake III: Arena Screenshots for Windows - MobyGames Quake 3 Arena Quake III: Arena Screenshots for Windows - MobyGames
Quake III: Arena Screenshots for Windows - MobyGames Quake III: Arena Screenshots for Windows - MobyGames Quake III: Arena Screenshots for Windows - MobyGames
How to play classic multiplayer shooters on Windows 10  PCGamesN Quake III: Arena Screenshots for Windows - MobyGames

Closure

Thus, we hope this article has provided valuable insights into Quake III Arena: A Timeless Classic Thriving on Windows 10. We hope you find this article informative and beneficial. See you in our next article!

Reclaiming Your Windows 11 Widgets: A Guide To Removing The News Feed

Reclaiming Your Windows 11 Widgets: A Guide to Removing the News Feed

Introduction

With great pleasure, we will explore the intriguing topic related to Reclaiming Your Windows 11 Widgets: A Guide to Removing the News Feed. Let’s weave interesting information and offer fresh perspectives to the readers.

Reclaiming Your Windows 11 Widgets: A Guide to Removing the News Feed

How to remove news feed in Windows 11 widgets panel  how to manage widgets in windows 11 - YouTube

Windows 11 introduced a revamped Widgets panel, offering quick access to information and applications. However, the default inclusion of a news feed within this panel can be intrusive for users seeking a more streamlined and personalized experience. This article aims to provide a comprehensive guide on removing the news feed from the Windows 11 Widgets panel, highlighting the benefits of customization and control over your digital environment.

Understanding the Widgets Panel

The Windows 11 Widgets panel, accessible by clicking the Widgets icon on the taskbar, serves as a central hub for quick access to information and applications. The panel displays a variety of widgets, ranging from weather and calendar to news and to-do lists. While this functionality is intended to enhance user experience, the default inclusion of a news feed can be perceived as an unwelcome intrusion.

The Case for Removing the News Feed

Removing the news feed from the Widgets panel offers several advantages:

  • Enhanced Focus: The constant presence of news headlines can be distracting, particularly for individuals seeking to maintain focus on specific tasks. Removing the news feed eliminates this potential distraction, fostering a more conducive environment for productivity.
  • Personalized Experience: The news feed presented within the Widgets panel is not necessarily tailored to individual interests. Removing it allows users to curate a personalized experience, featuring widgets that align with their specific needs and preferences.
  • Reduced Information Overload: The news feed can contribute to information overload, particularly in a digital age characterized by constant streams of information. Removing it can help users prioritize and manage their information intake more effectively.
  • Control Over Data Consumption: The news feed often draws data from various sources, potentially impacting data usage and privacy. Removing it allows users to exercise greater control over their data consumption and privacy settings.

Methods for Removing the News Feed

While Windows 11 does not offer a direct option to remove the news feed, several methods can achieve this outcome:

1. Disabling the Widgets Panel:

  • Accessing the Settings: Navigate to the Windows Settings app by pressing the Windows key + I.
  • Personalization Options: Select "Personalization" from the left-hand menu.
  • Taskbar Settings: Click on "Taskbar" in the right-hand pane.
  • Widgets Toggle: Locate the "Widgets" option and toggle the switch to the "Off" position.

This method disables the entire Widgets panel, including the news feed, effectively removing it from your screen. However, it also disables all other widgets, limiting access to their functionality.

2. Using Third-Party Applications:

Several third-party applications offer alternative widgets panels and customization options, allowing users to curate their desired content without the default news feed. These applications often provide greater flexibility and control over the displayed widgets, enabling users to personalize their experience further.

3. Manual Modification (Advanced Users):

This method requires advanced knowledge of system files and should be approached with caution. It involves modifying the registry to disable the news feed specifically.

Caution: Modifying the registry incorrectly can lead to system instability. It is recommended to create a system restore point before attempting any registry modifications.

4. Alternative Widgets:

Windows 11 offers a range of widgets beyond the default news feed. Users can explore these alternatives to replace the news feed with widgets that align with their specific interests and needs. These include widgets for weather, calendar, to-do lists, and more.

FAQs: Addressing Common Concerns

1. Can I remove the news feed without disabling the entire Widgets panel?

Currently, Windows 11 does not offer a direct option to remove the news feed without disabling the entire Widgets panel. However, alternative methods like using third-party applications or manual registry modifications can achieve this outcome.

2. Will removing the news feed impact my access to other widgets?

No, removing the news feed will not impact your access to other widgets within the Widgets panel. You can still use widgets for weather, calendar, to-do lists, and more.

3. Is it safe to modify the registry to remove the news feed?

Modifying the registry requires advanced knowledge and should be approached with caution. It is recommended to create a system restore point before attempting any registry modifications to mitigate potential risks.

4. What are some alternative widgets I can use instead of the news feed?

Windows 11 offers a variety of widgets beyond the default news feed, including widgets for weather, calendar, to-do lists, music playback, and more. Explore these alternatives to personalize your Widgets panel based on your specific needs and interests.

Tips for Managing the Widgets Panel

  • Explore Widget Customization: Experiment with different widget configurations and layouts to create a personalized and efficient experience.
  • Utilize Third-Party Widgets: Consider using third-party applications to access a wider range of widgets and customize their appearance and functionality.
  • Prioritize Your Needs: Select widgets that align with your specific needs and interests, minimizing the presence of irrelevant or distracting content.
  • Regularly Review Widgets: Periodically review your Widgets panel, removing or adding widgets as needed to maintain a streamlined and personalized experience.

Conclusion

The Windows 11 Widgets panel offers a potentially valuable tool for quick access to information and applications. However, the default inclusion of a news feed can be distracting and intrusive for many users. By understanding the methods for removing the news feed and exploring alternative widgets, users can reclaim control over their digital environment, fostering a more focused, personalized, and efficient experience. Through careful customization and informed choices, users can transform the Widgets panel into a valuable asset, aligning with their specific needs and preferences.

How to remove news from Windows Widgets in Windows 11? - Neowin Windows 11 Widgets Remove News Turn Off News Feed In Windows 11 Widgets
How to delete the news widget in windows 11? - Super User How to Disable News in Windows 11 Widgets - All Things How Turn Off News Feed In Windows 11 Widgets
Youโ€™ll be able to remove the news feed in Windows 11, Finally! Turn Off News Feed In Windows 11 Widgets

Closure

Thus, we hope this article has provided valuable insights into Reclaiming Your Windows 11 Widgets: A Guide to Removing the News Feed. We hope you find this article informative and beneficial. See you in our next article!

Near Field Communication: Unlocking A World Of Seamless Interactions

Near Field Communication: Unlocking a World of Seamless Interactions

Introduction

With great pleasure, we will explore the intriguing topic related to Near Field Communication: Unlocking a World of Seamless Interactions. Let’s weave interesting information and offer fresh perspectives to the readers.

Near Field Communication: Unlocking a World of Seamless Interactions

Near Field Communication

Near Field Communication (NFC) technology has emerged as a pivotal force in modern communication and data exchange, seamlessly connecting devices and facilitating a wide array of applications. This wireless communication protocol operates at short distances, typically within a few centimeters, enabling rapid and secure data transfer between NFC-enabled devices.

The core principle of NFC lies in its ability to transmit data using electromagnetic fields. When two NFC-enabled devices come into close proximity, they establish a communication channel through the exchange of electromagnetic waves. This interaction allows for a swift and secure transfer of information, paving the way for numerous applications across diverse industries.

The Foundation of NFC: A Deeper Dive

NFC technology finds its roots in the Radio Frequency Identification (RFID) system, which utilizes radio waves for data identification and tracking. However, NFC goes beyond simple identification, offering a more versatile communication platform.

At its core, NFC operates on the 13.56 MHz frequency band, allowing for communication between two devices with NFC capabilities. This communication can be categorized into two distinct modes:

  • Passive Mode: In this mode, one device acts as a reader while the other acts as a tag. The reader device initiates communication by transmitting a signal, and the tag device responds with its stored data. This mode is primarily used for applications like contactless payments and data sharing.
  • Active Mode: Both devices act as both reader and tag, enabling peer-to-peer communication. This mode allows for bidirectional data exchange, making it suitable for applications like device pairing and data synchronization.

The Power of NFC: Applications Transforming Industries

The versatility of NFC technology has opened doors to a vast spectrum of applications, transforming industries and enhancing user experiences.

1. Contactless Payments: One of the most prominent applications of NFC is contactless payments. NFC-enabled smartphones and smartwatches allow users to make secure payments at point-of-sale terminals by simply tapping their devices. This eliminates the need for physical cards and streamlines the payment process, offering convenience and security.

2. Access Control: NFC technology plays a crucial role in access control systems, enabling secure entry into buildings, offices, and restricted areas. NFC-enabled access cards or mobile devices can be used to verify identity and grant access, enhancing security and streamlining access control processes.

3. Data Sharing: NFC facilitates seamless data sharing between devices. Users can easily share contact information, photos, documents, and other digital content by simply tapping their NFC-enabled devices together. This eliminates the need for manual data entry and simplifies data exchange.

4. Device Pairing: NFC simplifies the process of pairing devices, enabling effortless connection between smartphones, smartwatches, and other NFC-enabled devices. This allows for seamless data synchronization and device control, enhancing user convenience and streamlining connectivity.

5. Transportation Ticketing: NFC is revolutionizing the transportation industry by enabling contactless ticketing solutions. Passengers can purchase and store tickets on their NFC-enabled devices, eliminating the need for physical tickets and streamlining boarding processes.

6. Healthcare: NFC finds applications in the healthcare industry, enabling secure access to patient records, medication information, and other medical data. NFC-enabled devices can be used for patient identification, medication dispensing, and remote patient monitoring, enhancing healthcare efficiency and patient safety.

7. Automotive: NFC technology is being integrated into vehicles, enabling keyless entry, remote engine start, and other vehicle control features. NFC-enabled smartphones can be used as digital keys, providing convenient and secure access to vehicles.

8. Smart Homes: NFC is playing a significant role in the development of smart homes, enabling communication between devices and appliances. NFC-enabled smart home devices can be controlled via smartphones or other NFC-enabled devices, providing users with greater control over their home environments.

9. Asset Tracking: NFC-enabled tags can be attached to assets, enabling real-time tracking and inventory management. This technology is used in various industries, including logistics, manufacturing, and retail, to track assets, optimize inventory, and improve operational efficiency.

10. Marketing and Advertising: NFC technology is being leveraged in marketing and advertising campaigns to engage consumers and deliver personalized content. NFC-enabled posters, brochures, and other marketing materials can be used to provide users with product information, promotional offers, and other interactive experiences.

Unveiling the Benefits of NFC: A Closer Look

The widespread adoption of NFC technology across diverse sectors can be attributed to its numerous benefits, making it a powerful tool for enhancing efficiency, security, and user experience.

1. Enhanced Convenience: NFC technology simplifies interactions by eliminating the need for physical cards, cables, or complex pairing processes. This convenience translates to a smoother user experience, streamlining daily tasks and reducing friction points.

2. Increased Security: NFC leverages encryption and authentication protocols to ensure secure data transmission. This robust security framework protects sensitive information from unauthorized access, mitigating the risk of fraud and data breaches.

3. Improved Efficiency: NFC technology streamlines processes by automating tasks and reducing manual interventions. This increased efficiency translates to cost savings and time optimization, boosting productivity across various industries.

4. Enhanced User Experience: NFC technology enhances user experience by providing intuitive and seamless interactions. This intuitive nature fosters user engagement and satisfaction, making NFC a valuable tool for businesses seeking to improve customer experience.

5. Wide Compatibility: NFC technology is widely supported by smartphones, tablets, and other devices, ensuring compatibility across a broad range of platforms. This wide compatibility facilitates seamless integration and interoperability, making NFC a versatile and adaptable technology.

6. Cost-Effectiveness: NFC technology offers a cost-effective solution for various applications, reducing reliance on traditional methods and minimizing operational costs. This economic advantage makes NFC an attractive option for businesses seeking to optimize resource utilization.

FAQs: Addressing Common Queries About NFC

1. What is the range of NFC communication?

The effective range of NFC communication is typically within a few centimeters, typically up to 4 centimeters. This short-range nature ensures secure communication and prevents unintended data transfers.

2. Is NFC secure?

NFC technology incorporates encryption and authentication protocols to ensure secure data transmission. These security measures protect sensitive information from unauthorized access, making NFC a reliable and secure communication protocol.

3. What devices support NFC?

A wide range of devices support NFC, including smartphones, tablets, smartwatches, and other consumer electronics. To check if a device supports NFC, look for the NFC symbol, which resembles a wave with four dots, on the device’s packaging or specifications.

4. How do I enable NFC on my device?

To enable NFC on your device, navigate to the settings menu and locate the "NFC" or "Near Field Communication" option. Enable the feature, and your device will be ready to communicate with other NFC-enabled devices.

5. What are some common NFC applications?

Common NFC applications include contactless payments, access control, data sharing, device pairing, transportation ticketing, healthcare, automotive, smart homes, asset tracking, and marketing and advertising.

Tips: Maximizing the Benefits of NFC

1. Ensure Device Compatibility: Before using NFC, verify that both devices involved support NFC technology. Check the device specifications or packaging for the NFC symbol to confirm compatibility.

2. Enable NFC on Your Device: To use NFC, ensure that NFC is enabled on your device. Navigate to the settings menu and locate the "NFC" or "Near Field Communication" option to activate the feature.

3. Keep Devices Close: For NFC communication to work, the two devices must be within a few centimeters of each other. Ensure that the devices are aligned correctly and in close proximity to establish a connection.

4. Understand NFC Modes: Familiarize yourself with the two NFC modes: passive and active. Passive mode is used for reading data from a tag, while active mode enables peer-to-peer communication.

5. Explore NFC Applications: Explore the diverse range of NFC applications available to enhance your daily life. From contactless payments to access control and data sharing, NFC offers a wide range of possibilities.

6. Stay Informed About NFC Developments: Keep abreast of the latest advancements and innovations in NFC technology. As the technology continues to evolve, new applications and features will emerge, expanding the possibilities of NFC.

Conclusion: Shaping the Future of Communication

Near Field Communication technology has emerged as a transformative force in modern communication, seamlessly connecting devices and facilitating a wide array of applications. Its ability to enable rapid and secure data transfer at short distances has revolutionized industries, enhancing user experiences and streamlining processes. From contactless payments to access control, data sharing, and beyond, NFC is shaping the future of communication, fostering a world of seamless interactions and unlocking new possibilities for innovation and convenience. As technology continues to evolve, NFC is poised to play an even greater role in shaping the connected world, empowering individuals and businesses to embrace a future of seamless and secure interactions.

Near Field Communication (NFC) Near Field Communication in Mobility - WinWire Technologies What is NFC? - GeeksforGeeks
Near Field Communication  Visual.ly What Is Near Field Communication Applications - CXJRFIDFactory Near Field Communications nfc
Near Field Communication  PPT Near Field Communication NFC  Seminar Report and PPT for CSE Students

Closure

Thus, we hope this article has provided valuable insights into Near Field Communication: Unlocking a World of Seamless Interactions. We appreciate your attention to our article. See you in our next article!

Navigating The Landscape Of Windows 10 Installation: A Comprehensive Guide

Navigating the Landscape of Windows 10 Installation: A Comprehensive Guide

Introduction

With enthusiasm, let’s navigate through the intriguing topic related to Navigating the Landscape of Windows 10 Installation: A Comprehensive Guide. Let’s weave interesting information and offer fresh perspectives to the readers.

How to Install Windows 10: a Simple Step-by-Step Guide with Pictures

The world of operating systems can be intricate, with various options and approaches to installation. This guide delves into the intricacies of installing Windows 10 on a 64-bit system, focusing on the use of ISO files and their role in the process.

Understanding ISO Files and their Significance

An ISO file, short for International Organization for Standardization, is a digital image of an optical disc, typically a CD or DVD. It contains the complete contents of the disc, encompassing the operating system, drivers, and other essential files necessary for installation. In the context of Windows 10, an ISO file serves as a convenient and reliable method for obtaining the operating system for installation.

The Advantages of Using ISO Files

  • Flexibility and Control: ISO files offer unparalleled flexibility. They can be downloaded directly from Microsoft’s official website, ensuring access to the latest version and updates. This eliminates reliance on external sources, minimizing potential risks associated with outdated or compromised files.
  • Customization and Flexibility: ISO files allow for customization before installation. Users can modify the image to include specific drivers or applications, tailoring the installation to their specific needs. This flexibility is particularly valuable for those seeking a more personalized setup.
  • Offline Installation: ISO files enable offline installation, a crucial advantage for users with limited or unreliable internet access. The ISO image can be burned to a DVD or USB drive, allowing for a completely offline installation process.
  • Backup and Recovery: ISO files serve as valuable backups for your operating system. In the event of a system failure, the ISO image can be used to restore the system to its original state, ensuring data preservation and system recovery.

Steps for Downloading and Using a Windows 10 64-bit ISO File

  1. Downloading the ISO File:

    • Navigate to the official Microsoft website and locate the Windows 10 download page.
    • Choose the desired language and edition of Windows 10.
    • Select the 64-bit version, as this is compatible with most modern computers.
    • Download the ISO file to your computer.
  2. Creating a Bootable USB Drive:

    • Download and install a reliable USB drive creation tool, such as Rufus or the Media Creation Tool.
    • Insert a USB drive with sufficient storage space.
    • Launch the USB drive creation tool and select the downloaded ISO file.
    • Follow the on-screen instructions to create a bootable USB drive.
  3. Installing Windows 10:

    • Restart your computer and access the BIOS setup.
    • Configure the boot order to prioritize the USB drive.
    • Save the BIOS settings and exit.
    • The Windows 10 setup process will begin automatically.
    • Follow the on-screen instructions to complete the installation.

Important Considerations

  • System Requirements: Ensure your computer meets the minimum system requirements for Windows 10 64-bit.
  • Backups: Create a backup of your existing data before starting the installation process.
  • Product Key: Have your Windows 10 product key readily available.
  • Activation: After installation, activate Windows 10 using your product key.

Frequently Asked Questions (FAQs)

Q1: What is the difference between 32-bit and 64-bit Windows 10?

A: The primary difference lies in the processor architecture they support. 64-bit systems can handle more memory and run more complex applications, making them ideal for modern computers. 32-bit systems, while still functional, are limited in their capabilities.

Q2: Can I upgrade from a 32-bit version of Windows 10 to a 64-bit version?

A: No, upgrading directly from a 32-bit to a 64-bit version is not possible. You will need to perform a clean installation of the 64-bit version.

Q3: Can I use the same product key for both 32-bit and 64-bit versions of Windows 10?

A: Yes, a single product key can be used for both versions, as long as it is a valid key for the chosen edition of Windows 10.

Q4: What if I encounter errors during the installation process?

A: Refer to the official Microsoft troubleshooting guides or seek assistance from the Microsoft support team.

Q5: Is it legal to download and use a Windows 10 ISO file?

A: Yes, it is legal to download a Windows 10 ISO file from the official Microsoft website. However, using a pirated or unauthorized ISO file is illegal and unethical.

Tips for a Smooth Installation

  • Use a reliable USB drive creation tool: Ensure the tool is reputable and known to create bootable drives successfully.
  • Verify the ISO file integrity: Download the ISO file from a trusted source and verify its integrity using a checksum tool.
  • Check system requirements: Confirm your computer meets the minimum requirements before starting the installation.
  • Back up your data: Create a complete backup of your important files and data before proceeding.
  • Disconnect unnecessary peripherals: Disconnect any unnecessary external devices to avoid potential conflicts.
  • Read the on-screen instructions carefully: Pay close attention to the setup instructions to ensure a successful installation.

Conclusion

Installing Windows 10 using an ISO file offers a comprehensive and efficient approach to setting up a new operating system. By understanding the process and adhering to the recommended steps, users can ensure a smooth and successful installation, maximizing the benefits of a modern and robust operating system. Remember to always download ISO files from trusted sources, verify file integrity, and back up essential data before starting the installation. This approach fosters a secure and reliable computing experience.

How To Install Windows 10 for Free  Install Official Windows 10 Complete Guide #windows10 - YouTube How to Install Windows 10 full step by step guide How to Install Windows 10: Step-by-Step Guide with Pictures
How To Install Windows 10? โ€“ Complete Guide  DESKDECODE.COM PPT - A Comprehensive Guide to Installing Windows 10_ Step-by-Step Tutorial PowerPoint How to Install Windows 10 on Your PC [Step by Step Guide]
How to Install Windows 10 Step by Step with Pictures (with USB. 5Minute) How to Install Windows 10: Step-by-Step Guide with Pictures

Closure

Thus, we hope this article has provided valuable insights into Navigating the Landscape of Windows 10 Installation: A Comprehensive Guide. We hope you find this article informative and beneficial. See you in our next article!

Navigating The Landscape Of NVIDIA GeForce RTX 3060 Ti Drivers On Windows 11

Navigating the Landscape of NVIDIA GeForce RTX 3060 Ti Drivers on Windows 11

Introduction

In this auspicious occasion, we are delighted to delve into the intriguing topic related to Navigating the Landscape of NVIDIA GeForce RTX 3060 Ti Drivers on Windows 11. Let’s weave interesting information and offer fresh perspectives to the readers.

[Download] GeForce RTX 3060 Ti Driver for Windows 10/11 - Driver Easy

The NVIDIA GeForce RTX 3060 Ti, a powerful graphics card designed for high-performance gaming and creative workflows, thrives on the synergy between hardware and software. This synergy is facilitated by the drivers, which act as the communication bridge between the graphics card and the operating system. Windows 11, the latest iteration of Microsoft’s operating system, presents a unique environment for these drivers to operate within. Understanding the intricacies of this relationship is crucial for maximizing the potential of the RTX 3060 Ti on Windows 11.

The Crucial Role of Drivers

Drivers are specialized software programs that enable the operating system to recognize and interact with hardware components. In the case of the RTX 3060 Ti, drivers are essential for:

  • Unlocking Full Performance: Drivers translate instructions from the operating system into commands the graphics card can understand, ensuring smooth and efficient processing of graphics-intensive tasks.
  • Enabling Advanced Features: Drivers provide access to features like ray tracing, DLSS (Deep Learning Super Sampling), and NVIDIA Broadcast, which enhance visual fidelity and performance.
  • Optimizing Compatibility: Drivers ensure compatibility with various games and applications, enabling them to utilize the full capabilities of the RTX 3060 Ti.
  • Addressing Issues and Updates: Drivers are regularly updated to address potential bugs, improve performance, and introduce new features, ensuring a seamless and stable experience.

Windows 11 and the RTX 3060 Ti: A Match Made for Performance

Windows 11, with its focus on enhanced performance and visual aesthetics, provides a robust platform for the RTX 3060 Ti to excel. The operating system’s efficient resource management and DirectX 12 Ultimate support enable the graphics card to deliver its full potential. However, it is essential to have the right drivers installed to maximize this synergy.

The Importance of Up-to-Date Drivers

Keeping drivers updated is paramount for optimal performance and stability. Outdated drivers can lead to:

  • Performance Bottlenecks: Older drivers may not fully utilize the capabilities of the RTX 3060 Ti, resulting in slower frame rates and reduced visual quality.
  • Compatibility Issues: Outdated drivers can lead to compatibility problems with newer games and applications, resulting in crashes or instability.
  • Security Vulnerabilities: Outdated drivers can contain security vulnerabilities, leaving your system open to potential threats.

Obtaining and Installing Drivers

NVIDIA offers a user-friendly process for obtaining and installing the latest drivers for the RTX 3060 Ti on Windows 11:

  • NVIDIA GeForce Experience: This free application automatically detects your graphics card and recommends the most suitable drivers. It also offers features like game optimization and performance monitoring.
  • NVIDIA Website: You can manually download the latest drivers for your specific graphics card from the NVIDIA website. This method provides greater control over the driver installation process.

Tips for Optimizing Driver Performance

  • Clean Installation: Consider performing a clean installation of the drivers by uninstalling older versions before installing the new ones. This ensures a fresh start and eliminates potential conflicts.
  • Driver Settings: Adjust driver settings like power management and image scaling to optimize performance for specific tasks.
  • System Updates: Keep your operating system and other system drivers updated to ensure compatibility and stability.
  • Monitor for Updates: NVIDIA regularly releases driver updates. Enable automatic driver updates through GeForce Experience or manually check for updates on the NVIDIA website.

FAQs on NVIDIA GeForce RTX 3060 Ti Drivers on Windows 11

Q: How do I know if I have the latest drivers installed?

A: You can check the driver version through the NVIDIA Control Panel or GeForce Experience. You can also visit the NVIDIA website and check for updates for your specific graphics card.

Q: Are there specific drivers for Windows 11?

A: NVIDIA releases drivers that are compatible with Windows 11. However, drivers are typically compatible across multiple operating systems, and there may not be a specific driver designated only for Windows 11.

Q: What if I encounter issues after installing new drivers?

A: If you experience issues, try rolling back to the previous driver version. You can also consult the NVIDIA website for troubleshooting guides or contact NVIDIA support for assistance.

Q: Can I install drivers from a third-party source?

A: It is generally recommended to download drivers from official sources like the NVIDIA website or GeForce Experience. Third-party sources may offer outdated or potentially unsafe drivers.

Conclusion

The NVIDIA GeForce RTX 3060 Ti, when coupled with the right drivers on Windows 11, delivers a powerful and versatile graphics solution. Understanding the importance of drivers, keeping them updated, and optimizing their performance is crucial for maximizing the potential of this graphics card. By following the tips and guidelines outlined above, users can ensure a smooth, stable, and visually stunning experience, whether gaming, creating, or simply navigating the digital world.

How to Download, Install, Update RTX 3060 Drivers for Win 11/10 - MiniTool GeForce RTX 3060 Game Ready Driver Released  GeForce News  NVIDIA GeForce RTX 3060 Ti Game Ready Driver Released
Download GeForce RTX 3060 Ti Driver For Windows 10/11 GeForce RTX 3060 Game Ready Driver Released  GeForce News  NVIDIA GeForce RTX 3060 Game Ready Driver Released  GeForce News  NVIDIA
Nvidia Geforce Rtx 3060 Ti Latest Driver Review: Nvidia GeForce RTX 3060 Ti Founders Edition - Graphics - HEXUS.net

Closure

Thus, we hope this article has provided valuable insights into Navigating the Landscape of NVIDIA GeForce RTX 3060 Ti Drivers on Windows 11. We hope you find this article informative and beneficial. See you in our next article!

Windows 11: A Comprehensive Look At The Latest Operating System

Windows 11: A Comprehensive Look at the Latest Operating System

Introduction

With great pleasure, we will explore the intriguing topic related to Windows 11: A Comprehensive Look at the Latest Operating System. Let’s weave interesting information and offer fresh perspectives to the readers.

Windows 11: A Comprehensive Look at the Latest Operating System

Windows 11 Operating System - NetAns

Windows 11, the latest iteration of Microsoft’s flagship operating system, has been making waves since its release in 2021. This new operating system boasts a redesigned user interface, enhanced performance, and a host of new features, promising a more streamlined and intuitive user experience. This article delves into the key aspects of Windows 11, examining its features, benefits, and implications for users and businesses alike.

A New Look and Feel:

One of the most striking changes in Windows 11 is its revamped visual design. The user interface has undergone a significant transformation, adopting a cleaner, more modern aesthetic. The Start menu has been redesigned, with a central location for pinned applications and a focus on visual clarity. The taskbar has been repositioned to the center of the screen, a design choice that has sparked debate among users. However, the overall effect is a more polished and contemporary look that aligns with current design trends.

Performance Enhancements:

Beyond aesthetics, Windows 11 offers significant performance improvements. The operating system leverages the latest hardware advancements, including support for the new Intel 12th Gen processors and AMD Ryzen 6000 series processors. This translates to faster boot times, improved application responsiveness, and smoother multitasking. Windows 11 also incorporates advancements in power management, contributing to increased battery life on laptops.

New Features and Functionality:

Windows 11 is packed with new features designed to enhance productivity and user experience.

  • Android App Integration: Perhaps the most significant addition is the ability to run Android apps directly within Windows. This opens up a vast library of mobile applications to Windows users, expanding the capabilities of the operating system and offering a more seamless experience across devices.
  • Improved Gaming Experience: Windows 11 prioritizes gaming, introducing features like DirectStorage, which allows for faster loading times and enhanced performance in games. The operating system also supports Auto HDR, enhancing visual fidelity and providing a more immersive gaming experience.
  • Enhanced Security: Windows 11 prioritizes security, incorporating features like Microsoft Defender SmartScreen and Windows Hello, which use advanced technologies to protect against malware and unauthorized access.

Windows 11: A Look at the Impact

The release of Windows 11 has had a significant impact on the tech landscape.

  • Increased Adoption: The operating system has seen widespread adoption, with millions of users upgrading to Windows 11. The appeal of new features, performance improvements, and a fresh design has contributed to its popularity.
  • Impact on Businesses: Windows 11 offers businesses a powerful platform for productivity and collaboration. Features like Teams integration and improved security measures enhance the workplace experience and improve efficiency.
  • Evolution of the PC: Windows 11 has accelerated the evolution of the personal computer. The operating system’s focus on modern design, performance optimization, and integration with mobile devices signifies a shift towards a more connected and versatile computing experience.

FAQs about Windows 11:

Q: What are the system requirements for Windows 11?

A: Windows 11 requires a 1 GHz or faster processor with two or more cores, 4 GB of RAM, and 64 GB of storage. It also necessitates a compatible graphics card and an active internet connection.

Q: Is Windows 11 compatible with my current hardware?

A: You can check for compatibility using the PC Health Check app, available on the Microsoft website.

Q: How do I upgrade to Windows 11?

A: You can upgrade to Windows 11 by going to Settings > Update & Security > Windows Update. Follow the on-screen instructions to initiate the upgrade process.

Q: Is Windows 11 free?

A: If your device meets the system requirements and is running a genuine version of Windows 10, you can upgrade to Windows 11 for free.

Q: What are the benefits of using Windows 11?

A: Windows 11 offers several benefits, including a redesigned user interface, enhanced performance, improved security features, and the ability to run Android apps.

Tips for Using Windows 11:

  • Optimize Performance: Ensure your hardware meets the minimum system requirements for optimal performance.
  • Explore New Features: Familiarize yourself with the new features and functionalities offered by Windows 11.
  • Customize Your Experience: Personalize your settings and preferences to create a customized and efficient user experience.
  • Stay Updated: Keep your system up-to-date with the latest updates and security patches.

Conclusion:

Windows 11 represents a significant leap forward for Microsoft’s operating system. With a redesigned interface, performance enhancements, and a host of new features, Windows 11 delivers a modern and intuitive computing experience. Its focus on security, integration with mobile devices, and support for Android apps makes it a compelling option for both individual users and businesses. As Windows 11 continues to evolve, it is poised to shape the future of personal computing, offering a more connected, versatile, and user-friendly experience for all.

Microsoft has released version 11 of the Windows operating system - pictures Windows 11: this is the new Microsoft operating system - Techidence Windows 11 Revealed: A Comprehensive Overview of the New OS
Windows 11: The Ultimate Guide to the Latest Operating System by Microsoft Windows 11 Is Now Official: This Microsoft S New Operating System Has Released Version Of The Windows 11 operating system on PC screen. Windows 11 is the latest major release of Microsoft's
What the New Windows 11 Operating System Means for Businesses New Features of Windows 11 Operating System - EE-Vibes

Closure

Thus, we hope this article has provided valuable insights into Windows 11: A Comprehensive Look at the Latest Operating System. We appreciate your attention to our article. See you in our next article!

Downloading Netflix Content On Windows 11: A Comprehensive Guide

Downloading Netflix Content on Windows 11: A Comprehensive Guide

Introduction

With great pleasure, we will explore the intriguing topic related to Downloading Netflix Content on Windows 11: A Comprehensive Guide. Let’s weave interesting information and offer fresh perspectives to the readers.

Downloading Netflix Content on Windows 11: A Comprehensive Guide

How To Download And Install The Netflix App On Windows 11 - Softkeyworld

Netflix, the world’s leading streaming service, offers a convenient feature that allows users to download content for offline viewing. This feature is particularly valuable for individuals who frequently travel, have limited internet access, or simply prefer to watch content without relying on a constant internet connection. This article provides a comprehensive guide to downloading Netflix content on Windows 11 laptops, addressing key aspects of the process, potential issues, and helpful tips for a seamless experience.

Understanding Netflix Downloads: Key Considerations

Before delving into the specifics of downloading content on Windows 11, it is essential to understand the limitations and considerations associated with this feature:

  • Not all content is available for download: Netflix’s library of downloadable content varies depending on licensing agreements and regional availability. While a vast selection of movies and TV shows are available for offline viewing, some content may be restricted to streaming only.
  • Download limits: Users have a specific download limit, typically ranging from 1 to 4 devices, depending on their Netflix plan. It is crucial to be mindful of these limits, especially when sharing an account with others.
  • Download quality: Netflix offers different download quality options, ranging from low to high. Selecting a higher quality results in larger file sizes, consuming more storage space but providing a better visual experience.
  • Expiration: Downloaded content remains available for offline viewing for a specific period, usually ranging from 48 hours to 7 days, depending on the title and licensing agreements. Once the expiration date passes, the downloaded content will become inaccessible.

Downloading Netflix Content on Windows 11: A Step-by-Step Guide

The process of downloading Netflix content on Windows 11 is straightforward and can be accomplished using the dedicated Netflix application:

  1. Install the Netflix App: Ensure that the latest version of the Netflix application is installed on your Windows 11 laptop. The app can be downloaded from the Microsoft Store or the official Netflix website.
  2. Sign in to Your Account: Launch the Netflix app and log in using your existing account credentials.
  3. Locate Downloadable Content: Browse the Netflix library and locate the desired title. Look for the download icon (an arrow pointing downwards) next to the title.
  4. Select Download Quality: If the download icon is present, click on it to initiate the download process. You will be prompted to select the desired download quality (low, medium, high).
  5. Start Downloading: Confirm your selection, and the download process will begin automatically. The progress of the download can be monitored within the Netflix app.

Managing Downloaded Content: A Quick Guide

Once content has been downloaded, it is important to understand how to manage and access it:

  • Access Downloaded Content: Downloaded content is accessible within the Netflix app under a dedicated "Downloads" section.
  • Delete Downloads: To remove downloaded content from your device, navigate to the "Downloads" section and select the title you wish to delete. Click on the "Delete" icon to remove the content from your laptop.
  • Manage Download Quality: To adjust the download quality for future downloads, navigate to the "App Settings" within the Netflix app and select the desired quality setting.

Troubleshooting Common Download Issues

Despite the simplicity of the download process, users may encounter occasional issues. Here are some common problems and their potential solutions:

  • Slow or Failed Downloads: Insufficient internet connection, network congestion, or server issues can hinder download speeds. Ensure a stable internet connection and try restarting the Netflix app or your laptop.
  • Download Errors: Outdated app versions, corrupted data, or insufficient storage space can cause download errors. Update the Netflix app, free up storage space, or contact Netflix support for assistance.
  • Content Unavailable for Download: As mentioned earlier, not all content is available for download. If a download icon is not present next to a title, it is likely not available for offline viewing.

Frequently Asked Questions: Addressing Common Concerns

Q: What is the maximum number of devices I can download content on?

A: The number of devices you can download content on depends on your Netflix plan. Standard, Premium, and Ultra plans allow downloads on 1, 2, and 4 devices, respectively.

Q: How long does downloaded content remain available?

A: The duration for which downloaded content remains available varies depending on the title and licensing agreements. Typically, content is available for offline viewing for 48 hours to 7 days.

Q: Can I download content on multiple devices simultaneously?

A: Yes, you can download content on multiple devices simultaneously, but the total number of devices is limited by your plan.

Q: How do I manage download quality?

A: You can adjust download quality within the Netflix app settings. Choose from low, medium, or high quality based on your storage space and desired visual experience.

Q: What happens if I delete a download before the expiration date?

A: Deleting a download before its expiration date will remove the content from your device, and you will need to download it again if you wish to watch it offline.

Q: What should I do if I encounter download errors?

A: If you encounter download errors, try restarting the Netflix app or your laptop. Ensure a stable internet connection and update the Netflix app to the latest version. If the issue persists, contact Netflix support for assistance.

Tips for Optimizing Your Netflix Download Experience

  • Utilize Wi-Fi for Faster Downloads: Downloading content over a stable Wi-Fi connection ensures faster download speeds and a smoother experience.
  • Manage Storage Space: Downloaded content consumes significant storage space. Regularly check your device’s storage space and delete unwanted downloads to avoid storage issues.
  • Prioritize Download Quality: Choose the appropriate download quality based on your storage space and desired visual experience. Lower quality settings result in smaller file sizes, while higher quality settings offer a more visually appealing experience.
  • Check Download Limits: Be mindful of your plan’s download limit, especially when sharing an account with others.
  • Keep the Netflix App Updated: Regularly update the Netflix app to ensure optimal performance and access to the latest features.

Conclusion: Enhancing Your Netflix Viewing Experience

Downloading Netflix content on Windows 11 laptops offers a convenient and versatile way to enjoy your favorite shows and movies offline. By understanding the features, limitations, and troubleshooting tips outlined in this guide, users can optimize their download experience and enjoy a seamless and enjoyable offline viewing experience. Whether you are traveling, facing limited internet access, or simply prefer to watch content without relying on a constant internet connection, downloading Netflix content provides a valuable solution for enhancing your viewing experience.

How To Download and Install Netflix On Windows 11 - YouTube How To Download Netflix App on Windows 11 - YouTube How to Install Netflix on Windows 11 : Download Netflix Movies Offline - YouTube
How to Install Netflix App on Windows 11 - thecoderworld How to Download and Play Netflix Videos on Windows 11 PC How to download Netflix App on Windows 11 - YouTube
How to Download Netflix App for Windows 11 - YouTube How To Download Netflix Movies For Offline Watching In Windows 11 - YouTube

Closure

Thus, we hope this article has provided valuable insights into Downloading Netflix Content on Windows 11: A Comprehensive Guide. We appreciate your attention to our article. See you in our next article!

Securing Sensitive Data: A Guide To Password Protection In Windows 11

Securing Sensitive Data: A Guide to Password Protection in Windows 11

Introduction

With great pleasure, we will explore the intriguing topic related to Securing Sensitive Data: A Guide to Password Protection in Windows 11. Let’s weave interesting information and offer fresh perspectives to the readers.

Securing Sensitive Data: A Guide to Password Protection in Windows 11

Protect sensitive data on Windows PC using Password Monitor, check step-by-step process โ€“ Firstpost

In today’s digital landscape, safeguarding sensitive information is paramount. Whether it’s personal financial records, confidential project files, or private photographs, protecting data from unauthorized access is crucial. Windows 11 offers a convenient and effective method for securing such information: password-protected ZIP files. This comprehensive guide explores the intricacies of this feature, highlighting its importance and providing practical tips for implementation.

Understanding the Essence of Password Protection

Password protection for ZIP files is a robust security measure that restricts access to the contents of a compressed archive. By setting a password, users can ensure that only those who know the specific code can extract and view the files within. This mechanism effectively creates a digital lock, preventing unauthorized individuals from gaining access to sensitive data.

The Importance of Password Protection

The significance of password protection for ZIP files cannot be overstated. Here are key reasons why this feature is essential in today’s digital world:

  • Data Confidentiality: Password protection ensures that sensitive information remains confidential, preventing unauthorized access and potential misuse.
  • Privacy Protection: Personal files, such as photographs, financial records, or private correspondence, can be secured from prying eyes.
  • Compliance with Regulations: In various industries, regulations like HIPAA or GDPR require data protection measures. Password protection can contribute to compliance with these standards.
  • Enhanced Security: By adding an extra layer of security to compressed files, password protection mitigates the risk of data breaches and unauthorized access.
  • Control over File Sharing: Users can selectively grant access to specific files by sharing the password with authorized individuals.

Methods for Password Protecting ZIP Files in Windows 11

Windows 11 provides a straightforward and intuitive approach to password-protecting ZIP files, utilizing the built-in File Explorer:

  1. Right-Click and Select: Right-click on the file or folder you wish to compress and password-protect.
  2. Choose "Add to archive": Select "Add to archive" from the context menu.
  3. Configure Archive Settings: In the "Archive: Zip Compressed Folder" window, navigate to the "Advanced" tab.
  4. Set Password: Check the box labeled "Set password" and enter the desired password in the provided field.
  5. Confirm Password: Re-enter the password to confirm accuracy.
  6. Confirm and Create: Click "OK" to proceed with the compression and password protection.

Important Considerations for Password Security

While password protection offers a significant level of security, it is crucial to adhere to best practices for password creation and management:

  • Strong Passwords: Choose passwords that are at least 12 characters long, combining uppercase and lowercase letters, numbers, and symbols.
  • Unique Passwords: Avoid using the same password for multiple accounts or files.
  • Password Manager: Utilize a password manager to store and manage passwords securely.
  • Regular Password Updates: Change passwords regularly, especially for highly sensitive data.
  • Two-Factor Authentication: Enable two-factor authentication for sensitive accounts to enhance security further.

Frequently Asked Questions (FAQs)

Q: Can I recover a forgotten password for a ZIP file?

A: Unfortunately, there is no universal method to recover a forgotten password for a ZIP file. Once a password is lost, the content within the file is essentially inaccessible.

Q: How secure is password protection for ZIP files?

A: The level of security depends on the chosen password’s strength and the encryption algorithm used by the compression software. Modern ZIP file encryption algorithms provide a robust level of security, making it difficult to crack passwords without specialized tools.

Q: Are there alternative methods for password protection?

A: Yes, several third-party applications offer enhanced security features for password protection, including advanced encryption algorithms and additional security measures.

Q: What are the limitations of password protection for ZIP files?

A: While password protection offers a valuable security layer, it is not foolproof. Advanced hacking techniques or brute-force attacks could potentially compromise the protection.

Tips for Enhanced Security

  • Consider using a strong encryption algorithm: While the standard ZIP file encryption is generally secure, consider using third-party tools that offer more robust encryption algorithms for heightened security.
  • Avoid using common or easily guessed passwords: Choose passwords that are not readily available in password lists or dictionaries.
  • Store passwords securely: Utilize a password manager or keep passwords in a secure location, separate from the protected files.
  • Regularly review and update passwords: Periodically assess the strength of passwords and update them for enhanced security.

Conclusion

Password protection for ZIP files in Windows 11 offers a valuable tool for safeguarding sensitive data. By implementing best practices for password creation and management, users can significantly enhance the security of their files and protect their privacy. Remember, the strength of the protection depends directly on the strength of the chosen password and the security measures employed. By adhering to the guidelines outlined in this guide, users can effectively secure their data and maintain control over its access.

8 Password Best Practices to Secure Your Logins & Keep Your Personal Data Safe Securing Sensitive Data: A Comprehensive Guide to Encryption 9 Practical Tips To Protect Sensitive Data  denofgeek
Strengthening Your Digital Fortress: The Importance of Password Security - Creative Computer How to Password Protect or Encrypt ZIP File on Windows 10/11 โ€“ TechCult Developing a Secure Password Strategy - IT Services, Computer Tech Support,
10 Tips to Protect Your Data [Infographic]  SecurityHQ 9 Tricks & Resources to Help You Protect Sensitive Information - InfoSec Insights

Closure

Thus, we hope this article has provided valuable insights into Securing Sensitive Data: A Guide to Password Protection in Windows 11. We hope you find this article informative and beneficial. See you in our next article!