Archives February 2024

Beyond Bluetooth: Exploring Alternative Methods For Sharing Files Between Computers

Beyond Bluetooth: Exploring Alternative Methods for Sharing Files Between Computers

Introduction

In this auspicious occasion, we are delighted to delve into the intriguing topic related to Beyond Bluetooth: Exploring Alternative Methods for Sharing Files Between Computers. Let’s weave interesting information and offer fresh perspectives to the readers.

Beyond Bluetooth: Exploring Alternative Methods for Sharing Files Between Computers

Sharing Files Between Computers Wirelessly  Solution for sharing folders on WIFI network - YouTube

In today’s interconnected world, seamless file sharing between devices is a fundamental necessity. While Bluetooth has long been a popular choice for transferring data over short distances, it often faces limitations in speed, range, and compatibility. This has prompted the exploration of alternative methods for transferring files between computers, particularly those that do not rely on Bluetooth.

This article delves into the various techniques for sharing files between computers without relying on Bluetooth, exploring their strengths and limitations, and offering insights into their practical applications.

1. Wired Connections: The Foundation of Reliable Sharing

The most reliable and often fastest method for transferring large files between computers remains a wired connection. This approach leverages the established infrastructure of Ethernet cables, offering consistent high-speed data transfer rates.

a. Ethernet Cable Connection:

  • Advantages: Provides the highest data transfer speeds, ensuring rapid file transfers, particularly for large files. Offers stability and consistency, minimizing the risk of interruptions or data loss.
  • Disadvantages: Requires physical connection between devices, limiting mobility. May not be feasible for all scenarios, particularly when devices are located in separate rooms or buildings.

b. USB Connection:

  • Advantages: Offers a flexible and portable solution for transferring files between computers, enabling direct access to data on external drives.
  • Disadvantages: Can be slower than Ethernet connections, especially for large files. Requires a USB port on both devices.

2. Wireless Networks: Expanding the Sharing Horizon

Wireless networks have revolutionized the way we connect and share data. By leveraging existing Wi-Fi infrastructure, these methods offer convenient and flexible solutions for sharing files without physical cables.

a. Wi-Fi Direct:

  • Advantages: Enables direct connection between two devices without relying on a central Wi-Fi router. Offers a secure and reliable connection for sharing files.
  • Disadvantages: Requires both devices to support Wi-Fi Direct functionality. May not be as widely supported as other methods.
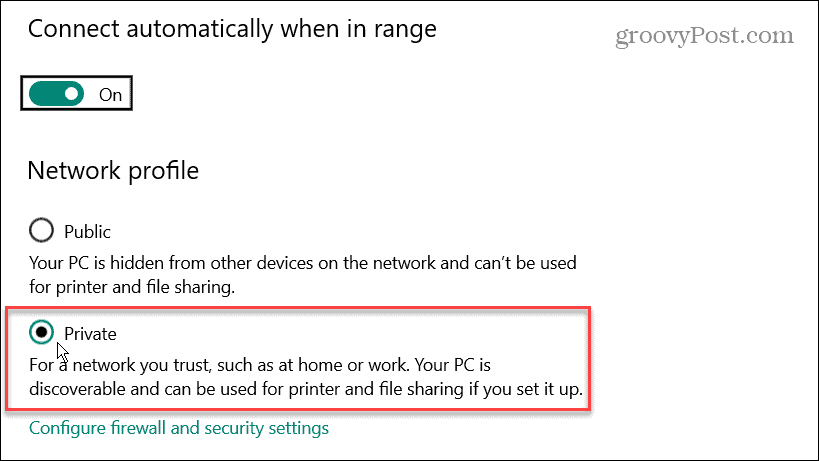
b. Network Sharing:

  • Advantages: Allows multiple devices on the same network to access shared folders and files. Provides a centralized location for managing and accessing shared resources.
  • Disadvantages: Requires a shared network connection. Security considerations are crucial, as shared files are accessible to all devices on the network.

c. Cloud Storage Services:

  • Advantages: Enables file sharing across multiple devices and locations. Provides convenient access to files from any internet-connected device.
  • Disadvantages: Requires an internet connection to access and share files. Data privacy and security concerns arise with storing sensitive information in the cloud.

3. Peer-to-Peer Sharing: Direct Connections Without Centralized Servers

Peer-to-peer (P2P) sharing technologies enable direct communication between devices without relying on a central server. This approach offers a decentralized and efficient way to transfer files.

a. File Transfer Protocol (FTP):

  • Advantages: Offers a simple and reliable method for transferring files between computers. Allows for both file uploads and downloads.
  • Disadvantages: Requires setting up an FTP server on one of the devices. Security concerns arise due to potential vulnerabilities in FTP protocols.

b. Secure Copy (SCP):

  • Advantages: Provides a secure and encrypted method for transferring files between computers. Suitable for transferring sensitive data.
  • Disadvantages: Requires a secure shell (SSH) connection, which can be more complex to set up than other methods.

4. Emerging Technologies: Exploring the Future of File Sharing

The rapid evolution of technology continues to drive innovation in file sharing methods. New approaches are emerging, offering promising solutions for seamless and efficient data transfer.

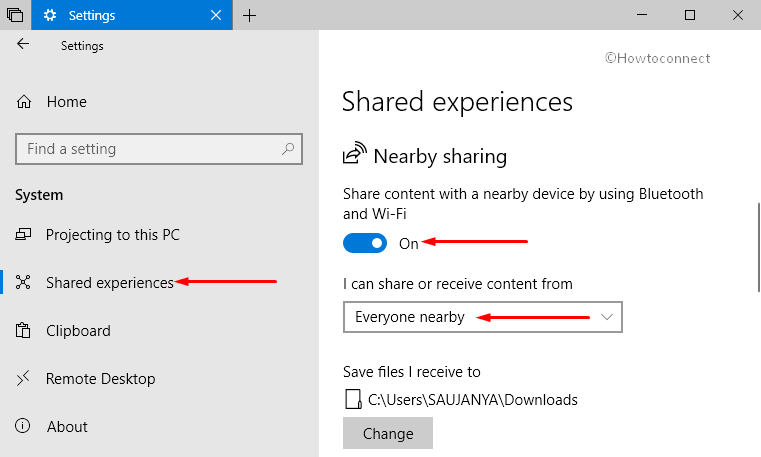
a. Near Field Communication (NFC):

  • Advantages: Enables data transfer between devices in close proximity, offering a convenient and fast option for sharing small files.
  • Disadvantages: Limited range, typically requiring devices to be within a few centimeters of each other. Not suitable for large file transfers.

b. Ultra-Wideband (UWB):

  • Advantages: Offers high data transfer rates and precise location tracking, enabling faster and more reliable file sharing.
  • Disadvantages: Relatively new technology with limited adoption and availability.

c. Li-Fi:

  • Advantages: Utilizes light waves for data transmission, offering faster speeds and greater security compared to Wi-Fi.
  • Disadvantages: Requires line-of-sight between devices. Limited range and availability.

Understanding the Importance of Choosing the Right Method

The choice of file sharing method depends on various factors, including the size of the files being transferred, the distance between devices, the desired speed, and security considerations.

  • For transferring large files quickly and reliably, wired connections offer the best performance.
  • For convenient and flexible sharing across devices, wireless networks and cloud storage services are suitable options.
  • For direct and secure file transfers, peer-to-peer methods like SCP provide a robust solution.
  • Emerging technologies like NFC and UWB offer promising alternatives for future file sharing needs.

FAQs: Addressing Common Questions About File Sharing

Q: What are the security implications of sharing files without Bluetooth?

A: The security implications of sharing files without Bluetooth depend on the chosen method. Wired connections generally offer high security, while wireless networks and cloud storage services require careful configuration and security measures to protect data. Peer-to-peer methods like SCP provide secure and encrypted file transfers, but require proper authentication and authorization.

Q: How can I ensure secure file sharing without Bluetooth?

A: To ensure secure file sharing without Bluetooth, consider the following:

  • Use strong passwords and encryption: Protect your devices and networks with strong passwords and enable encryption whenever possible.
  • Choose reputable cloud storage providers: Select cloud storage services with robust security features and a proven track record of protecting user data.
  • Use secure protocols: When using peer-to-peer methods like SCP, ensure that the connection is secure and uses encryption.
  • Be mindful of shared network access: Limit access to shared folders and files to authorized users only.

Q: What are the best practices for sharing files without Bluetooth?

A: To ensure efficient and secure file sharing without Bluetooth, follow these best practices:

  • Use a reliable and secure method: Choose a file sharing method that meets your specific needs and offers adequate security.
  • Back up your data: Regularly back up your files to prevent data loss in case of unexpected events.
  • Use antivirus software: Install and maintain antivirus software on all your devices to protect against malware and other threats.
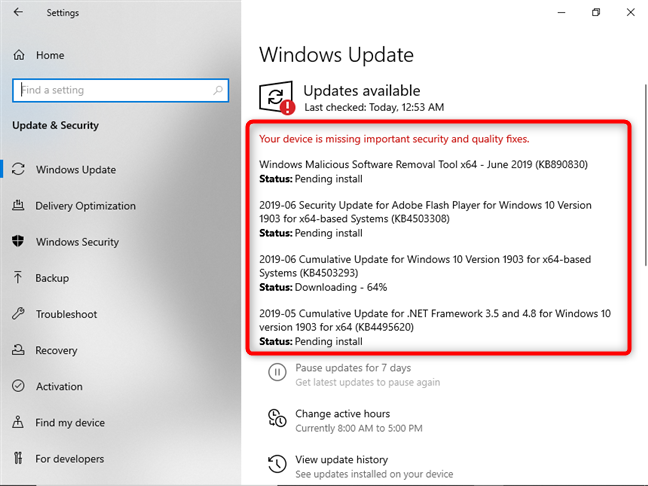
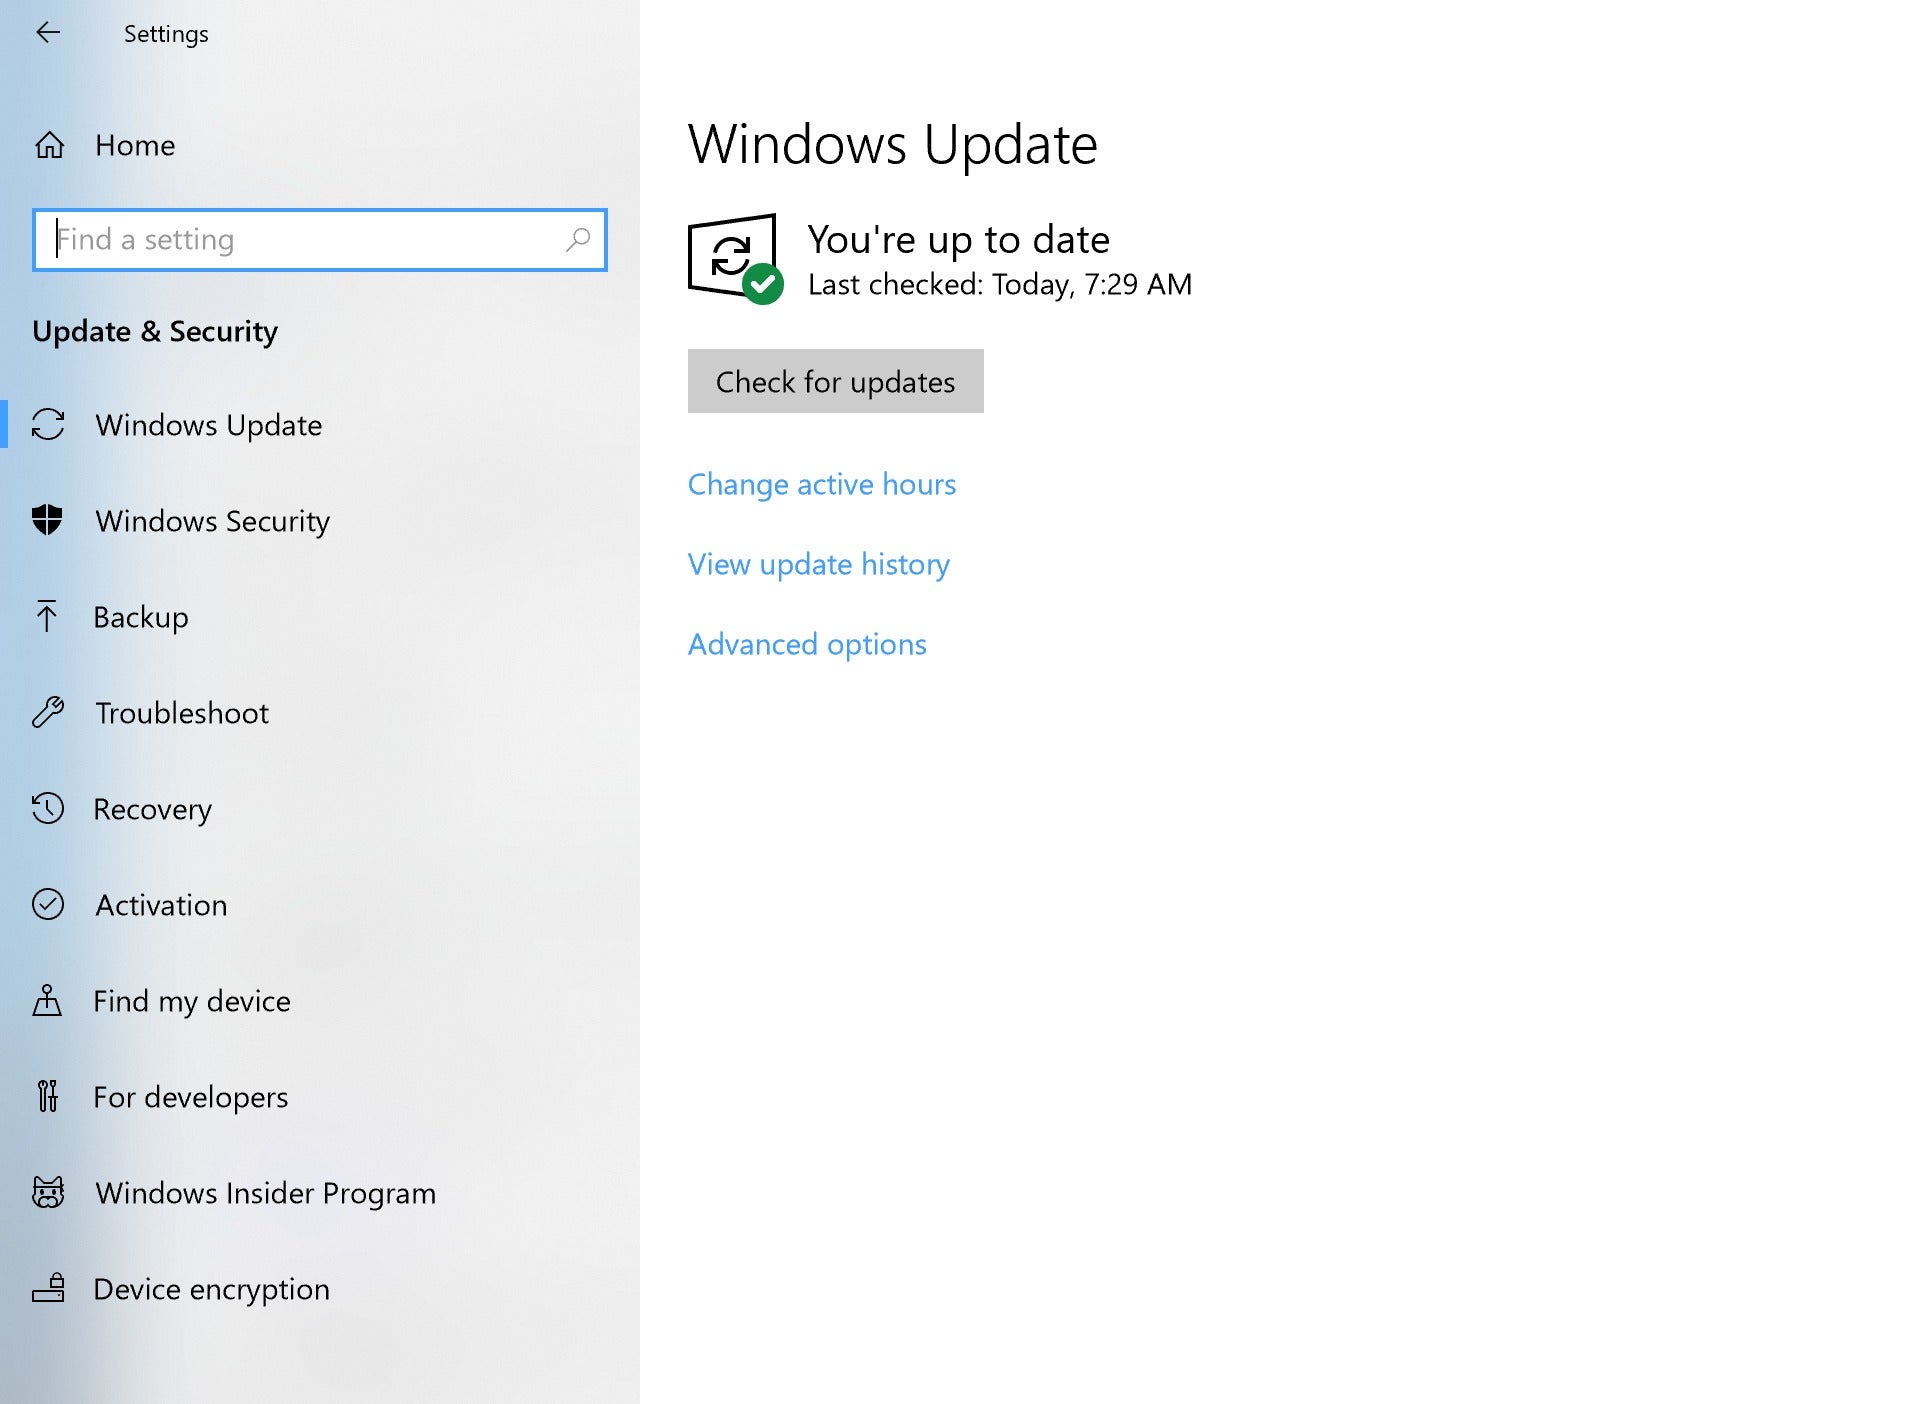
  • Keep your software updated: Regularly update your operating system and software to ensure you have the latest security patches.

Conclusion: Embracing the Future of File Sharing

The pursuit of seamless and efficient file sharing continues to drive innovation in technology. While Bluetooth remains a popular option, alternative methods offer diverse solutions to meet specific needs and preferences. By exploring the strengths and limitations of each approach, users can make informed decisions about how to share files between computers without relying on Bluetooth. As technology advances, we can expect even more innovative methods to emerge, further simplifying and enhancing the way we exchange data in our interconnected world.

Transfer files between mac and pc via bluetooth - ultimategera SHARE FILES BETWEEN PC AND ANDROID VIA BLUETOOTH - YouTube How to wirelessly share files between a mac and pc - naagm
Alternative Methods for File Sharing when WiFi and Bluetooth Fail 10 Ways to Share Files between Two Computers - TechWiser How to Share Files Between Computers? Here Are 5 Solutions (2023)
How To Share Files Via Bluetooth On Windows Pc  kokutom How to Wirelessly Share Files Between Mac and PC Without Any App

Closure

Thus, we hope this article has provided valuable insights into Beyond Bluetooth: Exploring Alternative Methods for Sharing Files Between Computers. We thank you for taking the time to read this article. See you in our next article!

The Enigma Of An Unresponsive Shutdown: Troubleshooting Windows 11’s Shutdown Issues

The Enigma of an Unresponsive Shutdown: Troubleshooting Windows 11’s Shutdown Issues

Introduction

In this auspicious occasion, we are delighted to delve into the intriguing topic related to The Enigma of an Unresponsive Shutdown: Troubleshooting Windows 11’s Shutdown Issues. Let’s weave interesting information and offer fresh perspectives to the readers.

The Enigma of an Unresponsive Shutdown: Troubleshooting Windows 11’s Shutdown Issues

How To Fix Windows 11 Shutdown Problem  Step By Step FIX - YouTube

The inability to shut down a Windows 11 laptop can be a frustrating and disruptive experience. It disrupts workflows, hinders productivity, and leaves users questioning the stability of their operating system. This article aims to provide a comprehensive guide to understanding and resolving this issue, exploring the diverse causes and offering practical solutions.

Understanding the Problem:

When a laptop fails to shut down, it often indicates an underlying problem that prevents the operating system from executing the shutdown process correctly. This could stem from various factors, including:

  • Software Conflicts: Incompatible or malfunctioning applications can interfere with the shutdown process, causing it to hang or stall.
  • Driver Issues: Outdated or corrupted drivers, particularly those related to hardware components, can lead to shutdown failures.
  • System File Corruption: Damaged or corrupted system files, essential for the smooth operation of Windows, can disrupt the shutdown sequence.
  • Hardware Malfunctions: Faulty hardware components, such as the motherboard, RAM, or hard drive, can prevent the system from shutting down properly.
  • Background Processes: Processes running in the background, often associated with system updates, antivirus software, or other applications, may prevent the system from shutting down completely.
  • Power Management Issues: Improper power settings or malfunctioning power components can also hinder the shutdown process.
  • Operating System Errors: Bugs or glitches within the Windows 11 operating system itself could cause shutdown failures.

Diagnosing the Root Cause:

Identifying the source of the shutdown problem is crucial for implementing the right solution. Here are some steps to diagnose the issue:

  1. Check for Running Processes: Open the Task Manager (Ctrl+Shift+Esc) and examine the list of running applications and processes. Look for any processes that appear to be consuming excessive resources or behaving erratically.
  2. Monitor System Logs: Examine the Windows Event Viewer for error messages or warnings related to the shutdown process. These logs can provide valuable clues about the cause of the issue.
  3. Run System File Checker: Use the System File Checker (SFC) tool to scan for and repair corrupted system files. This can be accessed by opening the command prompt (cmd) as an administrator and typing "sfc /scannow."
  4. Update Drivers: Ensure all drivers, particularly those related to hardware components like the motherboard, graphics card, and network adapter, are up to date.
  5. Perform a Clean Boot: A clean boot starts Windows with a minimal set of drivers and programs, isolating potential conflicts that may be causing the shutdown issue.
  6. Check for Hardware Malfunctions: Run diagnostic tests on hardware components, such as the RAM, hard drive, and motherboard, to rule out any potential hardware failures.

Solutions and Troubleshooting Strategies:

Once the root cause is identified, the following strategies can be employed to resolve the shutdown issue:

  • Terminate Conflicting Processes: If a specific process is identified as interfering with the shutdown, terminate it through the Task Manager.
  • Update or Reinstall Drivers: Update or reinstall drivers for any hardware component that might be causing the shutdown failure.
  • Repair System Files: Run the System File Checker (SFC) to repair any corrupted system files that might be interfering with the shutdown process.
  • Disable Background Processes: Temporarily disable unnecessary background processes, particularly those related to system updates, antivirus software, or other applications, to see if they are preventing the system from shutting down.
  • Adjust Power Settings: Verify power management settings and ensure they are configured correctly for optimal shutdown behavior.
  • Perform a System Restore: If the shutdown issue is recent, a system restore to a previous point in time can potentially revert the system to a stable state.
  • Reinstall Windows 11: If all other troubleshooting steps fail, reinstalling Windows 11 can potentially resolve the problem, but this should be considered a last resort as it requires a clean installation and may involve data loss.

FAQs:

Q: What if my laptop is completely unresponsive, even to the power button?

A: In this case, the problem might be a hardware malfunction. Try disconnecting the power cord, removing the battery (if possible), and holding down the power button for 30 seconds to discharge any residual power. Then, reconnect the power cord and try starting the laptop again. If the problem persists, seek professional technical assistance.

Q: Why does my laptop shut down but not completely turn off?

A: This could be due to a power management setting or a background process that keeps the system in a low-power state. Check power settings and disable any unnecessary background processes.

Q: Can a virus cause shutdown issues?

A: Yes, malware can interfere with the shutdown process. Run a thorough scan with a reputable antivirus software to detect and remove any potential threats.

Tips:

  • Regularly update your operating system and drivers: This helps ensure the system is running on the latest software versions, reducing the chances of conflicts or bugs.
  • Perform regular system maintenance: Clean up temporary files, defragment the hard drive, and run disk cleanup to optimize system performance and minimize the risk of shutdown issues.
  • Monitor system resources: Pay attention to CPU usage, RAM consumption, and hard drive activity to identify potential bottlenecks or resource-intensive processes that might be causing shutdown failures.
  • Backup your data regularly: This is crucial to protect your data in case of unforeseen issues, including shutdown failures.

Conclusion:

The inability to shut down a Windows 11 laptop can be a frustrating and disruptive experience. Understanding the potential causes and employing appropriate troubleshooting strategies can help resolve this issue. By following the steps outlined in this article, users can diagnose the root cause of the problem and implement solutions to restore normal shutdown functionality. It is important to remember that if the issue persists, seeking professional technical assistance may be necessary. Regular system maintenance, driver updates, and data backups are essential practices that can prevent and minimize the occurrence of shutdown issues, ensuring a smoother and more reliable computing experience.

How to fix Windows 11 shutdown box keeps showing up randomly? 5 Ways to Fix Windows 11 will not Shutdown Problem Easily FIX: Windows 11 shutdown box keeps popping up randomly - YouTube
Shutdown Windows 11 Troubleshooting Windows 11 Shutdown Issues Windows 11 Shut Down Problem
FIX: Windows 11 shutdown box keeps popping up randomly Shutdown Windows 11

Closure

Thus, we hope this article has provided valuable insights into The Enigma of an Unresponsive Shutdown: Troubleshooting Windows 11’s Shutdown Issues. We hope you find this article informative and beneficial. See you in our next article!

Navigating The Landscape Of Windows 11: A Comprehensive Look At Challenges And Solutions

Navigating the Landscape of Windows 11: A Comprehensive Look at Challenges and Solutions

Introduction

With enthusiasm, let’s navigate through the intriguing topic related to Navigating the Landscape of Windows 11: A Comprehensive Look at Challenges and Solutions. Let’s weave interesting information and offer fresh perspectives to the readers.

Windows 11 Challenges: Microsoft's Ongoing Efforts  May 23, 2023  Tech Backend

Windows 11, Microsoft’s latest operating system, has arrived with a host of new features and a refined visual aesthetic. However, its implementation has not been without its share of challenges, leaving some users facing a range of issues. This article aims to provide a comprehensive overview of common problems encountered with Windows 11, offering insights into their causes, potential solutions, and the broader implications for the user experience.

Understanding the Root Causes

The complexities of modern operating systems, coupled with the rapid pace of technological advancement, often lead to unforeseen issues. In the case of Windows 11, several factors contribute to the challenges users face:

  • Hardware Compatibility: Windows 11 introduces stricter system requirements, potentially rendering older hardware incompatible. This can lead to performance issues, application crashes, and even the inability to install the operating system.
  • Driver Issues: Drivers, the software that allows hardware components to communicate with the operating system, can be a source of instability. Newly released drivers may not be fully optimized for Windows 11, leading to conflicts and malfunctions.
  • Software Incompatibility: Some applications, particularly older ones, may not be compatible with the new operating system, causing them to malfunction or refuse to run altogether.
  • System Resource Management: Windows 11’s new features and enhanced security measures can demand more resources, potentially impacting performance on older or less powerful devices.
  • Bugs and Glitches: As with any new software release, Windows 11 may contain undiscovered bugs or glitches that can manifest in various ways, from minor annoyances to system-wide instability.

Exploring Common Problems in Windows 11

The challenges encountered by Windows 11 users can be categorized into several key areas:

1. Installation and Upgrade Issues:

  • TPM 2.0 Requirement: Windows 11 mandates the presence of a Trusted Platform Module (TPM) 2.0, a security feature not present in all older systems. This can prevent installation.
  • System Requirements: The minimum specifications for Windows 11 are more stringent than those for Windows 10, potentially excluding older devices.
  • Upgrade Errors: The upgrade process from Windows 10 to Windows 11 can be fraught with errors, leading to incomplete installations or system failures.

2. Performance and Stability Problems:

  • Slow Startup and Shutdown: Windows 11 may experience slower startup and shutdown times compared to its predecessor, impacting user productivity.
  • Frequent Crashes and Freezes: Unstable drivers, incompatible software, or system-level bugs can lead to crashes and freezes, disrupting workflow.
  • High CPU and Memory Usage: Resource-intensive processes or poorly optimized software can lead to excessive CPU and memory usage, impacting overall performance.

3. Application and Feature Issues:

  • Compatibility Problems: Older applications may not function correctly or at all on Windows 11, requiring updates or alternative solutions.
  • Feature Limitations: Some features, such as the Start Menu, may not function as expected or may lack specific customization options.
  • Application Errors: Software bugs or conflicts can lead to application crashes, error messages, or unexpected behavior.

4. Security and Privacy Concerns:

  • Data Collection: Windows 11’s telemetry features collect usage data, raising privacy concerns for some users.
  • Security Vulnerabilities: While Windows 11 introduces enhanced security measures, vulnerabilities can still emerge, requiring regular updates and vigilance.
  • Malware Threats: As with any operating system, Windows 11 can be susceptible to malware attacks, necessitating robust security software and practices.

Addressing the Challenges: Solutions and Strategies

While the problems mentioned above can be frustrating, there are steps users can take to mitigate them and enhance their Windows 11 experience:

1. Troubleshooting Installation and Upgrade Issues:

  • Check System Requirements: Verify that your computer meets the minimum system requirements for Windows 11.
  • Enable TPM 2.0: If your system supports TPM 2.0, ensure it is enabled in the BIOS settings.
  • Perform a Clean Install: If upgrade issues persist, consider a clean installation of Windows 11.
  • Use the Windows 11 Installation Assistant: This tool can help guide you through the installation process and resolve potential conflicts.

2. Enhancing Performance and Stability:

  • Update Drivers: Ensure all drivers, especially those for graphics cards and network adapters, are up-to-date.
  • Disable Unnecessary Startup Programs: Reduce the number of programs launching at startup to improve performance.
  • Run System Maintenance Tasks: Regularly run system maintenance tasks, such as disk cleanup and defragmentation, to optimize performance.
  • Check for System Updates: Install the latest Windows updates to address known bugs and improve stability.

3. Resolving Application and Feature Issues:

  • Check for Application Updates: Update applications to ensure compatibility with Windows 11.
  • Use Compatibility Mode: For older applications, try running them in compatibility mode to address potential conflicts.
  • Seek Alternative Applications: If an application is incompatible, consider finding an alternative that works with Windows 11.
  • Contact Application Developers: If an application is experiencing issues, contact the developers for support or updates.

4. Managing Security and Privacy:

  • Review Privacy Settings: Carefully review and adjust Windows 11’s privacy settings to control data collection and sharing.
  • Use Strong Passwords and Multi-Factor Authentication: Implement robust security measures to protect your system and data.
  • Install Antivirus Software: Protect your system from malware attacks by installing and regularly updating reputable antivirus software.
  • Stay Informed about Security Threats: Stay informed about emerging security threats and vulnerabilities to take appropriate precautions.

FAQs about Windows 11

Q: Is Windows 11 a significant upgrade over Windows 10?

A: Windows 11 offers a refined visual experience, improved performance in some areas, and new features like the redesigned Start Menu and widgets. However, the upgrade is not universally beneficial. Users with older hardware may face compatibility issues, and some features may not be compelling enough to justify the switch.

Q: Is it safe to upgrade to Windows 11?

A: Windows 11 is generally safe to upgrade to, but it’s essential to back up your data before proceeding. If you encounter issues during the upgrade, you can always revert back to Windows 10.

Q: What are the minimum system requirements for Windows 11?

A: Windows 11 requires a 64-bit processor, at least 4GB of RAM, 64GB of storage space, and a TPM 2.0 module. It also requires a compatible graphics card and display.

Q: How can I check if my computer is compatible with Windows 11?

A: Microsoft offers a PC Health Check app that can assess your system’s compatibility with Windows 11. You can download it from the Microsoft website.

Q: What are some tips for optimizing Windows 11 performance?

A: To improve performance, consider disabling unnecessary startup programs, regularly running system maintenance tasks, updating drivers, and ensuring you have sufficient RAM and storage space.

Conclusion

Windows 11 represents a significant shift in the Windows ecosystem, offering a blend of new features, visual refinements, and enhanced security measures. While its arrival has been accompanied by some challenges, understanding the root causes and implementing appropriate solutions can significantly enhance the user experience. By staying informed about potential issues, utilizing troubleshooting techniques, and embracing a proactive approach to system maintenance and security, users can navigate the complexities of Windows 11 and unlock its full potential.

Windows 11: A Comprehensive Guide about Features and Updates Perunity - Latest Business Story List of All Windows 11 Editions: Mixed Reality Enters the Stage Navigating Windows 11 by Ashraf Zakaria ยท OverDrive: ebooks, audiobooks, and more for libraries
Buy WINDOWS 11 HOME User Manual: A Comprehensive Illustrated Guide to Navigating the New Windows 11 Landscape Scenery [1920x1080] : r/wallpaper WINDOWS 11 HOME User Guide: A Complete and well-Illustrated Guide to Navigating the New Features
Learn Microsoft Windows 11 Comprehensive Windows 11 Course  Video Tutorials for Study Windows 11 Landscape Scenery 4K #1310h Wallpaper PC Desktop

Closure

Thus, we hope this article has provided valuable insights into Navigating the Landscape of Windows 11: A Comprehensive Look at Challenges and Solutions. We thank you for taking the time to read this article. See you in our next article!

Net Framework 3 5 Download For Windows 10 64

net framework 3 5 download for windows 10 64

Introduction

With great pleasure, we will explore the intriguing topic related to net framework 3 5 download for windows 10 64. Let’s weave interesting information and offer fresh perspectives to the readers.

A Comprehensive Guide to Installing and Utilizing .NET Framework 3.5 on Windows 10 64-bit

How to Install .NET Framework 3.5 on Windows 10

The .NET Framework, a foundational software development platform from Microsoft, has been instrumental in powering a wide range of applications and services. While newer versions have emerged, .NET Framework 3.5 remains relevant for specific applications and legacy software. This comprehensive guide will address the installation, importance, and potential benefits of .NET Framework 3.5 on Windows 10 64-bit systems, providing a clear understanding of its role in modern computing environments.

Understanding .NET Framework 3.5 and its Relevance

.NET Framework 3.5 is a robust platform that provides a consistent environment for building and running applications. It encompasses a vast library of pre-written code, allowing developers to focus on application logic rather than reinventing the wheel. The framework enables the creation of applications for various platforms, including Windows desktop applications, web services, and mobile applications.

While newer versions like .NET 5 and .NET 6 offer modern features and improved performance, .NET Framework 3.5 remains crucial for several reasons:

  • Legacy Application Compatibility: Many older applications and games still rely on .NET Framework 3.5. Installing it ensures compatibility with these existing programs.
  • Specific Libraries and Features: .NET Framework 3.5 includes specific libraries and features that may not be present in later versions. This can be crucial for certain functionalities.
  • Industry Standards: Some industries have adopted specific versions of the .NET Framework for their applications and systems. Compliance with these standards may necessitate the use of .NET Framework 3.5.

Installing .NET Framework 3.5 on Windows 10 64-bit

Installing .NET Framework 3.5 on Windows 10 64-bit is a straightforward process. Microsoft has made it readily accessible through the Windows Update feature.

Here’s how to install it:

  1. Open Settings: Click the Windows Start menu and select "Settings."
  2. Navigate to Update & Security: In the Settings window, select "Update & Security."
  3. Choose Windows Update: Click on "Windows Update" in the left-hand menu.
  4. Select "Optional Updates": Click on "View optional updates."
  5. Find .NET Framework 3.5: Look for the "Feature updates" section and find the entry for .NET Framework 3.5.
  6. Enable the Feature: Check the box next to .NET Framework 3.5 and click "Download and install."
  7. Restart the System: After the installation completes, restart your computer.

Alternatively, you can install .NET Framework 3.5 using the following steps:

  1. Open Control Panel: Click the Windows Start menu and search for "Control Panel."
  2. Navigate to Programs and Features: In the Control Panel, select "Programs and Features."
  3. Select "Turn Windows features on or off": Click on the link "Turn Windows features on or off" in the left-hand menu.
  4. Enable .NET Framework 3.5: Check the box next to ".NET Framework 3.5 (includes .NET 2.0 and 3.0)" and click "OK."
  5. Restart the System: After the installation completes, restart your computer.

Important Note: Installing .NET Framework 3.5 may require an internet connection to download the necessary files.

Troubleshooting Installation Issues

Occasionally, issues may arise during the installation process. Here are some common troubleshooting tips:

  • Check Internet Connection: Ensure a stable internet connection is available.
  • Run Windows Update Troubleshooter: Use the built-in Windows Update Troubleshooter to identify and resolve potential problems.
  • Check for System Updates: Ensure your Windows 10 system is up-to-date with the latest updates.
  • Disable Antivirus Software: Temporarily disable your antivirus software to see if it’s interfering with the installation.
  • Manually Download and Install: If the automatic installation fails, consider manually downloading the .NET Framework 3.5 installer from the Microsoft website and installing it.

Benefits of Using .NET Framework 3.5

While newer versions of the .NET Framework offer advancements, .NET Framework 3.5 still holds value for specific applications and situations. Here are some of its benefits:

  • Legacy Application Support: .NET Framework 3.5 allows users to run older applications that were built using this specific version of the framework.
  • Widely Supported: .NET Framework 3.5 has been a mainstay in the Microsoft ecosystem, making it a well-supported and tested platform.
  • Industry Compliance: In some industries, .NET Framework 3.5 remains the standard for specific applications and systems, ensuring compliance and interoperability.
  • Security Updates: Microsoft continues to provide security updates for .NET Framework 3.5, addressing vulnerabilities and enhancing system security.

FAQs

Q: Is .NET Framework 3.5 compatible with Windows 10 64-bit?

A: Yes, .NET Framework 3.5 is compatible with Windows 10 64-bit. Microsoft provides an easy installation process through Windows Update or Control Panel settings.

Q: Do I need to install .NET Framework 3.5 if I have a newer version of .NET?

A: If you need to run applications that specifically require .NET Framework 3.5, then yes, you will need to install it. Newer versions of .NET are not backward compatible with all features and libraries present in .NET Framework 3.5.

Q: Can I uninstall .NET Framework 3.5 after I’ve installed it?

A: Yes, you can uninstall .NET Framework 3.5 if you no longer need it. You can do this through the "Programs and Features" section in the Control Panel.

Q: Is .NET Framework 3.5 safe to install?

A: .NET Framework 3.5 is a safe and reliable platform. Microsoft regularly releases security updates to address vulnerabilities and ensure system security.

Conclusion

.NET Framework 3.5 remains a vital component for many users and applications, particularly those requiring compatibility with older software or adherence to specific industry standards. Its installation on Windows 10 64-bit is a simple process, and its benefits outweigh any potential drawbacks. While newer versions of the .NET Framework offer advancements, .NET Framework 3.5 continues to provide a stable and reliable environment for running legacy applications and ensuring compatibility with specific industry requirements.

Net Framework 3.5 for Windows 10 - Download & Install Guide How to Download & Install .Net Framework 3.5 On Windows 10 - YouTube Microsoft .NET Framework 3.5 Download & Install for Windows 10/11
Microsoft -net 3-5 sp1 download full - holosersafety Netframe 3 5 For Windows 10 .NET Framework 3.5 Offline Installer for Windows 10 and 8.x  TechGainer
Netframe 3 5 For Windows 10 how to install net framework 3.5 on windows 10,8.1,7 / How To Enable / Install .NET Framework 3.

Closure

Thus, we hope this article has provided valuable insights into net framework 3 5 download for windows 10 64. We hope you find this article informative and beneficial. See you in our next article!

Exploring The Tools Of Windows 11: A Comprehensive Guide

Exploring the Tools of Windows 11: A Comprehensive Guide

Introduction

In this auspicious occasion, we are delighted to delve into the intriguing topic related to Exploring the Tools of Windows 11: A Comprehensive Guide. Let’s weave interesting information and offer fresh perspectives to the readers.

Exploring the Tools of Windows 11: A Comprehensive Guide

Buy Windows 11 User Guide for Beginners: A Comprehensive Guide to Master Windows 11 Operating

Windows 11, the latest iteration of Microsoft’s iconic operating system, introduces a suite of powerful tools designed to enhance user experience, boost productivity, and ensure a secure and efficient computing environment. This article delves into the diverse range of tools available within Windows 11, highlighting their functionalities, benefits, and how they contribute to a seamless and enriching user journey.

Navigating the Windows 11 Interface: A User-Friendly Approach

Windows 11 prioritizes a user-friendly interface, making it intuitive for both seasoned computer users and newcomers. The redesigned Start menu, featuring a central location for pinned applications, recommended content, and a comprehensive search bar, provides a streamlined access point to essential functions. The Taskbar, now positioned at the bottom of the screen, offers quick access to open applications, system icons, and the search function.

Enhanced Personalization: Tailoring Windows 11 to Your Needs

Windows 11 empowers users to personalize their computing experience through a wide range of customization options. The Settings app, accessible through the Start menu, provides a centralized hub for adjusting system settings, managing accounts, and configuring preferences. Users can personalize their desktop with custom themes, wallpapers, and accent colors, reflecting their individual style.

Boosting Productivity: Tools for Efficiency and Focus

Windows 11 incorporates a suite of tools designed to enhance productivity and streamline workflows. The Snap Layouts feature enables users to arrange windows in pre-defined layouts, maximizing screen space and improving multitasking efficiency. Virtual desktops provide a way to organize open applications and files into distinct workspaces, fostering focus and reducing clutter.

Security and Privacy: Protecting Your Digital Footprint

Windows 11 prioritizes user security and privacy through a robust set of built-in features. Windows Defender, the integrated antivirus software, actively safeguards against malware threats, providing real-time protection. The Privacy Settings within the Settings app allow users to control data collection and sharing, ensuring their digital footprint remains secure.

Exploring the Diverse Toolkit: Essential Applications and Features

1. Windows File Explorer: The cornerstone of file management in Windows 11, File Explorer provides a graphical interface for navigating and organizing files and folders. Its intuitive design, enhanced search capabilities, and support for cloud storage services streamline file access and management.

2. Microsoft Store: The central hub for accessing and downloading applications, games, and digital content, the Microsoft Store offers a curated selection of trusted software. Users can browse, search, and install applications directly from the Store, ensuring compatibility and security.

3. Microsoft Edge: The default web browser in Windows 11, Microsoft Edge boasts a sleek interface, enhanced performance, and integrated security features. Its seamless integration with other Microsoft services and its focus on privacy make it a compelling choice for browsing the internet.

4. Windows Update: Ensuring your system stays up-to-date with the latest features, security patches, and performance enhancements, Windows Update automatically downloads and installs updates in the background. Users can choose to schedule updates or manually initiate them, ensuring a smooth and secure computing experience.

5. Accessibility Features: Windows 11 is designed to be accessible to all users, offering a range of features to accommodate diverse needs. Magnifier, Narrator, and other assistive technologies provide visual and auditory support, ensuring a comfortable and inclusive experience for all.

6. Gaming Features: Windows 11 caters to gamers with features that enhance performance and immersion. Auto HDR automatically enhances visual fidelity, while DirectX 12 Ultimate delivers high-performance graphics. The Xbox app provides access to Xbox Game Pass, offering a vast library of games to explore.

7. Windows Search: A powerful tool for finding files, applications, and information within your system, Windows Search utilizes indexing technology to provide quick and relevant results. Its advanced search filters and support for multiple search criteria enable users to locate specific items with ease.

8. Task Manager: A system monitoring tool that provides detailed information about running processes, resource usage, and system performance. Users can identify resource-intensive applications, terminate unresponsive programs, and monitor system health.

9. Settings App: A centralized hub for configuring system settings, managing accounts, and customizing preferences. Its intuitive interface and comprehensive options allow users to tailor their Windows 11 experience to their specific needs.

10. Control Panel: A legacy tool that provides access to a range of system settings and configurations. While some functionalities have been integrated into the Settings app, Control Panel remains a valuable resource for advanced users.

FAQs about Windows 11 Tools

1. How do I access the Settings app in Windows 11?

The Settings app can be accessed by clicking the Start button, then selecting the gear icon. Alternatively, you can press the Windows key + I to launch the Settings app directly.

2. What is the purpose of the Taskbar in Windows 11?

The Taskbar provides quick access to open applications, system icons, and the search function. It is located at the bottom of the screen and allows for easy switching between applications and accessing system functions.

3. How can I customize the Start menu in Windows 11?

You can customize the Start menu by right-clicking on any pinned application and selecting "Unpin from Start." To pin applications to the Start menu, simply drag and drop them from the Taskbar or File Explorer. You can also personalize the Start menu by changing the theme, accent color, and background image.

4. What are Snap Layouts in Windows 11?

Snap Layouts are pre-defined window arrangements that allow users to organize their open applications in a visually appealing and efficient manner. You can access Snap Layouts by hovering your mouse over the maximize button of a window and selecting a layout from the options presented.

5. How do I enable or disable Virtual Desktops in Windows 11?

To enable or disable Virtual Desktops, open the Settings app, navigate to "System," and select "Virtual desktops." You can then toggle the "Virtual desktops" option on or off.

6. What are the benefits of using Microsoft Edge as my web browser?

Microsoft Edge offers a sleek interface, enhanced performance, and integrated security features. Its seamless integration with other Microsoft services and its focus on privacy make it a compelling choice for browsing the internet.

7. How can I access the Accessibility features in Windows 11?

Accessibility features can be accessed through the Settings app, under the "Accessibility" section. You can find options for Magnifier, Narrator, and other assistive technologies to enhance your computing experience.

8. What are the gaming features available in Windows 11?

Windows 11 caters to gamers with features that enhance performance and immersion. Auto HDR automatically enhances visual fidelity, while DirectX 12 Ultimate delivers high-performance graphics. The Xbox app provides access to Xbox Game Pass, offering a vast library of games to explore.

Tips for Utilizing Windows 11 Tools Effectively

1. Explore the Settings App: The Settings app is a comprehensive hub for configuring your system preferences. Take the time to familiarize yourself with its various sections and options to customize your Windows 11 experience.

2. Master the Taskbar: The Taskbar is a powerful tool for quick access to open applications, system icons, and the search function. Learn how to pin applications, manage system tray icons, and utilize the search function to streamline your workflow.

3. Utilize Snap Layouts: Snap Layouts can dramatically improve your multitasking efficiency. Experiment with different layout configurations to find what works best for your specific needs and workflows.

4. Leverage Virtual Desktops: Virtual desktops provide a powerful way to organize your workspaces. Create separate desktops for different projects or tasks to maintain focus and reduce clutter.

5. Keep Your System Updated: Regularly updating your system ensures you have the latest security patches, performance enhancements, and new features. Enable automatic updates or manually initiate them to maintain a smooth and secure computing experience.

6. Explore Accessibility Features: Windows 11 offers a range of accessibility features to accommodate diverse needs. Experiment with Magnifier, Narrator, and other assistive technologies to create a comfortable and inclusive computing environment.

7. Optimize for Gaming: If you are a gamer, take advantage of the gaming features available in Windows 11. Enable Auto HDR, utilize DirectX 12 Ultimate, and explore the Xbox app and Game Pass for a superior gaming experience.

Conclusion

Windows 11 presents a comprehensive toolkit designed to empower users with a seamless, secure, and productive computing experience. From its user-friendly interface and personalization options to its robust security features and productivity-enhancing tools, Windows 11 provides a versatile platform for work, entertainment, and everything in between. By exploring the diverse array of tools available within Windows 11, users can unlock the full potential of their computing environment and enhance their digital journey.

Buy Windows 11: Discover from Beginner to Expert with this Ultimate & Complete Step-by-Step User Exploring Windows 11: The Illustrated, Practical Guide to Using Microsoft Windows ยป GFxtra Babelcube Windows 11 New Os Beginners Reference Guide Buy User Guide: A Complete To Master The
Buy WINDOWS 11 PRO USER GUIDE: A Comprehensive User Guide for Beginners and Seniors to Master Mastering Screenshots in Windows 11: A Comprehensive Guide to Built-In Tools and Features Windows 11 Comprehensive Guide And Cheat Sheet, 54% OFF
Windows 11 Windows Tools Windows 11 Introduction Quick Reference Guide by Beezix Inc  Goodreads

Closure

Thus, we hope this article has provided valuable insights into Exploring the Tools of Windows 11: A Comprehensive Guide. We thank you for taking the time to read this article. See you in our next article!

Troubleshooting Nearby Sharing Issues In Windows 10

Troubleshooting Nearby Sharing Issues in Windows 10

Introduction

With great pleasure, we will explore the intriguing topic related to Troubleshooting Nearby Sharing Issues in Windows 10. Let’s weave interesting information and offer fresh perspectives to the readers.

Troubleshooting Nearby Sharing Issues in Windows 10

Fix Nearby Sharing not working in Windows 10 - YouTube

Windows 10’s "Nearby Sharing" feature provides a seamless way to transfer files, links, and other content between nearby devices. However, instances where this feature fails to appear can be frustrating, hindering the efficient transfer of data. This article explores the common reasons behind Nearby Sharing not showing up in Windows 10 and provides detailed solutions to resolve these issues.

Understanding Nearby Sharing’s Importance

Nearby Sharing leverages Bluetooth and Wi-Fi Direct to establish a secure connection between devices, eliminating the need for cables or cloud services. This direct sharing method offers numerous advantages:

  • Speed and Efficiency: Data transfers happen quickly and directly, bypassing the latency associated with cloud services.
  • Privacy and Security: Data remains on the local network, enhancing privacy and minimizing the risk of data breaches.
  • Convenience: Sharing becomes effortless, requiring only the proximity of devices and a simple tap to initiate the transfer.

Common Causes for Nearby Sharing Not Appearing

Several factors can prevent Nearby Sharing from appearing in Windows 10. These include:

  • Disabled Feature: The Nearby Sharing feature might be turned off.
  • Bluetooth Issues: Bluetooth connectivity problems can hinder Nearby Sharing.
  • Wi-Fi Direct Issues: Malfunctioning Wi-Fi Direct functionality can disrupt the connection.
  • Network Restrictions: Network policies or firewall settings may block Nearby Sharing.
  • Outdated Drivers: Outdated Bluetooth or Wi-Fi drivers can cause compatibility issues.
  • Software Conflicts: Conflicting software or applications might interfere with Nearby Sharing.

Troubleshooting Steps

To resolve issues with Nearby Sharing, follow these steps in a sequential manner:

1. Enable Nearby Sharing:

  • Open Settings: Navigate to "Settings" by clicking the Start menu and selecting the gear icon.
  • Select System: Click on "System" from the left-hand menu.
  • Choose Shared Experiences: Select "Shared experiences" from the right-hand pane.
  • Turn on Nearby Sharing: Ensure the toggle switch for "Nearby sharing" is turned on.

2. Check Bluetooth Connectivity:

  • Open Settings: Navigate to "Settings" by clicking the Start menu and selecting the gear icon.
  • Select Devices: Click on "Devices" from the left-hand menu.
  • Verify Bluetooth Status: Confirm that Bluetooth is enabled and functioning correctly.
  • Troubleshoot Bluetooth: If Bluetooth is not working, use the built-in Windows troubleshooter to diagnose and fix potential issues.

3. Verify Wi-Fi Direct Functionality:

  • Open Settings: Navigate to "Settings" by clicking the Start menu and selecting the gear icon.
  • Select Network & Internet: Click on "Network & Internet" from the left-hand menu.
  • Choose Wi-Fi: Select "Wi-Fi" from the right-hand pane.
  • Check for Wi-Fi Direct: Verify that Wi-Fi Direct is enabled in the Wi-Fi settings.
  • Troubleshoot Wi-Fi: If Wi-Fi Direct is not working, use the built-in Windows troubleshooter to diagnose and fix potential issues.

4. Review Network Settings:

  • Open Settings: Navigate to "Settings" by clicking the Start menu and selecting the gear icon.
  • Select Network & Internet: Click on "Network & Internet" from the left-hand menu.
  • Choose Wi-Fi: Select "Wi-Fi" from the right-hand pane.
  • Check Network Restrictions: Ensure that no network policies or firewall settings are blocking Nearby Sharing.

5. Update Drivers:

  • Open Device Manager: Type "Device Manager" in the Windows search bar and click the top result.
  • Expand Bluetooth and Network Adapters: Locate and expand the "Bluetooth" and "Network Adapters" sections.
  • Update Drivers: Right-click on each Bluetooth and Wi-Fi device and select "Update driver." Follow the on-screen instructions to update the drivers.

6. Check for Software Conflicts:

  • Identify Conflicting Applications: Identify any recently installed software or applications that might interfere with Nearby Sharing.
  • Temporarily Disable Suspect Software: Disable the suspect software or applications to determine if they are causing the issue.
  • Reinstall or Update Drivers: If the issue persists, consider reinstalling or updating the drivers for the suspect software.

7. Restart Device:

  • Restart Windows: Restart your computer to clear any temporary files or processes that might be interfering with Nearby Sharing.

FAQs

Q: What if Nearby Sharing still doesn’t appear after troubleshooting?

A: If the issue persists, consider the following:

  • Check for Windows Updates: Ensure that Windows is up-to-date by checking for available updates.
  • Perform a System Restore: If the problem started recently, consider performing a system restore to a previous working state.
  • Contact Microsoft Support: If all else fails, contact Microsoft support for further assistance.

Q: Can I use Nearby Sharing with a different operating system?

A: Nearby Sharing is primarily designed for Windows 10 devices. While it may work with some Android devices, compatibility is not guaranteed.

Q: Can I use Nearby Sharing over the internet?

A: No, Nearby Sharing requires devices to be within close proximity and connected to the same local network.

Q: Is Nearby Sharing secure?

A: Yes, Nearby Sharing uses Bluetooth and Wi-Fi Direct to establish a secure connection between devices. Data is transferred directly between devices, minimizing the risk of data breaches.

Tips

  • Ensure devices are close together: Nearby Sharing relies on Bluetooth and Wi-Fi Direct, which have a limited range. Ensure the devices are within a few feet of each other.
  • Check for any obstacles: Walls, furniture, or other objects can interfere with Bluetooth and Wi-Fi signals. Try removing any potential obstacles between the devices.
  • Disable other wireless connections: Temporarily disable other wireless connections, such as Bluetooth headsets or speakers, to reduce interference.

Conclusion

Nearby Sharing is a convenient and secure way to transfer data between Windows 10 devices. Troubleshooting steps involve ensuring the feature is enabled, verifying Bluetooth and Wi-Fi Direct functionality, reviewing network settings, updating drivers, and checking for software conflicts. By following these steps, users can resolve most issues with Nearby Sharing and enjoy seamless data transfer between their devices.

How to fix Nearby Sharing not working on Windows 10 - Pureinfotech 4 formas  Cรณmo arreglar que el uso compartido cercano de Windows 10 no funciona - EaseUS How to Use Nearby Sharing to Share Files in Windows 10 - Hongkiat
How to fix Nearby Sharing not working on Windows 10 - Pureinfotech How to Fix Nearby Sharing Not Working on Windows How to fix Nearby sharing not working on Windows 10 - Pureinfotech
How to Fix Nearby Sharing Not Working on Windows Fix: Nearby sharing Issues in Windows 10

Closure

Thus, we hope this article has provided valuable insights into Troubleshooting Nearby Sharing Issues in Windows 10. We appreciate your attention to our article. See you in our next article!

Navigating The Windows 10 Update Landscape: A Comprehensive Guide

Navigating the Windows 10 Update Landscape: A Comprehensive Guide

Introduction

With great pleasure, we will explore the intriguing topic related to Navigating the Windows 10 Update Landscape: A Comprehensive Guide. Let’s weave interesting information and offer fresh perspectives to the readers.

Navigating the Windows 10 Upgrade: A Comprehensive Guide - Fashion Magazine

Windows 10, since its debut in 2015, has been a cornerstone of personal computing. Microsoft’s commitment to continuous improvement through regular updates has ensured the operating system remains relevant and secure, providing users with a dynamic and evolving experience. Understanding the intricacies of these updates is crucial for maximizing the benefits of Windows 10.

The Importance of Windows 10 Updates:

Windows 10 updates are not merely cosmetic enhancements; they are essential for maintaining a secure, efficient, and feature-rich computing environment. These updates play a critical role in:

  • Security Enhancements: Updates introduce patches to address vulnerabilities, protecting users from malware, ransomware, and other cyber threats. This is particularly important in today’s increasingly complex digital landscape.
  • Performance Optimization: Updates often include performance improvements, addressing bottlenecks and optimizing resource utilization. This leads to smoother operation, faster boot times, and improved overall responsiveness.
  • New Features and Functionality: Updates introduce new features, applications, and functionalities, enriching the user experience and expanding the capabilities of Windows 10. These additions can range from minor usability improvements to significant feature additions.
  • Bug Fixes and Stability Improvements: Updates address bugs and glitches, enhancing the stability of the operating system and minimizing system crashes or errors. This results in a more reliable and predictable computing experience.
  • Compatibility and Support: Updates ensure compatibility with the latest hardware and software, allowing users to seamlessly integrate new devices and utilize the most recent applications. This fosters a dynamic and evolving ecosystem.

Types of Windows 10 Updates:

Windows 10 updates are broadly classified into two categories:

  • Feature Updates: These are major updates that introduce significant new features, functionalities, and design changes. They are typically released twice a year, in the spring and fall. Feature updates are often referred to by their year and month of release, such as "Windows 10 May 2021 Update" or "Windows 10 October 2020 Update."
  • Quality Updates: These are smaller updates that focus on security enhancements, bug fixes, and performance improvements. They are released more frequently, often on a monthly basis. Quality updates are typically labeled as "Cumulative Updates" and are automatically installed in the background.

Understanding the Update Process:

Windows 10 automatically downloads and installs updates in the background. However, users have a degree of control over the update process:

  • Automatic Updates: This is the default setting, where updates are downloaded and installed automatically without user intervention. This ensures the system is always up-to-date and secure.
  • Scheduled Updates: Users can configure the update schedule to control when updates are downloaded and installed. This allows for flexibility and minimizes disruption during critical tasks.
  • Manual Updates: Users can manually check for and install updates through the Windows Update settings. This provides greater control over the update process but may require more user intervention.

Managing Windows 10 Updates:

Effective management of Windows 10 updates is crucial for a smooth and secure computing experience. Here are some key considerations:

  • Update Schedule: Regularly check the update schedule and prioritize installing important updates promptly. This ensures the system remains secure and receives the latest features and improvements.
  • Backup and Data Protection: Before installing major updates, it is advisable to create a system backup. This safeguards against potential data loss or system instability during the update process.
  • Compatibility Check: Before installing an update, ensure it is compatible with your hardware and software. This minimizes the risk of compatibility issues or unexpected errors.
  • Network Connectivity: Ensure a stable and reliable internet connection during the update process. This prevents interruptions and ensures a successful update installation.
  • Restart Requirements: Be prepared for system restarts during the update process. These restarts are necessary for the update to complete successfully and for the changes to take effect.

Addressing Common Concerns:

While Windows 10 updates are generally beneficial, users may encounter certain concerns:

  • Slow Download Speeds: Updates can be large files, and slow internet connections can lead to extended download times. Consider optimizing network settings or scheduling updates during off-peak hours.
  • System Instability: Some updates may cause temporary system instability or errors. This is usually resolved by restarting the system or installing subsequent updates.
  • Data Loss: While rare, data loss can occur during the update process. Regular backups can mitigate this risk.
  • Compatibility Issues: Updates may introduce compatibility issues with certain hardware or software. Check for compatibility information before installing updates.
  • Privacy Concerns: Some users may have privacy concerns regarding updates. Carefully review the update terms and conditions and consider adjusting privacy settings.

FAQs about Windows 10 Updates:

Q: How often are Windows 10 updates released?

A: Feature updates are typically released twice a year, while quality updates are released more frequently, often on a monthly basis.

Q: Are Windows 10 updates mandatory?

A: While updates are recommended, they are not strictly mandatory. However, it is highly advisable to install updates regularly for security and performance reasons.

Q: How long does it take to download and install a Windows 10 update?

A: The download and installation time varies depending on the size of the update, internet speed, and system specifications. Smaller updates may take a few minutes, while larger feature updates can take several hours.

Q: Can I pause or postpone a Windows 10 update?

A: Yes, you can pause or postpone updates for up to 35 days. However, it is advisable to install updates as soon as possible to maintain system security.

Q: What happens if I skip an update?

A: Skipping updates can leave your system vulnerable to security threats, limit access to new features, and potentially cause compatibility issues with newer software.

Q: How can I check for available updates?

A: You can check for updates by going to Settings > Update & Security > Windows Update.

Q: What if I encounter an error during the update process?

A: If you encounter an error, try restarting your computer or checking for troubleshooting information on Microsoft’s website.

Tips for Managing Windows 10 Updates:

  • Keep Your System Up-to-Date: Regularly check for and install updates to ensure your system is secure and receives the latest features.
  • Prioritize Security Updates: Install security updates promptly to protect your system from malware and other threats.
  • Schedule Updates for Off-Peak Hours: Schedule updates for times when you are not actively using your computer to minimize disruption.
  • Create System Backups: Regularly create system backups to safeguard your data in case of unexpected issues during updates.
  • Monitor Update History: Keep track of installed updates and their effects on your system. This helps identify potential issues and troubleshoot problems.
  • Check for Compatibility: Before installing updates, ensure they are compatible with your hardware and software.
  • Review Privacy Settings: Carefully review the update terms and conditions and adjust privacy settings to your preferences.

Conclusion:

Windows 10 updates are an integral part of maintaining a secure, efficient, and feature-rich computing experience. By understanding the different types of updates, managing them effectively, and addressing common concerns, users can leverage the benefits of these updates and maximize their overall computing experience. Regular updates ensure a safe, stable, and constantly evolving platform for users to enjoy the full potential of Windows 10.

The complete guide to Windows 10 updates - Digital Citizen How to manage Windows 10 updates to prevent them from ruining your life - Good Gear Guide Australia How to handle Windows 10 and 11 updates  Computerworld
Windows 10 21h2 Download And Installation Guide How to view available microsoft updates for windows 10 - kartvse How to Change Windows Update Settings
The Windows 10 Update Checklist: 5 Things to Do After Major Updates How to Update Your Windows 10 Computer : HelloTech How

Closure

Thus, we hope this article has provided valuable insights into Navigating the Windows 10 Update Landscape: A Comprehensive Guide. We appreciate your attention to our article. See you in our next article!

Windows 11: A Comprehensive Guide To Updates And Their Importance

Windows 11: A Comprehensive Guide to Updates and Their Importance

Introduction

With great pleasure, we will explore the intriguing topic related to Windows 11: A Comprehensive Guide to Updates and Their Importance. Let’s weave interesting information and offer fresh perspectives to the readers.

Windows 11: A Comprehensive Guide to Updates and Their Importance

Windows 11: A Comprehensive Guide about Features and Updates Perunity - Latest Business Story

Windows 11, the latest iteration of Microsoft’s flagship operating system, is designed to deliver a more modern, user-friendly, and secure experience. While the initial release marked a significant shift in design and functionality, the continuous evolution of Windows 11 through regular updates is crucial to maximizing its potential and ensuring a smooth, efficient, and secure user experience.

Understanding Windows 11 Updates

Windows 11 updates are a fundamental aspect of the operating system’s lifecycle. These updates serve various purposes, including:

  • Security Patches: Updates regularly address vulnerabilities and security loopholes, protecting your system from malware, ransomware, and other threats.
  • Bug Fixes: Updates resolve known bugs and issues, improving the overall stability and performance of the operating system.
  • Feature Enhancements: Updates introduce new features, functionalities, and improvements, enhancing the user experience and adding value to the operating system.
  • Performance Optimizations: Updates optimize system resources, improve hardware compatibility, and enhance overall performance, leading to faster boot times, smoother multitasking, and improved application responsiveness.
  • Driver Updates: Updates include driver updates for various hardware components, ensuring compatibility and optimal performance.

Types of Windows 11 Updates

Windows 11 updates are categorized into two primary types:

  • Feature Updates: These updates introduce major new features, significant design changes, or substantial improvements to the operating system. They are typically released once or twice a year.
  • Quality Updates: These updates focus on security enhancements, bug fixes, and performance improvements. They are released more frequently, typically on a monthly basis.

Importance of Keeping Windows 11 Updated

Maintaining an up-to-date Windows 11 system is crucial for several reasons:

  • Enhanced Security: Regular updates patch vulnerabilities and security holes, safeguarding your system and data from malicious attacks.
  • Improved Performance: Updates optimize system resources, improve hardware compatibility, and enhance overall performance, leading to a smoother and more efficient user experience.
  • Access to New Features: Updates introduce new features, functionalities, and improvements, adding value to the operating system and enhancing its capabilities.
  • Increased Stability: Updates address known bugs and issues, improving the overall stability and reliability of the operating system, minimizing crashes and errors.
  • Compatibility: Updates ensure compatibility with the latest hardware and software, enabling you to utilize the latest technologies and applications.

Managing Windows 11 Updates

Windows 11 offers various options for managing updates:

  • Automatic Updates: This is the default setting, where Windows automatically downloads and installs updates in the background.
  • Scheduled Updates: You can schedule updates to install at specific times, allowing you to control when updates occur.
  • Manual Updates: You can manually check for and download updates through the Windows Update settings.
  • Pause Updates: You can temporarily pause updates for a limited period if necessary.

FAQs about Windows 11 Updates

Q: What is the difference between Feature Updates and Quality Updates?

A: Feature updates introduce major new features and changes to the operating system, while quality updates focus on security enhancements, bug fixes, and performance improvements.

Q: How often are Windows 11 updates released?

A: Feature updates are typically released once or twice a year, while quality updates are released monthly.

Q: How do I know if my system is up-to-date?

A: You can check for updates by going to "Settings" > "Windows Update" and clicking on "Check for updates."

Q: What if I don’t want to install updates?

A: It is strongly recommended to keep your system updated for security and performance reasons. However, you can temporarily pause updates or manually manage their installation.

Q: What should I do if I encounter issues after installing an update?

A: If you experience issues after installing an update, you can try restarting your computer or rolling back the update. You can also consult Microsoft’s support website or contact their support team for assistance.

Tips for Managing Windows 11 Updates

  • Keep your system updated: Regularly check for and install updates to ensure optimal security, performance, and stability.
  • Backup your data: Before installing major updates, it is recommended to back up your important data to prevent data loss.
  • Check for compatibility: Before installing an update, verify that your hardware and software are compatible with the update.
  • Monitor update progress: Keep an eye on the update progress and ensure it is installing correctly.
  • Contact support if needed: If you encounter issues or have questions, contact Microsoft’s support team for assistance.

Conclusion

Windows 11 updates are a critical aspect of maintaining a secure, stable, and efficient operating system. By regularly installing updates, users can benefit from enhanced security, improved performance, access to new features, and increased compatibility. It is crucial to understand the different types of updates, manage them effectively, and stay informed about the latest updates and their impact on the Windows 11 experience.

Buy Windows 11 User Guide: The Most Complete Step by Step Manual to Mastering Windows 11 Best Buy Windows 11: A Complete Tutorial Guide for Beginners with Tips & Tricks to Learn and Master Windows 11 Comprehensive Guide And Cheat Sheet
Windows 11: A guide to the updates  Computerworld Windows 11 Comprehensive Guide And Cheat Sheet Update Any PC to Windows 11: Complete Guide - LoudFact
Buy Windows 11 User Guide: A Complete Guide to Master the New Windows 11 OS with Tips and Tricks Buy Windows 11 User Guide for Beginners: A Comprehensive Guide to Master Windows 11 Operating

Closure

Thus, we hope this article has provided valuable insights into Windows 11: A Comprehensive Guide to Updates and Their Importance. We hope you find this article informative and beneficial. See you in our next article!

Navigating The Windows 10 Control Panel: A Comprehensive Guide

Navigating the Windows 10 Control Panel: A Comprehensive Guide

Introduction

With enthusiasm, let’s navigate through the intriguing topic related to Navigating the Windows 10 Control Panel: A Comprehensive Guide. Let’s weave interesting information and offer fresh perspectives to the readers.

How To Open The Control Panel On Windows 10

The Control Panel, a central hub for managing various aspects of your Windows 10 operating system, remains an indispensable tool despite the emergence of the Settings app. While the Settings app offers a streamlined and modern interface, the Control Panel continues to provide access to a wider range of functionalities and advanced configuration options. This guide aims to demystify the location and usage of the Control Panel in Windows 10, highlighting its importance and benefits.

Locating the Control Panel in Windows 10

Accessing the Control Panel is straightforward and can be achieved through various methods:

  • Search Bar: The most convenient way to locate the Control Panel is by utilizing the Windows search bar. Simply type "Control Panel" into the search bar located on the taskbar, and the Control Panel icon will appear in the search results. Clicking on it will launch the Control Panel.

  • Start Menu: Another simple method involves accessing the Start menu. Click the Start button in the bottom left corner of your screen, and then type "Control Panel" in the search box within the Start menu. The Control Panel icon will appear in the search results.

  • Run Dialog Box: For users familiar with keyboard shortcuts, the Run dialog box offers a quick route to the Control Panel. Press the Windows key + R to open the Run dialog box. Type "control" in the box and click "OK" or press Enter. This will launch the Control Panel.

Understanding the Control Panel Interface

The Control Panel presents a categorized view of system settings, allowing users to easily navigate and access the relevant options. The interface is divided into different categories, each representing a specific aspect of system management. These categories include:

  • System and Security: This category houses settings related to system performance, security, and user accounts.
  • Hardware and Sound: This category provides access to settings for hardware devices, sound, and display.
  • Network and Internet: This category encompasses settings for network connections, internet options, and sharing.
  • Programs: This category allows users to manage installed programs, features, and default programs.
  • Appearance and Personalization: This category offers options for customizing the appearance of your desktop, taskbar, and other visual elements.
  • Clock and Region: This category enables users to adjust time and date settings, language preferences, and regional settings.
  • Ease of Access: This category provides accessibility options for users with disabilities.

Benefits of Using the Control Panel

The Control Panel, despite its traditional interface, offers several advantages over the Settings app:

  • Comprehensive Functionality: The Control Panel provides access to a wider range of settings and configuration options compared to the Settings app. This includes advanced features that are not readily available in the Settings app.

  • Flexibility and Customization: The Control Panel allows for greater flexibility and customization in managing system settings. It provides more granular control over various aspects of the operating system, enabling users to tailor their experience according to their preferences.

  • Legacy Support: The Control Panel continues to support legacy applications and settings that may not be accessible through the Settings app. This ensures compatibility with older software and configurations.

FAQs Regarding the Control Panel

Q: Can I use both the Control Panel and the Settings app?

A: Yes, you can use both the Control Panel and the Settings app simultaneously. They complement each other, providing different approaches to managing system settings. The Settings app is designed for common and everyday settings, while the Control Panel offers more advanced and granular control.

Q: Which is better, the Control Panel or the Settings app?

A: There is no definitive answer to this question. Both the Control Panel and the Settings app have their own strengths and weaknesses. The best option depends on your specific needs and preferences. If you require advanced settings or prefer a more familiar interface, the Control Panel might be the better choice. If you prefer a simpler and more modern interface, the Settings app might be more suitable.

Q: Can I remove the Control Panel from Windows 10?

A: No, you cannot remove the Control Panel from Windows 10. It is an integral part of the operating system and cannot be uninstalled.

Tips for Using the Control Panel Effectively

  • Utilize the Search Function: The Control Panel’s built-in search bar can quickly locate specific settings or features.
  • Explore the Categories: Familiarize yourself with the different categories within the Control Panel to understand the range of settings available.
  • Use the "View by" Option: The "View by" option at the top of the Control Panel allows you to choose between different display modes, such as "Large icons," "Small icons," or "Category."
  • Create Shortcuts: Create shortcuts on your desktop or taskbar for frequently accessed Control Panel items to enhance convenience.
  • Consult Online Resources: For detailed information on specific Control Panel settings, consult official Microsoft documentation or online resources.

Conclusion

The Control Panel remains a vital tool for managing and customizing your Windows 10 experience, offering a comprehensive set of settings and configuration options. While the Settings app provides a more streamlined and modern interface, the Control Panel continues to hold its relevance due to its legacy support, advanced functionality, and flexibility. By understanding its location, interface, and benefits, users can leverage the Control Panel effectively to optimize their Windows 10 environment.

Control Panel Windows 10 How to Access the "System" Control Panel in Windows 10 - Tech Advisor All ways to open Control Panel in Windows 10
Windows 10 help: Where is Control Panel in Windows 10?  Express.co.uk How To Open Control Panel In Windows 10 Quick Ways  Images and Photos finder Different Ways to Open Control Panel Windows - Solveddoc
windows 10 control panel settings - YouTube Understanding Microsoft Windows 10 Settings App (2024)

Closure

Thus, we hope this article has provided valuable insights into Navigating the Windows 10 Control Panel: A Comprehensive Guide. We appreciate your attention to our article. See you in our next article!

Unveiling The Secrets: A Comprehensive Guide To Removing Stored Passwords In Windows 10

Unveiling the Secrets: A Comprehensive Guide to Removing Stored Passwords in Windows 10

Introduction

With enthusiasm, let’s navigate through the intriguing topic related to Unveiling the Secrets: A Comprehensive Guide to Removing Stored Passwords in Windows 10. Let’s weave interesting information and offer fresh perspectives to the readers.

Unveiling the Secrets: A Comprehensive Guide to Removing Stored Passwords in Windows 10

How to Clear Stored Password in Windows 10? - Technoresult

Windows 10, like any modern operating system, offers the convenience of storing your passwords for websites, applications, and network connections. While this feature streamlines your online experience, it also poses security risks if not managed properly. Stored passwords, if compromised, can grant unauthorized access to sensitive information, making it crucial to understand how to remove them and maintain a secure digital environment.

This comprehensive guide delves into the intricacies of removing stored passwords in Windows 10, outlining various methods, addressing common concerns, and providing valuable tips to enhance your online security.

Understanding the Importance of Password Management

In today’s interconnected world, passwords are the gatekeepers to our digital lives. They protect access to our financial accounts, personal emails, online shopping profiles, and more. Storing these passwords locally on a device, while convenient, introduces a vulnerability point. If the device is lost, stolen, or compromised, the stored passwords become susceptible to unauthorized access.

Why Remove Stored Passwords?

The decision to remove stored passwords in Windows 10 stems from various security considerations:

  • Compromised Device: If your computer is infected with malware or falls into the wrong hands, stored passwords can be easily extracted, compromising your online accounts.
  • Shared Devices: Sharing a device with others exposes your stored passwords to potential misuse or unauthorized access.
  • Enhanced Security: Removing stored passwords forces you to use a unique and strong password for each account, significantly enhancing your overall online security.
  • Account Recovery: In case of a forgotten password, removing stored passwords necessitates a password reset through the respective website or application, promoting a secure recovery process.

Methods for Removing Stored Passwords in Windows 10

Windows 10 offers multiple methods for removing stored passwords, each catering to specific scenarios and user preferences:

1. Removing Saved Passwords for Websites and Applications:

  • Through the Credential Manager: This built-in tool allows you to view and delete stored passwords for websites and applications.
    • Open the Control Panel and search for "Credential Manager."
    • Select Windows Credentials and navigate to the desired website or application.
    • Click on Remove to delete the associated password.
  • Using the Browser’s Password Manager: Most modern web browsers, like Chrome, Firefox, and Edge, have integrated password managers. These tools allow you to view, edit, or delete saved passwords directly within the browser settings.
    • Open your browser and navigate to its settings.
    • Locate the "Passwords" or "Autofill" section.
    • Select the desired website or application and choose the "Delete" or "Remove" option.

2. Removing Saved Passwords for Network Connections:

  • Through the Network and Sharing Center: Windows 10 allows you to manage saved network passwords through this interface.
    • Open the Control Panel and navigate to "Network and Sharing Center."
    • Select "Manage Wireless Networks."
    • Choose the desired network and click on "Properties."
    • In the "Security" tab, uncheck the box for "Remember this network."
    • Click "OK" to save the changes.

3. Removing Saved Passwords for Microsoft Accounts:

  • Using the Microsoft Account Website: You can manage your Microsoft account passwords through the official website.
    • Visit the Microsoft Account website and sign in.
    • Navigate to the "Security" section.
    • Choose "Manage how you sign in."
    • You can view and remove stored passwords for different devices or applications associated with your Microsoft account.

4. Removing Saved Passwords for Other Accounts:

  • Using the Account Management Website or Application: Many websites and applications offer their own password management tools. These tools usually allow you to view, edit, or delete stored passwords associated with your account.
    • Access the website or application and navigate to the "Account Settings" or "Security" section.
    • Locate the password management options and follow the instructions provided.

5. Using Third-Party Password Managers:

  • Dedicated Password Management Tools: Several third-party password managers like LastPass, 1Password, and Dashlane provide a more robust and secure way to manage your passwords.
    • Download and install the chosen password manager.
    • Import existing passwords from your browser or other sources.
    • Use the password manager’s features to generate, store, and access passwords securely.

Addressing Common Concerns about Removing Stored Passwords

  • Loss of Convenience: While removing stored passwords might seem inconvenient initially, it ultimately enhances your security and promotes a safer online experience.
  • Difficulty Remembering Passwords: Utilizing a strong and unique password for each account can be challenging. Using a password manager can help you generate and store complex passwords securely.
  • Re-entering Passwords Frequently: Removing stored passwords may require you to re-enter passwords for websites and applications more often. This can be mitigated by using a password manager or by opting for autofill options offered by your browser.

Tips for Enhanced Security when Removing Stored Passwords

  • Use Strong Passwords: When creating new passwords, ensure they are at least 12 characters long and include a mix of uppercase and lowercase letters, numbers, and symbols.
  • Enable Two-Factor Authentication (2FA): Whenever possible, enable 2FA for your online accounts. This adds an extra layer of security by requiring a second authentication factor, such as a code sent to your phone or email.
  • Avoid Using the Same Password for Multiple Accounts: Using a unique password for each online account significantly reduces the risk of compromising multiple accounts if one password is compromised.
  • Regularly Update Passwords: Change your passwords regularly, especially for sensitive accounts like your bank or email.
  • Be Cautious of Phishing Attempts: Be wary of suspicious emails or websites that request your password or personal information.

Conclusion

Removing stored passwords in Windows 10 is an essential step towards a more secure online experience. While convenience might be compromised initially, the long-term benefits outweigh the minor inconvenience. By understanding the risks associated with stored passwords and implementing the methods and tips outlined in this guide, you can significantly enhance your online security and protect your sensitive information from unauthorized access.

Remember, staying vigilant and adopting sound password management practices is crucial in today’s digital landscape. By taking the necessary steps to secure your passwords, you can confidently navigate the online world with peace of mind.

FAQs

1. Will removing stored passwords affect my ability to access websites and applications?

No, removing stored passwords will not prevent you from accessing websites and applications. You will simply need to re-enter your password when prompted.

2. What happens to my saved passwords after I remove them?

Once removed, the saved passwords are permanently deleted from your device. They are not stored anywhere else and cannot be recovered.

3. Is it safe to use a third-party password manager?

Yes, using a reputable third-party password manager can be a secure way to manage your passwords. Choose a password manager with strong security features and a proven track record.

4. Should I remove all stored passwords from my device?

While removing all stored passwords is recommended for enhanced security, it might not be practical for everyone. Consider the risks and benefits before making a decision.

5. What if I forget my password after removing it?

If you forget your password, you will need to reset it through the website or application’s password recovery process.

How to Clear Stored Password in Windows 10? - Technoresult How to remove your login password from Windows 10  PCWorld How to Remove the User Password in Windows 10
Manage passwords in windows 10 - gaihost How to Remove Saved Passwords in Microsoft Edge on Windows 10 - YouTube Windows 10 Password Remove!! - Howtosolveit - YouTube
How To Remove Passwords From Windows 10 - YouTube Find the stored passwords in windows and then Edit or Remove them. - YouTube

Closure

Thus, we hope this article has provided valuable insights into Unveiling the Secrets: A Comprehensive Guide to Removing Stored Passwords in Windows 10. We hope you find this article informative and beneficial. See you in our next article!