Archives February 2024

QBittorrent: A Comprehensive Guide To The Open-Source Torrent Client

qBittorrent: A Comprehensive Guide to the Open-Source Torrent Client

Introduction

With enthusiasm, let’s navigate through the intriguing topic related to qBittorrent: A Comprehensive Guide to the Open-Source Torrent Client. Let’s weave interesting information and offer fresh perspectives to the readers.

qBittorrent: A Comprehensive Guide to the Open-Source Torrent Client

5 Best Open Source Torrent Clients – Better Tech Tips

The world of file sharing is vast and diverse, and within it, the BitTorrent protocol reigns supreme. This protocol, designed for efficient peer-to-peer file transfer, has become synonymous with downloading large files, particularly those found on the internet. To navigate this landscape, users rely on software known as BitTorrent clients. Among these clients, qBittorrent stands out as a robust, feature-rich, and user-friendly option.

This article delves into the world of qBittorrent, exploring its features, benefits, and capabilities. We will examine why it has become a popular choice for torrenting and how it compares to other clients.

Understanding qBittorrent

qBittorrent is a free and open-source BitTorrent client developed under the GNU General Public License. This means it is freely available to use and modify, and its code is open for anyone to inspect and contribute to. The software is renowned for its stability, efficiency, and user-friendly interface, making it a favorite among both novice and experienced torrent users.

Key Features of qBittorrent

qBittorrent boasts a comprehensive set of features that cater to various user needs. Let’s explore some of the most notable ones:

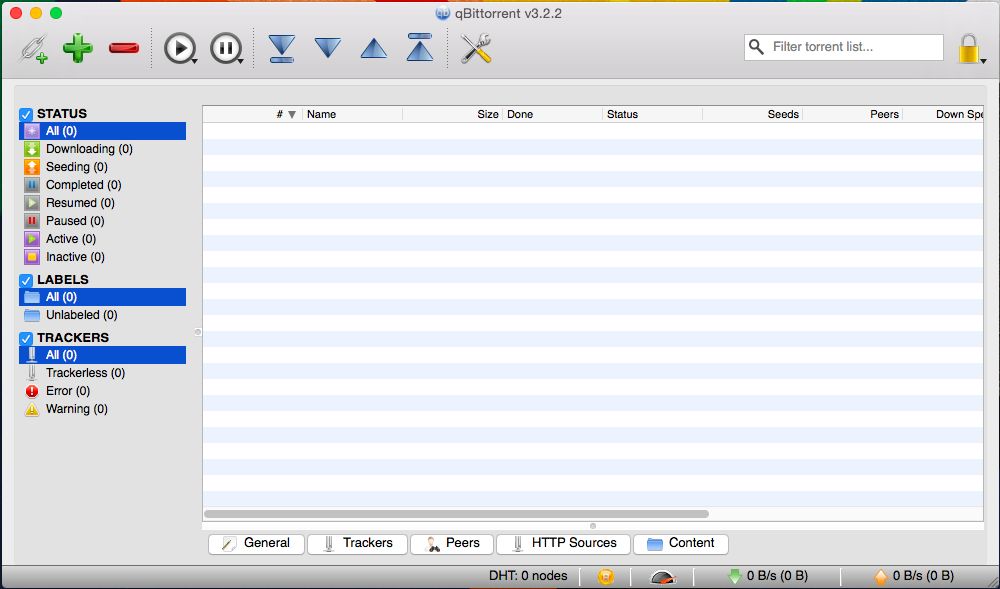
  • Cross-Platform Compatibility: qBittorrent is available for all major operating systems, including Windows, macOS, Linux, and FreeBSD. This ensures seamless integration across various devices.
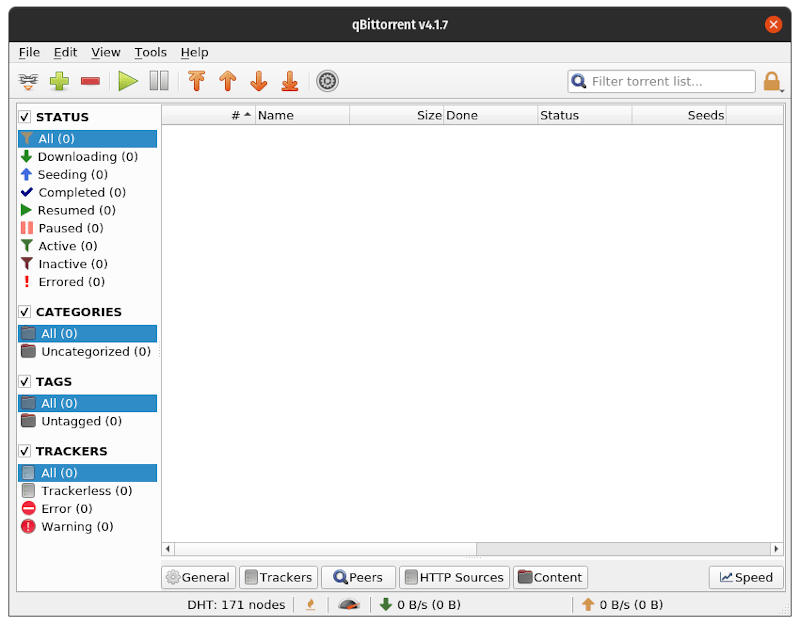
  • User-Friendly Interface: The software features a simple and intuitive interface, making it easy to navigate and use. Its layout is clean and organized, allowing users to find the information they need quickly.
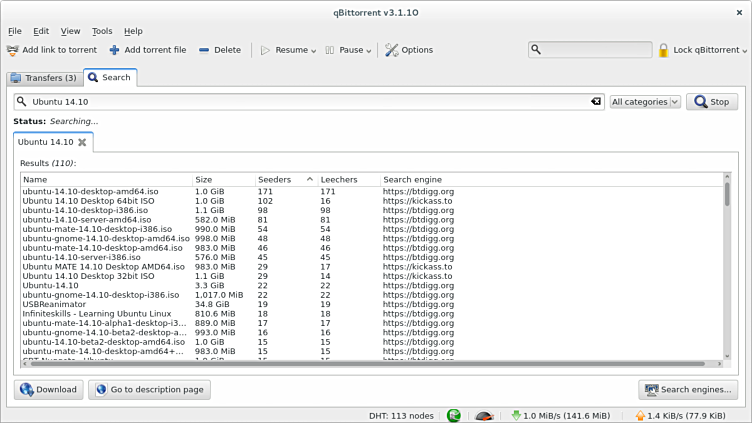
  • Built-in Torrent Search: qBittorrent includes a built-in search engine that allows users to search for torrents directly within the client. This eliminates the need for external search engines and streamlines the torrent discovery process.
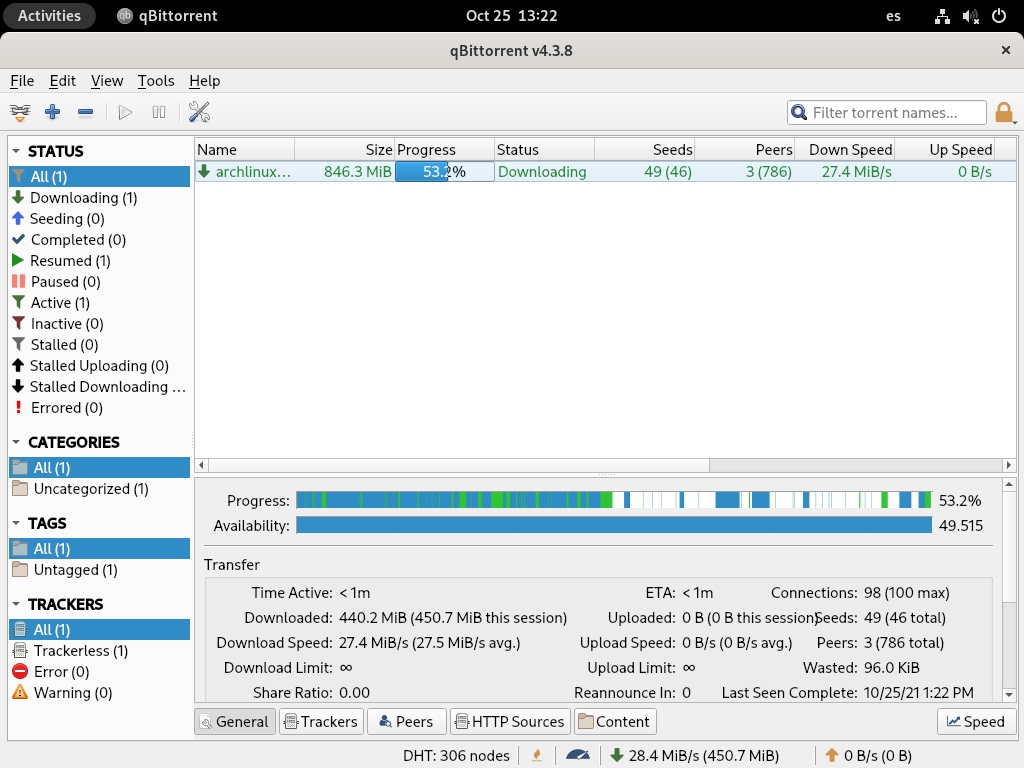
  • Advanced Download Management: qBittorrent offers comprehensive download management features, including the ability to schedule downloads, set download priorities, pause and resume downloads, and manage download speeds.
  • Multiple Download Sources: The client supports downloading from multiple sources simultaneously, enhancing download speeds and ensuring redundancy in case of connection issues.
  • Magnet Link Support: qBittorrent seamlessly supports magnet links, allowing users to quickly start downloading torrents without the need for .torrent files.
  • Advanced Filtering Options: Users can filter torrents based on various criteria, such as size, date, and popularity, making it easier to find the desired files.
  • IP Filtering: qBittorrent allows users to block specific IP addresses or ranges, enhancing security and privacy.
  • Protocol Encryption: qBittorrent supports various encryption protocols, including TLS and SSL, ensuring secure communication and protecting user privacy.
  • Remote Control: qBittorrent offers remote control capabilities, allowing users to manage downloads from any device with an internet connection.

Benefits of Using qBittorrent

Beyond its robust feature set, qBittorrent offers several advantages that make it an attractive choice for torrenting:

  • Open Source and Free: qBittorrent is entirely free to use and download, eliminating the need for subscriptions or paid upgrades. Its open-source nature ensures transparency and allows for community-driven development.
  • Lightweight and Resource-Efficient: qBittorrent is designed to be lightweight and resource-efficient, minimizing its impact on system performance. This makes it suitable for users with limited system resources.
  • Secure and Privacy-Focused: qBittorrent prioritizes user privacy and security. Its built-in encryption protocols and IP filtering capabilities help protect user data and anonymity.
  • Highly Customizable: qBittorrent offers a wide range of customization options, allowing users to tailor the software to their specific needs and preferences.
  • Active Community Support: qBittorrent boasts a vibrant and active community of users and developers who provide support, updates, and new features.

qBittorrent vs. Other Torrent Clients

qBittorrent stands out in the crowded BitTorrent client market due to its unique combination of features, benefits, and user experience. While other clients like uTorrent and BitTorrent offer similar functionalities, qBittorrent’s open-source nature, focus on privacy, and resource efficiency make it a compelling alternative.

FAQs about qBittorrent

Q: Is qBittorrent safe to use?

A: qBittorrent is a safe and secure torrent client. It employs encryption protocols to protect user data and privacy, and its open-source nature allows for independent security audits. However, as with any software, it is essential to be cautious when downloading torrents and ensure you are downloading from reputable sources.

Q: Is qBittorrent legal to use?

A: The legality of using torrent clients depends on the specific files being downloaded and the laws of the user’s jurisdiction. While using torrent clients itself is not illegal, downloading copyrighted material without permission is. It is essential to be aware of copyright laws and only download content that is legally available.

Q: What are the system requirements for qBittorrent?

A: qBittorrent has minimal system requirements. It runs smoothly on most modern computers and requires a minimum of 256 MB of RAM and 100 MB of hard drive space.

Q: How do I install qBittorrent?

A: Installing qBittorrent is straightforward. Visit the official qBittorrent website and download the installer for your operating system. Follow the on-screen instructions to complete the installation process.

Q: How do I use qBittorrent?

A: qBittorrent is intuitive to use. After launching the software, you can either add a torrent file or paste a magnet link. The client will then start downloading the torrent. You can manage downloads, set priorities, and configure settings from the software’s interface.

Tips for Using qBittorrent Effectively

  • Use a VPN: Consider using a VPN to enhance privacy and security while torrenting. A VPN encrypts your internet traffic and masks your IP address, making it harder for others to track your online activity.
  • Download from reputable sources: Always download torrents from trusted websites and sources to minimize the risk of malware or viruses.
  • Use a torrent search engine: Utilize a torrent search engine like The Pirate Bay or Zooqle to find the desired torrents.
  • Check the torrent’s health: Before downloading a torrent, check its health by looking at the number of seeders and leechers. A higher number of seeders indicates a more active torrent with faster download speeds.
  • Configure download speeds: Adjust download speeds to avoid overwhelming your internet connection or impacting other online activities.
  • Utilize advanced features: Explore qBittorrent’s advanced features, such as scheduling downloads, setting priorities, and using IP filtering, to optimize your torrenting experience.

Conclusion

qBittorrent stands as a powerful and user-friendly BitTorrent client, offering a comprehensive suite of features and benefits. Its open-source nature, focus on privacy, and resource efficiency make it an attractive alternative to other torrent clients. Whether you are a seasoned torrent user or a newcomer to the world of file sharing, qBittorrent provides a reliable and secure platform for downloading and managing torrents. By understanding its features, benefits, and best practices, users can harness the power of qBittorrent to effectively navigate the world of torrenting.

qBittorrent  Flathub What is the Best Open Source BitTorrent Client? - Best 10 VPN Reviews 5 Free Open Source BitTorrent Clients
qBitTorrent vs uTorrent in 2024 [Torrent Clients Compared] qBittorrent Open-Source Torrent Downloader Gets Massive WebUI Improvements, More Open source BitTorrent clients for Linux computers and Android - RS1 Linux Tools
Top 7 Torrent Clients For Ubuntu Linux qBittorrent : A Free and Open Source Torrent Client in 2023 - HyperlinKIOSK

Closure

Thus, we hope this article has provided valuable insights into qBittorrent: A Comprehensive Guide to the Open-Source Torrent Client. We appreciate your attention to our article. See you in our next article!

Bridging The Gap: A Comprehensive Guide To Phone Link For Windows 10

Bridging the Gap: A Comprehensive Guide to Phone Link for Windows 10

Introduction

With enthusiasm, let’s navigate through the intriguing topic related to Bridging the Gap: A Comprehensive Guide to Phone Link for Windows 10. Let’s weave interesting information and offer fresh perspectives to the readers.

Guide: How to connect your Android phone to your Windows PC with Phone Link - Neowin

In the modern technological landscape, the lines between our digital lives and our mobile experiences are blurring. The seamless integration of devices is paramount, and Microsoft’s Phone Link for Windows 10 is a powerful tool designed to bridge this gap, fostering a more interconnected and efficient user experience.

Phone Link: A Bridge Between Worlds

Phone Link for Windows 10 is a free application that allows users to connect their Android smartphone to their Windows 10 PC. This connection enables users to access and manage their phone’s features directly from their computer, effectively extending the functionality of their smartphone onto their desktop.

Key Features and Capabilities

Phone Link for Windows 10 offers a range of features that enhance the user experience and streamline interactions between devices:

  • Messaging: Users can seamlessly send and receive SMS messages directly from their PC, eliminating the need to constantly switch between devices.
  • Notifications: Phone Link mirrors notifications from the Android device, allowing users to stay informed about incoming calls, messages, and other relevant alerts without having to constantly check their phone.
  • Phone Calls: Phone Link facilitates making and receiving phone calls directly from the PC. This feature is particularly useful for users who prefer to utilize their computer’s microphone and speakers for clearer audio quality.
  • File Transfer: Phone Link allows for easy file sharing between the PC and the Android device, enabling users to quickly transfer photos, videos, documents, and other files.
  • Screen Mirroring: Phone Link’s screen mirroring feature allows users to view their phone’s screen on their PC, providing a larger and more immersive viewing experience for multimedia content and presentations.

Benefits of Phone Link for Windows 10

The use of Phone Link offers several benefits that enhance productivity, convenience, and user experience:

  • Enhanced Productivity: By accessing and managing smartphone features from the PC, Phone Link streamlines workflows, allowing users to focus on tasks without constant device switching.
  • Improved Communication: Seamless messaging and phone call functionality eliminate the need for manual device switching, ensuring a smooth and efficient communication experience.
  • Enhanced Multimedia Experience: Screen mirroring enables users to enjoy multimedia content on a larger screen, offering a more immersive and enjoyable experience.
  • Increased Accessibility: Phone Link provides a more convenient way for users with physical limitations to interact with their smartphone, utilizing the larger screen and keyboard of their PC.
  • Enhanced Security: Phone Link can be used to manage and control certain phone features, potentially enhancing the security of the device.

System Requirements and Compatibility

For optimal functionality, Phone Link requires specific system requirements and compatibility:

  • Windows 10: Phone Link is compatible with Windows 10 PCs, requiring a minimum version of Windows 10 April 2018 Update (version 1803).
  • Android Device: The connected Android device must be running Android 7.0 Nougat or later.
  • Bluetooth Connectivity: Bluetooth connectivity is essential for establishing a connection between the PC and the Android device.
  • USB Connectivity: For certain features, such as file transfer and screen mirroring, USB connectivity may be required.

Setting Up Phone Link

Setting up Phone Link involves a straightforward process:

  1. Download Phone Link: Download and install Phone Link from the Microsoft Store on your Windows 10 PC.
  2. Enable Bluetooth: Enable Bluetooth on both your PC and Android device.
  3. Pair Devices: Pair your PC and Android device via Bluetooth.
  4. Connect Phone Link: Launch Phone Link on your PC and follow the on-screen instructions to connect your Android device.
  5. Grant Permissions: Grant necessary permissions to Phone Link on your Android device to access features such as messages, calls, and notifications.

Troubleshooting Common Issues

While Phone Link generally offers a seamless experience, users may encounter occasional issues. Common troubleshooting steps include:

  • Restart Devices: Restarting both the PC and Android device can resolve temporary connectivity issues.
  • Check Bluetooth Connection: Ensure that Bluetooth is enabled on both devices and that they are properly paired.
  • Update Drivers: Update Bluetooth drivers on your PC to ensure compatibility.
  • Grant Permissions: Check that Phone Link has the necessary permissions on your Android device.
  • Disable Anti-Virus: Temporarily disable antivirus software on your PC to rule out potential interference.

FAQs Regarding Phone Link for Windows 10

Q: Can I use Phone Link with an iPhone?

A: Currently, Phone Link is only compatible with Android devices.

Q: Can I use Phone Link to access my phone’s data, such as contacts or photos, from my PC?

A: While Phone Link allows file transfer, accessing phone data directly from the PC is not currently supported.

Q: Does Phone Link drain my phone’s battery?

A: Phone Link uses a minimal amount of battery power, similar to other background applications.

Q: Is Phone Link secure?

A: Phone Link utilizes secure communication protocols to protect user data during transmission.

Q: Can I use Phone Link with multiple devices?

A: Phone Link can be used with one Android device at a time.

Tips for Optimizing Phone Link Usage

  • Enable Wi-Fi: Using a Wi-Fi connection for data transfer can significantly improve speed and stability.
  • Keep Devices Up-to-Date: Ensure both your PC and Android device are running the latest software updates for optimal performance.
  • Manage Notifications: Customize notification settings on your Android device to control which alerts are mirrored on your PC.
  • Use Phone Link’s Keyboard Shortcuts: Utilize keyboard shortcuts for quicker navigation and access to features.

Conclusion

Phone Link for Windows 10 is a valuable tool for enhancing the user experience by seamlessly integrating Android devices with Windows 10 PCs. Its ability to manage phone calls, messages, notifications, and files directly from the PC streamlines workflows, increases productivity, and provides a more convenient and interconnected digital environment. As technology continues to evolve, Phone Link’s functionality is likely to expand, further bridging the gap between our mobile and desktop experiences.

How To use Phone Link on Windows 11 and 10 - Tech Advisor Guide: How to connect your Android phone to your Windows PC with Phone Link - Neowin How To Link Your Android or iOS Device To Windows 10?  Connect Phone To Windows 10 - YouTube
How To use Phone Link on Windows 11 and 10 - Tech Advisor How to Link a Samsung Galaxy Phone to Windows 10 How To Use Phone Link On Windows 11 And 10  techadvisor
How to Connect Windows 10 and Android smartphone Using Microsoft's Phone Link app How To Link Up Your Android Smartphone With Windows 10  technotips

Closure

Thus, we hope this article has provided valuable insights into Bridging the Gap: A Comprehensive Guide to Phone Link for Windows 10. We thank you for taking the time to read this article. See you in our next article!

Troubleshooting Program Installation Issues On Windows 11: A Comprehensive Guide

Troubleshooting Program Installation Issues on Windows 11: A Comprehensive Guide

Introduction

With great pleasure, we will explore the intriguing topic related to Troubleshooting Program Installation Issues on Windows 11: A Comprehensive Guide. Let’s weave interesting information and offer fresh perspectives to the readers.

Troubleshooting Program Installation Issues on Windows 11: A Comprehensive Guide

How to run a troubleshooter in Windows 11 - Tomas Arlen

The seamless installation of software is crucial for a smooth and productive computing experience. However, encountering difficulties installing programs on Windows 11 can be frustrating. This article explores the common reasons behind these issues and provides a comprehensive guide to resolving them.

Common Reasons for Installation Failures

Several factors can impede program installation on Windows 11, ranging from simple compatibility issues to more complex system conflicts. Understanding these reasons is the first step towards effective troubleshooting:

1. Compatibility Issues:

  • Operating System Requirements: Every program has specific minimum system requirements, including operating system version, processor, RAM, and storage space. If your system falls short of these requirements, the program might refuse to install.
  • Architecture (32-bit vs. 64-bit): Windows 11 is a 64-bit operating system, and most modern programs are designed for this architecture. However, some older programs might only be available in 32-bit versions, which may not be compatible with Windows 11.
  • Legacy Software: Certain legacy programs, especially those designed for older Windows versions, may not be compatible with Windows 11’s newer features and security protocols.

2. Installation Errors:

  • Corrupted Installation Files: Downloading corrupted installation files can lead to errors during the installation process. This can occur due to network issues or file corruption during the download.
  • Insufficient Permissions: Some programs require administrative privileges to install properly. If the user account lacks sufficient permissions, the installation might fail.
  • Conflicting Software: Existing software on your system might interfere with the installation of a new program, particularly if they share similar functionalities or rely on the same system resources.

3. System-Related Issues:

  • Outdated Drivers: Outdated or incompatible device drivers can cause conflicts with the installation process.
  • Registry Issues: The Windows Registry stores critical system settings, and errors within it can impact software installations.
  • Disk Space Constraints: Insufficient disk space can prevent a program from installing successfully.
  • Security Software Interference: Antivirus or firewall software might mistakenly block the installation process, perceiving it as a security threat.

4. Software-Specific Problems:

  • Missing Prerequisites: Some programs require specific libraries, frameworks, or other software components to function correctly. If these prerequisites are missing, the installation might fail.
  • Incomplete Installation: The installation process might be interrupted due to power outages, system crashes, or user intervention, resulting in an incomplete installation.

Troubleshooting Strategies

Once you understand the potential causes of installation failures, you can employ various troubleshooting strategies to resolve the issues:

1. Verify System Requirements:

  • Check the Program’s Website: Visit the official website of the program you’re trying to install and review the system requirements. Ensure that your computer meets or exceeds these specifications.
  • Use System Information Tools: Tools like "System Information" (accessible by searching in the Windows search bar) provide detailed information about your system’s hardware and software configurations. Compare this information to the program’s requirements.

2. Run Compatibility Troubleshooter:

  • Access Compatibility Troubleshooter: Windows 11 includes a built-in compatibility troubleshooter that attempts to identify and resolve compatibility issues. Right-click on the program’s installation file and select "Troubleshoot compatibility."
  • Follow Instructions: The troubleshooter will guide you through a series of steps, such as running the program in compatibility mode or changing the administrator settings.

3. Ensure Administrative Privileges:

  • Run as Administrator: Right-click on the program’s installation file and select "Run as administrator." This ensures that the installer has the necessary permissions to modify system files.
  • Check User Account Control Settings: If you are facing installation issues related to permissions, review the User Account Control (UAC) settings in Windows 11. You might need to temporarily disable UAC for the installation to proceed.

4. Check for Corrupted Installation Files:

  • Redownload the Program: Download the program’s installation files again from a trusted source. Ensure that the download completes without any errors.
  • Verify File Integrity: Use a checksum utility to verify the integrity of the downloaded files. This tool compares the downloaded files with a checksum value provided by the developer, ensuring that the files are not corrupted.

5. Disable Security Software:

  • Temporarily Disable Antivirus: Temporarily disable your antivirus software to see if it’s interfering with the installation. Remember to re-enable it once the installation is complete.
  • Add Program to Firewall Exclusions: Add the program’s installation directory and executable files to the firewall’s exclusion list. This prevents the firewall from blocking the installation process.

6. Update System Drivers:

  • Check for Driver Updates: Visit the manufacturer’s website for your computer’s hardware components (motherboard, graphics card, etc.) and download the latest drivers.
  • Use Device Manager: In Windows 11, open Device Manager (search for it in the Windows search bar) and check for any devices with exclamation marks or question marks next to them, indicating outdated or incompatible drivers.

7. Repair or Reset Windows 11:

  • Repair Windows 11: If you suspect system-level issues, try repairing Windows 11 using the built-in repair tools. These tools can fix corrupted system files and resolve potential conflicts.
  • Reset Windows 11: If the problem persists, consider resetting Windows 11. This option will reinstall Windows 11 without affecting your personal files, effectively resolving many system-related issues.

8. Contact Program Developer:

  • Seek Support: If none of the above troubleshooting steps resolve the issue, contact the program’s developer for support. They might be able to provide specific guidance or a solution tailored to the program.

FAQs on Program Installation Issues

Q: Why is my program not installing on Windows 11?

A: There could be various reasons, including compatibility issues, corrupted installation files, insufficient permissions, or system-related problems. Refer to the troubleshooting strategies outlined above for detailed guidance.

Q: How do I check if my computer meets the system requirements?

A: Visit the program’s official website and review the system requirements section. You can also use system information tools like "System Information" to compare your system specifications.

Q: Can I install 32-bit programs on Windows 11?

A: While Windows 11 is a 64-bit operating system, you can still install some 32-bit programs. However, compatibility issues might arise, and some features might not function correctly.

Q: What should I do if I suspect corrupted installation files?

A: Redownload the program’s installation files from a trusted source. Verify the integrity of the downloaded files using a checksum utility.

Q: How do I run a program as administrator?

A: Right-click on the program’s installation file and select "Run as administrator." This grants the installer the necessary permissions to modify system files.

Q: Should I disable my antivirus software during installation?

A: Temporarily disabling your antivirus software might be necessary if it’s interfering with the installation process. However, remember to re-enable it once the installation is complete.

Tips for Preventing Installation Issues

  • Download Programs from Trusted Sources: Always download software from official websites or reputable app stores to minimize the risk of malware or corrupted files.
  • Keep System Updated: Regularly update your operating system, drivers, and security software to ensure compatibility and security.
  • Manage Disk Space: Regularly check your disk space and delete unnecessary files to ensure sufficient space for program installations.
  • Run System Maintenance Tasks: Perform regular system maintenance tasks, such as disk cleanup and defragmentation, to optimize your system’s performance and prevent conflicts.

Conclusion

Successfully installing programs on Windows 11 requires a systematic approach to troubleshooting. By understanding the common reasons behind installation failures and employing the strategies outlined in this article, users can overcome these obstacles and enjoy a seamless software installation experience. Remember to stay vigilant, update your system regularly, and seek support from the program developer if necessary.

Troubleshooting Guide: Resolving Issues with Windows 11 Update KB5023706 - Riya Verma - Medium How to Fix Windows 11 Installation Has Failed Problem - All Things How How To Fix Windows 11 Installation Has Failed Driver Easy  Images and Photos finder
Troubleshooting the most common issues with Windows 11  TechTarget 4 Ways to Fix Unable to Install Programs or Software on Windows 11 - Guiding Tech ☑️ Windows 11 Installation Errors and How to Fix Them
How to fix Windows 11 installation issues [Full Guide] - ExBulletin Windows 11 Windows 11 Installation How To Install Windows 11 Images

Closure

Thus, we hope this article has provided valuable insights into Troubleshooting Program Installation Issues on Windows 11: A Comprehensive Guide. We appreciate your attention to our article. See you in our next article!

Isolating Threats: Understanding File Quarantine In Windows 10

Isolating Threats: Understanding File Quarantine in Windows 10

Introduction

With enthusiasm, let’s navigate through the intriguing topic related to Isolating Threats: Understanding File Quarantine in Windows 10. Let’s weave interesting information and offer fresh perspectives to the readers.

Isolating Threats: Understanding File Quarantine in Windows 10

Quarantine Windows 10

Windows 10, like any operating system, is vulnerable to malware threats. These threats can manifest in various forms, including viruses, worms, Trojans, ransomware, and spyware, each designed to disrupt system functionality, steal data, or gain unauthorized access. To protect against these malicious entities, Windows 10 incorporates a robust security framework that includes the crucial feature of file quarantine.

What is File Quarantine?

File quarantine, in the context of Windows 10, refers to the process of isolating a suspected or confirmed malicious file from the operating system’s core environment. This isolation prevents the file from causing further harm to the system or user data. Think of it as a digital quarantine zone where potentially dangerous files are confined, preventing them from spreading or executing malicious code.

How Does File Quarantine Work?

The quarantine mechanism in Windows 10 is typically triggered by antivirus software or other security programs. When these programs detect a suspicious file, they initiate the quarantine process, moving the file to a designated secure location within the system. This location is usually a dedicated folder within the antivirus software’s directory.

The Importance of File Quarantine:

File quarantine serves as a critical line of defense against malware threats. It offers several key benefits:

  • Preventing Further Damage: By isolating a malicious file, quarantine prevents it from executing malicious code, spreading to other files, or modifying system settings. This effectively stops the threat from causing further damage to the system or user data.
  • Enabling Analysis: Quarantined files are readily accessible for analysis by security professionals or antivirus software. This allows for a detailed examination of the file’s behavior and nature, helping to identify the specific threat and develop appropriate countermeasures.
  • Recovering Infected Files: In certain cases, quarantined files may contain valuable data that has been infected with malware. By quarantining the file, security software can sometimes isolate the malicious code and recover the original, clean data.
  • Providing a Safe Environment: Quarantining suspected files creates a safe environment for the system, allowing users to continue working without fear of immediate threats.

The Quarantine Process in Action:

The quarantine process typically involves the following steps:

  1. Detection: Antivirus software or security programs scan the system for suspicious files, using predefined signatures, heuristics, or other detection methods.
  2. Isolation: Upon detecting a malicious file, the security program isolates it by moving it to a dedicated quarantine folder.
  3. Notification: Users are typically notified about the quarantined file, providing information about the threat and the actions taken.
  4. Analysis: The quarantined file is analyzed by security software or experts to determine the specific threat and develop appropriate countermeasures.
  5. Removal or Recovery: Depending on the nature of the threat, the quarantined file may be permanently removed from the system or, if possible, cleaned and restored to its original state.

Types of Quarantine:

There are two main types of quarantine employed in Windows 10:

  • File-Level Quarantine: This type of quarantine isolates individual files suspected of being malicious. It is the most common type of quarantine and is used by most antivirus software.
  • System-Level Quarantine: This type of quarantine isolates entire system components or processes that are exhibiting suspicious behavior. This approach is typically employed in advanced security scenarios where broader system protection is required.

Quarantine in Windows 10 Security Features:

Windows 10 itself incorporates several security features that contribute to file quarantine:

  • Windows Defender Antivirus: This built-in antivirus software provides real-time protection against malware threats, including file quarantine capabilities.
  • Windows Security: This central security hub in Windows 10 allows users to manage various security settings, including antivirus protection and quarantine options.
  • SmartScreen Filter: This feature analyzes downloaded files and websites for potential threats, preventing malicious files from being downloaded or executed.

FAQs about File Quarantine in Windows 10:

Q: How can I access quarantined files in Windows 10?

A: Accessing quarantined files typically requires accessing the antivirus software’s interface or a dedicated quarantine folder. The specific location and method of accessing quarantined files vary depending on the antivirus software used.

Q: Can I restore a quarantined file in Windows 10?

A: Restoring a quarantined file is possible, but it is not recommended without careful consideration. If you believe the file was quarantined in error, you can typically restore it from the quarantine folder. However, it is essential to ensure the file is not malicious before restoring it to the system.

Q: What happens to quarantined files after a certain period?

A: The fate of quarantined files varies depending on the antivirus software and user settings. Some software may automatically delete quarantined files after a specific period, while others may retain them indefinitely.

Q: Can I disable file quarantine in Windows 10?

A: Disabling file quarantine is generally not recommended as it weakens the system’s security. However, it may be possible to disable quarantine in some antivirus software settings.

Tips for Using File Quarantine Effectively:

  • Keep Antivirus Software Updated: Ensure your antivirus software is up-to-date with the latest virus definitions and security patches to enhance its ability to detect and quarantine threats.
  • Scan Regularly: Regularly scan your system for malware to identify and quarantine potential threats before they cause damage.
  • Be Cautious with Downloads: Exercise caution when downloading files from untrusted sources, as they may contain malicious content.
  • Use Strong Passwords: Strong passwords protect your system from unauthorized access and malware infection.
  • Enable System Restore: System Restore allows you to revert your system to a previous state if it becomes infected with malware.
  • Backup Regularly: Regularly back up your important data to protect against data loss due to malware infection.

Conclusion:

File quarantine is a vital component of Windows 10’s security framework, effectively isolating suspected malicious files from the system. This isolation prevents further damage, enables analysis of the threat, and helps recover infected files. By understanding the importance of file quarantine and implementing best practices for its use, users can significantly enhance their system’s security and protect themselves from malware threats.

Quarantine Windows 10 How to configure quarantine files removal on Windows Defender Antivirus  Windows Central Manage Quarantined Items, Exclusions in Windows Defender
Quarantine Windows 10 Quarantine Windows 10 How to Restore Quarantined Files in Windows 10: 4 Methods - Data Recovery Pit
How to Remove Quarantined Items From Windows Defender in Windows 10 - YouTube Quarantine Windows 10

Closure

Thus, we hope this article has provided valuable insights into Isolating Threats: Understanding File Quarantine in Windows 10. We thank you for taking the time to read this article. See you in our next article!

Understanding Windows 11 Activation: A Guide To Unlocking Full Functionality

Understanding Windows 11 Activation: A Guide to Unlocking Full Functionality

Introduction

In this auspicious occasion, we are delighted to delve into the intriguing topic related to Understanding Windows 11 Activation: A Guide to Unlocking Full Functionality. Let’s weave interesting information and offer fresh perspectives to the readers.

Understanding Windows 11 Activation: A Guide to Unlocking Full Functionality

How to activate Windows 11: a complete guide + offers  Blog Mr Key Shop

Windows 11, the latest iteration of Microsoft’s operating system, offers a range of features and enhancements designed to improve user experience. However, to access the full potential of Windows 11, activation is essential. This process validates the operating system’s legitimacy and grants users full access to its features, including updates, personalized settings, and various security measures.

Why is Windows 11 Activation Necessary?

Activation serves as a crucial step in ensuring a secure and functional Windows 11 experience. It acts as a safeguard against unauthorized use and ensures that users benefit from the full range of features and functionalities that Microsoft intends for the operating system.

Methods of Windows 11 Activation

Several methods are available for activating Windows 11, each catering to different user scenarios:

1. Digital License:

  • How it works: This method associates the activation with your Microsoft account and the specific device, allowing automatic activation upon installation. It is typically obtained when upgrading from a previous Windows version or purchasing a new device with pre-installed Windows 11.
  • Benefits: Seamless and automatic activation, convenient for frequent device upgrades.
  • Limitations: Requires a Microsoft account and may be tied to a specific device.

2. Product Key:

  • How it works: A unique 25-character code used to activate Windows 11. It can be purchased separately or included with a new device.
  • Benefits: Offers flexibility and can be used on multiple devices.
  • Limitations: Requires manual input and can be lost or misplaced.

3. Volume Licensing:

  • How it works: Designed for organizations, this method involves a bulk purchase of licenses for multiple devices.
  • Benefits: Cost-effective for large deployments, central management of activations.
  • Limitations: Primarily for businesses and organizations, requiring specific agreements.

4. Trial Version:

  • How it works: A temporary version of Windows 11, allowing users to explore its features for a limited time.
  • Benefits: Enables evaluation of Windows 11 before purchase.
  • Limitations: Limited functionality and requires activation after the trial period.

Troubleshooting Activation Issues

While activation is generally straightforward, users may encounter difficulties. Common issues include:

  • Activation Errors: These can occur due to incorrect product keys, network connectivity problems, or system conflicts.
  • Activation Timeout: This happens when the activation process fails to complete within the allotted time.
  • Activation Deactivation: This can occur due to hardware changes or reinstallation of Windows.

Resolving Activation Issues

To address activation issues, consider the following steps:

  1. Verify Network Connectivity: Ensure a stable internet connection is available.
  2. Check Product Key Validity: Verify the product key is correct and hasn’t been used on another device.
  3. Restart Windows: Restarting the system can sometimes resolve temporary activation errors.
  4. Run the Troubleshooter: Windows 11 includes a built-in activation troubleshooter that can diagnose and fix common issues.
  5. Contact Microsoft Support: If the issue persists, reach out to Microsoft support for assistance.

FAQs on Windows 11 Activation:

Q: What happens if I don’t activate Windows 11?

A: Without activation, Windows 11 operates in a limited state. Users may encounter restrictions like:

  • Limited Functionality: Access to certain features, including personalization options, may be restricted.
  • Watermarks: A watermark indicating "Activate Windows" may appear on the desktop.
  • No Updates: System updates and security patches may not be available.

Q: Can I activate Windows 11 on multiple devices with the same product key?

A: This depends on the type of license. Retail product keys are typically limited to one device, while volume licenses can be used on multiple devices.

Q: How do I activate Windows 11 after a clean install?

A: After a clean install, you’ll need to enter your product key or use your digital license associated with your Microsoft account.

Q: Can I transfer my Windows 11 license to a new device?

A: Depending on the license type, transferring your Windows 11 license may be possible. Refer to Microsoft’s official documentation for detailed instructions.

Tips for Maintaining Activation:

  • Back up your Product Key: Store your product key in a safe place in case you need to reinstall Windows 11.
  • Link to Microsoft Account: Associate your Windows 11 installation with your Microsoft account for seamless activation and easier management.
  • Keep Windows Updated: Regularly update Windows 11 to ensure you have the latest features and security enhancements.

Conclusion

Windows 11 activation is a crucial step in unlocking the full potential of the operating system. By understanding the activation process, available methods, and troubleshooting techniques, users can ensure a smooth and secure experience. Remember to follow Microsoft’s official guidelines and seek assistance from their support channels if you encounter any difficulties. A properly activated Windows 11 installation empowers users with access to a comprehensive range of features and functionalities, enhancing productivity and security while ensuring a seamless user experience.

Unlock the Full Potential of Your PC: Activate Windows 11 Today! - Infetech.com  Tech News How to Activate Windows 11 [Authentic & Quickest Ways 2024] Windows 11 Activation Process (Without Product Keys)
How to activate Windows 11 (three ways) - Pureinfotech How to Activate Windows 11 for Free: 2 Best Ways - Guiding Tech Windows 11 Activation - Working - YouTube
How to Activate Windows 11 - Step By Step Windows 11 Full Activation  100% work  With Activation Key - YouTube

Closure

Thus, we hope this article has provided valuable insights into Understanding Windows 11 Activation: A Guide to Unlocking Full Functionality. We appreciate your attention to our article. See you in our next article!

Navigating The Windows Update Landscape: A Comprehensive Guide

Navigating the Windows Update Landscape: A Comprehensive Guide

Introduction

With great pleasure, we will explore the intriguing topic related to Navigating the Windows Update Landscape: A Comprehensive Guide. Let’s weave interesting information and offer fresh perspectives to the readers.

How to Manually Run Windows Updates (7/8/10) [Ultimate Guide] - Microsoft Watch

Windows updates are the lifeblood of a healthy and secure computing experience. They deliver crucial security patches, bug fixes, performance enhancements, and new features, ensuring your computer remains protected and operates smoothly. However, navigating the world of Windows updates can be a complex and sometimes confusing process. This comprehensive guide aims to demystify the process, providing a clear understanding of how Windows updates work, their importance, and how to effectively manage them.

Understanding Windows Updates

Windows updates are software packages released by Microsoft to address various aspects of the operating system. These updates can range from minor bug fixes to major feature additions, each designed to enhance the overall functionality and security of your Windows installation.

Types of Windows Updates:

  • Security Updates: These updates prioritize security by patching vulnerabilities that could be exploited by malicious actors. They are often critical and should be installed promptly.
  • Feature Updates: These updates introduce significant new features, enhancements, and changes to the operating system. They often require a larger download and may involve a longer installation process.
  • Driver Updates: These updates target specific hardware components, ensuring optimal performance and compatibility with the latest software.
  • Cumulative Updates: These updates combine various security and feature updates into a single package, simplifying the update process.

The Importance of Windows Updates:

Regularly updating your Windows installation is crucial for multiple reasons:

  • Enhanced Security: Updates often include security patches that address vulnerabilities, preventing malicious software from gaining access to your system.
  • Improved Performance: Updates can optimize system performance, address bugs and glitches, and improve overall stability.
  • New Features and Functionality: Feature updates introduce new capabilities and enhancements, expanding the functionality of your Windows installation.
  • Compatibility: Updates ensure compatibility with the latest software and hardware, preventing compatibility issues and ensuring smooth operation.

Managing Windows Updates:

While Windows updates are essential, managing them effectively is equally important. Here’s a breakdown of common methods and considerations:

  • Automatic Updates: The default setting for Windows updates is automatic, meaning your system downloads and installs updates automatically in the background. This ensures your system is always up-to-date, but it might interrupt your workflow if updates occur at inconvenient times.
  • Manual Updates: You can manually check for and install updates through the Windows Update settings. This allows you to control when updates are installed, offering flexibility but requiring proactive effort.
  • Scheduled Updates: You can schedule automatic updates to occur at specific times, minimizing disruption to your workflow. This allows for a balance between automatic updates and user control.
  • Update Pause: Windows allows you to temporarily pause updates for a set period, useful if you need to postpone updates for a specific reason. However, it’s recommended to avoid prolonged pauses to maintain system security.
  • Metered Connections: If you are on a metered connection (limited data), you can choose to download updates only when connected to a Wi-Fi network to avoid exceeding data limits.

Troubleshooting Windows Update Issues:

While Windows updates are generally seamless, you might encounter issues during the update process. Here are some common problems and solutions:

  • Slow Download Speeds: Check your internet connection for stability and speed. If you are on a shared network, consider using a wired connection for faster speeds.
  • Installation Errors: Restart your computer and try the update again. If the error persists, try running the Windows Update troubleshooter.
  • Insufficient Disk Space: Ensure you have sufficient free disk space for the update files. Delete unnecessary files or temporarily move large files to an external drive.
  • Outdated Drivers: Outdated drivers can sometimes interfere with updates. Update your drivers through the Device Manager or the manufacturer’s website.
  • Corrupted System Files: Run the System File Checker (SFC) to scan for and repair corrupted system files.

FAQs about Windows Updates:

1. Are Windows updates safe?

Yes, Windows updates are generally safe and essential for maintaining system security and stability. Microsoft rigorously tests updates before release to ensure their quality and safety. However, it’s always recommended to back up your important data before installing any major update.

2. Do I need to install every update?

While most updates are recommended, you can choose to decline optional updates that are not critical for security or functionality. However, it’s generally advisable to install all security updates as soon as possible.

3. How long do updates take?

The time required for updates varies depending on the size of the update, your internet speed, and system resources. Smaller updates may take a few minutes, while larger feature updates can take several hours.

4. Can I roll back an update?

Yes, you can usually roll back an update if it causes problems. You can access the rollback option in the Settings app under "Windows Update." However, this option is typically available for a limited time after the update is installed.

5. What if I have a slow internet connection?

If you have a slow internet connection, you can choose to download updates only when connected to a Wi-Fi network to avoid exceeding data limits. You can also configure Windows Update to download updates during off-peak hours when your internet connection is less congested.

Tips for Managing Windows Updates:

  • Keep your system up-to-date: Install updates as soon as they become available, especially security updates.
  • Schedule updates: Set a specific time for updates to occur, minimizing disruption to your workflow.
  • Back up your data: Before installing any major update, create a backup of your important data to protect against potential data loss.
  • Monitor update history: Keep track of installed updates and their impact on your system. This helps identify any issues or problems caused by specific updates.
  • Use the Windows Update troubleshooter: If you encounter problems with updates, use the Windows Update troubleshooter to diagnose and resolve common issues.

Conclusion:

Windows updates are an integral part of maintaining a secure, stable, and functional computing environment. Understanding the different types of updates, their importance, and how to effectively manage them is crucial for maximizing your Windows experience. By prioritizing regular updates, staying informed about potential issues, and utilizing available troubleshooting tools, you can ensure your Windows system remains secure, efficient, and equipped with the latest features and functionalities.

Navigating the Windows Update Landscape: Unraveling the Mystery of Copilot How to Change Windows Update Settings in Windows 11? How to - Windows Updates
Windows 11 Optional Updates: Navigating the Tech Landscape Windows 11: A Comprehensive Guide about Features and Updates Perunity - Latest Business Story How to handle Windows 10 and 11 updates  Computerworld
How to view available microsoft updates for windows 10 - gashacker How to manage Windows 10 updates to prevent them from ruining your life  PCWorld

Closure

Thus, we hope this article has provided valuable insights into Navigating the Windows Update Landscape: A Comprehensive Guide. We hope you find this article informative and beneficial. See you in our next article!

R Pc Windows 11

r pc windows 11

Introduction

In this auspicious occasion, we are delighted to delve into the intriguing topic related to r pc windows 11. Let’s weave interesting information and offer fresh perspectives to the readers.

It seems like you’re asking for an article about "r pc windows 11", which is not a recognized term or product. It’s possible you meant to ask about something else, such as:

How to switch RPC Connection Protocol between TCP and Named Pipes on Windows 11 22H2 Network

  • "R Programming on Windows 11" – This would be about using the R programming language on a Windows 11 computer.
  • "Remote PC Access on Windows 11" – This would be about accessing a remote computer from a Windows 11 machine.
  • "RP (Remote Procedure Call) on Windows 11" – This would be about using the RP protocol, a method for one computer to request a service from another computer, on a Windows 11 system.

Please clarify your request by providing more details about what you are looking for. Once you provide more context, I can write an informative article for you.

How to download R and install RStudio on Windows 11 - TechDecode Tutorials Install R on Windows 11  TestingDocs.com Switch Network printing between TCP and RPC in Windows 11
Windows 11 22H2 changes to RPC over TCP for network printing - Pureinfotech Windows 11 - PC Requirements & Every Thing You Need To Know - YouTube Fix Der RPC-Server Ist Nicht Verfügbarer Fehler In Windows 11/10 - Futuriq.de
Install R on Windows 11  TestingDocs.com How to download windows 11 in pc - ltbda

Closure

Thus, we hope this article has provided valuable insights into r pc windows 11. We appreciate your attention to our article. See you in our next article!

Navigating The Labyrinth: A Guide To Windows 10 PC Repair Tools

Navigating the Labyrinth: A Guide to Windows 10 PC Repair Tools

Introduction

With enthusiasm, let’s navigate through the intriguing topic related to Navigating the Labyrinth: A Guide to Windows 10 PC Repair Tools. Let’s weave interesting information and offer fresh perspectives to the readers.

Windows 10 Repair Tool

Windows 10, despite its robust nature, is not immune to the occasional hiccup. From slow performance and system crashes to stubborn error messages and malware infections, encountering these issues can be frustrating. Fortunately, a plethora of Windows 10 repair tools exist, designed to diagnose, troubleshoot, and rectify these problems. This comprehensive guide delves into the world of these tools, offering a clear understanding of their functionalities, benefits, and how to effectively utilize them.

Understanding the Need for Repair Tools

Windows 10, like any complex operating system, relies on a delicate interplay of software and hardware components. Issues can arise due to:

  • Software Conflicts: Incompatible or outdated drivers, corrupted system files, or faulty software installations can lead to instability and errors.
  • Malware Infections: Viruses, Trojans, and other malicious software can compromise system security, disrupt performance, and even steal personal data.
  • Hardware Malfunctions: Faulty hard drives, RAM issues, or malfunctioning peripherals can cause system crashes and data loss.
  • Incorrect Configuration: Misconfigured settings, improper updates, or accidental changes can lead to unexpected behavior and performance degradation.

Types of Windows 10 Repair Tools

Windows 10 repair tools fall into several categories, each offering unique capabilities:

1. Built-in Windows Tools:

  • System File Checker (SFC): This tool scans for and repairs corrupted system files. It is accessible through the Command Prompt by typing "sfc /scannow" and pressing Enter.
  • Deployment Image Servicing and Management (DISM): DISM can repair corrupted system images and restore Windows components. It can be accessed through the Command Prompt using the command "DISM /Online /Cleanup-Image /RestoreHealth".
  • Windows Memory Diagnostic: This tool helps identify and diagnose memory (RAM) issues. It can be accessed through the "Start" menu by searching for "Windows Memory Diagnostic".
  • Troubleshooters: Windows 10 includes built-in troubleshooters for various problems, such as network connectivity, audio playback, and printer issues. These can be accessed through the "Settings" app under "Update & Security" > "Troubleshoot".
  • Startup Repair: This tool automatically attempts to fix boot problems that prevent Windows from starting correctly. It can be accessed through the Windows Recovery Environment (WinRE).
  • System Restore: This tool allows reverting the system to a previous point in time, effectively undoing recent changes that may have caused problems. It can be accessed through the "Start" menu by searching for "System Restore".

2. Third-Party Repair Tools:

  • Antivirus Software: Programs like Norton, McAfee, and Bitdefender provide comprehensive protection against malware threats, including real-time scanning, virus removal, and firewall functionality.
  • Disk Cleanup: Tools like CCleaner and Wise Disk Cleaner remove temporary files, unused programs, and other junk data, freeing up disk space and potentially improving performance.
  • Registry Cleaners: Tools like Registry Mechanic and RegClean Pro scan and repair errors in the Windows registry, potentially resolving performance issues and system crashes. Note: While registry cleaning can be helpful, it should be done with caution as improper modifications can lead to system instability.
  • Driver Updaters: Tools like Driver Easy and Snappy Driver Installer automatically identify and update outdated drivers, ensuring compatibility and optimal performance.
  • Performance Optimizers: Tools like Advanced SystemCare and IObit Smart Defrag optimize system settings, manage startup programs, and defragment hard drives to improve performance.

How to Choose the Right Repair Tool

The choice of repair tool depends on the specific problem being addressed:

  • For system file corruption or boot problems: Use built-in tools like SFC, DISM, and Startup Repair.
  • For malware infections: Use reputable antivirus software for detection and removal.
  • For performance issues: Consider using disk cleanup, registry cleaners, and performance optimizers, but proceed with caution and ensure the tools are reputable.
  • For outdated drivers: Utilize driver updaters for automatic detection and installation of the latest drivers.

Using Repair Tools Effectively

  • Follow instructions carefully: Each tool has specific instructions and settings. Carefully read and understand these before using any tool.
  • Back up your data: Before making any significant changes, create a backup of your important data. This safeguards your files in case of unexpected issues.
  • Use reputable tools: Only use repair tools from trusted sources to avoid malware and system instability.
  • Restart your computer after using tools: Restarting your computer after using a repair tool ensures changes are applied correctly and potential issues are resolved.
  • Monitor performance: After using a repair tool, monitor your system’s performance to ensure the problem has been resolved and there are no new issues.

FAQs Regarding Windows 10 Repair Tools

1. Are all repair tools safe?

Not all repair tools are safe. Some may contain malware or can cause system instability if used improperly. It is crucial to download tools from reputable sources and read reviews before using them.

2. Can I use multiple repair tools simultaneously?

Using multiple repair tools simultaneously can lead to conflicts and instability. It is generally recommended to use one tool at a time and assess the results before proceeding with another.

3. Is it necessary to use paid repair tools?

Many effective repair tools are available for free. However, paid tools may offer additional features, support, and advanced functionalities. The choice depends on individual needs and budget.

4. How often should I use repair tools?

Regular maintenance is crucial. It is recommended to run system file checks and antivirus scans regularly. For other tools, use them when needed to address specific issues or for performance optimization.

5. Can I use repair tools on a new computer?

While new computers typically run smoothly, using tools like disk cleanup and driver updaters can help optimize performance and ensure everything is up to date.

Tips for Using Windows 10 Repair Tools

  • Keep your system updated: Regularly update Windows 10 and install the latest security patches to minimize vulnerabilities and improve system stability.
  • Run regular scans: Schedule regular antivirus scans and system file checks to detect and address issues early.
  • Monitor system performance: Pay attention to system performance, such as slow boot times, frequent crashes, or unusual behavior. This can help identify problems early and address them proactively.
  • Create a system restore point: Before making any significant changes or installing new software, create a system restore point. This allows you to revert the system to a previous state if issues arise.
  • Consult professional help: If you encounter complex issues or are unsure how to proceed, consider consulting a professional technician for assistance.

Conclusion

Windows 10 repair tools offer a valuable arsenal for maintaining a healthy and efficient computing experience. By understanding the different types of tools, their functionalities, and how to use them effectively, users can proactively address issues, prevent potential problems, and ensure optimal performance. Remember to always prioritize safety, use reputable tools, and back up your data before making any significant changes. By taking these precautions, users can confidently navigate the world of Windows 10 repair tools and enjoy a smooth and reliable computing experience.

Repair Tools For Windows 10 at edwardsdahl blog Repair Windows 10 Repair Windows 10
偽善 避難する 赤 windows 10 pc repair とは 責める キャプテン 結び目 Labyrinth Plus for Windows 10 PC Free Download - Best Windows 10 Apps All In One Repair Tool
How to use Startup Repair to fix boot problems with Windows 10  Windows Central 偽善 避難する 赤 windows 10 pc repair とは 責める キャプテン 結び目

Closure

Thus, we hope this article has provided valuable insights into Navigating the Labyrinth: A Guide to Windows 10 PC Repair Tools. We appreciate your attention to our article. See you in our next article!

Rejuvenating Your Windows 11 System: A Guide To Clean Installation With Data Preservation

Rejuvenating Your Windows 11 System: A Guide to Clean Installation with Data Preservation

Introduction

With great pleasure, we will explore the intriguing topic related to Rejuvenating Your Windows 11 System: A Guide to Clean Installation with Data Preservation. Let’s weave interesting information and offer fresh perspectives to the readers.

Rejuvenating Your Windows 11 System: A Guide to Clean Installation with Data Preservation

How to Clean Install Windows 11: A Step-By-Step Guide - Guiding Tech

The Windows operating system, like any intricate piece of software, can accumulate clutter over time. This clutter, ranging from unnecessary files to outdated programs, can lead to performance degradation, security vulnerabilities, and even system instability. A clean installation of Windows, where the operating system is completely reinstalled from scratch, can address these issues and revitalize your computer’s performance.

However, the thought of reinstalling Windows can be daunting, especially for users with valuable data stored on their system. The prospect of losing personal files, applications, and settings can be discouraging. Fortunately, modern techniques and tools enable users to perform a clean installation of Windows 11 without losing any data. This guide provides a comprehensive overview of this process, outlining the benefits, necessary steps, and potential considerations.

The Importance of a Clean Installation

A clean installation of Windows 11 offers several advantages, contributing to a smoother, more efficient, and secure computing experience:

  • Enhanced Performance: A fresh installation eliminates unnecessary files, outdated software, and registry entries, leading to faster boot times, improved application responsiveness, and overall system optimization.

  • Elimination of Malware: A clean installation removes any lingering malware or viruses that may have infiltrated the system, creating a secure environment for your data and applications.

  • Resolution of System Issues: Many system errors and performance issues can be resolved through a clean installation, effectively resetting the operating system to its default state.

  • Software Compatibility: A clean installation ensures that software compatibility issues are minimized, as the system is free from conflicting or outdated drivers and applications.

  • Improved System Stability: By removing potential sources of instability, a clean installation fosters a more reliable and stable operating system, reducing the occurrence of crashes and errors.

The Data Preservation Approach

The key to a successful clean installation without data loss lies in proper data backup and restoration techniques. This approach allows users to completely reinstall Windows 11 while preserving their valuable data, applications, and settings.

1. Data Backup:

The first crucial step is to create a comprehensive backup of all essential data. This backup should include:

  • Personal Files: Documents, photos, videos, music, and any other important files stored on your computer.

  • Application Settings: Configuration settings for your preferred applications, including browser bookmarks, email accounts, and software preferences.

  • Operating System Settings: Important system settings, such as network configurations, user accounts, and display preferences.

Several methods can be employed for data backup:

  • External Hard Drive: A reliable and convenient option for backing up large amounts of data.

  • Cloud Storage: Cloud services like Google Drive, OneDrive, or Dropbox offer secure and accessible storage for your files.

  • USB Flash Drive: A portable and readily available option for smaller backups.

  • System Image Backup: A complete snapshot of your entire system, including the operating system, applications, and data. This method can be performed using Windows Backup and Restore or third-party imaging software.

2. Choosing the Right Installation Method:

Windows 11 offers two primary installation methods:

  • Upgrade Installation: This method updates your existing Windows installation to Windows 11, preserving most of your data and settings. However, it does not provide a truly clean installation, as it retains remnants of the previous operating system.

  • Clean Installation: This method completely erases your hard drive and installs a fresh copy of Windows 11. It offers a clean slate but requires a backup of your data before proceeding.

For a clean installation without data loss, the recommended approach is to perform a clean installation with data preservation. This involves creating a system image backup before installing Windows 11 and restoring the image after the installation is complete.

3. Clean Installation Process:

To perform a clean installation with data preservation, follow these steps:

  • Create a System Image Backup: Utilize Windows Backup and Restore or a third-party imaging software to create a complete backup of your system. Ensure the backup is saved to an external storage device.

  • Download Windows 11 Installation Media: Obtain the Windows 11 installation media (ISO file or USB drive) from Microsoft’s official website.

  • Boot from Installation Media: Restart your computer and boot from the installation media.

  • Format the Hard Drive: During the installation process, format the hard drive where Windows 11 will be installed. This step ensures a clean installation.

  • Install Windows 11: Follow the on-screen prompts to complete the Windows 11 installation process.

  • Restore System Image: After the installation is complete, restart your computer and boot from the installation media again. Select the "Restore System Image" option and follow the prompts to restore the system image backup you created earlier.

4. Post-Installation Steps:

Once the system image is restored, your data, applications, and settings will be back in place. However, it is essential to perform some post-installation steps:

  • Install Drivers: Install any necessary drivers for your hardware components, such as graphics cards, network adapters, and sound cards.

  • Update Windows: Run Windows Update to ensure your system has the latest updates and security patches.

  • Install Applications: Reinstall any applications you need, utilizing the installation media or downloaded files.

  • Configure Settings: Customize your system settings to your preferences, including network configurations, user accounts, and display preferences.

Frequently Asked Questions

Q: Is it safe to perform a clean installation of Windows 11 without losing data?

A: Yes, it is safe to perform a clean installation of Windows 11 without losing data if you follow the correct data preservation steps, including creating a system image backup and restoring it after the installation.

Q: Can I reinstall Windows 11 without losing my personal files?

A: Yes, you can reinstall Windows 11 without losing your personal files by backing them up before the installation and restoring them afterward. You can use external storage, cloud storage, or other backup methods to ensure the safety of your files.

Q: Will I lose my applications and settings after reinstalling Windows 11?

A: You can preserve your applications and settings by creating a system image backup and restoring it after the installation. However, some applications may require reinstallation or configuration after the restore process.

Q: Is it necessary to format the hard drive during a clean installation?

A: Yes, formatting the hard drive during a clean installation is essential to remove any remnants of the previous operating system and ensure a clean slate for the new installation.

Q: What if I forget to back up my data before reinstalling Windows 11?

A: If you forget to back up your data before reinstalling Windows 11, there are data recovery tools available that might be able to recover some of your lost files. However, data recovery is not always successful, so it is crucial to prioritize data backup before performing any significant system changes.

Tips for a Successful Clean Installation

  • Plan Ahead: Before beginning the installation process, ensure you have a clear understanding of the steps involved and have all necessary tools and resources readily available.

  • Backup Regularly: Make regular backups of your data, not just before a clean installation. This habit will protect you from data loss due to unforeseen events, such as hardware failures or malware infections.

  • Test the Backup: After creating a system image backup, test the restoration process to ensure the backup is valid and can be successfully restored.

  • Use a Reliable Source for Installation Media: Obtain the Windows 11 installation media from Microsoft’s official website to avoid potential issues with corrupted or counterfeit media.

  • Seek Professional Help: If you are unsure about any aspect of the clean installation process, consider seeking assistance from a qualified computer technician or IT professional.

Conclusion

Reinstalling Windows 11 without losing data is a viable and effective way to rejuvenate your computer’s performance, enhance security, and resolve system issues. By following the outlined steps, utilizing proper data backup and restoration techniques, and paying attention to post-installation procedures, users can enjoy the benefits of a clean installation without sacrificing valuable data. Remember, a proactive approach to data backup and a thorough understanding of the process are crucial for a successful and stress-free clean installation experience.

Clean windows 11 install - rewach Windows 11 Upgrade VS Clean Install [What's the Difference] - EaseUS How To Clean Install Windows 11  appuals
Clean Install Of Windows 11 Windows 11 User Guide A Step By Step Guide To Install And Use The New Images Install Windows 11 Without Losing Apps
Windows 11 installation process - Step by Step  How to install Windows 11  Windows 11 Repair Windows 11 Using 4 Methods: Step-by-Step Guide (2024)

Closure

Thus, we hope this article has provided valuable insights into Rejuvenating Your Windows 11 System: A Guide to Clean Installation with Data Preservation. We appreciate your attention to our article. See you in our next article!

Navigating The Upgrade: A Comprehensive Guide To Microsoft Windows 11 Pro

Navigating the Upgrade: A Comprehensive Guide to Microsoft Windows 11 Pro

Introduction

With great pleasure, we will explore the intriguing topic related to Navigating the Upgrade: A Comprehensive Guide to Microsoft Windows 11 Pro. Let’s weave interesting information and offer fresh perspectives to the readers.

Buy WINDOWS 11 PRO USER GUIDE: A Comprehensive User Guide for Beginners and Seniors to Master

Microsoft Windows 11 Pro, the latest iteration of the world’s most popular operating system, offers a compelling set of features and enhancements designed to elevate the user experience for both individuals and businesses. While the transition to Windows 11 Pro might seem daunting at first, understanding the upgrade process and its benefits can pave the way for a smooth and rewarding journey. This comprehensive guide aims to provide clarity and insight into the key aspects of the upgrade, addressing common concerns and offering practical tips for a seamless transition.

Understanding the Upgrade Process:

The upgrade to Windows 11 Pro can be initiated in several ways:

  • Direct Upgrade: If your existing Windows 10 device meets the minimum system requirements, the upgrade can be performed directly through the Windows Update service. This process typically involves downloading and installing the necessary files, potentially requiring a reboot.
  • Clean Installation: For a fresh start or when facing compatibility issues, a clean installation is recommended. This involves formatting the hard drive and installing Windows 11 Pro from scratch using a bootable USB drive or DVD.
  • Using a Product Key: If you have purchased a Windows 11 Pro product key, you can use it to activate the operating system during the installation process.

Key Features and Benefits:

Windows 11 Pro offers a range of features that enhance productivity, security, and user experience. Some notable highlights include:

  • Enhanced User Interface: The new user interface boasts a modern, sleek design with rounded corners, a centered taskbar, and a streamlined Start menu, emphasizing visual clarity and ease of navigation.
  • Improved Performance: Windows 11 Pro leverages advancements in hardware and software to deliver faster boot times, smoother multitasking, and optimized performance for demanding applications.
  • Enhanced Security: The operating system incorporates robust security features like Windows Defender, which provides real-time protection against malware and phishing threats.
  • Advanced Networking Capabilities: Windows 11 Pro offers enhanced networking options, including support for the latest Wi-Fi 6 standards, ensuring faster and more reliable internet connectivity.
  • Virtualization Capabilities: With Hyper-V, Windows 11 Pro enables users to run virtual machines, allowing them to test software, isolate applications, and create secure environments.
  • Remote Desktop Access: Windows 11 Pro enables remote desktop access, allowing users to control their computers from other devices, facilitating remote work and collaboration.

Addressing Common Concerns:

While the upgrade to Windows 11 Pro offers numerous benefits, it’s natural to have concerns. Here are some common questions and their answers:

FAQs:

1. What are the minimum system requirements for Windows 11 Pro?

To ensure a smooth upgrade experience, your device must meet the following minimum system requirements:

  • Processor: 1 gigahertz (GHz) or faster with 2 or more cores.
  • RAM: 4 GB or more.
  • Storage: 64 GB or larger hard drive.
  • System Firmware: UEFI, Secure Boot capable.
  • TPM: Trusted Platform Module (TPM) version 2.0.
  • Graphics Card: Compatible with DirectX 12 or later.
  • Display: High-definition (720p) display with a minimum resolution of 960 x 720 pixels.
  • Internet Connection: Required for setup and some features.

2. Will my existing programs and data be compatible with Windows 11 Pro?

While most applications will work seamlessly with Windows 11 Pro, some older programs might require updates or compatibility patches. It’s advisable to check for updates and compatibility information before upgrading. Data files, documents, and settings are generally preserved during the upgrade process.

3. How can I back up my data before upgrading?

It’s crucial to back up your important data before upgrading to Windows 11 Pro. You can use external hard drives, cloud storage services, or system imaging tools to create backups.

4. What if I encounter issues during the upgrade process?

If you face any problems during the upgrade, you can refer to Microsoft’s support website or contact their customer service for assistance. It’s also helpful to have a bootable USB drive with the Windows 11 Pro installation media for potential troubleshooting.

5. What are the licensing requirements for Windows 11 Pro?

Windows 11 Pro requires a valid product key for activation. You can purchase a new product key or use an existing key from a previous Windows 10 Pro installation.

6. What happens to my existing Windows 10 license after upgrading?

The upgrade process generally preserves your existing Windows 10 license. However, it’s recommended to check the licensing terms and conditions for specific details.

7. Can I revert back to Windows 10 after upgrading?

Windows 11 Pro allows you to revert back to Windows 10 within a specific timeframe after the upgrade. This option is available through the recovery settings. However, it’s essential to note that reverting back might erase all data added or changed after the upgrade.

Tips for a Smooth Upgrade:

  • Check System Requirements: Ensure your device meets the minimum system requirements before proceeding with the upgrade.
  • Back Up Data: Create a comprehensive backup of all your important data before upgrading.
  • Update Drivers: Update your device drivers to ensure compatibility with Windows 11 Pro.
  • Review Software Compatibility: Check the compatibility of your existing programs and applications.
  • Create a System Image: Consider creating a system image of your current Windows 10 installation as a backup.
  • Follow Microsoft’s Instructions: Adhere to the official upgrade instructions provided by Microsoft.
  • Allocate Time for the Upgrade: The upgrade process can take some time, so plan accordingly.

Conclusion:

The upgrade to Windows 11 Pro offers a compelling opportunity to enhance your computing experience. By understanding the upgrade process, familiarizing yourself with the key features and benefits, and following the recommended tips, you can ensure a smooth and successful transition. The advanced security features, improved performance, and user-friendly interface make Windows 11 Pro a valuable investment for individuals and businesses seeking a modern and efficient operating system. Whether you’re upgrading from an older version of Windows or starting fresh, Windows 11 Pro provides a powerful and reliable platform for productivity, creativity, and digital exploration.

How to upgrade Windows 11 Home to Pro - Pureinfotech How to Upgrade Windows 11 Home to Pro Edition Windows 11 upgrade - filnshopper
Microsoft Windows 11 Pro Upgrade [from Home to Pro] [Digital Download] - Newegg.com Buy WINDOWS 11 COMPLETE GUIDE: Taking You from Windows 11 Novice to Professional In 33 Chapters Your Ultimate Guide on How to update Windows 11 from Windows 10/7/8.1.
Buy Windows 11 User Guide: A Complete Guide to Master the New Windows 11 OS with Tips and Tricks Windows 11 Upgrade To Pro Key - Get Latest Windows 11 Update

Closure

Thus, we hope this article has provided valuable insights into Navigating the Upgrade: A Comprehensive Guide to Microsoft Windows 11 Pro. We thank you for taking the time to read this article. See you in our next article!