Archives February 2024

A Comprehensive Guide To RStudio On Windows 10: Empowering Data Analysis And Visualization

A Comprehensive Guide to RStudio on Windows 10: Empowering Data Analysis and Visualization

Introduction

In this auspicious occasion, we are delighted to delve into the intriguing topic related to A Comprehensive Guide to RStudio on Windows 10: Empowering Data Analysis and Visualization. Let’s weave interesting information and offer fresh perspectives to the readers.

A Comprehensive Guide to RStudio on Windows 10: Empowering Data Analysis and Visualization

Data Analysis with RStudio: The Complete Guide

RStudio is an integrated development environment (IDE) designed specifically for the R programming language. Its intuitive interface and powerful features make it a popular choice for data scientists, statisticians, and anyone working with data analysis and visualization. This guide provides a comprehensive overview of RStudio, focusing on its installation and use on Windows 10, highlighting its key benefits and functionalities.

Understanding R and RStudio

R is a free and open-source programming language renowned for its statistical computing and graphical capabilities. It provides a vast collection of packages, offering tools for data manipulation, statistical analysis, machine learning, and data visualization. While R itself is a powerful language, RStudio simplifies the process of writing and executing R code, providing a user-friendly environment for data exploration and analysis.

The Importance of RStudio

RStudio offers a range of features that significantly enhance the R programming experience:

  • Code Editor: RStudio’s code editor provides syntax highlighting, auto-completion, and code navigation features, making writing and debugging R code more efficient.
  • Interactive Console: The interactive console allows users to execute R commands directly and view results immediately, facilitating rapid experimentation and exploration.
  • Project Management: RStudio enables the creation and management of R projects, organizing code, data files, and other project-related resources in a structured manner.
  • Visualizations: RStudio offers built-in tools for creating various data visualizations, including charts, graphs, and plots, allowing users to communicate their findings effectively.
  • Package Management: RStudio simplifies the process of installing and managing R packages, providing a central interface for accessing and utilizing the extensive R package ecosystem.
  • Debugging Tools: RStudio includes debugging features that enable users to identify and resolve errors in their code, ensuring accurate and reliable analysis.
  • Version Control Integration: RStudio supports integration with version control systems like Git, enabling collaborative work and tracking code changes.

Downloading and Installing RStudio on Windows 10

  1. Download R: Before installing RStudio, it is necessary to download and install the R programming language. Visit the official CRAN (Comprehensive R Archive Network) website (https://cran.r-project.org/) and download the appropriate R installer for Windows 10. Follow the on-screen instructions to complete the installation.
  2. Download RStudio: Once R is installed, visit the RStudio website (https://www.rstudio.com/products/rstudio/download/) and download the appropriate RStudio installer for Windows 10.
  3. Install RStudio: Run the downloaded installer file and follow the on-screen instructions. Choose the desired installation directory and complete the installation process.

Getting Started with RStudio

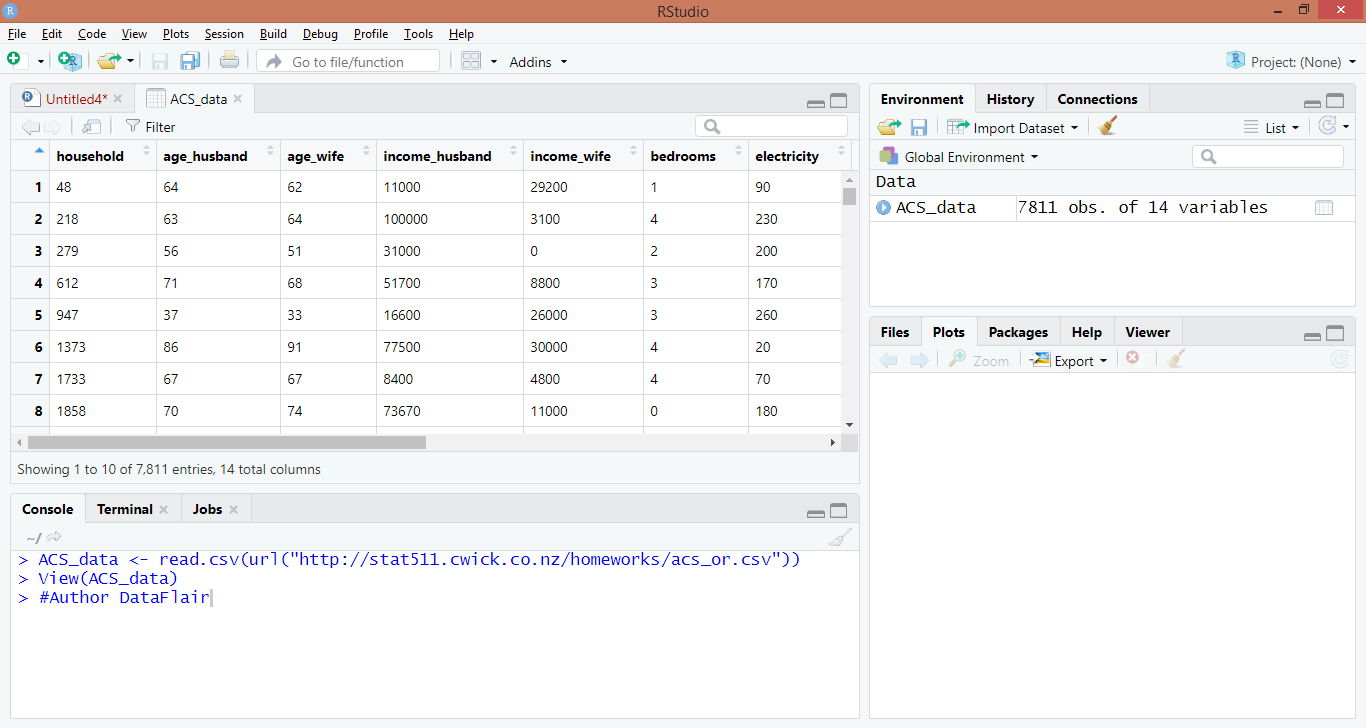
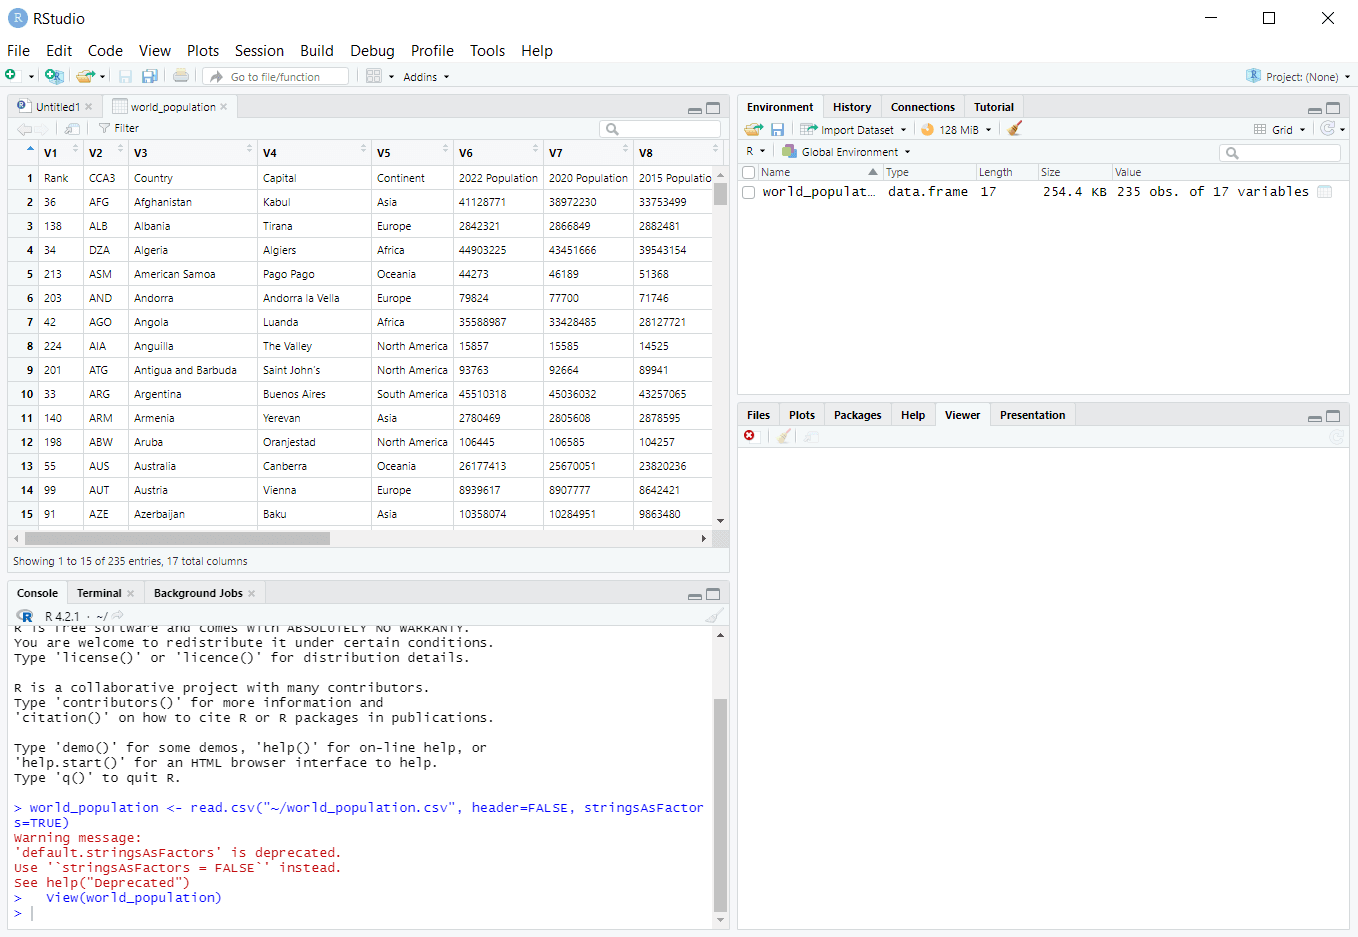
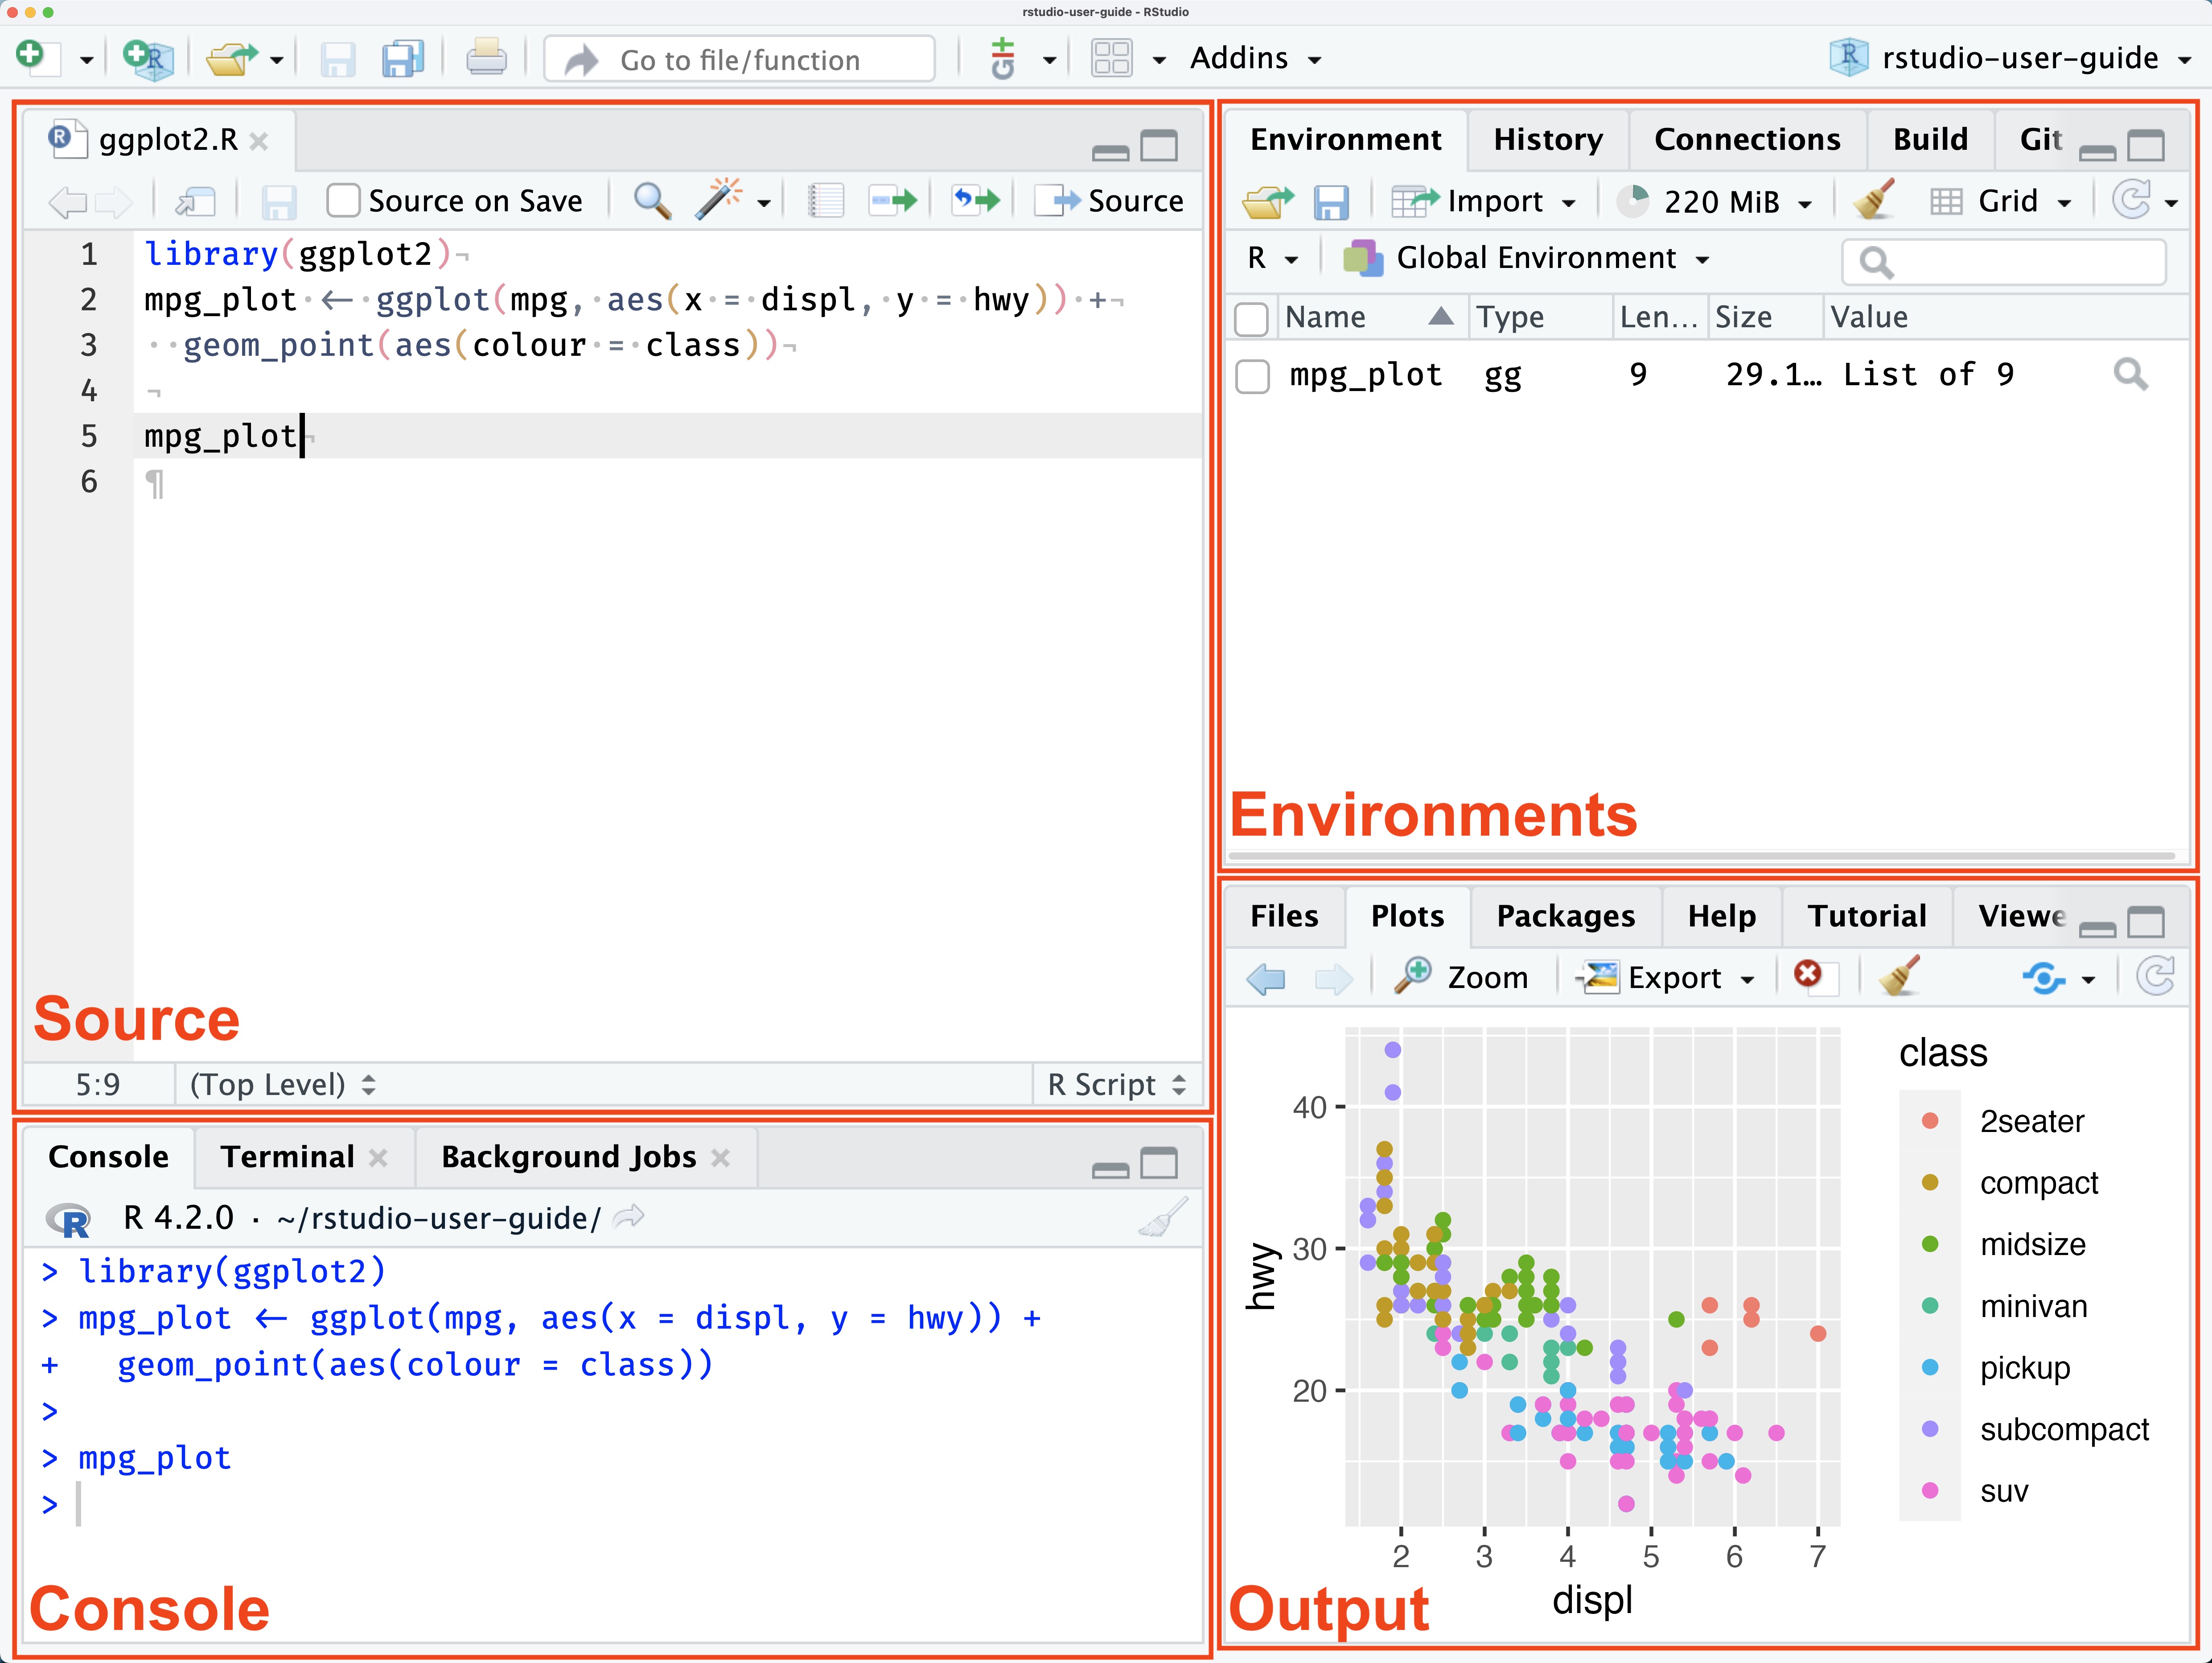
After installing RStudio, launch the application. The interface consists of several key components:

  • Source Editor: This is the primary window for writing and editing R code.
  • Console: The console displays the output of executed R commands.
  • Environment: This pane lists the objects and variables currently loaded in the R environment.
  • Files: This pane provides access to files and directories within the current project.
  • Plots: This pane displays any generated plots or visualizations.

Exploring RStudio Features

  • Code Completion and Syntax Highlighting: As you type code in the source editor, RStudio provides suggestions for available functions, variables, and keywords, accelerating the coding process. Syntax highlighting helps identify different code elements, improving readability and code comprehension.
  • Interactive Console: The interactive console allows you to execute R commands directly, providing immediate feedback and facilitating experimentation. You can type commands and press Enter to execute them, viewing the results in the console.
  • Project Management: RStudio allows you to create and manage R projects, organizing all project-related files, including code, data, and scripts. This helps maintain a structured workflow and ensures that all project elements are readily accessible.
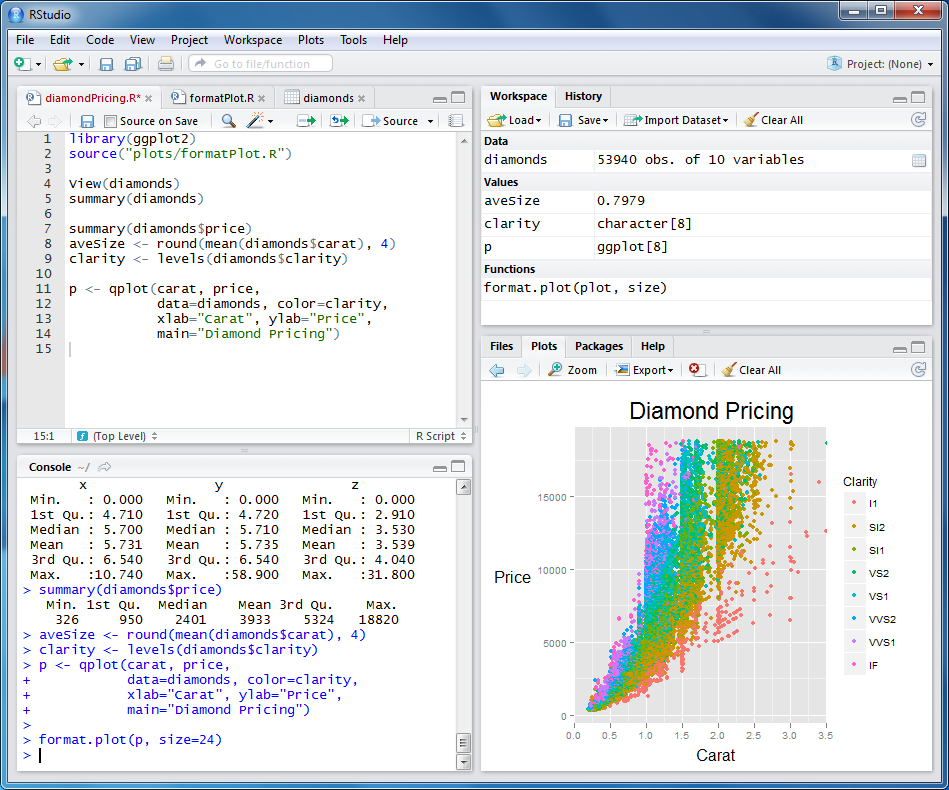
  • Data Visualization: RStudio offers built-in tools for creating various data visualizations, such as scatter plots, bar charts, histograms, and box plots. These tools allow you to explore and present data insights effectively.
  • Package Management: RStudio simplifies the process of installing and managing R packages. You can use the "Packages" pane to install, update, and remove packages, ensuring access to the latest tools and functionalities.
  • Debugging Tools: RStudio provides debugging tools that enable you to identify and resolve errors in your code. These tools allow you to step through code execution, inspect variables, and set breakpoints, facilitating error identification and code correction.
  • Version Control Integration: RStudio supports integration with version control systems like Git, allowing you to track code changes, collaborate with others, and manage code versions effectively.

FAQs about RStudio on Windows 10

Q: What are the system requirements for running RStudio on Windows 10?

A: RStudio requires a computer with a modern operating system, sufficient RAM, and a reasonable amount of disk space. The minimum system requirements are:

  • Operating System: Windows 10 (64-bit)
  • Processor: 2 GHz or faster
  • RAM: 4 GB or more
  • Disk Space: 2 GB or more

Q: How can I access the R documentation within RStudio?

A: RStudio provides access to the comprehensive R documentation through the "Help" menu. You can search for specific functions, packages, or concepts by typing keywords in the search bar.

Q: Can I customize the RStudio interface?

A: Yes, RStudio allows for customization of the user interface. You can adjust the appearance, layout, and settings according to your preferences.

Q: How do I install R packages within RStudio?

A: You can install R packages using the "Packages" pane in RStudio. Select "Install" and enter the package name in the search bar. RStudio will download and install the package, making it available for use in your R code.

Q: What are some popular R packages for data analysis and visualization?

A: There are numerous popular R packages for various data analysis and visualization tasks:

  • tidyverse: A collection of packages for data manipulation, transformation, and visualization.
  • ggplot2: A powerful package for creating high-quality statistical graphics.
  • dplyr: A package for data manipulation and transformation.
  • tidyr: A package for tidying and reshaping data.
  • stringr: A package for working with strings and text data.
  • lubridate: A package for working with dates and times.
  • caret: A package for machine learning and predictive modeling.

Tips for Using RStudio Effectively

  • Organize Your Projects: Create separate R projects for each analysis or task, ensuring a structured workflow and easy access to project-related files.
  • Use Comments and Documentation: Add comments to your code to explain the purpose and logic behind your code, making it easier to understand and maintain.
  • Explore and Experiment: Use the interactive console to experiment with different R commands and functions, fostering a deeper understanding of the language and its capabilities.
  • Utilize R Packages: Explore the vast collection of R packages available on CRAN to find tools that meet your specific data analysis and visualization needs.
  • Practice and Learn: Regularly practice your R skills by working on real-world data analysis projects. Participate in online communities and forums to learn from other R users and share your knowledge.

Conclusion

RStudio, in conjunction with the R programming language, empowers users to perform powerful data analysis and visualization tasks. Its intuitive interface, comprehensive features, and extensive package ecosystem make it a valuable tool for data scientists, statisticians, and anyone working with data. By leveraging the features and functionalities of RStudio, users can effectively manage their projects, write and debug code, create insightful visualizations, and gain valuable insights from their data. The comprehensive nature of RStudio, coupled with its ongoing development and community support, ensures its continued relevance and value in the ever-evolving field of data analysis.

RStudio Tutorial - A Complete Guide for Novice Learners! - DataFlair The RStudio IDE.  Data visualization, Visualisation, Coding RStudio Tutorial - A Complete Guide for Novice Learners! - DataFlair
Learn Data Analysis with RStudio Data visualization using R studio - YouTube RStudio Tutorial for Beginners: A Complete Guide  DataCamp
IDE features - RStudio RStudio User Guide - Pane Layout

Closure

Thus, we hope this article has provided valuable insights into A Comprehensive Guide to RStudio on Windows 10: Empowering Data Analysis and Visualization. We appreciate your attention to our article. See you in our next article!

Navigating The User Experience: A Comprehensive Look At Windows 11

Navigating the User Experience: A Comprehensive Look at Windows 11

Introduction

In this auspicious occasion, we are delighted to delve into the intriguing topic related to Navigating the User Experience: A Comprehensive Look at Windows 11. Let’s weave interesting information and offer fresh perspectives to the readers.

Buy Windows 11 User Guide for Beginners: A Comprehensive Guide to Master Windows 11 Operating

Windows 11, the latest iteration of Microsoft’s operating system, has been met with a mixed reception. While some users have embraced its new features and design, others have voiced their concerns, highlighting perceived shortcomings and a sense of disruption. This article aims to provide a balanced and comprehensive perspective on Windows 11, examining its features, addressing common criticisms, and exploring its potential impact on the future of computing.

A New Look and Feel:

Windows 11 introduces a significant visual overhaul compared to its predecessor. The most prominent change is the redesigned Start Menu, which now features a centered layout and a streamlined approach to accessing applications and files. The interface, overall, emphasizes a clean and minimalist aesthetic, with rounded corners and a focus on visual clarity. This design philosophy extends to other elements, such as the taskbar and system settings, aiming to create a more intuitive and user-friendly experience.

Performance and Functionality:

Windows 11 boasts several performance enhancements. The operating system leverages the latest hardware advancements, including support for the 12th Gen Intel Core processors and AMD Ryzen 6000 series processors. Additionally, Windows 11 integrates with Microsoft’s cloud services, enabling features like cloud storage, seamless device synchronization, and improved security.

Enhanced Security Features:

Security remains a top priority in Windows 11. The operating system incorporates advanced security features, including Microsoft Defender, a built-in antivirus solution, and Windows Hello, a biometric authentication system that utilizes facial recognition or fingerprint scanning for secure login. These features aim to protect users from malware and unauthorized access.

Addressing Concerns and Criticism:

While Windows 11 offers a range of improvements, it has also faced criticism. One common complaint is the requirement for specific hardware specifications, which has left some users unable to upgrade. The removal of certain features, such as the ability to drag and drop applications to the taskbar, has also sparked dissatisfaction among users accustomed to the functionality of previous versions.

The Future of Windows:

Windows 11 represents a significant shift in Microsoft’s approach to operating systems. The company aims to create a more unified and integrated ecosystem, leveraging cloud technologies and hardware advancements to enhance user experience. While the transition has encountered some challenges, Windows 11 demonstrates a clear vision for the future of computing, focusing on seamless integration, improved security, and a user-centric design.

FAQs

Q: What are the minimum system requirements for Windows 11?

A: Windows 11 requires a 1 GHz or faster processor with two or more cores, 4GB of RAM, 64GB of storage, a compatible graphics card, and a display with a resolution of 1366 x 768 pixels.

Q: Can I upgrade to Windows 11 from Windows 10?

A: Most Windows 10 users can upgrade to Windows 11 for free. However, the operating system requires specific hardware specifications, and not all devices will be eligible for the upgrade.

Q: Is Windows 11 compatible with my current applications?

A: Most applications compatible with Windows 10 will also work on Windows 11. However, some older applications may require updates or compatibility patches.

Q: What are the benefits of using Windows 11?

A: Windows 11 offers a range of benefits, including a redesigned user interface, improved performance, enhanced security features, and seamless integration with Microsoft’s cloud services.

Tips

Tip 1: Before upgrading to Windows 11, ensure your device meets the minimum system requirements.

Tip 2: Back up your important data before upgrading to avoid data loss.

Tip 3: Familiarize yourself with the new features and interface of Windows 11 to optimize your experience.

Tip 4: Explore the settings and customization options to tailor Windows 11 to your preferences.

Tip 5: Keep your operating system updated to benefit from the latest security patches and performance enhancements.

Conclusion

Windows 11 represents a significant evolution in the Windows operating system, introducing a new design language, improved performance, and enhanced security features. While the transition has faced some challenges, Windows 11 offers a vision for the future of computing, emphasizing user-centric design, cloud integration, and seamless user experience. As the operating system matures, it will be interesting to observe its impact on the computing landscape and its ability to meet the evolving needs of users.

WINDOWS 11 HOME User Guide: A Complete and well-Illustrated Guide to Navigating the New Features Buy WINDOWS 11 HOME User Manual: A Comprehensive Illustrated Guide to Navigating the New Windows 11: A Comprehensive Guide about Features and Updates Perunity - Latest Business Story
Every time Microsoft releases a new version of the Windows operating system, it comes with new Buy WINDOWS 11 PRO USER GUIDE: A Comprehensive User Guide for Beginners and Seniors to Master Buy Windows 11 For Beginners With Pictures: User-Friendly & Comprehensive Guide On How To Master
How to Install Windows 11 Step by Step: Guide with Images How to Fix Windows 11 User Experience - YouTube

Closure

Thus, we hope this article has provided valuable insights into Navigating the User Experience: A Comprehensive Look at Windows 11. We hope you find this article informative and beneficial. See you in our next article!

Mastering The Art Of Disc Burning: A Comprehensive Guide To Nero Burning ROM For Windows 10

Mastering the Art of Disc Burning: A Comprehensive Guide to Nero Burning ROM for Windows 10

Introduction

In this auspicious occasion, we are delighted to delve into the intriguing topic related to Mastering the Art of Disc Burning: A Comprehensive Guide to Nero Burning ROM for Windows 10. Let’s weave interesting information and offer fresh perspectives to the readers.

Mastering the Art of Disc Burning: A Comprehensive Guide to Nero Burning ROM for Windows 10

Nero Burning ROM actualizado - Licencias Eset Premium

In the digital age, where data flows effortlessly through the internet and cloud storage, the physical act of burning data onto a disc might seem antiquated. However, there are still numerous reasons why disc burning remains relevant and valuable, especially for users of Windows 10. For those seeking a reliable and feature-rich solution for creating CDs, DVDs, and Blu-ray discs, Nero Burning ROM stands as a time-tested and highly regarded software application.

This comprehensive guide will delve into the intricacies of downloading and utilizing Nero Burning ROM on Windows 10, exploring its features, benefits, and how to navigate its interface. We will also address common queries and provide practical tips for optimizing your disc burning experience.

Understanding the Importance of Disc Burning in the Modern Era

While cloud storage and online data sharing have become the norm, disc burning remains a vital tool for various scenarios:

  • Data Archiving and Backup: Storing critical data on physical media offers a secure and offline backup solution, safeguarding against data loss due to hardware failures, software malfunctions, or cyberattacks.
  • Creating Audio and Video Collections: Disc burning allows for the creation of personalized music compilations, family video archives, or multimedia presentations for sharing or personal enjoyment.
  • Software Distribution and Installation: Software developers and businesses often utilize discs for distributing software applications, drivers, or updates, ensuring a reliable and efficient delivery method.
  • Offline Data Access: Discs provide a portable and readily accessible method to transport data without internet connectivity, crucial for presentations, research, or travel.
  • Legacy System Compatibility: Some older devices and systems may not have the capability to access data stored on modern storage mediums, making disc burning a vital tool for compatibility.

Downloading and Installing Nero Burning ROM on Windows 10

The process of acquiring and installing Nero Burning ROM is straightforward and user-friendly:

  1. Visit the Nero Website: Navigate to the official Nero website (https://www.nero.com/) using your preferred web browser.
  2. Locate the Download Link: Search for the "Nero Burning ROM" software package and click on the download link.
  3. Choose the Correct Version: Select the appropriate version of Nero Burning ROM compatible with your Windows 10 operating system.
  4. Initiate the Download: Click on the download button, and the installation file will be downloaded to your computer.
  5. Run the Installer: Locate the downloaded installation file and double-click it to launch the setup wizard.
  6. Follow On-Screen Instructions: Follow the prompts provided by the installer, choosing the desired installation directory and accepting the license agreement.
  7. Complete the Installation: Once the installation process is complete, you will have access to Nero Burning ROM on your Windows 10 system.

Exploring the Features and Benefits of Nero Burning ROM

Nero Burning ROM offers a comprehensive suite of features designed to meet the diverse needs of disc burning users:

  • Versatile Disc Creation: Burn various types of discs, including CDs, DVDs, and Blu-ray discs, with support for different formats like audio, video, data, and hybrid discs.
  • Advanced Burning Options: Control disc burning settings, including writing speed, disc format, and data compression, to optimize performance and ensure data integrity.
  • Data Protection and Security: Utilize advanced features like password protection, data encryption, and disc spanning to safeguard sensitive information and prevent unauthorized access.
  • Multimedia Editing and Conversion: Edit and convert audio and video files before burning them onto discs, ensuring compatibility with various devices and platforms.
  • Disc Copying and Backup: Create exact copies of existing discs or back up important files onto blank discs for safekeeping.
  • Disc Labeling and Printing: Design and print custom labels for your discs, enhancing their organization and aesthetics.
  • Disc Image Creation and Management: Create disc images (ISO files) for easy archiving, sharing, or restoring data onto discs.
  • User-Friendly Interface: Navigate the intuitive interface with ease, thanks to a clear layout and straightforward controls.
  • Comprehensive Help and Support: Access extensive online documentation, tutorials, and community forums for assistance with any queries or troubleshooting.

The Nero Burning ROM interface is designed to be user-friendly and efficient. Here’s a breakdown of the key components:

  • Main Menu: Provides access to all core functions, including "New Compilation," "Copy Disc," "Backup," and "Erase Disc."
  • Project Window: Displays the selected project, showing the files or folders to be burned, the disc type, and burning settings.
  • Toolbars: Offer quick access to common functions like adding files, changing burning settings, and starting the burning process.
  • File List: Displays the files and folders selected for burning, allowing for organization and customization.
  • Burning Options: Provides a comprehensive set of settings for controlling the burning process, including writing speed, disc format, and data protection.
  • Progress Bar: Tracks the progress of the burning process, providing real-time updates on the remaining time and estimated completion.

FAQs about Nero Burning ROM on Windows 10

1. Can I use Nero Burning ROM on a free trial basis?

Yes, Nero Burning ROM offers a free trial period for users to explore its features and capabilities before committing to a purchase.

2. What are the system requirements for running Nero Burning ROM on Windows 10?

Nero Burning ROM requires a minimum of a 1.6 GHz processor, 1 GB of RAM, and 1 GB of free hard disk space. For optimal performance, it is recommended to have a faster processor, more RAM, and sufficient free disk space.

3. Is Nero Burning ROM compatible with all Windows 10 versions?

Nero Burning ROM is compatible with most Windows 10 versions, including Home, Pro, and Enterprise editions. However, it’s essential to check the official website for compatibility information regarding specific versions and updates.

4. Does Nero Burning ROM support burning Blu-ray discs?

Yes, Nero Burning ROM supports burning both standard Blu-ray discs and BD-R/RE discs, allowing you to create high-capacity discs for storing large amounts of data or multimedia content.

5. Can I burn data discs with Nero Burning ROM?

Yes, Nero Burning ROM is well-suited for creating data discs, allowing you to store files, folders, and applications on CDs, DVDs, or Blu-ray discs.

6. How can I create a bootable disc using Nero Burning ROM?

Nero Burning ROM allows you to create bootable discs for installing operating systems or other programs. You can create a bootable disc by selecting the appropriate option in the "New Compilation" menu and specifying the ISO image or files needed for the bootable disc.

7. Does Nero Burning ROM offer any data compression features?

Yes, Nero Burning ROM provides data compression options, allowing you to reduce the size of files before burning them onto discs, maximizing storage capacity and minimizing burning time.

8. Can I protect my data on a disc with a password using Nero Burning ROM?

Yes, Nero Burning ROM offers password protection features, allowing you to secure your data on discs with a password, preventing unauthorized access.

9. How can I create a disc image (ISO file) using Nero Burning ROM?

Nero Burning ROM allows you to create disc images (ISO files) of existing discs or data folders. You can use the "Create Image" option in the main menu to create an ISO file of your chosen data.

10. Where can I find help and support for Nero Burning ROM?

Nero provides comprehensive online documentation, tutorials, and community forums for users to access support and assistance. You can also contact Nero’s customer support team for personalized assistance.

Tips for Optimizing Your Disc Burning Experience with Nero Burning ROM

  • Use High-Quality Discs: Employ reputable brands of discs to ensure optimal performance, data integrity, and longevity.
  • Choose the Correct Disc Format: Select the appropriate disc format (CD, DVD, or Blu-ray) based on your storage requirements and the intended use of the disc.
  • Optimize Burning Settings: Experiment with different burning settings, such as writing speed and data compression, to find the best balance between performance and data integrity.
  • Verify Disc Integrity: After burning a disc, use Nero’s built-in verification feature to ensure the data has been written correctly and is accessible.
  • Clean and Maintain Your Disc Drive: Regularly clean your disc drive to prevent dust and debris accumulation, ensuring optimal performance and disc readability.
  • Utilize Disc Labeling and Printing: Create custom labels for your discs to enhance organization, aesthetics, and identification.
  • Back Up Important Data: Before burning a disc, create a backup of your data on your computer or an external storage device, ensuring data security and recovery options.
  • Explore Advanced Features: Utilize Nero Burning ROM’s advanced features, such as data encryption, disc spanning, and multimedia editing, to optimize your burning experience and enhance data security.
  • Stay Updated: Regularly check for updates to Nero Burning ROM, ensuring you have access to the latest features, bug fixes, and security patches.

Conclusion

Nero Burning ROM remains a powerful and versatile tool for disc burning in the digital age, offering a comprehensive set of features and benefits for users of Windows 10. From data archiving and backup to creating multimedia collections and software distribution, Nero Burning ROM empowers users to manage their data effectively, ensuring its security and accessibility. By leveraging its user-friendly interface, advanced options, and comprehensive support resources, users can master the art of disc burning and confidently create high-quality discs for various purposes.

Free Full Version Software and tricks How to Burn Music to Audio CD in 3 Steps  Nero Burning ROM Tutorial - YouTube Nero Burning ROM 2021 Free Download - ALLPCWorld
How To Burn ISO File To CD Or DVD Using Nero 7 Full Process  Burning an ISO File Using Nero Nero Burning ROM - Best-selling burning program How to burn a CD with Nero: in Windows 10
Gameplay24: Nero Burning Rom Nero Burning ROM 10 - YouTube

Closure

Thus, we hope this article has provided valuable insights into Mastering the Art of Disc Burning: A Comprehensive Guide to Nero Burning ROM for Windows 10. We appreciate your attention to our article. See you in our next article!

Understanding The Red Border Phenomenon In Windows 10: A Comprehensive Guide

Understanding the Red Border Phenomenon in Windows 10: A Comprehensive Guide

Introduction

With great pleasure, we will explore the intriguing topic related to Understanding the Red Border Phenomenon in Windows 10: A Comprehensive Guide. Let’s weave interesting information and offer fresh perspectives to the readers.

Understanding the Red Border Phenomenon in Windows 10: A Comprehensive Guide

Red Border Around Screen Windows 10 - Collection  OpenSea

The appearance of a red border around windows in Windows 10 can be a disconcerting experience, often accompanied by concerns about system malfunctions or security breaches. However, this visual anomaly is not necessarily indicative of a serious problem. It can arise from a variety of factors, ranging from simple software glitches to more complex hardware issues. This article aims to provide a comprehensive understanding of the red border phenomenon, outlining its potential causes, troubleshooting steps, and potential resolutions.

The Red Border: A Visual Clue to Underlying Issues

The presence of a red border around a window in Windows 10 is typically a visual cue indicating that the system is attempting to highlight or emphasize that specific window. This behavior can be triggered by various scenarios, including:

1. Active Window Emphasis: Windows 10 employs a visual cue to indicate the currently active window. In some cases, this visual cue might manifest as a red border, particularly when specific themes or settings are enabled.

2. System-Wide Border Settings: Certain system-wide settings, such as those related to accessibility features, might alter the default window border colors, leading to the appearance of red borders.

3. Software-Specific Settings: Specific software applications might have built-in options to modify window borders, potentially resulting in red borders as a user preference or due to a software glitch.

4. Hardware Issues: While less common, hardware issues, such as faulty graphics drivers or display problems, can sometimes manifest as unusual window border behaviors, including the appearance of red borders.

Troubleshooting the Red Border: A Step-by-Step Approach

Addressing the red border phenomenon requires a systematic approach, focusing on identifying and eliminating the potential causes. Here’s a comprehensive troubleshooting guide:

1. Check Active Window Emphasis:

  • Verify the Active Window: Ensure that the window displaying the red border is indeed the currently active window. If not, the red border might be a visual artifact.
  • Explore Theme Settings: Navigate to Settings > Personalization > Themes and examine the active theme. Some themes might incorporate red borders as part of their visual design. Consider switching to a different theme or modifying the current theme settings.
  • Adjust Window Border Settings: Within the same Themes section, explore the Window Color settings. These settings allow you to customize window borders, including colors. Ensure that the desired border color is set correctly.

2. Review System-Wide Settings:

  • Accessibility Features: Explore the Settings > Ease of Access options. Certain accessibility features, such as high contrast mode, might modify window borders, potentially leading to red borders. Disable or adjust these features to see if the red border disappears.
  • System-Wide Color Settings: Navigate to Settings > Personalization > Colors and examine the system-wide color settings. These settings influence the overall color scheme of Windows 10, including window borders. Ensure that the desired color settings are applied.

3. Examine Software-Specific Settings:

  • Application Settings: Open the specific application displaying the red border and review its settings. Many applications offer customization options for window borders, colors, and other visual elements. Ensure that the desired settings are applied.
  • Software Updates: Check for updates to the specific application exhibiting the red border. Software updates often include bug fixes and improvements that might address visual anomalies like red borders.

4. Investigate Hardware Issues:

  • Graphics Driver Updates: Update your graphics drivers to the latest versions. Outdated or faulty drivers can lead to various display issues, including unusual window borders.
  • Display Settings: Explore the Settings > System > Display options. Adjust the display settings, such as resolution and color profile, to ensure that the display is functioning correctly.
  • Hardware Diagnosis: Consider performing a hardware diagnosis to rule out any underlying hardware issues that might be contributing to the red border phenomenon.

FAQs: Addressing Common Concerns

1. Is the red border a sign of a virus or malware infection?

While it’s possible for malware to modify system settings and cause visual anomalies like red borders, it’s not a common occurrence. The red border is more likely due to other factors, such as software glitches or system settings. However, if you suspect a malware infection, perform a full system scan with a reputable antivirus software.

2. Can the red border be permanently removed?

Yes, the red border can usually be removed by addressing the underlying cause. This might involve adjusting system settings, updating software, or resolving hardware issues.

3. What if none of the troubleshooting steps work?

If the red border persists despite following the troubleshooting steps, consider contacting Microsoft support for assistance. They might be able to provide more specific guidance based on your system configuration.

Tips for Preventing Future Red Border Issues

  • Regular System Maintenance: Regularly perform system maintenance tasks, such as cleaning temporary files, updating drivers, and running system scans. This helps maintain system stability and reduces the likelihood of software glitches that might cause visual anomalies.
  • Software Updates: Keep your software applications updated to the latest versions. Software updates often include bug fixes and improvements that can address visual anomalies.
  • Hardware Maintenance: Ensure that your hardware components are functioning correctly. Regularly clean your system and check for any signs of hardware failure.
  • Backup Your Data: Regularly back up your important data. This helps protect your data in case of unforeseen system issues that might require a system reset or reinstall.

Conclusion: A Deeper Understanding of the Red Border Phenomenon

The appearance of a red border around windows in Windows 10 is not necessarily a cause for alarm. It is often a visual cue indicating a specific system state or a minor software glitch. By understanding the potential causes and employing the outlined troubleshooting steps, users can effectively address the red border phenomenon and restore their system’s normal visual appearance. Remember, regular system maintenance, software updates, and hardware checks can help prevent future occurrences of this visual anomaly.

Red Border Around Screen Windows 10  Peatix Why Are there red borders. In the system monitor and desktop settings? : r/ManjaroLinux How To Turn Off Window Border Color In Windows 11 The - vrogue.co
How to Turn Off Window Border Color in Windows 11 [Tutorial] - YouTube The Windows 11 window border is still missing from certain parts of the OS Border Theories – The New Inquiry
FIX Black Border In Windows 11  Change Resolution - YouTube Avection Fog: A Comprehensive Guide to Understanding and Dealing with this Weather Phenomenon

Closure

Thus, we hope this article has provided valuable insights into Understanding the Red Border Phenomenon in Windows 10: A Comprehensive Guide. We appreciate your attention to our article. See you in our next article!

The Importance Of Antivirus Protection In Windows 10: A Comprehensive Guide

The Importance of Antivirus Protection in Windows 10: A Comprehensive Guide

Introduction

With great pleasure, we will explore the intriguing topic related to The Importance of Antivirus Protection in Windows 10: A Comprehensive Guide. Let’s weave interesting information and offer fresh perspectives to the readers.

The Importance of Antivirus Protection in Windows 10: A Comprehensive Guide

What’s the Best Antivirus for Windows 10? (Comprehensive Guide)

Windows 10, despite its robust security features, remains susceptible to various cyber threats. These threats range from malicious software (malware) like viruses, worms, and Trojans to phishing attacks and data breaches. Installing and maintaining a reliable antivirus program is essential for safeguarding your computer and personal information.

Understanding the Need for Antivirus Protection

Modern operating systems like Windows 10 incorporate several built-in security measures, including firewalls and anti-malware components. However, these defenses are not foolproof. Cybercriminals constantly evolve their tactics, developing new and sophisticated methods to bypass existing security protocols.

Antivirus software plays a crucial role in bolstering your system’s defenses. It provides an additional layer of protection by:

  • Detecting and removing malware: Antivirus programs scan your system for suspicious files and programs, identifying and removing known threats. They also utilize advanced heuristics and machine learning algorithms to detect novel malware variants.
  • Blocking malicious websites and downloads: Antivirus software can prevent access to websites known to host malware or phishing schemes. It also monitors downloads for suspicious files, preventing them from entering your system.
  • Protecting your personal information: Antivirus programs can help safeguard sensitive data like passwords, financial information, and personal files from theft or unauthorized access. They often include features like anti-phishing and anti-ransomware capabilities.
  • Real-time protection: Modern antivirus solutions provide real-time protection, constantly monitoring your system for threats and blocking them before they can cause damage.

Choosing the Right Antivirus Solution

The market offers a wide range of antivirus software, each with its own features and pricing. Choosing the right solution depends on your individual needs and budget. Consider these factors when making your selection:

  • Features: Evaluate the features offered by different antivirus programs, such as real-time protection, malware detection and removal, phishing protection, and anti-ransomware capabilities.
  • Performance: Ensure the antivirus software you choose doesn’t significantly impact your system’s performance. Look for programs with minimal resource consumption and efficient scanning algorithms.
  • Ease of use: Select a program with a user-friendly interface, making it easy to manage and configure.
  • Customer support: Consider the availability and quality of customer support offered by the antivirus vendor.
  • Cost: Determine the pricing structure and choose a program that fits your budget.

Maintaining Your Antivirus Protection

Once you have installed an antivirus program, it is crucial to maintain it properly to ensure optimal protection. Here are some essential tips:

  • Regularly update your antivirus software: Antivirus vendors constantly update their software databases with the latest threat information. Ensure you enable automatic updates to keep your protection current.
  • Run regular scans: Schedule regular full system scans to detect any malware that may have evaded real-time detection.
  • Be cautious when browsing the internet: Avoid clicking on suspicious links or downloading files from untrusted sources.
  • Keep your operating system and software updated: Software updates often include security patches that address vulnerabilities exploited by malware.

FAQs

Q: Is Windows Defender sufficient for antivirus protection?

A: Windows Defender, the built-in antivirus solution in Windows 10, offers basic protection against common threats. However, it may not be as comprehensive as third-party antivirus programs, especially in detecting and removing advanced malware.

Q: Can I use multiple antivirus programs simultaneously?

A: Using multiple antivirus programs simultaneously can lead to conflicts and performance issues. It is generally recommended to use only one antivirus program at a time.

Q: How often should I run a full system scan?

A: It is recommended to run a full system scan at least once a month, or more frequently if you suspect your system may be infected.

Q: What should I do if my antivirus program detects a threat?

A: If your antivirus program detects a threat, follow the instructions provided by the program. This may involve quarantining or removing the infected file or program.

Conclusion

Installing and maintaining a reliable antivirus program is essential for safeguarding your Windows 10 computer from cyber threats. By choosing a reputable antivirus solution and following best practices for maintaining your protection, you can significantly reduce the risk of malware infections and protect your personal information. Remember, proactive security measures are crucial for navigating the ever-evolving landscape of cyber threats.

How important is antivirus software Best Free Antivirus for Windows 10: A Comprehensive Guide - The Knowledge Hub Comprehensive Guide to the Best Free Antivirus for Windows 10 - Ehmtic 2014
Importance of Antivirus Software: Protect Computers from Cyber Threat Best Antivirus for Windows 10 - YouTube Does Windows 10 Need Antivirus Protection?
6 Best Free Windows 10 Antivirus Software in (2024) Top 10 Best Antivirus Software For Windows 10 - Techarticle

Closure

Thus, we hope this article has provided valuable insights into The Importance of Antivirus Protection in Windows 10: A Comprehensive Guide. We hope you find this article informative and beneficial. See you in our next article!

Understanding "Qual O Meu Windows 10"

Understanding "Qual o Meu Windows 10"

Introduction

With enthusiasm, let’s navigate through the intriguing topic related to Understanding "Qual o Meu Windows 10". Let’s weave interesting information and offer fresh perspectives to the readers.

Understanding "Qual o Meu Windows 10"

Como descobrir qual é o meu Windows?

"Qual o Meu Windows 10" translates to "What is my Windows 10" in Portuguese. This phrase encapsulates the user’s need to understand their specific Windows 10 configuration, particularly its version, edition, and build number. Knowing these details is crucial for several reasons, ranging from troubleshooting software issues to ensuring compatibility with specific applications and hardware.

The Importance of Knowing Your Windows 10 Version

Determining the Windows 10 version installed on a computer is a foundational step in many computing tasks. It allows users to:

  • Identify System Requirements: Specific applications and games may have minimum system requirements that include a certain Windows 10 version. Knowing your version helps you avoid compatibility issues.
  • Troubleshoot Software Problems: Some software errors are specific to certain Windows 10 versions. Knowing your version can assist in finding relevant troubleshooting guides and solutions.
  • Access Updates: Windows 10 receives regular updates that address bugs, enhance security, and introduce new features. Knowing your version helps you identify the appropriate updates for your system.
  • Ensure Security: Windows 10 releases security patches to address vulnerabilities. Knowing your version ensures that you are receiving the latest security updates.
  • Optimize Performance: Certain Windows 10 versions may have different performance characteristics. Knowing your version allows you to adjust settings and optimize your system for optimal performance.

How to Determine Your Windows 10 Version

Several methods allow you to determine your Windows 10 version:

  • Settings App:

    • Open the Settings app.
    • Click on System.
    • Select About.
    • The Windows specifications section will display your Windows 10 version, edition, and build number.
  • Control Panel:

    • Open the Control Panel.
    • Navigate to System and Security.
    • Click on System.
    • The System window will display your Windows 10 version, edition, and build number.
  • Command Prompt:

    • Open the Command Prompt as an administrator.
    • Type winver and press Enter.
    • A window will display your Windows 10 version, edition, and build number.
  • Third-Party Tools:

    • Various free and paid third-party tools provide detailed system information, including Windows 10 version details.

Understanding the Components of Windows 10 Version Information

  • Version: This indicates the major version of Windows 10, for example, 21H2.
  • Edition: This specifies the specific feature set and functionalities included in the version, such as Home, Pro, Enterprise, or Education.
  • Build Number: This number represents a specific release of the Windows 10 version, indicating the latest updates and bug fixes.

Frequently Asked Questions (FAQs)

Q: Why is it important to know my Windows 10 version?
A: Knowing your Windows 10 version helps you identify system requirements, troubleshoot software issues, access updates, ensure security, and optimize performance.

Q: How can I update my Windows 10 version?
A: Windows 10 automatically checks for updates and installs them in the background. You can manually check for updates by opening the Settings app, navigating to Update & Security, and clicking on Check for updates.

Q: How can I find out which Windows 10 version is the latest?
A: The latest version of Windows 10 is usually available on the official Microsoft website. You can also find information about the latest version in the Windows Update settings.

Q: What are the differences between Windows 10 Home, Pro, and Enterprise editions?
A: Each edition of Windows 10 offers different features and functionalities. Home is designed for everyday users, Pro includes advanced features for businesses and professionals, and Enterprise is designed for large organizations.

Q: Can I downgrade my Windows 10 version?
A: Downgrading to a previous version of Windows 10 may not always be possible, depending on your specific situation. It is recommended to consult Microsoft’s documentation or contact their support team for guidance.

Tips for Understanding Your Windows 10 Version

  • Keep your Windows 10 up to date: Regular updates ensure you have the latest features, security patches, and performance improvements.
  • Back up your data: Before making any significant changes to your system, such as upgrading or downgrading your Windows 10 version, back up your important data to avoid losing it.
  • Consult Microsoft’s documentation: Microsoft’s official documentation provides detailed information about Windows 10 versions, features, and troubleshooting tips.
  • Seek help from a qualified technician: If you are unsure about your Windows 10 version or encounter any problems, seek assistance from a qualified computer technician.

Conclusion

Understanding your Windows 10 version is essential for maintaining a smooth and secure computing experience. By knowing your specific version, edition, and build number, you can optimize system performance, troubleshoot software issues, ensure compatibility, and stay informed about the latest updates and security patches. By taking the time to understand your Windows 10 version, you can enhance your computing experience and ensure that your system is running efficiently and securely.

Como saber qual versão do Windows 10 estou usando? - Meu Windows Windows 10: Qual é a minha versão? Saiba como ver.  i-Técnico UNDERSTANDING WINDOWS 10 - YouTube
Understanding Windows 10 - YouTube Tudo sobre o Windows 10: As diferenças entre o Windows 10 e o Windows 8 COMO SABER A VERSÃO DO MEU WINDOWS 10 - YouTube
Como saber qual é a versão e a compilação do meu Windows 10 - YouTube Windows 10: 3 formas para ver as especificações do seu PC

Closure

Thus, we hope this article has provided valuable insights into Understanding "Qual o Meu Windows 10". We appreciate your attention to our article. See you in our next article!