Archives February 2024

Understanding Network Throttling In Windows 10: A Comprehensive Guide

Understanding Network Throttling in Windows 10: A Comprehensive Guide

Introduction

In this auspicious occasion, we are delighted to delve into the intriguing topic related to Understanding Network Throttling in Windows 10: A Comprehensive Guide. Let’s weave interesting information and offer fresh perspectives to the readers.

Understanding Network Throttling in Windows 10: A Comprehensive Guide

Internet Throttling: What is it and How to fix it? - IP With Ease

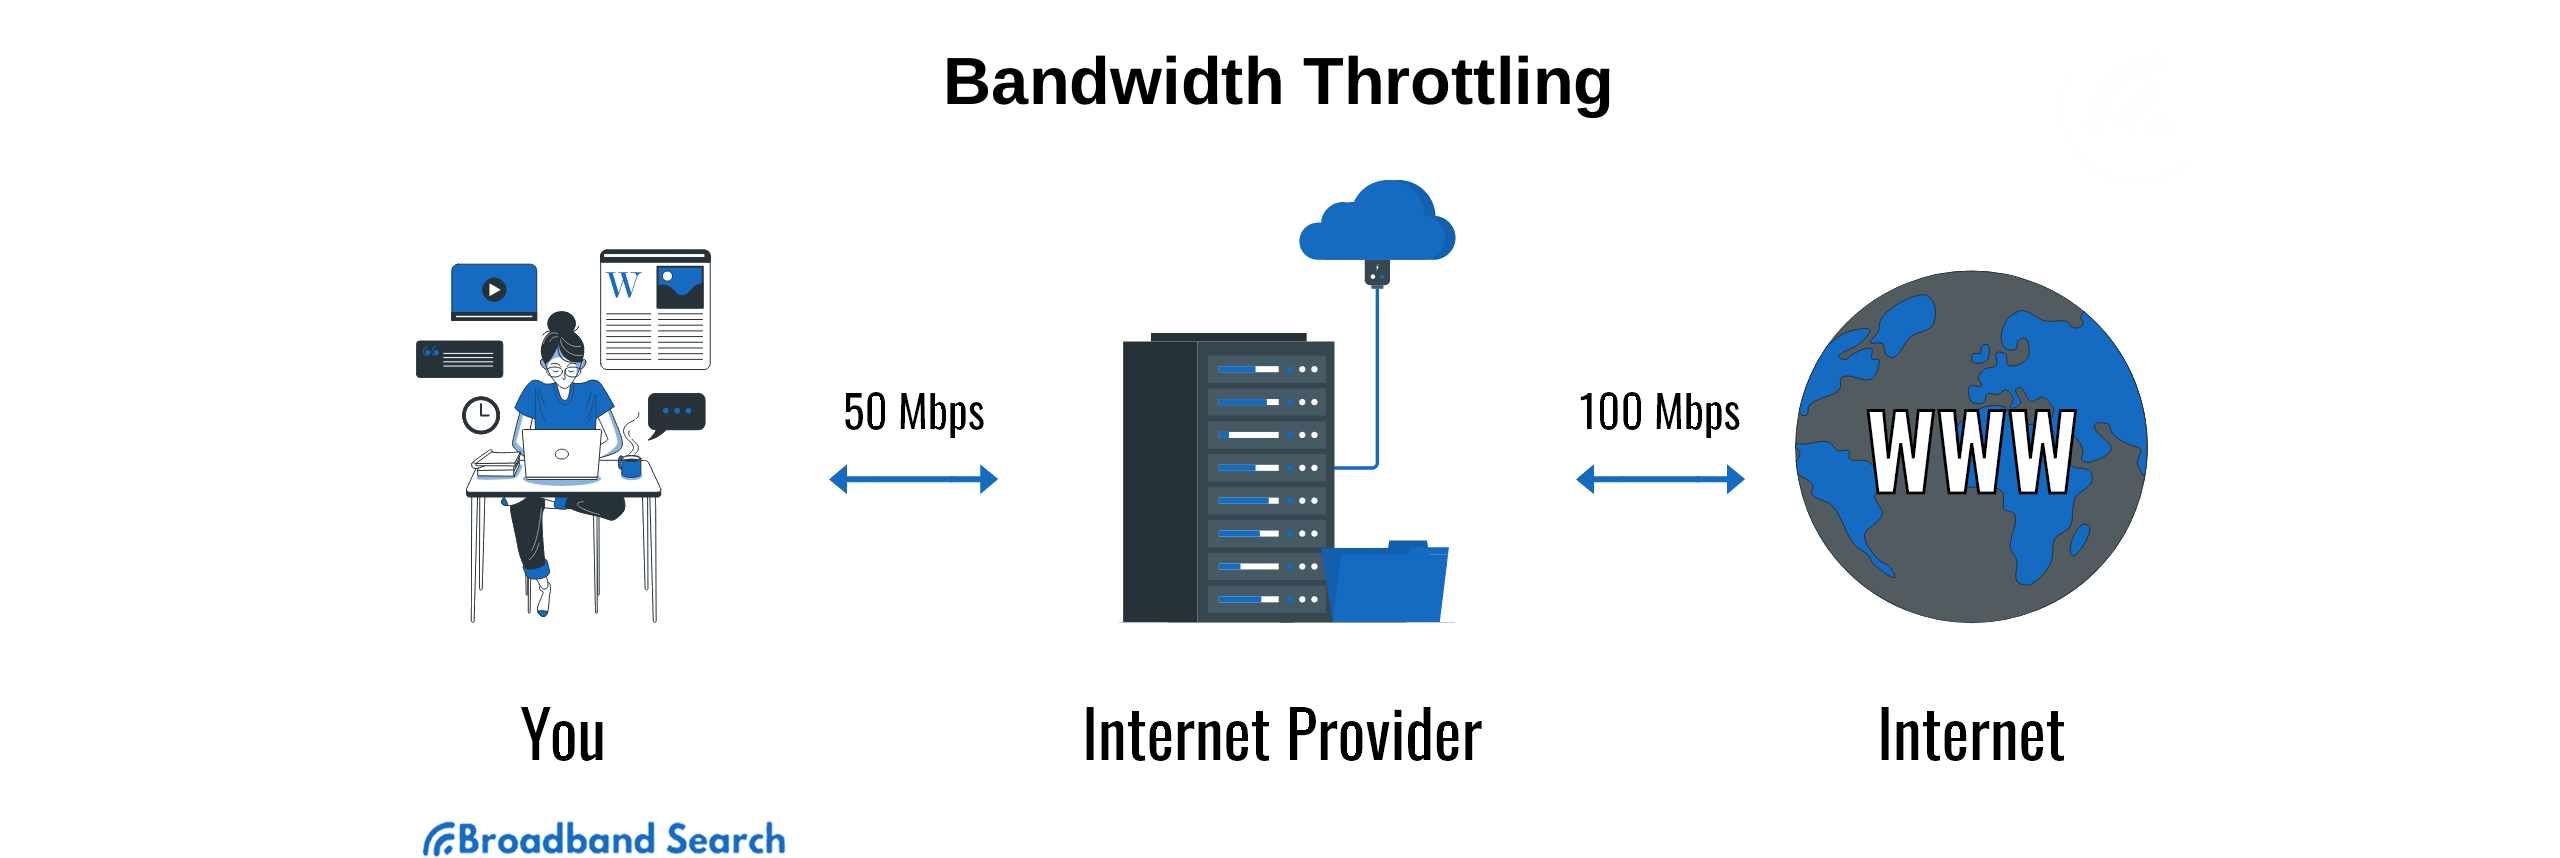
Network throttling is a mechanism employed by operating systems, including Windows 10, to manage network bandwidth allocation. It involves prioritizing certain network traffic over others, ensuring that critical applications receive sufficient bandwidth while less important tasks are temporarily slowed down. This process is crucial for maintaining system stability and optimizing user experience, particularly when dealing with limited bandwidth or high network demands.

How Network Throttling Works in Windows 10

Windows 10 utilizes a sophisticated network prioritization system that dynamically adjusts network traffic based on various factors. These factors include:

  • Application Priority: Windows assigns priority levels to different applications. Applications deemed critical, such as system processes, updates, and real-time communication tools, are given higher priority, while background tasks, such as file downloads and streaming services, are often assigned lower priority.
  • Network Connection Type: The type of network connection, whether wired or wireless, influences network prioritization. Wired connections generally receive higher priority due to their inherent stability and higher bandwidth capabilities.
  • Network Usage: Windows monitors network usage patterns and adjusts bandwidth allocation accordingly. If a network is heavily congested, applications with lower priority may experience throttling to ensure that essential processes continue smoothly.
  • User Preferences: Windows allows users to manually adjust network priorities for individual applications, granting them more control over bandwidth allocation.

Benefits of Network Throttling in Windows 10

Network throttling offers several benefits for Windows 10 users:

  • Improved System Performance: By prioritizing critical system processes, network throttling ensures that essential tasks, such as system updates and security checks, are not hindered by other network activities. This contributes to a smoother and more responsive user experience.
  • Enhanced Network Stability: During periods of high network traffic, network throttling helps prevent network congestion and potential disruptions by prioritizing essential traffic. This ensures that critical applications continue to function smoothly, even under heavy load.
  • Optimized Bandwidth Utilization: By allocating bandwidth strategically, network throttling ensures that critical applications receive the necessary resources, while less important tasks are temporarily slowed down. This optimizes bandwidth utilization and prevents network bottlenecks.
  • Improved User Experience: By ensuring that essential applications receive adequate bandwidth, network throttling enhances the overall user experience, making online activities more enjoyable and efficient.

Understanding Network Throttling in Practice

While network throttling operates behind the scenes, users can observe its effects in various scenarios:

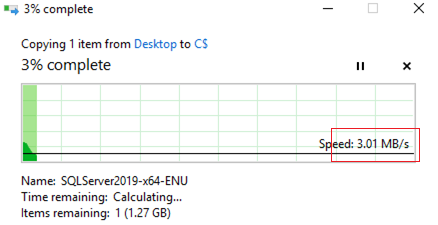
  • Slow Downloads or Streaming: When network resources are limited, applications with lower priority, such as file downloads or streaming services, may experience temporary slowdowns due to network throttling.
  • Lag in Online Games: Online games often require high bandwidth and low latency. Network throttling can temporarily affect game performance during periods of high network activity, resulting in lag or stuttering.
  • Delayed System Updates: System updates are critical for maintaining system security and stability. Network throttling ensures that these updates receive sufficient bandwidth, even when other network activities are ongoing.

Managing Network Throttling in Windows 10

Windows 10 provides users with several options for managing network throttling:

  • Network & Internet Settings: The "Network & Internet" settings allow users to adjust network priority for individual applications. Users can prioritize specific applications, ensuring they receive sufficient bandwidth, even during periods of high network activity.
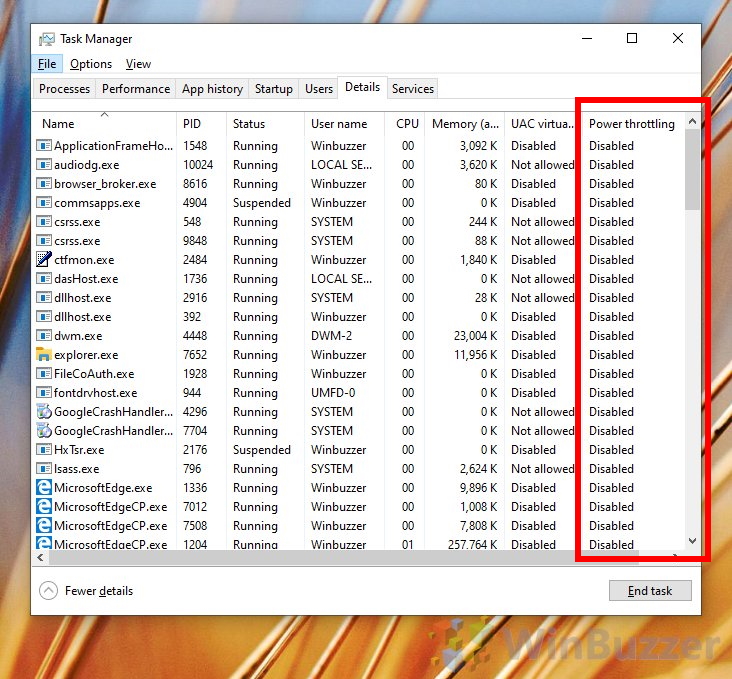
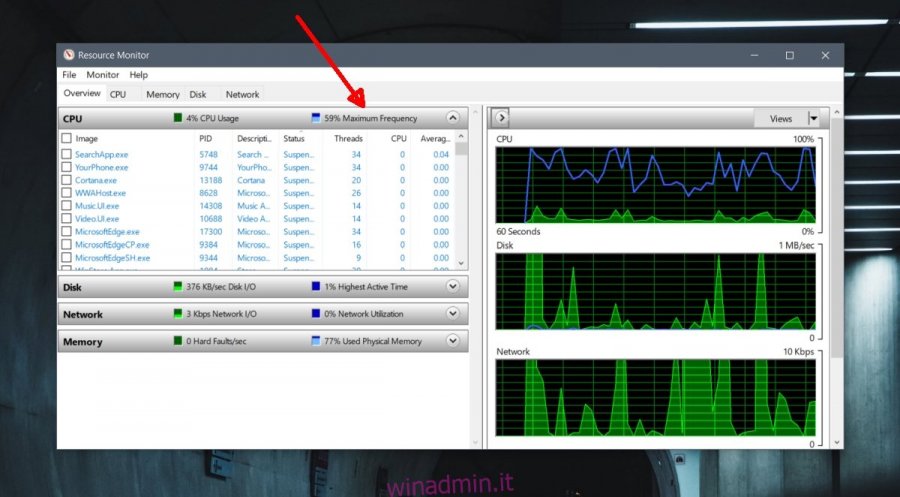
  • Task Manager: The Task Manager provides insights into network usage and allows users to identify applications that are consuming excessive bandwidth. This information can be used to adjust network priorities and optimize bandwidth allocation.
  • Third-Party Software: Several third-party network management tools offer more advanced features for managing network throttling, allowing users to fine-tune bandwidth allocation and optimize network performance.

Frequently Asked Questions

Q: Is network throttling a security threat?

A: Network throttling itself is not a security threat. However, it is important to be aware that malicious software could potentially exploit network throttling mechanisms to gain unauthorized access or disrupt network operations.

Q: Can network throttling be disabled?

A: While it is technically possible to disable network throttling, it is generally not recommended. Disabling network throttling can lead to network instability, reduced system performance, and potential security vulnerabilities.

Q: How can I identify if network throttling is affecting my internet connection?

A: You can identify network throttling by observing unusual slowdowns in specific applications, particularly during periods of high network activity. You can also use network monitoring tools to track bandwidth usage and identify potential bottlenecks.

Tips for Optimizing Network Throttling in Windows 10

  • Prioritize Critical Applications: Ensure that essential applications, such as system updates, security software, and real-time communication tools, are assigned high priority in network settings.
  • Monitor Network Usage: Regularly monitor network usage to identify applications that are consuming excessive bandwidth. Adjust network priorities accordingly to ensure that critical applications receive sufficient resources.
  • Use Wired Connections When Possible: Wired connections generally provide more stable and reliable network performance compared to wireless connections.
  • Optimize Network Settings: Ensure that your network settings are configured optimally for your specific needs and environment.
  • Consider Third-Party Network Management Tools: Explore third-party network management tools to gain more control over network throttling and optimize bandwidth allocation.

Conclusion

Network throttling is an essential mechanism in Windows 10 that helps manage network bandwidth allocation, ensuring that critical applications receive sufficient resources while less important tasks are temporarily slowed down. By understanding how network throttling works and utilizing the available management tools, users can optimize network performance, improve system stability, and enhance the overall user experience. While network throttling may occasionally lead to temporary slowdowns in certain applications, it ultimately contributes to a more efficient and reliable network environment.

Throttling Network File Transfer Speed on Windows  Windows OS Hub Understanding Windows Client upload throttling What is Bandwidth Throttling and How Can You Stop It - BroadbandSearch
How to manage Power Throttling in Windows 10 (Redstone 3) - gHacks Tech News How to Enable, Disable, and Configure Power Throttling in Windows 10 How To Enable Disable And Configure Power Throttling In Windows 10  winbuzzer
How to Enable or Disable Power Throttling in Windows 10  Tutorials Come controllare il throttling della CPU su Windows 10 โ‹† winadmin.it

Closure

Thus, we hope this article has provided valuable insights into Understanding Network Throttling in Windows 10: A Comprehensive Guide. We appreciate your attention to our article. See you in our next article!

Navigating The World With Ease: QR Code Readers On Windows 10

Navigating the World with Ease: QR Code Readers on Windows 10

Introduction

With great pleasure, we will explore the intriguing topic related to Navigating the World with Ease: QR Code Readers on Windows 10. Let’s weave interesting information and offer fresh perspectives to the readers.

4 Best QR Code Reader for Windows (Updated)

In the contemporary digital landscape, QR codes have become ubiquitous, seamlessly bridging the gap between the physical and virtual worlds. These square-shaped barcodes, readily scannable by smartphones and other devices, hold the key to unlocking a wealth of information, services, and experiences. Windows 10, a versatile and widely-used operating system, offers various methods for users to embrace the convenience of QR code scanning, enabling them to effortlessly access the digital realm.

This article delves into the world of QR code readers on Windows 10, exploring the diverse options available, their functionalities, and the benefits they bring to users. We will examine both built-in features and third-party applications, highlighting their strengths and limitations.

Built-in Functionality: The Windows 10 Camera App

Windows 10 equips users with a native QR code reader integrated within the Camera app, offering a simple and straightforward solution for scanning these codes. To utilize this feature, users simply need to:

  1. Open the Camera app: This can be done through the Start menu or by searching for "Camera" in the search bar.
  2. Point the camera at the QR code: Ensure the code is within the camera’s viewfinder and well-lit.
  3. Wait for the code to be recognized: The app will automatically detect and scan the code, displaying the associated content.

This built-in functionality proves particularly useful for quick and casual scanning, eliminating the need for additional software. However, it lacks advanced features found in dedicated QR code reader applications.

Third-Party Applications: Expanding the Horizons

Beyond the native Camera app, a plethora of third-party applications offer enhanced QR code reading capabilities, catering to diverse user needs and preferences. These applications often provide features such as:

  • Batch scanning: Enabling users to scan multiple codes simultaneously, streamlining the process for large-scale QR code deployments.
  • Code history: Maintaining a record of previously scanned codes, allowing users to revisit the information or links associated with them.
  • Customizable settings: Offering users the ability to tailor the scanning experience to their preferences, such as adjusting the scanning area or enabling specific code formats.
  • Offline scanning: Some applications allow users to scan codes without an active internet connection, proving beneficial in situations with limited connectivity.

Popular QR Code Reader Applications for Windows 10:

Several popular third-party QR code reader applications cater to Windows 10 users, each offering unique features and functionalities:

  • QR Code Reader for Windows 10: A straightforward and user-friendly application that excels in its simplicity. It allows for quick and easy scanning of codes, displaying the associated content in a clear and concise manner.
  • QR Code Reader Pro: This application goes beyond basic scanning, offering features like batch scanning, history management, and customizable settings. It proves particularly useful for users requiring more advanced functionality.
  • QR Code Scanner: A versatile application that supports a wide range of code formats, including QR codes, barcodes, and data matrix codes. It also offers offline scanning capabilities, ensuring users can access information even without internet access.

Benefits of Utilizing QR Code Readers on Windows 10:

Integrating QR code readers into the Windows 10 experience brings numerous benefits to users:

  • Enhanced accessibility: QR codes act as gateways to digital content, enabling users to access information, services, and experiences with a simple scan. This proves particularly useful for individuals with disabilities who may find traditional methods of access challenging.
  • Streamlined information retrieval: QR codes provide a direct and efficient means of accessing information, eliminating the need for manual input or searching. This saves time and effort, allowing users to focus on the content itself.
  • Interactive experiences: QR codes can be used to create engaging and interactive experiences, such as unlocking augmented reality content, accessing online surveys, or participating in interactive games.
  • Seamless integration: QR code readers seamlessly integrate with Windows 10, providing a convenient and familiar user experience. This eliminates the need for users to learn new interfaces or adapt to unfamiliar software.

FAQs: Addressing Common Queries

1. Can I use my smartphone to scan QR codes on Windows 10?

While smartphones are commonly used for QR code scanning, they are not directly compatible with Windows 10. However, users can connect their smartphones to their Windows 10 computer via USB or Bluetooth and use the phone’s camera app to scan QR codes.

2. Are there any security risks associated with scanning QR codes?

As with any online activity, there are potential security risks associated with scanning QR codes. Users should be cautious about scanning codes from unknown sources, as they may lead to malicious websites or downloads. It is advisable to only scan codes from trusted sources or websites.

3. How can I create my own QR codes?

Creating QR codes is a simple process. Numerous online tools and websites offer free QR code generation services. Users can input their desired content, such as a website URL, contact information, or text message, and generate a corresponding QR code.

4. Can I use QR code readers for business purposes?

Yes, QR code readers can be effectively utilized for business purposes. They can be used to share product information, access online promotions, collect customer feedback, or streamline payment processes.

Tips for Effective QR Code Utilization:

  • Use high-quality QR codes: Ensure the QR codes are printed clearly and are of sufficient size to be easily scanned.
  • Place codes in strategic locations: Consider the target audience and place codes in visible and accessible locations.
  • Provide clear instructions: Include a brief description or instructions on how to scan the code.
  • Track code usage: Utilize analytics tools to monitor code scans and measure their effectiveness.
  • Stay updated: Keep your QR code reader applications up to date to ensure optimal performance and security.

Conclusion: Embracing the Convenience of QR Code Readers

QR code readers have become an integral part of the Windows 10 experience, offering users a convenient and efficient way to access digital content, services, and experiences. Whether utilizing the built-in Camera app or exploring the diverse functionalities of third-party applications, users can seamlessly integrate QR code scanning into their daily routines. The benefits of QR code readers extend beyond convenience, enhancing accessibility, streamlining information retrieval, and creating interactive experiences. By embracing these tools, users can unlock a world of possibilities and navigate the digital landscape with ease.

4 Best QR Code Reader for Windows (Updated) QR Scanner+ // QR Code and Barcode Reader for Windows 10 How To Scan Barcodes And Qr Codes On Windows 10 Mobil - vrogue.co
Yes, you can read QR Codes on Windows Creating A Qr Code QR Code Desktop
How to Scan QR Code on Windows Laptops  Windows 11 or 10 - YouTube 4 Free Open Source QR Code Reader Software for Windows

Closure

Thus, we hope this article has provided valuable insights into Navigating the World with Ease: QR Code Readers on Windows 10. We hope you find this article informative and beneficial. See you in our next article!

Understanding Microsoft Office 365 And Its Access For Windows Users

Understanding Microsoft Office 365 and Its Access for Windows Users

Introduction

In this auspicious occasion, we are delighted to delve into the intriguing topic related to Understanding Microsoft Office 365 and Its Access for Windows Users. Let’s weave interesting information and offer fresh perspectives to the readers.

Understanding Microsoft Office 365 and Its Access for Windows Users

Microsoft Office 365 Infographic

Microsoft Office 365, a subscription-based productivity suite, has become a staple for businesses and individuals alike. It offers a comprehensive collection of applications, including Word, Excel, PowerPoint, Outlook, and more, accessible across multiple devices. While the suite is primarily available through a paid subscription model, there are avenues for users to access and experience the power of Office 365 on their Windows computers without a direct financial commitment.

Understanding the Subscription Model

It is important to clarify that there is no official "free download" for the full suite of Office 365 applications for Windows. The platform operates on a subscription model, where users pay a recurring fee to access and utilize the software. This model grants access to the latest versions of applications, regular updates, and cloud storage features.

Free Access Options: Exploring the Alternatives

While a direct download of the full Office 365 suite is not available for free, there are several alternative approaches for Windows users to engage with the platform’s capabilities:

1. Free Trial Period: Microsoft offers a free trial period for its Office 365 subscription. This allows users to explore the suite’s features and functionalities for a limited time without financial obligation. This trial period provides a valuable opportunity to experience the benefits of Office 365 firsthand.

2. Microsoft Office Online: This web-based version of Office 365 offers access to core applications like Word, Excel, and PowerPoint through a web browser. While it may lack some advanced features of the desktop versions, it provides a functional and accessible alternative for basic document creation and editing.

3. Free Microsoft Account: Creating a free Microsoft account grants users access to a limited version of Office 365, including OneDrive cloud storage, basic email functionality, and access to the online versions of Office applications. This free tier provides a starting point for users to explore the platform and its services.

4. Educational and Non-Profit Programs: Microsoft offers discounted or free access to Office 365 for students, educators, and non-profit organizations. These programs provide valuable opportunities to access the full suite of applications for academic or charitable purposes.

5. Microsoft 365 Apps for Enterprise: This option is available to businesses with existing Microsoft 365 subscriptions. It allows employees to install and utilize Office applications on their personal devices, including Windows computers, without requiring individual subscriptions.

6. Public Computers and Libraries: Many public libraries and computer labs offer access to Microsoft Office 365. This provides a convenient and cost-effective solution for users who need to access the suite without a personal subscription.

7. Open Source Alternatives: While not directly related to Microsoft Office 365, various open-source office suites like LibreOffice and OpenOffice provide a viable alternative for users seeking free and feature-rich productivity tools.

Importance and Benefits of Accessing Office 365

The ability to access and utilize Office 365, even through alternative means, offers numerous advantages for Windows users:

  • Enhanced Productivity: Office 365 provides a comprehensive suite of tools that streamline document creation, data analysis, presentation design, and communication. This enhanced productivity can be beneficial for both personal and professional tasks.
  • Cross-Platform Compatibility: Office 365 applications are available across multiple platforms, including Windows, macOS, iOS, and Android. This cross-platform compatibility ensures seamless document access and collaboration across different devices.
  • Cloud Storage and Collaboration: Office 365 integrates seamlessly with OneDrive, providing cloud storage and synchronization capabilities for documents, files, and emails. This feature facilitates collaborative work and ensures data accessibility from any location.
  • Integration with Other Microsoft Services: Office 365 integrates with other Microsoft services like Outlook, Teams, and SharePoint, creating a cohesive ecosystem for communication, collaboration, and data management.
  • Regular Updates and Feature Enhancements: Microsoft regularly updates Office 365 with new features, security enhancements, and bug fixes. This ensures users have access to the latest functionalities and a secure working environment.

Frequently Asked Questions (FAQs)

Q: Can I download Office 365 for free on my Windows computer?

A: No, there is no official free download available for the full suite of Office 365 applications. However, there are alternative methods for accessing and utilizing the platform’s features.

Q: How do I access Office 365 for free?

A: You can explore options like free trial periods, Microsoft Office Online, free Microsoft accounts, educational programs, or public computer access.

Q: What are the limitations of using the free version of Office 365?

A: The free version may have limited features, storage space, and functionality compared to the paid subscriptions.

Q: Can I use Office 365 on multiple devices with a free account?

A: The free version of Office 365 allows access on multiple devices, but functionality may be limited depending on the specific plan.

Q: How can I get Office 365 for students or educators?

A: Microsoft offers educational programs that provide discounted or free access to Office 365 for students and educators.

Q: What are the benefits of subscribing to Office 365?

A: Subscription benefits include access to the latest versions of applications, regular updates, cloud storage, and collaborative features.

Tips for Utilizing Office 365 Effectively

  • Explore the free trial: Take advantage of the free trial period to familiarize yourself with the suite’s features.
  • Utilize Office Online: Access basic functionality through the web-based versions of Office applications.
  • Maximize free storage: Utilize OneDrive’s free storage for document backup and sharing.
  • Take advantage of educational programs: If eligible, explore discounted or free access options for students and educators.
  • Consider a subscription: Evaluate the benefits of a paid subscription based on your individual or business needs.

Conclusion

While a direct "free download" of the full Office 365 suite for Windows is not available, alternative methods provide access to its powerful features. By exploring free trials, online versions, educational programs, or public computer access, users can leverage the benefits of Office 365 and enhance their productivity without direct financial commitment. Understanding the available options and utilizing them effectively can unlock a world of possibilities for individuals and businesses alike.

presentation about microsoft 365 Microsoft 365  DMC, Inc. Beginner's Guide to Microsoft 365 - Infographic  Lineal IT Support
Guide to Office 365 โ€“ Laurent Schoenaers Microsoft 365 Benefits: Skyrocket Your Productivity Today  Arc Systems How to Install and Activate Microsoft Office 365 for Free - Step by Step Guide - YouTube
Microsoft 365 OFFICE USER GUIDE 15+ Microsoft Access

Closure

Thus, we hope this article has provided valuable insights into Understanding Microsoft Office 365 and Its Access for Windows Users. We hope you find this article informative and beneficial. See you in our next article!

Connecting Computers In A Windows 10 Environment: A Comprehensive Guide

Connecting Computers in a Windows 10 Environment: A Comprehensive Guide

Introduction

With enthusiasm, let’s navigate through the intriguing topic related to Connecting Computers in a Windows 10 Environment: A Comprehensive Guide. Let’s weave interesting information and offer fresh perspectives to the readers.

Connecting Computers in a Windows 10 Environment: A Comprehensive Guide

How to Connect Two Computers and share files using LAN Cable on WINDOWS 10 - YouTube

Connecting computers within a network, particularly in a Windows 10 environment, is a fundamental aspect of modern computing. This process, often referred to as "networking," enables seamless sharing of resources, facilitates collaboration, and enhances productivity. This guide provides a comprehensive overview of the various methods and considerations involved in connecting computers in a Windows 10 environment.

Understanding Network Types:

The first step in connecting computers is to understand the different types of networks available. Two primary network types are relevant here:

  • Home Networks: These are typically smaller networks designed for personal use, often connecting devices within a single household. They are usually configured with a wireless router, allowing devices to connect wirelessly.
  • Business Networks: These networks are more complex and designed for larger organizations, encompassing multiple devices and users. They often employ a variety of technologies, including wired connections, wireless access points, and sophisticated security measures.

Methods for Connecting Computers:

There are two primary methods for connecting computers in a Windows 10 environment:

  • Wired Connections: This method utilizes Ethernet cables to physically connect computers to a network. Ethernet connections offer higher speeds and greater stability compared to wireless connections, making them ideal for tasks requiring high bandwidth or consistent connectivity.

  • Wireless Connections: This method relies on wireless routers to establish a network that devices can join without physical cables. Wireless connections offer flexibility and convenience, allowing users to move around freely while connected to the network.

Network Configuration in Windows 10:

Once you have chosen a connection method, you need to configure your Windows 10 computer to join the network. This process involves several steps:

  1. Identifying Network Settings: Locate the network settings within your Windows 10 computer. This can be done by accessing the "Network and Sharing Center" in the Control Panel or by clicking the network icon in the taskbar.

  2. Selecting a Network: Choose the network you want to join, whether it is a wired or wireless network. This involves entering the network password for wireless connections or simply connecting the Ethernet cable for wired connections.

  3. Configuring Network Properties: Once connected, you can configure network properties such as network name, password, and security settings. This step ensures your computer is properly integrated into the network and secures your connection.

Sharing Resources on a Windows 10 Network:

One of the primary benefits of connecting computers is the ability to share resources. This includes:

  • File Sharing: Share files and folders between computers on the network, allowing users to access and modify data easily.

  • Printer Sharing: Share printers connected to one computer with other computers on the network, eliminating the need for individual printers for each device.

  • Internet Sharing: Share an internet connection from one computer with other computers on the network, allowing multiple devices to access the internet simultaneously.

Network Security Considerations:

Network security is paramount, especially when sharing resources and sensitive data. Consider implementing the following measures:

  • Strong Passwords: Utilize strong passwords for network access and individual user accounts to prevent unauthorized access.

  • Firewall Protection: Enable the built-in Windows Firewall or use third-party firewall software to prevent unauthorized access to your computer and network.

  • Antivirus Protection: Install and maintain antivirus software on all computers connected to the network to protect against malware and other threats.

Troubleshooting Network Issues:

Network issues can arise, impacting connectivity and resource sharing. Common troubleshooting steps include:

  • Checking Network Connections: Ensure all cables are securely connected and the network router is powered on.

  • Restarting Devices: Restarting your computer and the network router can often resolve temporary connection issues.

  • Checking Network Settings: Verify network settings on your computer and router, ensuring they are correctly configured.

  • Running Network Diagnostics: Utilize built-in Windows network diagnostics tools to identify and troubleshoot potential network issues.

FAQs about Connecting Computers in a Windows 10 Environment:

1. How can I connect my computer to the internet using a wired connection?

Connect one end of an Ethernet cable to your computer’s Ethernet port and the other end to your router’s Ethernet port. Windows 10 should automatically detect and connect to the network.

2. How do I share a printer on my network?

Right-click the printer icon in your Control Panel, select "Printer Properties," and navigate to the "Sharing" tab. Enable printer sharing and set a share name for the printer. Other computers on the network can then access the printer.

3. What is a network drive, and how do I create one?

A network drive is a shared folder on another computer that you can access as if it were a drive on your own computer. To create a network drive, navigate to "This PC," click "Map Network Drive," and enter the path to the shared folder.

4. How do I secure my home network?

Use a strong password for your router and change the default router username and password. Enable the built-in Windows Firewall and install antivirus software on all computers connected to the network.

5. Why can’t I connect to my network?

Check your network cable connections, restart your computer and router, verify network settings, and run network diagnostics to troubleshoot the issue.

Tips for Connecting Computers in a Windows 10 Environment:

  • Use a wired connection for tasks requiring high bandwidth or consistent connectivity.

  • Consider a dual-band router for optimal wireless performance.

  • Regularly update your network drivers to ensure compatibility and stability.

  • Enable network discovery to easily identify other computers on the network.

  • Back up important data regularly to protect against data loss.

Conclusion:

Connecting computers in a Windows 10 environment is essential for modern computing, offering numerous benefits for personal and professional use. By understanding network types, configuration methods, and security considerations, users can establish reliable and secure networks, facilitating resource sharing, collaboration, and enhanced productivity. Implementing best practices, troubleshooting potential issues, and staying informed about network security best practices will ensure a smooth and efficient network experience.

Windows 10 Environment The Ultimate Step-By-Step Guide  9780655527916  Gerardus  bol.com How to Connect Two Computers Windows 10? 2 Ways Are Here!  Computer, Connection, Computer network How to Connect Two Computers Via WIFI / Wireless In Windows 10 - YouTube
How to Connect Two Computers [Step-By-Step Guide] Using the Windows 10 Interface  Taking a Tour of the Windows 10 Interface  InformIT Environment Variables : Windows 10 - How it works and how to set it - YouTube
Complete list of environment variables on Windows 10 - Pureinfotech Cubase On Two Computers - How to connect two computers through cross cable for data  - It's

Closure

Thus, we hope this article has provided valuable insights into Connecting Computers in a Windows 10 Environment: A Comprehensive Guide. We hope you find this article informative and beneficial. See you in our next article!

Navigating The Windows 11 Upgrade: A Comprehensive Guide To Pros And Cons

Navigating the Windows 11 Upgrade: A Comprehensive Guide to Pros and Cons

Introduction

With great pleasure, we will explore the intriguing topic related to Navigating the Windows 11 Upgrade: A Comprehensive Guide to Pros and Cons. Let’s weave interesting information and offer fresh perspectives to the readers.

See the Guide on Pros and Cons of Windows 11 & How to Upgrade

Microsoft’s Windows 11, released in October 2021, brought a significant visual overhaul and a suite of new features to the familiar Windows operating system. While the upgrade offers compelling advantages, it also presents potential drawbacks that users should consider before making the leap. This comprehensive guide aims to provide a balanced perspective on the Windows 11 upgrade, analyzing its benefits and challenges to help users make an informed decision.

Pros of Upgrading to Windows 11

1. Enhanced User Interface and Visual Appeal: Windows 11 boasts a refined, modern look with rounded corners, a centered taskbar, and a simplified Start menu. This streamlined interface prioritizes visual clarity and ease of navigation, offering a more intuitive user experience.

2. Improved Performance and Efficiency: Windows 11 incorporates performance enhancements that aim to optimize system resources and improve responsiveness. Features like DirectStorage and the new Windows Subsystem for Android enable faster loading times, smoother multitasking, and better overall performance.

3. Advanced Security Features: Windows 11 strengthens security with features like Windows Hello for facial recognition and fingerprint authentication, TPM 2.0 chip requirement for enhanced hardware security, and improved anti-malware protection. These measures aim to safeguard user data and prevent unauthorized access.

4. Integration of Microsoft 365 Features: Windows 11 seamlessly integrates with Microsoft 365 services like Teams, OneDrive, and Microsoft Edge. This integration simplifies collaboration, file sharing, and overall productivity, offering a unified ecosystem for users.

5. Gaming Enhancements: Windows 11 introduces features like Auto HDR and DirectX 12 Ultimate, enhancing the gaming experience with improved visuals, higher frame rates, and smoother gameplay. These features cater to gamers seeking a more immersive and visually appealing experience.

6. Enhanced Multitasking Capabilities: Windows 11 introduces features like Snap Layouts and Snap Groups, facilitating efficient multitasking. These features allow users to organize and manage multiple windows simultaneously, maximizing productivity and screen real estate.

7. Improved Accessibility: Windows 11 prioritizes accessibility with features like Live Captions, which automatically transcribe audio content, and improved high-contrast themes, making the operating system more inclusive for users with disabilities.

Cons of Upgrading to Windows 11

1. Hardware Requirements: Windows 11 has stringent hardware requirements, including a compatible processor, sufficient RAM, and a TPM 2.0 module. Older devices may not meet these specifications, limiting the upgrade options for some users.

2. Compatibility Issues: While Microsoft strives to ensure compatibility, some older software applications may not function optimally or at all on Windows 11. Users may encounter issues with legacy programs, requiring them to seek updates or alternatives.

3. Reduced Customization Options: Windows 11 offers less customization options compared to its predecessor. Users have limited control over the taskbar, Start menu, and other elements, potentially impacting their ability to personalize the operating system to their preferences.

4. Privacy Concerns: Windows 11 collects more data than previous versions, raising privacy concerns for some users. This data collection is primarily used to improve the operating system and personalize user experiences, but it may be a concern for those prioritizing data privacy.

5. Potential System Instability: While Windows 11 boasts improved stability, some users have reported encountering bugs and performance issues after upgrading. These issues may require troubleshooting or updates to resolve, potentially disrupting workflow and user experience.

6. Increased Resource Consumption: Windows 11 is generally more resource-intensive than its predecessor, potentially leading to slower performance on older or less powerful devices. Users with limited hardware resources may experience reduced responsiveness and battery life.

7. Limited Support for Older Devices: Microsoft has announced that Windows 11 will be the last version to support older devices with legacy processors. This decision will eventually limit support options for users with older hardware, potentially requiring them to upgrade their systems to continue receiving updates and security patches.

FAQs

1. Is it necessary to upgrade to Windows 11?

The need to upgrade to Windows 11 depends on individual user needs and hardware capabilities. If your current device meets the hardware requirements and you desire the new features and visual enhancements, upgrading can be beneficial. However, if your device is outdated or you prefer the familiar interface and features of Windows 10, staying on the current version might be more suitable.

2. How do I check if my computer meets the Windows 11 requirements?

Microsoft provides a dedicated tool called the "PC Health Check App" that can assess your device’s compatibility with Windows 11. This tool analyzes your hardware specifications and informs you if your device meets the minimum requirements for upgrading.

3. What happens if my device does not meet the Windows 11 requirements?

If your device does not meet the Windows 11 requirements, you can continue using Windows 10. Microsoft will continue to provide security updates for Windows 10 until October 14, 2025. However, you will not be able to upgrade to Windows 11 without meeting the specified hardware requirements.

4. What are the security implications of upgrading to Windows 11?

Windows 11 includes enhanced security features like TPM 2.0 chip requirement, improved anti-malware protection, and Windows Hello for facial recognition and fingerprint authentication. These features aim to enhance data security and prevent unauthorized access, making the operating system more secure than its predecessor.

5. Can I downgrade from Windows 11 to Windows 10?

Downgrading from Windows 11 to Windows 10 is possible, but it is a complex process that requires specific steps and may result in data loss. It is recommended to back up your data before attempting to downgrade.

6. What are the best practices for upgrading to Windows 11?

Before upgrading, it is crucial to back up your data to prevent any potential loss during the upgrade process. Additionally, ensure your device meets the Windows 11 requirements and check for software compatibility to avoid potential issues after upgrading.

Tips

1. Thoroughly Research Before Upgrading: Before committing to the upgrade, research the new features, hardware requirements, and compatibility considerations to ensure it aligns with your needs and device capabilities.

2. Back Up Your Data: Always back up your important data before upgrading to Windows 11. This safeguards your files and information in case of any issues during the upgrade process.

3. Check Software Compatibility: Before upgrading, review your installed software applications and ensure they are compatible with Windows 11. Check for updates or alternatives to avoid potential conflicts after upgrading.

4. Consider Hardware Requirements: Ensure your device meets the minimum hardware requirements for Windows 11 to avoid performance issues and compatibility problems.

5. Explore Alternatives: If you are unsure about upgrading to Windows 11, consider alternative operating systems like Linux or macOS. These options offer different features and user experiences that may align better with your specific needs.

Conclusion

The decision to upgrade to Windows 11 is a personal one that depends on individual needs, device capabilities, and priorities. While the new operating system offers several advantages, including enhanced security, improved performance, and a refined user interface, it also presents potential drawbacks like hardware requirements, compatibility issues, and privacy concerns. Users should carefully weigh the pros and cons, research the upgrade process, and make an informed decision based on their specific requirements and preferences. By thoughtfully considering the factors presented in this guide, users can navigate the Windows 11 upgrade with confidence, optimizing their computing experience and maximizing the benefits of this latest operating system.

Buy WINDOWS 11 COMPLETE GUIDE: Taking You from Windows 11 Novice to Professional In 33 Chapters Windows 11 upgrade vs. clean install: Here's the difference  Stellar Windows 11 Upgrade: Pros and Cons Explored - Daily Update
Windows 11 Upgrade Pros And Cons 2024 - Win 11 Home Upgrade 2024 How to Upgrade Windows 11 Home to Pro Without Reinstalling - YouTube Upgrade Windows 11 Home To Pro Edition - YouTube
Microsoft's Windows 11 Update: Complete Guide to Latest Features - Computer Repair  TickTockTech Buy WINDOWS 11 HOME User Manual: A Comprehensive Illustrated Guide to Navigating the New

Closure

Thus, we hope this article has provided valuable insights into Navigating the Windows 11 Upgrade: A Comprehensive Guide to Pros and Cons. We appreciate your attention to our article. See you in our next article!

Unveiling The Power Of Multiple Output Devices In Windows 11: A Comprehensive Guide

Unveiling the Power of Multiple Output Devices in Windows 11: A Comprehensive Guide

Introduction

With enthusiasm, let’s navigate through the intriguing topic related to Unveiling the Power of Multiple Output Devices in Windows 11: A Comprehensive Guide. Let’s weave interesting information and offer fresh perspectives to the readers.

Unveiling the Power of Multiple Output Devices in Windows 11: A Comprehensive Guide

25 Windows 11 Tricks You Need to Know

Windows 11, with its focus on enhanced user experience and versatility, introduces a powerful feature: the ability to manage and utilize multiple output audio devices simultaneously. This capability, often referred to as "multiple output sound," transcends the traditional single-device audio setup, opening doors to a more immersive and tailored audio experience.

Understanding the Fundamentals:

Before delving into the intricacies of multiple output devices, it is essential to grasp the core concept. In essence, multiple output devices allow users to send audio streams to different speakers, headphones, or other output devices concurrently. This is achieved through the "Spatial Sound" feature in Windows 11, which leverages the operating system’s advanced audio capabilities to create distinct audio channels for each connected device.

The Advantages of Multiple Output Sound:

The advantages of using multiple output devices are manifold, extending beyond mere convenience to enhance productivity, entertainment, and accessibility.

  • Enhanced Audio Immersion: Imagine immersing yourself in a movie with surround sound coming from your speakers while simultaneously enjoying the dialogue through your headphones. This is made possible by routing different audio streams to different devices, creating a truly immersive audio experience.

  • Streamlined Workflows: For professionals working with audio editing, music production, or live streaming, the ability to send different audio signals to separate outputs is invaluable. This allows for precise monitoring, mixing, and routing of audio streams, optimizing workflows and improving overall audio quality.

  • Accessibility and Customization: Users with hearing impairments can benefit from utilizing separate outputs for different audio sources, enabling them to adjust volume levels individually and prioritize specific audio content. Additionally, multiple output devices allow for personalized audio settings, catering to individual preferences and creating a more comfortable listening experience.

  • Multi-Device Communication: In a collaborative environment, using multiple output devices enables individuals to communicate effectively through different channels. For instance, a team working on a project can simultaneously use speakers for a shared audio feed while utilizing headphones for private communication.

Practical Applications of Multiple Output Devices:

The applications of multiple output devices are diverse, ranging from everyday tasks to specialized professional workflows.

  • Home Entertainment: Enjoy a movie night with surround sound on your speakers while listening to dialogue through headphones to avoid disturbing others. Utilize separate devices for music playback and voice commands, creating a personalized entertainment experience.

  • Gaming: Immerse yourself in the virtual world with surround sound from speakers while communicating with teammates through headphones, enhancing both the audio experience and strategic gameplay.

  • Content Creation: Utilize multiple output devices for professional audio editing, music production, and live streaming, allowing for precise audio monitoring, mixing, and routing.

  • Accessibility: Customize audio settings for individuals with hearing impairments, enabling them to adjust volume levels and prioritize specific audio content for a more comfortable listening experience.

  • Education: Create a collaborative learning environment by using speakers for shared audio content and headphones for individual study sessions, allowing for personalized learning experiences.

Setting Up Multiple Output Devices in Windows 11:

Setting up multiple output devices in Windows 11 is a straightforward process.

  1. Connect your Devices: Connect all desired output devices to your computer. This could include speakers, headphones, external sound cards, or other audio output devices.

  2. Configure Audio Settings: Navigate to "Sound" settings in Windows 11 by searching for "Sound" in the Start menu.

  3. Manage Output Devices: In the "Sound" settings, you will find a list of all connected output devices. Select the desired device for each audio stream by clicking on the device and choosing "Set as default device."

  4. Enable Spatial Sound: To utilize the full potential of multiple output devices, enable "Spatial sound" in the "Sound" settings. This feature allows for the routing of different audio streams to specific devices, creating a more immersive and tailored audio experience.

Tips for Optimizing Multiple Output Devices:

  • Device Compatibility: Ensure all connected devices are compatible with Windows 11 and support the desired audio formats and functionalities.

  • Driver Updates: Keep your audio drivers updated to ensure optimal performance and compatibility with multiple output devices.

  • Audio Routing: Experiment with different audio routing configurations to find the best setup for your specific needs and preferences.

  • Spatial Sound Settings: Customize spatial sound settings to optimize the audio experience for different devices and audio content.

Frequently Asked Questions (FAQs):

Q: How many output devices can I connect and use simultaneously in Windows 11?

A: The number of output devices you can connect and use simultaneously depends on your computer’s hardware capabilities and the specific audio drivers installed. Generally, most modern computers can handle multiple output devices without any limitations.

Q: Can I use different audio formats for different output devices?

A: Yes, you can configure different audio formats for different output devices. For example, you can use a high-quality audio format for your speakers while using a lower-quality format for your headphones.

Q: Can I adjust volume levels for each output device independently?

A: Yes, you can adjust volume levels for each output device independently through the Windows 11 "Sound" settings. This allows for fine-tuning the audio experience for each device.

Q: Can I use multiple output devices for gaming?

A: Yes, you can use multiple output devices for gaming to enhance the audio experience. You can use speakers for surround sound effects while using headphones for in-game communication.

Q: What are the system requirements for using multiple output devices in Windows 11?

A: To use multiple output devices effectively, your computer should meet the minimum system requirements for Windows 11 and have appropriate audio drivers installed.

Conclusion:

Multiple output devices in Windows 11 unlock a world of possibilities, offering a more immersive, tailored, and productive audio experience. From enhancing entertainment to streamlining workflows and improving accessibility, the ability to manage and utilize multiple audio outputs empowers users to customize their audio environment and optimize their interactions with technology. With its user-friendly interface and powerful features, Windows 11 empowers individuals to harness the full potential of multiple output devices, creating a truly personalized and engaging audio experience.

How to change output device for different apps on windows 11 โ€“ Artofit How to Use 2 Audio Outputs at the Same Time on Windows 11 How to use multiple output devices at once for different programs  Windows - YouTube
How to Change Output Device For Different Apps on Windows 11  Output device, Windows system, App How to Change Output Device For Different Apps on Windows 11 Input Devices, Audio Devices How to Change Output Device For Different Apps on Windows 11  Output device, Windows system
Set Audio Output Device For Apps Individually On Windows 11 - YouTube How to Change Audio Output Device in Windows 11 - All Things How

Closure

Thus, we hope this article has provided valuable insights into Unveiling the Power of Multiple Output Devices in Windows 11: A Comprehensive Guide. We hope you find this article informative and beneficial. See you in our next article!

Windows 10: A Continuous Evolution Of Features

Windows 10: A Continuous Evolution of Features

Introduction

With enthusiasm, let’s navigate through the intriguing topic related to Windows 10: A Continuous Evolution of Features. Let’s weave interesting information and offer fresh perspectives to the readers.

Windows 10: A Continuous Evolution of Features

The Evolution of Microsoft Windows Through The Years

Windows 10, since its release in 2015, has been a platform of constant evolution, receiving regular updates with new features and enhancements. These updates are not mere cosmetic changes; they are designed to address user needs, improve performance, and enhance the overall user experience. This article delves into some of the most significant new features introduced in Windows 10, highlighting their importance and benefits.

1. Windows Subsystem for Linux (WSL)

One of the most impactful additions to Windows 10 is the Windows Subsystem for Linux (WSL). This feature allows users to run Linux distributions directly within Windows, providing access to a vast library of Linux tools and applications. This has been a game-changer for developers and system administrators who previously had to rely on virtual machines or dual-booting to use Linux.

Benefits of WSL:

  • Development Flexibility: Developers can now work seamlessly with Linux tools and libraries within the Windows environment, enhancing productivity and simplifying workflows.
  • Cross-Platform Compatibility: WSL bridges the gap between Windows and Linux, enabling users to run applications that are traditionally only available on Linux.
  • Enhanced Security: Linux distributions are known for their strong security features, and WSL allows users to leverage this advantage within the Windows environment.

FAQs about WSL:

  • Q: What Linux distributions are supported by WSL?
    • A: WSL supports a wide range of Linux distributions, including Ubuntu, Debian, Fedora, and Kali Linux.
  • Q: Can I run graphical applications within WSL?
    • A: While WSL primarily focuses on command-line applications, recent versions support graphical applications through X server integration.
  • Q: Does WSL require any specific hardware specifications?
    • A: WSL is relatively lightweight and can run smoothly on most modern computers. However, performance may vary depending on system resources.

Tips for using WSL:

  • Use the Microsoft Store: The easiest way to install Linux distributions on WSL is through the Microsoft Store.
  • Utilize the Bash shell: The Bash shell provides a familiar environment for Linux users and allows for seamless interaction with Linux commands.
  • Explore the WSL documentation: Microsoft provides comprehensive documentation on WSL, including guides, tutorials, and troubleshooting tips.

2. Windows Sandbox

Windows Sandbox is a lightweight, isolated desktop environment that allows users to run untrusted applications without affecting the host operating system. This feature is particularly useful for testing software, exploring new applications, or opening potentially malicious files without risking the integrity of the main system.

Benefits of Windows Sandbox:

  • Enhanced Security: Sandbox isolates the running application, preventing it from accessing or modifying system files or data.
  • Safe Testing Environment: Users can test new software or applications within the sandbox without worrying about potential damage to their primary system.
  • Temporary Workspace: Sandbox provides a temporary workspace for tasks that require a clean environment, such as testing new drivers or software updates.

FAQs about Windows Sandbox:

  • Q: What are the system requirements for Windows Sandbox?
    • A: Windows Sandbox requires a 64-bit processor, 4GB of RAM, and at least 2GB of free disk space.
  • Q: Can I share files between the sandbox and the host system?
    • A: Yes, files can be shared between the sandbox and the host system using shared folders.
  • Q: Is Windows Sandbox suitable for running large applications or games?
    • A: Windows Sandbox is optimized for lightweight applications and may not be suitable for resource-intensive programs.

Tips for using Windows Sandbox:

  • Enable Virtualization in BIOS: Windows Sandbox requires virtualization to be enabled in the BIOS settings.
  • Use the "wsl.exe" command: The "wsl.exe" command can be used to launch Windows Sandbox from the command line.
  • Explore the Sandbox settings: Windows Sandbox offers various settings to customize its behavior, such as disk space allocation and network connectivity.

3. Windows Hello

Windows Hello is a biometric authentication system that uses facial recognition, fingerprint scanning, or iris scanning to secure user accounts. This feature provides a more convenient and secure alternative to traditional password-based authentication, enhancing system security and streamlining user login processes.

Benefits of Windows Hello:

  • Enhanced Security: Biometric authentication is more secure than passwords, as it is harder to compromise or steal.
  • Convenience: Windows Hello eliminates the need to remember and type passwords, simplifying user logins and making the process faster.
  • Improved User Experience: Windows Hello provides a seamless and intuitive authentication experience, enhancing user satisfaction.

FAQs about Windows Hello:

  • Q: What hardware is required for Windows Hello?
    • A: Windows Hello requires compatible hardware, such as a webcam for facial recognition, a fingerprint reader, or an iris scanner.
  • Q: Is Windows Hello compatible with all devices?
    • A: Windows Hello compatibility varies depending on the device and its hardware specifications.
  • Q: Can I use Windows Hello to unlock other devices?
    • A: Windows Hello can be used to unlock other devices that support this feature, such as smartphones and tablets.

Tips for using Windows Hello:

  • Ensure compatible hardware: Check if your device has the required hardware for Windows Hello.
  • Configure Windows Hello settings: Access the Windows Hello settings to customize its behavior and security options.
  • Use a strong PIN: While Windows Hello is secure, it’s still important to use a strong PIN as an additional layer of protection.

4. Microsoft Edge (Chromium-based)

The new Microsoft Edge, built on the Chromium open-source project, is a significant departure from its predecessor. This new browser offers enhanced performance, improved compatibility, and a modern user interface. It also provides access to a vast ecosystem of extensions and web applications, further enhancing its functionality.

Benefits of Chromium-based Edge:

  • Improved Performance: The Chromium engine provides faster page loading times, smoother scrolling, and overall better performance.
  • Cross-Platform Compatibility: Edge is now available on Windows, macOS, iOS, and Android, ensuring consistent user experience across multiple devices.
  • Enhanced Security: Chromium’s robust security features provide a safer browsing experience, protecting users from malicious websites and threats.

FAQs about Chromium-based Edge:

  • Q: What are the key differences between the new Edge and the old Edge?
    • A: The new Edge is based on Chromium, offering improved performance, compatibility, and a modern user interface.
  • Q: Does the new Edge support legacy extensions?
    • A: The new Edge does not support legacy extensions. However, it supports a wide range of Chromium-based extensions.
  • Q: Can I sync my browsing data between different devices?
    • A: Yes, Edge allows users to sync their browsing data, including bookmarks, passwords, and browsing history, across multiple devices.

Tips for using Chromium-based Edge:

  • Explore the new features: The new Edge comes with several new features, such as built-in PDF reader, vertical tabs, and improved collections.
  • Customize the interface: Edge offers various customization options, including themes, start page, and layout.
  • Install useful extensions: The Edge Add-ons Store offers a wide range of extensions to enhance browsing functionality.

5. Windows Defender Antivirus

Windows Defender Antivirus is an integrated security solution that provides real-time protection against malware, viruses, and other threats. It has undergone significant improvements over the years, becoming a more robust and effective security tool.

Benefits of Windows Defender Antivirus:

  • Real-Time Protection: Windows Defender Antivirus constantly monitors the system for suspicious activity and automatically blocks threats.
  • Automatic Updates: Defender Antivirus automatically updates its virus definitions and security features, ensuring continuous protection.
  • Integration with Windows: Defender Antivirus seamlessly integrates with Windows, providing a unified security experience.

FAQs about Windows Defender Antivirus:

  • Q: Is Windows Defender Antivirus sufficient for protecting my system?
    • A: Windows Defender Antivirus provides a strong baseline of security. However, users may consider additional security software for enhanced protection.
  • Q: Can I disable Windows Defender Antivirus?
    • A: While it is possible to disable Defender Antivirus, it is strongly discouraged as it leaves the system vulnerable to threats.
  • Q: How do I scan my system for malware with Windows Defender Antivirus?
    • A: Windows Defender Antivirus provides a full scan option, as well as quick scans and custom scans.

Tips for using Windows Defender Antivirus:

  • Keep Defender Antivirus updated: Ensure that Defender Antivirus is running the latest version for optimal protection.
  • Use the "Quick Scan" option: Quick scans provide a quick check for potential threats.
  • Schedule regular full scans: Regular full scans help to detect and remove any hidden threats.

Conclusion

Windows 10 continues to evolve with each update, bringing new features and enhancements that address user needs and improve the overall user experience. From the powerful Windows Subsystem for Linux to the robust security of Windows Defender Antivirus, these features showcase Microsoft’s commitment to providing a comprehensive and innovative operating system. By staying informed about these new features and their benefits, users can maximize the potential of Windows 10 and enjoy a more productive and secure computing experience.

Evolution of Microsoft Windows from 1986 to 2021 Shows Just How Far We've Come - TechEBlog Evolution Of Windows The Evolution Of The Microsoft Windows Operating System Infographic - Vrogue
The Evolution Of Windows aprogrammerlife.com The Evolution of Windows #infographic ~ Visualistan Evolution of Windows - YouTube
Windows 10 Chapter 3 Using System Utilities Review Question - Logan Herseept Evolution Of Microsoft Windows with startup and Shutdown Sound 1993 - 2020  History Of

Closure

Thus, we hope this article has provided valuable insights into Windows 10: A Continuous Evolution of Features. We hope you find this article informative and beneficial. See you in our next article!

Navigating The Challenges Of R In Windows 10: Unlocking The Power Of Statistical Computing

Navigating the Challenges of R in Windows 10: Unlocking the Power of Statistical Computing

Introduction

With enthusiasm, let’s navigate through the intriguing topic related to Navigating the Challenges of R in Windows 10: Unlocking the Power of Statistical Computing. Let’s weave interesting information and offer fresh perspectives to the readers.

The R Project for Statistical Computing - Tools - OasisHUB

R, a powerful open-source programming language and environment for statistical computing and graphics, has become a cornerstone for data analysis, machine learning, and research across various fields. Its versatility and extensive package ecosystem make it a highly sought-after tool for researchers, statisticians, and data scientists alike. However, users often encounter the frustrating issue of R becoming unresponsive in Windows 10, disrupting their workflow and hindering their ability to leverage its full potential.

This article aims to comprehensively explore the underlying causes of R’s unresponsiveness in Windows 10, providing a clear understanding of the issue and offering practical solutions to overcome it. By delving into the intricacies of R’s interaction with the Windows operating system, we aim to empower users with the knowledge and tools necessary to effectively troubleshoot and resolve these common issues.

Understanding the Root Causes of R’s Unresponsiveness

The problem of R becoming unresponsive in Windows 10 can stem from a multitude of factors, each requiring a tailored approach to resolution. Some common culprits include:

  • Resource Constraints: R’s processing demands can be substantial, especially when dealing with large datasets or complex computations. Insufficient memory (RAM), CPU power, or hard drive space can lead to R becoming unresponsive, struggling to allocate the necessary resources.

  • Conflicting Software: R’s functionality can be affected by other software running concurrently. Incompatible or resource-heavy applications might compete for system resources, leading to R’s sluggish performance and eventual unresponsiveness.

  • Package Conflicts: R relies on a vast ecosystem of packages, each offering specialized functionalities. Conflicts between packages, due to dependencies or incompatible versions, can disrupt R’s execution and lead to unresponsiveness.

  • Operating System Issues: Windows 10 itself can contribute to R’s unresponsiveness. System errors, outdated drivers, or corrupted files can interfere with R’s smooth operation, leading to performance issues and eventual freezing.

  • R Environment Configuration: R’s configuration settings, including memory allocation, working directory, and environment variables, can influence its performance. Incorrect or inadequate settings can lead to resource limitations and unresponsiveness.

Practical Strategies for Resolving R’s Unresponsiveness

Addressing R’s unresponsiveness requires a systematic approach, carefully considering the potential causes and implementing appropriate solutions. Here’s a comprehensive guide to troubleshooting and resolving common issues:

  1. Resource Optimization:

    • Increase RAM: If your system is experiencing memory constraints, consider increasing your RAM capacity. This will provide R with more resources to handle demanding tasks.

    • Monitor CPU Usage: Use Windows Task Manager to monitor CPU usage while R is running. If CPU usage is consistently high, consider upgrading your CPU or closing other resource-intensive applications.

    • Free Up Disk Space: Ensure sufficient disk space is available for R to operate efficiently. Delete unnecessary files or move large files to an external storage device to free up space.

  2. Software Compatibility:

    • Check for Updates: Ensure that both R and Windows 10 are running the latest versions. Updates often include bug fixes and performance enhancements that can address compatibility issues.

    • Minimize Running Applications: Close any unnecessary programs running in the background. This will reduce competition for system resources and potentially improve R’s performance.

    • Disable Antivirus Software: Temporarily disable your antivirus software, as it might interfere with R’s execution. Remember to re-enable it after troubleshooting.

  3. Package Management:

    • Check Package Dependencies: Use the install.packages() function to install any missing dependencies for the packages you are using.

    • Update Packages: Run update.packages() to ensure that all your packages are updated to the latest versions.

    • Reinstall Packages: If package conflicts are suspected, try reinstalling the affected packages using remove.packages() followed by install.packages().

  4. Operating System Troubleshooting:

    • Run System File Checker (SFC): Use the command sfc /scannow in the Command Prompt to scan for and repair corrupted system files.

    • Update Drivers: Ensure that all your drivers, especially those related to graphics and network, are up-to-date.

    • Clean Boot: Perform a clean boot to isolate the issue. This involves starting Windows with a minimal set of drivers and programs to identify potential conflicts.

  5. R Environment Configuration:

    • Adjust Memory Allocation: Modify the memory.limit() function in R to increase the available memory for R’s operations.

    • Set Working Directory: Ensure that the working directory is set to a location with sufficient space and write permissions.

    • Check Environment Variables: Verify that R’s environment variables, such as PATH and R_HOME, are set correctly.

Frequently Asked Questions (FAQs)

Q: Why does R freeze after a certain amount of time?

A: R’s freezing after a specific duration could be due to several factors, including memory leaks, resource limitations, infinite loops, or unresponsive code. Analyze your code for potential issues, check memory usage, and consider using profiling tools to identify bottlenecks.

Q: How do I know if R is using all available memory?

A: You can use the memory.limit() function to check the current memory limit and the gc() function to view the amount of memory used and available. Additionally, the Task Manager in Windows 10 can provide insights into memory usage.

Q: What are the best practices for avoiding R’s unresponsiveness?

A: It’s crucial to adopt best practices to prevent R from becoming unresponsive. These include optimizing code for efficiency, using memory-efficient data structures, avoiding unnecessary computations, and managing package dependencies effectively.

Q: Should I use a specific R distribution for Windows 10?

A: While the base R distribution is sufficient for many use cases, some users prefer specialized distributions like RStudio or Microsoft R Open. These distributions offer additional features, integrated development environments, and performance enhancements that can improve the overall R experience.

Tips for Enhancing R’s Performance in Windows 10

  • Utilize Vectorized Operations: Vectorized operations in R are significantly faster than looping through individual elements. Leverage R’s built-in functions to perform operations on entire vectors or matrices.

  • Use Data.table Package: The data.table package provides a high-performance data manipulation framework, offering significant speed improvements compared to base R data structures.

  • Optimize Memory Usage: Use memory-efficient data structures like data.table or tibble instead of data frames. Consider using compressed data formats like feather or parquet to reduce memory footprint.

  • Employ Profiling Tools: Utilize profiling tools like profvis or microbenchmark to identify performance bottlenecks in your code and optimize them for efficiency.

  • Consider Parallel Processing: For computationally intensive tasks, leverage R’s parallel processing capabilities using packages like parallel or foreach. This can distribute tasks across multiple cores and significantly reduce execution time.

Conclusion

R’s unresponsiveness in Windows 10 can be a frustrating obstacle for users, but understanding the underlying causes and adopting effective solutions can unlock its full potential. By optimizing resource usage, resolving software conflicts, maintaining package integrity, and employing best practices, users can ensure a seamless and efficient R experience within the Windows 10 environment. The power of R lies in its ability to analyze data, build models, and uncover insights. By overcoming the challenges of unresponsiveness, users can harness this power to drive innovation and advance their research, statistical analysis, and data science endeavors.

Intro to R R Statistical Computing  Software  UNLV Information Technology Download R-3.4.1 for Windows. The R-project for statistical computing.  Windows, Statistical
Changes in R software โ€“ DECISION STATS R Tutorial Series: R Tutorial Series: Introduction to The R Project for Statistical Computing Introduction to R programming, Interactive Mind Map. Statistical computing and graphics, Education.
R Statistical Computing Environment Introduction to Statistical Computing in R

Closure

Thus, we hope this article has provided valuable insights into Navigating the Challenges of R in Windows 10: Unlocking the Power of Statistical Computing. We thank you for taking the time to read this article. See you in our next article!

Navigating The Print Landscape: Setting Up Printers In Windows 11

Navigating the Print Landscape: Setting Up Printers in Windows 11

Introduction

In this auspicious occasion, we are delighted to delve into the intriguing topic related to Navigating the Print Landscape: Setting Up Printers in Windows 11. Let’s weave interesting information and offer fresh perspectives to the readers.

How to Change Print Settings in Windows 11  HP Printers

In the modern digital world, printing remains a vital aspect of communication and productivity. Whether it’s for documents, photos, or labels, having a functional printer seamlessly integrated with your Windows 11 device is crucial. This guide provides a comprehensive exploration of printer setup in Windows 11, encompassing various scenarios and addressing common challenges.

Understanding the Basics: Connecting Your Printer

The first step in setting up a printer in Windows 11 is to physically connect it to your device. There are two primary connection methods:

  • USB Connection: This traditional method involves physically plugging the printer’s USB cable into a USB port on your computer. It’s often the simplest and most reliable option, especially for older printers.
  • Wireless Connection: Many modern printers offer wireless connectivity, allowing them to communicate with your computer without cables. This method is convenient and flexible, but requires configuring the printer’s Wi-Fi settings and potentially joining your network.

The Windows 11 Printer Setup Process: A Step-by-Step Guide

Once your printer is connected, Windows 11 typically detects it automatically and initiates the setup process. However, if manual intervention is needed, follow these steps:

  1. Open the "Settings" app: Click the Windows icon in the taskbar, then select the gear icon to access Settings.
  2. Navigate to "Bluetooth & Devices": Within Settings, find and click on "Bluetooth & Devices."
  3. Select "Printers & Scanners": Under the "Bluetooth & Devices" section, choose "Printers & Scanners."
  4. Add a printer or scanner: Click the "Add Device" button to initiate the printer discovery process.
  5. Choose your printer: Windows 11 will scan for available printers. Select the desired printer from the list and follow the on-screen prompts.
  6. Install the driver: Depending on your printer model, Windows 11 may automatically install the necessary drivers. If not, you can download the latest drivers from the manufacturer’s website.
  7. Complete the setup: Follow the remaining prompts to finalize the printer setup, including specifying the default print settings.

Troubleshooting Common Printer Setup Challenges

While the setup process is generally straightforward, you might encounter some challenges:

  • Printer not detected: If your printer isn’t detected, ensure it’s powered on, connected correctly, and the USB cable is functioning. Check if the printer requires a specific driver, and download it from the manufacturer’s website.
  • Network connectivity issues: For wireless printers, verify that your computer and printer are connected to the same Wi-Fi network. Check the printer’s Wi-Fi settings and ensure they are configured correctly.
  • Driver incompatibility: If your printer is an older model, Windows 11 might not have the necessary drivers pre-installed. Download the latest drivers from the manufacturer’s website and install them manually.
  • Print quality issues: Ensure your printer is using the correct paper type and that the paper tray is loaded properly. Check for ink or toner levels and replace them if necessary.

FAQ: Addressing Common Printer Setup Questions

Q: What if my printer isn’t listed during the setup process?

A: If your printer isn’t listed, ensure it’s powered on and connected correctly. If the issue persists, check for driver updates on the manufacturer’s website.

Q: How do I connect a wireless printer to my Windows 11 device?

A: Most modern printers have built-in Wi-Fi capabilities. Follow the instructions in the printer’s manual to connect it to your Wi-Fi network. Then, use the "Add Device" option in Windows 11 to add the printer.

Q: Can I use a printer connected to another computer on my network?

A: Yes, you can share a printer connected to another computer on your network. You can typically configure printer sharing through the device’s settings.

Q: How do I change the default printer in Windows 11?

A: Navigate to "Settings > Bluetooth & Devices > Printers & Scanners." Select the printer you want to make the default and click the "Set as default" button.

Tips for a Smooth Printer Setup Experience

  • Check the printer’s manual: The manufacturer’s manual provides detailed instructions and troubleshooting guides for your specific printer model.
  • Keep your drivers updated: Regularly check for driver updates on the manufacturer’s website to ensure optimal performance and compatibility.
  • Restart your computer: Sometimes, a simple restart can resolve printer setup issues.
  • Contact the manufacturer’s support: If you’re still facing difficulties, contact the printer manufacturer’s support team for assistance.

Conclusion: Mastering the Art of Printer Setup

Setting up a printer in Windows 11 can be a simple and efficient process. Understanding the connection methods, navigating the Windows 11 settings, and addressing common challenges empowers you to seamlessly integrate your printer into your digital workflow. By following the steps outlined in this guide and leveraging the provided tips and FAQs, you can ensure a smooth and successful printer setup experience, maximizing your productivity and connectivity.

Windows 11 Printer Settings printer setup in windows 11 How to Set a Default Printer in Windows 11
How to Set the Default Printer on Windows 11/10?  Gear Up Windows Accessing Devices and Printers in Windows 11 : r/WindowsHelp How to Add a Printer on Windows 11 - Itechguides.com
So รถffnen Und รคndern Sie Die Druckereinstellungen In Windows 11/10 - Futuriq.de How to Add a Printer on Windows 11 - Itechguides.com

Closure

Thus, we hope this article has provided valuable insights into Navigating the Print Landscape: Setting Up Printers in Windows 11. We thank you for taking the time to read this article. See you in our next article!

The Enigma Of R Updates In Windows 10: A Comprehensive Guide To Troubleshooting And Maintaining A Robust Statistical Environment

The Enigma of R Updates in Windows 10: A Comprehensive Guide to Troubleshooting and Maintaining a Robust Statistical Environment

Introduction

With great pleasure, we will explore the intriguing topic related to The Enigma of R Updates in Windows 10: A Comprehensive Guide to Troubleshooting and Maintaining a Robust Statistical Environment. Let’s weave interesting information and offer fresh perspectives to the readers.

The Enigma of R Updates in Windows 10: A Comprehensive Guide to Troubleshooting and Maintaining a Robust Statistical Environment

How to install (and update!) R and RStudio  R (for ecology)

R, the powerful statistical programming language and environment, has become an indispensable tool for data scientists, researchers, and analysts across diverse fields. Its versatility and extensive package ecosystem empower users to tackle complex statistical analyses, data visualization, and machine learning tasks. However, encountering issues with R updates on Windows 10 can significantly hinder productivity and disrupt workflows. This article delves into the common reasons behind R update failures on Windows 10, providing a comprehensive guide to troubleshooting and ensuring a smooth and up-to-date R environment.

Understanding the Importance of R Updates

Regular updates are crucial for maintaining a robust and secure R environment. These updates incorporate vital bug fixes, security patches, and enhancements that contribute to:

  • Improved Stability: Updates address known bugs and vulnerabilities, enhancing the overall stability of R and its associated packages.
  • Enhanced Security: Regular updates include security patches that protect against potential exploits and vulnerabilities, safeguarding data and systems.
  • New Features and Functionality: Updates often introduce new features, functions, and enhancements, expanding the capabilities of R and providing users with access to the latest advancements.
  • Package Compatibility: Updates ensure compatibility with the latest versions of R packages, preventing conflicts and ensuring smooth integration.

Common Reasons for R Update Failures on Windows 10

While R updates are generally seamless, various factors can lead to installation issues. Understanding these common causes is the first step towards resolving update problems:

  1. Internet Connectivity Issues: A stable internet connection is paramount for successful R updates. Intermittent or unstable internet access can disrupt download and installation processes.
  2. Insufficient System Resources: R updates require a certain amount of system resources, including disk space and RAM. Insufficient resources can lead to installation failures.
  3. Conflicting Software: Existing software on the system, particularly antivirus programs or other statistical software, can interfere with R updates.
  4. Outdated or Corrupted R Installation: An outdated or corrupted R installation can hinder update processes.
  5. Administrative Privileges: R updates may require administrative privileges to modify system files. Insufficient permissions can lead to installation errors.
  6. Package Dependencies: R packages often rely on other packages for functionality. Outdated or missing dependent packages can prevent successful updates.
  7. Windows Updates: Pending Windows updates can sometimes interfere with R updates. Ensure Windows is up-to-date before attempting to update R.
  8. Firewall Restrictions: Firewall settings may block R updates from accessing necessary resources.
  9. Antivirus Interference: Antivirus software can mistakenly flag R updates as threats, preventing successful installation.
  10. Corrupted Update Files: Downloaded update files can become corrupted during transfer, leading to installation failures.

Troubleshooting R Update Failures on Windows 10

Addressing the root cause of the update issue is crucial for restoring a functional R environment. The following troubleshooting steps provide a structured approach:

1. Verify Internet Connection:

  • Ensure a stable and reliable internet connection.
  • Test the connection by browsing the web or downloading a small file.
  • Consider restarting your router or modem if necessary.

2. Check System Resources:

  • Ensure sufficient disk space is available for the update.
  • Close unnecessary programs and applications to free up RAM.
  • Consider deleting temporary files or uninstalling unused software to create more space.

3. Resolve Software Conflicts:

  • Temporarily disable antivirus software or firewall settings.
  • Check for any conflicting software that might interfere with R updates.
  • Consider uninstalling and reinstalling R if conflicts persist.

4. Update or Repair R Installation:

  • Update R to the latest version using the official R website or the RStudio installer.
  • If the update fails, attempt to repair the existing installation using the repair option in the installer.

5. Run R with Administrative Privileges:

  • Right-click the R executable file and select "Run as administrator."
  • This grants the necessary permissions for R to access system files and complete updates.

6. Update Dependent Packages:

  • Use the update.packages() function in R to update all installed packages.
  • Check for specific package dependencies using the depends attribute in the packageDescription() function.

7. Update Windows:

  • Ensure Windows is up-to-date by checking for available updates.
  • Install any pending Windows updates to resolve potential conflicts.

8. Adjust Firewall Settings:

  • Add R and its associated components to the firewall’s list of allowed programs.
  • Ensure that R has access to the internet through the firewall.

9. Exclude R from Antivirus Software:

  • Add R and its installation directory to the antivirus software’s exclusion list.
  • This prevents the antivirus from mistakenly blocking R updates.

10. Re-download Update Files:

  • Download the R update files again from the official website.
  • Verify the integrity of the downloaded files by comparing their checksums.

Frequently Asked Questions (FAQs)

Q: Why is my R update stuck or taking a long time?

A: R updates can take time depending on the size of the update and the speed of your internet connection. If the update is stuck, check for internet connectivity issues, insufficient system resources, or conflicting software.

Q: My R update failed with an error message. What should I do?

A: Consult the error message for specific guidance. Common errors include insufficient permissions, corrupted files, or conflicts with other software. Refer to the troubleshooting steps outlined above to address the specific error.

Q: I’m unable to update R to the latest version. What are the consequences?

A: Using an outdated version of R can lead to compatibility issues with newer packages, security vulnerabilities, and missing features. It’s recommended to update R to the latest version whenever possible.

Q: Can I update specific R packages without updating the entire R environment?

A: Yes, you can update individual packages using the update.packages() function in R, specifying the packages you want to update.

Q: I’m encountering issues with specific packages after updating R. What should I do?

A: Check the package documentation for known compatibility issues or update requirements. Consider reinstalling the problematic packages or reverting to a previous version if necessary.

Tips for Maintaining a Smooth R Environment

  • Regularly Check for Updates: Make it a habit to check for R updates regularly to ensure you have access to the latest features and security patches.
  • Use a Reliable Package Manager: RStudio’s package manager simplifies package management, including updates and installations.
  • Keep System Clean: Regularly clean temporary files and unused software to free up disk space and resources.
  • Monitor System Logs: Review system logs for any error messages or warnings related to R updates.
  • Backup Important Data: Before performing updates or installing new software, back up your important R projects and data.

Conclusion

Encountering R update failures on Windows 10 can be frustrating, but understanding the underlying causes and applying appropriate troubleshooting techniques can resolve most issues. By following the steps outlined in this guide, users can ensure a smooth and up-to-date R environment, maximizing productivity and harnessing the full potential of this powerful statistical tool.

Windows 10 Update Troubleshooting: Problems And Fixes How to manage Windows 10 updates to prevent them from ruining your life - IPS Inter Press Fix Problem With Windows Updates - Windows Diary
Fix Windows Update Problems in Windows 10 / How to Fix All Windows 10 Update Errors (100% Works The complete guide to Windows 10 updates - Digital Citizen How To Get Help In Windows 10 Updates โ€“ Lates Windows 10 Update
Improving the Windows 10 update experience with control, quality and transparency โ€“ ์ง€๋ฝ๋ฌธํ™”์˜ˆ์ˆ ๊ณต์ž‘๋‹จ How To Install Windows 10 21H1 Update Manually  Itechguides.com

Closure

Thus, we hope this article has provided valuable insights into The Enigma of R Updates in Windows 10: A Comprehensive Guide to Troubleshooting and Maintaining a Robust Statistical Environment. We appreciate your attention to our article. See you in our next article!