Archives February 2024

Enabling Seamless Sharing: A Guide To Near Share In Windows 10

Enabling Seamless Sharing: A Guide to Near Share in Windows 10

Introduction

With great pleasure, we will explore the intriguing topic related to Enabling Seamless Sharing: A Guide to Near Share in Windows 10. Let’s weave interesting information and offer fresh perspectives to the readers.

Enabling Seamless Sharing: A Guide to Near Share in Windows 10

How to Use Nearby Sharing to Share Files in Windows 10 - Hongkiat

Windows 10 introduced a revolutionary feature designed to simplify file sharing between devices: Near Share. This technology utilizes Bluetooth and Wi-Fi Direct to establish a secure and swift connection, allowing users to effortlessly transfer files, photos, videos, and even links between compatible devices. This article delves into the intricacies of Near Share, exploring its functionality, benefits, and how to activate and utilize it effectively.

Understanding the Mechanism of Near Share

At its core, Near Share operates on a principle of proximity and discovery. When two compatible devices are within a close range, typically around 30 feet, they can "discover" each other. This discovery process is facilitated by Bluetooth, which establishes a preliminary connection. Subsequently, Near Share leverages Wi-Fi Direct to establish a secure, high-speed connection for transferring data.

Benefits of Utilizing Near Share

Near Share offers a multitude of advantages over traditional file-sharing methods, making it a compelling option for users:

  • Effortless Sharing: The process is remarkably simple. Users merely need to select the file or content they wish to share and choose the recipient device from the available list.
  • Speed and Efficiency: Near Share leverages Wi-Fi Direct, enabling swift data transfer rates, significantly faster than traditional Bluetooth.
  • Security: Near Share prioritizes data security by employing encryption techniques. This ensures that the shared data remains protected throughout the transfer process.
  • Versatility: Near Share supports a wide range of file types, including documents, images, videos, and even web links. This versatility makes it a practical tool for various sharing needs.
  • No Internet Required: Near Share operates independently of an internet connection, enabling convenient file sharing even in the absence of a network.

Activating Near Share on Windows 10 Devices

To activate Near Share on your Windows 10 device, follow these simple steps:

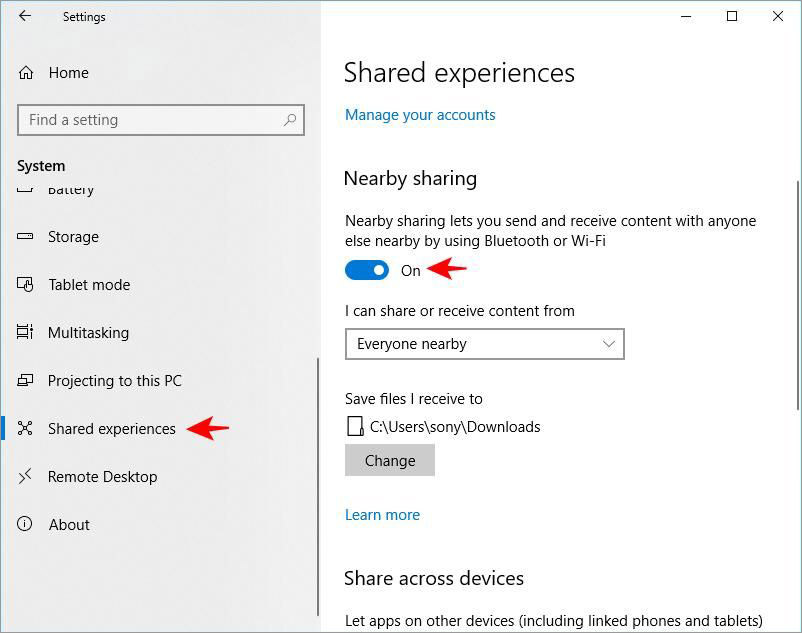
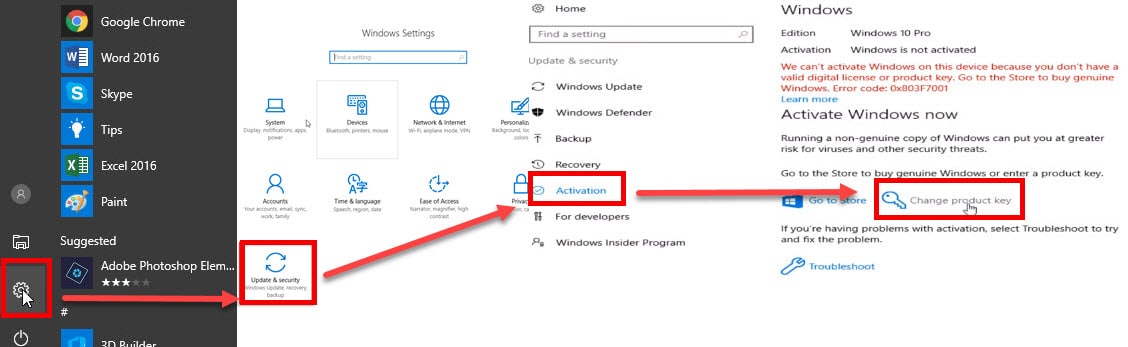
  1. Open Settings: Navigate to the "Settings" app by clicking the gear icon in the Start menu.
  2. Select "System": In the Settings window, click on "System."
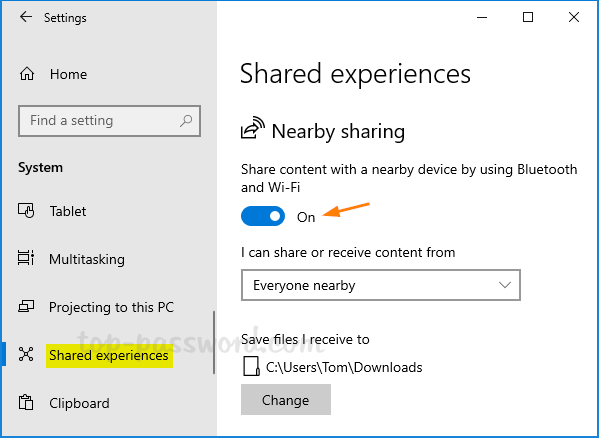
  3. Choose "Shared experiences": Locate the "Shared experiences" option on the left-hand pane.
  4. Enable "Near Share": Toggle the "Near Share" switch to the "On" position.
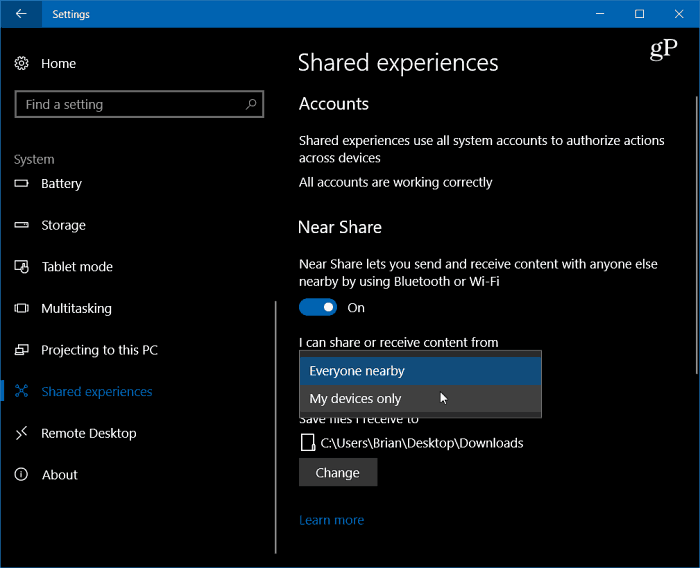
  5. Choose Sharing Preferences: Configure your sharing preferences, including selecting which devices can share with you, whether you want to share with everyone or only your contacts, and the type of content you wish to share.

Utilizing Near Share for File Transfer

Once Near Share is activated, transferring files is as straightforward as it gets:

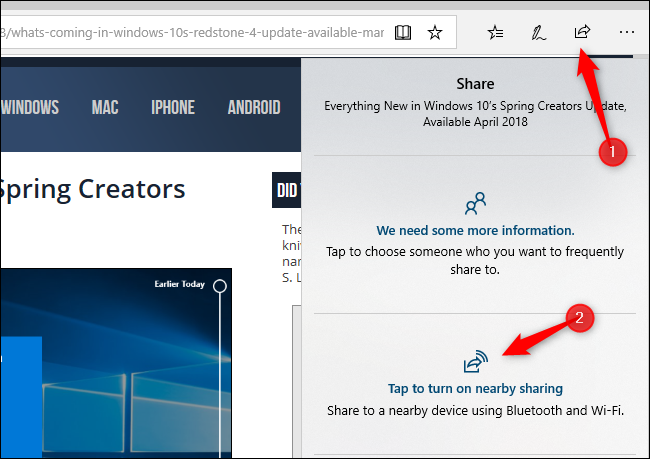
  1. Select the File: Locate the file or content you wish to share.
  2. Right-click: Right-click on the file and select "Share."
  3. Choose Recipient: A list of nearby devices will appear. Select the desired recipient device.
  4. Confirmation: The recipient device will receive a notification requesting permission to receive the file.
  5. Transfer Completion: Once the recipient accepts the transfer, the file will be transferred to their device.

Troubleshooting Near Share Issues

While Near Share is generally reliable, users might occasionally encounter issues. These common problems and their solutions can help resolve most issues:

  • Bluetooth and Wi-Fi Direct Enabled: Ensure both Bluetooth and Wi-Fi Direct are enabled on both devices.
  • Device Compatibility: Confirm that both devices support Near Share. Refer to the device’s specifications or manufacturer website for compatibility details.
  • Network Interference: Potential interference from other wireless devices can hinder Near Share. Try moving the devices closer together or temporarily disabling other wireless networks.
  • Device Visibility: Ensure that the recipient device is set to be discoverable.
  • Network Settings: Check if the network settings on both devices are configured correctly.
  • System Updates: Install the latest Windows updates to ensure compatibility and fix potential bugs.

FAQs about Near Share

Q: What devices are compatible with Near Share?

A: Near Share is primarily compatible with Windows 10 devices. However, some Android devices with the latest versions of Android also support Near Share.

Q: Is Near Share secure?

A: Yes, Near Share utilizes encryption to secure data transfer, ensuring the shared data remains protected.

Q: How does Near Share differ from Bluetooth sharing?

A: Near Share offers faster transfer speeds and greater security compared to traditional Bluetooth sharing.

Q: Can I use Near Share to share files with devices outside of my network?

A: No, Near Share requires both devices to be within close proximity and on the same network.

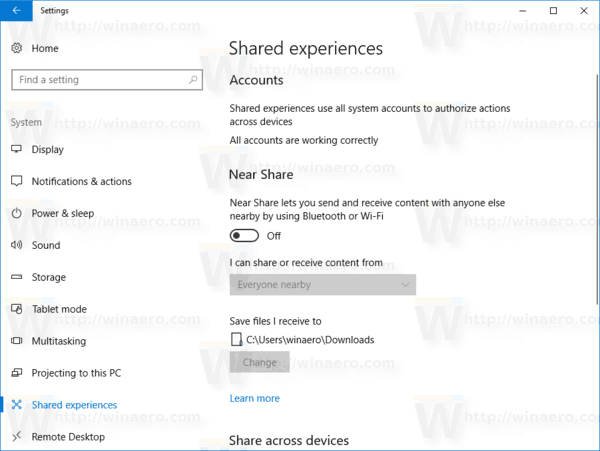
Q: How can I disable Near Share?

A: To disable Near Share, follow the same steps used to activate it, but toggle the "Near Share" switch to the "Off" position.

Tips for Enhancing Near Share Experience

  • Ensure Device Compatibility: Confirm that both devices support Near Share before attempting to share files.
  • Keep Devices Close: Maintain a close proximity between devices for optimal performance.
  • Disable Other Wireless Networks: Temporarily disable other wireless networks to minimize interference.
  • Check for Updates: Regularly update Windows to ensure compatibility and fix potential bugs.

Conclusion

Near Share revolutionizes file sharing in Windows 10, offering a seamless and secure method to transfer data between compatible devices. Its speed, efficiency, and ease of use make it a compelling alternative to traditional file-sharing methods. By understanding the mechanics of Near Share, activating it on your devices, and implementing the provided troubleshooting tips, users can fully leverage the benefits of this powerful feature.

How to Use Edge Near Share in Windows 10 from the Edge Browser What is Near Share in Windows 10 and How to Enable It Enable Near Share in Windows 10
[Step by Step Guide] How to Use Nearby Share on Windows? How to Use Nearby Sharing on Windows 10 3 Ways to Enable Nearby Sharing in Windows 10  Password Recovery
What Is "Near Share" In Windows 10? How To Share Files Wirelessly What is Near Share on Windows 10 and How To Use it - Edge Talk

Closure

Thus, we hope this article has provided valuable insights into Enabling Seamless Sharing: A Guide to Near Share in Windows 10. We thank you for taking the time to read this article. See you in our next article!

Photoshop 7.0 Windows 11

photoshop 7.0 windows 11

Introduction

With enthusiasm, let’s navigate through the intriguing topic related to photoshop 7.0 windows 11. Let’s weave interesting information and offer fresh perspectives to the readers.

Photoshop 7.0: A Legacy of Creativity in a Modern World

Adobe Photoshop 7.0 Free Download for Windows 11, 10, 8, 7

Photoshop 7.0, released in 2002, stands as a landmark in the history of digital image editing. While newer versions have emerged with advanced features, Photoshop 7.0 remains a powerful tool for many tasks, particularly for users seeking a balance between functionality and simplicity. This article delves into the nuances of running Photoshop 7.0 on Windows 11, exploring its strengths, limitations, and the unique considerations involved in its modern-day usage.

Understanding Photoshop 7.0 in the Context of Windows 11

Photoshop 7.0 was designed for an era of operating systems vastly different from Windows 11. This discrepancy introduces a set of challenges and opportunities. The most significant challenge lies in compatibility: Photoshop 7.0, being a 32-bit application, requires a 32-bit environment to run on Windows 11. This necessitates the use of specific compatibility modes and configurations to ensure proper functioning.

Compatibility and Installation: Bridging the Gap

Running Photoshop 7.0 on Windows 11 demands a careful approach to compatibility. The initial step involves obtaining a valid copy of Photoshop 7.0. Once acquired, the installation process requires attention to the following:

  • Compatibility Mode: Windows 11 includes compatibility settings that allow older programs to run in an environment mimicking earlier operating systems. Setting Photoshop 7.0 to run in "Windows XP (Service Pack 3)" compatibility mode can significantly improve its performance and stability.
  • Administrator Privileges: Running Photoshop 7.0 as an administrator can resolve potential permission issues that may arise due to the difference in operating system architectures.
  • 32-bit Environment: Windows 11’s default environment is 64-bit. To run Photoshop 7.0, it is necessary to create a 32-bit environment. This can be achieved by installing a 32-bit version of the necessary drivers and libraries, or by utilizing virtualization software to create a virtual machine running a compatible operating system.

Exploring the Strengths of Photoshop 7.0

Despite its age, Photoshop 7.0 boasts a set of strengths that continue to be valuable in specific scenarios:

  • User-Friendly Interface: Photoshop 7.0’s interface is known for its intuitive layout, making it easier for beginners to grasp the fundamentals of image editing. The tools and menus are organized logically, providing a familiar and comfortable environment for those accustomed to older versions of Photoshop.
  • Core Editing Capabilities: Photoshop 7.0 offers a robust set of core editing tools, including layers, masks, selections, and adjustment layers, enabling users to perform a wide range of image manipulations. These tools remain essential for basic image editing tasks, even in the context of modern software.
  • File Format Support: Photoshop 7.0 supports a diverse array of file formats, including PSD, TIFF, JPEG, GIF, and PNG. This versatility ensures compatibility with a wide range of image sources and output requirements.
  • Lightweight and Resource-Efficient: Compared to newer versions of Photoshop, Photoshop 7.0 is relatively lightweight and requires fewer system resources. This can be beneficial for users with older computers or limited system memory.

Addressing the Limitations of Photoshop 7.0

While Photoshop 7.0 offers valuable capabilities, it is crucial to acknowledge its limitations:

  • Lack of Modern Features: Photoshop 7.0 lacks many of the advanced features introduced in later versions, such as content-aware fill, camera raw processing, and advanced layer styles. Users seeking these features will need to upgrade to a more recent version.
  • Compatibility Issues: Running Photoshop 7.0 on Windows 11 may lead to compatibility issues with newer hardware and software. This can manifest as driver conflicts, display problems, or unexpected program behavior.
  • Security Concerns: Older software versions, like Photoshop 7.0, may have security vulnerabilities that could expose users to malware or data breaches. It is crucial to ensure the software is updated with the latest security patches or to use it in a controlled environment.
  • Limited Support: Photoshop 7.0 is no longer actively supported by Adobe. This means that users may encounter difficulty finding solutions to technical issues or obtaining updates.

FAQs: Addressing Common Concerns

Q: Is it safe to use Photoshop 7.0 on Windows 11?

A: While Photoshop 7.0 can be used on Windows 11, it is essential to address security concerns. Regularly scanning for malware and keeping the operating system and antivirus software updated is crucial. Using a virtual machine for running Photoshop 7.0 can further isolate it from the main system, reducing potential risks.

Q: What are the minimum system requirements for running Photoshop 7.0 on Windows 11?

A: The minimum system requirements for Photoshop 7.0 are:

  • Operating System: Windows 2000, Windows XP, or Windows Vista. However, running it on Windows 11 requires compatibility mode and a 32-bit environment.
  • Processor: Pentium III 500 MHz or faster.
  • RAM: 128 MB of RAM (recommended: 256 MB).
  • Hard Disk Space: 1.5 GB of available hard disk space.
  • Video Card: 16-bit color display (recommended: 32-bit).

Q: Can I use Photoshop 7.0 for professional work?

A: Photoshop 7.0 can be used for professional work in specific scenarios. However, its lack of modern features and potential compatibility issues might limit its applicability. For professional projects requiring advanced features or compatibility with current industry standards, newer versions of Photoshop are recommended.

Q: What are the alternatives to Photoshop 7.0 on Windows 11?

A: Several alternatives to Photoshop 7.0 are available on Windows 11, each with its strengths and weaknesses:

  • Adobe Photoshop CC: The latest version of Photoshop offers a comprehensive set of features, including advanced editing tools, AI-powered enhancements, and cloud integration.
  • GIMP: A free and open-source image editor that provides a wide range of editing tools and compatibility with various file formats.
  • Affinity Photo: A powerful and affordable photo editing software with a user-friendly interface and a focus on performance.
  • Paint.NET: A free and lightweight image editor designed for basic photo editing tasks and simple manipulations.

Tips for Optimizing Photoshop 7.0 on Windows 11

  • Use Compatibility Mode: Setting Photoshop 7.0 to run in "Windows XP (Service Pack 3)" compatibility mode can significantly improve its performance and stability.
  • Run as Administrator: Running Photoshop 7.0 as an administrator can resolve potential permission issues that may arise due to the difference in operating system architectures.
  • Create a 32-bit Environment: Install a 32-bit version of necessary drivers and libraries, or use virtualization software to create a virtual machine running a compatible operating system.
  • Update Drivers: Ensure all system drivers are up to date, particularly those related to graphics and sound.
  • Optimize System Resources: Close unnecessary programs and processes to free up system resources for Photoshop 7.0.
  • Use a Virtual Machine: Running Photoshop 7.0 in a virtual machine can provide a more controlled environment and isolate it from potential conflicts with other software.

Conclusion: A Legacy of Creativity Continues

Photoshop 7.0, despite its age, remains a testament to the enduring power of creative tools. While its modern-day use requires careful consideration of compatibility and limitations, it can still serve as a valuable tool for specific tasks, particularly for those seeking a familiar and user-friendly interface. As technology advances, Photoshop 7.0’s legacy continues to inspire, reminding us of the enduring nature of creativity and the power of tools that empower us to express ourselves through the art of digital image editing.

Adobe Photoshop 7.0 Télécharger pour Windows 11, 10, 7 (32 bits/64 bits) - Français Stream Adobe Photoshop 7.0 Free Download Full Version With Key For Windows 11 [VERIFIED] from Stream Adobe Photoshop 7.0 Free Download Full Version With Key For Windows 11 from Katherine
Adobe Photoshop 7.0 For Windows Features & Installation Steps - VOIVO InfoTech Download adobe photoshop 7-0 full version - lopbox Adobe photoshop 7.0 download for windows - treerolf
Download adobe photoshop 7-0 free download full version - topsonic Free Adobe Photoshop 7.0 Download कैसे करें Windows (7/8/10/11)

Closure

Thus, we hope this article has provided valuable insights into photoshop 7.0 windows 11. We thank you for taking the time to read this article. See you in our next article!

Troubleshooting Windows 10 Boot Issues: A Comprehensive Guide

Troubleshooting Windows 10 Boot Issues: A Comprehensive Guide

Introduction

With great pleasure, we will explore the intriguing topic related to Troubleshooting Windows 10 Boot Issues: A Comprehensive Guide. Let’s weave interesting information and offer fresh perspectives to the readers.

Troubleshooting Windows 10 Boot Issues: A Comprehensive Guide

How To Fix Windows 10 Startup and Boot Problems - YouTube

Encountering a Windows 10 boot failure can be a frustrating experience, leaving users unable to access their data and applications. This article aims to provide a comprehensive understanding of the common causes behind these issues and offer practical solutions to resolve them.

Understanding the Problem: Why Windows 10 Might Not Boot

The inability of Windows 10 to boot successfully can stem from a multitude of factors, ranging from simple hardware malfunctions to complex software conflicts. Identifying the root cause is crucial for effective troubleshooting. Here are some of the most common reasons behind a non-booting Windows 10 system:

1. Hardware Malfunctions:

  • Damaged or Failing Hard Drive: A faulty hard drive is a primary culprit behind boot failures. Physical damage, wear and tear, or logical errors can render the drive unable to access the operating system files.
  • Loose or Defective RAM: Defective or improperly seated RAM modules can disrupt the system’s memory access, leading to boot errors.
  • Faulty Motherboard: A malfunctioning motherboard, the main circuit board of the computer, can prevent the system from powering up or booting properly.
  • Power Supply Issues: An insufficient or faulty power supply can cause instability and prevent the computer from booting.
  • Overheating: Excessive heat can damage components and lead to boot failures.

2. Software Conflicts and Errors:

  • Corrupted System Files: Essential system files can become corrupted due to software updates, malware infections, or hardware failures, preventing Windows from loading.
  • Boot Sector Errors: The boot sector, a crucial part of the hard drive responsible for initiating the boot process, can be damaged, leading to boot failures.
  • Driver Issues: Incompatible or outdated drivers can cause conflicts, leading to system instability and boot problems.
  • Malware Infection: Malware can corrupt system files, modify boot settings, or block access to the operating system, causing boot failures.
  • Recent Software Changes: Installing new software or making significant system changes can sometimes lead to unforeseen conflicts and boot issues.

3. BIOS/UEFI Settings:

  • Incorrect Boot Order: If the boot order in the BIOS/UEFI settings is incorrect, the system may try to boot from an unavailable device instead of the hard drive.
  • Disabled Boot Options: Certain BIOS/UEFI settings, such as secure boot or legacy boot, can be accidentally disabled, preventing the system from booting.

Troubleshooting Boot Issues: A Step-by-Step Approach

1. Initial Checks:

  • Power Cycle: Restart the computer by completely shutting it down and then turning it back on. This can sometimes resolve temporary issues.
  • Check for Visual Cues: Observe the computer screen for any error messages, beeps, or flashing lights. These can provide clues about the cause of the boot problem.

2. Troubleshooting Hardware Issues:

  • Test RAM: If possible, remove and reseat the RAM modules, or test them individually using a known working module.
  • Check Hard Drive Connections: Ensure the hard drive is securely connected to the motherboard.
  • Inspect for Physical Damage: Check for any visible damage to the motherboard, RAM, or other components.
  • Test Power Supply: If possible, test the power supply with a known working unit.

3. Troubleshooting Software Issues:

  • Boot into Safe Mode: Attempt to boot into Safe Mode, which loads a minimal set of drivers and services, to diagnose software conflicts.
  • Run System File Checker (SFC): The SFC command can scan for and repair corrupted system files.
  • Run CHKDSK: The CHKDSK command can scan for and repair errors on the hard drive.
  • Use a Bootable USB Drive: Create a bootable USB drive with a recovery tool, such as the Windows 10 installation media, to access advanced troubleshooting options.

4. Troubleshooting BIOS/UEFI Settings:

  • Access BIOS/UEFI Settings: Enter the BIOS/UEFI settings by pressing the appropriate key during startup (usually F2, F10, or Delete).
  • Check Boot Order: Ensure that the hard drive is set as the primary boot device.
  • Enable Boot Options: Verify that necessary boot options, such as secure boot or legacy boot, are enabled.

5. Other Troubleshooting Tips:

  • Disconnect External Devices: Temporarily disconnect any external devices, such as USB drives or printers, to rule out conflicts.
  • Check for Malware: Run a full system scan with a reputable antivirus software.
  • Restore System to an Earlier Point: If possible, use the System Restore feature to revert to a previous working state.
  • Perform a Clean Install: If all else fails, consider performing a clean install of Windows 10, which will erase all data on the hard drive and install a fresh copy of the operating system.

Frequently Asked Questions (FAQs):

Q: What if I can’t access the BIOS/UEFI settings?

A: If you are unable to access the BIOS/UEFI settings, it might be due to a hardware issue or a corrupted boot sector. In this case, you may need to use a bootable USB drive with a recovery tool or contact a technician for assistance.

Q: What should I do if I see an error message during boot?

A: Error messages can provide valuable clues about the cause of the boot problem. Search online for the specific error message to find potential solutions.

Q: What if my hard drive is failing?

A: If your hard drive is failing, you may need to replace it. Backup your data to another drive before replacing the hard drive to avoid data loss.

Q: How can I prevent future boot issues?

A: To minimize the risk of future boot problems, regularly back up your data, update your system and drivers, run antivirus scans, and avoid installing untrusted software.

Conclusion:

Resolving Windows 10 boot issues requires a systematic and patient approach. By understanding the common causes, following the troubleshooting steps, and utilizing available tools, users can identify and address the problem effectively. Remember to back up your data regularly to protect against data loss in case of a hardware failure. If you are unable to resolve the issue independently, seeking professional assistance from a qualified technician is recommended.

8 Ways to Fix Boot Device Problem in Windows 10 – TechCult How to access Windows 10 troubleshooting tools step by step  TechTarget How To Easily Boot Windows 10 In Safe Mode?
How to use Startup Repair to fix boot problems with Windows 10  Windows Central Troubleshooting Windows 10 How to Fix Windows 10 Startup Problems -4 Ways-
Fix Boot Device Problem In Windows 10  techteds How to access Windows 10 troubleshooting tools step by step  TechTarget

Closure

Thus, we hope this article has provided valuable insights into Troubleshooting Windows 10 Boot Issues: A Comprehensive Guide. We appreciate your attention to our article. See you in our next article!

Activating Windows 10: A Comprehensive Guide To Phone Activation

Activating Windows 10: A Comprehensive Guide to Phone Activation

Introduction

With great pleasure, we will explore the intriguing topic related to Activating Windows 10: A Comprehensive Guide to Phone Activation. Let’s weave interesting information and offer fresh perspectives to the readers.

Activating Windows 10: A Comprehensive Guide to Phone Activation

How to activate Windows by phone? Activation Guide - All Good Keys

Windows 10, Microsoft’s flagship operating system, offers a comprehensive suite of features and functionalities for personal and professional use. To unlock the full potential of Windows 10 and ensure its continued stability and security, activation is a crucial step. While various methods exist for activating Windows 10, the phone activation method stands out as a reliable and accessible option, particularly for users facing challenges with other activation routes.

This article delves into the intricacies of phone activation for Windows 10, providing a comprehensive guide that clarifies the process, explores its importance, and addresses frequently asked questions.

Understanding Phone Activation

Phone activation is a process that involves contacting Microsoft directly to obtain a unique activation code for your Windows 10 installation. This method proves particularly useful when other activation pathways, such as online activation or product key entry, encounter obstacles. It serves as a fallback option, ensuring that users can activate their Windows 10 installation and enjoy its full functionality.

The Phone Activation Process

  1. Initiate Activation: Begin by attempting to activate Windows 10 through the standard methods, such as entering a product key or using an online activation service. If these methods fail, proceed to phone activation.

  2. Access Activation Settings: Navigate to "Settings" on your Windows 10 device, then select "Update & Security." Within this menu, choose "Activation."

  3. Select Phone Activation: Under "Activation," locate the option for "Activate by phone." Click or tap this option to proceed.

  4. Contact Microsoft: You will be presented with a unique installation ID. This ID is crucial for the activation process. Contact Microsoft’s activation support line, which is available 24/7.

  5. Provide Installation ID: During the call, provide the installation ID to the Microsoft representative. They will then guide you through the activation process, requesting additional information if necessary.

  6. Receive Activation Code: After verifying your information, the Microsoft representative will provide you with a unique activation code.

  7. Enter Activation Code: Return to your Windows 10 device and enter the activation code you received from the representative. This will complete the activation process.

Benefits of Phone Activation

  1. Accessibility and Convenience: Phone activation offers a readily accessible solution for users encountering activation difficulties. It eliminates the need for internet access, making it a viable option for individuals in remote areas or experiencing internet connectivity issues.

  2. Direct Support: Phone activation connects users directly with Microsoft representatives, providing a dedicated channel for resolving activation-related concerns.

  3. Problem-Solving Assistance: Microsoft representatives can diagnose activation problems and offer tailored solutions, ensuring a smooth and successful activation experience.

FAQs Regarding Phone Activation

Q1: What if I don’t have my product key?

A: If you don’t have your product key, you can still activate Windows 10 by phone. However, you may need to provide additional information to verify your license.

Q2: What if I am unable to reach the Microsoft activation support line?

A: If you are unable to contact Microsoft’s activation support line, consider seeking assistance from their online support channels, such as their website or forums.

Q3: Can I activate multiple devices using the same phone activation method?

A: Typically, phone activation is associated with a specific device. If you need to activate multiple devices, you may require additional product keys or contact Microsoft for guidance.

Q4: What if I encounter errors during phone activation?

A: If you encounter errors during phone activation, carefully review the instructions provided by the Microsoft representative. If the issue persists, seek further assistance from their support team.

Tips for Phone Activation

  1. Prepare Your Installation ID: Before contacting Microsoft, ensure you have your installation ID readily available.

  2. Have Your Product Key Information Ready: If you have your product key, be prepared to provide it to the Microsoft representative.

  3. Be Patient and Courteous: The phone activation process may involve waiting on hold or providing additional information. Maintain patience and be courteous with the Microsoft representative.

  4. Record the Activation Code: Carefully record the activation code provided by the Microsoft representative.

  5. Follow Instructions Carefully: Adhere to the instructions provided by the Microsoft representative to ensure a successful activation.

Conclusion

Phone activation serves as a valuable and accessible method for activating Windows 10. It offers a direct channel to Microsoft support, ensuring a smooth and efficient activation process, even in challenging circumstances. By understanding the process, benefits, and potential challenges associated with phone activation, users can confidently navigate this activation route and unlock the full potential of their Windows 10 experience.

Activate windows 10 by Phone Guide How to activate Windows by phone? Activation Guide - All Good Keys How to activate Windows by phone? Activation Guide - All Good Keys
How to activate Windows by phone? Activation Guide - Genius Pc Softwares How to activate windows from phone - YouTube How to activate Windows 10 by Phone?
Activating Windows 10 Over The Phone  Method [2024] Activate Windows 10 By Phone - dasertag

Closure

Thus, we hope this article has provided valuable insights into Activating Windows 10: A Comprehensive Guide to Phone Activation. We appreciate your attention to our article. See you in our next article!

Windows 10: A Comprehensive Exploration Of The Modern Operating System

Windows 10: A Comprehensive Exploration of the Modern Operating System

Introduction

In this auspicious occasion, we are delighted to delve into the intriguing topic related to Windows 10: A Comprehensive Exploration of the Modern Operating System. Let’s weave interesting information and offer fresh perspectives to the readers.

Windows 10: A Comprehensive Exploration of the Modern Operating System

Windows 10: Exploration of the newest Microsoft operating system - Bohner, Michael

Windows 10, released in 2015, stands as a significant milestone in the evolution of Microsoft’s operating system. This iteration marked a departure from its predecessors, introducing a unified platform for desktops, laptops, tablets, and even smartphones. It brought forth a user-centric design, enhanced security features, and a robust ecosystem of applications, all aimed at elevating the user experience.

A Glimpse into the Architecture of Windows 10

At its core, Windows 10 is built on a foundation of stability and efficiency. The operating system utilizes a hybrid kernel, combining elements of both the monolithic and microkernel architectures. This approach offers the benefits of both worlds, ensuring robust security and optimal performance.

The core components of Windows 10 include:

  • Kernel: The heart of the operating system, responsible for managing hardware resources, memory allocation, and process scheduling.
  • User Interface: The visual representation of the operating system, providing a user-friendly interface for interacting with the system.
  • File System: The system for organizing and storing files and data on the device.
  • Drivers: Software components that enable communication between the operating system and hardware devices.
  • Applications: Software programs that provide specific functionality and services to the user.

Key Features and Benefits of Windows 10

Windows 10 has been meticulously designed to cater to the diverse needs of users. Its features and benefits are evident in various aspects:

1. User Interface and Usability:

  • Modern Design: Windows 10 boasts a clean and intuitive user interface, with a focus on simplicity and accessibility. The Start Menu, Taskbar, and Action Center have been redesigned to enhance navigation and ease of use.
  • Responsive and Fluid: The operating system is known for its smooth and responsive performance, enabling seamless multitasking and efficient application execution.
  • Personalization: Windows 10 offers extensive customization options, allowing users to personalize their experience with different themes, wallpapers, and settings.

2. Security and Privacy:

  • Enhanced Security Measures: Windows 10 incorporates robust security features, including Windows Defender, a built-in antivirus and anti-malware solution, and Windows Hello, a biometric authentication system for secure logins.
  • Privacy Controls: The operating system provides granular privacy controls, allowing users to manage their data sharing preferences and control access to personal information.
  • Regular Updates: Microsoft regularly releases security updates and patches to address vulnerabilities and ensure the system remains secure.

3. Productivity and Performance:

  • Multitasking Capabilities: Windows 10 excels in handling multiple tasks simultaneously, allowing users to run several applications efficiently without compromising performance.
  • Enhanced Performance: The operating system utilizes advanced power management features and resource optimization techniques to ensure optimal performance and energy efficiency.
  • Cortana, the Digital Assistant: Windows 10 comes equipped with Cortana, a powerful digital assistant that can help users with tasks, reminders, and information retrieval.

4. Ecosystem and Applications:

  • Microsoft Store: The Microsoft Store provides a vast library of applications, games, and software, catering to a wide range of user needs.
  • Universal Windows Platform (UWP): This platform enables developers to create applications that run seamlessly across various Windows 10 devices.
  • Integration with Microsoft Services: Windows 10 integrates seamlessly with other Microsoft services, such as OneDrive, Office 365, and Xbox Live, providing a unified experience across platforms.

5. Continuous Evolution and Updates:

  • Regular Updates: Microsoft consistently releases feature updates and security patches for Windows 10, ensuring that the operating system remains up-to-date and secure.
  • Windows Insider Program: This program allows users to preview upcoming features and provide feedback to Microsoft, contributing to the continuous evolution of the operating system.

Windows 10: A Comprehensive Overview

Windows 10 has established itself as a powerful and versatile operating system, catering to the needs of both home users and businesses. Its user-friendly interface, robust security features, and extensive ecosystem of applications have made it a popular choice for individuals and organizations alike.

FAQs on Windows 10

1. What are the system requirements for Windows 10?

To run Windows 10, your computer needs to meet specific hardware requirements. These include:

  • Processor: 1 gigahertz (GHz) or faster processor or SoC
  • RAM: 1 gigabyte (GB) for 32-bit or 2 GB for 64-bit
  • Hard disk space: 16 GB for 32-bit or 20 GB for 64-bit
  • Graphics card: Microsoft DirectX 9 or later with WDDM 1.0 driver
  • Display: 800 x 600 resolution

2. How can I upgrade to Windows 10?

You can upgrade to Windows 10 from a previous version of Windows using the Windows Update feature. You can also download the Windows 10 installation media from Microsoft’s website and perform a clean install.

3. How do I troubleshoot common Windows 10 issues?

Common Windows 10 issues can be resolved through a variety of methods, including:

  • Restarting your computer: A simple restart can often fix temporary glitches.
  • Running the Windows Troubleshooter: Windows provides built-in troubleshooters for various issues.
  • Updating your drivers: Outdated drivers can cause compatibility problems.
  • Performing a system restore: This option restores your computer to a previous point in time.

4. What are the different versions of Windows 10?

Windows 10 is available in various editions, each tailored to specific user needs:

  • Windows 10 Home: The standard edition for home users.
  • Windows 10 Pro: Designed for professionals and businesses, offering enhanced security and management features.
  • Windows 10 Enterprise: A comprehensive edition for large organizations, with advanced features for enterprise deployment and security.
  • Windows 10 Education: Designed for educational institutions, providing tools for student and teacher collaboration.
  • Windows 10 S: A streamlined edition for education and security, designed to run only applications from the Microsoft Store.

5. What are the benefits of using Windows 10?

Windows 10 offers a multitude of benefits, including:

  • User-friendly interface: Its intuitive design makes it easy to navigate and use.
  • Enhanced security: Robust security features protect your data and device.
  • Improved performance: Efficient resource management ensures smooth operation.
  • Wide app compatibility: Access to a vast library of applications and games.
  • Regular updates: Continuous updates ensure the system remains up-to-date and secure.

Tips for Optimizing Windows 10 Performance

To ensure optimal performance, consider these tips:

  • Regularly update your system: Ensure your operating system and drivers are up-to-date.
  • Run a disk cleanup: Remove unnecessary files and free up disk space.
  • Disable unnecessary startup programs: Reduce the number of programs that launch automatically.
  • Adjust power settings: Optimize power consumption for better battery life.
  • Close background apps: Minimize the number of applications running in the background.
  • Defragment your hard drive: Improve disk performance by reorganizing files.

Conclusion

Windows 10 has revolutionized the way we interact with computers, offering a user-centric experience that prioritizes security, performance, and productivity. Its continuous evolution, driven by regular updates and the Windows Insider Program, ensures that it remains a relevant and powerful operating system for years to come. As technology continues to advance, Windows 10 will undoubtedly adapt and evolve, continuing to meet the ever-changing needs of users in a dynamic digital world.

Windows Modern Exploration by Gareth Johnson on Dribbble Complete History of Windows Operating System as Time Changes Evolution of Windows OS. Windows Operating System was launched…  by Jeewantha Lahiru  Medium
Read Online Windows 10: The Ultimate Guide For Beginners (Windows 10 for dummies, Windows 10 Windows 10's exploration interface on Craiyon Windows 10 Free Download Full Version with Key complete guide
Windows 10 Operating System : Windows 10 release date, download preview & get it for  - This Info Tech and Me: Explaining the Many Roles of the Modern Operating System

Closure

Thus, we hope this article has provided valuable insights into Windows 10: A Comprehensive Exploration of the Modern Operating System. We hope you find this article informative and beneficial. See you in our next article!

A Comprehensive Guide To PhotoImpression 4 For Windows 10: Unleashing Creative Potential

A Comprehensive Guide to PhotoImpression 4 for Windows 10: Unleashing Creative Potential

Introduction

In this auspicious occasion, we are delighted to delve into the intriguing topic related to A Comprehensive Guide to PhotoImpression 4 for Windows 10: Unleashing Creative Potential. Let’s weave interesting information and offer fresh perspectives to the readers.

A Comprehensive Guide to PhotoImpression 4 for Windows 10: Unleashing Creative Potential

Photoimpression 4.1 Quick Start Guide

PhotoImpression 4, a widely acclaimed image editing software, empowers users to transform ordinary images into extraordinary masterpieces. Its intuitive interface and comprehensive suite of tools cater to both novice and experienced photo editors, making it a versatile choice for a wide range of creative endeavors. This article delves into the key features, benefits, and functionalities of PhotoImpression 4, providing a comprehensive understanding of its capabilities for Windows 10 users.

Understanding PhotoImpression 4: A Powerful Image Editing Tool

PhotoImpression 4 stands out as a user-friendly image editing software that simplifies the process of enhancing and manipulating photographs. Its intuitive design and straightforward tools eliminate the need for extensive technical expertise, making it accessible to individuals of all skill levels. This accessibility, coupled with its robust features, makes PhotoImpression 4 an ideal choice for a diverse range of users, including:

  • Amateur photographers: Those seeking to enhance their photos with basic editing tools, such as cropping, resizing, and color correction.
  • Hobbyists: Individuals who enjoy creating personalized photo projects, including greeting cards, calendars, and collages.
  • Small businesses: Enterprises requiring a cost-effective solution for creating marketing materials, such as flyers, brochures, and social media graphics.
  • Students and educators: Individuals who need to edit and manipulate images for assignments, presentations, and educational projects.

Key Features and Functionalities of PhotoImpression 4

PhotoImpression 4 boasts a wide array of features designed to empower users to edit and manipulate images with precision and creativity. Its functionalities cater to a multitude of editing needs, ranging from basic adjustments to advanced manipulations. Some of the key features include:

  • Basic Editing Tools: PhotoImpression 4 provides essential editing tools like cropping, resizing, rotating, and flipping images, enabling users to adjust the composition and dimensions of their photos.
  • Color Correction and Enhancement: Users can enhance the vibrancy and clarity of their photos by adjusting brightness, contrast, saturation, and other color parameters.
  • Special Effects: PhotoImpression 4 offers a diverse range of special effects, such as sepia tones, black and white conversions, and artistic filters, allowing users to add a unique touch to their images.
  • Text and Graphics: The software enables users to add text, shapes, and graphics to their images, creating personalized captions, labels, and visual elements.
  • Layers and Masks: Advanced users can leverage layers and masks to isolate specific areas of an image, apply effects selectively, and create complex compositions.
  • Batch Processing: PhotoImpression 4 allows users to apply the same edits to multiple images simultaneously, streamlining the editing process for large sets of photos.
  • File Format Support: The software supports a wide array of image file formats, ensuring compatibility with various digital cameras, scanners, and other image sources.

Benefits of Using PhotoImpression 4 for Windows 10

PhotoImpression 4 offers numerous benefits that make it a compelling choice for image editing on Windows 10:

  • User-friendly interface: The software’s intuitive interface and straightforward tools make it easy for users to navigate and utilize its features, regardless of their experience level.
  • Comprehensive toolset: PhotoImpression 4 provides a wide range of editing tools, encompassing basic adjustments, special effects, and advanced manipulations, catering to diverse editing needs.
  • Affordable pricing: PhotoImpression 4 is available at a reasonable price, making it an accessible option for individuals and small businesses.
  • Regular updates: The developers consistently release updates to improve performance, add new features, and enhance compatibility with the latest versions of Windows 10.
  • Strong community support: A dedicated online community provides a platform for users to share tips, troubleshoot issues, and access resources.

Downloading and Installing PhotoImpression 4 on Windows 10

Downloading and installing PhotoImpression 4 on Windows 10 is a straightforward process. Users can follow these steps:

  1. Visit the official website: Navigate to the official website of PhotoImpression 4 to access the download link.
  2. Download the installer: Click the download button to begin downloading the installation file.
  3. Run the installer: Once the download is complete, double-click the installer file to initiate the installation process.
  4. Follow the on-screen instructions: The installer will guide you through the installation process, prompting you to accept the terms and conditions, choose the installation directory, and select any additional options.
  5. Launch PhotoImpression 4: Once the installation is complete, you can launch PhotoImpression 4 from the Start menu or desktop shortcut.

Getting Started with PhotoImpression 4: A Beginner’s Guide

For novice users, PhotoImpression 4 provides a user-friendly experience. Here are some tips to help you get started:

  • Explore the interface: Familiarize yourself with the interface, including the toolbar, menu bar, and panels.
  • Experiment with basic tools: Start by exploring the basic editing tools, such as cropping, resizing, and color correction, to understand their functionalities.
  • Utilize the help resources: PhotoImpression 4 provides comprehensive help resources, including tutorials, documentation, and FAQs, to guide you through the software’s features.
  • Practice with sample images: Experiment with editing sample images to gain hands-on experience and learn the software’s capabilities.

FAQs about PhotoImpression 4 for Windows 10

Q: What are the system requirements for PhotoImpression 4 on Windows 10?

A: PhotoImpression 4 requires a computer with a minimum of 1 GB of RAM, 1 GB of hard disk space, and a compatible graphics card. It is recommended to have a more powerful system for optimal performance.

Q: Is PhotoImpression 4 compatible with all versions of Windows 10?

A: PhotoImpression 4 is compatible with the latest versions of Windows 10, including Home, Pro, and Enterprise editions. However, it is advisable to check the software’s compatibility information for specific versions.

Q: Is PhotoImpression 4 a free software?

A: PhotoImpression 4 is not a free software. It requires a purchase to access its full features and functionalities. However, a free trial version is available for users to evaluate the software before purchasing.

Q: How can I get support for PhotoImpression 4?

A: PhotoImpression 4 offers various support options, including a dedicated online help center, user forums, and email support. Users can access these resources for assistance with troubleshooting, feature inquiries, and other support needs.

Tips for Using PhotoImpression 4 Effectively

  • Organize your images: Create folders to organize your images based on projects, dates, or themes to facilitate easy access and management.
  • Use layers for complex edits: Leverage layers to isolate specific areas of an image, apply effects selectively, and create complex compositions.
  • Experiment with effects: Explore the various special effects offered by PhotoImpression 4 to enhance your images and create unique artistic styles.
  • Save your work frequently: Regularly save your edits to prevent losing your progress, especially when working on complex projects.
  • Back up your images: Create backups of your images to safeguard against data loss or accidental deletion.

Conclusion: PhotoImpression 4 – A Powerful Tool for Windows 10 Users

PhotoImpression 4 stands out as a powerful and user-friendly image editing software for Windows 10 users. Its comprehensive feature set, intuitive interface, and affordable pricing make it an ideal choice for individuals, hobbyists, and small businesses seeking to enhance and manipulate their images. Whether you are a novice or an experienced photo editor, PhotoImpression 4 provides the tools and resources to unleash your creative potential and transform your images into stunning masterpieces.

Arcsoft Photoimpression 4 Softwares Photo Editor Arcsoft Photoimpression 4 Software - bucketcrack Photoimpression 4.1 Quick Start Guide
hasemowl.blogg.se - Photoimpression 4 manual PhotoImpression 4.1 Quick Start Guide  Manualzz Photoimpression 4.1 Quick Start Guide
Photoimpression 4.1 Quick Start Guide ArcSoft PhotoImpression Software Informer: Screenshots

Closure

Thus, we hope this article has provided valuable insights into A Comprehensive Guide to PhotoImpression 4 for Windows 10: Unleashing Creative Potential. We hope you find this article informative and beneficial. See you in our next article!

A Comprehensive Guide To PUBG Lite: Downloading, Playing, And Mastering The Battle Royale Experience On Windows 10

A Comprehensive Guide to PUBG Lite: Downloading, Playing, and Mastering the Battle Royale Experience on Windows 10

Introduction

With great pleasure, we will explore the intriguing topic related to A Comprehensive Guide to PUBG Lite: Downloading, Playing, and Mastering the Battle Royale Experience on Windows 10. Let’s weave interesting information and offer fresh perspectives to the readers.

A Comprehensive Guide to PUBG Lite: Downloading, Playing, and Mastering the Battle Royale Experience on Windows 10

How to download PUBG Lite on PC: Step-by-step guide and system requirements

Introduction

PUBG Lite, the streamlined version of the renowned battle royale game PlayerUnknown’s Battlegrounds, offered an accessible gateway to the thrilling world of competitive online gaming. Designed specifically for lower-end PCs, PUBG Lite provided a compelling experience without demanding high system specifications. This article aims to provide a comprehensive guide to downloading, installing, and enjoying PUBG Lite on Windows 10, along with insights into the game’s mechanics, strategies, and the reasons behind its popularity.

Understanding PUBG Lite: A Simplified Approach to Battle Royale

PUBG Lite retained the core gameplay elements of its full-fledged counterpart, placing 100 players on a vast island to battle it out until only one remains standing. However, PUBG Lite offered several key differences:

  • Reduced System Requirements: PUBG Lite was optimized for PCs with lower hardware specifications, allowing a broader range of players to experience the game.
  • Streamlined Graphics: While maintaining the essence of the PUBG experience, PUBG Lite employed simplified graphics and visual effects to ensure smooth gameplay on less powerful machines.
  • Dedicated Servers: PUBG Lite ran on its own dedicated servers, ensuring a more stable and optimized experience for players with varying hardware configurations.
  • Free-to-Play: PUBG Lite was entirely free to download and play, eliminating any financial barriers to entry for potential players.

Downloading and Installing PUBG Lite on Windows 10

The process of downloading and installing PUBG Lite on Windows 10 was straightforward:

  1. Visit the Official Website: Navigate to the official PUBG Lite website (the website is no longer available as the game has been discontinued).
  2. Download the Installer: Locate the download link for the PUBG Lite installer and initiate the download.
  3. Run the Installer: Once the download is complete, run the installer file. Follow the on-screen instructions to complete the installation process.
  4. Launch the Game: After the installation is finished, locate the PUBG Lite shortcut on your desktop or within the Start menu and launch the game.

Setting Up Your PUBG Lite Account

To begin playing PUBG Lite, players needed to create an account:

  1. Create a PUBG Lite Account: Upon launching the game, players were prompted to create a new account or log in to an existing one.
  2. Account Information: Provide the required information, including a username, email address, and password.
  3. Account Verification: Verify your email address to complete the account creation process.

Navigating the PUBG Lite Interface

The PUBG Lite interface was designed to be user-friendly and intuitive:

  • Main Menu: The main menu offered access to various options, including the game modes, settings, and the in-game store.
  • Game Modes: PUBG Lite featured various game modes, each offering a unique gameplay experience. The most popular modes included:
    • Solo: Players compete individually against 99 other opponents.
    • Duo: Two players team up to fight against other duos.
    • Squad: Four players form a squad to battle against other squads.
  • Settings: The settings menu allowed players to customize their game experience, including graphics settings, audio options, and key bindings.
  • In-Game Store: The in-game store offered cosmetic items like skins, outfits, and emotes that could be purchased using in-game currency.

Mastering the Basics of PUBG Lite

PUBG Lite’s gameplay revolved around survival, strategy, and resource management:

  • Landing and Looting: Upon landing on the island, players had to quickly gather essential items like weapons, armor, and medical supplies.
  • Weapon Mastery: Understanding the strengths and weaknesses of various weapons was crucial for success. Experimenting with different weapon types and attachments was recommended.
  • Survival Skills: Players needed to manage their health, hunger, and thirst levels while navigating the island.
  • Map Knowledge: Familiarity with the island’s layout, landmarks, and strategic locations provided a significant advantage.
  • Communication and Teamwork: For duo and squad modes, effective communication and teamwork were essential for coordinated strategies and successful engagements.

Tips for Success in PUBG Lite

  • Practice Makes Perfect: The more you play, the better you will become at mastering the game’s mechanics and strategies.
  • Focus on Early Game Looting: Prioritize gathering essential gear and weapons in the early stages of the game.
  • Stay Informed: Pay attention to the in-game map, the shrinking play zone, and the locations of other players.
  • Use Cover and Concealment: Take advantage of buildings, trees, and terrain to protect yourself from enemy fire.
  • Learn Weapon Recoil Patterns: Mastering the recoil patterns of different weapons will improve your accuracy in combat.
  • Communicate Effectively: For team-based modes, clear and concise communication is crucial for success.

FAQs about PUBG Lite

  • What are the minimum system requirements for PUBG Lite?
    • PUBG Lite had significantly lower system requirements than its full-fledged counterpart. However, the game has been discontinued, so the minimum system requirements are no longer relevant.
  • Is PUBG Lite free to play?
    • Yes, PUBG Lite was entirely free to download and play. However, the game has been discontinued.
  • Can I transfer my PUBG Lite account to the full PUBG game?
    • Account transfers were not possible between PUBG Lite and the full PUBG game.
  • What are the differences between PUBG Lite and the full PUBG game?
    • PUBG Lite featured simplified graphics, lower system requirements, and dedicated servers, while the full PUBG game offered more detailed graphics, a wider range of features, and a larger player base.
  • Why was PUBG Lite discontinued?
    • PUBG Lite was discontinued due to various factors, including the declining popularity of the game and the increasing competition in the battle royale genre.

Conclusion

PUBG Lite provided an accessible and engaging entry point into the world of battle royale gaming for players with lower-end PCs. Its streamlined gameplay, free-to-play model, and dedicated servers made it a popular choice among a wide range of players. While PUBG Lite is no longer available, its legacy continues to highlight the importance of accessibility and optimization in the ever-evolving landscape of online gaming.

How to Download PUBG Lite on Windows PC - DoItFor How to play PUBG Mobile Lite on PC How To Download And Install PUBG Lite On PC [TUTORIAL]
PUBG LITE PC(Official) Download- Windows 11/10/8/7 & Mac OS How to Install PUBG Lite on PC - How To Pubg lite download pc windows 10 - dolfnexus
PUBG Lite New Version Download Full • Reworked Games PUBG Mobile Lite Download: Mastering Lightweight Battle Royale  by Earning Genius  Mar, 2024

Closure

Thus, we hope this article has provided valuable insights into A Comprehensive Guide to PUBG Lite: Downloading, Playing, and Mastering the Battle Royale Experience on Windows 10. We thank you for taking the time to read this article. See you in our next article!

Understanding And Managing Windows 10’s Start Menu: A Comprehensive Guide

Understanding and Managing Windows 10’s Start Menu: A Comprehensive Guide

Introduction

With great pleasure, we will explore the intriguing topic related to Understanding and Managing Windows 10’s Start Menu: A Comprehensive Guide. Let’s weave interesting information and offer fresh perspectives to the readers.

Understanding and Managing Windows 10’s Start Menu: A Comprehensive Guide

A Guide To The Windows 10 Start Menu Windows 10 Windo - vrogue.co

The Windows 10 Start menu serves as a central hub for accessing applications, settings, and system information. While its functionality is extensive, users may encounter scenarios where specific elements, such as pinned items, need to be adjusted. This article delves into the intricacies of managing the Windows 10 Start menu, focusing on the process of removing pinned items.

The Importance of Start Menu Management

The Windows 10 Start menu, despite its user-friendly design, can become cluttered over time. Pinned items, while initially convenient, can accumulate, obscuring frequently used applications and hindering efficient navigation. This clutter can lead to frustration, reduced productivity, and a less intuitive user experience.

Understanding Pinned Items

Pinned items in the Start menu are shortcuts to applications, files, or folders. These shortcuts provide quick access to frequently used resources. While this functionality is valuable, it’s crucial to maintain a balance between accessibility and organization.

Removing Pinned Items: A Step-by-Step Guide

To remove pinned items from the Windows 10 Start menu, follow these steps:

  1. Locate the Pinned Item: Open the Start menu and navigate to the pinned item you wish to remove. It could be an application, a file, or a folder.

  2. Right-Click the Item: Right-click the pinned item. A context menu will appear.

  3. Select "Unpin from Start": In the context menu, choose the option "Unpin from Start."

  4. Confirm Removal: The pinned item will be immediately removed from the Start menu.

Alternative Methods for Removing Pinned Items

While the right-click method is straightforward, alternative methods can be employed to manage pinned items:

  • Using the "All Apps" List: Access the "All Apps" list by clicking the arrow icon in the bottom left corner of the Start menu. Locate the pinned item within the list and right-click it. Select "Unpin from Start."

  • Using the Settings App: Navigate to the "Start" settings within the Settings app. In the "Start" settings, locate the "Pinned to Start" section. Click the "Unpin" button next to the desired item.

Benefits of Removing Pinned Items

Removing unnecessary pinned items from the Windows 10 Start menu offers several benefits:

  • Enhanced Organization: A decluttered Start menu promotes a more organized and efficient user experience.

  • Improved Navigation: With fewer items cluttering the Start menu, navigation becomes smoother and faster.

  • Increased Productivity: A streamlined Start menu reduces distractions and improves focus, leading to increased productivity.

  • Personalized User Experience: Users can personalize their Start menu by removing items that are no longer relevant or frequently used.

Frequently Asked Questions

Q: Can I remove all pinned items at once?

A: Currently, there is no built-in option to remove all pinned items simultaneously. However, you can use third-party software or manually unpin each item individually.

Q: Will removing pinned items delete the original files or applications?

A: No, removing pinned items from the Start menu only removes the shortcut, not the original file or application.

Q: Can I pin items back to the Start menu after removing them?

A: Yes, you can easily pin items back to the Start menu by right-clicking the desired item and selecting "Pin to Start."

Tips for Managing the Start Menu

  • Regularly Review Pinned Items: Make a habit of reviewing pinned items periodically and removing those that are no longer relevant or frequently used.

  • Utilize the "All Apps" List: The "All Apps" list offers a comprehensive view of all installed applications, making it easier to find and pin specific items.

  • Consider Third-Party Tools: Several third-party tools are available that offer advanced Start menu management features, such as batch pinning and unpinning.

Conclusion

Managing the Windows 10 Start menu, specifically removing pinned items, is essential for maintaining a streamlined and efficient user experience. By decluttering the Start menu and removing unnecessary shortcuts, users can enhance organization, improve navigation, and boost productivity. By following the steps outlined in this guide and implementing the provided tips, users can effectively manage their Start menu and create a personalized and user-friendly environment.

A closer look at Windows 10's brand-new Start Menu A beginner's guide to Windows 10 Start menu - TechEngage How to Use the Windows 10 Start Menu: 6 Steps (with Pictures)
Windows 10's refreshed Start Menu launched — here's your first look Windows 10 Start Menu - Surprising Facts How to Use the Windows 10 Start Menu: 6 Steps (with Pictures)
How to Use the Windows 10 Start Menu: 6 Steps (with Pictures) All about Start menu in Windows 10 You must know

Closure

Thus, we hope this article has provided valuable insights into Understanding and Managing Windows 10’s Start Menu: A Comprehensive Guide. We appreciate your attention to our article. See you in our next article!

Opera Mini For Windows 10 64-bit: A Review

Opera Mini for Windows 10 64-bit: A Review

Introduction

With enthusiasm, let’s navigate through the intriguing topic related to Opera Mini for Windows 10 64-bit: A Review. Let’s weave interesting information and offer fresh perspectives to the readers.

Opera Mini for Windows 10 64-bit: A Review

Opera mini browser download for pc windows 10 64 bit - jackver

Opera Mini, a renowned mobile browser renowned for its data compression capabilities, has made its foray into the desktop realm with a dedicated version for Windows 10 64-bit. This review delves into the functionality, performance, and user experience of Opera Mini on the Windows platform, offering a comprehensive assessment of its strengths and limitations.

Functionality and Features

Opera Mini for Windows 10 64-bit inherits many of the features that have made its mobile counterpart popular. The browser boasts a clean and intuitive interface, with a focus on providing a streamlined browsing experience. Key features include:

  • Data Compression: Opera Mini’s core strength lies in its data compression technology. The browser compresses web pages before they reach the user’s device, significantly reducing data usage and loading times, especially on slower internet connections. This feature is particularly valuable for users with limited data plans or those browsing on mobile hotspots.
  • Built-in Ad Blocker: The browser incorporates an integrated ad blocker, eliminating intrusive ads and pop-ups, enhancing the browsing experience and improving page load speeds.
  • Night Mode: Opera Mini offers a night mode feature, which adjusts the display to a darker color scheme, reducing eye strain during nighttime browsing.
  • Download Manager: The browser includes a built-in download manager, allowing users to download files efficiently and manage their downloads with ease.
  • Customizable Start Page: Users can personalize their start page by adding shortcuts to their favorite websites, news feeds, or social media accounts, making access to frequently visited sites quick and convenient.
  • Tab Management: Opera Mini allows users to open multiple tabs and switch between them seamlessly, facilitating efficient multitasking.
  • Synchronization: Users can synchronize their browsing data, bookmarks, and settings across multiple devices, ensuring a consistent browsing experience.

Performance and User Experience

Opera Mini for Windows 10 64-bit delivers a generally smooth and responsive browsing experience. The browser’s data compression technology noticeably improves page load times, even on slower internet connections. The ad blocker effectively eliminates most intrusive ads, enhancing the overall browsing experience.

However, certain aspects of the user experience require improvement. While the interface is clean and straightforward, it lacks some of the advanced customization options found in other desktop browsers. The browser’s data compression algorithm can sometimes impact the quality of image rendering, resulting in slightly blurry images or distorted layouts.

Comparison to Other Browsers

Opera Mini for Windows 10 64-bit competes with established desktop browsers like Chrome, Firefox, and Edge. Compared to these browsers, Opera Mini offers a unique selling proposition with its data compression technology. While other browsers offer extensions and add-ons for ad blocking and data saving, Opera Mini integrates these features natively, providing a more streamlined experience.

However, Opera Mini lacks the extensive customization options and advanced features found in other browsers. For users who prioritize a feature-rich browsing experience with a high degree of control over their browsing environment, other browsers may be a better choice.

Target Audience

Opera Mini for Windows 10 64-bit caters to a specific audience. It is particularly well-suited for users with:

  • Limited Data Plans: The browser’s data compression technology makes it an ideal choice for users who want to minimize data usage while browsing.
  • Slower Internet Connections: Opera Mini’s ability to compress web pages significantly improves loading times on slower internet connections, providing a more enjoyable browsing experience.
  • Focus on Privacy: The integrated ad blocker helps users avoid intrusive ads and potentially harmful tracking scripts.

FAQs

Q: Is Opera Mini for Windows 10 64-bit free to use?

A: Yes, Opera Mini for Windows 10 64-bit is completely free to download and use.

Q: Does Opera Mini for Windows 10 64-bit support extensions?

A: Currently, Opera Mini for Windows 10 64-bit does not support extensions.

Q: Can I customize the user interface of Opera Mini for Windows 10 64-bit?

A: While the browser offers some basic customization options, it lacks the extensive customization features found in other desktop browsers.

Q: How effective is Opera Mini’s data compression technology?

A: Opera Mini’s data compression technology can significantly reduce data usage, often by 90% or more, depending on the website being accessed.

Q: Does Opera Mini for Windows 10 64-bit support multiple profiles?

A: Currently, Opera Mini for Windows 10 64-bit does not support multiple profiles.

Tips

  • Enable Data Compression: Ensure that the data compression feature is enabled in the browser settings to maximize data savings.
  • Utilize the Ad Blocker: Take advantage of the built-in ad blocker to enhance browsing speed and privacy.
  • Explore Night Mode: Use night mode for more comfortable browsing during nighttime hours.
  • Customize the Start Page: Add shortcuts to your favorite websites for quick access.
  • Experiment with the Download Manager: Utilize the download manager to efficiently download files.

Conclusion

Opera Mini for Windows 10 64-bit offers a unique approach to desktop browsing by prioritizing data compression and privacy. Its data saving capabilities make it an attractive option for users with limited data plans or slow internet connections. However, the browser lacks the extensive customization options and advanced features found in other desktop browsers.

Ultimately, the choice between Opera Mini and other browsers depends on individual needs and preferences. For users who prioritize data saving and a streamlined browsing experience, Opera Mini presents a compelling alternative. However, users seeking a feature-rich browser with extensive customization options may find other browsers better suited to their needs.

Opera mini for windows 10 pro 64 bit - plmrt Opera mini browser download for pc windows 10 64 bit - callplm Opera mini browser download for pc windows 10 64 bit - jackver
Opera Mini For PC Windows 10 64 bit Free Download 2019 Version – Safe Files Opera Mini Download & Install for PC Windows 10, 32/64 bit. - YouTube Opera mini download for pc windows 10 64 bit filehippo - daststock
Opera mini for windows 10 - idealdax Opera Mini download free for Windows 10 64/32 bit - Mobile Browser Software

Closure

Thus, we hope this article has provided valuable insights into Opera Mini for Windows 10 64-bit: A Review. We thank you for taking the time to read this article. See you in our next article!

Navigating The Path To Windows 11: A Comprehensive Guide

Navigating the Path to Windows 11: A Comprehensive Guide

Introduction

With enthusiasm, let’s navigate through the intriguing topic related to Navigating the Path to Windows 11: A Comprehensive Guide. Let’s weave interesting information and offer fresh perspectives to the readers.

Buy Windows 11 User Guide for Beginners: A Comprehensive Guide to Master Windows 11 Operating

Microsoft’s Windows 11, released in October 2021, represents a significant evolution in the operating system landscape. This update boasts a revamped interface, enhanced performance, and a focus on security and user experience. While the allure of a fresh and modernized operating system is undeniable, the process of obtaining Windows 11 can seem daunting. This article aims to demystify the download process, providing a comprehensive guide for users considering the upgrade.

Understanding the Download Options

The path to Windows 11 begins with understanding the available download options. Microsoft offers two primary methods for obtaining the operating system:

1. Upgrade from a Previous Version:

  • Eligibility: This method is available for users with compatible Windows 10 devices. Microsoft has outlined specific hardware requirements for Windows 11 compatibility, which users must verify before attempting an upgrade.
  • Process: The upgrade process is initiated through the Windows Update settings within Windows 10. The system checks for compatibility, downloads the necessary files, and guides the user through the installation process.
  • Advantages: This method is generally considered the most straightforward and convenient, as it leverages existing system files and settings.
  • Disadvantages: The upgrade process can be time-consuming, and users may encounter errors or compatibility issues depending on their hardware and software configurations.

2. Clean Installation:

  • Eligibility: This option is available to all users, regardless of their current operating system. It involves downloading the Windows 11 ISO file and creating a bootable USB drive or DVD.
  • Process: The clean installation requires formatting the hard drive, installing Windows 11 from the bootable media, and configuring the operating system.
  • Advantages: A clean installation offers a fresh start, resolving potential software conflicts and ensuring a more optimized experience. It also provides the opportunity to customize system settings and choose desired features.
  • Disadvantages: This method requires more technical knowledge and time commitment, as it involves formatting the hard drive and reinstalling all software.

Essential Considerations Before Downloading

Before embarking on the download journey, several crucial considerations should guide the decision-making process:

1. Hardware Compatibility:

  • Minimum Requirements: Windows 11 necessitates a modern processor, sufficient RAM, and storage space. Microsoft’s official website provides detailed specifications. Users must ensure their system meets these requirements to avoid installation issues.
  • TPM 2.0: This security feature is mandatory for Windows 11. Users can check their system’s TPM status through the BIOS settings. If TPM 2.0 is unavailable, upgrading to Windows 11 may not be possible.
  • Secure Boot: This feature enhances system security by preventing unauthorized software from loading during startup. Windows 11 requires Secure Boot to be enabled.

2. Software Compatibility:

  • Driver Compatibility: Ensure that drivers for essential hardware components, such as graphics cards and network adapters, are compatible with Windows 11. Compatibility issues can lead to performance problems or device malfunctions.
  • Application Compatibility: Verify that critical applications, including productivity tools, games, and other software, are compatible with Windows 11. Some applications may require updates or may not function optimally on the new operating system.

3. Data Backup:

  • Prioritize Data Preservation: Before initiating any installation process, it is crucial to back up important data. This includes files, documents, photos, and other critical information.
  • Backup Methods: Utilize a variety of backup methods, such as external hard drives, cloud storage services, or system image backups.

4. Licensing and Activation:

  • Valid Windows License: Ensure a valid Windows license is available for activation. Users who have upgraded from Windows 10 are typically eligible for automatic activation.
  • Activation Methods: Windows 11 can be activated online through Microsoft’s servers or via a product key.

1. Downloading the Windows 11 Installation Media:

  • Official Microsoft Website: Visit the official Microsoft website and navigate to the Windows 11 download page.
  • ISO File: Download the Windows 11 ISO file, which contains the operating system’s installation files.
  • Bootable Media: Use a tool like Rufus or the Windows USB/DVD Download Tool to create a bootable USB drive or DVD from the ISO file.

2. Upgrading from Windows 10:

  • Windows Update Settings: Access the Windows Update settings within Windows 10.
  • Check for Updates: Select the "Check for updates" option.
  • Windows 11 Upgrade: If your system is compatible, the Windows 11 upgrade will appear as an available update.
  • Download and Install: Follow the on-screen instructions to download and install the upgrade.

3. Performing a Clean Installation:

  • Boot from USB Drive: Restart your computer and boot from the bootable USB drive created earlier.
  • Installation Process: Follow the on-screen instructions to install Windows 11.
  • Format Hard Drive: Choose the option to format the hard drive, which will erase all existing data.
  • Customize Settings: Configure the operating system’s language, region, and other settings.

4. Post-Installation Steps:

  • Install Drivers: Install the latest drivers for all hardware components to ensure optimal performance.
  • Install Applications: Reinstall essential applications and software.
  • Restore Data: Restore backed-up data to the newly installed operating system.

Addressing Common Download Challenges

The download process may present challenges, such as compatibility issues, installation errors, or activation problems. Here are some common challenges and potential solutions:

1. Compatibility Issues:

  • Check Hardware Requirements: Ensure your system meets the minimum hardware requirements for Windows 11.
  • Verify TPM 2.0 and Secure Boot: Enable TPM 2.0 and Secure Boot in the BIOS settings.

2. Installation Errors:

  • Troubleshoot Installation Errors: Consult Microsoft’s official documentation for troubleshooting tips related to specific installation errors.
  • Re-download Installation Media: Ensure the installation media is not corrupted by re-downloading the ISO file and creating a new bootable drive.

3. Activation Problems:

  • Check Product Key: Verify that the product key is valid and correctly entered.
  • Contact Microsoft Support: If activation issues persist, contact Microsoft support for assistance.

Frequently Asked Questions (FAQs)

1. Is Windows 11 a free upgrade for Windows 10 users?

  • Windows 11 is a free upgrade for eligible Windows 10 devices. However, compatibility requirements must be met.

2. Can I upgrade to Windows 11 from Windows 7 or Windows 8?

  • No, Windows 11 is not a direct upgrade from Windows 7 or Windows 8. Users must upgrade to Windows 10 first to be eligible for the Windows 11 upgrade.

3. What happens to my data during the upgrade process?

  • The upgrade process generally preserves user data, including files, settings, and applications. However, it is always recommended to back up data before initiating the upgrade.

4. Can I downgrade from Windows 11 to Windows 10?

  • Yes, it is possible to downgrade from Windows 11 to Windows 10. However, this process may involve reinstalling Windows 10 from a bootable media and may require a valid Windows 10 license.

5. What are the key benefits of Windows 11?

  • Windows 11 offers a modernized interface, improved performance, enhanced security features, and a streamlined user experience.

Tips for a Smooth Download Experience

1. Prepare for the Download:

  • Check Compatibility: Verify that your system meets the minimum hardware requirements and that essential software is compatible.
  • Back Up Data: Create comprehensive backups of all important data before initiating the upgrade or clean installation.

2. Choose the Right Download Method:

  • Upgrade from Windows 10: This method is generally the most convenient for compatible devices.
  • Clean Installation: Consider a clean installation for a fresh start or to resolve compatibility issues.

3. Troubleshoot Installation Errors:

  • Consult Microsoft Documentation: Refer to Microsoft’s official documentation for troubleshooting tips related to specific errors.
  • Seek Community Support: Engage with online communities or forums for assistance with troubleshooting.

4. Stay Informed:

  • Microsoft Website: Visit the official Microsoft website for the latest information on Windows 11, including compatibility updates and troubleshooting guides.
  • News and Reviews: Stay updated on news and reviews related to Windows 11 to gain insights into its features, performance, and potential issues.

Conclusion

Downloading Windows 11 is a significant decision that requires careful planning and execution. By understanding the available options, considering compatibility requirements, and following the steps outlined in this guide, users can navigate the download process with confidence. Remember to prioritize data backup, stay informed about potential challenges, and leverage resources like Microsoft’s documentation and online communities for assistance. With proper preparation and a methodical approach, users can seamlessly transition to the latest version of Windows, enjoying its enhanced features and modern design.

Buy Windows 11 User Guide: A Complete Guide to Master the New Windows 11 OS with Tips and Tricks Buy Windows 11: Discover from Beginner to Expert with this Ultimate & Complete Step-by-Step User WINDOWS 11 HOME User Guide: A Complete and well-Illustrated Guide to Navigating the New Features
Windows 11 The Complete Manual Issue 1 2022 Pdf – GFXFather Buy WINDOWS 11 HOME User Manual: A Comprehensive Illustrated Guide to Navigating the New Buy WINDOWS 11 COMPLETE GUIDE: Taking You from Windows 11 Novice to Professional In 33 Chapters
Windows 11 Ultimate Guide – Leaf Publishing Buy Windows 11 User Guide: The Complete Tutorials for Beginners and Pro with Tips & Tricks to

Closure

Thus, we hope this article has provided valuable insights into Navigating the Path to Windows 11: A Comprehensive Guide. We appreciate your attention to our article. See you in our next article!