The Silent Struggle: Troubleshooting Audio Issues After A Windows 11 Update
The Silent Struggle: Troubleshooting Audio Issues After a Windows 11 Update
Related Articles: The Silent Struggle: Troubleshooting Audio Issues After a Windows 11 Update
Introduction
With great pleasure, we will explore the intriguing topic related to The Silent Struggle: Troubleshooting Audio Issues After a Windows 11 Update. Let’s weave interesting information and offer fresh perspectives to the readers.
Table of Content
The Silent Struggle: Troubleshooting Audio Issues After a Windows 11 Update
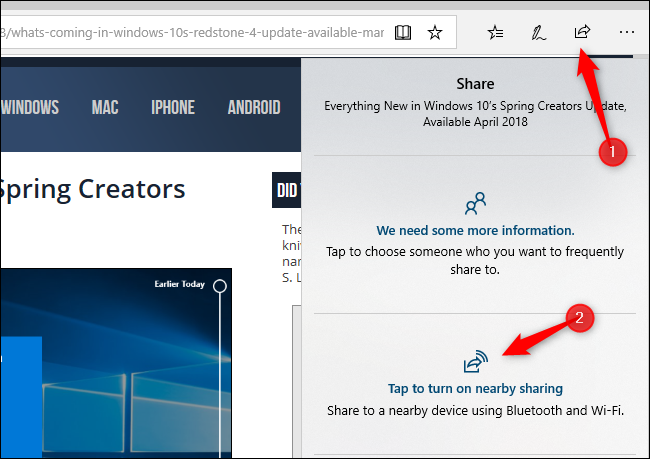
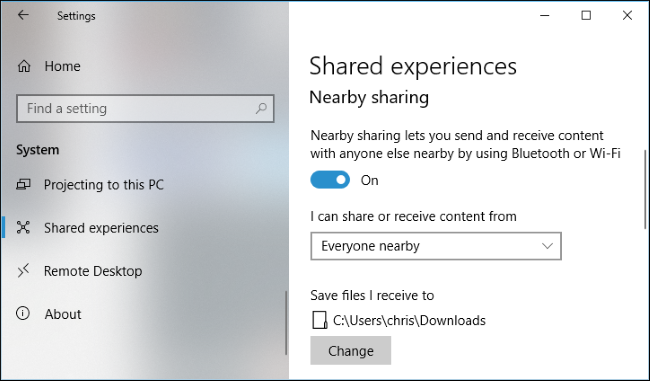
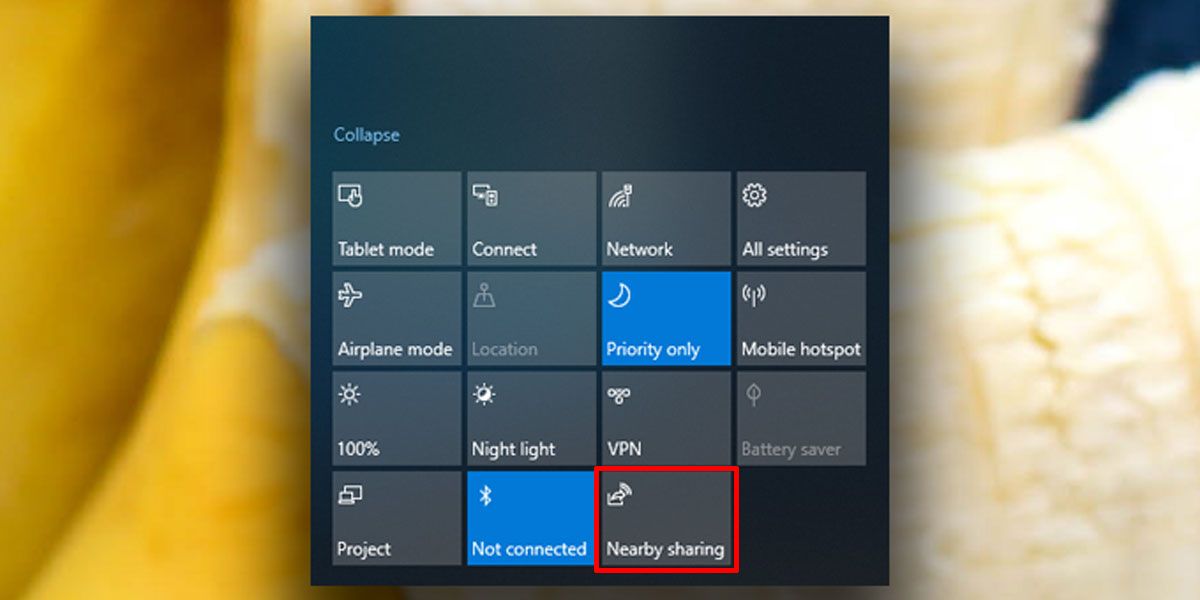
![How to Fix: No Sound After Windows 11 Update - Sound Missing [Solved] - ViDoe](https://i.ytimg.com/vi/7hp8evY0GrQ/mqdefault.jpg)
The smooth transition from one operating system to another is a common expectation, yet the reality can sometimes involve unexpected glitches. One such glitch that can leave users frustrated is the sudden absence of sound after a Windows 11 update. This issue, while seemingly straightforward, can stem from a variety of factors, ranging from simple driver conflicts to more complex system-wide errors.
Understanding the Root of the Problem
The silence following a Windows 11 update is often a symptom, not the problem itself. The update process can inadvertently disrupt audio drivers, settings, or even hardware configurations, leading to the unwelcome silence. To effectively address this issue, it’s crucial to understand the possible culprits:
- Driver Conflicts: The most common cause for post-update audio issues is driver incompatibility. When Windows 11 updates, it may attempt to install new or updated drivers for your audio hardware. If these drivers are incompatible with your specific hardware, conflicts can arise, resulting in no sound.
- System Settings: Windows 11 updates can sometimes inadvertently alter system settings related to audio, such as the default output device or volume settings. These changes can lead to unexpected audio behavior.
- Hardware Malfunctions: While less common, hardware malfunctions can also contribute to audio problems. This could involve issues with your sound card, speakers, or even the connections between them.
- System Errors: In rare cases, the update process itself might introduce system-level errors that affect audio functionality. These errors can be more complex to diagnose and resolve.
Troubleshooting Strategies: Restoring the Sound
The following steps outline a comprehensive troubleshooting approach to restore audio functionality after a Windows 11 update:
1. Restart Your Computer: This simple step can often resolve temporary glitches that might have arisen during the update process. Restarting allows the system to refresh and potentially clear any minor conflicts.
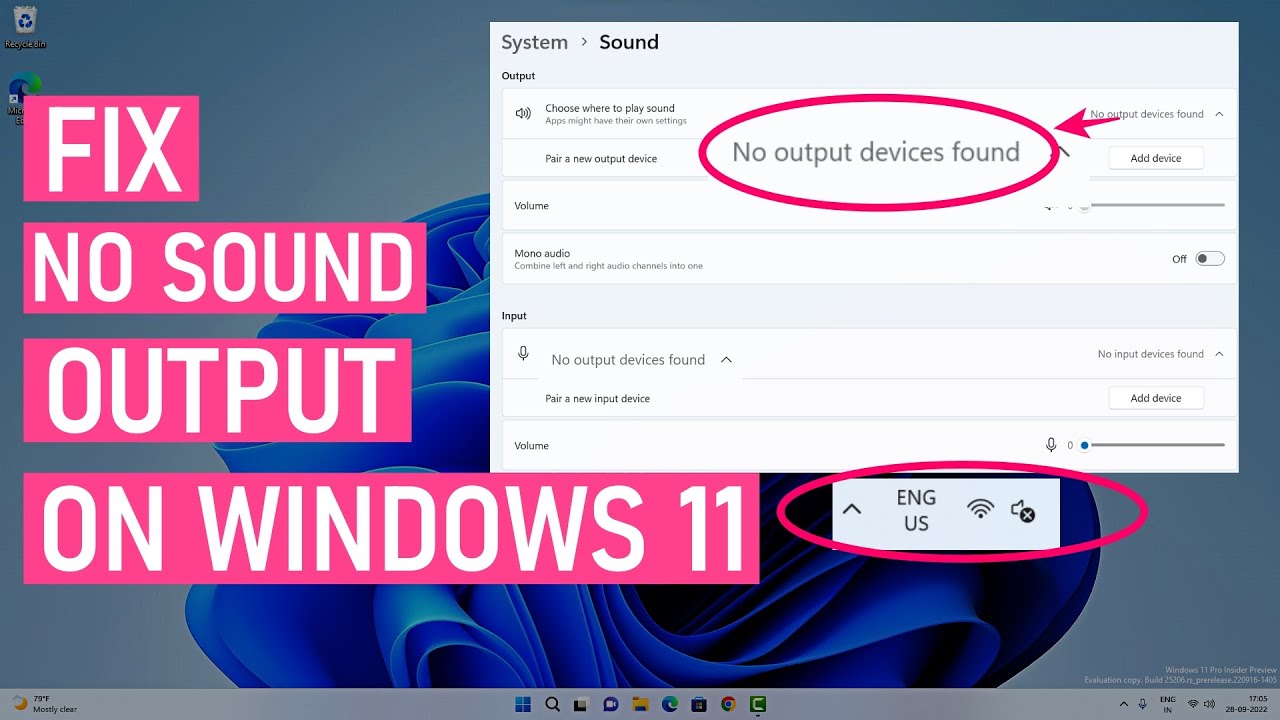
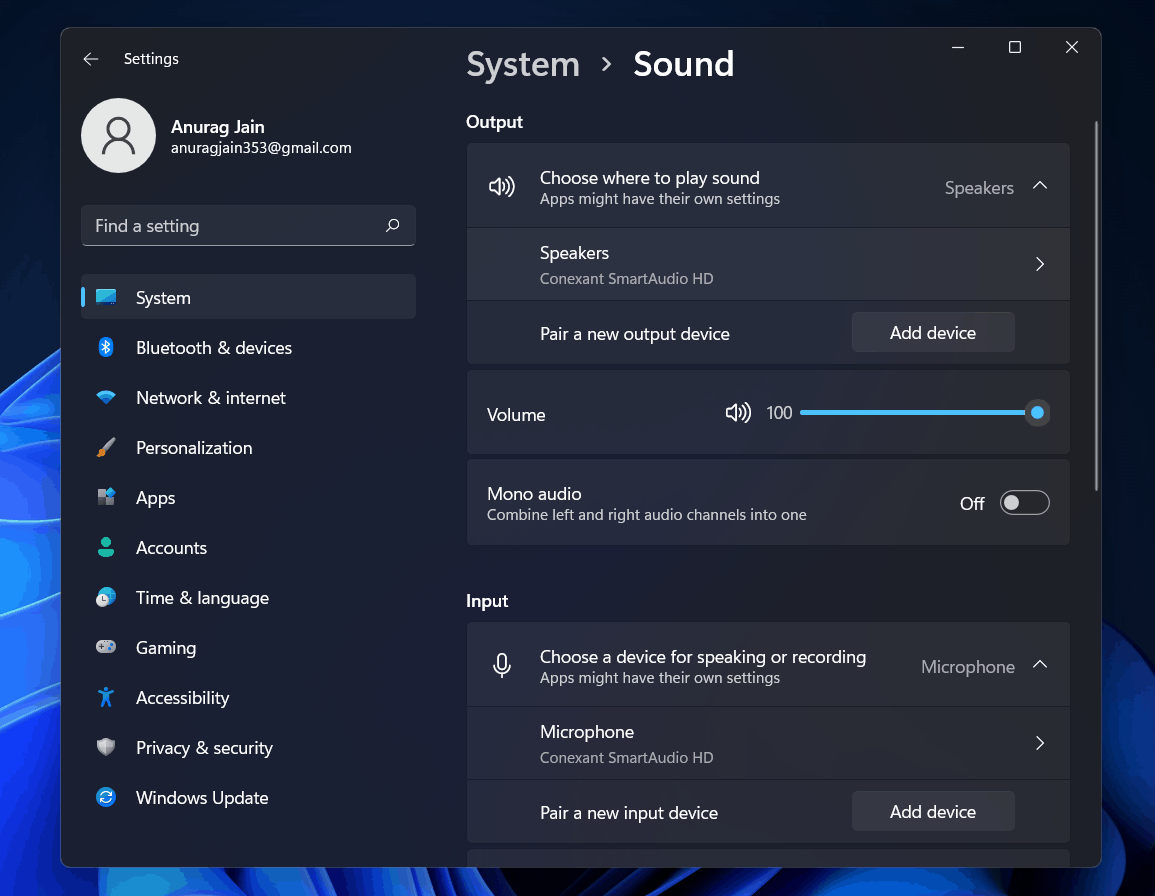
2. Verify Audio Device Settings: Check your system’s sound settings to ensure the correct audio device is selected as the output.
- Windows Settings: Navigate to Settings > System > Sound, and verify that the desired audio device is listed as the "Output device."
- Control Panel: Alternatively, open the Control Panel > Sound and check the playback tab for the selected device.
3. Update or Reinstall Audio Drivers: Outdated or incompatible drivers are a primary suspect in audio issues.
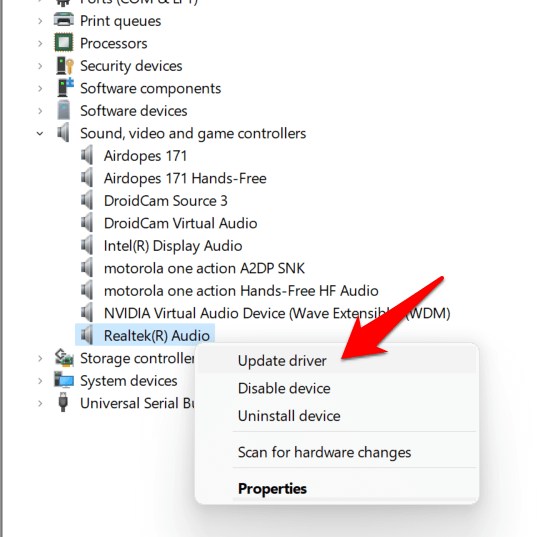
- Device Manager: Open Device Manager (search for it in the Windows search bar), expand the Sound, video and game controllers section, and right-click on your audio device. Choose Update driver and follow the prompts.
- Manufacturer Website: Visit the website of your audio hardware manufacturer (e.g., Realtek, Intel, etc.) and download the latest drivers compatible with Windows 11. Ensure you select the correct driver version for your specific hardware model.
- Reinstall Drivers: If updating drivers doesn’t resolve the issue, consider reinstalling them. Right-click on the audio device in Device Manager and choose Uninstall device. After uninstallation, restart your computer. Windows will automatically attempt to reinstall the drivers.
4. Troubleshoot Windows Audio Services: Windows relies on specific services for audio functionality. Ensure these services are running correctly.
-
Services: Open the Services window (search for it in the Windows search bar). Locate the following services:
- Windows Audio
- Multimedia Class Scheduler
- Windows Audio Endpoint Builder
- Right-click on each service and select Properties.
- Startup type: Ensure it’s set to Automatic.
- Status: Verify that the service is Running. If not, click Start.
5. Check for System Errors: If the above steps haven’t yielded results, it’s time to consider system-level errors.
-
System File Checker (SFC): This tool scans for and repairs corrupted system files. Open Command Prompt as administrator (search for it in the Windows search bar) and enter the command
sfc /scannow. -
Deployment Image Servicing and Management (DISM): This tool repairs corrupted system images. In Command Prompt (administrator), enter the command
DISM /Online /Cleanup-Image /RestoreHealth.
6. Reset Audio Settings: If all else fails, consider resetting your audio settings to their default values.
- Windows Settings: Navigate to Settings > System > Sound and click on the Sound Control Panel link at the bottom.
- Control Panel: Open the Control Panel > Sound and click on the Troubleshoot sound playback link.
7. Hardware Troubleshooting: If you’ve exhausted software-based troubleshooting, suspect a hardware issue.
- Speaker and Connection Check: Verify that your speakers are connected correctly and powered on. Try connecting them to a different audio source to rule out speaker problems.
- Sound Card Check: If you have a dedicated sound card, try disabling it in Device Manager and restarting your computer. If sound returns, the sound card might be faulty.
FAQs: Addressing Common Concerns
Q: My computer is completely silent, not even a beep during startup. What could be wrong?
A: This suggests a more serious hardware issue, potentially involving the motherboard or BIOS. Consider contacting a professional for diagnosis and repair.
Q: I have tried all the troubleshooting steps, but there’s still no sound. What should I do?
A: If you’ve exhausted all the steps above, it’s advisable to seek professional assistance. A technician can diagnose more complex issues and recommend appropriate solutions.
Q: I’m not comfortable with troubleshooting myself. Is there a simpler way to fix the sound?
A: While there’s no guaranteed "simple fix," you can try rolling back the Windows 11 update to a previous version. This might resolve the issue if the update itself introduced the problem. However, be aware that rolling back could temporarily revert other updates as well.
Tips for Preventing Future Audio Issues:
- Keep Drivers Updated: Regularly update your audio drivers to ensure compatibility and optimal performance.
- Back Up Your System: Before installing any major updates, create a system restore point or a complete system backup. This allows you to revert to a previous state if an update causes problems.
- Monitor for Updates: Stay informed about upcoming Windows updates and their potential impact. Read release notes and community forums for reports of known issues.
Conclusion: Restoring Harmony
The absence of sound after a Windows 11 update can be a frustrating experience, but it’s not insurmountable. By understanding the potential causes and employing the troubleshooting steps outlined above, users can effectively address this issue and restore their audio functionality. Remember, patience and a systematic approach are key to resolving technical glitches. If all else fails, seeking professional assistance is always an option. The silence will eventually be broken, and your computer will once again fill your world with sound.


![How to Fix: No Sound After Windows 10/11 Update - Sound Missing 2024 [Solved] - YouTube](https://i.ytimg.com/vi/tvjynf0zMG8/maxresdefault.jpg)
Closure
Thus, we hope this article has provided valuable insights into The Silent Struggle: Troubleshooting Audio Issues After a Windows 11 Update. We appreciate your attention to our article. See you in our next article!


![How to Remove Microsoft Account from Windows 11 [Guide] Beebom](https://beebom.com/wp-content/uploads/2021/07/Create-Local-Account-On-Your-Windows-11-PC-body-1.jpg)


![Windows 10 Not Booting Up FIX [Tutorial] - YouTube](https://i.ytimg.com/vi/pYY5Ms2sk7A/maxresdefault.jpg)