Archives January 2024

Navigating The Labyrinth: Common Issues With Resetting Windows 11

Navigating the Labyrinth: Common Issues with Resetting Windows 11

Introduction

In this auspicious occasion, we are delighted to delve into the intriguing topic related to Navigating the Labyrinth: Common Issues with Resetting Windows 11. Let’s weave interesting information and offer fresh perspectives to the readers.

How To Fix The Problem Windows 11 Cannot Start On Thi - vrogue.co

Resetting Windows 11, a seemingly straightforward process, can sometimes present unexpected hurdles. While intended as a solution to various system problems, it can itself become a source of frustration. This article explores the common pitfalls encountered during the reset process, shedding light on their causes and offering potential solutions.

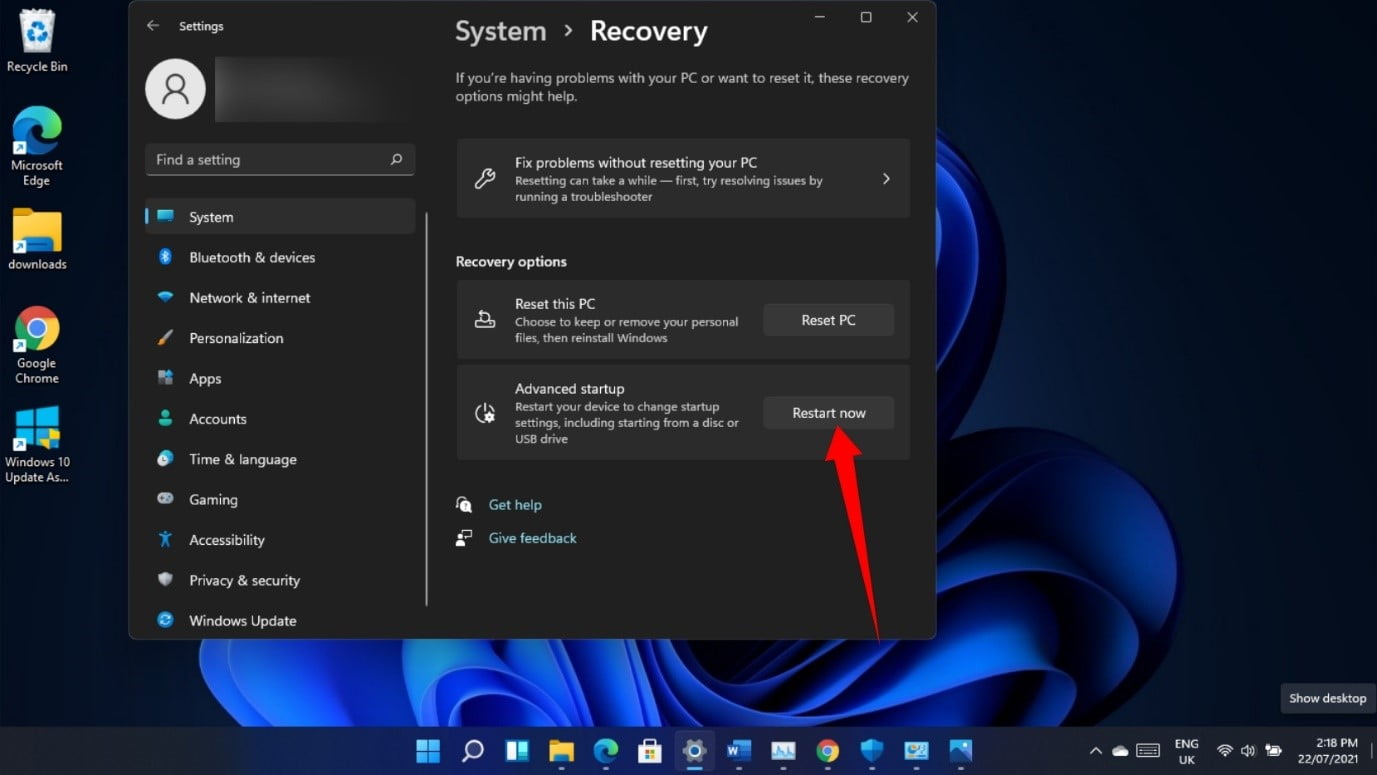
Understanding the Reset Process:

Resetting Windows 11 involves either keeping personal files and reinstalling the operating system or performing a clean install, erasing everything. This process aims to resolve issues like software conflicts, performance degradation, or malware infections. However, the complexity of modern operating systems and the diverse configurations of individual computers can lead to unforeseen complications.

Common Issues and their Causes:

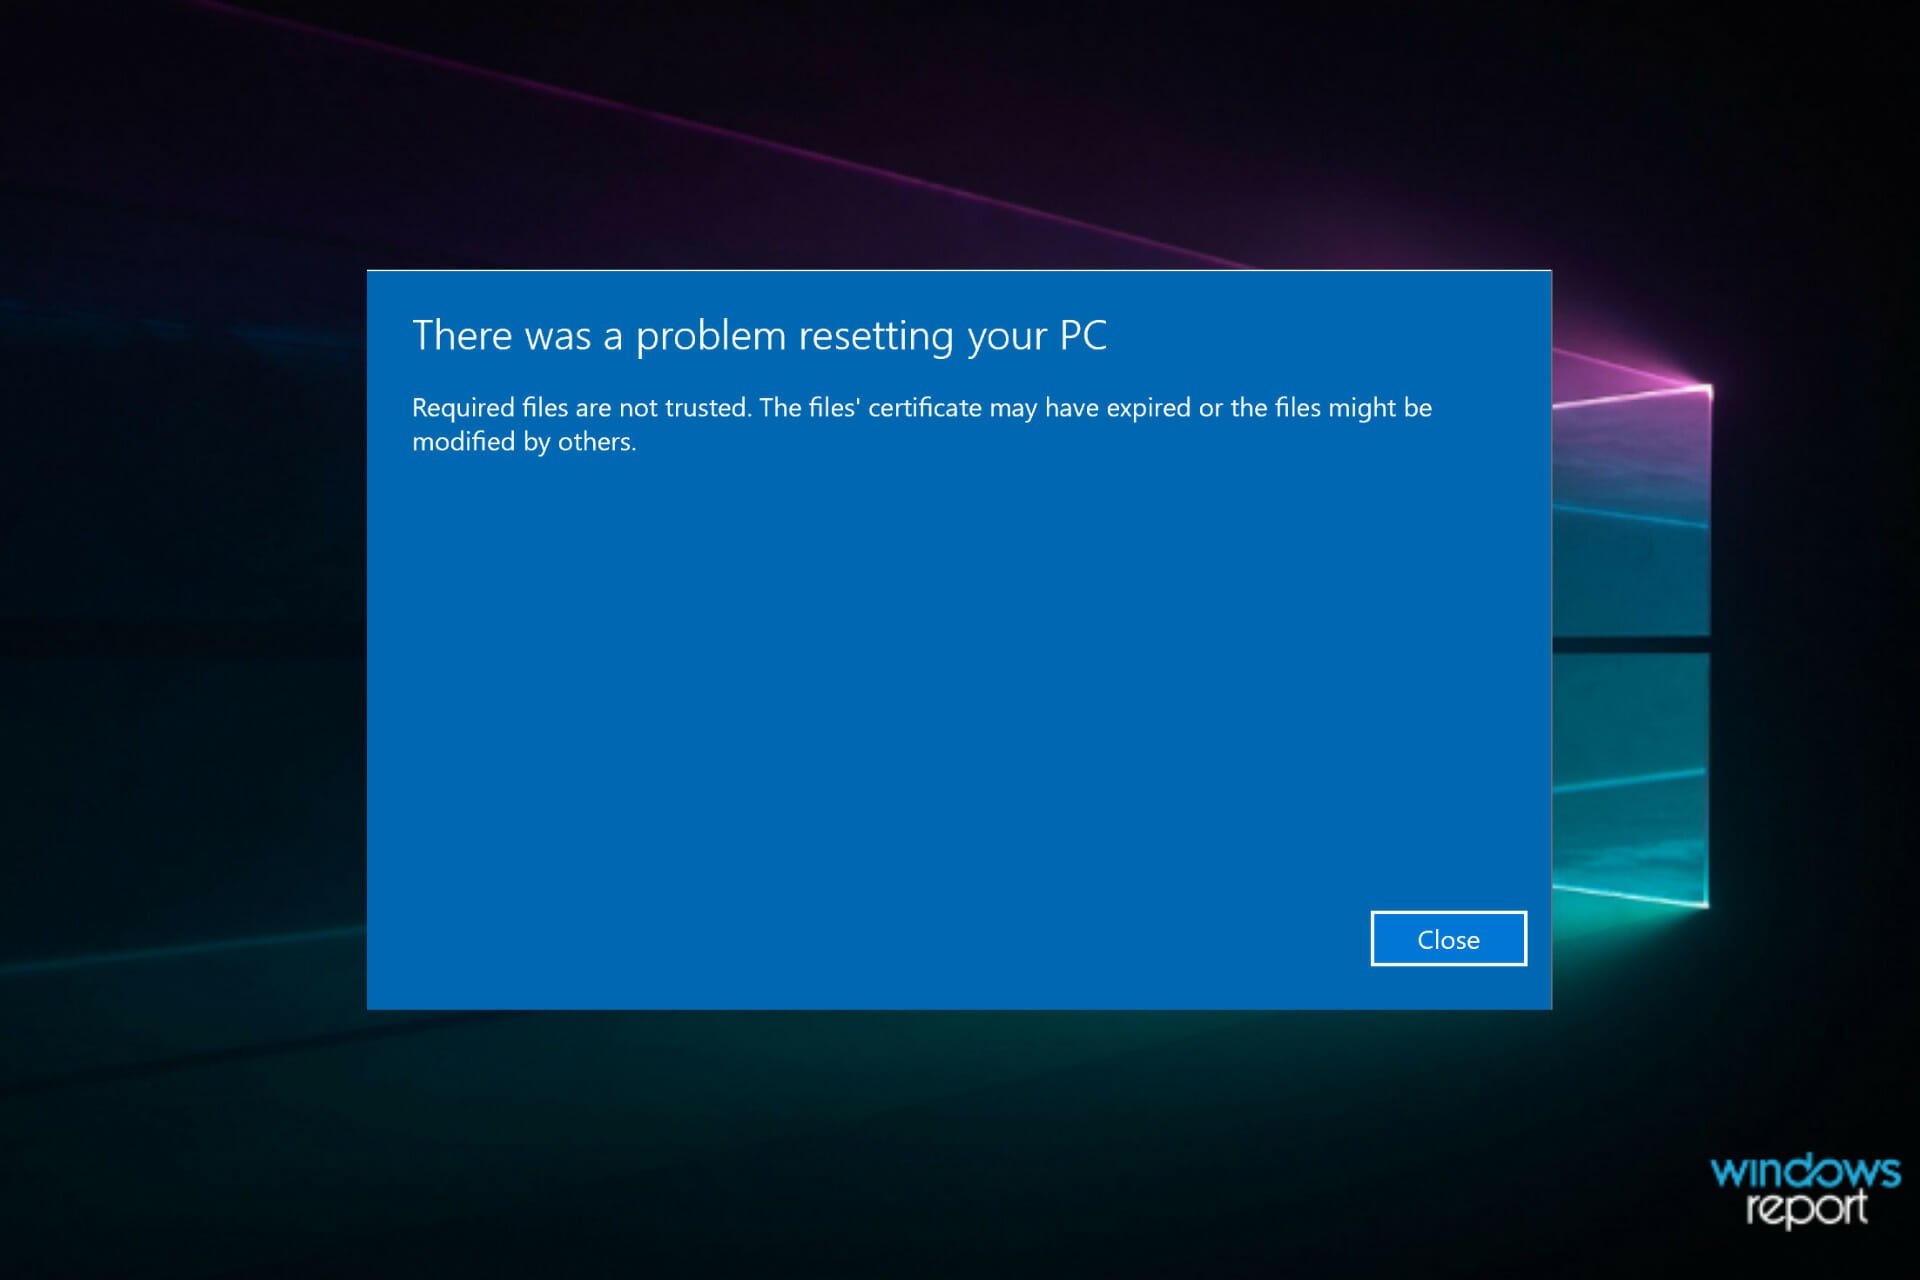
1. Error Codes and System Errors:

  • Error Code 0x8007000D: This error often indicates a problem with the Windows Update process, preventing the download of necessary files for the reset.
  • Error Code 0x80070017: This error usually points to a corrupted system file or a problem with the hard drive.
  • Error Code 0x80070002: This error indicates a general error during the reset process, often related to hardware issues or corrupted system files.
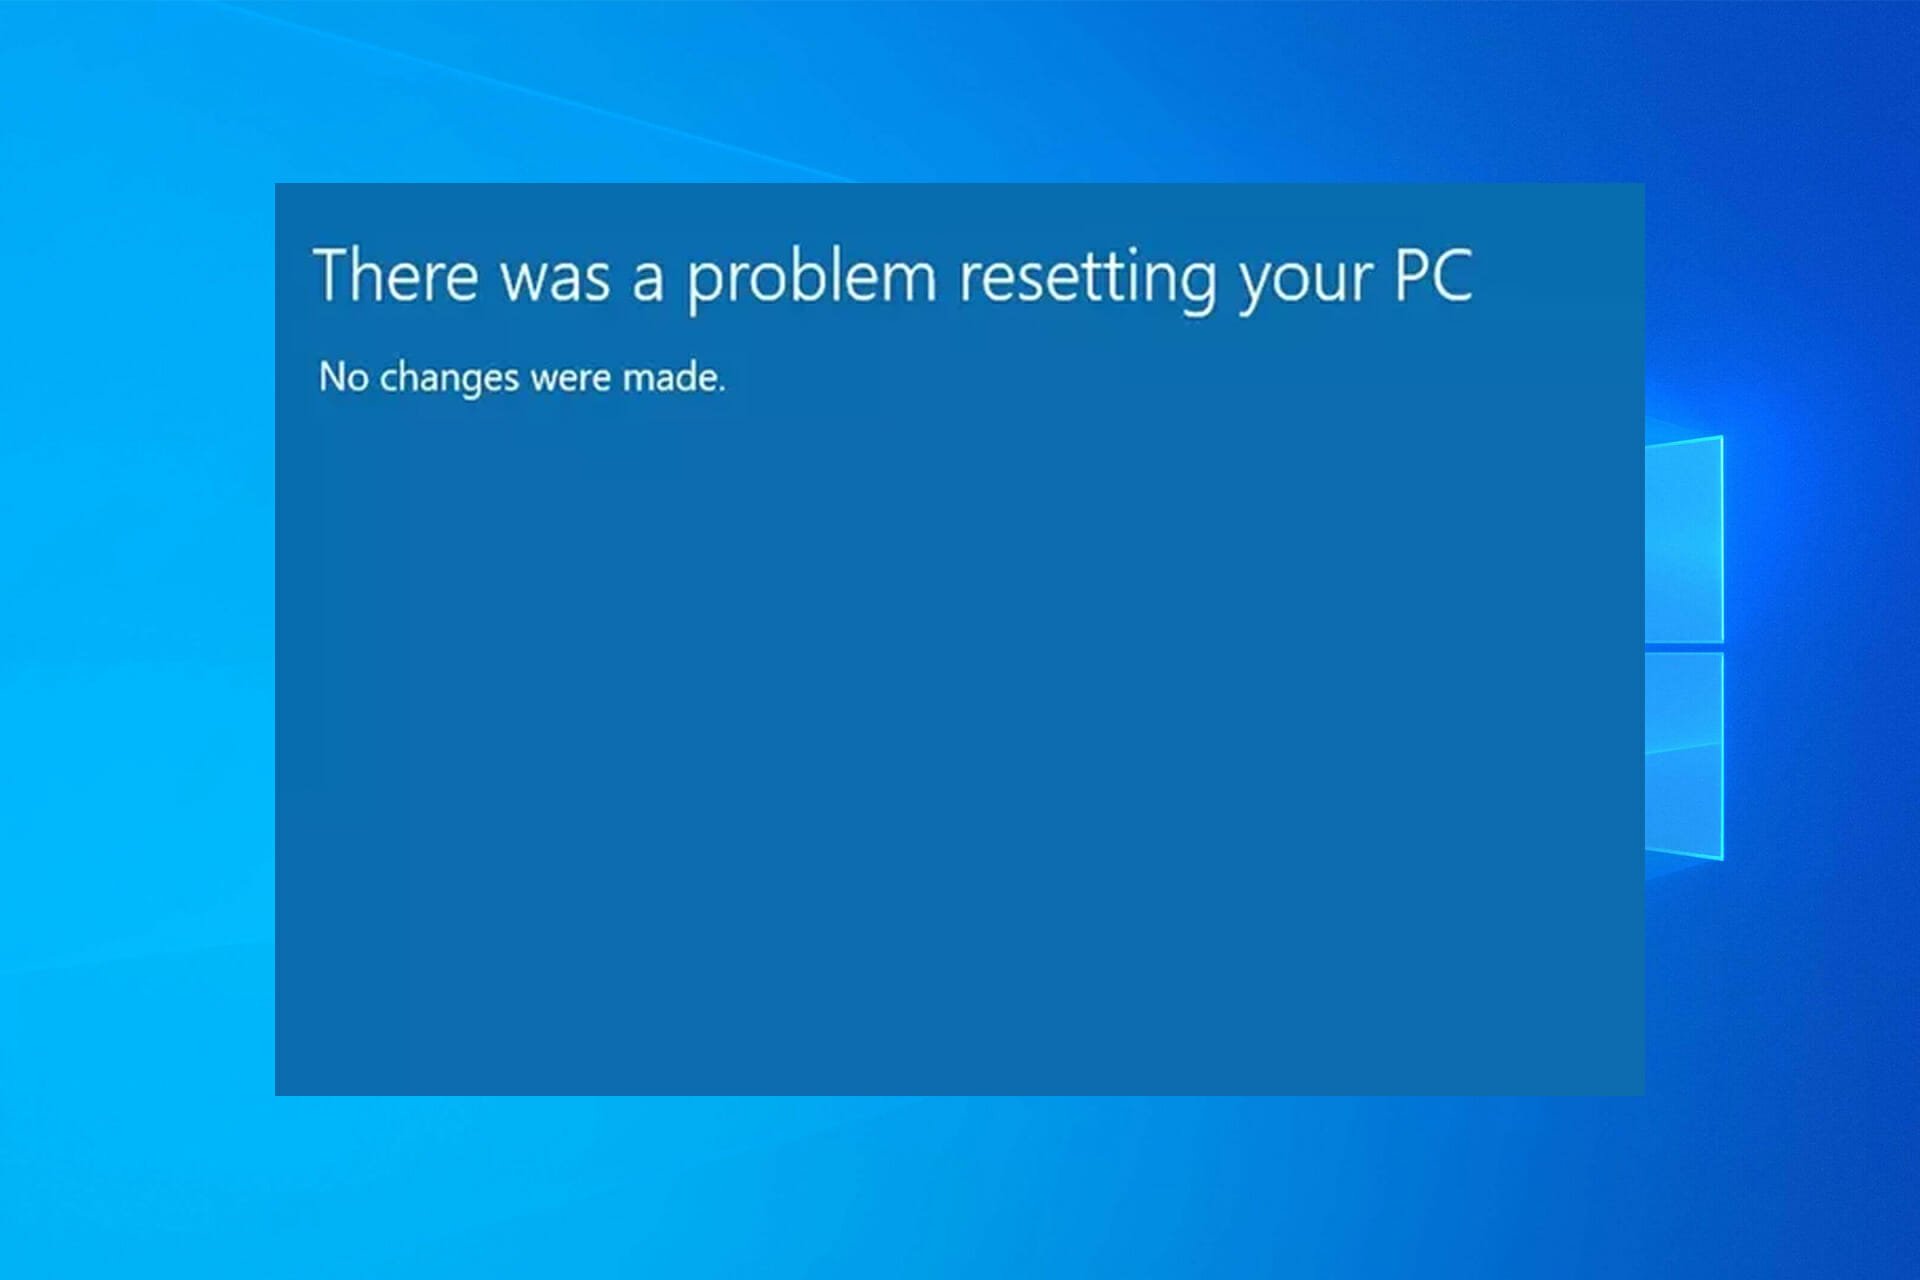
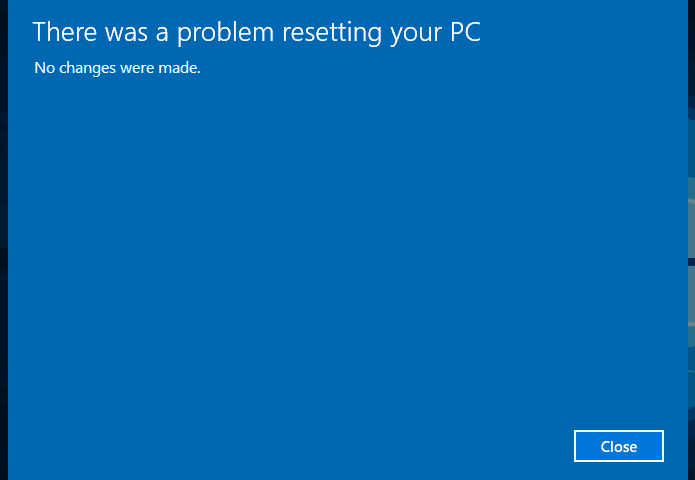
2. Endless Looping:

The reset process can sometimes get stuck in a loop, continuously restarting without completing the installation. This can be caused by:

  • Corrupted system files: Damaged files crucial for the reset process can prevent it from progressing.
  • Hardware incompatibility: Certain hardware components might not be compatible with the reset process, leading to conflicts.
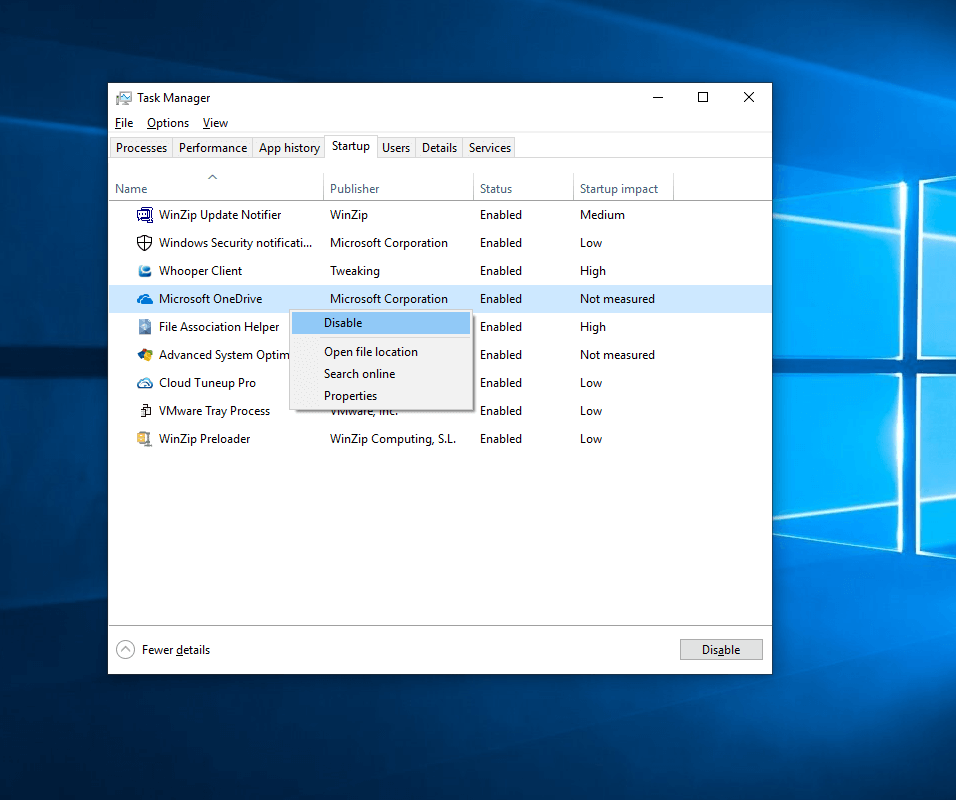
  • Third-party software interference: Programs installed on the computer might interfere with the reset process, particularly if they are not designed to be compatible with the new installation.

3. Data Loss:

While the "Keep My Files" option during a reset aims to preserve personal data, it is not foolproof.

  • Incomplete data transfer: Certain files might not be transferred correctly during the reset process, resulting in data loss.
  • Data corruption: The reset process can unintentionally corrupt existing files, rendering them inaccessible.
  • External storage limitations: If the computer is using an external storage device for the reset, insufficient space or a faulty device can lead to data loss.

4. Driver Issues:

After the reset, the computer might encounter driver issues, leading to:

  • Hardware malfunctions: Missing or incompatible drivers can cause certain hardware components to malfunction.
  • Performance problems: Incorrect or outdated drivers can lead to performance degradation and system instability.
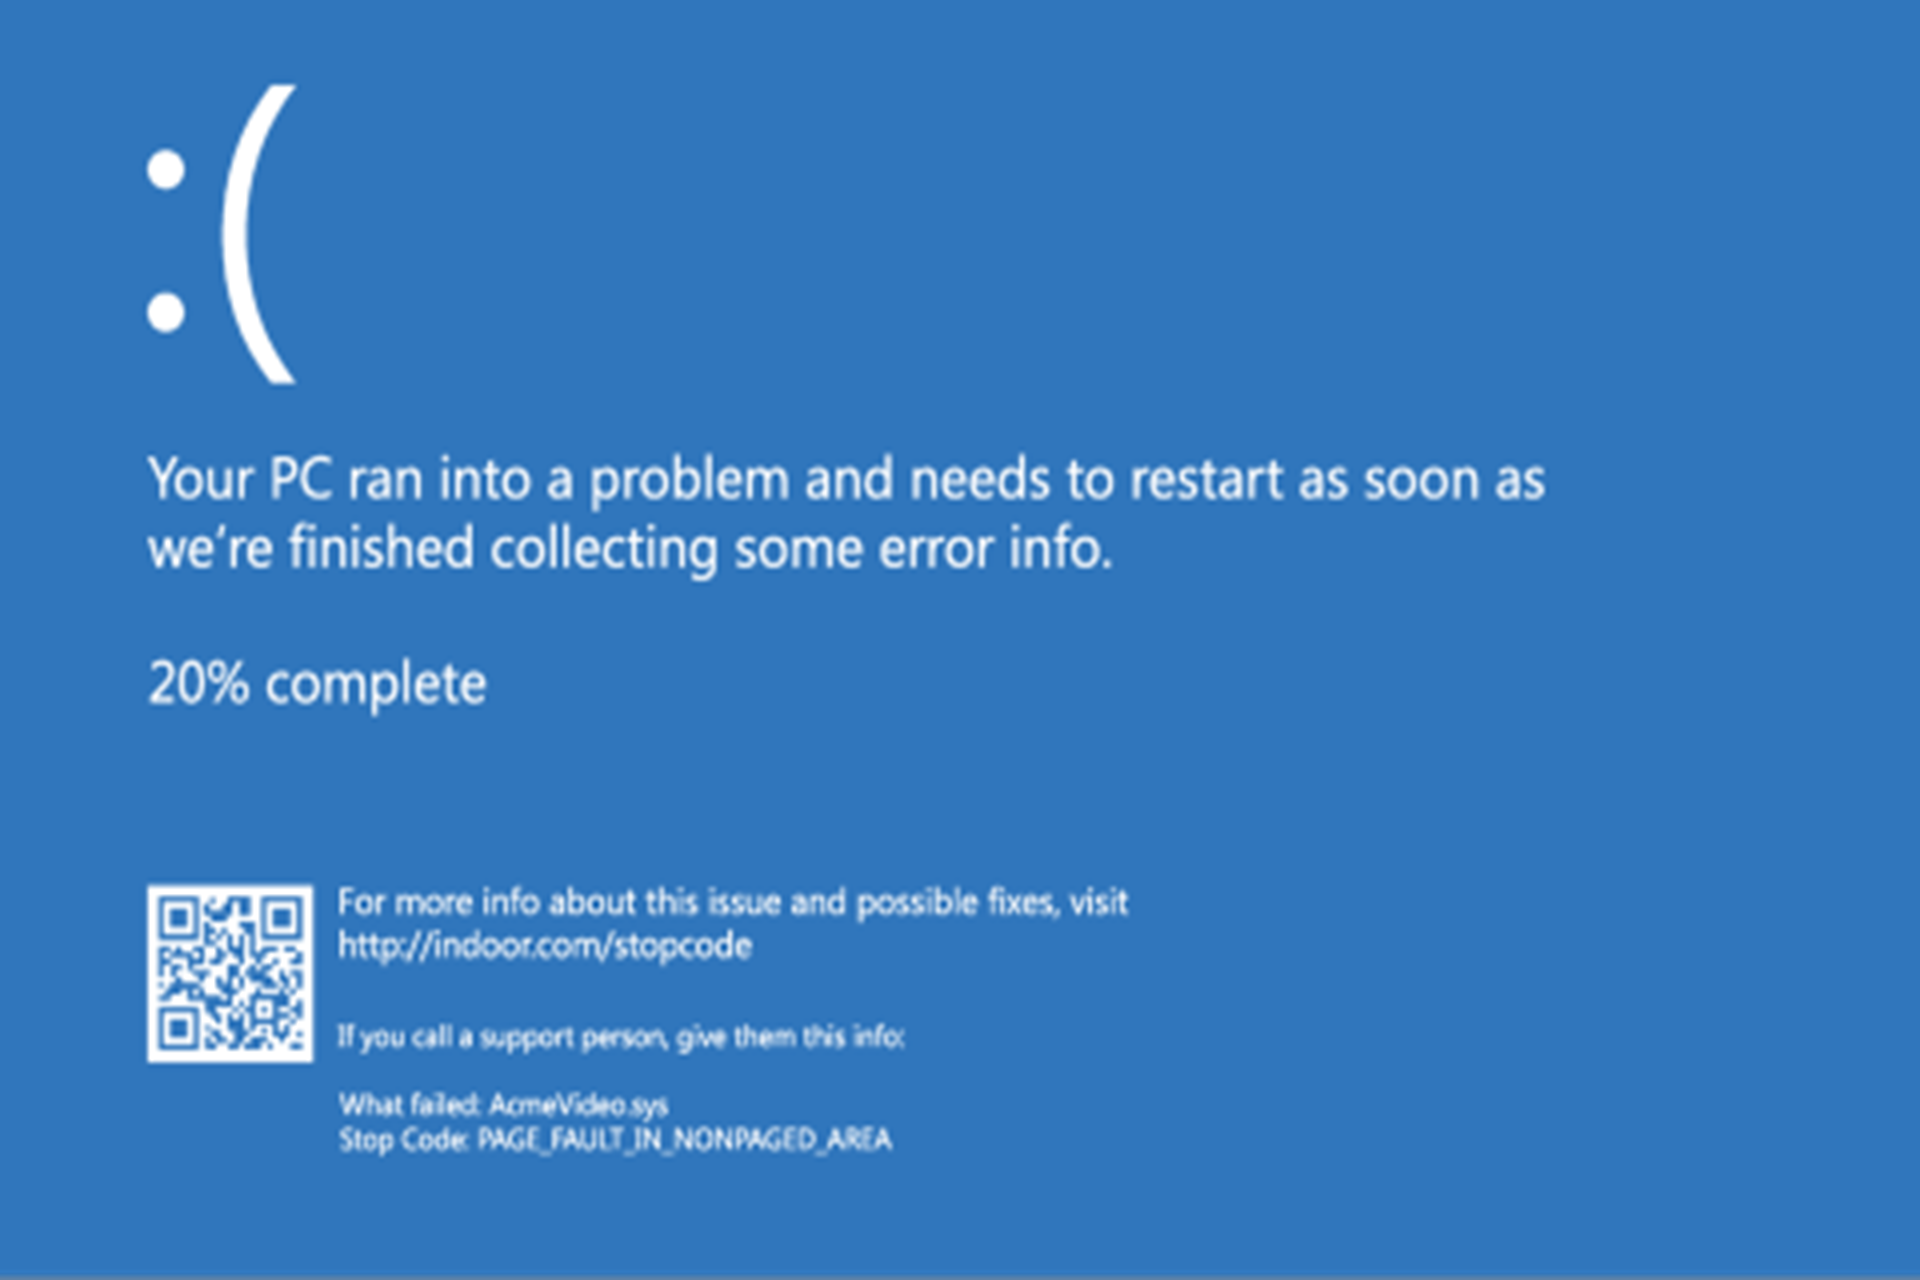
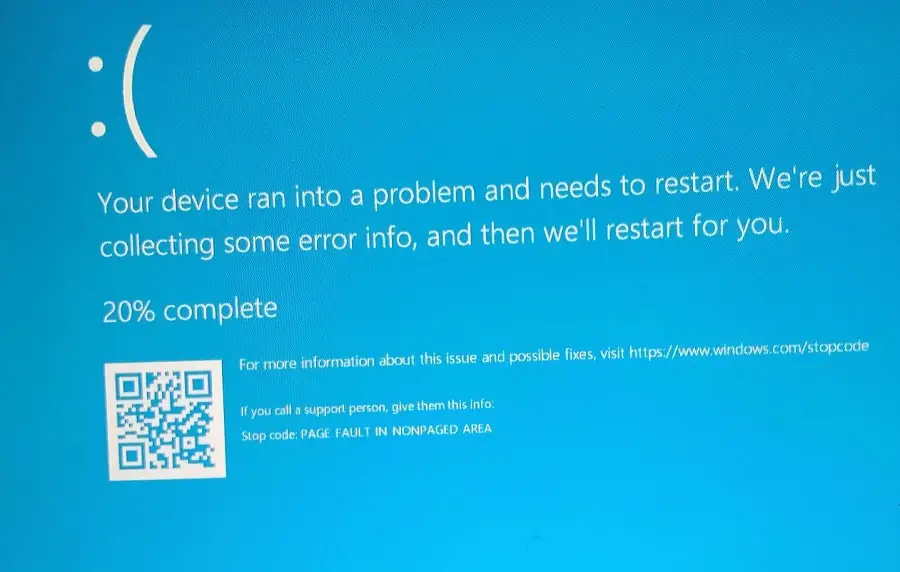
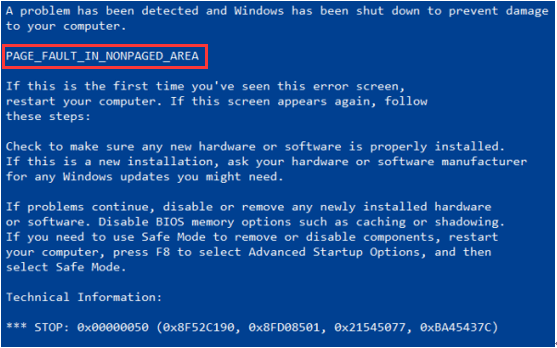
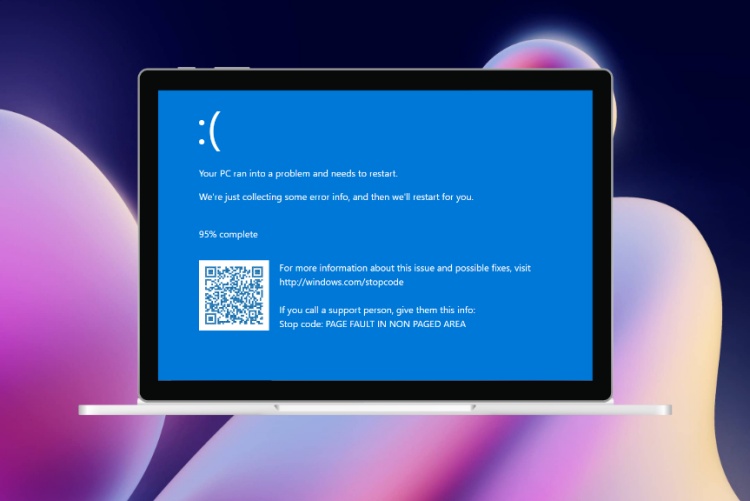
  • Blue Screen of Death (BSOD): Driver errors can trigger a BSOD, interrupting system operation.

5. Activation Problems:

  • Invalid Product Key: If the product key used for the initial installation is not valid, the reset might fail to activate Windows.
  • Digital License Issues: Problems with the digital license associated with the computer can hinder activation after a reset.

Solutions and Mitigation Strategies:

1. Troubleshooting Error Codes:

  • Run the Windows Update Troubleshooter: This tool can diagnose and resolve common issues with the Windows Update process.
  • Check for corrupted system files: Use the System File Checker (SFC) tool to scan and repair corrupted files.
  • Run the DISM tool: The Deployment Image Servicing and Management (DISM) tool can repair corrupted system images.

2. Addressing Endless Looping:

  • Boot into Safe Mode: Safe Mode starts Windows with a minimal set of drivers, potentially allowing the reset to complete.
  • Perform a clean install: If the reset is stuck, consider a clean install, which completely erases the hard drive and installs a fresh copy of Windows.
  • Check for hardware issues: Test individual hardware components to identify and resolve any potential conflicts.

3. Protecting Data:

  • Back up data before the reset: Use a reliable backup solution to create a complete copy of important files.
  • Use an external storage device: Store backup data on a separate hard drive or cloud storage service.
  • Check the reset options carefully: Understand the difference between keeping files and performing a clean install before proceeding.

4. Driver Management:

  • Download drivers beforehand: Find and download the latest drivers for all hardware components before starting the reset.
  • Use the Windows Update service: Enable automatic driver updates to ensure the computer is running the latest drivers.
  • Check for driver updates manually: Visit the manufacturer’s website to download the most recent drivers for specific hardware components.

5. Activation Solutions:

  • Verify the Product Key: Ensure the product key is valid and correctly entered during the reset process.
  • Troubleshoot digital license issues: Use the Windows Activation Troubleshooter to resolve any problems with the digital license.
  • Contact Microsoft support: If activation issues persist, contact Microsoft support for assistance.

FAQs:

Q: What is the difference between "Keep My Files" and "Remove Everything" during a reset?

A: "Keep My Files" preserves personal data, such as documents, pictures, and music, while reinstalling Windows. However, it might not transfer all files correctly or could corrupt existing data. "Remove Everything" erases all data from the hard drive and performs a clean installation.

Q: Can I reset Windows 11 without a USB drive?

A: Yes, you can reset Windows 11 from within the operating system itself. However, using a USB drive with a bootable Windows installation media can be more reliable and offer more options, including a clean install.

Q: What happens to my installed applications after a reset?

A: All installed applications will be removed during a reset. You will need to reinstall them after the reset is complete.

Q: Will I lose my personal files if I choose "Remove Everything"?

A: Yes, choosing "Remove Everything" will erase all data from the hard drive, including personal files.

Tips:

  • Check for system updates: Ensure your computer has the latest Windows updates before attempting a reset.
  • Create a backup: Always create a complete backup of important data before performing a reset.
  • Use a bootable USB drive: Consider using a USB drive with a bootable Windows installation media for a more reliable reset process.
  • Test individual hardware components: If encountering issues, test hardware components to rule out potential conflicts.
  • Contact Microsoft support: If problems persist, contact Microsoft support for assistance.

Conclusion:

Resetting Windows 11 can be a valuable tool for resolving various system issues. However, it is crucial to understand the potential pitfalls and be prepared to address them effectively. By carefully considering the options, creating backups, and troubleshooting potential problems, users can navigate the reset process with greater confidence and achieve a stable and functional Windows 11 experience.

Resetting Windows 11 PC from Boot When It Won’t Boot  July 2024 How To Reset Wsa To Fix Problems On Windows 11 Purein - vrogue.co Can’t factory reset Windows 10/11? Try 4 ways to fix it
Windows 11 Bugs You Still Have to Worry About - Auslogics blog Navigating the Labyrinth of Success (AI Generated) Stock Illustration - Illustration of depth PC reset won't work: Here's how you can fix this issue
Navigating the Labyrinth: An Executive Guide to Data Management (English Edition) eBook Navigating the lobby labyrinth: A guide to transparency and ethics for MEPs  ALTER-EU

Closure

Thus, we hope this article has provided valuable insights into Navigating the Labyrinth: Common Issues with Resetting Windows 11. We hope you find this article informative and beneficial. See you in our next article!

Optimizing Windows 10 Startup: A Comprehensive Guide To Managing Unnecessary Programs

Optimizing Windows 10 Startup: A Comprehensive Guide to Managing Unnecessary Programs

Introduction

In this auspicious occasion, we are delighted to delve into the intriguing topic related to Optimizing Windows 10 Startup: A Comprehensive Guide to Managing Unnecessary Programs. Let’s weave interesting information and offer fresh perspectives to the readers.

Optimizing Windows 10 Startup: A Comprehensive Guide to Managing Unnecessary Programs

How to Optimize Windows 10 for Best Performance (2022)

Windows 10, like any operating system, relies on a variety of programs and services to function correctly. However, some of these programs might not be essential for daily operations and can contribute to slow startup times and reduced system performance. Managing these programs, often referred to as "startup programs," is crucial for maintaining a smooth and efficient user experience.

Understanding Startup Programs

When you turn on your computer, Windows 10 initiates a sequence of processes to load the operating system and launch essential applications. These processes are collectively referred to as the "startup process." Some programs are designed to run automatically at startup, either for convenience or to provide necessary background services.

While some startup programs are essential, others might be unnecessary or even detrimental to system performance. These programs can:

  • Increase boot time: Programs launching at startup consume system resources and slow down the boot process, delaying access to your computer.
  • Reduce available memory: Startup programs consume valuable RAM, potentially affecting the performance of other applications running concurrently.
  • Create security risks: Certain startup programs might be malicious or contain vulnerabilities that can compromise system security.

Methods for Managing Startup Programs

Windows 10 offers several methods for managing startup programs, each with its unique advantages:

1. Task Manager

Task Manager is a built-in tool that provides a comprehensive view of running processes and allows users to manage startup programs effectively.

  • Accessing Task Manager: Right-click the taskbar and select "Task Manager" or use the keyboard shortcut Ctrl+Shift+Esc.
  • Managing Startup Programs: Navigate to the "Startup" tab. This tab displays a list of programs configured to run at startup, along with their publisher and impact on startup time. You can disable any program by right-clicking it and selecting "Disable."
  • Benefits: Task Manager provides a clear visual representation of startup programs and their impact on system performance. It is a simple and accessible method for managing startup programs.

2. System Configuration (msconfig)

System Configuration, often referred to as "msconfig," is a powerful tool for advanced system settings, including managing startup programs.

  • Accessing System Configuration: Search for "msconfig" in the Windows search bar and select the top result.
  • Managing Startup Programs: Navigate to the "Startup" tab. This tab provides a comprehensive list of programs and services configured to run at startup. You can disable specific programs by unchecking their corresponding boxes.
  • Benefits: System Configuration offers more detailed control over startup processes, including the ability to manage services and boot options. It is ideal for users seeking advanced customization options.

3. Settings App

The Windows Settings app provides a streamlined interface for managing various system settings, including startup programs.

  • Accessing Settings: Click the Start menu and select "Settings" or use the keyboard shortcut Windows key + I.
  • Managing Startup Programs: Navigate to "Apps" and then "Startup." This section displays a list of programs configured to run at startup. You can toggle the switch next to each program to enable or disable it.
  • Benefits: The Settings app offers a simple and user-friendly interface for managing startup programs, making it suitable for beginners.

4. Third-Party Tools

Several third-party tools are available to assist in managing startup programs. These tools often offer advanced features such as:

  • Detailed analysis: Analyze startup programs and their impact on system performance.
  • Automated optimization: Identify and disable unnecessary startup programs automatically.
  • Real-time monitoring: Monitor system performance and identify programs causing slowdowns.

Important Considerations

While managing startup programs can improve system performance, it’s essential to exercise caution:

  • Essential Programs: Avoid disabling programs that are crucial for system functionality or specific applications you rely on.
  • Security Software: Do not disable antivirus or firewall programs, as they are essential for system security.
  • Driver Updates: Ensure that your system drivers are up-to-date, as outdated drivers can lead to performance issues.

Benefits of Managing Startup Programs

  • Faster Boot Times: By eliminating unnecessary programs, you can significantly reduce the time it takes for your computer to start up.
  • Improved Performance: Reduced startup programs translate to more available system resources, leading to smoother performance and faster application loading times.
  • Enhanced Security: By disabling potentially malicious programs, you can reduce the risk of security threats and malware infections.
  • Increased Battery Life: For laptop users, managing startup programs can extend battery life by reducing the energy consumed by unnecessary processes.

FAQs

1. Can I permanently disable startup programs?

Yes, you can permanently disable startup programs using the methods described above. However, consider the potential consequences of disabling essential programs.

2. Is it safe to disable all startup programs?

No, disabling all startup programs is not recommended. Essential programs like antivirus software and system services are crucial for system functionality and security.

3. How can I identify unnecessary startup programs?

You can identify unnecessary startup programs by analyzing their publisher, description, and impact on startup time. Programs you don’t recognize or haven’t used recently are likely candidates for disabling.

4. Will disabling startup programs affect my applications?

Disabling startup programs might affect the functionality of certain applications that rely on those programs for background services or integration.

5. Can I re-enable disabled startup programs?

Yes, you can re-enable disabled startup programs using the same methods you used to disable them.

Tips

  • Regularly Review Startup Programs: Periodically review your startup programs to ensure they are still necessary and not impacting performance.
  • Use a Third-Party Tool: Consider using a third-party tool for advanced analysis and automation of startup program management.
  • Monitor System Performance: Keep an eye on your system performance after disabling startup programs to ensure that the changes are beneficial.
  • Back Up Your System: Before making significant changes to your startup programs, create a system restore point or backup your system to prevent unintended consequences.

Conclusion

Managing startup programs is an essential aspect of optimizing Windows 10 performance. By identifying and disabling unnecessary programs, users can significantly improve boot times, enhance system performance, and reduce the risk of security threats. However, it’s crucial to exercise caution and avoid disabling essential programs that are critical for system functionality. By carefully managing startup programs, users can ensure a smoother and more efficient Windows 10 experience.

Optimizing Windows 10 2 Quick Ways to optimize Windows 10/11 startup 7 Settings You Should Optimize After Installing Windows 10 - Make Tech Easier
Optimizing Windows 10 How to Manage Startup Programs in Windows 10 [Tutorial] How To Remove Unnecessary Files/Trash  Manage Startup Programs  Optimize Drive - YouTube
Windows 10 optimization program - fusepooterMy Site Disable Unnecessary Startup Programs and Services - AvoidErrors

Closure

Thus, we hope this article has provided valuable insights into Optimizing Windows 10 Startup: A Comprehensive Guide to Managing Unnecessary Programs. We hope you find this article informative and beneficial. See you in our next article!

A Comprehensive Guide To PhotoStory For Windows 11: Creating Engaging Visual Narratives

A Comprehensive Guide to PhotoStory for Windows 11: Creating Engaging Visual Narratives

Introduction

With enthusiasm, let’s navigate through the intriguing topic related to A Comprehensive Guide to PhotoStory for Windows 11: Creating Engaging Visual Narratives. Let’s weave interesting information and offer fresh perspectives to the readers.

A Comprehensive Guide to PhotoStory for Windows 11: Creating Engaging Visual Narratives

Guide to Photostory ppt download

The digital age has revolutionized the way we share stories, and with the advent of powerful software tools, creating captivating visual narratives has become more accessible than ever before. While many platforms cater to video editing, there exists a niche tool that excels in crafting simple yet impactful slideshows: PhotoStory. While not officially available for Windows 11, its legacy and functionality continue to resonate with users seeking a user-friendly and intuitive approach to storytelling.

Understanding the Legacy of PhotoStory

PhotoStory, initially released as a free application for Windows XP, quickly gained popularity for its simplicity and accessibility. It empowered users to transform still images into engaging slideshows, complete with transitions, music, and narration. This ease of use attracted a wide audience, including educators, families, and individuals seeking to preserve memories or showcase their work.

The Evolution of PhotoStory

Despite its popularity, PhotoStory was discontinued by Microsoft in 2006. However, its legacy lived on through various community-driven projects and alternative solutions. While Microsoft no longer offers an official version for Windows 11, several avenues exist to access and utilize its functionality:

  • PhotoStory 3 for Windows XP: This version remains accessible for download and use on Windows XP, though compatibility with newer operating systems may be limited.
  • Third-Party Alternatives: Various software programs, such as Windows Movie Maker, iMovie, and Animoto, offer similar features and capabilities to PhotoStory, catering to diverse levels of expertise and project needs.
  • Online Tools: Websites like Animoto and Slidesgo provide user-friendly online platforms for creating slideshows with minimal technical knowledge.

The Enduring Value of PhotoStory

Despite its discontinued status, PhotoStory continues to hold value for several reasons:

  • Ease of Use: The software’s intuitive interface makes it accessible to users of all technical backgrounds, allowing anyone to create compelling slideshows without extensive learning curves.
  • Focus on Storytelling: PhotoStory emphasizes the narrative aspect of slideshow creation, guiding users to structure their images and add narration to create a cohesive story.
  • Nostalgia and Sentimentality: For many, PhotoStory evokes a sense of nostalgia, reminding them of a simpler time when creating slideshows was a beloved pastime.

Exploring the Functionality of PhotoStory

While PhotoStory’s interface may appear basic, it offers a surprising array of features for creating visually engaging slideshows:

  • Image Import: PhotoStory allows users to import images from various sources, including digital cameras, scanners, and hard drives.
  • Image Editing: Basic editing tools enable users to adjust image brightness, contrast, and color balance, enhancing the visual appeal of their slideshows.
  • Transitions: A variety of transitions, including fades, wipes, and zooms, can be applied between images, adding visual interest and flow to the slideshow.
  • Music Integration: Users can incorporate background music from their own libraries or utilize royalty-free tracks provided by PhotoStory.
  • Narration: PhotoStory allows users to record narration directly into the slideshow, adding a personal touch and enhancing the storytelling experience.
  • Text Overlays: Text can be added to individual slides, providing context, captions, or additional information.

Beyond the Basics: Tips for Effective PhotoStory Use

While PhotoStory’s simplicity is its strength, several tips can elevate the quality and impact of your slideshows:

  • Story Structure: Plan your slideshow’s narrative arc beforehand, ensuring a clear beginning, middle, and end.
  • Image Selection: Choose images that are visually appealing and relevant to your story, considering composition, lighting, and subject matter.
  • Transition Choice: Select transitions that flow naturally between images, avoiding jarring or distracting effects.
  • Music Selection: Choose music that complements the mood and tone of your slideshow, enhancing the emotional impact.
  • Narration Style: Speak clearly and confidently, ensuring your voice is audible and engaging.
  • Text Placement: Use text sparingly and strategically, ensuring it is legible and doesn’t distract from the images.

FAQs: Addressing Common Queries

Q: Is PhotoStory still available for download?

A: While Microsoft no longer officially offers PhotoStory, it can be found through various online sources. However, be cautious of potential malware or outdated versions.

Q: What are some alternatives to PhotoStory?

A: Several alternatives exist, including Windows Movie Maker, iMovie, Animoto, and online tools like Slidesgo.

Q: Can I use PhotoStory on Windows 11?

A: While PhotoStory was designed for earlier Windows versions, it may be possible to run it on Windows 11 using compatibility modes or virtual machines. However, compatibility is not guaranteed.

Q: Are there any limitations to PhotoStory?

A: PhotoStory’s features are limited compared to professional video editing software. It lacks advanced editing tools, special effects, and video integration capabilities.

Conclusion: A Legacy of Storytelling

Despite its discontinued status, PhotoStory’s legacy as a user-friendly and accessible storytelling tool endures. While newer alternatives offer more advanced features, PhotoStory continues to hold value for its simplicity, focus on narrative, and nostalgic appeal. Its enduring popularity demonstrates the power of simple tools in empowering users to create engaging visual narratives, showcasing memories, and sharing stories with the world.

Guide to Photostory ppt download Creating an Online Narrative for my Photostory – fspeedps The Art And Science Of Mapstyle: Crafting Visual Narratives - Best Map Software for Windows
PhotoStory - Download PhotoStory 3.1, 3.0.1115.11 for Windows Best Slideshow Makers for Windows 11 - Free/Paid Photostory deluxe: Simple & Easy! Create Slideshows in Minutes
Exposure Review & Tutorial: Creating Stunning Visual Stories Made Easy (Exposure Lifetime Deal Engaging Visual Narratives: Storytelling through Design

Closure

Thus, we hope this article has provided valuable insights into A Comprehensive Guide to PhotoStory for Windows 11: Creating Engaging Visual Narratives. We hope you find this article informative and beneficial. See you in our next article!

Razer 7.1 Surround Sound Windows 11

razer 7.1 surround sound windows 11

Introduction

With great pleasure, we will explore the intriguing topic related to razer 7.1 surround sound windows 11. Let’s weave interesting information and offer fresh perspectives to the readers.

Unlocking Immersive Audio: Razer 7.1 Surround Sound in Windows 11

Razer 7.1 surround sound  Razer Insider

Razer 7.1 surround sound, a hallmark of the company’s gaming peripherals, has become synonymous with immersive audio experiences. This technology, designed to replicate the spatial characteristics of sound, elevates the gaming experience by creating a virtual environment that envelops the user. With the advent of Windows 11, the integration of Razer 7.1 surround sound has reached new heights, offering unparalleled audio fidelity and a more refined user experience.

The Essence of Surround Sound

Surround sound, in its essence, aims to recreate a three-dimensional soundscape, mimicking the natural way sound travels in the real world. This is achieved by utilizing multiple speakers strategically positioned around the listener, each delivering a distinct audio channel. By manipulating the timing and volume of sound across these channels, a sense of depth and direction is created, effectively immersing the listener in the audio environment.

Razer 7.1: A Virtual Masterpiece

While traditional surround sound systems require dedicated speakers, Razer 7.1 takes a different approach. It utilizes software processing to simulate a multi-speaker setup using just two audio output channels. This virtual surround sound technology, implemented through Razer’s proprietary software, analyzes the incoming audio signal and distributes it across the virtual speaker array, creating the illusion of a surround sound environment.

The Windows 11 Advantage

Windows 11, with its focus on enhanced audio capabilities, provides a perfect platform for Razer 7.1 surround sound. The operating system’s advanced audio processing engine and support for spatial audio formats like Dolby Atmos and Windows Sonic seamlessly integrate with Razer’s software, delivering an unparalleled level of audio immersion.

Benefits of Razer 7.1 Surround Sound in Windows 11

The integration of Razer 7.1 surround sound in Windows 11 yields a multitude of benefits for gamers, content creators, and audio enthusiasts alike:

  • Enhanced Gaming Experience: Razer 7.1 transforms the gaming experience by creating a more immersive and realistic soundscape. Players can pinpoint the location of enemies with greater accuracy, hear subtle environmental cues, and fully immerse themselves in the game’s atmosphere.

  • Improved Content Creation: For content creators, Razer 7.1 offers a more accurate representation of the audio mix, enabling them to identify and address potential issues in their projects. This leads to a more polished and professional final product.

  • Enhanced Multimedia Consumption: Whether it’s watching movies, listening to music, or attending virtual meetings, Razer 7.1 elevates the multimedia experience by creating a more engaging and immersive audio environment.

  • Accessibility for All: Razer 7.1 can be implemented on a wide range of devices, from gaming headsets to laptop speakers, making immersive audio accessible to everyone.

Setting Up Razer 7.1 Surround Sound in Windows 11

Setting up Razer 7.1 surround sound in Windows 11 is a straightforward process:

  1. Download and Install Razer Synapse: The Razer Synapse software is the central hub for configuring Razer peripherals, including the activation of 7.1 surround sound. Download and install the latest version from the official Razer website.

  2. Connect Your Razer Device: Connect your Razer headset or speakers to your computer. Windows 11 should automatically detect and install the necessary drivers.

  3. Configure Surround Sound: Open Razer Synapse and navigate to the audio settings for your connected device. Select "7.1 Surround Sound" from the available options.

  4. Customize Audio Settings: Razer Synapse provides a range of audio customization options, allowing users to adjust the sound balance, bass levels, and other settings to their preferences.

FAQs about Razer 7.1 Surround Sound in Windows 11

Q: What are the system requirements for using Razer 7.1 surround sound in Windows 11?

A: To utilize Razer 7.1 surround sound in Windows 11, you will need a computer with a compatible sound card or integrated audio chip, as well as a Razer headset or speakers with 7.1 surround sound capabilities.

Q: Can I use Razer 7.1 surround sound with any audio source?

A: Razer 7.1 surround sound works best with audio sources that are encoded in a multi-channel format, such as Dolby Digital or DTS. However, the software can also process stereo audio, creating a virtual surround sound experience.

Q: How do I troubleshoot issues with Razer 7.1 surround sound?

A: If you encounter issues with Razer 7.1 surround sound, try restarting your computer, reinstalling the Razer Synapse software, or updating your audio drivers. You can also consult the Razer support website for troubleshooting guides.

Q: Is Razer 7.1 surround sound compatible with all Windows 11 devices?

A: Razer 7.1 surround sound is compatible with most Windows 11 devices, but it is always recommended to check the device specifications to ensure compatibility.

Tips for Optimizing Razer 7.1 Surround Sound in Windows 11

  • Use a High-Quality Headset or Speakers: For the best audio experience, invest in a high-quality Razer headset or speakers that are specifically designed for 7.1 surround sound.

  • Calibrate Your Audio Settings: Razer Synapse offers an audio calibration tool that can help you fine-tune the sound balance and adjust the virtual speaker positions to optimize the surround sound experience.

  • Experiment with Different Audio Profiles: Razer Synapse includes a variety of pre-configured audio profiles designed for different scenarios, such as gaming, music, and movies. Experiment with these profiles to find the best setting for your needs.

  • Consider Using Dolby Atmos or Windows Sonic: Windows 11 supports spatial audio formats like Dolby Atmos and Windows Sonic, which can further enhance the immersive audio experience provided by Razer 7.1 surround sound.

Conclusion

Razer 7.1 surround sound, when integrated with the audio capabilities of Windows 11, delivers an unparalleled immersive audio experience. By creating a virtual surround sound environment, this technology elevates the gaming, content creation, and multimedia consumption experience, providing users with a more realistic and engaging audio landscape. As technology continues to evolve, Razer 7.1 surround sound promises to remain a key driver of immersive audio experiences, further enhancing the way we interact with the digital world.

Razer Announces World's First True 7.1 Surround Sound Gaming Headset How to activate and use 7.1 Surround Sound Razer Surround 7.1 Virtual Surround Sound Software Free Download Full Version
Razer 7.1 Surround Sound - nehunter Razer Surround Sound 7.1 - Download Razer Surround Sound for Windows Программа 7.1 Surround Sound для виртуального объёмного звука наушников Razer
Razer Surround, software gratuito para dotar de sonido envolvente 7.1 a cualquier auricular estéreo Best Buy: Razer Tiamat 7.1 V2 Wired True Surround Sound Gaming Headset for PC Black RZ04

Closure

Thus, we hope this article has provided valuable insights into razer 7.1 surround sound windows 11. We hope you find this article informative and beneficial. See you in our next article!

QBittorrent: A Comprehensive Guide To Torrenting On Windows 11

QBittorrent: A Comprehensive Guide to Torrenting on Windows 11

Introduction

In this auspicious occasion, we are delighted to delve into the intriguing topic related to QBittorrent: A Comprehensive Guide to Torrenting on Windows 11. Let’s weave interesting information and offer fresh perspectives to the readers.

QBittorrent: A Comprehensive Guide to Torrenting on Windows 11

how to install qbittorrent on windows 11  how to install the qbittorrent on windows 10 - YouTube

In the realm of file sharing, torrenting remains a popular method for acquiring large files, particularly those not readily available through traditional download services. QBittorrent, a free and open-source BitTorrent client, offers a robust and user-friendly platform for managing torrent downloads on Windows 11. This article delves into the intricacies of QBittorrent, exploring its features, installation process, and advantages, ultimately providing a comprehensive guide for navigating the world of torrenting on Windows 11.

Understanding the Fundamentals of BitTorrent

Before embarking on the journey of QBittorrent, it is crucial to grasp the core principles of the BitTorrent protocol. Unlike traditional download methods, where a user downloads a file directly from a server, BitTorrent utilizes a peer-to-peer (P2P) network. This means that instead of relying on a single source, users download pieces of a file from multiple peers simultaneously.

This distributed approach offers several advantages:

  • Faster Downloads: As multiple peers contribute parts of the file, download speeds are significantly enhanced, particularly for large files.
  • Reduced Server Load: The burden of hosting the file is distributed across multiple users, alleviating pressure on central servers.
  • Increased Availability: Files remain accessible even if the original source becomes unavailable, ensuring long-term availability.

Introducing QBittorrent: A Powerful and User-Friendly Torrent Client

QBittorrent stands out as a reliable and feature-rich BitTorrent client, catering to both novice and experienced users. Its open-source nature guarantees transparency and security, while its user-friendly interface makes it accessible to a wide audience.

Key Features of QBittorrent:

  • Intuitive Interface: QBittorrent boasts a clean and intuitive interface, simplifying the process of managing torrents. Users can easily add, pause, resume, and remove downloads, navigate through torrent details, and monitor download progress.
  • Built-in Torrent Search: QBittorrent eliminates the need for external search engines, providing a built-in search function that allows users to locate and download torrents directly within the application.
  • Advanced Download Management: QBittorrent offers granular control over download settings, enabling users to prioritize specific torrents, limit download speed, schedule downloads, and configure various other parameters.
  • Secure and Private: QBittorrent prioritizes user privacy by not collecting personal data or engaging in intrusive advertising. It also supports encryption protocols, ensuring secure file transfers.
  • Cross-Platform Compatibility: QBittorrent is available on multiple platforms, including Windows, macOS, Linux, and FreeBSD, allowing users to access their downloads from various devices.
  • Open-Source and Free: QBittorrent is entirely free to use and its open-source nature ensures transparency and community-driven development.

Downloading and Installing QBittorrent on Windows 11

Installing QBittorrent on Windows 11 is a straightforward process:

  1. Visit the Official Website: Navigate to the official QBittorrent website (https://www.qbittorrent.org/).
  2. Download the Installer: Locate the appropriate installer for your Windows 11 system (32-bit or 64-bit) and download it.
  3. Run the Installer: Double-click the downloaded installer file to initiate the installation process.
  4. Follow the Instructions: Follow the on-screen instructions, selecting your preferred installation location and language.
  5. Launch QBittorrent: Once the installation is complete, launch QBittorrent from the Start menu or your desktop shortcut.

Navigating the QBittorrent Interface

QBittorrent’s user interface is designed for simplicity and efficiency. Upon launch, you will be greeted with the main window, displaying various sections:

  • Toolbar: Contains essential buttons for adding torrents, starting/stopping downloads, and accessing settings.
  • Torrent List: Displays a list of all active and completed torrents, along with their progress, download speed, and other relevant information.
  • Details Panel: Provides detailed information about the selected torrent, including its size, number of peers, and file list.
  • Bottom Panel: Displays the overall download and upload speed, as well as the amount of data transferred.

Using QBittorrent to Download Torrents

  1. Adding Torrents:
    • Magnet Links: Copy and paste a magnet link into the "Add Torrent" field in the toolbar.
    • Torrent Files: Drag and drop a torrent file onto the QBittorrent window.
  2. Setting Download Preferences:
    • Download Location: Choose the desired location to save downloaded files.
    • Download Speed: Limit download speed to avoid network congestion.
    • File Prioritization: Prioritize specific files for faster download.
  3. Managing Downloads:
    • Pause/Resume: Pause or resume downloads as needed.
    • Remove Torrents: Delete completed or unwanted torrents.
    • Search for Torrents: Use the built-in search function to find torrents.

Understanding Torrent File Types

Torrents come in various file types, each serving a specific purpose:

  • .torrent: This is the primary file type for torrent downloads. It contains information about the file, including its name, size, and location of peers.
  • .magnet: A magnet link is a URL that points to a torrent without requiring a separate .torrent file.
  • .zip, .rar, .iso: These are common file extensions for compressed files or disc images, often downloaded via torrents.

Tips for Optimizing QBittorrent Performance

  • Choose a Reliable Internet Connection: A stable and fast internet connection is crucial for optimal download speeds.
  • Use a VPN: A VPN can enhance privacy and security while torrenting, masking your IP address and encrypting your traffic.
  • Limit Download Speed: Set a reasonable download speed limit to prevent network congestion and ensure smooth operation of other applications.
  • Prioritize Important Files: Prioritize downloading specific files within a torrent to ensure their faster completion.
  • Keep QBittorrent Up-to-Date: Regularly update QBittorrent to benefit from bug fixes and security improvements.

Frequently Asked Questions (FAQs)

Q: Is QBittorrent legal to use?

A: QBittorrent itself is legal. However, the legality of downloading specific content through torrents depends on copyright laws and the nature of the file. It is crucial to respect copyright laws and download only legal content.

Q: Is QBittorrent safe to use?

A: QBittorrent is generally safe to use, as it is an open-source application with a strong security track record. However, it is always recommended to use a VPN for added privacy and security while torrenting.

Q: How do I choose a reliable torrent source?

A: Choose reputable torrent websites with a strong community and a history of providing safe and verified torrents. Avoid websites with questionable reputations or suspicious content.

Q: What are the risks associated with torrenting?

A: Torrenting carries certain risks, including:

  • Malware and Viruses: Malicious files can be disguised as legitimate downloads, potentially infecting your computer.
  • Copyright Infringement: Downloading copyrighted material without permission is illegal and can lead to legal consequences.
  • Privacy Concerns: Your IP address and download activity can be tracked by third parties, compromising your privacy.

Conclusion

QBittorrent provides a robust and user-friendly platform for torrenting on Windows 11. Its open-source nature, comprehensive feature set, and intuitive interface make it a popular choice for users seeking a reliable and secure torrent client. By understanding the fundamentals of BitTorrent, navigating the QBittorrent interface, and adhering to responsible torrenting practices, users can leverage this powerful tool for downloading files efficiently and securely. Always prioritize safety, respect copyright laws, and use a VPN to enhance your online privacy while engaging in torrenting activities.

10 Best Torrent Clients for Windows 11 Download qBittorrent for Windows 11/10/8/7 (Latest version 2023) - Downloads Guru Qbittorrent windows - acakit
What is Torrenting and How Do Torrents Work? A Comprehensive Guide qBittorrent Free Download for Windows 10, 11, 7 (32 / 64-bit) This will Change Your Way of Using Internet  How To Install qBittorrent On Windows 11/10/8/7
Qbittorrent downloads  Best BitTorrent Clients for Windows 11  Windows Mode qBittorrent Review: A Torrenting Client for the Modern Age

Closure

Thus, we hope this article has provided valuable insights into QBittorrent: A Comprehensive Guide to Torrenting on Windows 11. We thank you for taking the time to read this article. See you in our next article!

Deciphering The "Page Fault In Nonpaged Area" Error In Windows 11: A Comprehensive Guide

Deciphering the "Page Fault in Nonpaged Area" Error in Windows 11: A Comprehensive Guide

Introduction

With enthusiasm, let’s navigate through the intriguing topic related to Deciphering the "Page Fault in Nonpaged Area" Error in Windows 11: A Comprehensive Guide. Let’s weave interesting information and offer fresh perspectives to the readers.

Deciphering the "Page Fault in Nonpaged Area" Error in Windows 11: A Comprehensive Guide

Page Fault in Nonpaged Area on Windows 11: 6 Tested Fixes

The "Page Fault in Nonpaged Area" error in Windows 11 is a cryptic message that often throws users into a state of confusion and uncertainty. This error, while seemingly intimidating, is a symptom of underlying issues within the operating system’s memory management mechanisms. Understanding the root causes of this error is crucial for effective troubleshooting and ensuring the smooth operation of your Windows 11 system.

Understanding Memory Management in Windows

To comprehend the "Page Fault in Nonpaged Area" error, we must first delve into the fundamental workings of memory management in Windows. The operating system utilizes a sophisticated system known as virtual memory. This system allows applications to access more memory than physically available by utilizing a combination of RAM and hard disk space.

Virtual memory is divided into two distinct areas:

  • Paged Area: This area encompasses memory pages that are actively being used by applications. These pages can be swapped in and out of RAM as needed, utilizing hard disk space for temporary storage.
  • Nonpaged Area: This area houses crucial system files and data that are considered essential for the operating system’s core functionalities. These pages remain permanently resident in RAM, ensuring continuous access for critical operations.

The "Page Fault in Nonpaged Area" Error: A Closer Look

The "Page Fault in Nonpaged Area" error signals a failure to access a critical system component within the nonpaged area of memory. This failure can be triggered by a variety of factors, including:

  • Damaged or Corrupted System Files: Critical system files residing in the nonpaged area can become corrupted due to malware infections, hardware failures, or software conflicts. These corrupted files can lead to access errors, resulting in the "Page Fault in Nonpaged Area" message.
  • Hardware Malfunctions: Faulty RAM modules, defective hard drives, or malfunctioning motherboard components can disrupt the smooth functioning of memory access. These hardware issues can lead to errors in accessing the nonpaged area, triggering the error message.
  • Driver Conflicts or Errors: Incompatible or faulty device drivers can interfere with memory access, causing conflicts that result in the "Page Fault in Nonpaged Area" error.
  • System Overloads: Excessive resource consumption by applications or background processes can lead to memory shortages. This can force the system to attempt accessing the nonpaged area, potentially causing errors.
  • Improperly Configured System Settings: Incorrect memory management settings or conflicting system configurations can lead to memory access errors, triggering the "Page Fault in Nonpaged Area" message.

Troubleshooting Strategies for the "Page Fault in Nonpaged Area" Error

Troubleshooting this error requires a systematic approach, focusing on identifying and resolving the underlying cause. Here’s a comprehensive guide to help you address this issue:

  1. Check for Hardware Issues: Start by assessing the physical hardware components involved in memory access. Perform the following steps:

    • Run Memory Diagnostics: Utilize the Windows Memory Diagnostic tool to scan your RAM for errors. This tool can identify faulty memory modules that could be contributing to the error.
    • Check Hard Drive Health: Use tools like CrystalDiskInfo or SMART utilities to evaluate the health of your hard drive. A failing hard drive can cause memory access errors.
    • Verify System Components: Inspect your system’s components for any signs of damage or loose connections. Ensure that all components are securely installed and functioning properly.
  2. Identify and Resolve Driver Issues: Faulty or incompatible device drivers can be a significant source of memory access errors. Follow these steps:

    • Update Drivers: Ensure that all your device drivers are up-to-date. Visit the manufacturer’s website for the latest driver versions.
    • Rollback Drivers: If recent driver updates have coincided with the error, consider rolling back to a previous driver version.
    • Disable Problematic Drivers: If you suspect a specific driver is causing the issue, temporarily disable it to see if the error persists.
  3. Scan for Malware and Viruses: Malware infections can corrupt system files, including those residing in the nonpaged area. Run a thorough scan using reputable antivirus software to eliminate any potential threats.

  4. Repair Corrupted System Files: Use the System File Checker (SFC) tool to scan and repair corrupted system files. This can help address issues caused by damaged files in the nonpaged area.

  5. Perform a Clean Boot: A clean boot starts Windows with a minimal set of drivers and services. This helps isolate the source of the error by eliminating unnecessary software conflicts.

  6. Check System Settings: Review your system’s memory management settings and ensure they are configured appropriately. Consider adjusting virtual memory settings or checking for conflicting configurations.

  7. Run a System Restore: If the error persists, consider performing a system restore to a previous point in time when the system was operating correctly. This can revert your system to a stable state before the error occurred.

  8. Reinstall Windows: As a last resort, reinstalling Windows can resolve issues caused by deep-seated system corruption or persistent hardware conflicts.

FAQs Related to "Page Fault in Nonpaged Area" Error

Q: What are the potential consequences of ignoring this error?

A: Ignoring this error can lead to system instability, crashes, data loss, and ultimately, complete system failure. It is crucial to address the underlying cause to maintain system stability and prevent further complications.

Q: Can this error be caused by insufficient RAM?

A: While insufficient RAM can contribute to general system slowdowns and performance issues, it is not the primary cause of the "Page Fault in Nonpaged Area" error. This error specifically indicates a problem accessing critical system components within the nonpaged area, which is always resident in RAM.

Q: Is this error specific to Windows 11?

A: No, this error can occur in previous versions of Windows as well. It is a general system error that can arise due to a variety of factors, regardless of the specific operating system version.

Q: Can I fix this error without reinstalling Windows?

A: In many cases, the error can be resolved without resorting to a complete Windows reinstall. The troubleshooting steps outlined above provide a comprehensive approach to identify and address the underlying cause, often eliminating the need for a clean installation.

Tips for Preventing the "Page Fault in Nonpaged Area" Error

  • Regularly Update Drivers: Keep your device drivers updated to ensure compatibility and stability.
  • Run Regular System Scans: Perform regular malware and virus scans to prevent system corruption.
  • Monitor System Health: Use system monitoring tools to track resource usage and identify potential bottlenecks or memory issues.
  • Perform Regular System Maintenance: Run disk cleanup and defragmentation tools to optimize system performance and prevent file corruption.
  • Back Up Your Data: Create regular backups of your important data to protect against potential data loss.

Conclusion

The "Page Fault in Nonpaged Area" error in Windows 11 is a critical indicator of underlying system issues. By understanding the root causes and employing the appropriate troubleshooting strategies, you can effectively address this error and restore your system’s stability. Regular system maintenance, driver updates, and vigilant security practices are essential for preventing this error and ensuring the smooth operation of your Windows 11 system.

FIX: Page Fault in Nonpaged area error in Windows 11 - YouTube PAGE_FAULT_IN_NONPAGED_AREA in Windows 11 (9 solutions) How to Fix Stop code Page Fault in Nonpaged Area Windows 10, 11 - YouTube
Page_fault_in_nonpaged_area Windows 11 PAGE_FAULT_IN_NONPAGED_AREA Windows 11 SOLUCION ️ - YouTube Page_fault_in_nonpaged_area Windows 11
Page_fault_in_nonpaged_area Windows 11 How to Fix 'Page Fault in Nonpaged Area' BSOD Error in Windows 10/11  Beebom

Closure

Thus, we hope this article has provided valuable insights into Deciphering the "Page Fault in Nonpaged Area" Error in Windows 11: A Comprehensive Guide. We hope you find this article informative and beneficial. See you in our next article!

Windows 10: A Comprehensive Overview Of Microsoft’s Flagship Operating System

Windows 10: A Comprehensive Overview of Microsoft’s Flagship Operating System

Introduction

With great pleasure, we will explore the intriguing topic related to Windows 10: A Comprehensive Overview of Microsoft’s Flagship Operating System. Let’s weave interesting information and offer fresh perspectives to the readers.

Windows 10: A Comprehensive Overview of Microsoft’s Flagship Operating System

Microsoft Windows 10 Operating System

Windows 10, released in 2015, represents the latest iteration of Microsoft’s flagship operating system. It is designed to power a wide range of devices, from personal computers and laptops to tablets and smartphones. This operating system has been a significant departure from its predecessors, introducing a user-friendly interface, enhanced security features, and a focus on cloud integration.

Key Features and Benefits:

1. User Interface and Experience:

Windows 10 boasts a modern and intuitive user interface, with a focus on ease of navigation and accessibility. The Start Menu, a familiar feature from previous Windows versions, has been redesigned with a live tile interface, allowing users to quickly access frequently used applications and information. The Taskbar, a central hub for open applications and system tools, remains a key element of the user experience.

2. Enhanced Security:

Windows 10 emphasizes security through features like Windows Defender, a built-in antivirus solution, and Windows Hello, a biometric authentication system that uses facial recognition or fingerprint scanning for secure login. The operating system also incorporates security updates and patches, delivered automatically to keep devices protected against emerging threats.

3. Cloud Integration:

Windows 10 leverages cloud integration for seamless user experiences. OneDrive, Microsoft’s cloud storage service, allows users to store and access their files from any device. The operating system also integrates with other Microsoft services, such as Office 365, ensuring a cohesive and productive work environment.

4. Cortana, the Digital Assistant:

Cortana, Microsoft’s voice-activated digital assistant, is a prominent feature of Windows 10. Users can interact with Cortana to perform tasks like setting reminders, searching the web, and controlling smart home devices. Cortana’s integration with the operating system provides a convenient and hands-free way to manage tasks.

5. Universal Apps:

Windows 10 supports universal apps, designed to function seamlessly across different devices. This allows developers to create apps that can run on PCs, tablets, and smartphones, offering users a unified experience across platforms.

6. Gaming and Entertainment:

Windows 10 is a popular platform for gaming and entertainment. The operating system features DirectX 12, a graphics API that delivers enhanced performance and visual fidelity in games. The Windows Store offers a wide selection of games, movies, and TV shows, catering to diverse entertainment preferences.

7. Updates and Upgrades:

Microsoft regularly releases updates for Windows 10, ensuring that users have access to the latest features, security enhancements, and bug fixes. The operating system also offers free upgrades to newer versions, ensuring that users have access to the latest capabilities.

Frequently Asked Questions (FAQs):

Q: What are the system requirements for Windows 10?

A: The system requirements for Windows 10 vary depending on the edition and desired features. Generally, a 1 GHz processor, 1 GB RAM for 32-bit or 2 GB RAM for 64-bit, and 16 GB of free hard disk space are recommended.

Q: Is Windows 10 free?

A: While Windows 10 was initially offered as a free upgrade for users of Windows 7 and 8.1, it is now available for purchase. However, Microsoft offers a free version of Windows 10 called Windows 10 Home in S mode, which is restricted to apps from the Microsoft Store.

Q: How do I upgrade to Windows 10?

A: You can upgrade to Windows 10 by downloading the installation files from Microsoft’s website and following the on-screen instructions. Alternatively, you can purchase a Windows 10 license and install it on your device.

Q: What are the different editions of Windows 10?

A: Windows 10 is available in several editions, including Home, Pro, Enterprise, and Education. Each edition offers different features and functionalities to cater to specific user needs.

Tips for Using Windows 10:

1. Customize Your Start Menu:

Personalize your Start Menu by pinning frequently used applications, organizing tiles, and adjusting the layout to suit your preferences.

2. Explore the Settings App:

The Settings app provides a centralized location to configure various aspects of your Windows 10 experience, including privacy settings, network connections, and display options.

3. Utilize Cortana:

Take advantage of Cortana’s capabilities to manage tasks, set reminders, and search the web using voice commands.

4. Use Universal Apps:

Explore the Windows Store and download universal apps that offer a seamless experience across different devices.

5. Stay Updated:

Ensure that your Windows 10 system is up-to-date by installing the latest security updates and feature upgrades.

Conclusion:

Windows 10 has emerged as a powerful and user-friendly operating system, offering a wide range of features and benefits. Its intuitive interface, enhanced security measures, cloud integration, and support for universal apps make it a compelling choice for both personal and professional use. Microsoft’s ongoing commitment to delivering updates and upgrades ensures that Windows 10 remains a relevant and robust platform for the foreseeable future.

Windows OS: The Evolution, Features, and Popularity of Microsoft’s Flagship Operating System Microsoft Unveils Windows 10 — The Next Version Of Windows Operating system Windows 10#Operating System - YouTube
Microsoft Windows 10 Comprehensive - STANZATEXTBOOKS The Evolution of Microsoft's Operating Systems: Windows 10 and Windows 11 Windows 10 S: Microsoft launches new operating system  The Independent  The Independent
History And Evolution Of Windows Operating System - The Best Picture History Celebrating the release of Windows 10 - the evolution of the Windows logo  GWS Media

Closure

Thus, we hope this article has provided valuable insights into Windows 10: A Comprehensive Overview of Microsoft’s Flagship Operating System. We appreciate your attention to our article. See you in our next article!

Removing The Windows Copilot Icon From The Taskbar: A Comprehensive Guide

Removing the Windows Copilot Icon from the Taskbar: A Comprehensive Guide

Introduction

With enthusiasm, let’s navigate through the intriguing topic related to Removing the Windows Copilot Icon from the Taskbar: A Comprehensive Guide. Let’s weave interesting information and offer fresh perspectives to the readers.

Removing the Windows Copilot Icon from the Taskbar: A Comprehensive Guide

How to Remove Copilot icon from Taskbar in Windows 11 - YouTube

Microsoft’s Windows Copilot, a powerful AI assistant integrated into Windows 11, aims to enhance productivity and user experience. However, for some users, the persistent presence of the Copilot icon on the taskbar might be perceived as intrusive or unnecessary. This guide provides a comprehensive understanding of how to remove this icon, addressing its potential benefits and exploring related considerations.

Understanding the Copilot Icon and its Purpose

The Copilot icon, typically displayed as a blue "C" symbol, serves as a gateway to the AI-powered features of Windows Copilot. It allows users to initiate interactions with the assistant directly from the taskbar, enabling quick access to features like:

  • Text generation: Creating documents, emails, or code snippets using natural language prompts.
  • Information retrieval: Searching the web, accessing local files, or retrieving data from various applications.
  • Task management: Setting reminders, creating to-do lists, and managing calendar entries.
  • Contextual assistance: Providing relevant information and suggestions based on the user’s current activity.

Benefits of Removing the Copilot Icon

While Copilot offers valuable features, its constant presence on the taskbar might not be desirable for all users. Removing the icon can provide several benefits:

  • Minimized visual clutter: A cleaner taskbar with fewer icons can enhance visual clarity and reduce distractions, particularly for users who prefer a minimalist interface.
  • Enhanced focus: By removing the icon, users can avoid unintentional interactions with Copilot, enabling them to concentrate on their primary tasks without interruptions.
  • Personalized control: Removing the icon allows users to customize their taskbar experience according to their individual preferences and workflow requirements.
  • Reduced resource consumption: While minimal, removing the icon may slightly reduce the system resources dedicated to maintaining the Copilot presence on the taskbar, potentially improving overall system performance.

Methods for Removing the Copilot Icon

There are two primary methods for removing the Copilot icon from the Windows 11 taskbar:

1. Using the Taskbar Settings:

  • Navigate to Settings: Open the Windows Settings app by pressing the Windows key + I.
  • Access Taskbar Settings: Click on "Personalization" and then select "Taskbar" from the left-hand menu.
  • Manage Taskbar Icons: Scroll down to "Taskbar icons" and click on "System icons."
  • Toggle Copilot: Locate the Copilot icon and toggle the switch to the "Off" position.

2. Using the Windows Registry:

  • Open Registry Editor: Press the Windows key + R, type "regedit," and press Enter.
  • Navigate to the relevant key: Go to the following path: HKEY_CURRENT_USERSOFTWAREMicrosoftWindowsCurrentVersionExplorerTaskband.
  • Create a new DWORD value: Right-click in the right pane, select "New," and choose "DWORD (32-bit) Value."
  • Name the value: Name the newly created value "UseTaskbandCopilot."
  • Modify the value: Double-click the "UseTaskbandCopilot" value, set its "Value data" to "0," and click "OK."

Important Considerations

  • Functionality remains: Removing the icon from the taskbar does not disable Copilot. Users can still access its features through the Start menu, the search bar, or by using the keyboard shortcut "Win + C."
  • Potential for future updates: Microsoft may introduce changes to Copilot’s functionality and integration with the taskbar in future updates. The methods described above may require adjustments depending on these updates.

Frequently Asked Questions (FAQs)

Q: Will removing the Copilot icon affect my ability to use Copilot?

A: No, removing the icon does not disable Copilot. You can still access its features through the Start menu, the search bar, or by using the keyboard shortcut "Win + C."

Q: Is there a way to permanently disable Copilot?

A: Currently, there is no official method to permanently disable Copilot. However, by removing the icon, you can prevent it from appearing on the taskbar and avoid unintentional interactions.

Q: Can I customize the Copilot icon?

A: As of now, there is no option to customize the Copilot icon. You can only choose to hide or display it.

Q: Will removing the icon impact my system performance?

A: The impact on system performance is likely minimal, as the icon’s presence is not a significant resource drain. However, removing it may slightly improve overall performance by reducing the resources dedicated to maintaining its presence on the taskbar.

Tips for Optimizing the Copilot Experience

  • Explore the Copilot features: Familiarize yourself with the various features of Copilot to maximize its potential benefits.
  • Use natural language prompts: Copilot is designed to understand natural language, so use clear and concise prompts for optimal results.
  • Provide context: For better responses, provide Copilot with relevant context, such as the specific document or task you are working on.
  • Utilize the keyboard shortcut: Use the "Win + C" keyboard shortcut for quick access to Copilot without relying on the taskbar icon.

Conclusion

Removing the Windows Copilot icon from the taskbar is a matter of personal preference and workflow efficiency. It offers a cleaner visual experience and reduces potential distractions, but it does not disable Copilot’s functionality. By understanding the benefits and considerations involved, users can make an informed decision regarding the presence of the Copilot icon on their taskbar, optimizing their Windows 11 experience for maximum productivity and personalization.

How to remove copilot from taskbar windows 11  Disable copilot from taskbar windows 10 - YouTube How to Hide the Microsoft Copilot Button on Taskbar  Remove Copilot button from taskbar Windows Remove Windows Copilot button from taskbar on Windows 11 - YouTube
How to remove Copilot from Taskbar in Windows 11 How to remove Copilot icon from Taskbar in Windows 11  Umesh Krishnia  - YouTube How to Remove Copilot From Windows 11 Taskbar with a few steps
Add or remove Windows Copilot button on Windows 11 taskbar taskbar - Remove the new Copilot search icon from the Windows 11 task bar - Super User

Closure

Thus, we hope this article has provided valuable insights into Removing the Windows Copilot Icon from the Taskbar: A Comprehensive Guide. We thank you for taking the time to read this article. See you in our next article!

Photoimpression 4.0 Free Download

photoimpression 4.0 free download

Introduction

In this auspicious occasion, we are delighted to delve into the intriguing topic related to photoimpression 4.0 free download. Let’s weave interesting information and offer fresh perspectives to the readers.

PhotoImpression 4.0: A Comprehensive Overview of a Powerful Image Editing Tool

Arcsoft Photoimpression 4.0 Free Download - everhit

PhotoImpression 4.0, while not currently available for free download, represents a significant milestone in the history of image editing software. Its legacy continues to influence the modern landscape of digital image manipulation, offering a powerful suite of tools for users of all skill levels. While the software itself is no longer actively developed, understanding its features and impact on the industry provides valuable insights into the evolution of digital image editing.

Understanding PhotoImpression 4.0

PhotoImpression 4.0 was a popular image editing software released in the late 1990s. It was renowned for its user-friendly interface and comprehensive set of features, making it accessible to both beginners and experienced users.

Key Features of PhotoImpression 4.0

PhotoImpression 4.0 offered a wide range of tools for image manipulation, including:

  • Basic Image Editing: PhotoImpression 4.0 provided essential editing tools like cropping, resizing, rotating, and flipping images. Users could also adjust brightness, contrast, color balance, and sharpness to enhance the overall appearance of their images.
  • Advanced Image Editing: The software offered advanced features like color correction, noise reduction, and sharpening. Users could also apply various effects like blur, emboss, and vignette to their images, adding artistic flair.
  • Layers and Masks: PhotoImpression 4.0 introduced the concept of layers and masks, allowing users to work on different elements of an image independently. This facilitated non-destructive editing, enabling users to experiment with different effects without permanently altering the original image.
  • Text and Graphics: Users could add text and graphics to their images, customizing fonts, colors, and sizes. This feature allowed for creating personalized images for various purposes, such as greeting cards, invitations, or social media posts.
  • Filters and Effects: PhotoImpression 4.0 offered a variety of built-in filters and effects, allowing users to enhance their images with artistic touches. These filters could create a vintage look, add a soft focus, or create a more dramatic effect.
  • File Support: The software supported various image file formats, ensuring compatibility with different devices and applications.

Impact of PhotoImpression 4.0

PhotoImpression 4.0 played a crucial role in popularizing image editing among individuals and businesses alike. Its user-friendly interface and comprehensive features made it accessible to a wide audience, democratizing the process of image manipulation. The software’s influence can be seen in the development of modern image editing software, which often incorporates similar features and functionalities.

FAQs Regarding PhotoImpression 4.0

1. Is PhotoImpression 4.0 still available for download?

PhotoImpression 4.0 is no longer actively developed or supported. While older versions might be available on certain websites, it is important to exercise caution when downloading software from unknown sources.

2. What are the system requirements for PhotoImpression 4.0?

The system requirements for PhotoImpression 4.0 varied depending on the specific version. Generally, the software required a Windows operating system and a minimum of 16 MB of RAM.

3. Are there any alternatives to PhotoImpression 4.0?

Several modern image editing software packages offer similar features and functionalities to PhotoImpression 4.0. Some popular alternatives include Adobe Photoshop, GIMP, and Paint.NET.

4. Is PhotoImpression 4.0 compatible with modern operating systems?

PhotoImpression 4.0 was designed for older operating systems and might not be compatible with modern versions of Windows or macOS.

5. What are the limitations of PhotoImpression 4.0?

PhotoImpression 4.0 lacked advanced features found in modern image editing software, such as support for RAW images, advanced color management, and sophisticated layer manipulation.

Tips for Using PhotoImpression 4.0

While PhotoImpression 4.0 is no longer actively developed, users who still have access to the software can benefit from these tips:

  • Familiarize yourself with the interface: Spend time exploring the software’s various menus, toolbars, and options to understand its layout and functionality.
  • Experiment with different features: Try out various editing tools, filters, and effects to discover their capabilities and find those that best suit your needs.
  • Use layers effectively: Utilize layers to separate different elements of your images, allowing for non-destructive editing and experimentation.
  • Learn from tutorials and online resources: Several online tutorials and resources provide guidance on using PhotoImpression 4.0 effectively.

Conclusion

PhotoImpression 4.0, despite its age, remains a significant chapter in the history of image editing. Its influence on the industry is undeniable, paving the way for the sophisticated image editing software we use today. While the software itself is no longer actively developed, understanding its features and impact offers valuable insights into the evolution of digital image manipulation.

Arcsoft photoimpression 4.0 free download : poecaweal Arcsoft Photoimpression 4.0 Free Download ArcSoft PhotoImpression 4.0 Download (Free trial)
TÉLÉCHARGER ARCSOFT PHOTOIMPRESSION 4 ArcSoft PhotoImpression 4.0 Download (Free trial) Photoimpression 4 Free Full Version - cleverexcel
Free Arcsoft Photoimpression 4 Download - labfasr Скачать редактор фотографий. PhotoImpression 4

Closure

Thus, we hope this article has provided valuable insights into photoimpression 4.0 free download. We hope you find this article informative and beneficial. See you in our next article!

Navigating The Labyrinth: Troubleshooting Outlook Search Issues In Windows 11

Navigating the Labyrinth: Troubleshooting Outlook Search Issues in Windows 11

Introduction

In this auspicious occasion, we are delighted to delve into the intriguing topic related to Navigating the Labyrinth: Troubleshooting Outlook Search Issues in Windows 11. Let’s weave interesting information and offer fresh perspectives to the readers.

How to Fix Outlook Instant Search Problems in Windows 11 - PUPUWEB

Outlook, Microsoft’s ubiquitous email client, is a cornerstone of productivity for individuals and businesses alike. Its robust functionality, including its powerful search capabilities, allows users to efficiently navigate vast amounts of email data. However, encountering search issues in Outlook can significantly impede workflow, turning a simple task into a frustrating ordeal.

This article delves into the common culprits behind Outlook search malfunctions in Windows 11, providing a comprehensive guide to diagnosing and resolving these issues. We will explore a range of troubleshooting steps, from basic checks to more advanced solutions, empowering users to regain control over their email search experience.

The Importance of a Functional Outlook Search

The search function in Outlook serves as a vital tool for accessing and managing email data. It enables users to:

  • Locate specific emails: Quickly find emails based on sender, recipient, subject, keywords, or dates.
  • Filter and organize emails: Refine search results by specific criteria, allowing for efficient email management.
  • Retrieve attachments: Locate attachments within emails based on file type or keywords.
  • Conduct research: Find relevant information within emails for various projects or tasks.

When Outlook search malfunctions, these capabilities are compromised, leading to:

  • Increased time spent searching: Manually sifting through emails becomes necessary, wasting valuable time.
  • Reduced productivity: The inability to quickly access information hinders efficient task completion.
  • Missed deadlines: Crucial information may be overlooked due to the inability to find it promptly.
  • Frustration and dissatisfaction: The inability to efficiently manage emails can lead to frustration and a negative user experience.

Common Causes of Outlook Search Problems in Windows 11

Several factors can contribute to Outlook search issues in Windows 11. Understanding these causes is crucial for pinpointing the root of the problem and implementing the appropriate solution.

1. Indexing Issues:

Outlook relies on a search index to efficiently locate emails. If the index is corrupt, incomplete, or outdated, search results may be inaccurate or nonexistent. This can occur due to:

  • Incomplete Indexing: The initial indexing process may not have been completed successfully.
  • Corrupted Index: The index file can become corrupted due to software glitches, system errors, or hardware failures.
  • Outdated Index: Changes to the email data, such as new emails, deleted emails, or modified attachments, may not be reflected in the index.

2. Search Service Errors:

The Windows Search service plays a crucial role in enabling Outlook search functionality. If this service is not running or encounters errors, search operations will be affected.

3. Outlook Add-ins:

Certain Outlook add-ins can interfere with search functionality. These add-ins may modify email data or interfere with the indexing process, leading to search problems.

4. File System Errors:

Issues with the file system, such as corrupted files or disk errors, can also affect Outlook search functionality.

5. Antivirus Software Conflicts:

Antivirus software can sometimes interfere with Outlook’s search capabilities, especially when scanning email data or attachments.

6. Network Connectivity Issues:

If Outlook is unable to connect to the server or access email data due to network connectivity problems, search operations may fail.

7. Insufficient System Resources:

Insufficient system resources, such as RAM or disk space, can also hinder Outlook search performance.

Troubleshooting Outlook Search Issues in Windows 11

Addressing Outlook search problems requires a systematic approach, starting with basic checks and progressively moving towards more advanced solutions.

1. Basic Troubleshooting Steps:

  • Restart Outlook and Windows: Sometimes, a simple restart can resolve temporary glitches affecting search functionality.
  • Check Network Connectivity: Ensure a stable internet connection and verify that Outlook can access the email server.
  • Disable Add-ins: Temporarily disable all Outlook add-ins to see if they are interfering with search operations.
  • Rebuild Search Index: Rebuild the Outlook search index to ensure it is up-to-date and accurate. This can be done by going to File > Options > Search and clicking Rebuild Search Index.
  • Repair Outlook Installation: Repair the Outlook installation to fix any corrupt or missing files that may be causing search issues. This can be done by going to Control Panel > Programs and Features and selecting Repair for Microsoft Office.

2. Advanced Troubleshooting Steps:

  • Check Windows Search Service: Ensure the Windows Search service is running and configured correctly. This can be done by going to Windows Search in the Services window.
  • Run System File Checker (SFC) Scan: Run the SFC scan to check for and repair any corrupted system files that may be affecting Outlook search functionality.
  • Disable Antivirus Software: Temporarily disable antivirus software to see if it is interfering with Outlook search.
  • Check Disk Space: Ensure sufficient disk space is available for Outlook to function properly.
  • Run Outlook in Safe Mode: Start Outlook in Safe Mode to disable add-ins and other extensions that may be interfering with search.

3. Additional Tips:

  • Use Precise Search Terms: Use specific keywords and phrases when searching for emails to improve search accuracy.
  • Check Email Folder Structure: Ensure emails are organized in a logical folder structure to facilitate efficient searching.
  • Use Advanced Search Options: Utilize advanced search options, such as filters, date ranges, and sender/recipient filters, to refine search results.
  • Consider Alternative Search Tools: If troubleshooting efforts prove unsuccessful, consider using alternative search tools, such as the Windows Search bar or third-party email search applications.

FAQs on Outlook Search Issues in Windows 11

1. Why is my Outlook search not working after a Windows update?

Windows updates can sometimes introduce changes that affect Outlook search functionality. It’s crucial to rebuild the search index after a major update to ensure it reflects the latest changes.

2. Why are my search results not showing up?

Several factors can cause search results to disappear, including a corrupted index, indexing errors, or issues with the Windows Search service.

3. Why is my Outlook search slow?

Slow search performance can be attributed to factors such as a large mailbox size, insufficient system resources, or a fragmented search index.

4. Why am I unable to search for emails older than a specific date?

Outlook’s search function may have limitations in accessing emails older than a certain date. This can be due to indexing settings or limitations in the email server.

5. Why is my Outlook search not finding specific emails?

Search results may not be accurate due to indexing issues, incorrect search terms, or limitations in Outlook’s search functionality.

Conclusion

Outlook search issues in Windows 11 can be frustrating and disruptive to workflow. However, by understanding the common causes and implementing the troubleshooting steps outlined in this article, users can effectively diagnose and resolve these problems. From basic checks to advanced solutions, the guide provides a comprehensive approach to regaining control over Outlook search functionality and maximizing productivity. By following these steps, users can ensure that Outlook search continues to be a reliable and efficient tool for managing email data in Windows 11.

How to Fix: Outlook Search Not Working On Windows  WM Troubleshooting Outlook search issues - Microsoft Support How to Rebuild Your Search Index on Microsoft Outlook How to Fix Outlook Search Problems - YouTube
Outlook Search Not Working: Here’s What to Do - Troubleshooting Central How to resolve search problems in Microsoft Outlook  TechRepublic How to Fix Outlook Search Problems  Comprehensive Guide
How to Fix Outlook Search Problem How to fix: Outlook search problems (Search doesn't work or doesn't return all search results

Closure

Thus, we hope this article has provided valuable insights into Navigating the Labyrinth: Troubleshooting Outlook Search Issues in Windows 11. We appreciate your attention to our article. See you in our next article!