Archives January 2024

Navigating The Labyrinth: Recent Windows 10 Update Issues And Their Impact

Navigating the Labyrinth: Recent Windows 10 Update Issues and Their Impact

Introduction

In this auspicious occasion, we are delighted to delve into the intriguing topic related to Navigating the Labyrinth: Recent Windows 10 Update Issues and Their Impact. Let’s weave interesting information and offer fresh perspectives to the readers.

Latest Windows 10 Update Problems And How To Fix Them - vrogue.co

Windows 10, Microsoft’s flagship operating system, has undergone numerous updates since its inception. While these updates aim to improve system performance, security, and user experience, they have occasionally introduced new challenges for users. Recent updates have been particularly noteworthy for their impact on system stability, functionality, and user workflows.

This article delves into the recent Windows 10 update issues, analyzing their nature, impact, and the potential solutions available. It aims to provide a comprehensive overview of the challenges encountered by users and the strategies employed by Microsoft to address them.

A History of Update Troubles

Windows updates have historically been a source of both anticipation and anxiety for users. While updates promise new features, bug fixes, and enhanced security, they can also lead to unforeseen consequences.

Past updates have been associated with:

  • Blue Screen of Death (BSOD): This notorious error screen, often accompanied by a cryptic error code, has been a recurring problem for users encountering update-related issues.
  • Driver Conflicts: Updates can sometimes clash with existing drivers, leading to hardware malfunction, device incompatibility, and performance degradation.
  • Software Compatibility Issues: Updates can disrupt the functionality of existing software applications, leading to compatibility issues and requiring users to update or find alternative solutions.
  • Data Loss: While rare, update processes have been known to result in data loss, necessitating backups and data recovery efforts.

Recent Update Issues: A Closer Look

Recent Windows 10 updates, particularly those released in 2023, have presented a new set of challenges for users. These issues have been widely reported and discussed in online forums, tech communities, and even mainstream media.

1. Performance Degradation:

  • Slow Boot Times: Users have reported significantly slower boot times and system responsiveness after installing recent updates. This can be attributed to various factors, including resource-intensive updates, driver conflicts, or background processes consuming excessive resources.
  • Hardware Resource Utilization: Some users have experienced increased CPU, RAM, and storage utilization, even with minimal applications running. This can lead to system lag, slow application loading, and overall performance degradation.

2. Feature Inconsistencies:

  • Missing or Malfunctioning Features: Certain features, including built-in applications, settings, or system functionalities, have been reported as missing or malfunctioning after updates. This can range from minor annoyances to critical limitations impacting user workflows.
  • UI Glitches and Bugs: Updates have introduced UI glitches, such as inconsistent button behavior, text rendering errors, or unexpected window behavior. These issues can disrupt user experience and hinder productivity.

3. Security Concerns:

  • Increased Vulnerability: While updates are intended to enhance security, some users have expressed concerns about vulnerabilities introduced by recent updates. This highlights the importance of prompt updates to address security patches and mitigate potential risks.
  • Privacy Concerns: Updates have sometimes introduced changes to user privacy settings or data collection practices, leading to concerns about data security and user autonomy.

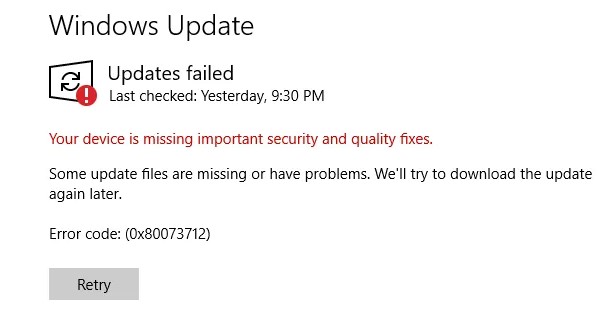
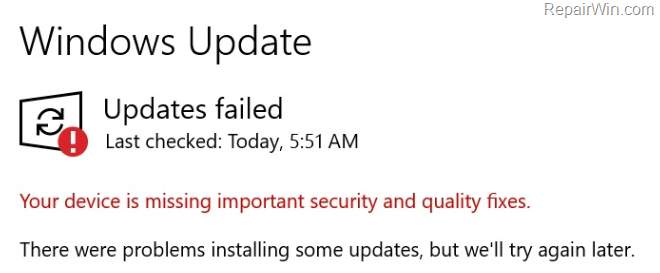
4. Update Installation Issues:

  • Failed Installations: Users have encountered frequent update installation failures, resulting in system instability, errors, and the inability to complete the update process.
  • Long Installation Times: Updates have become increasingly time-consuming, requiring extended periods of downtime and impacting user productivity.

The Impact of Update Issues

These recent update issues have had a significant impact on individual users and businesses alike.

  • Individual Users: Frustration, wasted time, and loss of productivity are common consequences of update issues. Users may need to spend hours troubleshooting problems, reinstalling software, or seeking technical support.
  • Businesses: Update issues can disrupt business operations, leading to downtime, lost revenue, and potential security risks. Businesses rely on stable and reliable systems to maintain productivity and customer satisfaction.

Microsoft’s Response and Solutions

Microsoft has acknowledged the recent update issues and has been actively working on addressing them. Their response has included:

  • Release of Patches and Updates: Microsoft has released numerous patches and updates to address specific issues reported by users. These updates aim to fix bugs, improve performance, and enhance system stability.
  • Communication and Transparency: Microsoft has improved communication with users through official channels, such as blog posts, support forums, and social media. They have provided updates on the status of ongoing issues and outlined steps being taken to resolve them.
  • Support and Resources: Microsoft has made available various support resources, including online documentation, troubleshooting guides, and dedicated support channels to assist users experiencing update issues.

Addressing Update Issues: User Actions

Users can take several proactive steps to mitigate the impact of update issues:

  • Regular Backups: Creating regular backups of important data can safeguard against data loss during update processes.
  • Software Updates: Ensure all software applications are up-to-date to minimize compatibility issues.
  • Driver Updates: Keep device drivers updated to ensure compatibility with the latest Windows updates.
  • System Restore Points: Create system restore points before installing major updates to allow for reverting to a previous state if necessary.
  • Phased Rollout: If possible, implement a phased rollout of updates within a business environment to minimize disruption and allow for monitoring and troubleshooting.
  • Reporting Issues: Report any encountered issues to Microsoft through official channels to contribute to the resolution process.

FAQs

Q: How often are Windows 10 updates released?

A: Windows 10 updates are released on a regular schedule, typically on the second Tuesday of every month. These updates include security patches, bug fixes, and feature updates.

Q: Are all Windows 10 updates mandatory?

A: While some updates are mandatory for security reasons, users can often choose to delay optional updates. However, it is generally recommended to install updates promptly to maintain system security and stability.

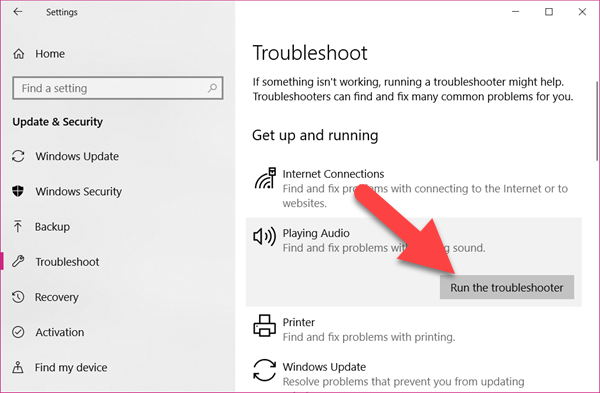
Q: What should I do if a Windows 10 update causes problems?

A: If an update causes issues, you can try troubleshooting steps such as restarting your computer, running a system scan, or using system restore to revert to a previous state. If these steps fail, you may need to contact Microsoft support for assistance.

Q: How can I prevent future update issues?

A: While preventing all update issues is impossible, you can minimize their impact by following best practices such as creating regular backups, keeping software and drivers updated, and reporting any encountered problems to Microsoft.

Tips

  • Disable automatic updates: You can temporarily disable automatic updates if you encounter recurring problems. This allows you to manually install updates after thorough testing.
  • Check for compatibility: Before installing an update, check for compatibility information and known issues on Microsoft’s website or online forums.
  • Monitor system performance: After installing an update, monitor system performance for any changes in boot times, resource utilization, or application responsiveness.

Conclusion

Windows 10 updates are a crucial part of maintaining system security, stability, and functionality. However, recent updates have introduced challenges for users, impacting system performance, features, and user experience. While Microsoft has been actively addressing these issues, users need to remain aware of potential problems and take proactive steps to mitigate their impact. By understanding the nature of recent update issues, staying informed about Microsoft’s response, and implementing preventative measures, users can navigate the labyrinth of Windows 10 updates with greater confidence and minimize disruption to their workflows.

Latest Windows 10 Update Problems And How To Fix Them - vrogue.co How to Fix Windows Update Problems - Tech Advisor How to fix Windows 10 Update Problems. - WinTips.org
Latest Windows 10 Update Problems and How to Fix Them - Make Tech Easier Navigating the Labyrinth: An Executive Guide to Data Management (English Edition) - eBooks em How to fix Windows Update problems in Windows 10
FIX: Windows 10 Update Troubleshooting Guide. • Repair Windows™ Latest Windows 10 Update Problems and How to Fix Them - Make Tech Easier

Closure

Thus, we hope this article has provided valuable insights into Navigating the Labyrinth: Recent Windows 10 Update Issues and Their Impact. We appreciate your attention to our article. See you in our next article!

Microsoft Word For Windows 10: A Comprehensive Guide To The Essential Word Processing Tool

Microsoft Word for Windows 10: A Comprehensive Guide to the Essential Word Processing Tool

Introduction

With great pleasure, we will explore the intriguing topic related to Microsoft Word for Windows 10: A Comprehensive Guide to the Essential Word Processing Tool. Let’s weave interesting information and offer fresh perspectives to the readers.

Microsoft Word for Windows 10: A Comprehensive Guide to the Essential Word Processing Tool

The Ultimate Microsoft Word: Essential Comprehensive Guide - StudyBullet.com

Microsoft Word, an integral part of the Microsoft Office suite, has become synonymous with word processing for individuals and businesses alike. Its extensive features, user-friendly interface, and compatibility across multiple platforms make it a powerful tool for creating, editing, and managing documents. This article delves into the intricacies of Microsoft Word for Windows 10, exploring its functionalities, benefits, and how it empowers users in various scenarios.

Understanding the Power of Microsoft Word

Microsoft Word is a versatile application with a broad spectrum of capabilities designed to cater to diverse needs. It enables users to:

  • Create and Edit Documents: From simple text files to complex documents with intricate formatting, Word provides a comprehensive set of tools for manipulating text, images, tables, and other elements.
  • Collaborate Effectively: Word facilitates seamless collaboration through features like real-time co-authoring, allowing multiple users to work on a document simultaneously.
  • Enhance Readability: Word offers a range of formatting options, including styles, fonts, and layout tools, enabling users to create visually appealing and easily readable documents.
  • Boost Productivity: Word’s extensive features, including templates, macros, and automation tools, streamline document creation and enhance user productivity.
  • Integrate with Other Applications: Word seamlessly integrates with other Microsoft Office applications like Excel and PowerPoint, facilitating data exchange and enhancing workflow efficiency.

Navigating the Microsoft Word Interface

The Microsoft Word interface, designed with user-friendliness in mind, provides a clear and intuitive layout.

  • Ribbon: The ribbon, located at the top of the application window, houses all the essential tools and commands organized into logical tabs like Home, Insert, Design, Layout, References, Mailings, Review, and View.
  • Quick Access Toolbar: The Quick Access Toolbar, located above the ribbon, offers shortcuts to frequently used commands like Save, Undo, and Redo.
  • Document Window: The main document window displays the content being worked on.
  • Status Bar: Located at the bottom of the window, the status bar provides information about the document, including page number, word count, and zoom level.

Exploring Key Features of Microsoft Word

Microsoft Word offers a wealth of features designed to empower users in various scenarios. Some of the key features include:

  • Text Formatting: Word provides a comprehensive set of tools for formatting text, including font selection, size, color, alignment, spacing, and indentation.
  • Paragraph Formatting: Users can easily adjust paragraph settings like spacing, alignment, indentation, and line breaks.
  • Lists and Numbering: Word simplifies the creation of bulleted and numbered lists for organized content presentation.
  • Tables: Word allows users to create and manipulate tables with various formatting options, including cell merging, borders, and shading.
  • Images and Graphics: Word supports the insertion and manipulation of images and graphics, allowing users to enhance the visual appeal of documents.
  • Headers and Footers: Users can easily add headers and footers to documents, including page numbers, dates, and document titles.
  • Styles: Word provides a range of pre-defined styles that can be applied to text and paragraphs for consistent formatting and a professional look.
  • Templates: Word offers a vast library of pre-designed templates for various document types, including letters, resumes, and reports.
  • Macros: Macros allow users to record and automate repetitive tasks, saving time and effort.
  • Mail Merge: Mail merge enables users to create personalized documents from a single template and a data source.
  • Collaboration Features: Word facilitates real-time co-authoring, allowing multiple users to work on a document simultaneously.
  • Track Changes: The Track Changes feature allows users to track edits made to a document, facilitating collaboration and revision management.
  • Comments: Word allows users to add comments to documents, facilitating discussion and feedback.
  • Spelling and Grammar Check: Word’s built-in spell and grammar checker helps users create error-free documents.
  • Find and Replace: The Find and Replace feature allows users to quickly locate and modify specific text within a document.
  • Thesaurus: Word’s built-in thesaurus helps users find synonyms for words, enriching their vocabulary and improving the quality of their writing.

Leveraging Microsoft Word for Enhanced Productivity

Microsoft Word’s powerful features can be leveraged to enhance productivity in various ways:

  • Efficient Document Creation: Word’s templates, styles, and automation tools streamline the document creation process, saving time and effort.
  • Effective Collaboration: Real-time co-authoring and collaboration features enable teams to work together seamlessly, improving efficiency and communication.
  • Improved Communication: Word’s formatting options and visual aids enhance the clarity and readability of documents, facilitating effective communication.
  • Streamlined Workflows: Word’s integration with other Microsoft Office applications and its automation capabilities streamline workflows, enhancing productivity and reducing errors.

FAQs About Microsoft Word for Windows 10

Q: What are the system requirements for Microsoft Word for Windows 10?

A: Microsoft Word requires a Windows 10 operating system and a compatible processor, RAM, and storage space. Specific system requirements may vary depending on the version of Word being used.

Q: How can I create a new document in Microsoft Word?

A: To create a new document, open Microsoft Word and click on the "Blank document" option in the "New" tab or press Ctrl+N.

Q: How do I save a document in Microsoft Word?

A: To save a document, click on the "File" tab and select "Save As" or press Ctrl+S. Choose a location and file name for the document and click "Save."

Q: How can I share a document with others?

A: You can share a document by clicking on the "File" tab and selecting "Share." Choose the sharing method, such as email, cloud storage, or a link, and follow the instructions.

Q: How do I use the Track Changes feature in Microsoft Word?

A: To use Track Changes, click on the "Review" tab and select "Track Changes." This will enable the feature, allowing you to see and manage edits made to the document.

Q: How can I insert an image into a Word document?

A: To insert an image, click on the "Insert" tab and select "Pictures." Choose the image file from your computer and click "Insert."

Q: How do I create a table in Microsoft Word?

A: To create a table, click on the "Insert" tab and select "Table." Choose the number of rows and columns for your table and click "OK."

Tips for Using Microsoft Word Effectively

  • Utilize Templates: Templates provide a structured foundation for documents, saving time and ensuring consistency.
  • Explore Styles: Styles offer pre-defined formatting options, enhancing document consistency and professionalism.
  • Master Keyboard Shortcuts: Keyboard shortcuts can significantly speed up document creation and editing processes.
  • Take Advantage of AutoCorrect: AutoCorrect helps to prevent typos and ensures consistent spelling and grammar.
  • Use the Thesaurus: The Thesaurus helps to expand vocabulary and improve the quality of writing.
  • Explore Collaboration Features: Real-time co-authoring and Track Changes facilitate efficient teamwork.
  • Practice Regularly: Regular practice helps to improve proficiency in using Microsoft Word.

Conclusion

Microsoft Word for Windows 10 remains a powerful and versatile tool for word processing, offering a comprehensive suite of features for creating, editing, and managing documents. Its user-friendly interface, extensive functionalities, and integration with other Microsoft Office applications make it an indispensable tool for individuals and businesses alike. By mastering its features and leveraging its capabilities, users can enhance their productivity, improve communication, and streamline workflows, ultimately achieving greater efficiency in their work.

How to Learn Microsoft Word: Mastering the Essential Word Processing Tool - Howtoguidescore - Medium What is word processing skills How to use office word in windows 10 - ertheatre
Introduction to Microsoft Word - Word Processing tool from Microsoft Office Suite. - YouTube What Is Microsoft Word? Download Microsoft Word For Windows 10/11 Latest Version  Windows word, Word app, Buy word
Word For Windows 10 Microsoft Word Processing  Coursepedia Learning Center

Closure

Thus, we hope this article has provided valuable insights into Microsoft Word for Windows 10: A Comprehensive Guide to the Essential Word Processing Tool. We hope you find this article informative and beneficial. See you in our next article!

The Silent Symphony: Troubleshooting Audio Issues In Windows 10

The Silent Symphony: Troubleshooting Audio Issues in Windows 10

Introduction

With great pleasure, we will explore the intriguing topic related to The Silent Symphony: Troubleshooting Audio Issues in Windows 10. Let’s weave interesting information and offer fresh perspectives to the readers.

The Silent Symphony: Troubleshooting Audio Issues in Windows 10

How To Fix Sound Problems In Windows 10 The Microsoft Windows11 - Vrogue

The absence of sound on a Windows 10 computer can be a frustrating experience, hindering everything from enjoying multimedia content to receiving system notifications. This silence can stem from a multitude of factors, ranging from simple configuration errors to more complex hardware malfunctions. Understanding the potential causes and implementing effective troubleshooting steps is essential to restoring the harmonious soundscape of your system.

Unveiling the Silent Culprits:

The lack of audio output in Windows 10 can be attributed to a diverse range of issues, each requiring a distinct approach to resolution. The following categories encompass the most common culprits:

1. Software and Configuration Issues:

  • Muted Volume: The simplest and most overlooked reason for silence is a muted volume control. Verify that the system volume, application volume, and individual device volume are not set to mute.
  • Incorrect Audio Output Device: If multiple audio devices are connected, ensure that the correct output device is selected in the Windows sound settings.
  • Outdated or Corrupted Drivers: Outdated or corrupted audio drivers can lead to sound issues. Updating or reinstalling the drivers can often resolve the problem.
  • Conflicting Software: Certain software programs, particularly those related to audio processing or virtual sound cards, can interfere with the system’s audio output. Disabling or uninstalling such programs might restore sound functionality.
  • System Configuration Changes: Recent system changes, such as updates or software installations, might have inadvertently affected audio settings. Reversing these changes or performing a system restore could resolve the issue.

2. Hardware Problems:

  • Faulty Audio Device: A malfunctioning audio device, such as speakers, headphones, or the internal sound card, can cause silence. Testing the device with a different computer or using a different set of headphones can help isolate the issue.
  • Loose Connections: Loose connections between the audio device and the computer, or within the computer itself, can disrupt the audio signal. Ensuring secure connections can rectify the problem.
  • Hardware Failure: In rare cases, the internal sound card might have failed, requiring replacement or repair.

3. Windows Updates and Settings:

  • Windows Update Issues: Recent Windows updates sometimes introduce bugs or conflicts that can affect audio functionality. Reinstalling the update or reverting to a previous version might resolve the problem.
  • Audio Services Issues: Essential audio services in Windows might have been disabled or corrupted. Restoring these services or enabling them can restore sound output.

Troubleshooting Strategies:

Addressing audio issues in Windows 10 requires a systematic approach. The following steps can help isolate and resolve the problem:

1. Basic Checks:

  • Verify Volume Controls: Ensure that the system volume, application volume, and individual device volume are not muted.
  • Check Audio Output Device: Confirm that the correct audio output device is selected in the Windows sound settings.
  • Test with Different Devices: Connect a different set of speakers or headphones to rule out a faulty device.

2. Driver Management:

  • Update Audio Drivers: Install the latest audio drivers from the manufacturer’s website or through Windows Update.
  • Reinstall Audio Drivers: Uninstall the current audio drivers and reinstall them.
  • Rollback Driver Updates: If recent driver updates caused the problem, roll back to the previous version.

3. System Settings and Services:

  • Troubleshoot Audio Playback: Run the Windows built-in audio troubleshooter to automatically diagnose and fix common issues.
  • Check Audio Services: Ensure that the Windows Audio service is running and set to automatic.
  • System Restore: If recent changes caused the problem, perform a system restore to a point before the issue occurred.

4. Hardware Inspection:

  • Inspect Connections: Ensure that all connections between the audio device and the computer are secure.
  • Test Audio Device: Connect the audio device to a different computer to determine if it is faulty.
  • Consult Hardware Documentation: Refer to the manufacturer’s documentation for specific troubleshooting steps for the audio device.

5. Software Conflicts:

  • Disable Conflicting Software: Temporarily disable any audio processing software or virtual sound cards that might be interfering with the system’s audio output.
  • Uninstall Conflicting Software: If the conflict persists, uninstall the software entirely.

6. Advanced Troubleshooting:

  • Run System File Checker (SFC): Scan for and repair corrupted system files that might be affecting audio functionality.
  • Use Command Prompt to Troubleshoot: Utilize advanced commands to reset audio settings or diagnose hardware problems.
  • Clean Boot: Start Windows in a clean boot environment to isolate potential software conflicts.

FAQs:

Q: Why is there no sound from my speakers, but headphones work?

A: This indicates that the internal sound card might be malfunctioning, specifically the output jack for speakers. Testing with different speakers and headphones can help confirm this.

Q: My speakers work on other devices, but not my computer. What could be wrong?

A: This suggests a problem with the computer’s audio output, potentially a driver issue, a faulty sound card, or a configuration error.

Q: I updated my Windows 10, and now there is no sound. What should I do?

A: Recent Windows updates can sometimes introduce bugs that affect audio. Reinstalling the update or reverting to a previous version might resolve the issue.

Q: My computer is making a buzzing or crackling sound. What’s going on?

A: This could indicate a problem with the sound card, speakers, or connections. Check for loose connections, faulty devices, or potential interference from other electronic devices.

Tips:

  • Keep Drivers Updated: Regularly update audio drivers to ensure compatibility and stability.
  • Use High-Quality Audio Cables: Avoid using cheap or damaged audio cables, as they can degrade sound quality and cause issues.
  • Clean Audio Ports: Regularly clean the audio ports on your computer and devices to prevent dust and debris accumulation.
  • Monitor System Resources: Ensure that the computer has enough available resources to handle audio processing.
  • Back Up Important Data: Before performing any troubleshooting steps, back up important data to prevent accidental loss.

Conclusion:

Restoring sound to a silent Windows 10 computer can be a journey of troubleshooting and perseverance. By understanding the potential causes and implementing the appropriate strategies, users can effectively diagnose and resolve audio issues, returning their systems to their harmonious state. Remember to approach the process systematically, starting with basic checks and progressively exploring more advanced solutions as needed. With patience and a methodical approach, the silent symphony can be brought back to life, enriching the user experience with the sounds of multimedia, notifications, and the joy of a fully functional system.

How to Fix Audio Issues on Windows 10 in 2021 How To Fix Audio Sound Problem in Windows 10 [2 Methods] - YouTube Fix audio/sound problems on windows 10!! - Howtosolveit - YouTube
How to Fix Sound or Audio Problems on Windows 10  Audio Problems Solved - YouTube How To Fix Windows 10 Sound Problem - Windows 10 Audio Problems Fix - YouTube How to quickly fix sound problems on Windows 10 - Pureinfotech
5 Tips to Fix Sound Problems in Windows 10 - MiniTool How to quickly fix sound problems on Windows 10 - Pureinfotech

Closure

Thus, we hope this article has provided valuable insights into The Silent Symphony: Troubleshooting Audio Issues in Windows 10. We appreciate your attention to our article. See you in our next article!

Migrating Your Digital Life: A Comprehensive Guide To Transferring Data From An Old Computer To A New One

Migrating Your Digital Life: A Comprehensive Guide to Transferring Data from an Old Computer to a New One

Introduction

In this auspicious occasion, we are delighted to delve into the intriguing topic related to Migrating Your Digital Life: A Comprehensive Guide to Transferring Data from an Old Computer to a New One. Let’s weave interesting information and offer fresh perspectives to the readers.

Migrating Your Digital Life: A Comprehensive Guide to Transferring Data from an Old Computer to a New One

Data Migration - What it is, and how you can to do it faster

The transition to a new computer is often met with excitement. Faster processing speeds, enhanced storage capacity, and the latest software features promise a more streamlined and enjoyable digital experience. However, the process of moving your data from the old machine to the new one can be daunting. This comprehensive guide aims to demystify the process, providing a step-by-step approach to ensure a smooth and efficient transfer of your digital life.

Understanding the Importance of Data Transfer

The data stored on your computer represents a significant part of your digital life. It encompasses everything from personal documents and photos to financial records and email correspondence. This data holds immense value, both sentimental and practical. Losing it due to a faulty old computer or a botched transfer process would be a significant setback. Therefore, migrating your data to a new computer is not merely a technical task but a crucial step in safeguarding your digital legacy.

Methods of Data Transfer: Choosing the Right Approach

Several methods exist for transferring data from an old computer to a new one. The best approach depends on factors such as the size of the data, the type of files involved, and the level of technical expertise you possess.

1. External Storage Devices:

  • USB Flash Drives: These portable storage devices offer a simple and affordable solution for transferring small to medium-sized data sets. They are particularly suitable for documents, photos, and music files.
  • External Hard Drives: For larger data sets, external hard drives provide ample storage space. They are ideal for transferring entire folders, applications, and even operating systems.
  • Cloud Storage Services: Cloud storage platforms like Dropbox, Google Drive, and OneDrive offer a convenient way to store and access data from multiple devices. This method is particularly useful for syncing files across different computers.

2. Network Transfer:

  • Ethernet Cable: Connecting your old and new computers via an Ethernet cable allows for a fast and reliable transfer of large files. This method is suitable for transferring entire operating systems and applications.
  • Wi-Fi Network: If both computers have a Wi-Fi connection, you can transfer data wirelessly. However, this method might be slower than a wired connection, especially for large files.

3. System Imaging:

  • Backup Software: Programs like Acronis True Image or Macrium Reflect allow you to create an exact copy of your old computer’s hard drive, including the operating system, applications, and user settings. This method is ideal for a complete system migration, but it requires a significant amount of storage space.
  • Windows Migration Assistant (Windows): This built-in tool helps transfer data, settings, and applications from an older Windows computer to a newer one. It simplifies the process for Windows users.
  • Migration Assistant (Mac): Similar to Windows Migration Assistant, this tool streamlines the data transfer process between two Mac computers.

Preparing for the Transfer: A Checklist for Success

Before embarking on the data transfer process, it’s crucial to prepare both the old and new computers. This will minimize the risk of errors and ensure a smooth migration.

1. Back Up Your Data:

  • Full System Backup: Create a complete backup of your old computer’s hard drive using backup software or cloud storage. This backup serves as a safety net in case of unforeseen issues during the transfer process.
  • Selective Backup: Identify critical data folders, such as documents, photos, and financial records, and back them up separately using external storage devices or cloud storage.

2. Clean Up Your Old Computer:

  • Delete Unnecessary Files: Remove files you no longer need to free up storage space and improve transfer speed.
  • Uninstall Unused Programs: Uninstall software that you don’t use anymore to minimize the amount of data to be transferred.
  • Defragment Hard Drive: Defragmenting your old computer’s hard drive can improve transfer speeds, especially for large files.

3. Prepare Your New Computer:

  • Install Necessary Software: Ensure that your new computer has the required software, such as a web browser, office suite, and antivirus program.
  • Set Up User Accounts: Create user accounts on the new computer and configure the desired settings.
  • Connect to the Internet: Connect your new computer to the internet to download updates and activate software licenses.

Step-by-Step Guide to Data Transfer

1. Choose Your Transfer Method:

  • Assess the size of your data, the type of files involved, and your level of technical expertise.
  • Select the most appropriate transfer method based on these factors.

2. Connect Your Computers:

  • If using external storage devices, connect them to both computers.
  • If using a network connection, connect your old and new computers via an Ethernet cable or Wi-Fi.

3. Transfer Your Data:

  • Using External Storage Devices: Copy files from your old computer to the external storage device and then transfer them to your new computer.
  • Using Network Transfer: Utilize file transfer protocols like FTP or SMB to transfer files between computers.
  • Using System Imaging: Create a system image of your old computer and restore it to your new computer using backup software.
  • Using Windows Migration Assistant or Migration Assistant (Mac): Follow the on-screen instructions to transfer data, settings, and applications.

4. Verify Data Transfer:

  • After the transfer process is complete, carefully verify that all your data has been transferred successfully.
  • Check for missing files or corrupted data.

5. Configure Your New Computer:

  • Once your data is transferred, customize your new computer’s settings according to your preferences.
  • Install any remaining software and configure applications.

6. Disconnect Your Old Computer:

  • Once you are confident that all your data has been successfully transferred, you can disconnect your old computer.
  • Consider backing up your old computer’s hard drive one last time for future reference.

FAQs: Addressing Common Concerns

Q: What if I lose data during the transfer process?

A: It is essential to back up your data before starting the transfer process. This backup serves as a safety net in case of data loss. Additionally, verify the transfer process carefully to ensure all files are successfully transferred.

Q: Can I transfer my operating system to the new computer?

A: Yes, you can transfer your operating system using system imaging software. However, this process might require a clean install of the operating system on the new computer.

Q: What if I don’t have enough storage space on my new computer?

A: You can use cloud storage services to store data that you don’t need to access frequently. Alternatively, you can purchase an external hard drive to store additional data.

Q: How long does the data transfer process take?

A: The time required for data transfer depends on the size of the data and the chosen transfer method. It can range from a few minutes for small files to several hours for large data sets.

Q: What if I encounter problems during the transfer process?

A: If you encounter any problems, consult the documentation of the chosen transfer method or seek assistance from a technical expert.

Tips for a Smooth Data Transfer

  • Plan Ahead: Plan the transfer process carefully and allocate sufficient time for the task.
  • Back Up Your Data: Create a complete backup of your old computer’s hard drive before starting the transfer process.
  • Use a Reliable Transfer Method: Choose a reliable and efficient transfer method based on your data size and technical expertise.
  • Verify the Transfer: Carefully verify the transfer process to ensure all files are successfully transferred.
  • Seek Assistance If Needed: Don’t hesitate to seek assistance from a technical expert if you encounter problems during the transfer process.

Conclusion: Embracing Your New Digital Landscape

Migrating your data from an old computer to a new one is a crucial step in transitioning to a new digital landscape. By following the steps outlined in this guide, you can ensure a smooth and efficient transfer process, safeguarding your valuable digital life. Remember to prioritize data backup, choose the right transfer method, and verify the transfer process carefully. With proper preparation and planning, the transition to a new computer can be a seamless and exciting experience.

Data Migration Process Strategy Types And Key Steps - vrogue.co Data Migration Life Cycle Powerpoint Presentation Ppt - vrogue.co Complete Cloud Migration Guide
Transferring Data to a New Computer  ThriftyFun Data Migration: Process, Strategy, Types, and Key Steps Data migration basics: A comprehensive guide Free eBook
Basic Strategies & Approaches to Data Migration NIX Data Movement and Storage

Closure

Thus, we hope this article has provided valuable insights into Migrating Your Digital Life: A Comprehensive Guide to Transferring Data from an Old Computer to a New One. We thank you for taking the time to read this article. See you in our next article!

Overscan On Windows 11: Understanding And Managing Display Settings

Overscan on Windows 11: Understanding and Managing Display Settings

Introduction

With enthusiasm, let’s navigate through the intriguing topic related to Overscan on Windows 11: Understanding and Managing Display Settings. Let’s weave interesting information and offer fresh perspectives to the readers.

Overscan on Windows 11: Understanding and Managing Display Settings

Fix Overscan in Windows 11/10 to Fit to Screen

Overscan, a feature present in older display technologies, refers to the display of a slightly larger image than the intended content area. This extra area, typically encompassing the edges of the screen, can be seen as an artifact of the analog television signal, where the signal itself contained information beyond the active display area. While the concept of overscan originated in the realm of analog television, it has found its way into the digital world, albeit with a different interpretation.

In the context of Windows 11, overscan refers to the potential for the operating system to display content beyond the physical boundaries of the screen. This can occur due to mismatched display settings, leading to a situation where the user sees only a portion of the intended content, with parts of the interface or applications being cropped out.

Understanding the Impact of Overscan on Windows 11

The consequences of overscan on Windows 11 can be multifaceted, depending on the extent of the discrepancy between the display settings and the physical screen size. Here are some key implications:

  • Loss of Interface Elements: Overscan can cause essential interface elements, such as scroll bars, toolbars, or window borders, to be hidden, making it difficult to interact with applications and navigate the operating system effectively.
  • Content Clipping: Important content within applications, such as text, images, or video, might be clipped, rendering the displayed information incomplete or distorted. This can be particularly problematic for tasks requiring precise visual accuracy, like graphic design or video editing.
  • Visual Distortion: Overscan can lead to a distorted aspect ratio, making the displayed image appear stretched or compressed, ultimately affecting the intended visual experience.
  • User Frustration: The inability to access all elements of the interface or view the entirety of intended content can lead to significant user frustration and hinder productivity.

Identifying and Resolving Overscan Issues

Determining whether overscan is affecting your Windows 11 setup is crucial for addressing any potential problems. The following steps can help you identify and resolve overscan issues:

  1. Visual Inspection: Carefully observe the edges of your screen for any missing interface elements or content. Look for signs of clipping or distortion in applications and windows.
  2. Display Settings: Access the Windows 11 display settings by right-clicking on the desktop and selecting "Display settings." Navigate to the "Scale and layout" section and look for options related to scaling or overscan.
  3. Resolution and Scaling: Experiment with different screen resolutions and scaling options within the display settings. Adjusting these settings might correct any overscan issues.
  4. Driver Updates: Ensure that your graphics card drivers are up to date. Outdated drivers can sometimes contribute to display inconsistencies, including overscan.
  5. Monitor Settings: Some monitors offer their own settings related to overscan or aspect ratio. Consult your monitor’s manual or settings menu to explore these options.

FAQs Regarding Overscan on Windows 11

Q: What are the common causes of overscan on Windows 11?

A: Overscan on Windows 11 can arise from several factors, including:

  • Mismatched display settings: The screen resolution or scaling settings might be misconfigured, leading to a discrepancy between the intended content area and the physical screen boundaries.
  • Outdated graphics drivers: Outdated drivers can sometimes cause display inconsistencies, including overscan.
  • Monitor settings: Some monitors have built-in overscan settings that can affect the displayed image.

Q: How can I disable overscan on Windows 11?

A: The process of disabling overscan can vary depending on the specific display settings and monitor capabilities. Here are some general approaches:

  • Display Settings: In the Windows 11 display settings, navigate to the "Scale and layout" section. Look for options related to scaling or overscan. Experiment with different scaling percentages or try setting the scaling to 100%.
  • Monitor Settings: Consult your monitor’s manual or settings menu for options related to overscan or aspect ratio. Some monitors allow you to disable overscan directly.

Q: Is overscan a problem for all users?

A: Overscan is not necessarily a problem for all users. If your display settings are correctly configured and your monitor does not have any overscan settings enabled, you might not experience any issues. However, it is important to be aware of the potential for overscan and to know how to identify and resolve any problems that might arise.

Tips for Managing Overscan on Windows 11

  • Keep Drivers Updated: Regularly update your graphics card drivers to ensure optimal display performance and minimize the risk of overscan issues.
  • Experiment with Settings: Try different screen resolutions and scaling options within the display settings to find the best configuration for your setup.
  • Consult Monitor Manual: Review your monitor’s manual for information on its settings and capabilities related to overscan or aspect ratio.
  • Monitor Calibration: Calibrating your monitor can help ensure accurate color reproduction and reduce the likelihood of visual distortions caused by overscan.

Conclusion

Overscan, while originating from analog television technology, can still manifest in the digital realm of Windows 11. Understanding the potential impact of overscan and knowing how to identify and resolve any related issues is crucial for maintaining a seamless and productive user experience. By carefully configuring display settings, updating drivers, and exploring monitor-specific options, users can effectively manage overscan and ensure that their Windows 11 environment displays content accurately and without any unwanted clipping or distortion.

Overscaling Or Overscan in Windows 10 and Windows 11 [Fixed] Overscaling Or Overscan in Windows 10 and Windows 11 [Fixed] Overscaling Or Overscan in Windows 10 and Windows 11 [Fixed]
Fix Overscan in Windows 11/10 to Fit to Screen Fix: "Overscan in Windows 11/10 to Fit the Screen" issue Fix Overscan in Windows 11/10 to Fit to Screen
Overscaling Or Overscan in Windows 10 and Windows 11 [Fixed] Overscaling Or Overscan in Windows 10 and Windows 11 [Fixed]

Closure

Thus, we hope this article has provided valuable insights into Overscan on Windows 11: Understanding and Managing Display Settings. We hope you find this article informative and beneficial. See you in our next article!

Photo Impressions 6 For Windows 10: A Comprehensive Guide

Photo Impressions 6 for Windows 10: A Comprehensive Guide

Introduction

With great pleasure, we will explore the intriguing topic related to Photo Impressions 6 for Windows 10: A Comprehensive Guide. Let’s weave interesting information and offer fresh perspectives to the readers.

Photo Impressions 6 for Windows 10: A Comprehensive Guide

Photoimpression For Windows 10 - newcreator

Photo Impressions 6 is a popular and versatile photo editing software designed specifically for Windows 10 users. It offers a wide range of tools and features to enhance, manipulate, and create stunning images, catering to both amateur and professional photographers. This article provides a comprehensive overview of Photo Impressions 6, outlining its key features, benefits, and functionalities.

Understanding the Importance of Photo Editing

In today’s digital age, image editing is an integral part of visual communication. Whether it’s for personal projects, professional work, or social media, the ability to manipulate and enhance images is essential. Photo editing software like Photo Impressions 6 empowers users to:

  • Enhance image quality: Correct imperfections, adjust lighting, and improve color balance for a more visually appealing result.
  • Create unique effects: Apply filters, textures, and special effects to add artistic flair and personal expression.
  • Compose and manipulate images: Crop, resize, rotate, and combine images to achieve desired compositions.
  • Prepare images for different purposes: Optimize images for printing, web use, or social media platforms.

Key Features of Photo Impressions 6

Photo Impressions 6 boasts a comprehensive suite of features designed to cater to diverse editing needs:

1. Basic Editing Tools:

  • Brightness and Contrast: Adjust the overall brightness and contrast of the image for better visual appeal.
  • Color Balance: Fine-tune the color balance to achieve a more natural or artistic look.
  • Saturation and Hue: Modify the intensity and color of the image.
  • Sharpness and Noise Reduction: Enhance sharpness or reduce noise for a cleaner image.

2. Advanced Editing Tools:

  • Layers: Work with multiple layers to create complex compositions and apply effects selectively.
  • Masks: Isolate specific areas of an image for precise editing.
  • Selections: Select specific areas of an image for targeted manipulation.
  • Curves and Levels: Adjust the tonal range of the image for greater control.

3. Special Effects:

  • Filters: Apply a wide variety of filters to create artistic effects, from vintage to modern.
  • Textures: Add realistic or abstract textures to images.
  • Frames and Borders: Enhance images with decorative frames and borders.
  • Text and Graphics: Add text, graphics, and other elements to create unique designs.

4. Photo Organization and Management:

  • Album Creation: Organize images into albums for easy access and management.
  • Keyword Tagging: Tag images with keywords for efficient searching.
  • Metadata Management: Edit and manage image metadata for better organization.
  • Slideshows and Presentations: Create slideshows and presentations from your images.

5. Printing and Sharing:

  • Print Optimization: Prepare images for high-quality printing.
  • Social Media Integration: Share images directly to social media platforms.
  • Email Sharing: Easily share images via email.

Benefits of Using Photo Impressions 6

Photo Impressions 6 offers a multitude of benefits for users seeking a reliable and user-friendly photo editing solution:

  • Intuitive User Interface: The software is designed with a user-friendly interface, making it easy to navigate and use even for beginners.
  • Comprehensive Feature Set: Offers a wide range of features catering to both basic and advanced editing needs.
  • Affordable Pricing: Compared to professional-grade software, Photo Impressions 6 offers an affordable solution without compromising on functionality.
  • Regular Updates: The software receives regular updates to ensure compatibility with the latest operating systems and to introduce new features.
  • Excellent Customer Support: Users have access to comprehensive online documentation, tutorials, and customer support resources.

FAQs About Photo Impressions 6

1. Is Photo Impressions 6 compatible with Windows 10?

Yes, Photo Impressions 6 is specifically designed for Windows 10 and is compatible with all versions of the operating system.

2. Does Photo Impressions 6 require any specific hardware requirements?

While Photo Impressions 6 can run on a variety of systems, it is recommended to have a computer with at least 4 GB of RAM and a graphics card that supports OpenGL 2.0 for optimal performance.

3. Is Photo Impressions 6 suitable for professional photographers?

While Photo Impressions 6 offers a wide range of features, it may not be as robust as professional-grade software like Adobe Photoshop. However, it provides a comprehensive set of tools for amateur and semi-professional photographers.

4. What file formats does Photo Impressions 6 support?

Photo Impressions 6 supports a wide range of popular image file formats, including JPEG, PNG, GIF, TIFF, and BMP.

5. Can I create custom brushes and textures in Photo Impressions 6?

Yes, Photo Impressions 6 allows users to create and import custom brushes and textures to enhance their editing capabilities.

Tips for Using Photo Impressions 6

  • Explore the Tutorials: Take advantage of the comprehensive online tutorials provided by the software developers to learn essential editing techniques.
  • Experiment with Different Features: Don’t be afraid to experiment with the various features and tools offered by Photo Impressions 6 to discover your own unique editing style.
  • Use Layers Effectively: Layers allow for non-destructive editing, enabling you to make changes without permanently altering the original image.
  • Take Advantage of Keyboard Shortcuts: Familiarize yourself with the keyboard shortcuts for frequently used tools to speed up your workflow.
  • Practice Regularly: Consistent practice is key to mastering the art of photo editing.

Conclusion

Photo Impressions 6 offers a user-friendly and feature-rich photo editing solution for Windows 10 users. Its intuitive interface, comprehensive features, and affordable pricing make it a valuable tool for both amateur and semi-professional photographers. By understanding its key features, benefits, and functionalities, users can leverage Photo Impressions 6 to enhance their images, create artistic effects, and showcase their creativity. Whether it’s for personal projects or professional work, Photo Impressions 6 provides a powerful and versatile platform for all your image editing needs.

Arcsoft PhotoImpression - Download Arcsoft PhotoImpression 6.5.9.110, 3.0 for Windows Download PhotoImpression 6.5 Download ArcSoft PhotoImpression for Windows 11/10/8/7 (Latest version 2021) - Downloads Guru
Windows 10 Impressions Windows 10 Impressions - YouTube Impression de documents ou de photos - Windows
YouTube Impressions vs Views: A Comprehensive Guide MES IMPRESSIONS SUR : WINDOWS 10 ! - YouTube

Closure

Thus, we hope this article has provided valuable insights into Photo Impressions 6 for Windows 10: A Comprehensive Guide. We thank you for taking the time to read this article. See you in our next article!

Understanding Drive D: A Guide To Navigating Your Windows 10 Computer

Understanding Drive D: A Guide to Navigating Your Windows 10 Computer

Introduction

With great pleasure, we will explore the intriguing topic related to Understanding Drive D: A Guide to Navigating Your Windows 10 Computer. Let’s weave interesting information and offer fresh perspectives to the readers.

Understanding Drive D: A Guide to Navigating Your Windows 10 Computer

Windows 10 Disk Management Explained  Sweetwater

In the realm of Windows 10, understanding the structure and purpose of different drives is crucial for efficient computer usage. While Drive C typically houses the operating system and its core files, Drive D often serves as a secondary storage space, offering additional capacity for various data.

This article delves into the significance of Drive D, exploring its role in managing files, its advantages, and how to effectively utilize it within the Windows 10 environment.

The Role of Drive D: Expanding Storage and Organizing Data

Drive D functions as a supplemental storage location, providing a dedicated space for files and programs beyond the limitations of Drive C. This separation offers several benefits:

  • Enhanced Storage Capacity: Drive D expands the overall storage capacity of your computer, allowing you to store more files, programs, and multimedia content. This is particularly beneficial for users who frequently work with large files, such as high-resolution images, videos, or complex software projects.
  • Improved Performance: By segregating system files from user data, Drive D can contribute to faster system performance. The operating system on Drive C can access and process its files more efficiently without being burdened by the presence of numerous user files.
  • Organized Data Management: Drive D facilitates a more organized approach to data management. You can create folders and subfolders within Drive D to categorize your files, making them easier to locate and manage. This is especially helpful for users with large collections of documents, photos, or music.
  • Data Backup and Recovery: Drive D can serve as a backup location for critical files stored on Drive C. In the event of a system failure or hard drive malfunction, having backups on a separate drive can significantly reduce data loss and facilitate a smoother recovery process.

Accessing and Utilizing Drive D

Accessing Drive D in Windows 10 is straightforward:

  1. File Explorer: Open File Explorer by clicking the folder icon on the taskbar or by pressing the Windows key + E.
  2. Navigation Pane: In the left pane of File Explorer, you will find a list of drives, including Drive D.
  3. Double-Click: Double-click on the Drive D icon to open its contents.

Once you have accessed Drive D, you can navigate through its folders, create new folders, move files, or copy files from other drives to Drive D.

Benefits of Utilizing Drive D

Beyond the advantages mentioned earlier, effectively utilizing Drive D can enhance your Windows 10 experience in various ways:

  • Increased Stability: By separating system files from user data, Drive D can contribute to greater system stability. This is because potential issues with user files are less likely to affect the operating system’s functionality.
  • Enhanced Security: Drive D can be used to store sensitive data, such as financial records or personal documents, which can be encrypted or password-protected for added security.
  • Flexibility and Customization: Drive D provides a flexible storage space that can be tailored to your specific needs. You can create dedicated folders for different types of data, ensuring a well-organized and efficient file management system.
  • Ease of Access: Drive D can be accessed quickly and easily from within Windows 10, making it a convenient location for storing and retrieving files.

FAQs Regarding Drive D

Q: Is Drive D always present on a Windows 10 computer?

A: No, Drive D is not always present. Its existence depends on the specific hardware configuration of the computer. Some computers may have only one hard drive, which is typically designated as Drive C. Others may have multiple hard drives, with one serving as Drive C and the others assigned subsequent drive letters.

Q: Can I change the drive letter of Drive D?

A: Yes, you can change the drive letter of Drive D using the Disk Management tool in Windows 10. However, it is generally recommended to avoid changing drive letters unless there is a specific reason to do so, as it can affect the functionality of programs and applications that are configured to access files on that drive.

Q: What happens if Drive D is full?

A: If Drive D becomes full, you will be unable to save new files or programs to that drive. You may need to free up space on Drive D by deleting unnecessary files, moving files to another drive, or purchasing an external storage device.

Q: Can I install programs on Drive D?

A: Yes, you can install programs on Drive D. However, it is generally recommended to install programs on Drive C, as this ensures that the operating system and its associated programs can access them more efficiently.

Tips for Optimizing Drive D Usage

  • Regularly Clean Up Drive D: Delete unnecessary files, empty the Recycle Bin, and uninstall unused programs to free up space on Drive D.
  • Utilize File Compression: Compress large files to reduce their storage space requirements.
  • Utilize Cloud Storage: Store files in cloud storage services like Google Drive or Dropbox to reduce the amount of data stored locally on Drive D.
  • Backup Regularly: Regularly backup important files stored on Drive D to a separate drive or external storage device to protect against data loss.

Conclusion

Drive D plays a crucial role in maximizing storage capacity and enhancing data management within the Windows 10 environment. By understanding its purpose, benefits, and proper utilization, users can effectively leverage Drive D to improve computer performance, organize data, and ensure data security.

Remember to regularly maintain and optimize Drive D to prevent it from becoming full and to maximize its effectiveness. Through proper management, Drive D can become a valuable asset in your Windows 10 computing experience.

Mastering Windows 10: A Beginner's Guide to Navigating the Operating System Windows 10 Run Commands you should Know General Tips Drives in Navigation Pane - Add or Remove in Windows 10 - Windows 10 Tutorials
Windows 10 command prompt list of drives - rillybinary Add or Remove Duplicate Drives in Navigation Pane in Windows 10  Tutorials Mapping a Network Drive in Windows 10
Disk info windows 10 - forwardfad Windows 10 - File Explorer Drives - How to Manage Files on USB Flash Stick & Hard Drive

Closure

Thus, we hope this article has provided valuable insights into Understanding Drive D: A Guide to Navigating Your Windows 10 Computer. We hope you find this article informative and beneficial. See you in our next article!

Windows 11 S Mode: A Detailed Examination Of Its Advantages And Disadvantages

Windows 11 S Mode: A Detailed Examination of its Advantages and Disadvantages

Introduction

With enthusiasm, let’s navigate through the intriguing topic related to Windows 11 S Mode: A Detailed Examination of its Advantages and Disadvantages. Let’s weave interesting information and offer fresh perspectives to the readers.

Windows 11 S Mode: A Detailed Examination of its Advantages and Disadvantages

Windows 11 S Mode Pros And Cons Everyone Should Know - vrogue.co

Windows 11 S Mode, a streamlined version of Windows 11, presents a unique proposition for users seeking a simplified and secure computing experience. While it offers certain advantages, it also comes with limitations that might not suit everyone’s needs. Understanding these pros and cons is crucial before deciding if Windows 11 S Mode is the right choice.

Advantages of Windows 11 S Mode:

1. Enhanced Security:

The primary benefit of Windows 11 S Mode is its enhanced security. By restricting users to installing apps from the Microsoft Store, the operating system significantly reduces the risk of malware infections and other security threats. This is achieved through a strict vetting process for applications available in the Microsoft Store, ensuring a higher level of security than traditional Windows installations.

2. Optimized Performance:

Windows 11 S Mode is designed to be lightweight and efficient, leading to improved performance. The restricted app ecosystem and the lack of unnecessary background processes contribute to a faster and smoother user experience, especially on older or less powerful devices.

3. Simplified User Interface:

The simplified nature of Windows 11 S Mode makes it easier to navigate and use. The streamlined interface and the limited app selection offer a less cluttered and more intuitive experience, particularly for new or casual computer users.

4. Reduced Bloatware:

Windows 11 S Mode comes with minimal pre-installed software, reducing the amount of bloatware that can slow down the system and consume resources. This clean slate allows for a more efficient and responsive computing experience.

5. Lower Cost:

Some devices come pre-installed with Windows 11 S Mode, often at a lower price point than their counterparts running the full version of Windows 11. This makes it a cost-effective option for budget-conscious users or those seeking a value-for-money solution.

Disadvantages of Windows 11 S Mode:

1. Limited App Availability:

The biggest drawback of Windows 11 S Mode is the limited app selection. Users are restricted to apps available in the Microsoft Store, which might not include all the software they require. This can be a significant limitation for users who rely on specific applications not available through the Microsoft Store.

2. Inability to Install Traditional Desktop Apps:

Windows 11 S Mode does not allow users to install traditional desktop applications, which are typically downloaded from external sources. This restriction prevents users from accessing a wide range of software, including popular productivity tools, design software, and gaming applications.

3. Restrictions on Customization:

Windows 11 S Mode restricts user customization options, limiting the ability to modify system settings or personalize the user interface. This can be frustrating for users who prefer a more customized computing environment.

4. Dependence on Microsoft Store:

Users are entirely dependent on the Microsoft Store for app installations, which can be a disadvantage if the app they need is not available or if there are issues with the store itself. This lack of flexibility can be a significant drawback for users who require specific software not available through the store.

5. Limited Flexibility:

Windows 11 S Mode offers less flexibility than the full version of Windows 11. Users cannot switch between different operating systems or install third-party software without switching out of S Mode, which can be a barrier for users who need greater flexibility and customization options.

FAQs about Windows 11 S Mode:

1. Can I switch out of Windows 11 S Mode?

Yes, you can switch out of Windows 11 S Mode to the full version of Windows 11. However, this is a one-way process, and you cannot switch back to S Mode after switching to the full version.

2. What are the system requirements for Windows 11 S Mode?

The system requirements for Windows 11 S Mode are the same as for the full version of Windows 11.

3. Is Windows 11 S Mode suitable for gaming?

Windows 11 S Mode is not recommended for gaming, as it does not allow installation of traditional gaming applications.

4. Can I use Microsoft Office in Windows 11 S Mode?

Yes, you can use Microsoft Office apps in Windows 11 S Mode, as they are available in the Microsoft Store.

5. Is Windows 11 S Mode suitable for businesses?

Windows 11 S Mode can be suitable for businesses with strict security requirements and a limited need for specific applications. However, the limited app selection might be a constraint for some businesses.

Tips for using Windows 11 S Mode:

1. Explore the Microsoft Store:

Familiarize yourself with the available apps in the Microsoft Store to determine if it offers the software you need.

2. Consider alternative solutions:

Explore cloud-based alternatives for apps not available in the Microsoft Store, such as web-based productivity tools or online gaming platforms.

3. Utilize the Windows 11 S Mode features:

Take advantage of the built-in security features and the simplified user interface to enhance your computing experience.

4. Regularly check for updates:

Ensure your Windows 11 S Mode installation is up-to-date with the latest security patches and app updates.

5. Weigh the pros and cons:

Before making a decision, carefully consider the advantages and disadvantages of Windows 11 S Mode to determine if it aligns with your needs and preferences.

Conclusion:

Windows 11 S Mode offers a simplified and secure computing experience, particularly for users who prioritize safety and ease of use. However, the limited app selection and restricted customization options might be a significant drawback for users who require specific software or a more customizable environment. Ultimately, the decision of whether to use Windows 11 S Mode depends on individual needs and preferences, and it is essential to carefully weigh the advantages and disadvantages before making a choice.

What is Windows 11 in S mode?  Deep Dive - YouTube What Is Windows 11 S Mode and How to Use It Windows 11 S Mode Pros And Cons - Frey's Blog
Windows 11 S Mode: Everything You Need to Know - GeekChamp Windows 11 S Mode: What it is and should you use it - Android Authority What is Windows 11 S Mode - Explained - How to Turn OFF Windows 11 S Mode - In less than 1
Windows 11 home s mode - grepayment Tìm hiểu về S Mode trên Windows 11 và cách bật tắt chế độ này đơn giản nhất

Closure

Thus, we hope this article has provided valuable insights into Windows 11 S Mode: A Detailed Examination of its Advantages and Disadvantages. We hope you find this article informative and beneficial. See you in our next article!

O Kam For Windows

o kam for windows

Introduction

In this auspicious occasion, we are delighted to delve into the intriguing topic related to o kam for windows. Let’s weave interesting information and offer fresh perspectives to the readers.

Please provide me with the topic you would like me to write about. I understand you are looking for an article about "o kam for windows" but I need more information to understand what you mean by "o kam."

Télécharger O-KAM Pro sur PC - Windows 10 et 11 - Windowsapp.fr

For example, is "o kam" a:

  • Specific software program? If so, what is its full name and purpose?
  • A type of software or technology? If so, what are its key features and uses?
  • A concept related to Windows operating systems? If so, what is the concept and what are its implications?

Once you provide me with the necessary information, I can write a comprehensive and informative article about it.

O-KAM für PC - Windows 7/10/11 (Deutsch) - Download kostenlos O-KAM para PC / Mac / Windows 11,10,8,7 - Descarga gratis - Napkforpc.com O-KAM Pro For Pc : O-KAM Pro Computer Client Download
O-KAM APP cloud storage offers a variety of packages to choose from - YouTube O-KAM pc ダウンロード- Windows バージョン10/8/7 (2022) O-KAM pc ダウンロード- Windows バージョン10/8/7 (2022)
Télécharger O-KAM sur PC - Windows 10 et 11 - Windowsapp.fr O-KAM pc ダウンロード- Windows バージョン10/8/7 (2022)

Closure

Thus, we hope this article has provided valuable insights into o kam for windows. We thank you for taking the time to read this article. See you in our next article!

Navigating The World Of SD Cards In Windows 11: A Comprehensive Guide To FAT32

Navigating the World of SD Cards in Windows 11: A Comprehensive Guide to FAT32

Introduction

In this auspicious occasion, we are delighted to delve into the intriguing topic related to Navigating the World of SD Cards in Windows 11: A Comprehensive Guide to FAT32. Let’s weave interesting information and offer fresh perspectives to the readers.

How To Format SD Card To Fat32 - PC Guide

The ubiquitous SD card, a cornerstone of portable storage, plays a vital role in our digital lives. From capturing memories on cameras to storing documents and files, SD cards offer a convenient and reliable way to move data across devices. Windows 11, the latest iteration of Microsoft’s operating system, seamlessly integrates with these cards, ensuring a smooth and efficient data transfer experience.

This article delves into the intricacies of interacting with SD cards formatted in the FAT32 file system within the Windows 11 environment. We will explore the inherent advantages of FAT32, unravel the process of reading and accessing data on these cards, and address common queries and troubleshooting tips.

Understanding FAT32: A Legacy of Compatibility

The File Allocation Table (FAT) file system, introduced with the early versions of MS-DOS, has evolved through various iterations, including FAT16 and FAT32. While newer file systems like NTFS offer enhanced features and larger storage capacity, FAT32 remains a ubiquitous choice due to its widespread compatibility.

Here’s why FAT32 continues to hold relevance in the modern computing landscape:

  • Broad Compatibility: FAT32 is supported by a vast array of devices, including cameras, smartphones, gaming consoles, and older operating systems. This universal acceptance makes it ideal for sharing files across diverse platforms.
  • Simplicity and Efficiency: The FAT32 file system is known for its straightforward structure, which translates into efficient data access and minimal overhead. This simplicity contributes to its reliability and performance.
  • Accessibility: FAT32 is readily recognized by Windows 11, requiring minimal configuration for data access. This ease of use makes it a user-friendly choice for everyday storage needs.

Reading SD Cards in Windows 11: A Straightforward Process

Accessing data stored on a FAT32 formatted SD card in Windows 11 is remarkably simple. The operating system automatically recognizes the card upon insertion, presenting it as a drive letter in the File Explorer window.

Here’s a step-by-step guide to reading data from an SD card:

  1. Insert the SD card: Carefully insert the SD card into the SD card reader of your computer.
  2. Identify the drive letter: Windows 11 will automatically assign a drive letter to the SD card, typically denoted as "D:" or "E:" depending on the existing drives connected to your system.
  3. Access the data: Open File Explorer (Windows key + E) and navigate to the designated drive letter. You will see the folders and files stored on the SD card, allowing you to browse, copy, move, or delete them as needed.

Addressing Common Queries and Troubleshooting Tips

While the process of reading SD cards in Windows 11 is generally straightforward, users may encounter occasional issues. Here are some common queries and their solutions:

1. SD card not detected:

  • Check the physical connection: Ensure the SD card is properly inserted into the card reader.
  • Verify the card reader: If the card reader is malfunctioning, try using a different one.
  • Restart your computer: A simple restart can sometimes resolve connectivity issues.
  • Run a hardware troubleshooter: Windows 11 offers built-in troubleshooting tools that can diagnose and fix hardware problems.

2. SD card is read-only:

  • Check the write protection switch: Some SD cards have a physical write protection switch. Ensure it is not engaged, allowing write access to the card.
  • Format the card: Formatting the SD card will erase all data but may resolve write protection issues. However, this should be done as a last resort, as it results in data loss.
  • Run a disk check: Use the "chkdsk" command in the Command Prompt to check for file system errors and potentially resolve write protection issues.

3. SD card is corrupted:

  • Run a disk check: Use the "chkdsk" command to scan the card for errors and attempt repair.
  • Use data recovery software: If the card is corrupted, specialized data recovery software can attempt to recover lost data.
  • Replace the SD card: If the card is beyond repair, consider replacing it with a new one.

4. Slow performance:

  • Ensure sufficient free space: A full SD card can lead to performance degradation. Free up space by deleting unnecessary files.
  • Defragment the card: Defragmentation can improve read/write speeds by organizing data more efficiently.
  • Use a high-speed card reader: Consider using a faster card reader for enhanced performance.

5. Data transfer errors:

  • Ensure sufficient free space on the destination drive: Ensure there is enough space on the target drive to accommodate the files being transferred.
  • Check for viruses: Scan both the source and destination drives for viruses to rule out any potential interference.
  • Restart your computer: A simple restart can sometimes resolve data transfer errors.

Conclusion: Seamless Integration for Enhanced Data Management

Windows 11 provides a seamless and user-friendly experience for interacting with SD cards formatted in FAT32. The operating system’s automatic recognition and intuitive file management tools empower users to effortlessly access, manage, and transfer data. By understanding the nuances of FAT32 and the troubleshooting tips outlined in this article, users can confidently navigate the world of SD cards within the Windows 11 environment.

[4+] Format SD Card FAT32 in Windows 11 with Free Software How to Format SD Card to FAT32? Your Reliable Guide Here 2024 [4+] Format SD Card FAT32 in Windows 11 with Free Software
How to Format SD Card to FAT32? Your Reliable Guide Here 2024 How To Format 256gb Sd Card To Fat32 On Windows 11 - Free Word Template Best FAT32 Format Tools for Windows 11/10
How to Format 64GB SD Card to FAT32 - Easy and Safe How to Format an SD Card to FAT32

Closure

Thus, we hope this article has provided valuable insights into Navigating the World of SD Cards in Windows 11: A Comprehensive Guide to FAT32. We appreciate your attention to our article. See you in our next article!