Archives January 2024

Net Framework 2 0 Download Free Windows 11

net framework 2 0 download free windows 11

Introduction

With great pleasure, we will explore the intriguing topic related to net framework 2 0 download free windows 11. Let’s weave interesting information and offer fresh perspectives to the readers.

Enable Net Framework 2 0 And Net Framework 3 5 In Windows 11  thewindowsclub

In the dynamic world of software development, the .NET Framework stands as a cornerstone, providing a comprehensive platform for building and running applications. While newer versions like .NET 6 and .NET 7 have emerged, the .NET Framework 2.0 remains relevant for certain legacy applications, particularly those designed for Windows XP and Vista. Installing .NET Framework 2.0 on Windows 11 can be a necessity for maintaining compatibility with older software, presenting a unique challenge due to the operating system’s evolution.

The Importance of .NET Framework 2.0

.NET Framework 2.0, released in 2005, marked a significant leap forward in software development. It introduced features like:

  • Generics: Enhanced code reusability and type safety.
  • Windows Communication Foundation (WCF): Facilitated communication between applications.
  • Windows Presentation Foundation (WPF): Provided a rich user interface framework.
  • Language Integration Query (LINQ): Simplified data querying across various sources.

These advancements made .NET Framework 2.0 a popular choice for building a wide range of applications, from desktop software to web services. Many applications, especially those developed during this era, rely on .NET Framework 2.0’s features and functionalities.

Challenges of Installing .NET Framework 2.0 on Windows 11

Windows 11, designed for modern applications and security, is not inherently equipped to support .NET Framework 2.0. The operating system’s architecture and security measures can pose challenges:

  • Compatibility Issues: .NET Framework 2.0 was designed for older Windows versions, making direct installation on Windows 11 problematic.
  • Security Concerns: Windows 11 prioritizes security, potentially blocking the installation of older software due to potential vulnerabilities.
  • Dependency Conflicts: Newer Windows versions often have updated libraries and components that might conflict with .NET Framework 2.0.

Steps for Installing .NET Framework 2.0 on Windows 11

Installing .NET Framework 2.0 on Windows 11 requires careful consideration and adherence to specific steps:

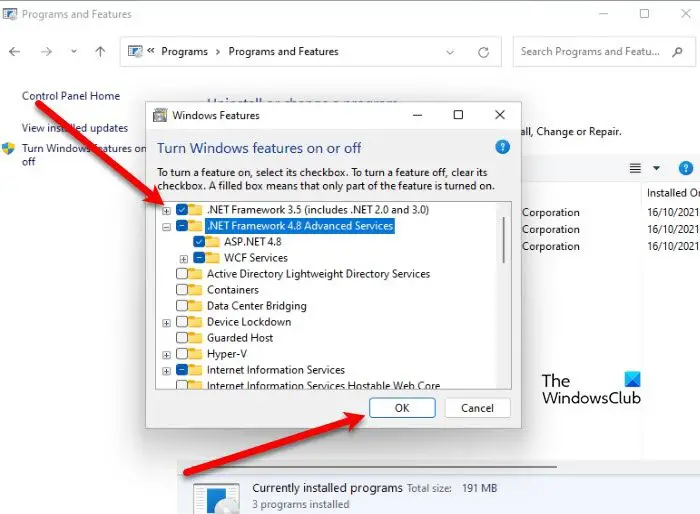
  1. Compatibility Check: Ensure the application requiring .NET Framework 2.0 is compatible with Windows 11. Check for updates or alternative versions that support newer operating systems.
  2. Download the Offline Installer: Download the offline installer for .NET Framework 2.0 from a trusted source like Microsoft’s official website.
  3. Disable Windows Updates: Temporarily disable Windows updates to avoid potential interference during the installation process.
  4. Run the Installer as Administrator: Right-click the installer file and select "Run as administrator" to grant necessary permissions.
  5. Follow Installation Instructions: Follow the on-screen instructions provided by the installer, accepting any prompts or agreements.
  6. Reboot Your Computer: Once the installation completes, reboot your computer to ensure the changes take effect.
  7. Enable Windows Updates: Re-enable Windows updates after successful installation.

Tips for a Smooth Installation:

  • Use a Clean Boot: Consider performing a clean boot to minimize potential conflicts from other applications or services.
  • Check System Requirements: Ensure your system meets the minimum requirements for .NET Framework 2.0 installation.
  • Backup Important Data: Create a backup of your important data before any significant system changes.
  • Consider Virtualization: If direct installation is not feasible, consider running a virtual machine with an older Windows version to run the application requiring .NET Framework 2.0.

FAQs about .NET Framework 2.0 Installation on Windows 11:

Q: Is it safe to install .NET Framework 2.0 on Windows 11?

A: Installing .NET Framework 2.0 on Windows 11 can pose security risks due to the age of the framework. It is essential to download the installer from a trusted source and ensure your system is up-to-date with the latest security patches.

Q: Can I install .NET Framework 2.0 directly from the Windows Update catalog?

A: Windows 11’s update catalog does not include .NET Framework 2.0. You need to download the offline installer from Microsoft’s website.

Q: What if the installation fails?

A: If the installation fails, try troubleshooting by:

  • Re-running the installer: Restart the installation process after ensuring all prerequisites are met.
  • Checking for errors: Review the installation logs for error messages and address the underlying issues.
  • Seeking online support: Consult Microsoft’s support forums or community websites for assistance.

Conclusion:

Installing .NET Framework 2.0 on Windows 11 presents a unique challenge, requiring careful consideration and adherence to specific steps. While newer versions of the .NET Framework offer enhanced features and security, .NET Framework 2.0 remains crucial for running legacy applications. By understanding the compatibility issues and following the outlined steps, users can successfully install .NET Framework 2.0 on Windows 11, ensuring the continued functionality of older software. However, it is important to remember that installing older software carries inherent security risks, and users should exercise caution and prioritize system security.

Microsoft .NET Framework 2.0 - Free Download Download Microsoft .NET Framework 2.0 all packages Offline installer free  GIS English How To Enable Net Framework 2 0 And 3 5 In Windows 11  Images and Photos finder
Скачать Microsoft .NET Framework 2.0 SP1 How To Enable Net Framework 2 0 And 3 5 In Windows 11  grovetech .NET Framework 2.0 Free Download - Get Into Pc
.NET Framework 2.0 Free Download - Getintopc How To Enable Net Framework 2 0 And 3 5 In Windows 11  grovetech

Closure

Thus, we hope this article has provided valuable insights into net framework 2 0 download free windows 11. We appreciate your attention to our article. See you in our next article!

Windows 11: A Comprehensive Evaluation Of Its Strengths And Weaknesses

Windows 11: A Comprehensive Evaluation of Its Strengths and Weaknesses

Introduction

With enthusiasm, let’s navigate through the intriguing topic related to Windows 11: A Comprehensive Evaluation of Its Strengths and Weaknesses. Let’s weave interesting information and offer fresh perspectives to the readers.

Windows 11: A Comprehensive Evaluation of Its Strengths and Weaknesses

Self Evaluation Examples Of Strengths And Weaknesses

Microsoft’s Windows 11, released in October 2021, marked a significant departure from its predecessor, Windows 10. This new operating system (OS) ushered in a redesigned user interface, enhanced security features, and a suite of new functionalities. While its arrival was met with excitement, it also sparked debate regarding its merits and shortcomings. This article delves into the pros and cons of Windows 11, providing a comprehensive assessment of its impact and implications.

The Pros of Windows 11

1. Modernized User Interface: Windows 11 boasts a refined, modern look and feel that prioritizes visual clarity and user-friendliness. The redesigned Start Menu, Taskbar, and overall interface offer a more intuitive and aesthetically pleasing experience. The rounded corners, translucent elements, and focus on minimalism contribute to a cleaner, more streamlined appearance.

2. Enhanced Security Features: Windows 11 incorporates advanced security measures, including hardware-based security features and improved threat detection capabilities. The inclusion of Windows Hello, a biometric authentication system, strengthens user account security by relying on facial recognition or fingerprint scanning for login. Additionally, the OS employs Microsoft Defender Antivirus, which provides real-time protection against malware and other threats.

3. Improved Gaming Performance: Windows 11 optimizes gaming performance with features like DirectX 12 Ultimate and Auto HDR, enhancing visual fidelity and delivering smoother gameplay. The OS also prioritizes gaming tasks by allocating resources efficiently, resulting in a more responsive and immersive gaming experience.

4. Enhanced Multitasking Capabilities: Windows 11 introduces features like Snap Layouts and Snap Groups, facilitating more efficient multitasking. Snap Layouts enable users to arrange windows in pre-defined layouts, maximizing screen space. Snap Groups allow users to group multiple windows together, enabling seamless switching between related applications.

5. Integration with Microsoft Ecosystem: Windows 11 seamlessly integrates with other Microsoft services and applications, such as Microsoft 365, Teams, and OneDrive. This integration streamlines workflows and enhances productivity, enabling users to access and manage their data across various devices.

6. Focus on Accessibility: Windows 11 emphasizes accessibility, offering features like Narrator and Magnifier to enhance usability for users with disabilities. The OS also incorporates text-to-speech functionality, allowing users to interact with the system through voice commands.

The Cons of Windows 11

1. System Requirements: Windows 11 imposes stricter system requirements than its predecessor, excluding older devices from compatibility. This has drawn criticism, as many users with perfectly functional computers are unable to upgrade to the new OS. The requirement for a TPM 2.0 module and a Secure Boot enabled system has been particularly contentious.

2. Limited App Compatibility: While Windows 11 is designed to support legacy applications, some users have reported compatibility issues with older programs. This can be a significant drawback for users heavily reliant on specific applications that may not have been updated for Windows 11 compatibility.

3. Controversial Design Choices: The redesigned Start Menu and Taskbar have been met with mixed reactions. Some users find the changes to be an improvement, while others prefer the traditional layout of Windows 10. The removal of the "All Apps" list from the Start Menu has also been a source of frustration for some users.

4. Performance Issues: Despite performance optimizations, some users have reported encountering performance issues with Windows 11. These issues can manifest as slow boot times, sluggish application launches, or overall system instability. While these issues are often related to specific hardware configurations or software conflicts, they can be a cause for concern for some users.

5. Privacy Concerns: Windows 11 collects more user data than its predecessor, raising privacy concerns among some users. While Microsoft has stated that this data is used to improve the user experience and personalize features, some individuals remain wary of the potential for data misuse.

FAQs

1. Can I upgrade to Windows 11 from Windows 10?

Yes, you can upgrade to Windows 11 from Windows 10 if your system meets the minimum requirements. You can use the Windows Update tool to check for the upgrade and proceed with the installation.

2. What are the minimum system requirements for Windows 11?

Windows 11 requires a 64-bit processor, 4GB of RAM, 64GB of storage, a TPM 2.0 module, and a Secure Boot enabled system. Additionally, your device must have a compatible graphics card.

3. Is Windows 11 free?

Yes, Windows 11 is free for users who are upgrading from a compatible version of Windows 10. However, new devices that come pre-installed with Windows 11 may require a purchase.

4. What are the key differences between Windows 10 and Windows 11?

Windows 11 features a redesigned user interface, enhanced security features, improved gaming performance, and new multitasking capabilities. It also incorporates a tighter integration with the Microsoft ecosystem and emphasizes accessibility features.

5. Is Windows 11 better than Windows 10?

Whether Windows 11 is "better" than Windows 10 depends on individual user preferences and needs. Windows 11 offers a more modern and intuitive user interface, improved security, and enhanced gaming capabilities, but it also comes with stricter system requirements, potential compatibility issues, and privacy concerns.

Tips

1. Check System Compatibility: Before attempting to upgrade to Windows 11, ensure that your device meets the minimum system requirements. You can use the PC Health Check app from Microsoft to determine compatibility.

2. Backup Your Data: Before proceeding with any OS upgrade, it is essential to back up your important data. This will help to prevent data loss in case of unexpected issues during the installation process.

3. Review Privacy Settings: Once you have upgraded to Windows 11, take the time to review your privacy settings and adjust them according to your preferences. This will help to control the amount of data collected by the OS.

4. Address Compatibility Issues: If you encounter compatibility issues with specific applications after upgrading to Windows 11, consider contacting the software developer for support or seeking alternative solutions.

5. Monitor Performance: Keep an eye on system performance after upgrading to Windows 11. If you encounter performance issues, try updating your drivers, running a system scan, or adjusting your power settings.

Conclusion

Windows 11 is a significant evolution of the Windows operating system, offering a modern user interface, enhanced security features, and improved gaming performance. However, its stricter system requirements, potential compatibility issues, and privacy concerns have generated debate. Ultimately, the decision of whether to upgrade to Windows 11 depends on individual user needs and priorities. By carefully evaluating the pros and cons, users can make an informed decision that aligns with their specific requirements and preferences.

Strengths And Weaknesses Analysis Evaluating List Of Organisational Attributes  PowerPoint Systematic Evaluation of Strengths and Weaknesses Self Evaluation Examples Of Strengths And Weaknesses
How To Write Strengths And Weakness Examples strengths and weakness of various assessment tools Strengths Weaknesses  Download Table Strengths and Weaknesses Assessment - Excelas
Sample Of Strength And Weaknesses Teaching Strengths And Weaknesses Lists

Closure

Thus, we hope this article has provided valuable insights into Windows 11: A Comprehensive Evaluation of Its Strengths and Weaknesses. We hope you find this article informative and beneficial. See you in our next article!

QR Code Reduction: A Comprehensive Guide To QR Code Optimization

QR Code Reduction: A Comprehensive Guide to QR Code Optimization

Introduction

With great pleasure, we will explore the intriguing topic related to QR Code Reduction: A Comprehensive Guide to QR Code Optimization. Let’s weave interesting information and offer fresh perspectives to the readers.

QR Code Reduction: A Comprehensive Guide to QR Code Optimization

QR code optimization

QR codes, ubiquitous in the digital landscape, offer a convenient bridge between the physical and digital worlds. However, the standard QR code, with its intricate pattern of black and white squares, can sometimes be bulky and cumbersome, especially when it comes to printing or embedding within limited spaces. This is where QR code reduction techniques come into play, optimizing QR codes for efficient storage and transmission without compromising their functionality.

Understanding the Need for QR Code Reduction

The size of a QR code, measured in pixels, directly impacts its readability. Larger codes require more space, potentially leading to limitations in printing, website embedding, or even text message transmission. Moreover, larger codes necessitate more data transmission, leading to slower loading times and increased bandwidth consumption.

QR Code Reduction Techniques: A Deep Dive

Several techniques exist to reduce the size of QR codes while maintaining their functionality. These techniques can be broadly categorized as follows:

1. Data Compression:

  • Encoding Techniques: QR codes employ error correction codes to ensure reliable data recovery even in the presence of noise or damage. Different error correction levels offer varying degrees of redundancy. Choosing a lower error correction level can reduce the code size, but it comes at the cost of reduced error tolerance.
  • Data Encoding: QR codes can encode data using various modes, such as numeric, alphanumeric, byte, and kanji. Selecting the most efficient encoding mode for the specific data type can significantly reduce the code size. For instance, encoding a purely numerical string in numeric mode is more efficient than using the byte mode.
  • Data Optimization: Data compression algorithms like Huffman coding and Run-Length encoding can be applied to reduce the size of the data payload within the QR code. These algorithms identify patterns and redundancies in the data and represent them more efficiently.

2. Code Optimization:

  • Mask Patterns: QR codes utilize mask patterns to improve readability by balancing the distribution of black and white modules. Different mask patterns offer varying degrees of optimization, and selecting the optimal pattern can contribute to code size reduction.
  • Version Selection: QR codes come in different versions, each supporting a specific maximum data capacity. Choosing the smallest version that accommodates the required data can significantly reduce the code size.
  • Code Placement: The placement of the QR code within a design or print layout can influence its readability. Positioning the code in a well-lit area with sufficient contrast can enhance its scannability, potentially allowing for a smaller code size.

QR Code Reduction Tools: Empowering Users

Numerous online tools and software applications offer QR code reduction capabilities. These tools often combine data compression, code optimization, and other techniques to generate compact QR codes without compromising functionality.

Benefits of QR Code Reduction

  • Reduced Print Costs: Smaller QR codes require less ink and paper, leading to cost savings in printing applications.
  • Improved Website Performance: Smaller QR codes load faster on websites, enhancing user experience and reducing bounce rates.
  • Enhanced Scannability: Compact QR codes are easier to scan, especially in low-light conditions or when printed on smaller surfaces.
  • Increased Data Capacity: By reducing the size of the code, more data can be encoded within the same physical space, allowing for more complex information or longer URLs.
  • Improved Compatibility: Smaller QR codes are more compatible with various devices and scanners, including those with limited processing power or memory.

FAQs

Q: Can QR code reduction compromise the functionality of the code?

A: QR code reduction techniques are designed to optimize the code without affecting its functionality. However, excessive reduction can lead to a decrease in error tolerance, potentially making the code more susceptible to scanning errors. It is crucial to strike a balance between code size and reliability.

Q: What are the limitations of QR code reduction?

A: QR code reduction techniques are not universally applicable. Some data types, such as images or complex text formats, may not be easily compressed. Additionally, the reduction techniques may not always be effective in achieving significant size reduction.

Q: How do I choose the right QR code reduction tool?

A: Consider the following factors when selecting a QR code reduction tool:

  • Functionality: Ensure the tool supports the necessary data compression and code optimization techniques.
  • Ease of Use: Select a tool with a user-friendly interface and clear instructions.
  • Compatibility: Choose a tool that generates codes compatible with various scanners and devices.
  • Security: Prioritize tools that prioritize data security and privacy.

Tips for Effective QR Code Reduction

  • Optimize Data: Before generating the QR code, ensure the data is clean, concise, and optimized for compression.
  • Choose the Right Encoding Mode: Select the most efficient encoding mode for the specific data type.
  • Experiment with Error Correction Levels: Test different error correction levels to find the optimal balance between code size and reliability.
  • Use a Reputable QR Code Reduction Tool: Choose a tool with a proven track record and positive user reviews.
  • Test the Reduced QR Code: Thoroughly test the reduced QR code to ensure it scans correctly and delivers the intended information.

Conclusion

QR code reduction plays a crucial role in optimizing QR code performance, enabling efficient storage, transmission, and readability. By employing data compression, code optimization, and choosing the appropriate tools, users can significantly reduce the size of QR codes without compromising their functionality. This optimization contributes to a more efficient and user-friendly experience, promoting the widespread adoption of QR codes in various applications.

How to track QR codes: QR statistics and optimization • QR Code Kit QR Code Optimization: Here’s How to Make Sure You Get Scans - QR TIGER Unveiling the Power of QR Code Scanner Features: A Comprehensive Guide – QR Code Scanners
How can QR Codes optimize Maintenance Management? Conversion Rate Optimization with QR Codes: A Detailed Guide QR Code tracking- Measure performance and optimize campaigns
Dynamic VS Static QR Code - What’s The Difference? Unveiling the Power of QR Code Scanner Features: A Comprehensive Guide – QR Code Scanners

Closure

Thus, we hope this article has provided valuable insights into QR Code Reduction: A Comprehensive Guide to QR Code Optimization. We hope you find this article informative and beneficial. See you in our next article!

Navigating The Labyrinth: Troubleshooting Windows 10 Boot Issues

Navigating the Labyrinth: Troubleshooting Windows 10 Boot Issues

Introduction

With great pleasure, we will explore the intriguing topic related to Navigating the Labyrinth: Troubleshooting Windows 10 Boot Issues. Let’s weave interesting information and offer fresh perspectives to the readers.

How to use Startup Repair to fix boot problems with Windows 10  Windows Central

The familiar Windows 10 logo, usually a welcome sight, can become a source of frustration when it fails to appear, leaving you staring at a blank screen. This inability to boot into Windows 10 can stem from various causes, ranging from minor software glitches to severe hardware malfunctions. However, understanding the underlying issues and employing the appropriate troubleshooting techniques can often restore your system to its operational state.

Delving into the Causes: Understanding the Roots of the Problem

Before diving into solutions, it’s essential to grasp the common culprits behind a Windows 10 boot failure. These can be broadly categorized as follows:

1. Software-Related Issues:

  • Corrupted System Files: Essential files within the operating system can become damaged due to software conflicts, malware infections, or improper updates.
  • Driver Conflicts: Incompatible or outdated device drivers can disrupt the boot process.
  • Boot Configuration Errors: The system’s boot settings, which dictate the order and manner in which the system starts, can become corrupted.
  • Malware Infection: Malicious software can interfere with the boot process, preventing Windows from loading.

2. Hardware-Related Issues:

  • Failing Hard Drive: A failing hard drive can lead to data corruption and prevent the operating system from loading.
  • Loose or Damaged Connections: Loose or damaged cables connecting components like RAM, hard drives, or the motherboard can disrupt the boot process.
  • Faulty Hardware Components: Malfunctioning RAM modules, the motherboard, or other critical hardware components can also impede booting.

3. Power-Related Issues:

  • Power Supply Problems: An inadequate or malfunctioning power supply unit can cause instability and prevent the system from booting.
  • Intermittent Power Fluctuations: Power surges or dips can disrupt the boot process and potentially damage hardware.

Troubleshooting Strategies: A Step-by-Step Guide

Once you’ve identified the potential causes, you can embark on a systematic troubleshooting journey. Here’s a comprehensive approach:

1. Basic Troubleshooting:

  • Restart the Computer: A simple restart can often resolve minor glitches and allow the system to boot properly.
  • Check Connections: Ensure that all cables connecting hardware components are firmly secured.
  • Boot into Safe Mode: Safe Mode loads Windows with minimal drivers and programs, helping to isolate the problem. To access Safe Mode, press F8 repeatedly during startup or use the advanced startup options in the Windows Recovery Environment.
  • Run a System Scan: Use the built-in Windows tools like System File Checker (SFC) or the Deployment Image Servicing and Management (DISM) tool to scan and repair corrupted system files.

2. Advanced Troubleshooting:

  • Perform a System Restore: System Restore allows you to revert your system to a previous working state, potentially undoing recent changes that caused the boot issue.
  • Boot from a Recovery Drive: Create a bootable USB drive or DVD with the Windows 10 installation media. This allows you to access the Recovery Environment, which offers tools like Startup Repair and System Restore.
  • Use a Live Linux Distribution: Boot your computer from a live Linux distribution, like Ubuntu, to access your files and potentially diagnose the problem.
  • Reinstall Windows 10: If all else fails, reinstalling Windows 10 can resolve software-related issues and restore your system to a fresh state. However, this will erase all data on your hard drive, so ensure you have a backup.

3. Hardware Troubleshooting:

  • Test RAM: Run memory diagnostic tools to check for faulty RAM modules.
  • Check Hard Drive Health: Use diagnostic software to assess the health of your hard drive.
  • Replace Components: If you suspect faulty hardware, consider replacing the suspected component.
  • Seek Professional Help: If you’re unable to resolve the issue yourself, consult a qualified computer technician.

FAQs: Addressing Common Queries

Q: What is the Windows Recovery Environment (RE)?

A: The Windows Recovery Environment (RE) is a built-in recovery tool accessible through the Windows installation media or a recovery drive. It provides a range of options for troubleshooting boot issues, including Startup Repair, System Restore, and Command Prompt.

Q: How do I create a bootable USB drive with the Windows 10 installation media?

A: You can download the Windows 10 installation media from Microsoft’s website. Then, use the Media Creation Tool to create a bootable USB drive. Follow the on-screen instructions carefully.

Q: What is the difference between Startup Repair and System Restore?

A: Startup Repair automatically attempts to fix boot problems, while System Restore allows you to manually choose a previous restore point to revert your system to a working state.

Q: What if I lose all my data after reinstalling Windows 10?

A: Always back up your important data before performing a clean install. You can use external hard drives, cloud storage services, or other backup solutions to ensure your data is safe.

Tips for Preventing Boot Issues:

  • Keep Your System Updated: Regularly update your operating system and drivers to patch vulnerabilities and ensure compatibility.
  • Run Antivirus Software: Use reliable antivirus software to protect your system from malware.
  • Perform Regular Backups: Create regular backups of your important data to prevent data loss.
  • Monitor System Health: Use system monitoring tools to check for hardware issues and potential problems.

Conclusion: A Path to Restoration

Encountering a Windows 10 boot failure can be a frustrating experience. However, understanding the potential causes and employing the appropriate troubleshooting techniques can often lead to a successful resolution. Remember to be patient, systematic, and consult professional help when necessary. By following these steps and implementing preventative measures, you can minimize the likelihood of encountering such issues in the future and ensure a smooth and reliable computing experience.

How to access Windows 10 troubleshooting tools step by step  TechTarget How To Fix Windows 10 Startup and Boot Problems - YouTube Windows Boot Manager: How to Edit and Fix Boot Manager in Windows 10
How to troubleshoot Windows 10 boot problems? – Depot Catalog How To Open Troubleshooting Options in Windows 10 How to use Startup Repair to fix boot problems with Windows 10  Windows Central
Troubleshooting Windows 10 Insert the recovery disc or Win10 USB media into your computer.

Closure

Thus, we hope this article has provided valuable insights into Navigating the Labyrinth: Troubleshooting Windows 10 Boot Issues. We appreciate your attention to our article. See you in our next article!

Capturing Your Digital Story: A Guide To Screen Recording On Windows 10

Capturing Your Digital Story: A Guide to Screen Recording on Windows 10

Introduction

In this auspicious occasion, we are delighted to delve into the intriguing topic related to Capturing Your Digital Story: A Guide to Screen Recording on Windows 10. Let’s weave interesting information and offer fresh perspectives to the readers.

Capturing Your Digital Story: A Guide to Screen Recording on Windows 10

The Easiest Way to Record Your Screen in Windows 10: A Step-by-Step Guide (2023)

In the digital age, where information flows seamlessly and interaction is increasingly visual, the ability to record your screen has become an indispensable tool. Whether you’re creating tutorials, capturing gameplay, documenting presentations, or simply sharing a process with others, screen recording on Windows 10 offers a versatile and efficient solution. This article provides a comprehensive guide to the various methods available, their functionalities, and their advantages, empowering you to harness the power of screen recording for your specific needs.

The Power of Screen Recording: Unveiling Its Versatility

Screen recording on Windows 10 transcends the realm of mere technical functionality; it unlocks a plethora of possibilities across diverse applications. Its utility extends far beyond mere entertainment, empowering individuals and businesses alike to communicate, learn, and collaborate more effectively.

1. Educational Content Creation:

  • Tutorials: Whether you’re a tech enthusiast sharing tips, a teacher explaining complex concepts, or a musician demonstrating techniques, screen recording facilitates the creation of engaging and informative tutorials.
  • Educational Videos: Teachers can record lectures, presentations, and interactive exercises, offering students flexible learning opportunities and enhancing their understanding.
  • Online Courses: Screen recording becomes a vital tool for instructors building online courses, capturing screen activity, voiceover narration, and interactive elements for a comprehensive learning experience.

2. Business and Productivity:

  • Product Demonstrations: Businesses can showcase their software or services through detailed screen recordings, highlighting features and benefits for potential clients.
  • Remote Collaboration: Teams can record meetings, brainstorming sessions, and project updates, fostering seamless collaboration even when geographically dispersed.
  • Training Materials: Screen recordings are invaluable for creating training materials, capturing step-by-step instructions and providing a visual reference for employees.

3. Gaming and Entertainment:

  • Gameplay Capture: Gamers can record their gameplay sessions, sharing victories, showcasing skills, or creating entertaining content for online platforms.
  • Livestreaming: Screen recording enables live streaming of gameplay, allowing viewers to participate in real-time and interact with the streamer.
  • Game Reviews and Walkthroughs: Gamers can record walkthroughs, offering guidance and insights to other players, or create reviews highlighting game features and experiences.

4. Documentation and Communication:

  • Technical Support: Screen recordings are essential for documenting technical issues, allowing users to share their experiences with support teams for faster resolution.
  • Software Bug Reporting: Developers can use screen recordings to capture and report software bugs, providing valuable context for debugging and fixing issues.
  • Personal Projects: Individuals can record their creative processes, showcasing their work and offering insights into their methods.

Exploring the Options: A Comprehensive Overview of Screen Recording Tools

Windows 10 offers a variety of built-in and third-party tools for screen recording, each tailored to specific needs and offering unique features. Understanding these options empowers you to choose the tool that best suits your requirements.

1. Built-in Tools:

  • Xbox Game Bar: This feature, accessible via the Windows key + G shortcut, provides a user-friendly interface for recording gameplay. It allows for capturing audio, selecting recording area, and adjusting quality settings. However, its primary focus is on gaming, limiting its functionality for other applications.
  • Windows 10’s Built-in Recorder: Accessible through the "Windows + Alt + R" shortcut, this tool captures the entire screen with audio. While simple to use, it lacks advanced features like editing or annotation.

2. Third-Party Applications:

  • OBS Studio: A powerful open-source application, OBS Studio offers extensive customization options for screen recording and live streaming. It allows for multiple scene setups, source selection, audio mixing, and advanced settings for high-quality video output.
  • Camtasia: A comprehensive screen recording and video editing tool, Camtasia provides a user-friendly interface for recording, editing, and producing professional-looking videos. It includes features like annotations, transitions, and audio editing, making it ideal for creating engaging tutorials and presentations.
  • Bandicam: Known for its high-quality video output and lightweight design, Bandicam allows for capturing specific areas of the screen, recording games, and capturing webcam footage. It offers a range of customization options for video settings and performance optimization.
  • Snagit: Primarily designed for capturing images and videos, Snagit offers a comprehensive suite of tools for creating engaging visuals. It includes features for screen recording, annotation, editing, and sharing, making it ideal for capturing specific moments and creating visually appealing content.

Choosing the Right Tool: Navigating the Options for Your Needs

Selecting the appropriate screen recording tool depends on your specific requirements and the type of content you aim to create. Consider the following factors:

  • Purpose: Determine the primary use for the recording. For gaming, Xbox Game Bar or Bandicam are ideal, while Camtasia or Snagit are better suited for tutorials or presentations.
  • Features: Identify the features you need, such as audio recording, video editing, annotation tools, or specific output formats.
  • Ease of Use: Choose a tool with a user-friendly interface that aligns with your technical expertise.
  • Performance: Consider the system resources required and the impact on your computer’s performance.

FAQs: Addressing Common Questions about Screen Recording

1. Can I record audio with screen recordings?

  • Yes, most screen recording tools allow for audio capture. You can record system audio, microphone audio, or a combination of both.

2. How do I choose the right recording area?

  • Some tools allow you to select a specific area of the screen, while others capture the entire desktop. Choose the option that best suits your content.

3. What video formats are supported?

  • Common video formats include MP4, AVI, and MOV. Choose a format compatible with your intended use and platform.

4. Can I edit screen recordings after capturing them?

  • Many tools offer built-in editing features, allowing you to trim, cut, add transitions, and annotate your recordings.

5. Is there a limit on recording duration?

  • Some tools have recording time limitations, while others offer unlimited recording time. Check the tool’s specifications for details.

Tips: Optimizing Your Screen Recording Experience

  • Prepare your environment: Close unnecessary applications and minimize distractions to ensure smooth recording.
  • Optimize video settings: Choose a recording resolution and frame rate that balances quality and file size.
  • Use a microphone: Record clear audio for better engagement and understanding.
  • Practice recording: Familiarize yourself with the tool’s interface and features before recording important content.
  • Edit your recordings: Enhance your videos by trimming, adding transitions, and annotating key points.

Conclusion: Embracing the Power of Screen Recording

Screen recording on Windows 10 has evolved from a niche functionality to an indispensable tool for individuals and businesses alike. Its versatility, accessibility, and power to capture digital experiences make it a valuable resource for education, business, gaming, and personal projects. By understanding the different options available, choosing the right tool, and mastering its features, you can leverage the power of screen recording to create engaging, informative, and impactful content.

How to screen recorder windows 10 - polypag How To Record Your Screen On Windows 10 Screen record in Windows 10 - How to capture videos of applications and games - IONOS UK
How to screen record on windows 10 How to record video on screen windows 10 - jopuhaus A Guide to Screen recording on Windows 10
The Easiest Way to Record Your Screen in Windows 10: A Step-by-Step Guide How to screen recorder windows 10 - directvse

Closure

Thus, we hope this article has provided valuable insights into Capturing Your Digital Story: A Guide to Screen Recording on Windows 10. We appreciate your attention to our article. See you in our next article!

Navigating The Landscape Of Image Editing: A Comprehensive Guide To Photoshop Alternatives For Windows 10

Navigating the Landscape of Image Editing: A Comprehensive Guide to Photoshop Alternatives for Windows 10

Introduction

In this auspicious occasion, we are delighted to delve into the intriguing topic related to Navigating the Landscape of Image Editing: A Comprehensive Guide to Photoshop Alternatives for Windows 10. Let’s weave interesting information and offer fresh perspectives to the readers.

Die 17 besten kostenlosen Photoshop-Alternativen 2024  Skylum Blog

The realm of digital image editing is vast and dynamic, with Adobe Photoshop reigning supreme for decades. Yet, for many users, the cost barrier and the complexity of the software present significant hurdles. Fortunately, a robust ecosystem of free and affordable alternatives exists, offering powerful tools for Windows 10 users seeking to enhance, manipulate, and create stunning visuals. This article provides a comprehensive guide to navigating this landscape, exploring the features, benefits, and considerations of various options.

Understanding the Need for Image Editing Software

Image editing software empowers individuals and professionals to manipulate digital images for various purposes:

  • Enhancement: Adjusting brightness, contrast, color balance, and sharpness to improve the overall quality of photographs.
  • Manipulation: Removing blemishes, red-eye, or unwanted objects, as well as creating composites and montages.
  • Artistic Expression: Applying filters, textures, and effects to create unique and artistic visuals.
  • Design and Creation: Designing logos, graphics, and web elements, as well as manipulating images for print and digital media.

Exploring the Free and Affordable Alternatives

While Adobe Photoshop remains the industry standard, its price tag can be prohibitive for many users. Thankfully, a plethora of free and affordable alternatives offer comparable features and functionality, catering to diverse needs and skill levels.

1. GIMP (GNU Image Manipulation Program)

GIMP stands as a powerful, open-source image editor renowned for its versatility and extensive feature set. It provides a comprehensive suite of tools for image manipulation, including:

  • Layer-based editing: Allows for non-destructive editing, enabling users to easily adjust and experiment with different elements.
  • Selection tools: Precisely select areas of an image for editing, masking, or manipulation.
  • Brush and painting tools: Create and edit images with a range of brushes, patterns, and color options.
  • Filters and effects: Apply a wide variety of artistic and practical effects to enhance or transform images.

Advantages of GIMP:

  • Free and Open-Source: GIMP is completely free to download and use, with its source code available for anyone to modify and distribute.
  • Cross-Platform Compatibility: Available for Windows, macOS, and Linux, ensuring accessibility across various operating systems.
  • Powerful Features: Offers a wide range of tools and features comparable to professional software.
  • Large Community Support: A thriving community of users and developers provides extensive documentation, tutorials, and support.

Disadvantages of GIMP:

  • Steep Learning Curve: GIMP’s interface can be overwhelming for beginners due to its complexity and extensive feature set.
  • Limited Plugin Support: While GIMP offers a selection of plugins, it lacks the vast plugin ecosystem of Adobe Photoshop.

2. Paint.NET

Paint.NET is a free, user-friendly image editor designed for Windows users. It offers a streamlined interface and a range of essential tools for basic and advanced image editing, including:

  • Layers: Allows for non-destructive editing, providing flexibility for experimentation and adjustments.
  • Selection Tools: Provides a variety of tools for selecting specific areas of an image.
  • Effects and Filters: Offers a range of built-in effects and filters for enhancing and manipulating images.
  • Special Effects: Includes features like text and shape tools, as well as tools for creating artistic effects.

Advantages of Paint.NET:

  • Free and Easy to Use: Offers a simple and intuitive interface, making it accessible for beginners.
  • Lightweight and Fast: Runs smoothly on most Windows computers, offering a responsive editing experience.
  • Regular Updates: Continuously receives updates with new features and improvements.
  • Active Community Support: A dedicated community provides support, tutorials, and resources.

Disadvantages of Paint.NET:

  • Limited Advanced Features: Lacks the extensive feature set and advanced tools found in more professional software.
  • Windows-Only Software: Not available for other operating systems like macOS or Linux.

3. Photopea

Photopea is a web-based image editor that provides a robust set of features comparable to Photoshop, accessible directly through a web browser. It offers:

  • Layer-Based Editing: Enables non-destructive editing, allowing for adjustments and experimentation without affecting the original image.
  • Selection Tools: Provides a variety of tools for selecting areas of an image for editing, masking, or manipulation.
  • Brush and Painting Tools: Offers a range of brushes, patterns, and color options for painting and editing.
  • Filters and Effects: Includes a wide range of filters and effects for enhancing and transforming images.

Advantages of Photopea:

  • Web-Based Access: Accessible from any device with an internet connection, eliminating the need for software installation.
  • Free to Use: Offers a free version with core features, making it accessible to everyone.
  • Photoshop-Like Interface: Provides a familiar interface for users transitioning from Adobe Photoshop.
  • Regular Updates: Continuously receives updates with new features and improvements.

Disadvantages of Photopea:

  • Limited Offline Access: Requires an internet connection to access and use the software.
  • Potential Performance Issues: May experience performance issues depending on internet speed and browser capabilities.

4. Pixlr

Pixlr is a suite of free online and mobile image editors offering a range of options for different needs. It includes:

  • Pixlr X: A web-based editor with a user-friendly interface and a range of essential tools for basic and advanced image editing.
  • Pixlr E: A simpler, web-based editor designed for quick edits and basic image adjustments.
  • Pixlr Mobile Apps: Mobile apps for iOS and Android devices, providing on-the-go image editing capabilities.

Advantages of Pixlr:

  • Free and Accessible: Offers free online and mobile versions, making it accessible to everyone.
  • Multiple Options: Provides a range of editors for different needs and skill levels.
  • Simple and User-Friendly: Offers intuitive interfaces for both basic and advanced editing.
  • Cross-Platform Compatibility: Available on web browsers and mobile devices, ensuring accessibility across platforms.

Disadvantages of Pixlr:

  • Limited Feature Set: Compared to more professional software, Pixlr offers a more limited range of tools and features.
  • Potential Performance Issues: May experience performance issues depending on internet speed and device capabilities.

5. Photo Pos Pro

Photo Pos Pro is a free image editor for Windows, offering a blend of user-friendliness and powerful features. It provides:

  • Layer-Based Editing: Allows for non-destructive editing, enabling users to experiment and adjust images without affecting the original.
  • Selection Tools: Offers a variety of tools for selecting specific areas of an image for editing or manipulation.
  • Brush and Painting Tools: Includes a range of brushes, patterns, and color options for painting and editing.
  • Effects and Filters: Provides a collection of effects and filters for enhancing and transforming images.

Advantages of Photo Pos Pro:

  • Free and Easy to Use: Offers a user-friendly interface and a range of features for both beginners and advanced users.
  • Powerful Features: Provides a comprehensive set of tools for image editing, manipulation, and creation.
  • Regular Updates: Continuously receives updates with new features and improvements.
  • Active Community Support: A dedicated community provides support, tutorials, and resources.

Disadvantages of Photo Pos Pro:

  • Windows-Only Software: Not available for other operating systems like macOS or Linux.
  • Limited Plugin Support: Offers a limited selection of plugins compared to other software options.

Choosing the Right Image Editor for Your Needs

Selecting the ideal image editor depends on individual needs, skill level, and specific requirements. Consider these factors:

  • Level of Experience: Beginners might prefer user-friendly options like Paint.NET or Pixlr, while experienced users may opt for more powerful software like GIMP or Photopea.
  • Specific Features: Identify the specific features you need, such as layer-based editing, advanced selection tools, or specific filters and effects.
  • Platform Compatibility: Determine the operating system you are using and choose a software compatible with your platform.
  • Budget: Consider your budget and choose a free or affordable option that fits your needs and financial constraints.

FAQs About Photoshop Alternatives for Windows 10

1. What is the best free image editor for Windows 10?

The "best" free image editor depends on individual needs and preferences. GIMP offers a powerful feature set, Paint.NET provides user-friendliness, and Photopea offers web-based accessibility. Explore each option to determine which best suits your requirements.

2. Can I use Photoshop for free?

Adobe offers a free trial of Photoshop, allowing users to explore its features for a limited time. However, continued use requires a subscription.

3. Are there any free alternatives to Photoshop for professional use?

Yes, GIMP and Photopea offer powerful features comparable to Photoshop and can be used for professional projects. However, they may require a steeper learning curve and may lack the extensive plugin support of Photoshop.

4. Can I use image editing software on my mobile device?

Yes, several image editing apps are available for iOS and Android devices, including Pixlr Mobile, Snapseed, and Adobe Photoshop Express.

5. What are the benefits of using free image editing software?

Free image editing software offers several advantages, including accessibility, cost-effectiveness, and a wide range of features. It allows users to explore image editing without financial commitment and experiment with different tools and techniques.

Tips for Using Free Image Editing Software

  • Start with the Basics: Begin with basic editing tools and gradually explore more advanced features as you gain experience.
  • Utilize Online Tutorials: Numerous online tutorials and resources can guide you through the software’s features and techniques.
  • Experiment with Different Features: Don’t be afraid to experiment with different tools and settings to discover what works best for you.
  • Join Online Communities: Connect with other users and developers to share knowledge, ask questions, and learn from their experiences.
  • Practice Regularly: The key to mastering any image editing software is consistent practice and experimentation.

Conclusion

The world of free and affordable image editing software offers a diverse range of options for Windows 10 users seeking to enhance, manipulate, and create stunning visuals. From the powerful and versatile GIMP to the user-friendly Paint.NET and the web-based Photopea, each software caters to different needs and skill levels. By carefully considering your requirements and exploring the available options, you can find the perfect image editor to unlock your creative potential and elevate your digital imagery.

10 Best Alternatives to Photoshop for Graphic Design The 8 Best Photoshop Alternatives for Windows (2023) – Yes Web Designs The Best Alternatives To Photoshop - Weber Design Labs
The 8 Best Photoshop Alternatives for Windows (2024)  Design Shack Top 12 Photoshop Alternatives - Which Photo Editing Tool is the Best? Editing Pdf In Photoshop
Top 12 Photoshop Alternatives - Which Photo Editing Tool is the Best? 17 Best Free Alternatives To Photoshop In 2024  Skylum Blog

Closure

Thus, we hope this article has provided valuable insights into Navigating the Landscape of Image Editing: A Comprehensive Guide to Photoshop Alternatives for Windows 10. We thank you for taking the time to read this article. See you in our next article!

Windows 10: A Comprehensive Overview Of The Operating System

Windows 10: A Comprehensive Overview of the Operating System

Introduction

With great pleasure, we will explore the intriguing topic related to Windows 10: A Comprehensive Overview of the Operating System. Let’s weave interesting information and offer fresh perspectives to the readers.

Windows 10: A Comprehensive Overview of the Operating System

Windows 10  Full Overview - YouTube

Windows 10 is a powerful and versatile operating system that has become the cornerstone of modern computing for millions worldwide. Released in 2015, it represents a significant evolution from its predecessors, offering a comprehensive suite of features, enhanced security, and a user-friendly interface. This article delves into the key aspects of Windows 10, exploring its functionality, benefits, and impact on the computing landscape.

Understanding the Core Functionality:

Windows 10 is a multifaceted operating system that acts as the intermediary between the user and the computer’s hardware. It manages all the essential functions, including:

  • User Interface: Windows 10 provides a visually appealing and intuitive interface, allowing users to navigate seamlessly through applications, settings, and files. Its Start Menu, Action Center, and Taskbar are designed to facilitate easy access to frequently used features and applications.
  • Application Management: The operating system allows users to install, manage, and run a wide range of applications, from productivity tools to entertainment software. The Microsoft Store offers a vast library of apps, while users can also download and install programs from other sources.
  • File System and Storage: Windows 10 utilizes a robust file system that enables users to organize, store, and access data efficiently. It supports various file formats and provides options for data backup and recovery.
  • Networking and Connectivity: Windows 10 facilitates seamless connectivity to the internet, local networks, and other devices. It supports various network protocols, enabling users to share files, access resources, and communicate with others.
  • Security and Privacy: Windows 10 incorporates robust security features, including built-in antivirus protection, firewall, and user account management. It also offers privacy controls that allow users to manage their personal information and data access.

Key Benefits of Windows 10:

Windows 10 offers numerous advantages that have contributed to its widespread adoption:

  • Improved Performance: Windows 10 boasts optimized performance, with faster boot times, enhanced multitasking capabilities, and smoother application execution. It utilizes the latest hardware technologies to ensure efficient resource utilization.
  • Enhanced Security: Windows 10 prioritizes security with features like Windows Defender, SmartScreen, and Windows Hello. These technologies protect users from malware, phishing attacks, and unauthorized access.
  • User-Friendly Interface: Windows 10 features a modern and intuitive interface that is easily navigated by users of all skill levels. Its consistent design language and clear visual cues promote ease of use.
  • Cross-Device Compatibility: Windows 10 seamlessly integrates with other devices, including smartphones, tablets, and gaming consoles. Users can sync their data, access applications, and manage their devices from a single platform.
  • Regular Updates and Support: Microsoft regularly releases updates for Windows 10, ensuring that users have access to the latest security patches, bug fixes, and feature enhancements. This ongoing support ensures a stable and reliable operating system.

Frequently Asked Questions:

1. What are the system requirements for Windows 10?

To run Windows 10 smoothly, your computer needs to meet certain minimum specifications:

  • Processor: 1 gigahertz (GHz) or faster processor
  • RAM: 1 gigabyte (GB) for 32-bit or 2 GB for 64-bit
  • Hard disk space: 16 GB for 32-bit or 20 GB for 64-bit
  • Graphics card: Microsoft DirectX 9 graphics device with WDDM 1.0 driver

2. How do I upgrade to Windows 10?

Upgrading to Windows 10 is a straightforward process. You can:

  • Download and install the upgrade: Visit the official Microsoft website and download the Windows 10 installation files.
  • Use the Windows Update feature: Go to Settings > Update & Security > Windows Update and check for updates.

3. Is Windows 10 free?

Windows 10 is not entirely free. While Microsoft offers a free upgrade path for users with eligible Windows 7 or 8.1 licenses, new installations typically require a purchase.

4. How can I customize Windows 10?

Windows 10 offers extensive customization options. You can:

  • Change themes and backgrounds: Personalize your desktop with different colors, images, and themes.
  • Adjust settings: Fine-tune various aspects of the operating system, including display, sound, and keyboard settings.
  • Install third-party applications: Enhance functionality and personalize your experience with a wide range of applications.

5. What are the different versions of Windows 10?

Windows 10 comes in various editions, each targeting specific user needs and functionalities:

  • Windows 10 Home: Designed for everyday users, it offers a balance of features and functionality.
  • Windows 10 Pro: Suitable for businesses and power users, it includes additional security features and management tools.
  • Windows 10 Enterprise: Tailored for large organizations, it provides advanced security, management, and deployment capabilities.
  • Windows 10 Education: Designed for educational institutions, it offers features for student and teacher collaboration.

Tips for Optimizing Windows 10:

  • Regularly update your system: Install the latest updates to ensure security and stability.
  • Manage your startup programs: Disable unnecessary programs from launching at startup to improve boot times.
  • Clean up your hard drive: Regularly delete temporary files and unused programs to free up space.
  • Optimize your power settings: Adjust power settings to conserve battery life and improve performance.
  • Use a reliable antivirus: Install and regularly update a reputable antivirus program to protect your system from malware.

Conclusion:

Windows 10 has emerged as a dominant force in the operating system landscape, offering a powerful and versatile platform for individuals, businesses, and educational institutions. Its intuitive interface, robust security features, and regular updates have made it a reliable and user-friendly choice for a wide range of computing needs. As technology continues to evolve, Windows 10 will likely continue to adapt and improve, further solidifying its position as a leading operating system in the years to come.

Windows 10#Operating System - YouTube Windows Operating System: A Complete Overview Describes the different phases of the windows operating system  Download Scientific Diagram
Microsoft Windows 10 Comprehensive - STANZATEXTBOOKS Windows 10 Overview Windows 10: An Overview of the Popular Operating System
What Is Windows Operating System windows 10 operating system features - YouTube

Closure

Thus, we hope this article has provided valuable insights into Windows 10: A Comprehensive Overview of the Operating System. We hope you find this article informative and beneficial. See you in our next article!

Optimizing Performance: A Guide To NVIDIA GeForce GTX 1050 Ti Drivers On Windows 11

Optimizing Performance: A Guide to NVIDIA GeForce GTX 1050 Ti Drivers on Windows 11

Introduction

With enthusiasm, let’s navigate through the intriguing topic related to Optimizing Performance: A Guide to NVIDIA GeForce GTX 1050 Ti Drivers on Windows 11. Let’s weave interesting information and offer fresh perspectives to the readers.

Optimizing Performance: A Guide to NVIDIA GeForce GTX 1050 Ti Drivers on Windows 11

NVIDIA GeForce GTX 1050 Ti Drivers Download for Windows 10,11  TechPout

The NVIDIA GeForce GTX 1050 Ti, a popular graphics card known for its robust performance and affordability, continues to be a reliable choice for gamers and professionals alike. With the advent of Windows 11, ensuring optimal performance and compatibility with this hardware necessitates the use of the correct drivers. This article aims to provide a comprehensive guide to navigating the world of NVIDIA GeForce GTX 1050 Ti drivers on Windows 11, highlighting their importance and offering valuable tips for a seamless experience.

Understanding the Role of Drivers

Drivers act as the bridge between your hardware and software, enabling communication and proper functionality. In the context of the NVIDIA GeForce GTX 1050 Ti, drivers facilitate the seamless interaction between the graphics card and Windows 11, allowing for optimal performance, enhanced visual fidelity, and access to advanced features.

Importance of Up-to-Date Drivers

Maintaining updated drivers is crucial for several reasons:

  • Performance Enhancement: Newer drivers often include optimizations and bug fixes that can significantly improve performance in games and applications, resulting in smoother gameplay, higher frame rates, and enhanced responsiveness.
  • Feature Access: Updated drivers provide access to the latest features and technologies, including support for new games, DirectX versions, and advanced graphics settings.
  • Stability and Compatibility: Regular driver updates ensure stability and compatibility with the latest Windows 11 updates, preventing potential conflicts and ensuring a smooth user experience.
  • Security: Drivers may contain security patches that address vulnerabilities, protecting your system from potential threats.

Navigating the Driver Installation Process

The process of installing NVIDIA GeForce GTX 1050 Ti drivers on Windows 11 is relatively straightforward:

  1. Download the Latest Drivers: Visit the official NVIDIA website and navigate to the "Drivers" section. Select your graphics card model (GeForce GTX 1050 Ti) and operating system (Windows 11). Download the appropriate driver package.
  2. Run the Installer: Execute the downloaded installer file. Follow the on-screen prompts, accepting the license agreement and selecting the desired installation options.
  3. Restart Your Computer: Once the installation is complete, restart your computer to ensure the drivers are fully loaded.

Troubleshooting Common Driver Issues

While installing and using NVIDIA GeForce GTX 1050 Ti drivers on Windows 11 is typically smooth, encountering occasional issues is not uncommon. Here are some common problems and solutions:

  • Driver Conflicts: If you have previously installed drivers from a third-party source, they might conflict with the official NVIDIA drivers. Uninstall any conflicting drivers before installing the official ones.
  • Compatibility Issues: Ensure that the downloaded drivers are compatible with your specific graphics card model and Windows 11 version. Check the NVIDIA website for the latest driver versions and compatibility information.
  • Installation Errors: Driver installation errors can occur due to insufficient permissions or corrupted files. Run the installer as administrator and try downloading the driver package again.
  • Performance Degradation: If you experience a drop in performance after installing new drivers, consider rolling back to a previous version. This can be done through the Device Manager in Windows 11.

FAQs about NVIDIA GeForce GTX 1050 Ti Drivers on Windows 11

Q: What are the minimum system requirements for running the NVIDIA GeForce GTX 1050 Ti on Windows 11?

A: The minimum system requirements for running the NVIDIA GeForce GTX 1050 Ti on Windows 11 are:

  • Processor: Intel Core i3 or AMD equivalent
  • Memory: 4 GB RAM
  • Storage: 50 GB free hard disk space
  • Operating System: Windows 11 (64-bit)

Q: How do I check if my NVIDIA GeForce GTX 1050 Ti drivers are up-to-date?

A: You can check for driver updates through the NVIDIA GeForce Experience application or directly on the NVIDIA website.

Q: What are the benefits of using the latest drivers for my NVIDIA GeForce GTX 1050 Ti on Windows 11?

A: The latest drivers offer performance enhancements, feature access, stability improvements, and security patches.

Q: Can I use drivers intended for a different NVIDIA graphics card on my GeForce GTX 1050 Ti?

A: It is not recommended to use drivers designed for other graphics cards. Using incompatible drivers can lead to instability, performance issues, and potential damage to your system.

Q: What should I do if I encounter driver installation errors?

A: If you encounter driver installation errors, try running the installer as administrator, downloading the driver package again, or checking for compatibility issues.

Q: How can I roll back to a previous version of my NVIDIA GeForce GTX 1050 Ti drivers?

A: You can roll back to a previous version of your NVIDIA GeForce GTX 1050 Ti drivers through the Device Manager in Windows 11.

Q: Can I use a third-party driver installer for my NVIDIA GeForce GTX 1050 Ti on Windows 11?

A: While using third-party driver installers may seem convenient, it is generally recommended to stick to the official drivers provided by NVIDIA. Third-party installers can sometimes bundle unwanted software or introduce compatibility issues.

Tips for Optimizing NVIDIA GeForce GTX 1050 Ti Performance on Windows 11

  • Utilize NVIDIA GeForce Experience: The NVIDIA GeForce Experience application provides a user-friendly interface for managing drivers, optimizing game settings, and recording gameplay.
  • Adjust Graphics Settings: Optimize game settings to match your hardware capabilities and preferences. Lowering graphics settings can improve performance, especially in demanding games.
  • Enable VSync: Vertical synchronization (VSync) helps reduce screen tearing, but can also decrease frame rates. Experiment with VSync to find the optimal balance between visual quality and performance.
  • Monitor System Temperature: Overheating can affect performance and potentially damage your hardware. Monitor your graphics card temperature using the NVIDIA GeForce Experience or other monitoring tools.
  • Keep Your System Clean: Regularly clean your computer’s dust filters and fans to ensure optimal airflow and cooling.

Conclusion

The NVIDIA GeForce GTX 1050 Ti remains a capable graphics card that can deliver enjoyable gaming and professional experiences on Windows 11. Utilizing the correct drivers is essential for maximizing performance, accessing advanced features, and ensuring a stable and secure computing environment. By following the guidelines outlined in this article, users can ensure their NVIDIA GeForce GTX 1050 Ti operates at its full potential on Windows 11. Regularly updating drivers, troubleshooting issues promptly, and employing optimization tips will contribute to a smooth and enjoyable user experience.

Nvidia GeForce GTX 1050 Ti Driver Download Links with Setup Guide Nvidia GeForce GTX 1050 Ti Driver Download Links with Setup Guide NVIDIA GeForce GTX 1050 Ti Drivers Download for Windows 10,11  TechPout
GTX 1050 Ti Drivers Download & Update for Your Better Gaming Experience - Driver Easy NVIDIA GeForce GTX 1050 Ti Drivers Download for Windows 10,11  TechPout How to Download and Update NVidia GeForce GTX 1050 Ti Drivers? - MiniTool
NVIDIA GeForce GTX 1050 Ti Drivers Download for Windows 10,11  TechPout How to optimize NVIDIA GeForce Now settings for best performance  Windows Central

Closure

Thus, we hope this article has provided valuable insights into Optimizing Performance: A Guide to NVIDIA GeForce GTX 1050 Ti Drivers on Windows 11. We thank you for taking the time to read this article. See you in our next article!

Windows 11: A New Era Of Personal Computing

Windows 11: A New Era of Personal Computing

Introduction

With enthusiasm, let’s navigate through the intriguing topic related to Windows 11: A New Era of Personal Computing. Let’s weave interesting information and offer fresh perspectives to the readers.

Windows 11: A New Era of Personal Computing

Windows 11: A new era for the PC begins today - jpralves.net

Microsoft’s Windows 11, released in October 2021, represents a significant evolution in the operating system landscape. Building upon the foundation of Windows 10, it introduces a fresh visual aesthetic, enhanced functionality, and a renewed focus on user experience. This article explores the key features, benefits, and implications of Windows 11, providing a comprehensive understanding of this latest iteration of the world’s most popular operating system.

A Refined Visual Identity:

Windows 11 boasts a redesigned interface that prioritizes clarity, simplicity, and a modern aesthetic. The Start menu has been repositioned to the center of the taskbar, offering a more intuitive and visually appealing layout. Rounded corners, translucent effects, and a lighter color palette create a visually harmonious experience. These design choices emphasize a streamlined and user-friendly approach, promoting an efficient workflow and a visually pleasing environment.

Enhanced Multitasking and Productivity:

Windows 11 introduces features designed to enhance multitasking and productivity. Snap Layouts streamline window arrangement, allowing users to quickly create and manage multiple windows side-by-side. Snap Groups save these configurations for easy recall, eliminating the need to manually arrange windows every time. Virtual Desktops provide a more organized approach to managing multiple workspaces, allowing users to seamlessly switch between different tasks or projects. These features empower users to work more efficiently and effectively, maximizing productivity within the digital environment.

Integration with Microsoft Ecosystem:

Windows 11 seamlessly integrates with other Microsoft services and applications, creating a cohesive and interconnected user experience. Features like Microsoft Teams integration facilitate seamless communication and collaboration. The integration of Microsoft Store offers a curated selection of applications, ensuring a secure and trustworthy source for software. This interconnected ecosystem enhances the overall user experience by streamlining workflows, simplifying access to essential services, and promoting a unified digital environment.

Gaming and Entertainment:

Windows 11 prioritizes gaming and entertainment, offering enhanced performance and features for immersive experiences. DirectX 12 Ultimate delivers stunning visuals and improved performance, enhancing the gaming experience. Auto HDR (High Dynamic Range) technology expands the color range of games, creating a more vibrant and realistic visual experience. These features elevate the entertainment experience, providing users with a platform for immersive gaming and multimedia consumption.

Security and Privacy:

Security remains a paramount concern in the digital landscape, and Windows 11 reinforces its commitment to user privacy and data protection. Features like Microsoft Defender, a built-in antivirus solution, provide comprehensive protection against malware and cyber threats. Windows Hello, a biometric authentication system, enables secure login using facial recognition or fingerprint scanning. These security features ensure a secure and trustworthy computing environment, safeguarding user data and privacy.

Accessibility and Inclusivity:

Windows 11 incorporates features designed to enhance accessibility and promote inclusivity. The new Narrator feature provides a comprehensive screen reader experience, making the operating system more accessible for users with visual impairments. Improved text-to-speech functionality further enhances accessibility, ensuring a more inclusive digital environment for all users. These features demonstrate Microsoft’s commitment to creating a platform that caters to diverse needs and promotes equal access to technology.

FAQs on Windows 11:

Q: What are the minimum system requirements for Windows 11?

A: Windows 11 requires a 1 GHz or faster processor with 2 or more cores, 4 GB of RAM, 64 GB of storage, a DirectX 12 compatible graphics card, and a display with a resolution of 1366 x 768 pixels. Additionally, the system must have a TPM 2.0 module and a Secure Boot enabled.

Q: Is Windows 11 compatible with my current hardware?

A: The compatibility of Windows 11 with your existing hardware depends on several factors, including your processor, RAM, storage space, and graphics card. You can use the PC Health Check app to assess the compatibility of your system with Windows 11.

Q: Can I upgrade to Windows 11 from Windows 10?

A: Yes, you can upgrade to Windows 11 from Windows 10, provided your system meets the minimum requirements. Microsoft offers a free upgrade path for eligible Windows 10 users.

Q: How do I install Windows 11?

A: You can install Windows 11 by downloading the installation media from Microsoft’s website. Alternatively, you can upgrade from Windows 10 through the Windows Update settings.

Q: What are the differences between Windows 10 and Windows 11?

A: Windows 11 features a redesigned interface, improved multitasking capabilities, enhanced gaming performance, and a focus on security and accessibility. It also offers a tighter integration with Microsoft’s ecosystem of services and applications.

Q: Is Windows 11 a free upgrade for everyone?

A: No, Windows 11 is not a free upgrade for everyone. While Microsoft offers a free upgrade path for eligible Windows 10 users, certain system requirements must be met for eligibility.

Tips for Using Windows 11:

1. Explore the New Start Menu: Familiarize yourself with the redesigned Start menu and its new features, including pinned apps, recent documents, and search functionality.

2. Utilize Snap Layouts and Snap Groups: Take advantage of Snap Layouts and Snap Groups to streamline multitasking and efficiently manage multiple windows.

3. Optimize Virtual Desktops: Leverage virtual desktops to create organized workspaces for different tasks or projects, enhancing productivity and focus.

4. Embrace Microsoft Teams Integration: Utilize the seamless integration with Microsoft Teams for efficient communication and collaboration within your digital environment.

5. Explore the Microsoft Store: Discover a curated selection of applications and software within the Microsoft Store, ensuring a secure and trustworthy source for digital content.

6. Enable Windows Hello: Enhance security and convenience by enabling Windows Hello for biometric authentication using facial recognition or fingerprint scanning.

7. Customize Your Desktop: Personalize your desktop experience with custom themes, wallpapers, and backgrounds to create a visually appealing and personalized environment.

8. Explore Accessibility Features: Discover the accessibility features available in Windows 11, such as Narrator and text-to-speech, to create a more inclusive and accessible digital experience.

Conclusion:

Windows 11 represents a significant evolution in the operating system landscape, offering a refined visual identity, enhanced functionality, and a renewed focus on user experience. Its features, including improved multitasking, seamless integration with the Microsoft ecosystem, gaming enhancements, and robust security measures, aim to provide a more productive, engaging, and secure computing environment for users. As Microsoft continues to iterate and refine Windows 11, it is poised to shape the future of personal computing, empowering users with a powerful, intuitive, and accessible platform for their digital endeavors.

Windows 11 segna l’inizio di una nuova era per i personal computer  Keep Up Culture PPT - Windows 10 vs. Windows 11: A New Era of Computing PowerPoint Presentation - ID:12531032 Windows 11 Review: The New Era Evolves Digital Trends, 51% OFF
Windows 11 Review: The New Era Evolves Digital Trends Windows 11 review: The new era evolves - Techno Blender Windows 11 Review: The New Era Evolves Digital Trends, 51% OFF
Windows 11 Review: The New Era Evolves Digital Trends Microsoft brings AI to Windows 11 to unlock new productivity era

Closure

Thus, we hope this article has provided valuable insights into Windows 11: A New Era of Personal Computing. We thank you for taking the time to read this article. See you in our next article!

Navigating The Past: Nero 6 On Windows 10

Navigating the Past: Nero 6 on Windows 10

Introduction

In this auspicious occasion, we are delighted to delve into the intriguing topic related to Navigating the Past: Nero 6 on Windows 10. Let’s weave interesting information and offer fresh perspectives to the readers.

The Best Free Software of the World: Nero 6 (Full Version With License Key)

The world of software development is a dynamic landscape, constantly evolving with new advancements and technological shifts. While modern software solutions cater to contemporary needs, it is not uncommon to encounter situations requiring older software versions, particularly when dealing with legacy formats or specific hardware compatibility issues.

Nero 6, released in 2004, represents a significant chapter in the history of optical disc burning software. It was a popular choice for users seeking reliable tools to burn CDs, DVDs, and even Blu-ray discs, a technology still in its infancy at the time. However, the digital landscape has dramatically changed since then, with the advent of cloud storage, streaming services, and widespread adoption of portable devices. This evolution has understandably led to the discontinuation of Nero 6 development and support.

Challenges of Using Legacy Software on Modern Systems

Running Nero 6 on Windows 10 presents a unique set of challenges. The software was designed for an operating system environment significantly different from the modern Windows 10 landscape. This disparity can manifest in several ways:

  • Compatibility Issues: Windows 10’s architecture and security measures may pose compatibility problems for older software like Nero 6. This could lead to unexpected errors, program crashes, or even security vulnerabilities.
  • Driver Conflicts: Drivers are essential software components that allow your computer to communicate with hardware devices. Nero 6 might require specific drivers that are no longer compatible with Windows 10. This can result in difficulties recognizing optical drives or other hardware components.
  • Security Concerns: Older software may lack the latest security patches and updates, making it susceptible to exploits and malware attacks. Running such software on a modern system can potentially expose your computer to security risks.
  • Lack of Support: As Nero 6 is no longer supported by the developers, users are left without access to bug fixes, updates, or technical assistance. This can significantly impact the software’s stability and functionality.

The Importance of Alternatives

Given the challenges associated with running Nero 6 on Windows 10, it is crucial to consider alternative solutions. Modern software programs offer a wider range of features, enhanced security, and better compatibility with current operating systems. Some popular alternatives include:

  • Free and Open-Source Options: Programs like ImgBurn and CDBurnerXP offer free, reliable solutions for burning optical discs. They are often updated with the latest security patches and are compatible with various operating systems.
  • Commercial Software Solutions: Companies like CyberLink and Ashampoo offer comprehensive software suites that include CD/DVD burning capabilities alongside other features like multimedia editing and file management.

FAQs Regarding Nero 6 on Windows 10

Q: Can I still download and install Nero 6 on Windows 10?

A: While you might find older versions of Nero 6 online, it is strongly discouraged. The software is unsupported and may not function properly on Windows 10. Installing it could expose your system to security risks.

Q: Can I use Nero 6 to burn discs on Windows 10?

A: It is possible to run Nero 6 on Windows 10, but it is not recommended due to potential compatibility issues and security risks.

Q: What are the best alternatives to Nero 6 for Windows 10?

A: Several excellent alternatives are available, both free and commercial. Consider exploring options like ImgBurn, CDBurnerXP, CyberLink Power2Go, or Ashampoo Burning Studio.

Q: Is it safe to use Nero 6 on Windows 10?

A: Using unsupported software like Nero 6 on Windows 10 poses security risks due to potential vulnerabilities and the lack of updates. It is strongly recommended to use modern, supported software for burning optical discs.

Tips for Using Legacy Software on Windows 10

  • Compatibility Check: Before installing any legacy software, research its compatibility with Windows 10. Look for information on the developer’s website or online forums.
  • Virtualization: Consider using a virtual machine environment like VirtualBox or VMware to run older software in a controlled environment. This can help minimize potential conflicts with your main operating system.
  • Security Precautions: If you must run legacy software, ensure your antivirus and anti-malware software are up to date. Avoid downloading software from untrusted sources.
  • Alternative Solutions: Prioritize using modern, supported software alternatives for essential tasks. This will ensure better compatibility, stability, and security.

Conclusion

While Nero 6 holds a significant place in the history of optical disc burning software, its usage on Windows 10 presents considerable challenges. The software’s lack of support, potential compatibility issues, and security concerns make it a risky choice for modern users. It is strongly recommended to explore alternative solutions that provide improved functionality, security, and compatibility with current operating systems. Embracing modern software tools ensures a smoother, more secure, and efficient digital experience.

Download Nero 6 with Keygen  All Software Nero 6 backup - lanaforce Nero 6 backup - lanaforce
Nero 6 slunečnice / europan-cz.cz Nero 6 voor Windows - CCM Nero 6 free download - smartermasa
Nero Burning Rom 6.6.0.14 - Download inside - WinFuture.de download Nero For Windows 10

Closure

Thus, we hope this article has provided valuable insights into Navigating the Past: Nero 6 on Windows 10. We appreciate your attention to our article. See you in our next article!