Archives January 2024

Navigating The Browser Landscape: Exploring Options Beyond Microsoft Edge On Windows 10

Navigating the Browser Landscape: Exploring Options Beyond Microsoft Edge on Windows 10

Introduction

With great pleasure, we will explore the intriguing topic related to Navigating the Browser Landscape: Exploring Options Beyond Microsoft Edge on Windows 10. Let’s weave interesting information and offer fresh perspectives to the readers.

Configure Browser tab experiences in Windows for Microsoft Edge

In the ever-evolving digital landscape, web browsers have become indispensable tools for accessing information, engaging in online activities, and navigating the vast expanse of the internet. While Microsoft Edge has emerged as the default browser on Windows 10, users may find themselves seeking alternative browsing experiences that better align with their needs and preferences. This exploration delves into the reasons why users might choose to explore options beyond Microsoft Edge, providing a comprehensive guide to understanding the available alternatives and the process of transitioning to a different browser.

Understanding the Need for Browser Diversity

The decision to move away from Microsoft Edge is often driven by a desire for enhanced functionality, improved performance, or a more tailored browsing experience. Here are some key reasons why users might consider exploring alternative browsers:

  • Customization and Flexibility: Different browsers offer varying levels of customization, allowing users to personalize their browsing experience with themes, extensions, and settings tailored to their preferences.
  • Security and Privacy: Browser security and privacy are paramount concerns in today’s digital world. Users may prioritize browsers that prioritize robust security features, enhanced privacy settings, and strong anti-tracking measures.
  • Performance and Resource Consumption: Browser performance can significantly impact user experience. Some browsers prioritize speed and resource efficiency, minimizing system impact and ensuring a smooth browsing experience, especially on devices with limited resources.
  • Compatibility and Feature Set: Specific websites or web applications may function optimally with certain browsers. Users might choose a browser known for its compatibility with specific technologies or its robust feature set that aligns with their particular needs.

Exploring the Browser Alternatives

The web browser market offers a diverse range of options, each catering to a specific set of user preferences and requirements. Here are some of the most popular and widely-used browsers:

  • Google Chrome: Known for its speed, vast extension library, and seamless integration with Google services, Chrome enjoys widespread popularity.
  • Mozilla Firefox: Emphasizing privacy and security, Firefox offers a robust feature set, including powerful customization options and a strong focus on user control.
  • Opera: Opera stands out with its built-in VPN, data-saving features, and a unique sidebar for easy access to social media and other online services.
  • Brave: Brave prioritizes privacy and security, blocking ads and trackers by default. It also offers a unique reward system for users who choose to view ads.
  • Safari: Apple’s native browser, Safari, is optimized for Apple devices and offers seamless integration with the Apple ecosystem.

Transitioning to a New Browser: A Step-by-Step Guide

Switching to a new browser involves a straightforward process that ensures a smooth transition while preserving your essential browsing data:

  1. Download and Install the New Browser: Visit the website of your chosen browser and download the installer for your operating system. Run the installer and follow the on-screen instructions to complete the installation.
  2. Import Bookmarks and Settings: Most browsers offer an import feature that allows you to transfer your bookmarks, passwords, and other settings from your previous browser. This ensures a seamless transition and preserves your browsing history.
  3. Configure Your New Browser: Customize your new browser to suit your preferences. Adjust settings related to privacy, security, appearance, and extensions.
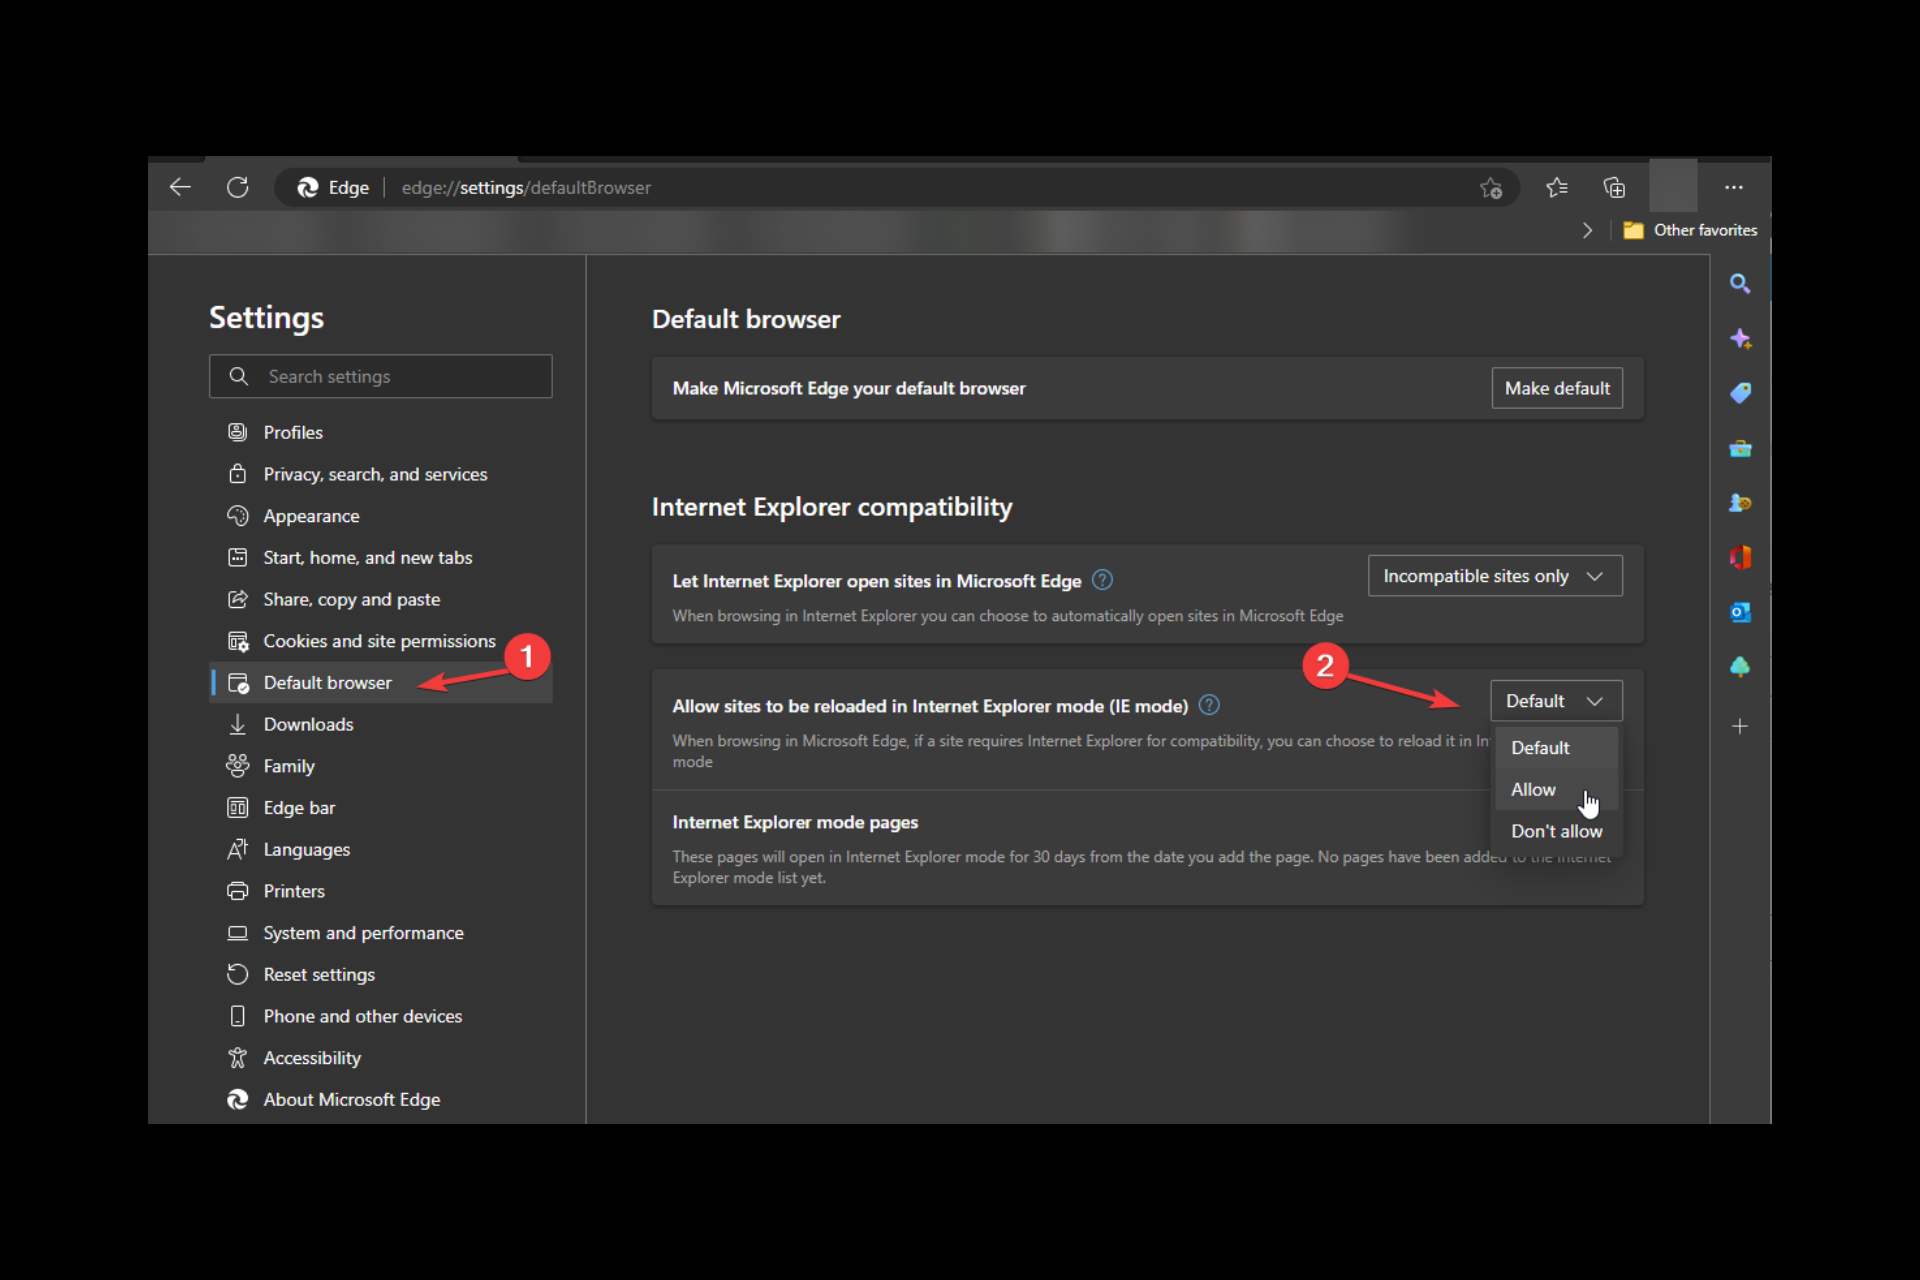
  4. Set Your New Browser as Default: Navigate to your operating system’s settings and change the default browser to your newly installed choice. This ensures that all web links automatically open in your preferred browser.
  5. Test and Evaluate: Browse the internet using your new browser and familiarize yourself with its features and functionality. Evaluate its performance, security, and overall user experience.

FAQs: Addressing Common Concerns

1. Will I Lose My Browsing Data?

No, you can easily import your bookmarks, passwords, and other browsing data from your previous browser. Most browsers offer import features that allow you to seamlessly transfer your information.

2. Is It Safe to Switch Browsers?

Yes, switching browsers is safe and generally a straightforward process. Ensure you download the browser from the official website and follow the installation instructions carefully.

3. Can I Use Multiple Browsers Simultaneously?

Yes, you can use multiple browsers on your system without any conflicts. You can choose the browser that best suits your needs for specific tasks or websites.

4. What Happens to My Microsoft Edge Data?

Your Microsoft Edge data, including bookmarks, passwords, and history, remains accessible even after switching browsers. You can import this data into your new browser or choose to keep it separate.

5. Will My Website Preferences Change?

Your website preferences, such as language settings and cookies, are generally linked to your browser profile and will be transferred to your new browser during the import process.

Tips for a Smooth Transition

  • Backup Your Data: Before making the switch, back up your bookmarks, passwords, and other important browsing data to ensure data security.
  • Explore Browser Features: Take time to familiarize yourself with the features and functionalities of your new browser. Explore its customization options, extensions, and security settings.
  • Test Compatibility: Ensure that your new browser is compatible with the websites and web applications you regularly use.
  • Consider Extensions: Explore the extension libraries of different browsers and install extensions that enhance your browsing experience.

Conclusion

Choosing the right web browser is a personal decision influenced by individual needs and preferences. While Microsoft Edge remains a viable option, exploring alternatives allows users to discover browsers that offer enhanced functionality, improved performance, and a more tailored browsing experience. By understanding the reasons for exploring options beyond Microsoft Edge, the available alternatives, and the process of transitioning to a new browser, users can make informed decisions that align with their specific requirements and navigate the digital landscape with greater control and efficiency.

How the transition from microsoft edge legacy to new edge happens on windows 10 530161 2 scaled Microsoft Edge Browser In Windows 10 Settings How to Change Search Engine on Microsoft Edge โ€“ Apps For Windows 10
Navigating the Digital Landscape:Exploring 20 Examples of Web Browsers  by Reynoldsfred  Medium Microsoft Shakes Up The Browser Landscape With The All-New Edge Microsoft Edge to Get New Settings UI Ahead of Windows 10 Redstone 5 Launch
11 Best Microsoft Edge Themes for Windows 10, 11 in 2023 (2023) How to Enable And Use Compatibility View Settings in Edge?

Closure

Thus, we hope this article has provided valuable insights into Navigating the Browser Landscape: Exploring Options Beyond Microsoft Edge on Windows 10. We appreciate your attention to our article. See you in our next article!

A Deep Dive Into Windows 11: Exploring The Latest Operating System For Personal Computers

A Deep Dive into Windows 11: Exploring the Latest Operating System for Personal Computers

Introduction

With enthusiasm, let’s navigate through the intriguing topic related to A Deep Dive into Windows 11: Exploring the Latest Operating System for Personal Computers. Let’s weave interesting information and offer fresh perspectives to the readers.

A Deep Dive into Windows 11: Exploring the Latest Operating System for Personal Computers

Exploring The Features Of Windows 11: A Deep Dive

Windows 11, the latest iteration of Microsoft’s ubiquitous operating system, represents a significant leap forward in both design and functionality. Released in 2021, it has garnered considerable attention from both users and industry experts, promising a more refined and intuitive experience for personal computer users. This article delves into the key features, benefits, and considerations surrounding Windows 11, providing a comprehensive understanding of its capabilities and potential impact.

A Refined User Interface: Reimagining the Desktop Experience

Windows 11 introduces a visually striking and user-friendly interface that emphasizes simplicity and clarity. The most prominent change is the redesigned Start menu, which now features a central location for pinned apps and recently used files, offering a streamlined and accessible way to navigate frequently used applications. The taskbar, too, has undergone a transformation, adopting a centralized layout that aligns with the contemporary design language of modern operating systems.

The new interface incorporates rounded corners for windows and icons, contributing to a more visually cohesive and modern aesthetic. The overall effect is a clean and uncluttered desktop environment that prioritizes user experience, reducing visual noise and promoting a more intuitive workflow.

Enhanced Performance and Security: Building a Solid Foundation

Windows 11 is not just about aesthetics; it also boasts significant improvements in performance and security. Leveraging the power of modern hardware, the operating system delivers faster boot times, smoother application launches, and improved responsiveness overall. This enhancement is attributed to a combination of factors, including optimized system resources, improved power management, and a streamlined codebase.

Security is paramount in the digital age, and Windows 11 addresses this concern with a robust suite of security features. It incorporates hardware-level security measures like Windows Hello for biometric authentication, ensuring secure access to the system. Additionally, the operating system features enhanced anti-malware protection and improved sandboxing capabilities, further safeguarding user data and privacy.

Modernization of Features: Embracing New Technologies

Windows 11 embraces the latest technological advancements, incorporating features that enhance productivity and user engagement. The integration of Microsoft Teams directly into the operating system allows for seamless communication and collaboration, making it easier to connect with colleagues and friends. The introduction of "Snap Layouts" provides a more efficient way to manage multiple windows, enabling users to arrange them in pre-defined configurations for optimal multitasking.

Virtualization, a technology that allows users to run multiple operating systems simultaneously, is also integrated into Windows 11. This feature empowers users to run specialized applications or experiment with different operating systems within a secure environment.

Accessibility and Inclusivity: A Focus on User Experience

Windows 11 emphasizes accessibility and inclusivity, ensuring that the operating system caters to diverse user needs. The operating system incorporates features like improved text-to-speech functionality, enhanced screen reader capabilities, and customizable keyboard shortcuts, making it more accessible for users with disabilities.

Microsoft has also focused on providing language support for a wider range of users, expanding the number of languages supported by the operating system. This commitment to inclusivity ensures that Windows 11 can be used by individuals from various cultural backgrounds and linguistic communities.

Compatibility and Upgrade Considerations: Navigating the Transition

While Windows 11 offers a wealth of improvements, compatibility with older hardware remains a concern. The minimum system requirements for running Windows 11 are more stringent than those for its predecessor, requiring a more modern processor, sufficient RAM, and a compatible TPM chip. This requirement might necessitate hardware upgrades for some users, especially those with older machines.

Upgrading to Windows 11 from an earlier version of Windows involves a straightforward process, typically guided by the operating system itself. However, it is crucial to ensure that the system meets the minimum requirements and to back up important data before proceeding with the upgrade.

FAQs: Addressing Common Queries About Windows 11

Q: Is Windows 11 free to upgrade?

A: Windows 11 is a free upgrade for users with compatible Windows 10 devices. However, it is essential to ensure that the system meets the minimum requirements for a smooth upgrade experience.

Q: What are the minimum system requirements for Windows 11?

A: Windows 11 requires a 1 GHz or faster processor with at least two cores, 4 GB of RAM, 64 GB of storage space, a compatible TPM 2.0 chip, and a display with a resolution of at least 1280 x 720 pixels.

Q: How can I check if my computer is compatible with Windows 11?

A: Microsoft provides a dedicated tool called the "PC Health Check app" that can assess whether your computer meets the minimum system requirements for Windows 11.

Q: What are the benefits of upgrading to Windows 11?

A: Upgrading to Windows 11 offers a range of benefits, including a visually appealing and user-friendly interface, enhanced performance and security, integration of modern technologies, and improved accessibility features.

Q: What are the potential drawbacks of upgrading to Windows 11?

A: Upgrading to Windows 11 might require hardware upgrades for older systems, and some older applications might not be fully compatible with the new operating system.

Tips: Optimizing Your Windows 11 Experience

  • Run Windows Update: Ensure that your system is running the latest version of Windows 11 by regularly checking for updates.
  • Customize the Start Menu: Pin frequently used applications and files to the Start menu for quick and easy access.
  • Utilize Snap Layouts: Optimize multitasking by arranging multiple windows in pre-defined configurations using Snap Layouts.
  • Explore Widgets: Enhance your desktop experience with interactive widgets that provide quick access to information and updates.
  • Enable Windows Hello: Enhance security by setting up Windows Hello for biometric authentication, allowing you to log in using facial recognition or fingerprint scanning.

Conclusion: A New Era of Personal Computing with Windows 11

Windows 11 represents a significant evolution in the world of personal computing. Its refined user interface, enhanced performance, and integration of modern technologies create a more intuitive and efficient desktop experience. While compatibility with older hardware might pose challenges for some users, the benefits offered by Windows 11, including its focus on security, accessibility, and productivity, make it a compelling choice for those seeking a modern and versatile operating system. As Microsoft continues to refine and expand the capabilities of Windows 11, it is poised to become a cornerstone of the future of personal computing, shaping the way users interact with their devices and engage with the digital world.

Feature Deep Dive โ€“ Windows 11 Readiness Windows 11 deep dive: How to use virtual desktops What is Windows 11 in S mode?  Deep Dive - YouTube
Windows 11 deep dive: Learn about Windows features with the Tips app Windows 11 Deep Dive Checking Out The New Snipping To - vrogue.co Link to Windows and Phone Link on Windows 11  Deep Dive - YouTube
Windows 11: Everything We Want From Microsoft's New Operating System - New Jersey Times Windows 11 deep dive: Checking out the new Settings app

Closure

Thus, we hope this article has provided valuable insights into A Deep Dive into Windows 11: Exploring the Latest Operating System for Personal Computers. We appreciate your attention to our article. See you in our next article!

A Comprehensive Guide To Obtaining Windows 10: Installation, Features, And Considerations

A Comprehensive Guide to Obtaining Windows 10: Installation, Features, and Considerations

Introduction

With enthusiasm, let’s navigate through the intriguing topic related to A Comprehensive Guide to Obtaining Windows 10: Installation, Features, and Considerations. Let’s weave interesting information and offer fresh perspectives to the readers.

A Comprehensive Guide to Obtaining Windows 10: Installation, Features, and Considerations

PPT - A Comprehensive Guide to Installing Windows 10_ Step-by-Step Tutorial PowerPoint

Windows 10, Microsoft’s flagship operating system, has become a staple in the digital world, powering a vast array of devices from personal computers to tablets and even some specialized embedded systems. Its widespread adoption is a testament to its robust features, user-friendly interface, and constant updates. This guide aims to provide a comprehensive understanding of obtaining and installing Windows 10, exploring its key features, and addressing common concerns.

Understanding Windows 10 Versions and Licensing

Before embarking on the installation process, it is crucial to understand the different versions of Windows 10 and the licensing implications. Microsoft offers several editions, each tailored to specific needs and budgets:

  • Windows 10 Home: The most basic version, designed for home users and offering essential features like Cortana, Microsoft Edge, and built-in security tools.
  • Windows 10 Pro: Aimed at small businesses and professionals, it includes additional features like BitLocker encryption, Remote Desktop, and the ability to join a domain.
  • Windows 10 Enterprise: Designed for large organizations, it offers advanced security features, management tools, and support for virtual desktops.
  • Windows 10 Education: Specifically tailored for educational institutions, it provides features similar to Enterprise but with additional tools for classroom management and collaboration.

Each version requires a valid license to activate and use. Licensing options include:

  • Retail Licenses: Purchased from retailers, these are tied to a specific device and can be transferred only a limited number of times.
  • OEM Licenses: Pre-installed on new devices, these are typically bundled with the hardware and cannot be transferred.
  • Volume Licensing: Designed for businesses and organizations, these offer various options for managing licenses across multiple devices.

Methods for Obtaining Windows 10

There are several ways to acquire Windows 10, each with its own advantages and considerations:

  • Purchasing a New Device: Most new computers and tablets come pre-installed with Windows 10. This is often the most convenient option, as the license is typically bundled with the hardware.
  • Purchasing a Retail License: Retail licenses can be purchased from online retailers or physical stores. This allows users to install Windows 10 on a new or existing device.
  • Upgrading from a Previous Version: If you have a valid license for a previous version of Windows, such as Windows 7 or 8.1, you may be eligible for a free upgrade to Windows 10. However, this option is no longer available for new installations.
  • Using a Windows 10 Installation Media: This method involves creating a bootable USB drive or DVD containing the Windows 10 installation files. It is a versatile option, allowing users to perform a clean installation, upgrade from an older version, or repair existing installations.

Creating a Bootable USB Drive for Windows 10 Installation

For users who prefer a clean installation or require a bootable media for troubleshooting, creating a bootable USB drive is a common method. The process involves the following steps:

  1. Download the Windows 10 ISO file: Visit the official Microsoft website and download the ISO file for the desired Windows 10 version.
  2. Prepare a USB drive: Ensure the USB drive is at least 8GB in size and format it to FAT32.
  3. Use a tool like Rufus or the Windows 10 USB/DVD Download Tool: These tools allow you to create a bootable USB drive from the downloaded ISO file.

Installing Windows 10

Once you have obtained the necessary files and licensing, you can proceed with the installation. The process typically involves the following steps:

  1. Boot from the installation media: Insert the bootable USB drive or DVD and configure your computer’s BIOS to boot from the external device.
  2. Choose your language, time, and keyboard layout: Select the appropriate settings for your region.
  3. Accept the license terms: Carefully review and agree to the terms of use.
  4. Choose the installation type: You can either perform a clean installation or upgrade from an existing version.
  5. Select the partition to install Windows 10: Choose the appropriate drive where you want to install the operating system.
  6. Wait for the installation to complete: The process may take some time depending on your hardware and chosen installation type.
  7. Configure your system: After installation, you will need to set up your account, personalize your settings, and install any necessary drivers.

Key Features of Windows 10

Windows 10 boasts a wide array of features designed to enhance user experience, productivity, and security. Some of the notable features include:

  • Start Menu: A modernized version of the classic Start menu, providing quick access to applications, settings, and files.
  • Cortana: Microsoft’s digital assistant, offering voice-activated search, reminders, and integration with other apps.
  • Microsoft Edge: A modern web browser with enhanced security features, improved performance, and seamless integration with other Microsoft services.
  • Windows Store: A central hub for downloading and installing apps, games, and software.
  • Continuum: A feature that seamlessly adapts the user interface for different device types, allowing for a smooth transition between desktop and tablet modes.
  • Windows Hello: A biometric authentication system that uses facial recognition or fingerprint scanning for secure login.
  • Windows Defender: A built-in antivirus and antimalware solution that provides real-time protection against threats.
  • Microsoft OneDrive: A cloud storage service that allows users to store files online and access them from any device.

Frequently Asked Questions

Q: Can I install Windows 10 on a device that previously had a different operating system?

A: Yes, you can install Windows 10 on a device that previously had a different operating system, such as Windows 7, 8, or Linux. However, you will need a valid license for Windows 10 and may need to format the hard drive before installation.

Q: What are the minimum system requirements for running Windows 10?

A: To run Windows 10 smoothly, your device should meet the following minimum requirements:

  • Processor: 1 gigahertz (GHz) or faster processor
  • RAM: 1 gigabyte (GB) for 32-bit or 2 GB for 64-bit
  • Hard disk space: 16 GB for 32-bit or 20 GB for 64-bit
  • Graphics card: DirectX 9 or later with WDDM 1.0 driver
  • Display: 800 x 600 resolution

Q: How can I upgrade to a higher version of Windows 10, such as from Home to Pro?

A: To upgrade to a higher version of Windows 10, you will need to purchase a license for the desired version. You can then use the Settings app to upgrade your existing installation.

Q: What is the difference between a clean installation and an upgrade installation?

A: A clean installation erases all data and settings on your drive and installs a fresh copy of Windows 10. An upgrade installation retains your data and settings but updates the operating system to the latest version.

Q: How can I activate Windows 10 after installation?

A: After installation, you will be prompted to activate Windows 10 using a product key. You can enter the product key provided with your license or use the digital license linked to your Microsoft account.

Q: What are the benefits of using a bootable USB drive for Windows 10 installation?

A: A bootable USB drive offers several benefits, including:

  • Clean installation: Allows for a fresh install without carrying over data or settings from the previous operating system.
  • Troubleshooting: Can be used to repair corrupted installations or troubleshoot system issues.
  • Portability: Provides a convenient and portable way to install Windows 10 on multiple devices.

Tips for Installing and Using Windows 10

  • Back up your data: Before installing Windows 10, it is essential to back up your important data to an external drive or cloud storage service.
  • Check for driver compatibility: Ensure your device’s drivers are compatible with Windows 10. You can download the latest drivers from the manufacturer’s website.
  • Customize your settings: Windows 10 offers a wide range of customization options. Take the time to personalize your settings and preferences to enhance your user experience.
  • Keep your system updated: Regularly update Windows 10 to receive the latest security patches, bug fixes, and feature enhancements.
  • Use a strong password: Protect your system by setting a strong and unique password for your user account.
  • Enable Windows Defender: Activate Windows Defender for real-time protection against malware and viruses.
  • Explore the Windows Store: Discover new apps, games, and software in the Windows Store.
  • Learn about the new features: Familiarize yourself with the new features and functionalities of Windows 10 to take full advantage of its capabilities.

Conclusion

Obtaining and installing Windows 10 is a straightforward process with multiple options available to suit individual needs and preferences. By understanding the different versions, licensing options, and installation methods, users can make informed decisions and ensure a smooth transition to the latest Microsoft operating system. Windows 10 offers a wealth of features designed to enhance productivity, security, and user experience, making it a reliable and versatile choice for both personal and professional use. Regular updates and ongoing development ensure that Windows 10 remains a leading platform for the modern digital world.

How to Install Windows 10: Step-by-Step Guide with Pictures How to Install Windows 10: Step-by-Step Guide with Pictures Install Windows 10 The Complete Guide - Riset
How to Install Windows 10 full step by step guide Here's a step-by-step guide to installing Windows 10 - HardwareZone.com.my The ultimate guide to obtaining and installing Windows 10 - Electronic Products
The Process Of Installing Windows 10 Microsoft Community - Riset Tutorial: Comprehensive Windows 10 Installation Guide - YouTube

Closure

Thus, we hope this article has provided valuable insights into A Comprehensive Guide to Obtaining Windows 10: Installation, Features, and Considerations. We appreciate your attention to our article. See you in our next article!

Creating Bootable Windows 11 USB Drives: A Comprehensive Guide

Creating Bootable Windows 11 USB Drives: A Comprehensive Guide

Introduction

With enthusiasm, let’s navigate through the intriguing topic related to Creating Bootable Windows 11 USB Drives: A Comprehensive Guide. Let’s weave interesting information and offer fresh perspectives to the readers.

Creating Bootable Windows 11 USB Drives: A Comprehensive Guide

How to Create Windows 11 Bootable USB - YouTube

The ability to create a bootable USB drive containing the Windows 11 operating system is an essential skill for anyone looking to install or reinstall Windows on their computer, upgrade their existing system, or troubleshoot issues. This process, often referred to as "creating a Windows 11 USB installation media," empowers users to perform a clean install, repair existing installations, or even transfer their operating system to a new computer.

This guide will provide a detailed explanation of how to create a bootable Windows 11 USB drive, covering the necessary steps, tools, and considerations.

Understanding the Process

Creating a bootable USB drive involves transferring the Windows 11 installation files onto a USB flash drive and configuring it to act as a bootable device. This allows your computer to boot from the USB drive, initiating the Windows 11 installation process.

Prerequisites

Before embarking on the creation process, ensure you have the following:

  • A USB flash drive: Choose a USB drive with at least 8GB of storage capacity. The recommended size is 16GB or larger, as the Windows 11 installation files can be quite large.
  • A working computer: This computer will be used to create the bootable USB drive. It can be running any version of Windows.
  • Windows 11 ISO file: This file contains the installation files for Windows 11. You can download it from the official Microsoft website.
  • A USB drive formatting tool: Windows includes a built-in tool for formatting USB drives. Alternatively, you can use third-party tools like Rufus or BalenaEtcher.

Steps to Create a Bootable Windows 11 USB Drive

  1. Download the Windows 11 ISO file: Visit the official Microsoft website and download the Windows 11 ISO file for your desired language and edition.
  2. Format the USB drive: Connect the USB drive to your computer. Open the File Explorer and locate the drive. Right-click on the drive and select Format. In the formatting window, choose NTFS as the file system and ensure the Quick Format option is unchecked. Click Start to format the drive.
  3. Use the Media Creation Tool: Download the Media Creation Tool from the Microsoft website. Run the tool and follow the onscreen instructions. Select "Create installation media for another PC" and choose the language and edition of Windows 11 you want to install.
  4. Select the USB drive: The Media Creation Tool will prompt you to select the USB drive you wish to use. Ensure the correct drive is selected and click Next.
  5. Download and create the installation media: The tool will download the necessary files and create the bootable USB drive. This process might take some time depending on your internet connection speed.
  6. Verify the bootable USB drive: Once the process is complete, you can verify the bootable USB drive by booting your computer from it. To do this, enter the BIOS settings of your computer by pressing the appropriate key during startup (usually F2, F10, or Delete). In the BIOS settings, change the boot order to prioritize the USB drive. Save the changes and exit the BIOS. Your computer should now boot from the USB drive and start the Windows 11 installation process.

Alternative Methods for Creating a Bootable USB Drive

Besides the Media Creation Tool, you can also use other methods to create a bootable Windows 11 USB drive. These methods often require using command-line tools or third-party software:

  • Using the command prompt: This method involves using the Diskpart command-line tool to format the USB drive and then copying the Windows 11 ISO files to it.
  • Using third-party tools: Several third-party tools, such as Rufus, BalenaEtcher, and WinUSB, offer a user-friendly interface for creating bootable USB drives. These tools often provide additional features like selecting specific partitions, creating bootable drives for other operating systems, and customizing the boot process.

Tips for Creating a Bootable Windows 11 USB Drive

  • Use a reliable USB drive: Ensure the USB drive you choose is reliable and has sufficient storage capacity.
  • Back up your data: Before formatting the USB drive, ensure you have backed up all your important data.
  • Download the latest version of the Media Creation Tool: Always download the latest version of the Media Creation Tool to ensure compatibility with the latest Windows 11 updates.
  • Check the system requirements: Before installing Windows 11, ensure your computer meets the minimum system requirements.
  • Use a high-speed internet connection: Downloading the Windows 11 ISO file can take a considerable amount of time, especially if you have a slow internet connection.

Troubleshooting Common Issues

  • The USB drive is not recognized: Ensure the USB drive is properly connected to the computer. Try connecting it to a different USB port.
  • The USB drive is not bootable: Make sure you have followed the correct steps for formatting the drive and copying the installation files.
  • The Media Creation Tool is not working: Try restarting your computer and running the tool again. You can also try downloading the latest version of the tool from the Microsoft website.
  • The Windows 11 installation fails: Ensure your computer meets the system requirements and try reinstalling the operating system.

FAQs

Q: Can I use a USB drive that has been used for other purposes?

A: Yes, you can use a USB drive that has been used for other purposes. However, ensure you format the drive before creating the bootable media. Formatting the drive will erase all existing data on the drive.

Q: What if I have a slow internet connection?

A: Downloading the Windows 11 ISO file can take a considerable amount of time if you have a slow internet connection. You can try downloading the file in smaller chunks or using a different internet connection.

Q: Can I create a bootable USB drive from a different operating system?

A: Yes, you can create a bootable USB drive from a different operating system, such as macOS or Linux. You can use third-party tools like Rufus or BalenaEtcher to create the bootable drive.

Q: Can I create multiple bootable USB drives with the same ISO file?

A: Yes, you can create multiple bootable USB drives with the same ISO file. This can be useful if you need to install Windows 11 on multiple computers.

Q: How long does it take to create a bootable USB drive?

A: The time it takes to create a bootable USB drive depends on the size of the ISO file and the speed of your internet connection. It can take anywhere from 10 minutes to several hours.

Q: What happens to the data on the USB drive after I create the bootable media?

A: The data on the USB drive will be erased when you format it before creating the bootable media.

Conclusion

Creating a bootable Windows 11 USB drive is a straightforward process that empowers users to install, reinstall, or repair their operating system. This guide has provided a comprehensive overview of the necessary steps, tools, and considerations involved in creating a bootable USB drive. By following these instructions and troubleshooting tips, users can effectively create a bootable USB drive and perform various tasks related to their Windows 11 operating system.

How To Make Bootable USB Drive of Windows 11  Windows 11 USB bootable flash drive - YouTube How to Make Windows 11 Bootable USB Drive [Step-by-Step Guide] - MiniTool Partition Wizard How To Create Windows 11 Bootable Usb Drive Full Guide  techvirals
How To Create Windows 11 Bootable USB.Drive. Create bootable USB Drive for Windows 11. Social How To Create Bootable USB Drive of Windows 11. - YouTube How to Create a Bootable Windows 11 USB Flash Drive to Install Windows & Bypass the TPM
How to Create Windows 11 Bootable USB Drive (Full Guide) How to Make a Bootable USB of Windows 11  Rufus Bootable USB of Windows 11  Rufus 3.14  2023

Closure

Thus, we hope this article has provided valuable insights into Creating Bootable Windows 11 USB Drives: A Comprehensive Guide. We thank you for taking the time to read this article. See you in our next article!

Unlocking The Android Experience On Windows 10: A Comprehensive Guide To Online Emulators

Unlocking the Android Experience on Windows 10: A Comprehensive Guide to Online Emulators

Introduction

In this auspicious occasion, we are delighted to delve into the intriguing topic related to Unlocking the Android Experience on Windows 10: A Comprehensive Guide to Online Emulators. Let’s weave interesting information and offer fresh perspectives to the readers.

Unlocking the Android Experience on Windows 10: A Comprehensive Guide to Online Emulators

7 Best Android Emulators for Windows 10 that you Must Consider

The realm of mobile technology has become increasingly intertwined with our daily lives. Android, the ubiquitous operating system powering billions of smartphones and tablets, has become a central hub for communication, entertainment, and productivity. However, accessing the vast library of Android apps and games on a Windows 10 PC was, for a long time, a challenge. Enter online Android emulators: software solutions that bridge the gap between these two platforms, allowing users to experience the Android ecosystem seamlessly on their Windows 10 devices.

This guide aims to provide a comprehensive understanding of online Android emulators for Windows 10, exploring their functionalities, advantages, and considerations.

Understanding Online Android Emulators

An Android emulator, in essence, is a virtual machine that replicates the Android environment within a Windows 10 system. It allows users to install, run, and interact with Android apps and games as if they were using a physical Android device. The "online" aspect refers to the emulator’s availability through a web browser, eliminating the need for complex installations or downloads.

Benefits of Online Android Emulators

The advent of online Android emulators has revolutionized how users engage with the Android ecosystem on Windows 10. Here are some of the key benefits they offer:

  • Accessibility: Online emulators eliminate the need for extensive software downloads and installations. Users can access the Android experience directly through their web browser, simplifying the process and making it readily available to a wider audience.
  • Cross-Platform Compatibility: Online emulators are designed to work seamlessly with Windows 10, ensuring compatibility across various device configurations and specifications.
  • Performance Enhancement: Modern online emulators utilize advanced technologies to optimize performance, delivering a smooth and responsive Android experience on Windows 10.
  • Cost-Effective: Online emulators often offer free or subscription-based access, making them a cost-effective alternative to purchasing physical Android devices.
  • Testing and Development: Online emulators are invaluable tools for developers and testers. They provide a controlled environment for testing Android apps and games across different device configurations and Android versions.
  • Productivity and Entertainment: Online emulators open up a world of Android productivity apps and entertainment options to Windows 10 users. This includes popular messaging apps, productivity tools, and a vast library of games.

Key Features of Online Android Emulators

Online Android emulators offer a diverse range of features to enhance the user experience. Some of the common features include:

  • Multi-Touch Support: Emulators provide support for multi-touch gestures, allowing users to interact with Android apps in a natural and intuitive manner.
  • Keyboard and Mouse Integration: Emulators allow users to control Android apps using their keyboard and mouse, providing a familiar and comfortable input method.
  • App Store Access: Online emulators provide access to the Google Play Store, allowing users to browse and download a vast library of Android apps and games.
  • Customization Options: Many emulators offer customization options, allowing users to adjust settings such as screen resolution, memory allocation, and performance preferences.
  • Performance Optimization: Emulators employ techniques like hardware acceleration and virtualization to optimize performance, delivering a smooth and responsive Android experience.

Choosing the Right Online Android Emulator

With a plethora of online Android emulators available, selecting the right one for your needs can be overwhelming. Here are some key factors to consider:

  • Performance: Look for an emulator with a strong track record of performance and optimization, ensuring a smooth and responsive Android experience.
  • Compatibility: Ensure the emulator supports your desired Android apps and games and is compatible with your Windows 10 system.
  • Features: Consider the features offered by different emulators, including multi-touch support, keyboard and mouse integration, and customization options.
  • Security: Choose an emulator from a reputable developer with a strong commitment to security and privacy.
  • User Interface: Look for an emulator with a user-friendly interface that is easy to navigate and understand.

Popular Online Android Emulators for Windows 10

Several online Android emulators have gained popularity among Windows 10 users. Some of the notable options include:

  • Bluestacks: A widely recognized and highly regarded emulator, Bluestacks offers excellent performance, extensive compatibility, and a user-friendly interface. It supports various customization options and features hardware acceleration for enhanced performance.
  • NoxPlayer: NoxPlayer is another popular choice, known for its gaming-centric features. It offers a customizable keyboard mapping system, macro recording capabilities, and optimized performance for resource-intensive Android games.
  • MEmu Play: MEmu Play is a lightweight emulator designed for smooth performance on a wide range of Windows 10 devices. It features a simple interface, multi-instance support, and a focus on gaming optimization.
  • LDPlayer: LDPlayer is another gaming-focused emulator, offering features like multi-instance support, macro recording, and a built-in gamepad mapper. It prioritizes performance and stability, making it a popular choice for demanding Android games.

FAQs about Online Android Emulators for Windows 10

Q: Are online Android emulators legal?

A: Yes, online Android emulators are legal. They are software programs designed to replicate the Android environment on a different platform. However, it’s crucial to ensure that the emulator you choose is from a reputable developer and adheres to copyright and licensing regulations.

Q: Are online Android emulators safe?

A: The safety of online Android emulators depends on the specific emulator and its developer. It’s essential to choose an emulator from a reputable source and follow best practices for online security. Be cautious about downloading emulators from untrusted websites or sources.

Q: Can I use online Android emulators for gaming?

A: Yes, online Android emulators are excellent for gaming. Many emulators offer features specifically designed for gaming, such as keyboard mapping, macro recording, and performance optimization.

Q: Do online Android emulators require a lot of resources?

A: Online Android emulators can vary in their resource requirements. Some emulators are lightweight and run efficiently on modest hardware configurations, while others demand more powerful hardware for optimal performance.

Q: Can I use online Android emulators for work?

A: Yes, online Android emulators can be used for work purposes. Many productivity apps are available on Android, and emulators can provide a convenient way to access these apps on your Windows 10 PC.

Tips for Using Online Android Emulators

  • Choose the right emulator: Select an emulator that aligns with your needs and preferences, considering factors like performance, compatibility, and features.
  • Optimize performance: Adjust emulator settings, such as memory allocation and hardware acceleration, to enhance performance and reduce lag.
  • Install apps from trusted sources: Download apps from the Google Play Store or other reputable sources to ensure their safety and security.
  • Back up your data: Regularly back up your emulator data to prevent loss in case of issues or system updates.
  • Keep your emulator updated: Regularly update your emulator to benefit from the latest performance improvements, bug fixes, and security updates.

Conclusion

Online Android emulators have become an indispensable tool for Windows 10 users seeking to access the vast world of Android apps and games. They offer a seamless and convenient way to experience the Android ecosystem on their PCs, opening up a world of possibilities for productivity, entertainment, and development. By understanding the benefits, features, and considerations involved in choosing and using online Android emulators, users can unlock the full potential of this technology and enjoy the Android experience on their Windows 10 devices.

9 Best Android Emulators For Windows 10 โ€“ TechCult Top 5 Android emulators for Windows 10 [Gamers and Developers] - Waftr.com Best android emulator for windows 10 2021 - tennisdamer
10 Best Android Emulators To Experience Android On Pc  Images and Photos finder Exploring Android Emulators for Windows VPS: A Comprehensive Guide - VPS Navigator Online Android Emulator to Run Android Apps on Browser - PC/Mac - YouTube
The 9 Best Android Emulators for Windows 10 and Windows 11 (2023) Top 10 Best Android Emulators To Experience Android On PC ยป TechieGenie

Closure

Thus, we hope this article has provided valuable insights into Unlocking the Android Experience on Windows 10: A Comprehensive Guide to Online Emulators. We hope you find this article informative and beneficial. See you in our next article!

Mastering Chemistry: A Guide To Choosing And Utilizing Chemistry Apps

Mastering Chemistry: A Guide to Choosing and Utilizing Chemistry Apps

Introduction

With enthusiasm, let’s navigate through the intriguing topic related to Mastering Chemistry: A Guide to Choosing and Utilizing Chemistry Apps. Let’s weave interesting information and offer fresh perspectives to the readers.

Mastering Chemistry: A Guide to Choosing and Utilizing Chemistry Apps

Best Chemistry Apps for Students - EducationalAppStore

The realm of chemistry, with its intricate structures, complex reactions, and nuanced concepts, can often seem daunting. However, the digital age has brought forth a powerful tool to aid in mastering this fascinating field: chemistry apps. These applications, designed to cater to diverse learning styles and needs, offer a plethora of resources, from interactive simulations to comprehensive study materials, to make the learning process more engaging and effective.

Understanding the Significance of Chemistry Apps

Chemistry apps are more than just digital textbooks. They are innovative tools that leverage technology to enhance the learning experience in various ways:

  • Interactive Learning: Apps often incorporate interactive simulations, quizzes, and games, allowing users to visualize complex chemical processes, test their knowledge, and solidify their understanding through hands-on engagement.
  • Personalized Learning: Many apps offer adaptive learning algorithms, tailoring the content and pace to individual learning styles and needs. This personalized approach ensures that users are challenged appropriately and receive targeted support where required.
  • Accessibility and Convenience: Chemistry apps provide access to a wealth of information and resources at any time and place, making learning more convenient and flexible. This accessibility is especially beneficial for students who are on the move or have limited access to traditional learning materials.
  • Engaging Content: Apps often employ visually appealing graphics, animations, and audio-visual elements to make learning more engaging and less monotonous. This can be particularly helpful for students who learn best through visual or auditory means.
  • Comprehensive Resources: Many apps offer a comprehensive library of study materials, including notes, flashcards, practice problems, and even virtual laboratories. This centralized access to resources eliminates the need to search for information from multiple sources.

Navigating the App Landscape: Key Features to Consider

The wide range of available chemistry apps can be overwhelming. To make informed decisions, it is crucial to consider the following key features:

  • Content Coverage: Determine the specific topics and areas of chemistry the app covers. Some apps focus on general chemistry, while others specialize in organic, inorganic, or analytical chemistry.
  • Learning Style Compatibility: Consider your preferred learning style and choose an app that aligns with it. Some apps prioritize visual learning, while others emphasize textual content or interactive simulations.
  • User Interface and Navigation: Evaluate the app’s user interface and navigation. It should be intuitive, easy to use, and allow for seamless access to desired content.
  • Additional Features: Explore additional features offered by the app, such as study planners, progress trackers, offline access, and integration with other learning platforms.
  • User Reviews and Ratings: Consult user reviews and ratings to gain insights into the app’s effectiveness, reliability, and user experience.

A Comprehensive Guide to Popular Chemistry Apps

To help navigate the vast app landscape, here is a curated list of some of the most popular and highly-rated chemistry apps, categorized by their primary focus:

General Chemistry Apps:

  • Chemistry: Periodic Table & Quiz: This app provides a comprehensive overview of the periodic table, including detailed information about each element, along with interactive quizzes to test knowledge.
  • ChemDoodle: This app allows users to draw chemical structures, perform calculations, and explore molecular properties, making it a versatile tool for students and researchers.
  • Chemistry Pro: This app offers a comprehensive collection of chemistry topics, including stoichiometry, thermodynamics, and chemical bonding, with interactive exercises and practice problems.
  • Chemistry 101: This app serves as a virtual textbook, covering a wide range of general chemistry concepts, with interactive diagrams, quizzes, and study guides.

Organic Chemistry Apps:

  • Organic Chemistry Reactions: This app focuses on organic chemistry reactions, providing detailed explanations, mechanisms, and practice problems to solidify understanding.
  • Organic Chemistry Nomenclature: This app assists in learning and applying organic chemistry nomenclature rules, with interactive quizzes and exercises to test knowledge.
  • Organic Chemistry Reactions & Mechanisms: This app covers a wide range of organic chemistry reactions and mechanisms, offering detailed explanations, animations, and practice problems.

Inorganic Chemistry Apps:

  • Inorganic Chemistry: This app provides a comprehensive overview of inorganic chemistry, including topics such as coordination chemistry, main group chemistry, and transition metal chemistry.
  • Inorganic Chemistry Reactions: This app focuses on inorganic chemistry reactions, offering detailed explanations, mechanisms, and practice problems to aid in understanding.
  • Inorganic Chemistry Nomenclature: This app assists in learning and applying inorganic chemistry nomenclature rules, with interactive quizzes and exercises to test knowledge.

Analytical Chemistry Apps:

  • Analytical Chemistry: This app provides a comprehensive overview of analytical chemistry, covering topics such as spectroscopy, chromatography, and electrochemistry.
  • Analytical Chemistry Calculations: This app assists in performing analytical chemistry calculations, with a wide range of tools and functions to simplify complex calculations.
  • Analytical Chemistry Techniques: This app explores various analytical chemistry techniques, providing detailed explanations, animations, and practice problems to enhance understanding.

Beyond Individual Apps: Exploring Online Resources

While individual chemistry apps offer valuable resources, several online platforms and resources can further enhance the learning experience:

  • Khan Academy: This platform offers a vast library of free chemistry videos, exercises, and practice problems, covering a wide range of topics.
  • Coursera: This platform provides access to online chemistry courses from reputable universities, offering structured learning experiences with expert instructors.
  • EdX: Similar to Coursera, EdX offers online chemistry courses from leading institutions, providing a comprehensive and interactive learning experience.
  • Chemistry Stack Exchange: This online forum allows users to ask questions, share knowledge, and engage in discussions related to chemistry, providing a valuable community for learning and support.

FAQs Regarding Chemistry Apps

Q: Are chemistry apps suitable for all levels of learners?

A: Yes, chemistry apps cater to a wide range of learners, from high school students to university undergraduates and even professionals. Many apps offer content tailored to specific levels of learning, allowing users to choose resources that align with their current understanding.

Q: Can chemistry apps replace traditional textbooks and lectures?

A: While chemistry apps can supplement traditional learning methods, they cannot fully replace textbooks and lectures. Apps are valuable tools for enhancing understanding and providing interactive learning experiences, but they should be used in conjunction with other educational resources.

Q: Are chemistry apps reliable and accurate?

A: The reliability and accuracy of chemistry apps vary depending on the developer and the app’s content. It is crucial to choose apps from reputable sources and review user feedback to assess their accuracy and reliability.

Q: Are chemistry apps free or paid?

A: Both free and paid chemistry apps are available. Free apps often offer basic features and limited content, while paid apps provide more comprehensive features and resources. It is essential to evaluate the app’s value proposition and determine if the paid version justifies the cost.

Tips for Maximizing the Benefits of Chemistry Apps

  • Set Realistic Goals: Determine your specific learning objectives and choose apps that align with those goals.
  • Engage Actively: Do not passively consume content; actively participate in interactive exercises, quizzes, and simulations to deepen your understanding.
  • Use Apps in Conjunction with Other Resources: Integrate apps into your overall learning strategy, using them alongside textbooks, lectures, and other educational materials.
  • Seek Feedback and Support: If you encounter difficulties, seek help from teachers, tutors, or online communities to clarify concepts and overcome challenges.
  • Stay Organized: Utilize the app’s features to organize your learning materials, track your progress, and create study schedules.

Conclusion

Chemistry apps have become invaluable tools for mastering the complexities of chemistry. By leveraging interactive learning, personalized content, and comprehensive resources, these apps empower learners of all levels to engage with the subject in a dynamic and effective manner. Choosing the right apps, considering individual learning styles and needs, and utilizing them strategically can significantly enhance the learning experience and contribute to a deeper understanding of this fascinating field. As technology continues to evolve, chemistry apps are poised to play an even greater role in shaping the future of chemistry education.

Apps to learn chemistry Best Chemistry Apps for Android and Iphone - Learn Chemistry Easily The Best Apps To Learn About Chemistry
Mastering Chemistry with Pearson Etext -- Standalone Access Card -- For General Chemistry MasteringChemistry: Modified Mastering Chemistry with Pearson Etext -- Standalone Access Card Chemistry - Apps on Google Play
Chemistry Pro 2020 - Best Chemistry App on Android Free  Gigantic Apps - YouTube Chemistry Plus Mastering Chemistry with Pearson Etext -- Access Card Package [With Access Code

Closure

Thus, we hope this article has provided valuable insights into Mastering Chemistry: A Guide to Choosing and Utilizing Chemistry Apps. We thank you for taking the time to read this article. See you in our next article!

A Haven Of Relaxation And Recreation: Exploring Oceania Marina Deck 10

A Haven of Relaxation and Recreation: Exploring Oceania Marina Deck 10

Introduction

With enthusiasm, let’s navigate through the intriguing topic related to A Haven of Relaxation and Recreation: Exploring Oceania Marina Deck 10. Let’s weave interesting information and offer fresh perspectives to the readers.

A Haven of Relaxation and Recreation: Exploring Oceania Marina Deck 10

Oceania Marina deck 10 plan  CruiseMapper

Oceania Cruises, renowned for its elegant and intimate cruise experiences, offers a plethora of onboard amenities designed to cater to diverse tastes and preferences. Among these, Deck 10 stands out as a hub of relaxation and recreation, providing a unique blend of open-air spaces, culinary delights, and entertainment options.

A Symphony of Open-Air Spaces:

Deck 10 is a testament to Oceania’s commitment to maximizing guest enjoyment of the open sea. The centerpiece of this deck is the "The Terrace Cafe & Bar," a sprawling outdoor haven that seamlessly blends the allure of the ocean with the comfort of a chic cafรฉ. Here, guests can unwind in the shade of sun umbrellas, savor refreshing cocktails and light bites, or simply soak in the panoramic views of the horizon.

Adjacent to The Terrace Cafe & Bar, the "The Pool Deck" offers a refreshing escape from the sun. This inviting space features a large, sparkling pool, comfortable loungers, and a dedicated bar serving chilled drinks and snacks. The pool deck serves as a perfect spot to relax, socialize, or simply bask in the warmth of the sun.

Culinary Delights and Entertainment:

Deck 10 is not merely a space for relaxation; it also serves as a culinary destination. "The Terrace Cafe & Bar" offers a diverse menu of international cuisine, from fresh salads and gourmet sandwiches to light pasta dishes and refreshing desserts. Guests can enjoy their meals while taking in the breathtaking ocean vistas, creating a truly unforgettable dining experience.

For those seeking a more formal dining experience, "The Grand Dining Room" on Deck 10 presents a sophisticated setting for indulging in Oceania’s renowned culinary artistry. With its elegant dรฉcor, impeccable service, and extensive menu featuring global delicacies, The Grand Dining Room promises an unforgettable gastronomic journey.

Beyond culinary delights, Deck 10 also caters to entertainment desires. "The Terrace Cafe & Bar" regularly hosts live music performances, creating a lively and engaging atmosphere. Guests can enjoy the sounds of talented musicians while enjoying their drinks and snacks, adding a touch of vibrancy to their evening.

A Unique Blend of Comfort and Entertainment:

Oceania Marina Deck 10 offers a unique blend of comfort and entertainment, catering to a wide range of guest preferences. Whether seeking a relaxing escape, a culinary adventure, or a lively evening out, Deck 10 provides a haven for every traveler.

FAQs about Oceania Marina Deck 10:

Q: What are the main features of Deck 10 on Oceania Marina?

A: Deck 10 features a variety of amenities including The Terrace Cafe & Bar, The Pool Deck, The Grand Dining Room, and various entertainment options like live music performances.

Q: Is there a dress code for The Grand Dining Room on Deck 10?

A: While Oceania Cruises encourages guests to dress comfortably, The Grand Dining Room maintains a dress code of smart casual for dinner.

Q: What are the operating hours for The Terrace Cafe & Bar on Deck 10?

A: The Terrace Cafe & Bar operates throughout the day, serving breakfast, lunch, and dinner. The bar remains open late into the evening, offering a selection of drinks and snacks.

Q: Are there any specific activities or events held on Deck 10?

A: Deck 10 regularly hosts live music performances at The Terrace Cafe & Bar, creating a lively and engaging atmosphere.

Q: What are the age restrictions for using the pool on Deck 10?

A: The pool on Deck 10 is open to all guests, regardless of age. However, children under the age of 16 must be accompanied by an adult.

Tips for Enjoying Oceania Marina Deck 10:

  • Reserve a table at The Grand Dining Room in advance, especially during peak dining hours.
  • Bring a good book or magazine to relax and enjoy the ocean views at The Terrace Cafe & Bar.
  • Pack your swimsuit and towel for a refreshing dip in the pool on Deck 10.
  • Take advantage of the live music performances held at The Terrace Cafe & Bar.
  • Explore the various food and beverage options available on Deck 10.

Conclusion:

Oceania Marina Deck 10 stands as a testament to Oceania’s dedication to providing its guests with an exceptional onboard experience. With its diverse range of amenities, from open-air spaces to culinary delights and entertainment options, Deck 10 offers a haven for relaxation, recreation, and unforgettable moments. Whether seeking a tranquil escape, a culinary adventure, or a lively evening out, Deck 10 promises to enhance any Oceania cruise with its unique blend of comfort and entertainment.

Oceania Marina Deck plan & cabin plan Oceania Riviera Deck 10 Deck Plan Tour Oceania Marina Deck plan & cabin plan
Oceania Riviera Deck 10 Deck Plan Tour Oceania Marina Deck plan & cabin plan Oceania Marina Culinary Center Pictures
Oceania Marina Deck plan & cabin plan Oceania Nautica Deck plan & cabin plan

Closure

Thus, we hope this article has provided valuable insights into A Haven of Relaxation and Recreation: Exploring Oceania Marina Deck 10. We appreciate your attention to our article. See you in our next article!

Navigating The Cost Of Windows 10: A Comprehensive Guide

Navigating the Cost of Windows 10: A Comprehensive Guide

Introduction

With enthusiasm, let’s navigate through the intriguing topic related to Navigating the Cost of Windows 10: A Comprehensive Guide. Let’s weave interesting information and offer fresh perspectives to the readers.

How much does Windows 10 cost? Price and Version Guide Blog Mr Key Shop

Windows 10, Microsoft’s flagship operating system, powers millions of devices worldwide. While its core functionality is free, the path to acquiring it can be complex, with various licensing options and pricing structures. Understanding these complexities is crucial for making informed decisions about acquiring and using Windows 10.

The Dynamics of Windows 10 Pricing

Unlike previous versions, Windows 10 operates on a licensing model that focuses on device activation rather than individual installations. This means you purchase a license for a specific device, allowing you to install and use Windows 10 on that device. However, the price of a Windows 10 license can vary significantly based on several factors:

  • Retail vs. OEM Licenses: Retail licenses, purchased directly from Microsoft or authorized retailers, offer greater flexibility, allowing users to install Windows 10 on different devices as needed. OEM licenses, bundled with new devices by manufacturers, are typically cheaper but tied to a specific device.
  • Edition: Windows 10 offers various editions, each catering to specific needs and functionalities. The most common editions are:
    • Windows 10 Home: Designed for personal use, offering basic features and functionalities.
    • Windows 10 Pro: Aimed at professionals and small businesses, offering advanced features like BitLocker encryption and remote desktop access.
    • Windows 10 Enterprise: Tailored for large organizations, providing enhanced security features, management tools, and deployment options.
    • Windows 10 Education: Specifically designed for educational institutions, offering features for classroom management and deployment.
  • Upgrade Path: If you are upgrading from a previous version of Windows, you may be eligible for a discounted upgrade price.
  • Promotional Offers: Microsoft often runs promotional campaigns offering discounts or free upgrades for specific periods.

Decoding the Price Structure:

  • Retail Licenses: These are typically purchased directly from Microsoft or authorized retailers. The price for a retail license can range from approximately $100 to $200, depending on the edition and any ongoing promotions.
  • OEM Licenses: These licenses are bundled with new devices and are often included in the device’s price. They are generally less expensive than retail licenses but lack the flexibility of being transferred to other devices.
  • Upgrade Prices: If you are upgrading from a previous version of Windows, you might be eligible for a discounted upgrade price. The price for an upgrade can vary depending on the previous version and the edition you are upgrading to.
  • Free Upgrades: Microsoft has offered free upgrades to Windows 10 for users of eligible previous versions of Windows. However, this offer has expired, and users who did not take advantage of it will need to purchase a license.

The Importance of Choosing the Right License:

Selecting the appropriate Windows 10 license is crucial, as it dictates the features you access and the flexibility you have in using the operating system. For personal use, Windows 10 Home is typically sufficient, while professionals and small businesses may benefit from the advanced features of Windows 10 Pro. Large organizations with specific security and management needs might require Windows 10 Enterprise.

Navigating the Licensing Landscape:

  • Microsoft Store: The official Microsoft Store is the primary source for purchasing retail licenses of Windows 10.
  • Authorized Retailers: Many online and brick-and-mortar retailers offer Windows 10 licenses, often with competitive prices and promotions.
  • OEM Licenses: These are typically included in the price of new devices.
  • Upgrade Offers: Microsoft occasionally offers upgrade discounts for users of older Windows versions.

Frequently Asked Questions:

Q: Is Windows 10 free?

A: While the core functionality of Windows 10 is free, you need a license to activate and use it on a device.

Q: How can I get Windows 10 for free?

A: Microsoft has offered free upgrades to Windows 10 in the past, but this offer has expired. Currently, there are no official ways to obtain a free Windows 10 license.

Q: What is the difference between a retail and an OEM license?

A: A retail license allows you to install Windows 10 on different devices as needed, while an OEM license is tied to a specific device and cannot be transferred.

Q: How do I know which edition of Windows 10 is right for me?

A: Consider your needs and usage. Windows 10 Home is suitable for personal use, while Windows 10 Pro offers advanced features for professionals and businesses.

Q: Can I upgrade to a different edition of Windows 10?

A: Yes, you can upgrade to a different edition by purchasing an upgrade license.

Q: What happens if my Windows 10 license expires?

A: Windows 10 licenses do not expire, but you need to activate the license on your device to use the operating system.

Tips for Acquiring Windows 10:

  • Research and compare prices: Explore different retailers and compare prices for the edition you need.
  • Consider upgrade options: Check if you are eligible for a discounted upgrade from a previous version of Windows.
  • Look for promotional offers: Microsoft often runs promotions offering discounts or free upgrades.
  • Read reviews and user feedback: Before purchasing a license, read reviews and user feedback to understand the pros and cons of different retailers and licensing options.

Conclusion:

Understanding the various licensing options and pricing structures is crucial for making informed decisions about acquiring and using Windows 10. By carefully considering your needs, researching available options, and comparing prices, you can choose the right license for your device and budget. Remember, staying informed and evaluating your options can lead to a smooth and cost-effective experience with Windows 10.

Shelly Cashman Series Microsoft Windows 10: Comprehensive 1st Edition  Rent 9781305656741 Microsoft Windows 10 Comprehensive - STANZATEXTBOOKS Microsoft Windows 10 Comprehensive - STANZATEXTBOOKS
Navigating the Windows 10 Upgrade: A Comprehensive Guide - Fashion Magazine How Much Does Windows 10 Cost? - Windows 10 - Computer Repair Comprehensive of Windows 10 editions with features comparison - AugmaStudio
PPT - A Comprehensive Guide to Installing Windows 10_ Step-by-Step Tutorial PowerPoint Mastering Windows 10: A Beginner's Guide to Navigating the Operating System

Closure

Thus, we hope this article has provided valuable insights into Navigating the Cost of Windows 10: A Comprehensive Guide. We thank you for taking the time to read this article. See you in our next article!

Unlocking The Full Potential Of Windows 10: A Guide To Exiting S Mode

Unlocking the Full Potential of Windows 10: A Guide to Exiting S Mode

Introduction

In this auspicious occasion, we are delighted to delve into the intriguing topic related to Unlocking the Full Potential of Windows 10: A Guide to Exiting S Mode. Let’s weave interesting information and offer fresh perspectives to the readers.

Unlocking the Full Potential of Windows 10: A Guide to Exiting S Mode

What is Windows 10 S Mode and How Do You Turn It Off? - The HelloTech Blog

Windows 10 in S mode is a streamlined version of the popular operating system designed for simplicity and security. It offers a user-friendly experience, particularly for individuals new to computers or those seeking a straightforward and secure environment. However, the limitations imposed by S mode can restrict users from installing certain applications, customizing their system, or accessing specific functionalities. For users who require more flexibility and control over their Windows 10 experience, transitioning out of S mode is a valuable option.

Understanding S Mode: The Trade-Offs

S mode primarily restricts users to installing applications from the Microsoft Store. While the Microsoft Store offers a wide variety of applications, it may not include all the software a user might need or prefer. This limitation can be particularly frustrating for users who require specific applications not available in the Store, such as specialized software for professional use, gaming applications, or custom programs.

Furthermore, S mode prevents users from installing alternative web browsers, such as Google Chrome or Mozilla Firefox. While Microsoft Edge is a capable browser, some users may prefer the features or customization options offered by other browsers. This limitation can impact users who rely on specific browser features or extensions for their workflow.

Exiting S Mode: A Straightforward Process

Exiting S mode is a simple and straightforward process that can be completed within the Windows 10 settings. Users can switch out of S mode by following these steps:

  1. Open the Settings app: This can be done by clicking the Start menu and selecting the gear icon.
  2. Navigate to "Activation": Within the Settings app, select "Update & Security" and then "Activation."
  3. Click "Switch to Windows 10 Home": This option will be displayed if your device is running Windows 10 in S mode.
  4. Confirm your decision: You will be prompted to confirm your decision to exit S mode. Once confirmed, the process will begin.

The Benefits of Exiting S Mode

Exiting S mode unlocks a wide range of possibilities for Windows 10 users. Here are some key benefits:

  • Increased Flexibility: Users can install applications from any source, including websites, external drives, and other repositories. This allows access to a wider range of software, including specialized applications, productivity tools, and gaming software.
  • Enhanced Customization: Exiting S mode enables users to customize their system in various ways, including installing themes, changing the default browser, and modifying system settings. This gives users more control over their Windows 10 experience and allows them to personalize it according to their preferences.
  • Expanded Functionality: Users can install and utilize a wider range of software, including antivirus programs, system optimization tools, and other utilities that may not be available in the Microsoft Store. This enhances the functionality of Windows 10 and allows users to tailor their system to their specific needs.

Considerations Before Exiting S Mode

While exiting S mode offers significant benefits, it’s essential to consider a few factors before making the decision:

  • Security: S mode is designed with security in mind. Exiting S mode may increase the potential for security vulnerabilities if proper precautions are not taken. Users should ensure they have a robust antivirus solution and practice safe browsing habits.
  • Performance: S mode is optimized for performance and efficiency. Exiting S mode may slightly impact system performance, particularly on devices with limited resources.
  • Compatibility: Some applications may not be compatible with standard Windows 10 after exiting S mode. Users should check compatibility before installing any software.

Frequently Asked Questions

Q: Is exiting S mode permanent?
A: Yes, exiting S mode is a permanent change. Once you switch out of S mode, you cannot revert back to S mode without reinstalling Windows 10.

Q: Will I lose any data when I exit S mode?
A: No, exiting S mode will not delete any data on your device. All your files, settings, and applications will remain intact.

Q: Can I switch back to S mode after exiting?
A: No, once you exit S mode, you cannot switch back to S mode without reinstalling Windows 10.

Q: Will I still have access to the Microsoft Store after exiting S mode?
A: Yes, you will still have access to the Microsoft Store after exiting S mode.

Q: What if I encounter issues after exiting S mode?
A: If you encounter any issues after exiting S mode, you can contact Microsoft support for assistance.

Tips for Exiting S Mode

  • Back up your data: Before exiting S mode, ensure you have a backup of all your important data. This will protect you in case of any unforeseen issues.
  • Check compatibility: Before installing any new software after exiting S mode, check its compatibility with standard Windows 10.
  • Install a robust antivirus: After exiting S mode, it is essential to install a reliable antivirus program to protect your system from malware and other threats.
  • Keep your system updated: Regularly update Windows 10 and your antivirus software to ensure your system is protected and running smoothly.

Conclusion

Exiting S mode can unlock the full potential of Windows 10 by providing users with greater flexibility, customization options, and access to a wider range of software. While it’s essential to consider the potential implications for security and performance, the benefits of exiting S mode often outweigh the risks for users who require more control over their operating system. By understanding the process, benefits, and considerations involved in exiting S mode, users can make informed decisions about their Windows 10 experience and maximize its potential.

What is Windows 10 S Mode and How Do You Turn It Off? - The HelloTech Blog How to exit full-screen mode on your Windows 10 computer in 3 different ways  Business Insider How To Exit Windows 10 Safe Mode
Complete Guide on Activating and Exiting Windows Safe Mode 2021 Method  Windows 7 and 10 PPT - Unlocking the Full Potential of Windows 10 with the Best Software PowerPoint Presentation 4 Ways to Fix Unable to Switch Out of S Mode on Windows 11 - Guiding Tech
Complete Guide on Activating and Exiting Windows Safe Mode 2021 Method  Windows 7 and 10 3 Ways to exit Safe Mode

Closure

Thus, we hope this article has provided valuable insights into Unlocking the Full Potential of Windows 10: A Guide to Exiting S Mode. We appreciate your attention to our article. See you in our next article!

The Enigma Of Blurry Text On Computer Screens: A Comprehensive Guide To Troubleshooting And Resolution

The Enigma of Blurry Text on Computer Screens: A Comprehensive Guide to Troubleshooting and Resolution

Introduction

With enthusiasm, let’s navigate through the intriguing topic related to The Enigma of Blurry Text on Computer Screens: A Comprehensive Guide to Troubleshooting and Resolution. Let’s weave interesting information and offer fresh perspectives to the readers.

The Enigma of Blurry Text on Computer Screens: A Comprehensive Guide to Troubleshooting and Resolution

How to Fix Windows 10 Blurry Text Issues

The ability to clearly discern text on a computer screen is paramount for efficient and comfortable work, study, and leisure. When text appears blurry, it can lead to eye strain, headaches, and a diminished user experience. This phenomenon, while seemingly straightforward, can stem from a variety of underlying causes, each requiring a distinct approach to resolution.

This article provides a comprehensive guide to understanding and addressing the issue of blurry text on computer screens. It explores the various factors that can contribute to this problem, ranging from simple adjustments to more complex hardware issues. The goal is to empower users with the knowledge and tools necessary to diagnose and rectify the issue, restoring clear and comfortable text display.

Understanding the Root Causes of Blurry Text

The appearance of blurry text on a computer screen can be attributed to a confluence of factors, each contributing to the overall clarity of the displayed image. These factors can be broadly categorized as:

1. Display-Related Issues:

  • Resolution Mismatch: One of the most common culprits is a mismatch between the screen’s native resolution and the resolution set within the operating system. This can occur when the system attempts to display content at a higher resolution than the screen can physically handle, resulting in stretched and blurred text.
  • Scaling and DPI Settings: Operating systems often employ scaling and DPI (dots per inch) settings to adjust the size of text and other elements on the screen. Incorrectly configured scaling or DPI can lead to blurry text, especially on high-resolution displays.
  • Display Driver Issues: Outdated, corrupted, or incompatible display drivers can disrupt the proper communication between the graphics card and the monitor, leading to blurry text.
  • Monitor Settings: Certain monitor settings, such as brightness, contrast, and sharpness, can affect text clarity. Improperly adjusted settings can lead to a blurry image.
  • Monitor Defects: Physical defects in the monitor’s panel or circuitry can cause text to appear blurry, particularly in localized areas of the screen.

2. Hardware-Related Issues:

  • Graphics Card Issues: A malfunctioning or outdated graphics card can lead to blurry text, particularly if it struggles to process the required rendering tasks.
  • Cable Issues: Damaged or faulty cables connecting the monitor to the computer can degrade the signal quality, resulting in blurry text.
  • System Resources: Insufficient system resources, such as RAM or CPU power, can strain the system’s ability to render text accurately, leading to blurriness.

3. Software-Related Issues:

  • Font Issues: Incorrectly installed or corrupted fonts can cause text to appear blurry or distorted.
  • Software Compatibility: Certain software applications might not be optimized for the screen’s resolution or display settings, resulting in blurry text.

Troubleshooting and Resolution Strategies

Addressing blurry text requires a systematic approach to identify the underlying cause and implement the appropriate solution. The following steps provide a comprehensive framework for troubleshooting and resolving this issue:

1. Verify Screen Resolution:

  • Check Native Resolution: Begin by determining the native resolution of your monitor. This information is usually available in the monitor’s specifications or through the display settings in your operating system.
  • Adjust Resolution: Set the screen resolution to match the monitor’s native resolution. This ensures that the image is displayed at its optimal resolution, minimizing blurriness.

2. Optimize Scaling and DPI Settings:

  • Adjust Scaling: Experiment with different scaling settings within your operating system to find the optimal balance between text size and clarity.
  • Set DPI: Configure the DPI settings to match the screen’s resolution and your personal preferences.

3. Update Display Drivers:

  • Download Latest Drivers: Visit the manufacturer’s website for your graphics card and download the latest available drivers.
  • Install Drivers: Install the downloaded drivers, following the manufacturer’s instructions.

4. Review Monitor Settings:

  • Adjust Brightness and Contrast: Fine-tune the brightness and contrast settings to ensure optimal text visibility.
  • Enable Sharpness: If your monitor offers a sharpness setting, experiment with different levels to enhance text clarity.

5. Examine Cables:

  • Inspect Cables: Carefully examine the cables connecting the monitor to the computer for any signs of damage or wear.
  • Replace Cables: If any cables appear damaged, replace them with new, high-quality cables.

6. Check System Resources:

  • Monitor Resource Usage: Use system monitoring tools to assess CPU and RAM usage.
  • Close Unnecessary Programs: Close any unnecessary programs or processes to free up system resources.

7. Verify Font Installation:

  • Reinstall Fonts: If suspecting font issues, try reinstalling the fonts you commonly use.
  • Use System Fonts: Consider using the system’s default fonts, which are generally optimized for screen display.

8. Address Software Compatibility:

  • Update Software: Update your software applications to their latest versions to ensure compatibility with your system and display settings.
  • Check for Updates: Look for software updates that address known compatibility issues or improve text rendering.

9. Seek Professional Assistance:

  • Contact Manufacturer: If all other troubleshooting steps fail, contact the manufacturer of your monitor or graphics card for further assistance.
  • Consult a Technician: Consider consulting a qualified computer technician for a comprehensive hardware diagnosis and repair.

FAQs Regarding Blurry Text on Computer Screens

Q: Why does my text appear blurry after upgrading to a new monitor?

A: The most likely cause is a mismatch between the new monitor’s native resolution and the resolution set within your operating system. Ensure that the resolution is set to the monitor’s native resolution for optimal clarity.

Q: Is blurry text a sign of a failing graphics card?

A: Blurry text can be a symptom of a failing graphics card, particularly if the issue is accompanied by other visual artifacts, such as flickering or distorted images. However, it’s essential to rule out other potential causes before concluding a graphics card failure.

Q: Can I fix blurry text by simply adjusting the monitor’s sharpness setting?

A: While adjusting the sharpness setting can sometimes improve text clarity, it’s not a guaranteed solution. Other factors, such as resolution mismatch or driver issues, may need to be addressed.

Q: How can I prevent blurry text from occurring in the future?

A: Regularly updating display drivers, maintaining optimal system resources, and ensuring proper monitor settings can help prevent blurry text. Additionally, avoid using damaged cables and consider investing in a high-quality monitor with a suitable resolution for your needs.

Tips for Preventing Blurry Text on Computer Screens

  • Regularly Update Drivers: Ensure that your graphics card drivers are up-to-date to ensure optimal performance and compatibility.
  • Optimize System Resources: Close unnecessary programs and processes to free up system resources, particularly RAM and CPU power.
  • Maintain Proper Monitor Settings: Adjust brightness, contrast, and sharpness settings to suit your preferences and ensure optimal text clarity.
  • Use High-Quality Cables: Invest in high-quality cables to ensure a stable and clear signal transmission between your monitor and computer.
  • Consider a High-Resolution Monitor: If you frequently work with text-heavy documents or demanding applications, consider investing in a high-resolution monitor to enhance text clarity.

Conclusion

Blurry text on computer screens can be a frustrating and potentially harmful experience. However, by understanding the underlying causes and employing a systematic troubleshooting approach, users can effectively diagnose and resolve this issue. Addressing factors such as screen resolution, scaling settings, display drivers, monitor settings, and system resources can restore clear and comfortable text display, enhancing productivity and user experience.

Remember, seeking professional assistance from the manufacturer or a qualified technician is always an option if troubleshooting efforts prove unsuccessful. By taking a proactive approach to maintaining your system and display settings, you can minimize the risk of blurry text and ensure a visually comfortable and productive computing experience.

How to Fix Blurry Screen or Text in Windows 11 How to Fix Windows 10 Blurry Text Issues How to Fix Blurry Text on Windows 10 on High Resolution Displays ?  Windows 10, Windows 10
How To Fix Blurry Screen Windows 10 Easy Guide - vrogue.co Blurry Screen on Windows 11: How to Fix It in 7 Steps How To Remove Blurred Text
2 Easiest Tricks to Fix Blurry Text in Windows 10 on High Resolution Displays  WPVKP A Guide to Fix a Blurry Screen in Windows 11

Closure

Thus, we hope this article has provided valuable insights into The Enigma of Blurry Text on Computer Screens: A Comprehensive Guide to Troubleshooting and Resolution. We thank you for taking the time to read this article. See you in our next article!