Archives 2023

Nudi 5 0 For Windows 11

nudi 5 0 for windows 11

Introduction

With great pleasure, we will explore the intriguing topic related to nudi 5 0 for windows 11. Let’s weave interesting information and offer fresh perspectives to the readers.

It appears you are asking for information about a software program or tool named "nudi 5 0" for Windows 11. However, there is no known software or tool with that name. It is possible there is a typo in the name, or it may be a lesser-known or specialized application.

How to install Nudi 5.0 in PC  Computer Windows 7, 8, 8.1, Windows 10 and Windows 11 - YouTube

To provide you with accurate and helpful information, please clarify the following:

  • Is the name of the software or tool correct? Please double-check the spelling and verify the name.
  • What is the purpose of this software or tool? What are its intended functionalities or features?
  • Where did you encounter this name? Was it in an online forum, a software review, or a product description?

With this additional information, I can provide you with a comprehensive and informative article about the software or tool you are seeking.

download Nudi 5.0 software new version how to download and install complete details watch this Nudi 5.0 Software Free Download Full Version - eliteilida Nudi 5.0 Software Free Download Full Version - eliteilida
HOW TO INSTALL NUDI SOFTWARE  HOW TO INSTALL NUDI 5.0 SOFTWARE NUDI SOFTWARE DOWNLOAD AND NUDI 5.0 - HOW TO INSTALL NUDI 5.0 #Shorts - YouTube Nudi 5.0 Software Free Download Full Version - talknitro
How to download Nudi In PC or Laptops. Kannada Nudi 6.5, 6.1,6.0 , 5.0 software download - YouTube Nudi 5.0 Download  Kannada - YouTube

Closure

Thus, we hope this article has provided valuable insights into nudi 5 0 for windows 11. We appreciate your attention to our article. See you in our next article!

Understanding And Optimizing Your Windows 10 Experience: A Comprehensive Guide

Understanding and Optimizing Your Windows 10 Experience: A Comprehensive Guide

Introduction

In this auspicious occasion, we are delighted to delve into the intriguing topic related to Understanding and Optimizing Your Windows 10 Experience: A Comprehensive Guide. Let’s weave interesting information and offer fresh perspectives to the readers.

Understanding and Optimizing Your Windows 10 Experience: A Comprehensive Guide

Optimizing Windows 10

Windows 10, the flagship operating system from Microsoft, boasts a robust ecosystem designed to enhance user experience and maintain optimal performance. However, the sheer volume of features and settings can often leave users feeling overwhelmed, struggling to manage their system effectively. This guide aims to demystify the intricacies of managing Windows 10, providing a comprehensive understanding of its tools and functionalities.

Navigating the Windows 10 Interface: A Primer

The Windows 10 interface is designed for ease of navigation. Its key components include:

  • Start Menu: The gateway to applications, settings, and system files.
  • Taskbar: Located at the bottom of the screen, it displays running applications, system icons, and the search bar.
  • Action Center: Accessible through the taskbar, it houses notifications, quick actions, and system settings.
  • Settings App: A centralized hub for configuring system settings, managing accounts, and customizing the user experience.

Essential Windows 10 Management Tools

Windows 10 offers a suite of built-in tools designed to streamline system maintenance, enhance security, and optimize performance. These tools are categorized below:

1. System Settings:

  • System: This section allows users to adjust display settings, manage storage space, and configure system notifications.
  • Apps: Here, users can manage installed applications, including uninstalling unwanted programs and setting default apps.
  • Accounts: This section manages user accounts, including creating new accounts, setting privacy options, and controlling family settings.
  • Network & Internet: Users can configure network connections, manage Wi-Fi settings, and control VPN connections.
  • Bluetooth & other devices: This section allows users to manage Bluetooth devices, add printers, and configure other peripherals.
  • Ease of Access: This section provides options for customizing accessibility settings, such as screen readers and keyboard shortcuts.
  • Privacy: This section allows users to manage privacy settings for various system functions, such as location tracking and microphone access.
  • Update & Security: This section handles system updates, manages Windows Defender antivirus, and provides recovery options.

2. Task Manager:

The Task Manager is a powerful tool for monitoring system resources, managing running processes, and identifying potential performance bottlenecks. Its key features include:

  • Processes: Displays all running applications and background processes, allowing users to prioritize and terminate resource-intensive tasks.
  • Performance: Monitors CPU, memory, disk, and network utilization, providing insights into system performance.
  • Startup: Lists programs that automatically launch at system startup, allowing users to disable unnecessary programs for faster boot times.
  • Users: Displays information about currently logged-in users and their resource usage.
  • Details: Provides detailed information about each running process, including memory consumption, CPU usage, and network activity.

3. Control Panel:

The Control Panel is a traditional interface that offers a comprehensive range of system settings, including:

  • Programs: Allows users to install and uninstall programs, manage program features, and set default programs.
  • Network and Internet: Provides access to network connections, sharing settings, and internet options.
  • Hardware and Sound: Allows users to manage devices, adjust sound settings, and configure system components.
  • Clock and Region: Configures date and time settings, language preferences, and regional formats.
  • User Accounts: Manages user accounts, including creating new accounts, setting passwords, and managing account permissions.

4. Disk Cleanup:

This tool identifies and removes temporary files, system files, and other unnecessary data from the hard drive, freeing up valuable storage space.

5. Windows Defender:

Windows 10 comes equipped with a built-in antivirus program, Windows Defender, which provides real-time protection against malware and viruses. It offers features such as:

  • Real-time protection: Continuously monitors system activity for malicious threats.
  • Virus and threat protection: Scans for and removes existing malware.
  • Firewall: Protects the system from unauthorized network access.
  • SmartScreen: Helps prevent users from visiting malicious websites and downloading harmful files.

Optimizing Windows 10 Performance:

While Windows 10 is designed to be efficient, several factors can affect its performance, including:

  • Hardware limitations: Insufficient RAM, outdated hardware, or a slow hard drive can impact performance.
  • Background processes: Unnecessary programs running in the background can consume system resources.
  • Software conflicts: Incompatible or outdated software can cause system instability and slowdowns.
  • Malware infections: Malware can hinder system performance and compromise security.

To optimize Windows 10 performance, consider these strategies:

  • Upgrade hardware: If your system is struggling to keep up, consider upgrading components like RAM, storage, or the graphics card.
  • Manage startup programs: Disable unnecessary programs from launching at startup using the Task Manager.
  • Clean up your hard drive: Use Disk Cleanup to remove temporary files and other unnecessary data.
  • Defragment your hard drive: Defragmentation helps improve read/write speeds, especially on older hard drives.
  • Update your drivers: Ensure all device drivers are up-to-date to ensure optimal hardware performance.
  • Run a system scan: Regularly scan your system for malware using Windows Defender or a third-party antivirus program.
  • Uninstall unnecessary programs: Remove programs you no longer use to free up disk space and reduce resource consumption.

FAQs: Addressing Common Windows 10 Management Concerns

1. How do I troubleshoot a slow computer?

  • Check for resource-intensive processes: Use the Task Manager to identify programs consuming excessive CPU, memory, or disk space.
  • Disable unnecessary startup programs: Reduce the load on your system by disabling programs that launch automatically at startup.
  • Clean up your hard drive: Remove temporary files, system files, and other unnecessary data using Disk Cleanup.
  • Run a virus scan: Malware infections can significantly impact system performance.
  • Check for hardware issues: Ensure your system components, like RAM and hard drive, are functioning properly.

2. How do I manage my storage space?

  • Use Disk Cleanup: Regularly remove temporary files, system files, and other unnecessary data.
  • Uninstall unused programs: Remove programs you no longer use to free up disk space.
  • Move files to external storage: Store large files or media on external hard drives or cloud storage services.
  • Use a storage management tool: Third-party tools can help analyze storage usage and identify files to delete or move.

3. How do I protect my computer from malware?

  • Use a strong antivirus program: Windows Defender provides built-in protection, but consider using a third-party antivirus program for enhanced security.
  • Keep your software up-to-date: Install the latest security updates for Windows and your software programs.
  • Be cautious about downloading files: Only download files from trusted sources and avoid suspicious links or attachments.
  • Use a firewall: A firewall helps protect your system from unauthorized network access.
  • Be mindful of phishing scams: Avoid clicking on links or opening attachments from unknown sources.

4. How do I customize my Windows 10 experience?

  • Personalize your desktop: Change your wallpaper, theme, and screen saver to suit your preferences.
  • Adjust display settings: Customize screen resolution, brightness, and color settings for optimal viewing.
  • Customize your taskbar: Add or remove icons, adjust the size and position of the taskbar, and customize its appearance.
  • Manage notifications: Control the notifications you receive from apps and system services.
  • Use keyboard shortcuts: Learn keyboard shortcuts to streamline common tasks and improve efficiency.

5. How do I troubleshoot connectivity issues?

  • Check your network connection: Ensure your Wi-Fi or Ethernet cable is properly connected and functioning.
  • Restart your router or modem: Sometimes restarting these devices can resolve connectivity issues.
  • Run network troubleshooter: Windows 10 includes a built-in network troubleshooter that can identify and fix common problems.
  • Update your network drivers: Ensure your network drivers are up-to-date to ensure optimal performance.
  • Contact your internet service provider: If the problem persists, contact your ISP for support.

Tips for Effective Windows 10 Management:

  • Regularly update your system: Install the latest Windows updates to ensure security and stability.
  • Back up your data: Create regular backups of your important files to protect against data loss.
  • Use a password manager: Store your passwords securely and avoid using the same password for multiple accounts.
  • Be cautious about installing software: Only install software from trusted sources and be wary of suspicious downloads.
  • Learn keyboard shortcuts: Master keyboard shortcuts to streamline common tasks and improve efficiency.
  • Explore system settings: Take time to familiarize yourself with the various system settings and customize your experience.

Conclusion:

Effectively managing Windows 10 requires understanding its various tools, settings, and functionalities. By leveraging the built-in tools, optimizing system performance, and adopting best practices, users can ensure a smooth, secure, and productive experience. Regular maintenance, proactive security measures, and a willingness to learn and adapt to new features will empower users to take full advantage of Windows 10’s capabilities.

Optimizing Windows 10 Optimizing Your Windows 10 Experience Mastering Windows 10: A Comprehensive Guide to Essential Tips and Tricks
Optimize Windows 10 Experience with these Settings  Geekflare Optimize Windows: 10 Tips Guide  Computer Tips,Tricks&Games How To Optimize Windows 10 - YouTube
25 Best Methods To Optimize Windows 10 Performance 7 Tips For Optimising Windows 10 Experience  Techno FAQ

Closure

Thus, we hope this article has provided valuable insights into Understanding and Optimizing Your Windows 10 Experience: A Comprehensive Guide. We thank you for taking the time to read this article. See you in our next article!

Undoing Mistakes And Restoring Actions: A Comprehensive Guide To Shortcut Keys In Windows 11

Undoing Mistakes and Restoring Actions: A Comprehensive Guide to Shortcut Keys in Windows 11

Introduction

With enthusiasm, let’s navigate through the intriguing topic related to Undoing Mistakes and Restoring Actions: A Comprehensive Guide to Shortcut Keys in Windows 11. Let’s weave interesting information and offer fresh perspectives to the readers.

Undoing Mistakes and Restoring Actions: A Comprehensive Guide to Shortcut Keys in Windows 11

All Shortcut Keys For Windows 11

In the realm of digital tasks, the ability to reverse actions is paramount. Whether it’s a misplaced keystroke in a document, an accidental deletion, or a misapplied formatting, the power to undo and redo empowers users to navigate the digital landscape with confidence. Windows 11, the latest iteration of Microsoft’s operating system, offers a robust set of keyboard shortcuts for undoing and reapplying actions, enhancing workflow efficiency and minimizing frustration.

This article delves into the intricacies of these shortcut keys, providing a comprehensive guide to their usage and functionality. It explores the benefits of using these shortcuts, addressing common FAQs, and offering valuable tips for maximizing their utility.

The Undo and Redo Mechanism: A Foundation for Efficient Workflows

At its core, the undo/redo mechanism is a fundamental feature of many software applications, enabling users to retrace their steps and correct errors. It functions as a safety net, allowing for the restoration of previous states, effectively mitigating the consequences of accidental actions.

In Windows 11, the undo and redo functionality is deeply integrated into the operating system, extending its reach across various applications and contexts. This integration ensures consistency and familiarity across the user experience, promoting seamless navigation between different programs.

Navigating the Shortcuts: A Guide to Undo and Redo Functionality

The most common and widely used shortcut for undoing actions in Windows 11 is Ctrl + Z. This combination, pressed simultaneously, effectively reverses the last action performed, whether it’s deleting text, moving a file, or applying formatting changes.

The counterpart to undo, the redo shortcut, allows users to reapply actions that have been undone. In Windows 11, this functionality is accessed by pressing Ctrl + Y. This shortcut effectively reverses the undo operation, restoring the previously undone action.

Beyond the Basics: Exploring Additional Shortcuts and Contextual Variations

While Ctrl + Z and Ctrl + Y are the primary shortcuts for undoing and redoing actions, Windows 11 offers a range of additional shortcuts for specific applications and scenarios.

1. Undoing Multiple Actions:

For undoing multiple actions in sequence, users can repeatedly press Ctrl + Z. Each press will undo the previous action, allowing for a step-by-step reversal of a series of operations.

2. Redoing Multiple Actions:

Similarly, pressing Ctrl + Y multiple times will reapply multiple actions that have been undone, effectively restoring a sequence of previously reversed operations.

3. Contextual Variations:

Certain applications and programs may employ alternative shortcut keys for undo and redo operations. These variations are often documented within the application’s help files or user manuals. It’s essential to consult these resources for specific application-specific shortcuts.

Benefits of Using Undo and Redo Shortcuts: A Symphony of Efficiency

The utilization of undo and redo shortcuts offers numerous advantages for users, enhancing their workflow efficiency and minimizing the impact of errors.

1. Time-Saving Efficiency:

Using shortcut keys significantly reduces the time required to undo or redo actions. Instead of navigating through menus or using the mouse, users can quickly reverse or reapply actions with a simple keyboard combination, streamlining their workflow.

2. Enhanced Accuracy:

The ability to undo mistakes empowers users to experiment with different options without fear of permanent consequences. This encourages exploration and experimentation, ultimately leading to more accurate and refined results.

3. Reduced Frustration:

The undo/redo mechanism acts as a safety net, mitigating the frustration associated with accidental actions. Users can easily correct errors and recover from mistakes, maintaining a positive and productive work environment.

4. Improved Workflow:

The seamless integration of undo and redo functionality across various applications promotes a consistent and efficient workflow. Users can confidently navigate between different programs, knowing that the undo/redo shortcuts will function consistently, regardless of the application.

FAQs: Addressing Common Queries about Undo and Redo Shortcuts

1. Can I Undo and Redo Actions in All Windows 11 Applications?

While the undo/redo mechanism is deeply integrated into Windows 11, the specific functionality and availability of shortcuts may vary depending on the application. Most standard Windows applications, such as Microsoft Word, Excel, and PowerPoint, support undo and redo operations. However, specialized applications or third-party software may have their own unique implementations.

2. What Happens When I Close an Application After Undoing an Action?

If an application is closed after undoing an action, the undone action will not be permanently restored. The undo/redo functionality is typically maintained within the active session of the application. Once the application is closed, the undo history is cleared, and the undone action is lost.

3. Are There Limits to the Number of Actions I Can Undo or Redo?

The number of actions that can be undone or redone is typically limited by the application itself. Each application maintains its own undo history, which has a finite capacity. As more actions are performed, older actions may be discarded from the history, limiting the number of actions that can be reversed.

4. Can I Customize the Undo and Redo Shortcuts?

While the default shortcuts for undo and redo (Ctrl + Z and Ctrl + Y) are generally standardized across Windows 11, some applications may offer customization options. Users can explore the settings or preferences of individual applications to determine if they can modify the assigned shortcut keys.

Tips for Maximizing the Utility of Undo and Redo Shortcuts

1. Embrace Regular Undoing:

Don’t hesitate to use the undo shortcut frequently. This proactive approach allows for constant error correction and reduces the risk of accumulating significant changes that are difficult to reverse.

2. Use Undo to Explore Options:

Utilize the undo functionality to experiment with different options without fear of permanent consequences. This encourages exploration and helps users identify the most effective solutions.

3. Leverage the Redo Shortcut:

Remember that the redo shortcut is just as valuable as the undo shortcut. Use it to reapply actions that have been accidentally undone, avoiding unnecessary repetition of steps.

4. Familiarize Yourself with Application-Specific Shortcuts:

Explore the documentation of individual applications to understand any application-specific shortcuts for undoing and redoing actions. This ensures that you are utilizing the most efficient methods for each program.

Conclusion: Empowering Users with the Power of Undo and Redo

The undo and redo shortcuts in Windows 11 are invaluable tools for users, enabling efficient workflows, minimizing the impact of errors, and fostering a more productive and enjoyable digital experience. By embracing these shortcuts and understanding their functionalities, users can navigate the digital landscape with confidence, knowing that they have the power to undo mistakes and restore actions with ease. The seamless integration of these shortcuts across various applications promotes a consistent and familiar user experience, enhancing productivity and user satisfaction.

Shortcut of Undo: What are Shortcut Keys for Undo on Windows 11 and Mac โ€“ Droid News Windows 11 Keyboard Shortcuts The Complete List In 20 - vrogue.co Shortcuts Windows 11
All Shortcut Keys For Windows 11 Windows 11 Keyboard Shortcuts Guide Of 2023  itechhacks 150+ Windows 11 Keyboard Shortcuts You Should Know (2024)  Beebom
Windows 11 And 10 Keyboard Shortcuts Quick Reference Guide,, 40% OFF Shortcuts Windows 11

Closure

Thus, we hope this article has provided valuable insights into Undoing Mistakes and Restoring Actions: A Comprehensive Guide to Shortcut Keys in Windows 11. We thank you for taking the time to read this article. See you in our next article!

Optimizing PDF Files: A Comprehensive Guide To Efficient File Management

Optimizing PDF Files: A Comprehensive Guide to Efficient File Management

Introduction

In this auspicious occasion, we are delighted to delve into the intriguing topic related to Optimizing PDF Files: A Comprehensive Guide to Efficient File Management. Let’s weave interesting information and offer fresh perspectives to the readers.

Optimizing PDF Files: A Comprehensive Guide to Efficient File Management

How to Retain the Quality of PDF Files When Optimizing

In the digital age, Portable Document Format (PDF) files have become ubiquitous, serving as a standardized way to share and preserve documents across various platforms. However, the convenience of PDF often comes with a trade-off: large file sizes that can strain storage space, slow down downloads, and hinder efficient data transfer. This is where tools like Q Reduce Lite PDF come into play, offering a solution to optimize PDF files without compromising their content or quality.

Understanding File Compression: The Essence of Q Reduce Lite PDF

At its core, Q Reduce Lite PDF leverages the power of file compression to reduce the size of PDF documents without sacrificing their essential elements. File compression techniques work by identifying redundancies and patterns within data, representing them more efficiently. This process allows for a significant reduction in file size without compromising the integrity of the original information.

The Benefits of PDF File Optimization:

Optimizing PDF files using tools like Q Reduce Lite PDF offers numerous advantages, impacting both individual users and organizations:

  • Reduced Storage Space: Smaller file sizes mean less storage space required on local devices, cloud drives, and servers. This is especially crucial for users with limited storage capacity or organizations managing vast digital archives.
  • Faster Downloads and Transfers: Smaller files download and transfer at significantly faster speeds, enhancing user experience and streamlining workflows. This is particularly beneficial for users accessing files over slow internet connections or sharing large documents with colleagues.
  • Improved Collaboration: Reduced file sizes facilitate smoother collaboration, enabling faster sharing and editing of documents without compromising on performance. This is essential for teams working on projects that involve frequent document exchange.
  • Enhanced Accessibility: Optimized PDFs can be more easily accessed and viewed on various devices, including mobile phones and tablets, improving user experience and accessibility for individuals with limited screen space or bandwidth.
  • Reduced Environmental Impact: By minimizing the size of files, users can reduce the energy required for data transmission and storage, contributing to a more sustainable digital footprint.

Key Features of Q Reduce Lite PDF:

Q Reduce Lite PDF typically offers a range of features designed to optimize PDF files effectively:

  • Compression Algorithm: Q Reduce Lite PDF employs advanced compression algorithms specifically tailored for PDF files, ensuring optimal file size reduction while maintaining document integrity.
  • Image Optimization: Images often constitute a significant portion of PDF file size. Q Reduce Lite PDF intelligently optimizes images by reducing their resolution or converting them to more efficient formats without compromising visual quality.
  • Font Subsetting: Q Reduce Lite PDF can selectively include only the fonts necessary for displaying the document, reducing the file size without affecting the text rendering.
  • Content Removal: Q Reduce Lite PDF may allow users to remove unnecessary elements like bookmarks, annotations, or hidden layers, further reducing file size.
  • Batch Processing: Q Reduce Lite PDF often supports batch processing, allowing users to optimize multiple files simultaneously, significantly streamlining workflows.

Using Q Reduce Lite PDF: A Step-by-Step Guide

Utilizing Q Reduce Lite PDF is generally straightforward:

  1. Choose the PDF File: Select the PDF file you wish to optimize.
  2. Set Compression Settings: Adjust compression settings based on your desired file size reduction and quality.
  3. Start Optimization: Initiate the optimization process.
  4. Save the Optimized File: Save the compressed PDF file to your desired location.

FAQs about Q Reduce Lite PDF:

  • Q: Is Q Reduce Lite PDF safe to use?
    • A: Reputable PDF optimization tools like Q Reduce Lite PDF prioritize user security and data privacy. They typically do not access or store sensitive information and are designed to operate without compromising the integrity of the original file.
  • Q: Does Q Reduce Lite PDF affect the quality of the PDF file?
    • A: While reducing file size, Q Reduce Lite PDF aims to minimize any impact on the visual quality of the document. However, the extent of quality preservation depends on the compression settings and the nature of the PDF file.
  • Q: Is Q Reduce Lite PDF compatible with different operating systems?
    • A: Q Reduce Lite PDF is often available for various operating systems, including Windows, macOS, and Linux, ensuring compatibility across different platforms.
  • Q: Can I optimize password-protected PDF files?
    • A: The ability to optimize password-protected PDF files may vary depending on the specific tool. Some Q Reduce Lite PDF versions might require the password to access and optimize the file.
  • Q: What are the limitations of Q Reduce Lite PDF?
    • A: Q Reduce Lite PDF, being a free or lite version, may have limitations compared to its paid counterparts. These might include restrictions on the number of files that can be optimized, compression levels, or the availability of advanced features.

Tips for Optimizing PDFs with Q Reduce Lite PDF:

  • Prioritize Compression Level: Choose a compression level that balances file size reduction with quality preservation. Higher compression levels result in smaller files but may lead to noticeable quality degradation.
  • Optimize Images Independently: If possible, optimize images separately using specialized image editing tools before incorporating them into the PDF file. This can achieve greater compression without impacting the document’s overall quality.
  • Remove Unnecessary Elements: Before optimizing, identify and remove any unnecessary elements like bookmarks, annotations, or hidden layers. This can significantly reduce file size without affecting the core content.
  • Consider File Format Conversion: If the final document does not require the PDF format, consider converting it to a more efficient format like EPUB or MOBI for further size reduction.
  • Backup Original Files: Before optimizing, always create a backup of the original PDF file to ensure you have a copy of the uncompressed document.

Conclusion:

Q Reduce Lite PDF provides a valuable solution for optimizing PDF files, enhancing efficiency and reducing storage requirements without compromising document integrity. By understanding the benefits and features of such tools, users can effectively manage their digital documents, streamline workflows, and contribute to a more sustainable digital environment. While Q Reduce Lite PDF may have limitations compared to its paid counterparts, it offers a powerful and accessible solution for individuals and organizations seeking to optimize their PDF files.

Streamlining Design Workflows: A Comprehensive Guide to Optimizing PDF Files in CorelDRAW How to Optimize PDF by Digitizing your Documents with PDFelement The Ultimate Guide to Efficient PDF Management
Batch-Optimizing of PDF Files File Management  Teaching Resources Optimizing a PDF document with Acrobat 9
Batch-Optimizing of PDF Files Streamline Document Scanning And Efficient File Management Securely For Businesses - Prim Mart

Closure

Thus, we hope this article has provided valuable insights into Optimizing PDF Files: A Comprehensive Guide to Efficient File Management. We appreciate your attention to our article. See you in our next article!

Outlook Mail App For Windows 10: A Comprehensive Guide

Outlook Mail App for Windows 10: A Comprehensive Guide

Introduction

With enthusiasm, let’s navigate through the intriguing topic related to Outlook Mail App for Windows 10: A Comprehensive Guide. Let’s weave interesting information and offer fresh perspectives to the readers.

Outlook Mail App for Windows 10: A Comprehensive Guide

How to get started with the Mail app on Windows 10  Windows Central

The Outlook Mail app, integrated into Windows 10, serves as a robust and user-friendly platform for email management. It seamlessly integrates with Microsoft’s suite of productivity tools, offering a comprehensive experience for managing personal and professional communications. This article delves into the key features, functionalities, and benefits of the Outlook Mail app for Windows 10, providing a comprehensive understanding of its capabilities.

Understanding the Outlook Mail App

The Outlook Mail app is a dedicated email client designed specifically for Windows 10. It offers a clean and intuitive interface, allowing users to effortlessly manage multiple email accounts, organize messages, and access various productivity tools. Unlike its web-based counterpart, the Outlook Mail app provides a native experience, leveraging the power of the Windows operating system for enhanced performance and integration.

Key Features and Functionalities

The Outlook Mail app boasts a rich set of features, making it a versatile tool for managing email communication. These include:

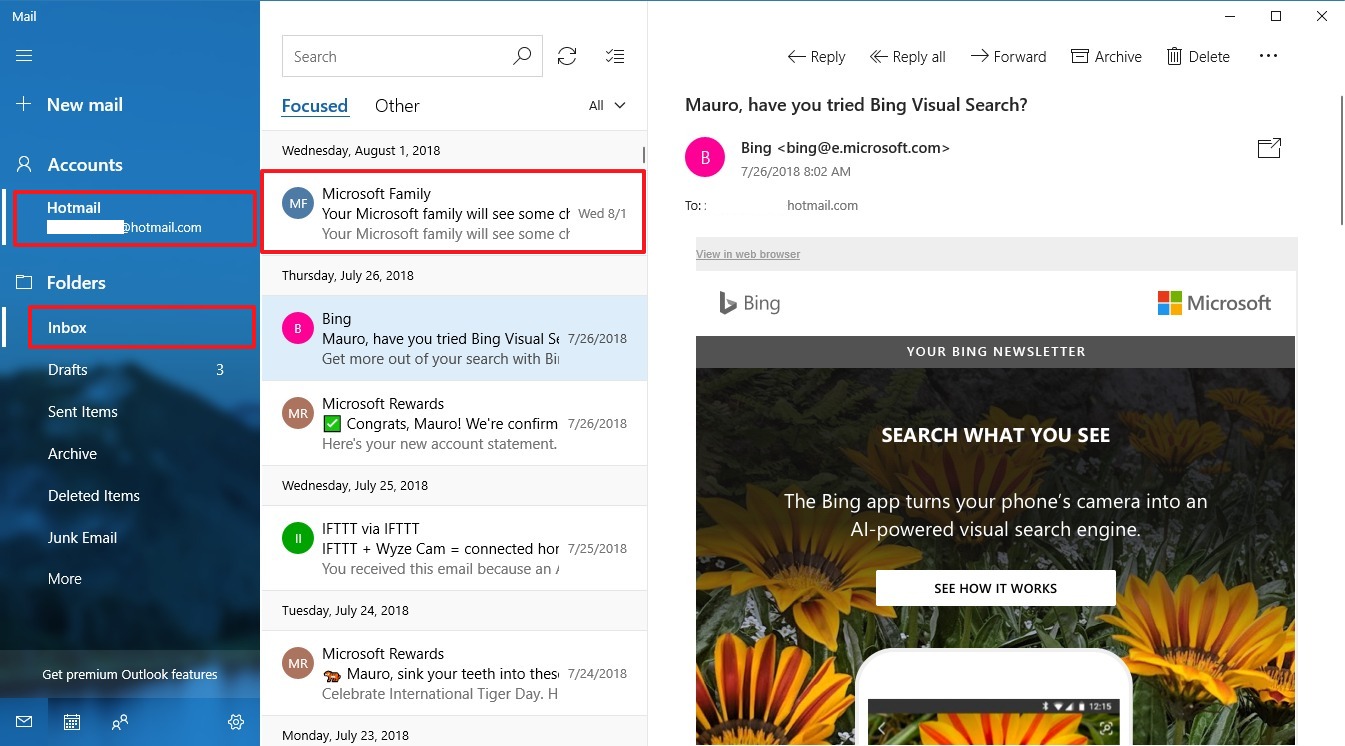
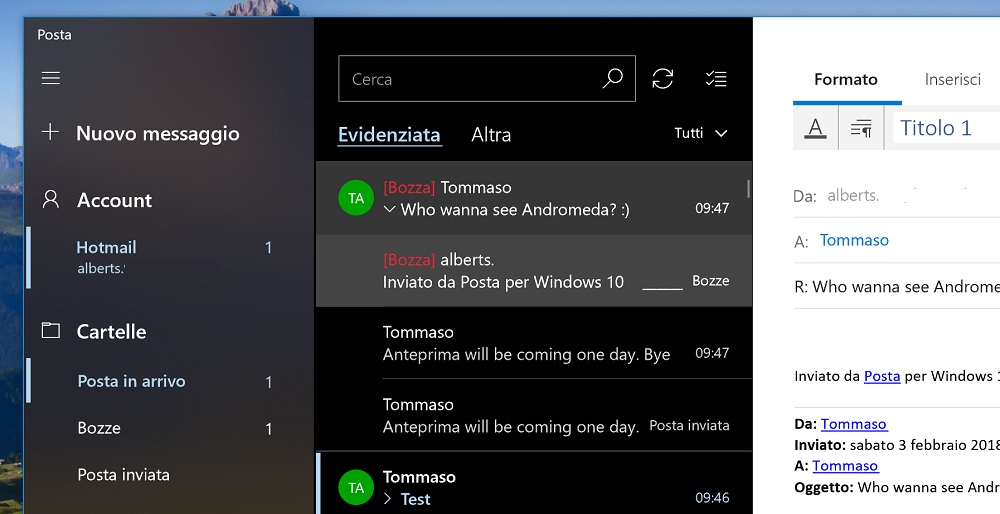
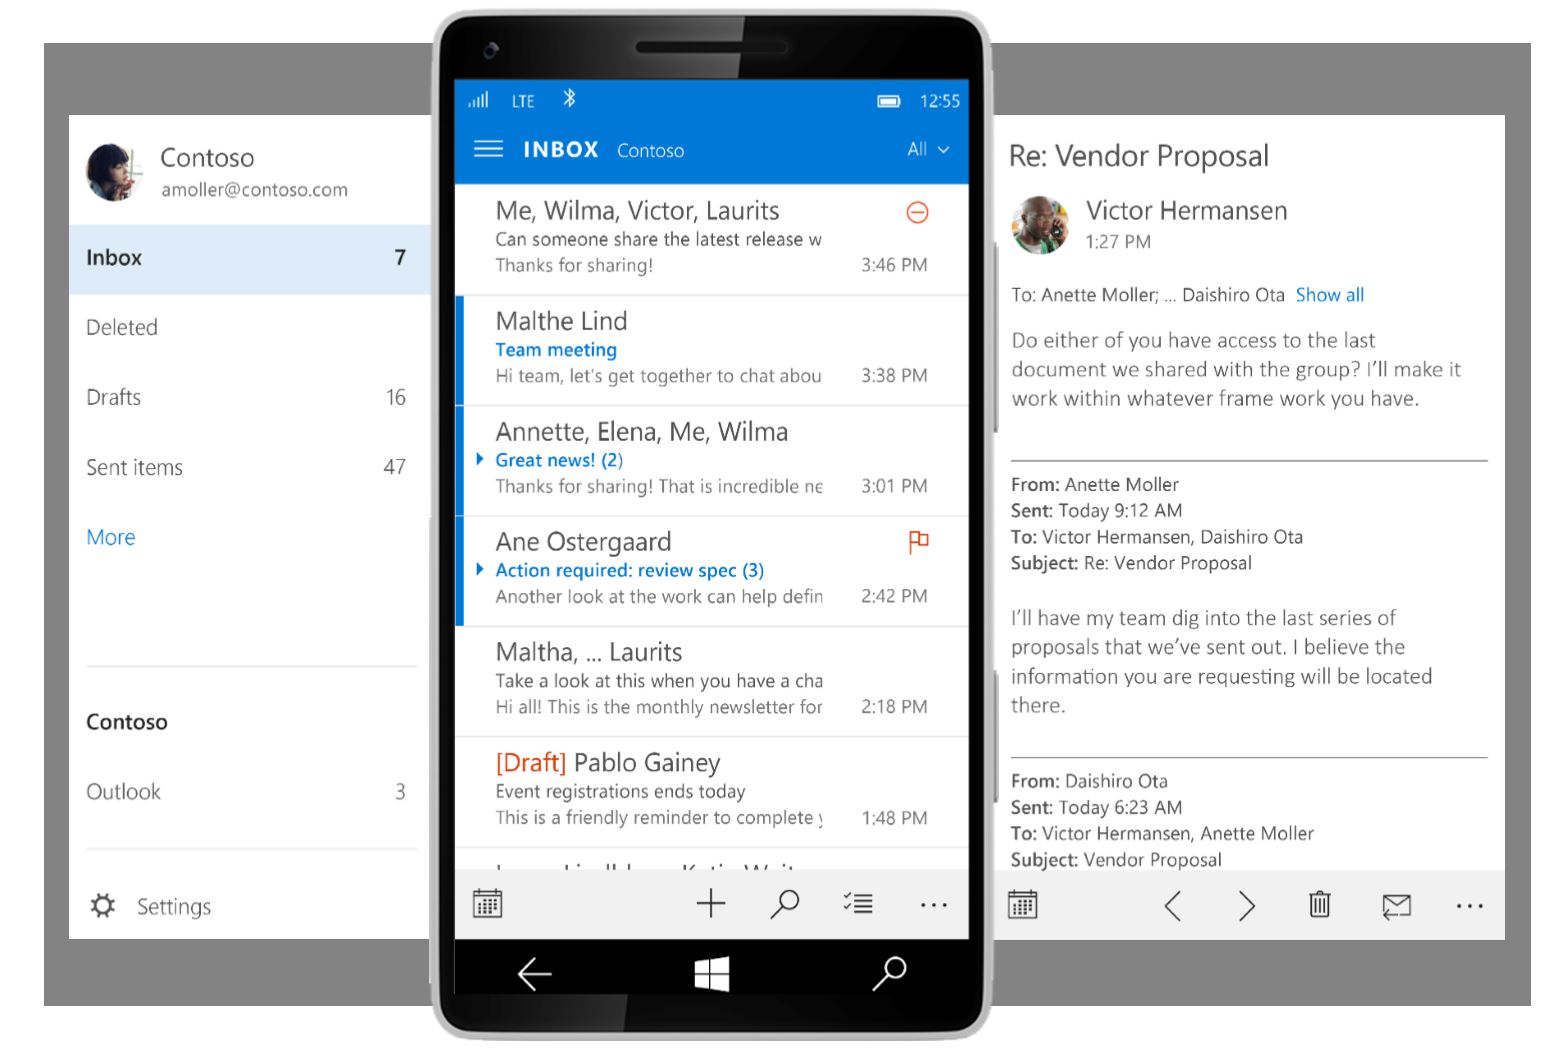
1. Unified Inbox: The app consolidates emails from multiple accounts into a single inbox, providing a centralized platform for managing all communications. This eliminates the need to switch between different accounts, streamlining email management.

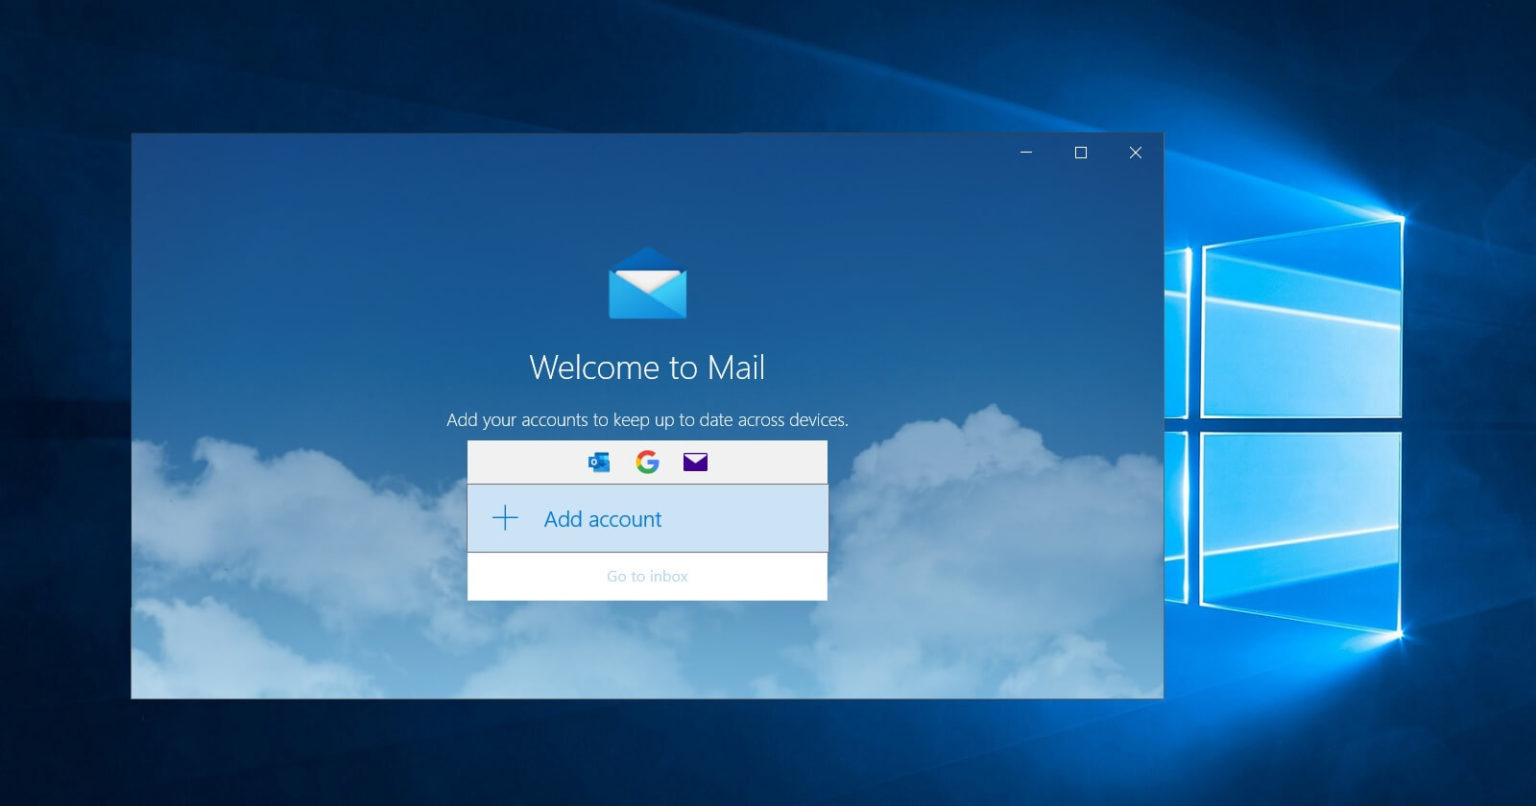
2. Account Management: The Outlook Mail app supports a wide range of email providers, including Microsoft Exchange, Outlook.com, Gmail, Yahoo Mail, and others. Users can easily add and manage multiple accounts, switching between them effortlessly.

3. Email Organization: The app offers robust organization tools, allowing users to create folders, categorize emails, and utilize search functions to locate specific messages quickly. This ensures efficient management of large email volumes.

4. Calendar Integration: The Outlook Mail app seamlessly integrates with the Windows Calendar app, providing a unified view of appointments, meetings, and deadlines. Users can schedule events, set reminders, and manage their schedules directly from the email app.

5. Contacts Management: The app integrates with the Windows Contacts app, allowing users to manage their contact list directly within the email client. This facilitates easy access to contact information and streamlines communication.

6. Attachments Management: The Outlook Mail app enables users to easily attach files to emails, preview attachments, and manage attachments within the app. It supports various file formats, ensuring seamless communication with various recipients.

7. Focused Inbox: The Focused Inbox feature intelligently prioritizes important emails, separating them from less important messages. This ensures users focus on critical communications while minimizing distractions.

8. Sweep Feature: The Sweep feature allows users to automatically delete or archive emails based on specific criteria. This helps manage email clutter and keep the inbox organized.

9. Offline Access: The Outlook Mail app enables users to access emails even when offline. This feature is particularly useful for users who frequently travel or work in areas with limited internet connectivity.

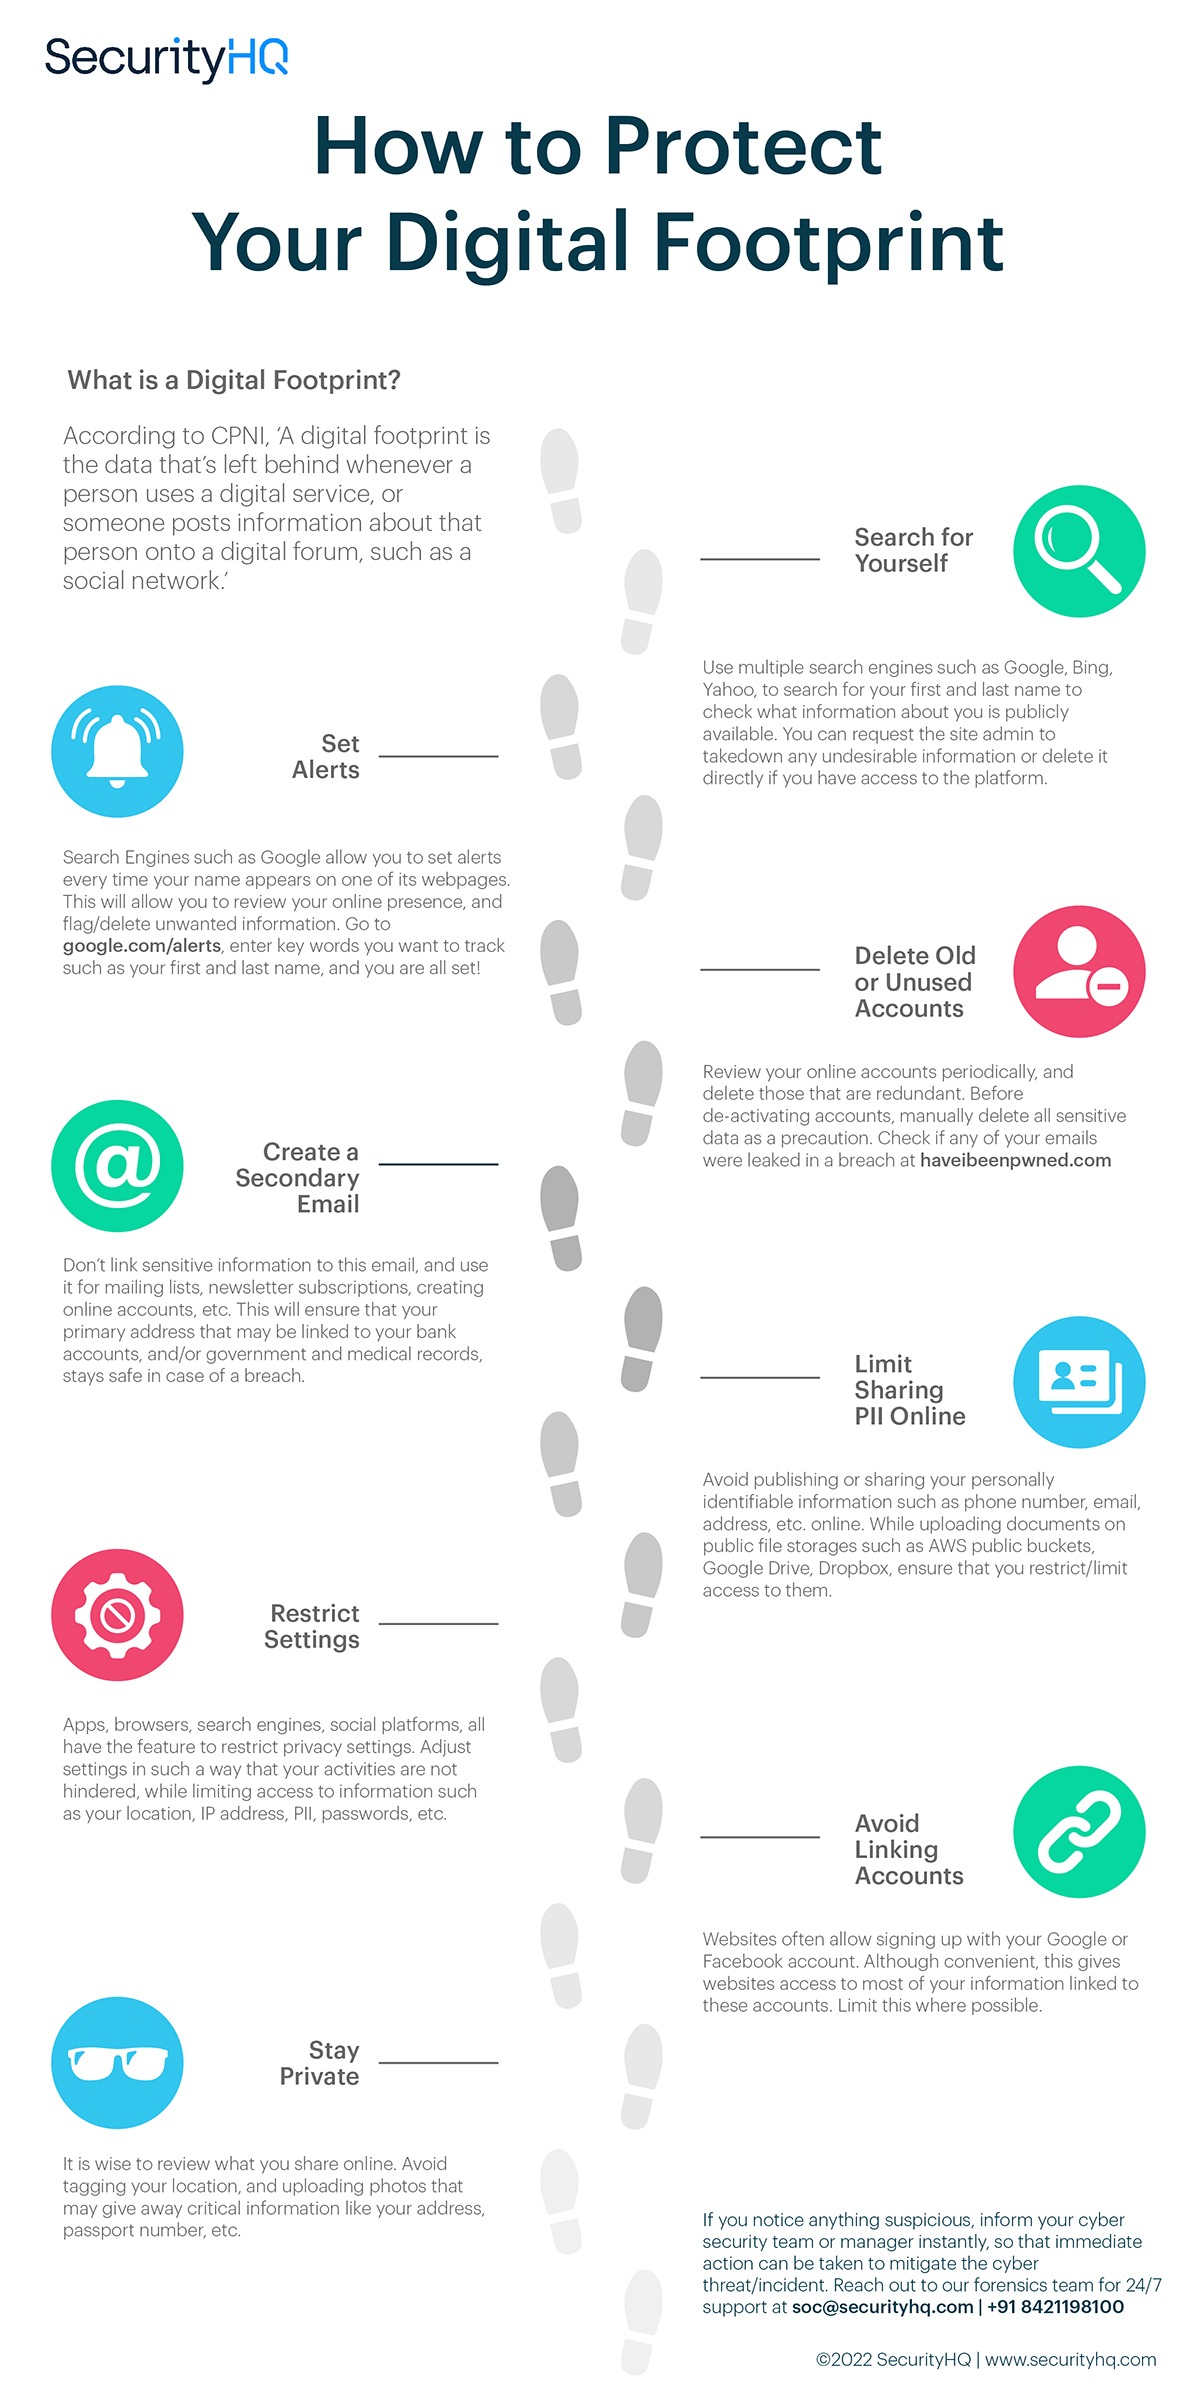
10. Security and Privacy: The Outlook Mail app prioritizes security and privacy, utilizing industry-standard encryption protocols to protect user data. It also offers features like two-factor authentication to enhance account security.

Benefits of Using the Outlook Mail App

The Outlook Mail app offers numerous benefits for Windows 10 users, making it a valuable tool for managing email communications. Some key advantages include:

1. Seamless Integration: The Outlook Mail app seamlessly integrates with other Windows 10 apps, such as Calendar, Contacts, and OneDrive. This unified experience streamlines productivity and eliminates the need for separate applications.

2. Enhanced Productivity: The app’s features, including Focused Inbox, Sweep, and offline access, contribute to improved productivity by minimizing distractions and maximizing efficiency.

3. User-Friendly Interface: The Outlook Mail app boasts a clean and intuitive interface, making it easy to navigate and use, even for users unfamiliar with email clients.

4. Robust Functionality: The app offers a wide range of features, including account management, email organization, calendar integration, and security measures, providing a comprehensive solution for email management.

5. Free and Accessible: The Outlook Mail app is free to download and use for all Windows 10 users, making it an accessible and cost-effective solution for email communication.

FAQs about the Outlook Mail App

1. Can I use the Outlook Mail app with multiple email accounts?

Yes, the Outlook Mail app supports multiple email accounts from various providers, allowing users to manage all their communications in one place.

2. How can I add a new email account to the Outlook Mail app?

Adding a new account is straightforward. Simply navigate to the "Settings" menu and select "Add account." Follow the on-screen instructions to configure your account details.

3. Does the Outlook Mail app support offline access?

Yes, the Outlook Mail app allows users to access emails even when offline. This feature ensures uninterrupted communication even in areas with limited internet connectivity.

4. How do I manage email attachments with the Outlook Mail app?

The app allows users to easily attach files to emails, preview attachments, and manage attachments directly within the app. It supports various file formats, ensuring seamless communication.

5. What security measures are in place for the Outlook Mail app?

The Outlook Mail app prioritizes security, utilizing industry-standard encryption protocols and offering features like two-factor authentication to protect user data.

6. How do I access the Focused Inbox feature?

The Focused Inbox feature is enabled by default. However, users can customize their settings to adjust how the feature prioritizes emails.

7. How can I customize the Outlook Mail app’s appearance?

The Outlook Mail app offers customization options, allowing users to adjust the theme, font size, and other visual settings to personalize their experience.

8. Can I sync my contacts from other platforms to the Outlook Mail app?

Yes, the app allows users to import contacts from other platforms, such as Gmail or iCloud, ensuring a comprehensive contact list within the app.

9. Is the Outlook Mail app compatible with other Microsoft products?

Yes, the Outlook Mail app seamlessly integrates with other Microsoft products, such as Office 365, OneDrive, and Teams, providing a unified experience for productivity.

10. What are the system requirements for using the Outlook Mail app?

The Outlook Mail app is compatible with Windows 10 and requires a minimum of 1GB of RAM and 1GB of available storage space.

Tips for Using the Outlook Mail App

1. Utilize Folders and Categories: Create folders and categories to organize emails efficiently, making it easier to locate specific messages.

2. Leverage Search Functions: Utilize the app’s powerful search functions to quickly find specific emails based on keywords, senders, or dates.

3. Schedule Emails for Later: Use the "Schedule Send" feature to send emails at a later time, ensuring timely communication without interrupting your workflow.

4. Customize Notifications: Adjust notification settings to receive alerts only for important emails, minimizing distractions and enhancing focus.

5. Enable Two-Factor Authentication: Enhance account security by enabling two-factor authentication to protect your email account from unauthorized access.

6. Use the Sweep Feature: Regularly utilize the Sweep feature to manage email clutter, automatically deleting or archiving unwanted messages.

7. Optimize Focused Inbox: Customize the Focused Inbox settings to prioritize emails based on your specific needs, ensuring important messages are not overlooked.

8. Take Advantage of Calendar Integration: Integrate the Outlook Mail app with the Windows Calendar app to manage appointments, meetings, and deadlines seamlessly.

9. Utilize the Offline Access Feature: Access emails even when offline, ensuring uninterrupted communication while traveling or in areas with limited connectivity.

10. Explore App Settings: Familiarize yourself with the app’s settings to customize its functionality and optimize its performance based on your preferences.

Conclusion

The Outlook Mail app for Windows 10 provides a robust and user-friendly platform for managing email communication. Its seamless integration with other Windows 10 apps, comprehensive features, and intuitive interface make it a valuable tool for both personal and professional use. By understanding the app’s capabilities and utilizing its features effectively, users can streamline their email management, enhance productivity, and stay connected with ease. The Outlook Mail app empowers users to navigate the digital landscape of communication efficiently, ensuring a seamless and productive experience.

How to add email to outlook windows 10 - deskvse Microsoft outlook mail - toolboxolerX Using the Outlook Mail App in Windows 10 - Microsoft Community
Outlook Mail app for Windows 10 gets UI improvements in Release Preview Ring - MSPoweruser Outlook Mail and Calendar App updated for Windows 10 and Windows 10 Mobile Seriously! 44+ Facts About Outlook Mail App For Windows: If you're having trouble with your
A Basic Guide to Microsoft Outlook Windows Mail app got a new UI : r/Windows10

Closure

Thus, we hope this article has provided valuable insights into Outlook Mail App for Windows 10: A Comprehensive Guide. We thank you for taking the time to read this article. See you in our next article!

The Crucial Role Of NVIDIA Drivers In Windows 11: A Comprehensive Guide

The Crucial Role of NVIDIA Drivers in Windows 11: A Comprehensive Guide

Introduction

With enthusiasm, let’s navigate through the intriguing topic related to The Crucial Role of NVIDIA Drivers in Windows 11: A Comprehensive Guide. Let’s weave interesting information and offer fresh perspectives to the readers.

The Crucial Role of NVIDIA Drivers in Windows 11: A Comprehensive Guide

Guide to Update Graphics Driver on Windows 11 with NVIDIA 2024

The seamless operation of a modern computer system relies heavily on a delicate interplay between hardware and software. This is especially true for the graphics processing unit (GPU), a crucial component responsible for rendering visuals on your screen. NVIDIA, a leading manufacturer of GPUs, provides specialized software known as drivers that act as the bridge between your hardware and the operating system, enabling optimal performance and functionality.

In the context of Windows 11, NVIDIA drivers play an even more critical role. This latest operating system introduces advanced graphical features and functionalities, demanding a robust and up-to-date driver suite for optimal utilization. This article will delve into the intricacies of NVIDIA drivers in Windows 11, exploring their importance, benefits, and essential aspects for a smooth user experience.

Understanding the Significance of NVIDIA Drivers in Windows 11

NVIDIA drivers are not mere optional software add-ons; they are fundamental components that dictate how your GPU interacts with Windows 11. These drivers translate commands from the operating system into instructions that the GPU understands, facilitating smooth graphics rendering, video playback, and other visually intensive tasks.

Key Benefits of Using the Latest NVIDIA Drivers in Windows 11:

  • Enhanced Performance: Modern NVIDIA drivers are meticulously optimized to leverage the full potential of your GPU, delivering noticeable improvements in frame rates, visual fidelity, and overall gaming performance. They often incorporate new features and optimizations specific to Windows 11, enhancing the overall gaming experience.
  • Improved Stability and Compatibility: NVIDIA continuously releases driver updates to address compatibility issues, fix bugs, and enhance system stability. These updates ensure that your GPU seamlessly integrates with Windows 11, minimizing potential conflicts and crashes.
  • Access to New Features: NVIDIA drivers frequently introduce new features and functionalities, such as support for advanced graphics technologies like ray tracing and DLSS, which enrich the visual experience in games and other applications.
  • Enhanced Security: NVIDIA prioritizes security in its driver development process. Regular updates often include security patches, mitigating potential vulnerabilities and safeguarding your system from malicious attacks.
  • Support for Latest Hardware: NVIDIA drivers are designed to support the latest GPU hardware, ensuring optimal performance and compatibility with new technologies. This is particularly important for users with high-end gaming PCs or workstations that rely on cutting-edge graphics capabilities.

Essential Aspects of NVIDIA Drivers in Windows 11:

  • Driver Versions: NVIDIA releases drivers in various versions, each tailored for specific GPU models and Windows operating systems. It is crucial to download and install the correct driver version for your system to ensure optimal compatibility and performance.
  • Driver Installation: The process of installing NVIDIA drivers is generally straightforward. Users can download the latest drivers from the NVIDIA website or use the GeForce Experience software for automatic updates.
  • Driver Updates: Maintaining updated drivers is essential for optimal performance and system stability. NVIDIA recommends enabling automatic driver updates through GeForce Experience or manually checking for new versions on the NVIDIA website.
  • Driver Settings: NVIDIA drivers offer a range of customizable settings, allowing users to fine-tune performance and visual preferences. The NVIDIA Control Panel provides access to various settings related to graphics quality, power management, and other parameters.

Troubleshooting Common NVIDIA Driver Issues in Windows 11:

  • Driver Conflicts: In rare instances, NVIDIA drivers might conflict with other software or hardware components on your system. This can lead to crashes, performance issues, or display problems. To resolve these conflicts, try reinstalling the drivers, updating other software, or checking for driver compatibility issues.
  • Driver Installation Errors: Driver installation errors can occur due to various factors, including incompatible hardware, corrupt files, or insufficient system resources. To troubleshoot these errors, try reinstalling the drivers, verifying system requirements, and ensuring sufficient disk space.
  • Display Issues: Outdated or corrupted drivers can sometimes cause display problems, such as flickering, screen tearing, or distorted images. To resolve these issues, try updating the drivers, reinstalling them, or adjusting display settings.

FAQs About NVIDIA Drivers in Windows 11:

Q: How do I know which NVIDIA driver version is right for my system?
A: The NVIDIA website provides a comprehensive driver download section. To find the appropriate driver, select your operating system (Windows 11), GPU model, and product series.

Q: How do I update my NVIDIA drivers?
A: You can update your drivers through the NVIDIA GeForce Experience software or manually download the latest version from the NVIDIA website.

Q: What are the benefits of using the latest NVIDIA drivers?
A: The latest drivers offer enhanced performance, improved stability, access to new features, and enhanced security.

Q: What should I do if I experience driver installation errors?
A: Try reinstalling the drivers, verifying system requirements, ensuring sufficient disk space, and checking for potential conflicts with other software.

Q: How can I resolve display issues caused by NVIDIA drivers?
A: Try updating the drivers, reinstalling them, adjusting display settings, and checking for compatibility issues with other hardware components.

Tips for Optimizing NVIDIA Drivers in Windows 11:

  • Enable Automatic Updates: Activating automatic driver updates through GeForce Experience ensures that you are always using the latest and most stable drivers.
  • Monitor Driver Release Notes: Stay informed about new driver releases and their features by reading the release notes on the NVIDIA website.
  • Consider Customizing Settings: Explore the NVIDIA Control Panel to fine-tune graphics settings, power management, and other parameters for optimal performance and visual preferences.
  • Perform Clean Installations: For a fresh start, consider performing a clean installation of NVIDIA drivers by completely removing previous versions before installing the latest update.
  • Utilize GeForce Experience: This software offers a streamlined experience for updating drivers, optimizing game settings, and accessing other NVIDIA features.

Conclusion:

NVIDIA drivers are an indispensable part of a seamless Windows 11 experience, enabling optimal performance, stability, and access to the latest features. Understanding their importance, benefits, and troubleshooting techniques is crucial for maximizing your system’s potential. By keeping your drivers updated, exploring customization options, and staying informed about driver releases, you can ensure a smooth and enjoyable experience on Windows 11, whether you’re gaming, working, or simply navigating the operating system.

Download Windows 11 Nvidia Driver - Officially Released Game Ready Driver How To Download Nvidia Drivers For Windows 11 - YouTube Windows 11 Nvidia Drivers
How To Update NVIDIA Graphics Card Drivers On Windows 11 - YouTube How to Update Nvidia Graphics Drivers Windows 11 (2023)  Download & Install Nvidia Drivers Win Nvidia Drivers Windows 11
How to Update Nvidia Drivers Windows 11 - YouTube How to Update Graphics Driver on Windows 11

Closure

Thus, we hope this article has provided valuable insights into The Crucial Role of NVIDIA Drivers in Windows 11: A Comprehensive Guide. We appreciate your attention to our article. See you in our next article!

Remote Assistance Reimagined: A Comprehensive Guide To Quick Assist In Windows 11

Remote Assistance Reimagined: A Comprehensive Guide to Quick Assist in Windows 11

Introduction

With enthusiasm, let’s navigate through the intriguing topic related to Remote Assistance Reimagined: A Comprehensive Guide to Quick Assist in Windows 11. Let’s weave interesting information and offer fresh perspectives to the readers.

Remote Assistance Reimagined: A Comprehensive Guide to Quick Assist in Windows 11

Windows 11 Remote Assistance: How to Use Quick Assist to Repair a Computer Remotely - WinBuzzer

Windows 11 introduces a streamlined and intuitive remote assistance tool known as Quick Assist, designed to simplify the process of providing technical support to others. This application empowers users to share their screen, control another computer remotely, or receive assistance from a remote helper. This guide delves into the intricacies of Quick Assist, exploring its functionality, benefits, and practical applications.

Understanding Quick Assist: A Gateway to Remote Collaboration

Quick Assist is an integral part of Windows 11, offering a user-friendly interface for remote assistance. It operates on the principle of secure connections, allowing users to share their screen or grant control to a remote helper. This capability proves invaluable for troubleshooting technical issues, providing guidance on software applications, or simply demonstrating a task to another user.

Key Features of Quick Assist:

  1. Screen Sharing: Quick Assist enables users to share their entire screen or a specific window with a remote helper. This allows the helper to see what is happening on the user’s computer and provide guidance accordingly.
  2. Remote Control: Quick Assist grants remote control over the user’s computer, empowering the helper to take direct actions and resolve issues. This feature is particularly useful for tasks that require hands-on intervention.
  3. Code Sharing: Quick Assist facilitates the sharing of text, such as code snippets or error messages, between the user and the helper. This streamlines communication and ensures accurate information transfer.
  4. Security: Quick Assist prioritizes security through a robust encryption system, safeguarding user data during remote sessions.

Downloading and Installing Quick Assist:

Quick Assist is pre-installed in Windows 11. To initiate a Quick Assist session, navigate to the Start Menu and type "Quick Assist" in the search bar. The Quick Assist application will appear in the results.

Benefits of Using Quick Assist:

  1. Enhanced Efficiency: Quick Assist streamlines the remote assistance process, eliminating the need for physical presence or complex configuration settings.
  2. Improved Communication: The integrated chat feature enables real-time communication between the user and the helper, facilitating clear instructions and problem-solving.
  3. Accessibility: Quick Assist removes geographical barriers, allowing users to connect with helpers regardless of their location.
  4. Security: The secure connection protocol protects user data and ensures privacy during remote sessions.

Practical Applications of Quick Assist:

  1. Technical Support: Quick Assist is an ideal tool for troubleshooting computer issues, such as software malfunctions, network connectivity problems, or hardware errors.
  2. Software Training: Quick Assist enables remote demonstrations of software applications, providing users with hands-on training and guidance.
  3. Collaboration: Quick Assist facilitates remote collaboration on projects, allowing users to share screens and work together on documents or presentations.
  4. Remote Access: Quick Assist allows users to access their own computers remotely, enabling them to retrieve files, manage applications, or perform other tasks from any location.

FAQs Regarding Quick Assist:

1. What are the system requirements for Quick Assist?

Quick Assist requires a Windows 11 operating system and a stable internet connection.

2. How secure is Quick Assist?

Quick Assist employs robust encryption protocols to safeguard user data during remote sessions. The connection is secure and protected from unauthorized access.

3. Can I use Quick Assist to access someone else’s computer without their permission?

No, Quick Assist requires the consent of the user whose computer is being accessed. It is essential to respect user privacy and obtain permission before initiating a remote session.

4. What happens if the internet connection drops during a Quick Assist session?

If the internet connection is interrupted, the Quick Assist session will be paused. Once the connection is restored, the session can be resumed.

5. Is Quick Assist compatible with other operating systems?

Currently, Quick Assist is only compatible with Windows 11.

Tips for Using Quick Assist Effectively:

  1. Clear Communication: Ensure clear and concise communication with the remote helper, providing detailed descriptions of the issue and any relevant information.
  2. Secure Connection: Verify the security of the connection before granting remote control to another user.
  3. Privacy: Be mindful of privacy concerns when sharing your screen or granting remote access.
  4. Troubleshooting: If encountering difficulties with Quick Assist, refer to the official Microsoft documentation or contact their support team for assistance.
  5. Updates: Keep Quick Assist updated to benefit from the latest features and security enhancements.

Conclusion:

Quick Assist is a powerful and versatile tool for remote assistance, empowering users to connect with helpers, share screens, and troubleshoot technical issues. Its ease of use, security features, and practical applications make it an indispensable asset for individuals, businesses, and organizations alike. By embracing Quick Assist, users can streamline remote support, enhance collaboration, and overcome technical challenges with greater efficiency and ease.

Windows 11 Remote Assistance: How to Use Quick Assist to Repair a Computer Remotely - WinBuzzer Windows 11 Remote Assistance: How to Use Quick Assist to Repair a Computer Remotely - WinBuzzer Windows 11 - How to use Remote Assistance in Windows 11  Windows 11 Remote Assitance Tutorial
Windows 11 Remote Assistance: How to Use Quick Assist to Repair a Computer Remotely - WinBuzzer How to use Remote Desktop, Quick Assist or Remote Assistance in Windows 11 Windows 11 Remote Assistance: How to Use Quick Assist to Repair a Computer Remotely - WinBuzzer
How to use Quick Assist for remote assistance on Windows 11 - Pureinfotech Windows 11 Remote Assistance: How to Use Quick Assist to Repair a Computer Remotely - WinBuzzer

Closure

Thus, we hope this article has provided valuable insights into Remote Assistance Reimagined: A Comprehensive Guide to Quick Assist in Windows 11. We appreciate your attention to our article. See you in our next article!

Net Framework 3 5 For Windows 10 Offline

net framework 3 5 for windows 10 offline

Introduction

With great pleasure, we will explore the intriguing topic related to net framework 3 5 for windows 10 offline. Let’s weave interesting information and offer fresh perspectives to the readers.

The Enduring Relevance of .NET Framework 3.5 for Windows 10: A Comprehensive Guide

Como instalar net Framework 3.5 no windows 10 [ OFFLINE ] ~ [ LAUDRINO TUTORIAIS ]

While the .NET Framework has evolved significantly with newer versions, the legacy of .NET Framework 3.5 remains relevant in certain scenarios, particularly for Windows 10 users. This comprehensive guide delves into the intricacies of .NET Framework 3.5, its compatibility with Windows 10, and its enduring importance in specific application contexts.

Understanding .NET Framework 3.5

.NET Framework 3.5 is a comprehensive software development platform released by Microsoft in 2007. It serves as a foundation for building and running applications for the Windows operating system. This framework provides a robust set of libraries, tools, and runtime environments, enabling developers to create a wide range of applications, including desktop programs, web applications, and mobile apps.

.NET Framework 3.5 is built upon previous versions, including .NET Framework 2.0 and 3.0. It incorporates features from these earlier versions, adding new capabilities such as Windows Communication Foundation (WCF), Windows Presentation Foundation (WPF), and Windows Workflow Foundation (WF). These features enhance application development by providing advanced functionalities for communication, user interface design, and workflow management.

.NET Framework 3.5 and Windows 10 Compatibility

While Windows 10 primarily focuses on newer .NET technologies like .NET Core and .NET 5/6, .NET Framework 3.5 continues to hold relevance for certain scenarios. Windows 10 retains backward compatibility with .NET Framework 3.5, allowing users to run legacy applications built on this framework. This compatibility is particularly important for organizations and individuals who rely on older applications that haven’t yet been migrated to newer .NET versions.

Why .NET Framework 3.5 Still Matters

Despite the emergence of newer frameworks, .NET Framework 3.5 remains relevant for various reasons:

  • Legacy Applications: Many existing applications, especially those built before .NET Core’s introduction, rely on .NET Framework 3.5. These applications might be critical to business operations or personal workflows, making .NET Framework 3.5 essential for their continued functionality.
  • Specific Features: .NET Framework 3.5 includes features that may not be fully replicated in newer versions. For instance, WPF’s 3D graphics capabilities or WCF’s specific communication protocols might still be required for certain applications.
  • Security Updates: Microsoft continues to release security updates for .NET Framework 3.5, ensuring that applications built on this framework remain secure and protected against vulnerabilities.

Installing .NET Framework 3.5 on Windows 10

Installing .NET Framework 3.5 on Windows 10 is a straightforward process:

  1. Open Windows Settings: Navigate to "Settings" by searching in the taskbar or pressing "Windows Key + I".
  2. Select "Apps": Click on the "Apps" option in the left-hand menu.
  3. Choose "Optional Features": On the right side, click "Optional Features".
  4. Add .NET Framework 3.5: Click "Add a Feature" and select ".NET Framework 3.5 (includes .NET 2.0 and 3.0)".
  5. Restart: Restart your computer to complete the installation.

Note: You might need an internet connection during the installation process to download the necessary components.

Offline Installation of .NET Framework 3.5 on Windows 10

For scenarios where an internet connection is unavailable, you can install .NET Framework 3.5 offline using an installation media:

  1. Obtain the Installation Media: Download the Windows 10 installation media (ISO file) from Microsoft’s official website.

  2. Mount the ISO File: Right-click on the ISO file and select "Mount".

  3. Open Command Prompt: Search for "Command Prompt" in the taskbar and run it as administrator.

  4. Execute the Command: Type the following command and press Enter:

    Dism /online /enable-feature /featurename:NetFx3 /All /Source:X:sourcessxs /LimitAccess

    Replace "X" with the drive letter where you mounted the ISO file.

  5. Restart: Restart your computer to complete the installation.

Note: This method requires the Windows 10 installation media, which contains the necessary files for offline installation.

Frequently Asked Questions (FAQs)

Q1: Is .NET Framework 3.5 still supported by Microsoft?

A: Yes, Microsoft continues to provide security updates for .NET Framework 3.5. However, new features or major updates are unlikely.

Q2: Will .NET Framework 3.5 work on future Windows versions?

A: Microsoft does not guarantee backward compatibility for older frameworks with future Windows releases. While it’s possible that .NET Framework 3.5 might work on future versions, it’s not guaranteed.

Q3: Should I migrate my applications from .NET Framework 3.5 to newer versions?

A: Migrating legacy applications to newer .NET versions can be beneficial, offering modern features, improved performance, and better security. However, the migration process can be complex and time-consuming. It’s recommended to carefully evaluate the benefits and costs before undertaking such a migration.

Q4: Can I run .NET Framework 3.5 applications on a different operating system?

A: .NET Framework 3.5 is designed specifically for Windows operating systems. Running it on other operating systems is not possible without significant modifications or virtualization techniques.

Tips for Using .NET Framework 3.5 on Windows 10

  • Keep it Updated: Regularly install security updates for .NET Framework 3.5 to ensure your applications are protected from vulnerabilities.
  • Consider Migration: If you’re using .NET Framework 3.5 for applications that are no longer critical, consider migrating them to newer .NET versions for improved security and functionality.
  • Document Your Dependencies: Maintain a record of all applications that rely on .NET Framework 3.5. This documentation will be crucial if you need to make changes to the system or plan future migrations.

Conclusion

While .NET Framework 3.5 might seem outdated in the era of .NET Core and .NET 5/6, its relevance persists for specific scenarios involving legacy applications and unique feature requirements. Understanding its importance, compatibility with Windows 10, and installation methods empowers users to effectively manage their software environments. As technology progresses, the decision to maintain or migrate applications built on .NET Framework 3.5 becomes a strategic choice, balancing legacy needs with the advantages of modern frameworks.

Microsoft .net framework 3 5 offline installer for windows 10 - YouTube Windows 10 - Install .Net Framework 3.5 On Windows 10 Offline [HD] - YouTube Offline install of .NET Framework 3.5 in Windows 10 using DISM
How to Install Microsoft NET Framework 3 5 Offline in Windows 10 - YouTube How To Enable .NET 3 5 Framework in Windows 10 - Offline Install - TechBuzz Microsoft.NET Framework 3.5 Offline Installer - Download
How To Install .Net Framework 3.5 in Windows 10 Offline - YouTube Install .NET Framework 3.5 in Windows 10 - Offline Installer - YouTube

Closure

Thus, we hope this article has provided valuable insights into net framework 3 5 for windows 10 offline. We thank you for taking the time to read this article. See you in our next article!

Navigating Your Digital Footprint: Understanding Recent Access In Windows 10

Navigating Your Digital Footprint: Understanding Recent Access in Windows 10

Introduction

With enthusiasm, let’s navigate through the intriguing topic related to Navigating Your Digital Footprint: Understanding Recent Access in Windows 10. Let’s weave interesting information and offer fresh perspectives to the readers.

How to Clear Quick Access and Recent File and Folders in Windows 10  4iT

Windows 10, like many modern operating systems, employs a feature that tracks recently accessed files. This seemingly simple function, often found in the "File Explorer" or "Quick Access" area, plays a crucial role in enhancing user experience and productivity. It essentially acts as a digital memory, enabling users to effortlessly revisit files they have interacted with recently. This article delves into the mechanics of this feature, exploring its benefits, addressing common questions, and offering tips for optimization.

Understanding the Mechanism: How Recent Access Works

At its core, the recent access feature functions by maintaining a dynamic list of files accessed by the user. This list is not a mere chronological record but rather a dynamic representation of files deemed most relevant based on user activity. The system continuously updates this list, prioritizing files based on the recency and frequency of access.

Several factors contribute to the prioritization of files within the recent access list:

  • Recency: Files accessed most recently are generally placed higher on the list, facilitating swift retrieval.
  • Frequency: Files accessed repeatedly, even if not recently, may also gain prominence, reflecting user preference and ongoing engagement with specific content.
  • File Type: Certain file types, such as documents or images, might be prioritized over others, reflecting common user workflows and needs.

This dynamic prioritization ensures that the list remains relevant and useful, offering users a personalized and efficient pathway to their frequently used files.

Benefits of Recent Access: A Productivity Booster

The recent access feature offers several significant advantages for users, contributing to a more streamlined and productive workflow:

  • Time-Saving Navigation: By providing quick access to recently used files, the feature eliminates the need for extensive searching within folders and drives. This saves valuable time, especially for users who frequently work with numerous files.
  • Enhanced Organization: The feature acts as a virtual hub, consolidating commonly accessed files, thereby contributing to a sense of organized digital workspace.
  • Improved File Management: The recent access list can serve as a reminder of files that require further action, prompting users to revisit and complete tasks.
  • Seamless Workflow: For users engaged in multi-step processes involving several files, the feature allows for easy transitions between files, promoting a smoother and more efficient workflow.

Addressing Common Concerns: FAQs on Recent Access

Q: Can I customize the number of files displayed in the recent access list?

A: While the exact settings may vary depending on the version of Windows 10, the feature typically offers options to adjust the number of files displayed. Users can choose to display a smaller or larger number of files, tailoring the list to their specific needs and preferences.

Q: Is it possible to remove individual files from the recent access list?

A: Yes, most versions of Windows 10 allow for the removal of individual files from the recent access list. This can be achieved through a simple right-click action on the file within the list, followed by selecting the option to remove it.

Q: Can I completely disable the recent access feature?

A: While disabling the feature entirely is not typically an option within the standard settings, users can achieve a similar effect by clearing the recent access list regularly. Additionally, some third-party tools and utilities may offer more advanced options for controlling the feature.

Q: Does the recent access feature compromise user privacy?

A: The recent access feature primarily functions at the user level, tracking only the files accessed by the specific user. However, it’s important to be aware of potential security implications, especially when sharing computers or devices. If privacy concerns arise, users can periodically clear the list or explore additional privacy settings offered by Windows 10.

Q: Is it possible to access the recent access list from multiple devices?

A: The recent access feature is primarily tied to the individual device and user account. However, certain cloud storage services or file syncing applications can offer a similar functionality across multiple devices, allowing users to access recently accessed files from different locations.

Tips for Optimizing Recent Access: Enhancing User Experience

  • Regularly Clear the List: Maintaining a clean recent access list ensures its relevance and prevents unnecessary clutter. Periodically clearing the list removes outdated or irrelevant files, improving the overall user experience.
  • Utilize the Search Function: For files not readily available in the recent access list, leverage the powerful search function within Windows 10 to efficiently locate desired files.
  • Explore Folder Options: The "File Explorer" in Windows 10 offers options for customizing folder behavior. Users can choose to display or hide the recent access list within specific folders, adapting the feature to their individual needs.
  • Utilize Third-Party Tools: Several third-party tools and utilities offer enhanced functionality for managing recent access, providing additional options for customization and control.

Conclusion: A Powerful Tool for Productivity and Organization

The recent access feature in Windows 10 is a valuable tool for enhancing user experience and productivity. By offering quick access to frequently used files, the feature streamlines workflow, saves time, and contributes to a more organized digital workspace. While privacy considerations should be acknowledged, the feature offers numerous benefits when used appropriately. By understanding the mechanics, benefits, and potential concerns, users can effectively leverage this feature to optimize their digital experience and maximize their productivity.

PPT - Understanding your Digital Footprint PowerPoint Presentation, free download - ID:2344648 What is a Digital Footprint and How to Protect it? - SecurityHQ What is your digital footprint โ€ข Teacha!
Add the Recent Items Folder to Windows 10 Quick Access  @Poremsky.com Navigating Your Digital Footprint: Essential Steps for Safety and Security Importance Of Digital Footprint: Complete Guide [2024]
What is Digital Footprinting in Cybersecurity? - sunnyvalley.io Digital Footprint

Closure

Thus, we hope this article has provided valuable insights into Navigating Your Digital Footprint: Understanding Recent Access in Windows 10. We appreciate your attention to our article. See you in our next article!

The Enduring Utility Of Notepad: A Guide To Using The Classic Text Editor In Windows 11

The Enduring Utility of Notepad: A Guide to Using the Classic Text Editor in Windows 11

Introduction

With enthusiasm, let’s navigate through the intriguing topic related to The Enduring Utility of Notepad: A Guide to Using the Classic Text Editor in Windows 11. Let’s weave interesting information and offer fresh perspectives to the readers.

The Enduring Utility of Notepad: A Guide to Using the Classic Text Editor in Windows 11

How to Make Notepad++ the Default Text Editor in Windows 11

In the ever-evolving landscape of operating systems and software, the simple elegance of Notepad remains a constant. This unassuming text editor, pre-installed on every Windows system since its inception, continues to hold a prominent position in the digital toolbox of users across all skill levels. While more feature-rich text editors and IDEs (Integrated Development Environments) exist, Notepad’s streamlined functionality and uncluttered interface make it an invaluable tool for a wide range of tasks.

Understanding Notepad’s Core Functionality

Notepad’s primary purpose is straightforward: to create and edit plain text files. It lacks the advanced formatting options found in word processors, focusing solely on the raw text itself. This simplicity makes it ideal for tasks that demand unadorned content, such as:

  • Writing code: Notepad is a popular choice for writing and editing code in various programming languages, particularly those that rely on plain text syntax. Its lack of formatting ensures that the code remains uncorrupted and easily portable across different systems.
  • Creating configuration files: Many applications and operating system components rely on configuration files that are essentially plain text documents. Notepad allows users to create, edit, and manage these files with ease.
  • Taking notes: Whether it’s a quick thought, a shopping list, or a longer-form note, Notepad provides a simple and accessible way to jot down ideas and information.
  • Working with text-based data: Notepad can be used to manipulate and analyze text-based data, such as logs, scripts, and data files.
  • Creating web pages: While not as robust as dedicated web development tools, Notepad can be used to create basic HTML pages for simple websites.

The Benefits of Using Notepad

Despite its minimalist design, Notepad offers several advantages that continue to make it a relevant and valuable tool in the modern digital landscape:

  • Simplicity and Ease of Use: Notepad’s intuitive interface and lack of complex features make it incredibly easy to learn and use. Even novice computer users can quickly grasp its basic functionalities.
  • Lightweight and Fast: Notepad requires minimal system resources, making it a fast and efficient application that runs smoothly on even older computers.
  • Cross-Platform Compatibility: Plain text files created in Notepad are compatible with virtually all operating systems and text editors, ensuring seamless data exchange.
  • Universal Availability: Notepad is pre-installed on every Windows system, making it readily accessible without the need for additional downloads or installations.
  • Customizable: While Notepad’s interface is intentionally minimalistic, users can customize its appearance and functionality through various settings and extensions.

Navigating Notepad in Windows 11

In Windows 11, accessing Notepad is straightforward. It can be found through the following methods:

  • Start Menu Search: Type "Notepad" in the Start menu search bar and select the corresponding result.
  • Run Command: Press the Windows key + R to open the Run dialog box, type "notepad" and press Enter.
  • File Explorer: Navigate to the "C:WindowsSystem32" folder in File Explorer and double-click the "notepad.exe" file.

Once Notepad is open, users can begin creating and editing text files. The basic functionalities include:

  • Creating New Files: Use the "File" menu and select "New" to create a blank document.
  • Opening Existing Files: Use the "File" menu and select "Open" to browse and open an existing text file.
  • Saving Files: Use the "File" menu and select "Save" or "Save As" to save the current document.
  • Editing Text: Use the standard keyboard shortcuts and mouse actions to edit text, including cut, copy, paste, and undo.
  • Formatting Text: While Notepad lacks extensive formatting options, it allows users to change font size, font style, and text color.

Beyond the Basics: Expanding Notepad’s Functionality

While Notepad’s core functionality is focused on plain text editing, various methods can enhance its capabilities:

  • Using Keyboard Shortcuts: Learning keyboard shortcuts can significantly streamline the editing process, increasing efficiency and speed.
  • Integrating with Other Applications: Notepad can be integrated with other applications, such as web browsers and programming environments, to facilitate seamless data transfer and collaboration.
  • Utilizing Plugins and Extensions: While Notepad itself lacks extensibility, third-party plugins and extensions can add features and functionality, expanding its capabilities beyond basic text editing.
  • Leveraging Notepad’s Command Line Interface: Notepad can be accessed and controlled through the command line interface, enabling users to automate tasks and integrate it into scripting processes.

Frequently Asked Questions (FAQs) about Notepad in Windows 11

1. Can I use Notepad to create and edit documents with complex formatting?

While Notepad is primarily designed for plain text editing, it lacks the advanced formatting options found in word processors like Microsoft Word. For documents requiring complex formatting, dedicated word processing software is recommended.

2. Is Notepad suitable for writing code in all programming languages?

Notepad is a viable option for writing code in various programming languages, particularly those that rely on plain text syntax. However, for more complex coding projects, dedicated IDEs (Integrated Development Environments) offer specialized features and tools that can enhance productivity.

3. Can I use Notepad to create and edit images or other non-text files?

Notepad is designed specifically for text files and cannot be used to create or edit images or other non-text file formats.

4. Does Notepad have a built-in spell checker?

Notepad does not have a built-in spell checker. However, users can utilize third-party spell checkers or integrate Notepad with other applications that offer spell-checking functionality.

5. Is Notepad secure for storing sensitive information?

Notepad is a simple text editor and does not offer any built-in security features. For storing sensitive information, it is recommended to use encrypted text editors or dedicated password managers.

Tips for Using Notepad Effectively in Windows 11

  • Utilize Keyboard Shortcuts: Mastering keyboard shortcuts can significantly enhance editing speed and efficiency.
  • Organize Your Files: Create separate folders for different types of documents to maintain organization and ease of access.
  • Utilize Notepad’s Find and Replace Feature: This feature can be invaluable for quickly searching and replacing text within documents.
  • Consider Third-Party Plugins and Extensions: Explore available plugins and extensions to expand Notepad’s functionality and adapt it to specific needs.
  • Explore Notepad’s Command Line Interface: Utilize the command line interface to automate tasks and integrate Notepad into scripting processes.

Conclusion

Despite its simplicity, Notepad remains an indispensable tool for users across all skill levels. Its uncluttered interface, lightweight design, and universal availability make it an ideal choice for a wide range of tasks, from writing code and taking notes to creating configuration files and manipulating text-based data. While more feature-rich text editors and IDEs exist, Notepad’s enduring utility lies in its straightforward functionality and ease of use, ensuring its continued relevance in the modern digital landscape.

How to Make Notepad++ Default Text Editor on Windows 11 - YouTube How to Install Classic Notepad in Windows 11? - Technoresult How to Change Notepad Font and Size in Windows 11?  Gear Up Windows
Notepad Text Editor Download Notepad++ Editor on Windows 11  TestingDocs.com Notepad++ Text Editor for Windows - OlympusNet
Download Notepad++ Editor on Windows 11  TestingDocs.com Top 7 Best Text Editors for Windows 11  Free Text Editors  Guiding Tech - YouTube

Closure

Thus, we hope this article has provided valuable insights into The Enduring Utility of Notepad: A Guide to Using the Classic Text Editor in Windows 11. We appreciate your attention to our article. See you in our next article!