Archives 2023

Seamless Sharing: Exploring Windows 11’s Nearby Share Functionality

Seamless Sharing: Exploring Windows 11’s Nearby Share Functionality

Introduction

In this auspicious occasion, we are delighted to delve into the intriguing topic related to Seamless Sharing: Exploring Windows 11’s Nearby Share Functionality. Let’s weave interesting information and offer fresh perspectives to the readers.

Seamless Sharing: Exploring Windows 11’s Nearby Share Functionality

How to Use Nearby Sharing on Windows 11

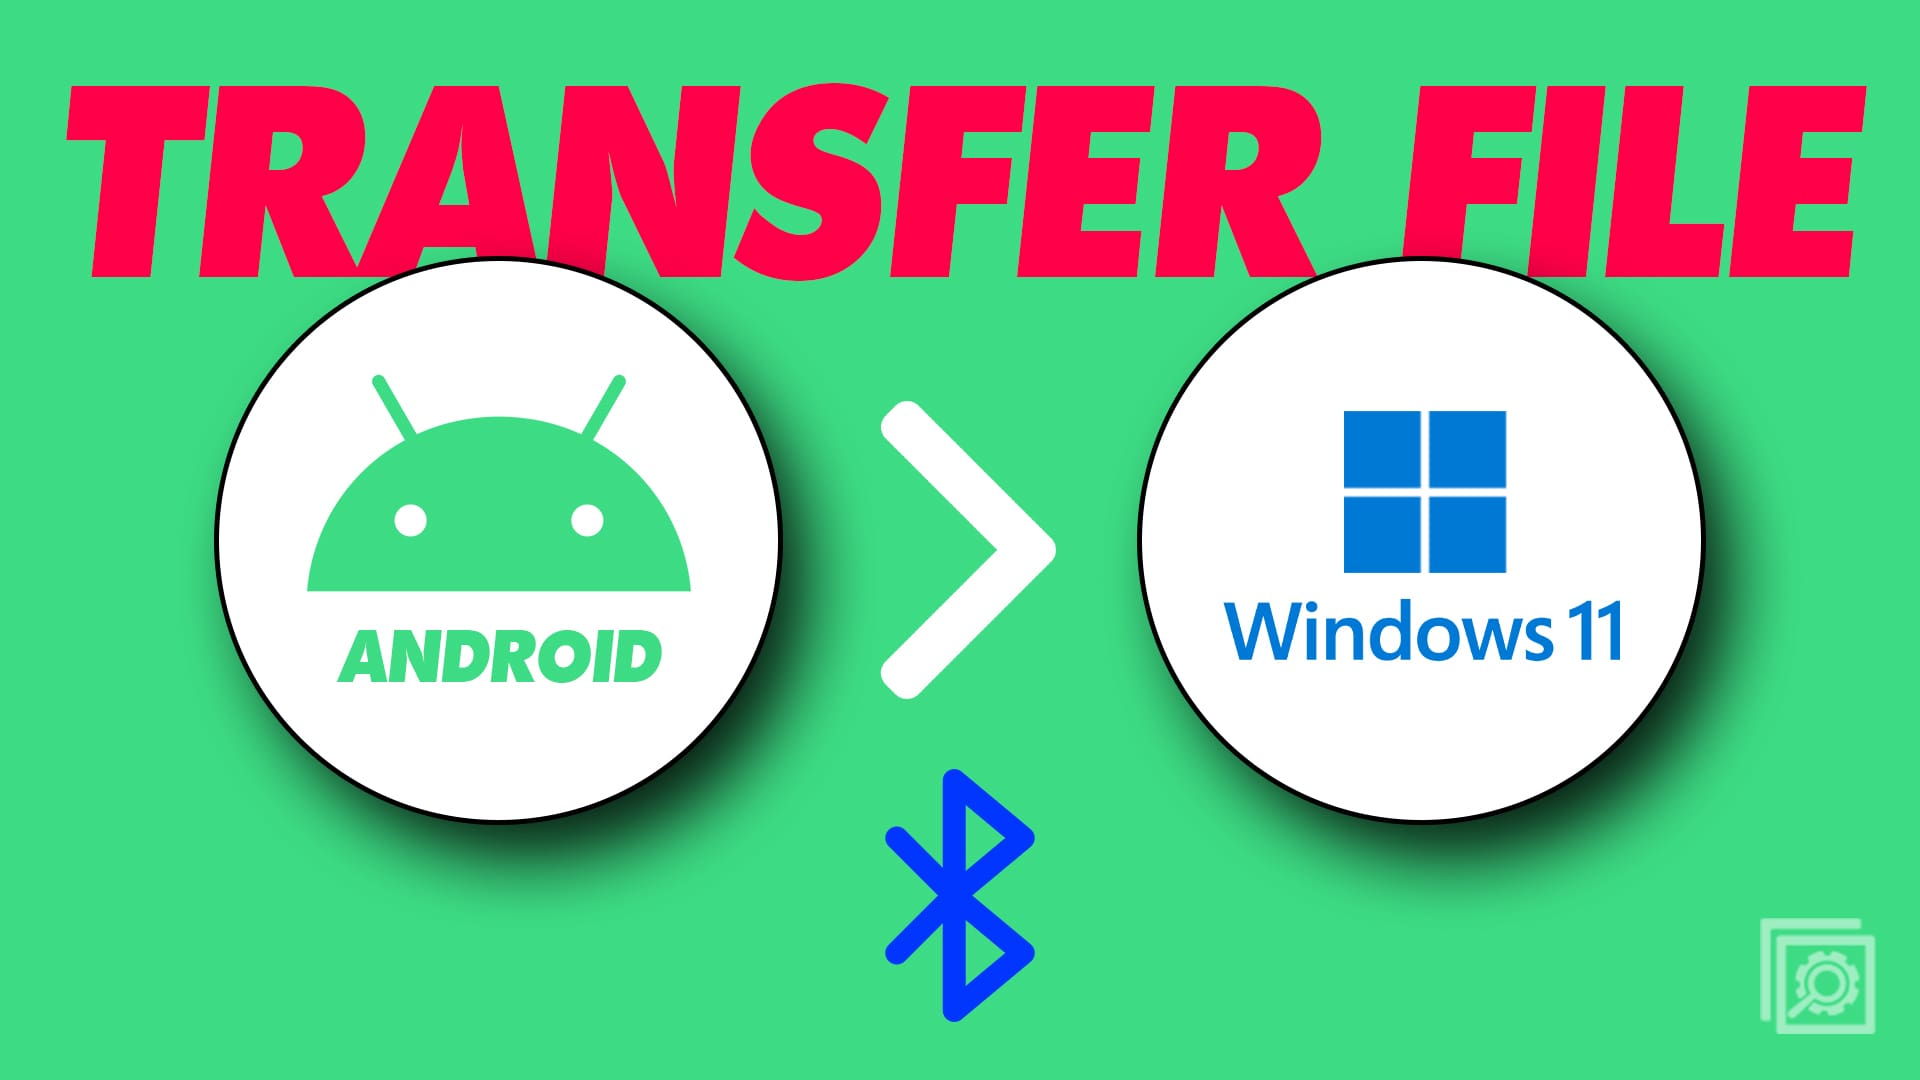
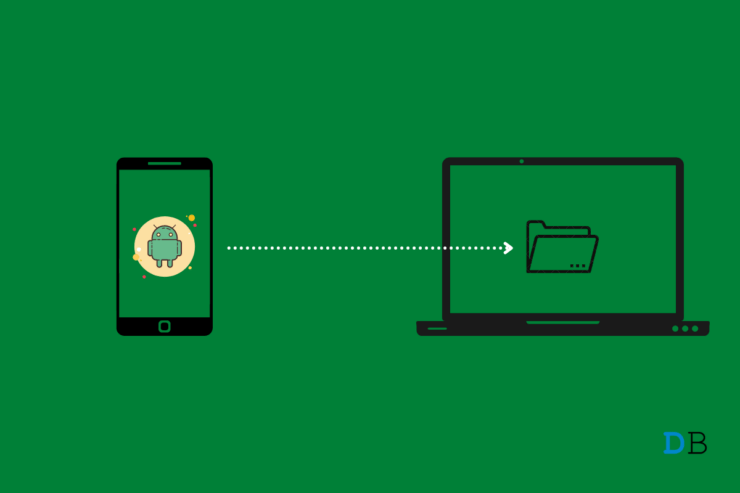
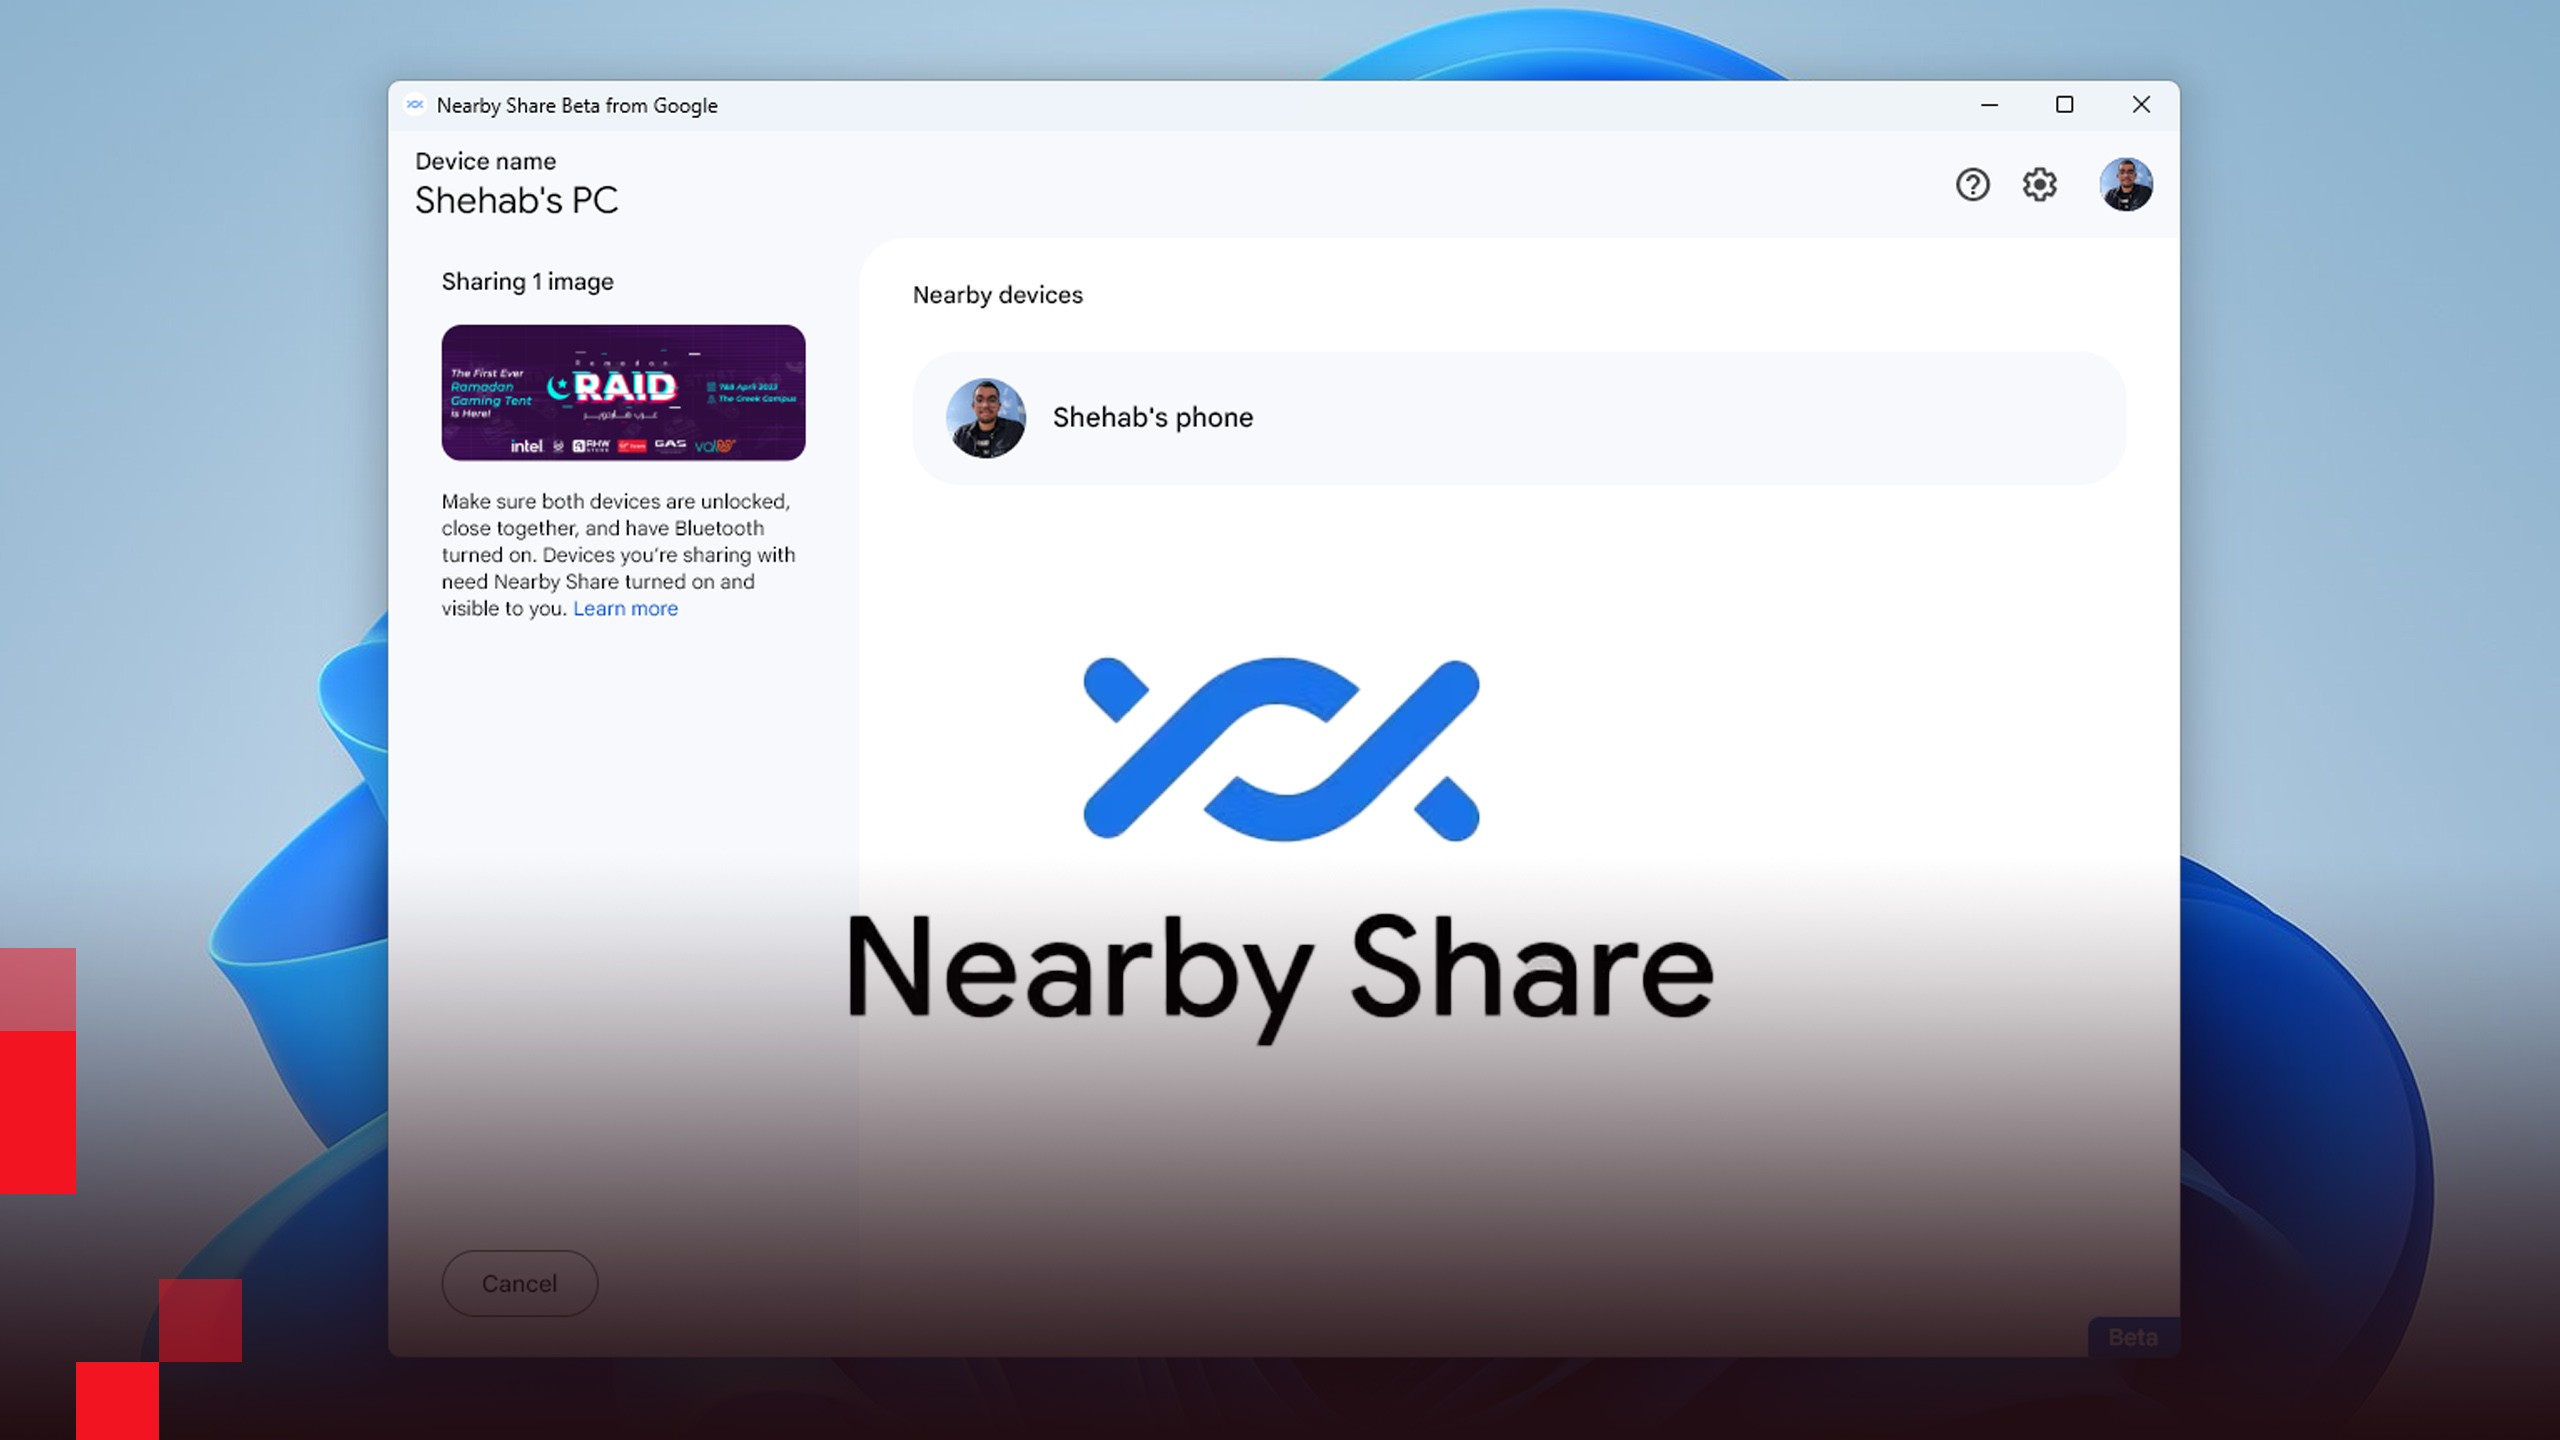
Windows 11, with its focus on enhancing user experience and fostering seamless connectivity, introduces a feature that revolutionizes file sharing: Nearby Share. This innovative tool allows users to transfer files, images, links, and even text effortlessly between Windows devices, mirroring the simplicity and convenience of sharing on Android devices.

Understanding the Mechanics of Nearby Share

At its core, Nearby Share operates on a foundation of Bluetooth and Wi-Fi technologies. It leverages the proximity of devices to establish a direct connection, facilitating the rapid transfer of data. Unlike traditional file-sharing methods that rely on cloud services or external storage, Nearby Share enables sharing directly between devices, eliminating the need for intermediaries.

Benefits of Utilizing Nearby Share

The advantages of Nearby Share are multifaceted, offering users a compelling alternative to traditional sharing methods:

  • Effortless Sharing: The process of sharing files is remarkably simple. Users can select the files they wish to share, choose the recipient device from a list of nearby devices, and initiate the transfer. The entire process is intuitive and user-friendly, eliminating the complexities associated with traditional methods.
  • Speed and Efficiency: Nearby Share leverages direct connections between devices, resulting in significantly faster transfer speeds compared to cloud-based sharing. This efficiency is particularly noticeable when transferring large files, eliminating the need for lengthy uploads and downloads.
  • Enhanced Security: Nearby Share prioritizes security by utilizing Bluetooth and Wi-Fi to establish direct connections between devices. This approach mitigates the risks associated with sharing files through public cloud services or external storage, safeguarding sensitive information.
  • Wide Device Compatibility: Nearby Share is compatible with a wide range of Windows devices, ensuring accessibility for a broad user base. This cross-device compatibility enhances the utility of the feature, allowing users to share files seamlessly across different devices.

Navigating Nearby Share: A Comprehensive Guide

To utilize Nearby Share effectively, users need to understand its functionalities and settings:

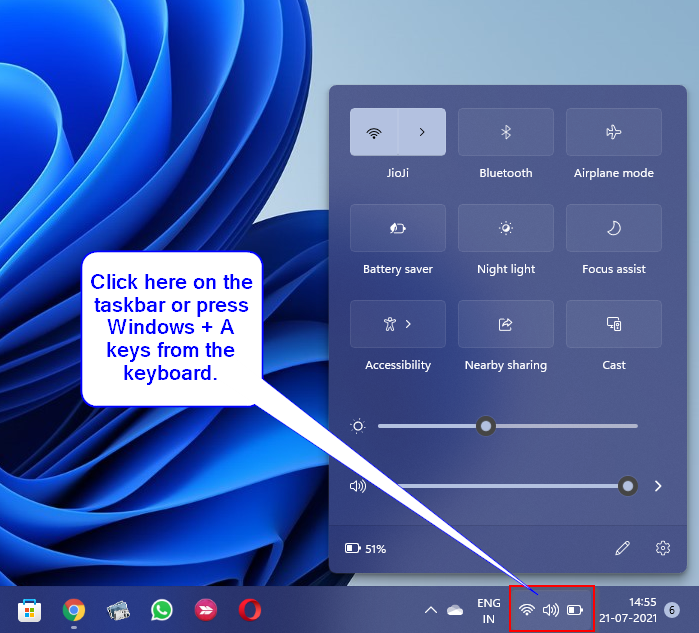
1. Enabling Nearby Share:

  • Open the Settings app on your Windows 11 device.
  • Navigate to System > Shared experiences.
  • Ensure the toggle for Nearby Share is enabled.
  • You can customize the visibility of your device to others, choosing between Everyone, Contacts, or Hidden.
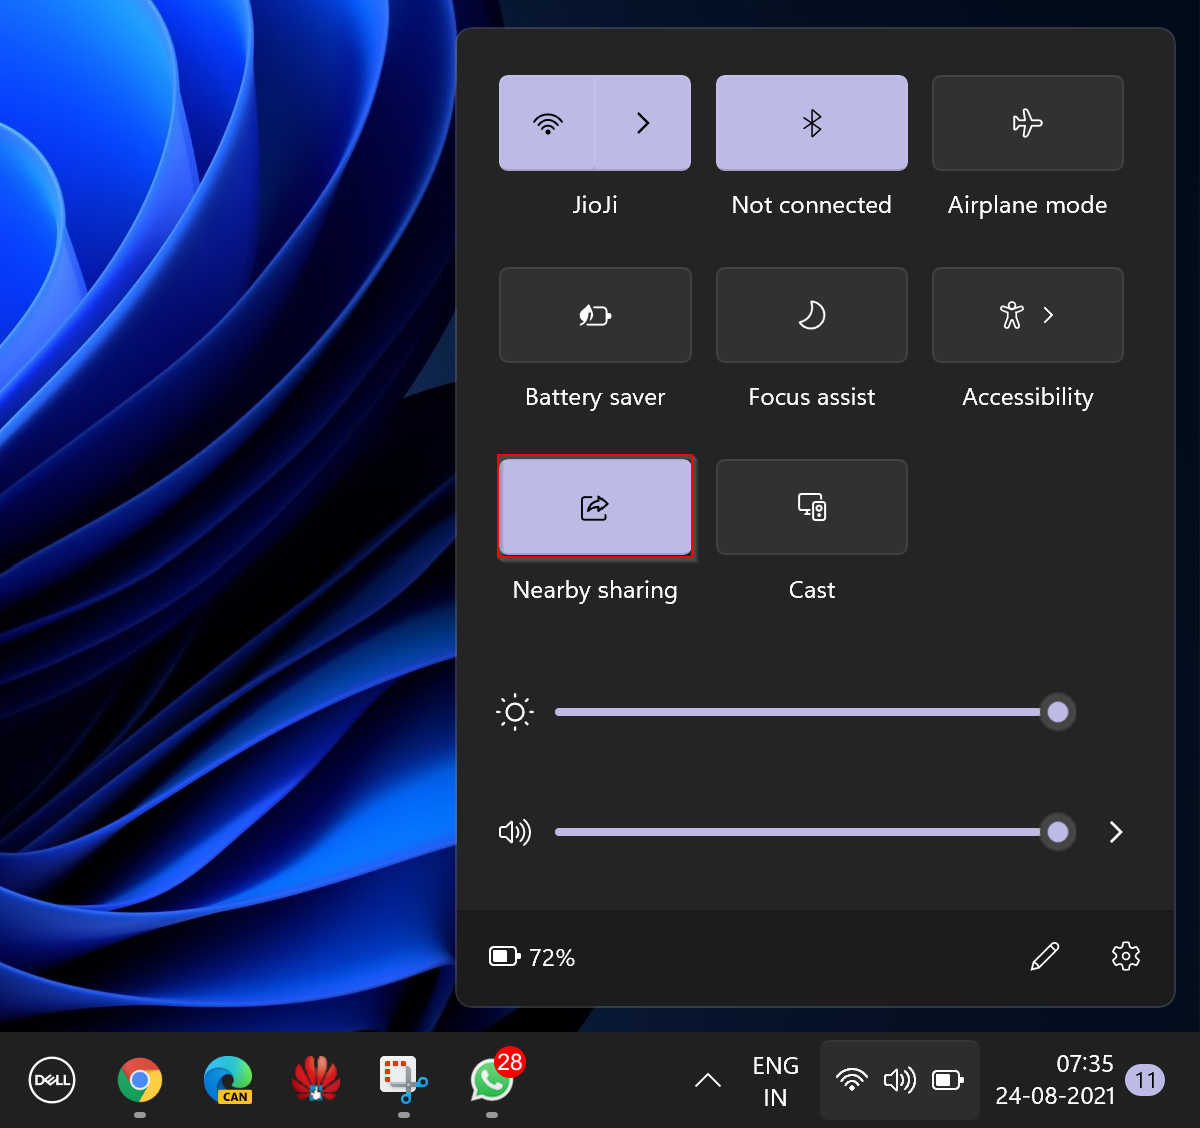
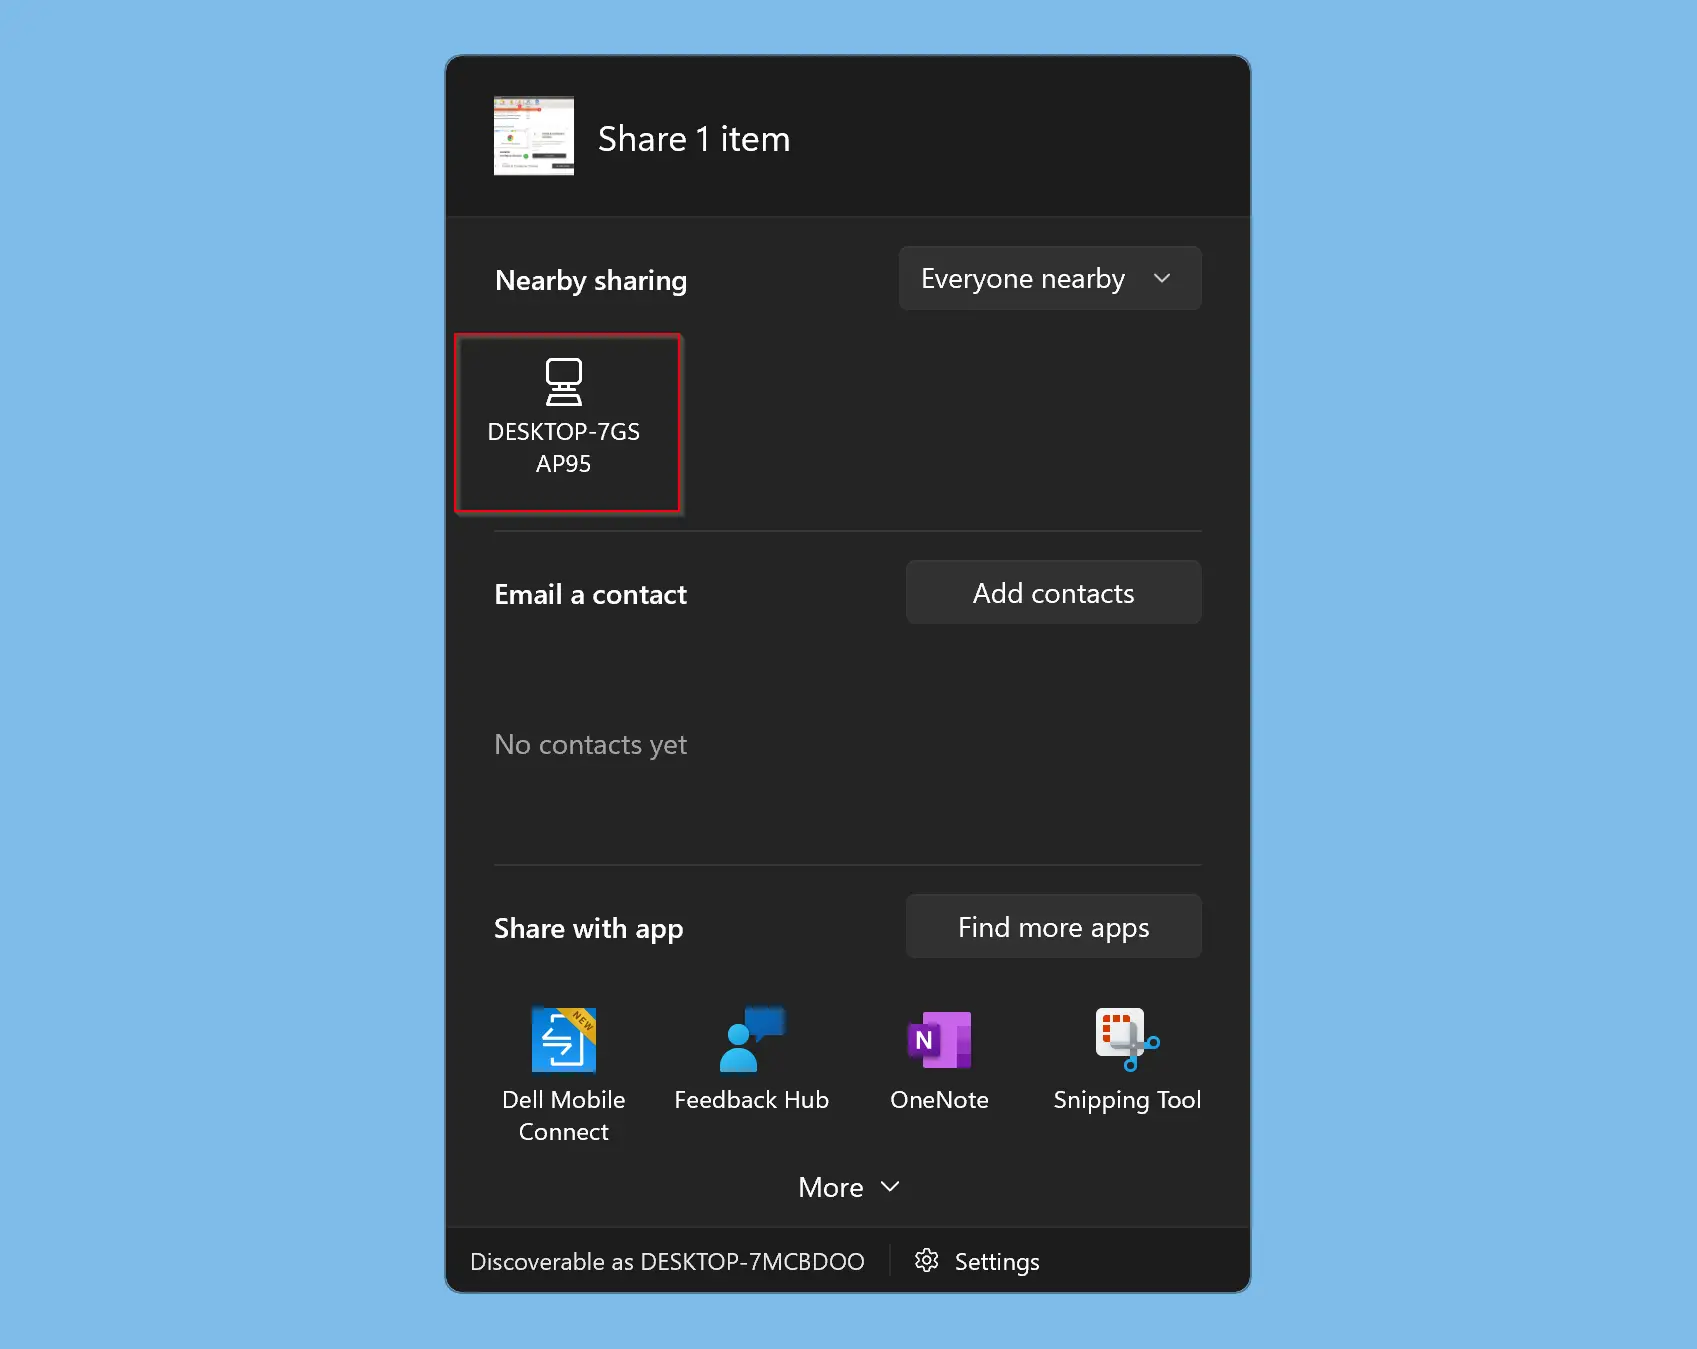
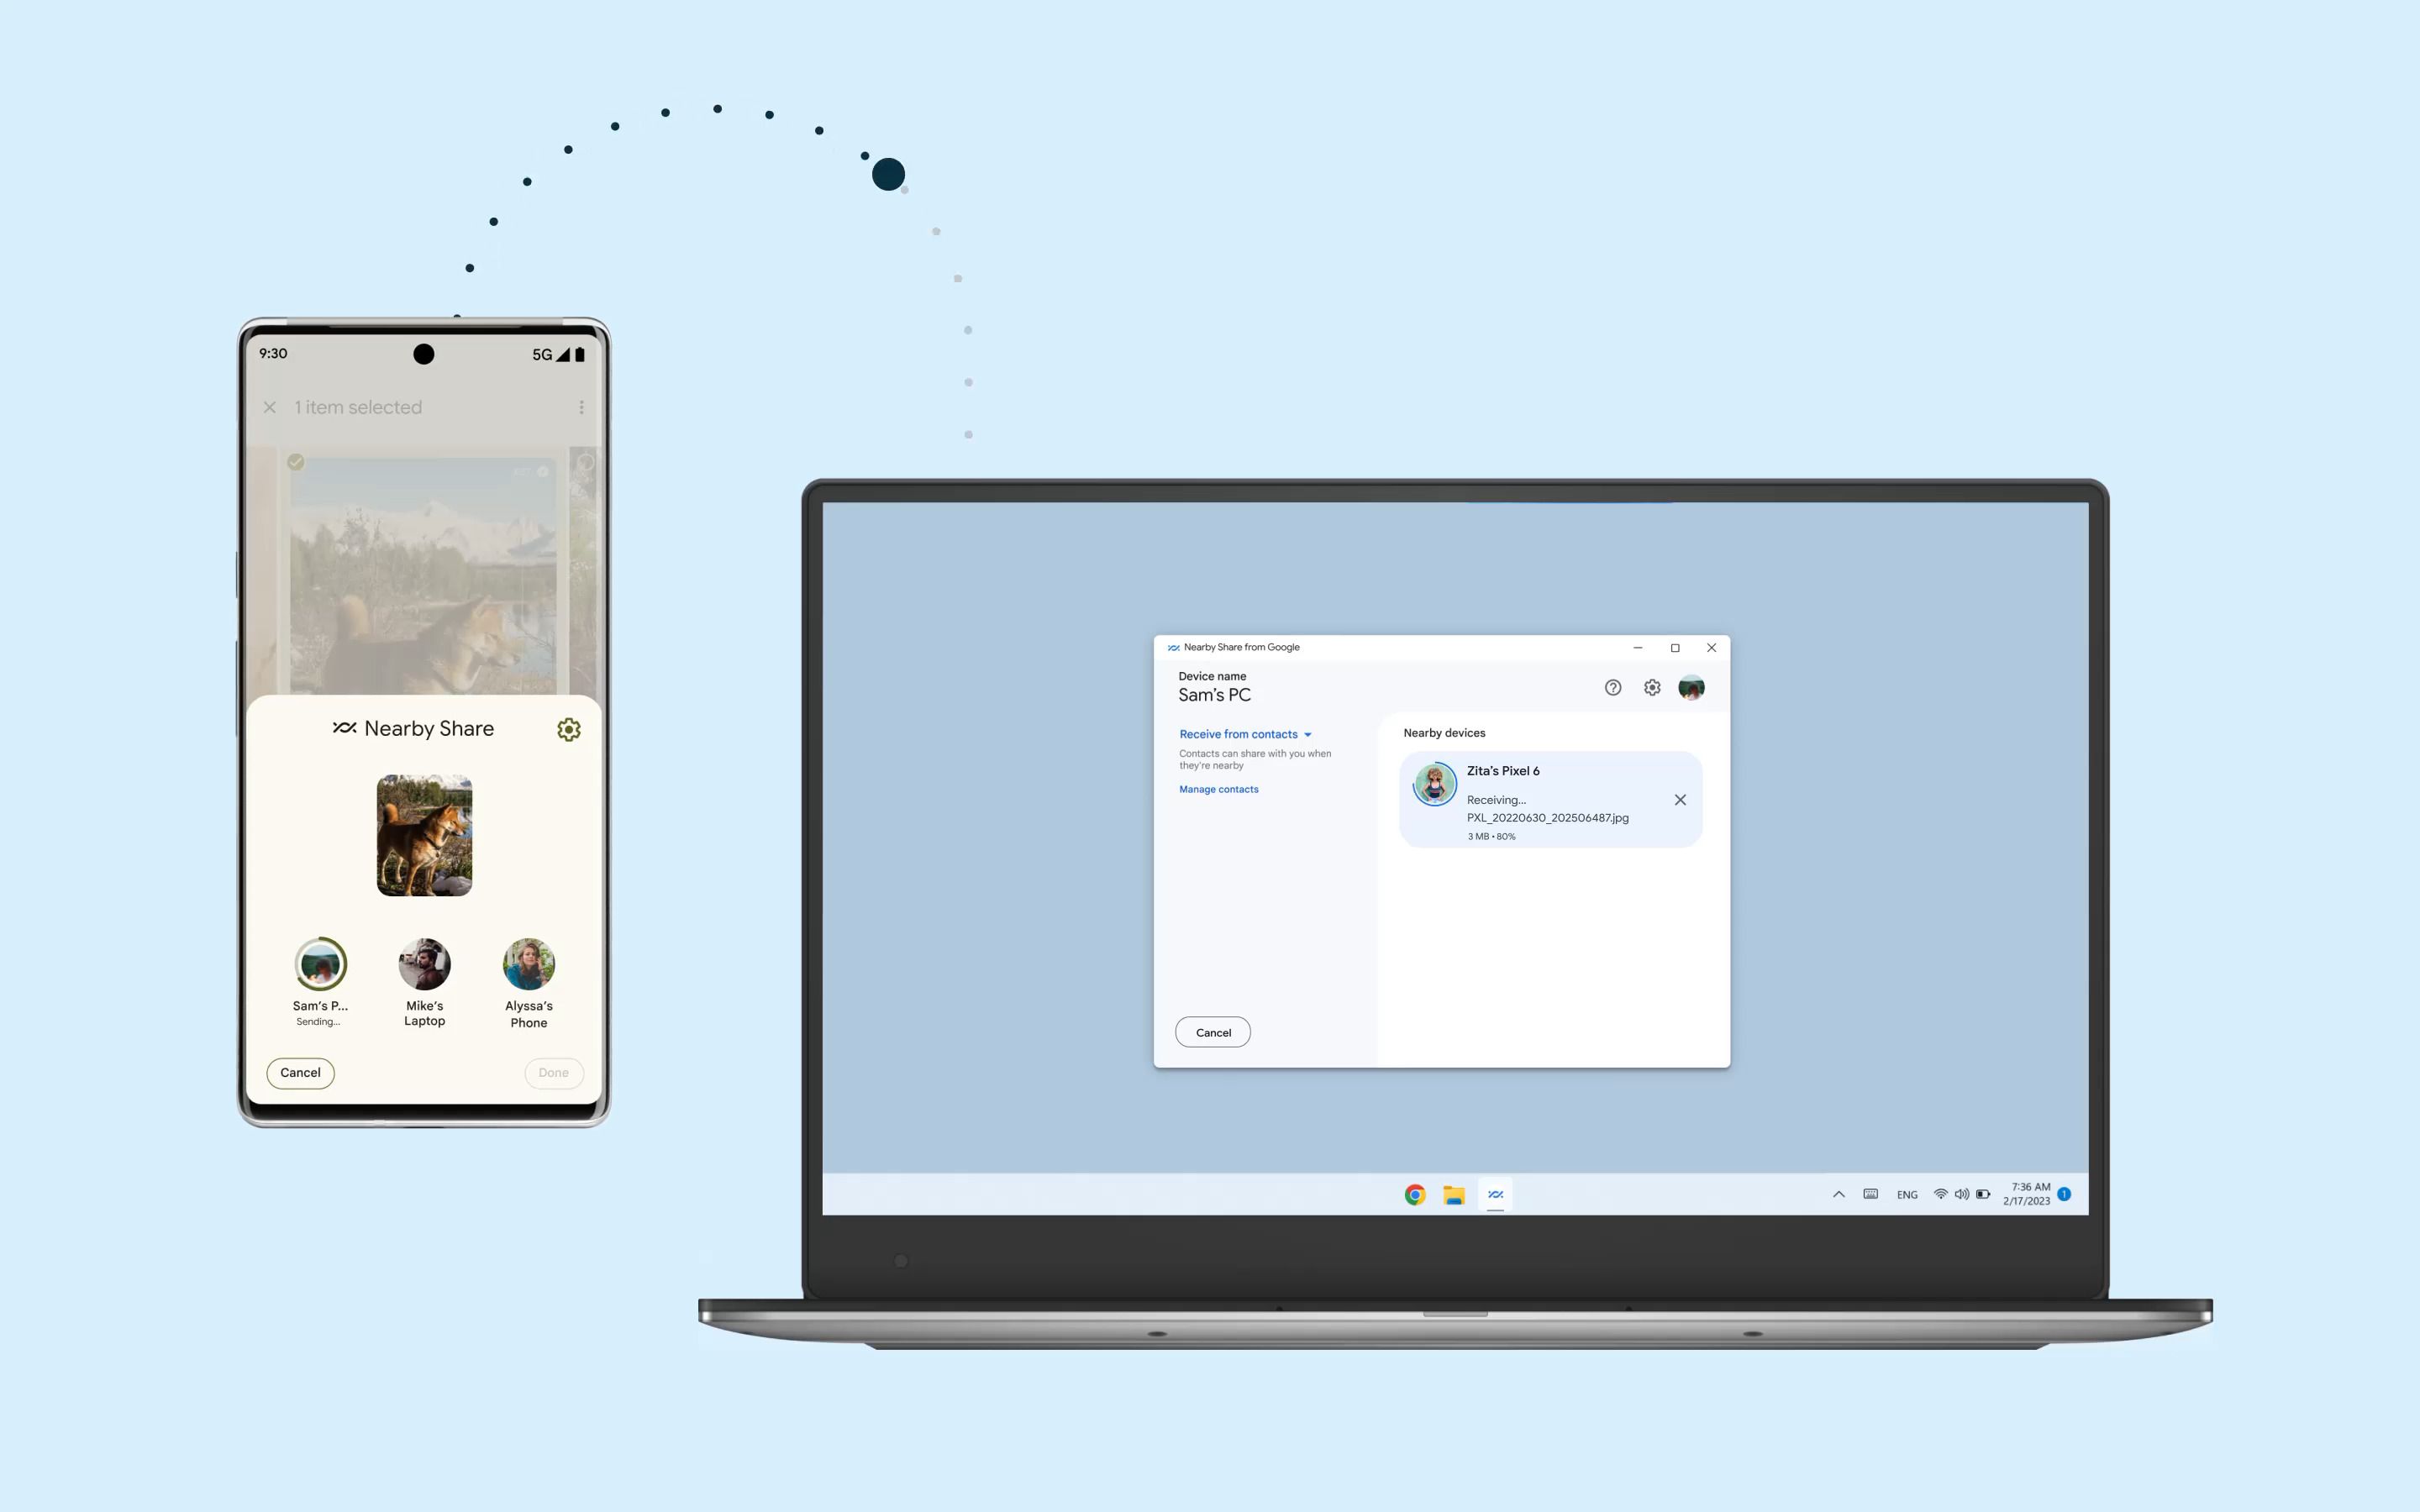
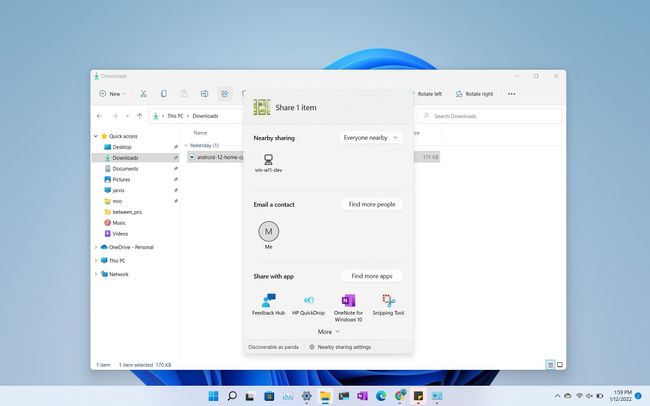
2. Sharing Files:

  • Open the File Explorer and locate the file you wish to share.
  • Right-click on the file and select Share.
  • Choose the recipient device from the list of nearby devices.
  • The selected device will receive a notification prompting them to accept the file transfer.

3. Receiving Files:

  • When a nearby device initiates a file transfer, a notification will appear on your device.
  • Select Accept to receive the file.
  • The file will be saved to your Downloads folder.

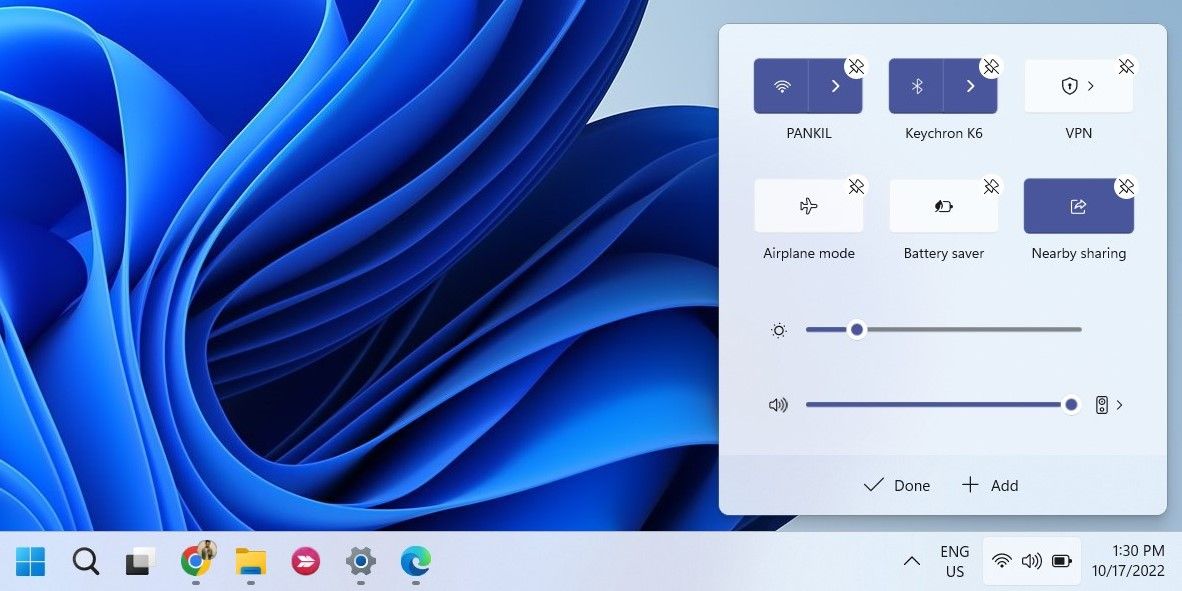
4. Managing Nearby Share Settings:

  • Access the Nearby Share settings by navigating to Settings > System > Shared experiences.
  • You can adjust the visibility of your device, manage the types of files that can be shared, and choose the preferred network connection (Bluetooth or Wi-Fi).

Frequently Asked Questions (FAQs)

1. What are the requirements for using Nearby Share?

  • To use Nearby Share, your device must be running Windows 11 and have Bluetooth and Wi-Fi enabled.

2. Is Nearby Share secure?

  • Nearby Share uses Bluetooth and Wi-Fi to establish direct connections between devices, enhancing security by eliminating the need for cloud services or external storage.

3. Can I share files with devices running other operating systems?

  • Currently, Nearby Share is only compatible with Windows 11 devices.

4. How do I troubleshoot Nearby Share issues?

  • Ensure Bluetooth and Wi-Fi are enabled on both devices.
  • Check the visibility settings of your device.
  • Restart both devices and try again.
  • If the issue persists, contact Microsoft support for assistance.

Tips for Effective Nearby Share Usage

  • Ensure both devices are within close proximity for optimal performance.
  • Regularly update your device’s operating system to benefit from the latest features and security enhancements.
  • Utilize Nearby Share for sharing large files, images, videos, and documents, maximizing its efficiency.
  • Consider the visibility settings of your device, choosing the appropriate level based on your privacy preferences.

Conclusion

Nearby Share, a feature seamlessly integrated into Windows 11, empowers users to share files effortlessly and securely. Its ease of use, speed, and compatibility across Windows devices position it as a compelling alternative to traditional file-sharing methods. By understanding the mechanics and settings of Nearby Share, users can leverage its benefits to enhance their digital experience and streamline file sharing. As technology continues to evolve, Nearby Share is poised to become an integral part of the modern digital landscape, fostering seamless connectivity and collaboration.

How to Enable Nearby Sharing in Windows 11?  Gear up Windows 11 & 10 How to Use Nearby Sharing on Windows 11?  Gear Up Windows How To Use Nearby Sharing On Windows 11  digisrun
Seamless File Sharing: Google Nearby Share for Windows How to Enable Nearby Sharing in Windows 11?  Gear Up Windows How to Use Nearby Sharing on Windows 11?  Gear Up Windows
How to Use Nearby Sharing on Windows 11 How To Use Nearby Share In Windows 11_best Methods - Rayabaan

Closure

Thus, we hope this article has provided valuable insights into Seamless Sharing: Exploring Windows 11’s Nearby Share Functionality. We hope you find this article informative and beneficial. See you in our next article!

Navigating The World Of C Programming: Online Compilers, GDB, And Windows 10

Navigating the World of C Programming: Online Compilers, GDB, and Windows 10

Introduction

With enthusiasm, let’s navigate through the intriguing topic related to Navigating the World of C Programming: Online Compilers, GDB, and Windows 10. Let’s weave interesting information and offer fresh perspectives to the readers.

Online GDB Tutorial C Free Compiler and Debugger - YouTube

The realm of programming is vast and intricate, demanding a robust toolkit for developers to effectively navigate its complexities. C, a powerful and widely-used programming language, requires a combination of tools for writing, compiling, and debugging code. This article delves into the intricacies of online C compilers, the indispensable GDB debugger, and how these tools seamlessly integrate within the Windows 10 environment.

Understanding the Essentials: C Compilers and the Role of GDB

At its core, a C compiler translates human-readable C code into machine-executable instructions, enabling computers to understand and execute the program. Online C compilers offer a convenient and readily accessible platform for this transformation, eliminating the need for local installations. These platforms provide a user-friendly interface where users can write, compile, and run C code directly within a web browser.

However, even well-written C code can encounter unexpected issues. This is where the power of a debugger, such as GDB, comes into play. GDB is a versatile and powerful tool for debugging C programs. It allows developers to step through the code line by line, inspect the values of variables, and pinpoint the root cause of errors. This meticulous examination is crucial for identifying and resolving bugs, ensuring the program functions as intended.

Exploring the Landscape: Online C Compilers for Windows 10

Windows 10 users have a plethora of online C compiler options at their disposal, each offering a unique set of features and functionalities. Some popular choices include:

  • OnlineGDB: This platform boasts a user-friendly interface and seamless integration with GDB. It provides a comprehensive environment for writing, compiling, and debugging C code, making it an excellent choice for beginners and experienced developers alike.

  • Repl.it: Known for its collaborative features, Repl.it offers a platform where multiple users can work on the same project simultaneously. It supports various programming languages, including C, and provides a built-in compiler and debugger.

  • OneCompiler: This platform stands out for its wide range of compiler options, including support for various C standards. It offers a user-friendly interface and provides features like code highlighting and syntax checking.

  • CodeChef: Primarily known as a platform for competitive programming, CodeChef also offers an online C compiler. It provides a robust environment for writing and testing code, making it suitable for programmers of all levels.

  • JDoodle: This platform offers a minimalist and straightforward approach, focusing on providing a basic compiler environment. It supports various programming languages, including C, and offers features like code highlighting and syntax checking.

The Synergy of GDB and Online Compilers

While online C compilers streamline the compilation process, they often lack the advanced debugging capabilities of a dedicated debugger like GDB. To harness the full power of GDB, users typically need to install it locally on their Windows 10 machine. However, some online compilers, like OnlineGDB, offer seamless integration with GDB, providing a convenient and efficient debugging experience without the need for local installations.

Benefits of Utilizing Online C Compilers and GDB

Combining the convenience of online C compilers with the debugging prowess of GDB offers numerous benefits for C programmers:

  • Accessibility: Online compilers eliminate the need for local installations, making C programming accessible to anyone with an internet connection.

  • Convenience: Online platforms provide a user-friendly interface for writing, compiling, and running C code directly within a web browser, simplifying the development process.

  • Collaboration: Some platforms, like Repl.it, facilitate collaborative development, allowing multiple users to work on the same project simultaneously.

  • Debugging Power: GDB provides a powerful toolset for identifying and resolving bugs, ensuring the program functions as intended.

  • Time Efficiency: Online compilers and GDB streamline the development process, reducing the time required to write, compile, debug, and execute C programs.

FAQs: Addressing Common Questions

Q: Are online C compilers suitable for all C programming tasks?

A: While online compilers offer a convenient platform for basic C programming tasks, they may not be ideal for complex projects requiring advanced features or libraries. For such projects, a local installation of a C compiler and GDB might be more suitable.

Q: Can I use GDB with any online C compiler?

A: Not all online compilers offer seamless integration with GDB. Some platforms may require local installations or specific configurations to utilize GDB. It’s essential to check the platform’s documentation for compatibility details.

Q: What are the limitations of online C compilers?

A: Online compilers may have limitations in terms of available libraries, runtime environments, and debugging capabilities. They may also be subject to network connectivity issues and potential security concerns.

Q: Is it necessary to install GDB on my Windows 10 machine?

A: While some online compilers offer GDB integration, for more advanced debugging scenarios or platforms that lack GDB support, installing GDB locally on your Windows 10 machine might be necessary.

Q: How do I install GDB on Windows 10?

A: GDB can be installed on Windows 10 using a package manager like MinGW-w64 or by downloading the source code and compiling it manually. Detailed installation instructions are available online.

Tips for Effective C Programming Using Online Compilers and GDB

  • Choose the Right Platform: Select an online C compiler that aligns with your specific needs and project requirements.

  • Familiarize Yourself with the Interface: Take time to understand the platform’s interface, including its features and functionalities.

  • Optimize Code: Write clean and efficient code to enhance performance and readability.

  • Utilize GDB Effectively: Master the use of GDB to effectively debug your C programs and identify the root cause of errors.

  • Learn from Errors: Treat errors as learning opportunities, analyzing them to understand the underlying issues and improve your coding practices.

Conclusion

Online C compilers, coupled with the power of GDB, provide a potent combination for C programmers working within the Windows 10 environment. These tools offer a convenient, accessible, and efficient platform for writing, compiling, debugging, and running C programs. By embracing the synergy between online compilers and GDB, developers can streamline their development process, enhance code quality, and navigate the world of C programming with greater confidence and efficiency. As the field of programming continues to evolve, online C compilers and GDB will remain essential tools for developers of all skill levels, empowering them to create innovative and impactful software solutions.

Online GDB Free Compiler for C++  Online Free C++ Compiler  How to Use OnlineGDB C++ GDB online Debugger Compiler Code, Compile, Run, Debug online C, C++ Opera 2021 11 10 23 56 12 Online GDB Compiler By Logicmojo
Online gdb compiler  C Language compiler  Python language compiler - YouTube Run and Debug C program with OnlineGDB.com - YouTube Online GDB Compiler By Logicmojo
Best Compiler for C Programming - javatpoint How To Use Online GDB Compiler?  Free Compiler and Debugger

Closure

Thus, we hope this article has provided valuable insights into Navigating the World of C Programming: Online Compilers, GDB, and Windows 10. We appreciate your attention to our article. See you in our next article!

Transferring Files Between Windows 11 And Android Devices: A Comprehensive Guide

Transferring Files Between Windows 11 and Android Devices: A Comprehensive Guide

Introduction

With enthusiasm, let’s navigate through the intriguing topic related to Transferring Files Between Windows 11 and Android Devices: A Comprehensive Guide. Let’s weave interesting information and offer fresh perspectives to the readers.

Transferring Files Between Windows 11 and Android Devices: A Comprehensive Guide

Transfer Files Between Android & Windows 11 Via Bluetooth - Technipages

The seamless integration of technology has blurred the lines between our various devices, enabling us to move data effortlessly between them. One such integration, often overlooked, is the ability to transfer files between a Windows 11 computer and an Android phone via Bluetooth. This method offers a convenient and readily available solution for sharing various file types, including images, documents, videos, and even audio files.

Understanding Bluetooth and its Function in File Transfer

Bluetooth, a wireless technology operating on short-range radio waves, has become ubiquitous in modern devices, facilitating communication and data exchange between them. While primarily known for connecting headphones and speakers, Bluetooth also provides a reliable and secure channel for transferring files. The process involves establishing a connection between the sending and receiving devices, creating a temporary wireless bridge for data transmission.

Prerequisites for Bluetooth File Transfer

Before embarking on the journey of transferring files between your Windows 11 computer and Android phone, ensure that the following prerequisites are met:

  • Bluetooth Enabled on Both Devices: Both your Windows 11 computer and Android phone must have Bluetooth enabled and activated. This can typically be found in the respective device settings.
  • Bluetooth Drivers Up-to-Date: Ensure that the Bluetooth drivers on your Windows 11 computer are up-to-date. Outdated drivers can lead to compatibility issues and hinder file transfer.
  • Pairing the Devices: The first step involves pairing your Windows 11 computer and Android phone. This process involves making the devices discoverable and establishing a connection. This pairing process only needs to be done once for each device pair, allowing for subsequent file transfers without repeated pairing.

Step-by-Step Guide to Transferring Files

Once the prerequisites are in place, follow these steps to transfer files from your Android phone to your Windows 11 computer via Bluetooth:

  1. Enable Bluetooth and Make Devices Discoverable: On both your Android phone and Windows 11 computer, navigate to the Bluetooth settings and enable the functionality. Additionally, ensure that both devices are set to "discoverable" mode, allowing them to be detected by each other.
  2. Pair the Devices: On your Windows 11 computer, select "Add Bluetooth or other device" from the Bluetooth settings. Your Android phone should appear in the list of available devices. Select your phone and follow the on-screen prompts to complete the pairing process. You may be required to enter a PIN code, which is typically displayed on both devices.
  3. Select Files for Transfer: On your Android phone, locate the files you wish to transfer. This could be images, videos, documents, or any other file type. Open the file and select the "share" option. A list of available sharing methods will appear, including Bluetooth.
  4. Initiate Transfer: Select "Bluetooth" from the sharing options. Your Windows 11 computer should appear in the list of available devices. Select your computer, and the file transfer process will begin.
  5. Confirm File Reception: On your Windows 11 computer, a notification will appear indicating that a file transfer is in progress. Once the transfer is complete, the received files will be saved in a designated folder, usually the "Downloads" folder.

Troubleshooting Common Issues

While Bluetooth file transfer is generally straightforward, occasional issues may arise. Here are some common problems and solutions:

  • Devices Not Discovering Each Other: Ensure that Bluetooth is enabled on both devices and that they are set to "discoverable" mode. Try restarting the Bluetooth service on both devices, and make sure that the devices are within close proximity (approximately 30 feet).
  • Pairing Failure: If the devices fail to pair, ensure that the PIN code is entered correctly. If the issue persists, try deleting the pairing information from both devices and attempting to pair again.
  • Transfer Speed Issues: Bluetooth file transfer speeds can be slower than other methods like Wi-Fi. This is due to the limited bandwidth of the Bluetooth connection. For larger files, consider using alternative methods like USB cable or cloud storage.
  • File Transfer Errors: If the file transfer fails, ensure that the file size is within the acceptable limit for Bluetooth. Large files may exceed the Bluetooth protocol’s capabilities. Try restarting the Bluetooth service on both devices and attempting the transfer again.

Benefits of Bluetooth File Transfer

Utilizing Bluetooth for file transfer offers several advantages:

  • Convenience: It eliminates the need for physical cables or external storage devices, offering a simple and readily available solution.
  • Accessibility: Most modern devices are equipped with Bluetooth capabilities, making it a widely accessible method for file transfer.
  • Security: Bluetooth uses encryption protocols to secure data transfer, reducing the risk of unauthorized access.
  • Portability: Bluetooth operates on short-range radio waves, allowing for file transfer without the need for internet connectivity.

FAQs

Q: What types of files can be transferred via Bluetooth?

A: Bluetooth can transfer various file types, including images, videos, documents, audio files, and even compressed folders. The specific file types supported may vary depending on the operating systems of the devices involved.

Q: What is the maximum file size that can be transferred via Bluetooth?

A: The maximum file size for Bluetooth transfer is not fixed and can vary based on factors like the Bluetooth version, device capabilities, and the available bandwidth. However, generally, transferring large files can be slow and may encounter errors.

Q: Is Bluetooth file transfer secure?

A: Yes, Bluetooth utilizes encryption protocols to secure data transfer. However, it is essential to ensure that your devices are paired correctly and that you are connecting to trusted devices.

Q: What are the limitations of Bluetooth file transfer?

A: Bluetooth file transfer is generally slower than other methods like Wi-Fi or USB cable. The maximum transfer distance is limited to approximately 30 feet. Additionally, the file size may be limited depending on the Bluetooth version and device capabilities.

Tips for Optimizing Bluetooth File Transfer

  • Keep Devices Close: Ensure that both devices are within close proximity (approximately 30 feet) for optimal performance.
  • Reduce Background Activity: Minimize background processes and apps running on both devices during the transfer to maximize available bandwidth.
  • Use a Strong Bluetooth Signal: Avoid transferring files in areas with interference from other wireless devices.
  • Consider Alternative Methods: For larger files or faster transfer speeds, consider using alternative methods like USB cable or cloud storage.

Conclusion

Bluetooth file transfer provides a convenient and readily available solution for sharing files between your Windows 11 computer and Android phone. This method offers a simple, secure, and portable way to transfer various file types, eliminating the need for physical cables or external storage devices. While limitations exist regarding transfer speed and file size, understanding the process and troubleshooting common issues can optimize your Bluetooth file transfer experience. By embracing the versatility of Bluetooth, you can seamlessly integrate your devices and enjoy the convenience of transferring files between them.

How to Wireless Transfer Files from Android to Windows 11? A Guide to Transferring Files Between Windows 11 and Your Phone Using Drag and Drop - Geek Rewind The easiest way to transfer files between Android and Windows
How to transfer files between Android and Windows PC How to Share Files Between Your Android Phone & Windows PC with Bluetooth - Techlicious Five Effective Ways To Transfer Files From Pc Hi Tech Gazette Between And Android Devices Using
A Guide to Transferring Files Between Windows 11 and Your Phone Using Drag and Drop - Geek Rewind How to Transfer File From Android to Windows 11 PC via Bluetooth  Bluetooth, Android, Social

Closure

Thus, we hope this article has provided valuable insights into Transferring Files Between Windows 11 and Android Devices: A Comprehensive Guide. We hope you find this article informative and beneficial. See you in our next article!

The Risks And Alternatives To Downloading Cracked Software: A Comprehensive Look At Premiere Pro On Windows 11

The Risks and Alternatives to Downloading Cracked Software: A Comprehensive Look at Premiere Pro on Windows 11

Introduction

In this auspicious occasion, we are delighted to delve into the intriguing topic related to The Risks and Alternatives to Downloading Cracked Software: A Comprehensive Look at Premiere Pro on Windows 11. Let’s weave interesting information and offer fresh perspectives to the readers.

The Risks and Alternatives to Downloading Cracked Software: A Comprehensive Look at Premiere Pro on Windows 11

Adobe Premiere Pro Cc Crack Dll File - virtualblog

The allure of free software is undeniable, especially for those seeking professional-grade tools like Adobe Premiere Pro. However, the path of downloading cracked software, often referred to as "cracked" or "pirated" versions, is fraught with risks and ethical considerations. This article aims to provide a comprehensive understanding of the dangers associated with using cracked software, emphasizing the importance of ethical and legal alternatives for accessing Premiere Pro on Windows 11.

Understanding the Risks of Using Cracked Software

Downloading cracked software from untrusted sources exposes users to a multitude of risks, including:

  • Malware and Viruses: Cracked software often serves as a conduit for malicious software, such as viruses, Trojans, and ransomware. These threats can steal personal data, compromise system security, and even damage hardware.
  • Data Breaches: Cracked software may contain backdoors that allow unauthorized access to user data, including sensitive information like financial details, personal documents, and passwords.
  • Legal Consequences: Downloading and using cracked software is illegal in most countries. Users could face fines, lawsuits, or even criminal charges.
  • Performance Issues: Cracked software often lacks essential features and updates, leading to performance problems, crashes, and incompatibility issues.
  • Lack of Support: Users of cracked software have no access to official support channels or updates, leaving them vulnerable to bugs, security vulnerabilities, and compatibility issues.

Alternatives to Cracked Software

Fortunately, there are numerous legal and ethical alternatives to using cracked software, ensuring access to the full functionality of Premiere Pro while protecting users from risks:

  • Free Trial: Adobe offers a free trial of Premiere Pro, allowing users to explore its features and capabilities for a limited period.
  • Subscription-Based Plans: Adobe’s Creative Cloud offers various subscription plans that provide access to Premiere Pro and other creative applications at affordable monthly or annual rates. These plans include regular updates, technical support, and cloud storage for collaborative projects.
  • Educational Discounts: Students, teachers, and educational institutions can access discounted Creative Cloud subscriptions, making professional software more accessible for learning and creative pursuits.
  • Open-Source Alternatives: While not identical to Premiere Pro, open-source video editing software like DaVinci Resolve offers a powerful alternative with a free version and professional-grade features.

The Importance of Ethical Software Usage

Using legal and ethical alternatives to cracked software benefits not only individuals but also the entire creative community. It:

  • Supports Software Developers: Purchasing legitimate software helps support developers in creating and maintaining high-quality software, fostering innovation and improvement.
  • Protects Users: Using legitimate software minimizes the risk of malware infections, data breaches, and legal consequences, ensuring a secure and reliable user experience.
  • Promotes a Fair and Ethical Software Ecosystem: Supporting legal software distribution contributes to a fair and ethical software ecosystem, discouraging piracy and fostering a healthy environment for innovation and development.

FAQs Regarding Premiere Pro on Windows 11

Q: What are the best ways to install Premiere Pro on Windows 11?

A: The most secure and reliable way to install Premiere Pro on Windows 11 is through Adobe’s official website or the Creative Cloud app. This ensures access to the latest version, updates, and official support.

Q: Can I use Premiere Pro on Windows 11 without a subscription?

A: While Adobe offers a free trial, using Premiere Pro without a subscription is not possible after the trial period. Subscription-based models are the primary way to access the full functionality of Premiere Pro.

Q: Are there any free alternatives to Premiere Pro for Windows 11?

A: Open-source software like DaVinci Resolve offers a free version with professional-grade features, providing a viable alternative to Premiere Pro.

Q: What are the minimum system requirements for Premiere Pro on Windows 11?

A: Adobe’s official website provides detailed system requirements for Premiere Pro, including specifications for processor, RAM, storage, and graphics card.

Tips for Using Premiere Pro on Windows 11

  • Optimize System Performance: Ensure your system meets the recommended specifications for Premiere Pro to avoid performance issues.
  • Utilize Project Presets: Use project presets to streamline workflow and maintain consistent settings across projects.
  • Explore Keyboard Shortcuts: Learn and utilize keyboard shortcuts for faster and more efficient editing.
  • Utilize Adobe Stock: Access high-quality royalty-free assets like footage, graphics, and music from Adobe Stock directly within Premiere Pro.
  • Leverage Creative Cloud Libraries: Organize and share assets across different Adobe applications using Creative Cloud Libraries.

Conclusion

While the allure of free software might be tempting, using cracked software poses significant risks to users and the software ecosystem. Choosing legal and ethical alternatives, such as Adobe’s Creative Cloud subscriptions, free trials, or open-source alternatives like DaVinci Resolve, guarantees access to the full functionality of Premiere Pro while protecting users from malware, data breaches, and legal consequences. By embracing ethical software usage, individuals can contribute to a healthier and more sustainable software environment for everyone.

is it safe to use ADOBE PREMIERE PRO CRACKED SOFTWARE? Adobe Premiere Pro Free download 2022 Adobe premiere pro cc crack pc - geraeastern How to download crack adobe premiere pro cs6 - maincardio
Adobe Premiere Pro Crack 14.9.0.52 + Free License Key [2021] Davinci Resolve vs Adobe Premiere Pro and Better Alternative Adobe premiere pro crack version offline - gdlsa
Premiere Pro crashing or stops working on Windows 11/10 - TheWindowsClub - Best Website Designer Adobe premiere pro free download cracked - mertqautomation

Closure

Thus, we hope this article has provided valuable insights into The Risks and Alternatives to Downloading Cracked Software: A Comprehensive Look at Premiere Pro on Windows 11. We thank you for taking the time to read this article. See you in our next article!

Recovering The Classic: Reinstalling Microsoft Solitaire On Windows 10

Recovering the Classic: Reinstalling Microsoft Solitaire on Windows 10

Introduction

With great pleasure, we will explore the intriguing topic related to Recovering the Classic: Reinstalling Microsoft Solitaire on Windows 10. Let’s weave interesting information and offer fresh perspectives to the readers.

Recovering the Classic: Reinstalling Microsoft Solitaire on Windows 10

Reset Microsoft Solitaire Collection App In Windows 10  PCGUIDE4U

Microsoft Solitaire, a timeless classic, has entertained generations of computer users. Its simple gameplay, addictive nature, and nostalgic charm continue to appeal to users of all ages. However, for various reasons, users may find themselves needing to reinstall the game on their Windows 10 systems. This article aims to provide a comprehensive guide on reinstalling Microsoft Solitaire, addressing common challenges and offering solutions.

Understanding the Need for Reinstallation

Several scenarios might necessitate reinstalling Microsoft Solitaire on a Windows 10 system:

  • Missing or Corrupted Files: Over time, game files can become corrupted or accidentally deleted, leading to errors or malfunctions. Reinstallation ensures a fresh, uncorrupted set of files.
  • Performance Issues: If Solitaire experiences lag, slow loading times, or frequent crashes, reinstalling the game can resolve these performance problems.
  • New Windows Installation: After a fresh Windows 10 installation, Solitaire might not be pre-installed. Reinstallation ensures access to the game.
  • Updating to a New Version: Microsoft periodically releases updates for Solitaire, introducing new features or bug fixes. Reinstallation ensures access to the latest version.
  • Customization: Reinstalling Solitaire allows users to personalize their gameplay experience by selecting specific themes, card backs, and other customization options.

Methods of Reinstallation

There are two primary methods for reinstalling Microsoft Solitaire on Windows 10:

1. Using the Microsoft Store:

The Microsoft Store is the official platform for downloading and installing apps on Windows 10. This method ensures access to the latest version of Solitaire and benefits from automatic updates.

  • Open the Microsoft Store: Locate the Microsoft Store icon on the taskbar or through the Start menu.
  • Search for Solitaire: In the search bar, type "Solitaire" and press Enter.
  • Select Microsoft Solitaire Collection: From the search results, select "Microsoft Solitaire Collection" and click the "Get" button.
  • Install the Game: The game will download and install automatically. Once complete, you can launch Solitaire from the Start menu or the Microsoft Store.

2. Reinstalling from the Control Panel:

This method involves removing and reinstalling the game through the Control Panel, which can be useful for resolving specific issues or when the Microsoft Store method fails.

  • Open the Control Panel: Search for "Control Panel" in the Start menu and open it.
  • Navigate to Programs: Choose "Programs and Features" from the Control Panel.
  • Uninstall Solitaire: Locate "Microsoft Solitaire Collection" in the list of installed programs and click "Uninstall."
  • Restart your Computer: After the uninstallation process completes, restart your computer.
  • Reinstall from the Microsoft Store: Once the computer restarts, reinstall Solitaire using the steps outlined in the previous method.

Troubleshooting Reinstallation Issues

Despite the straightforward process, reinstalling Solitaire might encounter unexpected issues. Here are some common problems and their solutions:

  • Error Messages: If you encounter error messages during the installation process, check your internet connection, ensure sufficient disk space, and try restarting your computer.
  • Missing Game Files: If the installation fails, try reinstalling Solitaire from a different source, like a CD or USB drive, if available.
  • Incompatibility Issues: If Solitaire is incompatible with your Windows 10 version, try updating your operating system to the latest version or contacting Microsoft support.
  • Permissions Issues: Ensure you have administrator privileges on your computer to install Solitaire. If necessary, contact your system administrator for assistance.

FAQs about Reinstalling Solitaire

Q: What happens to my saved game progress after reinstalling Solitaire?

A: Reinstalling Solitaire usually does not affect your saved game progress. The game data is typically stored separately from the installation files.

Q: Can I reinstall Solitaire without losing my customization settings?

A: While reinstalling Solitaire usually resets customization settings, you can try backing up the relevant configuration files before uninstalling the game.

Q: Why is Solitaire not showing up in my Start menu after reinstalling it?

A: Check your Start menu settings and ensure that Solitaire is not hidden. You can also try searching for "Solitaire" in the Start menu to locate the game.

Q: What are the system requirements for reinstalling Solitaire?

A: Solitaire is a lightweight game with minimal system requirements. Most Windows 10 computers should be able to run it without issues.

Q: Can I reinstall Solitaire on multiple computers with the same Microsoft account?

A: Yes, you can install Solitaire on multiple computers using the same Microsoft account. Your game progress and customization settings will be synced across all devices.

Tips for a Smooth Reinstallation

  • Backup your data: Before reinstalling Solitaire, back up any important data on your computer, including saved game progress and customization settings.
  • Check for updates: Ensure your Windows 10 operating system and Microsoft Store are up to date before reinstalling Solitaire.
  • Restart your computer: Restarting your computer after reinstalling Solitaire can resolve any lingering issues and ensure the game is functioning correctly.
  • Contact Microsoft support: If you encounter persistent problems, contact Microsoft support for assistance with reinstalling Solitaire.

Conclusion

Reinstalling Microsoft Solitaire on Windows 10 is a straightforward process that can resolve a range of issues, including corrupted files, performance problems, and incompatibility issues. By understanding the various methods, troubleshooting techniques, and FAQs, users can ensure a smooth and successful reinstallation, allowing them to enjoy the classic game once again. Whether seeking nostalgia, a mental challenge, or simply a fun way to pass the time, reinstalling Solitaire provides access to a beloved pastime that continues to captivate users across generations.

Install or Reinstall Solitaire, Freecell and other Windows 7 Games in Windows 10 - Nov 20 Update Restore Microsoft Solitaire Collection - BEST GAMES WALKTHROUGH Reinstallare Microsoft Solitaire Collection in Windows 10
Reinstall microsoft solitaire collection windows 10 - serretry Restore Microsoft Solitaire Collection - BEST GAMES WALKTHROUGH How to reinstall microsoft solitaire collection windows 10 - creationpilot
How to reinstall windows 10 microsoft solitaire collection - akpblocks How to reinstall microsoft solitaire collection in windows 10 - ilbopso

Closure

Thus, we hope this article has provided valuable insights into Recovering the Classic: Reinstalling Microsoft Solitaire on Windows 10. We hope you find this article informative and beneficial. See you in our next article!

Rekordbox 6: A Comprehensive Guide To Music Management And Performance

Rekordbox 6: A Comprehensive Guide to Music Management and Performance

Introduction

In this auspicious occasion, we are delighted to delve into the intriguing topic related to Rekordbox 6: A Comprehensive Guide to Music Management and Performance. Let’s weave interesting information and offer fresh perspectives to the readers.

Rekordbox 6: A Comprehensive Guide to Music Management and Performance

Like It Or Not, Rekordbox 6 Has Just Started The Next DJ Music Revolution - Digital DJ Tips

Rekordbox, Pioneer DJ’s renowned music management software, has become an indispensable tool for DJs, producers, and music enthusiasts alike. Its sixth iteration, Rekordbox 6, offers a suite of powerful features designed to streamline music organization, enhance performance preparation, and unlock creative possibilities. This guide delves into the essential aspects of Rekordbox 6 for Windows 10 users, exploring its download, installation, key features, and benefits.

Understanding Rekordbox 6

Rekordbox 6 transcends the traditional role of a music library manager. It acts as a central hub for organizing, analyzing, and preparing music for live performances. The software offers a comprehensive set of tools that cater to various aspects of music production, from initial track analysis and categorization to advanced performance features like cue points, loops, and hot cues.

Download and Installation

Acquiring Rekordbox 6 for Windows 10 is a straightforward process. The software can be downloaded directly from the Pioneer DJ website. The download process involves:

  1. Visiting the Pioneer DJ Website: Navigate to the official Pioneer DJ website and locate the Rekordbox 6 download page.
  2. Choosing the Correct Version: Select the "Windows" option to ensure compatibility with your operating system.
  3. Downloading the Installer: Click on the download link to initiate the file transfer.
  4. Running the Installer: Once the download is complete, double-click the installer file to start the installation process. Follow the on-screen instructions to complete the setup.

Key Features and Benefits

Rekordbox 6 boasts a comprehensive feature set designed to elevate the music management and performance experience:

1. Music Library Management:

  • Track Analysis and Tagging: Rekordbox 6 automatically analyzes music files, extracting key information like BPM, key, and waveform. This information is used for sorting, filtering, and creating playlists.
  • Categorization and Tagging: Users can create custom tags and categories to organize their music libraries based on genre, mood, era, or any other desired criteria.
  • Smart Playlists: Rekordbox 6 employs intelligent algorithms to generate playlists based on user-defined criteria, such as BPM range, key, and genre. This simplifies playlist creation and discovery.

2. Performance Preparation:

  • Cue Points and Loops: Set cue points and loop sections within tracks to create seamless transitions and memorable moments during performances.
  • Hot Cues: Assign hot cues to specific points in tracks for instant playback and creative improvisation.
  • Performance Pads: Rekordbox 6 integrates seamlessly with Pioneer DJ controllers, providing access to performance pads for triggering hot cues, loops, and other functions.

3. Advanced Features:

  • Rekordbox Cloud: Store and sync your music library across multiple devices using the cloud storage service.
  • Performance Recording: Capture and record your DJ sets directly within Rekordbox for later analysis, sharing, or archiving.
  • Track Preparation for Serato DJ Pro: Users can prepare tracks in Rekordbox and seamlessly import them into Serato DJ Pro, streamlining workflow and ensuring compatibility.

4. Integration with Pioneer DJ Hardware:

  • Controller Mapping: Rekordbox 6 offers pre-configured mappings for a wide range of Pioneer DJ controllers, ensuring seamless integration and intuitive control.
  • Hardware Synchronization: The software synchronizes with Pioneer DJ hardware, allowing for seamless track mixing and beatmatching.

5. User Interface and Navigation:

  • Intuitive Interface: The software features a user-friendly interface that is easy to navigate and understand.
  • Customizable Layouts: Users can customize the layout and view options to suit their individual preferences and workflows.
  • Multiple View Modes: Rekordbox 6 offers various view modes, including a browser view, a playlist view, and a performance view, providing flexibility for different tasks.

Benefits of Using Rekordbox 6

The use of Rekordbox 6 offers numerous advantages for DJs, producers, and music enthusiasts:

  • Efficient Music Organization: Streamline music library management with intelligent analysis, tagging, and categorization tools.
  • Enhanced Performance Preparation: Create seamless transitions and memorable moments with cue points, loops, and hot cues.
  • Creative Freedom: Unleash creative possibilities with advanced performance features and seamless hardware integration.
  • Seamless Workflow: Integrate seamlessly with Pioneer DJ hardware and other software platforms for a streamlined workflow.
  • Improved Performance Accuracy: Ensure accurate beatmatching and track synchronization with the software’s powerful analysis and beatgrid capabilities.

FAQs

1. Is Rekordbox 6 compatible with Windows 10?

Yes, Rekordbox 6 is fully compatible with Windows 10.

2. What are the system requirements for Rekordbox 6 on Windows 10?

  • Operating System: Windows 10 (64-bit)
  • Processor: Intel Core i3 or AMD equivalent
  • Memory: 4 GB RAM
  • Hard Drive: 10 GB free space
  • Display: 1280 x 768 resolution

3. Is Rekordbox 6 free to use?

Rekordbox 6 offers a free version with basic features. To access all features, including advanced performance tools and cloud storage, a paid subscription is required.

4. How do I update Rekordbox 6?

Updates for Rekordbox 6 are available through the Pioneer DJ website. You can check for updates within the software itself by going to "Help" > "Check for Updates."

5. Can I use Rekordbox 6 with other DJ controllers?

While Rekordbox 6 is primarily designed for Pioneer DJ controllers, it can also be used with other controllers that support MIDI mapping.

Tips for Using Rekordbox 6

  • Utilize the Analyze Function: Analyze all your music files to take advantage of the software’s beatgrid, key detection, and other advanced features.
  • Create Custom Playlists: Organize your music library into playlists based on genre, mood, or any other criteria.
  • Experiment with Performance Features: Explore the use of cue points, loops, and hot cues to enhance your DJ sets.
  • Take Advantage of Hardware Integration: If you use Pioneer DJ hardware, leverage the seamless integration and controller mapping features.
  • Utilize the Rekordbox Cloud: Store and sync your music library across multiple devices for easy access.

Conclusion

Rekordbox 6 stands as a powerful and versatile tool for DJs, producers, and music enthusiasts. Its comprehensive features, seamless hardware integration, and user-friendly interface empower users to organize, analyze, and prepare music for live performances with efficiency and creativity. Whether you are a seasoned professional or a budding DJ, Rekordbox 6 provides the tools and capabilities to elevate your music management and performance experience. By embracing the software’s capabilities, users can unlock their full creative potential and deliver unforgettable performances.

Pioneer DJ Rekordbox 6.0 & iOS 3.0 Bring Cloud Music & Subscriptions Top 5 New Features in Rekordbox 6 - The DJ Guide Rekordbox 6.0 Virtual Tour - All Music Spain
rekordbox  MusicTech Review: Pioneer DJ's new Rekordbox 6 – is it worth subscribing? - DJ TechTools Rekordbox 6.0 Introduces Subscription Packages and Cloud Music Management
rekordbox ver. 6 subscription plans explained Rekordbox 6.0.1 ya disponible  Hispasonic

Closure

Thus, we hope this article has provided valuable insights into Rekordbox 6: A Comprehensive Guide to Music Management and Performance. We appreciate your attention to our article. See you in our next article!

Seamless Sharing: A Deep Dive Into Windows 11’s Nearby Sharing Feature

Seamless Sharing: A Deep Dive into Windows 11’s Nearby Sharing Feature

Introduction

With great pleasure, we will explore the intriguing topic related to Seamless Sharing: A Deep Dive into Windows 11’s Nearby Sharing Feature. Let’s weave interesting information and offer fresh perspectives to the readers.

Seamless Sharing: A Deep Dive into Windows 11’s Nearby Sharing Feature

Seamless File Sharing: Google Nearby Share for Windows

Windows 11 introduces a streamlined approach to sharing files and content between devices, eliminating the complexities of traditional methods. This feature, known as Nearby Sharing, leverages Bluetooth and Wi-Fi to enable the transfer of various data types, including photos, videos, documents, and even web links, directly between compatible devices.

Understanding the Mechanics of Nearby Sharing

At its core, Nearby Sharing operates on the principle of proximity and discovery. When a user initiates a sharing action, their device broadcasts a signal, seeking nearby compatible devices. These signals are encrypted and anonymous, ensuring user privacy and security. Upon detection, the recipient device receives a notification, allowing the user to choose whether to accept or decline the incoming transfer.

A Comprehensive Overview of Nearby Sharing Capabilities

1. Sharing Diverse Data Types:

Nearby Sharing transcends the limitations of traditional file sharing methods by accommodating a wide range of data types:

  • Photos and Videos: Capture memories and share them instantly with friends and family.
  • Documents: Collaborate on projects efficiently by transferring documents between devices.
  • Web Links: Share interesting articles or websites with others in a single click.
  • Other Files: Transfer any file type, from presentations to audio recordings, without restrictions.

2. Device Compatibility:

Nearby Sharing extends its reach beyond the boundaries of Windows, enabling seamless sharing with other devices:

  • Android Devices: Transfer files between Windows and Android devices with ease.
  • Apple Devices: Share content with iPhones and iPads, bridging the gap between operating systems.

3. Secure and Reliable Transfers:

Nearby Sharing prioritizes data security, employing encryption protocols to protect sensitive information during transmission:

  • Encrypted Transfers: All data transfers are encrypted, safeguarding against unauthorized access.
  • Automatic Device Verification: The system verifies recipient devices before initiating transfers, minimizing the risk of unauthorized access.
  • Transfer Progress Tracking: Users can monitor the progress of ongoing transfers, ensuring a smooth and reliable experience.

4. Streamlined User Interface:

The Nearby Sharing feature boasts a user-friendly interface, making it accessible to users of all skill levels:

  • Intuitive Integration: Nearby Sharing seamlessly integrates with the Windows user interface, accessible through the Share button or context menus.
  • Simple Sharing Process: Initiating a transfer is as simple as selecting the desired content and choosing the recipient device.
  • Clear Notifications: Users receive clear notifications regarding incoming transfers, allowing them to accept or decline with ease.

Benefits of Nearby Sharing in a Modern World

1. Enhanced Collaboration and Productivity:

Nearby Sharing fosters a collaborative environment, enabling seamless sharing of projects, documents, and ideas between colleagues, students, and collaborators.

2. Simplified Content Sharing:

The intuitive interface and broad compatibility make content sharing effortless, eliminating the need for complex file-sharing platforms or cumbersome email attachments.

3. Increased Efficiency and Convenience:

Nearby Sharing streamlines the sharing process, saving time and effort compared to traditional methods. This increased efficiency translates to enhanced productivity and a more enjoyable user experience.

4. Enhanced Communication and Connectivity:

The ability to share content directly between devices fosters communication and connectivity, promoting collaboration and knowledge sharing among individuals and groups.

FAQs About Nearby Sharing in Windows 11

1. What devices are compatible with Nearby Sharing?

Nearby Sharing is compatible with Windows 11 devices and a wide range of Android and Apple devices.

2. Is Nearby Sharing secure?

Yes, Nearby Sharing utilizes encryption protocols to ensure the security of data transfers.

3. How do I enable Nearby Sharing on my Windows 11 device?

To enable Nearby Sharing, navigate to Settings > System > Shared experiences and toggle the "Nearby sharing" option to "On."

4. Can I share files with multiple devices simultaneously?

Currently, Nearby Sharing allows for file transfers to a single device at a time.

5. What happens if I lose connection during a transfer?

If the connection is interrupted, the transfer will pause. Once the connection is restored, the transfer will resume automatically.

6. How can I ensure my data is secure when using Nearby Sharing?

Nearby Sharing employs encryption protocols and verifies recipient devices to enhance data security. It is advisable to only share data with trusted individuals and devices.

Tips for Optimizing Nearby Sharing

1. Ensure Bluetooth and Wi-Fi are Enabled:

For Nearby Sharing to function correctly, ensure that Bluetooth and Wi-Fi are enabled on both the sending and receiving devices.

2. Keep Devices in Close Proximity:

Nearby Sharing operates best when devices are within close proximity to each other.

3. Verify Recipient Device:

Before accepting a file transfer, verify the recipient device to prevent unauthorized access.

4. Update Device Drivers:

Ensure that all device drivers are up-to-date to optimize Nearby Sharing performance.

5. Explore Advanced Sharing Settings:

Delve into the advanced settings within the Nearby Sharing feature to customize sharing options and preferences.

Conclusion: The Future of Seamless Sharing

Nearby Sharing in Windows 11 represents a significant advancement in file sharing technology, offering a seamless, secure, and user-friendly experience. Its ability to facilitate efficient collaboration, enhance communication, and simplify content transfer makes it an invaluable tool in the modern digital landscape. As the technology continues to evolve, we can expect further advancements in functionality and compatibility, solidifying its position as the future of seamless sharing.

Nearby Share is Finally Available on Windows, Allowing for a Seamless File Sharing Experience How to Use Nearby Sharing on Windows 11 How to Use Nearby Sharing on Windows 11
How to Use Nearby Sharing on Windows 11?  Gear Up Windows How To Use Nearby Sharing On Windows 11  digisrun شرح استخدام ميزة Nearby Share بين Windows 11 و Android - Arabhardware
How to Enable Nearby Sharing in Windows 11?  Gear Up Windows How to use Nearby sharing on Windows 11  Windows Central

Closure

Thus, we hope this article has provided valuable insights into Seamless Sharing: A Deep Dive into Windows 11’s Nearby Sharing Feature. We thank you for taking the time to read this article. See you in our next article!

Unresponsive Shutdown: Troubleshooting Windows 11 Shutdown Issues

Unresponsive Shutdown: Troubleshooting Windows 11 Shutdown Issues

Introduction

In this auspicious occasion, we are delighted to delve into the intriguing topic related to Unresponsive Shutdown: Troubleshooting Windows 11 Shutdown Issues. Let’s weave interesting information and offer fresh perspectives to the readers.

Unresponsive Shutdown: Troubleshooting Windows 11 Shutdown Issues

How To Fix Windows 11 Shutdown Problem  Step By Step FIX - YouTube

The inability to shut down a computer running Windows 11 can be a frustrating experience, hindering productivity and potentially leading to data loss. This article aims to provide a comprehensive guide for troubleshooting and resolving this common issue, offering practical solutions for various scenarios.

Understanding the Problem

Before delving into solutions, it’s essential to understand the different types of shutdown problems users might encounter:

  • Complete Freeze: The computer becomes unresponsive, and the shutdown process does not initiate at all. The screen might remain frozen, or the cursor may become non-functional.
  • Endless Loading: The shutdown process starts but remains stuck at a specific stage, often with a loading icon or message.
  • Forced Shutdown: The only way to shut down the computer is through a hard reset by pressing and holding the power button, potentially causing data loss.

Common Causes of Windows 11 Shutdown Issues

Several factors can contribute to a computer’s inability to shut down properly. These include:

  • Software Conflicts: Faulty or incompatible software, including drivers, applications, or updates, can interfere with the shutdown process.
  • Hardware Issues: Malfunctioning hardware components, such as the hard drive, RAM, or motherboard, can hinder the computer’s ability to perform shutdown operations.
  • Operating System Errors: Corrupted system files, registry errors, or outdated operating system components can cause shutdown failures.
  • Power Management Problems: Incorrectly configured power settings or faulty power supply units can lead to shutdown issues.
  • Background Processes: Processes running in the background, such as antivirus scans, system updates, or resource-intensive applications, can delay or prevent the shutdown process.

Troubleshooting Steps

To resolve Windows 11 shutdown issues, follow these troubleshooting steps in a systematic manner:

1. Check for Running Processes:

  • Task Manager: Open the Task Manager (Ctrl+Shift+Esc) and navigate to the "Processes" tab. Look for any applications or processes consuming significant resources, especially those that are unresponsive or have high CPU or memory usage.
  • Background Processes: Check for any unusual or resource-intensive processes running in the background. You can access the Startup tab in Task Manager to see applications that launch automatically at startup.

2. Update Drivers:

  • Device Manager: Go to the Device Manager (right-click "This PC" > "Manage" > "Device Manager"). Look for any devices with a yellow exclamation mark, indicating a driver issue.
  • Manufacturer Websites: Visit the official websites of your hardware manufacturers (motherboard, graphics card, etc.) to download and install the latest drivers for your devices.

3. Run System File Checker (SFC):

  • Command Prompt: Open the Command Prompt (cmd) as administrator.
  • Run SFC: Type "sfc /scannow" and press Enter. This command will scan for and repair corrupted system files.

4. Disable Startup Applications:

  • Task Manager: Open the Task Manager and navigate to the "Startup" tab. Disable any applications that are not essential for system operation.

5. Check Power Settings:

  • Control Panel: Open the Control Panel and navigate to "Power Options."
  • Shutdown Settings: Ensure that the "Shutdown settings" are configured correctly, including the time delay for the shutdown process.

6. Perform a Clean Boot:

  • System Configuration: Press Windows key + R, type "msconfig," and press Enter.
  • Selective Startup: In the System Configuration window, select "Selective Startup" and uncheck "Load startup items."
  • Disable Services: Click on the "Services" tab and select "Hide all Microsoft services." Then, uncheck all remaining services.

7. Check for Hardware Issues:

  • Diagnostic Tools: Run hardware diagnostic tools provided by your motherboard manufacturer or use third-party tools like MemTest86+ to check RAM for errors.
  • Replace Components: If hardware issues are suspected, consider replacing malfunctioning components like the hard drive or RAM.

8. Run a System Restore:

  • System Restore: Search for "System Restore" in the Windows search bar.
  • Restore Point: Choose a restore point created before the shutdown issues began.

9. Reinstall Windows 11:

  • Windows Installation Media: Create a bootable USB drive with the Windows 11 installation media.
  • Clean Installation: Perform a clean installation of Windows 11, which will erase all data on your hard drive.

FAQs

Q: Why does my computer freeze when I try to shut down?

A: This can be caused by a variety of factors, including software conflicts, hardware issues, or corrupted system files. Refer to the troubleshooting steps above to identify and resolve the underlying issue.

Q: What if my computer is stuck on a loading screen during shutdown?

A: This often indicates a problem with background processes, driver issues, or corrupted system files. Try restarting the computer, checking for running processes, and updating drivers. If the issue persists, consider performing a system restore or reinstalling Windows 11.

Q: What are some tips to prevent shutdown issues in the future?

A:

  • Regularly Update Drivers: Ensure all drivers are up-to-date to avoid compatibility issues.
  • Run Disk Cleanup: Regularly clean your hard drive to remove unnecessary files and improve system performance.
  • Defragment Hard Drive: Defragmenting your hard drive can improve its efficiency and reduce shutdown time.
  • Check for Updates: Keep your operating system and software updated to receive security patches and bug fixes.
  • Monitor System Resources: Regularly monitor system resources (CPU, RAM, disk space) to identify any potential bottlenecks.

Conclusion

Troubleshooting shutdown issues in Windows 11 can be challenging but is often solvable with careful analysis and systematic troubleshooting. By following the steps outlined in this guide, users can identify the root cause of the problem and implement appropriate solutions. Remember to back up important data before attempting any major troubleshooting steps, as data loss can occur during system repair or reinstallation.

Fix Windows 11 Not Shutting Down  How To Solve windows 11 Won’t Shut down Properly - YouTube 5 Ways to Fix Windows 11 will not Shutdown Problem Easily [Solved] Windows 11 Stuck on Shutting Down
Windows 11 Shutdown Button Not Working: Best Fixes - NEXTOFWINDOWS.COM How to Shut down or Restart Windows 11 PC?  Gear Up Windows 5 Simple Steps To Shut Down Windows 11 - LAPTOP MURAH KOMPUTER MALAYSIA
How To Fix Windows 11 Shutdown Problem - Step By Step FIX - YouTube Windows 11 Shutdown Box Keeps Popping up Randomly? Fix It!

Closure

Thus, we hope this article has provided valuable insights into Unresponsive Shutdown: Troubleshooting Windows 11 Shutdown Issues. We hope you find this article informative and beneficial. See you in our next article!

Disabling Fast Startup: A Comprehensive Guide To Enhancing System Stability And Troubleshooting

Disabling Fast Startup: A Comprehensive Guide to Enhancing System Stability and Troubleshooting

Introduction

With great pleasure, we will explore the intriguing topic related to Disabling Fast Startup: A Comprehensive Guide to Enhancing System Stability and Troubleshooting. Let’s weave interesting information and offer fresh perspectives to the readers.

Disabling Fast Startup: A Comprehensive Guide to Enhancing System Stability and Troubleshooting

How to Disable Fast Startup Windows 11

Fast startup, a feature introduced in Windows 8, aims to accelerate the boot process by utilizing a hybrid shutdown mode. While this feature generally provides a faster startup experience, it can also lead to certain complications and limitations. In situations where system stability is paramount, or when troubleshooting complex issues, disabling fast startup might be necessary. This article delves into the intricacies of this feature, exploring its impact, the methods for disabling it, and the potential benefits it can offer.

Understanding Fast Startup

Fast startup, also known as "Hybrid Shutdown," represents a compromise between a traditional shutdown and a hibernation state. Upon selecting "Shut Down," Windows doesn’t completely power off but rather saves the current system state to a hibernation file. This allows for a quicker boot-up process as the system can resume from the saved state instead of loading everything from scratch.

The Trade-offs of Fast Startup

While fast startup generally provides a noticeable speed boost, it comes with certain trade-offs:

  • Limited Troubleshooting: Fast startup can hinder troubleshooting efforts. Since the system doesn’t fully shut down, certain system processes and drivers might remain active in the background, making it difficult to isolate and resolve issues.
  • Increased System Complexity: The hybrid shutdown mode introduces an additional layer of complexity to the system’s shutdown and startup processes, potentially increasing the likelihood of encountering unexpected behavior or errors.
  • Potential Data Integrity Issues: In rare cases, fast startup can lead to data corruption if the hibernation file becomes corrupted or if the system encounters an unexpected shutdown during the hibernation process.
  • Incompatibility with Certain Software: Some applications and utilities might not function correctly when fast startup is enabled, as they require a clean system shutdown for proper operation.

Disabling Fast Startup: A Practical Solution

Disabling fast startup is a straightforward process that can be accomplished through the Windows Control Panel or by modifying the system registry.

Using the Control Panel:

  1. Access Power Options: Open the Control Panel and navigate to "Power Options."
  2. Choose "Choose what the power buttons do": In the left-hand pane, click on "Choose what the power buttons do."
  3. Modify Settings: Click on "Change settings that are currently unavailable."
  4. Disable Fast Startup: Uncheck the box labeled "Turn on fast startup (recommended)."
  5. Save Changes: Click "Save Changes" to apply the modifications.

Using the Registry Editor (Regedit):

  1. Open Registry Editor: Press "Windows Key + R" to open the Run dialog box. Type "regedit" and press Enter.
  2. Navigate to the Registry Key: Navigate to the following registry key:
    HKEY_LOCAL_MACHINESYSTEMCurrentControlSetControlPower
  3. Modify the "HiberbootEnabled" Value: Double-click on the "HiberbootEnabled" DWORD value. Set the value data to "0" and click "OK."
  4. Modify the "FastStartupEnabled" Value: Double-click on the "FastStartupEnabled" DWORD value. Set the value data to "0" and click "OK."
  5. Close Registry Editor: Close the Registry Editor and restart your computer for the changes to take effect.

Benefits of Disabling Fast Startup:

Disabling fast startup can offer several benefits, particularly for users who prioritize system stability and troubleshooting capabilities:

  • Enhanced Troubleshooting: By disabling fast startup, you ensure a complete system shutdown, allowing for a clean slate for troubleshooting. This eliminates the possibility of lingering processes or drivers interfering with the diagnostic process.
  • Improved System Stability: Disabling fast startup can potentially reduce the occurrence of unexpected system behavior or errors related to the hybrid shutdown mode.
  • Increased Compatibility: Certain software applications and utilities that require a complete system shutdown for proper functionality will work without issues when fast startup is disabled.
  • Reduced Risk of Data Corruption: By eliminating the hibernation file, you reduce the risk of data corruption associated with the fast startup process.

FAQs Regarding Disabling Fast Startup

Q: Will disabling fast startup significantly impact my boot time?

A: While disabling fast startup will result in a slightly longer boot time compared to the fast startup mode, the difference is usually negligible for most users.

Q: Can I revert back to using fast startup after disabling it?

A: Yes, you can re-enable fast startup by following the same steps outlined in the Control Panel or Registry Editor instructions, but setting the values to "1" instead of "0."

Q: Is disabling fast startup necessary for all users?

A: Disabling fast startup is not essential for all users. It is primarily recommended for those who frequently encounter system issues, need to perform extensive troubleshooting, or use software that requires a clean system shutdown.

Tips for Disabling Fast Startup

  • Backup Your Registry: Before making any changes to the registry, it is always advisable to create a backup of your registry to prevent any potential data loss or system instability.
  • Check for Updates: Ensure your system is running the latest Windows updates, as updates often include bug fixes and improvements that might address any issues related to fast startup.
  • Monitor System Performance: After disabling fast startup, closely monitor your system’s performance to ensure that the change has not negatively impacted its overall functionality.

Conclusion

Disabling fast startup can be a valuable step for users seeking to enhance system stability, facilitate troubleshooting, and ensure compatibility with specific software applications. While it might slightly increase boot time, the benefits it offers in terms of system reliability and troubleshooting capabilities outweigh the potential performance trade-off for many users. By understanding the intricacies of fast startup and its implications, users can make informed decisions about whether to disable it based on their individual needs and priorities.

How to disable or enable Fast Startup in Windows 10 How to Disable Windows 10 Fast Startup How To Enable Or Disable Fast Startup In Windows 11 - Vrogue
How to Disable Fast Startup in Windows 11 - WindowsChimp Disable Fast Startup Simple Steps To Do That In Windows 10  itechguides How To Disable Fast Startup In Windows 11 Very Quick Guide On 11 Fix - Vrogue
How to Enable / Disable "Fast Startup" in Windows 11/10  Fast Startup not Showing - YouTube How to Disable Fast Start: A Step-by-Step Guide - The Enlightened Mindset

Closure

Thus, we hope this article has provided valuable insights into Disabling Fast Startup: A Comprehensive Guide to Enhancing System Stability and Troubleshooting. We hope you find this article informative and beneficial. See you in our next article!

A Comprehensive Guide To Understanding And Utilizing QReduce Lite

A Comprehensive Guide to Understanding and Utilizing QReduce Lite

Introduction

With enthusiasm, let’s navigate through the intriguing topic related to A Comprehensive Guide to Understanding and Utilizing QReduce Lite. Let’s weave interesting information and offer fresh perspectives to the readers.

A Comprehensive Guide to Understanding and Utilizing QReduce Lite

QReduce Lite॥QReduce Photo Reducer/Compressor Mobile App॥ How To Reduce Photo Size॥ compress

Introduction

In the realm of software development, optimizing code for efficiency and performance is paramount. One tool that has gained significant traction in this domain is QReduce Lite. This lightweight, yet powerful, application facilitates the process of reducing code complexity and improving its overall quality. This article aims to provide a comprehensive understanding of QReduce Lite, exploring its functionalities, benefits, and practical applications.

Understanding QReduce Lite

QReduce Lite is a code reduction tool designed to simplify and streamline complex code structures. It operates by identifying redundant or unnecessary code segments and suggesting ways to refactor them. The process involves analyzing the code, identifying areas for improvement, and then automatically applying transformations to achieve a more concise and efficient representation.

Key Features and Functionality

QReduce Lite offers a range of features that empower developers to enhance their codebase:

  • Code Simplification: QReduce Lite identifies and eliminates redundant code blocks, variable declarations, and unnecessary function calls, resulting in cleaner and more readable code.
  • Variable Optimization: It analyzes variable usage patterns and suggests more efficient variable names and data types, leading to improved code readability and performance.
  • Function Refactoring: QReduce Lite assists in identifying complex functions and suggests ways to break them down into smaller, more manageable units, improving code modularity and maintainability.
  • Error Detection and Correction: The tool can detect potential errors and inconsistencies in the code, providing suggestions for corrections and improvements.
  • Code Style Standardization: QReduce Lite helps enforce coding standards and best practices, ensuring consistency and uniformity across the codebase.

Benefits of Utilizing QReduce Lite

Employing QReduce Lite offers numerous advantages for developers and software projects:

  • Enhanced Code Readability: By removing unnecessary code and simplifying complex structures, QReduce Lite makes code easier to understand and maintain, reducing the risk of errors and improving collaboration among developers.
  • Improved Code Performance: Optimized code often translates to faster execution times and reduced resource consumption, enhancing the overall performance of applications.
  • Reduced Development Time: By automating the process of code reduction, QReduce Lite saves developers valuable time, allowing them to focus on more complex tasks.
  • Increased Code Maintainability: Streamlined code is easier to modify and update, minimizing the risk of introducing new bugs and facilitating future development efforts.
  • Improved Code Quality: QReduce Lite helps ensure adherence to coding standards and best practices, leading to higher-quality code that is more robust and reliable.

Applications of QReduce Lite

QReduce Lite finds application in a wide range of software development scenarios:

  • Web Development: Simplifying front-end and back-end code for websites and web applications, improving performance and user experience.
  • Mobile Development: Optimizing code for mobile apps, ensuring efficient resource utilization and a smooth user experience.
  • Game Development: Enhancing code performance for games, optimizing rendering, physics calculations, and other critical functionalities.
  • Data Science and Machine Learning: Refactoring complex algorithms and models to improve efficiency and accuracy.
  • Embedded Systems: Simplifying code for resource-constrained embedded systems, optimizing for memory usage and performance.

FAQs about QReduce Lite

Q: Is QReduce Lite compatible with all programming languages?

A: QReduce Lite supports a wide range of popular programming languages, including Python, Java, C++, JavaScript, and more. However, compatibility may vary depending on the specific version and features of the tool.

Q: How does QReduce Lite handle code comments?

A: QReduce Lite is designed to preserve comments during the code reduction process, ensuring that important documentation is not lost.

Q: Can QReduce Lite modify the original code?

A: QReduce Lite typically operates on a copy of the original code, preserving the original version for reference. However, some features may allow users to directly modify the original code.

Q: What are the limitations of QReduce Lite?

A: QReduce Lite is a powerful tool, but it is not a magic bullet. It may not be able to optimize all code segments, and some manual refactoring may still be required. Additionally, the tool’s effectiveness can depend on the complexity and structure of the code.

Tips for Utilizing QReduce Lite

  • Understand the codebase: Before using QReduce Lite, ensure a thorough understanding of the code’s functionality and structure.
  • Start with small code segments: Begin by testing QReduce Lite on smaller code segments to familiarize yourself with its capabilities.
  • Review the suggested changes: Carefully review the transformations suggested by QReduce Lite before applying them to the code.
  • Test thoroughly: After applying changes, conduct thorough testing to ensure that the code remains functional and meets performance expectations.
  • Iterative approach: Use QReduce Lite iteratively, applying changes gradually and testing at each step.

Conclusion

QReduce Lite represents a valuable tool for developers seeking to enhance the quality, efficiency, and readability of their code. By simplifying complex code structures, optimizing variable usage, and identifying potential errors, QReduce Lite empowers developers to create more robust, maintainable, and performant software. While it is not a substitute for careful code design and manual refactoring, QReduce Lite provides a powerful and efficient means to streamline the code reduction process, ultimately contributing to the success of software development projects.

Tutorial mengecilkan resolusi gambar dengan qreduce lite #tutorial #mudahguys #tutorial2020 [Updated] QReduce Lite  Compress image size in kb & mb for PC / Mac / Windows 11,10,8,7 QReduce Lite Premium - Apps on Google Play
Cara Agar Status WhatsApp Tidak Pecah Untuk Video & Foto  Titik ID تحميل برنامج ضغط حجم الصور دفعة واحدة للاندرويد Download Qreduce Lite - تصميم ميكس 10 Aplikasi Kompres Foto Terbaik untuk Laptop dan Android
تحميل تطبيق Qreduce Lite برنامج ضغط الصور وتقليل حجمها للحفاظ على المساحة للأندرويد 2021 QReduce Lite - Compress image size by KB or MB - YouTube

Closure

Thus, we hope this article has provided valuable insights into A Comprehensive Guide to Understanding and Utilizing QReduce Lite. We hope you find this article informative and beneficial. See you in our next article!