Archives 2023

Managing User Accounts In Windows 11: A Comprehensive Guide To Removing Accounts

Managing User Accounts in Windows 11: A Comprehensive Guide to Removing Accounts

Introduction

With enthusiasm, let’s navigate through the intriguing topic related to Managing User Accounts in Windows 11: A Comprehensive Guide to Removing Accounts. Let’s weave interesting information and offer fresh perspectives to the readers.

Managing User Accounts in Windows 11: A Comprehensive Guide to Removing Accounts

How To Remove Microsoft Account From Windows 11 Guide  yorketech

Windows 11, like its predecessors, allows users to create multiple accounts, each with its own unique settings, data, and permissions. This can be beneficial for families, shared computers, or even individuals who prefer to separate their work and personal activities. However, circumstances may arise where the need to remove an account from a Windows 11 PC becomes necessary. This could be due to a change in user needs, the departure of a family member, or the desire to streamline the system.

This guide will provide a comprehensive overview of the process of removing user accounts from Windows 11, covering various scenarios and addressing potential challenges. It will delve into the implications of account removal, the different methods available, and the necessary precautions to ensure a smooth transition.

Understanding the Implications of Account Removal

Before embarking on the process of removing an account, it is crucial to understand the consequences. Removing an account from a Windows 11 PC will permanently delete:

  • User data: This includes files, documents, applications, and settings associated with the account.
  • Account settings: Personalized settings, such as desktop themes, language preferences, and notification settings, will be lost.
  • Installed applications: Any software installed specifically for the account will be removed.

It is therefore essential to back up any critical data before proceeding with account removal. This can be done by transferring files to external storage devices, cloud services, or another user account on the same PC.

Methods for Removing User Accounts in Windows 11

Windows 11 offers several methods for removing user accounts, each suited to different scenarios:

1. Removing a Local Account:

  • Through Settings:

    • Open Settings by pressing Windows key + I.
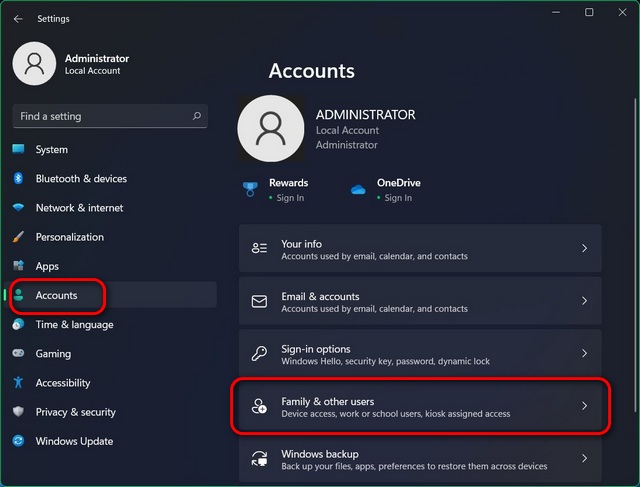
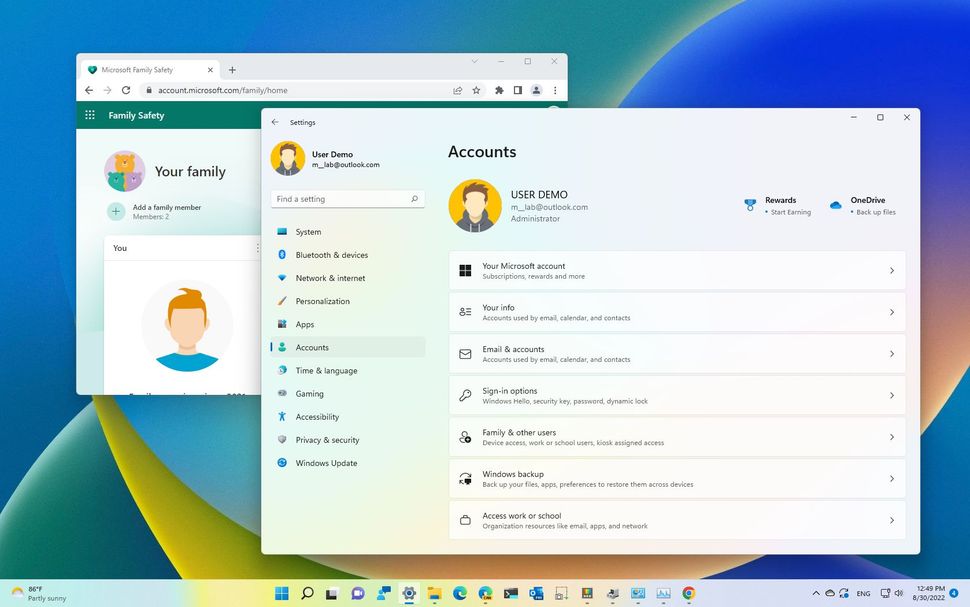
    • Navigate to Accounts > Family & other users.
    • Select the account you wish to remove and click Remove.
    • Confirm your decision in the pop-up window.
  • Using Control Panel:

    • Open Control Panel by searching for it in the Start menu.
    • Go to User Accounts > User Accounts.
    • Choose the account you want to remove and click Manage another account.
    • Select the account again and click Delete the account.
    • Confirm your action in the pop-up window.

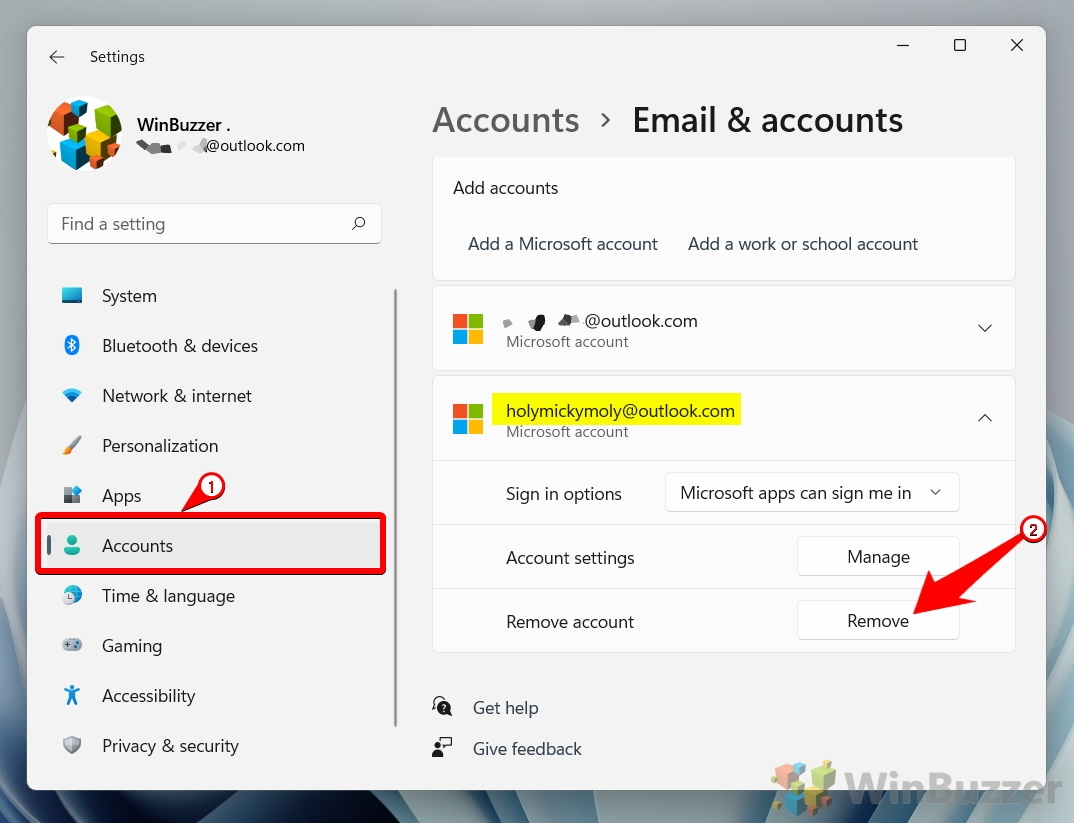
2. Removing a Microsoft Account:

  • Through Settings:
    • Open Settings.
    • Go to Accounts > Family & other users.
    • Select the Microsoft account you wish to remove and click Remove.
    • Confirm your decision in the pop-up window.

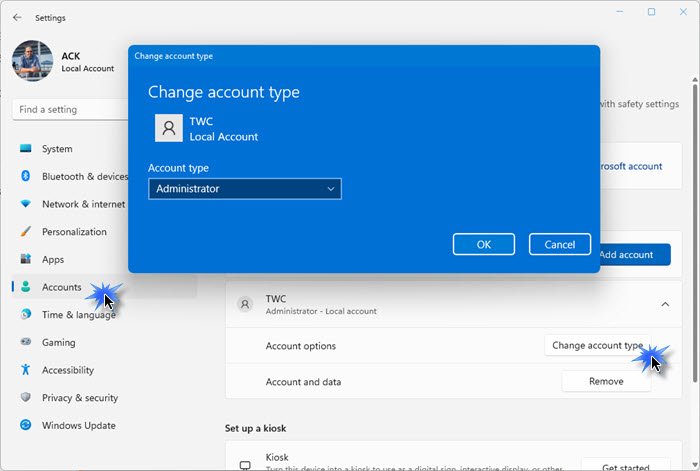
3. Removing an Administrator Account:

  • Using Command Prompt:
    • Open Command Prompt as administrator by searching for it in the Start menu and right-clicking to select "Run as administrator."
    • Type the following command and press Enter: *net user /delete*. Replace "" with the username of the account you want to remove.
    • Confirm the deletion in the pop-up window.

4. Removing an Account from a Locked PC:

  • Using a bootable USB drive:
    • Create a bootable USB drive with a Windows installation media.
    • Boot the PC from the USB drive.
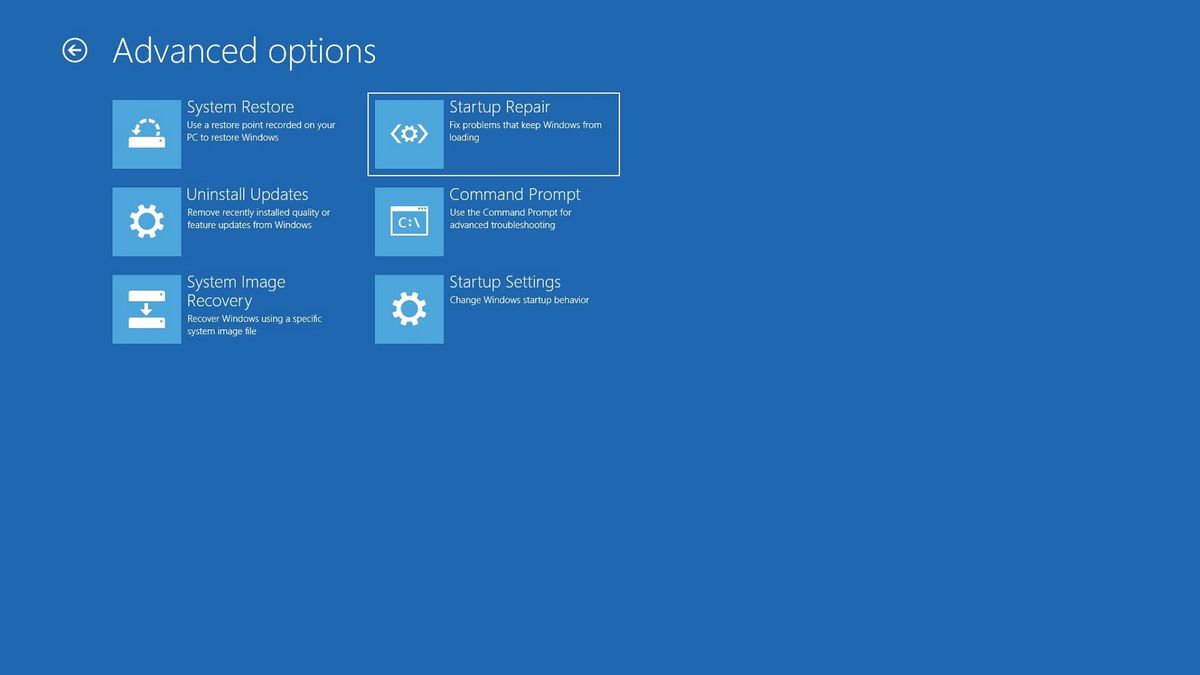
    • Select "Repair your computer" from the installation options.
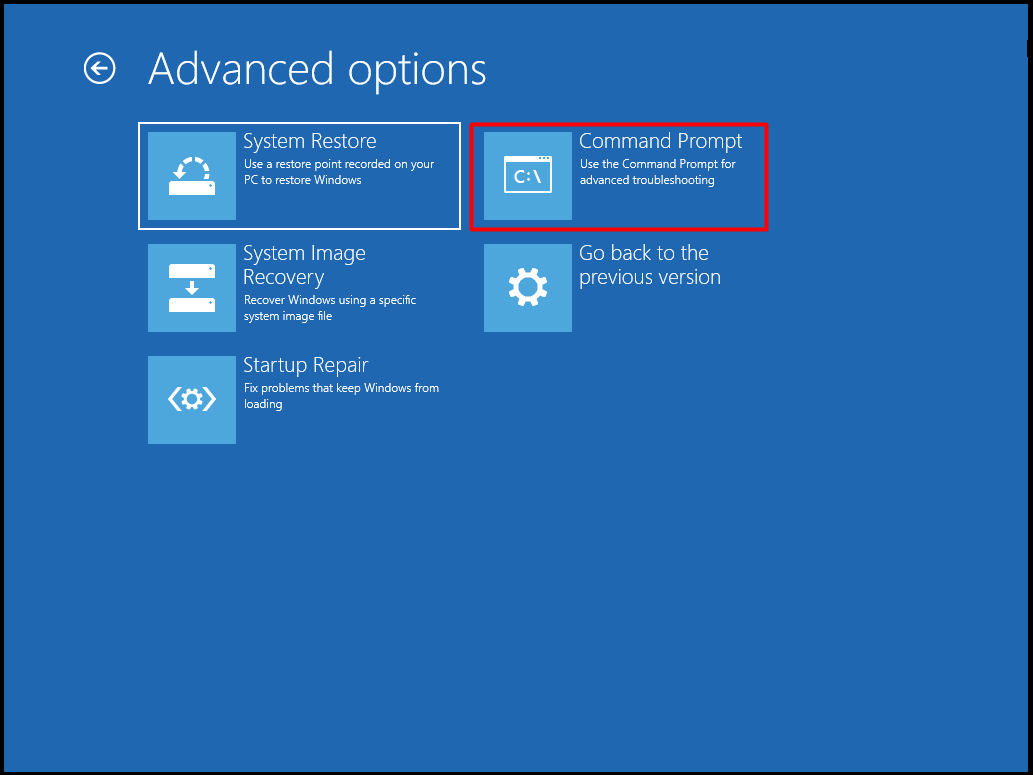
    • Choose "Troubleshoot" and then "Advanced options."
    • Select "Command Prompt" and follow the steps for removing an administrator account using the command line.

Important Considerations:

  • Account Ownership: Ensure you have the necessary permissions to remove the account. If you are not the administrator, you may need to contact the administrator for assistance.
  • Data Backup: Always back up important data before removing any account to prevent permanent loss.
  • System Stability: Removing the administrator account can affect system stability and functionality. It is generally advisable to keep at least one administrator account active.
  • Account Recovery: Once an account is removed, it cannot be recovered unless a backup is available.

FAQs

Q: Can I remove my own account from the PC?

A: Yes, you can remove your own account as long as you are the administrator. However, you will need to create a new administrator account before removing your current one to avoid locking yourself out of the system.

Q: What happens to my files after I remove an account?

A: The files associated with the removed account will be deleted permanently. If you need to keep them, you must back them up beforehand.

Q: Can I remove a guest account?

A: Yes, you can remove a guest account using the same methods described above.

Q: What if I forget the password for the account I want to remove?

A: If you forget the password, you will need to reset it before you can remove the account. You can use the built-in password reset feature in Windows 11 or use a third-party password recovery tool.

Tips

  • Check for important data: Before removing an account, carefully review the account’s files and folders to identify any critical information that needs to be backed up.
  • Create a new administrator account: If you are the only administrator and intend to remove your account, create a new administrator account beforehand to avoid losing access to the system.
  • Utilize cloud storage: Consider storing important data in cloud storage services like OneDrive or Google Drive for easy access and backup.
  • Consult a professional: If you are unsure about the process or have concerns about data loss, consult a qualified IT professional for assistance.

Conclusion

Removing a user account from a Windows 11 PC can be a straightforward process, but it requires careful planning and execution to avoid data loss and ensure system stability. By understanding the implications, choosing the appropriate method, and taking necessary precautions, users can effectively manage their accounts and maintain a streamlined computer environment.

How To Remove Microsoft Account From Windows 11 Guide  beebom How to Remove a Microsoft Account from Windows 11 How to manage user account settings on Windows 11  Windows Central
How To Remove Other User Accounts From Windows 11 - YouTube Delete User Account Windows 11 How To Remove User Account In Windows  Images and Photos finder How to remove Work or School account in Windows 11/10
How to Completely Delete a Microsoft Account and Remove It from Windows 11 - WinBuzzer How to remove Microsoft Account from Windows 11 [3 Methods] - DroidWin

Closure

Thus, we hope this article has provided valuable insights into Managing User Accounts in Windows 11: A Comprehensive Guide to Removing Accounts. We appreciate your attention to our article. See you in our next article!

Shielding Your Digital Fortress: A Comprehensive Guide To Ransomware Protection In Windows Security

Shielding Your Digital Fortress: A Comprehensive Guide to Ransomware Protection in Windows Security

Introduction

With enthusiasm, let’s navigate through the intriguing topic related to Shielding Your Digital Fortress: A Comprehensive Guide to Ransomware Protection in Windows Security. Let’s weave interesting information and offer fresh perspectives to the readers.

Shielding Your Digital Fortress: A Comprehensive Guide to Ransomware Protection in Windows Security

Shielding Your Digital Fortress: The Ultimate Guide to Cyber-Security  Jonathan M Taylor

Ransomware, a relentless cyber threat, has become a pervasive concern for individuals and organizations alike. Its insidious nature, holding valuable data hostage and demanding payment for its release, poses a significant risk to digital security and operational continuity. However, Windows security offers a robust arsenal of features designed to mitigate the threat of ransomware attacks, safeguarding your data and systems from the clutches of these digital extortionists. This comprehensive guide will delve into the multifaceted approach Windows security employs to protect against ransomware, exploring its key components, benefits, and best practices for a more secure digital environment.

Understanding the Threat: A Deep Dive into Ransomware

Ransomware, a type of malicious software, is designed to infiltrate computer systems and encrypt user data, rendering it inaccessible. The perpetrators behind these attacks then demand payment, typically in cryptocurrency, for the decryption key, threatening to permanently delete the data if the ransom is not paid.

The impact of ransomware goes beyond data loss. It can disrupt business operations, cripple critical infrastructure, and inflict significant financial damage. The consequences of a successful ransomware attack can be devastating, leading to lost productivity, reputational harm, and potential legal liabilities.

Windows Security: A Multi-Layered Defense Against Ransomware

Windows security offers a comprehensive suite of features that work in tandem to provide a robust defense against ransomware attacks. This multi-layered approach aims to prevent the initial infection, detect suspicious activity, and mitigate the impact of a successful attack.

1. Controlled Folder Access: This feature acts as a digital guardian, limiting the access of potentially malicious applications to sensitive folders, such as Documents, Pictures, Videos, and Desktop. By default, it allows only trusted applications to modify data within these folders, preventing ransomware from encrypting your most valuable files.

2. Exploit Protection: A critical component of Windows security, Exploit Protection safeguards your system against vulnerabilities that attackers might exploit to gain unauthorized access. It employs various techniques, including code integrity checks, memory protections, and data execution prevention, to thwart malicious code from executing on your system.

3. Windows Defender Antivirus: The built-in antivirus solution in Windows, Windows Defender Antivirus, plays a crucial role in preventing ransomware infections. It utilizes real-time protection to identify and block malicious files before they can reach your system. It also employs behavioral analysis, detecting suspicious activities indicative of ransomware behavior.

4. Windows Defender Firewall: Acting as a digital gatekeeper, Windows Defender Firewall blocks unauthorized access to your system from external networks. It can be configured to allow only specific applications to communicate with the internet, limiting the potential entry points for ransomware.

5. Microsoft Defender for Endpoint: This advanced security solution extends the protection provided by Windows Defender Antivirus, offering comprehensive endpoint protection against various threats, including ransomware. It utilizes machine learning and advanced threat detection capabilities to identify and mitigate sophisticated ransomware attacks.

6. Windows Security Center: This central hub provides a consolidated view of your system’s security status, allowing you to easily manage and monitor various security features, including Windows Defender Antivirus, Firewall, and Controlled Folder Access.

Beyond the Built-in Arsenal: Enhancing Ransomware Protection

While Windows security offers a robust foundation for ransomware protection, additional measures can further strengthen your digital defenses. These include:

1. Regular Software Updates: Regularly updating your operating system and applications is crucial. Updates often include security patches that address vulnerabilities that attackers might exploit.

2. Strong Passwords and Multi-Factor Authentication: Employing strong, unique passwords for all your accounts and enabling multi-factor authentication (MFA) adds an extra layer of security, making it significantly harder for attackers to gain access to your system.

3. Backups: Your Digital Lifeline: Regularly backing up your data is essential for recovery in case of a ransomware attack. Consider using multiple backup methods, such as cloud storage and external hard drives, for added redundancy.

4. Security Awareness Training: Educating users about the dangers of ransomware and best practices for preventing infections is crucial. Training should cover topics such as recognizing phishing attempts, avoiding suspicious links and attachments, and understanding the importance of security software.

5. Network Segmentation: Dividing your network into separate segments can limit the spread of ransomware if one system becomes infected. This approach can prevent the malware from spreading to other devices on your network.

6. Threat Intelligence: Staying informed about the latest ransomware threats and attack techniques is crucial for proactive protection. Leverage threat intelligence feeds from reputable security vendors to identify emerging threats and adjust your defenses accordingly.

7. Data Loss Prevention (DLP) Solutions: These solutions can monitor and control the flow of sensitive data, preventing it from leaving your organization’s network without authorization. This can help limit the impact of a ransomware attack by preventing attackers from exfiltrating valuable data.

8. Cybersecurity Insurance: While not a substitute for robust security measures, cybersecurity insurance can provide financial protection in the event of a ransomware attack. It can help cover costs related to data recovery, ransom payments (in some cases), and business interruption.

FAQs: Addressing Common Concerns Regarding Ransomware Protection

Q: What should I do if my computer is infected with ransomware?

A: If you suspect your computer is infected with ransomware, immediately disconnect it from the internet to prevent the malware from spreading to other devices. Do not attempt to pay the ransom, as there is no guarantee that the attackers will provide the decryption key. Contact a cybersecurity professional or a reputable IT support service for assistance in recovering your data and restoring your system.

Q: How can I tell if a file is infected with ransomware?

A: Ransomware often displays warning messages demanding payment. Additionally, you might notice unusual file extensions, such as ".locked" or ".encrypted," appended to your files. The files themselves might become inaccessible, and you may encounter error messages when trying to open them.

Q: Is it safe to pay the ransom?

A: Paying the ransom is generally not recommended. There is no guarantee that the attackers will provide the decryption key, and paying the ransom could encourage further attacks. Moreover, it can inadvertently fund criminal activity.

Q: How can I protect my business from ransomware?

A: Implementing a comprehensive cybersecurity strategy is essential for protecting your business from ransomware. This should include measures like regular software updates, strong passwords, multi-factor authentication, data backups, employee training, and threat intelligence monitoring.

Q: What are the latest ransomware trends?

A: Ransomware attacks are becoming increasingly sophisticated, utilizing techniques such as double extortion (encrypting data and stealing it), targeted attacks on specific organizations, and ransomware-as-a-service (RaaS) models. Staying informed about these trends is crucial for adapting your security measures accordingly.

Tips: Proactive Steps for Enhanced Ransomware Protection

1. Implement a "Zero Trust" Security Model: This approach assumes that no user or device can be trusted by default, requiring strict verification and authorization before granting access to sensitive resources.

2. Regularly Review Security Policies and Procedures: Conduct periodic reviews of your security policies and procedures to ensure they are up-to-date and effective in addressing evolving threats.

3. Implement a Security Information and Event Management (SIEM) System: This system can centralize and analyze security logs from various sources, providing valuable insights into potential threats and enabling timely responses.

4. Conduct Regular Security Audits: Independent security audits can identify vulnerabilities in your system and processes, helping you to address them proactively.

5. Foster a Culture of Cybersecurity Awareness: Encourage employees to report suspicious activities and participate in security training to promote a culture of proactive security awareness.

Conclusion: A Secure Future in the Face of Ransomware

Ransomware poses a significant threat to individuals and organizations, but with the right security measures, you can significantly reduce your risk. Windows security provides a robust foundation for protecting your data and systems, but it’s crucial to complement these features with additional security best practices. By implementing a multi-layered approach that includes regular software updates, strong passwords, data backups, employee training, and proactive threat intelligence monitoring, you can build a more secure digital environment, mitigating the threat of ransomware and safeguarding your valuable data from the clutches of digital extortionists. Remember, a proactive and comprehensive cybersecurity strategy is the key to staying ahead of the ever-evolving ransomware landscape.

Shielding Your Digital Fort: A Comprehensive Guide to Protecting Yourself from Cyber Scams and Shielding Your Digital Fortress: A Practical Guide to Cybersecurity for Business Leaders Gigahertz  Resources  Blog  Fortifying Your Digital Fortress: Ransomware Protection and
5 Best Anti-Ransomware Protection Software: Your Shield Against Ransomware Fortifying your digital fortress: Proactive steps to safeguard against Ransomware - TeCHS How to Protect Yourself from Ransomware
How to Protect and Harden a Computer against Ransomware How to Protect Yourself from Ransomware

Closure

Thus, we hope this article has provided valuable insights into Shielding Your Digital Fortress: A Comprehensive Guide to Ransomware Protection in Windows Security. We hope you find this article informative and beneficial. See you in our next article!

Windows 11: A Comprehensive Look At Its Release Timeline And Significance

Windows 11: A Comprehensive Look at Its Release Timeline and Significance

Introduction

With great pleasure, we will explore the intriguing topic related to Windows 11: A Comprehensive Look at Its Release Timeline and Significance. Let’s weave interesting information and offer fresh perspectives to the readers.

Windows 11: A Comprehensive Look at Its Release Timeline and Significance

As Windows 11 Rolls Out Take A Look At The Past Windo - vrogue.co

Windows 11, the latest iteration of Microsoft’s iconic operating system, was unveiled in June 2021, marking a significant shift in the company’s approach to user experience and design. While the initial announcement generated considerable excitement, the actual rollout of Windows 11 was a phased process, with various release windows catering to different user segments and hardware configurations. Understanding this release timeline is crucial for anyone seeking to grasp the evolution of Windows 11 and its implications for the broader computing landscape.

Phase 1: The Initial Release (October 5, 2021)

The initial release of Windows 11 on October 5, 2021, targeted a select group of users with eligible hardware. This phase focused on ensuring the stability and functionality of the operating system in a controlled environment before wider distribution. Microsoft emphasized that this initial release was for "early adopters" and those willing to participate in the testing and feedback process.

Phase 2: Expansion to Eligible Devices (October 2021 – Ongoing)

Following the initial release, Windows 11 began rolling out to a wider audience. This phase targeted devices meeting the minimum system requirements outlined by Microsoft, including specific processor generations, RAM capacity, and storage space. The rollout was gradual, with Microsoft prioritizing users based on factors such as device type, geographic location, and user activity. This approach allowed Microsoft to monitor system performance, address potential issues, and ensure a smoother transition for the majority of users.

Phase 3: Continued Updates and Feature Enhancements (Ongoing)

Microsoft continues to release updates for Windows 11, addressing bugs, improving performance, and introducing new features. These updates are delivered through the Windows Update service, ensuring that users have access to the latest enhancements and security patches. This ongoing development cycle is a testament to Microsoft’s commitment to maintaining the stability and relevance of Windows 11 in a rapidly evolving technological landscape.

The Significance of the Phased Release

The phased release strategy employed by Microsoft for Windows 11 was driven by several factors:

  • Quality Control and Stability: By releasing Windows 11 to a select group of users initially, Microsoft could gather valuable feedback and identify potential issues before a wider rollout. This approach ensured a smoother transition for the majority of users, minimizing the risk of widespread compatibility problems.
  • Resource Management: A phased rollout allowed Microsoft to manage the demand for Windows 11 effectively, ensuring that server infrastructure could handle the influx of users. This approach also helped prevent overloading the support system and mitigated potential issues related to user experience.
  • Targeted Deployment: The gradual rollout enabled Microsoft to prioritize users based on factors such as device type and user activity. This approach allowed for a more efficient allocation of resources and ensured that users with the most compatible hardware received the update first.

Benefits of Windows 11

Windows 11 offers a range of benefits for users, including:

  • Improved User Interface: Windows 11 features a redesigned user interface with a modern and intuitive design. The new Start menu, taskbar, and file explorer provide a more streamlined and user-friendly experience.
  • Enhanced Security Features: Windows 11 includes advanced security features, such as Windows Hello for biometric authentication and Microsoft Defender for comprehensive protection against malware.
  • Improved Performance: Windows 11 is optimized for modern hardware, delivering faster boot times, improved application performance, and enhanced responsiveness.
  • Integration with Microsoft Services: Windows 11 seamlessly integrates with Microsoft services like OneDrive, Microsoft Teams, and Xbox Game Pass, providing a more unified and connected user experience.
  • Gaming Enhancements: Windows 11 offers features tailored for gaming, such as DirectStorage for faster loading times and Auto HDR for enhanced visuals.

FAQs Regarding Windows 11 Release

1. How do I know if my device is eligible for Windows 11?

Microsoft provides a dedicated tool called the "PC Health Check app" to determine if your device meets the minimum system requirements for Windows 11. You can download this app from the Microsoft Store and run it to check the compatibility of your device.

2. What are the minimum system requirements for Windows 11?

The minimum system requirements for Windows 11 include:

  • Processor: 1 gigahertz (GHz) or faster with 2 or more cores on a compatible 64-bit processor or System on a Chip (SoC).
  • RAM: 4 gigabytes (GB)
  • Storage: 64 GB or larger storage device
  • Graphics Card: Compatible with DirectX 12 or later with WDDM 2.x driver
  • Display: High Definition (720p) display with a minimum resolution of 9 inches diagonally.

3. How do I upgrade to Windows 11?

Once your device meets the minimum system requirements, you can upgrade to Windows 11 through the Windows Update service. You can check for updates by going to "Settings" > "Update & Security" > "Windows Update" and clicking "Check for Updates."

4. What happens to my existing data during the upgrade?

During the upgrade process, your existing data will be preserved. However, it is always recommended to back up your important files before proceeding with the upgrade.

5. Is Windows 11 free?

Yes, Windows 11 is free for users with eligible devices. The upgrade is offered as part of the Windows Update service, and no additional payment is required.

6. What happens if my device doesn’t meet the minimum requirements?

If your device doesn’t meet the minimum system requirements for Windows 11, you will not be able to upgrade through the Windows Update service. You may consider purchasing a new device that meets the requirements or upgrading to a different operating system.

Tips for a Smooth Windows 11 Upgrade

  • Back Up Your Data: Before upgrading to Windows 11, back up all your important files and data to an external drive or cloud storage service. This ensures that you have a copy of your data in case something goes wrong during the upgrade process.
  • Check for Compatibility: Ensure that all your essential software and hardware are compatible with Windows 11. You can check the manufacturer’s websites for compatibility information.
  • Free Up Disk Space: Windows 11 requires a minimum of 64 GB of storage space. Free up disk space by deleting unnecessary files, moving data to external drives, and uninstalling unused applications.
  • Review System Requirements: Make sure your device meets the minimum system requirements for Windows 11 before attempting the upgrade.
  • Update Drivers: Ensure that all your device drivers are up to date before upgrading to Windows 11. You can update drivers through the Device Manager or the manufacturer’s website.
  • Run the PC Health Check App: Use the PC Health Check app to assess your device’s compatibility with Windows 11 before attempting the upgrade.

Conclusion

Windows 11 represents a significant evolution in the Windows operating system, offering a range of benefits for users, including a modern user interface, enhanced security features, improved performance, and seamless integration with Microsoft services. The phased release strategy adopted by Microsoft ensured a smooth rollout, prioritizing quality control, resource management, and targeted deployment. By understanding the release timeline and its implications, users can make informed decisions about upgrading to Windows 11 and leveraging its benefits. As Microsoft continues to release updates and enhancements, Windows 11 is poised to shape the future of computing, offering a more user-friendly, secure, and feature-rich experience for users across the globe.

Microsoft Announces Windows 11 Release Date Today Windows 11 First Look Windows 11 update: All new features, changes & release date  WinCentral
Windows 11 sneak peek: New UI, start menu, and much more Explore the look and feel of Windows 11 - YouTube Windows 11 First Look All Tips And Tricks World - Riset
What Does Windows 11 Look Like? First Leaks! Download A Look at Windows 11  Wallpapers.com

Closure

Thus, we hope this article has provided valuable insights into Windows 11: A Comprehensive Look at Its Release Timeline and Significance. We thank you for taking the time to read this article. See you in our next article!

Navigating Windows 11: A Guide To Taskbar Customization And Application Access

Navigating Windows 11: A Guide to Taskbar Customization and Application Access

Introduction

With enthusiasm, let’s navigate through the intriguing topic related to Navigating Windows 11: A Guide to Taskbar Customization and Application Access. Let’s weave interesting information and offer fresh perspectives to the readers.

How to Customize the Taskbar in Windows 11 [Guide]  Beebom

Windows 11, with its redesigned interface and modern aesthetics, introduces a new paradigm for interacting with your computer. While the familiar taskbar remains a central element, navigating its functionalities and customizing its appearance can be a crucial step in enhancing your productivity and streamlining your workflow. This article delves into the intricate world of the Windows 11 taskbar, focusing on the process of adding application icons for quick and efficient access.

Understanding the Taskbar: A Gateway to Your Applications

The taskbar, situated at the bottom of the screen by default, serves as a visual hub for your active applications, system processes, and quick access tools. It provides a convenient platform for launching programs, switching between open windows, and interacting with system settings. Each application that is currently running or has been recently used is represented by an icon, offering a visual snapshot of your ongoing activities.

Adding Application Icons: A Step-by-Step Guide

The process of adding application icons to the taskbar is straightforward and can be accomplished through various methods:

1. Drag and Drop:

  • Locate the Application: Open the desired application through the Start menu or File Explorer.
  • Drag and Drop: Click and hold the application’s icon in the taskbar and drag it to the desired location.
  • Release: Release the mouse button to pin the icon to the taskbar.

2. Right-Click Menu:

  • Open the Application: Launch the application you wish to add to the taskbar.
  • Right-Click the Taskbar: Right-click on an empty area of the taskbar.
  • Select "Taskbar Settings": Choose this option from the context menu.
  • Navigate to "Taskbar Items": Locate this section within the settings panel.
  • Select "Taskbar icons": Click on this option to manage the icons displayed on the taskbar.
  • Toggle "Show system icons": This setting controls the visibility of icons like volume, network, and battery.
  • Enable "Taskbar alignment": Choose the alignment of the taskbar, either at the bottom or the top of the screen.

3. Start Menu Pinning:

  • Locate the Application: Open the Start menu and find the application you want to add.
  • Right-Click the Application: Right-click on the application’s icon.
  • Select "Pin to taskbar": This option will add the application icon directly to the taskbar.

Benefits of Taskbar Icon Customization:

  • Increased Efficiency: Quick access to frequently used applications streamlines your workflow, reducing time spent searching through menus.
  • Improved Organization: A customized taskbar allows you to prioritize and visually organize your most essential applications.
  • Enhanced Productivity: With your most used programs readily available, you can focus on tasks without distractions.
  • Personalized Interface: Tailoring your taskbar reflects your individual preferences and enhances your overall computing experience.

FAQs: Addressing Common Queries

Q: How do I remove an icon from the taskbar?

A: Right-click on the icon you want to remove and select "Unpin from taskbar".

Q: Can I rearrange the icons on the taskbar?

A: Yes, you can drag and drop icons to change their order.

Q: What happens if I close an application that is pinned to the taskbar?

A: The icon will remain on the taskbar, but it will become inactive. You can relaunch the application by clicking on its icon.

Q: Can I add folders or files to the taskbar?

A: Currently, the taskbar only supports pinning applications.

Q: How can I customize the appearance of the taskbar icons?

A: Windows 11 offers limited options for customizing icon appearance. However, you can change the overall taskbar theme through the "Personalization" settings.

Tips for Effective Taskbar Customization:

  • Prioritize Essential Applications: Pin only the applications you use most frequently to avoid clutter.
  • Use Folders for Organization: Group related applications within folders to improve visual clarity.
  • Experiment with Alignment: Try placing the taskbar at the top of the screen for a different visual experience.
  • Utilize Search Functionality: The taskbar’s search bar can be used to quickly find applications, files, and system settings.

Conclusion:

The Windows 11 taskbar, with its customizable nature, offers a powerful tool for enhancing your computing experience. By understanding the process of adding application icons, you can streamline your workflow, improve organization, and unlock greater efficiency in your daily tasks. Through strategic customization and thoughtful organization, you can transform your taskbar into a personalized gateway to your digital world.

Windows 11 Taskbar Customization Guide โ€” Tech How How to customize the taskbar on Windows 11  iThinkDifferent How to customize Windows 11 Taskbar area - YouTube
How to Customize the Windows 11 Start Menu and Taskbar  Petri (2022) How To Customize Windows 11 Taskbar Step By Step Guide HTMD Blog How to customize the Windows 11 Start menu and taskbar  Laptop Mag
Windows 11 Taskbar Customization (Tutorial) - YouTube How To Customize Windows 11 Taskbar - YouTube

Closure

Thus, we hope this article has provided valuable insights into Navigating Windows 11: A Guide to Taskbar Customization and Application Access. We appreciate your attention to our article. See you in our next article!

Windows 10: A Constant Evolution Of Features And Improvements

Windows 10: A Constant Evolution of Features and Improvements

Introduction

With enthusiasm, let’s navigate through the intriguing topic related to Windows 10: A Constant Evolution of Features and Improvements. Let’s weave interesting information and offer fresh perspectives to the readers.

Windows 10: A Constant Evolution of Features and Improvements

The Evolution of Microsoft Windows Through The Years

Windows 10, since its initial release in 2015, has undergone a continuous cycle of updates and refinements, introducing new features and enhancing existing functionalities. These advancements aim to improve user experience, enhance productivity, and bolster security, making the operating system more adaptable and responsive to evolving user needs.

A Glimpse into the Evolution: Key Feature Updates

The journey of Windows 10 has seen significant feature updates, often delivered through major feature releases, known as "feature updates," and smaller, more frequent "quality updates." These updates have introduced a plethora of changes, ranging from visual enhancements to fundamental system improvements.

1. Enhanced User Interface and Personalization:

  • Start Menu Revamp: The Start Menu, a cornerstone of Windows, has undergone significant transformations. The introduction of Live Tiles, which dynamically display updates and information, provided a more interactive and informative experience. Subsequent updates refined the Start Menu’s layout and organization, making it more intuitive and efficient.
  • Action Center: Introduced in Windows 10, the Action Center serves as a centralized hub for notifications, quick actions, and system settings. It consolidates various system alerts and allows users to manage them effectively.
  • Dark Mode: The addition of a system-wide dark mode in Windows 10 offered a visually appealing alternative to the traditional light theme. This feature not only improved aesthetic appeal but also reduced eye strain in low-light environments.
  • Theme Customization: Windows 10 provides extensive customization options for themes, allowing users to personalize the operating system to their preferences. From color palettes to accent colors, users can tailor the visual experience to match their individual style.

2. Enhanced Security and Privacy:

  • Windows Defender: Windows Defender, the built-in antivirus and anti-malware solution, has undergone significant improvements over time. It offers real-time protection against threats, including ransomware and phishing attacks.
  • Windows Hello: Windows Hello leverages biometric authentication, such as facial recognition and fingerprint scanning, to secure user accounts. This secure login method enhances user security by eliminating the need for passwords.
  • Privacy Controls: Windows 10 provides granular control over privacy settings, allowing users to manage data collection and sharing. Users can selectively control access to their location, camera, microphone, and other sensitive information.
  • Windows Security: This centralized security dashboard consolidates various security settings and tools, providing users with a comprehensive view of their system’s security status.

3. Productivity and Collaboration:

  • Microsoft Edge: The new Microsoft Edge browser, built on the Chromium engine, offers improved performance, compatibility, and security. It also features a robust set of extensions and integration with other Microsoft services.
  • Cortana: The voice assistant, Cortana, has evolved from a simple voice command tool to a more comprehensive personal assistant. It can help users manage tasks, schedule appointments, and access information through voice commands.
  • Windows Ink: Windows Ink introduced a suite of tools for pen-based input, allowing users to interact with the operating system more naturally. It supports handwritten notes, drawing, and annotation features.
  • Microsoft Teams: This collaboration platform allows users to communicate, collaborate, and share files, enhancing teamwork and productivity.

4. Performance and System Optimization:

  • Game Mode: Game Mode prioritizes system resources for games, enhancing performance and reducing lag. This feature is particularly beneficial for gamers who demand optimal gaming experiences.
  • Storage Sense: This feature automatically manages storage space by identifying and deleting unnecessary files, ensuring optimal system performance.
  • Windows Update Optimization: Windows Update has been optimized to deliver updates more efficiently, reducing download times and minimizing disruption to users.
  • Power Optimization: Windows 10 incorporates features that optimize power consumption, extending battery life and reducing energy usage.

5. Accessibility Features:

  • Narrator: The Narrator screen reader provides aural feedback for visually impaired users, enabling them to interact with the operating system effectively.
  • Magnifier: The Magnifier tool enlarges portions of the screen, making it easier for users with visual impairments to see content.
  • High Contrast: The High Contrast mode enhances visual clarity for users with low vision, making text and icons more visible.

Addressing Common Concerns: FAQs

Q: How often are updates released for Windows 10?

A: Windows 10 receives both major feature updates and smaller quality updates regularly. Feature updates are typically released twice a year, while quality updates are released on a monthly basis.

Q: Are Windows 10 updates mandatory?

A: While updates are generally recommended for security and performance reasons, users can defer updates for a certain period. However, it is crucial to keep the system updated for optimal security and functionality.

Q: What are the system requirements for Windows 10?

A: Windows 10 requires a minimum of 1 GB of RAM for 32-bit systems and 2 GB for 64-bit systems. It also necessitates a minimum of 16 GB of storage space for 32-bit systems and 20 GB for 64-bit systems.

Q: Are there any costs associated with upgrading to Windows 10?

A: For eligible devices, upgrading to Windows 10 is generally free. However, purchasing a new device or upgrading to a newer version of Windows 10 may incur costs.

Q: How can I ensure my data is protected during updates?

A: Windows 10 includes built-in data protection mechanisms. It is recommended to back up important data before installing updates to ensure its safety.

Tips for Optimizing Windows 10 Experience

  • Regularly Update: Keep your system updated with the latest patches and features to ensure optimal security and performance.
  • Manage Storage: Use Storage Sense to automatically clean up unnecessary files and free up disk space.
  • Optimize Power Settings: Adjust power settings to extend battery life and reduce energy consumption.
  • Utilize Windows Search: Use the Windows Search bar to quickly find files, applications, and settings.
  • Explore Accessibility Features: If you require assistance with vision, hearing, or mobility, explore the accessibility features available in Windows 10.

Conclusion

Windows 10 has evolved into a powerful and versatile operating system, constantly adapting to changing user needs. Its continuous updates and improvements enhance user experience, bolster security, and optimize performance. By embracing the features and updates offered by Windows 10, users can unlock its full potential and enjoy a more efficient, secure, and personalized computing experience.

Evolution of Microsoft Windows from 1986 to 2021 Shows Just How Far We've Come - TechEBlog Windows 10 22H2 new features and changes - Pureinfotech The Evolution of Windows #infographic - Visualistan
Evolution of Windows OS. Windows Operating System was launchedโ€ฆ  by Jeewantha Lahiru  Medium Visualistan โ€” The Evolution of Windows #infographic The Windows 10 Evolution Youtube - vrogue.co
Microsoft shows off the Windows 10 Start Menu evolution New Windows 10 preview build features UI, Edge improvements - SlashGear

Closure

Thus, we hope this article has provided valuable insights into Windows 10: A Constant Evolution of Features and Improvements. We hope you find this article informative and beneficial. See you in our next article!

Navigating Windows 10 Boot Issues: A Comprehensive Guide

Navigating Windows 10 Boot Issues: A Comprehensive Guide

Introduction

In this auspicious occasion, we are delighted to delve into the intriguing topic related to Navigating Windows 10 Boot Issues: A Comprehensive Guide. Let’s weave interesting information and offer fresh perspectives to the readers.

Navigating the Boot Configuration Maze: A Comprehensive Guide to Fixing Boot Configuration File

The inability to boot into Windows 10 can be a frustrating experience, leaving users stranded and unable to access their files and applications. This guide aims to provide a comprehensive understanding of the potential causes behind this issue and offer solutions to help users regain access to their operating system.

Understanding the Boot Process

To troubleshoot Windows 10 boot problems, it is essential to understand the sequence of events that occur when a computer starts. The process begins with the Power On Self Test (POST), which checks the hardware components for functionality. If the POST is successful, the system searches for a bootable device, typically a hard drive or a USB drive. Once the bootable device is identified, the operating system’s boot loader is loaded, which in turn loads the operating system’s kernel and other necessary files. Finally, the user interface appears, allowing users to interact with the system.

Common Causes of Windows 10 Boot Issues

Numerous factors can disrupt the boot process, leading to a failure to load Windows 10. These factors can be categorized as follows:

1. Hardware Issues:

  • Faulty Hard Drive: A damaged or failing hard drive can prevent the operating system from loading. This can be caused by physical damage, wear and tear, or logical errors.
  • Defective RAM: RAM plays a crucial role in loading the operating system. Defective RAM can cause errors during the boot process, leading to a failure to load Windows 10.
  • Loose or Damaged Connections: Loose or damaged connections between the motherboard and other components, such as the hard drive, RAM, or graphics card, can also lead to boot issues.
  • Overheating: Overheating components, particularly the CPU and GPU, can cause instability and lead to boot failures.
  • Power Supply Problems: A faulty power supply can cause insufficient power to the system, leading to boot issues.

2. Software Issues:

  • Corrupted Boot Files: The boot files are essential for loading the operating system. Corruption in these files can prevent Windows 10 from booting successfully.
  • Driver Conflicts: Incompatible or outdated device drivers can cause conflicts during the boot process, leading to a failure to load Windows 10.
  • Malware Infection: Malware can damage system files, including boot files, and interfere with the boot process.
  • Recent Software Changes: Installing new software, updating drivers, or making significant system changes can sometimes cause conflicts that disrupt the boot process.
  • Windows Updates: While Windows updates are generally beneficial, they can sometimes introduce bugs or conflicts that lead to boot issues.

3. Other Factors:

  • Incorrect Boot Order: The boot order in the BIOS/UEFI settings determines which device the system tries to boot from first. An incorrect boot order can prevent Windows 10 from loading.
  • BIOS/UEFI Settings: Incorrect or outdated BIOS/UEFI settings can sometimes interfere with the boot process.
  • External Devices: Connected external devices, such as USB drives or external hard drives, can sometimes interfere with the boot process.

Troubleshooting Windows 10 Boot Issues

Once the potential causes have been identified, it’s time to troubleshoot the issue. Here are some steps to take:

1. Basic Troubleshooting:

  • Restart the Computer: A simple restart can sometimes resolve temporary issues that prevent Windows 10 from booting.
  • Check for Loose Connections: Ensure all connections between the motherboard and other components are secure.
  • Disconnect External Devices: Disconnect all external devices, except for the keyboard and mouse, to see if they are interfering with the boot process.
  • Check for Overheating: Ensure that the computer is not overheating. Consider cleaning the fans and vents to improve airflow.

2. Advanced Troubleshooting:

  • Boot into Safe Mode: Safe Mode starts Windows 10 with a limited set of drivers and services. This can help identify if a specific driver or service is causing the boot issue.
  • Use System Restore: System Restore can revert the system to a previous point in time, potentially resolving issues caused by recent software changes.
  • Run a Startup Repair: Startup Repair can automatically fix common boot problems.
  • Use a Boot Repair Tool: Third-party boot repair tools, such as EasyBCD, can help repair boot files and resolve boot errors.
  • Perform a Clean Install of Windows 10: If all other solutions fail, a clean install of Windows 10 may be necessary. This will erase all data on the hard drive, so it’s essential to back up important files before proceeding.

3. Hardware Diagnostics:

  • Run Hardware Diagnostics: Most manufacturers provide diagnostic tools that can test the hardware components, such as the hard drive, RAM, and motherboard.
  • Replace Faulty Components: If hardware diagnostics identify a faulty component, it should be replaced.

FAQs: Addressing Common Queries

Q: What if I see a black screen with a blinking cursor during boot?

This could indicate a problem with the hard drive, RAM, or boot files. Try running a hard drive check or replacing the RAM.

Q: What if I see a blue screen with an error message during boot?

This indicates a system error. The error message can provide clues about the cause of the problem. Check the error message for details, and consult online resources for troubleshooting tips.

Q: What if I can’t access the BIOS/UEFI settings?

If you can’t access the BIOS/UEFI settings, try restarting the computer and pressing the appropriate key (usually F2, F10, or Delete) during the boot process.

Q: Can I recover my data if I need to perform a clean install?

Yes, you can back up your data to an external drive or cloud storage before performing a clean install.

Tips for Preventing Windows 10 Boot Issues:

  • Keep Windows 10 Updated: Regularly install Windows updates to ensure that the operating system is secure and stable.
  • Back Up Your Data: Regularly back up important data to prevent data loss in case of a boot failure.
  • Monitor System Health: Monitor system health using built-in tools or third-party software to identify potential problems early.
  • Run Antivirus Software: Regularly scan your system for malware to prevent infections that can disrupt the boot process.
  • Avoid Installing Unnecessary Software: Only install software from trusted sources and avoid installing unnecessary software that could cause conflicts.

Conclusion:

Windows 10 boot issues can be frustrating, but with a systematic approach to troubleshooting, most problems can be resolved. By understanding the boot process, identifying potential causes, and applying appropriate solutions, users can regain access to their operating system and restore functionality. Remember to always back up important data before performing any major troubleshooting steps. While this guide offers a comprehensive overview, it’s essential to consult official documentation and seek professional assistance if necessary.

[Complete Guide] How to Fix Inaccessible Boot Device Error Windows 10 Windows 10 Boot Repair - Ultimate Usage Guide 8 Ways to Fix Boot Device Problem in Windows 10 โ€“ TechCult
How To Fix Windows 10 Startup and Boot Problems - YouTube Windows 10 Boot Manager and Boot Issue Fix How to use Startup Repair to fix boot problems with Windows 10  Windows Central
Windows 10 Won't Boot? 12 Fixes to Get Your PC Running Again Windows 10 Boot Manager and Boot Issue Fix

Closure

Thus, we hope this article has provided valuable insights into Navigating Windows 10 Boot Issues: A Comprehensive Guide. We hope you find this article informative and beneficial. See you in our next article!

Understanding Windows 10 Pro OEM Licenses: A Comprehensive Guide

Understanding Windows 10 Pro OEM Licenses: A Comprehensive Guide

Introduction

With great pleasure, we will explore the intriguing topic related to Understanding Windows 10 Pro OEM Licenses: A Comprehensive Guide. Let’s weave interesting information and offer fresh perspectives to the readers.

Understanding Windows 10 Pro OEM Licenses: A Comprehensive Guide

Windows 10 Pro OEM Key  The Tech Act

The world of software licensing can be a complex labyrinth, especially for users seeking the most cost-effective and legitimate way to utilize operating systems like Windows 10. This guide aims to provide a comprehensive understanding of Windows 10 Pro OEM licenses, specifically focusing on their global availability and the benefits they offer.

Defining the Terms: OEM and Global

OEM stands for Original Equipment Manufacturer. In the context of software licensing, an OEM license refers to a specific type of software license that is tied to a particular piece of hardware. This means that the license is typically sold by the hardware manufacturer (like a computer manufacturer) and is pre-installed on the device. The license is not transferable to another device, and the user cannot purchase the software separately from the hardware.

Global refers to the geographical scope of the license. A global Windows 10 Pro OEM license means that the license is valid for activation and use in any region worldwide. This differs from regional licenses, which may be restricted to specific countries or continents.

Benefits of Windows 10 Pro OEM Licenses

  1. Cost-Effectiveness: OEM licenses are often significantly cheaper than retail versions of Windows 10 Pro. This makes them an attractive option for individuals and businesses looking to save on software costs, particularly when purchasing new hardware.

  2. Convenience: The license is pre-installed on the device, eliminating the need for separate installation and activation processes. This provides a seamless user experience, particularly for those unfamiliar with software installation procedures.

  3. Global Accessibility: Global licenses offer flexibility and convenience for users who travel or work internationally. They ensure compatibility and functionality regardless of the user’s location.

  4. Security and Updates: OEM licenses grant access to the full range of features and security updates offered by Windows 10 Pro. This ensures that users are protected from the latest threats and have access to the latest functionalities.

Considerations for Using Windows 10 Pro OEM Licenses

  1. Hardware Dependence: The license is tied to the specific hardware on which it was initially installed. Transferring the license to another device is typically not allowed.

  2. No Upgrade Rights: OEM licenses do not typically include upgrade rights. This means that users cannot upgrade to a newer version of Windows without purchasing a separate license.

  3. Limited Support: OEM licenses may offer limited technical support compared to retail versions. Support is usually provided by the hardware manufacturer.

Frequently Asked Questions (FAQs) About Windows 10 Pro OEM Licenses

Q: Can I use a Windows 10 Pro OEM license on a different computer?

A: No. OEM licenses are tied to the specific hardware on which they were initially installed. They cannot be transferred to another device.

Q: What if I upgrade my hardware components?

A: Upgrading certain components like RAM or storage might not affect the license. However, replacing the motherboard or CPU typically requires a new license.

Q: What happens if I lose my Windows 10 Pro OEM license key?

A: It is generally recommended to keep a copy of your license key safe. If you lose it, you may need to contact the hardware manufacturer or Microsoft for assistance.

Q: Can I buy a Windows 10 Pro OEM license separately?

A: Generally, OEM licenses are not sold separately. They are typically bundled with the hardware.

Q: What are the main differences between Windows 10 Pro OEM and Windows 10 Pro retail licenses?

A: The key difference lies in the transferability and upgrade rights. OEM licenses are tied to specific hardware and do not offer upgrade rights, while retail licenses are transferable and often include upgrade options.

Tips for Using Windows 10 Pro OEM Licenses

  1. Keep your license key safe: Store your license key securely in a safe place.

  2. Contact the hardware manufacturer for support: If you have any issues with your license or need technical assistance, contact the hardware manufacturer.

  3. Ensure compatibility: Before purchasing a device with a pre-installed Windows 10 Pro OEM license, ensure that the hardware meets the minimum system requirements for Windows 10.

Conclusion

Windows 10 Pro OEM licenses can be a cost-effective and convenient option for individuals and businesses seeking a legitimate and functional operating system. Understanding the intricacies of these licenses, including their global availability and the considerations associated with their use, is crucial for making informed decisions. By carefully assessing individual needs and considering the benefits and limitations, users can determine if a Windows 10 Pro OEM license is the right choice for their specific requirements.

Microsoft Windows 10 Pro OEM System builder License Key Microsoft Windows 10 Pro OEM Key  Get your Cheap License CD Key โ€“ RoyalCDKeys Windows 10 Pro OEM Key  Buy on Kinguin
Windows 10 Pro Oem Microsoft windows 10 pro oem license  How to buy a windows 10 Pro OEM license?. 2019-05-07 Windows 10 Pro Oem Digital License - Licenศ›ฤƒ Blog
Windows 10 pro digital license - ftras Windows 10 Pro OEM licenses for businesses

Closure

Thus, we hope this article has provided valuable insights into Understanding Windows 10 Pro OEM Licenses: A Comprehensive Guide. We thank you for taking the time to read this article. See you in our next article!

Navigating The World Of Windows 10 Pro: A Comprehensive Guide

Navigating the World of Windows 10 Pro: A Comprehensive Guide

Introduction

In this auspicious occasion, we are delighted to delve into the intriguing topic related to Navigating the World of Windows 10 Pro: A Comprehensive Guide. Let’s weave interesting information and offer fresh perspectives to the readers.

All You Need to Know About Windows 10 Professional: A Comprehensive Guide - Aartisto Web Media

Windows 10 Pro, a robust and feature-rich operating system, has become a mainstay for individuals and businesses seeking a reliable and versatile computing experience. Understanding the intricacies of acquiring and utilizing this operating system is crucial for maximizing its potential. This guide aims to provide a comprehensive overview of Windows 10 Pro, covering its key features, download process, and essential considerations.

Understanding Windows 10 Pro: A Powerful Platform

Windows 10 Pro stands out from its consumer counterpart, Windows 10 Home, by offering advanced functionalities tailored for professional and business users. These features include:

  • Enhanced Security: Windows 10 Pro incorporates robust security measures like BitLocker drive encryption, Windows Defender Advanced Threat Protection, and Domain Join capabilities, safeguarding sensitive data and ensuring secure network access.
  • Remote Desktop Access: The Remote Desktop feature allows users to remotely access and manage their computers, enabling seamless collaboration and productivity from any location.
  • Group Policy Management: This feature grants administrators greater control over system settings and user configurations, streamlining network administration and ensuring consistent security policies.
  • Windows Update for Business: This feature provides businesses with greater control over software updates, allowing them to schedule deployments and ensure seamless integration with their existing IT infrastructure.
  • Hyper-V Virtualization: Windows 10 Pro enables users to run multiple operating systems simultaneously on a single computer, facilitating software testing, development, and resource optimization.

Acquiring Windows 10 Pro: A Step-by-Step Guide

Obtaining a legitimate copy of Windows 10 Pro is crucial for enjoying its full potential and avoiding potential legal issues. The process involves the following steps:

  1. Purchase a License: Windows 10 Pro licenses are available through authorized retailers, original equipment manufacturers (OEMs), and Microsoft’s online store. Ensure the license is genuine and compatible with your system.
  2. Download the Installation Media: Once the license is secured, download the Windows 10 Pro installation media (ISO file) from Microsoft’s website. This file contains all the necessary files to install the operating system.
  3. Create Bootable Media: Use a USB drive or DVD to create bootable media from the downloaded ISO file. This will allow you to install Windows 10 Pro on your computer.
  4. Install Windows 10 Pro: Boot your computer from the created bootable media and follow the on-screen instructions to install Windows 10 Pro. The installation process typically involves formatting the hard drive, selecting your language and region, and activating the license.

Essential Considerations for a Smooth Transition

While the download and installation process may seem straightforward, several factors require attention for a smooth transition:

  • System Requirements: Before proceeding with the download and installation, ensure your computer meets the minimum system requirements for Windows 10 Pro. This includes processor, RAM, storage space, and graphics capabilities.
  • Data Backup: Prior to installing Windows 10 Pro, back up all your essential data. This includes files, documents, applications, and settings. A data backup safeguards your information in case of unforeseen issues during the installation process.
  • Driver Compatibility: Ensure your computer’s drivers are compatible with Windows 10 Pro. Outdated drivers can lead to compatibility issues and system instability.
  • Software Compatibility: Check the compatibility of your existing software applications with Windows 10 Pro. Some applications may require updates or alternative versions to function properly on the new operating system.

FAQs: Addressing Common Concerns

Q: What are the differences between Windows 10 Home and Windows 10 Pro?

A: Windows 10 Pro offers advanced features tailored for professional and business users, including enhanced security measures, remote desktop access, group policy management, and virtualization capabilities. Windows 10 Home is designed for personal use and lacks these advanced functionalities.

Q: Can I upgrade from Windows 10 Home to Windows 10 Pro?

A: Yes, you can upgrade from Windows 10 Home to Windows 10 Pro. This can be done through the Windows Store or by purchasing a product key and using the "Change product key" option in Windows settings.

Q: How do I activate Windows 10 Pro?

A: Windows 10 Pro activation is typically done automatically during the installation process using the product key. If activation fails, you can use the "Activate Windows" option in Windows settings to manually enter the product key.

Q: What are the benefits of using Windows 10 Pro?

A: Windows 10 Pro offers enhanced security, remote access capabilities, group policy management, and virtualization features, making it ideal for professional and business users who require a robust and versatile operating system.

Tips for Optimizing Your Windows 10 Pro Experience

  • Regular Updates: Keep Windows 10 Pro up-to-date with the latest security patches and feature updates to ensure optimal performance and security.
  • Performance Optimization: Use the built-in Performance Monitor to identify and address any performance bottlenecks. You can also disable unnecessary background processes and services to improve system responsiveness.
  • Customization: Personalize your Windows 10 Pro experience by customizing the Start menu, taskbar, and desktop settings to suit your preferences.
  • Utilize Built-in Features: Explore and utilize the wide range of built-in features in Windows 10 Pro, such as Cortana, OneDrive, and Microsoft Edge, to enhance your productivity and efficiency.

Conclusion: Embracing the Power of Windows 10 Pro

Windows 10 Pro offers a comprehensive and powerful operating system that caters to the needs of professional users and businesses. By understanding its features, navigating the download process, and considering essential factors, users can unlock its full potential and optimize their computing experience. Whether it’s enhancing security, enabling remote access, or streamlining network administration, Windows 10 Pro empowers users to achieve greater productivity and efficiency.

Microsoft Windows 10 Pro  Shacknews Microsoft Windows 10 Pro - Bright Technologies Windows 10 Pro Version 22H2 Build 19045.2364 incl Office 2021 en-US December 2022 (x64)  Viแบฟt
Windows 10 Pro How Is the World Adjusting To Windows 10?  Movie TV Tech Geeks News Microsoft Windows 10 Pro - Gasy Publishing
How To Navigate Windows 10 - SSCSD Educational Technology Windows 10 Pro And Windows 11 Pro Difference - IMAGESEE

Closure

Thus, we hope this article has provided valuable insights into Navigating the World of Windows 10 Pro: A Comprehensive Guide. We hope you find this article informative and beneficial. See you in our next article!

Understanding Drive Letters And Their Significance

Understanding Drive Letters and Their Significance

Introduction

With great pleasure, we will explore the intriguing topic related to Understanding Drive Letters and Their Significance. Let’s weave interesting information and offer fresh perspectives to the readers.

Understanding Drive Letters and Their Significance

What Is A Drive Letter

In the realm of computer systems, drive letters are an essential element for organizing and accessing data. These alphabetical designations, such as "C," "D," or "J," represent physical storage devices or logical partitions within a computer. Each drive letter acts as a unique identifier, allowing the operating system and applications to locate and interact with the corresponding storage space.

The Importance of Drive Letters

Drive letters play a crucial role in several aspects of computer operation:

  • File System Navigation: Drive letters provide a hierarchical structure for organizing files and folders. The operating system uses drive letters to differentiate between storage locations and navigate through the file system efficiently.
  • Application Installation and Data Storage: Applications often require specific drive letters for installation and data storage. This ensures that applications are correctly installed and their data is stored in the designated location.
  • Data Backup and Recovery: Drive letters are essential for backing up data to external storage devices or creating system images. They facilitate the process of restoring data to the original location or a different storage device.
  • Network Sharing: Drive letters are used to share files and folders across a network. By assigning a drive letter to a shared resource, users on the network can easily access and manage files.

Exploring the "J" Drive

The "J" drive, like any other drive letter, represents a specific storage location within a computer system. However, the meaning and purpose of the "J" drive can vary significantly depending on the system configuration and user preferences.

Possible Interpretations of the "J" Drive:

  • External Storage Device: The "J" drive could be assigned to an external hard drive, USB flash drive, or other removable storage device. This allows users to access data stored on these devices directly from their computer.
  • Network Share: The "J" drive might represent a shared folder on another computer within the network. This enables users to access and manage files stored on the shared resource.
  • Virtual Drive: In some cases, the "J" drive could be a virtual drive created by software such as a virtual machine or a disk imaging tool. This allows users to create and access virtual storage spaces on their computer.
  • Dedicated Storage Location: The "J" drive might be assigned to a specific partition on the hard drive for a particular purpose, such as storing large media files or backing up system data.

Determining the Purpose of the "J" Drive

To understand the purpose of the "J" drive on a specific computer, it is necessary to examine the system configuration and identify the associated storage device or resource.

Steps to Identify the "J" Drive:

  1. Check the "My Computer" or "This PC" Window: Open the "My Computer" or "This PC" window and observe the list of drives displayed. If the "J" drive is present, it will be listed alongside other drives.
  2. Examine the Device Manager: Open the Device Manager and check the "Disk Drives" section. This will display a list of connected storage devices, including the one associated with the "J" drive.
  3. Review Network Connections: If the "J" drive represents a network share, it will appear in the "Network" section of "My Computer" or "This PC."
  4. Consult System Information: Review system information tools, such as "System Properties," to identify the drive letter assignments and associated storage devices.

Benefits of Understanding Drive Letters

Understanding drive letters and their associated storage locations is essential for managing data effectively. This knowledge empowers users to:

  • Organize Data Efficiently: By assigning specific drive letters to different types of data, users can create a structured and logical organization for their files.
  • Optimize Storage Utilization: Understanding the available storage space on each drive allows users to allocate resources efficiently and avoid potential storage limitations.
  • Back Up Data Safely: Drive letters provide a clear framework for backing up data to external storage devices or creating system images, ensuring data safety and recovery options.
  • Troubleshoot System Issues: By identifying the drive letter associated with a particular storage device or resource, users can diagnose and troubleshoot system problems more effectively.

FAQs about Drive Letters

Q: Why are drive letters assigned alphabetically?

A: Historically, drive letters were assigned alphabetically to simplify the organization and identification of storage devices. However, modern operating systems allow for more flexible drive letter assignments, including the use of non-alphabetical characters.

Q: Can I change the drive letter assigned to a storage device?

A: Yes, drive letters can be changed in most operating systems. However, it is important to ensure that the changes do not interfere with existing applications or data storage configurations.

Q: What happens if I delete a drive letter?

A: Deleting a drive letter will not physically erase the data stored on the associated device. However, it will make the data inaccessible until the drive letter is re-assigned.

Q: How can I access data stored on a network drive?

A: To access data stored on a network drive, the drive must be mapped to a drive letter on the local computer. This can be done through the "Network" section of "My Computer" or "This PC."

Q: What is the difference between a physical drive and a logical drive?

A: A physical drive refers to the actual storage device, such as a hard drive or SSD. A logical drive, on the other hand, is a partition created on a physical drive, which acts as a separate storage space.

Tips for Managing Drive Letters

  • Use a Consistent Naming Convention: Create a consistent naming convention for drive letters to ensure clear identification and organization.
  • Avoid Using Drive Letters for Critical System Files: Do not assign drive letters to partitions containing critical system files, as this can lead to system instability.
  • Back Up Data Regularly: Regularly back up data stored on all drives to prevent data loss in case of hardware failure or accidental deletion.
  • Monitor Disk Space: Keep track of the available disk space on each drive to avoid running out of storage.
  • Use Disk Management Tools: Utilize disk management tools provided by the operating system to create, format, and manage partitions and drive letters.

Conclusion

Drive letters are an essential part of the computer system, providing a framework for organizing and accessing data. Understanding the purpose and significance of drive letters is crucial for managing data effectively, ensuring data safety, and troubleshooting system issues. By employing best practices and utilizing available tools, users can optimize their storage utilization and ensure a seamless and efficient computing experience.

Understanding Drive Letters - Partition Magic online help Understanding Drive Letters - Partition Magic online help Rename and/or Change Drive Letters For Installed Drives - YouTube
Disk Partitions and Drive Lettering What is a Drive Letter and How to Find Drive Letter on a Computer How to show drive letters before drive names in Windows 10
Drive Letters  PDF Drive Letter and multiple drives - Super User

Closure

Thus, we hope this article has provided valuable insights into Understanding Drive Letters and Their Significance. We hope you find this article informative and beneficial. See you in our next article!

Navigating The World Of NinjaTrader 8: A Comprehensive Guide For Windows 11 Users

Navigating the World of NinjaTrader 8: A Comprehensive Guide for Windows 11 Users

Introduction

With great pleasure, we will explore the intriguing topic related to Navigating the World of NinjaTrader 8: A Comprehensive Guide for Windows 11 Users. Let’s weave interesting information and offer fresh perspectives to the readers.

How to Use NinjaTrader 8 - Complete Beginner's Tutorial / Guide for Traders - YouTube

NinjaTrader 8, a powerful and versatile trading platform, offers a comprehensive suite of tools for both novice and experienced traders. This guide aims to provide a thorough understanding of NinjaTrader 8, focusing on its compatibility with Windows 11 64-bit systems, its key features, and how to effectively utilize its capabilities.

Understanding the Significance of NinjaTrader 8

NinjaTrader 8 stands out as a robust trading platform renowned for its customization options, advanced charting capabilities, and diverse order types. Its compatibility with Windows 11 64-bit systems ensures smooth operation and efficient performance on modern computers, making it an ideal choice for traders seeking a reliable and feature-rich environment.

Exploring the Key Features of NinjaTrader 8

  • Advanced Charting: NinjaTrader 8 provides an extensive array of charting tools, allowing traders to visualize market data with precision. Users can customize chart types, indicators, and drawing tools to create personalized views that suit their trading strategies.

  • Multiple Timeframes: The platform supports the analysis of data across various timeframes, enabling traders to gain insights into market trends and identify potential trading opportunities. This multi-timeframe analysis is crucial for understanding the broader market context and making informed decisions.

  • Automated Trading: NinjaTrader 8 empowers traders with the ability to automate their trading strategies through its powerful strategy development environment. This feature allows traders to implement pre-defined rules and execute trades automatically, potentially improving efficiency and reducing emotional biases.

  • Real-time Data: Access to real-time market data is essential for timely trading decisions. NinjaTrader 8 provides access to live quotes from various brokers and data providers, ensuring traders have up-to-the-minute information at their disposal.

  • Backtesting and Optimization: NinjaTrader 8 facilitates backtesting, allowing traders to evaluate the performance of their strategies against historical data. This process helps in validating strategies, identifying potential weaknesses, and optimizing parameters for improved future results.

Installing and Configuring NinjaTrader 8 on Windows 11

The installation process of NinjaTrader 8 on Windows 11 is straightforward. Users can download the latest version from the official NinjaTrader website, which includes detailed installation instructions. The software is compatible with both 64-bit and 32-bit versions of Windows 11.

Customizing NinjaTrader 8 for Optimal Trading

NinjaTrader 8 offers extensive customization options to cater to individual trading preferences. Users can personalize the platform’s layout, color schemes, and various settings to create a trading environment that aligns with their workflow and trading style.

Utilizing the Power of NinjaTrader 8

  • Developing Trading Strategies: NinjaTrader 8 provides a robust strategy development environment that allows traders to create custom strategies using its powerful scripting language. This feature enables users to implement complex trading logic and automate their trading processes.

  • Backtesting and Optimization: Backtesting is a crucial step in refining trading strategies. NinjaTrader 8 provides advanced backtesting capabilities, enabling traders to evaluate their strategies against historical data and identify areas for improvement.

  • Order Management: The platform offers a comprehensive order management system, allowing traders to place and manage orders efficiently. Users can choose from various order types, including market orders, limit orders, and stop orders, to execute their trades according to their specific requirements.

Frequently Asked Questions (FAQs)

Q: Is NinjaTrader 8 compatible with Windows 11?

A: Yes, NinjaTrader 8 is fully compatible with Windows 11, both 32-bit and 64-bit versions.

Q: Can I use NinjaTrader 8 on a 64-bit system?

A: Yes, NinjaTrader 8 is designed for 64-bit systems, providing optimal performance and compatibility with modern hardware.

Q: What are the system requirements for running NinjaTrader 8 on Windows 11?

A: NinjaTrader 8 requires a minimum of 4 GB of RAM, a dual-core processor, and a graphics card capable of displaying 1024×768 resolution. However, for optimal performance, it is recommended to use a system with at least 8 GB of RAM and a quad-core processor.

Q: Is NinjaTrader 8 free to use?

A: NinjaTrader 8 offers a free simulated trading environment, allowing users to explore the platform’s features and test their strategies without risking real capital. However, to access real-time data and live trading capabilities, a paid subscription is required.

Q: How do I get started with NinjaTrader 8?

A: To begin using NinjaTrader 8, download the software from the official website and follow the installation instructions. You can then explore the platform’s features and create a demo account to practice your trading skills.

Tips for Maximizing NinjaTrader 8 Performance

  • Optimize System Resources: Ensure your computer has sufficient RAM, processor power, and storage space to run NinjaTrader 8 smoothly.
  • Regular Updates: Keep your NinjaTrader 8 software updated to benefit from the latest features, bug fixes, and performance improvements.
  • Utilize the Help Resources: NinjaTrader 8 provides extensive documentation, tutorials, and support resources to assist users in navigating the platform and maximizing its potential.

Conclusion

NinjaTrader 8 provides a comprehensive and powerful trading platform for both novice and experienced traders. Its compatibility with Windows 11 64-bit systems ensures smooth operation and efficient performance on modern computers. By leveraging its advanced charting capabilities, automated trading features, and comprehensive order management system, traders can effectively analyze markets, implement strategies, and execute trades with confidence. The platform’s extensive customization options allow users to tailor the trading environment to their specific needs and preferences, ensuring a seamless and productive trading experience.

Guided Tour of New NinjaTrader 8 User Driven Features - YouTube How to set up Ninjatrader 8 on your PC and how to set up data connections and charts. - YouTube Beginners Guide on using NinjaTrader 8 charts effectively? - YouTube
Ninjatrader 8 Trading Platform - Comprehensive Review - YouTube Ninjatrader 8 Requirements: A Comprehensive Guide โ€“ DerivFx.com NinjaTrader 8 Review โ€“ Everything You Need to Know
NinjaTrader 8 Data Feeds - Every Question Answered NinjaTrader 8 Quick Start Guide - YouTube

Closure

Thus, we hope this article has provided valuable insights into Navigating the World of NinjaTrader 8: A Comprehensive Guide for Windows 11 Users. We thank you for taking the time to read this article. See you in our next article!