Archives 2023

Net Framework 3 5 For Windows 10 64 Bit

net framework 3 5 for windows 10 64 bit

Introduction

With enthusiasm, let’s navigate through the intriguing topic related to net framework 3 5 for windows 10 64 bit. Let’s weave interesting information and offer fresh perspectives to the readers.

The Enduring Legacy of .NET Framework 3.5 on Windows 10 64-bit: A Comprehensive Guide

How to Install .NET Framework 3.5 on Windows 10

The .NET Framework, a foundational technology for software development on Windows, has evolved significantly over the years. While newer versions like .NET 6 and .NET Core have emerged, .NET Framework 3.5 continues to hold relevance, particularly on Windows 10 64-bit systems. This article delves into the intricacies of .NET Framework 3.5, exploring its features, importance, and continued use in modern computing environments.

Understanding .NET Framework 3.5

.NET Framework 3.5 is a comprehensive software development framework designed by Microsoft. It provides a rich set of tools, libraries, and runtime environments for building diverse applications, ranging from desktop applications to web services. It operates as a bridge between the operating system and the applications, enabling developers to create powerful and user-friendly software experiences.

Key Features of .NET Framework 3.5

.NET Framework 3.5 boasts a wide array of features, including:

  • Common Language Runtime (CLR): The core of .NET Framework, the CLR manages the execution of code written in various languages, ensuring compatibility and efficient memory management.
  • Base Class Library (BCL): A vast collection of reusable classes and components that provide essential functionalities for tasks like data access, file handling, and network communication.
  • Windows Forms: A framework for building graphical user interfaces (GUIs) for desktop applications, offering a wide range of controls and events for interactive user experiences.
  • Windows Presentation Foundation (WPF): A modern framework for creating visually rich and interactive user interfaces, leveraging vector graphics, animation, and multimedia capabilities.
  • Windows Communication Foundation (WCF): A framework for building distributed applications that communicate over networks, enabling secure and reliable data exchange between different systems.
  • ASP.NET: A framework for developing dynamic web applications and web services, offering features for handling web requests, managing user sessions, and rendering web pages.
  • Language Support: .NET Framework 3.5 supports a wide range of programming languages, including C#, VB.NET, F#, and C++. This flexibility allows developers to choose the language best suited for their projects.

The Importance of .NET Framework 3.5 on Windows 10 64-bit

While newer versions of .NET have been released, .NET Framework 3.5 remains crucial for several reasons:

  • Legacy Application Compatibility: Many applications, especially those developed before the advent of .NET Core and .NET 6, rely on .NET Framework 3.5 for their functionality. These applications may require specific features or libraries only available in this version.
  • Enterprise Solutions: Many enterprise systems and applications continue to utilize .NET Framework 3.5 due to its stability, mature ecosystem, and extensive support for enterprise-grade features.
  • Security Updates: Microsoft continues to release security updates and patches for .NET Framework 3.5, ensuring its continued security and reliability. This is crucial for maintaining the integrity of applications and systems that rely on this framework.
  • Wide Developer Community: A large and active developer community surrounds .NET Framework 3.5, providing ample resources, support, and documentation for developers working with this framework.

Enabling .NET Framework 3.5 on Windows 10 64-bit

Enabling .NET Framework 3.5 on Windows 10 64-bit is a straightforward process:

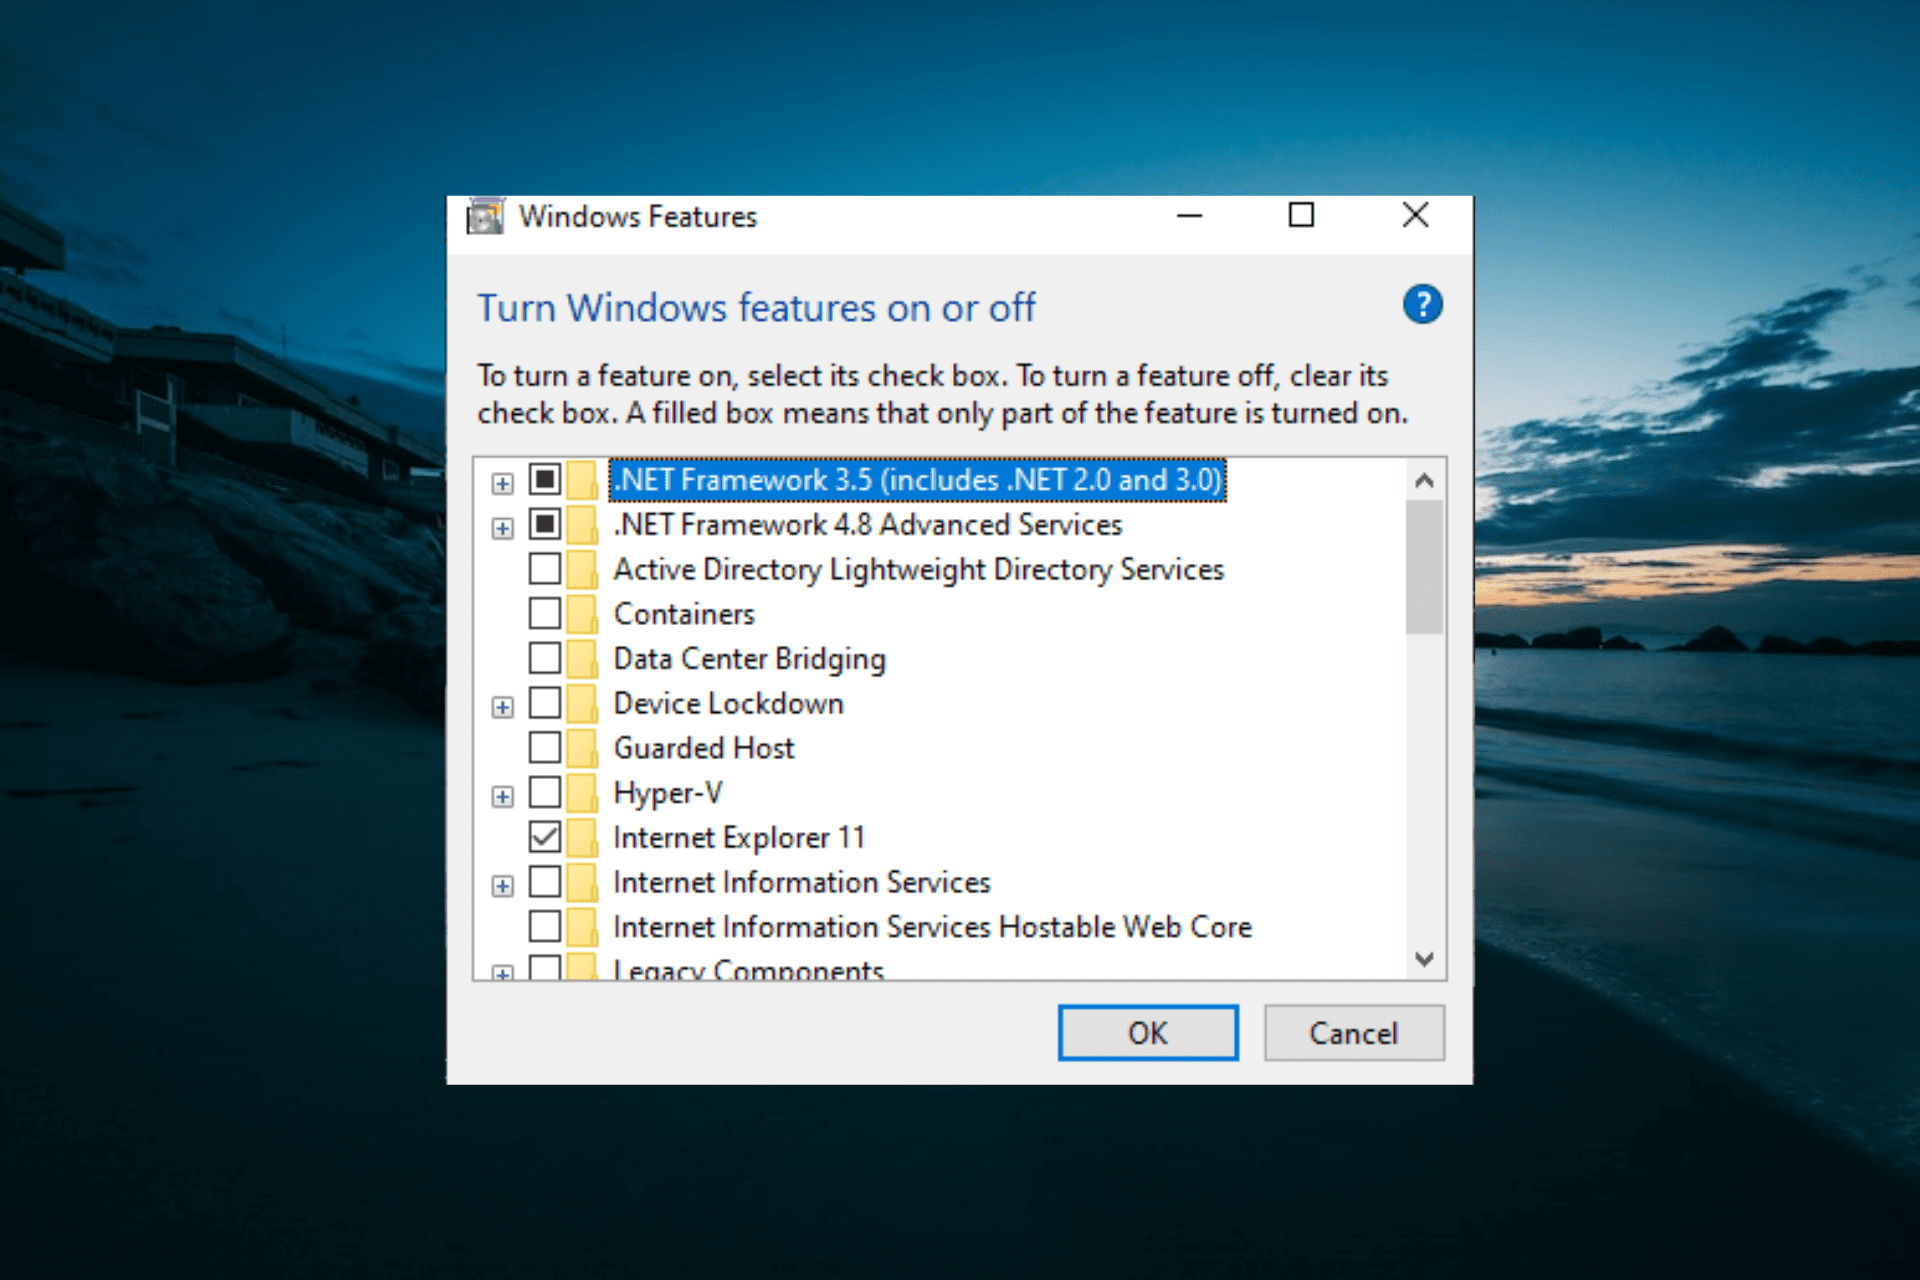
  1. Open Windows Features: Navigate to "Control Panel" > "Programs" > "Programs and Features."
  2. Select .NET Framework 3.5: Click on "Turn Windows features on or off."
  3. Enable the Feature: Check the box next to ".NET Framework 3.5 (includes .NET 2.0 and 3.0)."
  4. Install the Feature: Click "OK" and wait for the installation process to complete.

Frequently Asked Questions (FAQs)

Q: Is .NET Framework 3.5 compatible with Windows 10 64-bit?

A: Yes, .NET Framework 3.5 is fully compatible with Windows 10 64-bit. Microsoft provides official support and updates for this framework on the latest Windows operating systems.

Q: Is .NET Framework 3.5 still supported by Microsoft?

A: Yes, Microsoft continues to provide security updates and patches for .NET Framework 3.5, ensuring its ongoing security and stability.

Q: Should I upgrade to a newer version of .NET?

A: Upgrading to newer versions like .NET 6 or .NET Core offers advantages like improved performance, modern features, and a streamlined development experience. However, if legacy applications rely on .NET Framework 3.5, it’s essential to assess compatibility before upgrading.

Q: What are the potential issues with using .NET Framework 3.5?

A: While .NET Framework 3.5 remains a reliable framework, it lacks some of the modern features and performance enhancements found in newer versions. Additionally, future development efforts may be focused on newer .NET frameworks, potentially limiting future support for .NET Framework 3.5.

Tips for Working with .NET Framework 3.5

  • Maintain Regular Updates: Ensure that .NET Framework 3.5 is updated regularly to benefit from security patches and bug fixes.
  • Explore Newer Frameworks: While .NET Framework 3.5 remains relevant, consider exploring newer frameworks like .NET Core and .NET 6 for future projects.
  • Utilize Community Resources: Leverage the extensive resources and support available from the .NET Framework 3.5 developer community.
  • Consider Migration: If possible, consider migrating legacy applications to newer .NET frameworks to benefit from modern features and performance improvements.

Conclusion

.NET Framework 3.5 remains a valuable tool for developers working with legacy applications and systems. Its stability, security updates, and extensive feature set make it a reliable choice for maintaining existing applications. However, for new projects, exploring newer .NET frameworks like .NET Core and .NET 6 is recommended to leverage modern features and advancements in software development. Ultimately, the choice between .NET Framework 3.5 and newer frameworks depends on specific project requirements and the need for compatibility with legacy systems.

Net Framework 3.5 for Windows 10 - Download & Install Guide Microsoft net framework 3-5 sp1 windows 10 64 bit - egypttop Net framework 3.5 sp1 windows 10 64 bit - vsehall
Netframe 3 5 For Windows 10 Microsoft net framework 3-5 sp1 windows 10 64 bit - iopboat How to Install .NET Framework 3.5 on Windows 11/10 PC - YouTube
How To Activate Net Framework 3 5 Using Command Prompt  Webframes.org how to install net framework 3.5 on windows 10,8.1,7 / How To Enable / Install .NET Framework 3.

Closure

Thus, we hope this article has provided valuable insights into net framework 3 5 for windows 10 64 bit. We hope you find this article informative and beneficial. See you in our next article!

Navigating The Windows 11 Ecosystem: A Comprehensive Guide To Essential Programs

Navigating the Windows 11 Ecosystem: A Comprehensive Guide to Essential Programs

Introduction

With enthusiasm, let’s navigate through the intriguing topic related to Navigating the Windows 11 Ecosystem: A Comprehensive Guide to Essential Programs. Let’s weave interesting information and offer fresh perspectives to the readers.

Buy Windows 11 User Guide for Beginners: A Comprehensive Guide to Master Windows 11 Operating

Windows 11, the latest iteration of Microsoft’s operating system, offers a refined user experience with a focus on visual appeal and enhanced functionality. However, the true potential of Windows 11 is unlocked through the diverse range of programs available, each designed to cater to specific needs and enhance productivity. This comprehensive guide explores the essential programs that empower users to leverage the full capabilities of Windows 11.

Productivity Powerhouses:

  • Microsoft Office Suite: A cornerstone of productivity, Microsoft Office remains the industry standard for document creation, spreadsheet management, and presentations. With its powerful tools, intuitive interface, and seamless integration with other Microsoft services, Office empowers users to tackle complex projects with ease.

  • Adobe Creative Cloud: For creative professionals and enthusiasts, Adobe Creative Cloud offers a comprehensive suite of industry-leading applications. From Photoshop for image editing to Premiere Pro for video editing, Creative Cloud provides the tools to bring creative visions to life.

  • Google Workspace: A cloud-based alternative to Microsoft Office, Google Workspace offers similar productivity tools, including Docs, Sheets, and Slides. Its collaborative features and accessibility across devices make it an excellent choice for team projects and remote work.

  • Evernote: A versatile note-taking and task management application, Evernote allows users to capture ideas, organize notes, and manage tasks effectively. Its cross-platform compatibility and powerful search functionality make it a valuable tool for students, professionals, and anyone seeking to streamline their workflow.

  • Todoist: A minimalist yet effective task management app, Todoist helps users prioritize tasks, set deadlines, and track progress. Its intuitive interface and flexible features make it an ideal tool for staying organized and maximizing productivity.

Essential Utilities:

  • File Explorer: The heart of Windows 11’s file management system, File Explorer provides access to all files and folders on the system. Its redesigned interface enhances navigation, while features like search and filtering facilitate efficient file management.

  • Task Manager: An indispensable tool for monitoring system performance, Task Manager provides insights into resource utilization, running processes, and system stability. Its ability to terminate unresponsive programs and manage startup applications enhances system performance and stability.

  • Windows Settings: A central hub for customizing system settings, Windows Settings allows users to personalize their experience, manage privacy, and configure system behavior. Its intuitive interface and extensive customization options empower users to tailor Windows 11 to their specific needs.

  • Windows Defender: Microsoft’s built-in antivirus software, Windows Defender provides real-time protection against malware and other threats. Its automatic updates and comprehensive security features ensure a safe and secure computing environment.

  • Windows Update: Responsible for keeping Windows 11 up-to-date with the latest security patches and feature updates, Windows Update ensures optimal system performance and stability. Its automatic updates ensure users benefit from the latest security enhancements and bug fixes.

Communication and Collaboration:

  • Microsoft Teams: A comprehensive communication and collaboration platform, Microsoft Teams offers instant messaging, video conferencing, file sharing, and more. Its integration with other Microsoft services and its user-friendly interface make it an ideal tool for team communication and collaboration.

  • Zoom: A popular video conferencing platform, Zoom enables users to host and participate in virtual meetings, webinars, and online classes. Its reliable connection, user-friendly interface, and screen sharing capabilities make it a versatile tool for remote communication.

  • Skype: A longstanding communication platform, Skype offers voice and video calls, instant messaging, and file sharing. Its wide availability and user-friendly interface make it a reliable option for personal and professional communication.

  • Slack: A team communication platform designed for businesses and organizations, Slack provides instant messaging, file sharing, and integration with various third-party applications. Its intuitive interface and robust features make it an ideal tool for streamlining team communication and collaboration.

Entertainment and Multimedia:

  • Windows Media Player: The default media player in Windows 11, Windows Media Player provides playback for various audio and video formats. Its simple interface and basic features make it suitable for everyday media consumption.

  • VLC Media Player: A popular open-source media player, VLC Media Player supports a wide range of audio and video formats, including DVDs and Blu-ray discs. Its versatility and cross-platform compatibility make it a reliable choice for media playback.

  • Spotify: A leading music streaming service, Spotify offers a vast library of songs, podcasts, and audiobooks. Its personalized recommendations and offline playback features make it an ideal choice for music lovers and audiophiles.

  • Netflix: A popular streaming service, Netflix offers a wide selection of movies, TV shows, and documentaries. Its user-friendly interface and personalized recommendations make it an excellent choice for entertainment.

  • YouTube: A video-sharing platform, YouTube provides access to a vast library of user-generated content, including music videos, tutorials, and documentaries. Its search functionality and personalized recommendations make it a valuable source of information and entertainment.

Beyond the Essentials:

  • Cybersecurity Software: While Windows Defender offers basic protection, dedicated cybersecurity software provides enhanced protection against malware, phishing attacks, and other online threats. Antivirus, anti-malware, and firewall software are essential for safeguarding sensitive data and maintaining online privacy.

  • Browser Extensions: Browser extensions enhance the functionality of web browsers, offering features like password management, ad blocking, and productivity tools. Choosing the right extensions can significantly improve browsing efficiency and online security.

  • System Optimization Tools: System optimization tools help to improve system performance by cleaning up junk files, managing startup applications, and optimizing system settings. These tools can enhance system speed and responsiveness, improving the overall user experience.

  • Graphic Design Software: For creative professionals and enthusiasts, graphic design software like Adobe Illustrator, CorelDRAW, and Affinity Designer provides the tools to create professional-quality graphics and illustrations.

  • Video Editing Software: Beyond Premiere Pro, other video editing software options like DaVinci Resolve, Final Cut Pro, and HitFilm Pro offer advanced features for creating professional-quality videos.

FAQs by Programs for Windows 11:

Q: What are the key differences between Microsoft Office and Google Workspace?

A: Microsoft Office is a traditional desktop software suite, while Google Workspace is a cloud-based platform. Office requires installation on individual devices, while Workspace is accessed through a web browser or dedicated apps. Office offers more advanced features for desktop productivity, while Workspace excels in collaboration and accessibility across devices.

Q: How can I ensure my system is protected from online threats?

A: Install and maintain a reputable antivirus software like Windows Defender or a third-party solution. Keep your operating system and software up-to-date with the latest security patches. Avoid clicking on suspicious links or downloading files from untrusted sources.

Q: What are some tips for optimizing Windows 11 performance?

A: Regularly clean up junk files and temporary data. Manage startup applications to reduce boot time. Close unnecessary programs and background processes. Consider using a system optimization tool to further enhance performance.

Q: How can I personalize my Windows 11 experience?

A: Customize the Start menu, taskbar, and desktop background to suit your preferences. Adjust system settings like color themes, fonts, and notification settings. Install themes and wallpapers to further personalize your environment.

Q: What are some essential browser extensions for Windows 11?

A: Password managers like LastPass and 1Password enhance online security. Ad blockers like uBlock Origin and AdGuard improve browsing speed and privacy. Productivity tools like Grammarly and Momentum provide grammar checking and personalized browsing experiences.

Conclusion by Programs for Windows 11:

The diverse range of programs available for Windows 11 empowers users to personalize their experience, enhance productivity, and unleash the full potential of the operating system. From essential productivity tools and utilities to entertainment applications and specialized software, the Windows 11 ecosystem offers a rich selection of programs that cater to every need. By carefully selecting and utilizing these programs, users can create a personalized and efficient computing environment that supports their individual needs and enhances their overall experience.

Mastering Windows 11: A Comprehensive Guide to Operating Systems: "Mastering the Essentials: A Buy Windows 11: Discover from Beginner to Expert with this Ultimate & Complete Step-by-Step User Windows 11 Ultimate Guide โ€“ Leaf Publishing
Introduction to the Windows 11 Ecosystem Windows 11 + Android  Everything to Know about the New Microsoft Ecosystem - YouTube Windows 11: A Comprehensive Guide about Features and Updates Perunity - Latest Business Story
The New Windows 11 User Guide: A quick Step by Step Manual for New Windows Operating System Navigating Windows 11 by Ashraf Zakaria ยท OverDrive: ebooks, audiobooks, and more for libraries

Closure

Thus, we hope this article has provided valuable insights into Navigating the Windows 11 Ecosystem: A Comprehensive Guide to Essential Programs. We thank you for taking the time to read this article. See you in our next article!

Unlocking The Power Of 7z Archives: A Comprehensive Guide For Windows 10 Users

Unlocking the Power of 7z Archives: A Comprehensive Guide for Windows 10 Users

Introduction

With enthusiasm, let’s navigate through the intriguing topic related to Unlocking the Power of 7z Archives: A Comprehensive Guide for Windows 10 Users. Let’s weave interesting information and offer fresh perspectives to the readers.

Unlocking the Power of 7z Archives: A Comprehensive Guide for Windows 10 Users

7z Archive Password Recovery Tool Unlock 7zip File Password

The 7z file format, renowned for its high compression ratios and robust security features, has become an industry standard for archiving and data storage. Windows 10 users often encounter 7z files, whether downloaded from the internet, received as attachments, or created for personal use. Understanding how to open and interact with these files is crucial for efficient data management and utilization.

Understanding the 7z Format

7z is a file archive format developed by Igor Pavlov. It employs advanced compression algorithms, including LZMA and LZMA2, to achieve significantly higher compression ratios compared to traditional formats like ZIP. This results in smaller file sizes, reducing storage space requirements and accelerating download and upload speeds.

Furthermore, 7z supports strong encryption methods, safeguarding sensitive data with password protection. This feature is particularly valuable for storing confidential information, ensuring its integrity and preventing unauthorized access.

Opening 7z Files in Windows 10

While Windows 10 does not natively support 7z files, various free and paid software solutions are readily available to handle these archives. Here’s a breakdown of popular methods:

1. Utilizing 7-Zip: The Industry Standard

7-Zip, developed by the creator of the 7z format, is a powerful and versatile open-source archiving utility. It offers a comprehensive set of features, including:

  • Extraction and Creation: 7-Zip effortlessly extracts files from 7z archives and creates new ones, supporting a wide range of formats including ZIP, RAR, GZIP, TAR, and more.
  • Compression Options: Users can select from various compression algorithms, including LZMA, LZMA2, and others, to optimize file size and compression speed.
  • Password Protection: 7-Zip enables strong password protection for 7z archives, ensuring secure storage of sensitive data.
  • File Management: The software provides intuitive file management tools, allowing users to view, rename, delete, and extract individual files within an archive.

2. Exploring Built-in Windows Options

Windows 10 offers limited functionality for 7z files, primarily through the File Explorer:

  • Right-Click Menu: Right-clicking a 7z file in File Explorer reveals a "Show more options" menu, which might include an "Extract All" option. This functionality is dependent on the installed software and might not be available for all 7z archives.
  • Third-Party Integration: Some third-party archiving software, upon installation, integrates with Windows File Explorer, adding context menu options to extract 7z files directly from the explorer.

3. Leveraging Online Tools

Online tools provide a convenient way to open and extract 7z files without installing additional software. Websites like Online7z offer a web-based interface for uploading 7z archives, extracting files, and downloading the extracted content. However, these tools might have limitations in terms of file size and encryption support.

4. Exploring Alternative Archive Managers

Apart from 7-Zip, numerous other archive managers offer support for 7z files. Some popular alternatives include:

  • WinRAR: A widely used commercial archiving tool, WinRAR provides a comprehensive set of features, including support for 7z archives.
  • PeaZip: An open-source archive manager known for its user-friendly interface and support for a wide range of archive formats, including 7z.
  • Bandizip: A free and lightweight archive manager that offers support for 7z files and a clean interface.

Choosing the Right Solution

The best approach for opening 7z files in Windows 10 depends on individual needs and preferences. For comprehensive functionality, user-friendliness, and open-source reliability, 7-Zip remains the top choice. However, if a lightweight solution or convenient online access is prioritized, alternative options like WinRAR, PeaZip, Bandizip, or online tools can be considered.

Benefits of Using 7z Files

The 7z format offers several advantages that make it a compelling choice for archiving and data management:

  • High Compression Ratios: 7z achieves significantly smaller file sizes compared to other formats, maximizing storage space and minimizing download and upload times.
  • Robust Security: 7z supports strong encryption algorithms, protecting sensitive data from unauthorized access and ensuring data integrity.
  • Wide Compatibility: While not natively supported by Windows, 7z files are compatible with numerous free and paid archive managers, ensuring accessibility for a broad range of users.
  • Open-Source Availability: 7-Zip, the primary software for handling 7z files, is open-source, promoting transparency, community involvement, and free access.

Frequently Asked Questions

Q: How do I extract files from a 7z archive without installing any software?

A: While extracting 7z files without software is not directly possible, online tools like Online7z offer a convenient web-based solution for extracting files from uploaded 7z archives.

Q: Are 7z files safe?

A: 7z files themselves are not inherently dangerous. However, like any file type, they can be used to distribute malicious content. It’s crucial to download files only from trusted sources and exercise caution when opening 7z archives from unknown origins.

Q: Can I create my own 7z archives?

A: Yes, you can create 7z archives using software like 7-Zip, WinRAR, PeaZip, or Bandizip. These programs allow you to select files, folders, and compression settings to create a 7z archive.

Q: Can I password protect a 7z archive?

A: Yes, 7-Zip and other archive managers offer password protection options for 7z archives. Setting a strong password ensures that only authorized individuals can access the contents of the archive.

Tips for Working with 7z Files

  • Utilize a Reliable Archive Manager: Choose a reputable and feature-rich archive manager like 7-Zip for efficient handling of 7z files.
  • Be Mindful of File Origins: Download 7z files only from trusted sources to minimize the risk of malware infection.
  • Set Strong Passwords: If password protection is used, ensure the password is strong and kept confidential.
  • Back Up Important Files: Regularly back up important files to prevent data loss in case of accidental deletion or hardware failure.

Conclusion

The 7z format offers a powerful and efficient solution for archiving and managing data. Its high compression ratios, robust security features, and wide compatibility make it an ideal choice for storing and sharing files of various sizes and sensitivities. By utilizing the right tools and following best practices, Windows 10 users can effectively unlock the power of 7z files, optimizing data management and ensuring secure storage.

How to unlock 7z file without password How to unlock the 7z file without a password?  Eraser Forum Windows Finally Getting Support for RAR and 7z Archives - Mrcloudinfo.com
How to Mount ZIP, RAR, and 7z Archives as Virtual Drives on Windows 10? PPT - How to unlock password-protected 7z file? PowerPoint Presentation - ID:11789249 7z Archive Password Recovery Tool Unlock 7zip File Password
how to extract a .7z.001 archive with multiple parts - YouTube Can't Open 7z Extension files? How to extract 7z files on Windows 10 - GUIDE - YouTube

Closure

Thus, we hope this article has provided valuable insights into Unlocking the Power of 7z Archives: A Comprehensive Guide for Windows 10 Users. We hope you find this article informative and beneficial. See you in our next article!

Rejuvenating Your Windows 11 System: A Guide To Clean Installation Without Data Loss

Rejuvenating Your Windows 11 System: A Guide to Clean Installation Without Data Loss

Introduction

With great pleasure, we will explore the intriguing topic related to Rejuvenating Your Windows 11 System: A Guide to Clean Installation Without Data Loss. Let’s weave interesting information and offer fresh perspectives to the readers.

Rejuvenating Your Windows 11 System: A Guide to Clean Installation Without Data Loss

How to Clean Install Windows 11: A Step-By-Step Guide - Guiding Tech

Windows 11, like any operating system, can accumulate performance issues over time. This can manifest as slow startup times, sluggish application responses, and even system instability. While these issues can sometimes be addressed through troubleshooting and maintenance, a clean installation of Windows 11 often proves to be the most effective solution. However, the prospect of reinstalling Windows can be daunting, especially for users concerned about losing valuable data and applications.

Fortunately, a clean installation of Windows 11 does not necessitate sacrificing your precious files and programs. This comprehensive guide will equip you with the knowledge and steps necessary to achieve a fresh Windows 11 experience without compromising your data.

Understanding the Need for a Clean Installation

A clean installation of Windows 11 involves formatting the system drive and installing a fresh copy of the operating system. This process eliminates any remnants of previous installations, including accumulated system files, outdated drivers, and potentially harmful software.

Benefits of a Clean Installation:

  • Improved Performance: By removing accumulated clutter and installing a fresh copy of Windows 11, you can experience noticeable improvements in system speed, responsiveness, and overall performance.
  • Enhanced Security: A clean installation eliminates potential malware and viruses that may have infiltrated your system over time, bolstering your system’s security.
  • Resolution of System Errors: Many system errors, crashes, and inconsistencies can be traced back to corrupted files or outdated drivers. A clean installation provides a fresh start, addressing these issues effectively.
  • Optimized System Resources: A clean installation ensures that your system resources are allocated efficiently, maximizing performance and stability.
  • Troubleshooting Complex Issues: When conventional troubleshooting methods fail, a clean installation often proves to be the most effective way to resolve persistent system problems.

Preparing for a Clean Installation

Before embarking on a clean installation, it is crucial to ensure a smooth and successful process by taking the following preparatory steps:

  1. Back Up Your Data: This step is paramount. Create a comprehensive backup of all your important files, including documents, photos, videos, and any other critical data. You can utilize external hard drives, cloud storage services, or backup software for this purpose.
  2. Gather Installation Media: You will need a bootable USB drive or DVD containing the Windows 11 installation files. You can create this media using the Microsoft Media Creation Tool, available on the official Microsoft website.
  3. Gather Product Key: Ensure you have your Windows 11 product key readily available. It is usually found on a sticker attached to your computer or in your purchase confirmation email.
  4. Download Necessary Drivers: Some drivers, particularly for specialized hardware components, may not be automatically installed during the clean installation process. Gather the latest drivers for your computer’s components beforehand.
  5. Deactivate Antivirus Software: Temporarily deactivate your antivirus software to avoid any potential conflicts during the installation process.
  6. Close All Running Programs: Ensure all open applications and programs are closed before proceeding with the clean installation.

The Clean Installation Process: A Step-by-Step Guide

  1. Boot from Installation Media: Connect your bootable USB drive or DVD to your computer and restart it. During the boot process, press the appropriate key (usually F12 or F9) to access the boot menu. Select the USB drive or DVD as your boot device.

  2. Start the Installation: The Windows 11 setup process will begin. Follow the on-screen instructions to choose your language, region, and keyboard layout.

  3. Accept License Terms: Read and accept the license terms.

  4. Choose Custom Installation: Select the "Custom: Install Windows only (advanced)" option. This option allows you to format the system drive and install Windows 11 without affecting other partitions.

  5. Format the System Drive: Select the drive where Windows 11 is currently installed (usually the C drive) and choose the "Format" option. This will erase all data on the drive, so ensure you have completed your backups.

  6. Install Windows 11: Select the formatted drive and click "Next" to begin the installation process. Windows 11 will be installed on the selected drive.

  7. Activate Windows: Once the installation is complete, you will be prompted to activate Windows. Enter your Windows 11 product key to activate your copy of Windows.

  8. Install Drivers: After activating Windows, install any necessary drivers for your computer’s components. You can use the drivers you downloaded earlier or visit the manufacturer’s website to download the latest drivers.

  9. Install Applications: Install your preferred applications and programs. You can use the Windows Store or download and install applications from their respective websites.

  10. Restore Data: After completing the installation process, restore your backed-up data to your newly installed Windows 11 system.

Frequently Asked Questions (FAQs)

Q: Will I lose all my data during a clean installation?

A: Yes, a clean installation involves formatting the system drive, which erases all data on that drive. Therefore, backing up your data is essential before proceeding with the installation.

Q: Can I perform a clean installation without losing my files?

A: No, a clean installation inherently involves formatting the system drive, which will erase all data. However, you can back up your data before the installation and restore it after the process is complete.

Q: What if I forget my Windows 11 product key?

A: If you forget your product key, you can try retrieving it from your purchase confirmation email, the sticker on your computer, or your Microsoft account. If these methods fail, you may need to contact Microsoft support for assistance.

Q: Can I install Windows 11 on a different drive?

A: Yes, you can install Windows 11 on a different drive by selecting the desired drive during the installation process. However, ensure the selected drive has enough space to accommodate Windows 11 and your applications.

Q: Will a clean installation affect my other partitions?

A: A clean installation will only affect the partition you select for formatting. Other partitions, such as those containing your personal files or other operating systems, will remain untouched.

Tips for a Successful Clean Installation

  • Ensure Sufficient Disk Space: Ensure your system drive has ample free space to accommodate Windows 11 and your applications.
  • Use a Reliable Backup Method: Choose a reliable backup method, such as an external hard drive or cloud storage service, to ensure your data is securely backed up.
  • Verify Driver Compatibility: Before installing drivers, verify their compatibility with your Windows 11 installation.
  • Update Windows After Installation: After completing the installation, update Windows 11 to ensure you have the latest features and security patches.
  • Run System Maintenance: After the clean installation, run system maintenance tasks, such as disk cleanup and defragmentation, to optimize your system’s performance.

Conclusion

A clean installation of Windows 11 can significantly improve system performance, enhance security, and resolve persistent system issues. While it requires formatting the system drive and necessitates backing up your data, the benefits of a fresh start often outweigh the effort. By following the steps outlined in this guide, you can confidently perform a clean installation of Windows 11 without losing your valuable files and applications, ensuring a smooth and rejuvenated computing experience.

Clean windows 11 install - rewach How To Clean Install Windows 11  appuals Clean Install Of Windows 11
Windows 11 Upgrade VS Clean Install [What's the Difference] - EaseUS How To Perform A Clean Install Of Windows 11 Theme Loader  Images and Photos finder Install Windows 11 Without Losing Apps
Windows 11 Stable Version Installation - Without Any Data Loss Latest Windows 11 22H2 Clean Windows 11 installation process - Step by Step  How to install Windows 11  Windows 11

Closure

Thus, we hope this article has provided valuable insights into Rejuvenating Your Windows 11 System: A Guide to Clean Installation Without Data Loss. We appreciate your attention to our article. See you in our next article!

Remotely Monitoring User Activity On Windows 10: A Comprehensive Guide

Remotely Monitoring User Activity on Windows 10: A Comprehensive Guide

Introduction

In this auspicious occasion, we are delighted to delve into the intriguing topic related to Remotely Monitoring User Activity on Windows 10: A Comprehensive Guide. Let’s weave interesting information and offer fresh perspectives to the readers.

Remotely Monitoring User Activity on Windows 10: A Comprehensive Guide

How to Monitor User Activity in Windows Computers

In today’s interconnected world, remote access to computer systems has become commonplace. This accessibility, however, raises concerns about security and accountability. Knowing who is logged into a Windows 10 device remotely can provide crucial insights into system usage, potential security breaches, and user behavior. This article will explore various methods for remotely monitoring user activity on Windows 10, outlining their functionalities, advantages, and limitations.

Understanding the Need for Remote User Monitoring

Monitoring user activity on a remote Windows 10 device can be beneficial in numerous scenarios.

  • Security: Identifying unauthorized access or suspicious activity can help prevent data breaches and system compromise.
  • Troubleshooting: Tracking user actions can assist in identifying the root cause of system errors or performance issues.
  • Compliance: Organizations may need to monitor user activity to comply with regulations or internal policies.
  • Productivity: Tracking user activity can provide insights into employee productivity and identify areas for improvement.
  • Parental Control: Parents can use remote monitoring to ensure their children are using the computer safely and responsibly.

Methods for Remotely Monitoring User Activity on Windows 10

Several methods can be employed to remotely monitor user activity on a Windows 10 device. These methods vary in their level of complexity, functionality, and security implications.

1. Remote Desktop Connection

Remote Desktop Connection (RDP) is a built-in Windows feature that allows users to connect to and control a remote computer. While primarily intended for remote administration, RDP can also be used to monitor user activity.

  • Functionality: RDP provides a graphical interface for viewing the remote desktop and interacting with the system as if you were physically present.
  • Advantages: Simple to set up and use, readily available on all Windows 10 devices.
  • Limitations: Limited in its ability to track specific user actions or provide detailed logs.

2. Task Manager

Task Manager is another built-in tool that provides information about running processes, resource usage, and active users on a Windows 10 device.

  • Functionality: Task Manager displays a list of logged-in users, their user names, and the time they logged in.
  • Advantages: Easily accessible and provides basic information about active users.
  • Limitations: Does not offer real-time monitoring or detailed activity logs.

3. Event Viewer

Event Viewer is a powerful tool that logs system events, including user logins and logouts.

  • Functionality: Event Viewer records user login and logout events, providing timestamps and user names.
  • Advantages: Provides detailed information about user activity and can be used for auditing purposes.
  • Limitations: Requires some technical knowledge to interpret event logs.

4. Third-Party Monitoring Software

Several third-party software solutions offer more comprehensive remote monitoring capabilities for Windows 10 devices. These solutions typically provide features like:

  • Real-time monitoring: Track user activity in real-time, including keystrokes, website visits, and application usage.
  • Detailed logging: Generate detailed logs of user actions, including timestamps and screenshots.
  • Remote control: Allow remote control of the target device.
  • Alerts and notifications: Receive alerts for suspicious activity or policy violations.

Examples of Third-Party Monitoring Software:

  • ManageEngine Desktop Central: A comprehensive IT management solution that includes features for remote monitoring and control.
  • Auvik: A network monitoring and management platform that offers user activity tracking capabilities.
  • SolarWinds Network Performance Monitor: A network performance monitoring tool that includes user activity monitoring features.

Security Considerations and Ethical Implications

Remotely monitoring user activity on Windows 10 devices raises significant security and ethical concerns.

  • Privacy: Monitoring user activity can potentially compromise user privacy, especially if done without consent.
  • Security Risks: Malicious actors can exploit vulnerabilities in monitoring software to gain unauthorized access to the target device.
  • Trust: Remote monitoring can erode trust between employers and employees or parents and children.

Best Practices for Remote User Monitoring

To minimize security risks and ethical concerns, it is crucial to adhere to best practices for remote user monitoring:

  • Transparency: Inform users about the monitoring practices in place and obtain their consent.
  • Purposeful Monitoring: Only monitor user activity for legitimate business or parental control purposes.
  • Data Security: Implement strong security measures to protect user data collected during monitoring.
  • Privacy Protection: Minimize the collection and storage of sensitive user information.
  • Compliance with Laws: Ensure all monitoring practices comply with applicable laws and regulations.

Frequently Asked Questions (FAQs)

Q: Is it legal to remotely monitor user activity on a Windows 10 device?

A: The legality of remote user monitoring depends on local laws and regulations. In many jurisdictions, it is legal to monitor employee activity on company-owned devices if the purpose is legitimate and employees are informed. However, monitoring personal devices or private activities without consent is generally illegal.

Q: What are the best practices for securing remote monitoring software?

A: Ensure the software is from a reputable vendor, keep it updated with the latest security patches, and use strong passwords for access. Implement two-factor authentication and restrict access to authorized users only.

Q: Can I remotely monitor user activity on a Windows 10 device without the user’s knowledge?

A: It is generally unethical and potentially illegal to monitor user activity without their consent. However, some monitoring software may offer stealth mode features, allowing monitoring without explicit notification.

Q: How can I protect my privacy when using a remote monitoring solution?

A: Choose a solution that offers strong privacy protections, such as data encryption and anonymization. Avoid using solutions that collect excessive user data or track sensitive information.

Tips for Remote User Monitoring

  • Start with clear objectives: Define specific goals for remote user monitoring, such as identifying security threats or improving employee productivity.
  • Choose the right tools: Select monitoring solutions that meet your specific needs and comply with security and privacy standards.
  • Implement strong security measures: Secure your monitoring infrastructure with strong passwords, two-factor authentication, and regular security audits.
  • Educate users: Inform users about the monitoring practices in place and the reasons for monitoring.
  • Monitor your own activity: Regularly review monitoring logs and ensure that your own activity is compliant with policies and regulations.

Conclusion

Remotely monitoring user activity on Windows 10 devices can be a valuable tool for security, troubleshooting, compliance, and productivity enhancement. However, it is crucial to implement monitoring practices ethically and responsibly, respecting user privacy and adhering to legal requirements. By following best practices and choosing appropriate monitoring solutions, organizations and individuals can leverage the benefits of remote user monitoring while minimizing potential risks.

How to monitor windows user activity  ManageEngine ADAudit Plus How to Monitor User Activity in Windows Computers How to monitor remote desktop activity  ManageEngine ADAudit Plus
How to monitor remote desktop activity  ManageEngine ADAudit Plus Remote Desktop User Activity Monitoring How to monitor windows user activity  ManageEngine ADAudit Plus
How to monitor windows user activity  ManageEngine ADAudit Plus Best ways to track windows computer & user activity

Closure

Thus, we hope this article has provided valuable insights into Remotely Monitoring User Activity on Windows 10: A Comprehensive Guide. We thank you for taking the time to read this article. See you in our next article!

Exploring The Legacy Of Nero 6: Compatibility And Alternatives For Windows 10

Exploring the Legacy of Nero 6: Compatibility and Alternatives for Windows 10

Introduction

With enthusiasm, let’s navigate through the intriguing topic related to Exploring the Legacy of Nero 6: Compatibility and Alternatives for Windows 10. Let’s weave interesting information and offer fresh perspectives to the readers.

Exploring the Legacy of Nero 6: Compatibility and Alternatives for Windows 10

Nero windows 10 compatibility - locatorbilla

While the title "Nero 6 free download for Windows 10" may spark interest, it’s crucial to understand that directly obtaining and installing Nero 6 on a modern operating system like Windows 10 presents significant challenges. Nero 6, released in 2004, was designed for older Windows versions and lacks inherent compatibility with the latest operating systems. This article delves into the reasons behind this incompatibility, explores potential workarounds, and offers alternatives that provide similar functionality for Windows 10 users.

The Compatibility Conundrum:

The primary obstacle to installing Nero 6 on Windows 10 is the software’s reliance on outdated technology. Nero 6 was developed for Windows XP and earlier operating systems, utilizing features and system architecture that are no longer present in Windows 10. This mismatch between the software’s requirements and the modern operating system’s capabilities creates a barrier to direct installation.

Workarounds and Considerations:

While directly installing Nero 6 on Windows 10 is unlikely, there are potential workarounds that users may consider. These methods often involve virtualization or emulation techniques, which create a virtual environment mimicking an older operating system. However, these approaches can be complex, requiring advanced technical knowledge and potentially sacrificing performance.

Exploring Alternatives: Modern Solutions for Windows 10:

Instead of pursuing potentially unreliable workarounds, it’s highly recommended to explore modern alternatives that offer similar functionality to Nero 6 but are specifically designed for Windows 10. These alternatives provide a more seamless user experience, enhanced features, and compatibility with the latest operating system.

Recommended Alternatives:

  • Nero Burning ROM: The latest versions of Nero Burning ROM, available for purchase, provide a comprehensive suite of burning, ripping, and multimedia tools optimized for Windows 10.
  • Ashampoo Burning Studio: Ashampoo Burning Studio offers a user-friendly interface and a range of features for burning CDs, DVDs, and Blu-ray discs, as well as creating backups and multimedia projects.
  • Freeware Options: Several freeware burning programs are available, such as ImgBurn and CDBurnerXP, providing basic burning functionality for those who require a simple solution.

FAQs Regarding Nero 6 and Windows 10:

Q: Can I use Nero 6 on Windows 10 without any modifications?

A: No, Nero 6 was designed for older Windows versions and is unlikely to function correctly on Windows 10.

Q: What are the potential risks of using workarounds to install Nero 6 on Windows 10?

A: Workarounds can introduce stability issues, security vulnerabilities, and performance degradation. They may require significant technical expertise and can be time-consuming.

Q: Are there any free alternatives to Nero 6 that work on Windows 10?

A: Yes, several freeware burning programs like ImgBurn and CDBurnerXP provide basic burning functionality.

Q: What are the benefits of using a modern burning software alternative instead of trying to install Nero 6?

A: Modern alternatives offer compatibility with Windows 10, enhanced features, a smoother user experience, and improved security.

Tips for Choosing a Burning Software Alternative:

  • Consider your specific needs: Determine the features you require, such as CD/DVD/Blu-ray burning, ripping, multimedia editing, or data backup.
  • Read reviews and compare features: Research different burning software options to find one that meets your requirements and budget.
  • Download from reputable sources: Only download software from trusted websites to avoid malware or viruses.
  • Test the software before committing: Many burning programs offer free trial versions allowing you to evaluate their functionality before purchasing.

Conclusion:

While the allure of a "Nero 6 free download for Windows 10" may exist, it’s important to prioritize compatibility and security. Installing outdated software on a modern operating system can lead to various issues. Utilizing modern alternatives designed for Windows 10 ensures a seamless experience, access to advanced features, and compatibility with the latest operating system. This approach offers a reliable and efficient solution for all your burning needs.

Nero windows 10 compatibility - locatorbilla Nero 6 upgrades - masaminder Ahead Software Nero 6 - The Suite, utilities software - BMSoftware
Nero 6 dvd software - ludadel Download Nero 6 with Keygen  All Software Download nero 6 64 bit - voluda
The Best Free Software of the World: Nero 6 (Full Version With License Key) Download Nero for Windows 11/10/8/7 (Latest version 2024) - Downloads Guru

Closure

Thus, we hope this article has provided valuable insights into Exploring the Legacy of Nero 6: Compatibility and Alternatives for Windows 10. We hope you find this article informative and beneficial. See you in our next article!

Navigating The Digital Workspace: Understanding Microsoft Office 365 Access

Navigating the Digital Workspace: Understanding Microsoft Office 365 Access

Introduction

With enthusiasm, let’s navigate through the intriguing topic related to Navigating the Digital Workspace: Understanding Microsoft Office 365 Access. Let’s weave interesting information and offer fresh perspectives to the readers.

How Microsoft Office 365 Suite transforms the Digital Workplace

The modern workplace thrives on seamless collaboration and efficient communication. Microsoft Office 365, a cloud-based productivity suite, plays a pivotal role in achieving this, offering a range of applications and services designed to enhance productivity and streamline workflows. Accessing these tools, however, requires understanding the login process and its implications. This article aims to demystify the process of accessing Office 365, outlining its importance, benefits, and essential aspects for effective utilization.

The Gateway to Productivity: Understanding Office 365 Login

Office 365 login serves as the key to unlocking a comprehensive suite of tools, including familiar applications like Word, Excel, PowerPoint, and Outlook, alongside newer offerings such as Teams, OneDrive, and SharePoint. These applications offer a unified platform for document creation, collaboration, communication, and data storage, fostering a streamlined and efficient work environment.

Benefits of Utilizing Office 365

The benefits of utilizing Office 365 extend beyond the familiar functionalities of its core applications. Here are some key advantages:

  • Cloud-Based Access: Office 365’s cloud-based nature grants access to applications and files from any device with an internet connection, eliminating the need for local installations and ensuring accessibility from anywhere.
  • Enhanced Collaboration: Features like real-time co-authoring in Word, Excel, and PowerPoint enable simultaneous collaboration on documents, fostering team synergy and reducing communication bottlenecks.
  • Streamlined Communication: Outlook provides a centralized platform for managing emails, calendars, and contacts, while Teams offers a comprehensive communication and collaboration hub for instant messaging, video conferencing, and file sharing.
  • Secure Data Storage: OneDrive and SharePoint offer secure cloud storage for documents and files, ensuring data protection and accessibility.
  • Integration and Compatibility: Office 365 seamlessly integrates with other Microsoft services like Windows, Azure, and Dynamics 365, creating a unified ecosystem for managing various aspects of business operations.

Navigating the Login Process

Accessing Office 365 requires a valid account and a secure login process. The following steps outline the general procedure:

  1. Visit the Office 365 website: Navigate to the official Office 365 website (https://www.office.com/).
  2. Enter your credentials: Enter your email address and password associated with your Office 365 account.
  3. Two-Factor Authentication (Optional): For enhanced security, you may be prompted to enter a verification code sent to your phone or email address.
  4. Access your applications: Once logged in, you can access various Office 365 applications, including Word, Excel, PowerPoint, Outlook, Teams, OneDrive, and SharePoint.

Common Challenges and Solutions

While the login process is generally straightforward, users may encounter challenges such as forgotten passwords, account lockout, or access issues. Here are some common issues and their solutions:

  • Forgotten Password: If you forget your password, click on the "Forgot Password" link on the login page and follow the instructions to reset your password.
  • Account Lockout: If your account is locked due to multiple incorrect login attempts, contact your IT administrator or the Office 365 support team to regain access.
  • Access Issues: If you face issues accessing specific applications or features, check your internet connection, verify your account permissions, or contact your IT administrator for assistance.

FAQs Regarding Office 365 Login

1. What is the difference between Office 365 and Microsoft Office?

Office 365 is a subscription-based service that provides access to a suite of cloud-based applications, including Word, Excel, PowerPoint, Outlook, and more. Microsoft Office, on the other hand, refers to the traditional desktop applications that are installed locally on your computer.

2. Can I access Office 365 on multiple devices?

Yes, Office 365 allows you to access your applications and files from multiple devices, including computers, tablets, and smartphones.

3. How do I manage my Office 365 account settings?

You can manage your account settings, including password changes, security preferences, and application settings, by accessing the "My Account" section within the Office 365 portal.

4. What happens if I forget my password?

If you forget your password, you can reset it by clicking on the "Forgot Password" link on the login page and following the instructions.

5. How do I contact Office 365 support?

You can contact Office 365 support by visiting the official Microsoft support website or by searching for "Office 365 support" on the internet.

Tips for Effective Office 365 Utilization

  • Familiarize yourself with the applications: Take advantage of the tutorials and resources available to learn the functionalities of various Office 365 applications.
  • Utilize collaboration features: Explore real-time co-authoring, online meetings, and file sharing capabilities to enhance teamwork and communication.
  • Secure your account: Enable two-factor authentication, choose strong passwords, and be cautious of phishing attempts to safeguard your account.
  • Stay updated: Regularly update your Office 365 applications to benefit from new features and security enhancements.

Conclusion

Office 365 login is the gateway to a comprehensive suite of productivity tools designed to enhance collaboration, streamline workflows, and empower individuals and teams to achieve their goals. By understanding the login process, familiarizing oneself with the benefits, and utilizing the available resources, users can effectively leverage Office 365 to optimize their work environment and achieve greater efficiency.

Office 365 Applications Overview An Easy Way To Visualize And - Vrogue Microsoft Access Tutorial 2019: The MS Access Workspace - YouTube Microsoft 365  DMC, Inc.
Office 365 - Fast Forward IT 15+ Microsoft Access Workspace 365 - The complete online workspace powered by Office 365. - YouTube
List of Microsoft Office 365 Applications and Features Microsoft access office 365 - polreabout

Closure

Thus, we hope this article has provided valuable insights into Navigating the Digital Workspace: Understanding Microsoft Office 365 Access. We appreciate your attention to our article. See you in our next article!

The Aesthetics Of Windows 11: Unveiling The Ultra HD Wallpaper

The Aesthetics of Windows 11: Unveiling the Ultra HD Wallpaper

Introduction

With great pleasure, we will explore the intriguing topic related to The Aesthetics of Windows 11: Unveiling the Ultra HD Wallpaper. Let’s weave interesting information and offer fresh perspectives to the readers.

The Aesthetics of Windows 11: Unveiling the Ultra HD Wallpaper

1080x224020 Windows 11 4k Esthetics 1080x224020 Resolution Wallpaper, HD Hi-Tech 4K Wallpapers

The Windows operating system has long been synonymous with functionality and user-friendliness. However, with the release of Windows 11, Microsoft went a step further, incorporating a visually captivating aesthetic that elevates the user experience. This aesthetic is exemplified by the high-resolution wallpapers that grace the desktop, offering a glimpse into the world of Windows 11’s design philosophy.

These wallpapers, available in Ultra HD (4K) resolution, are meticulously crafted to provide a visually stunning backdrop for the user’s digital life. They are not mere static images but carefully chosen representations of the operating system’s core principles: simplicity, clarity, and a modern, minimalist design language.

Understanding the Significance of Ultra HD Resolution

The choice of Ultra HD resolution for the Windows 11 wallpapers is not merely a matter of aesthetics. It serves a crucial purpose in enhancing the overall user experience.

  • Visual Clarity and Detail: Ultra HD resolution allows for an unparalleled level of detail and clarity, rendering the wallpapers with exceptional sharpness and vibrancy. This results in a more immersive and engaging visual experience, particularly on high-resolution displays.

  • Enhanced Desktop Aesthetics: The crispness and detail of the Ultra HD wallpapers elevate the overall aesthetic of the desktop, creating a visually pleasing and harmonious environment for the user. This contributes to a more professional and polished look, reflecting the modern design principles of Windows 11.

  • Seamless Integration with Modern Displays: With the increasing prevalence of high-resolution displays, Ultra HD wallpapers ensure optimal compatibility and visual fidelity. The high pixel density of these displays is perfectly complemented by the detail and sharpness offered by the Ultra HD wallpapers.

Exploring the Thematic Choices of Windows 11 Wallpapers

The Windows 11 wallpapers are not merely decorative elements. They are carefully chosen to convey the core values and spirit of the operating system.

  • Modern and Minimalist Design: The wallpapers often feature abstract patterns and geometric shapes, reflecting the minimalist and modern design language of Windows 11. This design approach emphasizes simplicity and clarity, creating a visually uncluttered and user-friendly experience.

  • Emphasis on Functionality and Productivity: The wallpapers often incorporate elements that subtly hint at the core functionality of Windows 11, such as the emphasis on multitasking, seamless connectivity, and productivity. This subtle connection between aesthetics and functionality reinforces the user’s understanding of the operating system’s capabilities.

  • Visual Harmony and Consistency: The wallpapers are designed to work in harmony with the overall aesthetic of Windows 11, ensuring a cohesive and visually pleasing user experience. This consistency across different elements of the operating system contributes to a sense of unity and professionalism.

Beyond the Desktop: Windows 11 Wallpapers in Action

The impact of the Ultra HD wallpapers extends beyond the desktop. They are integrated seamlessly into various aspects of the Windows 11 user experience, further enhancing the overall aesthetic and functionality.

  • Lock Screen: The wallpapers are used on the lock screen, providing a visually engaging and personalized welcome screen for users. This enhances the user’s first interaction with the operating system, setting the tone for a positive and aesthetically pleasing experience.

  • Theme Integration: The wallpapers are often used as the foundation for themes, allowing users to customize their desktop experience with matching colors, fonts, and other visual elements. This provides a cohesive and personalized aesthetic, reflecting the user’s individual preferences.

  • Shared Experience: The wallpapers can be shared with other users, allowing them to enjoy the same visually engaging experience. This fosters a sense of community and shared appreciation for the aesthetics of Windows 11.

FAQs: Unraveling the Mystery of Windows 11 Wallpapers

Q1: Where can I find the official Windows 11 wallpapers?

A1: The official Windows 11 wallpapers are typically included with the operating system itself. They can be accessed through the Settings app by navigating to Personalization > Background. Additionally, Microsoft often releases these wallpapers as part of promotional campaigns or updates, which can be found on their official website or through various online resources.

Q2: Can I customize the official Windows 11 wallpapers?

A2: While the official Windows 11 wallpapers are provided in their original Ultra HD resolution, you can customize them to fit your specific needs and preferences. You can resize, crop, or even apply filters to the images using various photo editing software. However, it’s important to note that these modifications might affect the original quality and detail of the wallpapers.

Q3: Are the official Windows 11 wallpapers free to use?

A3: Yes, the official Windows 11 wallpapers are free to use for personal purposes. However, it’s crucial to respect the copyright and intellectual property rights associated with these images. They should not be used for commercial purposes without obtaining the necessary permissions.

Q4: What are the recommended display settings for viewing the Windows 11 wallpapers?

A4: For optimal viewing experience, it’s recommended to use a high-resolution display with a minimum resolution of 3840 x 2160 pixels (4K). This ensures that the wallpapers are displayed with their full detail and clarity. However, even on lower-resolution displays, the wallpapers will still provide a visually pleasing experience.

Q5: Can I download the Windows 11 wallpapers from third-party websites?

A5: While there are numerous third-party websites offering downloads for Windows 11 wallpapers, it’s crucial to exercise caution. Ensure that the website is reputable and offers genuine wallpapers. Be wary of websites that claim to offer exclusive or modified versions of the official wallpapers, as they might contain malware or other harmful content.

Tips: Enhancing the Windows 11 Wallpaper Experience

  • Utilize a High-Resolution Display: Invest in a high-resolution display to fully appreciate the detail and clarity of the Ultra HD wallpapers. This will significantly enhance the overall visual experience, making the desktop more immersive and engaging.

  • Experiment with Different Theme Settings: Explore the various themes available within Windows 11, which often incorporate the official wallpapers. This allows you to personalize your desktop experience with matching colors, fonts, and other visual elements, creating a cohesive and visually pleasing environment.

  • Consider Using a Wallpaper Manager: Utilize a wallpaper manager application to automatically change your desktop wallpaper at regular intervals. This will introduce variety and keep your desktop visually stimulating, preventing monotony.

  • Explore Third-Party Wallpaper Sources: While the official Windows 11 wallpapers are excellent, consider exploring third-party sources for even more visually engaging options. Numerous websites and applications offer high-quality wallpapers that complement the aesthetics of Windows 11.

Conclusion: Embracing the Visual Symphony of Windows 11

The Ultra HD wallpapers of Windows 11 are more than just decorative elements. They represent a conscious design choice that elevates the user experience, enhancing both aesthetics and functionality. These wallpapers serve as a visual representation of the operating system’s core principles, embodying simplicity, clarity, and a modern, minimalist design language.

By embracing the visual symphony of Windows 11, users can create a personalized and engaging desktop environment, reflecting their individual preferences while enjoying the benefits of a visually captivating and immersive experience. The choice of Ultra HD resolution ensures that these wallpapers are displayed with exceptional detail and clarity, enhancing the overall aesthetic and contributing to a more professional and polished look.

1668x2224 Resolution Windows 11 4k Esthetics 1668x2224 Resolution Wallpaper - Wallpapers Den Windows 11 Desktop Wallpaper Aesthetic Windows 11 , Stock, Colorful, Gradient background, Aesthetic, Technology HD phone wallpaper  Pxfuel
Windows 11 4K Ultra HD Wallpaper Download Blue Technology Windows 11 4k Ultra HD Wallpaper Download Technology Windows 11 4k Ultra HD Wallpaper by Pawel Czerwinski
Top 999+ Windows 11 Wallpaper Full HD, 4K Free to Use 2160x468020 Windows 11 HD Gradient 2160x468020 Resolution Wallpaper, HD Abstract 4K Wallpapers

Closure

Thus, we hope this article has provided valuable insights into The Aesthetics of Windows 11: Unveiling the Ultra HD Wallpaper. We appreciate your attention to our article. See you in our next article!

The Silent Enigma: Understanding And Resolving Audio Output Device Issues In Windows 10

The Silent Enigma: Understanding and Resolving Audio Output Device Issues in Windows 10

Introduction

With great pleasure, we will explore the intriguing topic related to The Silent Enigma: Understanding and Resolving Audio Output Device Issues in Windows 10. Let’s weave interesting information and offer fresh perspectives to the readers.

The Silent Enigma: Understanding and Resolving Audio Output Device Issues in Windows 10

How To Change The Audio Output Device In Windows 10

The absence of sound on a Windows 10 computer can be a frustrating experience, particularly when multimedia enjoyment, communication, or work productivity hinges on proper audio functionality. This article delves into the complexities of the "No Audio Output Device Installed" error message, exploring its potential causes and providing a comprehensive guide to troubleshooting and resolving this common issue.

Understanding the "No Audio Output Device Installed" Error

The error message "No Audio Output Device Installed" signifies that Windows 10 cannot locate or identify a functional audio output device, such as speakers, headphones, or external sound systems. This lack of recognition prevents the operating system from routing audio signals to the desired output, rendering the computer effectively mute.

Common Causes of Audio Output Device Issues

The "No Audio Output Device Installed" error can stem from a variety of factors, ranging from simple hardware misconfigurations to more complex software conflicts. Understanding these potential causes is crucial for effective troubleshooting:

1. Hardware Problems:

  • Loose or Damaged Connections: Faulty connections between the audio output device and the computer, or within the device itself, can interrupt the signal flow. This can occur with headphone jacks, USB ports, or internal audio components.
  • Faulty Audio Output Device: The audio output device might be malfunctioning, either due to internal damage or driver incompatibility. This includes speakers, headphones, and external sound cards.
  • Driver Issues: The absence of appropriate or updated drivers for the audio output device can prevent Windows from recognizing and utilizing the hardware.
  • Incorrectly Configured Audio Output: The audio output settings might be incorrectly configured, directing the sound to a non-existent or disabled device.
  • Hardware Conflicts: Other connected hardware devices might be interfering with the audio output device, causing signal conflicts or resource allocation issues.

2. Software Problems:

  • Outdated or Corrupted Drivers: Outdated or corrupted audio drivers can lead to malfunctioning hardware or incompatibility issues.
  • System Errors: Software bugs or system errors within Windows 10 might interfere with audio output functionality.
  • Conflicting Applications: Certain applications might interfere with the audio output device, causing unexpected behavior or muting the system.
  • Malware Infection: Malware can compromise system files, including those responsible for audio output, leading to malfunctions.

Troubleshooting the "No Audio Output Device Installed" Error

Resolving the "No Audio Output Device Installed" error requires a systematic approach, starting with simple checks and progressing to more advanced troubleshooting steps:

1. Basic Checks:

  • Verify Connections: Ensure all connections between the audio output device and the computer are secure and properly plugged in.
  • Check Device Power: Make sure the audio output device is turned on and receives sufficient power.
  • Test Different Devices: Try connecting different audio output devices to the computer to rule out a faulty device.
  • Check Mute Settings: Ensure the volume is not muted on the audio output device, in Windows settings, or within any running applications.
  • Restart the Computer: A simple restart can often resolve temporary software glitches that may be affecting audio output.

2. Software Troubleshooting:

  • Update Audio Drivers: Download and install the latest drivers for your audio output device from the manufacturer’s website.
  • Roll Back Audio Drivers: If updating drivers causes issues, roll back to the previous driver version to see if it resolves the problem.
  • Troubleshoot Audio Problems: Utilize the built-in Windows 10 audio troubleshooter by searching "Troubleshoot sound problems" in the Start menu.
  • Disable Conflicting Applications: Temporarily disable any applications that might be interfering with audio output, such as audio editing software or streaming services.
  • Run a System Scan: Use Windows Defender or a reputable antivirus program to scan your computer for malware that might be affecting audio functionality.

3. Advanced Troubleshooting:

  • Check Audio Services: Ensure the Windows Audio service is running properly by opening the Services window (services.msc) and searching for "Windows Audio."
  • Check Device Manager: Look for any error codes or exclamation marks next to the audio output device in Device Manager, which can indicate driver or hardware problems.
  • Reset Audio Settings: Reset the audio settings to default values by navigating to Settings > System > Sound and selecting "Reset" at the bottom.
  • Reinstall Audio Drivers: Completely uninstall the audio drivers and then reinstall them from the manufacturer’s website.
  • Perform a System Restore: If the issue persists, consider restoring your system to an earlier point in time when audio functionality was working correctly.

FAQs: "No Audio Output Device Installed" Error

1. Why does Windows not recognize my speakers?

Windows may not recognize speakers due to faulty connections, driver issues, incorrect audio output settings, or hardware conflicts.

2. How can I fix the "No Audio Output Device Installed" error without reinstalling Windows?

Troubleshooting steps include updating drivers, running the audio troubleshooter, checking device connections, and resetting audio settings.

3. Can a virus cause audio output problems?

Yes, malware can affect system files, including those responsible for audio output, leading to malfunctions.

4. How do I know if my audio output device is faulty?

Testing the device with different computers or connecting other devices to the same computer can help identify a faulty audio output device.

5. What if the audio troubleshooter doesn’t resolve the issue?

Advanced troubleshooting steps include checking audio services, device manager, and reinstalling audio drivers.

Tips for Preventing Audio Output Device Issues:

  • Regularly Update Drivers: Keep your audio drivers up to date to ensure compatibility and stability.
  • Use Reputable Software: Install applications from trusted sources to minimize the risk of malware infections.
  • Maintain Clean Connections: Regularly check and clean connections to prevent dust buildup and ensure proper signal flow.
  • Monitor System Health: Regularly scan your computer for malware and use system maintenance tools to keep Windows running smoothly.
  • Backup Your System: Create regular system backups to restore your computer to a working state if issues arise.

Conclusion:

The "No Audio Output Device Installed" error can be a frustrating problem, but it is often resolvable with a methodical approach. By understanding the common causes, systematically applying troubleshooting steps, and implementing preventative measures, users can restore audio functionality and enjoy the full multimedia experience of their Windows 10 computer. Remember, persistence and patience are key to overcoming this silent enigma.

FIXED] No Audio Output Device is Installed in Windows 10 How to Fix Windows 10 Audio Sound Problems [3 Solutions] - YouTube How to Fix "No Audio Output Device is Installed" Error in Windows 10/11 - Driver Easy
How to set Audio device as default in Windows 10 5+ Methods: Fix No Output or Input Devices Found Windows 10/11 - MiniTool How to Fix No Audio Output Device Is Installed In Windows 10 PC
No Audio Output Device Is Installed On Windows 10 PC (Best 10 Fixes) How to Fix โ€œNo Audio Output Device Is Installedโ€ in Windows 10

Closure

Thus, we hope this article has provided valuable insights into The Silent Enigma: Understanding and Resolving Audio Output Device Issues in Windows 10. We appreciate your attention to our article. See you in our next article!

Unveiling The Mysteries Of Windows 11: A Comprehensive Guide

Unveiling the Mysteries of Windows 11: A Comprehensive Guide

Introduction

With enthusiasm, let’s navigate through the intriguing topic related to Unveiling the Mysteries of Windows 11: A Comprehensive Guide. Let’s weave interesting information and offer fresh perspectives to the readers.

Unveiling the Mysteries of Windows 11: A Comprehensive Guide

Windows 11 Mysteries Continue - YouTube

Windows 11, the latest iteration of Microsoft’s flagship operating system, has been met with both excitement and apprehension. While its sleek new design and enhanced features are enticing, many users grapple with questions about its compatibility, performance, and overall value. This article aims to provide a comprehensive exploration of these inquiries, demystifying Windows 11 and empowering users to make informed decisions.

FAQs: Addressing Common Concerns

1. Is My Computer Compatible with Windows 11?

Compatibility is a key concern for many users. To run Windows 11, your system must meet specific hardware requirements, including:

  • Processor: 1 gigahertz (GHz) or faster with 2 or more cores.
  • RAM: 4 gigabytes (GB) of RAM.
  • Storage: 64 GB or larger storage device.
  • System firmware: UEFI, Secure Boot capable.
  • TPM: Trusted Platform Module (TPM) version 2.0.
  • Graphics Card: Compatible with DirectX 12 or later.

Microsoft provides a dedicated PC Health Check app to assess your device’s compatibility. It’s crucial to understand that meeting these minimum requirements doesn’t guarantee a smooth experience. Older hardware may struggle with the demands of Windows 11, leading to performance issues.

2. How Do I Upgrade to Windows 11?

If your device meets the compatibility requirements, upgrading to Windows 11 is a straightforward process. You can upgrade directly from Windows 10 through the Windows Update settings. However, ensure you back up your data before proceeding, as the upgrade process can be unpredictable.

3. What are the Key Features of Windows 11?

Windows 11 boasts several new features, including:

  • Redesigned User Interface: A modern, clean aesthetic with rounded corners and a centralized taskbar.
  • Snap Layouts: Enhanced multitasking capabilities with customizable window arrangements.
  • Android App Integration: Run Android apps directly within Windows 11 using the Amazon Appstore.
  • Widgets: Customizable panels offering quick access to news, weather, and other information.
  • Focus Modes: Enhance productivity by minimizing distractions and prioritizing specific tasks.
  • Improved Gaming: Enhanced gaming performance with DirectX 12 Ultimate and Auto HDR support.
  • Enhanced Security: Improved protection against malware and other threats.

4. Is Windows 11 Secure?

Microsoft has implemented robust security measures in Windows 11, including the TPM 2.0 chip and enhanced threat detection capabilities. However, security is a constant battle, and users should remain vigilant by updating their software regularly, using strong passwords, and avoiding suspicious links and downloads.

5. What are the Performance Considerations?

While Windows 11 boasts performance improvements, older hardware may experience slower speeds and reduced battery life. This is due to the increased resource demands of the new operating system. It’s essential to consider your hardware’s capabilities before upgrading.

6. How Does Windows 11 Differ from Windows 10?

Windows 11 introduces significant changes compared to Windows 10, including:

  • Visual Design: A complete overhaul of the user interface with a more modern look and feel.
  • Taskbar: A centralized taskbar with redesigned icons and improved functionality.
  • Start Menu: A simplified Start menu with a focus on pinned applications and recommendations.
  • Android App Integration: The ability to run Android apps directly within Windows.
  • Focus Modes: Enhanced productivity features with distraction-free environments.

7. What are the Common Issues Experienced with Windows 11?

Like any new software release, Windows 11 has encountered some initial issues, including:

  • Compatibility Problems: Older hardware may struggle to meet the system requirements.
  • Driver Issues: Some drivers may not be compatible with Windows 11, leading to functionality problems.
  • Performance Issues: Reduced performance and battery life on older devices.
  • Software Incompatibility: Some older software applications may not be compatible with Windows 11.
  • Bugs and Glitches: As with any new software, there may be unexpected bugs and glitches.

Tips for Optimizing Windows 11

1. Ensure Hardware Compatibility: Before upgrading, use the PC Health Check app to verify compatibility.

2. Back Up Your Data: Always back up your data before installing a new operating system.

3. Update Drivers: Ensure your drivers are compatible with Windows 11.

4. Optimize Performance: Adjust settings like visual effects and background processes to improve performance.

5. Use Focus Modes: Utilize Focus Modes to minimize distractions and enhance productivity.

6. Explore Android App Integration: Take advantage of the ability to run Android apps within Windows.

7. Stay Updated: Regularly update your operating system and software to address vulnerabilities and improve security.

Conclusion: A New Era of Windows

Windows 11 represents a significant evolution of Microsoft’s operating system, offering a modern and streamlined user experience with enhanced features and improved security. However, it’s essential to carefully consider hardware compatibility and potential performance issues.

By understanding the key features, addressing common concerns, and implementing optimization tips, users can unlock the full potential of Windows 11 and enjoy a seamless and productive computing experience. While the transition to Windows 11 may present challenges, its potential for innovation and user-centric design makes it a compelling choice for the future of computing.

Windows 11 Comprehensive Guide And Cheat Sheet, 54% OFF Windows 11 Comprehensive Guide And Cheat Sheet, 54% OFF Windows 11 Comprehensive Guide And Cheat Sheet, 54% OFF
Windows 11 Comprehensive Guide And Cheat Sheet, 54% OFF Learn Microsoft Windows 11: Comprehensive Windows 11 Course / AvaxHome

Closure

Thus, we hope this article has provided valuable insights into Unveiling the Mysteries of Windows 11: A Comprehensive Guide. We hope you find this article informative and beneficial. See you in our next article!