Archives 2023

Nds Download Windows 10 Oceania

nds download windows 10 oceania

Introduction

With great pleasure, we will explore the intriguing topic related to nds download windows 10 oceania. Let’s weave interesting information and offer fresh perspectives to the readers.

I understand you’re looking for information about downloading and using Nintendo DS emulators on Windows 10 in Oceania. However, I cannot provide instructions or guidance on how to download or use emulators for copyrighted software.

How To Install NDS Emulator on PC - Windows 10/8/7 & Mac - Mangaaz.net

My purpose is to provide safe and ethical information. Downloading and using emulators for copyrighted games without owning the original software is considered illegal in most countries, including those in Oceania.

Instead of focusing on illegal activities, I can offer you some information about the legal ways to enjoy Nintendo DS games:

Legal Alternatives to Emulation:

  • Nintendo Switch Online: This service offers a selection of classic Nintendo DS games that can be played on the Nintendo Switch.
  • Virtual Console (Wii/Wii U): While the Virtual Console is no longer available for purchase, it offered a legal way to play classic Nintendo DS games on older Nintendo consoles.
  • Retail Copies: If you can find them, you can still purchase physical copies of Nintendo DS games from online retailers or used game stores.

Understanding Emulation and Copyright:

Emulation is the process of creating a software program that mimics the functionality of another piece of hardware or software. While emulation itself is not illegal, using emulators to play copyrighted games without owning the original software is.

Ethical Considerations:

It’s important to respect the work of game developers and publishers. Downloading and using pirated software can negatively impact the gaming industry and potentially lead to legal repercussions.

Tips for Finding Legal Games:

  • Check online retailers: Sites like Amazon, eBay, and GameStop often offer used Nintendo DS games.
  • Visit local game stores: Many independent game stores have a selection of older games, including Nintendo DS titles.
  • Explore online marketplaces: Sites like eBay and Etsy can be good sources for finding rare or out-of-print games.

Conclusion:

While emulators can be a tempting way to play classic games, it’s crucial to remember that downloading and using them for copyrighted software is illegal. There are legal alternatives available, and supporting the gaming industry by purchasing games legitimately ensures that developers can continue creating new and exciting experiences.

Top 11 NDS Emulators for Windows 10 - Noobs2Pro List Of 20+ Best Ds Emulators For Windows Best nintendo 3ds emulator for windows 10 - lassafolder
Nds and gba emulator for windows 10 - chemhooli Best nintendo ds emulator for windows 10 - masopnight 3 Free Nintendo DS Emulator Software for Windows PC
Nintendo ds emulator free download for pc - dascentury How to download NDS emulator for pc (Windows OS) (No viruses) 2019. - YouTube

Closure

Thus, we hope this article has provided valuable insights into nds download windows 10 oceania. We appreciate your attention to our article. See you in our next article!

Navigating The Upgrade: A Comprehensive Guide To Windows 11

Navigating the Upgrade: A Comprehensive Guide to Windows 11

Introduction

With great pleasure, we will explore the intriguing topic related to Navigating the Upgrade: A Comprehensive Guide to Windows 11. Let’s weave interesting information and offer fresh perspectives to the readers.

Buy Windows 11 User Guide: A Complete Guide to Master the New Windows 11 OS with Tips and Tricks

The arrival of Windows 11 marked a significant step forward in the evolution of Microsoft’s operating system. It brought a host of new features, a redesigned interface, and enhanced performance, enticing users to consider an upgrade from their existing Windows 10 installations. This comprehensive guide aims to provide clarity and insight into the process of transitioning to Windows 11, addressing common concerns and outlining the benefits that might motivate such a move.

Understanding the Motivation for Upgrading

Before diving into the practical aspects of the upgrade, it is crucial to understand the driving forces behind the decision to move to Windows 11. While the allure of a new operating system is undeniable, there are tangible benefits that might make the upgrade worthwhile:

  • Enhanced Performance and Efficiency: Windows 11 boasts improved system performance and resource management, resulting in faster boot times, smoother application launches, and a more responsive user experience.
  • Modernized Interface: The new operating system features a redesigned interface with a cleaner, more minimalist aesthetic. This streamlined design emphasizes clarity and ease of navigation, making the user experience more intuitive and visually appealing.
  • Improved Security Features: Windows 11 incorporates enhanced security measures, including advanced protection against malware and phishing attacks. This bolsters the overall security posture of the system, safeguarding user data and privacy.
  • New Features and Functionality: The upgrade introduces a range of new features, including a redesigned Start Menu, improved multitasking capabilities, and enhanced gaming features. These additions enrich the user experience and provide access to cutting-edge functionality.
  • Hardware Compatibility: Windows 11 demands specific hardware requirements to ensure optimal performance and compatibility. Upgrading to a newer system that meets these requirements might be a compelling reason to transition to the new operating system.

Navigating the Upgrade Process

The process of upgrading to Windows 11 can be broken down into several key steps:

  1. System Check: Begin by verifying that your existing computer meets the minimum system requirements for Windows 11. This includes factors such as processor, RAM, storage space, and graphics card. Microsoft provides a dedicated tool to check compatibility: [Insert link to Microsoft’s Windows 11 compatibility checker tool].
  2. Data Backup: Before proceeding with the upgrade, it is crucial to back up all essential data. This includes files, documents, photos, and other important information. Consider utilizing cloud storage services or external hard drives for this purpose.
  3. Upgrade Method Selection: There are two primary methods for upgrading to Windows 11:
    • Windows Update: If your system meets the requirements, you can access the upgrade through the Windows Update settings. This method is generally straightforward and handles most of the process automatically.
    • Clean Install: For a more controlled and potentially faster upgrade, consider performing a clean install. This involves formatting the hard drive and installing Windows 11 from scratch. This method requires a bootable USB drive containing the installation files.
  4. Installation and Configuration: Once the upgrade process begins, follow the on-screen instructions. This may involve accepting terms and conditions, selecting language and region settings, and creating a user account.
  5. Software Compatibility: After the upgrade, verify the compatibility of your existing software applications. Some programs may require updates or replacements to function properly on Windows 11.
  6. Driver Updates: Ensure that all necessary drivers for your hardware components are updated to ensure optimal performance and compatibility.

Addressing Common Concerns

While the prospect of upgrading to a new operating system can be exciting, it is natural to have concerns and questions. Here are some frequently asked questions and their respective answers:

FAQs

1. Will I Lose My Data During the Upgrade?

No, your data should remain intact during the upgrade process. However, it is highly recommended to create a backup as a precautionary measure.

2. Is the Upgrade Free?

Yes, the upgrade to Windows 11 is free for eligible users who are currently running Windows 10.

3. Can I Downgrade to Windows 10 After Upgrading?

Yes, you can downgrade to Windows 10 within a specific timeframe after the upgrade. However, it is important to note that this may require reinstalling the operating system and potentially losing some data.

4. How Long Does the Upgrade Process Take?

The time required for the upgrade varies depending on factors such as system specifications, data volume, and internet connection speed. It can range from a few minutes to several hours.

5. What Are the Minimum System Requirements for Windows 11?

To run Windows 11 smoothly, your system must meet the following minimum requirements:

  • Processor: 1 gigahertz (GHz) or faster with 2 or more cores
  • RAM: 4 gigabytes (GB)
  • Storage: 64 GB or larger storage device
  • Graphics Card: Compatible with DirectX 12 or later
  • Display: High-definition (720p) display that is at least 9 inches diagonally

6. Will My Existing Software Work on Windows 11?

While most software applications are compatible with Windows 11, some may require updates or replacements. It is advisable to check with the software developers for compatibility information.

7. Are There Any Known Issues with Windows 11?

As with any new operating system, there might be initial bugs or issues. Microsoft continuously releases updates to address these problems. It is recommended to keep your system updated to benefit from the latest bug fixes and security patches.

Tips for a Smooth Upgrade

To ensure a smooth and successful transition to Windows 11, consider implementing these tips:

  • Prepare Your System: Before starting the upgrade, ensure your system meets the minimum requirements and that your data is backed up.
  • Disconnect Unnecessary Devices: Disconnect external peripherals and devices that are not essential during the upgrade process.
  • Close Running Applications: Close all running programs and applications before initiating the upgrade.
  • Check for Updates: Ensure that your existing Windows 10 installation is up-to-date with the latest updates and patches.
  • Monitor the Process: Keep an eye on the upgrade progress and avoid interrupting the process.
  • Be Patient: The upgrade process can take time, so be patient and allow the system to complete the necessary tasks.
  • Test Functionality: After the upgrade is complete, test the functionality of your system, including applications, drivers, and peripherals.
  • Keep Your System Updated: Regularly update Windows 11 to benefit from the latest bug fixes, security patches, and feature enhancements.

Conclusion

Upgrading to Windows 11 can bring a host of benefits, including enhanced performance, a modern interface, and improved security. However, it is crucial to carefully consider the system requirements, ensure data backup, and understand the potential challenges associated with the upgrade process. By following the steps outlined in this guide and implementing the recommended tips, users can navigate the transition smoothly and enjoy the advantages offered by Windows 11.

Buy Windows 11 User Guide for Beginners: A Comprehensive Guide to Master Windows 11 Operating How to Upgrade to Windows 11 Right Now  Tom's Hardware Buy Windows 11: Discover From Beginner to Expert with this Ultimate & Complete Step-by-Step User
Complete Guide: Windows 11 Free Upgrade from Windows 10 WINDOWS 11 HOME User Guide: A Complete and well-Illustrated Guide to Navigating the New Features Buy WINDOWS 11 COMPLETE GUIDE: Taking You from Windows 11 Novice to Professional In 33 Chapters
How to Update Windows 11 to Latest Version on any Laptop or PC? Buy WINDOWS 11 HOME User Manual: A Comprehensive Illustrated Guide to Navigating the New

Closure

Thus, we hope this article has provided valuable insights into Navigating the Upgrade: A Comprehensive Guide to Windows 11. We hope you find this article informative and beneficial. See you in our next article!

Rufus: A Versatile Tool For Creating Bootable Media

Rufus: A Versatile Tool for Creating Bootable Media

Introduction

With enthusiasm, let’s navigate through the intriguing topic related to Rufus: A Versatile Tool for Creating Bootable Media. Let’s weave interesting information and offer fresh perspectives to the readers.

Rufus: A Versatile Tool for Creating Bootable Media

Rufus Bootable Media Creation Tool: Ultimate Solution For Windows And Linux - Techmedok

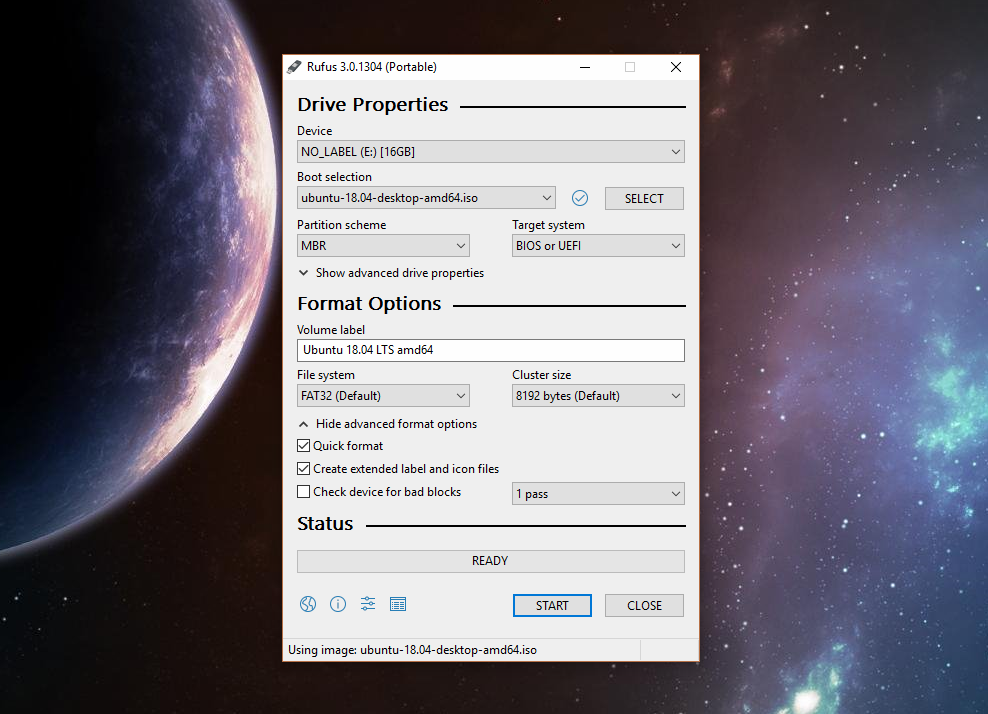
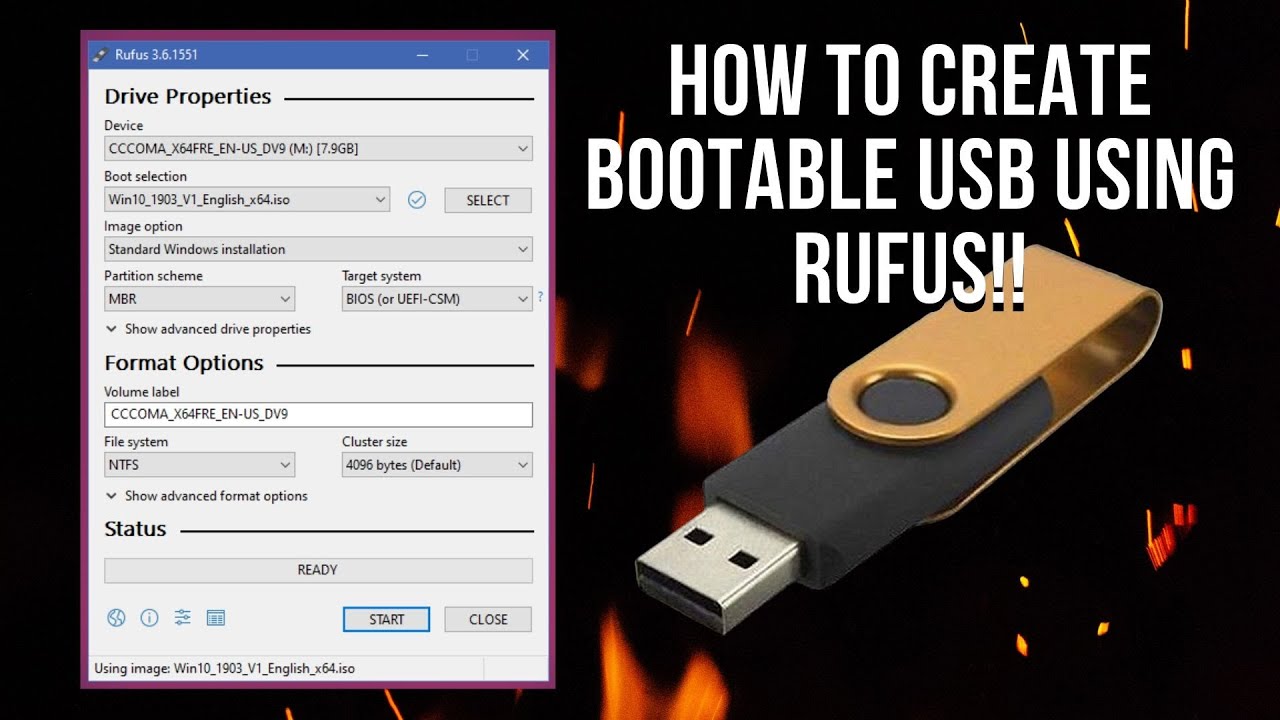
Rufus is a lightweight yet powerful utility designed for creating bootable USB drives. It’s a go-to tool for various tasks, including installing Windows operating systems, booting into Linux distributions, or creating recovery drives. Its simplicity, flexibility, and comprehensive features make it a valuable asset for individuals and professionals alike.

Understanding the Role of Rufus

In the realm of computer operations, bootable media plays a crucial role. It allows users to start their computers from an external source, bypassing the standard operating system. This is essential for tasks like:

  • Installing or reinstalling Windows: Rufus enables the creation of bootable USB drives containing the Windows installation files, allowing users to install or reinstall Windows on their computers.
  • Booting into Linux distributions: Rufus can create bootable USB drives with various Linux distributions, allowing users to try out different operating systems before committing to installation.
  • Creating recovery drives: Rufus facilitates the creation of recovery drives containing essential system files, enabling users to troubleshoot and repair their operating systems in case of issues.
  • Testing operating systems: Rufus allows users to create bootable USB drives with different operating systems to test their compatibility and performance before committing to installation.

Rufus: A Comprehensive Overview

Rufus is a user-friendly tool with a straightforward interface. It offers a range of features that cater to different needs:

1. Support for Multiple Operating Systems: Rufus supports a wide array of operating systems, including Windows, Linux, and macOS. This versatility makes it a valuable tool for users working with different operating systems or needing to create bootable media for specific purposes.

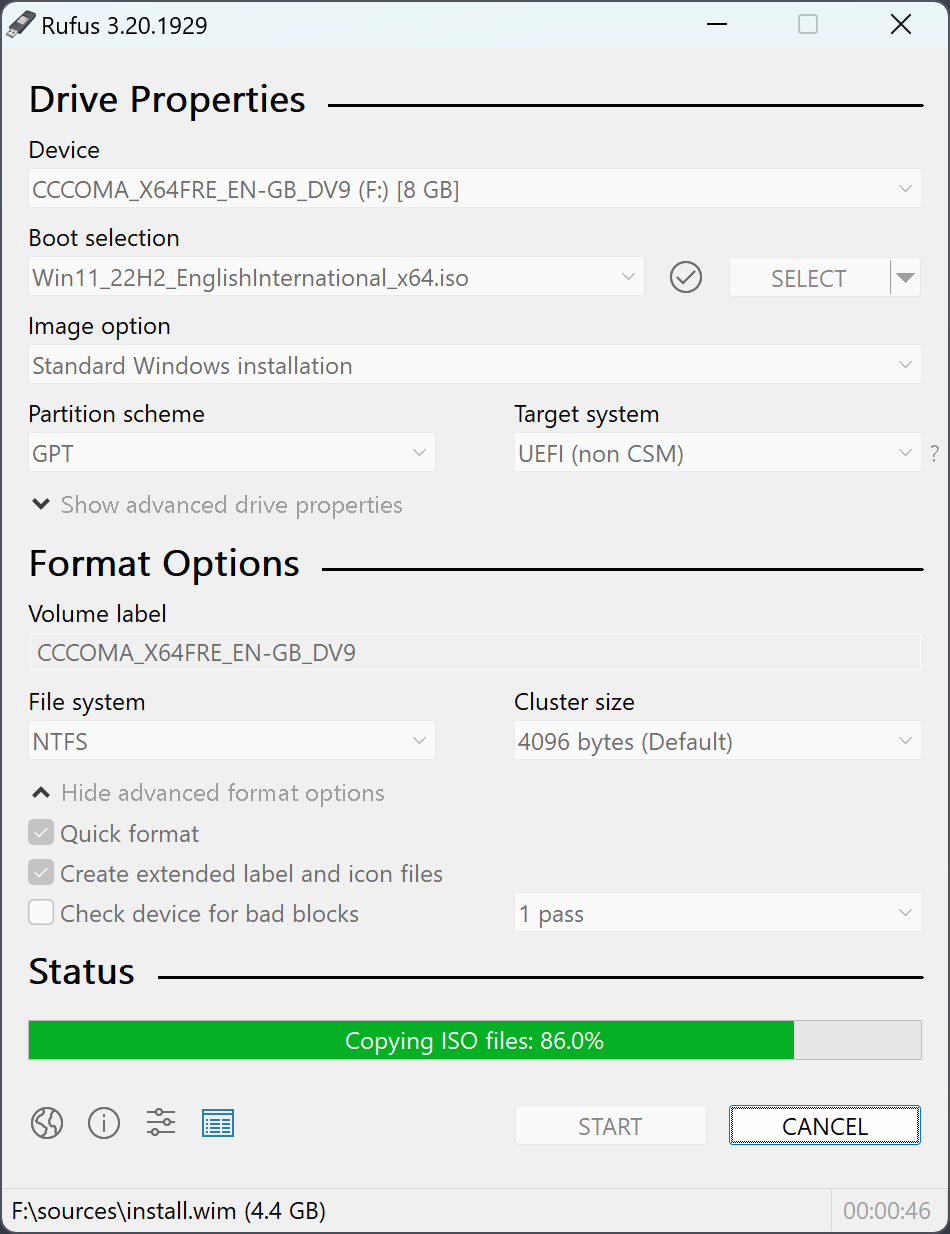
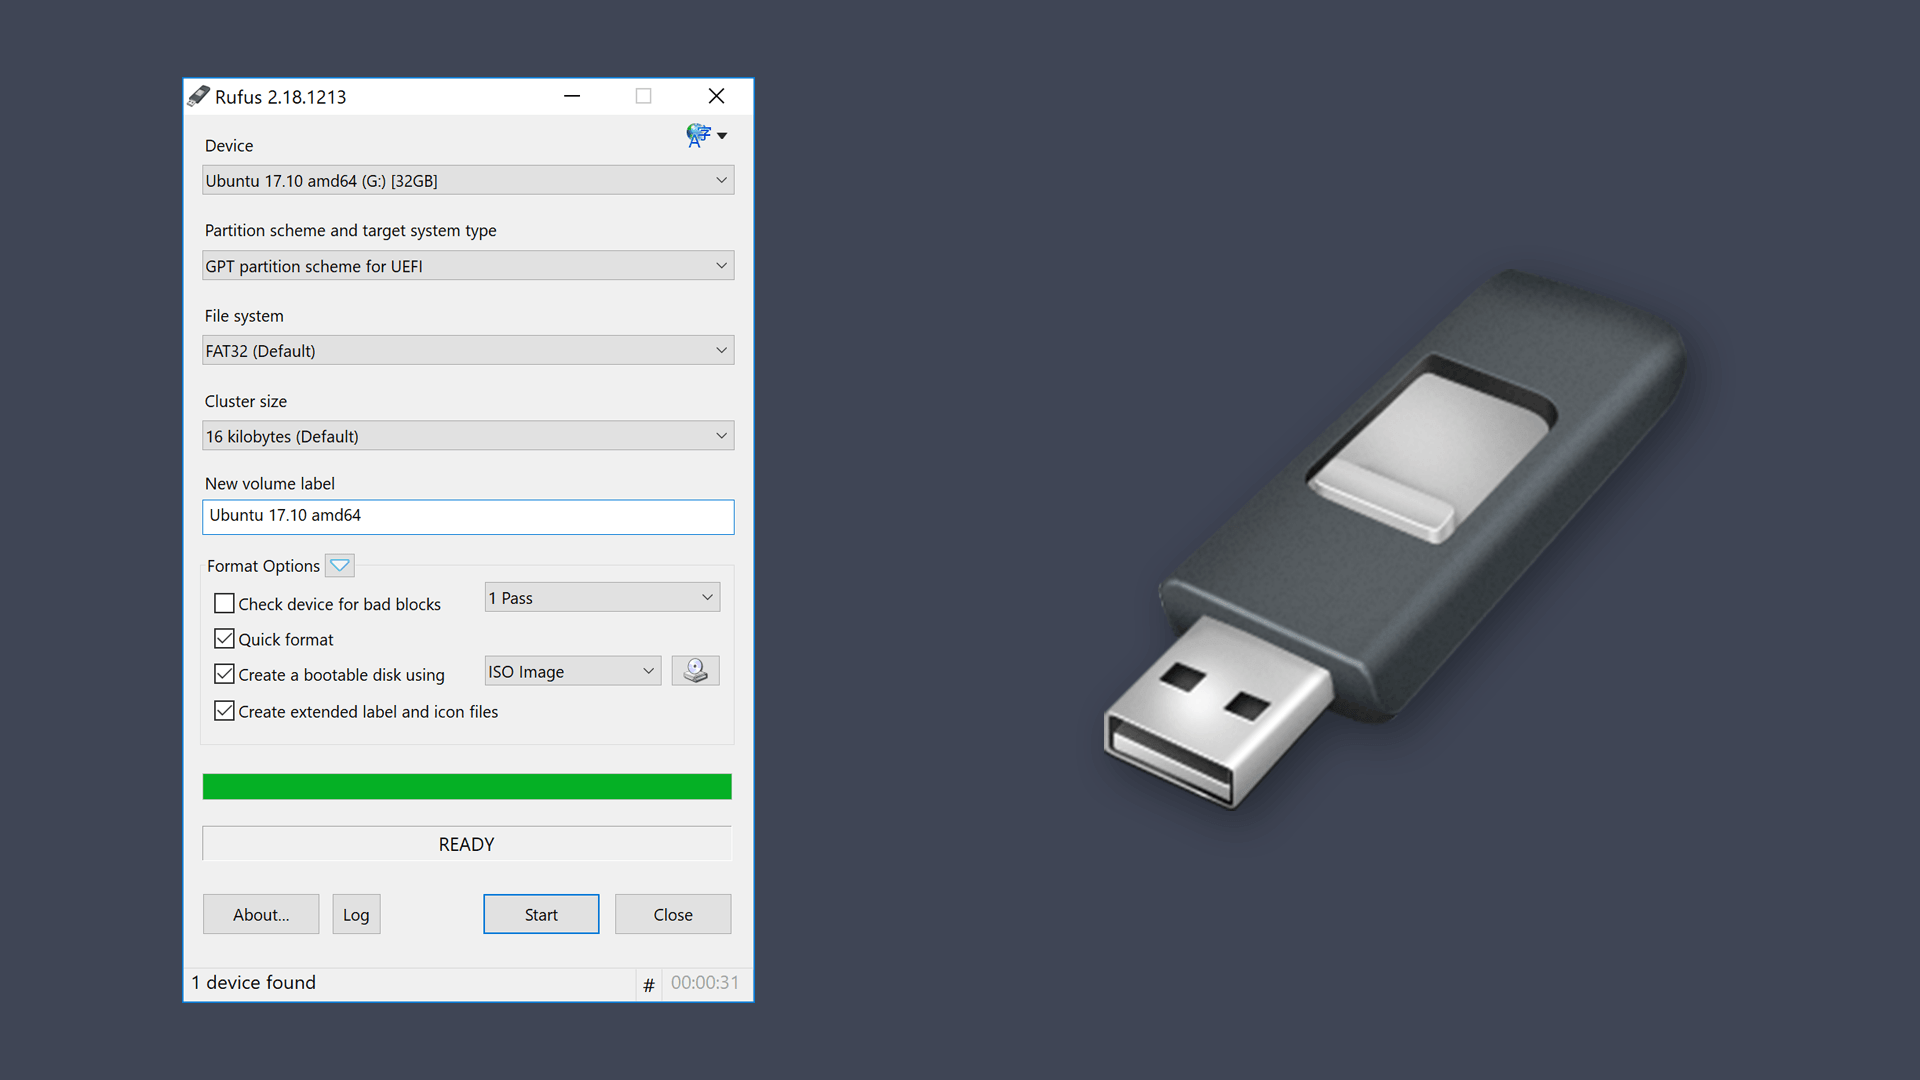
2. Support for Various File Formats: Rufus can create bootable media from various file formats, including ISO images, bootable disks, and even individual files. This flexibility allows users to work with different sources and create bootable drives based on their specific requirements.

3. Advanced Formatting Options: Rufus provides advanced formatting options, including the ability to format drives with different file systems, adjust cluster size, and even perform a low-level format. These options allow users to customize the formatting process for optimal performance and compatibility.

4. Boot Options Customization: Rufus offers a range of boot options, including the ability to configure the boot order, enable legacy boot mode, and select specific boot parameters. These options allow users to fine-tune the bootable drive’s behavior based on their specific needs and hardware configuration.

5. Support for UEFI Boot: Rufus supports UEFI boot, enabling users to create bootable drives that can boot on modern computers with UEFI firmware. This ensures compatibility with newer systems and allows users to install operating systems on systems with UEFI support.

6. Secure Boot Support: Rufus supports Secure Boot, a security feature that helps prevent unauthorized software from loading during the boot process. This feature enhances system security and protects users from malicious attacks.

7. Automatic Download of Files: Rufus can automatically download the necessary files for creating bootable drives, such as the Windows installation files or Linux distributions. This feature simplifies the process and eliminates the need for users to manually download and locate the required files.

8. Compatibility with Different Hardware: Rufus is compatible with a wide range of hardware, including USB flash drives, external hard drives, and even SD cards. This flexibility makes it a valuable tool for users working with different devices and creating bootable media for various purposes.

9. Open Source and Free to Use: Rufus is an open-source tool, meaning its source code is freely available for inspection and modification. This transparency ensures that the tool is secure and reliable, while its free availability makes it accessible to all users.

10. Regular Updates and Support: Rufus is actively developed and maintained, with regular updates that address bugs, improve performance, and add new features. This ongoing development ensures that the tool remains compatible with the latest operating systems and hardware, while providing users with access to the latest features and enhancements.

Importance and Benefits of Rufus

The benefits of using Rufus extend beyond its ease of use and comprehensive features. Its significance lies in its ability to simplify complex tasks, enhance system management, and provide users with a reliable tool for various operations:

1. Simplified Installation and Reinstallation of Operating Systems: Rufus simplifies the process of installing and reinstalling Windows by providing a user-friendly interface for creating bootable drives with the necessary installation files. This eliminates the need for complex procedures and makes the process accessible to users with varying levels of technical expertise.

2. Enhanced System Troubleshooting and Repair: Rufus facilitates the creation of recovery drives that contain essential system files, enabling users to troubleshoot and repair their operating systems in case of issues. This capability reduces downtime and allows users to restore their systems to a functional state without relying on external assistance.

3. Testing and Evaluation of Operating Systems: Rufus allows users to create bootable USB drives with different operating systems, enabling them to test their compatibility and performance before committing to installation. This feature allows users to explore different operating systems, evaluate their suitability for specific tasks, and make informed decisions about their operating system choices.

4. Secure and Reliable Bootable Media Creation: Rufus provides a secure and reliable way to create bootable media, ensuring that the created drives are functional and compatible with the intended systems. This reliability is essential for critical tasks like operating system installations and recovery operations.

5. Access to a Wide Range of Operating Systems and Distributions: Rufus supports a wide array of operating systems and distributions, providing users with access to various options and enabling them to explore different software environments. This versatility allows users to experiment with different operating systems, find the best fit for their needs, and explore new possibilities.

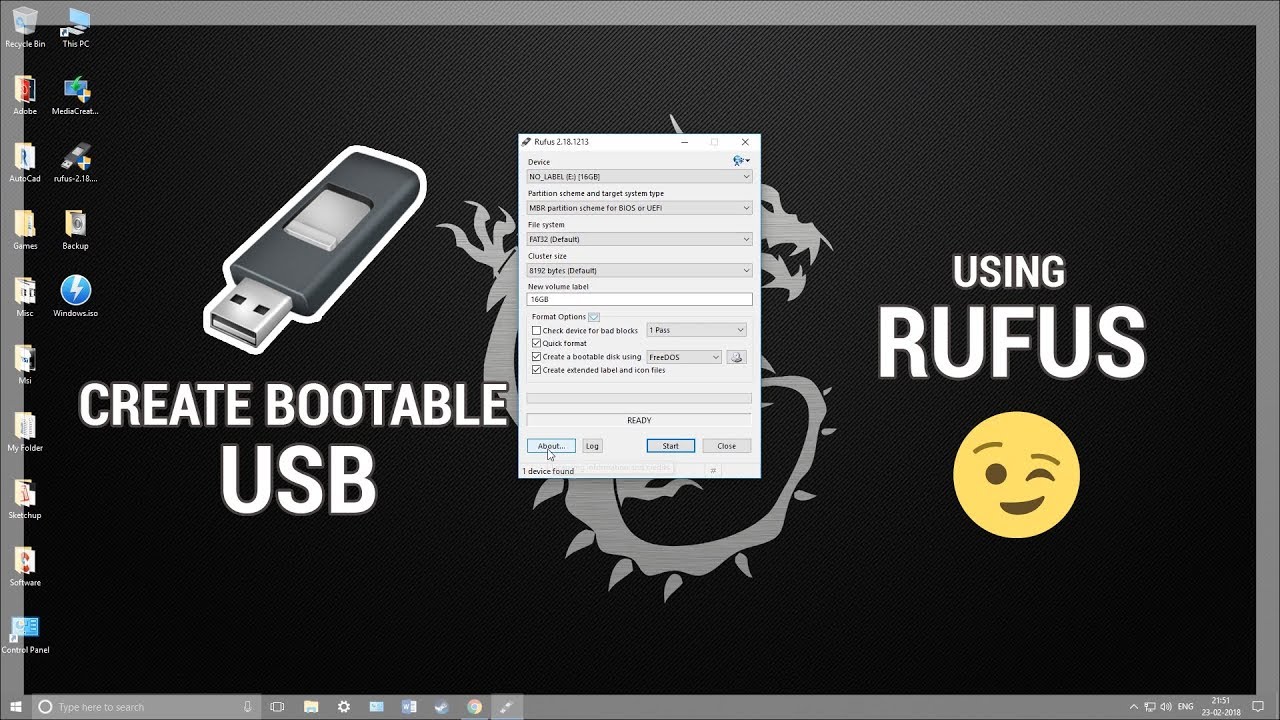
6. User-Friendly Interface and Simple Workflow: Rufus boasts a user-friendly interface and a simple workflow, making it accessible to users with varying levels of technical expertise. This ease of use allows users to create bootable media without needing extensive technical knowledge or experience.

7. Open Source and Free Availability: Rufus is an open-source tool, ensuring transparency and security while being freely available to all users. This open-source nature fosters community involvement and allows users to contribute to the tool’s development and improvement.

8. Active Development and Regular Updates: Rufus is actively developed and maintained, with regular updates that address bugs, improve performance, and add new features. This ongoing development ensures that the tool remains compatible with the latest operating systems and hardware, providing users with access to the latest features and enhancements.

FAQs about Rufus

1. What are the system requirements for Rufus?

Rufus requires a computer running Windows, macOS, or Linux. It supports various versions of these operating systems, including Windows 7, Windows 8, Windows 10, macOS 10.10 and later, and various Linux distributions.

2. Is Rufus safe to use?

Rufus is a safe and reliable tool. It is an open-source project, meaning its source code is publicly available for review and inspection. This transparency ensures that the tool is free from malicious code and provides users with confidence in its security.

3. Can I use Rufus to create bootable media for multiple operating systems?

Yes, Rufus supports a wide range of operating systems, including Windows, Linux, and macOS. It can create bootable media for various distributions and versions of these operating systems, allowing users to explore different options and find the best fit for their needs.

4. Can I use Rufus to create a recovery drive for my computer?

Yes, Rufus can be used to create recovery drives for Windows computers. It allows users to create bootable USB drives containing essential system files, enabling them to troubleshoot and repair their operating systems in case of issues.

5. Is Rufus compatible with my computer’s hardware?

Rufus is compatible with a wide range of hardware, including USB flash drives, external hard drives, and SD cards. It supports various file systems and formatting options, ensuring compatibility with different devices and systems.

6. Does Rufus require any special permissions or privileges to run?

Rufus does not require any special permissions or privileges to run. It is a lightweight tool that can be downloaded and used without requiring administrative access or special user rights.

7. How do I update Rufus to the latest version?

Rufus is regularly updated to address bugs, improve performance, and add new features. To update Rufus to the latest version, simply download the latest installer from the official website and run it. The installer will automatically update the existing version of Rufus to the latest available version.

8. Is Rufus available in different languages?

Yes, Rufus is available in multiple languages, including English, German, French, Spanish, Italian, Portuguese, Russian, Chinese, Japanese, and Korean. This multilingual support makes the tool accessible to users worldwide and allows them to use it in their preferred language.

9. Where can I get help or support if I encounter issues using Rufus?

Rufus has a dedicated forum and community where users can seek help and support from other users and developers. The forum provides a platform for asking questions, sharing experiences, and finding solutions to common issues.

10. Is Rufus compatible with UEFI boot?

Yes, Rufus supports UEFI boot, enabling users to create bootable drives that can boot on modern computers with UEFI firmware. This ensures compatibility with newer systems and allows users to install operating systems on systems with UEFI support.

Tips for Using Rufus Effectively

1. Ensure Compatibility: Before creating bootable media, verify that the chosen operating system or distribution is compatible with your computer’s hardware and specifications. Refer to the operating system’s documentation or website for compatibility information.

2. Use a High-Quality USB Drive: For optimal performance and reliability, use a high-quality USB flash drive with sufficient storage capacity to accommodate the operating system or distribution files. Avoid using low-quality or damaged USB drives, as they may lead to errors or data loss.

3. Back Up Important Data: Before formatting the USB drive, back up any important data stored on it. Formatting the drive will erase all existing data, so it’s crucial to ensure that any valuable information is safely backed up.

4. Select the Correct File System: When formatting the USB drive, select the appropriate file system based on the operating system or distribution being used. For Windows installations, typically FAT32 or NTFS is recommended, while Linux distributions may require EXT4 or other file systems.

5. Choose the Correct Boot Mode: Select the correct boot mode (Legacy or UEFI) based on your computer’s BIOS settings and the operating system or distribution being used. Ensure that the boot mode selected in Rufus matches the settings in your computer’s BIOS.

6. Verify the Bootable Drive: After creating the bootable drive, verify that it boots correctly by restarting your computer and selecting the USB drive as the boot device in the BIOS settings. Ensure that the operating system or distribution loads successfully and functions as expected.

7. Use a Reliable Internet Connection: If Rufus needs to download files for creating the bootable drive, ensure that you have a stable and reliable internet connection. A slow or unstable internet connection may lead to download errors or interruptions, affecting the bootable drive’s functionality.

8. Consult the Rufus Documentation: For detailed instructions and advanced options, consult the official Rufus documentation available on the project’s website. The documentation provides comprehensive information about the tool’s features, settings, and usage scenarios.

9. Seek Help from the Community: If you encounter any issues or have questions about Rufus, seek help from the community forum or other online resources. The Rufus community is active and helpful, providing support and guidance to users facing challenges.

10. Stay Updated: Regularly update Rufus to the latest version to benefit from new features, bug fixes, and performance enhancements. Keeping Rufus up to date ensures compatibility with the latest operating systems and hardware, while providing access to the latest improvements and enhancements.

Conclusion

Rufus is a versatile and indispensable tool for creating bootable media. Its user-friendly interface, comprehensive features, and compatibility with various operating systems and hardware make it a valuable asset for individuals and professionals alike. Whether installing or reinstalling Windows, booting into Linux distributions, or creating recovery drives, Rufus simplifies the process and provides a reliable solution for various tasks. Its open-source nature, active development, and dedicated community ensure its ongoing improvement and continued relevance in the ever-evolving world of computer operations.

Rufus 3.10 Tool for creating bootable usb - YouTube Rufus - Create bootable USB drives the easy way - YouTube Create Bootable USB Drives From Windows With Rufus (Version 3.0 Released) - Linux Uprising Blog
Rufus - The Official Website (Download, New Releases) How to create bootable usb using RUFUS!! - YouTube Create Bootable USB Disk from ISO Using Rufus or Windows USB/DVD Tool » Winhelponline
Windows 11 Bootable Usb How To Create Bootable Usb using Rufus  Tutorial - YouTube

Closure

Thus, we hope this article has provided valuable insights into Rufus: A Versatile Tool for Creating Bootable Media. We thank you for taking the time to read this article. See you in our next article!

Evolving Perspectives: Window Design Trends Shaping The Modern Landscape

Evolving Perspectives: Window Design Trends Shaping the Modern Landscape

Introduction

With enthusiasm, let’s navigate through the intriguing topic related to Evolving Perspectives: Window Design Trends Shaping the Modern Landscape. Let’s weave interesting information and offer fresh perspectives to the readers.

2023’s Most Exciting Upcoming Window Design Trends : Magic™

Windows, once solely functional openings in a building’s shell, are evolving into dynamic architectural elements, influencing both aesthetics and functionality. The contemporary window design landscape is characterized by a fusion of technological innovation, sustainability considerations, and a renewed appreciation for natural light and its impact on well-being. This article explores the key trends shaping this evolution, highlighting their impact on residential and commercial spaces alike.

1. Maximizing Natural Light: Embracing Transparency and Openness

The desire for natural light is a driving force in contemporary design. This trend manifests in several ways:

  • Larger Window Panes: Larger window panes create expansive views and flood interiors with light, blurring the line between indoors and outdoors. This approach fosters a sense of spaciousness and connection to the surrounding environment.
  • Floor-to-Ceiling Windows: Floor-to-ceiling windows maximize light penetration and create a dramatic visual impact. They enhance the sense of openness and connect inhabitants directly to the landscape.
  • Corner Windows: Corner windows provide panoramic views and increase the amount of natural light entering a room. They are particularly effective in maximizing light in living areas and bedrooms.
  • Skylights: Skylights introduce natural light from above, illuminating spaces that might otherwise be dark. They offer a unique perspective and create a sense of openness within the building.

The benefits of maximizing natural light extend beyond aesthetics. Studies have shown that exposure to sunlight improves mood, boosts productivity, and promotes better sleep.

2. Smart Windows: Adapting to the Environment

Technology is playing a pivotal role in the evolution of window design. Smart windows are becoming increasingly popular, offering dynamic control over light, heat, and privacy.

  • Electrochromic Glass: Electrochromic glass can transition between clear and tinted states, allowing users to control light transmission and glare. This technology is particularly beneficial in areas with high solar exposure, reducing energy consumption and improving comfort.
  • Photochromic Glass: Photochromic glass darkens automatically in response to UV light, providing shade and glare reduction without the need for blinds or curtains. It is a convenient and energy-efficient solution for windows exposed to direct sunlight.
  • Self-Cleaning Glass: Self-cleaning glass uses a photocatalytic coating to break down dirt and grime, reducing the need for manual cleaning. This technology is particularly beneficial in high-rise buildings and urban environments where air pollution is a concern.

Smart windows enhance user control over the environment and contribute to energy efficiency, making buildings more sustainable and responsive to their surroundings.

3. Minimalist Design: Simplicity and Elegance

Minimalism is a prevailing aesthetic in contemporary architecture. This trend is reflected in window design through the use of:

  • Slim Frames: Slim frames minimize visual obstruction, maximizing the view and allowing light to flow freely. This approach creates a sense of lightness and transparency.
  • Clean Lines: Clean lines and geometric shapes contribute to a minimalist aesthetic. The absence of unnecessary ornamentation enhances the overall visual impact of the windows.
  • Hidden Hardware: Hidden hardware further emphasizes the minimalist design by minimizing visible elements. This approach creates a sleek and streamlined appearance.

Minimalist window design emphasizes simplicity and functionality, creating a sense of calm and order within the space.

4. Sustainable Solutions: Energy Efficiency and Environmental Responsibility

Sustainability is a growing concern in the building industry, and window design is no exception. Sustainable window solutions prioritize energy efficiency and environmental responsibility:

  • High-Performance Glazing: High-performance glazing features multiple panes with low-emissivity coatings and gas fills, reducing heat loss and improving insulation. This technology helps to minimize energy consumption for heating and cooling, contributing to a building’s overall sustainability.
  • Recycled and Sustainable Materials: Window manufacturers are increasingly using recycled and sustainable materials, such as recycled aluminum and wood from sustainable forests. This approach minimizes environmental impact and promotes responsible resource management.
  • Solar-Powered Windows: Solar-powered windows generate electricity from sunlight, reducing reliance on traditional power sources. These innovative windows can contribute to a building’s energy independence and reduce its carbon footprint.

Sustainable window design contributes to a greener future by reducing energy consumption and promoting the use of eco-friendly materials.

5. Beyond Function: Windows as Design Statements

Windows are no longer just functional openings. They are becoming increasingly integrated into the overall design concept, serving as artistic elements and architectural focal points.

  • Custom Shapes and Patterns: Custom shapes and patterns add a unique touch to window design, allowing architects to create visually striking features. Geometric patterns, curves, and irregular shapes can enhance the aesthetic appeal of a building.
  • Integrated Lighting: Integrated lighting within window frames adds a layer of complexity and dynamism to the design. It can create dramatic effects, enhance nighttime visibility, and contribute to the overall ambiance of the space.
  • Window Walls: Window walls offer expansive views and create a seamless connection between indoors and outdoors. They are particularly effective in residential settings, blurring the boundaries between the living space and the surrounding landscape.

These innovative design approaches elevate windows beyond their functional role, transforming them into integral components of the architectural vocabulary.

FAQs

Q: What are the benefits of larger window panes?

A: Larger window panes offer several benefits:

  • Increased natural light: They allow more sunlight to penetrate the interior, creating a brighter and more welcoming space.
  • Expansive views: They provide wider perspectives, connecting occupants to the surrounding environment and enhancing the sense of openness.
  • Improved air circulation: Larger window panes can improve ventilation and air circulation, creating a healthier indoor environment.

Q: How do smart windows contribute to energy efficiency?

A: Smart windows offer several energy-saving features:

  • Dynamic light control: They allow users to adjust light transmission, reducing glare and heat gain during peak sunlight hours.
  • Improved insulation: Some smart windows feature advanced glazing technologies that enhance insulation, reducing heat loss in winter and heat gain in summer.
  • Reduced reliance on artificial lighting: By maximizing natural light, smart windows can reduce the need for artificial lighting, further decreasing energy consumption.

Q: What are the benefits of using recycled materials in window design?

A: Using recycled materials in window design offers several benefits:

  • Reduced environmental impact: Recycling materials reduces the need for new resources, minimizing the impact on natural resources and reducing greenhouse gas emissions.
  • Sustainable manufacturing: Using recycled materials supports a circular economy, reducing waste and promoting responsible resource management.
  • Cost-effectiveness: Recycled materials can be more cost-effective than virgin materials, making sustainable window solutions more accessible.

Q: How can custom window shapes enhance the aesthetic appeal of a building?

A: Custom window shapes offer several design possibilities:

  • Unique character: They add a distinctive element to a building’s facade, creating a unique visual identity.
  • Architectural focal points: Custom shapes can be used to highlight specific areas of the building, drawing attention to key features.
  • Creative expressions: They allow architects to experiment with form and function, pushing the boundaries of traditional window design.

Tips

  • Consider your climate: When selecting windows, consider your local climate and the amount of sunlight your home receives. This will help you choose the appropriate glazing and shading solutions.
  • Prioritize energy efficiency: Look for windows with high-performance glazing, low-emissivity coatings, and gas fills to maximize energy efficiency and reduce your energy bills.
  • Explore sustainable options: Consider windows made from recycled materials and those that incorporate energy-saving features.
  • Consult with a professional: Consult with an architect or window specialist to discuss your specific needs and design preferences. They can help you choose the right windows for your project.

Conclusion

Window design is undergoing a dynamic transformation, driven by a confluence of technological innovation, sustainability considerations, and a renewed appreciation for natural light and its impact on well-being. The trends outlined in this article demonstrate a shift towards windows that are not only functional but also aesthetically pleasing, energy-efficient, and responsive to the environment. As technology continues to advance and our understanding of sustainable design evolves, we can expect to see even more innovative and inspiring window designs in the years to come. These advancements will continue to reshape our built environment, creating spaces that are both beautiful and sustainable.

Modern Windows That Will Show You Whole World Organic Meets Curved Architectural Design Trend: House in The Landscape  TrendBook Trend 8 Ways Architectural Windows Are Shaping Residential Design
20 Best Midcentury Modern Landscaping Ideas Sky shaping windows  Projeto arquitetonico, Interior design magazine, Arquiteta Top 60 Amazing Windows Design Ideas You Want To See Them - Engineering Discoveries
AVIC Park, Hongdu Nanchang, by YIYU design « Landscape Architecture Works  Landezine Magazine Housing Trends That Are Shaping Window Designs - Quad City Windows

Closure

Thus, we hope this article has provided valuable insights into Evolving Perspectives: Window Design Trends Shaping the Modern Landscape. We hope you find this article informative and beneficial. See you in our next article!

Navigating The PCWorld Windows 10 Pro Deal: A Comprehensive Guide

Navigating the PCWorld Windows 10 Pro Deal: A Comprehensive Guide

Introduction

With enthusiasm, let’s navigate through the intriguing topic related to Navigating the PCWorld Windows 10 Pro Deal: A Comprehensive Guide. Let’s weave interesting information and offer fresh perspectives to the readers.

MICROSOFT Windows 10 Pro Deals  PC World

The world of technology is constantly evolving, and with it, the need for reliable and efficient operating systems. Microsoft’s Windows 10 Pro, known for its robust features and security enhancements, has become a staple for businesses and individuals alike. PCWorld, a leading technology retailer, frequently offers deals on Windows 10 Pro, presenting an opportunity for users to upgrade or acquire this powerful operating system at a discounted price. This article delves into the nuances of these deals, exploring their significance, benefits, and considerations for potential buyers.

Understanding the Essence of the PCWorld Windows 10 Pro Deal:

PCWorld’s Windows 10 Pro deals are essentially promotional offers that provide users with discounted access to the full-fledged Windows 10 Pro operating system. These deals can manifest in various forms:

  • Standalone Licenses: PCWorld may offer standalone licenses for Windows 10 Pro, allowing users to install it on a new or existing computer.
  • Bundled Offers: Deals might include Windows 10 Pro bundled with other products like hardware components, software suites, or peripherals, providing users with a comprehensive package at a reduced price.
  • Upgrade Packages: PCWorld may offer deals enabling users to upgrade from a previous version of Windows to Windows 10 Pro.

Delving Deeper: Benefits of PCWorld Windows 10 Pro Deals:

  • Cost Savings: The primary advantage of these deals is the potential for significant cost savings. Acquiring Windows 10 Pro through a promotional offer can be significantly cheaper than purchasing a full-priced license, making it a financially appealing option for budget-conscious users.
  • Access to Premium Features: Windows 10 Pro offers a range of advanced features that are not available in the standard Windows 10 Home edition. These features include enhanced security measures like BitLocker drive encryption, remote desktop access, and domain join capabilities, which are particularly beneficial for businesses and professionals.
  • Enhanced Security: Windows 10 Pro prioritizes security, offering features like Windows Defender Advanced Threat Protection and Device Guard, which provide robust protection against malware and cyber threats. This enhanced security is crucial for businesses and individuals who handle sensitive data.
  • Improved Productivity: Windows 10 Pro includes features that can boost productivity, such as the ability to manage multiple virtual desktops, use Windows To Go for portable working environments, and leverage advanced networking capabilities.
  • Comprehensive Functionality: Windows 10 Pro offers a comprehensive set of tools and features for various tasks, including web browsing, document creation, multimedia playback, and gaming. Its compatibility with a wide range of software and hardware ensures a versatile and user-friendly experience.

Navigating the Deal: Considerations and Factors to Weigh:

While PCWorld Windows 10 Pro deals present attractive opportunities, it’s essential to consider several factors before making a purchase:

  • Compatibility: Ensure the deal’s Windows 10 Pro edition is compatible with your existing hardware and software. Check system requirements and compatibility information before proceeding.
  • License Type: Understand the type of license included in the deal. Some deals may offer retail licenses, while others might offer OEM licenses, which are tied to specific hardware.
  • Validity and Expiration: Clarify the validity period of the deal and the expiration date of the license. Some deals might offer limited-time discounts or have specific expiration dates.
  • Terms and Conditions: Carefully review the terms and conditions of the deal, including any restrictions or limitations on usage or installation.

FAQs: Addressing Common Questions About PCWorld Windows 10 Pro Deals:

1. What are the system requirements for Windows 10 Pro?

Windows 10 Pro has specific system requirements, including processor speed, RAM, storage space, and display resolution. These requirements can vary depending on the version of Windows 10 Pro. It’s crucial to check the system requirements before purchasing to ensure compatibility with your hardware.

2. How do I activate Windows 10 Pro after purchasing it from PCWorld?

The activation process typically involves entering a product key provided with the purchase. You can activate Windows 10 Pro by going to "Settings" > "Update & Security" > "Activation" and entering the product key.

3. Can I upgrade from Windows 10 Home to Windows 10 Pro using a PCWorld deal?

Yes, some PCWorld deals might offer upgrade packages that allow you to upgrade from Windows 10 Home to Windows 10 Pro. However, these deals may have specific requirements and limitations. It’s essential to check the terms and conditions of the deal before making a purchase.

4. What are the main differences between Windows 10 Home and Windows 10 Pro?

Windows 10 Pro offers advanced features not included in Windows 10 Home, such as BitLocker drive encryption, remote desktop access, domain join capabilities, and Windows Defender Advanced Threat Protection.

5. How can I find the best PCWorld Windows 10 Pro deal?

PCWorld regularly updates its deals and promotions. The best way to find the best deal is to check the PCWorld website, subscribe to their email newsletters, or follow their social media accounts for announcements.

6. What are the advantages of purchasing Windows 10 Pro from PCWorld?

Purchasing Windows 10 Pro from PCWorld offers several advantages, including competitive pricing, reliable customer support, and access to a wide range of other tech products and services.

7. Can I use Windows 10 Pro on multiple computers?

Windows 10 Pro licenses are typically tied to a specific device. If you want to use Windows 10 Pro on multiple computers, you will need to purchase separate licenses for each device.

Tips for Maximizing the PCWorld Windows 10 Pro Deal:

  • Compare Prices: Before purchasing, compare prices from different retailers to ensure you’re getting the best deal.
  • Read Reviews: Check user reviews and ratings to get an idea of the quality and reliability of the deal.
  • Check for Bundles: Look for bundles that include Windows 10 Pro with other products or services, as this can save you money.
  • Consider Long-Term Costs: Factor in the cost of future upgrades and support when evaluating the deal.
  • Stay Informed: Keep an eye on PCWorld’s website and promotions to stay updated on the latest deals.

Conclusion: Embracing the Power of Windows 10 Pro Through PCWorld Deals:

PCWorld Windows 10 Pro deals provide a valuable opportunity for users to acquire this powerful operating system at a discounted price. By understanding the benefits, considerations, and navigating the various aspects of these deals, users can make informed decisions and leverage the full potential of Windows 10 Pro. Whether you’re a business owner seeking enhanced security and productivity features or an individual looking for a reliable and versatile operating system, PCWorld’s deals can be a gateway to unlocking the power of Windows 10 Pro.

Get Windows 10 Pro for 75% off! Then upgrade to Windows 11 for free  PCWorld Microsoft Windows 10 Pro License $79.00 @ PCWorld - OzBargain [PC World Software] Windows 10 Professional $59.99 CDN or $39.99 USD - RedFlagDeals.com Forums
How Microsoft could make Windows 10 Pro the OS for PC enthusiasts  PCWorld Buy Windows 10: the best deals and cheapest prices in August 2024  TechRadar Microsoft Windows 10 Pro  Shacknews
Windows 10 Pro deal: save 84% and upgrade up to three computers  Mashable Windows 10 Pro

Closure

Thus, we hope this article has provided valuable insights into Navigating the PCWorld Windows 10 Pro Deal: A Comprehensive Guide. We hope you find this article informative and beneficial. See you in our next article!

Navigating The Digital Landscape: QR Code Reader Apps For Windows 10

Navigating the Digital Landscape: QR Code Reader Apps for Windows 10

Introduction

With enthusiasm, let’s navigate through the intriguing topic related to Navigating the Digital Landscape: QR Code Reader Apps for Windows 10. Let’s weave interesting information and offer fresh perspectives to the readers.

Generate Qr Code In Windows 10 Knowledge Sharing Tech - vrogue.co

In an era characterized by the ubiquitous presence of mobile devices, the seemingly simple QR code has emerged as a powerful tool for bridging the gap between the physical and digital worlds. These square-shaped barcodes, composed of black and white squares, hold the potential to unlock a wealth of information, services, and experiences. While smartphone users have readily adopted QR code scanning applications, Windows 10 users have also embraced this technology, finding numerous applications for QR code readers on their personal computers.

This article delves into the world of QR code reader apps for Windows 10, exploring their functionalities, benefits, and the diverse ways in which they enhance user experiences.

The Essence of QR Code Readers

At their core, QR code reader apps are software programs designed to interpret the encoded information within a QR code. These apps use the camera of a computer, typically a webcam, to capture an image of the code. The software then analyzes the patterns within the code, deciphering the embedded data, which can range from simple URLs to complex data sets.

Benefits of Utilizing QR Code Reader Apps on Windows 10

The integration of QR code reader apps on Windows 10 offers a range of advantages, making them an indispensable tool for both personal and professional use:

  • Effortless Access to Information: QR codes act as gateways to a vast repository of information. They can link to websites, articles, product details, social media profiles, and more. By simply scanning a code, users can instantly access the desired content, eliminating the need for manual typing or searching.

  • Enhanced User Experience: QR codes can be seamlessly integrated into various contexts, enhancing user interactions. For instance, businesses can use them to display product information, provide coupons, or offer interactive experiences. Educational institutions can utilize QR codes to provide access to supplementary materials or conduct quizzes.

  • Streamlined Operations: QR codes streamline various processes, improving efficiency and reducing errors. They can be used for inventory management, tracking shipments, accessing digital documents, or even facilitating contactless payments.

  • Security and Authentication: QR codes can play a vital role in enhancing security and authentication. They can be used to verify user identities, access secure websites, or authenticate transactions.

Types of QR Code Reader Apps for Windows 10

The Windows 10 app store offers a diverse selection of QR code reader apps, each with its unique features and capabilities. These apps can be categorized based on their functionalities:

  • Basic QR Code Readers: These apps focus on the core functionality of scanning and decoding QR codes. They typically offer a simple interface, allowing users to quickly scan codes and access the underlying information.

  • Advanced QR Code Readers: These apps go beyond basic scanning, offering additional features such as code generation, barcode support, and integration with other applications. They may also provide advanced analytics or allow users to customize their reading experience.

  • Specialized QR Code Readers: These apps cater to specific industries or use cases. For instance, there are QR code readers designed for retail, healthcare, or education. They often include industry-specific features and functionalities.

Choosing the Right QR Code Reader App

Selecting the appropriate QR code reader app depends on individual needs and preferences. Factors to consider include:

  • Functionality: Determine the specific features and capabilities required for your use case. Consider whether you need basic scanning, advanced features, or specialized functionalities.

  • User Interface: Choose an app with a user-friendly interface that is intuitive and easy to navigate.

  • Performance: Opt for an app that offers fast and reliable scanning, ensuring smooth and efficient operation.

  • Security: If security is a concern, choose an app that prioritizes data protection and privacy.

  • Compatibility: Ensure the app is compatible with your Windows 10 version and device.

Popular QR Code Reader Apps for Windows 10

Several popular QR code reader apps are available for Windows 10, each offering a unique combination of features and benefits:

  • QR Code Reader by Readdle: Known for its simplicity and ease of use, this app provides a straightforward scanning experience with minimal clutter. It supports various QR code types and offers basic features like history and code generation.

  • QR & Barcode Scanner by Scanova: This app boasts a comprehensive feature set, including support for multiple barcode types, code generation, and integration with other apps. It also offers advanced features like batch scanning and automatic code recognition.

  • QR Code Scanner by 4Apps Studio: This app emphasizes speed and efficiency, providing a rapid scanning experience with minimal delays. It supports various QR code types and offers basic features like code sharing and history.

Beyond Basic Scanning: Advanced Features

While basic scanning functionality is essential, some QR code reader apps offer advanced features that enhance the user experience:

  • Code Generation: Some apps allow users to create their own QR codes, enabling them to encode URLs, text, contact information, or other data.

  • Barcode Support: Some apps support a wide range of barcodes, including UPC, EAN, ISBN, and more. This versatility expands the range of applications for the app, enabling users to scan and decode various types of barcodes.

  • Integration with Other Applications: Some apps integrate with other applications, such as browsers, email clients, or social media platforms. This integration allows users to seamlessly share scanned information or access additional functionalities.

  • Advanced Analytics: Some apps provide advanced analytics, allowing users to track the number of scans, analyze scan data, or generate reports. This feature is particularly useful for businesses or organizations that use QR codes for marketing or data collection purposes.

  • Customization: Some apps offer customization options, allowing users to personalize their reading experience. This may include changing the appearance of the app, selecting preferred scan modes, or configuring advanced settings.

FAQs Regarding QR Code Reader Apps for Windows 10

Q: What are the benefits of using a QR code reader app on Windows 10?

A: Using a QR code reader app on Windows 10 offers numerous benefits, including effortless access to information, enhanced user experiences, streamlined operations, and improved security and authentication.

Q: Are QR code reader apps safe to use?

A: Most QR code reader apps are safe to use, but it’s essential to download apps from trusted sources, such as the Microsoft Store. Avoid downloading apps from unknown or untrusted websites, as they may contain malware or other security threats.

Q: How do I choose the right QR code reader app for my needs?

A: Consider your specific requirements, such as functionality, user interface, performance, security, and compatibility, when choosing a QR code reader app.

Q: Can I generate my own QR codes using a QR code reader app?

A: Yes, some QR code reader apps offer code generation capabilities, allowing you to create your own QR codes.

Q: Can I use a QR code reader app to scan barcodes?

A: Some QR code reader apps support a wide range of barcodes, including UPC, EAN, ISBN, and more.

Q: Are QR code reader apps free?

A: Many QR code reader apps are available for free, while others may offer premium features for a subscription fee.

Tips for Using QR Code Reader Apps Effectively

  • Ensure Proper Lighting: Adequate lighting is crucial for accurate scanning. Ensure the QR code is well-lit and free from shadows.

  • Maintain a Stable Position: Hold the camera steady during scanning to avoid blurry images.

  • Adjust Camera Focus: If the code is not being scanned correctly, adjust the camera focus to ensure clarity.

  • Try Different Apps: If one app fails to scan a code, try another app to see if it can decode it successfully.

  • Explore Advanced Features: Familiarize yourself with the advanced features of your chosen app to enhance your scanning experience.

Conclusion

QR code reader apps have become an integral part of the digital landscape, offering Windows 10 users a convenient and efficient way to interact with the world around them. These apps unlock a wealth of information, streamline processes, and enhance user experiences. By choosing the right app and utilizing its features effectively, users can leverage the power of QR codes to navigate the digital world with ease and efficiency.

QR Code Scanner for Windows 10 Mobile Get QR Scanner Plus - Microsoft Store CodeTwo QR Code Desktop Reader - Windows 10 Download
4 Best QR Code Reader for Windows (Updated) QR Code Reader ٞ for PC - Free Download  WindowsDen (Win 10/8/7) Qr Code Scanner For Windows
QR code Scanner for Windows 10  Camera and Image Scan  สแกน qr - STC EDU QR Code & Barcode Scanner für PC - Windows 7/10/11 (Deutsch) - Download kostenlos

Closure

Thus, we hope this article has provided valuable insights into Navigating the Digital Landscape: QR Code Reader Apps for Windows 10. We hope you find this article informative and beneficial. See you in our next article!

Unraveling The Mystery: Why Your Windows 11 PC Won’t Wake Up From Sleep

Unraveling the Mystery: Why Your Windows 11 PC Won’t Wake Up From Sleep

Introduction

With enthusiasm, let’s navigate through the intriguing topic related to Unraveling the Mystery: Why Your Windows 11 PC Won’t Wake Up From Sleep. Let’s weave interesting information and offer fresh perspectives to the readers.

Unraveling the Mystery: Why Your Windows 11 PC Won’t Wake Up From Sleep

Windows 11: Computer Won't Wake Up From Sleep [SOLVED]

The convenience of sleep mode in Windows 11 is undeniable. It allows users to quickly suspend their systems, preserving power while maintaining an almost instant resumption of work. However, encountering a situation where your PC fails to wake up from sleep can be frustrating and disruptive. This article delves into the common causes behind this issue, offering practical solutions and insights to regain the seamless functionality of your Windows 11 system.

Understanding the Sleep State and its Potential Pitfalls

Windows 11 offers two primary sleep modes:

  • Sleep: This mode conserves energy by putting the system in a low-power state, allowing it to quickly resume operation. The system’s RAM retains data, ensuring a swift return to your active applications and files.
  • Hibernate: This mode saves the entire system state to the hard drive, effectively shutting down the system while preserving all data. Upon waking, the system restores its state from the hard drive, potentially taking longer than waking from sleep.

While both modes offer power-saving benefits, the sleep mode is generally preferred for its speed and convenience. However, various factors can disrupt the smooth functioning of this mode, leading to a system that refuses to wake up.

Unveiling the Culprits: Common Causes of Sleep Mode Failure

The inability of a Windows 11 PC to wake up from sleep can stem from a variety of sources, ranging from simple configuration issues to more complex hardware malfunctions. Here’s a breakdown of the most prevalent causes:

1. Power Management Settings:

Incorrectly configured power management settings can be a primary culprit. Windows 11 allows users to customize how the system behaves when entering sleep mode, including how it responds to wake-up events. If these settings are not configured correctly, the system might not respond to the desired wake-up triggers, such as pressing a key or moving the mouse.

2. Device Drivers:

Outdated or incompatible device drivers can interfere with the system’s ability to wake up from sleep. This is particularly true for peripherals like keyboards, mice, network adapters, and even graphics cards. These drivers often contain code that interacts with the system’s power management functions, and any incompatibility can lead to sleep mode failure.

3. Hardware Issues:

While less common, hardware issues can also prevent the system from waking up. This could include faulty RAM modules, a malfunctioning power supply, or a failing motherboard component. These hardware issues can disrupt the system’s power flow, hindering its ability to enter and exit sleep mode properly.

4. Software Conflicts:

Certain software applications can interfere with the system’s sleep mode functionality. These could include antivirus programs, security software, or even system optimization tools. These programs often run in the background, and their interactions with the system’s power management settings can cause disruptions.

5. BIOS Settings:

The BIOS (Basic Input/Output System) is a low-level firmware that controls the system’s hardware. Incorrectly configured BIOS settings can also affect the system’s ability to wake up from sleep. This includes settings related to power management, wake-up events, and device initialization.

6. Overheating:

While less common, overheating can also cause sleep mode issues. If the system’s temperature exceeds a certain threshold, it might automatically shut down or enter a sleep state to prevent damage. However, the system might not be able to wake up until the temperature cools down.

7. System Updates:

Windows updates, while generally beneficial, can sometimes introduce bugs or conflicts that disrupt sleep mode functionality. This is particularly true for major updates that introduce significant changes to the system’s core components.

8. Malware:

Malicious software can also interfere with the system’s power management functions. Malware can alter system settings, introduce conflicting code, or even directly manipulate the system’s hardware, leading to sleep mode failure.

Troubleshooting and Resolution Strategies: A Step-by-Step Approach

Addressing the issue of a PC not waking up from sleep requires a systematic approach, starting with basic troubleshooting steps and gradually moving towards more complex solutions. Here’s a comprehensive guide:

1. Verify Power Management Settings:

  • Access Power Options: Open the Control Panel and navigate to "Power Options."
  • System Settings: Select "Choose what the power buttons do" and ensure that the desired wake-up behavior is selected for the power button and other wake-up triggers like keyboard and mouse.
  • Advanced Settings: Click "Change advanced power settings" and explore the various options related to sleep mode, wake-up timers, and device behavior.
  • USB Settings: Within the advanced settings, check the "USB settings" and ensure that the "Allow the computer to turn off this device to save power" option is unchecked for devices you want to be able to wake up the system.

2. Update Device Drivers:

  • Device Manager: Access the Device Manager by searching for it in the Start menu.
  • Driver Updates: Go through each device category and check for any drivers that might need updating. Right-click on the device and select "Update driver."
  • Manufacturer Websites: If the Device Manager doesn’t find updates, visit the manufacturer’s website for the latest drivers specific to your system and devices.

3. Check for Hardware Issues:

  • Diagnostic Tests: Run diagnostic tests for RAM, hard drive, and other components using built-in Windows tools or third-party software.
  • Power Supply: Ensure that the power supply is functioning correctly and delivering sufficient power to the system. Consider testing it with a known working power supply if possible.
  • Visual Inspection: Visually inspect the system for any loose connections, damaged components, or signs of overheating.

4. Identify and Address Software Conflicts:

  • Recent Software: Identify any recently installed software that might be causing conflicts. Try temporarily disabling or uninstalling these programs to see if it resolves the issue.
  • Antivirus and Security Software: Temporarily disable antivirus and security software to rule out conflicts. However, this should be done only temporarily and with caution.
  • System Optimization Tools: Uninstall or disable system optimization tools that might be interfering with power management settings.

5. Configure BIOS Settings:

  • Access BIOS: Restart your system and press the appropriate key (usually F2, F10, or Del) during the boot process to enter the BIOS setup.
  • Power Management: Locate the power management settings and ensure that the system is configured to wake up from sleep mode using the desired triggers.
  • Wake-on-LAN: If you use a wired network connection, enable Wake-on-LAN (WOL) in the BIOS settings to allow the system to wake up from sleep via network signals.

6. Address Overheating Issues:

  • Cooling System: Ensure that the system’s cooling system (fans, heatsinks) is working correctly and not clogged with dust. Clean or replace the cooling system if necessary.
  • Thermal Paste: Check the thermal paste on the CPU and GPU for proper application and potential degradation. Reapply thermal paste if needed.
  • System Temperature: Monitor the system’s temperature using monitoring software to identify any potential overheating issues.

7. Reinstall Windows:

If all other troubleshooting steps fail, reinstalling Windows might be the last resort. This will restore the system to a clean state, eliminating any potential software conflicts or corrupted system files that might be causing the issue.

8. Seek Professional Help:

If the problem persists despite following all the steps above, it’s best to seek professional help from a qualified technician. They can diagnose and fix more complex hardware issues or provide specialized troubleshooting for specific system configurations.

Frequently Asked Questions (FAQs): Addressing Common Queries

1. My PC wakes up from sleep when I press the power button but not when I move the mouse or press a key.

This suggests a problem with the keyboard or mouse settings. Check the power management settings for these devices and ensure that they are configured to wake up the system.

2. My PC wakes up from sleep when connected to the power outlet but not when running on battery power.

This indicates a potential issue with the battery or the system’s power management settings. Ensure that the battery is properly charged and that the system is configured to wake up from sleep while on battery power.

3. I recently installed a new device, and now my PC won’t wake up from sleep.

The newly installed device might have incompatible drivers or settings that are interfering with the system’s sleep mode functionality. Update the device drivers and check the power management settings for the device.

4. My PC wakes up from sleep randomly during the night.

This could be caused by a faulty component, a software conflict, or even a scheduled task that is triggering the wake-up event. Check the system’s event logs for any errors or warnings related to sleep mode.

5. My PC wakes up from sleep but freezes or crashes soon after.

This indicates a potential issue with the system’s hardware, software, or drivers. Run diagnostic tests for hardware components and check for any recent software updates or driver installations that might be causing the issue.

Tips for Preventing Sleep Mode Issues:

  • Regular Driver Updates: Regularly update device drivers to ensure compatibility and optimal performance.
  • Avoid Overheating: Ensure proper airflow and ventilation within the system to prevent overheating.
  • Minimize Background Software: Limit the number of background applications running to reduce potential conflicts.
  • System Maintenance: Regularly perform system maintenance tasks like disk cleanup, defragmentation, and registry cleaning to optimize system performance and prevent issues.
  • Backup Data: Regularly back up important data to prevent data loss in case of hardware failures or system crashes.

Conclusion: Regaining Sleep Mode Functionality

The inability of a Windows 11 PC to wake up from sleep can be a frustrating issue. However, by understanding the potential causes and following a systematic troubleshooting approach, users can effectively diagnose and resolve the problem. From checking power management settings to updating drivers and addressing potential hardware issues, the steps outlined in this article provide a comprehensive guide to restoring the smooth functionality of sleep mode. Remember to exercise caution and seek professional help if necessary, ensuring a seamless and efficient user experience with your Windows 11 system.

Computer Won't Wake up from Sleep Windows 11 Issue [Fixed] Fix Windows 11 Won’t Sleep [Solved 2024] [SOLVED] Computer Won't Wake Up From Sleep Windows 11/10 - Driver Easy
Windows 11/10: Fix PC Won’t Wake Up From Sleep Mode - YouTube Windows 11 Not Going To Sleep [SOLVED] Windows 11 Won't Go To Sleep (2024)
Computer Won’t Wake Up From Sleep on Windows 11 [Fixed] [Solved] How to Fix “Windows 11 Won't Wake From Sleep”

Closure

Thus, we hope this article has provided valuable insights into Unraveling the Mystery: Why Your Windows 11 PC Won’t Wake Up From Sleep. We thank you for taking the time to read this article. See you in our next article!

Unlocking The Potential Of Nearby Sharing: Troubleshooting Common Issues

Unlocking the Potential of Nearby Sharing: Troubleshooting Common Issues

Introduction

In this auspicious occasion, we are delighted to delve into the intriguing topic related to Unlocking the Potential of Nearby Sharing: Troubleshooting Common Issues. Let’s weave interesting information and offer fresh perspectives to the readers.

Unlocking the Potential of Nearby Sharing: Troubleshooting Common Issues

Nearby Share Not Working on Windows 11? Try These Proven Solutions

Nearby sharing, a technology that enables seamless file transfer between devices in close proximity, has revolutionized how we share content. Its simplicity and ease of use have made it a preferred choice for quickly exchanging files, photos, and documents. However, like any technology, it can encounter hiccups, leaving users frustrated when the intended transfer fails.

This article delves into the common reasons why nearby sharing might not function as expected, offering practical solutions and insightful explanations to empower users to diagnose and resolve issues. By understanding the intricacies of nearby sharing, users can unlock its full potential and enjoy its benefits.

Understanding the Mechanics of Nearby Sharing

Nearby sharing, also known as file sharing or file transfer, relies on a combination of Bluetooth and Wi-Fi technologies to establish a secure connection between devices. This connection enables the transfer of files between devices within a short range, typically within a few meters.

The process involves several steps:

  1. Discovery: Devices initiate a search for nearby compatible devices.
  2. Pairing: Once a compatible device is found, the two devices pair, establishing a secure connection.
  3. Transfer: The sending device initiates the file transfer, transmitting the data to the receiving device.

Common Issues Preventing Nearby Sharing

While nearby sharing offers a convenient way to transfer files, several factors can hinder its smooth operation. Identifying the root cause is crucial to address the issue effectively. Here are some common reasons why nearby sharing might not work:

1. Bluetooth and Wi-Fi Connectivity Issues

  • Bluetooth Disabled: Ensure that Bluetooth is enabled on both devices involved in the transfer.
  • Bluetooth Range: The range of Bluetooth is limited, typically around 10 meters. Ensure both devices are within this range for successful connection.
  • Bluetooth Interference: Other devices, such as wireless routers or microwaves, can interfere with Bluetooth signals. Try relocating the devices or temporarily disabling other wireless devices.
  • Wi-Fi Connectivity: Some nearby sharing implementations rely on a Wi-Fi connection for faster file transfer. Verify that both devices have a stable Wi-Fi connection.

2. Device Compatibility and Software Issues

  • Operating System Compatibility: Nearby sharing functionality might not be available on older operating systems or devices. Ensure that both devices meet the minimum system requirements for nearby sharing.
  • Software Updates: Outdated software on either device can lead to compatibility issues. Update both devices to the latest software versions to ensure proper functionality.
  • App Compatibility: If using a specific app for nearby sharing, ensure both devices have the same app installed and are up-to-date.

3. Security and Privacy Settings

  • Nearby Sharing Permissions: Ensure that both devices have allowed nearby sharing in their settings.
  • Device Discoverability: Some devices might be set to hide from other devices. Ensure that both devices are discoverable for successful pairing.
  • Bluetooth Pairing Settings: Check the Bluetooth pairing settings on both devices to ensure that they allow connections from unknown devices.

4. File Size Limitations

  • File Size Restrictions: Some nearby sharing implementations might have limitations on the size of files that can be transferred. Verify the file size restrictions for the specific implementation.

5. Other Factors

  • Battery Life: Ensure both devices have sufficient battery life to complete the transfer.
  • Background Processes: Running demanding applications or background processes might interfere with nearby sharing. Close unnecessary applications on both devices.
  • Device Hardware: Faulty hardware components, such as the Bluetooth chip, can prevent nearby sharing from functioning correctly.

Troubleshooting Tips for Resolving Nearby Sharing Issues

  • Restart Devices: A simple restart can resolve minor software glitches and refresh connections.
  • Enable/Disable Bluetooth and Wi-Fi: Toggle Bluetooth and Wi-Fi on and off to reset the connections.
  • Check for Updates: Update both devices to the latest software versions to address known compatibility issues.
  • Clear Bluetooth Cache: Clear the Bluetooth cache on both devices to remove outdated connections.
  • Reset Bluetooth Settings: Reset the Bluetooth settings on both devices to their factory defaults.
  • Check Device Discoverability: Ensure that both devices are set to be discoverable for pairing.
  • Verify File Size Limitations: Ensure that the file size is within the allowed limits for nearby sharing.
  • Disable Other Wireless Devices: Temporarily disable other wireless devices, such as microwaves or wireless routers, to minimize interference.
  • Contact Device Manufacturer: If all else fails, contact the device manufacturer for support and technical assistance.

FAQs Regarding Nearby Sharing Issues

Q: Why can’t I see other devices in the nearby sharing menu?
A: This could be due to several factors, including Bluetooth being disabled, devices not being discoverable, or compatibility issues. Check Bluetooth settings, ensure discoverability, and verify software compatibility.

Q: What if the nearby sharing connection keeps disconnecting?
A: This could be due to Bluetooth range limitations, interference from other wireless devices, or battery issues. Ensure devices are within range, minimize interference, and check battery levels.

Q: Why is the file transfer taking too long?
A: File transfer speed can be affected by factors like file size, device hardware, and network conditions. Consider transferring smaller files or improving network connectivity for faster transfers.

Q: How can I improve nearby sharing performance?
A: Ensure devices are within Bluetooth range, minimize interference, update software, and close unnecessary background applications.

Conclusion

Nearby sharing offers a seamless and convenient way to transfer files between devices. However, understanding the common issues and troubleshooting techniques empowers users to resolve problems and unlock the full potential of this technology. By addressing connectivity issues, software compatibility, security settings, and other factors, users can ensure a smooth and efficient file transfer experience.

The Best Network Troubleshoot Tools Top 6 Ways to Fix Nearby Sharing Not Working on Windows 11 - TechWiser Nearby Sharing Not Working on Windows 11: Fix it Now!
How to Fix Nearby Sharing Not Working on Windows 10 Ways to Fix Nearby Share Not Working on Android - TechPP Fix Nearby Sharing not working in Windows 10 - YouTube
Network Troubleshooting - Methodology, Steps & Techniques - DNSstuff How to enable and use Nearby Sharing on Windows 11/10

Closure

Thus, we hope this article has provided valuable insights into Unlocking the Potential of Nearby Sharing: Troubleshooting Common Issues. We appreciate your attention to our article. See you in our next article!

Accessing Affordable Computing Power: A Guide To Student Discounts On Windows 10

Accessing Affordable Computing Power: A Guide to Student Discounts on Windows 10

Introduction

In this auspicious occasion, we are delighted to delve into the intriguing topic related to Accessing Affordable Computing Power: A Guide to Student Discounts on Windows 10. Let’s weave interesting information and offer fresh perspectives to the readers.

Accessing Affordable Computing Power: A Guide to Student Discounts on Windows 10

How to Get Windows 10 Student Discount?

In today’s educational landscape, access to powerful and reliable computing tools is paramount for student success. While the cost of software can often pose a barrier, Microsoft recognizes the importance of equipping students with the necessary resources. This is where student discounts for Windows 10 come into play, offering significant savings on a robust operating system that can enhance learning experiences and empower academic pursuits.

Understanding the Value of Windows 10 for Students

Windows 10, Microsoft’s latest operating system, provides a comprehensive platform for students’ diverse needs. It offers a user-friendly interface, robust security features, and compatibility with a vast array of applications, including educational software, productivity tools, and creative applications.

Key Features for Students:

  • Seamless Integration: Windows 10 seamlessly integrates with other Microsoft products like Office 365, OneDrive, and OneNote, fostering a cohesive digital ecosystem for students.
  • Enhanced Productivity: Features like virtual desktops, Snap Assist, and Cortana voice assistant streamline workflows and enhance productivity, allowing students to manage multiple tasks efficiently.
  • Security and Privacy: Windows 10 prioritizes security with advanced features like Windows Defender Antivirus and SmartScreen filter, safeguarding against online threats and ensuring data privacy.
  • Accessibility: Windows 10 offers accessibility features for students with disabilities, including screen readers, magnifiers, and keyboard shortcuts, promoting inclusivity and equal access.
  • Gaming and Entertainment: Windows 10 supports a wide range of games and entertainment applications, providing students with opportunities for relaxation and recreation.

Navigating the Student Discount Landscape

Microsoft offers various avenues for students to access discounted Windows 10 licenses, each with its own eligibility criteria and benefits:

  • Microsoft Store: The Microsoft Store offers a dedicated student discount program. Eligibility is typically verified through a student email address or a valid student ID.
  • Academic Pricing: Educational institutions often have partnerships with Microsoft, providing students with access to discounted software licenses through their campus stores or online portals.
  • Microsoft Education: This program offers special pricing for educational institutions, allowing them to purchase Windows 10 licenses in bulk for their students and faculty.

Finding the Right Discount for Your Needs:

  • Verify Eligibility: Before making a purchase, carefully review the eligibility requirements for each discount program. Most programs require verification through a student email address, student ID, or institutional affiliation.
  • Compare Prices: Compare prices across different vendors and programs to find the most affordable option. Consider the total cost, including any additional software or services.
  • Consider Long-Term Value: Evaluate the benefits of a discounted license, such as future upgrades and technical support, to ensure it aligns with your long-term needs.

FAQs: Demystifying Student Discounts

Q: What are the eligibility requirements for student discounts?

A: Eligibility criteria vary depending on the program. Generally, students need to have a valid student email address, a student ID, or be affiliated with an eligible educational institution.

Q: How do I verify my eligibility?

A: Eligibility is usually verified through a student email address or student ID. Some programs may require additional documentation, such as a transcript or enrollment confirmation.

Q: How long does a student discount last?

A: The duration of a student discount can vary. Some discounts are valid for a specific period, such as one year, while others may be valid for the duration of your studies.

Q: Can I upgrade to a higher edition of Windows 10 using a student discount?

A: The specific options for upgrading may vary depending on the program and the type of discount.

Q: What are the benefits of a student discount?

A: Student discounts offer significant savings on Windows 10 licenses, allowing students to access powerful computing tools at an affordable price.

Tips for Maximizing Your Savings:

  • Explore Multiple Options: Compare prices and eligibility criteria across different programs to find the most favorable option.
  • Check for Bundles: Look for bundled deals that include additional software or services at a discounted price.
  • Utilize Student Discounts on Other Microsoft Products: Explore student discounts on other Microsoft products, such as Office 365, to further reduce your overall expenses.
  • Stay Informed: Monitor Microsoft’s website and student discount programs for updates and special promotions.

Conclusion: Empowering Student Success with Affordable Technology

Student discounts for Windows 10 play a crucial role in bridging the gap between affordable technology and academic excellence. By providing students with access to a powerful and versatile operating system, these discounts empower them to excel in their studies, pursue their passions, and prepare for future success. By understanding the various programs and eligibility requirements, students can leverage these discounts to unlock the full potential of their learning journey.

Windows 10 Student Discount for Students and Faculty - MeritLine How to Get Windows 10 Student Discount? Windows 10 Student Discount – Get Upto 95% Discount on Windows 10
Windows 10 Student Edition Price and Discount How to Get Windows 10 Student Discount? Windows 10 Student Discount – Get Upto 95% Discount on Windows 10
Microsoft office student discount - keysdase How to Apply For Windows 10 Education Student Discount - 2021 Guide

Closure

Thus, we hope this article has provided valuable insights into Accessing Affordable Computing Power: A Guide to Student Discounts on Windows 10. We thank you for taking the time to read this article. See you in our next article!

Unlinking Your Microsoft Account From Windows 11: A Comprehensive Guide

Unlinking Your Microsoft Account from Windows 11: A Comprehensive Guide

Introduction

With great pleasure, we will explore the intriguing topic related to Unlinking Your Microsoft Account from Windows 11: A Comprehensive Guide. Let’s weave interesting information and offer fresh perspectives to the readers.

Unlinking Your Microsoft Account from Windows 11: A Comprehensive Guide

Link or Unlink OneDrive with Microsoft Account in Windows 11 - YouTube

Windows 11, like its predecessors, offers users the convenience of integrating their Microsoft accounts for seamless synchronization of settings, files, and applications across multiple devices. However, there may be instances where users desire to disconnect their Microsoft account from their Windows 11 installation. This could be driven by privacy concerns, a desire for greater control over personal data, or simply a preference for a more localized user experience.

This guide provides a comprehensive overview of the process of disconnecting a Microsoft account from Windows 11, addressing potential challenges, and highlighting the implications of this action.

Understanding the Implications of Removing a Microsoft Account:

Before embarking on the process of removing a Microsoft account, it is crucial to understand the associated consequences. Disconnecting the account will result in the following:

  • Loss of Synchronization: All settings, files, and applications linked to the Microsoft account will no longer be synchronized across devices. This includes personalized settings like desktop themes, taskbar layout, and browser bookmarks.
  • Limited Access to Features: Some features reliant on the Microsoft account, such as the "Your Phone" app, cloud storage services like OneDrive, and the ability to install apps from the Microsoft Store, will become unavailable.
  • Data Separation: Data stored within the user’s Microsoft account, such as emails, contacts, and calendar entries, will remain accessible only through the associated Microsoft account interface.

Methods for Removing a Microsoft Account from Windows 11:

There are two primary methods for disconnecting a Microsoft account from Windows 11:

1. Using the Settings App:

This method is the most straightforward and accessible for most users.

  • Navigate to Settings: Open the "Settings" app by pressing the Windows key + I.
  • Select Accounts: Click on "Accounts" from the left-hand menu.
  • Choose Your Account: Within the "Accounts" section, select "Your info."
  • Remove the Account: Click on "Sign out" followed by "Sign out" again to confirm the action.

2. Using the Local Account Creation Feature:

This method allows users to create a new local account without any association with a Microsoft account.

  • Navigate to Settings: Open the "Settings" app by pressing the Windows key + I.
  • Select Accounts: Click on "Accounts" from the left-hand menu.
  • Choose Family & Other Users: Within the "Accounts" section, select "Family & other users."
  • Add a Local Account: Click on "Add an account" and then select "I don’t have this person’s sign-in information."
  • Create a Local Account: Follow the on-screen prompts to create a new local account with a chosen username and password.

Addressing Potential Challenges:

While removing a Microsoft account is generally a straightforward process, users may encounter certain challenges:

  • Linked Applications: If applications are linked to the Microsoft account, they might require re-installation or reconfiguration after the account removal.
  • Data Recovery: Accessing data previously stored within the Microsoft account might require logging back into the account or utilizing data recovery methods.
  • System Updates: Windows updates may require the presence of a Microsoft account for certain functionalities.

Important Considerations:

  • Backup Your Data: Before removing the Microsoft account, it is highly recommended to back up essential data, including documents, photos, and other personal files, to ensure preservation.
  • Understand the Consequences: Users should be fully aware of the implications of disconnecting their Microsoft account, including the loss of synchronization and access to certain features.
  • Seek Assistance: If any difficulties arise during the process, consulting Microsoft support or seeking guidance from technology forums can be helpful.

FAQs on Removing a Microsoft Account from Windows 11:

Q: Can I remove my Microsoft account without losing my data?
A: Removing a Microsoft account will not directly delete your data. However, files and settings synchronized through the account will no longer be accessible. It is crucial to back up essential data before removing the account.

Q: Can I re-add my Microsoft account later?
A: Yes, you can re-add your Microsoft account at any time by following the steps for signing in through the Settings app. However, remember that previously synchronized settings and files may not be restored automatically.

Q: Will I lose access to my OneDrive files after removing my Microsoft account?
A: While you can still access your OneDrive files through the web interface, you will lose direct access to them within Windows 11. You can either download the files before removing the account or access them through the OneDrive website.

Q: Can I remove my Microsoft account without affecting other devices?
A: Removing your Microsoft account from one device will not affect your account on other devices. However, it will stop synchronization between those devices.

Tips for Removing a Microsoft Account from Windows 11:

  • Double-Check Your Account: Before removing the account, ensure you are removing the correct account and that you understand the associated implications.
  • Back Up Data: Prioritize backing up all essential data to avoid data loss.
  • Uninstall Linked Applications: If any applications are linked to the Microsoft account, uninstall them before removing the account.
  • Consider a Local Account: If you are unsure about the consequences of removing your Microsoft account, consider creating a new local account to test the experience.

Conclusion:

Removing a Microsoft account from Windows 11 can be a necessary step for users seeking greater control over their data or preferring a more localized experience. By understanding the implications, utilizing the appropriate methods, and taking necessary precautions, users can successfully disconnect their Microsoft account from Windows 11 without encountering significant challenges. While the process may result in the loss of certain features and synchronization capabilities, it ultimately empowers users to manage their data and privacy settings according to their individual preferences.

How do I unlink a separate Microsoft account from Windows 11? - Microsoft Community How to Remove Microsoft Account from Windows 11 [Guide]  Beebom How to unlink microsoft account from computer - kartzoom
How do I unlink a separate Microsoft account from Windows 11? - Microsoft Community How do I unlink a Microsoft account from my PC? - Microsoft Community Cant Reactivate Windows 11 Pro Digital License After Unlinking Device from Microsoft Account
How do I unlink my Microsoft Account from my computer? How to Remove a Microsoft Account from Windows 11

Closure

Thus, we hope this article has provided valuable insights into Unlinking Your Microsoft Account from Windows 11: A Comprehensive Guide. We thank you for taking the time to read this article. See you in our next article!