Archives 2023

Navigating The Wireless World: Finding Bluetooth In Windows 10

Navigating the Wireless World: Finding Bluetooth in Windows 10

Introduction

With great pleasure, we will explore the intriguing topic related to Navigating the Wireless World: Finding Bluetooth in Windows 10. Let’s weave interesting information and offer fresh perspectives to the readers.

How To Turn On Bluetooth Windows 10 Windows 10 Bluetooth

Bluetooth, a ubiquitous wireless technology, allows devices to communicate with each other without the need for cables. This has revolutionized the way we interact with our computers, smartphones, and other gadgets, enabling seamless data transfer, audio streaming, and even hands-free calling. In the realm of Windows 10, finding and utilizing Bluetooth is a straightforward process, empowering users to unlock the full potential of this versatile technology.

Locating the Bluetooth Settings

The first step towards harnessing the power of Bluetooth in Windows 10 is locating the settings. There are several ways to access this crucial control panel:

1. The Quick Access Menu:

  • Click the notification icon in the taskbar.
  • Locate the Bluetooth icon, which may appear as a stylized "B" or a Bluetooth symbol.
  • Click the icon to reveal the Bluetooth settings.

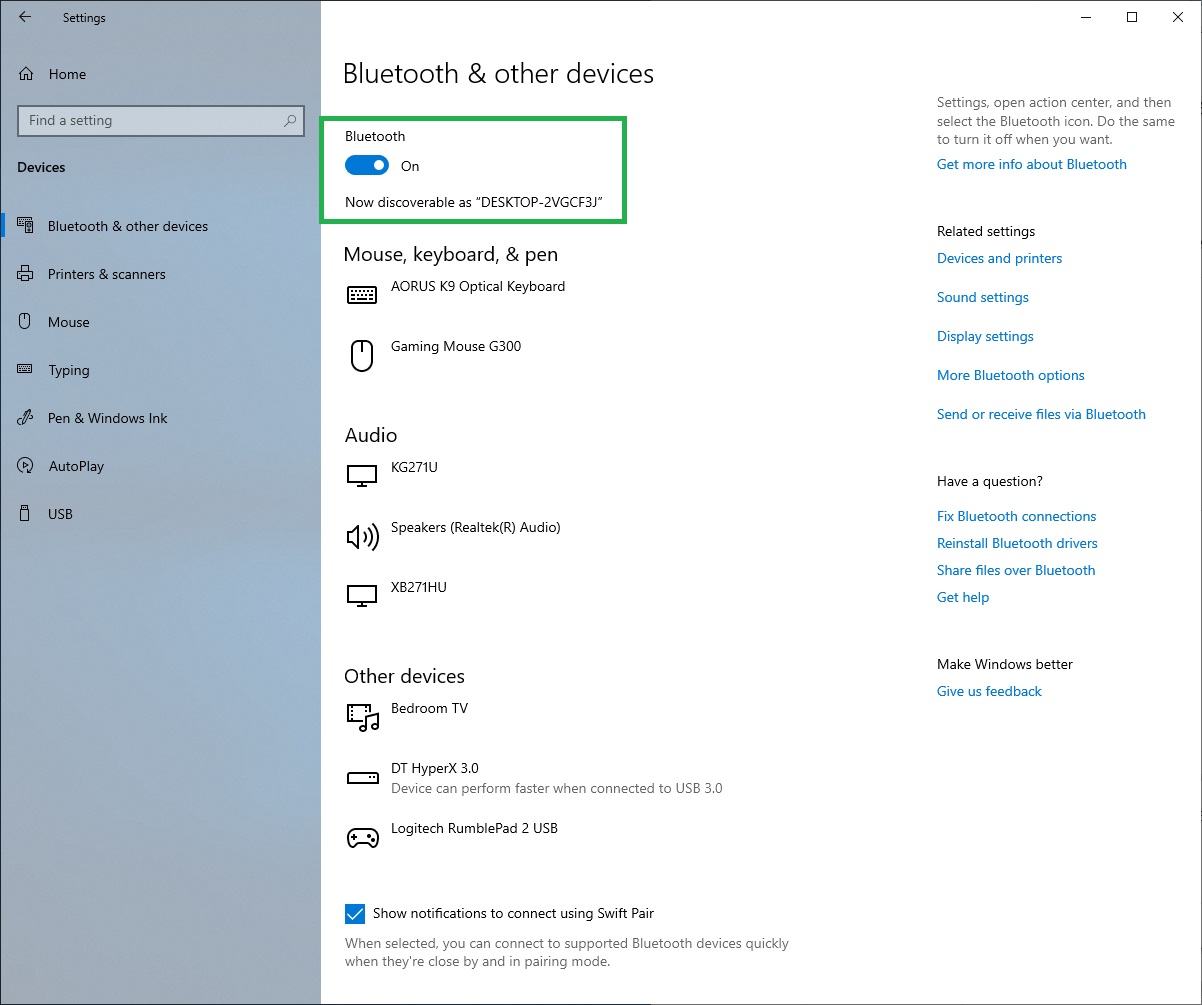
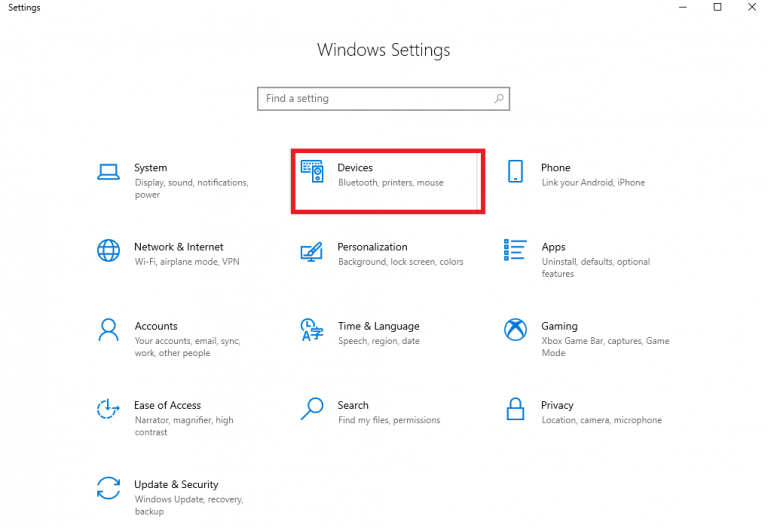
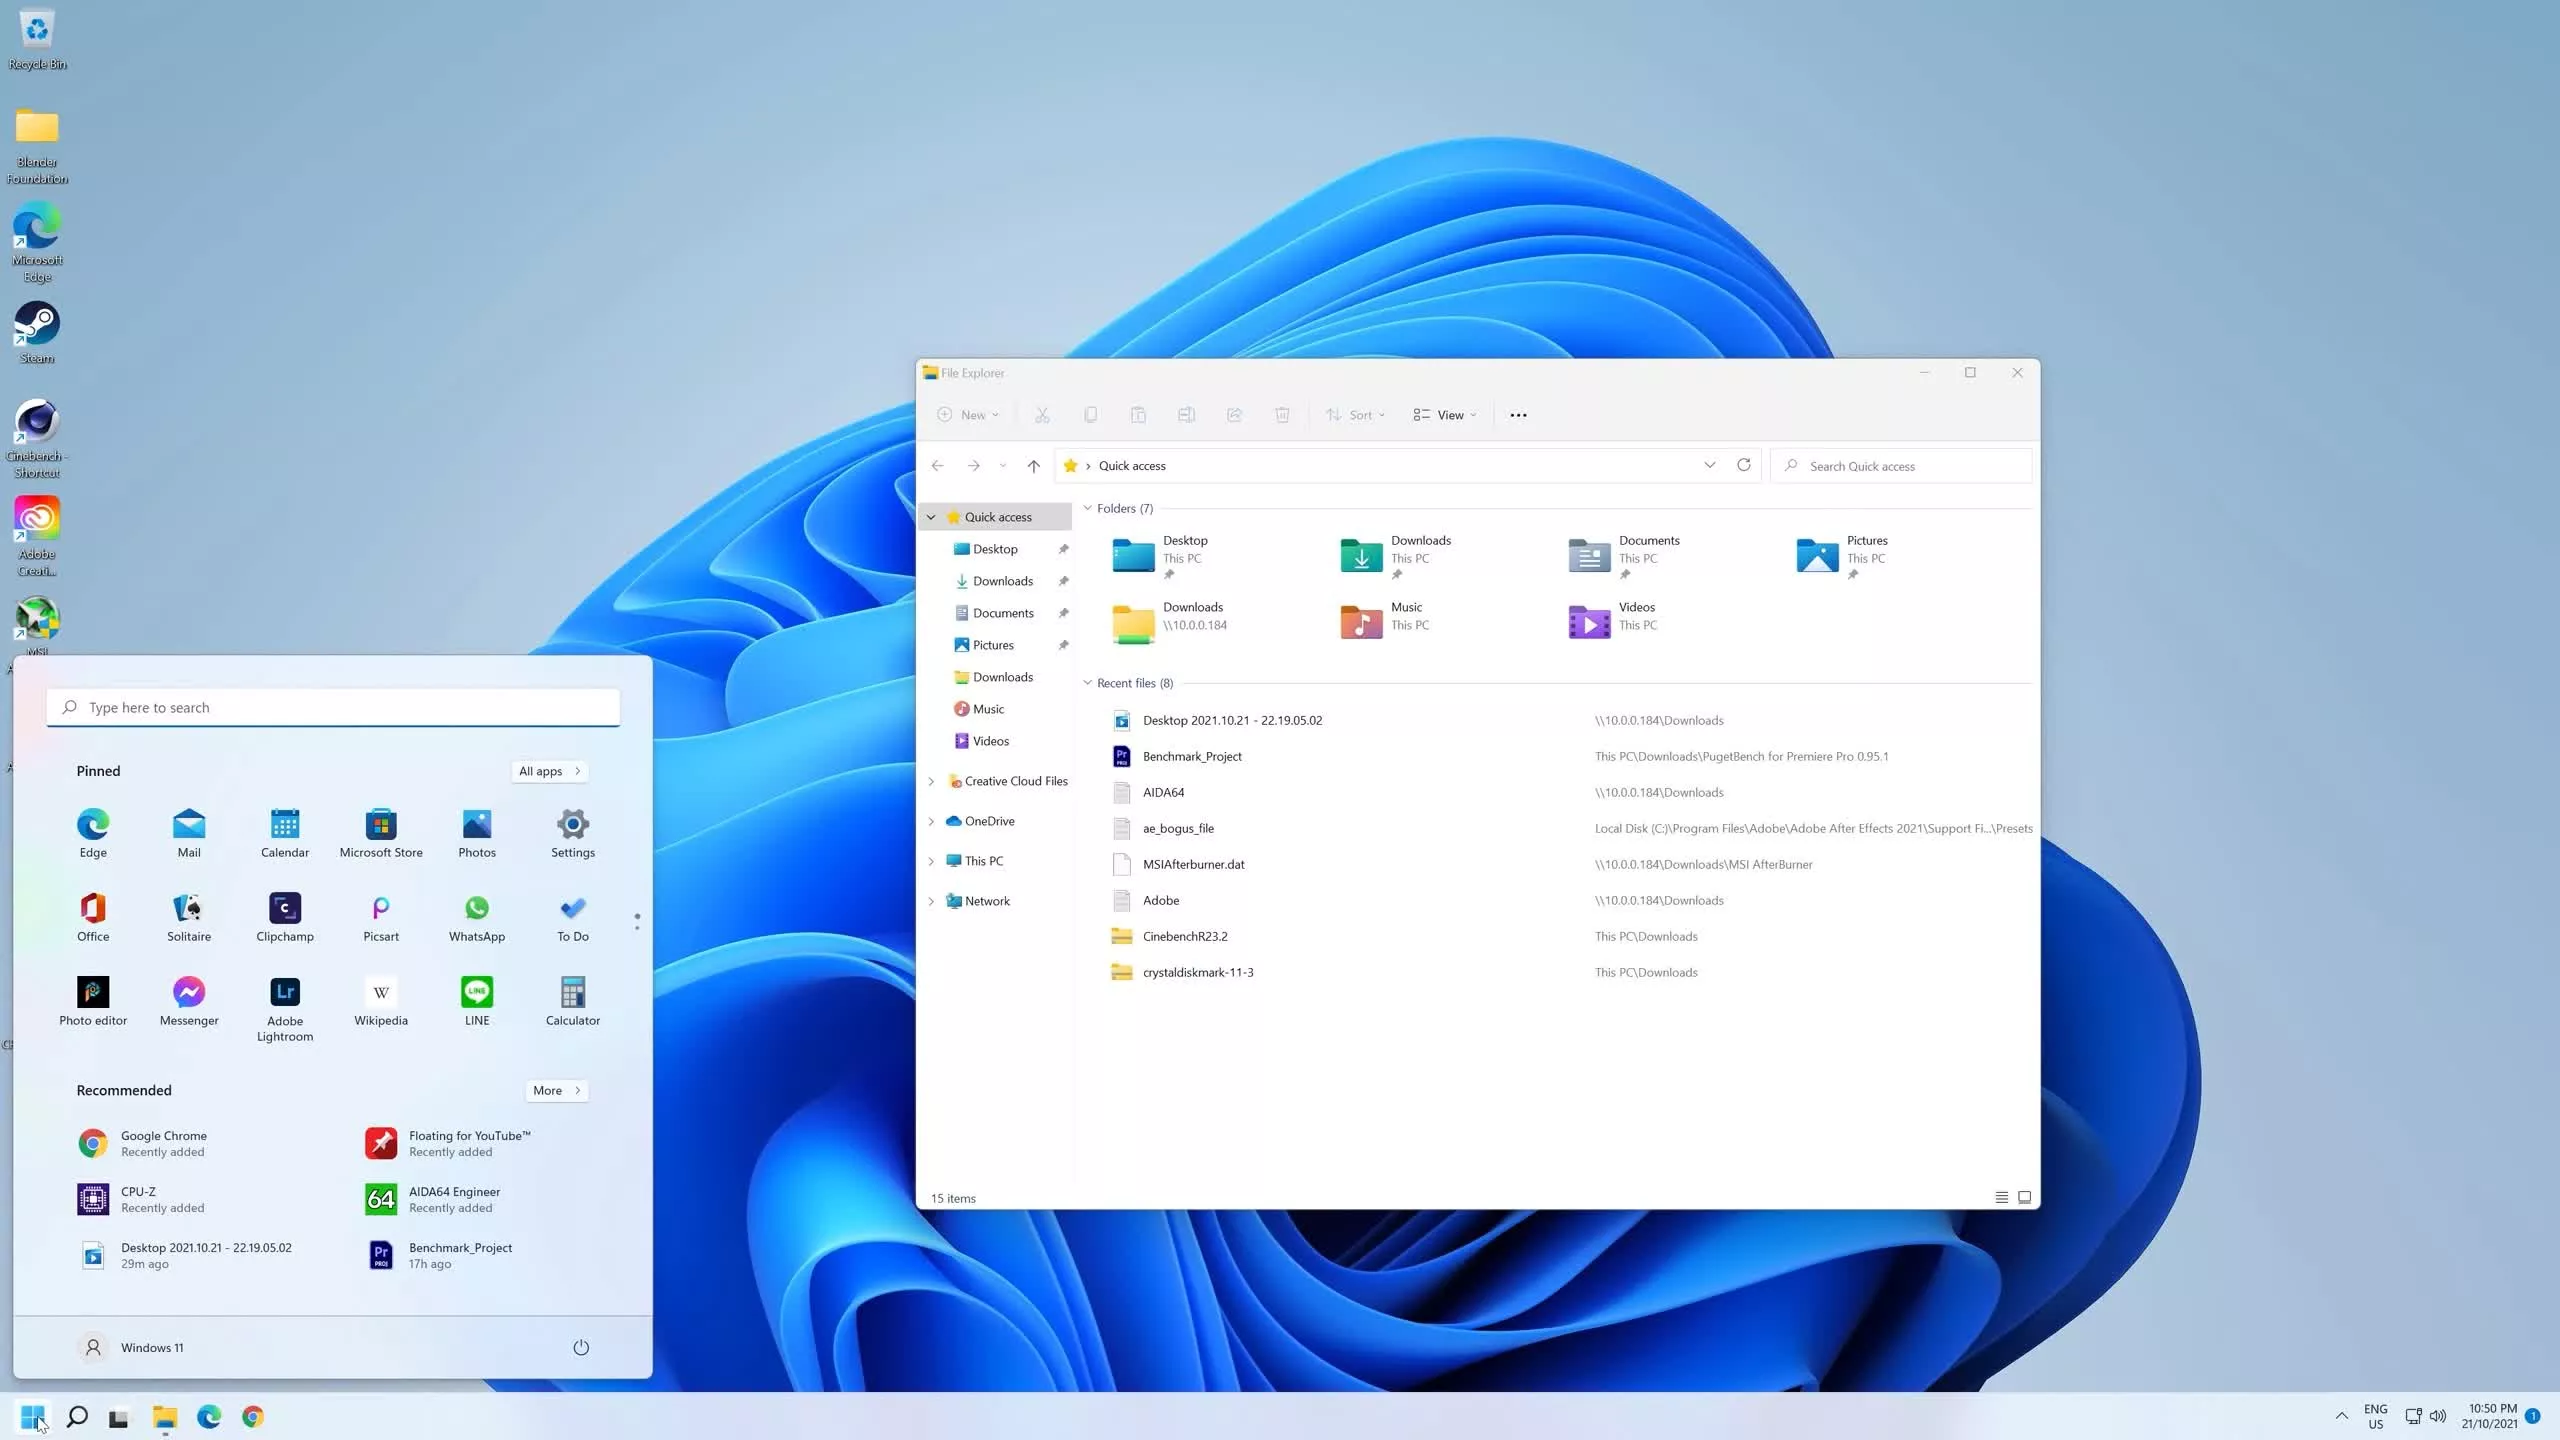
2. The Settings App:

  • Open the Start menu and select "Settings" (represented by a gear icon).
  • Click on "Devices."
  • Select "Bluetooth & other devices" from the left-hand menu.

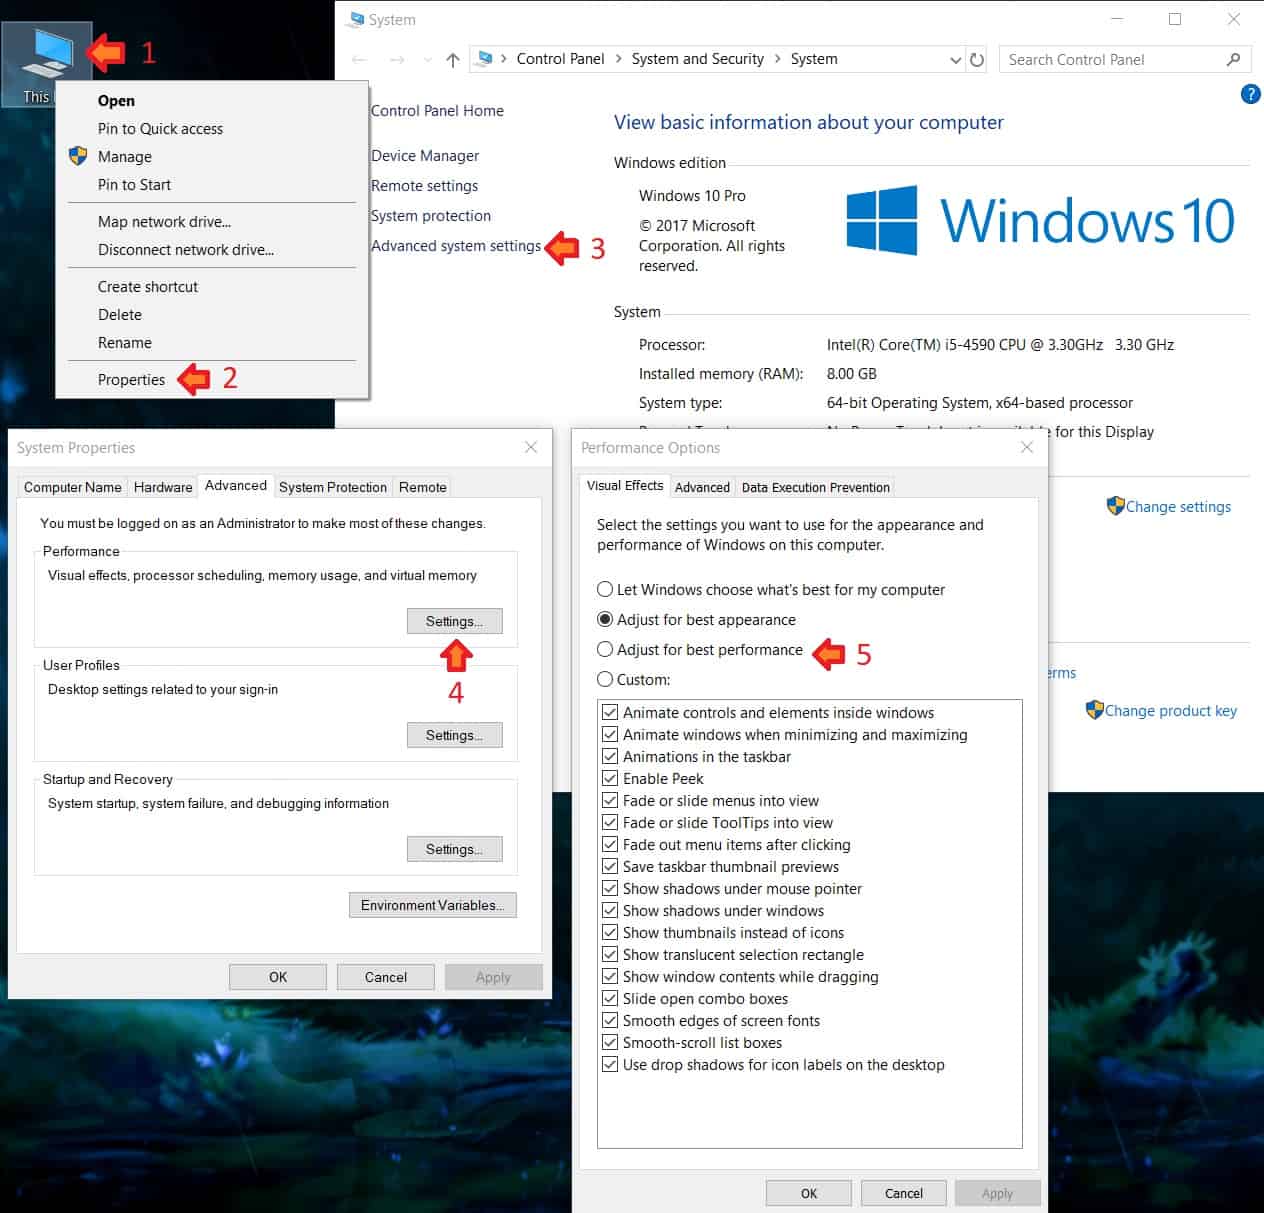
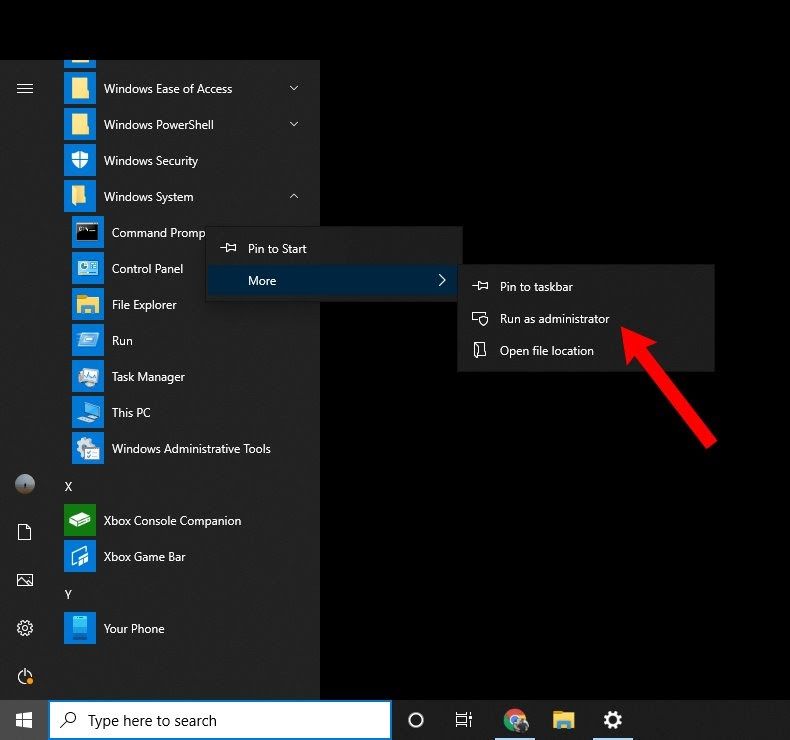
3. The Control Panel:

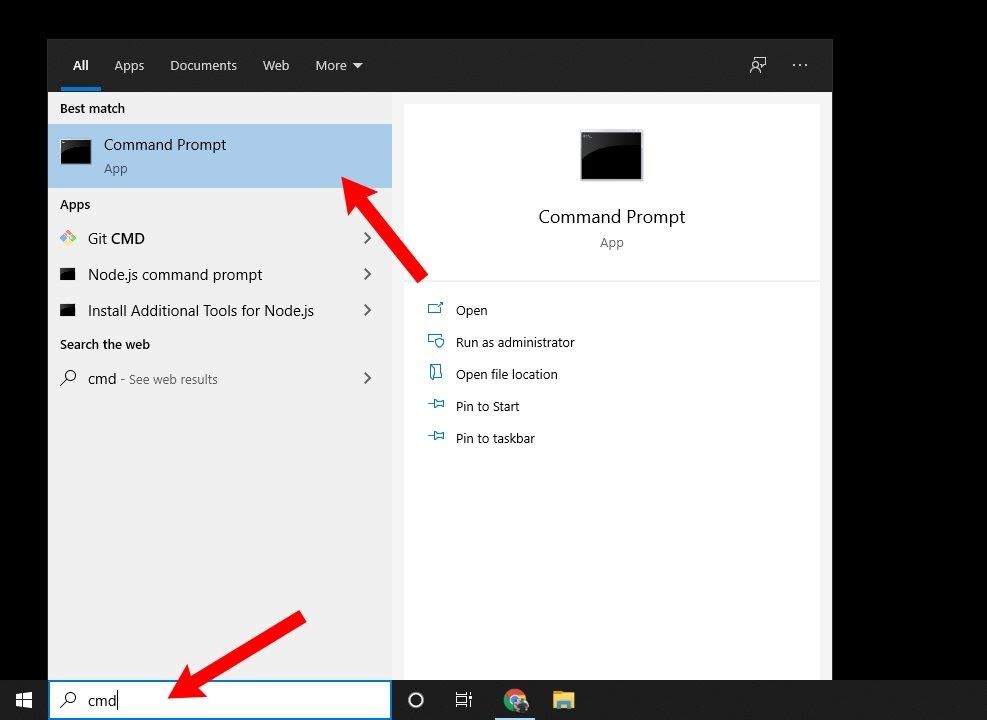
  • Open the Start menu and type "Control Panel" in the search bar.
  • Select "Control Panel" from the search results.
  • Click on "Hardware and Sound."
  • Choose "Devices and Printers."
  • The "Devices and Printers" window will display all connected and available devices, including Bluetooth devices.
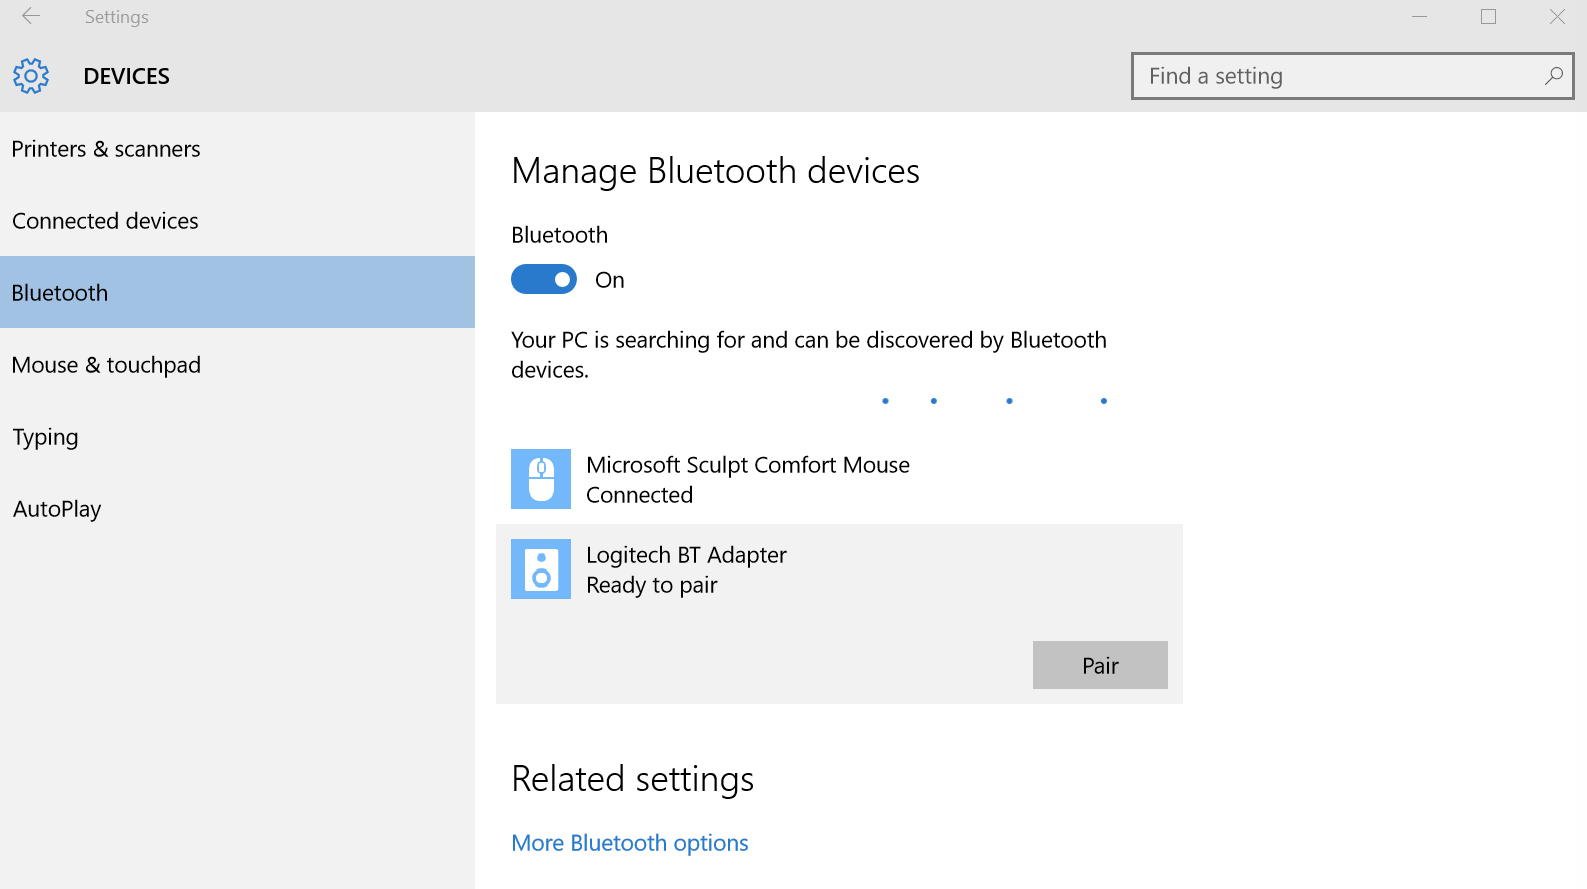
Enabling Bluetooth

Once you’ve located the Bluetooth settings, enabling the functionality is a simple process.

  • In the "Bluetooth & other devices" settings, toggle the "Bluetooth" switch to the "On" position.
  • Windows 10 will now start scanning for nearby Bluetooth devices.

Pairing Devices

Pairing a device with your Windows 10 computer involves connecting them wirelessly. This process varies slightly depending on the device type:

1. Pairing Headphones or Speakers:

  • Ensure your Bluetooth headphones or speakers are in pairing mode. This usually involves pressing a dedicated button on the device.
  • In the "Bluetooth & other devices" settings, click "Add Bluetooth or other device."
  • Select "Bluetooth" from the available options.
  • Windows 10 will scan for nearby devices.
  • Choose your headphones or speakers from the list of discovered devices.
  • Follow any on-screen prompts to complete the pairing process.

2. Pairing a Smartphone or Tablet:

  • On your smartphone or tablet, enable Bluetooth and make it discoverable.
  • In the "Bluetooth & other devices" settings, click "Add Bluetooth or other device."
  • Select "Bluetooth" from the available options.
  • Windows 10 will scan for nearby devices.
  • Choose your smartphone or tablet from the list of discovered devices.
  • You may be prompted to enter a PIN code on both devices. The PIN code is typically displayed on the screen of your smartphone or tablet.
  • Once the PIN code is entered, the devices will be paired.

Troubleshooting Bluetooth Issues

While Bluetooth connectivity is generally seamless, occasional issues may arise. Here are some common troubleshooting steps:

  • Ensure Bluetooth is enabled on both devices.
  • Check the range of the Bluetooth connection. Bluetooth has a limited range, typically around 30 feet.
  • Restart both devices. This can often resolve temporary connection issues.
  • Remove and re-pair the devices. This can refresh the connection and resolve pairing errors.
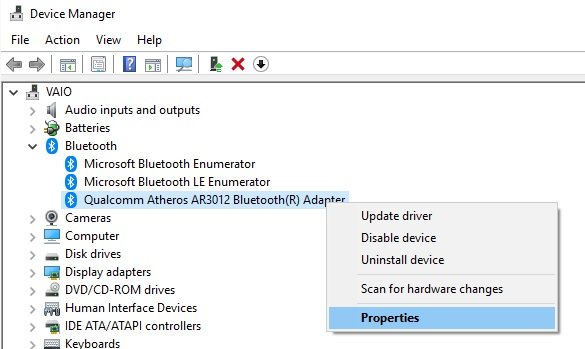
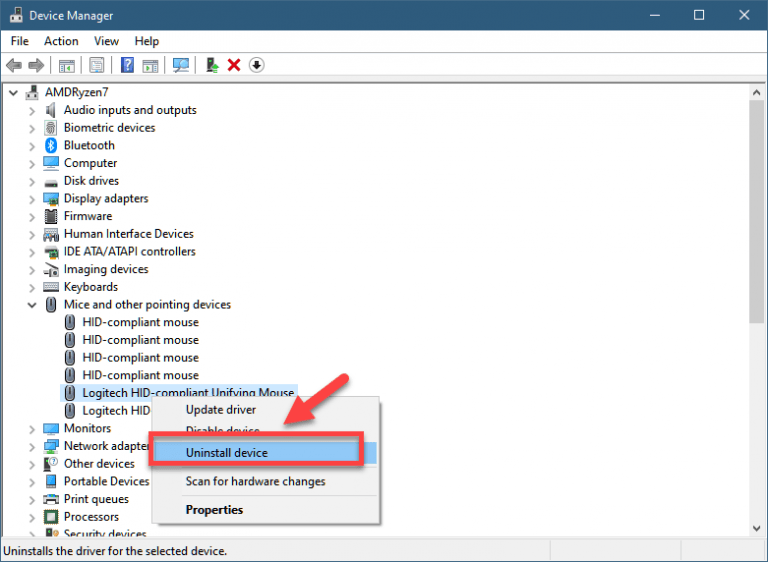
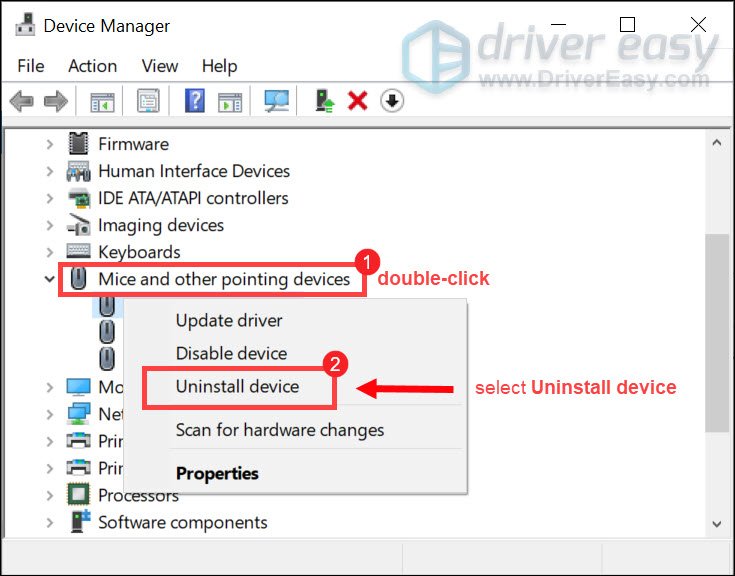
  • Update Bluetooth drivers. Outdated drivers can cause compatibility issues. Visit the manufacturer’s website for the latest drivers.
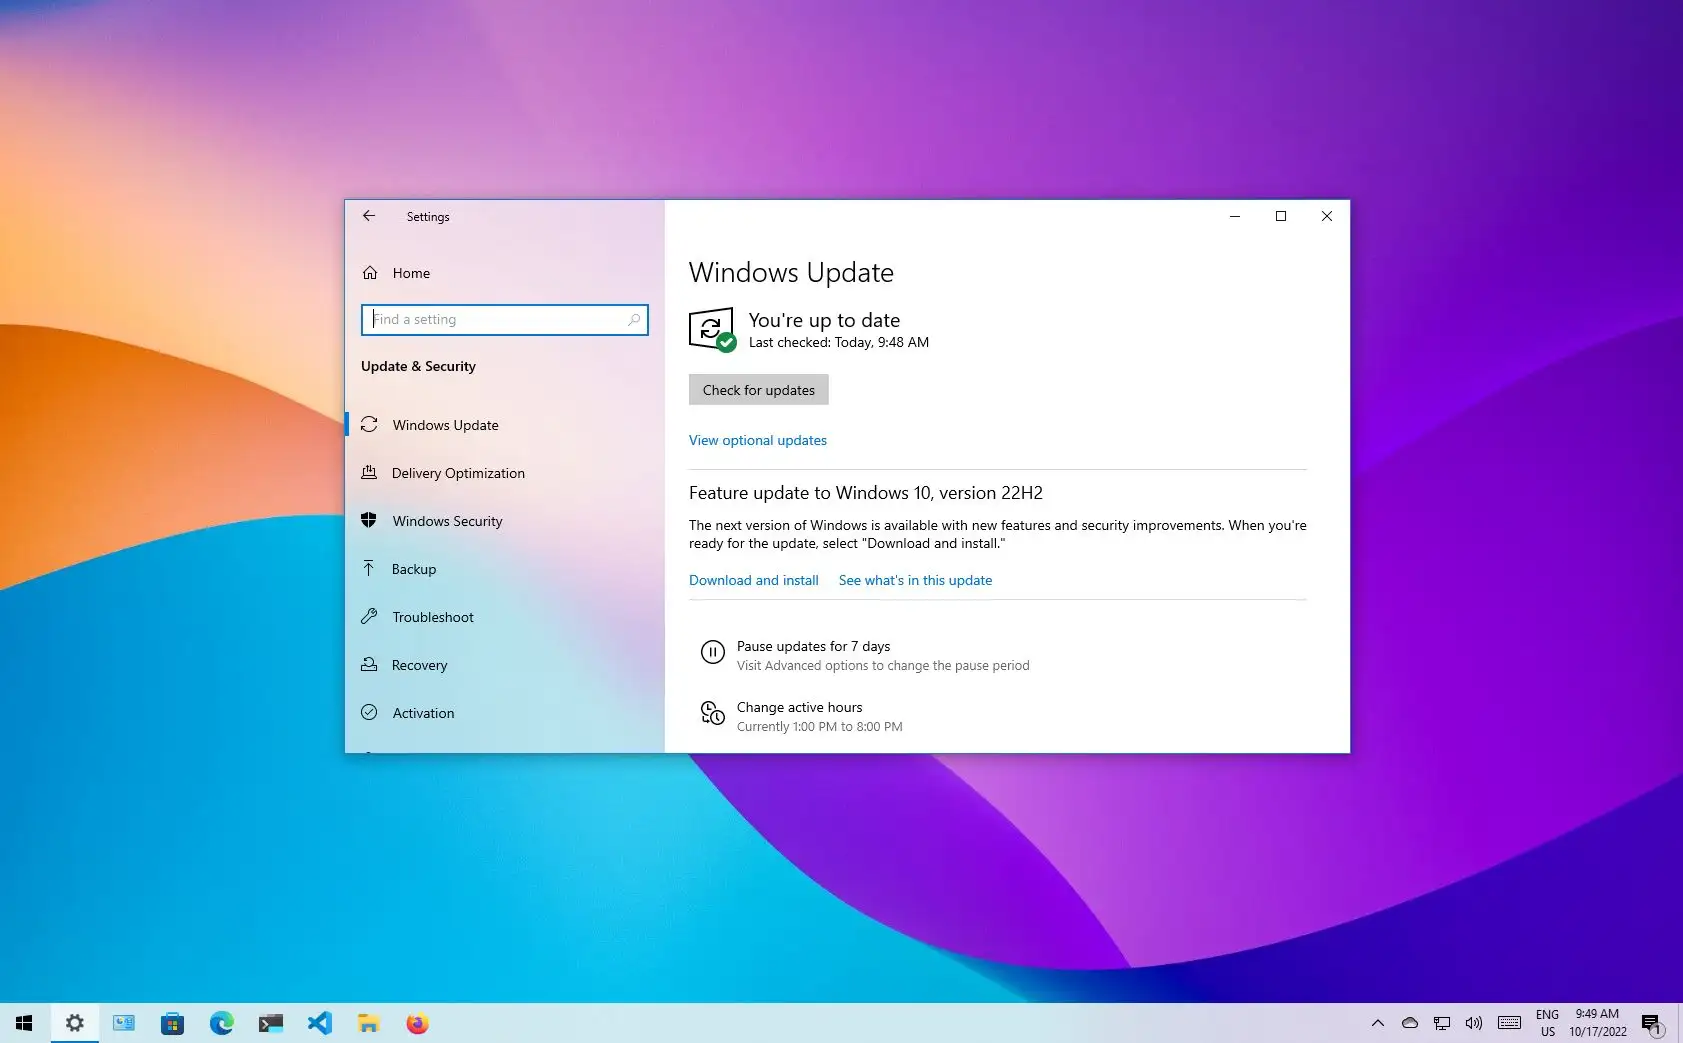
  • Check for software updates. Updates often include bug fixes and improvements that can resolve Bluetooth problems.
  • Disable other wireless connections. Interference from other wireless networks can impact Bluetooth connectivity.
  • Use a USB Bluetooth adapter. If your computer lacks built-in Bluetooth, consider using a USB Bluetooth adapter.

The Importance of Bluetooth in Modern Computing

Bluetooth has become an indispensable part of the modern computing experience, offering numerous benefits:

  • Wireless Connectivity: Bluetooth eliminates the need for cables, simplifying device connections and freeing up space.
  • Versatile Applications: Bluetooth supports a wide range of applications, from audio streaming and file transfers to hands-free calling and controlling smart home devices.
  • Enhanced User Experience: Bluetooth streamlines interactions with devices, making them more convenient and user-friendly.
  • Seamless Integration: Bluetooth seamlessly integrates with various operating systems and devices, ensuring widespread compatibility.

FAQs on Bluetooth in Windows 10

1. Can I use Bluetooth for file transfer?

Yes, Bluetooth can be used for transferring files between devices. However, it is generally slower than other methods like USB or Wi-Fi.

2. Can I use Bluetooth for internet access?

No, Bluetooth is not designed for internet access. While some devices may offer tethering options through Bluetooth, it’s not a primary function of the technology.

3. How do I remove a paired device?

To remove a paired device, go to the "Bluetooth & other devices" settings, select the device you want to remove, and click "Remove device."

4. Why is my Bluetooth connection slow?

Slow Bluetooth connections can be caused by various factors, including interference from other wireless networks, low battery levels on the device, or outdated drivers.

5. Is Bluetooth secure?

Bluetooth uses encryption to secure data transmissions. However, it’s essential to use strong passwords and keep your devices and software updated to minimize security risks.

Tips for Optimizing Bluetooth Performance

  • Minimize interference: Keep Bluetooth devices away from other wireless networks and electronic devices.
  • Maintain battery levels: Ensure the batteries in your Bluetooth devices are fully charged.
  • Update drivers: Regularly update Bluetooth drivers to ensure compatibility and optimal performance.
  • Use a USB Bluetooth adapter: Consider using a USB Bluetooth adapter if your computer lacks built-in Bluetooth capabilities.
  • Avoid using Bluetooth in crowded areas: Bluetooth signals can be easily disrupted in areas with high wireless traffic.

Conclusion

In the ever-evolving world of technology, Bluetooth remains a powerful tool for connecting and interacting with devices. Windows 10 provides a user-friendly interface for accessing and utilizing Bluetooth, empowering users to embrace the convenience and versatility of this wireless technology. By understanding the settings, pairing process, and troubleshooting tips, users can unlock the full potential of Bluetooth and seamlessly integrate it into their computing experience.

How to Fix Bluetooth Problems in Windows 10?  TechLatest How to master Bluetooth on Windows 10  Windows Central How To Enable Bluetooth in Windows 10  Tom's Hardware
How and why to use Bluetooth on your Windows 10 computer  Windows Central How to find and Enable Bluetooth in Windows 10 - WindowsFeed - Product Key and Activation Guide Tutorial 101 : Turn On Bluetooth On Windows 10 - TechLoris
How to check Bluetooth version in Windows 10 Fix Connections to Bluetooth Audio Devices and Wireless Displays in Windows 10

Closure

Thus, we hope this article has provided valuable insights into Navigating the Wireless World: Finding Bluetooth in Windows 10. We appreciate your attention to our article. See you in our next article!

Navigating The Digital World With Ease: A Comprehensive Guide To QR Code Readers On Windows 10

Navigating the Digital World with Ease: A Comprehensive Guide to QR Code Readers on Windows 10

Introduction

With enthusiasm, let’s navigate through the intriguing topic related to Navigating the Digital World with Ease: A Comprehensive Guide to QR Code Readers on Windows 10. Let’s weave interesting information and offer fresh perspectives to the readers.

Python Qr Code Reader: A Comprehensive Guide To Reading Qr Codes

In today’s digitally-driven world, QR codes have become ubiquitous, serving as gateways to a wealth of information and services. From accessing product information and online menus to engaging with marketing campaigns and accessing secure logins, QR codes offer a convenient and efficient way to bridge the gap between the physical and digital realms. Windows 10, a widely used operating system, provides users with a diverse range of options for decoding these ubiquitous codes, ensuring seamless integration into their digital lives.

Understanding QR Codes: A Gateway to Digital Information

QR codes, or Quick Response codes, are two-dimensional barcodes that can store a vast amount of data. Unlike traditional barcodes, which are limited to one-dimensional information, QR codes can encode text, URLs, contact information, images, and even complex data structures. This versatility makes them ideal for a wide range of applications, from simple product identification to sophisticated data transfer.

Decoding the Possibilities: QR Code Readers on Windows 10

Windows 10 users have access to a variety of methods for reading QR codes, catering to diverse needs and preferences. These methods can be broadly categorized into:

1. Built-in QR Code Reader:

Windows 10’s default camera app, accessible through the "Camera" icon in the Start menu, has a built-in QR code reader. This feature, available from Windows 10 version 1803 onwards, provides a simple and convenient way to decode QR codes. To activate the reader, users simply need to point the camera at the code, and the app automatically detects and decodes the information, displaying it on the screen. This built-in functionality eliminates the need for external apps, making it a user-friendly option for basic QR code scanning.

2. Dedicated QR Code Reader Apps:

For users seeking more advanced features or a dedicated QR code reader experience, a plethora of free and paid apps are available on the Microsoft Store. These apps offer various functionalities, including:

  • Advanced decoding capabilities: Some apps can read damaged or distorted QR codes, ensuring successful decoding even in challenging conditions.
  • Multiple code formats: They support various barcode formats, including QR codes, Data Matrix, Aztec, and PDF417, catering to diverse applications.
  • Customization options: Users can personalize the app’s appearance, choose their preferred language, and even customize the action taken after scanning a QR code.
  • Additional features: Some apps include features like history logs, code generation, and even the ability to share scanned data directly with other apps.

3. Browser Extensions:

Several browser extensions for popular web browsers like Chrome, Firefox, and Edge can be used to read QR codes directly within the browser window. These extensions offer a convenient way to scan QR codes without leaving the current webpage, streamlining the user experience.

Benefits of Using QR Code Readers on Windows 10

The use of QR code readers on Windows 10 offers numerous benefits, making them an indispensable tool in today’s digital landscape:

1. Enhanced User Experience:

QR code readers streamline interactions with the digital world, eliminating the need for manual data entry or complex navigation. This convenience enhances user experience, making accessing information and services effortless.

2. Increased Accessibility:

QR codes provide a visual and intuitive way to access information, making it accessible to individuals with visual impairments or learning disabilities.

3. Secure and Reliable Information Exchange:

QR codes can be used to securely transmit information, such as login credentials or sensitive data. This ensures the integrity and authenticity of the data exchanged, enhancing security and reliability.

4. Expanding Reach and Engagement:

QR codes allow businesses and organizations to engage with their audiences in innovative ways. By embedding QR codes in marketing materials, product packaging, or signage, they can provide access to additional information, promotions, or interactive experiences.

5. Streamlining Business Processes:

QR codes can be used to streamline various business processes, including inventory management, customer service, and data collection. This automation saves time and resources, increasing efficiency and productivity.

Navigating the World of QR Code Readers: FAQs

1. Are all QR code readers compatible with Windows 10?

While most QR code readers are compatible with Windows 10, it’s essential to verify compatibility before downloading and installing an app. Check the app description on the Microsoft Store or the developer’s website for detailed information.

2. Can I read QR codes using my Windows 10 phone or tablet?

Yes, most Windows 10 phones and tablets come equipped with a built-in camera app that can read QR codes. Additionally, you can download dedicated QR code reader apps from the Microsoft Store.

3. Are QR code readers secure?

QR code readers themselves are generally secure. However, it’s crucial to exercise caution when scanning QR codes from unknown sources. Avoid scanning codes from suspicious websites or emails, as they might lead to malicious websites or downloads.

4. What are the best QR code reader apps for Windows 10?

The best QR code reader app for you depends on your individual needs and preferences. Consider factors like features, user interface, and compatibility with your device. Some popular and highly-rated apps include QR Code Reader by Scanova, QR Scanner by B&B Apps, and QR Code Reader by QRDroid.

5. Can I create my own QR codes?

Yes, several online tools and software applications allow you to generate your own QR codes. These tools typically provide customization options, allowing you to choose the type of data to encode, the design, and the size of the code.

Tips for Using QR Code Readers on Windows 10

  • Ensure proper lighting: For optimal scanning, ensure adequate lighting to ensure the QR code is clearly visible.
  • Keep the code still: Avoid moving the camera or the QR code while scanning to prevent errors.
  • Use a dedicated QR code reader app: For advanced features and a more reliable experience, consider using a dedicated QR code reader app.
  • Be cautious with unknown codes: Only scan QR codes from trusted sources to avoid potential security risks.
  • Check the app’s permissions: When using a QR code reader app, review the app’s permissions and ensure it doesn’t request access to unnecessary data.

Conclusion

QR code readers on Windows 10 have become an integral part of our digital lives, bridging the gap between the physical and digital worlds. They provide a convenient, secure, and accessible way to access information, engage with services, and streamline various processes. By embracing the power of QR code readers, Windows 10 users can unlock a world of possibilities and navigate the digital landscape with ease. As technology continues to evolve, QR codes are poised to play an even more prominent role in our daily lives, making QR code readers an essential tool for navigating the future of digital interaction.

How to use QR codes shown by Windows 10's BSODs Unveiling the Power of QR Code Scanner Features: A Comprehensive Guide – QR Code Scanners The 5 Best QR Code Readers - Scanning QR Codes  TRUiC
Scan and create QR Codes with ease The 5 Best Qr Code Readers Scanning Qr Codes Truic - vrogue.co Best QR Code/ 2D Barcode Readers - QR Code Scanning Box, QR Code Software Reader and QR Code SDK
Unveiling the Power of QR Code Scanner Features: A Comprehensive Guide – QR Code Scanners Create Free QR Codes With Ease – Robotics & Automation News

Closure

Thus, we hope this article has provided valuable insights into Navigating the Digital World with Ease: A Comprehensive Guide to QR Code Readers on Windows 10. We thank you for taking the time to read this article. See you in our next article!

Windows 10: A Comprehensive Look At Performance In 2023

Windows 10: A Comprehensive Look at Performance in 2023

Introduction

With enthusiasm, let’s navigate through the intriguing topic related to Windows 10: A Comprehensive Look at Performance in 2023. Let’s weave interesting information and offer fresh perspectives to the readers.

Windows 10: A Comprehensive Look at Performance in 2023

Windows 10 Vs Windows 11 Performance Gaming 2023 – Get Latest Windows 10 Update

Windows 10, released in 2015, has become the dominant operating system for personal computers, boasting a vast user base. Its performance, a crucial factor for user satisfaction, has undergone significant evolution since its launch. This article delves into the multifaceted aspects of Windows 10 performance, analyzing its strengths, weaknesses, and the factors that influence its overall responsiveness and efficiency.

Understanding Performance Metrics

Performance, in the context of operating systems, encompasses several key aspects:

  • Boot Time: The time it takes for the system to start up and become fully operational.
  • Application Launch Speed: How quickly applications and programs load and become usable.
  • Responsiveness: The system’s ability to respond promptly to user input, such as mouse clicks or keyboard strokes.
  • Resource Utilization: How efficiently the system utilizes its hardware resources, such as CPU, RAM, and storage.
  • Stability: The system’s ability to operate without encountering errors or crashes.
  • Power Consumption: The amount of energy the system consumes while in use.

Factors Influencing Windows 10 Performance

Several factors can impact Windows 10’s performance, both hardware and software related:

  • Hardware:
    • Processor (CPU): A powerful processor is essential for demanding tasks like gaming, video editing, or running multiple applications simultaneously.
    • RAM: Adequate RAM is crucial for smooth multitasking and prevents the system from slowing down when multiple applications are open.
    • Storage: A fast storage drive, like an SSD, significantly improves boot times, application loading speeds, and overall responsiveness.
    • Graphics Card (GPU): A dedicated GPU is essential for gaming and other graphics-intensive tasks.
  • Software:
    • Operating System Updates: Windows 10 receives regular updates that often include performance enhancements and bug fixes.
    • Background Processes: Excessive background processes can consume system resources and impact performance.
    • Malware and Viruses: Malware and viruses can slow down the system and compromise its stability.
    • Driver Compatibility: Outdated or incompatible drivers can lead to performance issues and system instability.

Performance Enhancements in Windows 10

Microsoft has continuously worked to improve Windows 10’s performance through various updates and features:

  • Windows 10 Updates: Regular updates bring performance optimizations, bug fixes, and security improvements.
  • Resource Management: Windows 10 intelligently manages system resources, prioritizing active applications and minimizing the impact of background processes.
  • Storage Optimization: Features like "Storage Sense" automatically free up disk space by deleting temporary files and unused applications.
  • Power Management: Windows 10 optimizes power consumption, extending battery life and reducing energy usage.
  • Game Mode: This feature prioritizes game performance by reducing background activity and allocating resources efficiently.

Addressing Performance Issues

While Windows 10 generally offers solid performance, users might encounter issues that affect their experience. Here are some common performance problems and their potential solutions:

  • Slow Boot Times: This could be due to outdated drivers, excessive startup programs, or a slow storage drive.
  • Application Lag: Insufficient RAM, outdated drivers, or background processes consuming resources can cause application lag.
  • System Crashes: This can be caused by outdated drivers, hardware issues, or malware infection.
  • High CPU Usage: Excessive background processes, malware, or resource-intensive applications can lead to high CPU usage.

Troubleshooting Performance Issues

Addressing performance issues requires a systematic approach:

  1. Check for Updates: Ensure Windows 10 and all drivers are up to date.
  2. Manage Startup Programs: Disable unnecessary programs from starting automatically.
  3. Optimize Storage: Use "Storage Sense" or manually delete temporary files and unused applications.
  4. Run Disk Cleanup: Free up disk space by removing unnecessary files.
  5. Check for Malware: Scan your system for malware and viruses.
  6. Monitor Resource Usage: Use Task Manager to identify resource-intensive processes and troubleshoot accordingly.
  7. Check Hardware: Ensure your hardware is functioning correctly and meets the system requirements.

Performance Optimization Tips

Here are some additional tips to enhance Windows 10’s performance:

  • Disable Visual Effects: Turn off unnecessary visual effects to improve responsiveness.
  • Adjust Power Settings: Optimize power settings for performance or battery life depending on your needs.
  • Use a Dedicated Antivirus: Install a reputable antivirus program to protect your system from malware.
  • Defragment Hard Drive: Regularly defragment your hard drive to improve performance.
  • Use a Fast SSD: Consider upgrading to a solid-state drive (SSD) for faster boot times and application loading.
  • Optimize for Gaming: Utilize features like Game Mode and adjust graphics settings to enhance gaming performance.

FAQs

Q: How do I check my Windows 10 performance?

A: You can use the Task Manager to monitor resource usage, CPU performance, and memory consumption. You can also use third-party performance monitoring tools for more detailed insights.

Q: How can I improve Windows 10 performance on a low-end PC?

A: Disable unnecessary visual effects, manage startup programs, optimize storage, and ensure all drivers are up to date.

Q: What is the best way to troubleshoot slow performance issues?

A: Begin by checking for updates, managing startup programs, and optimizing storage. If the problem persists, consider running a malware scan, checking hardware compatibility, and monitoring resource usage.

Q: How often should I update Windows 10?

A: Windows 10 automatically updates in the background, but it’s recommended to install updates as soon as they become available to benefit from performance improvements and security patches.

Q: Is it necessary to upgrade to the latest version of Windows 10?

A: While newer versions of Windows 10 often offer performance enhancements and new features, upgrading is not always necessary. Consider the specific features and performance benefits of the newer version and assess if they align with your needs.

Conclusion

Windows 10’s performance is a dynamic aspect influenced by various factors, including hardware specifications, software updates, and user habits. While it generally offers a reliable and efficient experience, users can further optimize their system by understanding its performance characteristics and implementing appropriate strategies. By staying informed about performance optimization techniques and regularly monitoring resource utilization, users can ensure a smooth and responsive Windows 10 experience.

Windows 10 Vs Windows 11 Gaming Performance 2023 – Get Latest Windows 10 Update Masih Pengen Update Bandingin Windows 10 Vs Windows 11 Perubahan Fitur Gaming Test Lengkap Windows 10 21h2 Vs Windows 11 2023 – Get Latest Windows 10 Update
How To Find Your Windows 10 System Performance Rating - YouTube Performance Options Windows 10 How To Improve Pc Performance Windows 10 Dell (official Tech Check Your Computer On 10: 4 Steps
Windows 10 21h2 Vs 22h2 2023 – Get Latest Windows 10 Update Windows 10 System Performance Rating!! - Howtosolveit - YouTube

Closure

Thus, we hope this article has provided valuable insights into Windows 10: A Comprehensive Look at Performance in 2023. We thank you for taking the time to read this article. See you in our next article!

Navigating The Command Prompt In Windows 10: A Comprehensive Guide

Navigating the Command Prompt in Windows 10: A Comprehensive Guide

Introduction

With great pleasure, we will explore the intriguing topic related to Navigating the Command Prompt in Windows 10: A Comprehensive Guide. Let’s weave interesting information and offer fresh perspectives to the readers.

How to Open the Command Prompt in Windows 10

The Command Prompt, a powerful tool embedded within Windows 10, offers a text-based interface for interacting with the operating system. While it may seem intimidating at first, understanding its capabilities unlocks a world of possibilities for advanced users, system administrators, and anyone seeking to streamline their interaction with Windows. This guide delves into the intricacies of utilizing the Command Prompt, providing a comprehensive understanding of its functionalities and benefits.

Understanding the Command Prompt

The Command Prompt, often referred to as "cmd" or "Command Line Interface," is a legacy application that allows users to execute commands and scripts directly on the operating system. Its text-based nature, while initially appearing less intuitive than graphical interfaces, offers advantages in specific scenarios:

  • Precision and Control: Command Prompt commands are precise and unambiguous, offering granular control over system operations.
  • Automation and Scripting: Complex tasks can be automated through batch scripts, enabling repetitive operations to be performed efficiently.
  • Troubleshooting and Diagnostics: Command Prompt provides tools for diagnosing system issues, analyzing logs, and identifying potential problems.
  • System Administration: Administrators rely heavily on Command Prompt for managing user accounts, configuring network settings, and performing other system-level tasks.

Accessing the Command Prompt

Several methods exist to access the Command Prompt in Windows 10:

  1. Search Bar: Type "cmd" in the Windows search bar and select "Command Prompt" from the results.
  2. Run Dialog: Press the Windows key + R, type "cmd" in the Run dialog box, and click "OK."
  3. Task Manager: Open Task Manager (Ctrl + Shift + Esc), navigate to "File" > "Run new task," type "cmd," and click "OK."
  4. File Explorer: Navigate to the desired directory in File Explorer, type "cmd" in the address bar, and press Enter.

Navigating the Command Prompt Environment

Once the Command Prompt window is open, the user interacts with it through commands typed directly into the prompt. Several key concepts are crucial for understanding its functionality:

  • Current Directory: The Command Prompt operates within a specific directory on the system. The current directory is displayed in the prompt, for example, "C:UsersUsername>."
  • Commands: Commands are instructions given to the Command Prompt to perform specific actions. They are typically followed by arguments, which provide additional information to the command.
  • Syntax: Command Prompt commands adhere to specific syntax rules, including case sensitivity and the use of spaces. Incorrect syntax will result in an error message.
  • Basic Commands: A fundamental set of commands forms the foundation for utilizing the Command Prompt effectively:
    • cd (Change Directory): Navigates to a different directory on the system. For example, cd C:Windows will change the current directory to the Windows folder.
    • dir (Directory): Lists the files and folders within the current directory.
    • cls (Clear Screen): Clears the contents of the Command Prompt window.
    • exit (Exit): Closes the Command Prompt window.
    • help (Help): Displays a list of available commands and their syntax.

Leveraging the Command Prompt’s Power

Beyond basic navigation, the Command Prompt offers a wealth of functionalities for advanced users:

  • System Management: Commands like netstat, ipconfig, and tasklist provide insights into network connections, system resources, and running processes.
  • File and Folder Operations: Commands like copy, move, delete, and mkdir enable users to manipulate files and folders directly from the Command Prompt.
  • Scripting and Batch Files: Batch files (.bat) allow users to automate sequences of commands, streamlining repetitive tasks.
  • Network Administration: The Command Prompt provides tools for managing network shares, configuring DNS settings, and troubleshooting network connectivity.
  • Security and User Management: Commands like net user, net localgroup, and regedit facilitate user account management and system security configuration.

Examples of Command Prompt Use Cases

To illustrate the practical applications of the Command Prompt, consider these scenarios:

  • Finding a specific file: The findstr command can be used to search for a specific string within files located in a specified directory.
  • Creating a new directory: The mkdir command creates a new directory with the specified name.
  • Deleting a file: The del command permanently deletes a specified file.
  • Running a program: The start command launches a program with specific parameters.
  • Viewing system information: The systeminfo command provides detailed information about the operating system and hardware.

Troubleshooting and Best Practices

While the Command Prompt is a powerful tool, it’s essential to use it responsibly and with caution. Here are some tips for troubleshooting and working effectively:

  • Use help Command: When encountering an unfamiliar command, use help [command name] to get detailed information about its syntax and usage.
  • Check for Syntax Errors: Command Prompt commands are case-sensitive and require precise syntax. Incorrect syntax will result in an error message.
  • Read Error Messages: Error messages provide valuable clues about the cause of the problem and potential solutions.
  • Start Simple: Begin with basic commands and gradually increase complexity as your understanding grows.
  • Practice: The best way to master the Command Prompt is through consistent practice. Experiment with different commands and scenarios to gain experience.

Conclusion

The Command Prompt, despite its text-based interface, offers a unique and powerful way to interact with Windows 10. Its capabilities extend beyond basic navigation, enabling users to manage system settings, automate tasks, diagnose issues, and perform advanced operations. While it may seem daunting at first, understanding its functionalities and practicing its usage unlocks a world of possibilities for users seeking to gain greater control over their Windows environment.

How to Use Windows 10 CMD Command Prompt: Tips And Tricks - YouTube #10 Ways to Open the Command Prompt in Windows 10 – En.BuradaBiliyorum.Com Command prompt commands windows 10 list - hopperkurt
How To Open Command Prompt Windows 10 / 5 Ways to Open the Command Prompt as Administrator in How to Customize and Control the Command Prompt in Windows 10 and 11  PCMag How to Navigate in CMD and Explore/Change Directories - Sysprobs
Windows Command Line Tutorial - 1 - Introduction to the Command Prompt  command prompt windows How to Open the Command Prompt in Windows 10

Closure

Thus, we hope this article has provided valuable insights into Navigating the Command Prompt in Windows 10: A Comprehensive Guide. We hope you find this article informative and beneficial. See you in our next article!

The Enigma Of A Windows 11 PC That Won’t Sleep: A Comprehensive Guide To Troubleshooting And Resolution

The Enigma of a Windows 11 PC That Won’t Sleep: A Comprehensive Guide to Troubleshooting and Resolution

Introduction

With great pleasure, we will explore the intriguing topic related to The Enigma of a Windows 11 PC That Won’t Sleep: A Comprehensive Guide to Troubleshooting and Resolution. Let’s weave interesting information and offer fresh perspectives to the readers.

The Enigma of a Windows 11 PC That Won’t Sleep: A Comprehensive Guide to Troubleshooting and Resolution

Windows 11 PC Computer Won’t Sleep - Keeps Waking Up  Solved - YouTube

The ability of a computer to enter a low-power sleep state is a crucial aspect of energy efficiency and system longevity. When a Windows 11 PC fails to enter sleep mode, it can lead to unnecessary energy consumption, increased wear and tear on hardware components, and potentially even security vulnerabilities. This article aims to provide a comprehensive guide to troubleshooting and resolving this common issue, empowering users to regain control over their PC’s power management.

Understanding the Sleep Function:

Before delving into troubleshooting, it’s essential to understand the sleep function and its various modes in Windows 11. Sleep mode is a low-power state that allows the PC to enter a state of reduced activity while preserving the current session. There are two primary sleep modes:

  • Sleep: This mode consumes a minimal amount of power, allowing the PC to wake quickly. The system’s RAM retains the current session, ensuring a swift return to the active state.
  • Hibernate: This mode saves the entire system state to the hard drive, allowing the PC to shut down completely and consume no power. Upon waking, the system restores the saved state, effectively resuming from the point of hibernation.

The Importance of a Sleeping PC:

A PC that fails to enter sleep mode can have several detrimental consequences:

  • Increased Energy Consumption: A constantly active PC consumes significant amounts of electricity, leading to higher energy bills and contributing to environmental impact.
  • Hardware Wear and Tear: Continuous operation can accelerate the degradation of hardware components, such as the CPU, hard drive, and cooling fans, potentially leading to premature failure.
  • Security Risks: An inactive but powered-on PC can be vulnerable to security threats, as it remains accessible to unauthorized access or malicious software.
  • Reduced System Performance: A PC that is unable to enter sleep mode may experience reduced performance due to the constant activity and heat generated.

Troubleshooting a Non-Sleeping PC:

Several factors can prevent a Windows 11 PC from entering sleep mode. The following troubleshooting steps can help isolate and address the underlying cause:

1. Power Settings and Policies:

  • Verify Sleep Settings: Navigate to Settings > System > Power & battery and ensure that the "Sleep" option is enabled and set to an appropriate time frame.
  • Check Power Plan: Choose a power plan that allows for sleep mode activation. The "Balanced" or "Power saver" plans are typically suitable for sleep mode.
  • Disable Fast Startup: Fast Startup is a feature that speeds up boot times but can sometimes interfere with sleep mode. To disable it, go to Control Panel > Hardware and Sound > Power Options > Choose what the power buttons do and uncheck the "Turn on fast startup" option.
  • Advanced Power Settings: Access advanced power settings by clicking "Additional power settings" in the Power Options window. Here, you can fine-tune specific settings for sleep mode behavior.

2. Hardware Issues:

  • Faulty Hardware: A malfunctioning component, such as a faulty power supply or RAM, can prevent the PC from entering sleep mode. Check for any warning signs or errors related to hardware during boot-up.
  • Overheating: Excessive heat can trigger the system to remain active to prevent overheating. Ensure adequate cooling and ventilation for your PC.
  • External Devices: Connected devices, such as printers, scanners, or external drives, can sometimes interfere with sleep mode. Disconnect any unnecessary devices and see if the issue persists.

3. Software Conflicts:

  • Driver Issues: Outdated or incompatible drivers can cause conflicts and prevent sleep mode activation. Update all drivers, particularly for network adapters, graphics cards, and USB controllers.
  • Software Conflicts: Certain applications, especially those designed for continuous operation, can prevent sleep mode. Identify and close any unnecessary programs running in the background.
  • System Updates: Ensure your Windows 11 system is up-to-date with the latest updates and patches, as they often include fixes for power management issues.

4. Network Activity:

  • Network Connectivity: Ongoing network activity, such as file transfers or downloads, can prevent sleep mode activation. Pause any active downloads or transfers and disable unnecessary network connections.
  • Wake-on-LAN: This feature allows the PC to wake up from sleep mode via a network signal. If it’s not needed, disable it in the network adapter settings.

5. Background Processes:

  • System Processes: Certain background processes, such as system updates or virus scans, can keep the PC active. Check the Task Manager for any resource-intensive processes running in the background.
  • Third-Party Software: Many third-party applications, such as antivirus software or cloud storage services, can interfere with sleep mode. Review the settings of these applications and disable any features that might prevent sleep.

6. System Files and Registry:

  • Corrupted System Files: Corrupted system files can cause various issues, including sleep mode problems. Run the System File Checker (SFC) tool to scan and repair any corrupted files.
  • Registry Issues: Errors or inconsistencies in the registry can also affect sleep mode functionality. Use the Registry Editor with caution and only if you are familiar with its operation.

FAQs:

Q: My PC goes to sleep but wakes up shortly after. What could be the cause?

A: This is often caused by network activity, wake-on-LAN, or a scheduled task. Check for any active network connections, disable wake-on-LAN, and review scheduled tasks for any that might trigger wake-up events.

Q: My PC doesn’t sleep even after disabling all unnecessary applications and processes. What should I do?

A: Consider performing a clean boot to isolate the issue. A clean boot starts Windows with a minimal set of drivers and services, allowing you to identify any conflicting software or processes.

Q: Can a faulty power supply prevent my PC from sleeping?

A: Yes, a failing power supply can cause various issues, including sleep mode problems. If your power supply is old or experiencing issues, consider replacing it.

Tips for Preventing Sleep Mode Issues:

  • Regular Maintenance: Perform regular system maintenance tasks, such as disk cleanup, defragmentation, and driver updates, to ensure optimal system performance and prevent sleep mode issues.
  • Minimize Background Processes: Limit the number of applications and processes running in the background to reduce resource consumption and improve sleep mode efficiency.
  • Use Energy-Saving Features: Utilize Windows 11’s built-in energy-saving features, such as adaptive brightness and sleep timer, to further reduce energy consumption.
  • Monitor Power Consumption: Regularly monitor your PC’s power consumption using the Power & battery settings to identify any unusual patterns or high energy usage.
  • Consult Manufacturer Documentation: Refer to your PC’s manufacturer documentation for specific instructions on power management settings and troubleshooting steps.

Conclusion:

A Windows 11 PC that fails to enter sleep mode can be a frustrating and potentially detrimental issue. By following the troubleshooting steps outlined in this guide, users can systematically identify and resolve the underlying cause, restoring their PC’s ability to enter sleep mode and reap its benefits. Regular maintenance, awareness of power management settings, and a proactive approach to troubleshooting are key to ensuring a smooth and efficient sleep mode experience.

Fix: PC won't go to sleep mode in Windows 11 [2022 Guide] Fix - Windows 11 PC Won't Go Into Sleep mode [SOLVED] Windows 11 Won't Go To Sleep (2024)
Windows 11 PC Computer Won’t Sleep - Keeps Waking Up - Solved - YouTube How to stop your Windows 11 PC from going to sleep  Laptop Mag How to Fix PC Won't Go to sleep in Windows 11 [2024 Update]
Windows 11 Wont Sleep [SOLVED] Computer Won't Wake Up From Sleep Windows 11/10 - Driver Easy

Closure

Thus, we hope this article has provided valuable insights into The Enigma of a Windows 11 PC That Won’t Sleep: A Comprehensive Guide to Troubleshooting and Resolution. We thank you for taking the time to read this article. See you in our next article!

Reclaiming Control: A Guide To Reinstalling Mouse Drivers In Windows 10

Reclaiming Control: A Guide to Reinstalling Mouse Drivers in Windows 10

Introduction

In this auspicious occasion, we are delighted to delve into the intriguing topic related to Reclaiming Control: A Guide to Reinstalling Mouse Drivers in Windows 10. Let’s weave interesting information and offer fresh perspectives to the readers.

Reclaiming Control: A Guide to Reinstalling Mouse Drivers in Windows 10

How To Reinstall Mouse Drivers In Windows 10 [Tutorial] - YouTube

The mouse, an indispensable tool in the digital age, seamlessly translates our physical actions into commands, enabling us to navigate, interact, and control our computers. However, like any intricate piece of technology, mouse functionality can occasionally falter, leading to frustrating glitches, unresponsive clicks, or erratic cursor movements. This is often a symptom of outdated, corrupted, or incompatible mouse drivers. Reinstalling these drivers can effectively address such issues, restoring smooth and efficient interaction with your computer.

Understanding the Importance of Mouse Drivers

Mouse drivers act as the intermediary between your computer’s operating system and your physical mouse. They translate the signals generated by your mouse’s internal components, such as its buttons and sensor, into instructions that Windows 10 can understand. These drivers ensure that your mouse functions correctly, with accurate cursor movement, responsive button clicks, and proper scroll wheel functionality.

Identifying the Need for Driver Reinstallation

Several signs indicate that your mouse drivers may need a refresh:

  • Cursor Lag: Noticeable delays between moving your mouse and the corresponding cursor movement on the screen.
  • Unresponsive Clicks: Buttons fail to register clicks, or clicks register multiple times.
  • Erratic Cursor Movement: The cursor jumps or moves erratically, even when the mouse is stationary.
  • Scroll Wheel Malfunction: The scroll wheel spins freely without scrolling the page or scrolls erratically.
  • General Mouse Inconsistency: The mouse behaves inconsistently, exhibiting a combination of the aforementioned issues.

The Process of Reinstalling Mouse Drivers

Reinstalling mouse drivers involves replacing the existing drivers with fresh, updated versions. This process can be accomplished through two primary methods:

1. Using the Windows Device Manager

This method is a straightforward approach that leverages the built-in tools within Windows 10.

  • Step 1: Accessing Device Manager: Open the "Start" menu and type "Device Manager" in the search bar. Select the "Device Manager" application from the results.
  • Step 2: Locating the Mouse: Expand the "Mice and other pointing devices" category in the Device Manager window. Identify your specific mouse model listed within this category.
  • Step 3: Uninstalling the Driver: Right-click on your mouse entry and select "Uninstall device." Confirm the uninstallation by clicking "Uninstall" in the pop-up window.
  • Step 4: Restarting the Computer: Restart your computer to allow Windows 10 to automatically detect and reinstall the default drivers for your mouse.

2. Downloading and Installing Drivers from the Manufacturer’s Website

This method offers greater control and the potential for optimized performance.

  • Step 1: Identifying the Mouse Model: Determine the exact model of your mouse. You can find this information on the mouse itself, its packaging, or by referring to your computer’s documentation.
  • Step 2: Visiting the Manufacturer’s Website: Navigate to the website of your mouse manufacturer (e.g., Logitech, Razer, Microsoft).
  • Step 3: Locating the Support Section: Search for the "Support," "Downloads," or "Drivers" section on the manufacturer’s website.
  • Step 4: Selecting the Correct Driver: Use the search function or browse through the available drivers to locate the specific driver for your mouse model and operating system (Windows 10).
  • Step 5: Downloading and Installing the Driver: Download the driver file to your computer and follow the installation instructions provided by the manufacturer.

Troubleshooting Common Issues

While reinstalling mouse drivers is generally a straightforward process, certain issues may arise:

  • Missing or Incorrect Drivers: If the default drivers are insufficient or incompatible, your mouse may still exhibit problems. In such cases, downloading and installing the appropriate drivers from the manufacturer’s website is essential.
  • Driver Conflicts: Sometimes, other software or drivers on your computer can interfere with your mouse driver. Consider temporarily disabling or uninstalling any recently installed programs or drivers to isolate the issue.
  • Hardware Malfunction: If reinstalling drivers doesn’t resolve the issue, the problem could stem from a faulty mouse. Try connecting a different mouse to your computer to rule out this possibility.

FAQs

Q: Is reinstalling mouse drivers a safe procedure?

A: Reinstalling mouse drivers is a safe procedure when performed correctly. However, it is advisable to back up important data before initiating any driver updates or reinstallation.

Q: How often should I reinstall mouse drivers?

A: It is generally recommended to reinstall mouse drivers only when experiencing issues or when new driver updates are available from the manufacturer.

Q: Can I reinstall mouse drivers without restarting my computer?

A: While Windows 10 may attempt to automatically apply driver changes without restarting, a restart is often recommended for the changes to take full effect.

Q: What if I cannot find the correct driver for my mouse?

A: If you are unable to find the correct driver for your mouse on the manufacturer’s website, consider searching for generic mouse drivers compatible with Windows 10. However, these drivers may not offer the full functionality or optimized performance of the original drivers.

Tips for Optimal Mouse Performance

  • Keep Drivers Updated: Regularly check for driver updates from the manufacturer’s website to ensure optimal performance.
  • Clean Your Mouse: Dust and debris accumulated on your mouse’s sensor can disrupt its functionality. Regularly clean your mouse with a soft cloth or compressed air.
  • Use a Mouse Pad: Using a mouse pad provides a consistent and smooth surface for your mouse sensor, improving tracking accuracy.

Conclusion

Reinstalling mouse drivers is a simple yet effective solution for addressing a range of mouse-related issues in Windows 10. By following the steps outlined above, users can restore smooth and responsive mouse functionality, enhancing their overall computing experience. Regularly checking for driver updates and maintaining a clean mouse can further contribute to optimal performance and longevity.

How to Reinstall Mouse Drivers in Windows 10 How To Reinstall Mouse Drivers In Windows 10 - EasyPCMod How To Reinstall Mouse Drivers In Windows 10 - EasyPCMod
How To Reinstall Mouse Drivers In Windows 10 - YouTube How To Reinstall Mouse Drivers In Windows 10? How to Reinstall Mouse Drivers for Windows 11/10/7 - Driver Easy
How to Uninstall and Reinstall Mouse Drivers in Windows 10 How to Reinstall Mouse Driver on Windows 10, 8, 7

Closure

Thus, we hope this article has provided valuable insights into Reclaiming Control: A Guide to Reinstalling Mouse Drivers in Windows 10. We hope you find this article informative and beneficial. See you in our next article!

Rejuvenating Your Windows 10 Pro System: A Comprehensive Guide To Data-Preserving Reinstallation

Rejuvenating Your Windows 10 Pro System: A Comprehensive Guide to Data-Preserving Reinstallation

Introduction

In this auspicious occasion, we are delighted to delve into the intriguing topic related to Rejuvenating Your Windows 10 Pro System: A Comprehensive Guide to Data-Preserving Reinstallation. Let’s weave interesting information and offer fresh perspectives to the readers.

Rejuvenating Your Windows 10 Pro System: A Comprehensive Guide to Data-Preserving Reinstallation

[Simple Guide] How to Reinstall Windows 10 without Losing Data or Programs/Apps - Sysprobs

Windows 10 Pro, a robust and versatile operating system, can sometimes encounter performance issues or become susceptible to software conflicts. These issues can lead to a frustrating user experience, necessitating a refresh of the system. However, the prospect of reinstalling Windows can be daunting, particularly for users concerned about losing valuable data. Fortunately, there are methods to revitalize your Windows 10 Pro system while safeguarding your precious files and applications. This guide delves into the intricacies of reinstalling Windows 10 Pro without data loss, offering a clear and comprehensive approach for users of all levels.

Understanding the Need for Reinstallation

Reinstalling Windows 10 Pro can be a powerful tool for addressing various system-related problems. Some common scenarios where a reinstallation might be beneficial include:

  • Performance Issues: A sluggish system, slow boot times, and frequent crashes can indicate underlying issues that a fresh installation can resolve.
  • Software Conflicts: Incompatible software or corrupted drivers can disrupt system stability. Reinstalling Windows provides a clean slate, allowing for the installation of updated and compatible software.
  • Malware Infections: Malicious software can compromise system security and performance. A fresh installation helps eliminate these threats and restore system integrity.
  • System Errors: Unforeseen errors or glitches can sometimes render the system unusable. Reinstalling Windows can rectify these errors and restore functionality.
  • Upgrading to a New Version: When transitioning to a newer version of Windows 10 Pro, a fresh installation ensures a seamless and optimized user experience.

Methods for Reinstalling Windows 10 Pro Without Data Loss

There are two primary methods for reinstalling Windows 10 Pro while preserving your data:

1. Using the "Reset This PC" Feature:

This built-in Windows feature allows for a clean installation without losing personal files, applications, and settings. It offers two options:

  • Keep My Files: This option preserves personal files, but removes applications and settings, essentially resetting the system to its factory state.
  • Remove Everything: This option performs a complete wipe of the system, including all files and applications. This is recommended for resolving severe system issues or preparing the device for sale or disposal.

2. Performing a Custom Installation Using a USB Drive:

This method offers greater control and flexibility, allowing users to choose which partitions to format and retain. It involves creating a bootable USB drive with the Windows 10 Pro installation media and then performing a custom installation, selecting the option to preserve data during the process.

Detailed Steps for Each Method:

1. "Reset This PC" Feature:

  • Access Settings: Navigate to "Settings" by pressing the Windows key + I.
  • Select Update & Security: Choose "Recovery" from the left-hand menu.
  • Initiate Reset: Click "Reset this PC" and select the desired option ("Keep My Files" or "Remove Everything").
  • Follow On-Screen Instructions: The system will guide you through the reset process, which may involve restarting the computer several times.

2. Custom Installation Using a USB Drive:

  • Create a Bootable USB Drive: Download the Windows 10 Pro ISO file from Microsoft’s official website and use a tool like Rufus or the Windows Media Creation Tool to create a bootable USB drive.
  • Boot from USB: Restart your computer and access the BIOS menu by pressing a specific key (usually F2, F10, or Delete). Configure the boot order to prioritize the USB drive.
  • Initiate Installation: Follow the on-screen instructions to start the Windows installation process.
  • Select Custom Installation: Choose the "Custom: Install Windows only (advanced)" option.
  • Preserve Data Partitions: Carefully select the partitions to format and those to retain, ensuring that the partition containing your data is not selected for formatting.
  • Complete Installation: Follow the remaining steps to complete the installation process.

Important Considerations and Tips:

  • Back Up Your Data: While both methods aim to preserve data, it’s always advisable to create a backup of your essential files before proceeding. This serves as an extra layer of protection against unforeseen issues.
  • Check System Requirements: Ensure your hardware meets the minimum system requirements for Windows 10 Pro before attempting a reinstallation.
  • Update Drivers: After the reinstallation, ensure that all necessary drivers are installed for your hardware components to function properly.
  • Activate Windows: After the reinstallation, you will need to activate Windows using your existing product key.
  • Install Applications: Reinstall your essential applications and software after the reinstallation is complete.
  • Review System Settings: Take the opportunity to review and adjust system settings to optimize performance and security.

Frequently Asked Questions (FAQs)

Q: What happens to my applications and settings when I reinstall Windows 10 Pro using the "Reset This PC" feature with "Keep My Files"?

A: The "Keep My Files" option preserves your personal files, but it removes all applications and settings. You will need to reinstall your applications and configure your system settings after the reinstallation.

Q: Can I reinstall Windows 10 Pro using a different version than the one I currently have?

A: Yes, you can upgrade to a different version of Windows 10 Pro, but you will need a valid product key for the new version.

Q: What if I encounter an error during the reinstallation process?

A: If you encounter an error, consult Microsoft’s official documentation or seek assistance from a qualified technician.

Q: Can I recover my data after a clean reinstallation using "Remove Everything"?

A: Once you select "Remove Everything," your data is permanently deleted. It’s crucial to have a backup of your data before proceeding with this option.

Q: Is it safe to perform a custom installation using a USB drive?

A: Yes, it’s safe to perform a custom installation using a USB drive, but it requires a higher level of technical expertise. Carefully follow the instructions and ensure that you select the correct partitions for formatting and preservation.

Conclusion:

Reinstalling Windows 10 Pro without data loss can be a valuable tool for rejuvenating your system and resolving performance issues. By understanding the available methods and following the outlined steps, users can revitalize their Windows 10 Pro system while safeguarding their valuable data. Remember to back up your data, check system requirements, and carefully select the appropriate reinstallation method based on your specific needs. A clean and optimized system can provide a smoother and more efficient user experience.

How to Clean Install Windows 10 22H2 (the 2022 Update) from USB? - MiniTool [Simple Guide] How to Reinstall Windows 10 without Losing Data or Programs/Apps - Sysprobs Windows 10 Reset VS Clean Install VS Fresh Start, Detailed Guide!  Windows 10, Windows, Windows
Windows 10 pro setup - bmver "Windows Is Back": Microsoft Planing To Rejuvenate Windows 10 With New Graphic Interface By End How to Upgrade From Windows 10 Home to Windows 10 Pro?
Como acessar opções avançadas de inicialização no Windows 10 windows 10 pro System Backup(2) - YouTube

Closure

Thus, we hope this article has provided valuable insights into Rejuvenating Your Windows 10 Pro System: A Comprehensive Guide to Data-Preserving Reinstallation. We thank you for taking the time to read this article. See you in our next article!

Mastering The Art Of Writing: A Comprehensive Guide To Microsoft Word On Windows 10

Mastering the Art of Writing: A Comprehensive Guide to Microsoft Word on Windows 10

Introduction

With enthusiasm, let’s navigate through the intriguing topic related to Mastering the Art of Writing: A Comprehensive Guide to Microsoft Word on Windows 10. Let’s weave interesting information and offer fresh perspectives to the readers.

Mastering the Art of Writing: A Comprehensive Guide to Microsoft Word on Windows 10

Mastering Microsoft Word: A Comprehensive Guide to Boost You - StudyBullet.com

Microsoft Word, a cornerstone of productivity and communication, is an indispensable tool for individuals and organizations alike. Its robust features, intuitive interface, and extensive compatibility make it the go-to application for creating, editing, and sharing documents of all kinds. This guide delves into the world of Microsoft Word on Windows 10, providing a comprehensive overview of its capabilities, installation process, and essential tips for maximizing its potential.

Understanding Microsoft Word’s Power

Word transcends the realm of a simple text editor; it empowers users to craft professional-looking documents with ease. Its features cater to diverse needs, from composing basic letters and essays to creating intricate reports, brochures, and even interactive documents. Key advantages include:

  • Text Formatting: Word offers a rich array of tools for manipulating text, including fonts, sizes, colors, alignment, spacing, and more. This allows for precise control over the visual presentation of your content.
  • Document Structure: Features like headings, lists, tables, and columns facilitate document organization and readability. These elements provide structure and clarity, enhancing the overall flow of information.
  • Collaboration: Word facilitates seamless collaboration on documents, enabling multiple users to work simultaneously on the same file. This feature streamlines teamwork and fosters efficient communication.
  • Advanced Features: Word integrates powerful tools for research, referencing, and image manipulation. Features like the built-in dictionary, thesaurus, and citation manager enhance productivity and accuracy.
  • Versatility: Word supports various file formats, including PDF, HTML, and plain text, ensuring compatibility across different platforms and applications.

Navigating the Installation Process

Installing Microsoft Word on Windows 10 is a straightforward process. There are two primary methods:

  1. Microsoft 365 Subscription: This option provides access to the latest version of Word, along with other Office applications like Excel, PowerPoint, and Outlook. Subscribers enjoy regular updates and cloud storage capabilities.

  2. Standalone Purchase: This option allows users to buy a one-time license for Word, granting access to the software without a subscription. This method is suitable for individuals who need Word for occasional use or prefer a single purchase.

Unveiling the Interface: Getting Started

Upon launching Word, users are greeted by a familiar and intuitive interface. The ribbon interface, a staple of the Microsoft Office suite, provides easy access to all essential features. The ribbon is organized into tabs, each containing groups of related commands. Common tabs include Home, Insert, Design, Layout, References, and Mailings.

Unlocking the Power of Word: Essential Tips

  • Mastering Keyboard Shortcuts: Keyboard shortcuts significantly enhance productivity by minimizing mouse usage. Familiarize yourself with commonly used shortcuts like Ctrl+C (copy), Ctrl+V (paste), Ctrl+Z (undo), and Ctrl+S (save).
  • Leveraging Templates: Word offers a wide range of pre-designed templates for various document types, including letters, resumes, reports, and more. Utilizing templates saves time and ensures consistency in formatting.
  • Exploring Styles: Styles provide a consistent look and feel across your document. By applying styles, you can quickly format text, paragraphs, and headings with a single click.
  • Harnessing the Power of Tables: Tables are invaluable for organizing data, creating lists, and presenting information in a structured format. Word’s table tools allow for easy manipulation, including adding rows and columns, merging cells, and applying formatting.
  • Utilizing AutoCorrect and Spell Check: These features help maintain accuracy and professionalism by automatically correcting common typos and suggesting alternative spellings.
  • Embracing Collaboration Features: Word’s collaboration features, like real-time co-authoring and track changes, streamline teamwork and facilitate effective communication.

Addressing Common Questions: A Guide to Frequently Asked Questions

Q: Can I use Microsoft Word on multiple devices with a single subscription?

A: Yes, Microsoft 365 subscriptions typically allow users to install Word on multiple devices, such as computers, tablets, and smartphones. The number of devices allowed varies depending on the subscription plan.

Q: How do I save a document in a different format, such as PDF?

A: To save a document in a different format, click on "File" and then "Save As." Choose the desired format from the dropdown menu, and select a location to save the file.

Q: How can I insert images and other objects into my document?

A: To insert images, click on the "Insert" tab and then select "Pictures" or "Online Pictures." For other objects, such as shapes and charts, use the corresponding options within the "Insert" tab.

Q: What are some of the key differences between Microsoft Word and other word processing software?

A: While other word processing software exists, Microsoft Word remains a dominant player due to its robust features, user-friendly interface, and widespread compatibility. It excels in collaboration, document management, and advanced formatting options.

Conclusion: Empowering Communication and Productivity

Microsoft Word on Windows 10 is a powerful and versatile tool that empowers users to create, edit, and share documents effectively. Its intuitive interface, extensive features, and seamless integration with other Office applications make it an indispensable resource for individuals, students, and professionals alike. By mastering Word’s capabilities, users can enhance their communication, streamline their workflow, and achieve their goals with greater efficiency and professionalism.

Cara Membuat Word Art Pada Microsoft Office Word Tuto - vrogue.co How to Master MS Word Beginner to Advanced-Part 1 How to use office word in windows 10 - ertheatre
Microsoft Word How to Use Word Art in MS Word 2020 - YouTube Install microsoft word in windows 10 - daxskills how to use ms office word art ! Ms Office - YouTube
How to add word art in ms word - pormanage maiolinux.blogg.se - How to add word art in windows 10

Closure

Thus, we hope this article has provided valuable insights into Mastering the Art of Writing: A Comprehensive Guide to Microsoft Word on Windows 10. We appreciate your attention to our article. See you in our next article!

Deciphering The Mystery: Understanding Windows 11 Activation And KMS Keys

Deciphering the Mystery: Understanding Windows 11 Activation and KMS Keys

Introduction

With enthusiasm, let’s navigate through the intriguing topic related to Deciphering the Mystery: Understanding Windows 11 Activation and KMS Keys. Let’s weave interesting information and offer fresh perspectives to the readers.

Deciphering the Mystery: Understanding Windows 11 Activation and KMS Keys

Windows 11 Activation Key free 100% working \\KMS windows activation for win11 (I TRIED IT

The world of operating systems is often shrouded in technical jargon, leaving many users confused about crucial aspects like activation and keys. Windows 11, the latest iteration of Microsoft’s flagship operating system, is no exception. One term that frequently pops up in discussions about Windows 11 activation is "KMS Key." This article aims to shed light on the significance of KMS keys within the context of Windows 11 activation, providing a comprehensive understanding of its role and implications.

What is Windows 11 Activation?

Before diving into the specifics of KMS keys, it’s essential to grasp the concept of Windows 11 activation. Activation is a process that verifies the legitimacy of a Windows 11 installation. It ensures that the operating system is genuine and has not been illegally obtained or copied. Activation is crucial for a number of reasons:

  • Access to Updates: Activated Windows 11 installations receive regular security updates and feature upgrades, ensuring a secure and up-to-date system.
  • Enhanced Functionality: Certain features and functionalities within Windows 11 might be restricted or unavailable on non-activated installations.
  • Legal Compliance: Using an unactivated version of Windows 11 is a violation of Microsoft’s licensing terms and could lead to legal consequences.

The Role of KMS Keys in Windows 11 Activation

KMS (Key Management Service) keys are a specific type of activation key used for volume licensing scenarios. These keys are typically employed in organizations or businesses that have purchased multiple licenses for Windows 11. KMS keys are designed to activate multiple computers within a network environment, simplifying the activation process and reducing administrative overhead.

How KMS Keys Function:

Instead of directly activating each individual computer, KMS keys work by utilizing a central KMS server. This server acts as a hub for managing activations within a network. When a computer attempts to activate using a KMS key, it connects to the KMS server, which verifies the license and grants activation rights.

Key Differences Between KMS Keys and Retail Keys:

  • Scope: KMS keys are intended for volume licensing, activating multiple computers within a network, while retail keys are designed for single-computer activations.
  • Activation Method: KMS keys rely on a central KMS server for activation, whereas retail keys activate directly with Microsoft’s activation servers.
  • Validity: KMS keys have a limited validity period, usually 180 days, and require regular renewal through the KMS server. Retail keys, on the other hand, provide permanent activation for the specific device.

Benefits of Using KMS Keys:

  • Centralized Management: KMS keys simplify activation management, allowing administrators to activate multiple computers from a central location.
  • Simplified Deployment: KMS keys streamline the activation process during new computer deployments, reducing manual intervention and saving time.
  • Cost Efficiency: KMS keys offer a cost-effective solution for organizations with a large number of computers, as they typically involve a lower per-device licensing cost compared to retail keys.

FAQs About Windows 11 KMS Keys:

1. Can I use a KMS key to activate my personal computer?

No. KMS keys are specifically designed for volume licensing scenarios and are not intended for individual computer activations. Using a KMS key for a personal computer is a violation of Microsoft’s licensing terms.

2. How do I obtain a legitimate KMS key?

Legitimate KMS keys are only available through authorized Microsoft partners or volume licensing programs. Obtaining KMS keys from unofficial sources is illegal and carries significant risks.

3. What happens when a KMS key expires?

If a KMS key expires, the activated computers will revert to an unactivated state. To maintain activation, you need to renew the KMS key through the KMS server.

4. Can I use a KMS key for all versions of Windows 11?

No. KMS keys are specific to different editions of Windows 11. You need to use the appropriate KMS key for the specific edition you are activating.

5. Is it safe to use a KMS key?

Using a legitimate KMS key obtained through authorized channels is perfectly safe. However, using pirated or unauthorized KMS keys poses significant security risks and can lead to legal repercussions.

Tips for Using KMS Keys:

  • Obtain KMS keys from authorized sources: Ensure you acquire KMS keys from legitimate Microsoft partners or through authorized volume licensing programs.
  • Properly configure the KMS server: If you are managing a KMS server, ensure it is correctly configured and maintained to ensure smooth activation processes.
  • Regularly renew KMS keys: Monitor the expiration dates of your KMS keys and renew them before they expire to avoid interruptions in activation.
  • Stay updated on licensing terms: Keep yourself informed about the latest licensing terms and regulations surrounding KMS keys to ensure compliance.

Conclusion:

Understanding the role of KMS keys in Windows 11 activation is crucial for organizations and individuals involved in volume licensing scenarios. KMS keys offer a streamlined and cost-effective approach to activating multiple computers within a network environment. However, it’s essential to obtain KMS keys from legitimate sources, adhere to licensing terms, and maintain proper server configurations to ensure secure and compliant activation processes.

Microsoft Windows 11 Kms Key  edu.svet.gob.gt Kmsauto Windows 11 Windows 11 Product Keys For All Versions 32bit+64bit (2023)
Kms 11 Windows 10 Activator 2023 – Get Latest Windows 10 Update 無料でWindows 11をアクティブにする方法  Microsoft 365 Activate Windows 11 Pro Free Using Kms Key Permanently Activate Windows
Windows 11 Activation Keys 2023: How To Find Windows 11 Product Key Free? – Movavi Activation How to Activate Windows 11 [Authentic & Quickest Ways 2024]

Closure

Thus, we hope this article has provided valuable insights into Deciphering the Mystery: Understanding Windows 11 Activation and KMS Keys. We thank you for taking the time to read this article. See you in our next article!

Unveiling The Health Of Your PC: A Comprehensive Guide To Microsoft’s PC Health At A Glance

Unveiling the Health of Your PC: A Comprehensive Guide to Microsoft’s PC Health at a Glance

Introduction

In this auspicious occasion, we are delighted to delve into the intriguing topic related to Unveiling the Health of Your PC: A Comprehensive Guide to Microsoft’s PC Health at a Glance. Let’s weave interesting information and offer fresh perspectives to the readers.

Unveiling the Health of Your PC: A Comprehensive Guide to Microsoft’s PC Health at a Glance

How to Run the PC Health Check App for Microsoft Windows 11 Upgrades  Dell US

In the ever-evolving landscape of technology, maintaining the optimal performance of your personal computer is crucial. Microsoft, recognizing the importance of a healthy digital ecosystem, has introduced "PC Health at a Glance" – a user-friendly tool designed to provide insights into the well-being of your Windows device.

This comprehensive guide will delve into the intricacies of PC Health at a Glance, exploring its functionalities, benefits, and significance in ensuring a seamless and efficient computing experience.

Understanding PC Health at a Glance

PC Health at a Glance is a central hub for monitoring and managing the health of your Windows PC. It offers a concise and visually appealing overview of key system metrics, allowing users to quickly assess potential issues and take proactive steps to optimize performance.

Key Features of PC Health at a Glance:

  • System Health Summary: Provides a snapshot of your PC’s overall health, including storage space, battery life, and security status.
  • Storage Management: Offers insights into disk space usage, identifying large files and suggesting potential cleanup options.
  • Battery Health: Displays battery capacity and usage patterns, allowing users to optimize power settings for extended battery life.
  • Security Status: Presents a clear overview of security threats and vulnerabilities, encouraging users to update their antivirus software and security settings.
  • Performance Insights: Provides information on CPU, RAM, and storage utilization, helping users identify potential performance bottlenecks.
  • System Updates: Alerts users to available software updates, ensuring their PC runs on the latest and most secure version of Windows.
  • Troubleshooting: Offers guided assistance for common PC issues, simplifying the problem-solving process.

Benefits of Utilizing PC Health at a Glance

The advantages of utilizing PC Health at a Glance extend beyond simple monitoring. This tool empowers users to take control of their PC’s health, leading to:

  • Enhanced Performance: By identifying and addressing performance bottlenecks, PC Health at a Glance contributes to a smoother and faster computing experience.
  • Prolonged Battery Life: Battery health monitoring allows users to optimize power settings and extend the lifespan of their device’s battery.
  • Improved Security: Regular security checks and updates ensure your PC is protected against malware and other threats.
  • Reduced Downtime: Proactive troubleshooting and system updates minimize the likelihood of encountering critical errors or performance issues.
  • Increased User Confidence: Having a comprehensive understanding of your PC’s health fosters confidence and reduces anxiety regarding potential issues.

Accessing PC Health at a Glance

PC Health at a Glance is seamlessly integrated into the Windows 11 operating system. Users can access it through the following methods:

  • System Tray Icon: A dedicated icon in the system tray provides quick access to the PC Health at a Glance interface.
  • Settings Menu: Navigating to "Settings > System > About" will display the PC Health at a Glance dashboard.
  • Search Bar: Typing "PC Health" in the Windows search bar will directly lead to the tool.

FAQs Regarding PC Health at a Glance

Q: Is PC Health at a Glance available on all Windows versions?

A: PC Health at a Glance is currently available on Windows 11. Support for earlier versions is not yet confirmed.

Q: Can I customize the information displayed in PC Health at a Glance?

A: While the current version offers a comprehensive overview, customization options are limited. However, future updates may introduce more user-configurable features.

Q: Does PC Health at a Glance require internet access to function?

A: While internet access is required for certain features, such as system updates and security checks, PC Health at a Glance can still provide basic health information offline.

Q: Can I use PC Health at a Glance to diagnose and fix hardware issues?

A: PC Health at a Glance primarily focuses on software and system health. For hardware diagnostics, users are advised to utilize dedicated tools or contact technical support.

Tips for Optimizing PC Health at a Glance

  • Regularly Review Health Reports: Make a habit of reviewing the PC Health at a Glance reports to stay informed about your PC’s status.
  • Address Issues Promptly: When PC Health at a Glance identifies potential issues, address them promptly to prevent further complications.
  • Keep Software Updated: Ensure your PC is running on the latest version of Windows and other software to benefit from performance enhancements and security patches.
  • Optimize Storage Space: Regularly clean up your hard drive by removing unnecessary files and programs to improve performance and free up space.
  • Monitor Battery Usage: Adjust power settings based on your usage patterns to extend battery life and optimize performance.

Conclusion

PC Health at a Glance is a valuable tool for every Windows user. By providing a comprehensive overview of your PC’s health, it empowers you to take proactive steps towards ensuring optimal performance, security, and longevity. By leveraging this tool effectively, you can enhance your computing experience and minimize the risk of encountering unexpected issues. Embrace the power of PC Health at a Glance and unlock the full potential of your Windows device.

How to use the PC Health Check app - Microsoft Support  Check in app, Health check, App PC Health Check App Windows 11 Download [Official Microsoft] Pc Health At A Glance
Microsoft releases new and updated Windows 11 PC Health Check app again - YouTube Pc health check windows 11 - underose Windows 10 Upgrade to Windows 11: Your Comprehensive PC Health Checkup Guide - YouTube
Microsoft re-releases the PC Health Check to see if your PC can run Windows 11  Poc Network // Tech Microsoft PC Health Check adds detailed Windows 11 compatibility info

Closure

Thus, we hope this article has provided valuable insights into Unveiling the Health of Your PC: A Comprehensive Guide to Microsoft’s PC Health at a Glance. We thank you for taking the time to read this article. See you in our next article!