Windows 11’s Network Management Hub: A Comprehensive Guide
Windows 11’s Network Management Hub: A Comprehensive Guide
Related Articles: Windows 11’s Network Management Hub: A Comprehensive Guide
Introduction
In this auspicious occasion, we are delighted to delve into the intriguing topic related to Windows 11’s Network Management Hub: A Comprehensive Guide. Let’s weave interesting information and offer fresh perspectives to the readers.
Table of Content
Windows 11’s Network Management Hub: A Comprehensive Guide
Windows 11 introduces a streamlined approach to network management with its revamped Network and Sharing Center. This centralized hub consolidates all essential network-related settings and tools, simplifying the process of configuring, troubleshooting, and managing network connections. This guide delves into the intricacies of this crucial system component, explaining its functionalities, benefits, and how it empowers users to navigate their network environment with ease.
Navigating the Network Management Hub
Accessing the Network and Sharing Center in Windows 11 is straightforward:
- Search: Begin by typing "Network and Sharing Center" in the Windows search bar.
- Click: Select the "Network and Sharing Center" result from the search list.
Upon opening the Network and Sharing Center, users are presented with a clear and intuitive interface that displays:
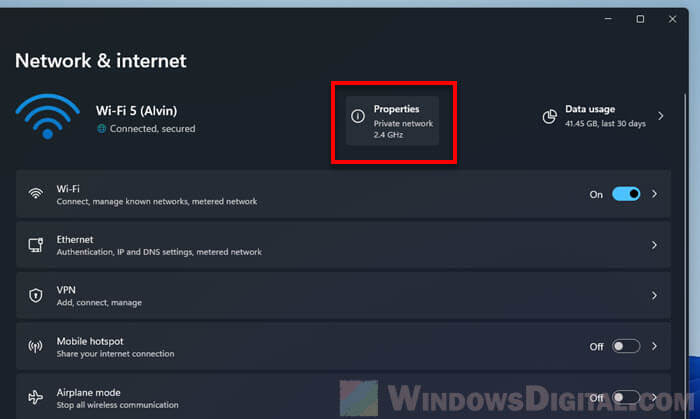
- Network Connections: A list of active network connections, including Wi-Fi, Ethernet, and VPN.
- Network Profile: The current network profile (Public, Private, or Work) and its associated security settings.
- Sharing Options: Options to manage file and printer sharing for the current network.
- Network and Sharing Center Tasks: Quick links to frequently used tasks, such as changing adapter settings, connecting to a new network, or troubleshooting network problems.
Understanding Network Profiles
Windows 11 utilizes network profiles to determine the appropriate security settings and sharing options for different network environments. These profiles cater to distinct scenarios, ensuring a balanced approach between security and accessibility:
- Public Network: This profile is typically used for public Wi-Fi networks, such as those found in cafes or airports. Public networks prioritize security, limiting network access and sharing capabilities.
- Private Network: This profile is ideal for home networks or trusted workplaces. Private networks offer greater flexibility, enabling file and printer sharing while maintaining a reasonable security level.
- Work Network: This profile is designed for corporate networks, providing enhanced security features and access control for sensitive data.
Managing Network Connections
The Network and Sharing Center provides a centralized platform for managing all network connections:
- View Connection Status: Users can quickly check the status of active connections, including signal strength, connection speed, and network name.
- Connect to a New Network: The Network and Sharing Center simplifies the process of connecting to new networks, whether Wi-Fi or Ethernet.
- Manage Wireless Networks: Users can view, add, and remove wireless networks, adjust connection preferences, and manage network security settings.
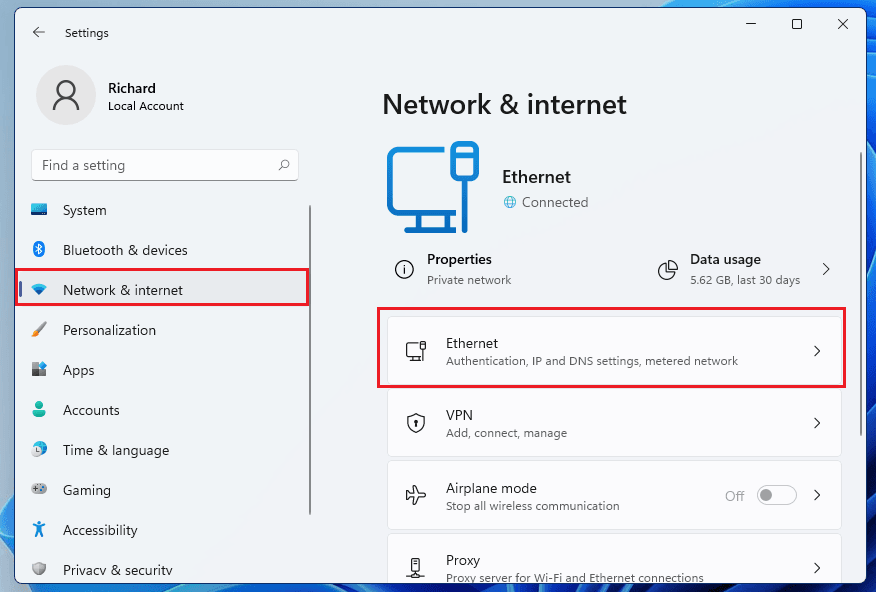
- Configure Ethernet Connections: The Network and Sharing Center allows users to customize Ethernet settings, such as IP address assignment, DNS server configuration, and network speed settings.
Sharing Options and Network Discovery
The Network and Sharing Center empowers users to control file and printer sharing across their network:
- Enable or Disable Sharing: Users can choose to enable or disable file and printer sharing for their network, allowing them to selectively share resources with other devices.
- Manage Sharing Settings: Specific sharing options can be customized, including selecting shared folders, setting permissions for different users, and configuring network discovery settings.
- Network Discovery: Network discovery allows devices on the same network to detect each other, facilitating file sharing and printer access.
- Password Protected Sharing: Enhanced security can be implemented through password protection for shared folders, limiting access to authorized users.
Troubleshooting Network Issues
The Network and Sharing Center offers a range of tools and resources to diagnose and resolve network problems:
- Network Diagnostics: The built-in network diagnostics tool automatically detects and identifies common network issues, providing troubleshooting steps and solutions.
- Network Adapter Settings: Users can access and adjust network adapter settings, including IP address configuration, DNS settings, and network speed settings.
- View Network History: The Network and Sharing Center displays a history of network connections, providing insights into potential issues related to network connectivity.
- Internet Connection Troubleshooter: The Network and Sharing Center offers a dedicated troubleshooter for Internet connection problems, guiding users through a series of steps to resolve common issues.
Benefits of the Network and Sharing Center
Windows 11’s Network and Sharing Center offers a plethora of benefits for users:
- Centralized Management: Consolidating network settings and tools into a single hub streamlines network management, simplifying configuration and troubleshooting.
- Enhanced User Experience: The intuitive interface and clear layout make it easy for users to navigate and understand network settings, even for those with limited technical expertise.
- Improved Security: Network profiles and sharing options provide a robust security framework, safeguarding sensitive data and limiting network access to authorized devices.
- Increased Flexibility: The Network and Sharing Center offers extensive customization options, allowing users to tailor network settings to their specific needs and preferences.
- Seamless Integration: The Network and Sharing Center seamlessly integrates with other Windows 11 features, providing a unified and consistent experience for managing network connections and sharing resources.
FAQs about Network and Sharing Center in Windows 11
Q: How do I change my network profile?
A: To change your network profile, open the Network and Sharing Center, click on "Change advanced sharing settings," and select the desired profile (Public, Private, or Work).
Q: Can I share files with other devices on my network?
A: Yes, you can share files with other devices on your network by enabling file sharing in the Network and Sharing Center.
Q: How do I troubleshoot network problems?
A: The Network and Sharing Center offers a built-in network diagnostics tool, as well as a dedicated Internet connection troubleshooter, to help diagnose and resolve network issues.
Q: What is network discovery, and how do I enable it?
A: Network discovery allows devices on the same network to detect each other, facilitating file sharing and printer access. To enable network discovery, open the Network and Sharing Center, click on "Change advanced sharing settings," and select "Turn on network discovery."
Q: How do I connect to a VPN?
A: The Network and Sharing Center allows you to set up and connect to VPNs. To connect to a VPN, click on "Set up a new connection or network" in the Network and Sharing Center, and choose "Connect to a workplace."
Tips for Using the Network and Sharing Center
- Regularly review network settings: Ensure that your network settings are appropriate for your current network environment and security needs.
- Use strong passwords for wireless networks: Protect your network from unauthorized access by using strong and unique passwords for your wireless network.
- Enable network discovery cautiously: Only enable network discovery on trusted networks, as it can expose your devices to potential security risks.
- Keep network drivers updated: Ensure that your network drivers are up to date to maintain optimal performance and address potential compatibility issues.
- Use a firewall: A firewall helps protect your devices from unauthorized access and malicious attacks.
Conclusion
Windows 11’s Network and Sharing Center serves as a comprehensive hub for managing network connections, sharing resources, and troubleshooting network issues. Its intuitive interface, centralized settings, and robust security features empower users to confidently navigate their network environment, ensuring a seamless and secure connection experience. By leveraging the capabilities of the Network and Sharing Center, users can optimize their network performance, enhance data security, and enjoy the benefits of a well-managed network infrastructure.

:max_bytes(150000):strip_icc()/Rectangle9-83c26933cf69400ca802f9fa2640f7f4.jpg)
:max_bytes(150000):strip_icc()/Rectangle14-9041862fe1f340efa8b8af0ee57b92fb.jpg)

Closure
Thus, we hope this article has provided valuable insights into Windows 11’s Network Management Hub: A Comprehensive Guide. We hope you find this article informative and beneficial. See you in our next article!


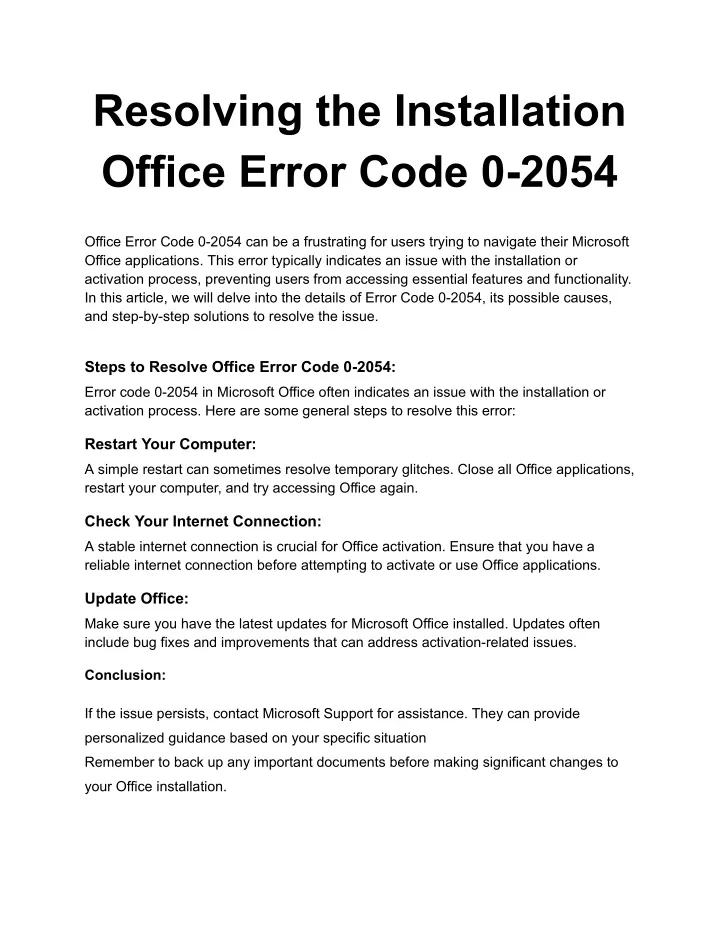


![[ SOLVED ] How to fix Office 365 Error code 0-2054 - Live Support](http://microsoftask.com/wp-content/uploads/2017/09/Firewall-disabling.jpg)


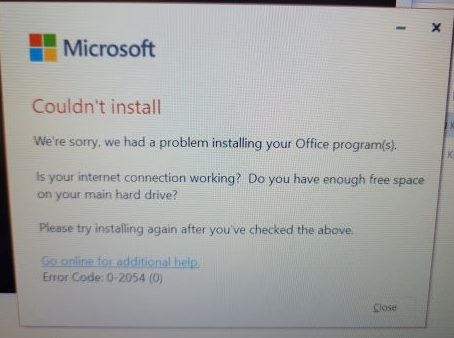
![5 Best Ransomware Removal Tools Software 2023 [Windows 11, 10, 7] Get PC Apps](https://www.getpcapps.com/wp-content/uploads/2018/09/Wana-Decrypt0r-2.0-Ransomware-removal-tools-windows-pc.jpg)
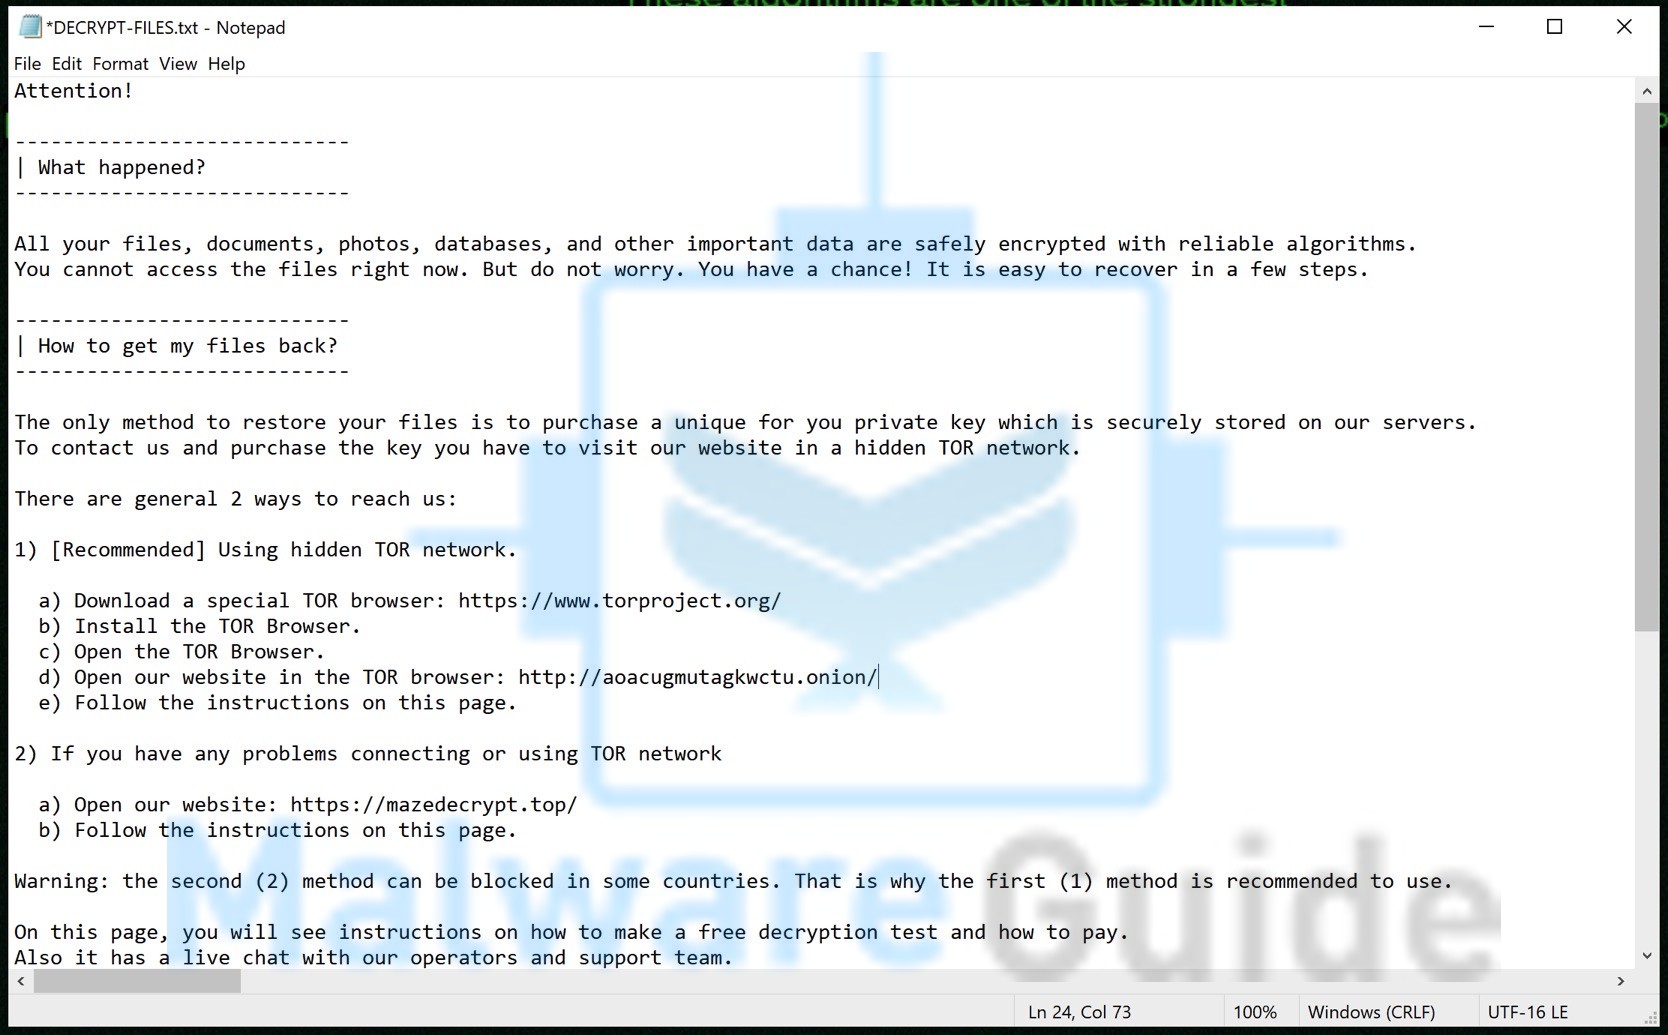


-png-1.png)