Archives 2023

Photo Story 3 For Windows 10: A Comprehensive Guide To Creating Engaging Visual Narratives

Photo Story 3 for Windows 10: A Comprehensive Guide to Creating Engaging Visual Narratives

Related Articles: Photo Story 3 for Windows 10: A Comprehensive Guide to Creating Engaging Visual Narratives

Introduction

In this auspicious occasion, we are delighted to delve into the intriguing topic related to Photo Story 3 for Windows 10: A Comprehensive Guide to Creating Engaging Visual Narratives. Let’s weave interesting information and offer fresh perspectives to the readers.

Photo Story 3 for Windows 10: A Comprehensive Guide to Creating Engaging Visual Narratives

PPT - Microsoft Photo Story 3 for Windows PowerPoint Presentation, free download - ID:6806569

Photo Story 3, a program designed for Windows 10, offers a user-friendly interface for creating visually compelling narratives. While often overlooked in the modern digital landscape dominated by sophisticated video editing software, Photo Story 3 remains a valuable tool for crafting simple yet effective slideshows with a focus on storytelling. Its ease of use and intuitive design make it an ideal choice for individuals seeking to preserve memories, share personal experiences, or create educational presentations.

Understanding the Power of Visual Storytelling:

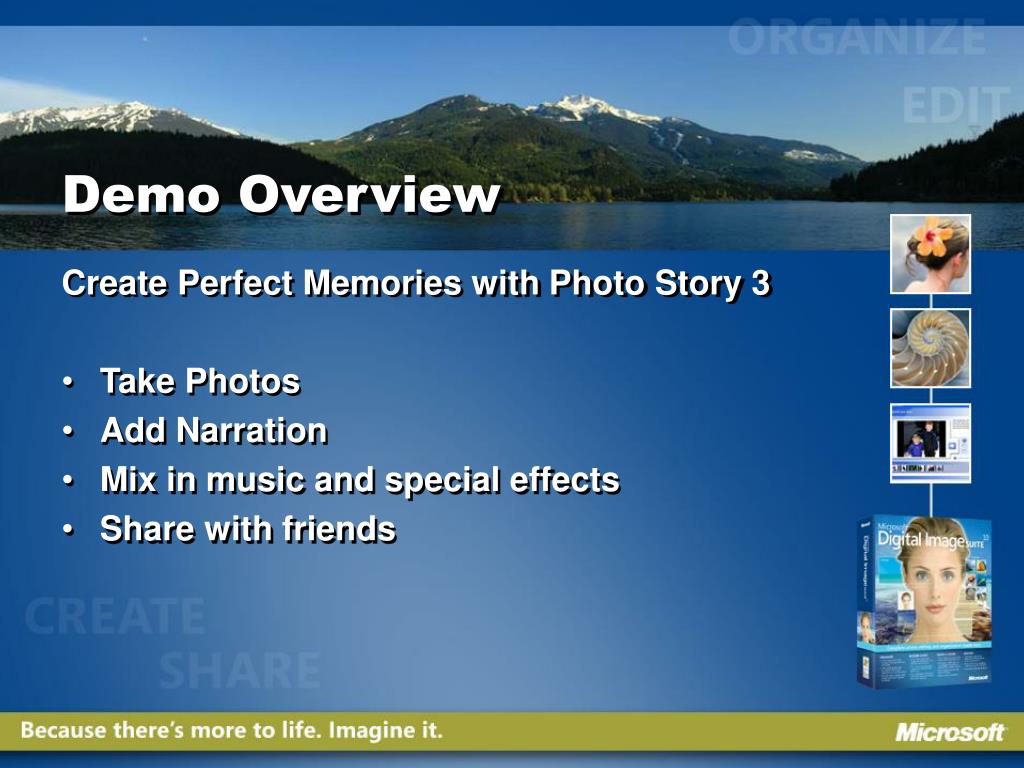
Photo Story 3 emphasizes the power of visual storytelling. It allows users to combine photographs with text, music, and transitions to create a dynamic slideshow that engages the audience. This approach utilizes the inherent human connection with visual elements, making the information conveyed more memorable and impactful.

Key Features of Photo Story 3:

Photo Story 3’s simplicity is its strength. It provides a streamlined set of features that facilitate the creation of compelling slideshows without overwhelming the user with complex functionalities. These key features include:

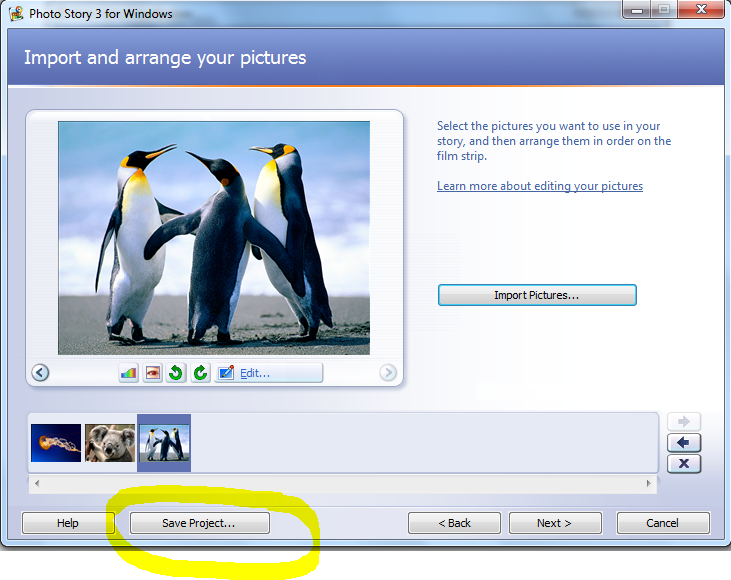
  • Image Import and Organization: Photo Story 3 supports importing images from various sources, including digital cameras, scanners, and computer files. Users can easily organize their images within the program, ensuring a smooth workflow.
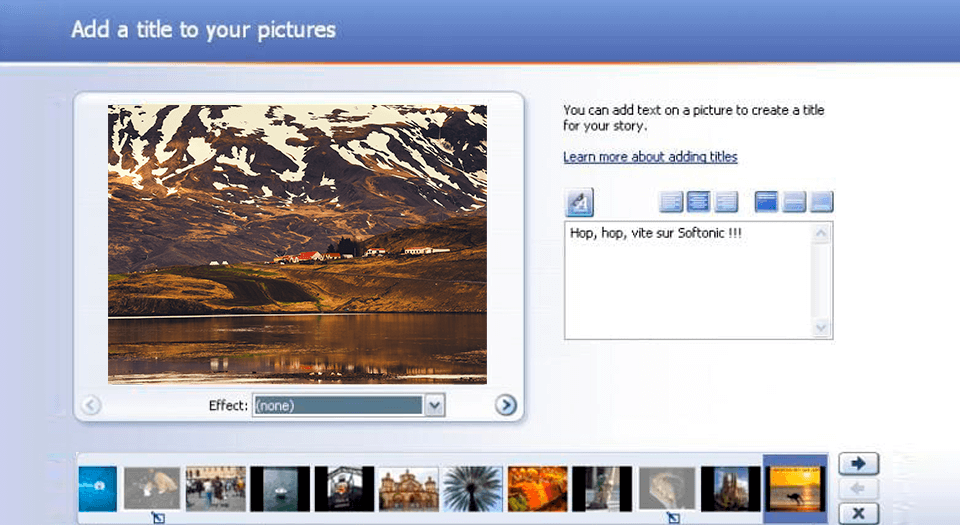
  • Text and Captioning: Adding text to images is crucial for providing context and narrative structure. Photo Story 3 offers flexible text editing options, allowing users to customize font styles, sizes, and colors.
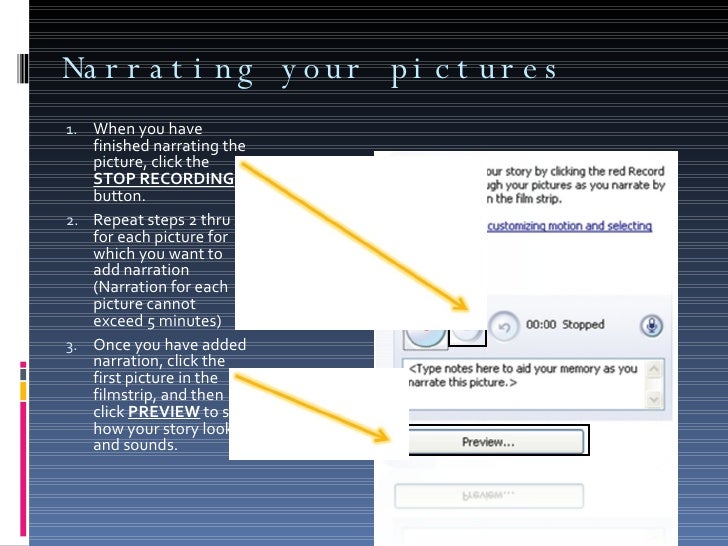
  • Audio Integration: Background music plays a significant role in setting the tone and enhancing the emotional impact of a slideshow. Photo Story 3 allows users to add music from their personal libraries or utilize pre-selected soundtracks.
  • Transitions and Effects: Photo Story 3 offers a range of transitions, including fades, wipes, and zooms, to seamlessly connect images and create a visually appealing flow.
  • Export Options: Once the slideshow is complete, users can export it in various formats, including video files (WMV) and self-running presentations. This versatility ensures compatibility with different devices and platforms.

Benefits of Using Photo Story 3:

While Photo Story 3 may not offer the advanced editing capabilities of professional video editing software, it excels in its simplicity and user-friendliness. This makes it an ideal tool for:

  • Preserving Memories: Capturing precious moments and sharing them with loved ones is a central function of Photo Story 3. Its ease of use allows users to create personalized slideshows showcasing family vacations, weddings, or other significant events.
  • Creating Educational Presentations: Photo Story 3 is a valuable tool for teachers, educators, and students looking to create engaging presentations. Its visual storytelling approach can help bring history, science, or other subjects to life.
  • Sharing Personal Experiences: Photo Story 3 facilitates the sharing of personal stories and experiences, offering a platform to showcase travels, hobbies, or artistic endeavors.
  • Creating Business Presentations: While not as sophisticated as professional video editing software, Photo Story 3 can be used to create basic presentations for business purposes, particularly for showcasing products, services, or company achievements.

FAQs about Photo Story 3 for Windows 10:

Q: Is Photo Story 3 still available for download?

A: Photo Story 3 is no longer officially available for download. Microsoft discontinued the program in 2009, and it is no longer supported. However, users can find older versions of the software through unofficial sources online, but it’s important to exercise caution when downloading software from unknown sources.

Q: What are the system requirements for Photo Story 3?

A: Photo Story 3 requires a Windows operating system, specifically Windows XP, Vista, or Windows 7. It is not compatible with Windows 10 or later versions.

Q: Can I use Photo Story 3 to create videos for social media platforms?

A: While Photo Story 3 allows for exporting videos in WMV format, the output may not be compatible with all social media platforms. Some platforms may require specific video formats or resolutions.

Q: Are there any alternatives to Photo Story 3 for creating slideshows?

A: Yes, there are numerous alternatives to Photo Story 3, both free and paid, available for Windows 10. Some popular options include:

  • Windows Movie Maker: While discontinued, Windows Movie Maker remains a popular option for creating basic slideshows.
  • PowerPoint: Microsoft PowerPoint is a powerful presentation software that can be used to create slideshows with advanced features.
  • Google Photos: Google Photos offers a free and user-friendly platform for creating slideshows directly from your photo library.
  • Adobe Spark: Adobe Spark is a cloud-based design platform that allows users to create slideshows with professional-looking templates and features.

Tips for Using Photo Story 3 Effectively:

  • Choose High-Quality Images: The quality of your images significantly impacts the overall visual appeal of your slideshow. Use high-resolution images for the best results.
  • Keep the Story Concise: Focus on telling a clear and concise story. Avoid overloading the slideshow with too many images or text.
  • Use Effective Transitions: Transitions help to create a smooth flow between images and enhance the visual appeal of the slideshow. Experiment with different transition styles to find what works best for your story.
  • Select Appropriate Music: Background music plays a vital role in setting the tone and enhancing the emotional impact of your slideshow. Choose music that complements the theme and mood of your story.
  • Proofread Carefully: Before exporting your slideshow, carefully proofread all text for errors in spelling and grammar.

Conclusion:

Photo Story 3, while no longer officially supported, remains a valuable tool for creating simple yet engaging slideshows. Its user-friendly interface and intuitive features make it accessible to individuals with varying levels of technical expertise. While alternative options exist with more advanced features, Photo Story 3 continues to offer a streamlined approach to visual storytelling, making it an ideal choice for preserving memories, sharing personal experiences, or creating educational presentations.

Photo Story 3 for Windows - QuanTriMang.com Photo Story 3 for Windows  Other Multimedia Software Create Free Slideshows from Photos with Microsoft Photostory 3
Photo Story 3 For Windows Download Photo Story 3 For Windows Photo Story 3 for Windows - Mrs. Ammons' Tech Help
PPT - Microsoft Photo Story 3 for Windows PowerPoint Presentation, free download - ID:6806569 Photo Story 3 Tutorial

Closure

Thus, we hope this article has provided valuable insights into Photo Story 3 for Windows 10: A Comprehensive Guide to Creating Engaging Visual Narratives. We appreciate your attention to our article. See you in our next article!

The Future Of Productivity: Exploring The Possibilities Of Office 2025

The Future of Productivity: Exploring the Possibilities of Office 2025

Introduction

With enthusiasm, let’s navigate through the intriguing topic related to The Future of Productivity: Exploring the Possibilities of Office 2025. Let’s weave interesting information and offer fresh perspectives to the readers.

The Future of Productivity: Exploring the Possibilities of Office 2025

The Future of Office Productivity, ChatGPT Advanced Robot Typing on a Computer, Generative AI

The world of work is constantly evolving, driven by technological advancements and shifting demands. As we approach 2025, the landscape of productivity tools is expected to be dramatically transformed. While Microsoft has not officially announced a release of "Office 2025," the concept of a future iteration of the suite serves as a valuable starting point for exploring the potential trajectory of office software.

The Evolution of Office Software

Microsoft Office has been a cornerstone of productivity for decades. From its humble beginnings as a suite of desktop applications, it has evolved into a comprehensive ecosystem encompassing cloud-based services, mobile apps, and AI-powered features. This evolution reflects the changing needs of the workforce, which is increasingly mobile, collaborative, and data-driven.

Anticipating the Future of Office Suites

While the specifics of "Office 2025" remain speculative, certain trends suggest the direction of future development:

  • Enhanced Cloud Integration: Cloud-based solutions like Microsoft 365 have become the dominant paradigm, enabling seamless collaboration and access from any device. Future iterations of Office are likely to further strengthen cloud integration, offering real-time co-authoring capabilities, enhanced storage options, and seamless data synchronization.
  • AI-Powered Automation: Artificial intelligence is rapidly transforming various industries, and office software is no exception. Future versions of Office could leverage AI to automate tasks, streamline workflows, and provide intelligent insights. This includes features like automated document summarization, content generation, and data analysis.
  • Immersive User Experiences: The rise of augmented and virtual reality technologies presents opportunities for immersive and interactive office experiences. Future Office suites might incorporate these technologies to enhance collaboration, training, and data visualization.
  • Focus on Security and Privacy: As cyber threats become increasingly sophisticated, security and privacy will remain paramount. Future Office iterations will likely prioritize robust security measures, data encryption, and user-centric privacy controls.

The Potential Benefits of Future Office Suites

The anticipated advancements in Office software hold immense potential for individuals and organizations:

  • Increased Productivity: AI-powered automation and streamlined workflows can significantly enhance productivity, freeing up time for strategic tasks and creative endeavors.
  • Enhanced Collaboration: Real-time collaboration tools and cloud-based platforms can foster seamless teamwork, regardless of location or device.
  • Improved Decision-Making: AI-driven insights and data analysis can provide valuable information to support informed decision-making.
  • Personalized Workflows: Future Office suites could adapt to individual preferences and working styles, creating personalized experiences that optimize productivity.
  • Accessible Work Environments: Innovative technologies like accessibility features and voice-based commands can make Office software more inclusive and accessible for individuals with disabilities.

FAQs about Future Office Software

Q: When will "Office 2025" be released?

A: Microsoft has not announced any specific release plans for a product named "Office 2025." The company continually updates its Office suite with new features and improvements, often released as part of its ongoing Microsoft 365 subscription service.

Q: Will "Office 2025" be available as a standalone download?

A: It is highly likely that future versions of Office will continue to be available through subscription services like Microsoft 365, providing access to the latest features and updates. However, standalone downloads may still be offered for specific versions or legacy applications.

Q: Will "Office 2025" be compatible with older operating systems?

A: Microsoft generally prioritizes compatibility with the latest operating systems. Future versions of Office may require specific system requirements and may not be compatible with older operating systems.

Q: What will be the pricing for "Office 2025"?

A: Pricing for future Office software will likely remain similar to current subscription models or standalone purchase options. Specific pricing details will be announced by Microsoft closer to any potential release.

Tips for Preparing for Future Office Software

  • Stay Informed: Keep abreast of Microsoft’s announcements and updates regarding Office software.
  • Embrace Cloud-Based Solutions: Transition to cloud-based platforms like Microsoft 365 to take advantage of enhanced collaboration and accessibility features.
  • Explore AI-Powered Tools: Familiarize yourself with AI-powered productivity tools and consider how they can augment your workflow.
  • Invest in Training: Stay current with the latest software updates and features by participating in training programs.

Conclusion

While the specifics of "Office 2025" remain uncertain, the trends and possibilities outlined above suggest a future where office software plays a transformative role in shaping productivity and collaboration. By embracing technological advancements and adapting to evolving needs, individuals and organizations can leverage the power of future Office suites to unlock new levels of efficiency and innovation. The future of work is being shaped by the tools we use, and the evolution of Office software is poised to play a pivotal role in this transformation.

PPT - Leading With The Future Of Productivity PowerPoint Presentation, free download - ID:4938605 Start Grasping The Modern Office Productivity Trends & Challenges Today Future shocks: 17 technology predictions for 2025  World Economic Forum
THE FUTURE OF PRODUCTIVITY The Future of Productivity Exploring the Future of Business Productivity with AI-Powered Tools Office of the Future: Productivity Anywhere
PPT - The future of productivity PowerPoint Presentation, free download - ID:6255307 The Future of Workplace Productivity  Twinview

Closure

Thus, we hope this article has provided valuable insights into The Future of Productivity: Exploring the Possibilities of Office 2025. We thank you for taking the time to read this article. See you in our next article!

Upgrading To Windows 11: A Comprehensive Guide

Upgrading to Windows 11: A Comprehensive Guide

Introduction

In this auspicious occasion, we are delighted to delve into the intriguing topic related to Upgrading to Windows 11: A Comprehensive Guide. Let’s weave interesting information and offer fresh perspectives to the readers.

Upgrading to Windows 11: A Comprehensive Guide

Upgrading to Windows 11 Why Wait for Microsoft Step by step - YouTube

Windows 11, the latest iteration of Microsoft’s popular operating system, offers a range of new features and improvements designed to enhance the user experience. Whether you’re a casual user or a tech enthusiast, upgrading to Windows 11 can bring about significant benefits. This guide provides a comprehensive overview of the upgrade process, its advantages, and essential considerations.

Understanding the Upgrade Process

Upgrading to Windows 11 involves replacing your existing operating system with the latest version. This process can be performed in two primary ways:

  • Clean Installation: This method involves erasing your hard drive and installing Windows 11 from scratch. This ensures a fresh system with no leftover files or settings from the previous operating system.
  • In-Place Upgrade: This method allows you to upgrade your existing Windows 10 installation to Windows 11 while retaining your personal files, applications, and settings.

System Requirements and Compatibility

Before attempting an upgrade, it’s crucial to ensure your computer meets the minimum system requirements for Windows 11. These include:

  • Processor: 1 gigahertz (GHz) or faster with 2 or more cores
  • RAM: 4 gigabytes (GB)
  • Storage: 64 GB or larger storage device
  • Graphics Card: Compatible with DirectX 12 or later, WDDM 2.x driver
  • Display: High definition (720p) display with a minimum resolution of 1366 x 768 pixels

Benefits of Upgrading to Windows 11

Upgrading to Windows 11 offers several advantages, including:

  • Enhanced Security: Windows 11 features improved security measures, including enhanced threat protection, hardware-based security features, and regular updates to address vulnerabilities.
  • Improved Performance: Windows 11 is optimized for modern hardware, resulting in faster boot times, improved application performance, and smoother multitasking.
  • New User Interface: Windows 11 boasts a redesigned user interface with a simplified Start menu, rounded corners, and a more modern aesthetic.
  • Enhanced Gaming Experience: Windows 11 includes features specifically designed to enhance gaming performance, such as DirectX 12 Ultimate support, Auto HDR, and Xbox Game Pass integration.
  • Improved Focus and Productivity: Features like Focus Assist and Snap Layouts help users minimize distractions and enhance productivity.

Preparing for the Upgrade

Before initiating the upgrade process, it’s essential to prepare your system to ensure a smooth transition:

  • Back Up Your Data: Create a backup of your important files, including documents, photos, and other essential data. This will safeguard your data in case of any unexpected issues during the upgrade.
  • Check for Compatibility: Verify that your hardware and software are compatible with Windows 11. This can be done by using Microsoft’s PC Health Check app.
  • Update Your Drivers: Ensure that your device drivers are up to date. Outdated drivers can cause compatibility issues during the upgrade process.
  • Uninstall Unnecessary Programs: Remove any unused programs or applications to free up storage space and improve performance.

Upgrading to Windows 11: Step-by-Step Guide

The upgrade process can vary depending on the chosen method. Here’s a general guide for both clean installation and in-place upgrade:

Clean Installation:

  1. Create a Bootable USB Drive: Download the Windows 11 installation media from Microsoft’s website and create a bootable USB drive.
  2. Boot from USB Drive: Restart your computer and boot from the USB drive.
  3. Follow On-Screen Instructions: The installation process will guide you through the steps, including selecting language, region, and partition.
  4. Format the Hard Drive: Choose to format the hard drive to ensure a clean installation.
  5. Install Windows 11: Wait for the installation process to complete.
  6. Configure Windows 11: After installation, configure your settings and personalize your system.

In-Place Upgrade:

  1. Check for Updates: Ensure that your Windows 10 system is up to date by checking for available updates.
  2. Download Windows 11: Download the Windows 11 setup file from Microsoft’s website.
  3. Run the Setup File: Run the setup file and follow the on-screen instructions.
  4. Accept the License Terms: Read and accept the license terms.
  5. Choose the Upgrade Option: Select the option to keep personal files and apps during the upgrade.
  6. Wait for Installation: Allow the upgrade process to complete.

Troubleshooting Common Issues

During the upgrade process, you may encounter some common issues:

  • Insufficient Disk Space: Ensure you have enough free space on your hard drive to accommodate Windows 11.
  • Incompatible Hardware or Software: Check for compatibility issues with your hardware or software and update drivers if necessary.
  • Installation Errors: If you encounter errors during installation, try restarting the process or seeking assistance from Microsoft support.

Frequently Asked Questions

Q: Is it safe to upgrade to Windows 11?

A: Yes, upgrading to Windows 11 is generally safe if you follow the recommended steps and ensure your system meets the minimum requirements.

Q: Will I lose my data during the upgrade?

A: If you choose the in-place upgrade method, you can retain your personal files and applications. However, it’s always recommended to back up your data before upgrading.

Q: Can I downgrade back to Windows 10 after upgrading?

A: Yes, you can downgrade back to Windows 10 within 10 days of upgrading to Windows 11. However, this will erase all data and settings installed on Windows 11.

Q: What are the minimum system requirements for Windows 11?

A: Refer to the system requirements mentioned earlier in this guide.

Q: What if my computer doesn’t meet the minimum requirements?

A: If your computer doesn’t meet the minimum requirements, you may not be able to upgrade to Windows 11. You can consider purchasing a new computer or upgrading your existing hardware.

Tips for a Smooth Upgrade

  • Check for compatibility before upgrading.
  • Back up your data before starting the upgrade process.
  • Ensure you have enough free disk space.
  • Update your drivers to the latest versions.
  • Disable antivirus software during the upgrade process.
  • Restart your computer after the upgrade is complete.

Conclusion

Upgrading to Windows 11 can offer significant benefits, including enhanced security, improved performance, and a modernized user interface. By following the recommended steps and addressing potential issues, you can ensure a smooth and successful upgrade experience. Remember to back up your data, check compatibility, and update drivers before initiating the upgrade process.

How to Install Windows 11 Update or Upgrade  FREE Step by Step - YouTube How to Upgrade Windows 11 HOME to Windows 11 PRO? - YouTube Buy Windows 11 User Guide for Beginners: A Comprehensive Guide to Master Windows 11 Operating
Windows 11 Upgrade From Windows 10 Tutorial How To Upgrade Windows - Riset How To Upgrade To Windows 11 From Windows 10 Microsoft Tutorial - Vrogue A Comprehensive English Guide on Upgrading to Windows 11 - REALM RUSH
How to Upgrade to Windows 11 Right Now - Rondea Windows 11 Upgrade

Closure

Thus, we hope this article has provided valuable insights into Upgrading to Windows 11: A Comprehensive Guide. We hope you find this article informative and beneficial. See you in our next article!

Navigating The Terrain: Panasonic Toughbook CF-54 Drivers For Windows 10

Navigating the Terrain: Panasonic Toughbook CF-54 Drivers for Windows 10

Introduction

With great pleasure, we will explore the intriguing topic related to Navigating the Terrain: Panasonic Toughbook CF-54 Drivers for Windows 10. Let’s weave interesting information and offer fresh perspectives to the readers.

Meet the powerful, portable, semi-rugged CF-54 Windows Toughbook  Panasonic Australia Business Blog

The Panasonic Toughbook CF-54, a ruggedized laptop designed for demanding environments, has earned a reputation for its durability and reliability. However, maximizing its potential requires seamless integration with your chosen operating system. This article delves into the crucial aspect of installing the appropriate drivers for Windows 10 on the CF-54, ensuring optimal performance and functionality.

Understanding the Role of Drivers

Drivers act as the bridge between your hardware and software, enabling communication and proper operation. Think of them as translators, converting the language of your hardware components into instructions your operating system can understand. Without the correct drivers, your CF-54’s components, such as the network card, touchpad, or graphics adapter, may not function properly or at all.

Acquiring the Right Drivers for Your Panasonic Toughbook CF-54

The first step towards a smooth Windows 10 experience with your CF-54 is acquiring the necessary drivers. Panasonic, as the manufacturer, provides comprehensive driver support for its products. Here’s how you can locate and download the correct drivers:

  1. Visit the Panasonic Support Website: Navigate to the Panasonic Toughbook support website. The website is the official source for the latest driver updates and support documentation.

  2. Locate Your CF-54 Model: On the website, utilize the search function to locate your specific CF-54 model. Be precise with the model number to ensure you download the correct drivers.

  3. Access the Drivers Section: Once you’ve located your model, navigate to the "Drivers and Downloads" or "Support" section. This section typically houses all the available drivers and software for your device.

  4. Filter by Operating System: The driver library will likely be categorized by operating system. Select Windows 10 as your operating system to filter for the relevant drivers.

  5. Download the Required Drivers: Identify the specific drivers you need based on the components you wish to install or update. For example, you might require drivers for the network adapter, touchpad, graphics card, and other peripherals.

Installing Drivers on Your Panasonic Toughbook CF-54

Once you’ve downloaded the required drivers, follow these steps to install them on your CF-54:

  1. Extract the Driver Files: The downloaded driver package will likely be in a compressed format (e.g., ZIP). Extract the contents of the package to a convenient location on your computer.

  2. Run the Setup File: Locate the setup file within the extracted driver folder. It will typically be an executable file (e.g., .exe). Double-click the setup file to launch the installation process.

  3. Follow On-Screen Instructions: The installation wizard will guide you through the process. Accept the license agreement and follow the prompts to complete the installation.

  4. Restart Your Computer: After the installation is complete, restart your computer for the changes to take effect.

Troubleshooting Driver Installation Issues

While the driver installation process is generally straightforward, you may encounter some challenges. Here are some common troubleshooting tips:

  • Check for Compatibility: Ensure that the downloaded drivers are compatible with your specific CF-54 model and Windows 10 version. Refer to the Panasonic support website for detailed compatibility information.

  • Run as Administrator: Some driver installations require administrator privileges. Right-click the setup file and select "Run as administrator" to ensure the installation process completes successfully.

  • Disable Antivirus Software: Antivirus software can sometimes interfere with driver installations. Temporarily disable your antivirus software during the installation process.

  • Update Windows 10: Outdated Windows 10 drivers can lead to incompatibility issues. Ensure your Windows 10 operating system is up-to-date.

  • Contact Panasonic Support: If you continue to encounter difficulties, reach out to Panasonic support for assistance. They can provide tailored guidance and support for your specific CF-54 model.

FAQ: Panasonic Toughbook CF-54 Drivers for Windows 10

Q: Are there universal drivers for all CF-54 models?

A: No, drivers are specific to each CF-54 model. Ensure you download the drivers designed for your particular model to avoid compatibility issues.

Q: Can I install drivers from third-party websites?

A: While third-party websites may offer drivers, it’s generally recommended to use drivers provided by Panasonic. Third-party drivers might not be compatible or could contain malware.

Q: Do I need to install all the drivers provided by Panasonic?

A: You only need to install the drivers for the components you intend to use or update. For example, if you don’t use the built-in webcam, you don’t need to install its driver.

Q: How often should I update drivers?

A: Regularly updating drivers is crucial for optimal performance and security. Check for driver updates periodically, especially after major Windows updates or when encountering issues with your CF-54.

Tips for Maintaining Optimal Driver Performance

  • Regularly Check for Updates: Stay informed about driver updates by visiting the Panasonic support website or using the Windows Update feature.

  • Create a System Restore Point: Before installing new drivers, create a system restore point. This allows you to revert to a previous state if the new drivers cause issues.

  • Keep Your Operating System Updated: Ensure your Windows 10 operating system is up-to-date. Windows updates often include driver improvements and security patches.

  • Avoid Unnecessary Driver Installations: Only install drivers for components you intend to use. Installing unnecessary drivers can potentially cause conflicts and performance issues.

Conclusion

Installing the appropriate drivers for your Panasonic Toughbook CF-54 on Windows 10 is essential for optimal functionality and performance. By following the steps outlined in this article and utilizing the provided resources, you can ensure a seamless integration of your CF-54 into your Windows 10 environment. Remember to prioritize driver updates from official sources and troubleshoot any issues promptly for a reliable and efficient computing experience.

Panasonic ToughbookWindows 10 Update  Toughpad Windows 10 Update  M Rugged Mobile CF-54 - Toughbook Semi Ruggedized Notebooks  Panasonic Business Panasonic Toughbook CF-54 (i5-7300U) Rugged Laptop Review - NotebookCheck.net Reviews
Panasonic Toughbook 54, CF-54 MK3, 14-inch FHD, Gloved Multi-Touch, Intel Core i5-7300U @ 2 Panasonic's new slim Toughbook CF-54 is ready for anything  Windows Central Panasonic Toughbook 54 Prime  Panasonic Mobility Solutions
Panasonic ToughBook CF-54 Core i5-5300U 4GB 500GB 14″ WIN 10  CompuPoint Panasonic Toughbook CF-54 - i5-7300U · Intel HD Graphics 620 · 14.0”, HD (1366 x 768), IPS

Closure

Thus, we hope this article has provided valuable insights into Navigating the Terrain: Panasonic Toughbook CF-54 Drivers for Windows 10. We appreciate your attention to our article. See you in our next article!

Creating A Bootable USB Drive For Windows 10: A Comprehensive Guide

Creating a Bootable USB Drive for Windows 10: A Comprehensive Guide

Introduction

With great pleasure, we will explore the intriguing topic related to Creating a Bootable USB Drive for Windows 10: A Comprehensive Guide. Let’s weave interesting information and offer fresh perspectives to the readers.

Creating a Bootable USB Drive for Windows 10: A Comprehensive Guide

How to Create a Windows 10 Bootable USB - Using a Media Creation Tool

Creating a bootable USB drive containing the Windows 10 installation files is an essential tool for various computer-related tasks. It enables users to install a fresh copy of Windows, upgrade existing systems, or troubleshoot boot issues. This guide provides a comprehensive overview of the process, encompassing the necessary steps, essential tools, and potential challenges.

Understanding the Importance of a Bootable USB Drive

A bootable USB drive containing Windows 10 installation files offers numerous advantages:

  • Clean Installation: It facilitates a fresh installation of Windows, removing any existing software, settings, and files, potentially resolving performance issues or malware infections.
  • System Upgrade: It allows users to upgrade their existing operating system to the latest version of Windows 10, benefitting from new features, security updates, and improved performance.
  • Troubleshooting Boot Issues: It provides a means to boot the computer from an external source, bypassing potential boot errors or corrupted system files, facilitating repairs or data recovery.
  • Dual Booting: It enables the installation of multiple operating systems on a single computer, allowing users to switch between different systems based on their needs.
  • Portable Operating System: It can transform a USB drive into a portable operating system, allowing users to access their data and applications on any compatible computer without installing the operating system on the host machine.

Essential Tools for Creating a Bootable USB Drive

Before embarking on the creation process, ensure the following tools are readily available:

  • Windows 10 ISO File: This file contains all the necessary installation files for Windows 10. It can be downloaded from Microsoft’s official website.
  • USB Drive: A USB drive with at least 8GB of free space is required. Ensure it is formatted as FAT32.
  • USB Drive Formatting Tool: Windows includes a built-in tool for formatting USB drives. Alternatively, third-party tools like Rufus or Universal USB Installer can be used.
  • Media Creation Tool: Microsoft provides a dedicated tool for creating bootable USB drives for Windows 10. It can be downloaded from their website.

Step-by-Step Guide to Creating a Bootable USB Drive

1. Download the Windows 10 ISO File:

  • Visit the Microsoft website and navigate to the Windows 10 download page.
  • Select the desired edition of Windows 10 (Home or Pro) and language.
  • Click on "Download Tool Now" and run the downloaded file.
  • Select "Create installation media for another PC" and click "Next."
  • Choose "USB flash drive" and click "Next."
  • Select the USB drive to be used for the installation and click "Next."
  • The Media Creation Tool will format the USB drive and copy the Windows 10 installation files.

2. Using the Media Creation Tool:

  • Run the Media Creation Tool and select "Create installation media for another PC."
  • Accept the license terms and choose "USB flash drive" as the media type.
  • Select the USB drive and click "Next."
  • The tool will download the necessary files and create the bootable USB drive.

3. Using Rufus:

  • Download and run the Rufus application.
  • Select the USB drive from the "Device" dropdown menu.
  • Click on the "Select" button next to "BOOT Selection" and choose the Windows 10 ISO file.
  • Choose the desired partition scheme and target system type (BIOS or UEFI).
  • Ensure the "Format options" are set to "FAT32" and "Quick format."
  • Click on the "Start" button to begin the process.

4. Using Universal USB Installer:

  • Download and run the Universal USB Installer application.
  • Select "Windows" as the operating system.
  • Choose the downloaded Windows 10 ISO file.
  • Select the USB drive from the "Drive" dropdown menu.
  • Click on the "Create" button to start the process.

5. Verifying the Bootable USB Drive:

  • Once the process is complete, eject the USB drive from the computer.
  • Restart the computer and access the BIOS settings by pressing the appropriate key (usually F2, F10, or Delete) during startup.
  • Configure the boot order to prioritize the USB drive.
  • Save the changes and exit the BIOS.
  • The computer should boot from the USB drive, displaying the Windows 10 installation screen.

Troubleshooting Common Issues

  • Error Message During Formatting: Ensure the USB drive is properly connected and has enough free space. Try formatting the drive using the Disk Management tool in Windows.
  • Error Message During Installation: Ensure the ISO file is downloaded correctly and the USB drive is formatted properly. Try using a different USB drive or downloading the ISO file again.
  • Computer Not Booting from USB Drive: Check the BIOS settings to ensure the boot order prioritizes the USB drive. Try restarting the computer and pressing the appropriate key to access the BIOS.

Tips for Creating a Bootable USB Drive

  • Use a dedicated USB drive for the installation process to avoid accidental data loss.
  • Back up important data before proceeding with the installation.
  • Ensure the USB drive is connected directly to the computer and not through a hub.
  • Use a high-quality USB drive for better performance and reliability.
  • Download the Windows 10 ISO file from Microsoft’s official website to avoid malware or corrupted files.

FAQs

Q: What if the USB drive is not recognized by the computer?

A: Check the USB port for any physical damage. Try connecting the USB drive to a different port. If the issue persists, the USB drive might be faulty.

Q: Can I create a bootable USB drive for multiple versions of Windows?

A: No, each bootable USB drive can only contain installation files for a single version of Windows.

Q: Can I use a USB drive with a smaller capacity than 8GB?

A: It is not recommended to use a USB drive with less than 8GB of free space, as it might not be able to accommodate all the necessary installation files.

Q: What if the computer does not boot from the USB drive after changing the boot order?

A: Check the BIOS settings again to ensure the USB drive is prioritized. Try restarting the computer and accessing the BIOS during startup.

Conclusion

Creating a bootable USB drive for Windows 10 is a valuable skill for any computer user. It empowers individuals to install, upgrade, or troubleshoot their operating system, ensuring a smooth and efficient computing experience. By following the steps outlined in this guide, users can confidently create a bootable USB drive, leveraging its numerous benefits for various computer-related tasks.

Creating A Windows 10 Usb Boot Windows 10 how to make a usb drive bootable - managesexi How to Create Windows 10 Bootable USB Flash Drive  RUFUS
How to Create a Windows 10 Bootable USB Drive using DiskPart  Computer Systems Servicing Guide How To Create Bootable USB Drive from Windows 10 ISO With CMD - YouTube Bootable Windows 10 USB Flash Disk. How to Create Windows 10 Bootable USB Disk? - YouTube
How To Create Bootable Windows 10 Usb Flash Drive Using The Media - Vrogue How To Create A Bootable Usb With Easybcd On Windows 10

Closure

Thus, we hope this article has provided valuable insights into Creating a Bootable USB Drive for Windows 10: A Comprehensive Guide. We thank you for taking the time to read this article. See you in our next article!

Understanding The "Program Files (x86)" Folder In Windows 11

Understanding the "Program Files (x86)" Folder in Windows 11

Introduction

With great pleasure, we will explore the intriguing topic related to Understanding the "Program Files (x86)" Folder in Windows 11. Let’s weave interesting information and offer fresh perspectives to the readers.

Understanding the "Program Files (x86)" Folder in Windows 11

Why programs files (x86) on Windows 11 if it's 64 Bit?

The "Program Files (x86)" folder, a familiar sight within the Windows operating system, is a dedicated location for storing 32-bit applications on 64-bit versions of Windows. While the name might seem a bit cryptic, its purpose is simple: to maintain compatibility and ensure that older applications designed for 32-bit systems can run smoothly on modern 64-bit computers.

The Evolution of Windows and the Need for Compatibility

The history of Windows is marked by a continuous evolution of its architecture. Early versions of Windows were primarily 16-bit operating systems, evolving to 32-bit systems with Windows 95 and later. The transition to 64-bit computing, starting with Windows XP 64-bit Edition, brought significant performance advantages and the ability to address larger amounts of memory.

However, this transition presented a challenge: a vast library of existing applications were designed for 32-bit systems. To ensure compatibility and avoid disrupting the user experience, Microsoft implemented a mechanism known as "WoW64" (Windows on Windows 64-bit). This technology allows 32-bit applications to run seamlessly within a 64-bit environment.

The Role of "Program Files (x86)"

The "Program Files (x86)" folder plays a crucial role in this compatibility strategy. It serves as a dedicated location for installing and storing 32-bit applications on 64-bit versions of Windows. This separation ensures that 32-bit applications do not interfere with 64-bit applications and vice versa.

Why Separate Folders for 32-bit and 64-bit Applications?

The separation of 32-bit and 64-bit applications into distinct folders offers several advantages:

  • Improved Compatibility: By segregating applications based on their architecture, Windows ensures that compatibility issues are minimized. 32-bit applications are isolated, preventing conflicts with 64-bit applications.
  • Enhanced Performance: Separating 32-bit applications from 64-bit applications can lead to improved performance. 64-bit applications, designed for the modern architecture, can utilize the full capabilities of the system without being hindered by older 32-bit applications.
  • Reduced Errors: Keeping 32-bit and 64-bit applications in separate folders reduces the likelihood of errors arising from conflicts between applications designed for different architectures.

Navigating the "Program Files (x86)" Folder

The "Program Files (x86)" folder is located within the root directory of your Windows installation. You can access it through the File Explorer, either by browsing to the root directory or by using the search function.

Within the "Program Files (x86)" folder, you will find various subfolders representing individual applications. These subfolders contain the application’s files, including executable files, libraries, and configuration data.

Understanding the "Program Files" Folder

While "Program Files (x86)" houses 32-bit applications, the "Program Files" folder is dedicated to 64-bit applications. This distinction is crucial for maintaining proper operation and avoiding compatibility issues.

Working with the "Program Files (x86)" Folder

It’s generally recommended to avoid directly modifying files within the "Program Files (x86)" folder. Doing so could potentially disrupt the functionality of applications or cause system instability.

When to Modify the "Program Files (x86)" Folder

There are specific situations where modifying the "Program Files (x86)" folder might be necessary:

  • Troubleshooting Application Issues: If an application is malfunctioning, you might need to modify or remove certain files within its respective subfolder. However, this should be done with caution and only after consulting relevant troubleshooting guides.
  • Updating or Repairing Applications: Some applications require manual updates or repairs that may involve modifying files within their subfolders.
  • Removing Applications: Uninstalling an application usually removes its associated files from the "Program Files (x86)" folder.

Important Considerations

  • System Security: The "Program Files (x86)" folder is a critical part of the Windows operating system. It is important to avoid installing or running applications from unknown sources, as this could introduce malware or other security threats.
  • Disk Space Management: The "Program Files (x86)" folder can occupy a significant amount of disk space, especially if you have many 32-bit applications installed. Consider regularly reviewing your installed applications and removing any that are no longer needed to free up space.

FAQs about "Program Files (x86)"

Q: What is the difference between "Program Files" and "Program Files (x86)"?

A: "Program Files" is for 64-bit applications, while "Program Files (x86)" is for 32-bit applications. This separation is necessary for compatibility and performance reasons.

Q: Why do I have both "Program Files" and "Program Files (x86)" folders?

A: Because you are running a 64-bit version of Windows. The "Program Files" folder is for applications designed for the 64-bit architecture, while "Program Files (x86)" is for older applications designed for 32-bit systems.

Q: Can I delete the "Program Files (x86)" folder?

A: No, deleting this folder will render many of your 32-bit applications unusable. It is an essential part of the Windows operating system.

Q: Can I move the "Program Files (x86)" folder to a different location?

A: It is not recommended to move the "Program Files (x86)" folder. Doing so could cause compatibility issues and disrupt the functionality of your applications.

Q: Is it safe to run applications from the "Program Files (x86)" folder?

A: It is generally safe to run applications from the "Program Files (x86)" folder, but it is important to be cautious about the source of the application. Always download applications from trusted sources and avoid running applications from unknown or untrusted websites.

Tips for Working with "Program Files (x86)"

  • Use the "Add or Remove Programs" Control Panel: Use the "Add or Remove Programs" control panel to uninstall applications. This will ensure that all files associated with the application are removed properly.
  • Regularly Clean Up Your Disk: Use the Windows Disk Cleanup tool to remove temporary files and other unnecessary data from your system, including the "Program Files (x86)" folder.
  • Consider Using a Disk Defragmentation Tool: Defragmenting your hard drive can improve performance by organizing files and making it easier for the computer to access them.

Conclusion

The "Program Files (x86)" folder is a vital component of the Windows operating system, playing a crucial role in maintaining compatibility for older 32-bit applications. Understanding its purpose and function is essential for managing your applications and ensuring a smooth user experience on your 64-bit Windows 11 system. By following best practices and being mindful of the importance of this folder, you can ensure that your computer runs efficiently and securely.

How to Find Where a Program is Installed on your Windows 11 PC 4100_the+differences+between+the+program+files+folder+and+program+files+(x86)+folders.jpg What's the Difference Between the "Program Files (x86)" and "Program Files" Folders in Windows?
Program files x86 and Windows 10/11 Fichiers de programme ou Fichiers de programme (x86)? Voici les différences  Maybaygiare.org What Is Program Files X86
Program Files X86 What is the Difference Between Program Files and Program Files x86 - Pediaa.Com

Closure

Thus, we hope this article has provided valuable insights into Understanding the "Program Files (x86)" Folder in Windows 11. We thank you for taking the time to read this article. See you in our next article!

Oo Shut Up Windows 11 Chip

oo shut up windows 11 chip

Introduction

With great pleasure, we will explore the intriguing topic related to oo shut up windows 11 chip. Let’s weave interesting information and offer fresh perspectives to the readers.

The "oo shut up Windows 11 chip" does not exist.

How to Shut down or Restart Windows 11 PC?  Gear Up Windows

The phrase "oo shut up Windows 11 chip" is not a recognized term in the tech industry or any other field. It appears to be a nonsensical phrase, likely created as a joke or a misunderstanding.

It is crucial to rely on verified and reliable sources of information when seeking information about technology or any other subject. Using credible sources helps ensure the accuracy and validity of the information you consume.

If you are interested in learning about specific aspects of Windows 11, such as its hardware requirements, features, or security updates, you can find accurate information on Microsoft’s official website or reputable technology websites like CNET, TechRadar, or PCMag.

Remember, critical thinking and fact-checking are essential when navigating the vast and sometimes misleading world of online information.

Windows 11 - How to Shut Down Windows 11 - YouTube O&O ShutUp10++: For Windows 10 & 11, with Dark Mode - YouTube Protect Yourself from Spying in Windows 10 & 11 with O&O Shutup 10++: - YouTube
Windows 11 Shutdown Shortcut Key How to Shutdown a Windows 11 PC - All Things How Shutdown Windows 11
How To Fully Shutdown Windows 11 Grenfell Internet Ce - vrogue.co How To Shut Down Or Restart Windows 11  solveyourtech

Closure

Thus, we hope this article has provided valuable insights into oo shut up windows 11 chip. We appreciate your attention to our article. See you in our next article!

The Evolution Of Windows 11: A Comprehensive Guide To Updates And Enhancements

The Evolution of Windows 11: A Comprehensive Guide to Updates and Enhancements

Introduction

In this auspicious occasion, we are delighted to delve into the intriguing topic related to The Evolution of Windows 11: A Comprehensive Guide to Updates and Enhancements. Let’s weave interesting information and offer fresh perspectives to the readers.

The Evolution of Windows 11: A Comprehensive Guide to Updates and Enhancements

Evolution of Microsoft Windows Through The Years: Windows 1 to Windows 11 - YouTube

Windows 11, Microsoft’s latest operating system, is a significant step forward in the evolution of the Windows platform. Since its initial release, Microsoft has been continuously refining and improving the operating system through a series of updates. These updates aim to enhance the user experience, address security vulnerabilities, introduce new features, and ensure optimal performance.

Understanding Windows 11 Updates

Windows 11 updates are delivered in two primary forms:

  • Feature Updates: These are substantial updates that introduce significant new features, design changes, and system enhancements. They are typically released once or twice a year and are often numbered (e.g., Windows 11 version 22H2).
  • Quality Updates: These updates focus on improving the stability, security, and performance of the operating system. They are smaller in scope than feature updates and are released more frequently, often on a monthly basis.

Benefits of Keeping Windows 11 Up-to-Date

Staying current with Windows 11 updates is crucial for several reasons:

  • Enhanced Security: Updates often include security patches that address vulnerabilities and protect your system from malware and other threats.
  • Improved Performance: Updates can optimize system performance, address bugs, and improve overall stability.
  • New Features and Functionality: Feature updates introduce new capabilities and functionalities, enhancing your productivity and user experience.
  • Compatibility: Updates ensure compatibility with the latest hardware and software, preventing potential conflicts and ensuring smooth operation.

Navigating the Update Process

Windows 11 is designed to automatically download and install updates in the background. However, you can manually check for updates and control the installation process through the Windows Update settings.

To check for updates:

  1. Open the Settings app by pressing Windows key + I.
  2. Select Windows Update from the left-hand menu.
  3. Click Check for updates.

To manage update settings:

  1. Go to Settings > Windows Update.
  2. Under Update settings, you can choose how and when updates are downloaded and installed.
  3. You can also opt to delay feature updates or pause updates temporarily.

Understanding Update Terminology

Several terms are commonly used when discussing Windows 11 updates:

  • Cumulative Update: A single update that includes all previous updates, ensuring your system is fully up-to-date.
  • Patch Tuesday: A regular release schedule for security updates, typically on the second Tuesday of each month.
  • Preview Builds: Pre-release versions of Windows 11 that allow users to test upcoming features and provide feedback.

Frequently Asked Questions (FAQs)

Q: Are Windows 11 updates mandatory?

A: While updates are generally recommended, you can choose to delay or pause them. However, it is essential to understand that delaying updates can leave your system vulnerable to security risks.

Q: How much space do updates require?

A: The size of updates varies depending on the type of update and the features included. It is advisable to have sufficient free disk space to ensure smooth installation.

Q: What happens if I skip an update?

A: Skipping updates can leave your system vulnerable to security threats and may cause compatibility issues with newer software.

Q: How do I rollback an update?

A: You can usually rollback an update within a certain timeframe. To do so, go to Settings > System > Recovery > Go back to an earlier build.

Q: What are the system requirements for Windows 11 updates?

A: Each update may have specific system requirements. It is recommended to check the official Microsoft website or update notes for detailed information.

Tips for Managing Windows 11 Updates

  • Stay informed: Regularly check for update announcements and release notes to understand the changes and benefits of each update.
  • Schedule updates: You can schedule updates to be installed during off-peak hours to minimize disruption to your workflow.
  • Back up your data: Before installing a major update, back up your important data to ensure you can restore it if necessary.
  • Troubleshoot issues: If you encounter any problems after installing an update, consult the Microsoft support website or community forums for assistance.

Conclusion

Windows 11 updates are an integral part of the operating system’s evolution, ensuring a secure, stable, and feature-rich experience for users. By staying informed about updates, managing their installation process effectively, and addressing any potential issues promptly, users can maximize the benefits of Windows 11 and enjoy a seamless and productive computing environment.

Windows 11 Comprehensive Guide And Cheat Sheet Windows 11: A Comprehensive Guide about Features and Updates Perunity - Latest Business Story Windows 11 UI Evolution!
The all-new Windows 11! Evolution of Windows Startup Screens (1.0 - 11) + Beta Versions  Windows 11 included Windows 11 March 2024 Update Unveils New Features and Enhancements: A Comprehensive Overview
Evolution of Windows Startup and Shutdown Sounds (1.0 - 11)  Latest Windows 11 Operating System Buy Windows 11 User Guide for Beginners: A Comprehensive Guide to Master Windows 11 Operating

Closure

Thus, we hope this article has provided valuable insights into The Evolution of Windows 11: A Comprehensive Guide to Updates and Enhancements. We appreciate your attention to our article. See you in our next article!

The Silent Symphony: Troubleshooting Audio Issues After Windows 11 Installation

The Silent Symphony: Troubleshooting Audio Issues After Windows 11 Installation

Introduction

With enthusiasm, let’s navigate through the intriguing topic related to The Silent Symphony: Troubleshooting Audio Issues After Windows 11 Installation. Let’s weave interesting information and offer fresh perspectives to the readers.

The Silent Symphony: Troubleshooting Audio Issues After Windows 11 Installation

6 Ways to Fix Windows 11 Sound Not Working Permanently

The transition to a new operating system, particularly one as significant as Windows 11, often brings about a wave of anticipation and excitement. However, the initial setup can sometimes be marred by unexpected hiccups. One such issue, frequently encountered by users, is the absence of sound after installing Windows 11. This seemingly simple problem can stem from a variety of underlying factors, requiring a systematic approach to diagnosis and resolution.

Understanding the Importance of Audio Functionality

In today’s digitally driven world, sound is integral to a seamless and enjoyable computing experience. From the subtle notification chimes to the immersive soundscapes of multimedia content, audio plays a crucial role in enhancing user interaction and engagement. The absence of sound can significantly hinder productivity, entertainment, and overall usability of the computer.

Identifying the Root Cause: A Multifaceted Approach

The lack of sound after a Windows 11 installation can be attributed to a multitude of factors, each requiring a distinct troubleshooting method. Here’s a comprehensive breakdown of potential causes and their respective solutions:

1. Driver Issues: The Silent Conductor

Drivers are software programs that enable the operating system to communicate with hardware components, including audio devices. If the correct drivers are not installed or are outdated, the sound system might fail to function.

Troubleshooting Steps:

  • Driver Update: The most common solution is to update the audio drivers. This can be achieved through the Device Manager, where users can locate the audio device, right-click, and select "Update driver."
  • Driver Reinstallation: If updating the drivers doesn’t resolve the issue, consider completely reinstalling the drivers. This can be done by uninstalling the current drivers and then downloading and installing the latest versions from the manufacturer’s website.
  • Compatibility Check: Ensure that the audio drivers are compatible with Windows 11. Older drivers might not function correctly with the new operating system. Check the manufacturer’s website for Windows 11-compatible drivers.

2. Audio Service Configuration: The Sound Maestro

Windows 11 relies on various services to manage audio output. If these services are not running correctly, sound might be disabled.

Troubleshooting Steps:

  • Service Restart: Open the Services window (search for "services.msc" in the Start menu) and locate the "Windows Audio" service. Right-click and select "Restart" to ensure the service is operational.
  • Service Enablement: If the "Windows Audio" service is disabled, right-click and select "Start." Additionally, check the "Startup type" and ensure it is set to "Automatic" to guarantee the service starts automatically upon system boot.

3. Hardware Malfunction: The Silent Instrument

While less common, hardware issues with the audio device itself can lead to sound problems.

Troubleshooting Steps:

  • Hardware Check: Inspect the audio device for any physical damage or loose connections. Ensure the device is properly connected to the computer.
  • Device Test: If possible, test the audio device on another computer to rule out a hardware failure.

4. System Settings: The Sound Mixer

Windows 11 offers a range of settings that can affect audio output. These settings might unintentionally mute the sound or redirect it to a different output device.

Troubleshooting Steps:

  • Volume Control: Check the volume control in the taskbar and ensure the sound is not muted.
  • Output Device: Verify that the correct audio output device is selected in the Sound settings.
  • System-wide Mute: Ensure that the system-wide mute option is not enabled in the Sound settings.

5. Software Conflicts: The Interfering Melody

Certain software applications might interfere with the audio system, causing sound problems.

Troubleshooting Steps:

  • Software Uninstall: If the issue arose after installing a particular program, consider uninstalling it to see if it resolves the sound problem.
  • Compatibility Check: Ensure that all installed software is compatible with Windows 11.

6. Windows Updates: The Sound Patch

Windows updates often include bug fixes and driver updates, which can sometimes resolve audio issues.

Troubleshooting Steps:

  • Update Check: Check for any pending Windows updates and install them.
  • Update Rollback: If the sound issue arose after a recent update, consider rolling back to a previous version of Windows.

7. BIOS Settings: The Silent Symphony’s Conductor

The BIOS (Basic Input/Output System) controls the basic hardware settings of the computer. Incorrect BIOS settings can sometimes affect audio output.

Troubleshooting Steps:

  • BIOS Access: Access the BIOS settings by pressing a specific key (usually F2 or Del) during system startup.
  • Audio Settings: Check for any audio-related settings in the BIOS and ensure they are correctly configured.

8. Audio Output Device: The Sound Source

The audio output device, such as speakers or headphones, might be the source of the problem.

Troubleshooting Steps:

  • Device Check: Verify that the audio output device is powered on and properly connected to the computer.
  • Device Test: Test the device on another computer to confirm its functionality.

FAQs: Addressing Common Concerns

Q: How do I know if the problem is with the driver or the hardware?

A: To isolate the issue, try connecting a different audio device to the computer. If the problem persists, it is likely a driver issue. If the new device works, the original device might be faulty.

Q: I have updated the drivers, but the sound is still not working. What should I do?

A: Consider reinstalling the drivers completely. This can sometimes resolve driver-related issues.

Q: I can hear sound from other applications, but not from games or videos. What could be the cause?

A: This could indicate a problem with the specific application’s audio settings. Check the application’s settings for any audio-related options and ensure they are configured correctly.

Tips for Preventing Future Audio Issues

  • Regular Driver Updates: Keep audio drivers updated to ensure compatibility and optimal performance.
  • Software Compatibility: Ensure that all software applications are compatible with Windows 11.
  • System Maintenance: Regularly clean and optimize the system to prevent software conflicts.
  • Backup Creation: Create regular system backups to facilitate quick recovery in case of unexpected issues.

Conclusion: A Symphony Restored

Resolving audio issues after a Windows 11 installation requires a methodical approach, considering various potential causes. By systematically troubleshooting the drivers, services, hardware, settings, and software, users can identify and rectify the problem, restoring the harmonious symphony of sound to their computing experience.

How To Fix No Sound Output Problems On Windows 11  Fix All Audio Issues No Audio Device Installed Windows 11 6 Ways to Fix Windows 11 Sound Not Working Permanently
5+ Ways to Fix the Audio Issues in Windows 11 – DigitBin How To Fix Windows 11 Audio Not Working - Tech Advisor How to Fix Sound or Audio Problems in Windows 11/10  LaptrinhX / News
Audio Not Working On Pc Windows 11 at emmafgeorge blog How to Fix Sound or Audio Problems on Windows 11 - YouTube

Closure

Thus, we hope this article has provided valuable insights into The Silent Symphony: Troubleshooting Audio Issues After Windows 11 Installation. We thank you for taking the time to read this article. See you in our next article!

Navigating Windows 10: A Guide To Taskbar Pinning

Navigating Windows 10: A Guide to Taskbar Pinning

Introduction

With great pleasure, we will explore the intriguing topic related to Navigating Windows 10: A Guide to Taskbar Pinning. Let’s weave interesting information and offer fresh perspectives to the readers.

How to Pin a Program to the Windows 10 Taskbar - TipsMake.com

Windows 10, like its predecessors, offers a plethora of tools and features designed to enhance user experience. Among these, the taskbar, a horizontal bar typically located at the bottom of the screen, serves as a central hub for launching applications, accessing system tools, and managing open windows. One of its key functionalities is the ability to "pin" items, effectively creating shortcuts for quick and convenient access.

Understanding Pinning: A Foundation for Efficient Navigation

Pinning in Windows 10 refers to the act of attaching an application, folder, or file directly to the taskbar. This action creates a dedicated icon representing the pinned item, allowing users to launch it with a single click. Pinning offers a streamlined approach to accessing frequently used programs and files, eliminating the need to navigate through menus or search for them in the Start menu.

Types of Pinnable Items: Expanding the Taskbar’s Functionality

The Windows 10 taskbar supports pinning various items, each contributing to a more efficient workflow:

  • Applications: Pinning applications directly to the taskbar provides instant access to frequently used programs like web browsers, productivity suites, or communication tools. This eliminates the need to search for these applications within the Start menu or file explorer.
  • Folders: Pinning folders to the taskbar allows users to quickly access specific locations on their computer, such as Documents, Downloads, or Pictures. This eliminates the need to browse through the file system, saving time and effort.
  • Files: Pinning individual files to the taskbar provides a direct path to frequently accessed documents, images, or other files, eliminating the need to search for them within the file explorer. This is particularly useful for files that are regularly used for work or personal projects.
  • System Tools: Pinning system tools like File Explorer, Settings, or the Task Manager provides instant access to these crucial system utilities, streamlining the management and troubleshooting process.

The Advantages of Pinning: A Comprehensive Overview

Pinning items to the Windows 10 taskbar offers several significant benefits:

  • Increased Efficiency: Pinning frequently used applications, folders, and files eliminates the need to search for them within the Start menu or file explorer, saving time and effort. This allows users to focus on their tasks without being bogged down by navigation.
  • Enhanced Productivity: By providing quick access to essential tools, pinning can significantly boost productivity. This is particularly true for users who rely on specific programs or files for their work or creative endeavors.
  • Improved Organization: Pinning helps organize the taskbar, making it easier to locate the desired item. This visual clarity contributes to a more streamlined and efficient workflow, especially when dealing with multiple open applications.
  • Personalized Workspaces: Pinning allows users to customize their taskbar, reflecting their specific needs and preferences. This personalized approach ensures a comfortable and efficient user experience.

Pinning in Action: A Step-by-Step Guide

Pinning items to the taskbar in Windows 10 is a straightforward process:

  1. Locate the Item: Open the application, folder, or file you wish to pin.
  2. Right-Click: Right-click on the application’s icon in the taskbar, or on the folder or file in File Explorer.
  3. Select "Pin to Taskbar": In the context menu that appears, select "Pin to taskbar".

The selected item will now appear as a dedicated icon on the taskbar, ready for instant access.

Unpinning Items: Removing Unnecessary Shortcuts

To remove a pinned item from the taskbar, follow these simple steps:

  1. Right-Click: Right-click on the pinned item’s icon on the taskbar.
  2. Select "Unpin from Taskbar": In the context menu that appears, select "Unpin from taskbar".

The pinned item will be removed from the taskbar, freeing up space for other shortcuts.

Advanced Pinning Techniques: Customizing the Taskbar

Windows 10 offers several additional features that can enhance the pinning experience:

  • Taskbar Groups: Create groups of pinned applications, allowing users to organize related programs into distinct categories. This enhances visual clarity and facilitates efficient access.
  • Taskbar Customization: The taskbar can be customized to suit individual preferences, including its size, position, and appearance. This allows users to create a personalized workspace that optimizes their workflow.
  • Third-Party Tools: Various third-party tools offer advanced pinning features, such as the ability to pin specific windows within an application, or to create custom shortcuts with unique icons.

FAQs: Addressing Common Questions about Pinning

Q: Can I pin multiple instances of the same application?
A: No, you can only pin one instance of an application to the taskbar at a time. However, you can open multiple windows within the same application, and these windows will be managed independently.

Q: Can I pin items to the taskbar from the Start menu?
A: Yes, you can right-click on an application, folder, or file in the Start menu and select "Pin to taskbar".

Q: What happens to pinned items when I log out of my account?
A: Pinned items are associated with your user account. When you log out, the pinned items will be removed from the taskbar. Upon logging back in, they will be restored.

Q: Can I pin items to the taskbar from a different computer?
A: No, pinned items are specific to the computer on which they were pinned.

Q: Can I pin items to the taskbar on a mobile device?
A: No, the taskbar and pinning functionality are only available on Windows 10 desktop and laptop computers.

Tips for Effective Pinning:

  • Prioritize Essential Items: Pin only the applications, folders, and files that you use most frequently. This ensures that the taskbar remains streamlined and easy to navigate.
  • Utilize Taskbar Groups: Group related applications together to enhance organization and visual clarity.
  • Experiment with Customization: Explore the taskbar customization options to create a personalized workspace that suits your specific needs.
  • Consider Third-Party Tools: Explore advanced pinning features offered by third-party tools to further streamline your workflow.

Conclusion: Empowering User Experience through Pinning

Pinning items to the taskbar in Windows 10 offers a powerful tool for enhancing user experience. By providing quick access to frequently used programs, files, and system tools, pinning streamlines workflows, boosts productivity, and fosters a personalized workspace. As a key feature of the Windows 10 taskbar, pinning empowers users to navigate their system efficiently, maximizing their time and effort.

How to Pin a Program or Website to the Windows Taskbar How to Pin a Folder or Drive to the Taskbar in Windows 10? - Technores How To Pin Folder To Taskbar In Windows 10 - oTechWorld
'Pin to taskbar' and 'Unpin from taskbar' Apps in Windows 10  Tutorials Windows 10 Taskbar And How To Pin Applications To Taskbar - Tutorial For Beginners - YouTube How to pin apps to the taskbar in Windows 10  Windows Central
How to Pin to Taskbar on Windows 10 How to Pin Shortcuts to the Taskbar on Windows 10? (10 Ways) - MiniTool

Closure

Thus, we hope this article has provided valuable insights into Navigating Windows 10: A Guide to Taskbar Pinning. We hope you find this article informative and beneficial. See you in our next article!