Archives 2023

Navigating The World Of Joystick Drivers On Windows 10: A Comprehensive Guide

Navigating the World of Joystick Drivers on Windows 10: A Comprehensive Guide

Introduction

In this auspicious occasion, we are delighted to delve into the intriguing topic related to Navigating the World of Joystick Drivers on Windows 10: A Comprehensive Guide. Let’s weave interesting information and offer fresh perspectives to the readers.

Windows 10 Joystick Driver - wecbeyond

The realm of gaming on Windows 10 is vast, encompassing a diverse array of genres and experiences. For many, the joy of gaming is heightened by the tactile feedback and intuitive control offered by joysticks. However, seamlessly integrating a joystick into your Windows 10 system requires a crucial component: the driver. This guide delves into the world of joystick drivers, specifically focusing on their importance, installation, and troubleshooting in the context of Windows 10.

Understanding the Role of Joystick Drivers

A joystick driver serves as a bridge between your joystick hardware and the operating system. It acts as a translator, enabling Windows 10 to recognize the joystick’s buttons, axes, and other functionalities. Without a compatible driver, your joystick will remain unresponsive, rendering it useless for gaming or other applications.

Types of Joystick Drivers

Joystick drivers can be broadly categorized into two main types:

  1. Generic Drivers: These drivers are pre-installed within Windows 10 and provide basic functionality for a wide range of joysticks. They offer a rudimentary level of control, recognizing buttons and axes but may not support advanced features or specific configurations.

  2. Manufacturer-Specific Drivers: These drivers are tailored to specific joystick models and provide optimized performance and support for advanced features. They are typically available on the manufacturer’s website and often offer greater control over button mapping, dead zones, and other settings.

The Importance of Choosing the Right Driver

Selecting the appropriate driver is crucial for maximizing the performance and functionality of your joystick. Utilizing a generic driver may result in limited functionality and potential compatibility issues. Conversely, installing a manufacturer-specific driver ensures optimal performance, full feature support, and a tailored user experience.

Installing Joystick Drivers on Windows 10

The installation process for joystick drivers varies depending on the driver type:

  1. Generic Drivers: Windows 10 automatically installs generic drivers for most joysticks upon connection. You can verify the driver installation by navigating to Device Manager (accessible through the Windows search bar) and checking for the joystick entry under "Human Interface Devices."

  2. Manufacturer-Specific Drivers: These drivers are typically downloaded from the manufacturer’s website. The installation process usually involves running an executable file, following on-screen instructions, and restarting your computer.

Troubleshooting Joystick Driver Issues

Despite the ease of installation, encountering issues with joystick drivers is not uncommon. Here are some common problems and solutions:

  • Joystick Not Recognized: This could indicate a driver installation error or a hardware malfunction. Try reinstalling the driver, updating Windows 10, or checking the physical connection.

  • Joystick Not Responding Correctly: This could be due to incorrect button mapping, dead zone settings, or driver incompatibility. Adjust settings within the game or joystick software, update the driver, or try using a different driver.

  • Driver Conflicts: Sometimes, multiple joystick drivers can clash, leading to unexpected behavior. Uninstall conflicting drivers or disable them in Device Manager.

FAQs Regarding Joystick Drivers on Windows 10

Q: Can I use a joystick without a driver?

A: No, a joystick requires a driver to communicate with Windows 10. Without a driver, the operating system cannot recognize and utilize the joystick’s inputs.

Q: How do I know if my joystick is working properly?

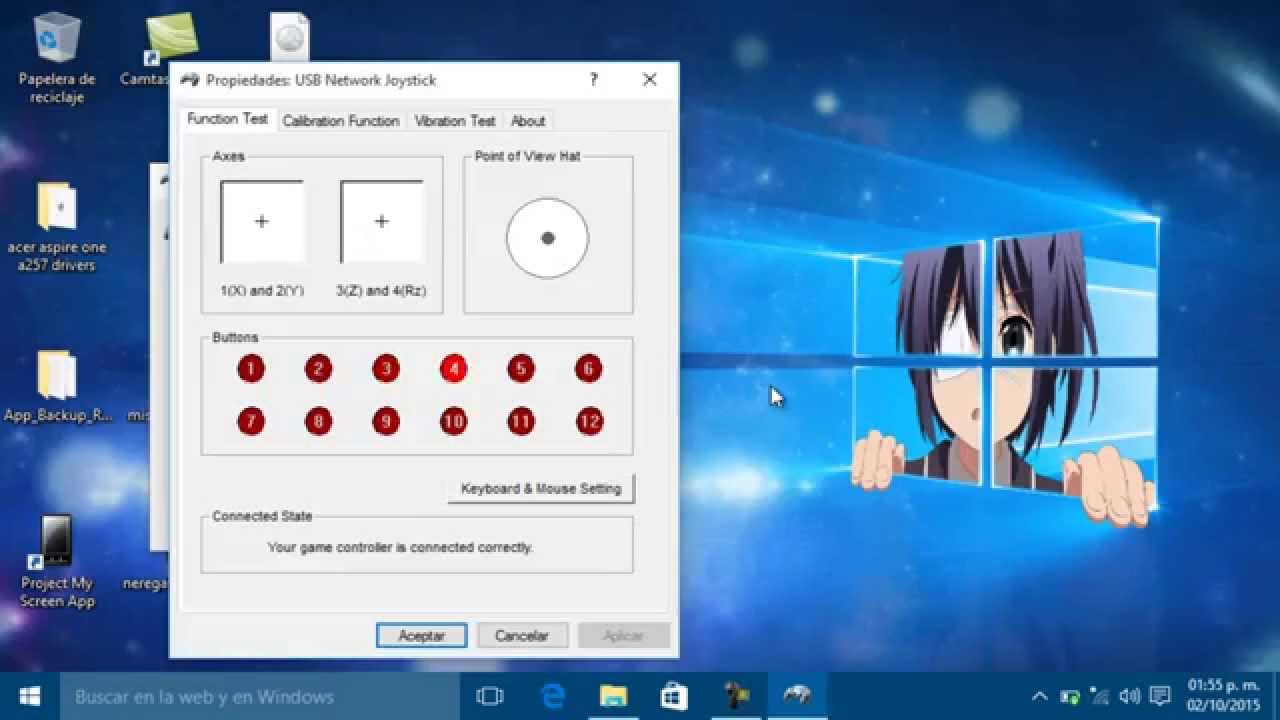
A: You can check the joystick’s functionality by navigating to Device Manager and looking for the joystick entry under "Human Interface Devices." If the device appears with no error flags, it is likely working properly. Additionally, you can test the joystick in a game or joystick calibration tool.

Q: What if I can’t find the driver for my joystick?

A: If the manufacturer’s website does not offer a driver, you can try searching online forums or contacting the manufacturer directly. You may also be able to find generic drivers that provide basic functionality.

Q: How do I update my joystick driver?

A: You can update your joystick driver through Device Manager. Right-click the joystick entry, select "Update Driver," and follow the on-screen instructions. Alternatively, you can download the latest driver from the manufacturer’s website and install it manually.

Tips for Optimizing Joystick Performance

  • Calibrate Your Joystick: Most games and joystick software offer calibration tools to fine-tune sensitivity, dead zones, and button mappings for optimal control.

  • Use a Dedicated Joystick Software: Several third-party software applications provide advanced joystick configuration options, allowing for customization beyond what is available in games.

  • Keep Drivers Updated: Regularly check for driver updates from the manufacturer to ensure compatibility and performance improvements.

  • Monitor for Driver Conflicts: If you are experiencing issues with your joystick, check for driver conflicts in Device Manager and resolve them accordingly.

Conclusion

Navigating the world of joystick drivers on Windows 10 can be straightforward with the right knowledge and approach. Understanding the role of drivers, choosing the appropriate type, and troubleshooting potential issues are crucial steps in ensuring a smooth and enjoyable gaming experience. By following the guidelines outlined in this guide, you can confidently integrate your joystick into your Windows 10 setup, unlocking a new level of immersive gameplay. Remember, the right driver is the key to unleashing the full potential of your joystick and enhancing your gaming experience.

Enter Joystick Driver Windows 10 - yellowig Windows 10 Joystick Driver Enter Joystick Driver Windows 10 - renewpe
Enter Joystick Driver Windows 10 - yellowig Twin Usb Joystick Driver Windows 10 Driver Joystick Windows 10
Enter Joystick Driver Windows 10 - abcnfc Microsoft Joystick Driver Windows 10 - sohawhere

Closure

Thus, we hope this article has provided valuable insights into Navigating the World of Joystick Drivers on Windows 10: A Comprehensive Guide. We thank you for taking the time to read this article. See you in our next article!

A Comprehensive Guide To Modernizing Your User Interface: Exploring The Principles Of Qwindows11style

A Comprehensive Guide to Modernizing Your User Interface: Exploring the Principles of qwindows11style

Introduction

With enthusiasm, let’s navigate through the intriguing topic related to A Comprehensive Guide to Modernizing Your User Interface: Exploring the Principles of qwindows11style. Let’s weave interesting information and offer fresh perspectives to the readers.

A Comprehensive Guide to Modernizing Your User Interface: Exploring the Principles of qwindows11style

Buy WINDOWS 11 USER GUIDE FOR BEGINNERS: Learn how to Operate and Understand the New Windows 11

The ever-evolving landscape of technology demands a constant adaptation of design principles to ensure user satisfaction and engagement. In the realm of user interface (UI) design, a new paradigm has emerged, characterized by a streamlined, intuitive, and visually appealing aesthetic. This approach, often referred to as "qwindows11style," represents a shift towards a more modern and user-centric design philosophy.

Understanding the Core Principles of qwindows11style

qwindows11style is not merely a stylistic choice but a comprehensive design philosophy that encompasses several key principles:

1. Clarity and Simplicity: The foundation of qwindows11style lies in prioritizing clarity and simplicity. This translates to a clean, uncluttered interface with minimal visual noise. By removing unnecessary elements and organizing information effectively, qwindows11style enhances user comprehension and reduces cognitive load.

2. Visual Hierarchy: A well-defined visual hierarchy guides users through the interface, highlighting essential information and functionalities. This is achieved through a strategic use of typography, color, and spacing to establish a clear order of importance and create a natural flow for user interaction.

3. Consistency and Familiarity: qwindows11style emphasizes consistency in design elements and interactions. This fosters a sense of familiarity and predictability, allowing users to navigate the interface effortlessly. By adhering to established design patterns and conventions, qwindows11style ensures a seamless user experience.

4. Accessibility and Inclusivity: Recognizing the diverse needs of users, qwindows11style prioritizes accessibility. This encompasses considerations for users with disabilities, ensuring that the interface is usable for all. This includes adhering to accessibility standards, providing alternative input methods, and ensuring sufficient contrast and readability.

5. Responsiveness and Adaptability: In today’s multi-device world, responsiveness is paramount. qwindows11style embraces this principle by ensuring that the interface adapts seamlessly to different screen sizes and devices. This allows for a consistent user experience across desktops, laptops, tablets, and mobile phones.

The Benefits of Implementing qwindows11style

Adopting the principles of qwindows11style offers numerous benefits, both for users and developers:

1. Enhanced User Experience: By prioritizing clarity, simplicity, and intuitiveness, qwindows11style delivers a more enjoyable and efficient user experience. Users can find information quickly, complete tasks efficiently, and navigate the interface with ease.

2. Increased Engagement: A visually appealing and user-friendly interface encourages user engagement. The intuitive design and clear visual hierarchy foster a sense of control and satisfaction, promoting longer session times and increased interaction.

3. Reduced Development Costs: Consistency and adherence to design patterns streamline the development process. By leveraging pre-existing components and adhering to established guidelines, developers can save time and resources.

4. Improved Brand Perception: A modern and visually appealing interface contributes to a positive brand perception. A well-designed interface reflects a commitment to innovation, user-centricity, and professionalism.

5. Enhanced Accessibility: By incorporating accessibility principles, qwindows11style ensures that the interface is usable for all users, regardless of their abilities. This fosters inclusivity and promotes a more equitable digital experience.

FAQs on qwindows11style

Q: What are some common elements of qwindows11style?

A: Common elements include a clean and modern color palette, a focus on typography for clear readability, a consistent use of icons and symbols for visual clarity, and a minimalistic approach to visual elements.

Q: How does qwindows11style differ from previous design trends?

A: qwindows11style emphasizes a more minimalist and user-centric approach compared to older design trends, which often featured cluttered interfaces and complex navigation.

Q: Can qwindows11style be applied to any type of software or website?

A: Yes, qwindows11style principles are applicable to various software and website designs, regardless of the specific industry or purpose.

Q: Is qwindows11style just a fad, or is it a sustainable design philosophy?

A: qwindows11style is not a fleeting fad but a reflection of evolving user expectations and technological advancements. Its principles of simplicity, accessibility, and responsiveness are likely to remain relevant in the future.

Tips for Implementing qwindows11style

1. Conduct User Research: Gain insights into your target audience’s needs and preferences to ensure that your design aligns with their expectations.

2. Establish a Clear Design System: Define a consistent set of design elements, typography, color palettes, and interaction patterns to ensure a cohesive and unified user experience.

3. Prioritize Content: Focus on presenting information clearly and concisely, ensuring that content is easily scannable and accessible.

4. Test and Iterate: Conduct usability testing throughout the development process to identify areas for improvement and refine your design based on user feedback.

5. Stay Updated on Design Trends: Continuously monitor evolving design trends and incorporate relevant principles into your design process to ensure your interface remains modern and engaging.

Conclusion

qwindows11style represents a paradigm shift in UI design, prioritizing simplicity, clarity, and accessibility. By adhering to its core principles, developers can create intuitive and visually appealing interfaces that enhance user experience, foster engagement, and contribute to a positive brand perception. As technology continues to evolve, the principles of qwindows11style will remain essential for delivering modern and user-centric digital experiences.

Windows 11 design principles - Windows apps  Microsoft Learn Windows 11 Styles and Effects – Updating Your GUI – Webinar User Interface Design Principles
PPT - User Interface Design PowerPoint Presentation, free download - ID:37699 10 Principles Of User Interface Design Ultimate Guide - vrogue.co Exploring User Interface Design Principles - KnowItAllNinja
user interface - How to change icon selection colour on Windows 11 desktop? - Super User Exploring User Interface Design Principles - KnowItAllNinja

Closure

Thus, we hope this article has provided valuable insights into A Comprehensive Guide to Modernizing Your User Interface: Exploring the Principles of qwindows11style. We hope you find this article informative and beneficial. See you in our next article!

Outlook 2007 Search Functionality In Windows 11: Addressing Compatibility Challenges

Outlook 2007 Search Functionality in Windows 11: Addressing Compatibility Challenges

Introduction

With great pleasure, we will explore the intriguing topic related to Outlook 2007 Search Functionality in Windows 11: Addressing Compatibility Challenges. Let’s weave interesting information and offer fresh perspectives to the readers.

Outlook 2007 Search Functionality in Windows 11: Addressing Compatibility Challenges

How to configure search function with Outlook 2007? - YouTube

The seamless integration of search functionality is paramount to the efficient utilization of any email client. However, navigating the compatibility landscape between legacy software like Outlook 2007 and the latest Windows operating system, Windows 11, can present challenges, particularly when it comes to search functionality. This article will explore the reasons behind the potential malfunction of Outlook 2007 search in Windows 11, provide insights into troubleshooting techniques, and offer solutions to restore the functionality of this crucial feature.

Understanding the Compatibility Landscape

The core issue lies in the inherent differences between the operating systems and the software versions involved. While Outlook 2007 was designed for earlier Windows versions, Windows 11 incorporates significant architectural changes, including updated indexing services and search algorithms. This mismatch can lead to inconsistencies in how Outlook 2007 interacts with the search engine within Windows 11, resulting in search failures.

Common Causes of Outlook 2007 Search Issues in Windows 11

Several factors can contribute to the malfunctioning of Outlook 2007 search in Windows 11:

  • Outdated Indexing Service: Windows 11 utilizes a modernized indexing service for search operations. Older applications like Outlook 2007 may not be fully compatible with this updated service, leading to search failures.
  • Corrupted Search Index: A corrupted search index can disrupt the functionality of any search operation, including Outlook 2007 searches. This corruption can arise from various factors, including software updates, system crashes, or malware infections.
  • Missing or Damaged Search Components: Specific components related to search functionality in Outlook 2007 might be missing or damaged due to incomplete installations, software conflicts, or accidental deletion.
  • Incompatible File Formats: Windows 11 may handle file formats differently compared to older operating systems. This discrepancy can impact the search results, particularly when searching for specific file types within emails.
  • Insufficient Permissions: Access restrictions or insufficient permissions for Outlook 2007 or the Windows search index can hinder the search process, preventing the application from accessing necessary files or data.

Troubleshooting Techniques for Outlook 2007 Search in Windows 11

Addressing the search issues requires a systematic approach, focusing on identifying and resolving the underlying cause. Below are some effective troubleshooting steps:

1. Rebuilding the Windows Search Index:

  • Access Indexing Options: Open the "Control Panel" and navigate to "Indexing Options."
  • Rebuild Index: Click on "Advanced" and then "Rebuild." This process will re-index all files and folders on your system, potentially resolving search inconsistencies.
  • Restart Computer: After the rebuild process completes, restart your computer to ensure the changes are applied correctly.

2. Repairing Outlook 2007:

  • Open Control Panel: Access the "Control Panel" and navigate to "Programs and Features."
  • Repair Outlook: Locate "Microsoft Office Outlook 2007" in the list and select "Repair." This will attempt to fix any corrupted or missing files within the Outlook installation.

3. Ensuring Proper Permissions:

  • Access User Accounts: Open the "Control Panel" and navigate to "User Accounts."
  • Modify Permissions: Select "Manage User Accounts" and ensure that your current user account has full permissions for accessing and modifying the Outlook data files.

4. Verifying Search Component Integrity:

  • Run System File Checker (SFC): This utility scans for corrupted or missing system files, which can impact search functionality. Open the "Command Prompt" as an administrator and type "sfc /scannow."
  • Run Deployment Image Servicing and Management (DISM): This tool can repair system image issues that may cause search problems. Open the "Command Prompt" as an administrator and type "DISM /Online /Cleanup-Image /RestoreHealth."

5. Updating Outlook 2007:

  • Check for Updates: While Outlook 2007 is no longer actively supported, ensure that you have installed any available updates for the software. These updates may contain bug fixes or compatibility improvements that could resolve search issues.

6. Utilizing Alternative Search Methods:

  • File Explorer Search: If the Outlook 2007 search remains dysfunctional, consider using the built-in Windows File Explorer search functionality to locate specific emails or files within the Outlook data folder.
  • Third-Party Search Tools: Several third-party search tools are available that can index and search data within Outlook 2007, offering an alternative solution if the native search function remains problematic.

FAQs Regarding Outlook 2007 Search in Windows 11

Q: Is it possible to upgrade Outlook 2007 to a newer version that is compatible with Windows 11?

A: While upgrading Outlook 2007 to a newer version might seem like a viable solution, it is not a direct upgrade path. Upgrading to a newer version of Outlook requires a complete purchase of the new software suite and involves migrating your existing data.

Q: Can I use a different email client instead of Outlook 2007?

A: Yes, numerous email clients are compatible with Windows 11, offering modern features and seamless integration with the operating system. Consider migrating to a newer email client like Microsoft Outlook (newer versions), Mozilla Thunderbird, or Gmail.

Q: Are there any specific settings within Outlook 2007 that might affect search functionality?

A: While Outlook 2007 does not offer extensive search-related settings, ensuring that the "Indexing" option is enabled within Outlook can improve search performance.

Q: Should I consider reinstalling Windows 11 to fix search issues?

A: Reinstalling Windows 11 is a drastic measure and should only be considered as a last resort. It is recommended to exhaust all other troubleshooting options before resorting to a clean installation.

Tips for Maintaining Outlook 2007 Search Functionality in Windows 11

  • Regularly Update Windows: Keeping your Windows 11 operating system up to date with the latest patches and updates can minimize compatibility issues and enhance search performance.
  • Schedule Regular Indexing: Consider scheduling regular indexing tasks within Windows 11 to ensure that the search index remains updated and accurate.
  • Avoid Third-Party Search Tools: While some third-party search tools claim to enhance Outlook search functionality, they can introduce conflicts and instability. It is generally advisable to rely on the built-in Windows search engine.

Conclusion

The compatibility challenges between Outlook 2007 and Windows 11 can create obstacles for users seeking to leverage the search functionality of this legacy email client. By understanding the potential causes of search issues, employing systematic troubleshooting techniques, and implementing preventative measures, users can restore the functionality of Outlook 2007 search in Windows 11, ensuring efficient and effective email management within the modern operating system environment.

How to fix searching emails not working on MS Outlook 2007 on WIndows 11 PC - YouTube Performing advanced search queries in Microsoft Outlook 2007 Windows 11 Outlook Search Not Working: 6 Fixes
Fixed - MS Outlook 2007 Search Function Not Working - Search Issue Windows 11 Outlook Search Not Working: 6 Fixes Disabling Instant Search in Outlook 2007
Windows 11 Outlook Search Not Working: 6 Fixes Fixed - MS Outlook 2007 Search Function Not Working - Search Issue

Closure

Thus, we hope this article has provided valuable insights into Outlook 2007 Search Functionality in Windows 11: Addressing Compatibility Challenges. We appreciate your attention to our article. See you in our next article!

Photo Story 3 For Windows: A Comprehensive Guide To Digital Storytelling

Photo Story 3 for Windows: A Comprehensive Guide to Digital Storytelling

Related Articles: Photo Story 3 for Windows: A Comprehensive Guide to Digital Storytelling

Introduction

With great pleasure, we will explore the intriguing topic related to Photo Story 3 for Windows: A Comprehensive Guide to Digital Storytelling. Let’s weave interesting information and offer fresh perspectives to the readers.

Photo Story 3 for Windows: A Comprehensive Guide to Digital Storytelling

Photo Story 3 for Windows  IT History Society

Photo Story 3 for Windows, a powerful and intuitive software application, emerged as a revolutionary tool for creating engaging digital narratives. Released in 2006, it provided users with a user-friendly interface to transform static images into dynamic slideshows, complete with music, narration, and captivating transitions. This article delves into the intricacies of Photo Story 3, exploring its functionalities, benefits, and lasting impact on the world of digital storytelling.

Understanding the Foundation: Photo Story 3’s Core Features

At its heart, Photo Story 3 is a digital storytelling platform that empowers users to craft compelling narratives from their personal photographs. It simplifies the process of creating slideshows, allowing individuals to effortlessly combine images, music, and narration to bring their stories to life. The software’s key features include:

  • Image Import and Editing: Photo Story 3 supports various image formats, enabling users to import photographs directly from their computer or digital cameras. Basic editing tools allow for cropping, resizing, and color adjustments, enhancing the visual appeal of the images.

  • Slide Design and Transitions: Users can personalize each slide with text, captions, and a wide range of visual effects. A variety of transitions, such as fades, wipes, and zooms, add dynamism and visual interest to the slideshow, guiding the viewer through the narrative.

  • Audio Integration: Photo Story 3 facilitates the inclusion of audio elements, enhancing the emotional impact of the story. Users can add background music, voice narration, or sound effects, creating a multi-sensory experience for the audience.

  • Output Options: The software enables users to export their finished stories in various formats, including video files, slideshows optimized for online sharing, and even DVD-quality presentations. This flexibility allows for diverse applications, from personal memories to professional presentations.

Unveiling the Benefits: Why Photo Story 3 Remains Relevant

While Photo Story 3 is no longer actively developed by Microsoft, its legacy persists as a testament to its innovative approach to digital storytelling. The software’s enduring relevance stems from several key benefits:

  • Accessibility and User-Friendliness: Photo Story 3’s intuitive interface and step-by-step guidance made digital storytelling accessible to users of all skill levels. The software’s straightforward design eliminated the need for technical expertise, empowering individuals to create captivating narratives effortlessly.

  • Creative Freedom and Personalization: Photo Story 3 provided users with extensive creative control over their stories. The ability to customize slides, transitions, and audio elements allowed for a high degree of personalization, ensuring that each story reflected the unique vision of its creator.

  • Emotional Connection and Storytelling Power: Photo Story 3 facilitated the creation of deeply personal and emotionally resonant narratives. By combining images, music, and narration, users could transform their cherished memories into engaging stories that evoked powerful emotions in their audiences.

  • Versatile Applications: Photo Story 3’s output options enabled users to share their stories in a variety of ways. Whether it was creating a personal slideshow for family gatherings, sharing memories online, or presenting a project at work, the software provided the flexibility to cater to diverse needs.

Beyond the Basics: Exploring Advanced Features

While Photo Story 3’s core features are user-friendly, the software also offered advanced options for those seeking greater control and creative freedom. Some notable features include:

  • Customizable Themes: Photo Story 3 provided pre-designed themes, offering a range of visual styles and color palettes to enhance the aesthetic appeal of the slideshow. Users could also create custom themes, tailoring the visual presentation to their specific needs.

  • Motion Effects: Beyond basic transitions, Photo Story 3 offered motion effects, allowing users to animate images within the slideshow. This feature added a dynamic element to the narrative, making the story more engaging and visually appealing.

  • Advanced Editing Tools: Photo Story 3 included advanced editing tools for enhancing image quality, such as color correction, brightness adjustments, and contrast control. These features enabled users to refine their images and create a visually cohesive slideshow.

  • Text and Caption Customization: The software offered a range of font styles, sizes, and colors for text and captions, allowing users to create visually appealing and informative slides. Users could also add borders, shadows, and other effects to further enhance the text elements.

FAQs: Addressing Common Questions about Photo Story 3

Q: Is Photo Story 3 still available for download?

A: Photo Story 3 is no longer available for download from Microsoft’s website. However, users can find older versions of the software through third-party websites or online archives.

Q: Can I use Photo Story 3 on modern operating systems?

A: Photo Story 3 was designed for Windows XP and Vista. While it may run on newer operating systems with compatibility modes, it is not officially supported and may encounter compatibility issues.

Q: Are there any alternatives to Photo Story 3?

A: Several modern alternatives to Photo Story 3 exist, offering similar features and functionalities. These include:

  • Windows Movie Maker: A free, built-in video editing software for Windows.
  • iMovie: A user-friendly video editing software for Apple devices.
  • Animoto: An online video creation platform offering templates and easy-to-use editing tools.
  • Canva: A versatile design platform that also offers video editing capabilities.

Q: Can I import video clips into Photo Story 3?

A: Photo Story 3 does not support the direct import of video clips. However, users can import still frames from video files and create a slideshow from them.

Q: How can I save my Photo Story 3 project?

A: Photo Story 3 saves projects in its own proprietary format. To ensure compatibility, it is recommended to export the finished story in a standard video format, such as AVI or WMV.

Tips for Creating Engaging Photo Stories with Photo Story 3

  • Tell a Clear and Concise Story: Ensure that your story has a beginning, middle, and end, with a clear narrative arc.

  • Choose High-Quality Images: Use sharp, well-composed photographs that effectively convey the story.

  • Use Music to Enhance Emotion: Select music that complements the mood and tone of your story.

  • Add Voice Narration: Narrate your story in a clear and engaging voice, adding context and depth to the images.

  • Experiment with Transitions and Effects: Use transitions and effects strategically to add visual interest and guide the viewer through the narrative.

  • Keep it Short and Sweet: Aim for a slideshow duration that is engaging but not overwhelming.

  • Share Your Story: Once you have finished your story, share it with others through online platforms, social media, or personal presentations.

Conclusion: Photo Story 3’s Lasting Legacy

Photo Story 3 for Windows played a pivotal role in democratizing digital storytelling, making it accessible to individuals of all skill levels. Its user-friendly interface, creative features, and versatility empowered countless users to share their personal narratives and connect with their audiences on an emotional level. While the software is no longer actively developed, its legacy lives on in the countless stories it helped bring to life. The impact of Photo Story 3 continues to inspire and influence the evolution of digital storytelling, reminding us of the power of combining images, music, and narration to create engaging and unforgettable narratives.

PPT - Microsoft Photo Story 3 for Windows PowerPoint Presentation, free download - ID:6806569 Create Free Slideshows from Photos with Microsoft Photostory 3 Digital storytelling with photo story 3
Photo Story 3 for Windows - QuanTriMang.com Photo Story 3 for Windows  Other Multimedia Software Photo Story 3 Tutorial
21st Century Teaching & Learning: Photo Story 3 for Windows Photo Story 3 for Windows - ppt download

Closure

Thus, we hope this article has provided valuable insights into Photo Story 3 for Windows: A Comprehensive Guide to Digital Storytelling. We hope you find this article informative and beneficial. See you in our next article!

Sharing Made Simple: A Comprehensive Guide To Windows 10’s Nearby Sharing Feature

Sharing Made Simple: A Comprehensive Guide to Windows 10’s Nearby Sharing Feature

Introduction

With enthusiasm, let’s navigate through the intriguing topic related to Sharing Made Simple: A Comprehensive Guide to Windows 10’s Nearby Sharing Feature. Let’s weave interesting information and offer fresh perspectives to the readers.

Sharing Made Simple: A Comprehensive Guide to Windows 10’s Nearby Sharing Feature

How to Use Nearby Sharing to Share Files in Windows 10

Windows 10 introduced a convenient and intuitive way to share files, links, and other content between nearby devices. This feature, known as Nearby Sharing, eliminates the need for cumbersome email attachments, tedious cloud uploads, or complex Bluetooth pairings. It leverages the power of Bluetooth and Wi-Fi to establish a secure connection between devices, enabling seamless data transfer within a close proximity.

Understanding the Mechanics of Nearby Sharing

At its core, Nearby Sharing operates on the principle of proximity and device discovery. When enabled, your Windows 10 device continuously scans for nearby compatible devices that have Nearby Sharing activated. This discovery process relies on Bluetooth and Wi-Fi, allowing your device to identify potential recipients within a short range.

Once a compatible device is found, a secure connection is established through a combination of Bluetooth and Wi-Fi Direct. This connection ensures that data transfer is encrypted and protected from unauthorized access. The transfer process itself is swift and efficient, making it a practical solution for everyday sharing needs.

Benefits of Utilizing Nearby Sharing

  1. Simplicity and Convenience: Nearby Sharing simplifies the sharing process, eliminating the need for complex configurations or multiple steps. Users can share content with a single click, without the hassle of uploading to the cloud or sending large email attachments.

  2. Secure Data Transfer: The feature prioritizes security by utilizing encryption during data transfer. This ensures that shared content remains protected from unauthorized access, providing peace of mind for users concerned about data privacy.

  3. Enhanced User Experience: Nearby Sharing enhances the user experience by streamlining the sharing process. The intuitive interface and straightforward steps make it accessible to users of all technical backgrounds, fostering a more seamless and enjoyable interaction with their devices.

  4. Broad Compatibility: Nearby Sharing is compatible with a wide range of devices running Windows 10, including PCs, laptops, tablets, and smartphones. This broad compatibility ensures that users can share content with a diverse range of devices within their network.

  5. Efficient File Transfer: The feature leverages the power of Bluetooth and Wi-Fi Direct, enabling fast and efficient file transfer. This is particularly beneficial for sharing large files, eliminating the need for lengthy uploads or downloads.

Practical Applications of Nearby Sharing

  1. Sharing Documents and Files: Seamlessly share documents, presentations, images, and other files with colleagues, friends, or family members within close proximity.

  2. Transferring Music and Videos: Easily transfer music, movies, and other multimedia content to nearby devices, simplifying entertainment sharing.

  3. Sharing Web Links: Quickly share interesting articles, web pages, and other online content with nearby devices, fostering collaborative browsing experiences.

  4. Connecting to Printers: Print documents and images directly from your device to a nearby printer without the need for wired connections or complex setup procedures.

Frequently Asked Questions (FAQs)

Q: What devices are compatible with Nearby Sharing?

A: Nearby Sharing is compatible with Windows 10 devices, including PCs, laptops, tablets, and smartphones.

Q: What types of content can I share using Nearby Sharing?

A: You can share files, links, and other content, including documents, images, videos, and music.

Q: Is Nearby Sharing secure?

A: Yes, Nearby Sharing uses encryption to protect data during transfer, ensuring that shared content remains secure.

Q: How do I enable Nearby Sharing on my device?

A: To enable Nearby Sharing, go to Settings > System > Shared experiences and toggle the switch for Nearby sharing.

Q: What is the range of Nearby Sharing?

A: The range of Nearby Sharing varies depending on the device and environmental factors. Generally, it operates within a range of approximately 30 feet.

Q: Can I share content with devices running different operating systems?

A: Currently, Nearby Sharing is primarily designed for sharing between Windows 10 devices. However, future updates may introduce compatibility with other operating systems.

Tips for Optimizing Nearby Sharing

  1. Ensure Bluetooth and Wi-Fi are Enabled: Nearby Sharing relies on these connections, so ensure they are activated on both devices.

  2. Keep Devices Within Range: Nearby Sharing operates within a limited range, so keep devices within close proximity for successful sharing.

  3. Check for Updates: Regularly update your device to ensure compatibility and optimal performance.

  4. Adjust Sharing Settings: Customize sharing settings to control what content is shared and with whom.

  5. Verify Device Compatibility: Ensure that both devices support Nearby Sharing for successful file transfer.

Conclusion

Nearby Sharing is a valuable feature in Windows 10 that simplifies and streamlines the process of sharing content between nearby devices. Its ease of use, security features, and broad compatibility make it a practical and efficient solution for everyday sharing needs. By leveraging the power of Bluetooth and Wi-Fi, Nearby Sharing eliminates the need for cumbersome methods and provides a seamless and secure experience for users. As technology continues to evolve, we can expect further enhancements and refinements to this feature, making it an even more integral part of the Windows 10 ecosystem.

How to Use Nearby Sharing on Windows 10 How to Share Files Between Computers on Windows 10 - Made Stuff Easy Quick and easy: Share files with Windows 10's Nearby sharing - CNET
How to use Nearby Sharing feature on Windows 10 How to Share Your Files with Nearby Sharing on Windows 10  Windows Geek [Step by Step Guide] How to Use Nearby Share on Windows?
How To Transfer Files Using Nearby Sharing On Windows 10 How To Share Files With Other PC In Windows 10 Without Any Tool

Closure

Thus, we hope this article has provided valuable insights into Sharing Made Simple: A Comprehensive Guide to Windows 10’s Nearby Sharing Feature. We thank you for taking the time to read this article. See you in our next article!

Navigating Windows 11 Startup Issues: A Comprehensive Guide

Navigating Windows 11 Startup Issues: A Comprehensive Guide

Introduction

With enthusiasm, let’s navigate through the intriguing topic related to Navigating Windows 11 Startup Issues: A Comprehensive Guide. Let’s weave interesting information and offer fresh perspectives to the readers.

Startup Settings (What It Is and How to Use It)

Windows 11, despite its modern design and enhanced features, is not immune to startup problems. These issues can range from minor inconveniences to major roadblocks, hindering user productivity and access to essential data. Understanding the common causes and troubleshooting steps is crucial for resolving these challenges effectively.

Common Windows 11 Startup Issues and Their Causes

  1. Slow Boot Times:

    • Outdated Drivers: Outdated device drivers can lead to compatibility issues and slow down the boot process.
    • Excessive Startup Programs: A large number of programs configured to launch automatically at startup can significantly increase boot time.
    • Hard Drive Issues: A fragmented or failing hard drive can cause delays in accessing data, impacting boot performance.
    • Insufficient RAM: Insufficient RAM can cause the system to struggle to load programs and services during startup, resulting in slow boot times.
  2. Blue Screen of Death (BSOD):

    • Hardware Failure: Faulty hardware components, such as RAM, hard drive, or motherboard, can trigger BSOD errors.
    • Driver Issues: Incompatible or corrupted drivers can lead to system instability and BSODs.
    • System File Corruption: Damaged or corrupted system files can cause critical errors, resulting in BSODs.
    • Overheating: Excessive heat can lead to system instability and BSODs.
  3. Automatic Repair Loop:

    • Corrupted System Files: Damaged or corrupted system files can prevent Windows from booting properly, leading to the automatic repair loop.
    • Hard Drive Errors: Errors on the hard drive, including bad sectors or file system corruption, can trigger the automatic repair loop.
    • Incompatible Hardware: Hardware components that are not compatible with Windows 11 can cause system instability and trigger the automatic repair loop.
  4. Error Messages During Boot:

    • Missing or Corrupted Boot Files: Critical boot files, such as BOOTMGR or BCD, may be missing or corrupted, preventing Windows from loading.
    • Incorrect Boot Order: The BIOS or UEFI settings might have an incorrect boot order, preventing Windows from being selected as the primary boot device.
    • Hard Drive Partition Issues: Problems with the hard drive partition, such as a corrupted partition table, can prevent Windows from accessing the boot files.

Troubleshooting Windows 11 Startup Issues

  1. Safe Mode: Starting Windows in safe mode disables most startup programs and drivers, isolating potential issues. This allows for troubleshooting without interfering with other software.

  2. System Restore: Rolling back the system to a previous restore point can revert changes that might have caused startup problems. This is particularly helpful for recent software updates or driver installations.

  3. Startup Repair: The built-in Startup Repair tool attempts to automatically detect and fix issues that prevent Windows from starting correctly.

  4. Check Disk (CHKDSK): Running CHKDSK can scan the hard drive for errors and attempt to repair them. This can be helpful for resolving issues related to file system corruption or bad sectors.

  5. Driver Updates: Updating device drivers to the latest versions can resolve compatibility issues and improve system stability.

  6. Uninstall Recent Software: Recent software installations can sometimes conflict with Windows 11, causing startup problems. Uninstalling the problematic software can resolve these issues.

  7. BIOS/UEFI Settings: Checking BIOS or UEFI settings, including boot order and hardware configuration, can ensure that Windows 11 is properly configured and can boot correctly.

  8. Hardware Troubleshooting: If hardware issues are suspected, testing individual components, such as RAM, hard drive, or motherboard, can help identify the faulty component.

Frequently Asked Questions

Q: What are the most common reasons for slow boot times in Windows 11?

A: Outdated drivers, excessive startup programs, hard drive issues, and insufficient RAM are the most common culprits.

Q: How do I access safe mode in Windows 11?

A: During startup, press and hold the Shift key while selecting "Restart" from the Start menu. Choose "Troubleshoot" > "Advanced options" > "Startup Settings" > "Restart" and then select the desired safe mode option.

Q: What are some signs of a failing hard drive?

A: Slow boot times, frequent crashes, error messages, and clicking noises from the hard drive are common signs of failure.

Q: How do I run CHKDSK in Windows 11?

A: Open Command Prompt as administrator and type "chkdsk /f /r" and press Enter.

Q: How do I update device drivers in Windows 11?

A: Go to "Device Manager" (search in the Start menu), select the device with outdated drivers, right-click, and choose "Update driver."

Tips for Preventing Windows 11 Startup Issues

  • Regularly Update Windows: Install the latest Windows updates to address security vulnerabilities and improve system stability.
  • Maintain a Clean System: Regularly remove unnecessary files, uninstall unused software, and defragment the hard drive to optimize performance.
  • Monitor System Resources: Keep an eye on RAM usage and hard drive space to avoid performance bottlenecks.
  • Backup Regularly: Create regular backups of important data to protect against data loss in case of system failure.
  • Use a Reputable Antivirus: Install and maintain a reputable antivirus program to protect against malware that can cause system instability.

Conclusion

Windows 11 startup issues can be frustrating, but by understanding the common causes and following the troubleshooting steps outlined above, users can effectively resolve these problems. Regular maintenance and proactive measures, such as keeping the system updated and clean, can significantly reduce the likelihood of encountering these issues. By taking a systematic approach and utilizing the available tools and resources, users can ensure a smooth and reliable Windows 11 experience.

How to FIX Automatic Repair Loop & StartUp Problems in Windows 11 (2023 Guide) - YouTube How to Access Advanced Startup Options (WinRE) on Windows 11? - MiniTool How to Fix Windows 11 Start Menu Not Working, Not Searching, Not Opening Issues - YouTube
Enable or Disable Startup Programs in Windows 11 [Guide 2024] How to Manage Startup Programs on Windows 11 – WiseCleaner How to Fix Windows 11 Slow Startup (3 Methods) - YouTube
Troubleshooting the most common issues with Windows 11  TechTarget Startup Repair Windows 11  How to Automatic Repair Loop Problems in Windows 11 - YouTube

Closure

Thus, we hope this article has provided valuable insights into Navigating Windows 11 Startup Issues: A Comprehensive Guide. We thank you for taking the time to read this article. See you in our next article!

Seamless Sharing In Windows 11: Exploring The Power Of Nearby Sharing

Seamless Sharing in Windows 11: Exploring the Power of Nearby Sharing

Introduction

With enthusiasm, let’s navigate through the intriguing topic related to Seamless Sharing in Windows 11: Exploring the Power of Nearby Sharing. Let’s weave interesting information and offer fresh perspectives to the readers.

Seamless Sharing in Windows 11: Exploring the Power of Nearby Sharing

How to Use Nearby Sharing on Windows 11

Windows 11 introduces a robust and intuitive feature called Nearby Sharing, designed to simplify the process of transferring files, links, and other content between compatible devices. This innovative technology leverages Bluetooth and Wi-Fi to establish a secure, direct connection, eliminating the need for cloud services or cumbersome cable connections.

Understanding the Mechanics of Nearby Sharing

At its core, Nearby Sharing in Windows 11 operates on a simple yet powerful principle: proximity and discoverability. When enabled, your device becomes visible to other nearby devices that also have Nearby Sharing activated. This visibility allows for the initiation of a secure connection, facilitated by Bluetooth for initial pairing and Wi-Fi for high-speed data transfer.

The Benefits of Nearby Sharing

The advantages of Nearby Sharing extend beyond mere convenience, offering a compelling solution for a range of scenarios:

  • Effortless File Transfers: Sharing photos, videos, documents, and other files between devices becomes a breeze. The process is as simple as selecting the content and choosing the target device from the Nearby Sharing interface.
  • Instantaneous Link Sharing: Websites, articles, and other online content can be shared instantly with nearby devices. This eliminates the need to manually copy and paste URLs, streamlining information exchange.
  • Enhanced Collaboration: Nearby Sharing facilitates collaborative work by enabling the seamless sharing of documents and projects between colleagues in close proximity.
  • Privacy and Security: The technology prioritizes user privacy and security. Connections are established only between devices that have Nearby Sharing enabled, and data transfers are encrypted, ensuring confidentiality.

Configuration and Usage

Enabling and utilizing Nearby Sharing in Windows 11 is straightforward:

  1. Activation: Navigate to the "Settings" app, select "System," and then choose "Nearby Sharing."
  2. Device Visibility: Choose whether to make your device visible to all nearby devices or only to those with your contacts.
  3. Sharing Content: To share content, select the file, link, or other item and choose "Share" from the context menu. Select the desired recipient device from the list of available options.

Exploring the Capabilities of Nearby Sharing

While Nearby Sharing is primarily designed for file and link transfers, its capabilities extend beyond these fundamental functionalities:

  • Sharing to Printers: Users can directly share documents and images with nearby printers that support Nearby Sharing.
  • Sharing to Smart Devices: Certain smart devices, such as smart speakers and displays, may support Nearby Sharing, enabling the transfer of content for playback or display.
  • Sharing to Other Platforms: While Nearby Sharing is primarily a Windows 11 feature, it can also be used to share content with devices running other operating systems, such as Android and iOS, through the "Nearby Share" app.

Addressing Common Concerns

While Nearby Sharing offers numerous advantages, it is important to address potential concerns:

  • Security: The encryption technology employed by Nearby Sharing ensures secure data transfer. However, it is crucial to be aware of the potential risks associated with sharing sensitive information with untrusted devices.
  • Compatibility: Not all devices support Nearby Sharing. Ensure that both the sending and receiving devices have the feature enabled and are compatible.
  • Range: The effective range of Nearby Sharing is limited by Bluetooth and Wi-Fi capabilities. While the actual range can vary, it is generally recommended to be within a close proximity for optimal performance.

Frequently Asked Questions

Q: What are the minimum system requirements for Nearby Sharing?

A: Nearby Sharing requires a device running Windows 11 with Bluetooth and Wi-Fi capabilities.

Q: Can I use Nearby Sharing to share files with devices running other operating systems?

A: Yes, Nearby Sharing can be used to share files with devices running Android and iOS through the "Nearby Share" app.

Q: Is Nearby Sharing secure?

A: Yes, Nearby Sharing uses encryption to secure data transfers. However, it is always important to be cautious about sharing sensitive information with untrusted devices.

Q: What is the range of Nearby Sharing?

A: The range of Nearby Sharing is limited by Bluetooth and Wi-Fi capabilities. It is generally recommended to be within close proximity for optimal performance.

Q: Can I use Nearby Sharing to share files with printers?

A: Yes, Nearby Sharing can be used to share files with printers that support the feature.

Tips for Optimizing Nearby Sharing

  • Enable Bluetooth and Wi-Fi: Ensure that both Bluetooth and Wi-Fi are enabled on both devices for optimal connectivity.
  • Keep Devices Close: Nearby Sharing works best when devices are within close proximity.
  • Check for Updates: Ensure that both devices have the latest operating system updates installed to benefit from the latest improvements and bug fixes.
  • Review Sharing Settings: Regularly review your sharing settings to ensure that only trusted devices are visible and that the desired level of visibility is maintained.

Conclusion

Nearby Sharing in Windows 11 represents a significant advancement in file sharing technology, offering a seamless, secure, and intuitive experience. Its ability to facilitate effortless transfers between devices, enhance collaboration, and prioritize user privacy makes it a valuable addition to the Windows ecosystem. By embracing this innovative feature, users can streamline their workflows, improve productivity, and enjoy a more connected digital experience.

How to Use Nearby Sharing on Windows 11?  Gear Up Windows How To Use Nearby Sharing On Windows 11  digisrun Nearby share for pc  nearby share windows 11  android to pc file transfer  how to use nearby
How to Use Nearby Sharing on Windows 11?  Gear Up Windows Seamless File Sharing: Google Nearby Share for Windows How to Enable and Use Nearby Sharing in Windows 11? 2024��
Nearby Share is Finally Available on Windows, Allowing for a Seamless File Sharing Experience Change Nearby Sharing Setting in Windows 11 - YouTube

Closure

Thus, we hope this article has provided valuable insights into Seamless Sharing in Windows 11: Exploring the Power of Nearby Sharing. We thank you for taking the time to read this article. See you in our next article!

Nero 9: A Legacy Of Disc Burning And Media Management In The Windows 10 Era

Nero 9: A Legacy of Disc Burning and Media Management in the Windows 10 Era

Introduction

In this auspicious occasion, we are delighted to delve into the intriguing topic related to Nero 9: A Legacy of Disc Burning and Media Management in the Windows 10 Era. Let’s weave interesting information and offer fresh perspectives to the readers.

Nero 9: A Legacy of Disc Burning and Media Management in the Windows 10 Era

TV & Music TechnoGeek: Nero Kwik Media & Nero 9 free burning software

Nero 9, released in 2007, represents a significant chapter in the history of disc burning and media management software. While it predates the widespread adoption of Windows 10, its capabilities remain relevant for those seeking to manage and manipulate optical media, particularly in environments where legacy hardware and software compatibility are essential.

Understanding the Significance of Nero 9 in the Context of Windows 10

The advent of cloud storage and streaming services has significantly reduced the reliance on physical media like CDs and DVDs. However, there are still scenarios where Nero 9’s capabilities prove invaluable:

  • Legacy Data Preservation: Many users still possess valuable data stored on optical discs. Nero 9 provides tools to back up, archive, and access this data.
  • Specialized Applications: Certain industries and applications, such as music production, video editing, and software distribution, continue to rely on physical media for archival and distribution purposes. Nero 9 offers the necessary tools for creating and managing these media formats.
  • Compatibility with Older Hardware: Nero 9 offers compatibility with a wide range of optical drives, including older models that might not be supported by newer software.
  • Offline Access: In situations where internet connectivity is limited or unreliable, Nero 9 enables offline access to data stored on optical media.

Key Features of Nero 9 for Windows 10 Users

While Nero 9 was designed for earlier versions of Windows, its core functionalities remain valuable for Windows 10 users:

  • Disc Burning: Nero 9 excels at burning data, audio, and video to CDs, DVDs, and Blu-ray discs. It supports a variety of formats, including ISO images, and offers advanced options for customizing disc content.
  • Disc Copying: The software enables users to create exact copies of existing discs, ensuring data preservation and duplication.
  • Disc Ripping: Nero 9 allows users to extract audio tracks from CDs and convert them to digital formats like MP3 or WAV, providing a convenient way to create digital music libraries.
  • Media Management: Beyond disc burning, Nero 9 offers tools for managing and organizing multimedia files, including photo slideshow creation and basic video editing.
  • Data Backup: The software includes backup features for safeguarding important data, allowing users to create backups to optical discs, external drives, or network locations.

Running Nero 9 on Windows 10: Considerations and Solutions

While Nero 9 was not designed for Windows 10, it can be run with some adjustments and workarounds:

  • Compatibility Mode: Windows 10 offers compatibility mode, which allows users to run older software designed for previous versions of Windows. This might be the most straightforward approach to running Nero 9.
  • Administrator Privileges: Running Nero 9 might require administrator privileges to access system resources and ensure proper functionality.
  • Driver Updates: Ensure that the optical drive drivers are up-to-date for optimal performance and compatibility with Nero 9.
  • Third-Party Tools: Some users might need to employ third-party tools, such as virtual machine software, to create a virtual environment simulating an older Windows version where Nero 9 can run without issues.

FAQs about Nero 9 and Windows 10

Q: Is Nero 9 compatible with Windows 10?

A: While Nero 9 was not designed for Windows 10, it can be run using compatibility mode and other workarounds. However, some features might not function as intended.

Q: Can I use Nero 9 to burn Blu-ray discs on Windows 10?

A: Nero 9 does support Blu-ray disc burning, but compatibility with specific Blu-ray drives on Windows 10 may vary.

Q: Does Nero 9 offer any security features for data protection?

A: Nero 9 includes password protection for discs, allowing users to restrict access to sensitive data.

Q: Are there any alternative disc burning software solutions for Windows 10?

A: Yes, there are several alternatives available, including free and paid options. Some popular choices include ImgBurn, CDBurnerXP, and Ashampoo Burning Studio.

Tips for Using Nero 9 on Windows 10

  • Check for Updates: Consider checking for any available updates for Nero 9, as these might address compatibility issues with Windows 10.
  • Run as Administrator: Launch Nero 9 with administrator privileges to avoid potential permission errors.
  • Use Compatibility Mode: If encountering issues, enable compatibility mode for Nero 9 by right-clicking the executable file and selecting "Properties."
  • Experiment with Settings: Adjust Nero 9 settings, such as the burning speed and disc format, to optimize performance and compatibility.

Conclusion

Nero 9 remains a valuable tool for users who require optical media management capabilities, particularly in scenarios involving legacy data, specialized applications, and offline access. While its compatibility with Windows 10 might require some adjustments, its core functionalities and versatility continue to make it a relevant choice for users with specific needs.

For those seeking a modern and more seamlessly integrated solution for disc burning and media management on Windows 10, exploring alternative software options might be advisable. However, for users who value the familiarity and features of Nero 9, it remains a viable option, albeit one that requires a bit more effort to integrate into the Windows 10 environment.

Nero 9.4.26.0 – Burn video, audio, data CDs and DVDs – FREE STREAMING What Happened To Nero Burning ROM, The Program With Which We Filled All Those Tubs Of CD's CD KEY Nero 9.0.9.4 Trial .Exe  Megaleecher.Net
Nero 9 Ultra Edition CD/DVD Burning Software for Windows 500109 Nero 9 Free - Download How To Use Nero 9 To Burn The Disc - YouTube
Top 10 Disc vypalovací software pro Windows Download Free Nero 9 Disc Burning Software

Closure

Thus, we hope this article has provided valuable insights into Nero 9: A Legacy of Disc Burning and Media Management in the Windows 10 Era. We appreciate your attention to our article. See you in our next article!

Unlocking The Potential Of R In Windows 10: Troubleshooting And Maximizing Its Power

Unlocking the Potential of R in Windows 10: Troubleshooting and Maximizing Its Power

Introduction

With great pleasure, we will explore the intriguing topic related to Unlocking the Potential of R in Windows 10: Troubleshooting and Maximizing Its Power. Let’s weave interesting information and offer fresh perspectives to the readers.

Unlocking the Potential of R in Windows 10: Troubleshooting and Maximizing Its Power

How to use the Troubleshoot tools to fix problems on the Windows 10 Creators Update  Windows

R, a free and open-source programming language and software environment, has become indispensable for data analysis, statistical computing, and visualization. Its flexibility, comprehensive libraries, and active community have made it a powerful tool for researchers, analysts, and data scientists across various domains. However, encountering issues with R in Windows 10 can be frustrating, hindering the ability to leverage its full potential. This article aims to provide a comprehensive guide to troubleshooting common R-related problems on Windows 10, highlighting the importance of R and its benefits while offering practical solutions.

Understanding the Importance of R in Data Analysis

R’s significance in the field of data analysis stems from its core features:

  • Comprehensive Statistical Functionality: R boasts a vast collection of packages dedicated to statistical analysis, covering everything from basic descriptive statistics to advanced machine learning algorithms. This rich ecosystem enables users to perform complex statistical procedures without writing extensive code.
  • Data Visualization Capabilities: R’s graphical capabilities are unmatched, allowing users to create visually appealing and informative charts, plots, and dashboards. This visual representation of data facilitates understanding and communication of insights.
  • Flexibility and Extensibility: R’s open-source nature allows for customization and extension through user-created packages. This fosters a collaborative environment where users can share and contribute to the growing library of tools.
  • Strong Community Support: A vibrant and active community of R users provides ample resources, tutorials, and forums for support and knowledge sharing. This collective effort ensures continuous learning and problem-solving.

Troubleshooting Common R Issues in Windows 10

While R offers immense value, its implementation in Windows 10 can sometimes present challenges. These issues can range from installation problems to unexpected errors during code execution. Here’s a breakdown of common R problems and their solutions:

1. Installation Issues:

  • Incomplete or Corrupted Installation: A faulty installation process can lead to missing files or corrupted components, preventing R from functioning correctly.
  • Solution: Reinstall R from the official website, ensuring a stable internet connection and sufficient disk space.

2. Environment Variables:

  • Incorrect Path Settings: R relies on environment variables to locate its executables and libraries. Incorrect or missing path settings can cause R to fail to find necessary components.
  • Solution: Verify and update environment variables, specifically the PATH variable, to include the directory containing R’s installation files and the R_HOME variable pointing to the R installation root directory.

3. Package Installation Errors:

  • Network Connectivity Issues: Package installation relies on internet connectivity to download required files. A poor internet connection or firewall restrictions can hinder the process.
  • Solution: Ensure a stable internet connection and check firewall settings to allow access for R package downloads.

4. Code Execution Errors:

  • Missing or Outdated Packages: R code often relies on specific packages. Missing or outdated packages can lead to errors during code execution.
  • Solution: Install or update the required packages using the install.packages() function.

5. Memory Management Issues:

  • Insufficient Memory: R can be memory-intensive, especially when handling large datasets. Insufficient memory can lead to crashes or slow performance.
  • Solution: Optimize code for memory efficiency, consider using 64-bit versions of R, and increase system memory if necessary.

6. Compatibility Issues:

  • Conflicting Software: Certain software applications might interfere with R’s functionality, causing unexpected errors.
  • Solution: Identify and temporarily disable potentially conflicting software.

7. RStudio Issues:

  • RStudio Configuration: RStudio, a popular IDE for R, requires proper configuration to work seamlessly with R.
  • Solution: Verify RStudio settings, particularly the R version and working directory, to ensure compatibility.

FAQs: Addressing Common R in Windows 10 Concerns

Q: Why does R keep crashing on Windows 10?

A: R crashing can be attributed to several factors, including insufficient memory, conflicting software, outdated packages, or corrupted installation files.

Q: How do I update R on Windows 10?

A: To update R, download the latest version from the official website and run the installer. The installer will automatically update your existing installation.

Q: Can I use R on a virtual machine in Windows 10?

A: Yes, you can install R on a virtual machine running a compatible operating system, such as Linux or macOS. This provides a controlled environment for R and its dependencies.

Q: How can I troubleshoot R package installation errors?

A: Check your internet connection, ensure you have administrator privileges, and verify the package name and repository. You can also try using the install.packages() function with the repos argument set to a mirror site.

Tips for Optimizing R in Windows 10

  • Use a Dedicated R Environment: Create a dedicated environment for R to prevent conflicts with other applications. This can be achieved using virtual environments or separate folders for R-related files.
  • Keep R and Packages Updated: Regularly update R and its packages to ensure compatibility and access to the latest features and bug fixes.
  • Utilize RStudio: RStudio provides a user-friendly interface for writing, running, and debugging R code, enhancing productivity and simplifying workflow.
  • Explore R Resources: Leverage online resources, tutorials, and forums to learn best practices, troubleshoot problems, and stay updated on R developments.

Conclusion: Unleashing the Power of R in Windows 10

R’s capabilities in data analysis, statistical computing, and visualization make it an invaluable tool for researchers, analysts, and data scientists. While challenges may arise in its implementation on Windows 10, understanding common issues and their solutions allows users to overcome obstacles and fully harness R’s potential. By addressing installation problems, environment variables, package errors, memory management issues, and compatibility conflicts, users can ensure a smooth and productive R experience on Windows 10. Continuously learning, updating, and seeking support within the R community further empowers users to unlock the full potential of this powerful language and environment.

How to access Windows 10 troubleshooting tools step by step  TechTarget Troubleshooting Windows 10 How to troubleshoot power issues in windows? - All-In-One Digital Adoption Platform
How to Enable Recommended Troubleshooting in Windows 10 How To Open Troubleshooting In Windows 10 Troubleshooting Windows 10
Troubleshooting Windows 10 13 Troubleshooting Tools to Fix Windows 10  MakeUseOf

Closure

Thus, we hope this article has provided valuable insights into Unlocking the Potential of R in Windows 10: Troubleshooting and Maximizing Its Power. We thank you for taking the time to read this article. See you in our next article!

The Power Of Proximity: Exploring The Role Of Near-Field Communication In The IPhone

The Power of Proximity: Exploring the Role of Near-Field Communication in the iPhone

Introduction

With great pleasure, we will explore the intriguing topic related to The Power of Proximity: Exploring the Role of Near-Field Communication in the iPhone. Let’s weave interesting information and offer fresh perspectives to the readers.

The Power of Proximity: Exploring the Role of Near-Field Communication in the iPhone

Near Field Communication on iPhone with iCarte

The iPhone, a ubiquitous symbol of technological advancement, has consistently pushed the boundaries of mobile functionality. One of its key features, often operating in the background, is Near-Field Communication (NFC). This technology, though seemingly invisible to many users, plays a vital role in enhancing user experience and facilitating seamless interactions with the physical world. This article delves into the intricacies of NFC on the iPhone, exploring its capabilities, applications, and the impact it has on everyday life.

Understanding Near-Field Communication

NFC, at its core, is a short-range wireless communication technology that enables devices to exchange data when they are in close proximity, typically within a few centimeters. This "near-field" interaction sets it apart from other wireless technologies like Bluetooth or Wi-Fi, which can operate over greater distances.

The technology operates on the principles of electromagnetic induction, where one device’s magnetic field induces a current in another device, facilitating data transfer. This process requires no pairing or complex setup, making it incredibly user-friendly.

The iPhone’s Embrace of NFC

Apple introduced NFC to the iPhone in 2011 with the release of the iPhone 4S, initially focusing on a specific application: Apple Pay. This mobile payment system revolutionized the way people paid for goods and services, eliminating the need for physical cash or cards. With a simple tap of the iPhone on a compatible terminal, users could quickly and securely make transactions.

However, the iPhone’s NFC capabilities extend far beyond Apple Pay. Over the years, Apple has progressively integrated NFC into various aspects of the device’s functionality, expanding its potential and enriching the user experience.

Applications of NFC on the iPhone

The iPhone’s NFC functionality enables a diverse range of applications, seamlessly integrating the digital and physical worlds. Here are some prominent examples:

  • Mobile Payments: Apple Pay, with its secure and convenient payment system, has become a dominant force in the mobile payment landscape. NFC empowers users to make purchases at a wide range of retailers, transit systems, and online platforms.

  • Data Transfer: NFC facilitates the quick and easy transfer of data between devices, such as sharing contact information, photos, and files. This eliminates the need for cumbersome Bluetooth pairing or complex file-sharing protocols.

  • Access Control: NFC enables access control systems, allowing users to unlock doors, gates, and other secured areas using their iPhones. This eliminates the need for physical keys or keycards, offering greater convenience and security.

  • Digital Tickets and Passes: NFC empowers users to store and access digital tickets and passes for events, transportation, and other services directly on their iPhones. This eliminates the need for physical tickets, reducing clutter and promoting a paperless environment.

  • Gaming and Entertainment: NFC can enhance gaming experiences by enabling interactions with NFC-enabled toys, figurines, or game cards. It can also be used for interactive installations and augmented reality applications, blurring the lines between the digital and physical realms.

  • Healthcare and Wellness: NFC can be utilized for healthcare applications, such as storing medical information, facilitating communication between patients and healthcare providers, and enabling contactless payment for medical services.

The Importance of NFC on the iPhone

The integration of NFC on the iPhone has brought about significant benefits, transforming how users interact with their devices and the world around them. Here are some key advantages:

  • Convenience and Simplicity: NFC eliminates the need for complex pairing or setup processes, offering a seamless and intuitive user experience.

  • Security and Privacy: NFC technology typically operates within a very limited range, reducing the risk of unauthorized access and enhancing data security.

  • Enhanced User Experience: NFC enables a range of applications that improve user convenience, efficiency, and entertainment.

  • Increased Functionality: NFC expands the iPhone’s capabilities, enabling users to interact with the physical world in new and innovative ways.

  • Future-Proofing: NFC is a rapidly evolving technology, and its integration into the iPhone ensures its future-readiness for emerging applications and advancements.

FAQs about NFC on the iPhone

1. What is the range of NFC on the iPhone?
NFC on the iPhone operates within a very short range, typically a few centimeters. This ensures secure data transfer and prevents unauthorized access.

2. Is NFC on the iPhone compatible with all devices?
NFC is a widely adopted technology, but not all devices are equipped with it. It’s essential to check if a device is NFC-enabled before attempting to use it for NFC-based interactions.

3. How can I enable or disable NFC on my iPhone?
NFC on the iPhone is typically enabled by default. To disable it, go to Settings > Wallet & Apple Pay and toggle off the "Apple Pay" switch.

4. Is NFC on the iPhone secure?
Apple Pay, which utilizes NFC, prioritizes security through various measures, including encryption, tokenization, and biometric authentication.

5. Can I use NFC on my iPhone without an internet connection?
NFC does not require an internet connection for basic data transfer between devices. However, some applications, such as mobile payments, may require an internet connection for processing transactions.

Tips for Using NFC on the iPhone

  • Ensure NFC is enabled: Double-check that NFC is enabled on your iPhone in the Settings app.
  • Keep devices close together: For successful NFC interactions, ensure the two devices are within a few centimeters of each other.
  • Align devices correctly: Align the NFC-enabled areas of both devices for optimal data transfer.
  • Use compatible devices: Ensure both devices are NFC-enabled and compatible with the intended application.
  • Keep your iPhone updated: Regularly update your iPhone to benefit from the latest NFC features and security enhancements.

Conclusion

NFC, while often operating behind the scenes, is a fundamental technology that has significantly impacted the iPhone’s functionality and user experience. It has enabled seamless mobile payments, facilitated data transfer, and opened doors to a world of possibilities, enhancing convenience, security, and user engagement. As NFC technology continues to evolve, it will likely play an even greater role in shaping the future of mobile devices and their interactions with the physical world. The iPhone, with its seamless integration of NFC, is poised to remain at the forefront of this technological revolution, empowering users to embrace the power of proximity and unlock a world of possibilities.

What is Near Field Communication, and Where is it used?  Covve Near-Field Communications (NFC) for Wireless Power Transfer (WPT): An Overview  IntechOpen Near Field Communication (NFC)
Near Field Communication: What Is It And How Can I Stay Safe Near Field Communication What Is Near Field Communication Applications - CXJRFIDFactory
Near field communication - “Near Field Communication” Near Field Communication (NFC) is a Near Field Communications  The iPhone FAQ

Closure

Thus, we hope this article has provided valuable insights into The Power of Proximity: Exploring the Role of Near-Field Communication in the iPhone. We thank you for taking the time to read this article. See you in our next article!